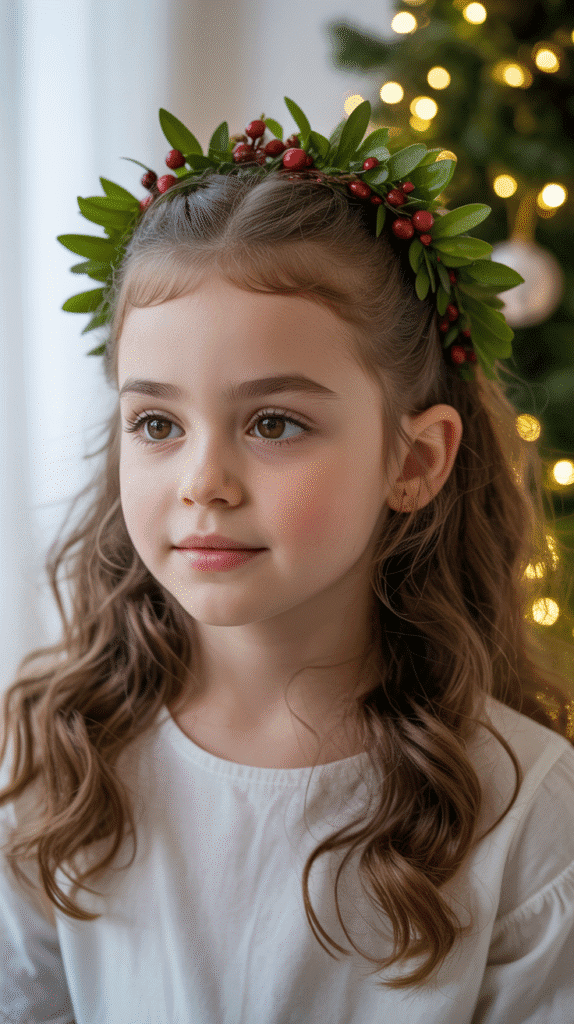
The holiday season brings magical moments, and what better way to celebrate than with enchanting Christmas hairstyles that transform your little ones into festive stars?
“27 Best Christmas Hairstyles for Kids That Are Adorable and Festive” is your ultimate guide to creating memorable looks that capture the spirit of Christmas while keeping comfort and practicality in mind.
Whether you’re preparing for family gatherings, school holiday parties, Christmas photo sessions, or church services, these hairstyles range from simple everyday styles to elaborate creations worthy of Santa’s workshop.
This comprehensive collection features options for all hair types, lengths, and skill levels, ensuring every parent can find the perfect festive look for their child.
From classic braided wreaths and candy cane twists to glittering updos and playful ponytails adorned with ribbons and ornaments, each style is designed to be both stunning and age-appropriate.
You’ll discover step-by-step guidance, styling tips, and creative embellishment ideas that make these hairstyles achievable even for busy parents with limited time.
Get ready to explore charming options that will make your children feel special and confident throughout the entire holiday season, creating picture-perfect memories that will last a lifetime.
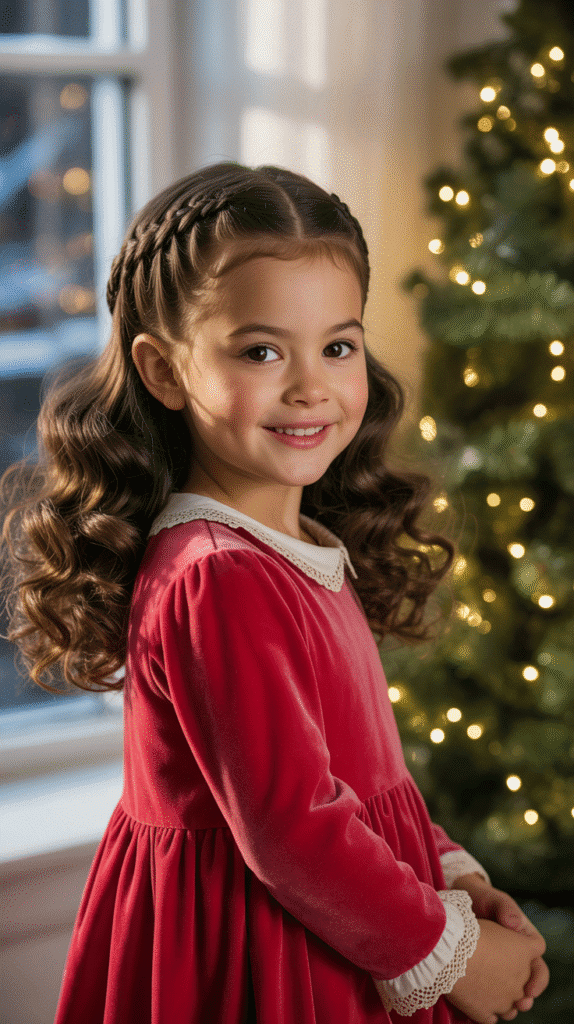
1. Christmas Tree Braid
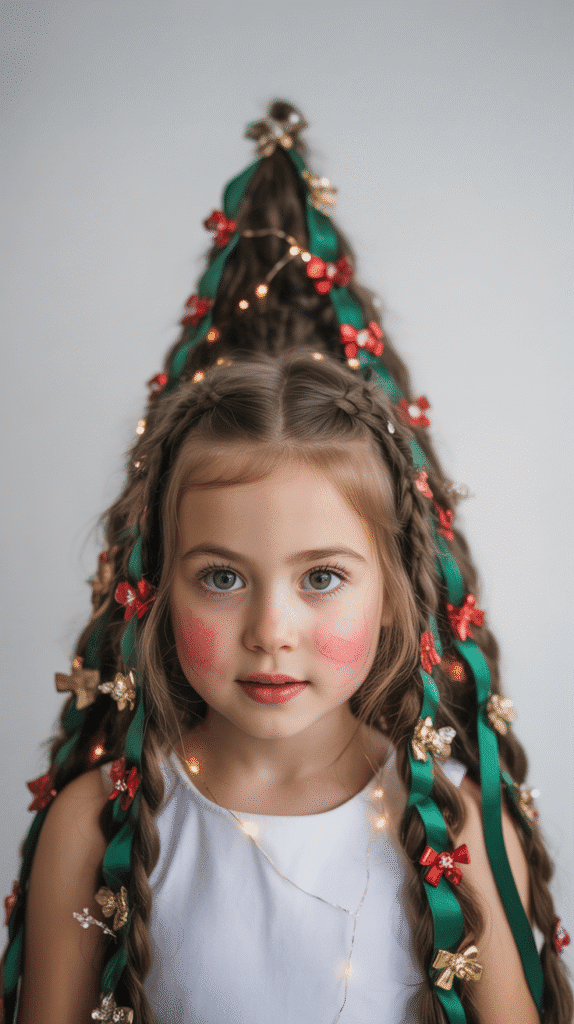
The Christmas tree braid transforms ordinary hair into a festive masterpiece that resembles a decorated holiday tree.
This creative style works beautifully for medium to long hair and becomes a conversation starter at any Christmas event.
Styling Instructions:
- Part the hair down the middle from forehead to crown, creating a triangular section that widens toward the bottom
- Begin a French braid at the crown, gradually incorporating more hair from the sides to create the tree shape
- Secure the braid with a clear elastic at the nape of the neck
- Decorate with miniature clip-on ornaments, small bows, or glittery bobby pins to mimic tree decorations
- Add a gold star hair clip at the top of the braid to represent the tree topper
- Finish with a light hold hairspray to keep decorations secure throughout the day
Best For:
- School Christmas parties and holiday concerts
- Children with straight to wavy hair textures
- Kids aged 5-12 years old
- Parents with intermediate braiding skills
2. Candy Cane Twisted Ponytail
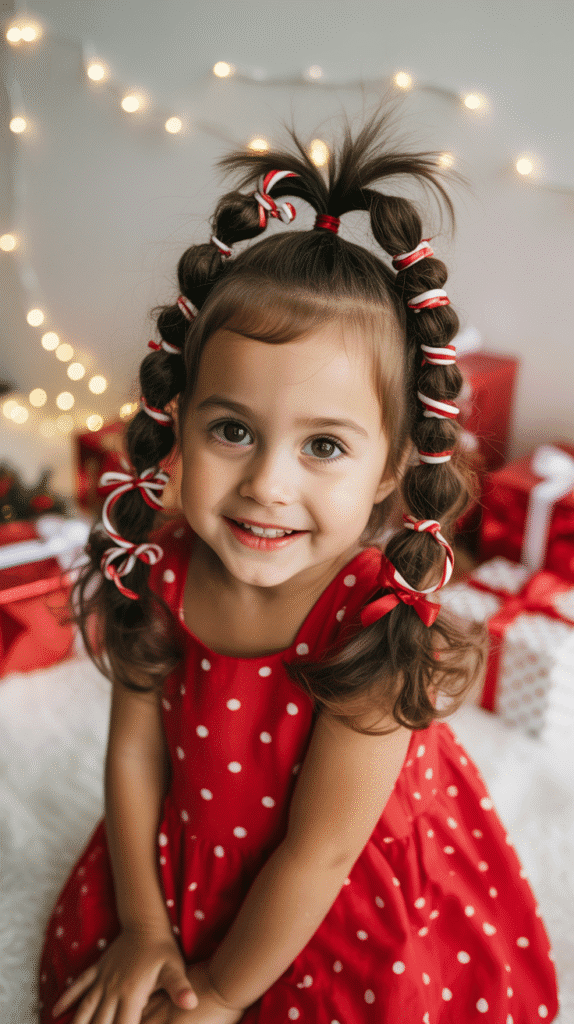
The candy cane twisted ponytail brings the iconic Christmas treat to life through red and white ribbon intertwined with hair sections.
This playful style is perfect for active kids who need a secure yet festive look.
Styling Instructions:
- Brush hair thoroughly and gather into a high ponytail at the crown
- Divide the ponytail into two equal sections
- Take red and white ribbons (approximately 1/4 inch wide) and attach them to the base of the ponytail
- Twist one ribbon with the left hair section and the other ribbon with the right section
- Wrap the two twisted sections around each other in a rope braid pattern
- Secure at the bottom with a clear elastic and tie the ribbon ends into a bow
- Apply a small amount of smoothing serum to prevent flyaways
Maintenance Tips:
- This style typically lasts 6-8 hours with active play
- Bring extra ribbons for quick touch-ups if needed
- Works exceptionally well on second-day hair for better grip
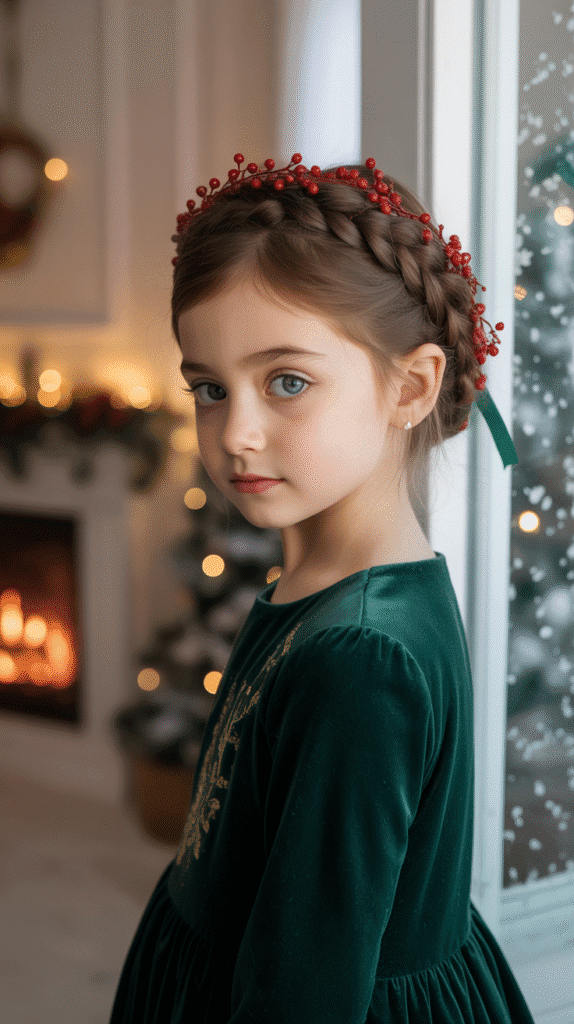
3. Snowflake Crown Braid
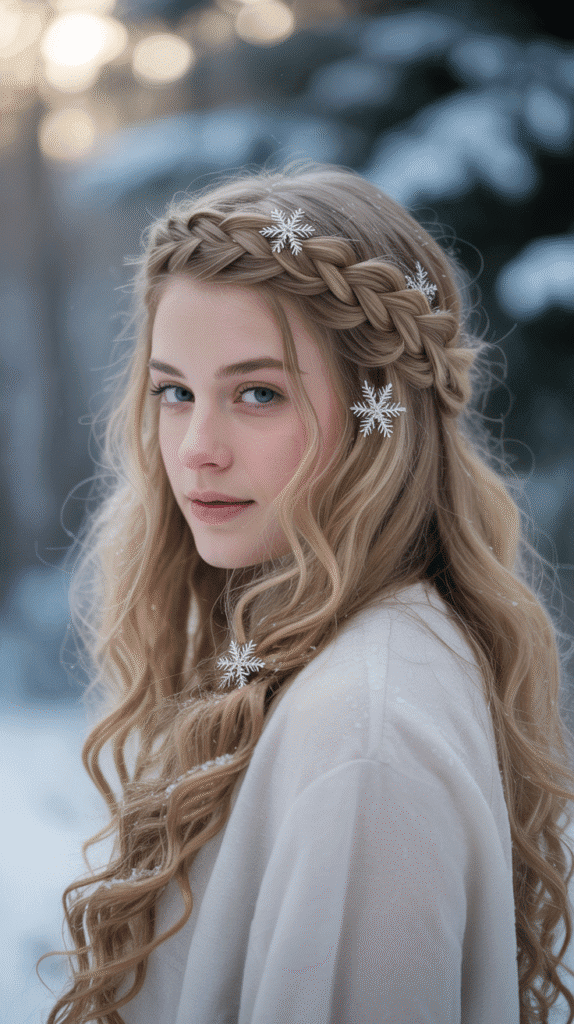
The snowflake crown braid creates an elegant halo effect while incorporating delicate snowflake accessories for a winter wonderland appearance.
This sophisticated style suits formal Christmas celebrations and photo sessions.
Styling Instructions:
- Create a deep side part and begin a Dutch braid (reverse French braid) starting from the part
- Continue braiding along the hairline, following the head’s natural curve
- Incorporate all hair from the front sections while keeping the braid close to the scalp
- When reaching the starting point, secure the braid and tuck the end underneath
- Pin strategically with bobby pins that match the hair color
- Insert decorative snowflake pins evenly throughout the crown braid
- Curl any remaining loose hair with a curling wand for added elegance
- Set with medium hold hairspray to maintain the style
Decoration Ideas:
- Silver or crystal snowflake bobby pins from craft stores
- Small white flowers for a softer look
- Pearl-topped pins for classic elegance
- Glitter spray for extra sparkle (use sparingly)
4. Reindeer Antler Space Buns
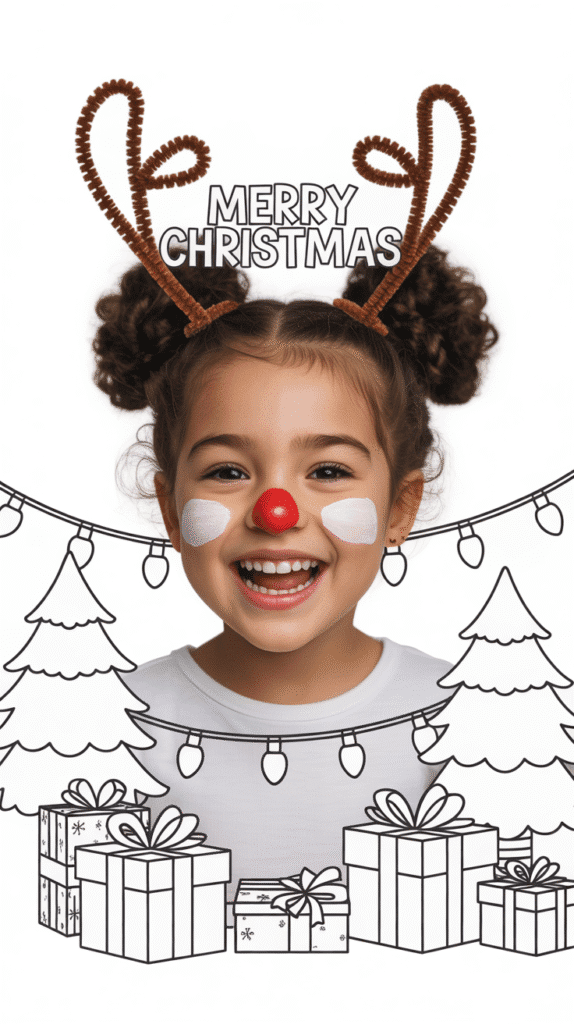
Reindeer antler space buns transform two classic buns into adorable Rudolph-inspired ears, complete with antler accessories.
This whimsical style guarantees smiles and perfectly captures childhood Christmas joy.
Styling Instructions:
- Section hair down the middle from forehead to nape
- Create two high pigtails positioned where ears would naturally sit
- Twist each pigtail and wrap around its base to form a bun
- Secure each bun with elastic bands and bobby pins
- Shape brown pipe cleaners into antler branches (3-4 points each)
- Insert pipe cleaners into the buns, positioning them to stand upward
- Add small jingle bells to the antler tips using thin wire or glue
- Optional: apply red face paint or a red pom-pom to the nose for Rudolph effect
- Spray lightly with hairspray to maintain structure
Customization Options:
- Use headband antlers for no-fuss alternative
- Add green and red ribbons around bun bases
- Incorporate glitter gel for shimmery buns
- Attach small ornaments with bobby pins
5. Holly Berry Half-Up Style
The holly berry half-up style combines the ease of wearing hair down with festive embellishments that add Christmas charm.
This versatile look works for various hair lengths and requires minimal time.
Styling Instructions:
- Curl hair in loose waves using a curling iron or hot rollers
- Take a horizontal section of hair from temple to temple, about 2-3 inches back from the hairline
- Gather this section and secure with a clear elastic at the crown
- Gently pull apart the secured section to create volume and texture
- Attach holly berry and leaf clips around the elastic to conceal it
- Arrange the decorative elements to resemble natural holly clusters
- Spray the top section with texturizing spray for hold
- Leave the remaining hair flowing naturally or add additional loose curls
Hair Accessory Sources:
- Find holly clips at seasonal sections of major retailers
- Craft stores offer DIY options with felt and beads
- Online marketplaces provide vintage-style holly accessories
- Consider making custom clips with hot glue and artificial holly
6. Christmas Bow Ponytail

The Christmas bow ponytail elevates a simple everyday style into a festive statement with an oversized bow that commands attention.
This classic look never goes out of style and works for all occasions.
Styling Instructions:
- Brush hair thoroughly to remove all tangles and create a smooth base
- Apply smoothing cream to eliminate frizz
- Gather hair into a high or mid-height ponytail depending on preference
- Secure tightly with a hair elastic
- Wrap a small section of hair from the ponytail around the elastic to conceal it
- Attach a large Christmas bow (velvet, satin, or plaid work beautifully)
- Ensure the bow is secured with bobby pins or sewn-in clips for stability
- Use a flat iron on the ponytail length for extra sleekness if desired
- Finish with shine spray for a polished appearance
7. Braided Wreath Updo
The braided wreath updo circles the head like a festive holiday wreath, creating an elegant and sophisticated look perfect for special Christmas events.
This intricate style showcases braiding skills while keeping hair completely secured.
Styling Instructions:
- Start with dry, brushed hair and apply light texturizing spray for grip
- Create a circular part around the crown, leaving a center section loose
- Begin a three-strand braid at one side, incorporating hair from the outer section only
- Continue braiding around the entire head in a circular pattern
- When reaching the starting point, continue braiding the remaining length without adding new hair
- Wrap this tail around the wreath to fill any gaps
- Secure with bobby pins that match the hair color
- Pin the center section in a low bun or twist for a polished finish
- Weave thin green ribbon through the braid
- Add miniature artificial berries or small flower clips to complete the wreath effect
Time Investment:
- Preparation: 5 minutes
- Braiding: 20-25 minutes
- Decoration: 5-10 minutes
- Total: 30-40 minutes
8. Glitter Root Part
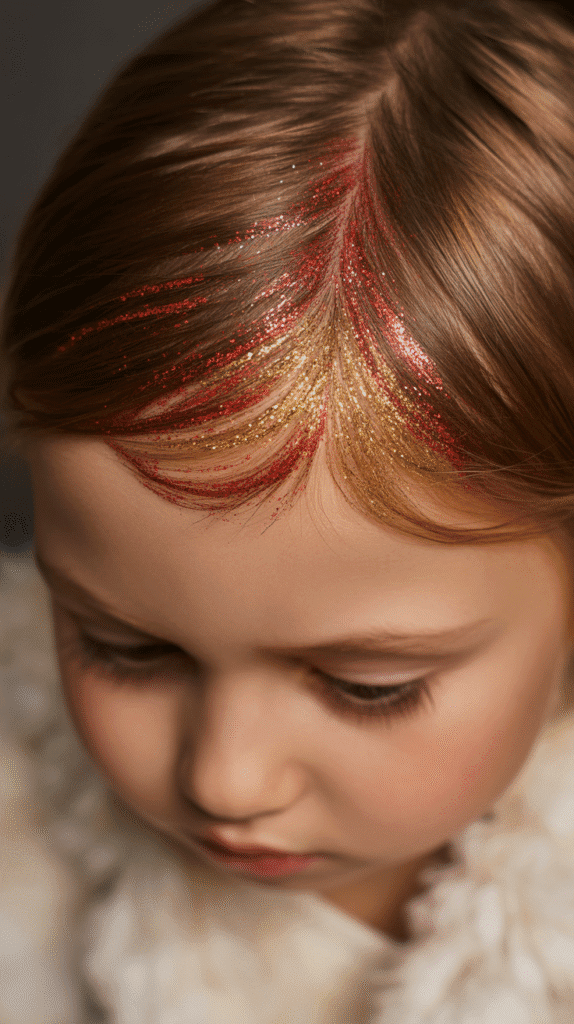
The glitter root part adds instant festive sparkle with minimal effort, making it perfect for busy mornings when you want impact without complicated styling.
This trend works with any hairstyle and suits all ages.
Styling Instructions:
- Style hair in any preferred base style (down, ponytail, braids, etc.)
- Create a clean, straight part using a rat-tail comb
- Choose Christmas-colored glitter gel (red, gold, silver, or green)
- Apply glitter gel along the part line using the applicator or a small brush
- Start at the forehead and work backward about 3-4 inches
- Allow 2-3 minutes for the gel to set before touching
- Add additional glitter if desired for more intensity
- Seal with a light mist of hairspray to prevent flaking
Glitter Safety Tips:
- Use only cosmetic-grade glitter products designed for hair and skin
- Avoid fine craft glitter that can irritate eyes
- Test on a small area first to check for sensitivity
- Remove with warm water and shampoo at the end of the day
9. Side-Swept Curls with Ornament Clips
Side-swept curls with ornament clips combine Hollywood glamour with Christmas whimsy, creating a style that feels both elegant and playful.
This asymmetrical look photographs beautifully and suits various face shapes.
Styling Instructions:
- Wash and blow-dry hair with a round brush for volume
- Create deep side part on preferred side (typically following natural part)
- Section hair and curl with a 1-inch curling iron, holding each curl for 8-10 seconds
- Allow curls to cool completely before touching
- Sweep all hair to one side and secure behind the ear with bobby pins
- Clip miniature ornament decorations along the curve where hair is pinned
- Leave curls loose and flowing over one shoulder
- Apply flexible hold hairspray to maintain the swept position
- Gently finger-comb curls for soft, romantic waves
Ornament Clip Options:
- Purchase miniature shatterproof ornaments and attach to alligator clips with hot glue
- Use store-bought ornament hair accessories from hair accessory retailers
- Consider lightweight plastic ornaments to prevent hair from falling
- Match ornament colors to outfit for coordinated appearance
10. Christmas Ribbon Braided Pigtails
Christmas ribbon braided pigtails weave festive ribbons directly into traditional braids, creating striped candy cane effects or elegant color accents.
This style works beautifully for younger children and active play.
Styling Instructions:
- Part hair down the center from forehead to nape
- Create two equal sections and secure one while working on the other
- Take ribbon approximately 3 feet long and fold in half
- Secure the folded middle of the ribbon at the top of the section with a small elastic
- Divide the hair section into three parts, incorporating ribbon into two of the strands
- Braid normally, ensuring ribbon stays visible on the outside of the braid
- Continue to the ends and secure with elastic
- Tie remaining ribbon into a bow
- Repeat process on the second side
- Adjust braids to ensure ribbons are evenly distributed and visible
Ribbon Selection:
- Satin ribbon (1/4 to 1/2 inch wide) works best for braiding
- Grosgrain ribbon provides more texture and grip
- Choose colors that contrast with hair color for maximum visibility
- Pre-cut ribbons before starting to save time
11. Twisted Halo with Mini Poinsettias
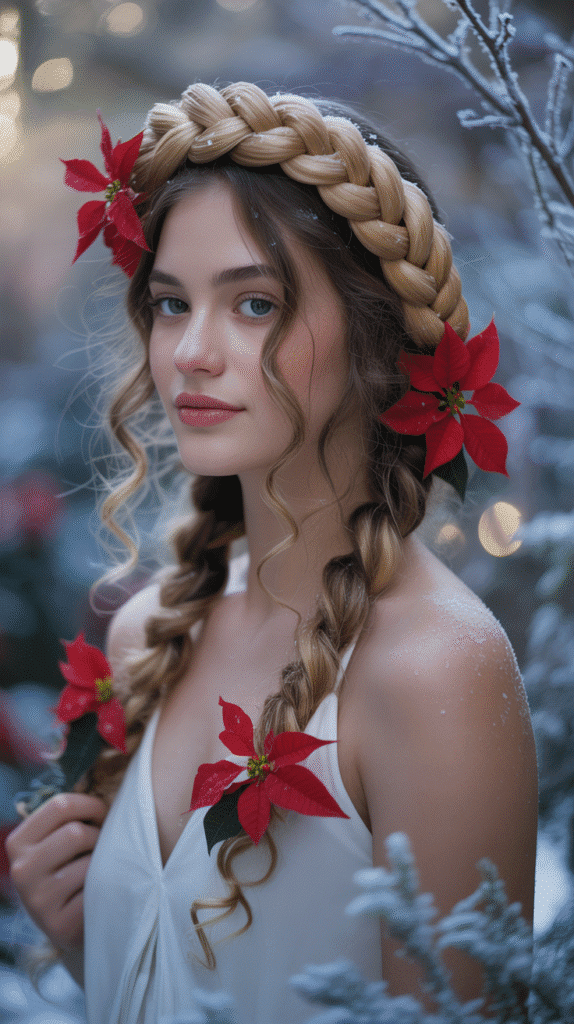
The twisted halo with mini poinsettias creates a romantic, garden-party aesthetic perfect for Christmas celebrations.
This soft style works exceptionally well for flower girls or formal family portraits.
Styling Instructions:
- Create a horizontal part from ear to ear across the top of the head
- Divide the front section into two equal parts
- Twist each section tightly from root to end
- Cross the twists over each other at the back of the head
- Pin securely with bobby pins underneath where they won’t show
- Curl the remaining hair that hangs loose
- Insert mini artificial poinsettias into the twisted sections
- Space flowers evenly for balanced appearance
- Secure flowers with hairspins or small U-shaped pins
- Mist with light hairspray to set the style
Flower Attachment Tips:
- Look for poinsettias with wire stems for easier insertion
- Remove excess plastic from artificial flowers for natural appearance
- Pin through both the flower stem and the twist for security
- Consider using floral wire to attach flowers to bobby pins
12. High Bun with Jingle Bell Accessories
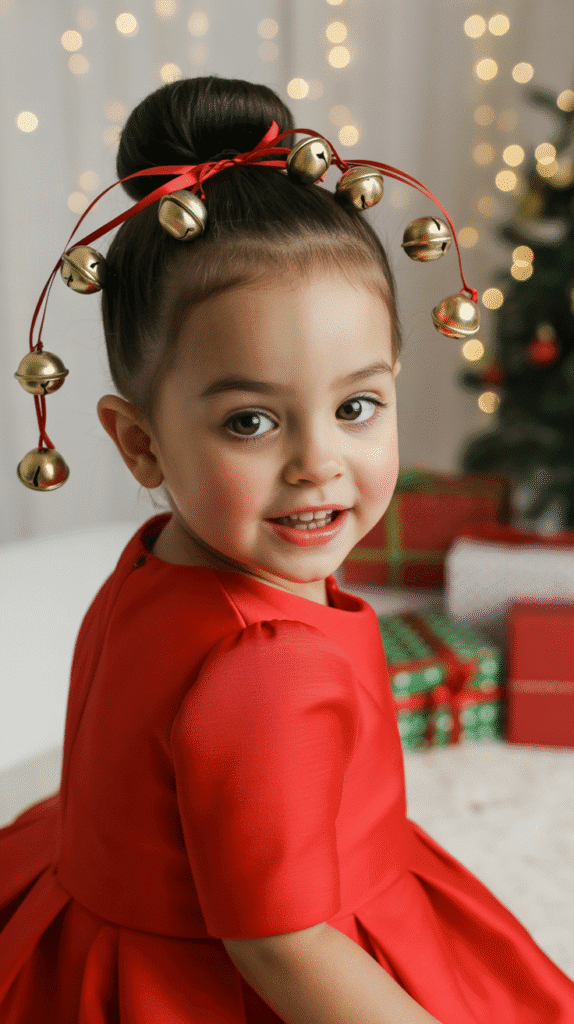
The high bun with jingle bell accessories adds playful sound effects to a classic elegant style, delighting younger children who enjoy the musical element.
This practical updo keeps hair completely off the face during activities.
Styling Instructions:
- Gather all hair into a high ponytail at the crown
- Twist the ponytail and wrap it around the base to form a bun
- Secure with elastic band and multiple bobby pins
- Take thin ribbons (each about 12 inches long) and attach small jingle bells to the ends
- Wrap ribbons around the bun base, securing with pins as you go
- Arrange bells so they hang loosely and can move freely
- Smooth any flyaways with gel or pomade
- Add a decorative hair donut inside the bun for extra volume if desired
- Finish with strong hold hairspray
Jingle Bell Sources:
- Craft stores sell jingle bells in various sizes during holiday season
- Dollar stores offer affordable multi-packs
- Choose lightweight bells to prevent bun from drooping
- Secure bells with thread if they slip off ribbons
13. Waterfall Braid with Snowflake Accents
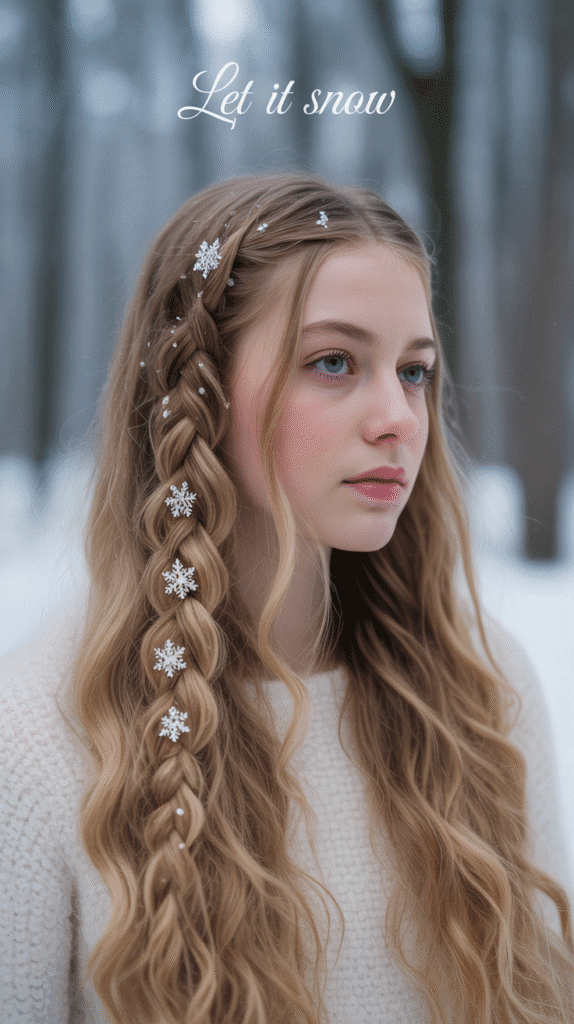
The waterfall braid with snowflake accents creates a cascading effect that mimics falling snow, combining intricate braiding technique with delicate winter-themed decorations.
This romantic style suits older children and teens.
Styling Instructions:
- Start with curled or wavy hair for best effect
- Create a side part and take a small section near the part
- Begin a standard three-strand braid
- After the first crossover, drop the bottom strand and pick up a new section from the top
- Continue this pattern, allowing strands to fall through like a waterfall
- Braid along the curve of the head from front to back
- Secure the end with a small clear elastic
- Insert snowflake pins where strands drop through the braid
- Place additional snowflakes randomly in the remaining loose hair
- Set with flexible hold hairspray to maintain movement
Waterfall Braid Tips:
- Practice this technique before the event day
- Work with slightly textured hair for better grip
- Use smaller sections for more intricate waterfall effect
- Video tutorials from YouTube hair channels provide visual guidance
14. Double Dutch Braids with Christmas Lights
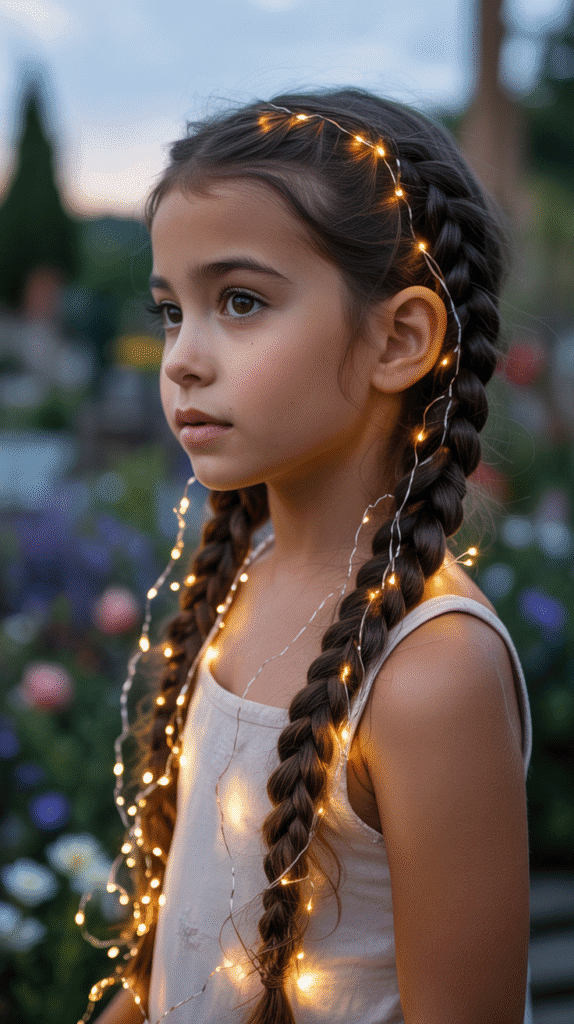
Double Dutch braids with Christmas lights transform a sporty athletic style into a magical light-up creation perfect for evening events.
This innovative look combines classic braiding with battery-operated LED accessories.
Styling Instructions:
- Part hair straight down the middle from forehead to nape
- Starting on one side, create a Dutch braid (braiding under instead of over)
- Keep the braid tight and close to the scalp
- Continue braiding to the ends and secure with clear elastic
- Repeat on the opposite side
- Take battery-operated micro LED string lights (with small battery pack)
- Carefully weave the light strand through one braid, securing with small pins
- Repeat with second light strand on the other braid
- Hide battery packs at the base of braids under hair or secure to clothing
- Test lights before leaving to ensure batteries work properly
LED Light Safety:
- Use only battery-operated LED lights, never plug-in electrical lights
- Choose lights specifically designed for crafts or costumes
- Ensure battery packs are small and lightweight
- Remove lights before sleeping
- Supervise young children with lit accessories
15. Messy Bun with Plaid Bow
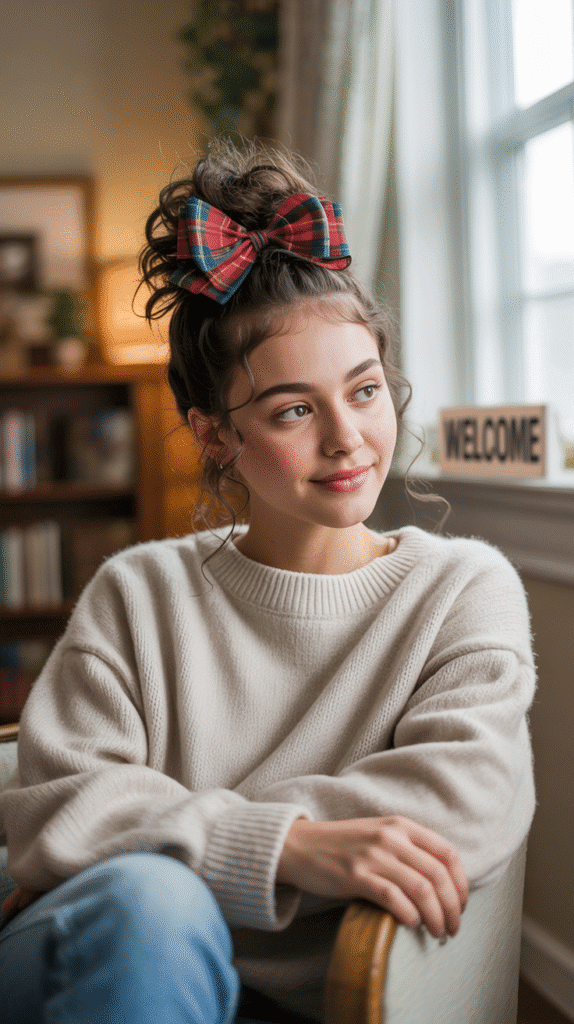
The messy bun with plaid bow balances effortless casual charm with Christmas tradition, creating a cozy look perfect for relaxed family gatherings.
This low-effort style appears intentionally stylish rather than undone.
Styling Instructions:
- Skip washing hair or use dry shampoo for ideal texture (day-old hair works best)
- Flip head upside down and gather hair loosely at the crown
- Twist hair loosely without smoothing
- Wrap around base to create an imperfect bun shape
- Secure with elastic, allowing pieces to fall naturally
- Gently pull apart sections of the bun to create deliberate messiness
- Pull out face-framing pieces around temples and ears
- Attach large plaid bow to one side or top of bun
- Leave some texture and flyaways for the intentionally undone look
- Optional: spray with texturizing spray for added grip
Achieving Perfect Messiness:
- Don’t brush hair before creating the bun
- Use fingers instead of comb for more texture
- Pull out random pieces after securing
- Embrace imperfection—symmetry is not the goal
16. Fishtail Braid with Red Berries

The fishtail braid with red berries combines an intricate braiding technique with nature-inspired embellishments, creating a sophisticated woodland Christmas aesthetic.
This detailed style works best for patient children and special occasions.
Styling Instructions:
- Brush hair thoroughly and gather into a low side ponytail
- Divide the ponytail into two equal sections
- Take a small piece from the outer edge of the left section
- Cross it over to join the right section
- Repeat from the right side, taking a small outer piece and crossing to the left
- Continue this alternating pattern down the entire length
- Keep sections small for tighter, more defined fishtail texture
- Secure the end with clear elastic
- Gently pull apart the braid sections to create wider, more textured appearance
- Insert artificial berry clusters at intervals throughout the braid
- Secure berries with small hairpins or wire
- Add individual leaves between berry clusters for authentic appearance
17. Top Knot with Ornament Hair Pins
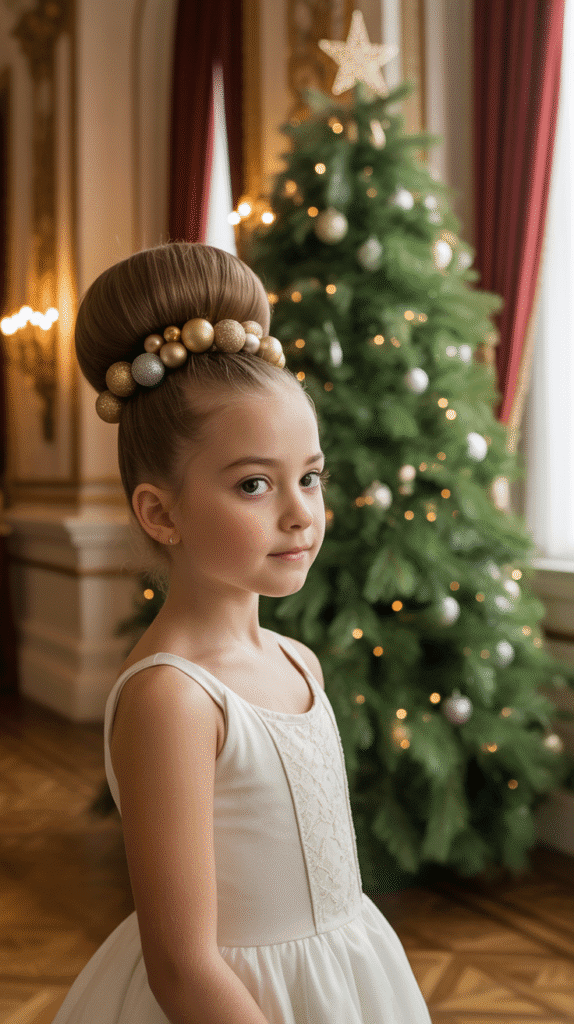
The top knot with ornament hair pins provides a ballet-inspired elegant silhouette enhanced by strategic placement of miniature ornament decorations.
This sophisticated style suits formal Christmas events and keeps hair completely secured.
Styling Instructions:
- Brush hair into a sleek high ponytail at the very top of the head
- Apply gel or mousse to smooth flyaways
- Twist the ponytail tightly while wrapping it around the base
- Create a tight, neat bun shape
- Secure with elastic band and criss-cross bobby pins through the center
- Use a hair donut insert for extra volume if hair is thin
- Smooth edges with toothbrush sprayed with hairspray
- Insert ornament-topped pins around the perimeter of the bun
- Space pins evenly for balanced appearance
- Ensure all pins are firmly secured to withstand movement
- Set entire style with strong hold hairspray
Professional Finish Techniques:
- Use edge control product on hairline for sleekness
- Bobby pins should match hair color and be invisible
- Create perfectly smooth surface by brushing while blow-drying
- A second person can help ensure back is as smooth as front
18. Half-Up Christmas Tree Bun
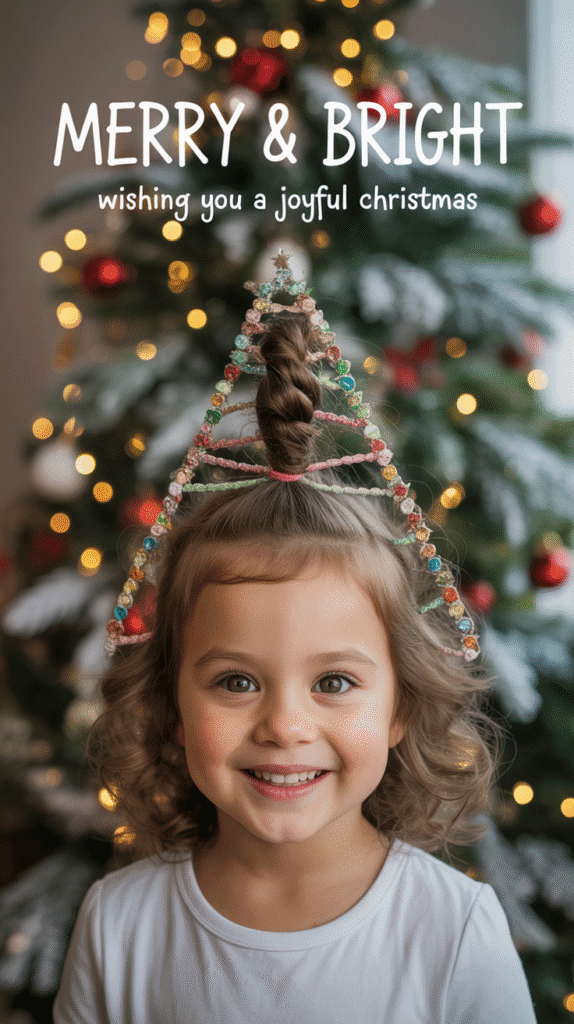
The half-up Christmas tree bun creates a literal tree shape from the secured top section, complete with decorative “ornaments” and a star topper.
This creative style serves as both hairstyle and conversation piece.
Styling Instructions:
- Section hair horizontally from temple to temple
- Gather the top section at the crown
- Divide this section into three smaller sections
- Create three small twisted buns stacked vertically in descending size (largest at bottom)
- Shape buns to form triangular tree silhouette
- Secure each bun individually with pins
- Attach miniature ornament clips, colorful bobby pins, or small bows to the “tree”
- Place a gold star clip at the very top
- Curl or wave the remaining loose hair
- Spray the bun structure with strong hold hairspray
- Add green hair chalk or temporary color spray to the bun sections for tree color
Creative Decoration Ideas:
- Use bobby pins in rainbow colors as ornaments
- Attach tiny real or artificial garland
- Apply glitter gel between bun sections
- Create “tinsel” effect with metallic thread
19. Braided Headband with Loose Curls
The braided headband with loose curls combines structured braiding with romantic flowing hair, creating dimension and visual interest.
This versatile style works for various formality levels and hair lengths.
Styling Instructions:
- Create a deep side part
- Take a 2-inch section from the heavy side of the part near the hairline
- Braid this section in a standard three-strand braid
- Pull the braid across the head like a headband
- Secure behind the opposite ear with bobby pins
- Repeat on the other side if desired for double headband effect
- Curl all remaining loose hair with curling iron
- Allow curls to cool completely
- Gently separate curls with fingers for soft waves
- Attach small Christmas-themed clips where braids are pinned
- Finish with light hairspray that won’t weigh down curls
Headband Braid Variations:
- Create a rope twist instead of standard braid
- Weave ribbon through the braid
- Make the braid thicker for more dramatic effect
- Incorporate small flowers or berries into the braid
20. Sleek Low Ponytail with Velvet Scrunchie
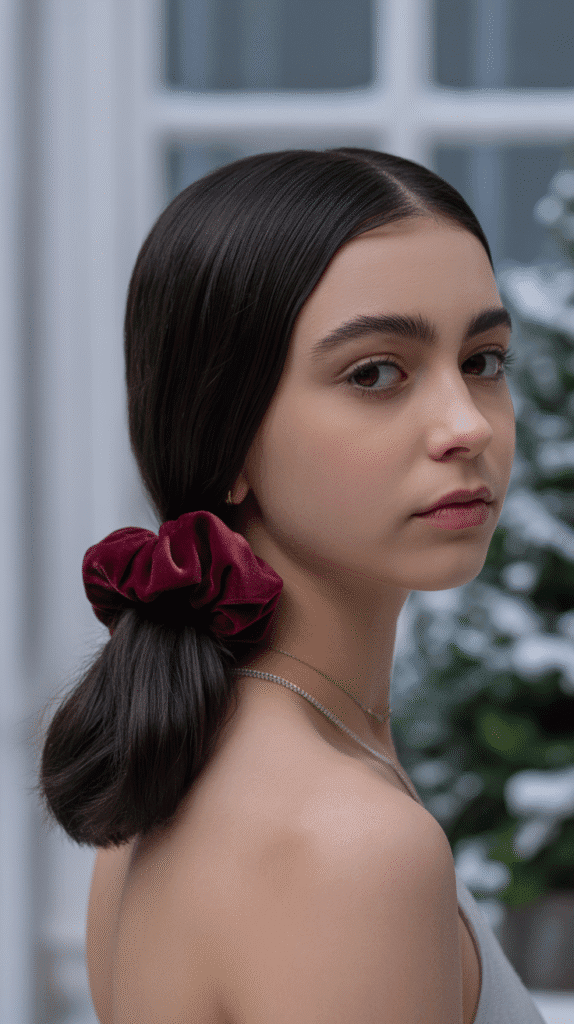
The sleek low ponytail with velvet scrunchie offers understated elegance perfect for children who prefer simple styles.
This sophisticated look works for any Christmas occasion and is comfortable for all-day wear.
Styling Instructions:
- Wash hair and blow-dry straight using paddle brush
- Apply smoothing serum throughout hair while damp
- Once dry, flat iron hair in sections for maximum sleekness
- Brush hair back into low ponytail at the nape
- Secure with clear elastic
- Apply gel to hairline and brush smooth
- Wrap large velvet scrunchie over the elastic
- Run flat iron down the ponytail length once more for extra smoothness
- Apply shine spray to finished ponytail
- Use toothbrush with hairspray to smooth any baby hairs at hairline
Velvet Scrunchie Benefits:
- Less damaging to hair than traditional elastics
- On-trend accessory with vintage appeal
- Available in luxurious holiday colors
- Prevents creases and breakage
- Provides extra volume at ponytail base
21. Crown of Curls with Gold Tinsel
The crown of curls with gold tinsel creates a halo of bouncy ringlets enhanced with shimmering metallic strands that catch light beautifully.
This glamorous style suits children with naturally curly or wavy hair.
Styling Instructions:
- Start with clean, conditioned curly hair
- Apply curl-defining cream to damp hair
- Use diffuser attachment on blow dryer to dry curls without frizz
- Once dry, define individual curls by wrapping small sections around finger
- Take thin gold tinsel strands (available at craft stores)
- Cut tinsel into 6-8 inch pieces
- Carefully twist tinsel around random curls throughout the head
- Concentrate tinsel placement around the crown area for halo effect
- Secure tinsel ends with small clear elastics if needed
- Avoid touching curls excessively to prevent frizz
- Set with light mist of flexible hold hairspray
- Optional: add gold glitter spray for extra sparkle
Tinsel Hair Safety:
- Use hair-safe tinsel, not crafting tinsel which may have sharp edges
- Avoid tinsel near face and eyes
- Remove carefully at end of day
- Don’t use heat tools after applying tinsel
22. Side Ponytail with Candy Cane Tie
The side ponytail with candy cane tie brings playful asymmetry and whimsical decoration to a classic ponytail style.
This fun look appeals to younger children and creates movement when kids play.
Styling Instructions:
- Brush hair to one side, choosing left or right based on preference
- Gather hair into ponytail positioned behind and slightly below the ear
- Secure with clear elastic
- Take red and white striped ribbon (or twist red and white ribbons together)
- Wrap ribbon around the elastic base, covering it completely
- Tie ribbon in a bow with long tails hanging down
- Optional: curl the ponytail length with curling iron
- Add additional candy cane ornaments or clips near the base
- Spray lightly to maintain position
- Leave ponytail to hang freely over shoulder
Side Ponytail Tips:
- Position placement higher for younger kids, lower for teens
- Ensure elastic is tight enough to hold without slipping
- Balance the look by keeping the opposite side smooth behind ear
- This style works on all hair lengths beyond shoulder-length
23. Bubble Ponytail with Christmas Colors
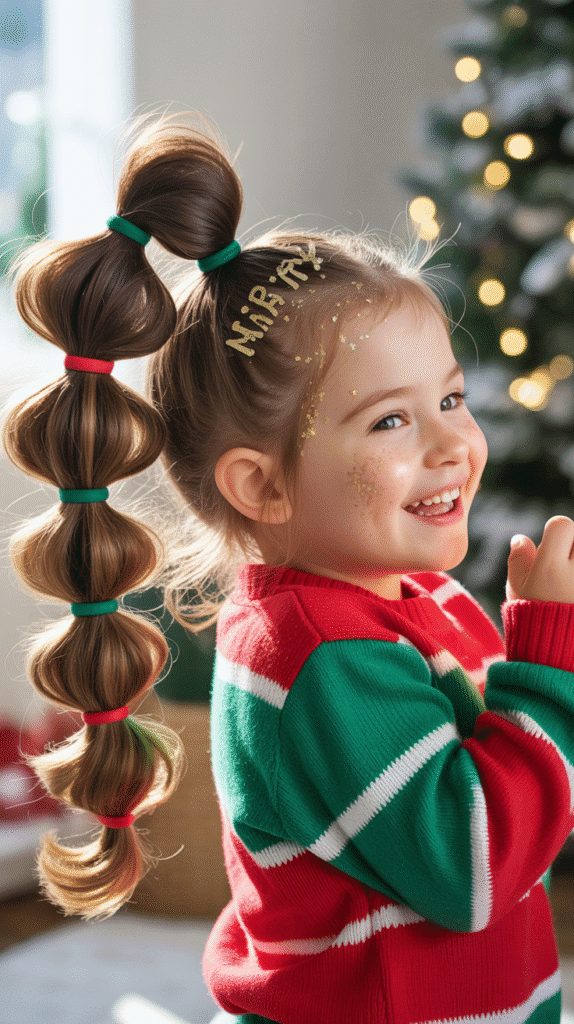
The bubble ponytail with Christmas colors transforms a trendy style into festive art through strategic use of red, green, and gold accessories.
This dimensional look adds visual interest to simple ponytails.
Styling Instructions:
- Create a high ponytail and secure with clear elastic
- Measure 2-3 inches down the ponytail and secure with colored elastic (red)
- Gently pull apart the hair between elastics to create a bubble effect
- Continue down the ponytail, alternating elastic colors (green, gold, red)
- Create 4-6 bubbles depending on hair length
- Pull each bubble section apart evenly for uniform appearance
- Apply glitter gel to the elastic areas for added sparkle
- Attach small ornament clips to random bubbles
- Curl the end of the ponytail below the last bubble
- Set with flexible hold hairspray
24. French Braid with Woven Lights
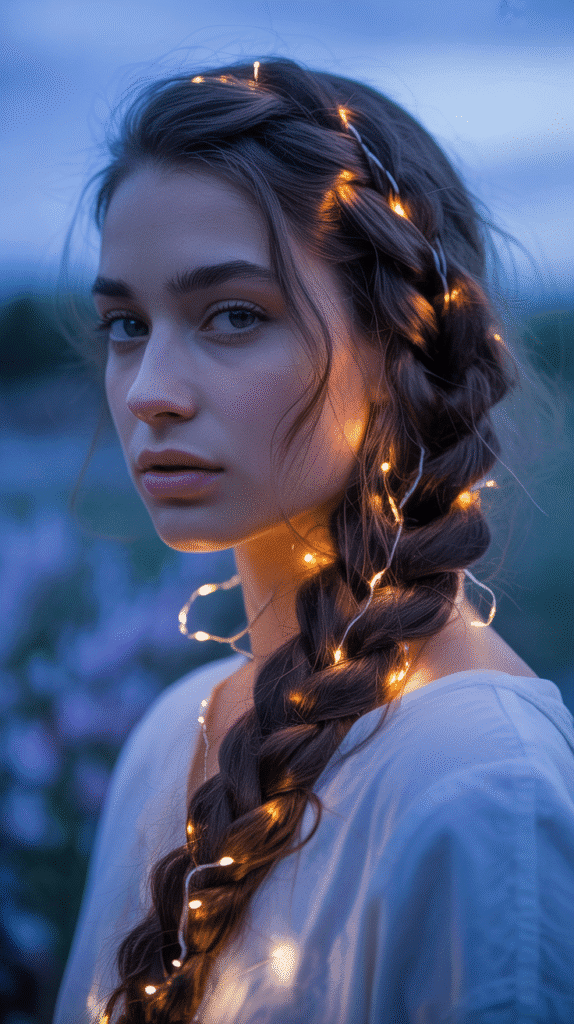
The French braid with woven lights creates an ethereal glowing effect perfect for evening Christmas events and parties.
This innovative style requires battery-operated micro lights woven throughout the braid structure.
Styling Instructions:
- Brush hair thoroughly and create center part
- Begin French braid at the crown, incorporating hair from both sides
- After completing 2-3 sections of the braid, begin incorporating LED light strand
- Weave lights over and under braid sections as you work down
- Keep lights visible on the outside of the braid rather than hidden inside
- Continue French braid to the ends
- Secure with elastic
- Position battery pack at nape of neck and secure to clothing or tuck under collar
- Turn on lights before event
- Carry extra batteries for longer events
- Test the look in dim lighting to ensure lights are visible
Light Weaving Technique:
- Use one continuous strand rather than multiple short strands
- Clip battery pack to hair elastic or clothing
- Choose warm white or colored LED lights
- Ensure lights are distributed evenly throughout braid length
25. Twisted Pigtails with Pom-Pom Ties
Twisted pigtails with pom-pom ties add three-dimensional fun through fluffy decorative accents on a simple twisted style.
This cheerful look suits very young children and captures innocent holiday joy.
Styling Instructions:
- Part hair straight down the middle
- Divide hair into two equal sections
- Take one section and twist it tightly from roots to ends
- Secure the twist with elastic at the bottom
- Repeat on the other side, ensuring twists are symmetrical
- Attach large fluffy pom-poms to elastics (pom-poms on elastic bands work best)
- Position pom-poms so they sit prominently at the ends
- Optional: add smaller pom-poms up the length of the twists
- This style works on all hair types and requires no special products
- Perfect for toddlers with limited patience for styling
Pom-Pom Attachment Methods:
- Purchase pom-pom hair elastics from accessory stores
- DIY by hot-gluing craft pom-poms to regular elastics
- Use pom-pom clips that attach to existing ponytails
- Choose pom-poms that match outfit or Christmas color scheme
26. Vintage Victory Rolls with Holly
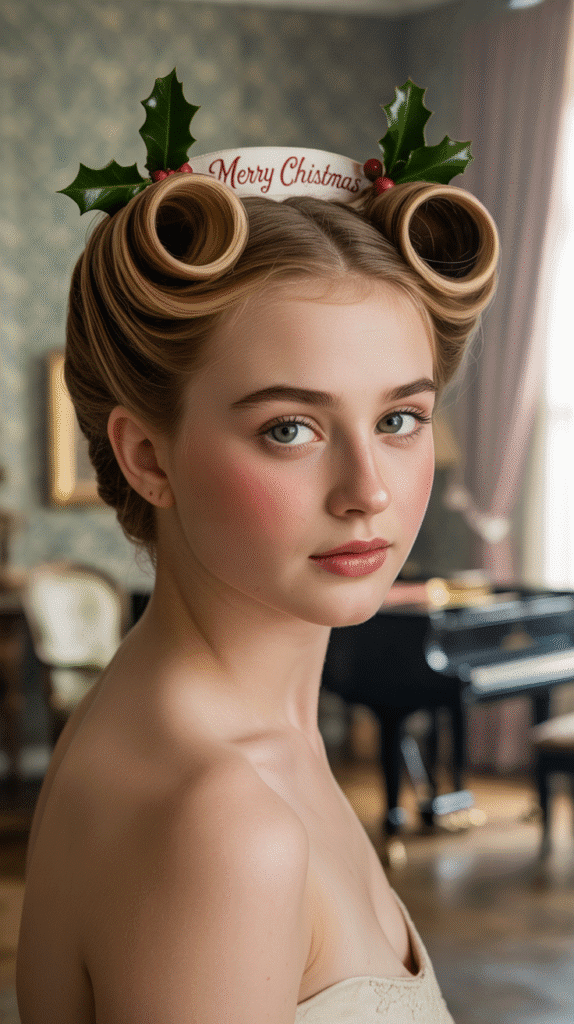
Vintage victory rolls with holly transport styles back to 1940s glamour while incorporating classic Christmas decorations.
This retro-inspired look suits older children and teens interested in vintage fashion.
Styling Instructions:
- Start with clean, dry hair and apply volumizing mousse
- Create a deep side part
- Take a 3-inch section from the heavy side of the part near the hairline
- Backcomb this section at the roots for volume
- Roll the section backward toward the crown, creating a tube shape
- Secure the roll with bobby pins inserted vertically through the center
- Repeat on the opposite side with a smaller section for asymmetrical balance
- Smooth the surface of each roll with a brush
- Insert vintage-style holly clips at the base of the larger roll
- Style remaining hair in soft waves or a low bun
- Set entire style with strong hold hairspray
- Apply shine spray for glossy finish
Victory Roll Tips:
- Practice rolling technique several times before event
- Use rat-tail comb for precise sectioning
- Pin from bottom of roll upward for security
- Works best on hair at least shoulder-length
- Consider watching vintage hairstyle tutorials for visual guidance
Vintage Accessory Sources:
- Antique stores for authentic vintage clips
- Reproduction vintage accessories from specialty retailers
- DIY holly clips using felt and craft supplies
- Red and green rhinestone clips for sparkle
27. Natural Curls with Glitter Roots and Star Clips
Natural curls with glitter roots and star clips celebrates the beauty of textured hair while adding festive embellishments that enhance rather than hide natural texture.
This inclusive style works for all curl patterns from loose waves to tight coils.
Styling Instructions:
- Begin with freshly washed and conditioned hair
- Apply leave-in conditioner and curl cream to damp hair
- Define curl sections using finger-coiling or shingling method
- Allow hair to air dry or use diffuser on low heat
- Once completely dry, create parts in desired pattern (center, side, or zigzag)
- Apply gold or silver glitter gel along each part line
- Allow glitter to set for 2-3 minutes
- Place gold star clips throughout the hair at varying heights
- Position clips to follow the hair’s natural volume and shape
- Avoid placing too many clips which can weigh down curls
- Optional: add a jeweled headband across the hairline
- Finish with light oil sheen spray for added luster
Curl-Friendly Product Recommendations:
- Use sulfate-free shampoos to prevent dryness
- Deep condition weekly for optimal curl health
- Apply products to soaking wet hair for best definition
- Refresh curls between washes with water and leave-in spray
- Choose accessories that don’t snag or damage textured hair
Conclusion
“27 Best Christmas Hairstyles for Kids That Are Adorable and Festive” provides you with a comprehensive collection of creative options that transform ordinary hair into extraordinary holiday statements.
From the whimsical charm of reindeer antler space buns to the elegant sophistication of vintage victory rolls with holly, these styles accommodate every preference, skill level, and hair type.
The beauty of these Christmas hairstyles lies not only in their visual appeal but in the memories you create while styling them together with your children.
Whether you choose simple options like the glitter root part that takes minutes or invest time in intricate creations like the braided wreath updo, each style offers an opportunity to bond and celebrate the season.
Remember that the most important element isn’t perfection but the joy and confidence these festive looks bring to your little ones.
The accessories, from jingle bells and ornaments to ribbons and flowers, allow for endless customization that reflects your child’s unique personality.
Many of these styles work beautifully for multiple occasions throughout December, from school concerts and family photos to Christmas morning and holiday parties.
As you experiment with these adorable hairstyles, don’t hesitate to mix elements from different styles or add your own creative touches that make each look uniquely yours.
With these 27 festive options at your fingertips, you’re fully equipped to ensure your children look picture-perfect and feel absolutely special throughout the entire magical Christmas season.