The holiday season brings sparkle, celebration, and the perfect excuse to elevate your hairstyle game with festive braided creations.
Whether you’re heading to a cozy family dinner, an elegant Christmas party, or simply want to add some seasonal magic to your everyday look, braided hairstyles offer the versatility and charm to make you shine throughout December.
From simple three-strand braids adorned with ribbons to intricate crown braids woven with tinsel, the possibilities are endless when you combine the timeless art of braiding with Christmas creativity.
This article titled “27 Easy Christmas Hairstyles with Braids for a Creative Holiday Look” will guide you through stunning yet achievable styles that range from beginner-friendly to moderately advanced, each designed to capture the warmth and wonder of the season.
You’ll discover classic braided buns perfect for formal gatherings, playful side braids that work beautifully with Santa hats, and romantic waterfall braids that look magical in holiday photos.
We’ll also explore how to incorporate festive accessories like pearl pins, velvet ribbons, evergreen sprigs, and glittering ornaments into your braids to create truly show-stopping holiday hair.
No matter your hair length, texture, or braiding skill level, you’ll find inspiring options that can be recreated at home with minimal tools and maximum impact.
Get ready to transform your tresses into a winter wonderland and embrace the joy of the most wonderful time of the year with these creative braided hairstyles that will have everyone asking for your styling secrets.
1. Classic Three-Strand Side Braid with Red Ribbon
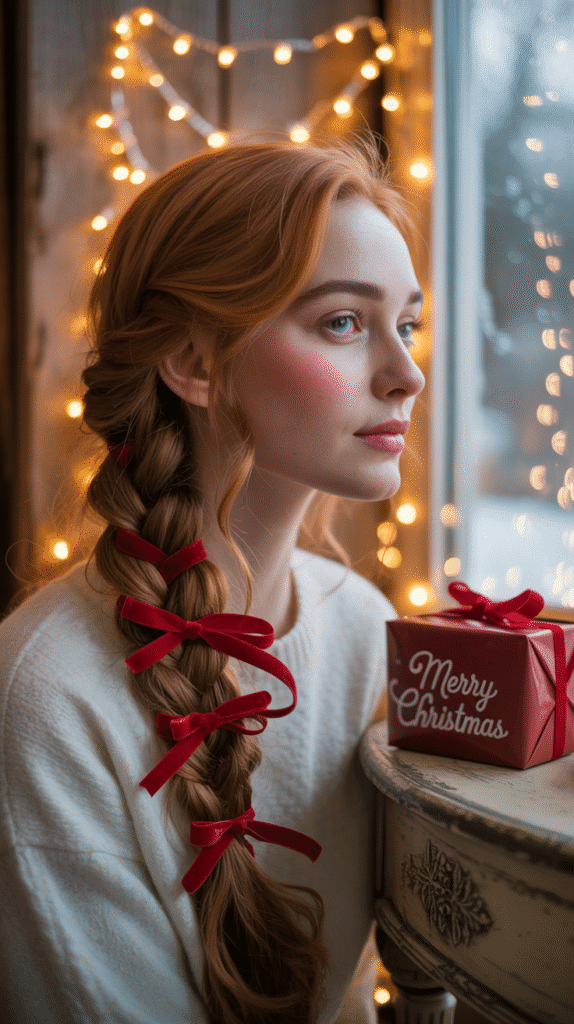
The timeless three-strand braid gets a festive upgrade when styled to the side and adorned with a luxurious red velvet ribbon.
This hairstyle works beautifully for both casual holiday gatherings and more formal Christmas events, offering simplicity with an elegant twist.
- Start by brushing your hair thoroughly to remove all tangles and create a smooth base for braiding.
- Gather all your hair to one side of your head, choosing whichever side feels most comfortable and flattering for your face shape.
- Divide the hair into three equal sections and begin braiding in the traditional over-under pattern, keeping consistent tension throughout.
- Continue braiding down to the ends of your hair, securing with a clear elastic band that won’t distract from the ribbon decoration.
- Weave a red velvet ribbon through the braid starting from the top, threading it between the sections for a candy-cane inspired effect.
- Alternatively, tie the ribbon in a beautiful bow at the base of the braid for a more classic Christmas gift-wrapped appearance.
- Gently pull apart the braid sections to create a fuller, more voluminous look that appears effortlessly romantic.
- Finish with a light mist of flexible hold hairspray to keep everything in place throughout your holiday festivities.
2. Double Dutch Braids with Snowflake Pins
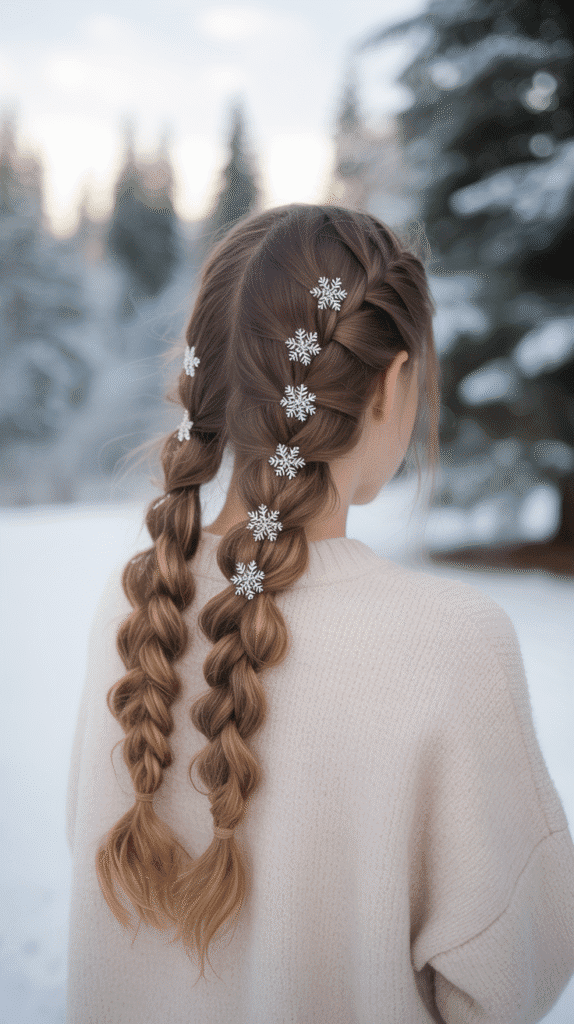
Double Dutch braids create a sporty yet sophisticated foundation that becomes wonderfully festive when decorated with delicate snowflake hair pins.
This style is perfect for those who want their hair securely styled while still embracing the Christmas spirit.
- Part your hair straight down the middle from forehead to nape, creating two equal sections.
- Begin with one section, taking a small portion of hair at the front hairline and dividing it into three strands.
- Create a Dutch braid by crossing the outer strands under the middle strand rather than over, incorporating new hair with each crossing.
- This inside-out braiding technique creates braids that sit on top of your head rather than sinking into the hair.
- Continue the Dutch braid all the way down, then secure with an elastic and repeat the entire process on the other side.
- Once both braids are complete, strategically place silver or crystal snowflake pins along the length of the braids.
- Space the snowflake decorations evenly or cluster them at the top for a snow-dusted crown effect.
- This hairstyle stays secure all day and night, making it ideal for active holiday activities or long Christmas celebrations.
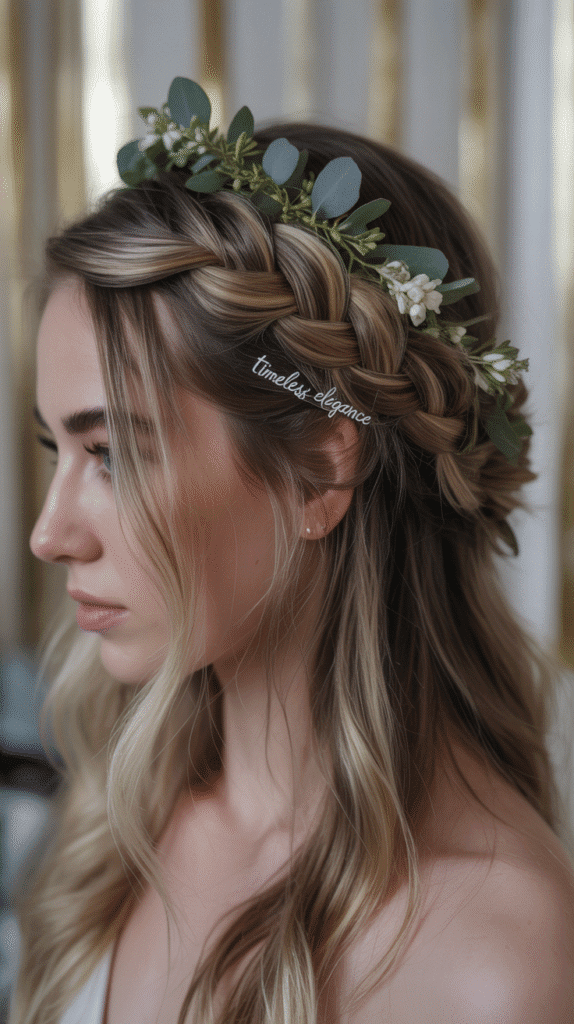
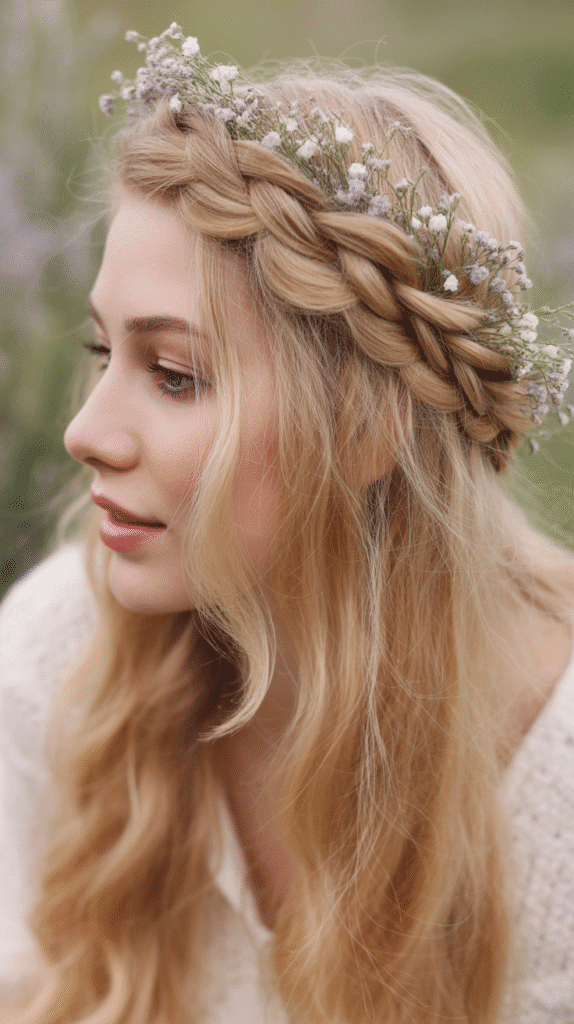
3. Crown Braid with Evergreen Sprigs

A crown braid encircling your head creates a regal, goddess-like appearance that’s perfect for Christmas, especially when embellished with fresh evergreen sprigs for a natural, woodland-inspired holiday aesthetic.
- Start by parting your hair on one side rather than in the center for a crown braid with more dimension.
- Take a section of hair from behind one ear and divide it into three strands to begin your braid.
- Braid around your head following your hairline, continuously adding small sections of hair from the front as you work.
- The technique is similar to a Dutch or French braid but follows the circular shape of your head like a halo.
- When you reach the starting point, continue braiding the remaining length without adding new sections.
- Tuck the end of the braid underneath the crown and secure it with bobby pins that match your hair color.
- Carefully insert small sprigs of evergreen, pine, or cedar into the braid at intervals, securing them with additional pins if needed.
- The natural greenery adds an organic, Christmas-morning freshness to the elegant braided crown.
4. Fishtail Braid Ponytail with Gold Tinsel
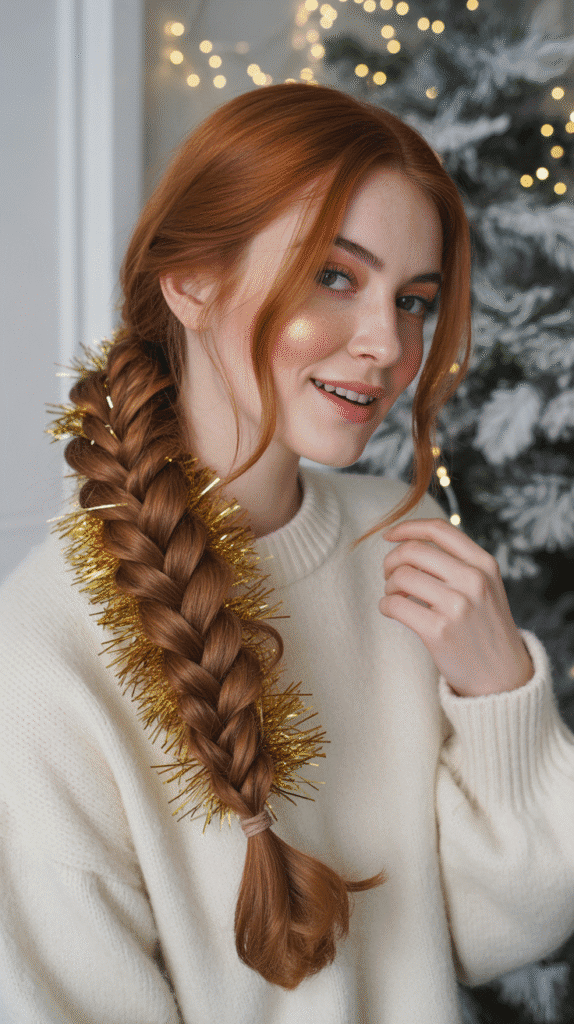
The fishtail braid offers a more intricate appearance than a traditional braid while remaining surprisingly simple to execute, and when combined with a high ponytail and gold tinsel, it becomes a glamorous Christmas statement.
- Brush your hair up into a high ponytail and secure it tightly with a strong elastic band.
- Divide the ponytail into two equal sections rather than the typical three used in standard braiding.
- Take a small piece from the outer edge of the left section and cross it over to join the right section.
- Then take a small piece from the outer edge of the right section and cross it over to join the left section.
- Continue this alternating pattern all the way down, keeping the small sections uniform in size for the distinctive fishtail texture.
- The smaller your sections, the more intricate and detailed your fishtail braid will appear.
- Once you reach the end, secure with an elastic and gently loosen the braid for a fuller, more textured finish.
- Wrap thin gold tinsel around the length of the fishtail braid or weave it through sections for sparkling holiday dimension.
5. French Braid Updo with Pearl Accessories
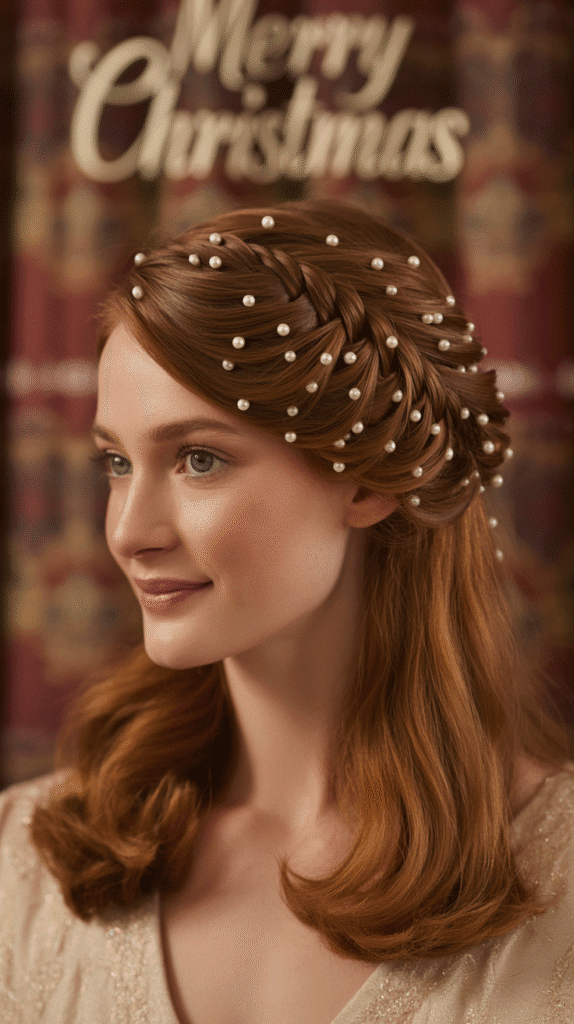
A French braid that transforms into an elegant updo offers sophistication perfect for formal Christmas parties, and pearl accessories add timeless, winter-white elegance to the finished style.
- Begin by creating a traditional French braid starting at the crown of your head.
- Take a section of hair at the top and divide it into three strands to start your braid.
- As you braid, continuously incorporate small sections of hair from both sides into the braid, working your way down.
- Instead of braiding all the way to the ends, stop at the nape of your neck.
- Twist the remaining length of hair into a low bun or roll it upward and pin it securely to create an updo.
- The French braid becomes the decorative element leading into the sophisticated bun at the base.
- Embellish the entire style with pearl-headed pins, inserting them along the braid and around the bun.
- Pearl accessories complement any Christmas color palette and add a refined, vintage-inspired touch to your holiday look.
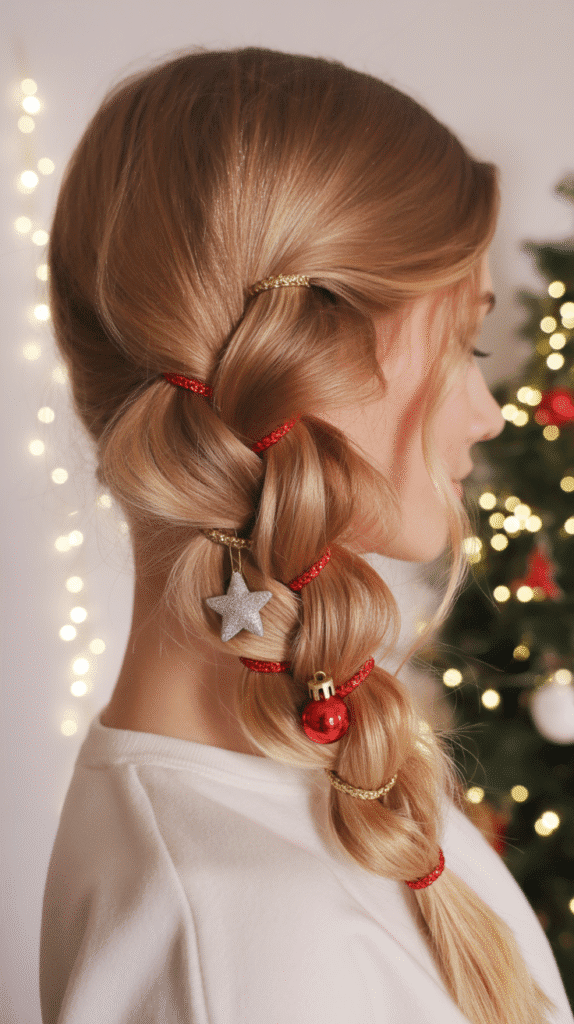
6. Messy Side Braid with Christmas Ornament Clips
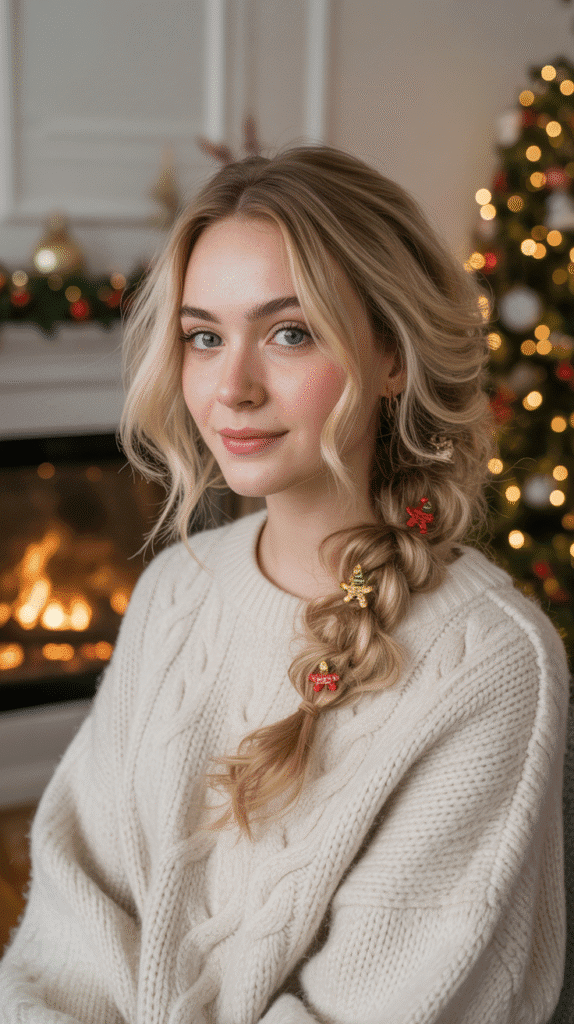
A deliberately tousled side braid embraces the relaxed, bohemian aesthetic while miniature Christmas ornament hair clips add playful holiday personality without requiring perfect precision in your braiding technique.
- Gather your hair loosely to one side without worrying about catching every strand for that effortlessly undone look.
- Create a loose three-strand or fishtail braid, intentionally allowing some pieces to escape and frame your face.
- Don’t pull the braid too tightly—the beauty of this style lies in its relaxed, textured appearance.
- Secure the end with a clear elastic, then gently pull apart the braid sections to maximize volume and create that coveted messy texture.
- Attach miniature ornament clips—tiny baubles, bells, or Christmas tree decorations designed as hair accessories—throughout the braid.
- These whimsical clips can be found at craft stores or online and come in countless festive designs and colors.
- This style works exceptionally well for casual Christmas gatherings, cookie decorating parties, or relaxed family celebrations.
- The imperfect nature of the braid means it’s forgiving for beginners and looks charming rather than sloppy.
7. Braided Top Knot with Velvet Scrunchie
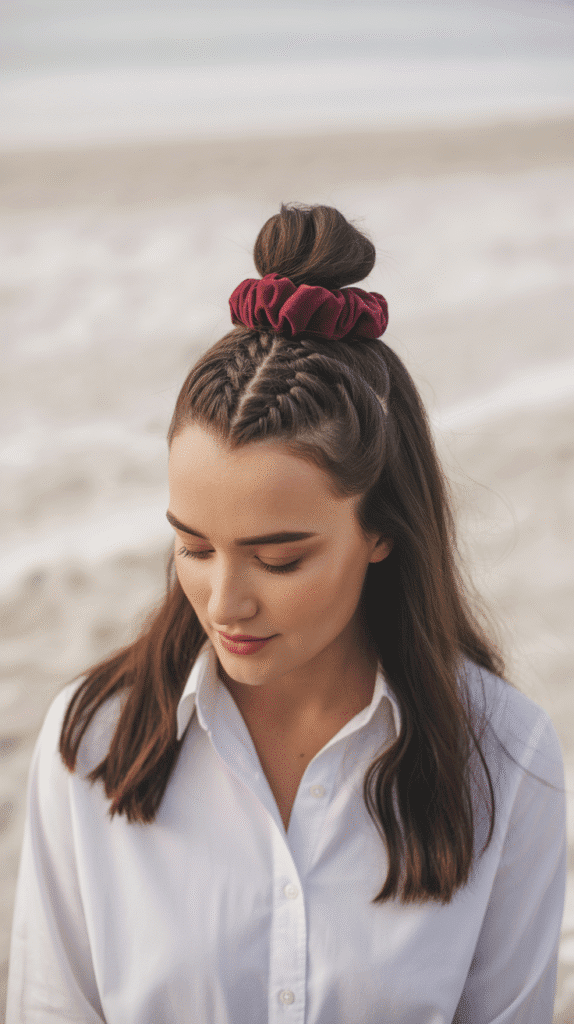
The braided top knot combines the sleek elegance of a braided base with the casual-chic appeal of a top knot bun, while a luxe velvet scrunchie in deep Christmas colors provides the perfect finishing touch.
- Flip your head upside down and begin creating a Dutch or French braid starting from the nape of your neck.
- Braid upward toward the crown of your head, incorporating hair as you go for a braid that appears to defy gravity.
- When you reach the crown or the point where you want your bun to sit, secure the braid with a temporary elastic.
- Gather all remaining hair, including the braided section, into a high ponytail at the crown.
- Twist the ponytail into a bun shape, wrapping it around the base and securing with bobby pins.
- Remove the temporary elastic if possible, or leave it if it helps secure the style.
- Place a velvet scrunchie in emerald green, burgundy, or navy blue around the base of the top knot for rich seasonal texture.
- This style keeps hair off your neck while cooking Christmas dinner but still looks polished enough for holiday photos.
8. Waterfall Braid with Berry Accents
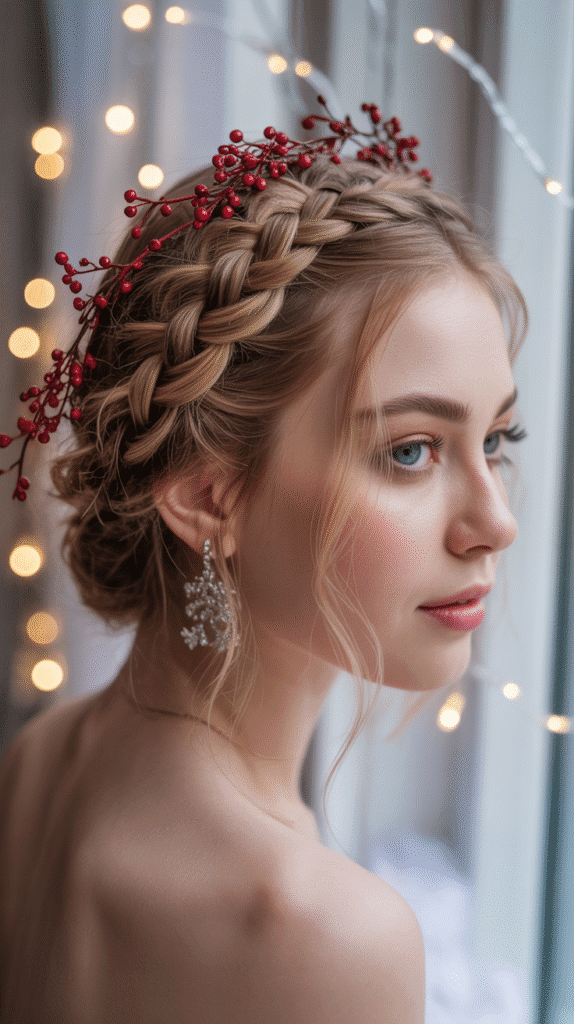
The romantic waterfall braid creates the illusion of hair cascading through the braid like a gentle waterfall, and when adorned with festive berry picks, it becomes an enchanting Christmas hairstyle perfect for parties and special occasions.
- Start by taking a section of hair near your part at the front of your head and dividing it into three strands.
- Begin braiding normally for one stitch, but when you bring the top strand down, release it and let it fall instead of continuing to hold it.
- Pick up a new section of hair from the top to replace the dropped strand and continue the braid.
- This dropping and replacing pattern creates the distinctive waterfall effect with strands cascading through the braid.
- Work the waterfall braid from one side of your head to the other, following your hairline like a delicate crown.
- The dropped sections will hang beautifully, especially if you curl them beforehand for added definition and bounce.
- Secure the end of the braid behind your ear with bobby pins, hiding the pins beneath the hair.
- Tuck small berry picks—artificial cranberries, holly berries, or winter berries—into the braid at intervals for pops of festive red color.
9.A Creative Zigzag Part Standard Double Braids

A creative zigzag part transforms standard double braids into something truly special and eye-catching, especially when colorful Christmas ribbons are woven through each braid for dimension and festive flair.
- Use a rat-tail comb to create a zigzag part down the center of your head instead of a straight line.
- Take your time with the part, making deliberate diagonal sections that alternate left and right for a lightning-bolt effect.
- Once the zigzag part is complete, you’ll have two sections of hair with a playfully geometric division.
- Create a standard three-strand braid on each side, starting from the top and working down to the ends.
- Keep the braids relatively tight so the zigzag part remains visible and doesn’t get hidden.
- Thread a different colored ribbon through each braid—try red and green, or silver and gold for classic Christmas combinations.
- You can weave the ribbon through as you braid or thread it afterward using a large-eye needle or bobby pin.
- This playful style works wonderfully for younger wearers or anyone who loves bold, creative holiday hairstyles.
10. Braided Half-Up Half-Down with Star Clips
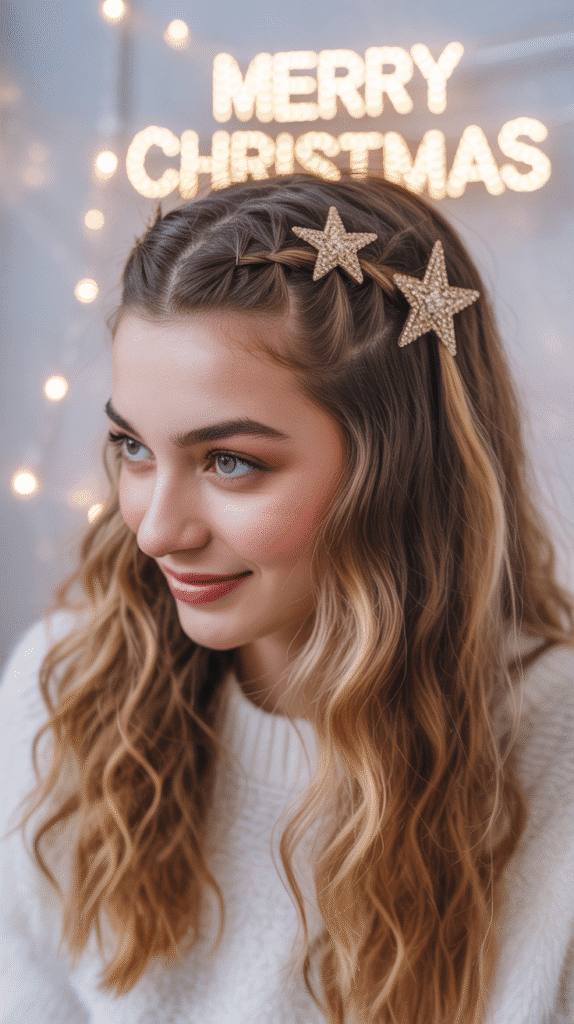
The half-up half-down style offers the best of both worlds—showing off your hair’s length while keeping the top section styled and secure with braids, and star-shaped clips add celestial Christmas magic.
- Section off the top portion of your hair from temple to temple, leaving the bottom half down.
- Divide the top section into two parts and create a small braid on each side, starting near your temples.
- These braids can be standard three-strand, Dutch, or even tiny rope braids depending on your preference.
- Bring both braids to the back center of your head and secure them together with a clear elastic or decorative clip.
- The bottom portion of your hair remains loose and can be left straight, wavy, or curled depending on your desired look.
- Position gold or silver star-shaped clips along the braids or at the point where they meet in the back.
- Stars represent the Star of Bethlehem and add a meaningful celestial element to your Christmas hairstyle.
- This versatile style works for virtually any hair length from medium to very long and suits most face shapes beautifully.
11. Four-Strand Braid with Copper Wire Wrap
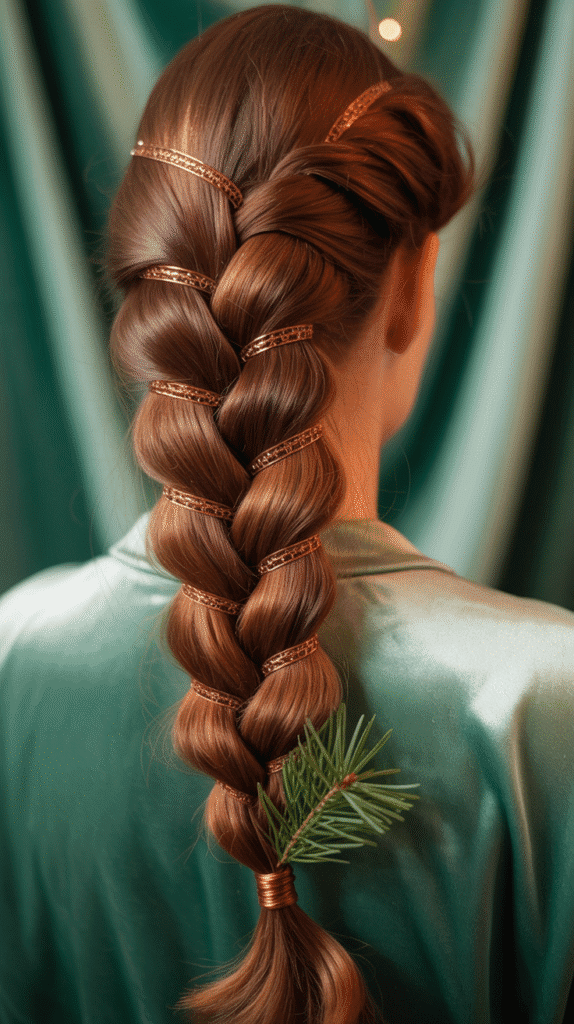
A four-strand braid offers more complexity and texture than traditional three-strand braiding, creating a rope-like appearance that becomes even more dramatic when wrapped with delicate copper wire for an artisanal, handcrafted Christmas aesthetic.
- Gather your hair into a low side ponytail or leave it hanging freely depending on your preference.
- Divide the hair into four equal sections instead of the usual three, numbering them mentally from left to right.
- The four-strand braid pattern goes: take strand 1 over strand 2, then under strand 3, keeping strand 4 in place.
- Then take strand 4 under strand 3 and over strand 2, and repeat this pattern down the length of your hair.
- This creates a more three-dimensional, woven appearance with incredible texture and visual interest.
- Secure the end with an elastic when the braid is complete, being patient as four-strand braiding requires more concentration initially.
- Wrap thin copper or rose gold craft wire loosely around the braid in a spiral pattern, tucking the ends securely.
- The metallic wire catches the light beautifully and gives your braid a warm, glowing appearance perfect for candlelit Christmas celebrations.
12. Braided Headband with Loose Curls
A braided headband created from your own hair provides a natural-looking accessory that keeps hair off your face while the remaining loose curls create volume and movement perfect for romantic Christmas occasions.
- Take a section of hair from behind one ear, approximately one to two inches wide depending on how thick you want the headband.
- Braid this section in a standard three-strand braid all the way to the ends and secure with a small clear elastic.
- Bring the braid across the top of your head like a headband, following your hairline from ear to ear.
- Secure the braid behind the opposite ear with bobby pins that match your hair color for invisible hold.
- The remaining hair stays loose and should be curled with a curling iron or wand for soft, bouncy waves.
- Tuck small festive elements like tiny poinsettia flowers or white berries into the braided headband for Christmas decoration.
- This style beautifully frames the face and works exceptionally well for holiday photos and parties.
- The contrast between the structured braid and soft curls creates a balanced, feminine appearance.
13. Dutch Braid into Low Bun with Greenery
The Dutch braid flowing seamlessly into a low bun creates an elegant, ballet-inspired silhouette that becomes winter-wedding worthy when adorned with eucalyptus, pine, or other greenery for organic Christmas beauty.
- Start a Dutch braid at the crown of your head by taking a section and dividing it into three strands.
- Remember that Dutch braiding involves crossing strands under rather than over for that raised, 3D effect.
- Continue the Dutch braid straight down the back of your head, adding hair from both sides as you go.
- When you reach the nape of your neck, continue braiding without adding new sections until you reach the ends.
- Twist the remaining braided length into a low bun at the nape, rolling it under and pinning securely.
- Pull gently on the edges of the Dutch braid to create more width and a softer, more romantic appearance.
- Insert sprigs of eucalyptus, cedar, or pine into the bun and along the braid, securing with bobby pins or hairpins.
- This sophisticated style works beautifully for Christmas church services, formal dinners, or winter weddings.
14. Boxer Braids with Candy Cane Striped Ribbon
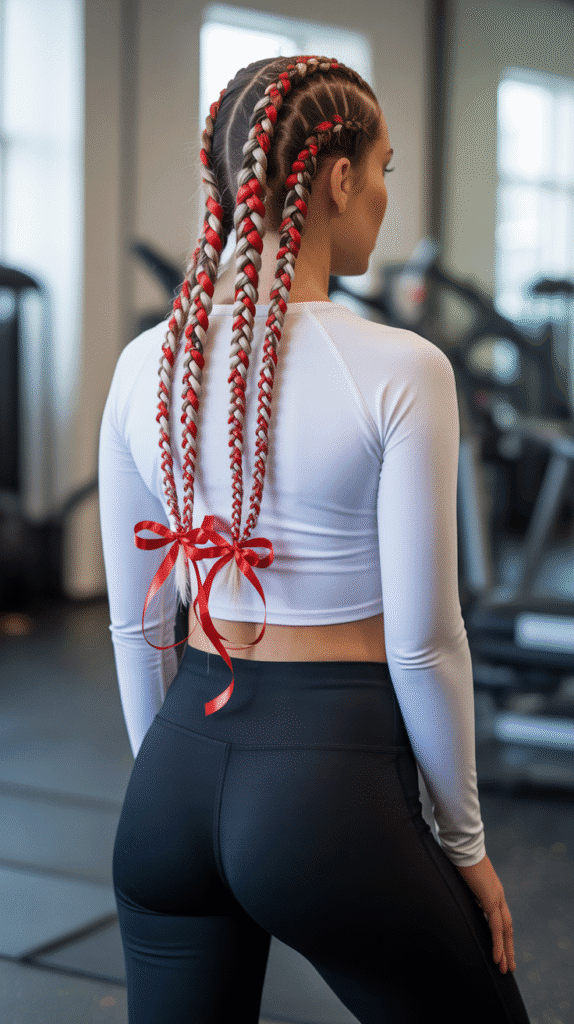
Boxer braids, essentially tight Dutch braids that start at the hairline and continue straight back, become playfully festive when candy cane striped ribbon is woven through them for a fun, athletic-meets-Christmas aesthetic.
- Create a precise center part from your forehead all the way to the nape of your neck.
- Beginning at the hairline, take a small section on one side and divide it into three strands for your Dutch braid.
- Braid tightly and close to the scalp, crossing under and adding hair with each stitch, continuing straight back.
- These braids should be very secure and tight, unlike the loosened, pulled-apart braids in other styles.
- Complete both braids all the way to the ends and secure with durable elastic bands that won’t slip.
- Thread red and white candy cane striped ribbon through each braid, weaving it over and under the sections.
- You can use actual thin ribbon or specialty braiding ribbon designed for this purpose.
- This fun, youthful style works perfectly for holiday sports events, ice skating, or casual Christmas celebrations where you want secure, long-lasting hair.
15. Halo Braid with String Lights
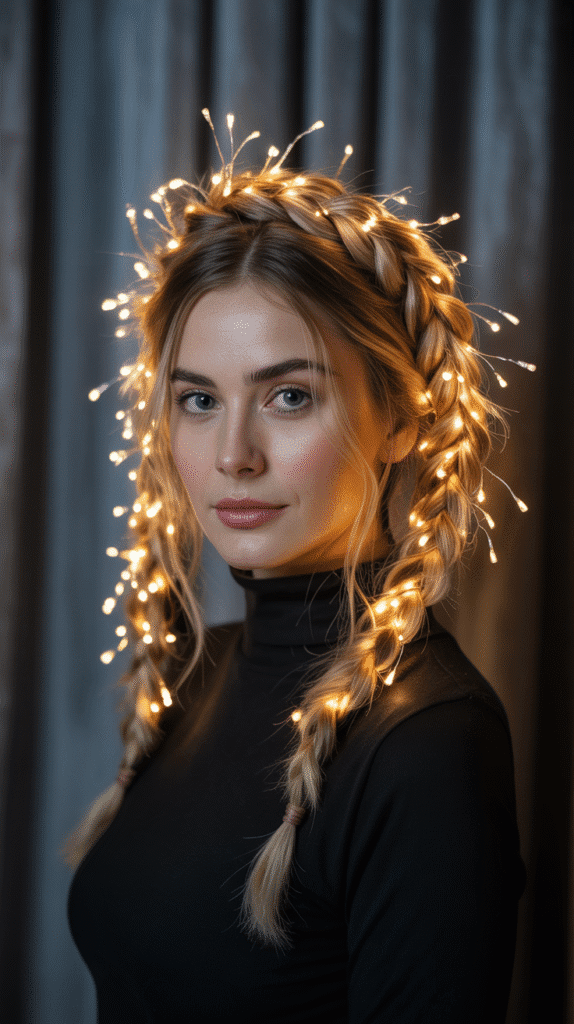
The halo braid creates an ethereal crown around your entire head, and when battery-powered micro string lights are carefully incorporated, you become a living, breathing Christmas decoration with a truly magical glow.
- Part your hair down the middle and create two standard braids, one on each side of your head.
- These will be wrapped around your head to form the halo, so braid all the way to the ends.
- Take the right braid and wrap it across the top of your head along your hairline, securing with bobby pins.
- Take the left braid and wrap it behind the right braid, creating a layered, dimensional halo effect.
- Tuck the ends of both braids underneath the opposite braid and pin them invisibly for a seamless appearance.
- Very carefully weave battery-powered micro LED string lights through the halo braid, ensuring the battery pack is hidden at the back.
- The lights should be thin enough to wrap around and through the braids without being too heavy or obvious.
- This show-stopping style is perfect for Christmas parties, photos, or anyone who really wants to embrace maximum holiday spirit with a illuminated crown.
16. Milkmaid Braids with Plaid Ribbon Bows
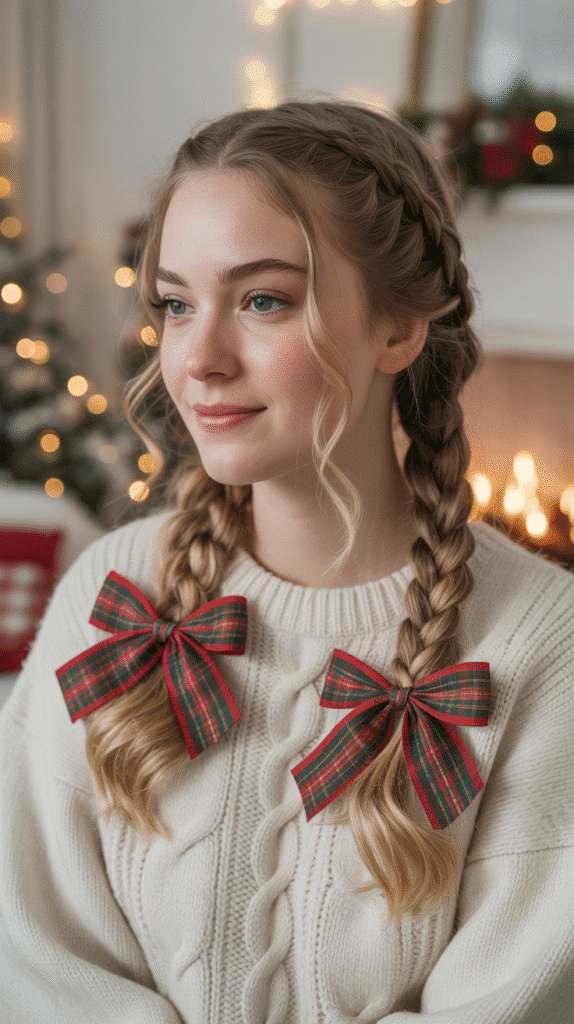
Milkmaid braids create a sweet, vintage-inspired look reminiscent of Alpine Christmas traditions, and plaid ribbon bows in traditional holiday colors add charming, country-cottage appeal to this timeless style.
- Create two standard three-strand braids, one on each side of your head, starting behind your ears.
- Braid all the way to the ends and secure each braid with a clear elastic band.
- Lift the right braid up and over the top of your head, positioning it like a headband, and pin it securely.
- Then lift the left braid and place it behind the right braid, creating a layered crown effect.
- Pin both braids securely, tucking the ends underneath the opposite braid so they’re hidden.
- Attach plaid ribbon bows in red and green, red and black, or traditional tartan patterns at the points where the braids meet.
- These bows can be attached with bobby pins or small clips for easy application and removal.
- This wholesome, nostalgic style evokes Christmas markets, gingerbread houses, and cozy holiday traditions.
17. Side Swept Fishtail with Crystal Pins
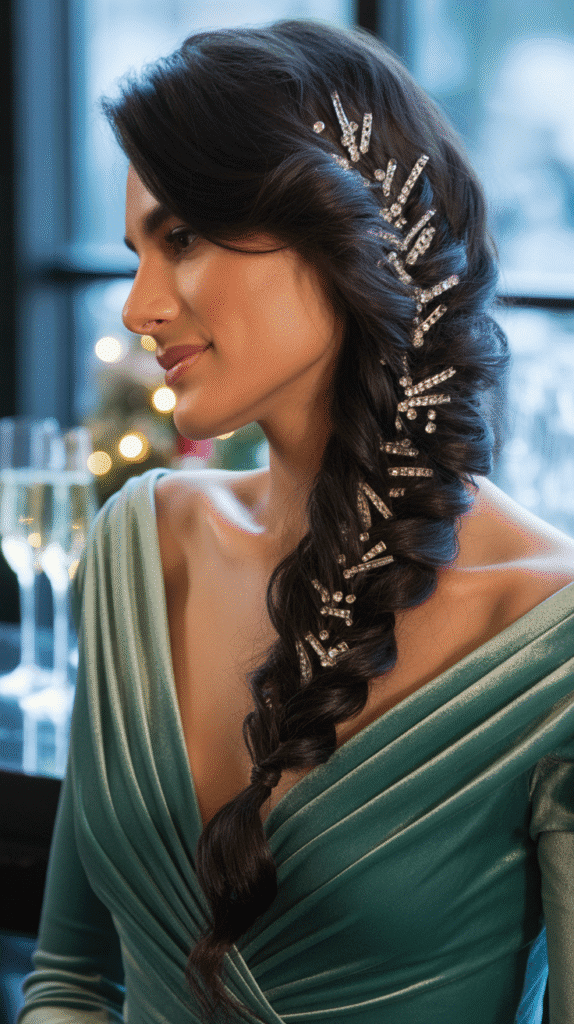
A dramatic side-swept fishtail braid showcases the intricate texture of this braiding technique while strategically placed crystal pins catch the light like freshly fallen snow for an elegant, winter-formal Christmas look.
- Sweep all your hair to one side, either left or right depending on your preference and face shape.
- Divide the hair into two sections and begin your fishtail braid by taking small pieces from the outer edges.
- The side-swept positioning allows the beautiful fishtail texture to be fully visible and appreciated.
- Continue the fishtail pattern all the way down, keeping relatively consistent tension for a uniform appearance.
- Once complete, gently pull apart the braid sections to create more width and a softer, more romantic texture.
- Insert clear crystal or rhinestone pins throughout the braid, spacing them evenly or clustering them at the top for a frozen, icy effect.
- The crystals reflect light beautifully in photographs and under Christmas lights, creating a sparkling, snow-kissed appearance.
- This sophisticated style pairs perfectly with formal holiday dresses and elegant Christmas evening events.
18. Double French Braids into Pigtails with Jingle Bells
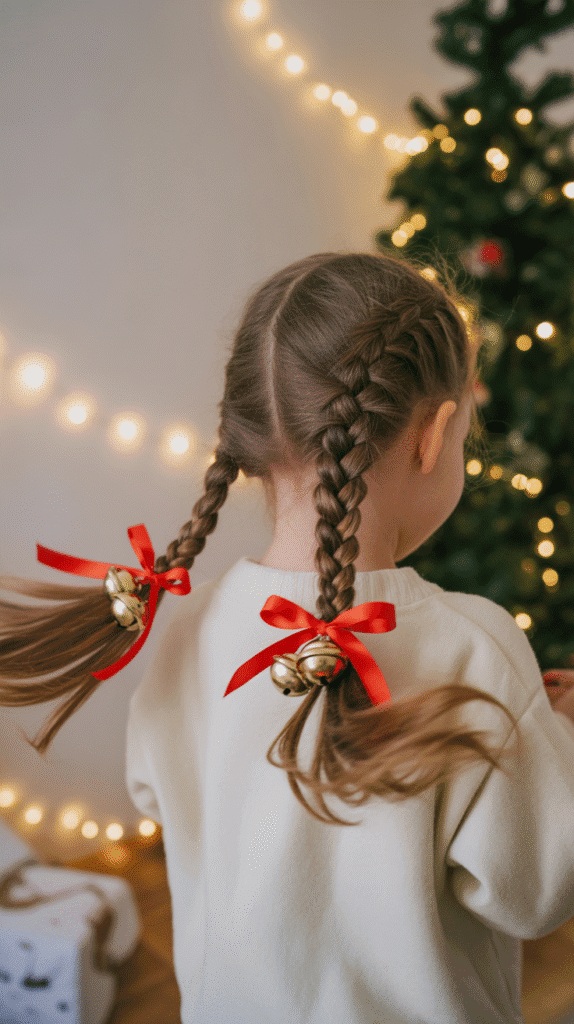
Double French braids that transition into playful pigtails create a youthful, spirited look, and attaching small jingle bells to the ends produces a delightfully festive sound and appearance perfect for celebrating Christmas with childlike joy.
- Part your hair straight down the middle from forehead to nape, creating two equal sections.
- Start a French braid on one side at the hairline, incorporating small sections of hair as you braid down.
- Continue the French braid until you reach behind the ear, then braid the remaining length without adding new hair.
- Repeat the exact process on the other side for symmetrical pigtails.
- Secure each braid with a decorative hair elastic or ribbon tie.
- Attach small jingle bells to the ends of each pigtail using ribbon, elastic loops, or special bell hair ties.
- Every movement creates a soft jingling sound that’s festive without being overwhelming.
- This playful style works wonderfully for children, teens, or adults who love whimsical, fun holiday expressions.
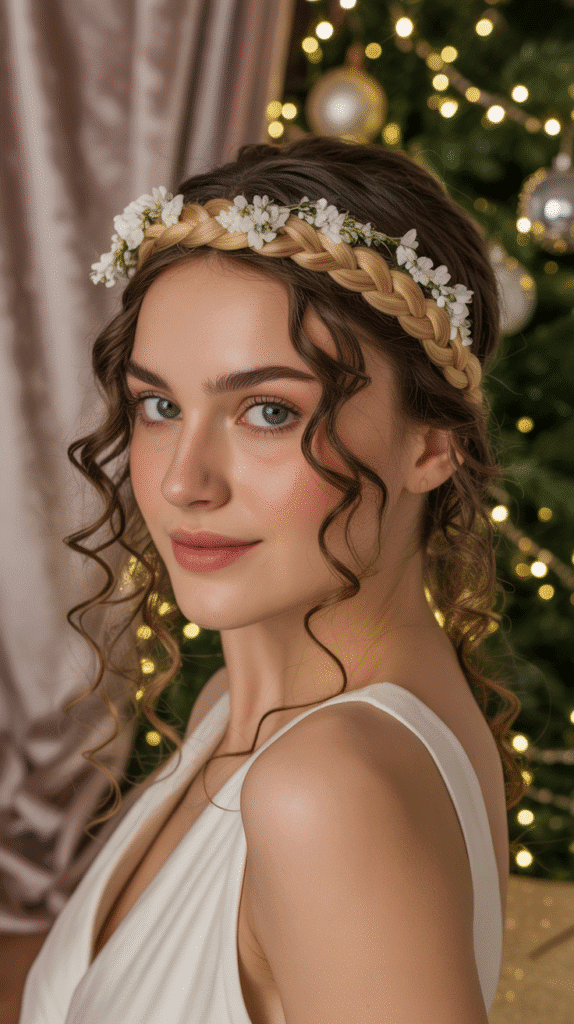
19. Twisted Crown Braid with White Flowers
Twisted sections of hair create a rope-like crown around your head with a softer, more ethereal quality than traditional braiding, and white flowers like baby’s breath or small roses add winter-wedding elegance perfect for Christmas celebrations.
- Section off a band of hair around your head from ear to ear, about two inches wide, leaving the rest of your hair down.
- Take a small section at one temple and divide it into two strands instead of three.
- Twist the two strands around each other while incorporating small sections of hair from the crown area with each twist.
- This creates a rope-braid effect that’s softer and less structured than a traditional braid.
- Continue twisting around your head following your hairline until you reach the opposite side.
- Secure the twisted crown with bobby pins, tucking the end underneath to hide it.
- Insert small white flowers throughout the twisted crown for an angelic, winter-bride appearance.
- The combination of twisted texture and delicate flowers creates a romantic, sophisticated Christmas style perfect for special occasions.
20. Bubble Braid Ponytail with Red and Green Elastics
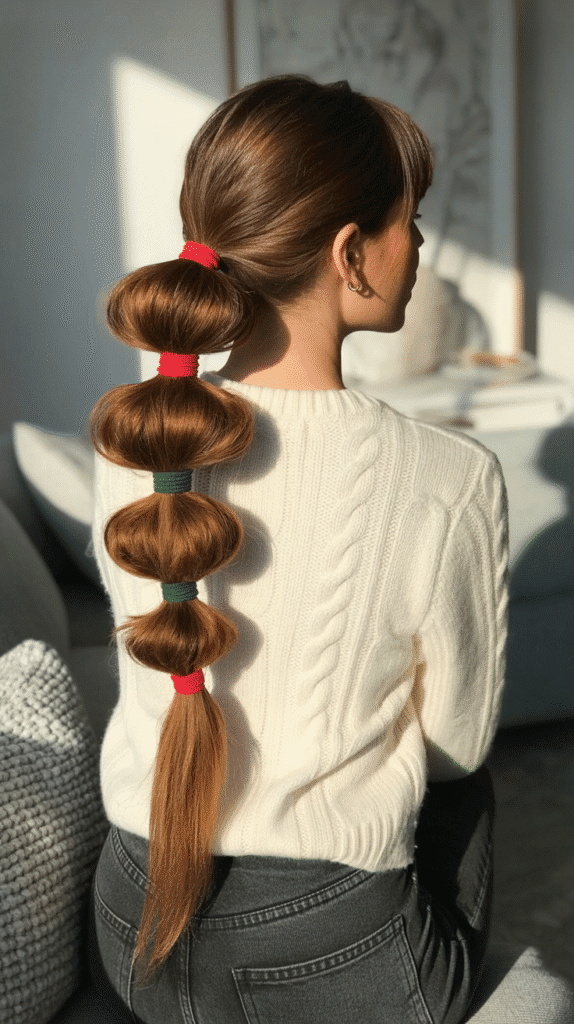
The trendy bubble braid creates playful, voluminous sections along a ponytail that resemble a string of ornaments, and using alternating red and green hair elastics makes this modern style unmistakably Christmas-themed and fun.
- Gather your hair into a ponytail at whatever height you prefer—high, mid, or low all work beautifully.
- Secure the ponytail base with a strong elastic band, then smooth the hair at the crown if desired.
- About two to three inches below the first elastic, add another elastic in red, securing it around the ponytail.
- Gently pull apart the hair between the two elastics to create volume and the distinctive “bubble” effect.
- Add another elastic two to three inches below in green, then create another bubble by pulling the hair apart.
- Continue alternating red and green elastics down the length of the ponytail, creating as many bubbles as your hair length allows.
- Each bubble should be roughly the same size for a uniform, polished appearance.
- This Instagram-worthy style is incredibly easy to create, requires no actual braiding skills, and looks festively fashionable for casual Christmas gatherings.
21. Lace Braid with Holly Leaf Pins
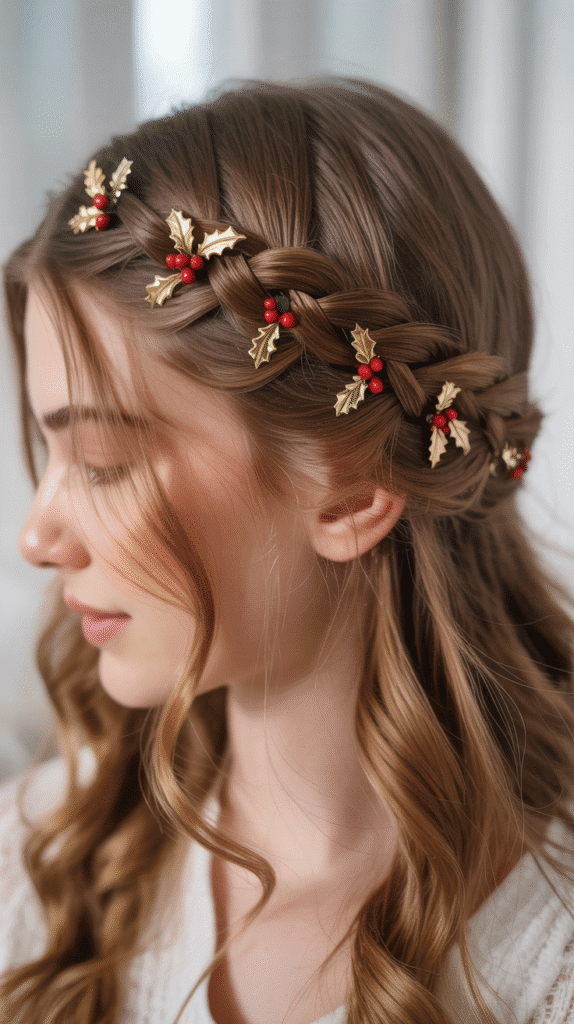
The lace braid, a variation where hair is only added from one side rather than both, creates a delicate, intricate appearance along your hairline, and holly leaf pins provide the quintessential Christmas botanical decoration.
- Start at one temple with a small section of hair divided into three strands for your braid.
- Begin braiding, but only add new hair from the top (crown side) with each stitch, leaving the bottom section alone.
- This one-sided feeding creates the distinctive “lace” appearance that’s more delicate than a full French braid.
- Continue the lace braid along your hairline from one side to the other, following the natural curve of your head.
- When you reach the opposite temple, secure the braid with bobby pins or continue it into a regular braid.
- The remaining hair can be left down, curled, or styled in an updo depending on your preference.
- Place small holly leaf pins with red berries along the lace braid for classic Christmas botanical decoration.
- This elegant style works beautifully for both formal and casual holiday occasions and flatters virtually every face shape.
22. Infinity Braid Ponytail with Silver Tinsel

The infinity braid, also called the figure-eight braid, creates a stunning looped pattern that truly stands out, and when crafted into a ponytail and wrapped with silver tinsel, it becomes a statement Christmas hairstyle.
- Pull your hair into a ponytail at your desired height and secure it firmly with an elastic band.
- Divide the ponytail into two equal sections that you’ll work with throughout.
- Take a small piece from the outer edge of the left section, bring it over its own section, then under the right section.
- Then take a small piece from the outer edge of the right section, bring it over its own section, then under the left section.
- This creates the distinctive figure-eight or infinity pattern that gives the braid its name.
- Continue this pattern down the length of the ponytail, keeping consistent tension for uniform loops.
- Secure the end with an elastic when complete, then gently loosen each loop for more dimension.
- Wrap silver tinsel loosely around the infinity braid or weave it through the loops for sparkling, celebratory shine.
23. Braided Bun with Poinsettia Clip
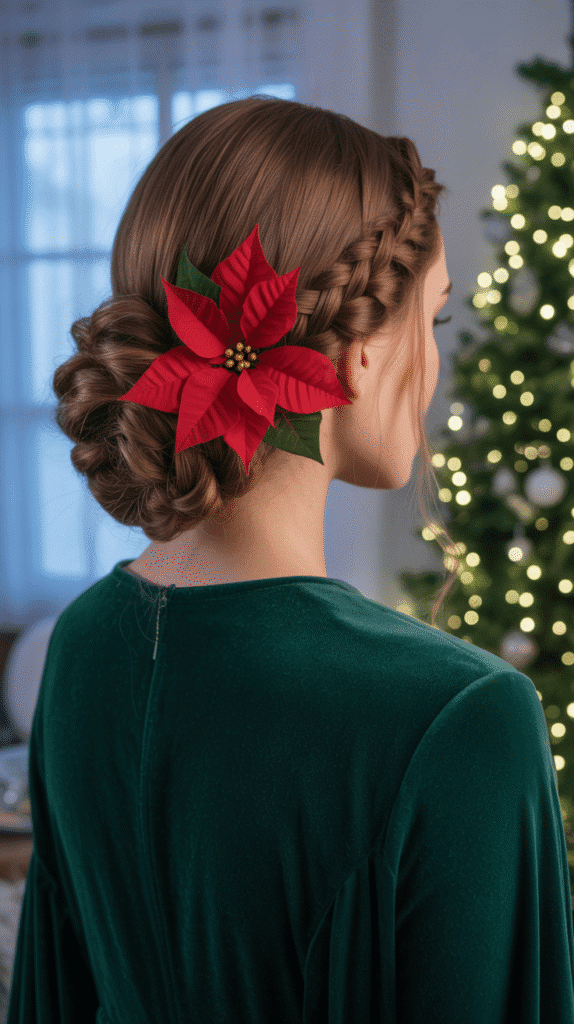
Multiple braids converging into a low bun create texture and interest in a sophisticated updo, and a statement poinsettia clip provides the perfect Christmas finishing touch for this elegant, occasion-ready style.
- Divide your hair into three or four sections from front to back depending on your hair thickness.
- Create a braid in each section, working from the hairline down toward the nape of your neck.
- These can be standard braids, Dutch braids, or a combination depending on your skill level and preference.
- When all sections are braided, gather the braids together at the nape of your neck.
- Twist them together or wrap them around each other to form a textured bun.
- Secure the bun thoroughly with bobby pins and hairpins, making sure it feels stable and comfortable.
- Attach a large poinsettia clip—either realistic silk flowers or decorative holiday clips—at the side or base of the bun.
- This sophisticated updo works beautifully for Christmas parties, holiday work events, or formal seasonal celebrations.
24. Pull-Through Braid with Ornament Dangles
The pull-through braid creates impressive dimension without requiring traditional braiding skills, using strategically placed elastics instead, and attaching miniature ornament dangles to some of the elastics adds playful Christmas movement.
- Gather your hair into a ponytail at whatever height you prefer and secure it with an elastic.
- About two inches below the base elastic, add another elastic around the ponytail.
- Split the hair between these two elastics in half vertically and pull the bottom section up and through the split.
- Clip the pulled-through section temporarily out of the way, then add another elastic two inches below.
- Release the clipped section so it falls over the new section you just created.
- Repeat this process of splitting, pulling through, and adding elastics down the entire length of the ponytail.
- Gently pull apart each section to create volume and the distinctive pull-through braid appearance.
- Attach small ornament dangles or charms to selected elastics throughout the braid for festive movement and jingle.
25. Rope Braid Half-Up with Mistletoe Sprig
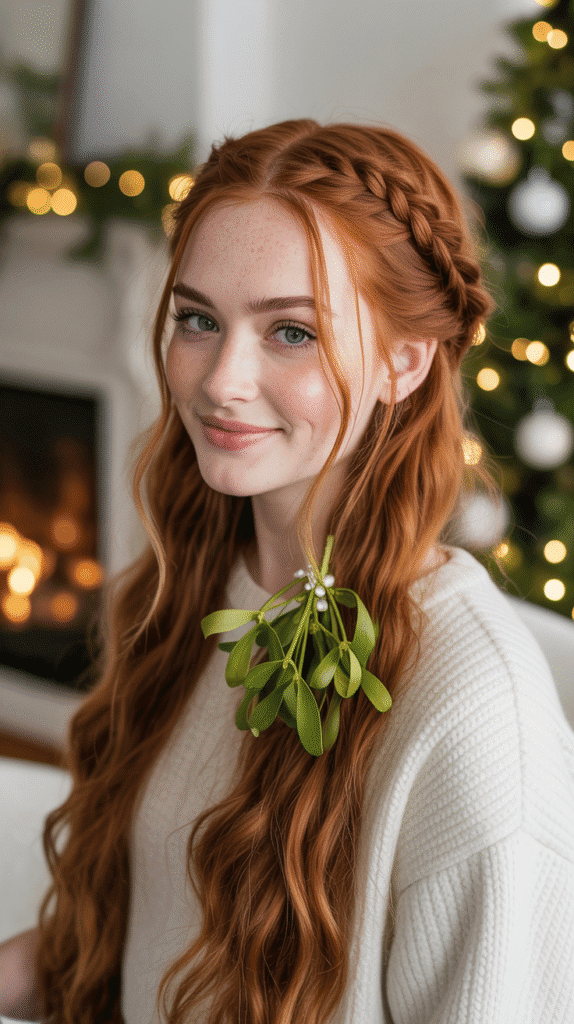
The rope braid offers a quick, elegant alternative to traditional braiding by simply twisting two sections around each other, and when styled in a half-up configuration with mistletoe tucked in, it becomes sweetly romantic for Christmas.
- Section off the top portion of your hair from temple to temple, leaving the bottom half down.
- Divide the top section into two equal parts at the center back of your head.
- Twist each section individually in the same direction (both clockwise or both counterclockwise).
- Then twist these two twisted sections around each other in the opposite direction to create the rope braid effect.
- This opposite-direction twisting prevents the rope from unraveling and creates beautiful dimension.
- Secure the rope braid at the center back with a clear elastic or decorative clip.
- Tuck a small sprig of mistletoe—real or artificial—into the joining point where the rope braid is secured.
- The remaining hair flows freely below, and can be curled or left natural depending on your preference and hair texture.
26. Accent Braids with Ribbon-Wrapped Base Ponytail
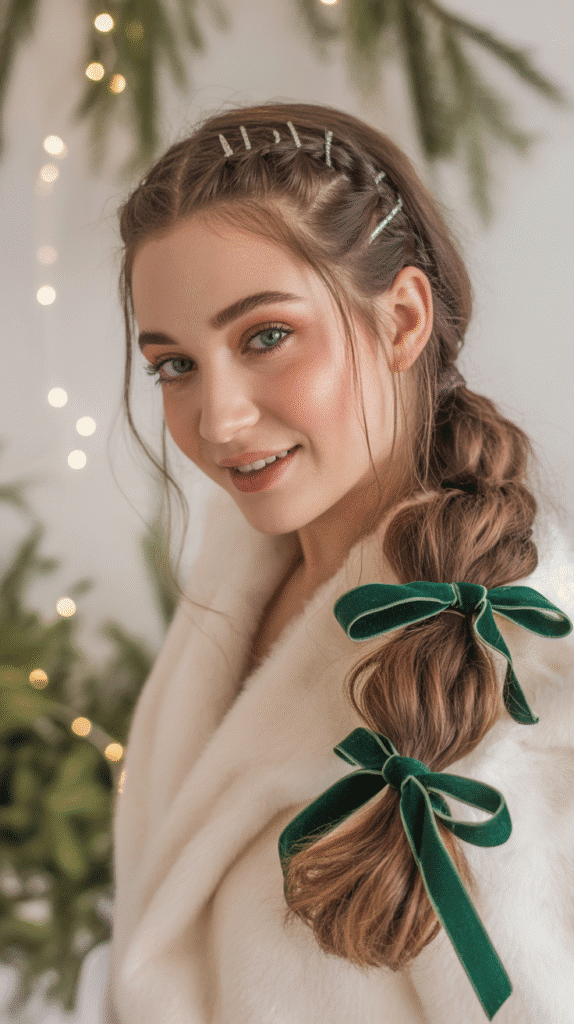
Multiple small accent braids scattered throughout loose hair that’s gathered into a ponytail create texture and visual interest, and wrapping the ponytail base with luxurious ribbon adds polished, gift-wrapped Christmas elegance.
- Leave most of your hair down and loose, but select 3-5 small sections randomly throughout.
- Create tiny three-strand braids with these selected sections, each about a quarter-inch wide.
- These accent braids can be placed symmetrically or asymmetrically depending on your desired look.
- Braid each small section all the way to the ends and secure with clear mini elastics.
- Gather all your hair, including the accent braids, into a ponytail at your preferred height.
- Secure the ponytail with a strong elastic band, ensuring all the small braids are incorporated.
- Take a wide velvet or satin ribbon in a Christmas color and wrap it around the base of the ponytail.
- Tie the ribbon in a bow or knot, allowing the ends to trail down with the ponytail for a gift-wrapped appearance.
- This style beautifully combines loose, flowing hair with braided details and festive ribbon decoration.
27. Stacked Braids with Fairy Light Strands
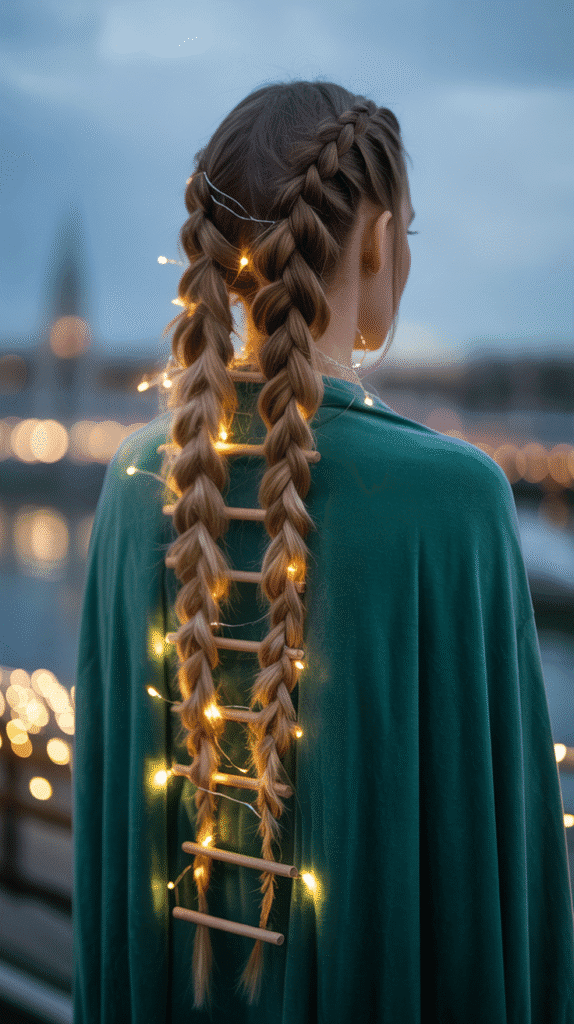
Multiple braids stacked horizontally across the back of the head create a ladder-like effect with impressive visual impact, and threading delicate fairy light strands between the braids transforms your hair into an illuminated work of Christmas art.
- Part your hair horizontally across the back from ear to ear, creating an upper and lower section.
- Secure the upper section temporarily out of the way with a clip.
- Take a thin horizontal section from the lower portion and create a tight three-strand braid from one side to the other.
- Pin both ends of this braid securely at the sides of your head, creating the first “rung” of your ladder.
- Release a bit more hair from the upper section and create another horizontal braid above the first.
- Continue this pattern, creating 3-5 stacked horizontal braids depending on your hair length and density.
- The remaining hair at the top can be left down, styled, or pinned up depending on preference.
- Very carefully weave battery-powered fairy light strands horizontally between the braids, securing the battery pack discreetly.
- This show-stopping style requires patience but creates an unforgettable Christmas statement perfect for parties and special celebrations.
Styling Tips and Hair Care for Christmas Braided Hairstyles
Before diving into your festive braided creations, understanding some fundamental techniques and care practices will help ensure your Christmas hairstyles look their best and your hair remains healthy throughout the holiday season.
Essential Tools and Products
- Invest in a quality detangling brush or wide-tooth comb to prevent breakage when preparing your hair for braiding.
- Keep clear elastic bands in various sizes on hand, as they’re invisible in finished styles and work with any hair color.
- Bobby pins and hairpins in colors matching your hair are essential for securing braids and decorative elements invisibly.
- A light-hold hairspray helps keep styles in place without creating stiffness or crunchiness that detracts from the natural beauty of braids.
- Texturizing spray or dry shampoo can add grip to very smooth or freshly washed hair, making braiding easier and helping styles hold longer.
Braiding Techniques for Success
- Always start with detangled hair to prevent painful snags and create smooth, polished braids without bumps or irregular sections.
- Slightly damp hair (not wet) braids more easily than completely dry hair and holds styles longer, though some prefer the texture of day-old hair.
- Maintain consistent tension throughout your braiding to create uniform, professional-looking results rather than tight-loose variations.
- When incorporating accessories, insert them as you braid rather than trying to add them afterward for more secure placement.
- Practice new braiding techniques before the actual event to build muscle memory and confidence in your abilities.
Hair Health During Holiday Styling
- Avoid braiding too tightly, as excessive tension can cause headaches and damage to hair follicles, leading to breakage or traction alopecia over time.
- Give your hair breaks between elaborate styles, allowing days of loose, unstressed hair to prevent damage from constant manipulation.
- Deep condition your hair weekly during the holiday season to counteract any dryness from heating tools, weather, or styling products.
- Remove all bobby pins, elastics, and decorative elements before sleeping to prevent tangles, breakage, and uncomfortable pressure points.
- Be gentle when taking down braided styles, using detangling spray and working from the ends upward to minimize hair loss and damage.
Accessorizing Your Christmas Braids
The right accessories can transform a simple braid into a stunning Christmas statement, and knowing how to select and place decorations makes all the difference in creating cohesive, festive hairstyles.
Choosing Christmas Hair Accessories
- Consider your outfit colors when selecting hair decorations, either matching for a coordinated look or contrasting for bold statements.
- Mix metallics like gold, silver, rose gold, and copper with traditional Christmas colors for sophisticated, multi-dimensional appeal.
- Natural elements like pine sprigs, berries, and small flowers work beautifully for organic, rustic Christmas aesthetics.
- Vintage-inspired accessories like velvet ribbons, pearl pins, and cameo clips create timeless elegance perfect for formal holiday gatherings.
- Playful elements like bells, miniature ornaments, and candy cane patterns work wonderfully for casual celebrations and children’s styles.
Strategic Accessory Placement
- Place larger statement pieces like poinsettia clips or substantial bows at focal points where you want to draw the eye.
- Distribute smaller decorations like pins and mini ornaments evenly throughout braids for balanced, harmonious appearance.
- Consider the viewing angle—accessories on the side of your head work well for photos, while back placement shines when your hair is up.
- Secure all decorations properly with pins or clips to prevent them from falling out during active celebrations or dancing.
- Less is often more—select one or two accessory types per style rather than overwhelming the braid with competing elements.
DIY Festive Hair Accessories
- Create custom ribbon ties by cutting velvet or satin ribbon and sealing the ends with clear nail polish to prevent fraying.
- Make your own ornament hair clips by attaching miniature Christmas ornaments to bobby pins or barrettes with hot glue.
- Preserve small sprigs of evergreen or eucalyptus by wrapping the stems in floral tape before inserting them into braids.
- Fashion wire-wrapped bobby pins by twisting craft wire around plain pins, leaving decorative spirals that catch the light.
- Assemble custom hair combs by gluing decorative elements like pearls, flowers, or vintage buttons onto plain comb bases.
Adapting Braided Styles for Different Hair Types
Christmas braided hairstyles can be achieved on virtually any hair type with the right modifications and techniques, ensuring everyone can participate in festive holiday styling regardless of their natural texture.
Fine or Thin Hair
- Create texture with volumizing mousse or dry shampoo before braiding to give fine hair more grip and body.
- Gently pull apart braided sections after securing them to create the illusion of fuller, thicker braids.
- Consider “pancaking” your braids by pulling the edges of each section to widen them and create more visual volume.
- Dutch braids (where you braid under instead of over) sit on top of the head and create more dramatic, fuller-looking results.
- Avoid making braids too tight, as this can emphasize the thinness of fine hair rather than creating the appearance of volume.
Thick or Coarse Hair
- Section hair into smaller, more manageable portions when creating complex styles with multiple braids.
- Use strong elastic bands and multiple bobby pins to secure thick hair properly, as standard accessories may not hold adequately.
- Consider braiding slightly damp hair with a leave-in conditioner to make thick, coarse hair more manageable and easier to manipulate.
- Embrace the natural volume of thick hair by creating looser, more relaxed braids that showcase fullness rather than fighting it.
- Allow extra time for braiding thick hair, as rushing can lead to uneven tension and less polished results.
Curly or Textured Hair
- Work with your natural texture rather than fighting it—braids on curly hair have beautiful dimension and character.
- Use leave-in conditioner or curl cream to define curls and reduce frizz before incorporating them into braided styles.
- Finger-detangle curly hair gently rather than using brushes that can disrupt curl patterns and create frizz.
- Protective braiding styles work wonderfully for textured hair and can help maintain hair health during the harsh winter months.
- Consider wet-setting braids by braiding damp hair and allowing it to dry completely for longer-lasting hold and definition.
Short to Medium Length Hair
- Focus on styles like braided headbands, crown braids, or accent braids that don’t require extensive length.
- Use bobby pins strategically to secure shorter ends that don’t reach all the way through longer braids.
- Consider half-up styles where only the top portion is braided, making the most of available length.
- Extensions or clip-in pieces can temporarily add length for special Christmas occasions if desired.
- Embrace shorter braids and use accessories like ribbons tied in bows at the ends to create the illusion of more length.
Making Braided Hairstyles Last Through Christmas Events
Holiday celebrations often last for hours, so ensuring your braided hairstyle remains intact and beautiful from start to finish requires strategic preparation and maintenance techniques.
Pre-Event Preparation
- Wash your hair the day before rather than the day of, as slightly less-than-fresh hair has better texture and grip for braiding.
- Apply a heat protectant before using any hot tools like curling irons on sections you plan to leave loose.
- Start with completely dry hair unless specifically creating a wet-set style, as damp braids can loosen and fall apart as they dry.
- Have all your tools, accessories, and products gathered and ready before beginning to avoid interruptions mid-styling.
- Allow adequate time for creation—rushing leads to mistakes and styles that don’t hold as well throughout the event.
Setting Your Style
- Use a flexible-hold hairspray rather than strong-hold products that create stiffness and make hair look unnatural.
- Spray hairspray on your hands and smooth over the style rather than directly spraying, which can create visible buildup.
- Allow braids to “set” for 15-30 minutes before heading out, giving elastics and pins time to grip and the hair time to conform.
- For extra security, sleep in simpler braided styles the night before and add decorative elements the next day for styles that truly last.
- Consider using a light hair oil on ends to prevent frizz and flyaways without weighing down the overall style.
During-Event Maintenance
- Carry a small emergency kit with extra bobby pins, a travel hairspray, and a small comb for quick touch-ups.
- Avoid constantly touching or adjusting your hair, as excessive handling loosens braids and creates frizz.
- If decorative elements start to slip, excuse yourself to the restroom for a quick readjustment rather than fidgeting in public.
- Be mindful of activities like dancing or hugging that might disrupt your style, and make gentle adjustments as needed.
- Take photos early in the event when your hair looks its absolute best, before any natural loosening occurs.
After-Event Care
- Remove all bobby pins, elastics, and decorative elements carefully before bed to prevent damage and tangles.
- Use a detangling spray and work from ends to roots when taking down braids, being patient with any knots.
- Don’t brush out braids immediately—use your fingers first to gently separate the hair before using any tools.
- Apply a nourishing hair mask or deep conditioner after removing elaborate styles to restore moisture and repair any stress.
- Give your hair at least one day of rest in loose, simple styles between elaborate braided creations.
Conclusion
The magic of Christmas extends far beyond decorations and gifts, finding beautiful expression in the creative hairstyles we choose to celebrate the season.
Throughout this article titled “27 Easy Christmas Hairstyles with Braids for a Creative Holiday Look,” we’ve explored an incredible variety of braided styles ranging from simple and casual to elaborate and formal, each offering unique opportunities to showcase your personal style while embracing festive holiday spirit.
Whether you’ve chosen the classic elegance of a French braid updo adorned with pearls, the playful charm of candy cane ribbon woven through boxer braids, or the show-stopping drama of stacked braids illuminated with fairy lights, each style represents a special way to make yourself feel beautiful and celebratory during the most wonderful time of the year.
The versatility of braiding techniques means that regardless of your hair type, length, or skill level, you’ve discovered options that work perfectly for your individual needs and the specific Christmas occasions you’ll be attending.
Remember that the most important element of any hairstyle isn’t perfection but rather the confidence and joy you feel while wearing it, so embrace the creative process and don’t be afraid to experiment with different techniques, accessories, and personal touches that make each style uniquely yours.
These braided hairstyles serve as more than just aesthetic choices—they’re expressions of celebration, creativity, and the special attention we give to making holiday moments memorable.
As you gather with loved ones for Christmas dinners, attend festive parties, or simply enjoy quiet winter evenings, let your beautifully braided hair reflect the warmth, wonder, and magic that define this special season, creating lasting memories and perhaps inspiring others to explore their own creative holiday styling possibilities.Retry