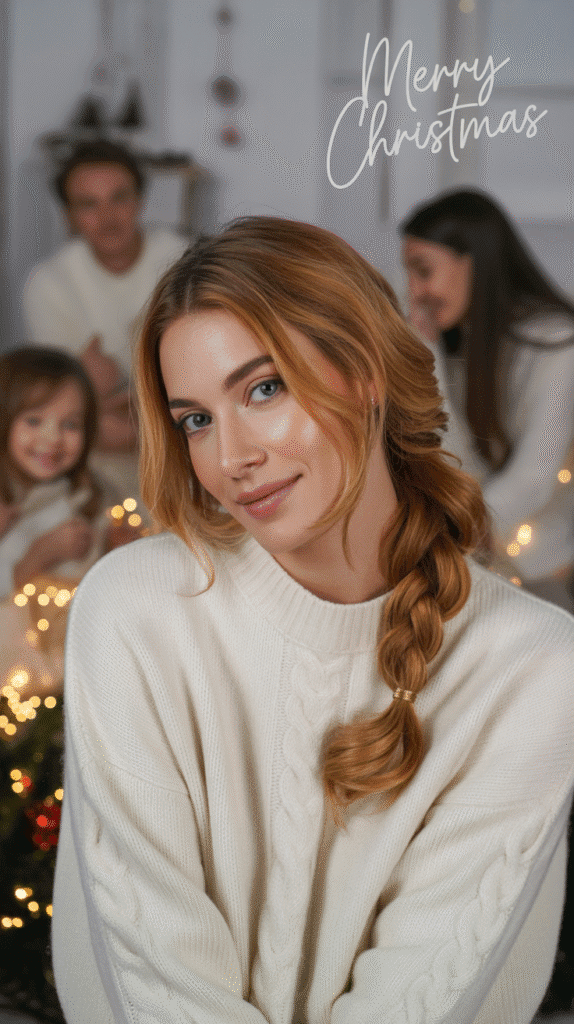
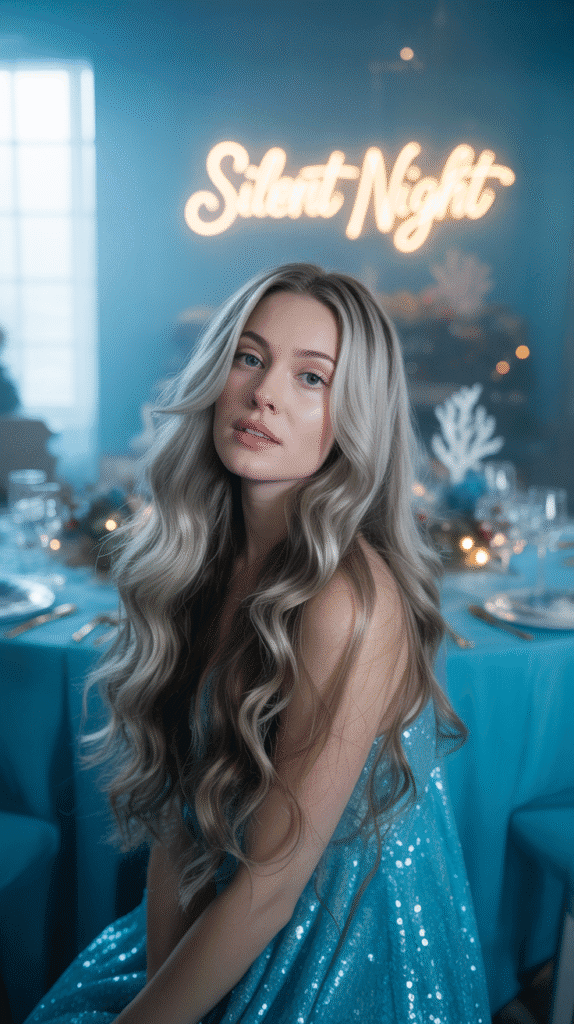
The holiday season brings sparkle, joy, and countless opportunities to showcase your most glamorous self, and nothing completes a stunning Christmas party look quite like a beautifully styled mane.
If you’re blessed with long locks and wondering how to transform them into show-stopping elegance for your upcoming festive celebrations, you’ve come to the perfect place.
This comprehensive guide to 30 Elegant Christmas Party Hairstyles for Long Hair You’ll Love will walk you through everything from classic updos to modern braided creations, romantic waves to sophisticated twists.
Whether you’re attending a formal corporate gathering, an intimate family dinner, or a lively evening celebration with friends, these hairstyles offer versatility, elegance, and that extra touch of holiday magic.
Each style has been carefully selected to complement various face shapes, dress styles, and skill levels, ensuring you’ll find the perfect look that makes you feel confident and radiant throughout the night.
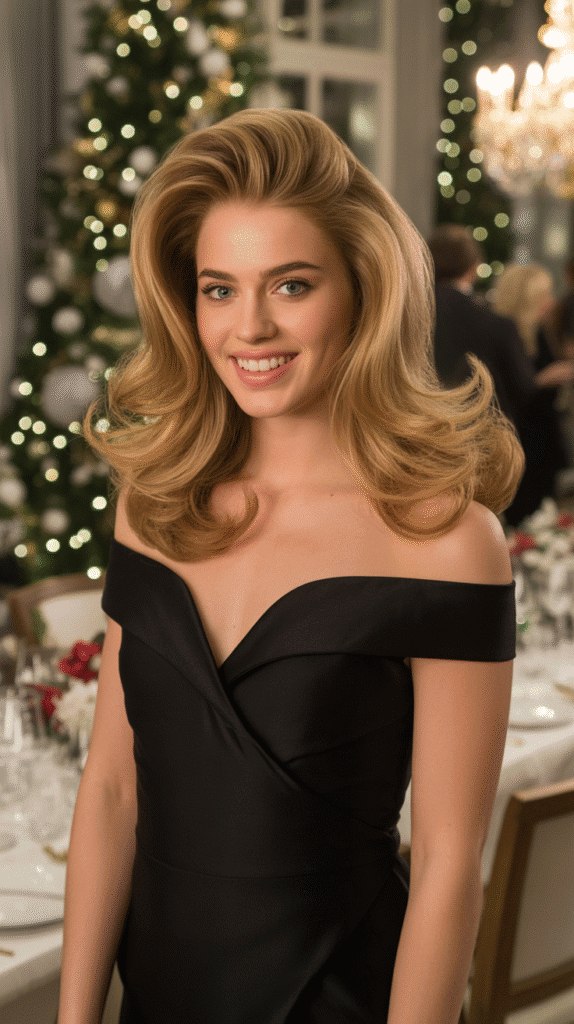
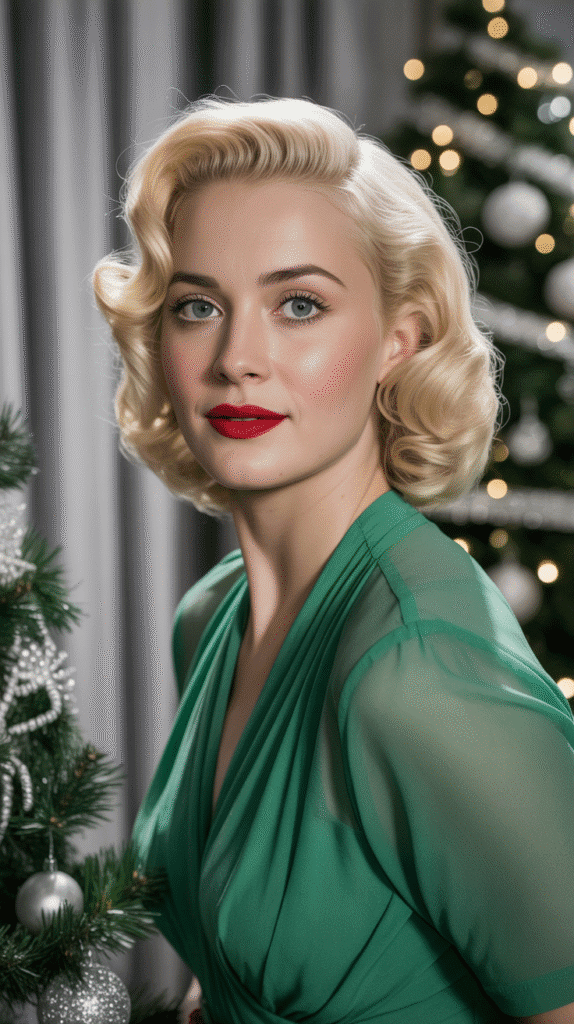
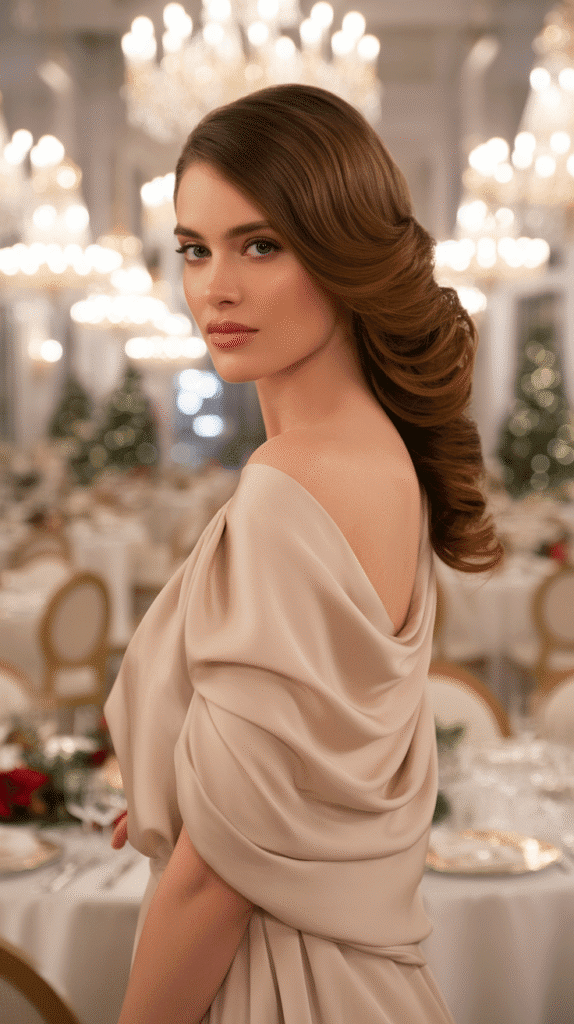
1. Classic Hollywood Waves

Hollywood waves remain timeless for Christmas parties, offering old-world glamour with effortless sophistication.
This vintage-inspired style channels the elegance of 1940s movie stars while perfectly complementing modern holiday fashion.
The structured S-shaped waves create dimension and movement that catches light beautifully under party lighting.
- Start with completely dry, clean hair as damp hair won’t hold the wave pattern effectively.
- Apply a heat protectant spray generously from roots to ends to prevent damage from hot styling tools.
- Section your hair into 2-inch portions using clips to make the styling process more manageable.
- Use a 1.5-inch curling iron held horizontally to create uniform waves throughout each section.
- Wrap each section around the barrel away from your face, holding for 8-10 seconds before releasing.
- Allow curls to cool completely in their coiled shape by pinning them against your head with clips.
- Once cooled, remove clips and gently brush through with a paddle brush to create smooth waves.
- Apply a shine serum to enhance the glossy finish characteristic of authentic Hollywood waves.
- Set everything in place with a flexible-hold hairspray that maintains movement while preventing frizz.
2. Twisted Low Bun with Ornamental Pins
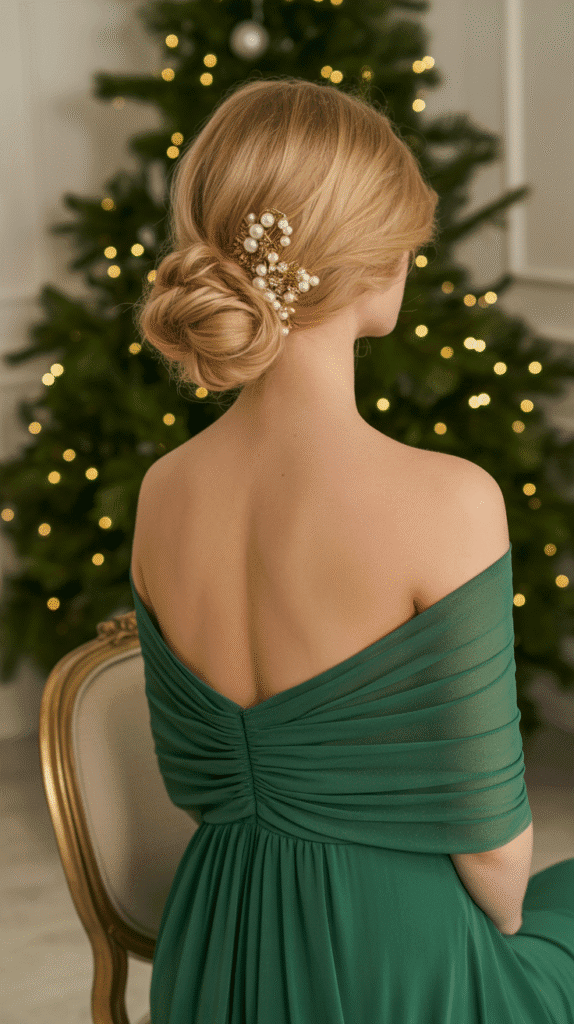
The twisted low bun offers refined elegance while keeping hair secure throughout evening festivities.
This sophisticated updo works exceptionally well with formal attire and allows statement earrings to shine.
Adding ornamental pins transforms a simple bun into a festive masterpiece.
- Brush hair thoroughly to remove all tangles and create a smooth foundation for twisting.
- Apply a smoothing cream to tame flyaways and add polish to the finished style.
- Gather hair into a low ponytail at the nape of your neck using a clear elastic band.
- Divide the ponytail into two equal sections for easier manipulation and twisting.
- Twist each section tightly in the same direction until the hair begins to coil naturally.
- Wrap both twisted sections around the base of the ponytail in opposite directions to create volume.
- Secure the bun with bobby pins inserted in an X-pattern for maximum hold throughout the evening.
- Insert decorative pins with pearls, crystals, or gold accents strategically around the bun for holiday sparkle.
- Finish with strong-hold hairspray focusing on the hair around your face and any loose ends.
3. Half-Up Twisted Crown
This romantic half-up style combines the best of both worlds by showcasing your hair’s length while keeping face-framing pieces elegantly secured.
The twisted crown creates a soft, ethereal look perfect for less formal Christmas gatherings.
This versatile style works beautifully with curled or straight hair.
- Start by curling the bottom half of your hair with a large-barrel curling iron for added texture and body.
- Take a 2-inch section of hair from just above your right ear moving toward the back.
- Twist this section loosely while moving horizontally toward the center back of your head.
- Secure the twisted section temporarily with a small claw clip to keep it in place.
- Repeat the same twisting process on the left side, creating a symmetrical crown effect.
- Join both twisted sections at the back center of your head, crossing them over each other.
- Secure the meeting point with bobby pins hidden underneath the twisted sections for invisible hold.
- Pull gently on the edges of the twists to create a fuller, more relaxed romantic appearance.
- Spray lightly with flexible-hold hairspray to maintain the style without creating stiffness.
4. Sleek High Ponytail with Volume
A sleek high ponytail delivers modern sophistication with dramatic height that elongates the silhouette.
This confident style works particularly well for contemporary party settings and pairs beautifully with statement necklaces.
The added volume at the crown prevents the style from appearing too severe.
- Begin with second-day hair or add dry shampoo to roots for better grip and texture.
- Tease the hair at your crown using a fine-tooth comb in short backward strokes to build volume.
- Smooth the top layer of teased hair gently with a brush while maintaining the volume underneath.
- Gather all hair into a high ponytail at the crown of your head using a strong elastic band.
- Take a small section from the underside of the ponytail and wrap it around the elastic to conceal it.
- Secure the wrapped section with a bobby pin tucked discreetly underneath the ponytail base.
- Apply a small amount of pomade to your hands and smooth down any flyaways along the hairline.
- Use a paddle brush on the length of the ponytail to create a sleek, polished finish.
- For extra staying power, spray the roots and ponytail base with strong-hold hairspray from 10 inches away.
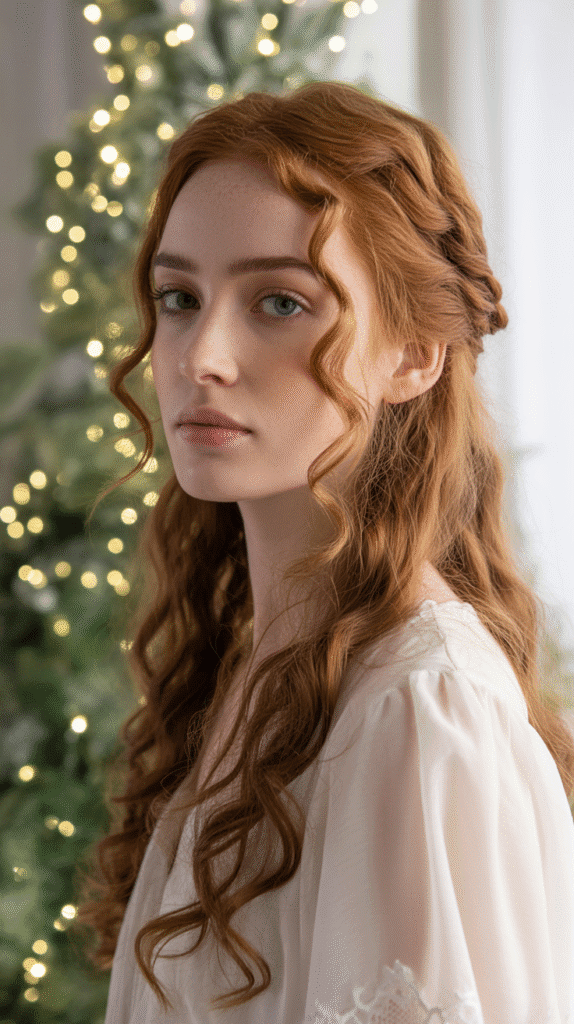
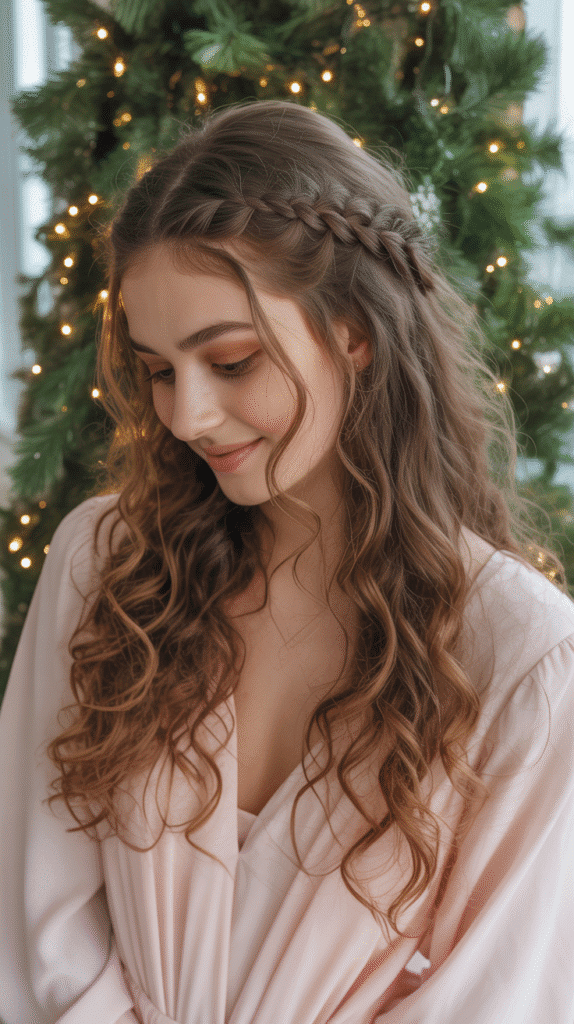
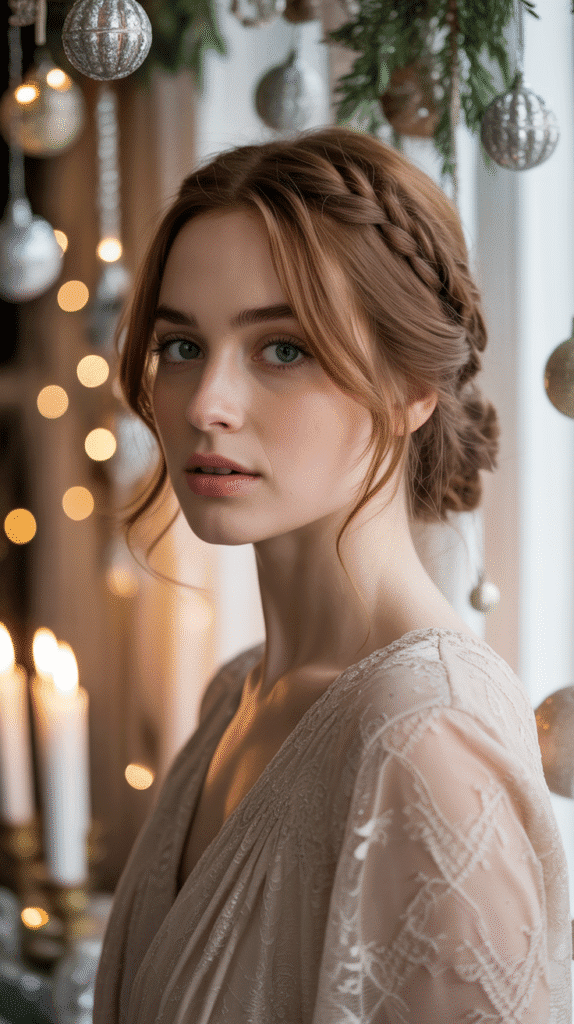
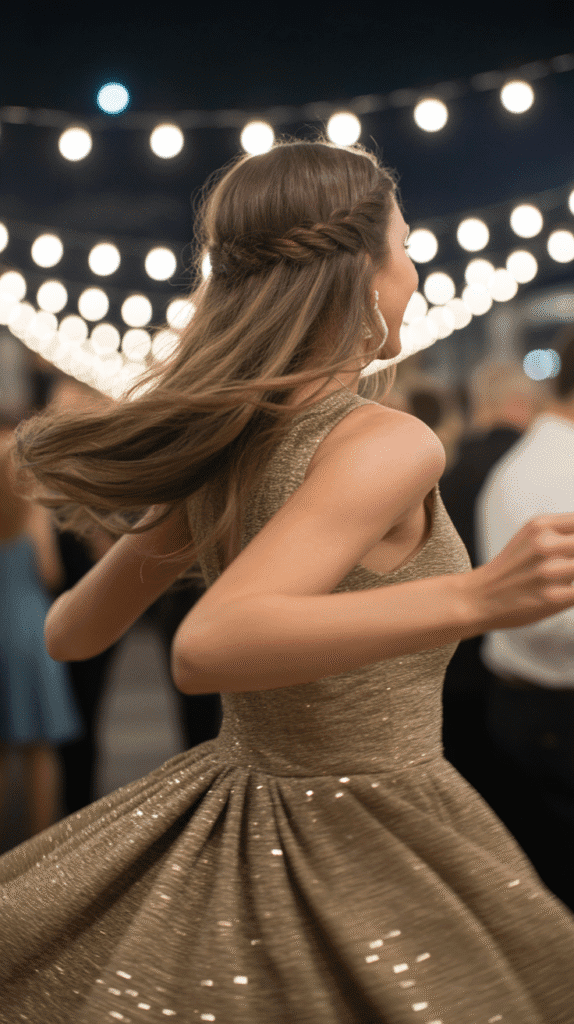
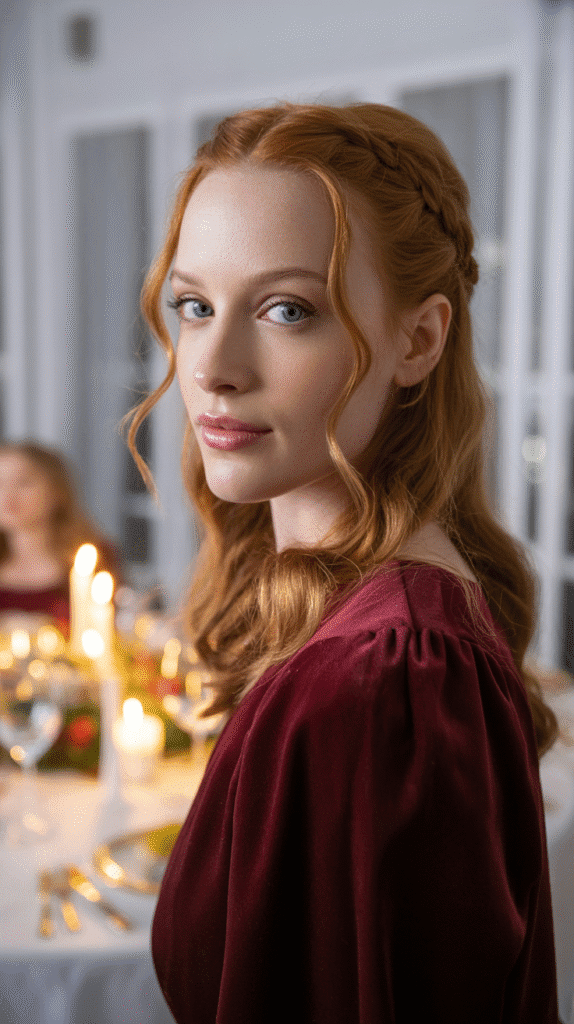
5. Braided Crown with Loose Curls

The braided crown creates a fairy-tale aesthetic perfect for enchanting holiday celebrations.
This intricate-looking style combines bohemian charm with formal elegance through the contrast between structured braiding and flowing curls.
Despite its complex appearance, this hairstyle becomes manageable with practice.
- Curl all of your hair with a 1-inch curling iron, working in small sections for defined spirals.
- Create a deep side part on your preferred side to establish the starting point for your braid.
- Begin a Dutch braid (reverse French braid) starting at the part line near your forehead.
- Continue the Dutch braid along your hairline like a headband, adding small sections as you progress.
- Braid all the way around to the opposite ear, incorporating hair from the front sections only.
- Transition to a regular three-strand braid once you’ve passed the opposite ear and run out of hair to add.
- Bring the braid across the back of your head and secure it with bobby pins tucked under the opposite side.
- Pull gently on the braid edges to create a fuller, more romantic braided crown effect.
- Leave the remaining curled hair flowing freely for a beautiful contrast with the structured crown.
6. Textured Fishtail Braid
The fishtail braid offers intricate beauty with a relaxed, approachable vibe suitable for various Christmas party atmospheres.
This textured version feels modern and effortless while still delivering impressive visual impact.
The pulled-apart sections create dimension that photographs exceptionally well.
- Apply texturizing spray throughout your hair to create grip and make braiding easier to manage.
- Brush hair back into a low ponytail position but don’t secure it with an elastic yet.
- Divide all hair into two equal sections held in each hand at the nape.
- Take a thin strand from the outer edge of the right section and cross it to the left section.
- Repeat by taking a thin strand from the outer edge of the left section and crossing it right.
- Continue this alternating pattern all the way down the length of your hair until reaching the ends.
- Secure the bottom of the braid with a clear elastic band that won’t distract from the braid’s texture.
- Gently pull apart the sides of the braid sections working from bottom to top for fullness.
- Spray with light-hold hairspray to maintain the textured appearance while allowing natural movement.
7. Voluminous Blowout with Flipped Ends
A glamorous blowout with flipped ends channels retro sophistication while feeling fresh and contemporary.
This style works wonderfully for those who prefer wearing hair down while still creating a polished, intentional look.
The flipped ends add playful movement that bounces beautifully when you walk.
- Wash hair with volumizing shampoo and conditioner, focusing conditioner only on the ends to prevent roots from becoming flat.
- Apply a root-lifting mousse to damp hair, concentrating on the crown area for maximum lift.
- Rough-dry hair until about 70% dry using your fingers to lift roots away from the scalp.
- Section hair into four parts: top, sides, and back for systematic blow-drying that ensures thorough styling.
- Use a large round brush to blow-dry each section, rolling the brush under at the ends while directing heat downward.
- Wrap each dried section around the round brush briefly, blasting it with cool air to set the shape.
- Once completely dry, use a large-barrel curling iron on the bottom 3-4 inches, rolling under for uniform flipped ends.
- Run your fingers through your hair to soften the curls into a more natural-looking wave pattern.
- Finish with volumizing hairspray sprayed underneath at the roots and lightly over the surface for all-night hold.
8. Side-Swept Waves with Embellished Clip
Side-swept waves create asymmetrical elegance that draws attention to your best features while maintaining effortless glamour.
The addition of an embellished hair clip elevates this simple style into true holiday territory.
This look works particularly well for one-shoulder or asymmetrical necklines.
- Create loose waves throughout all of your hair using a 1.25-inch curling wand held vertically.
- Allow waves to cool completely, then brush through gently with a paddle brush for soft, flowing movement.
- Create a deep side part on your preferred side, making it dramatic for maximum impact.
- Apply a shine serum to add gloss and tame any frizz created during the curling process.
- Sweep all hair to one side, bringing it over your shoulder on the heavier side of the part.
- Use a decorative clip embellished with rhinestones, pearls, or metallic details to secure hair behind your ear on the lighter side.
- Position the clip at an angle that feels secure while also displaying the embellishment prominently.
- Arrange the waves over your opposite shoulder, adjusting them for an effortlessly romantic appearance.
- Set with light-hold hairspray that won’t weigh down the movement of your waves throughout the evening.
9. Bubble Ponytail with Festive Ribbons
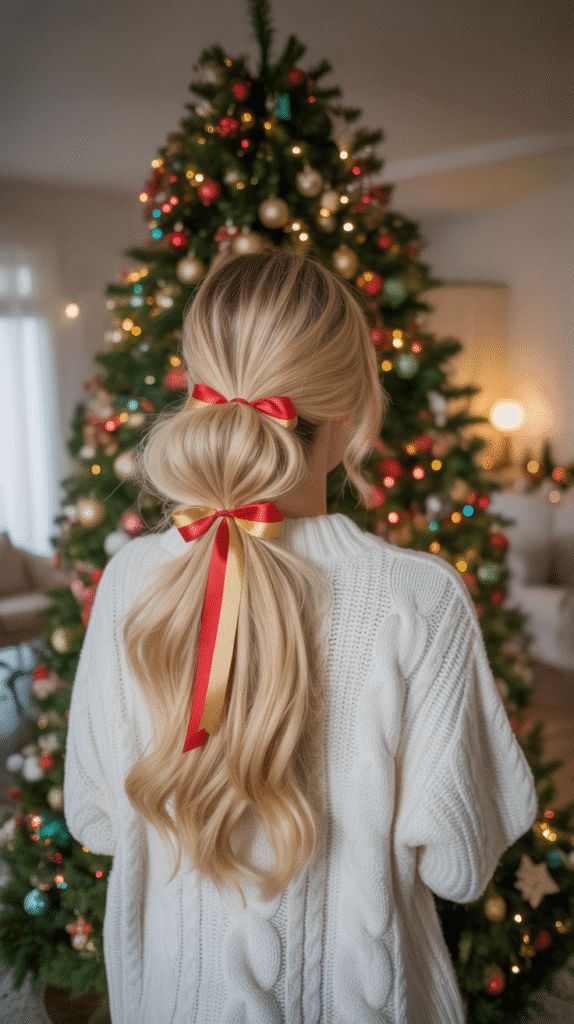
The bubble ponytail brings playful sophistication to holiday hairstyling with its dimensional, segmented appearance.
Adding festive ribbons makes this trendy style perfectly suited for Christmas celebrations.
This modern look works equally well for younger party-goers and fashion-forward guests of any age.
- Start with straightened or naturally straight hair for the cleanest bubble definition and shape.
- Gather hair into a high or mid-height ponytail depending on your preference and secure with elastic.
- Take a festive ribbon in Christmas colors and tie it around the elastic base to conceal it attractively.
- Measure down approximately 3-4 inches from the base and add another elastic around the ponytail.
- Gently pull the hair between the two elastics outward on all sides to create the first bubble effect.
- Continue adding elastics at regular intervals down the length of the ponytail, creating consistent spacing.
- Form bubbles between each elastic by carefully pulling the hair outward, maintaining uniform sizes throughout.
- Tie small ribbons around each elastic to add festive detail and hide the bands completely.
- Finish with light hairspray to prevent the bubbles from deflating while maintaining their dimensional shape.
10. Elegant French Twist
The French twist represents timeless sophistication with its vertical roll that exudes refined elegance.
This classic updo has graced formal events for decades while remaining perpetually stylish and appropriate.
The sleek silhouette perfectly showcases jewelry and elegant necklines.
- Begin with dry hair that has been straightened for the smoothest possible finish and easiest manipulation.
- Apply smoothing serum throughout to eliminate any texture that might disrupt the sleek appearance.
- Brush all hair straight back away from your face, gathering it at the center back of your head.
- Hold the gathered hair with your left hand while twisting the entire section clockwise with your right.
- Continue twisting until the hair begins to fold over itself, creating a vertical roll against your head.
- Tuck the ends of your hair into the twist, hiding them completely inside the rolled section.
- Secure the twist with bobby pins inserted vertically along the seam where the twist meets your head.
- Use additional pins inserted horizontally through the twist for extra security if you have thick or heavy hair.
- Smooth any flyaways with hairspray applied to a fine-tooth comb, then gently combed over the surface.
11. Waterfall Braid with Curled Ends
The waterfall braid creates a cascading effect that appears intricate while allowing your hair’s length to remain beautifully displayed.
This romantic style works wonderfully for semi-formal Christmas gatherings where you want to appear polished but approachable.
The combination of braiding and flowing curls offers textural interest.
- Curl the bottom two-thirds of your hair with a 1-inch curling iron for defined spirals that will frame your face.
- Create a side part and take a 2-inch section near the part at the front of your hairline.
- Divide this section into three strands and begin a French braid moving diagonally toward the back.
- After the first stitch of the braid, drop the bottom strand completely and let it fall like a waterfall.
- Pick up a new section of hair from the top to replace the dropped strand and continue braiding.
- Continue this pattern of dropping the bottom strand and adding a new top strand as you work around your head.
- Braid along your hairline toward the back, creating a beautiful cascading effect with the dropped strands.
- Secure the braid when you reach the area behind your ear with a small clear elastic band.
- Hide the elastic by wrapping a small section of hair around it and pinning it underneath discreetly.
12. Double Dutch Braids into Low Bun
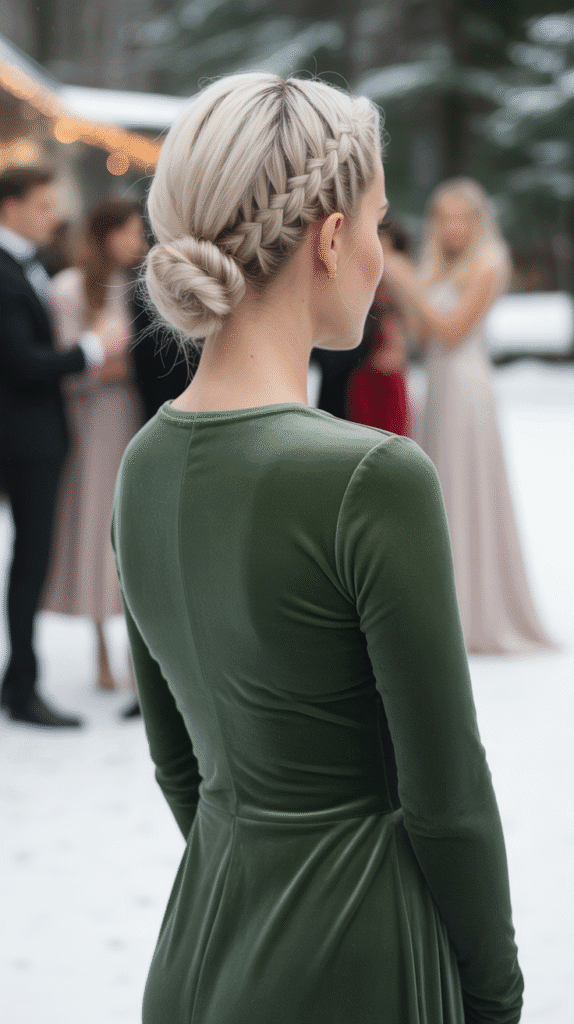
Double Dutch braids leading into a low bun combine athletic chic with formal elegance for a unique hybrid style.
This structured look keeps hair completely secure while offering visual interest from multiple angles.
The style works particularly well for active holiday parties where you’ll be dancing or moving around.
- Part your hair straight down the middle from forehead to nape, creating two perfectly equal sections.
- Clip one section away to keep it separate while you work on the first braid.
- Begin a Dutch braid (inverted French braid) at the hairline, braiding straight back toward the nape.
- Keep the braid close to the part line, maintaining tightness for a clean, athletic appearance throughout.
- Secure the bottom of the first braid temporarily with a small elastic once you reach the nape.
- Repeat the exact same Dutch braiding process on the opposite side, ensuring symmetry between both braids.
- Remove the temporary elastics and combine both braided sections together at the nape of your neck.
- Twist the combined sections together and wrap them around themselves to create a compact low bun.
- Secure the bun with multiple bobby pins inserted in different directions for maximum stability throughout your event.
13. Messy Side Braid with Face-Framing Pieces
A messy side braid delivers effortless bohemian charm perfect for casual Christmas gatherings with friends and family.
The deliberately undone appearance feels modern and relaxed while still demonstrating intentional styling.
Leaving face-framing pieces softens the look and flatters various face shapes.
- Start with second-day hair or spray with dry shampoo for the texture that makes this style work best.
- Pull out small sections of hair around your face on both sides before beginning the braid.
- Sweep all remaining hair over one shoulder, deciding which side feels most natural for you.
- Create a loose three-strand braid starting from just below ear level and working down the length.
- Deliberately keep the braid loose and relaxed, avoiding any tension that would make it too tidy.
- Secure the end with a fabric-covered elastic or ribbon that matches your outfit color scheme.
- Gently pull apart sections of the braid throughout its length to create intentional messiness and volume.
- Use your fingers to softly curl the face-framing pieces with a small curling wand for romantic wisps.
- Finish with light texturizing spray rather than hairspray to maintain the lived-in, effortless appearance.
14. Sleek Low Ponytail with Wrapped Base
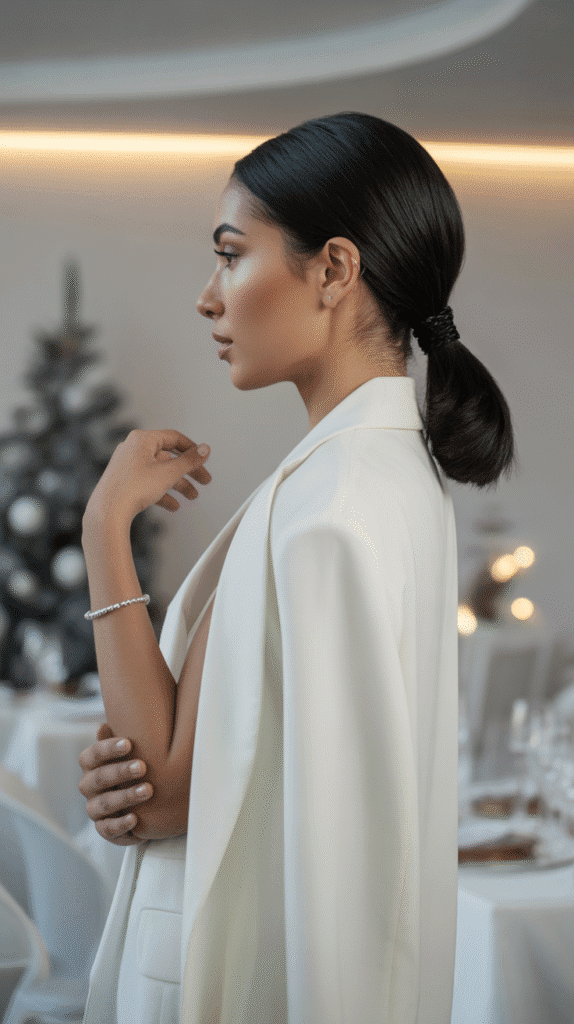
The sleek low ponytail offers understated elegance with modern minimalism that never goes out of style.
Wrapping a section of hair around the base adds a polished detail that elevates this simple style.
This sophisticated look pairs beautifully with statement earrings and clean-lined clothing.
- Straighten all of your hair using a flat iron for the ultra-smooth finish this style requires to look its best.
- Apply anti-humidity serum to prevent any frizz from developing during your evening out.
- Brush hair straight back into a low ponytail positioned at the nape of your neck using a boar bristle brush.
- Secure with a strong elastic band, making sure the ponytail sits exactly where you want it before proceeding.
- Take a 1-inch section from the underside of the ponytail and wrap it tightly around the elastic base.
- Continue wrapping until the elastic is completely concealed and the wrapped hair creates a polished cylinder effect.
- Secure the end of the wrapped section with a bobby pin inserted vertically into the base of the ponytail.
- Apply pomade or gel to a fine-tooth comb and smooth down the hair on your head for a flawless, sleek surface.
- Finish with strong-hold shine spray to maintain the mirror-like smoothness throughout the entire evening.
15. Romantic Loose Updo with Tendrils
A romantic loose updo creates soft, dreamy elegance with deliberately imperfect beauty that feels approachable and feminine.
The wispy tendrils framing your face add vintage-inspired romance.
This versatile style works for various formality levels depending on your clothing choices.
- Curl all of your hair with a large-barrel curling iron, creating loose, flowing waves throughout for texture.
- Pull out small sections at your temples and near your ears before creating the updo for face-framing tendrils.
- Gather hair loosely at the back of your head without brushing out the curls completely to maintain texture.
- Twist the gathered sections loosely and pin them against your head in a random, organic pattern rather than structured placement.
- Allow some curled sections to escape the pinning intentionally, creating a soft, undone appearance that looks effortless.
- Continue pinning sections in various directions until all hair is secured but the style still appears loose and romantic.
- Pull gently on pinned sections to create even more volume and a fuller, cloudlike appearance to the updo.
- Use your curling iron to enhance the face-framing tendrils, ensuring they curl softly toward your face.
- Set everything with flexible-hold hairspray that maintains movement rather than creating a stiff, frozen finish.
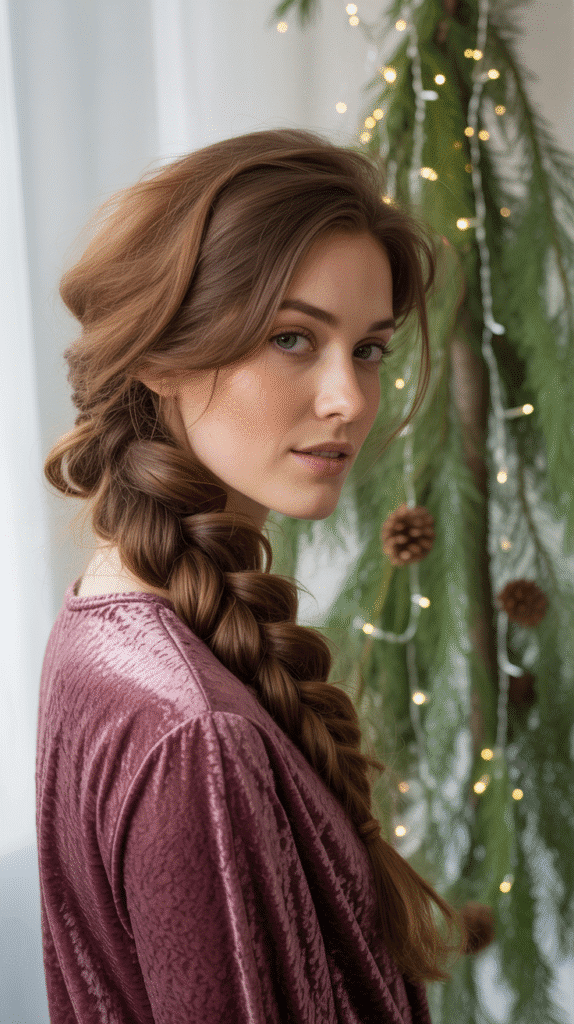
16. Braided Ponytail with Volume
A braided ponytail combines athletic energy with feminine detail through the textured braid that begins at the crown.
This style keeps hair secure and off your face while adding interest beyond a standard ponytail.
The added volume at the crown creates flattering height.
- Tease the hair at your crown thoroughly using a teasing brush to create substantial height and volume.
- Smooth the very top layer gently over the teased section to hide the backcombing while maintaining lift underneath.
- Take a section from your hairline straight back to where the teasing ends and begin a French braid.
- Continue the French braid from the crown down toward where you want your ponytail to sit at mid-head height.
- Once the French braid reaches your desired ponytail placement, secure everything together with a strong elastic band.
- The braid should flow seamlessly into the ponytail, creating a cohesive look from front to back.
- Gently pull on the edges of the braid sections to create additional width and a fuller appearance.
- Take a small piece from the ponytail and wrap it around the elastic to conceal it professionally.
- Spray the crown area and braid with strong-hold hairspray to maintain the volume throughout your celebration.
17. Twisted Ballerina Bun
The twisted ballerina bun brings ballet-inspired grace to Christmas party styling with its high placement and elegant structure.
This sophisticated updo works beautifully for formal events and showcases graceful neck lines.
The twisted texture adds interest to what could otherwise be a simple bun.
- Pull all hair up into a high ponytail at the crown of your head, securing it tightly with a strong elastic.
- Divide the ponytail into two equal sections for the twisting process that creates the bun’s texture.
- Twist both sections tightly in the same direction until they begin to coil on themselves naturally from the tension.
- Wrap one twisted section around the base of the ponytail clockwise, forming the foundation of your bun.
- Secure the first section with bobby pins inserted through the twist into the base ponytail for stable hold.
- Wrap the second twisted section around the bun counterclockwise, filling in gaps and creating fullness.
- Pin the second section securely as well, using enough pins to ensure the bun won’t shift during dancing or movement.
- Smooth any flyaways around the hairline and at the base of the bun with gel applied with a fine-tooth comb.
- Set with strong-hold hairspray, focusing on the hair tie area and the bun itself for all-evening stability.
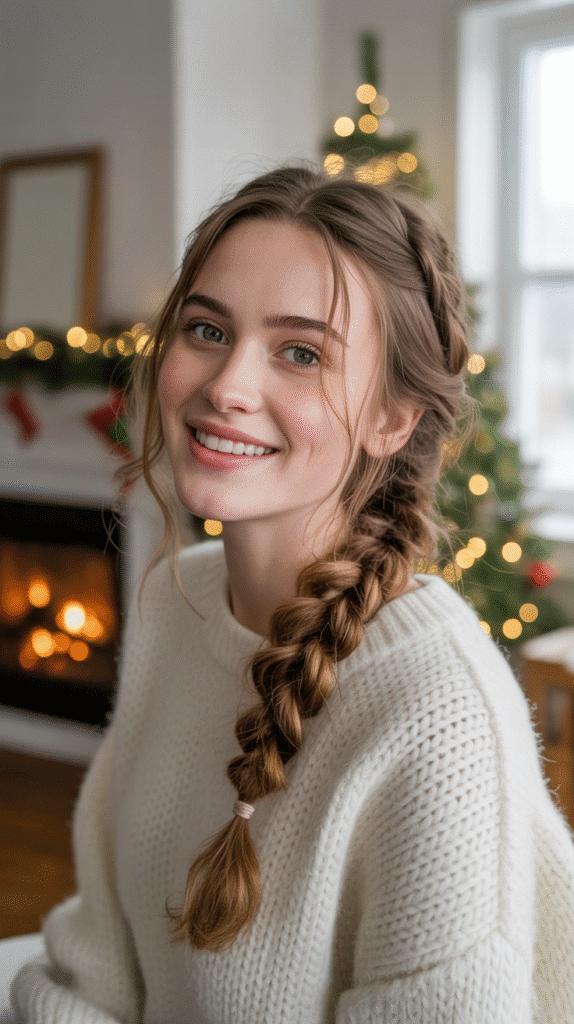
18. Half-Up Half-Down with Braided Detail
The half-up half-down style with braided detail offers the perfect compromise between wearing hair up and down.
Small braids add textural interest while keeping the style from feeling too basic.
This versatile look flatters almost everyone and suits various dress codes.
- Curl the bottom half of your hair loosely with a curling wand for soft, touchable waves and movement.
- Take a 1-inch section of hair from just above your right temple and create a simple three-strand braid.
- Braid this section all the way down to the ends and secure with a small clear elastic band.
- Repeat the same braiding process on the left side, ensuring both braids are positioned symmetrically for balance.
- Take both braids along with a small section of loose hair from each side and gather them at the back center.
- Secure all four sections (two braids and two loose sections) together with a clear elastic or decorative clip.
- Allow the remaining hair to flow freely down your back, showcasing the curls you created at the beginning.
- Pull gently on the crown area to create slight lift and volume for a more flattering overall shape.
- Set with light hairspray that won’t weigh down the flowing bottom section or make the braids stiff.
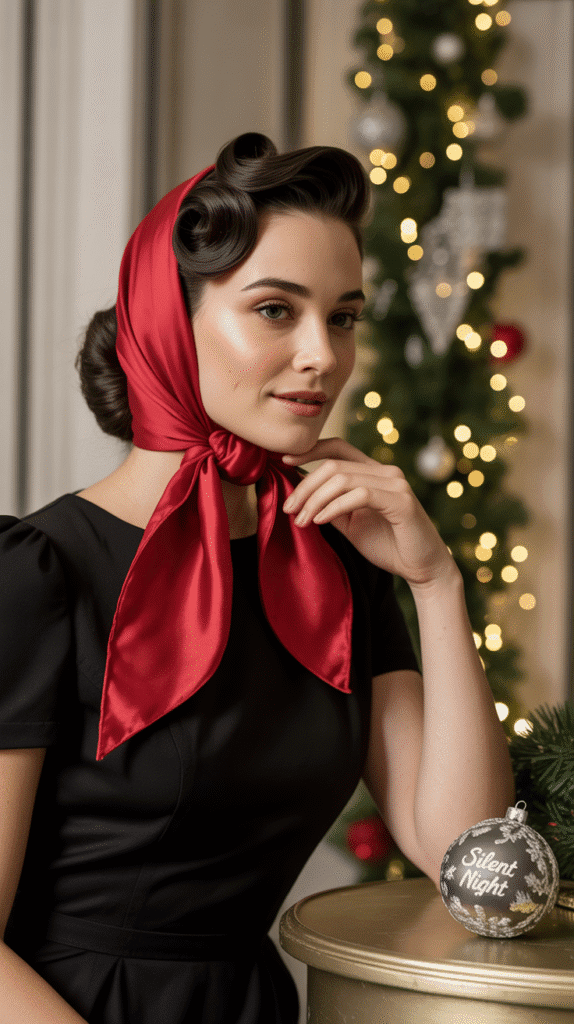
19. Vintage Pin Curls
Pin curls deliver authentic vintage glamour that transports you back to classic Hollywood’s golden age.
This intricate style requires time and practice but creates stunning results for formal Christmas events.
The structured curls maintain their shape throughout the longest celebrations.
- Wash hair and apply setting lotion while damp to help the curls hold their shape for maximum longevity.
- Section hair into 1-inch squares all over your head using clips to organize your work systematically.
- Take one section, wrap it around two fingers to form a flat curl, then pin it flat against your scalp.
- Continue this process throughout your entire head, ensuring all pin curls are rolled in the same direction for consistency.
- Allow hair to dry completely (air-dry overnight or use a hood dryer for faster results) before removing pins.
- Once fully dry, carefully remove each bobby pin without disturbing the curl shape that has set in place.
- Use a wide-tooth comb or your fingers to gently separate and arrange the curls into your desired vintage pattern.
- Shape curls strategically around your face and throughout your head, creating the classic sculpted waves of vintage styling.
- Finish with strong-hold hairspray applied generously to lock the styled curls in place throughout your entire evening.
20. Boho Side Braid with Flowers
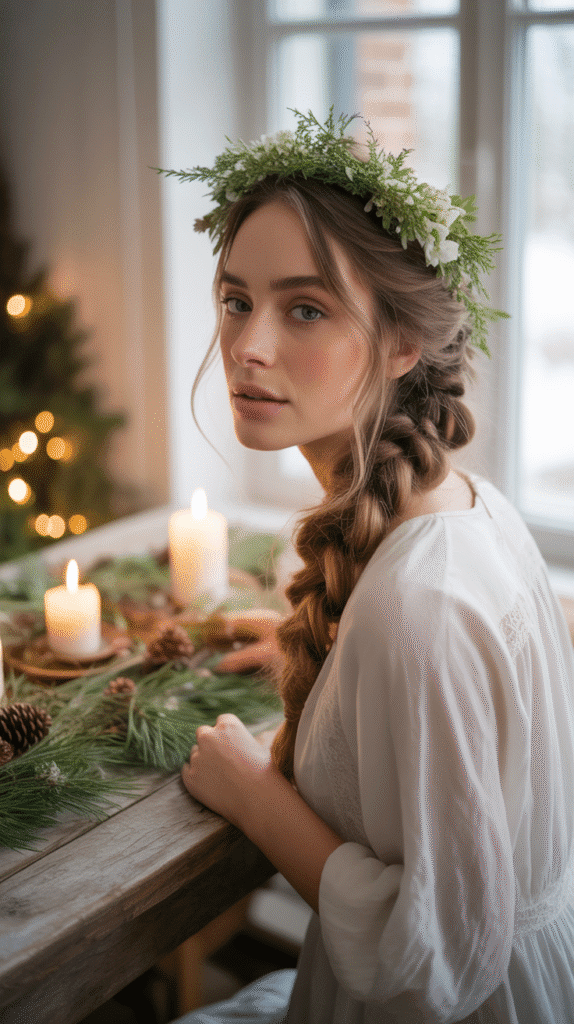
A boho side braid adorned with flowers creates whimsical, nature-inspired beauty perfect for less formal holiday gatherings.
The organic feel of this style contrasts beautifully with traditional Christmas elegance.
Adding flowers makes this braid feel special and celebratory without seeming overly done.
- Apply texturizing spray throughout damp hair and scrunch while air-drying for natural, beachy texture as your foundation.
- Create a deep side part on your preferred side for an asymmetrical, bohemian appearance that feels relaxed.
- Sweep all hair over one shoulder and begin a loose three-strand braid starting from behind your ear.
- Keep the braid deliberately loose and slightly messy, avoiding any tightness that would make it too polished or structured.
- Secure the end of the braid with a fabric-covered elastic or thin leather cord for a natural, organic finish.
- Pull gently on the braid edges throughout its length to create a fuller, more relaxed dimensional appearance.
- Tuck small fresh or artificial flowers into the braid at intervals, securing them with bobby pins if necessary.
- Choose flowers in white, red, or green to complement the Christmas theme while maintaining the natural aesthetic.
- Finish with light texturizing spray rather than traditional hairspray to maintain the effortless, undone quality of the style.
21. Sophisticated Chignon
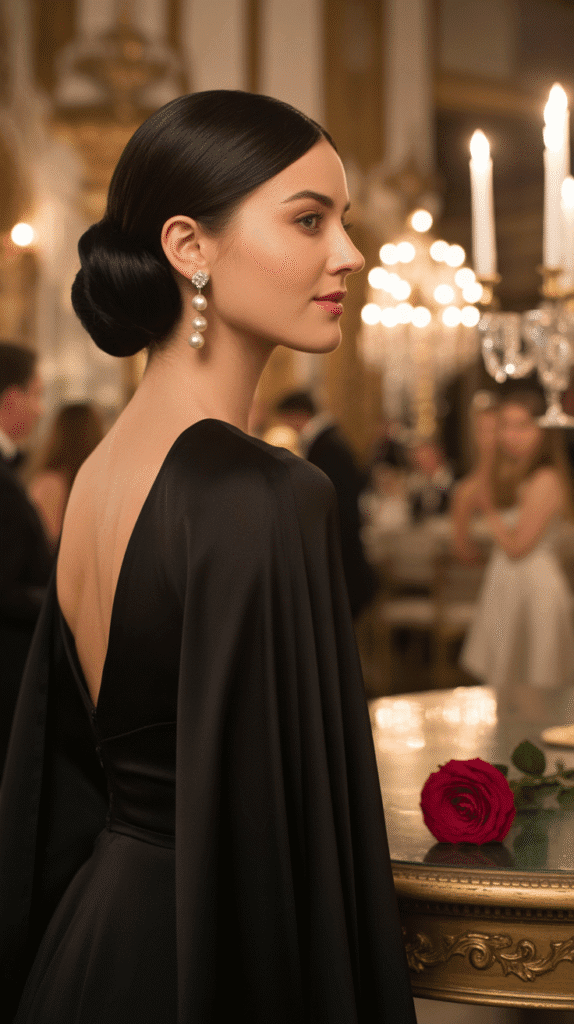
The chignon represents ultimate sophistication with its low, gathered placement that exudes refined elegance and timeless grace.
This classic updo has remained a staple of formal events for good reason—it’s universally flattering and impossibly chic.
The style works beautifully for the most elegant Christmas celebrations.
- Start with hair that has been straightened or blown out smooth for the most polished chignon foundation possible.
- Apply smoothing cream throughout your hair to create a sleek base and eliminate any unwanted texture or frizz.
- Gather all hair into a low ponytail at the nape of your neck and secure with an elastic band.
- Divide the ponytail into two or three sections depending on your hair thickness and desired chignon fullness.
- Twist each section loosely and wrap it around the ponytail base, building up the chignon in circular layers.
- Pin each wrapped section securely with bobby pins inserted in an X-pattern for maximum hold throughout the evening.
- Tuck all ends neatly into the chignon, ensuring no stray pieces stick out from the polished finished style.
- Smooth the hair on your head with a boar bristle brush, creating a flawless surface from your hairline to the chignon.
- Set with strong-hold shine spray for a glossy, mirror-like finish that photographs beautifully under party lighting.
22. Crimped Texture Ponytail
Crimped texture brings nostalgic 90s energy to modern party styling with its unique zigzag pattern that creates incredible volume.
This bold style works for fashion-forward holiday celebrations where making a statement is encouraged.
The texture catches light beautifully and photographs with striking dimension.
- Start with completely dry, clean hair as the crimping tool works only on dry strands for safety and effectiveness.
- Section hair into manageable 1-inch horizontal layers, clipping upper sections away while you work from bottom to top.
- Use a crimping iron on each section from roots to ends, holding the tool on each segment for 3-5 seconds.
- Work systematically through all sections until your entire head is covered with the distinctive crimped zigzag texture.
- Gather the crimped hair into a high ponytail, marveling at the incredible volume the texture has created naturally.
- Secure with a strong elastic band that can handle the expanded volume of the crimped texture.
- Take a small crimped section from the ponytail and wrap it around the elastic to conceal the band attractively.
- Allow the ponytail to fan out in all directions, showcasing the dramatic texture and impressive volume you’ve created.
- Use minimal hairspray as the crimped texture holds itself naturally and you want to maintain maximum movement and touchability.
23. Braided Low Side Ponytail
A braided low side ponytail combines casual charm with polished detail through the braid that wraps around into the ponytail.
This asymmetrical style feels youthful and fresh while remaining appropriate for various holiday events.
The wrapped braid adds visual interest to a simple ponytail base.
- Create a deep side part to establish the starting point for your braid on the heavier side of the part.
- Begin a French or Dutch braid at the part line, working along your hairline toward your ear.
- Continue braiding in a curve that follows your head shape, moving from front to back behind your ear.
- Once you reach the opposite side at the nape, transition from a French braid to a regular three-strand braid.
- Gather all remaining loose hair on the opposite side together with the braid you’ve created.
- Secure everything together in a low side ponytail that sits just behind your ear at neck level.
- Wrap the braided section around the base of the ponytail once before incorporating it into the ponytail itself.
- Pull gently on the braid edges to create a fuller, more dimensional appearance along the side of your head.
- Finish with flexible-hold hairspray that maintains the braid definition while allowing the ponytail to move naturally.
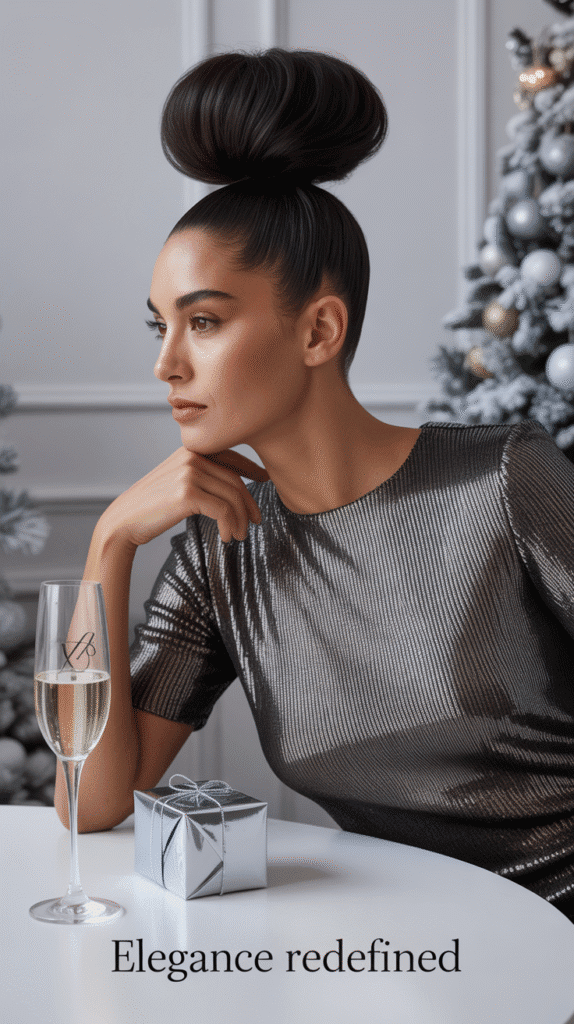
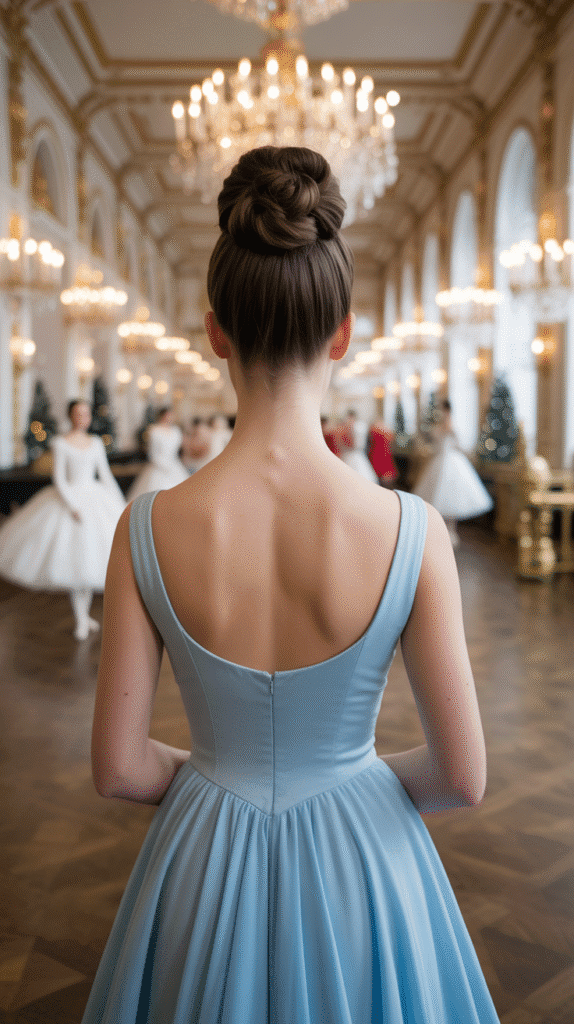
24. Elegant Top Knot
The elegant top knot delivers modern minimalism with effortless sophistication perfect for contemporary Christmas celebrations.
This sleek updo elongates the neck and showcases facial features beautifully.
- Brush all hair upward toward the crown of your head, gathering it into your hand as you go for smoothness.
- Secure hair into a very high ponytail at the crown using a strong elastic band that won’t slip throughout the evening.
- Apply a small amount of smoothing serum to the length of the ponytail to make twisting easier and create shine.
- Twist the entire ponytail length tightly in one direction until it begins to coil around itself naturally from tension.
- Wrap the twisted ponytail around its base in a circular motion, creating a neat, compact bun at the crown.
- Tuck the ends of your hair into the base of the knot, hiding them completely for a polished, finished appearance.
- Secure the knot with bobby pins inserted at various angles through the bun into the base ponytail for stability.
- Use a fine-tooth comb with gel or pomade to smooth any flyaways along the hairline and sides of the head.
- Finish with strong-hold hairspray applied from all angles to ensure the sleek style maintains its sharp appearance throughout the night.
25. Curled Half-Up with Crisscross Detail
The curled half-up with crisscross detail combines romantic waves with structured geometric elements for a balanced look.
The crisscross pattern at the crown adds unexpected visual interest while keeping the style feeling soft.
This versatile hairstyle works for both formal and semi-formal Christmas events.
- Curl all of your hair with a 1.25-inch curling iron, creating uniform loose curls from mid-length to ends throughout.
- Allow curls to cool completely before touching them to ensure they set properly and maintain their shape longer.
- Take a 1-inch section from above your right temple and bring it diagonally across the back of your head.
- Secure this first section temporarily at the opposite side with a small claw clip to hold it in place.
- Take a matching 1-inch section from above your left temple and cross it over the first section diagonally.
- Secure both crossed sections together at the center back of your head with bobby pins inserted in an X-pattern.
- Remove the temporary clip and adjust the crossed sections so they create a clean, visible crisscross pattern.
- Leave the remaining curled hair flowing freely down your back, allowing the curls to cascade naturally.
- Set with light hairspray that won’t weigh down the curls or make the crisscross sections appear stiff or unnatural.
26. Wrapped Scarf Updo
A wrapped scarf updo brings festive color and textile interest to your Christmas party hairstyle through integrated fabric.
This creative style allows you to coordinate your hair directly with your outfit colors.
The wrapped scarf adds vintage-inspired charm while keeping hair completely secured.
- Pull all hair back into a high ponytail at the crown or a low ponytail at the nape, depending on your preferred look.
- Secure the ponytail tightly with a strong elastic band that will support both hair and scarf weight throughout the evening.
- Take a long, narrow silk or satin scarf in festive colors like red, gold, green, or silver that complement your outfit.
- Fold the scarf lengthwise until it’s approximately 2-3 inches wide for easier wrapping and manipulation around the ponytail.
- Position the center of the scarf underneath the ponytail at the base and bring both ends up and over the elastic.
- Begin wrapping the scarf around the ponytail and elastic base, covering the band completely with the decorative fabric.
- Continue wrapping the scarf down the length of the ponytail, incorporating your hair into a rope-like wrapped effect.
- Secure the scarf ends by tying them in a small bow or knot at the bottom, or tuck them into the wrapped sections.
- Adjust the wrapped sections to ensure the scarf pattern shows evenly and the hair is completely covered for a polished finish.
27. Mermaid Waves
Mermaid waves create flowing, oceanic movement that cascades down your back with effortless, beachy glamour.
This relaxed wave pattern feels less structured than traditional curls while still delivering impressive styling.
The technique creates natural-looking waves that appear as though you’ve spent the day by the sea.
- Start with damp, towel-dried hair and apply a sea salt spray throughout from roots to ends for texture.
- Divide hair into four large sections and twist each section loosely before securing with a claw clip to air-dry partially.
- Once hair is about 80% dry, release the sections and apply heat protectant spray before using heated tools.
- Use a flat iron held vertically and slowly wave it back and forth as you glide down each section of hair.
- This S-curve motion creates the characteristic mermaid wave pattern that’s softer and more irregular than uniform curls.
- Work through all sections systematically, varying the wave pattern slightly in each section for a more natural, organic appearance.
- Once all hair is waved, flip your head upside down and shake vigorously to separate the waves and create movement.
- Apply a texturizing spray while scrunching the waves with your hands to enhance the beachy, lived-in texture throughout.
- Finish by running your fingers through the waves rather than brushing to maintain the piece-y, textured mermaid effect.
28. Twisted Side Updo
The twisted side updo creates asymmetrical elegance with all hair swept dramatically to one side.
This romantic style showcases one shoulder beautifully while adding sculptural interest through the twisted sections.
The gathered side placement feels both modern and timelessly elegant.
- Curl all hair loosely with a large-barrel curling iron to create a textured foundation that holds twists better than straight hair.
- Create a deep side part on your preferred side, establishing the asymmetrical foundation of this style’s dramatic appearance.
- Begin taking vertical sections from the lighter side of the part, twisting each section loosely toward the back.
- Pin each twisted section at the back of your head on the opposite side, creating a diagonal pattern of twists.
- Continue this process with all hair from the lighter side until everything is twisted and pinned across to the heavier side.
- Gather all the twisted sections along with the loose hair on the heavier side into a low side bun or twist.
- Arrange the curled ends decoratively around the gathering point, creating a soft, romantic clustered appearance at your shoulder.
- Pull gently on the twisted sections to create fuller, more dimensional rope-like details throughout the style.
- Secure everything with strategic bobby pins and finish with flexible-hold hairspray that maintains the romantic, soft texture.
29. Accessorized High Bun
An accessorized high bun combines classic ballet-inspired structure with festive embellishments that make it holiday-appropriate.
The high placement creates elegant height while the accessories add personalized sparkle.
This style works beautifully for formal Christmas events where you want to make a statement.
- Gather all hair into a very high ponytail at the crown of your head, securing it with a strong elastic band.
- Tease the ponytail lightly throughout its length to create texture and volume within the bun you’ll create next.
- Twist the teased ponytail loosely to maintain the volume you’ve created rather than smoothing it down completely.
- Wrap the twisted ponytail around the base, coiling it into a high bun and tucking the ends underneath to hide them.
- Secure the bun thoroughly with bobby pins inserted from multiple angles to ensure stability during dancing and movement.
- Add decorative accessories like jeweled pins, small ornaments, festive sprigs of holly, or metallic hair combs around the bun.
- Distribute accessories evenly around the bun or cluster them on one side for an asymmetrical, artistic appearance depending on preference.
- Use a small amount of gel on a toothbrush to smooth baby hairs at the hairline for a polished, refined finish.
- Set everything with strong-hold hairspray, paying special attention to the base of the bun and any smoothed areas around your face.
30. Voluminous Ponytail with Teased Crown
A voluminous ponytail with teased crown delivers maximum drama through impressive height and fullness.
This glamorous style creates stunning impact in photographs and in person.
The exaggerated volume at the crown elongates your silhouette while the flowing ponytail maintains feminine movement.
- Begin by sectioning off the top third of your hair from ear to ear across the crown area for focused teasing.
- Backcomb this crown section aggressively with a fine-tooth teasing comb, creating substantial height and volume at the roots.
- Smooth the very top layer of the teased section gently to disguise the backcombing while maintaining the height underneath.
- Gather all hair including the teased crown section into a high ponytail positioned where you want maximum height impact.
- Secure with a very strong elastic band that can handle the weight and volume you’ve created in the ponytail.
- Take a 1-inch section from the underside of the ponytail and wrap it around the elastic base to conceal it professionally.
- Lightly tease the length of the ponytail itself for additional fullness and dimension throughout the hair that hangs down.
- Apply volumizing powder at the roots inside the ponytail for even more lift and texture that lasts throughout the evening.
- Finish with strong-hold hairspray focused on the teased crown area to lock in the dramatic volume you’ve created and prevent any falling.
Conclusion
From timeless Hollywood waves to contemporary twisted updos, these 30 Elegant Christmas Party Hairstyles for Long Hair You’ll Love offer something special for every celebration and personal style preference.
Whether you’re drawn to the classic sophistication of a French twist, the romantic allure of waterfall braids, or the modern edge of crimped texture, your perfect holiday hairstyle awaits in this comprehensive collection.
Remember that the most important element of any hairstyle is how it makes you feel—confident, beautiful, and ready to celebrate the magical moments of the season.
Each of these styles can be adapted to your unique hair texture, face shape, and personal aesthetic, ensuring you’ll walk into your Christmas party feeling absolutely radiant.
Take time to practice your chosen style before the big event, gather the necessary tools and products, and don’t be afraid to add your own creative touches through accessories or slight modifications.
This holiday season, let your hair be the crown that completes your festive look, turning heads and creating memories that will last long after the decorations come down.
May your Christmas celebrations be filled with joy, laughter, and the confidence that comes from knowing you look absolutely stunning.