Have you ever gazed at the ethereal beauty of elven characters in fantasy films and yearned to capture that same mystical elegance in your own hair?
The enchanting world of elf hairstyles offers a treasure trove of inspiration for those blessed with long, flowing locks, combining intricate braiding techniques, delicate accessories, and romantic styling methods that transform ordinary hair into something truly extraordinary.
Whether you’re preparing for a themed event, a renaissance fair, a wedding, or simply wish to infuse your everyday look with a touch of fantasy magic, 30 Elegant Elf Hairstyles for Long Hair Straight Out of a Fairytale will guide you through the most captivating styles that blend timeless grace with otherworldly charm.
These hairstyles draw inspiration from Celtic traditions, medieval aesthetics, and modern fantasy interpretations to create looks that are both wearable and wonderfully whimsical.
From cascading waterfall braids adorned with flowers to half-up styles featuring intricate twists and romantic loose waves embellished with delicate accessories, each hairstyle in this collection has been carefully selected to help you channel your inner woodland elf and embrace the enchanting beauty that lies within these fairytale-inspired creations.
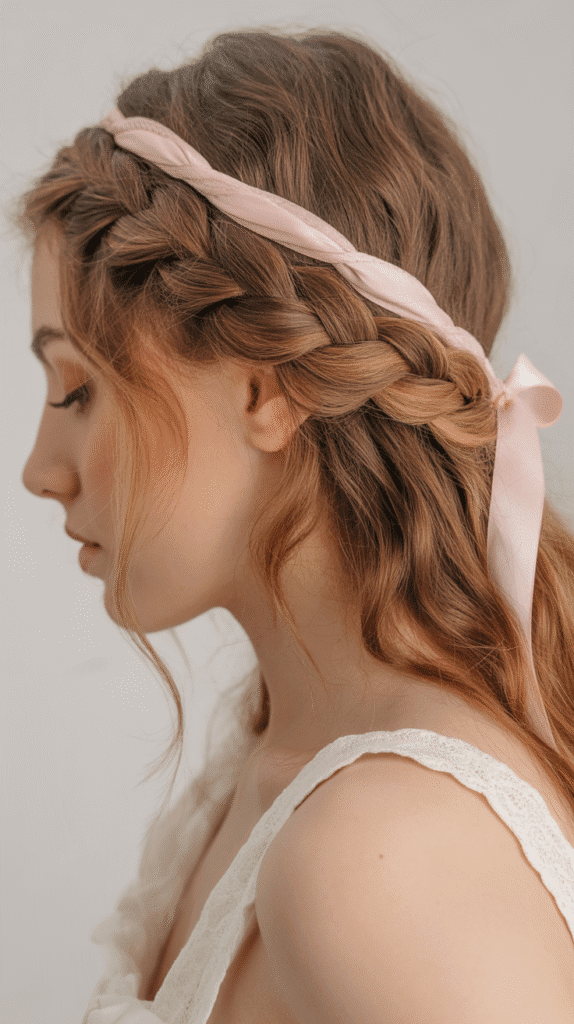
1. Classic Elven Half-Up Crown Braid
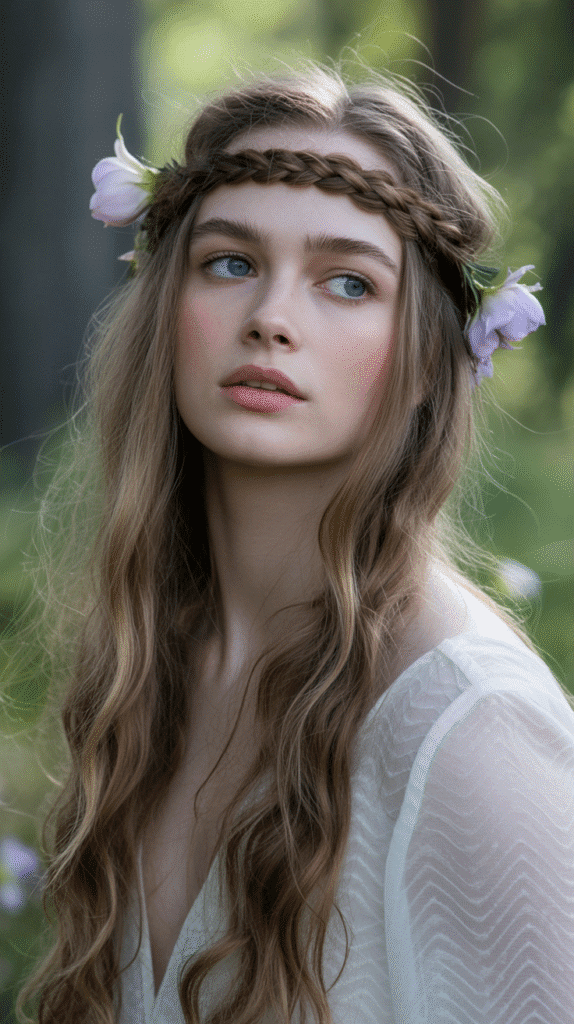
The half-up crown braid serves as the quintessential elven hairstyle, combining practicality with ethereal beauty that frames the face like a natural coronet.
This timeless style works beautifully for both casual woodland wanderings and formal enchanted gatherings, offering versatility that spans across seasons and occasions.
- Take two sections of hair from each side of your head, starting approximately at temple level and working backward toward the crown area
- Create a simple three-strand braid with each section, keeping the tension moderate to maintain a soft, romantic appearance rather than a tight, severe look
- Cross the braids over the top of your head, securing them with bobby pins or small elastic bands in a color that matches your natural hair tone
- Allow the remaining hair to flow freely down your back, creating a beautiful contrast between the structured crown and the flowing length
- Gently pull at the edges of the braids to create a fuller, more textured appearance that appears effortlessly romantic
- Add small flowers, leaf-shaped clips, or delicate hair jewelry along the braided crown to enhance the fantasy aesthetic
- This style works exceptionally well with highlights or balayage, as the dimensional color becomes more visible in the braided sections
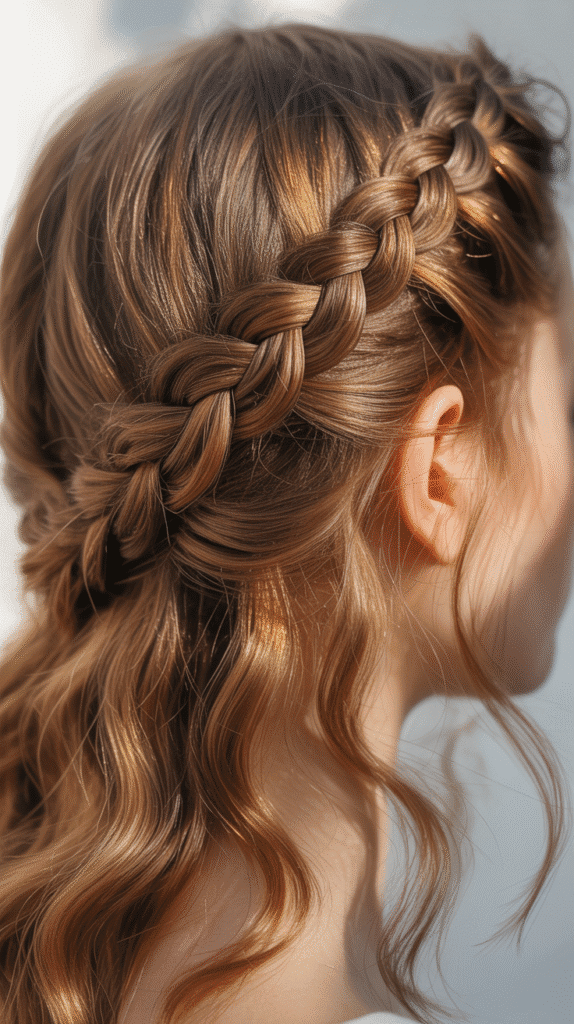
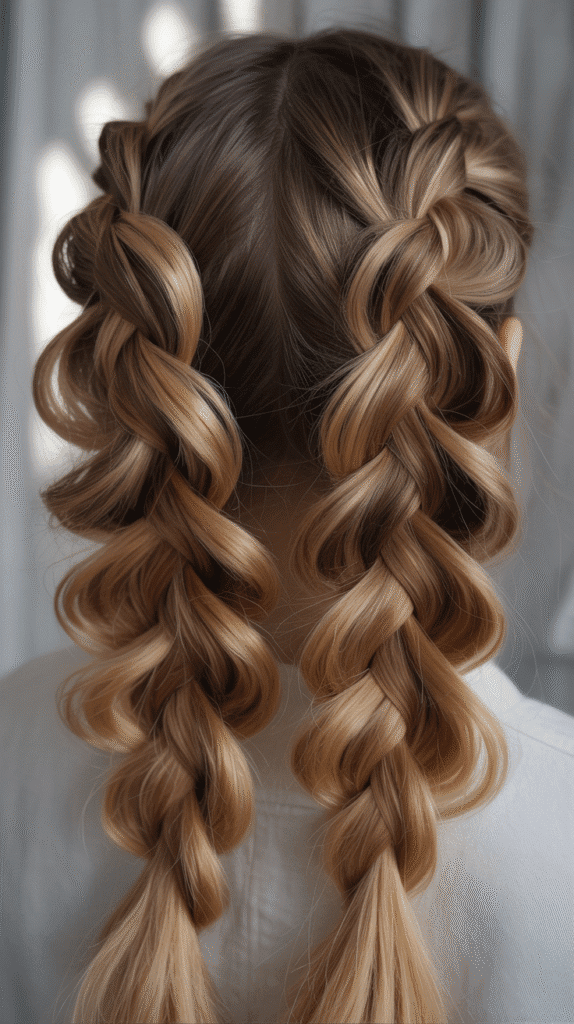
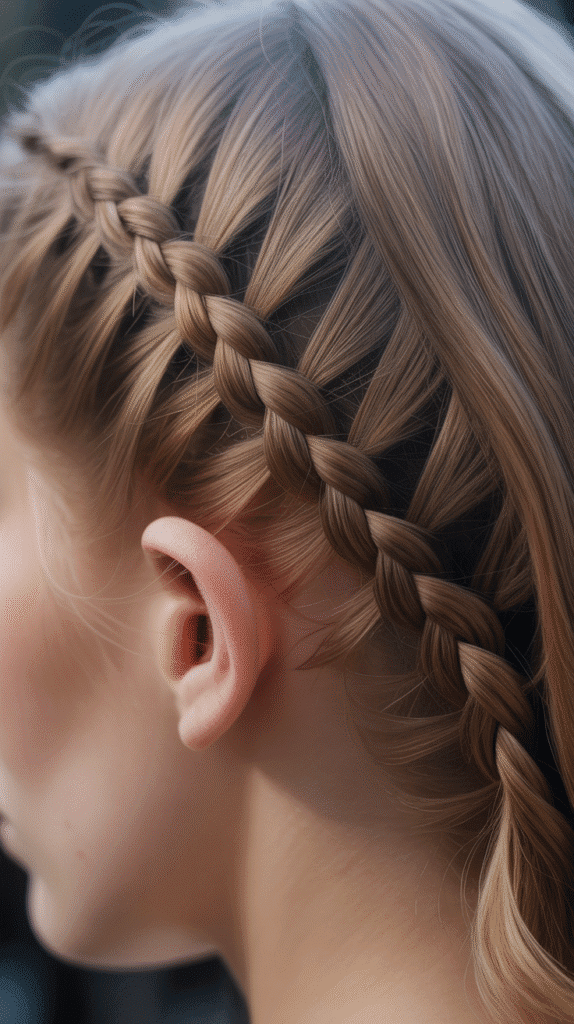
2. Cascading Waterfall Braid

The waterfall braid creates a mesmerizing effect where strands of hair appear to flow through the braid like water cascading over stones in a forest stream.
This intermediate-level technique produces a sophisticated look that captures the essence of natural elven beauty while maintaining an air of effortless grace.
- Begin at one side of your head near the temple, taking a small section of hair to start a standard French braid pattern
- As you cross the top strand over the middle, release it completely and let it fall, creating the “waterfall” effect that gives this style its distinctive name
- Pick up a new section of hair from above to replace the released strand, maintaining the continuous braid pattern as you work horizontally across your head
- Continue this process across the back of your head, keeping the braid at approximately ear level for the most flattering placement
- The released strands create beautiful vertical streams of hair that frame the face and add movement to the overall style
- Secure the end with a small elastic or continue into a regular braid that blends with the loose hair below
- This technique works beautifully on hair with natural waves or gentle curls, as the texture enhances the waterfall effect
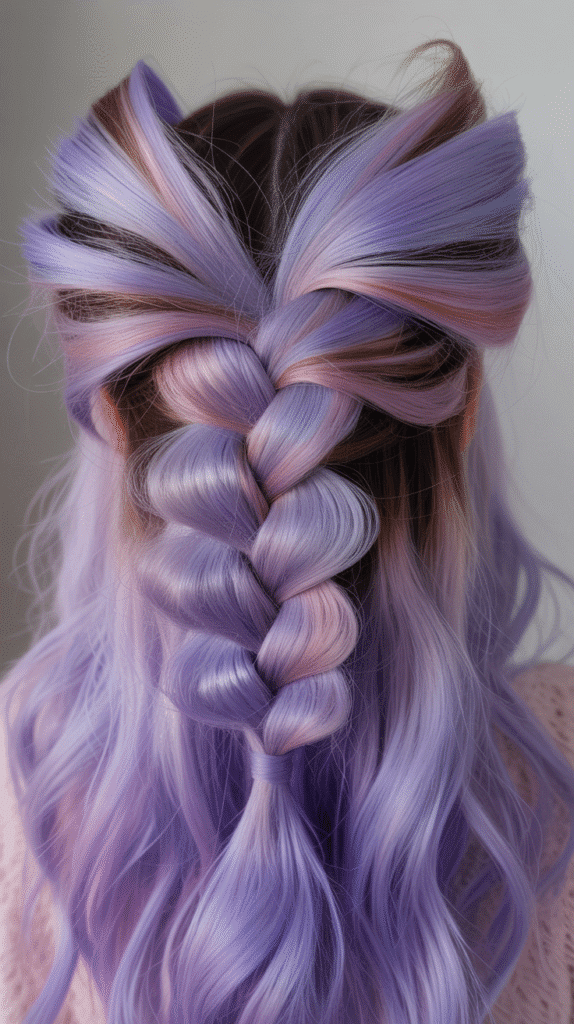
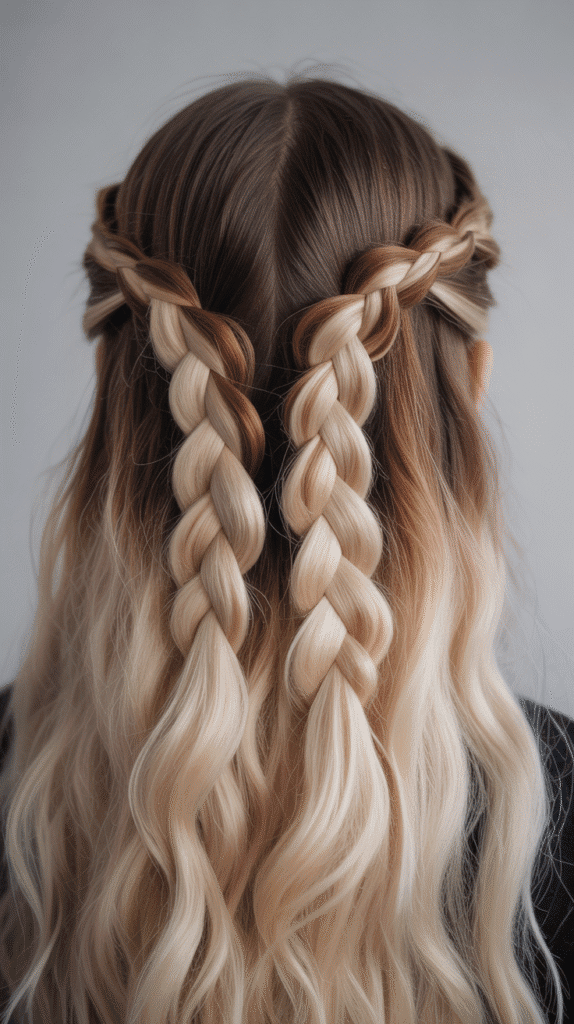
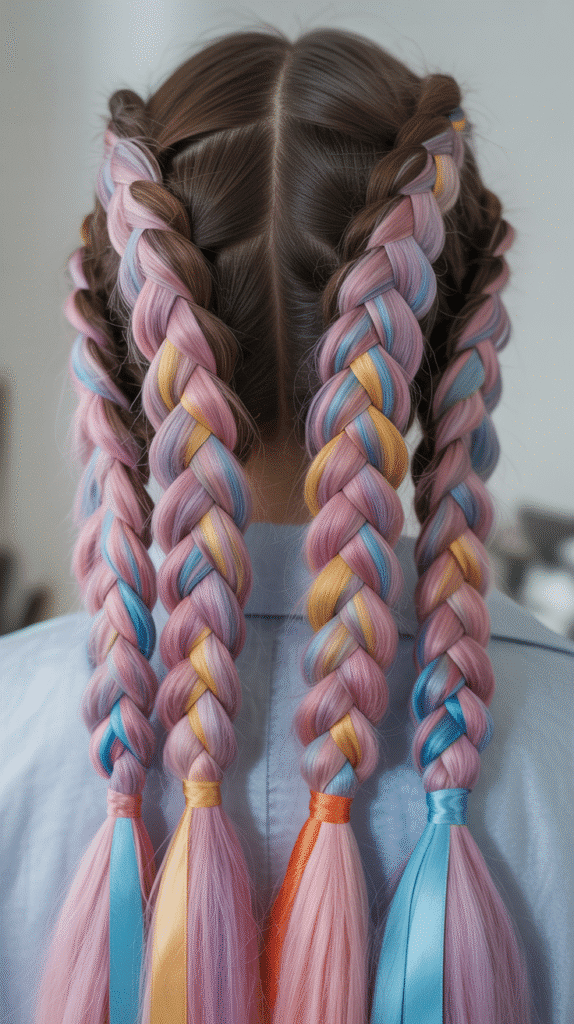
3. Double Dutch Braids with Loose Ends
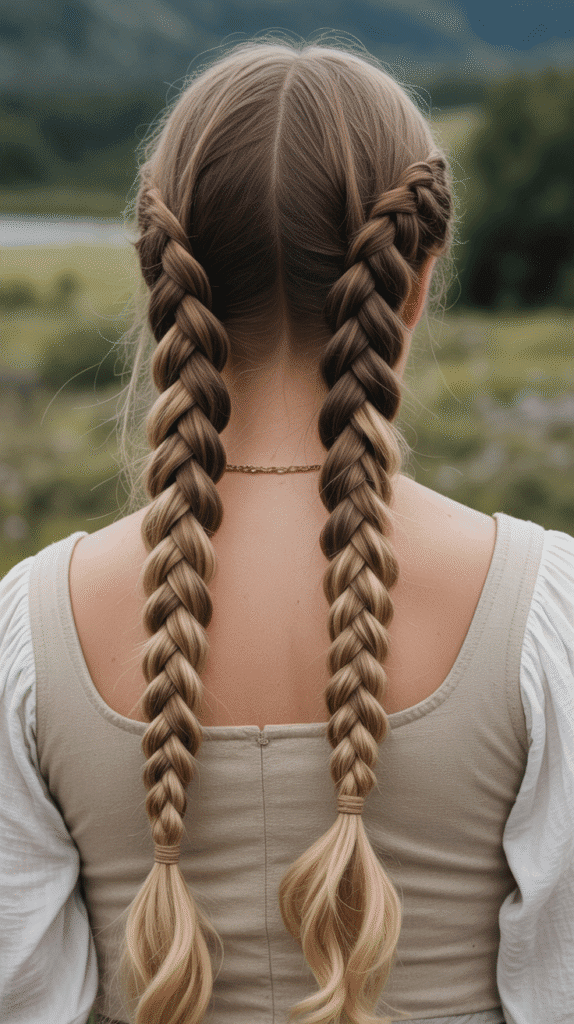
Double Dutch braids offer a more structured elven aesthetic while maintaining the romantic flowing quality essential to fantasy-inspired hairstyles.
This style provides excellent hold for active days while still delivering the ethereal appearance characteristic of elven beauty.
- Part your hair down the center from forehead to nape, creating two equal sections that will form the foundation of your symmetrical style
- Begin the Dutch braid technique on one side by crossing strands under rather than over, which creates a braid that sits on top of your hair like a raised design
- Add small sections of hair as you work down the head, maintaining even tension to ensure both braids match in size and tightness
- Stop braiding at approximately the nape of the neck or lower, depending on your preference for where the loose hair should begin flowing
- Secure each braid with a clear elastic or decorative hair tie that complements your overall aesthetic vision
- Gently pancake the braids by pulling at the outer edges to create width and a more relaxed, romantic appearance
- The contrast between the structured braids and flowing ends creates a perfect balance of control and freedom
4. Romantic Loose Waves with Flower Crown
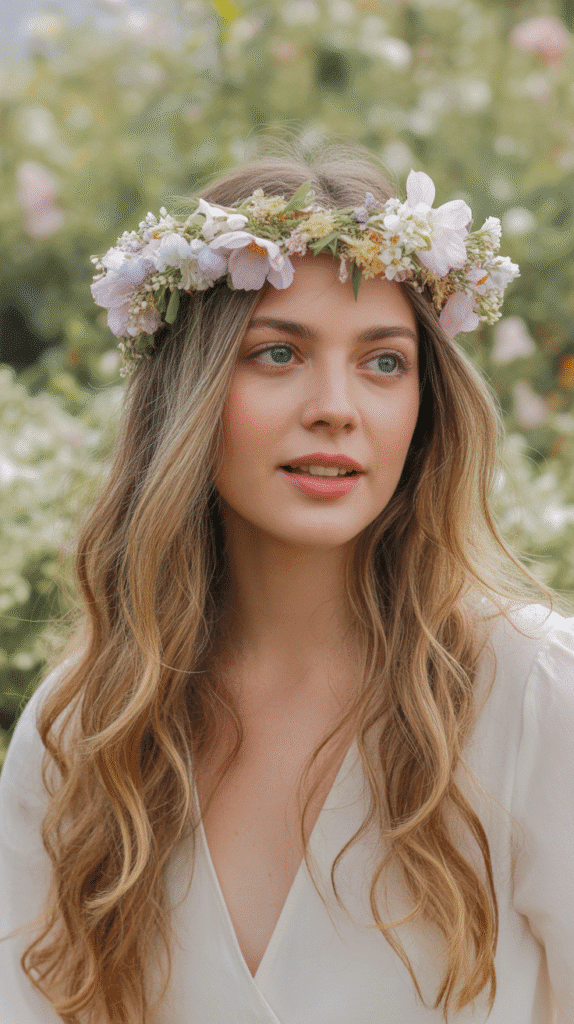
Sometimes the most enchanting elven look comes from embracing the natural beauty of flowing hair enhanced with minimal styling and maximum ethereal accessories.
Loose waves paired with a flower crown create an instantly recognizable fantasy aesthetic that requires less technical skill but delivers maximum visual impact.
- Start with clean, dry hair and apply a heat protectant spray to safeguard your strands from styling damage
- Use a large-barrel curling iron or wand (1.5 to 2 inches in diameter) to create loose, flowing waves throughout your hair
- Curl sections away from your face, holding each piece for only 5-7 seconds to create soft waves rather than defined ringlets
- Allow the curls to cool completely before gently running your fingers through them to break up the pattern and create natural-looking waves
- Apply a light texturizing spray or sea salt spray to enhance the movement and create that effortless, windswept appearance
- Place a flower crown made of fresh blooms, dried flowers, or artificial blossoms across the crown of your head, positioning it like a natural headband
- This style works beautifully for outdoor events, weddings, festivals, or photoshoots where a soft, romantic aesthetic is desired
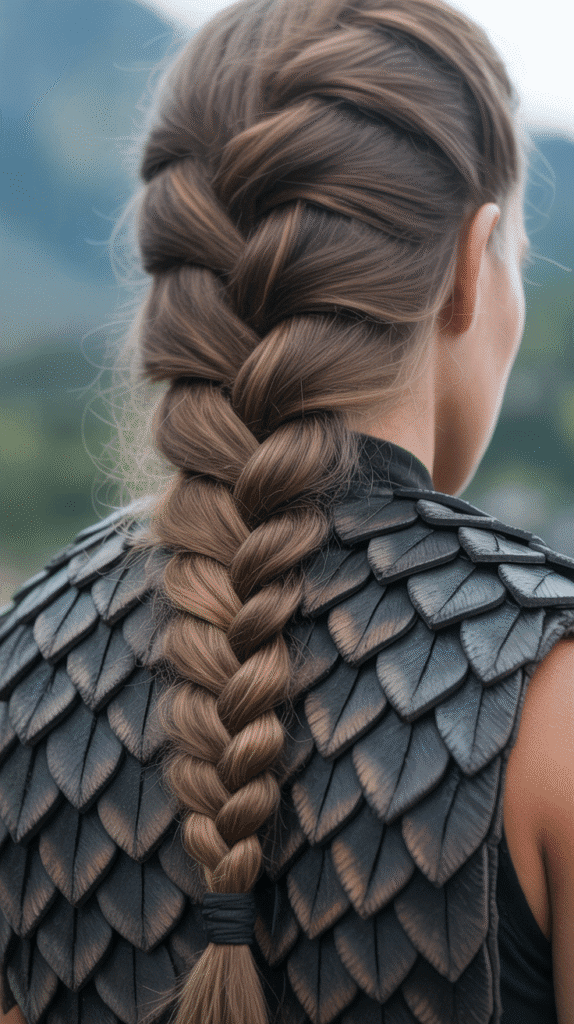
5. Elven Warrior Side Braid
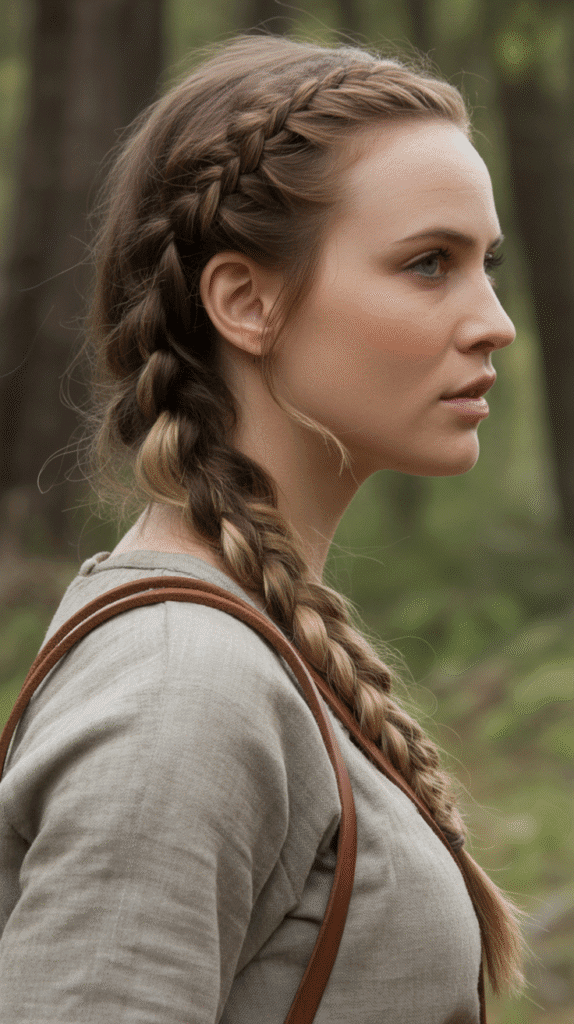
The side braid represents a more practical approach to elven hairstyling, perfect for those who need their hair secured but want to maintain that fantasy aesthetic.
This style balances functionality with beauty, making it ideal for active pursuits or everyday wear.
- Sweep all your hair to one side of your head, gathering it at approximately shoulder level on your preferred side
- Divide the hair into three equal sections to begin a traditional three-strand braid, or use four or five sections for a more complex pattern
- Braid tightly at the top near the scalp to ensure security, then gradually loosen the tension as you work down the length
- Incorporate small accessories like leather cords, thin ribbons, or metallic thread throughout the braid for added visual interest
- Secure the end with a decorative hair tie, leather wrap, or cord that fits the warrior aesthetic
- Pull at the outer edges of the braid to create strategic volume and a more relaxed appearance despite the secure hold
- This style pairs excellently with side-swept bangs or face-framing pieces left out intentionally for a softer look
6. Intricate Celtic Knot Half-Up Style
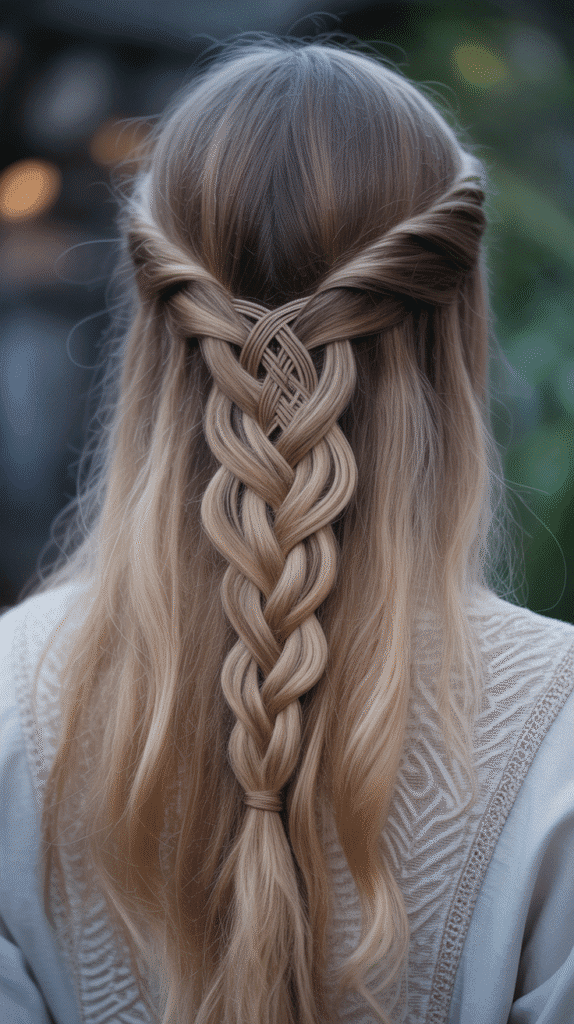
The Celtic knot hairstyle brings ancient symbolism and intricate artistry to your elven look, creating a stunning focal point that demonstrates both skill and cultural appreciation.
This complex style requires patience but rewards you with a truly unique and conversation-worthy appearance.
- Section off the top half of your hair from ear to ear, clipping the bottom section away to keep it separate during the styling process
- Divide the top section into four equal parts that will form the basis of your Celtic knot pattern
- Cross the sections over and under each other following a Celtic knot pattern, which typically involves creating loops that weave through one another
- Use small clear elastics to secure each loop temporarily as you build the pattern, ensuring nothing slips before the design is complete
- Once the knot is formed to your satisfaction, carefully remove the temporary elastics and replace them with hidden bobby pins that match your hair color
- The remaining loose hair flows beneath the intricate knotwork, creating a beautiful contrast between complexity and simplicity
- <a href=”https://www.wikihow.com/Do-Celtic-Knots-in-Hair”>Detailed Celtic knot tutorials</a> can provide step-by-step visual guidance for mastering this advanced technique
7. Bohemian Fishtail Braid
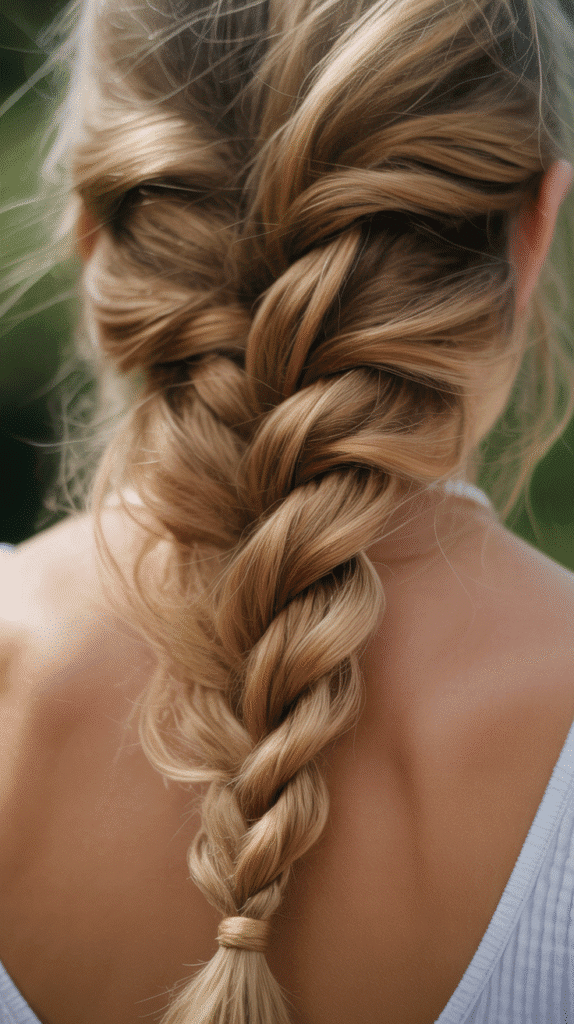
The fishtail braid offers a more textured alternative to traditional three-strand braids, creating a distinctive pattern that catches light beautifully and adds visual complexity to long hair.
This style strikes the perfect balance between bohemian casualness and elven elegance.
- Divide all your hair into two large sections rather than the traditional three sections used in standard braiding
- Take a small piece from the outer edge of the left section and cross it over to join the right section
- Repeat the process from the right side, taking a small outer piece and crossing it to the left section
- Continue this alternating pattern down the length of your hair, keeping the pieces small and consistent for a more defined fishtail texture
- The smaller your sections, the more intricate and detailed your fishtail pattern will appear, though this also increases styling time
- Secure the end with an elastic and gently pull at the edges to create the characteristic messy, textured appearance of a bohemian fishtail
- This braid works exceptionally well on hair with natural texture, highlights, or balayage that emphasizes the intricate woven pattern
8. Twisted Crown with Cascading Curls
The twisted crown hairstyle provides an easier alternative to braided crowns while still delivering that signature elven royalty appearance.
Combined with cascading curls, this style creates a perfect balance of structure and flowing romance.
- Part your hair down the middle and take a section from one side, starting near the temple and working back toward the crown
- Twist the section continuously in one direction, keeping the twist tight enough to hold but loose enough to maintain softness
- Bring the twist across the top of your head and secure it with bobby pins at the opposite side, tucking the ends discreetly
- Repeat the process with the other side, crossing this twist over the first or positioning it beside the original twist for a double-crown effect
- Use a curling iron to create defined ringlets in the remaining loose hair, or use hot rollers for voluminous curls
- Allow some face-framing pieces to escape the twists naturally, softening the overall appearance and creating a more organic look
- Set the style with a light-hold hairspray that maintains movement while keeping the twists secure throughout the day
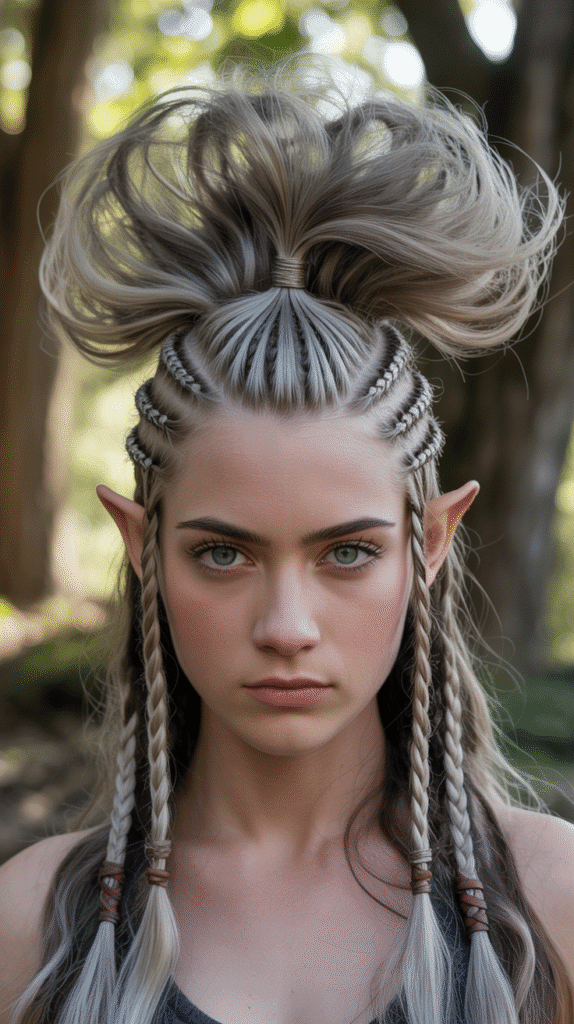
9. Viking-Inspired Mohawk Braid
The mohawk braid combines warrior strength with elven elegance, creating a bold statement style that stands out in any setting.
This edgy yet elegant approach to fantasy hairstyling demonstrates that elven aesthetics can be both fierce and beautiful.
- Create a center part running from forehead to nape, sectioning off approximately two inches of width down the center of your head
- Clip the side sections away to keep them separate from the center mohawk section you’ll be working with
- Begin a Dutch braid at the hairline, crossing strands under rather than over to create the raised effect characteristic of mohawk styling
- Continue the braid down the center, adding hair only from the designated mohawk section and maintaining consistent tension for a uniform appearance
- The side sections can be left sleek and straight, twisted into small braids, or styled with small decorative pins for added interest
- Pancake the center braid generously to create impressive width and height that emphasizes the mohawk effect
- This bold style works particularly well for costume events, themed parties, or anyone wanting to make a dramatic fashion statement
10. Wraparound Braid with Ribbon
The wraparound braid creates a beautiful frame for your face while incorporating decorative elements that enhance the fantasy aesthetic.
This style feels especially regal and polished, perfect for special occasions or when you want to elevate your everyday look.
- Begin with a side part and take a section of hair from the heavier side, starting near the part and including hair from the hairline
- Create a standard three-strand braid, but before beginning, lay a ribbon alongside one of the strands to incorporate it from the start
- Braid the section while wrapping the ribbon around the strands, allowing it to weave through the braid pattern as you work
- Bring the braid around the back of your head like a headband, positioning it at whatever height feels most flattering for your face shape
- Secure the braid behind your ear on the opposite side with bobby pins, tucking the ends seamlessly into the loose hair
- The ribbon can be thin and delicate for subtle elegance or wider and more substantial for dramatic impact
- Choose ribbon colors that complement your hair color, outfit, or the overall theme of your look for maximum cohesion
11. Elven Princess Ponytail with Braided Wrap
The elevated ponytail gets a fantasy makeover with braided wrapping techniques that transform this simple style into something truly special.
This approach offers the practicality of a secured ponytail with the visual interest of intricate braiding.
- Gather your hair into a high or mid-level ponytail, positioning it wherever feels most comfortable and flattering for your face shape
- Before securing with an elastic, separate out a small section from the underside of the gathered hair that you’ll use for wrapping
- Secure the main ponytail with an elastic, then take the reserved section and divide it into three strands to create a braid
- Wrap the braid around the base of the ponytail, covering the elastic completely and creating a polished, finished appearance
- Secure the end of the wrap braid with a small bobby pin tucked discreetly underneath the ponytail where it won’t be visible
- Add additional small braids throughout the length of the ponytail for extra visual interest and dimension
- This style works beautifully for both casual daily wear and more formal fantasy-themed events, offering impressive versatility
12. Rope Braid Half-Crown
The rope braid technique creates a twisted, cord-like appearance that adds texture and visual interest to traditional half-up styling.
This method is surprisingly simple to execute but delivers impressive results that look far more complicated than the actual process.
- Take a section of hair from one temple area, dividing it into two equal strands rather than three for traditional braiding
- Twist each strand clockwise (or your preferred direction) several times, keeping the individual twists tight
- Then cross the twisted strands over each other in a counter-clockwise direction, which prevents the twists from unraveling and creates the rope effect
- Continue twisting and wrapping down the length of the section, maintaining consistent tension to ensure an even rope appearance
- Repeat the process on the opposite side of your head, creating a matching rope braid for symmetrical styling
- Bring both rope braids to meet at the back of your head, securing them together with bobby pins or a small elastic
- The remaining hair flows freely beneath the rope crown, creating movement and romantic flow
13. Woodland Fairy Loose Updo

The woodland fairy updo embraces intentional messiness and organic texture, creating a style that looks as though nature itself arranged your hair.
This effortlessly romantic look works beautifully for outdoor events and brings a touch of wildness to formal occasions.
- Begin by creating loose waves or curls throughout your hair using your preferred heat styling method
- Gather sections randomly from around your head rather than following a structured pattern, embracing asymmetry and natural variation
- Twist and pin each section loosely at the back of your head, allowing pieces to escape and creating strategic texture
- Leave several face-framing tendrils loose, both in front and throughout the updo, to enhance the undone, organic appearance
- Incorporate small flowers, leaves, or decorative pins throughout the updo, placing them randomly for a natural, gathered-from-the-forest look
- Use minimal hairspray to maintain movement and touchable softness rather than creating stiff, immovable hair
- The beauty of this style lies in its imperfection, so resist the urge to make everything too neat or symmetrical
14. Ladder Braid Accent

The ladder braid creates a stunning decorative element that can be incorporated into various hairstyles, adding architectural interest and complexity.
This technique looks impressive but becomes manageable once you understand the basic mechanics of how the “rungs” are created.
- Section off a small strip of hair where you want your ladder braid to appear, typically along the side of the head or as a vertical accent
- Create two thin braids that will serve as the side rails of your ladder, keeping them relatively tight to maintain structure
- Take small horizontal sections of hair between the two rail braids and weave them over and under to create the ladder rung effect
- Continue adding rungs down the length of your ladder, spacing them evenly for a polished, intentional appearance
- The remaining hair can be left loose, incorporated into a larger braid, or styled separately depending on your desired final look
- This technique works especially well as an accent on one side of the head with the opposite side left smooth for contrast
- <a href=”https://www.cosmopolitan.com/style-beauty/beauty/how-to/a41033/ladder-braid-tutorial/”>Visual tutorials for ladder braiding</a> can help clarify the weaving technique if verbal instructions feel confusing
15. Medieval Maiden Center Part with Ribbons
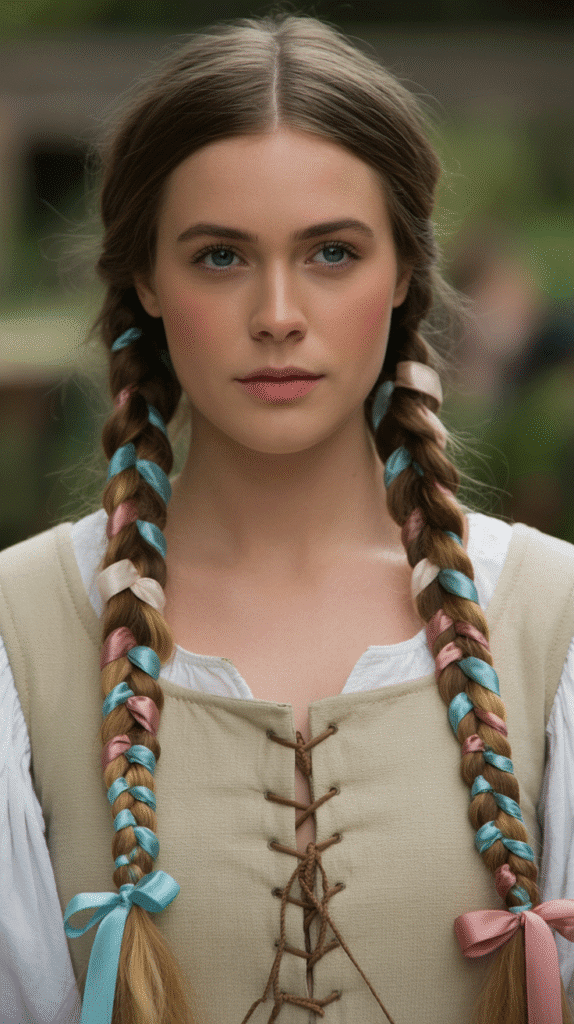
The center part with ribbon-woven braids evokes images of medieval maidens and Renaissance festivals, creating an instantly recognizable historical fantasy aesthetic.
This style combines simplicity in structure with ornate decoration for maximum visual impact.
- Create a precise center part running from forehead to nape, using a tail comb for the straightest possible line
- Divide your hair into two equal sections and create a standard three-strand braid on each side, starting at the nape
- Before beginning to braid, position ribbons at the top of each section so they incorporate into the braiding pattern
- Weave the ribbons through as you braid, allowing them to twist and wrap around the hair strands naturally
- Secure the ends of each braid with additional ribbon tied in bows rather than modern elastic bands for period-appropriate styling
- The braids can hang in front over your shoulders or be positioned behind your back depending on your preference
- Choose ribbon colors that either match your outfit for cohesion or contrast boldly for dramatic effect
16. Butterfly Braid
The butterfly braid creates dimensional, wing-like sections throughout the braid that add unexpected visual interest and texture.
This unique technique transforms ordinary braiding into something truly special and conversation-worthy.
- Begin with a standard French or Dutch braid down the center back or to one side of your head
- As you work down the braid, periodically pause to pull small loops out from the edges at regular intervals
- These pulled loops create the “butterfly wing” effect, adding dimension and decorative flair to the otherwise traditional braid
- The loops can be uniform in size for a polished look or varied for a more organic, whimsical appearance
- Continue the pattern down the entire length of your braid, maintaining consistent spacing between butterfly sections
- Secure the end with an elastic and adjust the loops as needed to create your desired level of fullness
- This style works particularly well on hair with balayage or highlights, as the dimensional color becomes more visible in the loops
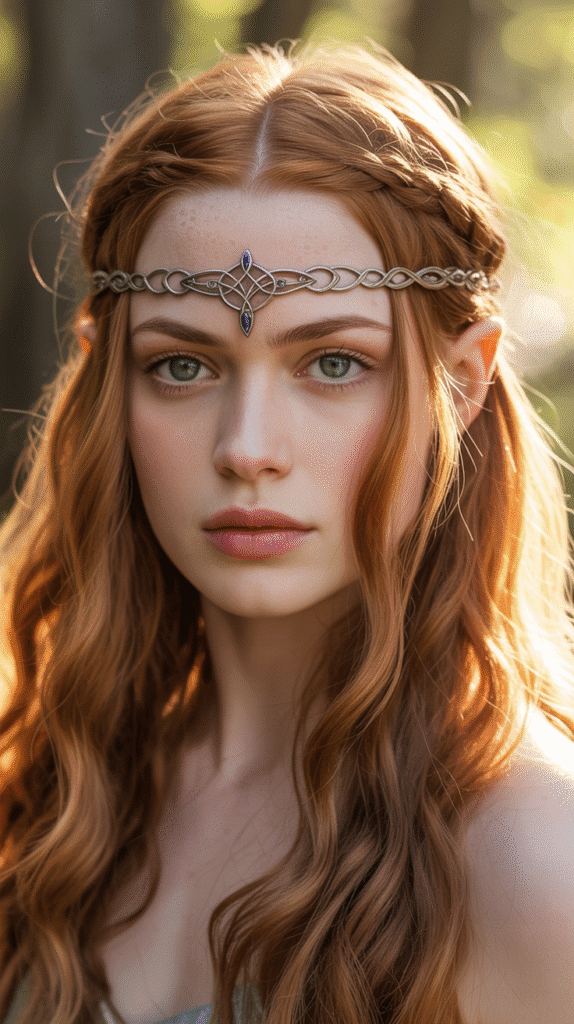
17. Elven Side Sweep with Metallic Accessories
Sometimes the most enchanting elven styles rely on gorgeous accessories rather than complex braiding techniques, allowing your long hair’s natural beauty to shine while adding fantasy elements.
The side sweep with metallic accessories creates an effortlessly elegant look perfect for formal fantasy occasions.
- Create a deep side part, sweeping the majority of your hair to one side for dramatic asymmetry
- Clip one or more metallic hair accessories along the part line, choosing pieces with Celtic designs, leaf motifs, or fantasy-inspired elements
- The accessories can be hair combs, decorative clips, or even chains that drape across the hair for added drama
- Allow your hair to flow naturally over one shoulder, enhancing the style with gentle waves or keeping it sleek depending on your preference
- Strategic placement of additional accessories throughout the swept hair creates points of interest without overwhelming the overall look
- This minimal-effort, maximum-impact style works beautifully when you want elegance without spending hours on intricate braiding
- The metallic elements catch light beautifully, adding dimension and drawing attention to your hair
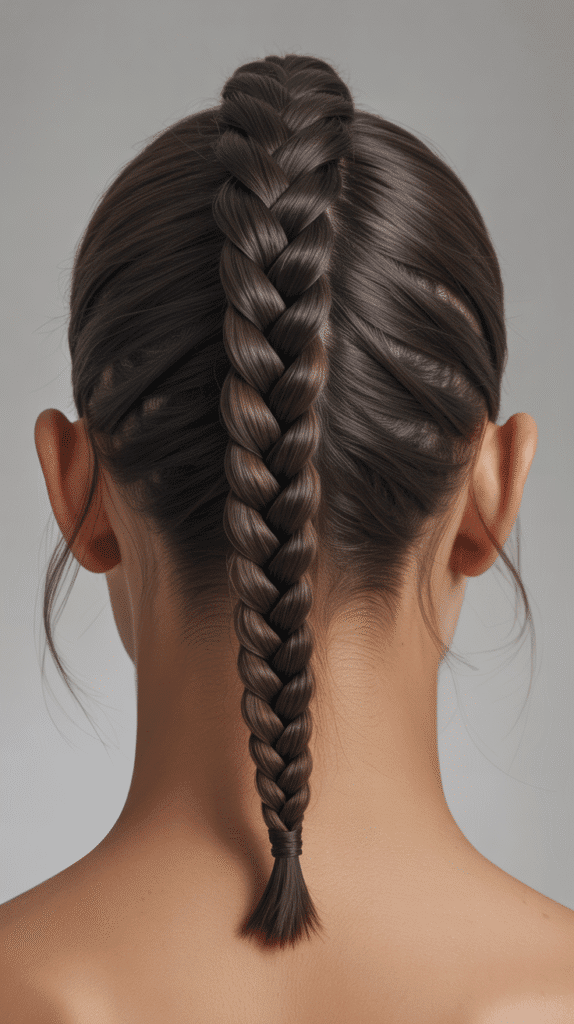
18. Triple Strand Pull-Through Braid
The pull-through braid creates the illusion of an incredibly complex woven pattern while actually using a series of simple ponytails.
This clever technique delivers impressive visual results without requiring advanced braiding skills.
- Section your hair into three vertical sections running from forehead to nape, creating left, center, and right divisions
- Create small ponytails down each section, spacing them evenly and using clear elastics for minimal visibility
- Split each ponytail in half and pull the next ponytail through the opening, creating the interlocking effect
- Continue this pattern down the length of all three sections, maintaining even spacing for a cohesive appearance
- Once complete, gently pull at the sections to create fullness and hide the elastics beneath the volume you’ve created
- The final result appears to be an intricate woven pattern but consists entirely of strategic ponytail placement
- This style works exceptionally well for those who struggle with traditional braiding but want a complex-looking result
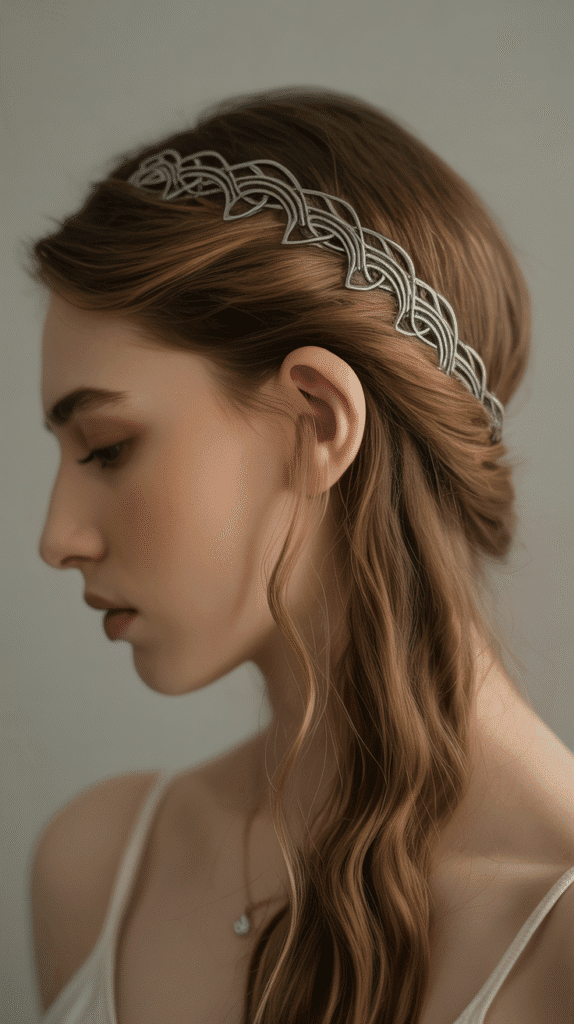
19. Circlet Braid with Loose Waves
The circlet braid creates a headband effect using your own hair, providing a perfect foundation for adding decorative circlets or crowns.
This combination of natural and ornamental elements epitomizes the elven aesthetic.
- Take a section of hair from behind one ear, keeping it relatively thin for a delicate circlet appearance
- Braid this section using your preferred braiding technique, though a standard three-strand braid works perfectly for this purpose
- Bring the braid across your forehead like a headband, positioning it where you’d typically place a traditional accessory
- Secure the braid behind the opposite ear with bobby pins, tucking the end discreetly into the hair to hide it from view
- The remaining hair can be styled in loose waves using a curling iron or left naturally straight depending on your preference
- Place a decorative metal circlet or crown over the braided headband for a layered, dimensional look
- This style beautifully frames the face and works for both casual fantasy styling and formal event
20. Asymmetrical French Braid
The asymmetrical French braid breaks from traditional symmetrical styling, creating a modern take on classic braiding that still maintains fantasy appeal.
This off-center approach adds visual interest and works particularly well for those who prefer contemporary interpretations of traditional elven styles.
- Create a deep side part rather than a center part, establishing the asymmetrical foundation for your braid
- Begin a French braid on the heavier side of the part, starting near the forehead and working diagonally across and down
- Add hair as you braid, but direct the braid’s path intentionally toward the opposite shoulder for maximum asymmetry
- The braid travels across the back of your head, creating a diagonal line that adds dynamic movement to the style
- Secure the braid at the opposite side, allowing the end to blend with loose hair or continuing the braid to the tips
- Leave the other side of your head smooth and sleek, creating contrast between the braided and unbraided sections
- This contemporary approach to elven styling works beautifully for everyday wear while maintaining fantasy elements
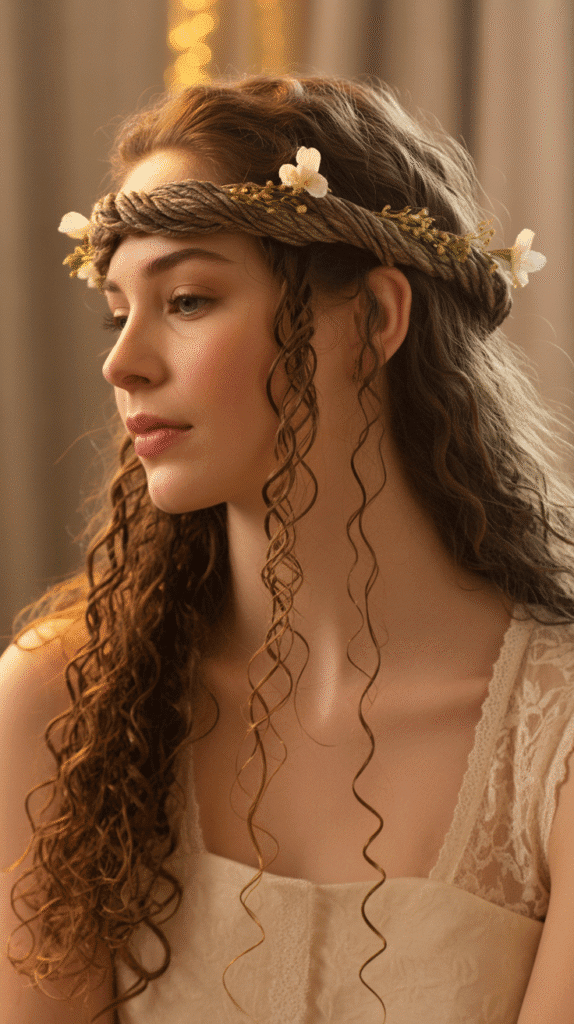
21. Flower-Woven Milkmaid Braid
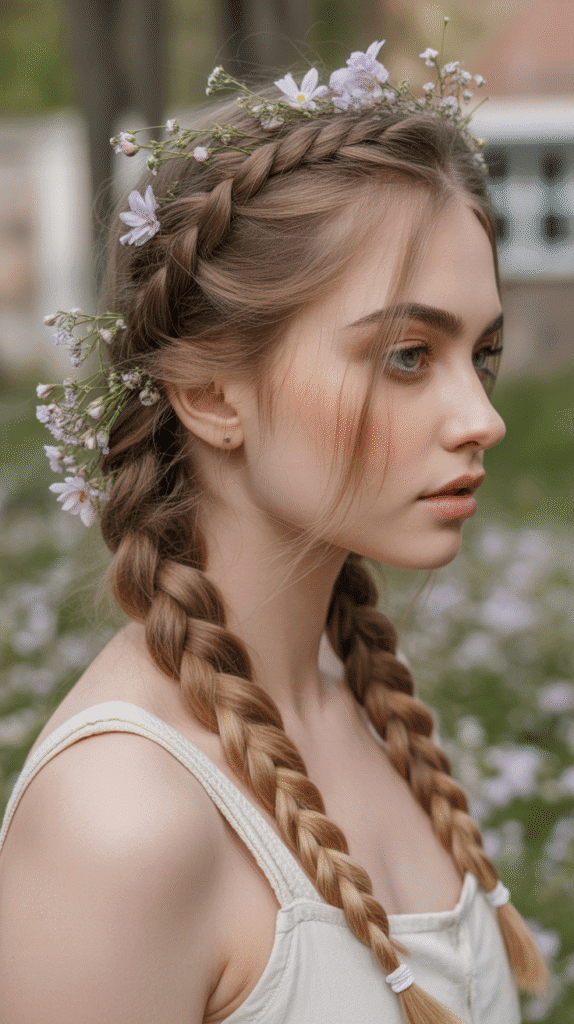
The milkmaid braid offers a soft, romantic aesthetic that becomes even more enchanting when fresh or artificial flowers are woven throughout.
This style works beautifully for outdoor summer events, weddings, and any occasion where you want to embody woodland fairy energy.
- Part your hair down the center and create two standard braids, one on each side, starting at the nape of the neck
- Wrap one braid over the top of your head like a headband, securing it with bobby pins along the opposite side
- Repeat with the second braid, positioning it either parallel to the first or slightly behind it for a stacked crown effect
- Tuck the ends of both braids discreetly beneath the opposite braid, creating a seamless circular appearance
- Carefully insert small flowers throughout the braids, tucking the stems into the woven sections for secure placement
- Choose flowers that complement your color scheme and won’t wilt quickly if using fresh blooms for extended wear
- This style beautifully showcases highlights and dimensional color while creating a soft, approachable fantasy aesthetic
22. Dragon Scale Braid
The dragon scale braid creates a textured, armor-like appearance that adds an edgy element to elven styling.
This advanced technique produces a truly unique result that commands attention and demonstrates serious braiding skill.
- Begin with a French braid at the crown, but modify the technique by creating alternating loops that stack upon each other
- As you add sections, pull them through previously created loops, building the scale-like pattern characteristic of this style
- The scales are formed by strategic pulling and looping rather than traditional over-under braiding patterns
- Work slowly and methodically, as this technique requires patience and precision to achieve the distinctive armor appearance
- Secure the end with an elastic once you’ve created scales down the entire length of your braid
- Gently adjust the scales as needed to ensure they’re uniform in size and properly positioned for maximum visual impact
- This bold style works exceptionally well for fantasy events, cosplay, or anyone wanting to make a dramatic statement
23. Twisted Low Bun with Wispy Tendrils
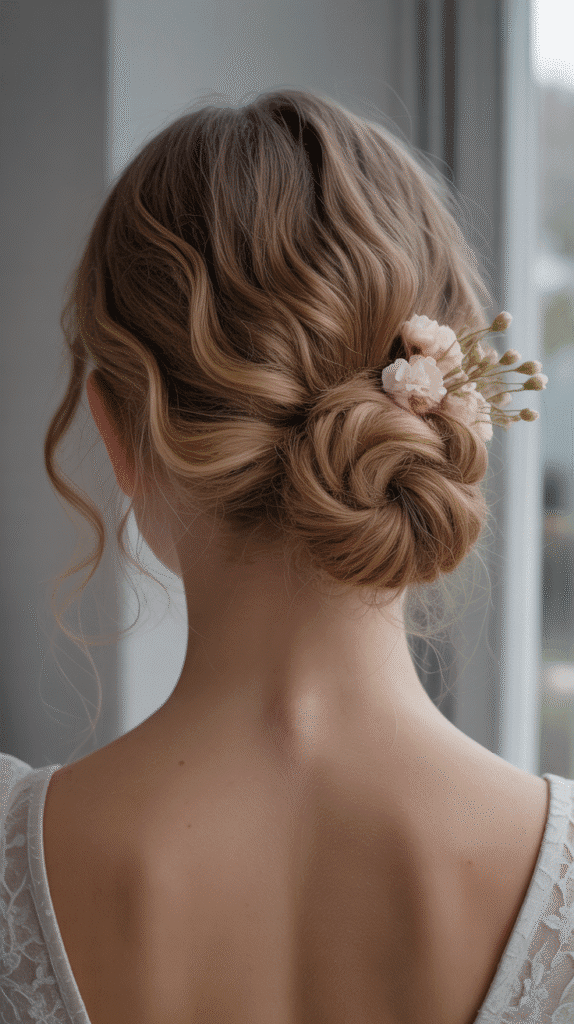
The twisted low bun offers an elegant, refined take on elven hairstyling that works beautifully for formal occasions while maintaining the soft, romantic quality essential to fantasy aesthetics.
This sophisticated updo demonstrates that elven styles can be both polished and approachable.
- Gather your hair at the nape of your neck, keeping the gathering loose and avoiding pulling the hair too tightly for a softer appearance
- Divide the gathered hair into two or three sections, twisting each section individually before wrapping it around itself
- Coil the twisted sections into a low bun, securing with bobby pins as you wrap to ensure everything stays in place
- Leave several thin tendrils loose around your face, either naturally falling from the styling process or pulled out intentionally
- The wispy pieces soften the overall look and prevent the style from appearing too severe or formal
- Add small decorative pins, flowers, or jeweled accessories throughout the bun for added fantasy flair
- This versatile style transitions beautifully from daytime events to evening affairs with appropriate accessories
24. Half-Up Infinity Braid
The infinity braid creates a stunning figure-eight pattern that adds mathematical precision and artistic flair to your hairstyle.
This eye-catching technique transforms the top section of your hair into a genuine conversation piece.
- Section off the top half of your hair from temple to temple, clipping the bottom section away during the styling process
- Divide the top section into two strands that will form the basis of your infinity loop pattern
- Create figure-eight patterns by crossing the strands over and under each other in a specific sequence that forms the infinity symbol
- Add small sections of hair as you work across the head, similar to French braiding but following the infinity pattern instead
- Secure the end of the infinity braid with a small elastic where it meets the loose hair at the back
- The remaining hair flows freely beneath the intricate infinity pattern, creating beautiful contrast between complexity and simplicity
- This advanced technique requires practice but delivers truly unique results that showcase serious styling skill
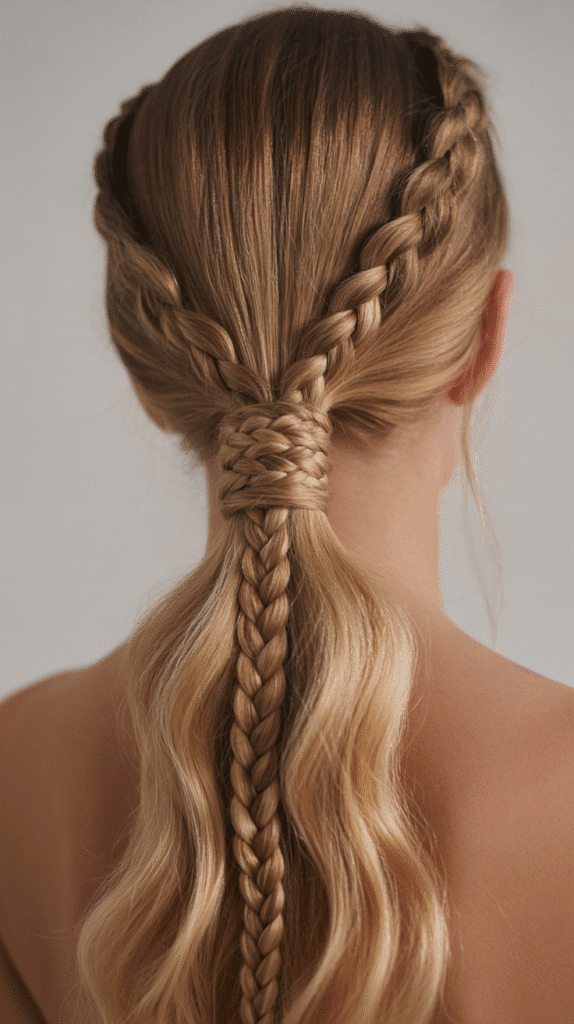
25. Wrapped Ponytail with Multiple Braids
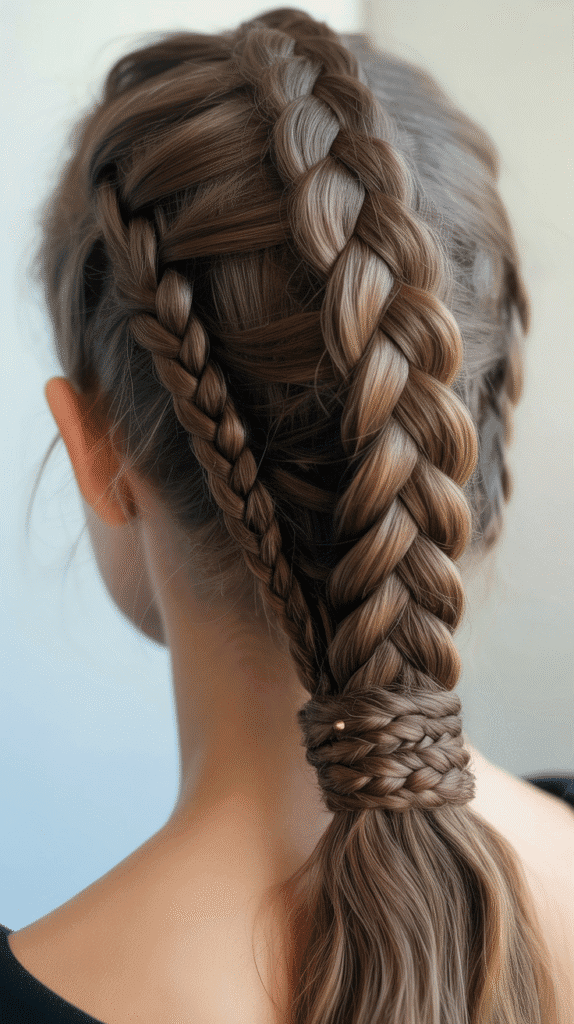
This style combines the practicality of a secured ponytail with the visual interest of multiple braiding techniques, creating a look that’s both functional and fantastical.
The layered braids add dimension and texture that elevates a simple ponytail into something special.
- Gather your hair into a ponytail at your desired height, securing it with an elastic band
- Divide the ponytail into multiple small sections (typically four to six sections depending on hair thickness)
- Create different types of braids with each section: three-strand, fishtail, rope braid, or four-strand braids for variety
- The combination of different braiding techniques creates visual interest and texture throughout the ponytail length
- Take one additional small section and wrap it around the elastic base, securing with bobby pins to conceal the band
- Allow a few face-framing pieces to remain loose for softness, preventing the style from appearing too severe
- This versatile approach works for both casual daily wear and more formal fantasy-themed events
26. Elven Mohawk with Side Braids
This bold interpretation of elven styling combines the edginess of a mohawk silhouette with the romance of intricate side braiding.
The result is a fierce yet feminine look that proves fantasy hairstyles can be both warrior-like and beautiful.
- Create three vertical sections by parting your hair into a center mohawk strip and two side sections
- French braid each side section tightly against the scalp, working from forehead to nape in parallel lines
- The center section can be left voluminous and loose, teased for height, or styled into a dramatic center braid
- This style creates the mohawk silhouette without requiring shaved sides, making it a temporary, event-friendly option
- Secure the side braids at the nape, either joining them with the center section or keeping them separate for defined lines
- Add decorative elements like leather cords, metal rings, or chains throughout the braids for enhanced warrior aesthetic
- This powerful style works beautifully for costume events, themed photoshoots, or anyone embracing their inner warrior elf
27. Romantic Messy Side Bun

The messy side bun embraces imperfection and organic texture, creating an effortlessly romantic look that appears as though you just returned from a magical forest adventure.
This relaxed approach to elven styling offers accessibility and charm in equal measure.
- Gather your hair loosely to one side at approximately ear level, allowing pieces to escape naturally for an intentionally undone appearance
- Twist the gathered hair loosely, wrapping it around itself to form a bun without pulling everything too tightly or neatly
- Secure the bun with bobby pins placed strategically throughout, using only enough pins to hold the shape while maintaining movement
- Purposefully pull out face-framing pieces, wispy tendrils, and small sections throughout the bun to enhance the messy, organic aesthetic
- The beauty of this style lies in its imperfection, so resist any urge to smooth flyaways or create symmetry
- Add small flowers, decorative pins, or delicate hair jewelry throughout the bun for whimsical fantasy touches
- This forgiving style works beautifully for all hair textures and requires minimal time investment while delivering maximum romantic impact
28. Geometric Braided Headband

The geometric braided headband creates clean lines and architectural interest that demonstrates the more structured side of elven beauty.
This modern interpretation combines fantasy elements with contemporary styling for a look that feels both timeless and current.
- Section off a strip of hair along your hairline from temple to temple, approximately two inches deep
- Divide this section into four or five smaller subsections that will form the geometric pattern
- Create a series of small braids that connect and intersect, forming triangular or diamond-shaped patterns across your forehead area
- Secure each intersection point with small bobby pins or clear elastics to maintain the geometric structure
- The remaining hair hangs freely beneath the geometric headband, flowing naturally or styled with waves as preferred
- This technique requires planning and precision to achieve clean geometric shapes, but the result is striking and unique
- The contrast between the structured headband and flowing loose hair creates beautiful visual balance
29. Stacked Dutch Braids with Ribbons
Stacked Dutch braids create impressive dimension and visual height while incorporating decorative ribbons that enhance the fantasy aesthetic.
This style offers both security and striking beauty, making it ideal for active pursuits or all-day events.
- Create three horizontal sections across your head, stacking them from the crown downward toward the nape
- Begin with the top section, creating a Dutch braid that travels horizontally across the head from one side to the other
- Incorporate ribbon into this first braid by laying it alongside the hair as you begin braiding
- Create a second Dutch braid directly beneath the first, also traveling horizontally and incorporating ribbon in a complementary or contrasting color
- Add a third horizontal braid beneath the second, maintaining consistent spacing between all three braided rows
- The stacked effect creates incredible dimension and the ribbons add color, texture, and fantasy flair throughout
- Secure the ends at the sides with bobby pins, allowing any remaining loose hair to flow freely at the nape
30. Crown of Thorns Braid
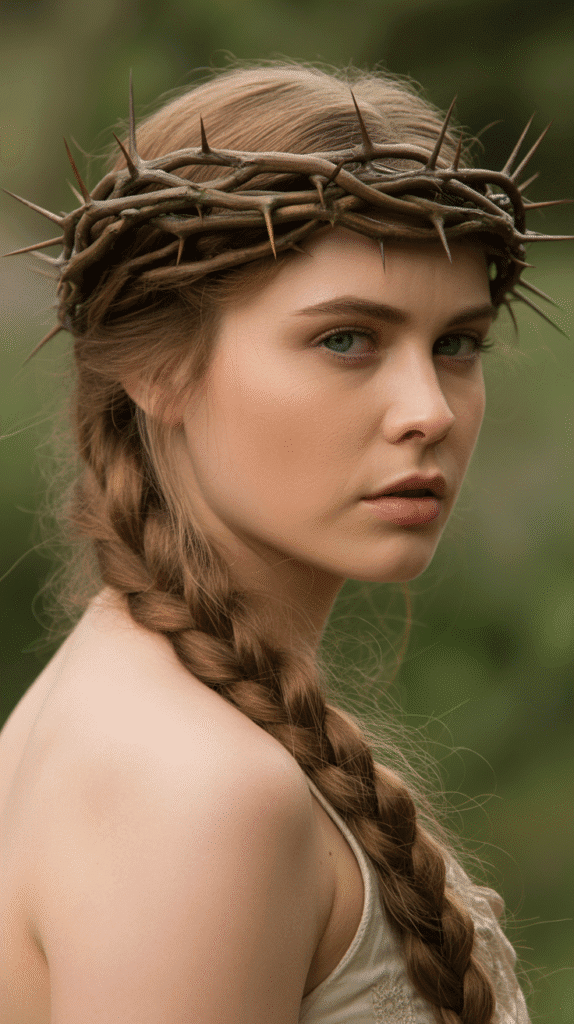
The crown of thorns braid creates a stunning halo effect with strategic loops and twists that resemble thorny vines encircling your head.
This dramatic style serves as the perfect culmination of our elven hairstyle collection, combining complexity with breathtaking beauty.
- Begin with a Dutch lace braid (adding hair only from one side) that travels around the perimeter of your head like a crown
- As you braid, periodically create small loops by pulling sections partially through rather than completing the braiding motion fully
- These loops create the “thorn” effect, adding texture and dimension to the crown circling your head
- Continue the lace braid all the way around your head until you return to your starting point near the forehead
- Secure the end by tucking it beneath the beginning of the braid, creating a seamless circular crown
- The remaining hair flows freely beneath the thorny crown, creating beautiful contrast between the structured crown and flowing locks
- This advanced technique requires patience and practice but creates a truly show-stopping result worthy of an elven queen
Essential Tips for Maintaining Elven Hairstyles
Creating these beautiful fantasy hairstyles requires understanding some fundamental maintenance techniques that ensure your look lasts throughout the day.
The following tips will help you achieve professional-quality results regardless of which style you choose from this collection.
- Always start with clean, properly conditioned hair that has been allowed to dry to at least 80% before styling, as damp hair creates less secure holds
- Apply a light texturizing spray or dry shampoo to freshly washed hair, as hair with slight texture holds braids and pins better than silky-smooth strands
- Invest in quality bobby pins that match your hair color exactly, as visible pins detract from the magical fantasy aesthetic you’re creating
- Use small, clear elastic bands for temporary holds during the styling process, removing them once bobby pins secure the final look
- <a href=”https://www.healthline.com/health/beauty-skin-care/how-to-make-hairstyles-last-longer”>Proper hair preparation techniques</a> significantly extend the longevity of complex styles and prevent frustrating mid-day collapses
- Set completed styles with a flexible-hold hairspray applied from 10-12 inches away, avoiding the stiff, crunchy texture that heavy-handed application creates
- For multi-day events like Renaissance fairs or fantasy conventions, sleep with your hair in a protective silk scarf to maintain the style overnight
Choosing the Right Accessories for Your Elven Look
The accessories you select can transform a simple hairstyle into a truly magical elven creation, adding personality and enhancing the fantasy aesthetic.
Understanding which accessories work best for different styles ensures your final look feels cohesive and intentional rather than randomly assembled.
- Fresh flowers work beautifully for outdoor summer events but wilt quickly, so consider high-quality silk flowers for extended wear situations
- Metallic hair accessories with Celtic knots, leaf designs, or nature-inspired motifs instantly enhance the elven aesthetic without overwhelming the hairstyle
- Leather cords and suede strips add warrior elf energy to more structured braided styles, creating an adventurous, practical appearance
- Ribbons in jewel tones or earth tones complement fantasy hairstyles while adding color and movement that catches light beautifully
- Delicate chains that drape across braids or connect multiple points create ethereal, magical connections throughout your hairstyle
- Crystal-adorned pins catch light and add subtle sparkle without appearing overly modern or out of place in fantasy styling
- When selecting accessories, consider the overall tone of your event and choose pieces that enhance rather than compete with your chosen hairstyle
Hair Health Considerations for Long Fantasy Hair
Maintaining the health of your long hair ensures you can continue creating these beautiful elven styles without damage or breakage.
The following health-focused practices support strong, beautiful hair that serves as the perfect canvas for fantasy styling.
- Regular trims every 8-12 weeks prevent split ends from traveling up the hair shaft and causing breakage that shortens your length
- Deep conditioning treatments once weekly restore moisture and protein balance, keeping hair strong enough to withstand frequent styling
- Heat protectant sprays create a barrier between your hair and hot tools, preventing the cumulative damage that leads to dry, brittle strands
- Avoid over-washing your hair, as daily shampooing strips natural oils that protect and nourish your long locks
- Use wide-tooth combs on wet hair rather than brushes, as wet hair is more vulnerable to breakage and rough handling causes damage
- Sleep on silk or satin pillowcases that reduce friction and prevent the tangling and breakage that cotton pillowcases create
- Consider taking biotin supplements or eating biotin-rich foods to support hair growth and strength from the inside out
Adapting Elven Styles for Different Hair Types
While these hairstyles were designed for long straight hair, understanding how to adapt them for various textures ensures everyone can embrace their inner elf.
The modifications below help you work with your natural hair texture rather than against it.
- Wavy hair naturally enhances romantic styles like loose updos and waterfall braids, as the texture adds volume and dimension without additional effort
- Curly hair should be stretched slightly before intricate braiding to make the pattern more visible, using a blow dryer with diffuser attachment
- Fine hair benefits from teasing at the roots before creating crown braids or updos, adding necessary volume that prevents flat, lifeless appearances
- Thick hair may require sectioning into smaller portions when creating complex braids to maintain control and ensure even, manageable results
- Hair with natural texture holds pins and elastics more securely than silky straight hair, requiring fewer securing points throughout your style
- Extremely straight, slippery hair benefits from texturizing products that create grip and help braids maintain their shape throughout the day
- Consider your hair’s natural movement and work with it rather than fighting against it for the most authentic, comfortable results
Photography Tips for Showcasing Your Elven Hairstyle
Once you’ve created a beautiful elven hairstyle, capturing it properly through photography helps you remember and share your fantasy creation.
These photography-focused tips ensure your hard work translates beautifully into images.
- Natural outdoor lighting during golden hour (the hour after sunrise or before sunset) creates the most flattering, magical illumination for fantasy photography
- Position yourself so the light comes from slightly behind or to the side, creating dimensional lighting that highlights the texture of braids and curls
- Choose backgrounds that complement the fantasy aesthetic, such as forests, gardens, stone architecture, or medieval-style settings
- Capture multiple angles including front, side, back, and three-quarter views to showcase different elements of complex hairstyles
- Include close-up detail shots that highlight intricate braiding patterns, accessories, or unique techniques you’ve incorporated
- Have your photographer shoot from slightly above eye level for the most flattering angle that showcases both your face and hairstyle
- Consider the overall composition, including clothing and accessories that enhance rather than distract from your beautiful hair creation
Conclusion
Throughout this comprehensive guide to 30 Elegant Elf Hairstyles for Long Hair Straight Out of a Fairytale, we’ve explored an enchanting array of braiding techniques, styling methods, and creative approaches that transform ordinary long hair into extraordinary fantasy creations.
From the accessible simplicity of romantic loose waves adorned with flower crowns to the impressive complexity of dragon scale braids and Celtic knot patterns, these hairstyles offer something for every skill level and occasion.
Whether you’re preparing for a themed event, seeking everyday magic, or simply wanting to express your creative side through your hair, these elven-inspired styles provide endless possibilities for self-expression and artistic exploration.
The key to successfully executing these fantasy hairstyles lies in patience, practice, and embracing the organic beauty that comes from working with your hair’s natural texture rather than against it.
Remember that even the most complex styles become manageable once you understand the fundamental techniques, and that imperfection often adds to the charm and authenticity of fantasy-inspired looks.
As you experiment with these thirty different styles, you’ll discover which techniques resonate most with your personal aesthetic and which work best with your unique hair type, building a repertoire of magical looks that bring fairytale beauty into your everyday life.
May these elven hairstyles inspire you to embrace your inner fantasy character and create looks that make you feel as enchanting and powerful as the mythical beings who inspired them.