Step into a world where cascading braids meet royal elegance and every strand tells a story of enchantment.
The allure of medieval princess hairstyles transcends time, bringing together the mystique of ancient kingdoms with the romance of fairytale dreams.
Whether you’re preparing for a Renaissance fair, a themed wedding, a costume event, or simply want to channel your inner royalty, these hairstyles offer the perfect blend of historical authenticity and magical charm.
From intricate braided crowns adorned with delicate ribbons to flowing locks embellished with jeweled accessories, each style in this collection captures the essence of medieval grandeur.
This comprehensive guide to 30 Fairytale-Inspired Medieval Hairstyles for Princesses will walk you through elaborate updos, romantic half-up styles, and cascading arrangements that would make any storybook character envious.
Discover the techniques, accessories, and styling secrets that will transform your hair into a masterpiece worthy of castle halls and royal courts.
1. The Classic Braided Crown

The braided crown stands as one of the most iconic medieval hairstyles, wrapping around the head like a natural tiara.
This timeless style was favored by noblewomen throughout history for its regal appearance and practical nature.
- Begin by parting your hair down the middle to create two equal sections for symmetrical braiding.
- Create two standard three-strand braids on each side, starting from behind your ears and braiding all the way to the ends.
- Wrap the first braid across the top of your head like a headband, securing it with bobby pins behind the opposite ear.
- Take the second braid and wrap it parallel to the first, creating a doubled crown effect for added volume and impact.
- Secure all loose ends underneath the braids and use hairspray to tame any flyaways for a polished finish.
- Embellish with small pearl pins, delicate flowers, or a jeweled headband to enhance the royal aesthetic.
2. Cascading Waterfall Braid
The waterfall braid creates an illusion of hair flowing through a braided pattern like water over stones.
This romantic style became synonymous with fairytale princesses and woodland nymphs in medieval lore.
- Start with a small section of hair near your temple and divide it into three equal strands.
- Begin a regular braid but drop the front strand after each crossover, allowing it to cascade down naturally.
- Pick up a new section of hair to replace each dropped strand, continuing the pattern across your head.
- The dropped strands create the “waterfall” effect as they flow freely through the braided structure.
- Continue the braid around the back of your head or stop at the opposite ear depending on your preference.
- Secure the end with a clear elastic and gently pull at the braid to create a softer, more romantic appearance.
- Curl the loose hanging hair with a curling iron to enhance the fairytale effect and add dimension.
3. Medieval Princess Bun with Veil
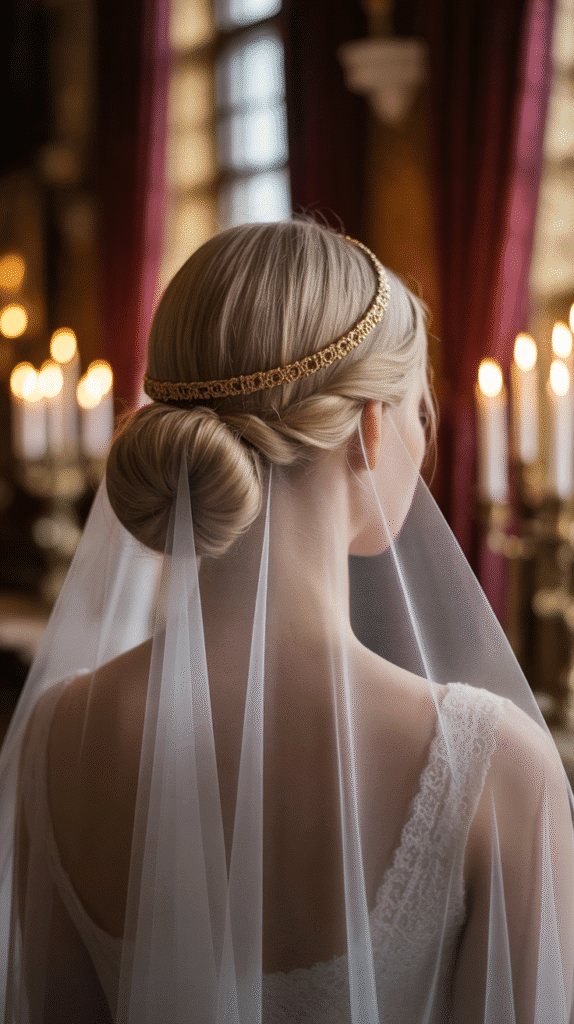
The veiled bun represents the height of medieval modesty and elegance, often worn by queens and noble ladies during formal ceremonies.
This sophisticated style combines a sleek low bun with the ethereal beauty of a flowing veil.
- Brush all your hair back smoothly to create a sleek foundation without any bumps or irregular sections.
- Gather your hair at the nape of your neck and twist it into a tight rope-like spiral.
- Coil the twisted hair around itself to form a low bun and secure it with bobby pins inserted in multiple directions.
- Place a decorative circlet or metal headband across your crown to anchor the veil properly.
- Drape a sheer veil over the crown and bun, allowing it to flow down your back for maximum dramatic effect.
- Secure the veil with additional pins tucked discreetly into the bun structure for stability throughout the day.
- Add jeweled pins or small brooches to the bun for extra ornamentation befitting a princess.
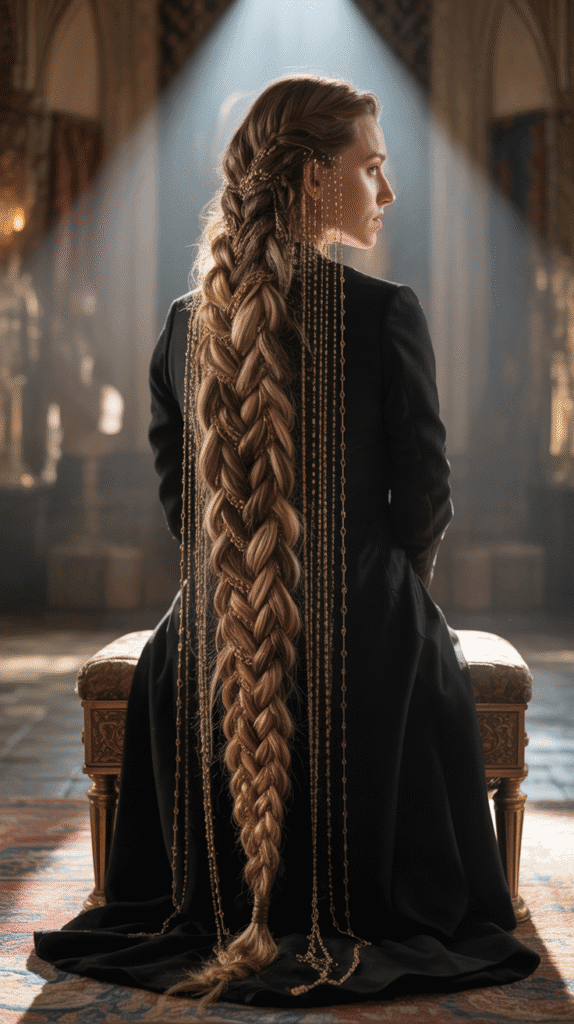
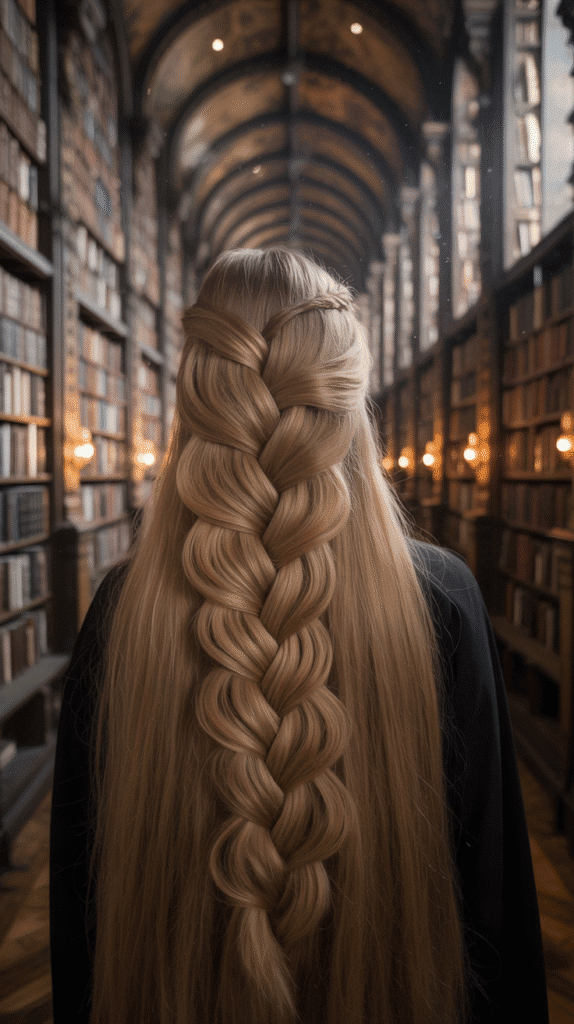
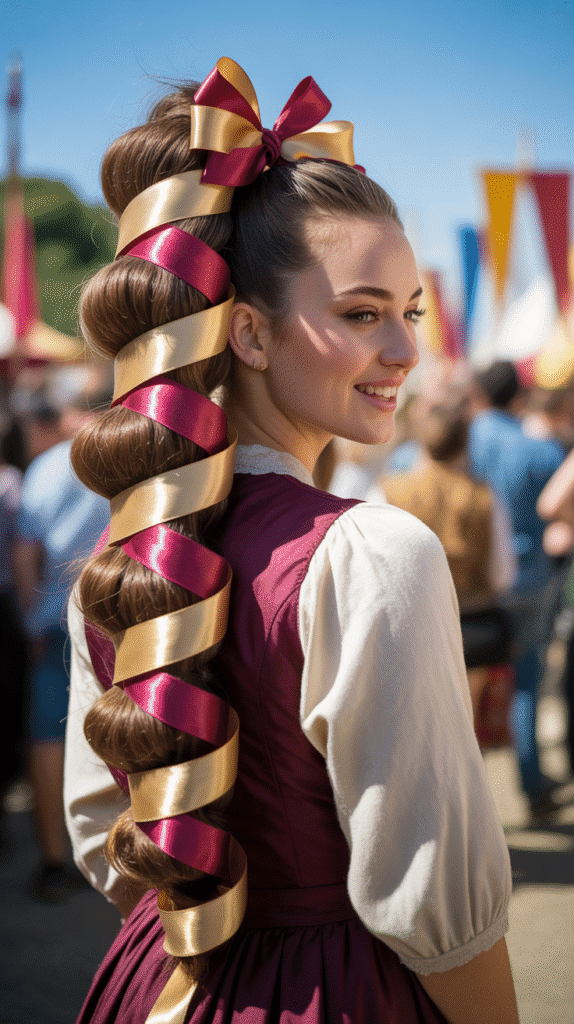
4. The Rapunzel Ultra-Long Braid
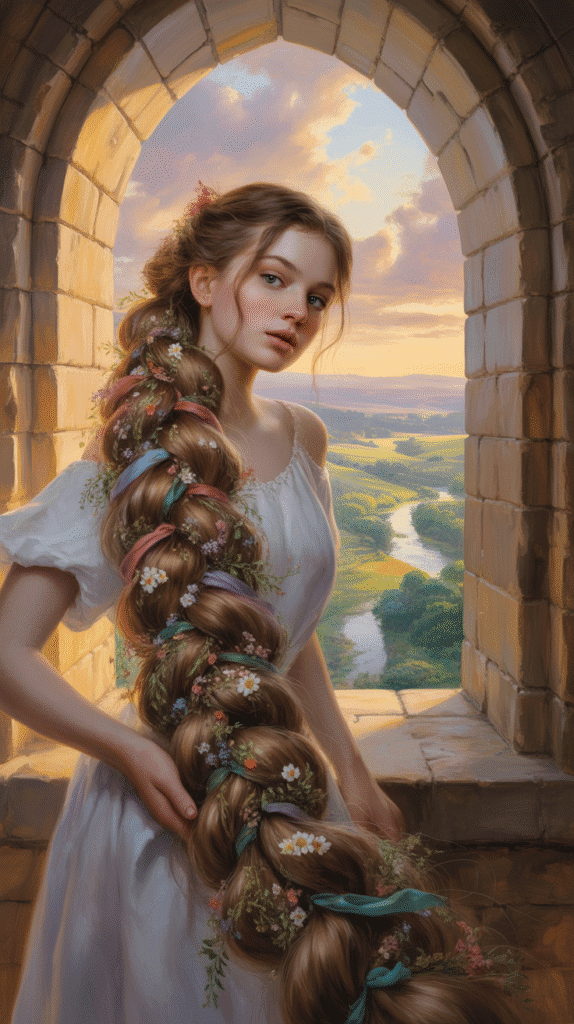
Inspired by the most famous fairytale of flowing locks, this single dramatic braid celebrates length and volume.
The Rapunzel braid works beautifully for those blessed with long hair or those using extensions to achieve the look.
- Brush through your entire length of hair to remove all tangles and create a smooth canvas.
- Apply a volumizing mousse or texturizing spray to add grip and fullness before braiding begins.
- Gather all hair at the nape of your neck or slightly off to one side for a relaxed appearance.
- Divide the hair into three thick sections and begin a tight traditional braid from top to bottom.
- Maintain consistent tension throughout the braiding process to prevent loose sections from forming irregularly.
- Once you reach the end, secure with a ribbon tied in a bow or a decorative hair tie.
- Gently pancake the braid by pulling at the outer edges to create width and the illusion of even greater volume.
- Weave ribbons, small flowers, or golden thread through the braid for an authentic medieval touch.
5. Double Dutch Braids with Ribbons
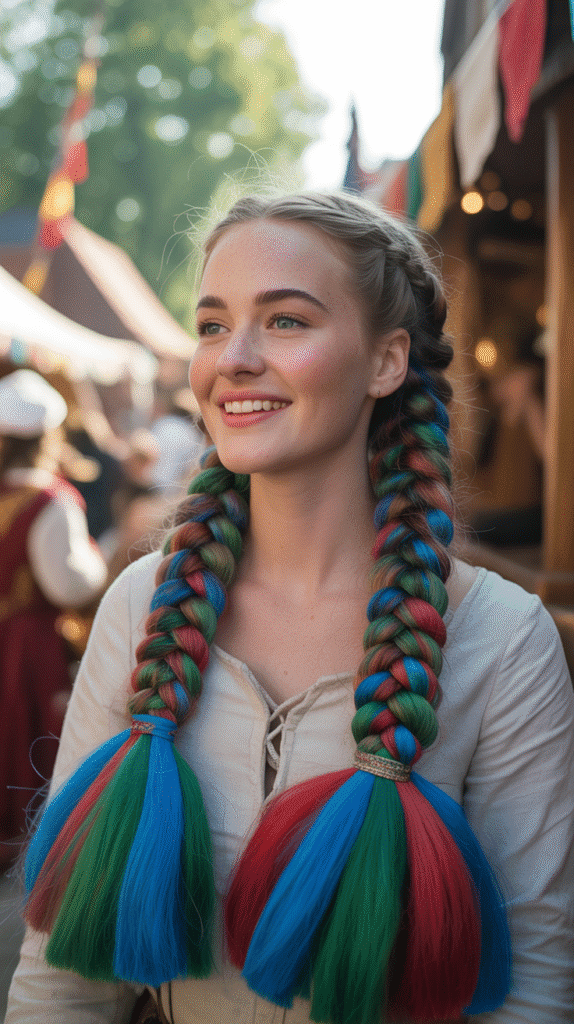
Double Dutch braids create a symmetrical, sporty yet elegant look that medieval maidens might have worn for both practical daily activities and special occasions.
The addition of ribbons elevates this style from simple to spectacular.
- Part your hair straight down the middle from forehead to nape for perfect symmetry between both sides.
- Take a ribbon approximately three times the length of your hair for each braid to ensure adequate material.
- Begin the Dutch braid on one side by crossing sections under rather than over for the inverted effect.
- Incorporate the ribbon as a fourth strand or weave it around the braid sections as you progress downward.
- Keep the braid tight to the scalp at the top and gradually allow it to loosen toward the ends.
- Repeat the identical process on the opposite side to maintain balance and visual harmony.
- Secure both braids with matching ribbon bows tied at the ends for a cohesive, polished look.
- Apply light hairspray to keep the style intact and prevent the ribbons from slipping throughout the day.
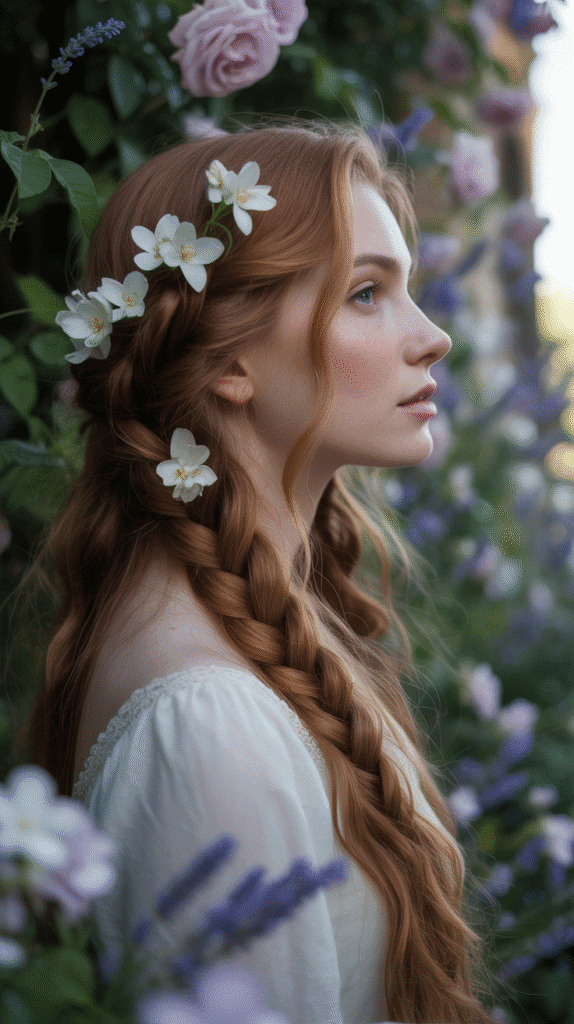
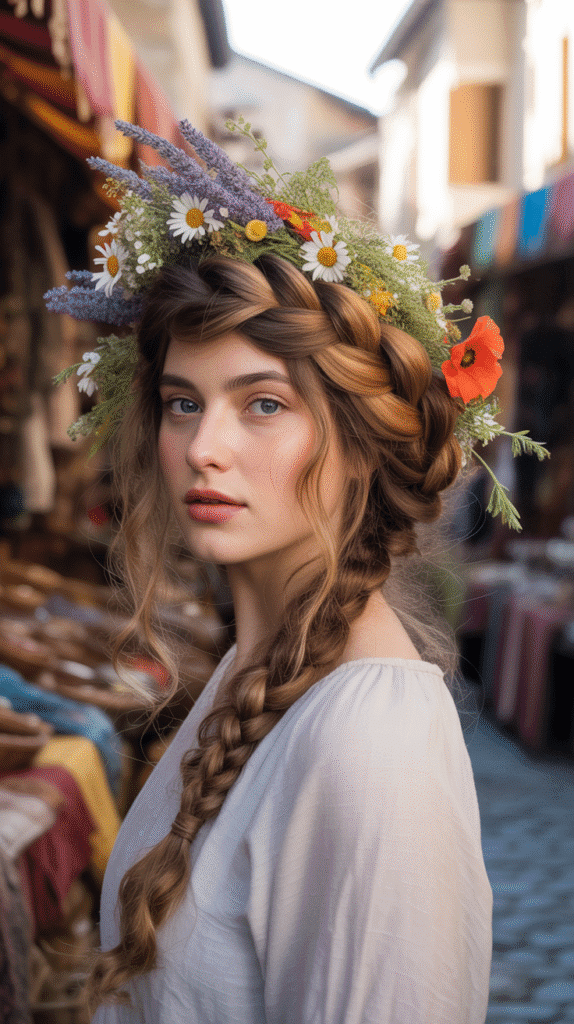
6. The Floral Crown Halo
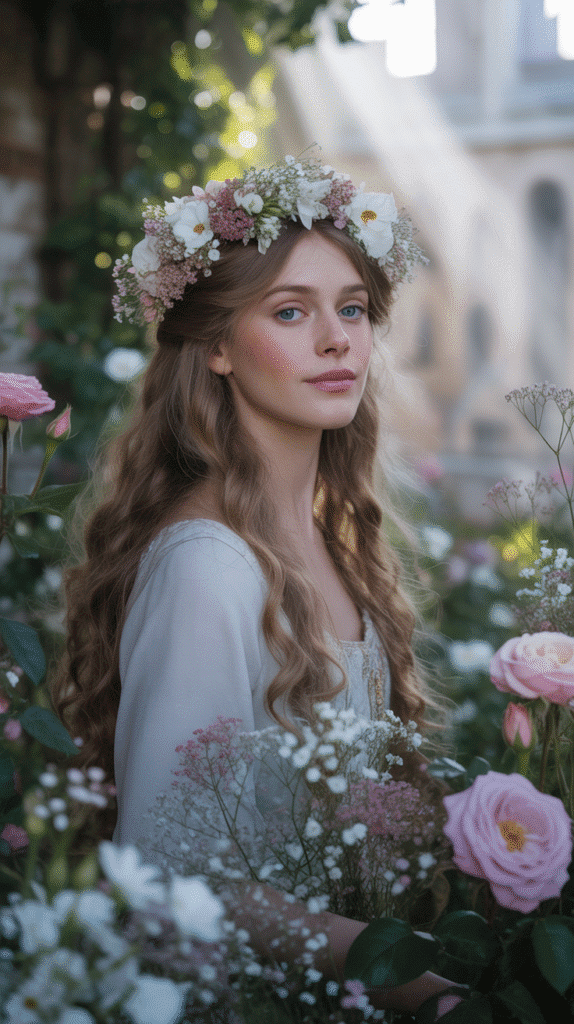
Nothing captures the essence of a woodland princess quite like hair adorned with a crown of fresh or artificial flowers.
This style combines loose, romantic waves with a circular floral arrangement that sits like a natural crown.
- Start with hair that has been curled or naturally wavy for the best texture and volume.
- Create a loose center or side part depending on which flatters your face shape most effectively.
- Use a pre-made floral crown or create your own using floral wire and fresh or silk flowers.
- Position the floral crown approximately one to two inches back from your hairline for proper placement.
- Secure the crown with bobby pins inserted through the flower stems or base into your hair underneath.
- Allow hair to flow freely over your shoulders or partially pin back sections for variation in styling.
- Pull out a few face-framing pieces to soften the overall look and create a more natural appearance.
- Add smaller individual flowers pinned throughout the loose hair for a cohesive, enchanted forest aesthetic.
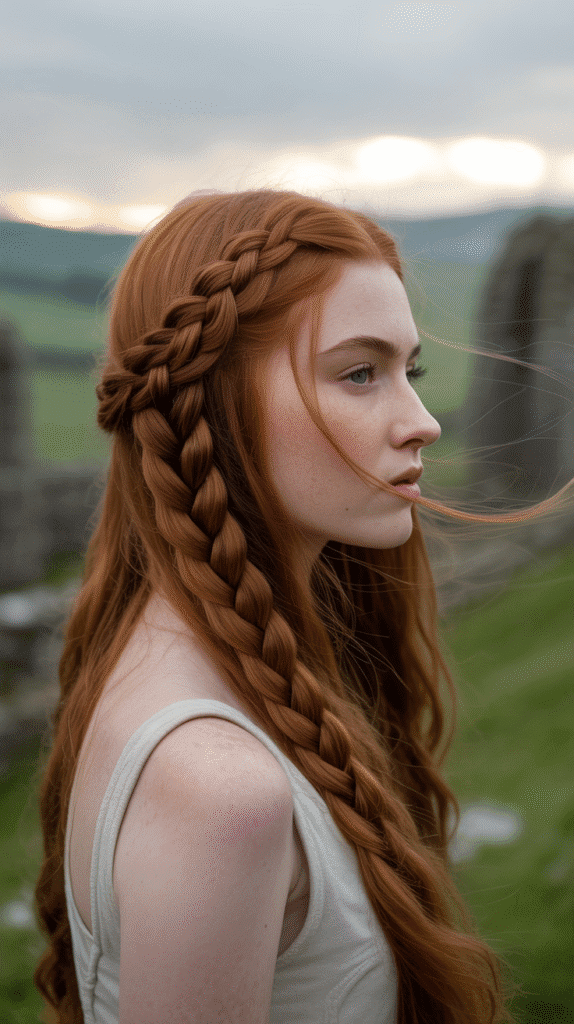
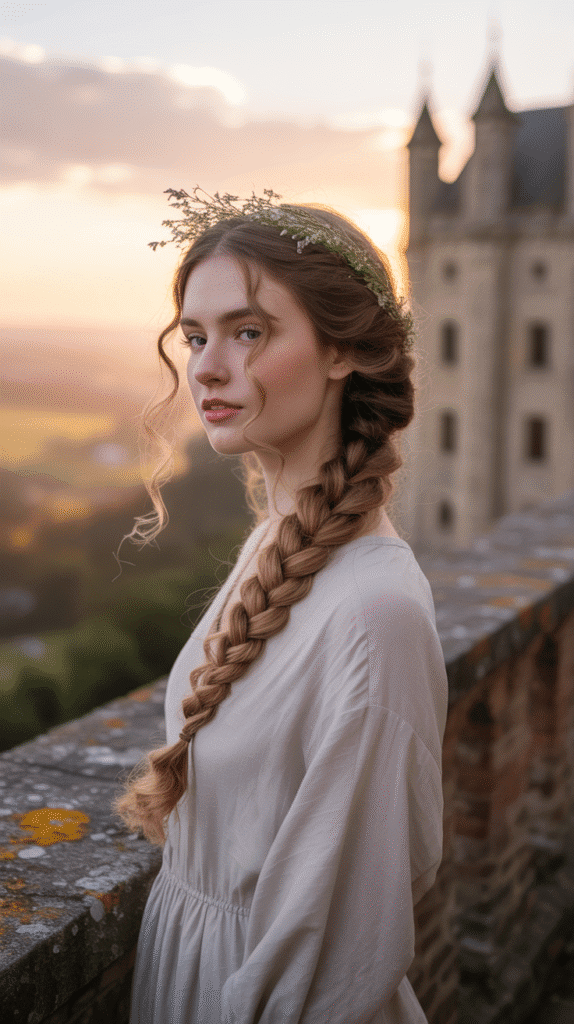
7. Medieval Side Braid with Hair Jewelry
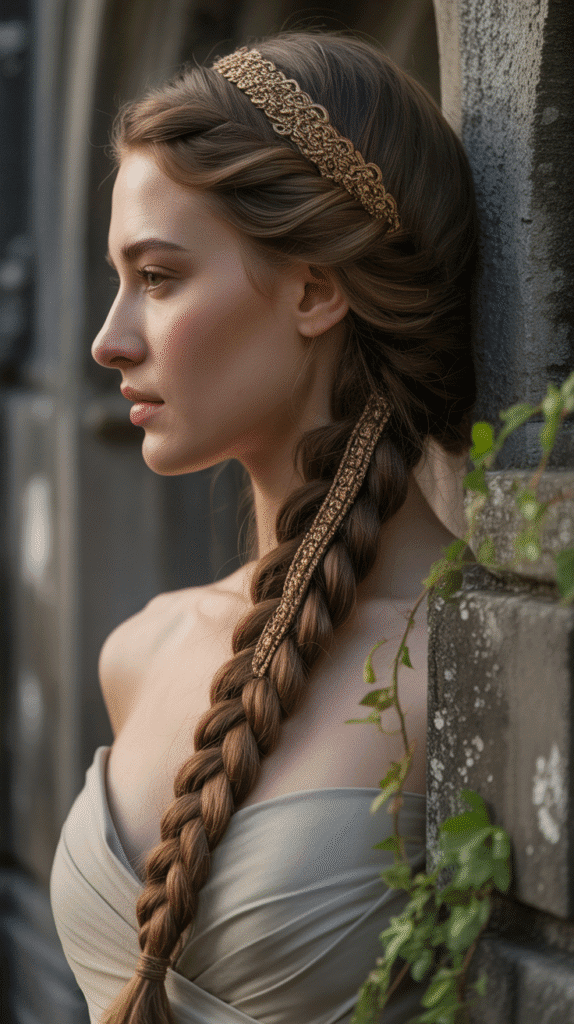
The side braid offers an asymmetrical elegance that was popular among young noblewomen seeking a romantic yet sophisticated appearance.
Hair jewelry elevates this simple style into something truly regal.
- Sweep all your hair over one shoulder, choosing the side that best complements your natural hair fall.
- Begin with a loose section at your temple and start a French or regular braid working downward.
- As you braid, thread chains of hair jewelry through the sections for continuous embellishment throughout.
- Maintain a looser tension for a romantic, softer appearance rather than a tight athletic braid.
- Secure the end with a small elastic and wrap a section of hair around it to conceal the band.
- Attach larger statement pieces like jeweled clips or medieval-style brooches at the braid’s origin point.
- Gently pull at the braid’s outer loops to create dimension and showcase the jewelry more prominently.
- Allow a few wispy strands to frame your face for a softer, more approachable princess appearance.
8. The Guinevere Half-Up Twist

Named after the legendary Queen Guinevere, this half-up style combines elegance with practicality.
The twisted sections create a crown-like effect while leaving the remaining hair to flow freely down the back.
- Section off the top half of your hair from temple to temple, leaving the bottom half free.
- Divide the top section into two equal parts on either side of a center part.
- Twist each section tightly as you bring them toward the back center of your head.
- Cross the twisted sections over each other and secure them with an ornate barrette or decorative pins.
- Ensure the twists are tight enough to hold but not so tight they cause discomfort or headaches.
- The remaining loose hair can be left straight, curled, or gently waved depending on your preference.
- Add a jeweled clip or medieval-style clasp at the meeting point of the twists for royal embellishment.
- Tease the crown area slightly before twisting for added height and a more dramatic silhouette.
9. Lattice Braid Updo
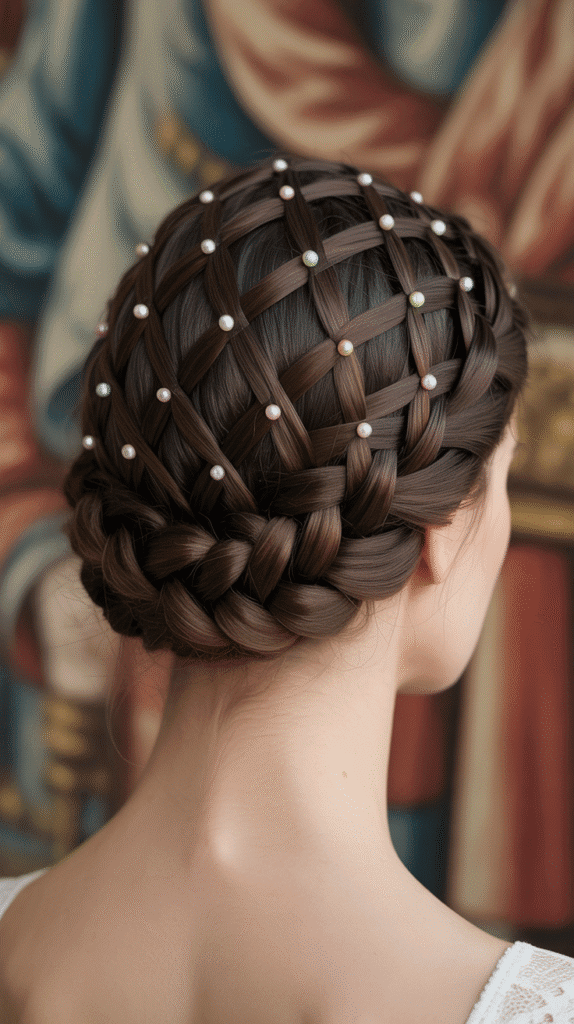
The lattice braid creates an intricate woven pattern that resembles medieval architectural details or decorative metalwork.
This complex style showcases advanced braiding skills and creates a stunning visual impact.
- Begin with hair that has some texture or apply a texturizing product for better grip and hold.
- Section your hair into multiple horizontal layers from the crown down to the nape of your neck.
- Create small braids from each section and secure them temporarily with small clips or elastics.
- Weave the braids over and under each other in a basket-weave or lattice pattern across your head.
- Pin each crossover point securely with bobby pins to maintain the structure throughout wear time.
- Tuck all remaining ends into a low bun or secure them invisibly within the lattice structure itself.
- Add small pearls, crystals, or jeweled pins at each intersection point to enhance the geometric beauty.
- Finish with strong-hold hairspray to ensure the intricate pattern remains intact for hours or days.
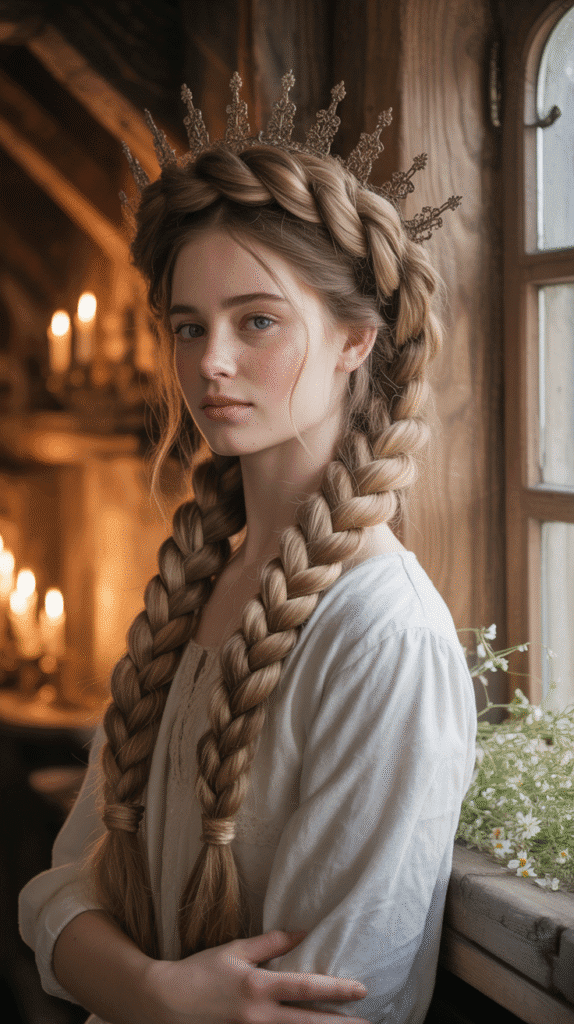
10. Crowned Braided Updo
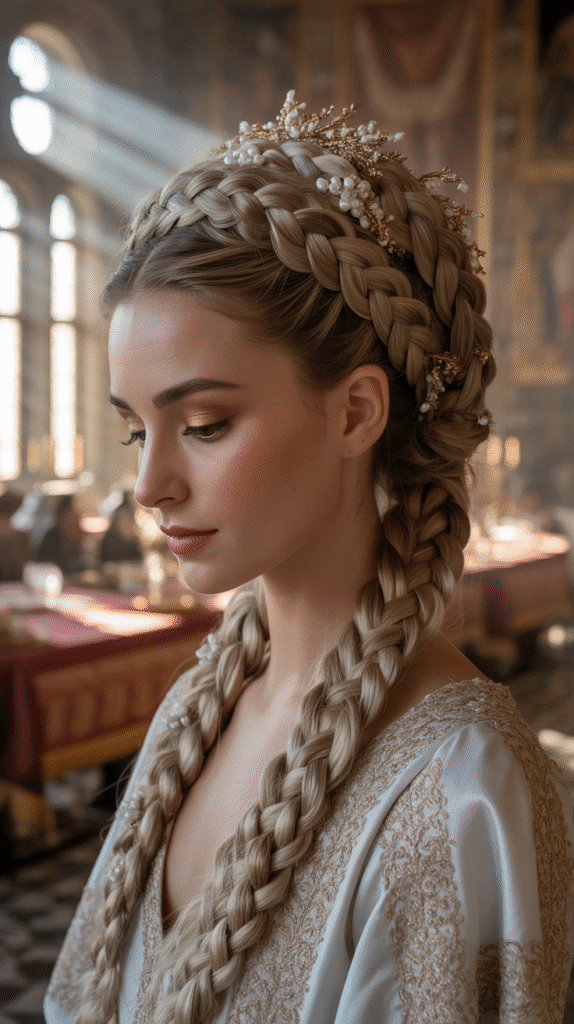
This style combines multiple braiding techniques into one elaborate updo that sits on the head like an actual crown.
Perfect for formal medieval events or fantasy weddings, this look requires patience but delivers dramatic results.
- Start by dividing your hair into five or six sections arranged around your head like a star pattern.
- Create a different type of braid from each section including Dutch, French, fishtail, and rope braids for variety.
- Begin pinning each braid around the crown of your head, layering them to create height and dimension.
- Crisscross the braids over each other and tuck ends underneath to hide them within the structure.
- Build the crown effect by stacking braids on top of each other rather than laying them flat.
- Secure every inch with multiple bobby pins inserted in different directions for maximum stability and hold.
- Embellish with a jeweled tiara placed on top or pearl pins distributed throughout the braided crown.
- Apply finishing spray and gently press down any lifted pieces without disrupting the overall sculptural shape.
11. Mermaid Braid with Pearls
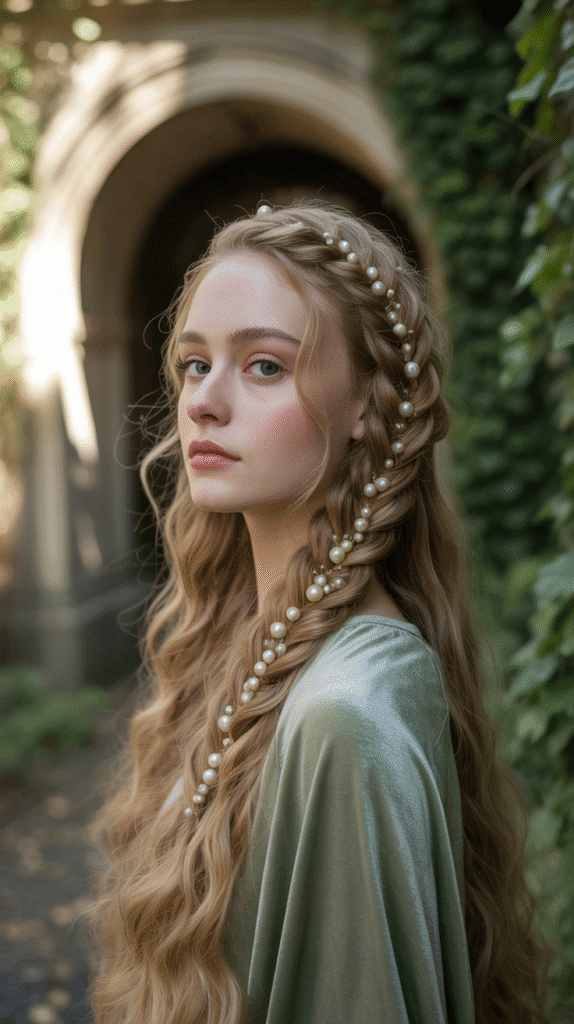
The mermaid braid offers an oceanic twist on medieval elegance, combining the romance of fairytales with the mystery of the sea.
Pearls woven throughout create an authentic connection to maritime mythology.
- Create texture in your hair first by braiding it while damp and allowing it to dry completely.
- Once unbraided, the crimped texture provides the perfect base for a voluminous mermaid braid effect.
- Begin a loose French braid starting at the crown and incorporating small sections as you work down.
- Weave strings of pearls or individual pearl pins throughout the braid at regular intervals for shimmer.
- Pull gently at the outer edges of each section to create the characteristic wide, flat mermaid braid appearance.
- Allow small pieces to escape the braid intentionally for a windswept, romantic, and lived-in quality.
- Secure the end loosely and wrap it with additional pearl strands or a pearl-adorned elastic band.
- Apply a sea salt spray for additional texture and a slightly tousled, just-emerged-from-the-ocean look.
12. The Noble French Twist
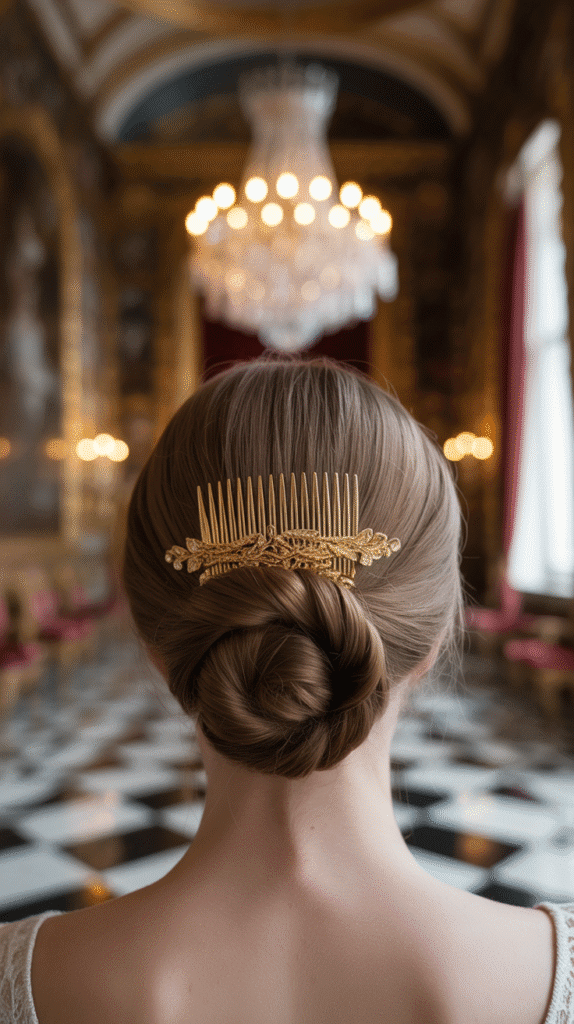
The French twist epitomizes timeless elegance and was adapted from Roman styles into medieval European courts. This sophisticated updo keeps hair completely off the neck while maintaining a regal silhouette.
- Brush all hair straight back without a part to create a smooth foundation for the twist.
- Gather hair at the nape and hold it as one unit while twisting it upward in a clockwise direction.
- As you twist, guide the hair vertically along the back center of your head creating a roll effect.
- Tuck the ends down into the twist pocket and secure the entire structure with multiple long bobby pins.
- Insert pins vertically into the twist for the strongest hold that can support heavy or thick hair.
- Place a decorative comb at the top of the twist or along its length for medieval embellishment.
- Spray with firm-hold hairspray and smooth any flyaways with a small amount of styling gel or pomade.
- For extra security during long events, insert a few additional pins horizontally through the twist’s base.
13. Braided Ponytail with Leather Wrap
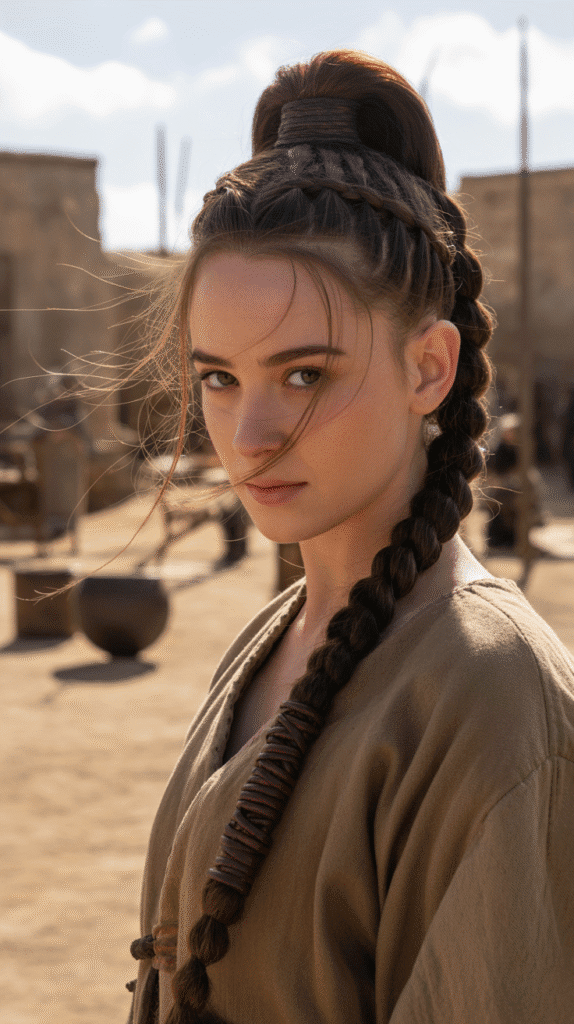
This style merges warrior princess practicality with feminine beauty, featuring a high or mid-level ponytail enhanced with braiding and wrapped with leather cord for an authentic medieval touch.
- Gather your hair into a ponytail at your desired height and secure it with a strong elastic band.
- Take small sections from within the ponytail and create several thin braids of varying thicknesses throughout the length.
- Leave some hair loose between the braids to create texture and visual interest within the overall style.
- Wrap leather cord or suede strips around the base of the ponytail multiple times to conceal the elastic.
- Secure the leather wrap by tying it tightly or using a small amount of fabric glue if needed.
- Add small metal beads or wooden beads to individual braids for additional medieval warrior detailing.
- Tease the loose hair sections gently to create volume and prevent the style from appearing too flat.
- This versatile style works equally well for Renaissance fairs, medieval reenactments, or fantasy-themed events.
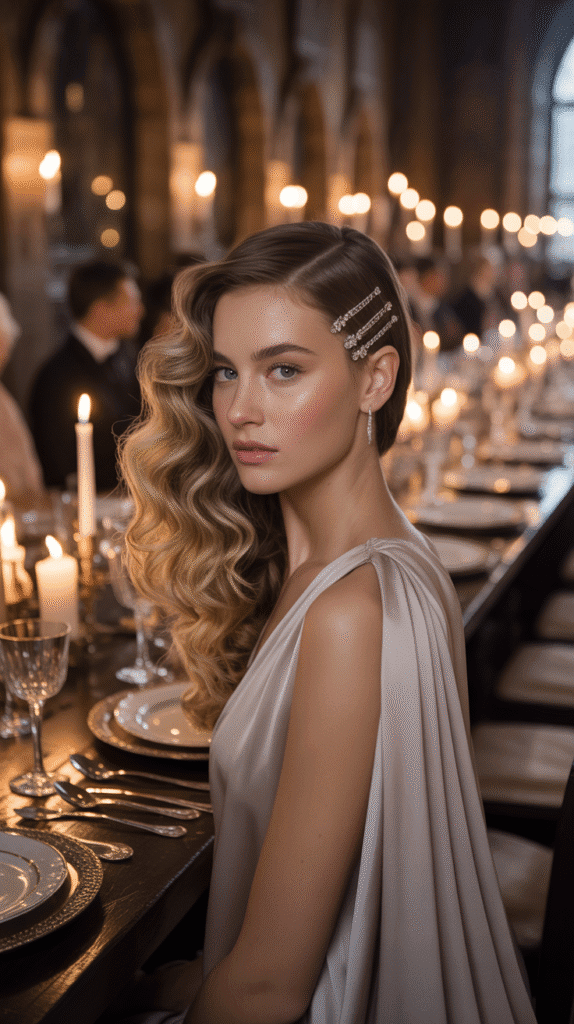
14. The Juliet Cap with Loose Curls
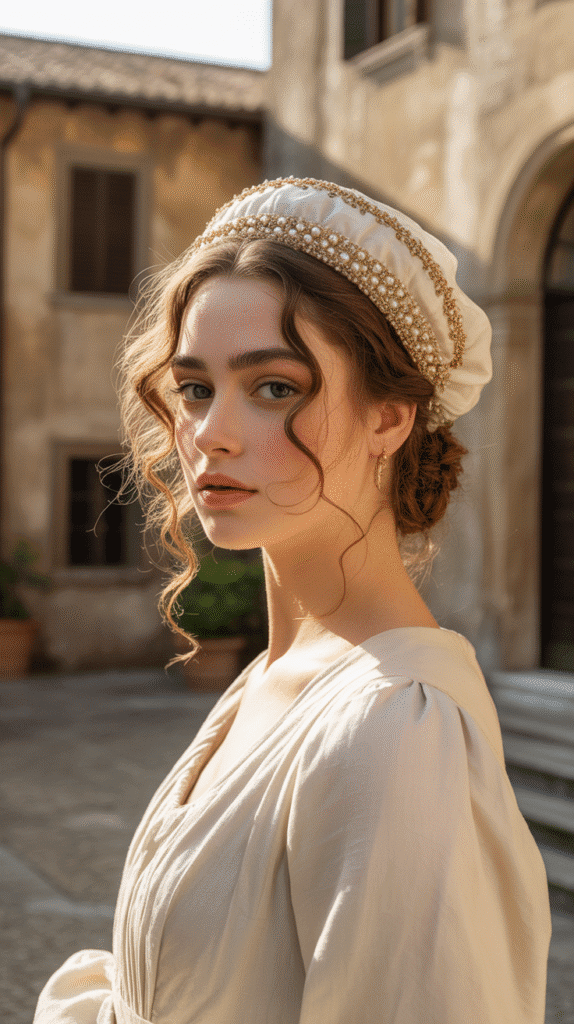
The Juliet cap is a small decorative mesh or beaded cap that sits on the back of the head.
Combined with loose romantic curls, this style captures Renaissance romance and Shakespearean elegance.
- Curl your hair using a medium-barrel curling iron, wrapping sections away from your face for volume and movement.
- Allow the curls to cool completely then gently brush through them with fingers to create soft waves.
- Position the Juliet cap at the back crown area where the head begins to curve downward naturally.
- Secure the cap with bobby pins inserted through the mesh or beading into the hair beneath.
- Arrange curls around and over the cap edges to blend it naturally into your hairstyle seamlessly.
- Pull a few face-framing tendrils forward to soften the overall appearance and frame your features romantically.
- The cap can be embellished with additional pearls, small gems, or metallic thread for enhanced medieval authenticity.
- Apply light-hold hairspray to maintain the curl structure without creating stiffness or unnatural texture.
15. Celtic Knot Braid
The Celtic knot symbolizes eternity and interconnection, making it a meaningful choice for medieval-inspired hairstyles.
This intricate pattern requires patience but creates a stunning statement piece.
- Section off a portion of hair where you want the Celtic knot to appear typically along one side.
- Divide this section into four equal strands which will form the basic structure of your knot pattern.
- Follow a Celtic knot pattern diagram, weaving outer strands over and under the middle strands repeatedly.
- Pin each crossover point temporarily to hold the pattern while you continue weaving the remaining sections.
- The knot should create a continuous interwoven pattern without a clear beginning or end point visible.
- Once the knot is complete, secure it permanently with small bobby pins that match your hair color.
- The remaining hair can be styled into a braid, left loose, or incorporated into an updo.
- Study Celtic knot designs beforehand or practice on a willing friend to master this challenging technique.
16. The Circlet with Straight Hair
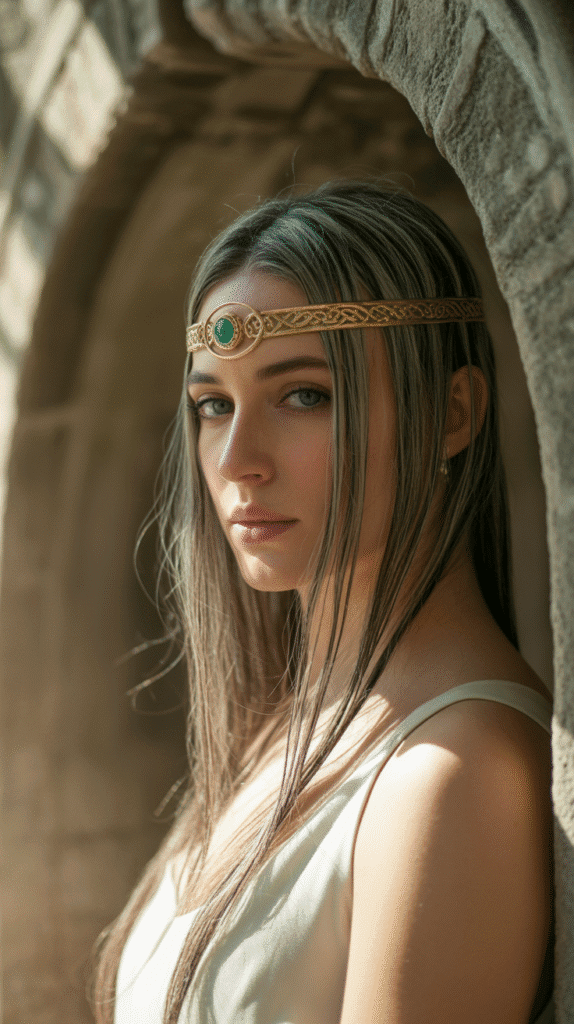
Sometimes simplicity speaks volumes, and straight flowing hair paired with an ornate circlet creates a striking medieval princess look.
This effortless style highlights the beauty of natural hair texture.
- Straighten your hair completely using a flat iron for a sleek, polished finish that catches light beautifully.
- Apply a shine serum or light oil to enhance the glossy appearance of perfectly straight strands.
- Position the circlet approximately one inch above your eyebrows across your forehead for proper placement.
- Choose a circlet that complements your face shape whether that’s delicate and thin or bold and ornate.
- Secure the circlet with bobby pins inserted at the temples if needed for stability during movement.
- Part your hair in the center or slightly off-center depending on which flatters your features most effectively.
- Allow the hair to cascade naturally over your shoulders and down your back without additional styling needed.
- The contrast between the ornate circlet and simple straight hair creates an elegant balance of simplicity and luxury.
17. Twisted Rope Braid Crown
The rope braid offers a different texture than traditional three-strand braids, creating a twisted spiral effect.
When arranged as a crown, it provides a unique take on the classic braided corona.
- Divide your hair into two large sections and gather them both into a high ponytail at your crown.
- Twist each section individually in a clockwise direction until both are tightly spiraled ropes of hair.
- Then twist the two ropes together in a counterclockwise direction which prevents them from unraveling naturally.
- Remove the ponytail elastic and wrap the rope braid around your head like a crown starting from one side.
- Pin the rope braid securely at intervals using bobby pins inserted through the twist into the hair beneath.
- Tuck the end of the rope braid under the beginning point and secure it invisibly for a seamless circular effect.
- Pull gently at sections of the rope to create more volume and a fuller crown appearance overall.
- Add small decorative pins or a delicate chain across the rope crown for additional medieval ornamentation.
18. Medieval Maiden Side Part
The deep side part creates dramatic asymmetry that was fashionable among medieval noblewomen.
Combined with gentle waves and strategic pinning, this style is both simple and sophisticated.
- Create a deep side part approximately at the outer edge of one eyebrow for maximum dramatic effect.
- Apply wave-enhancing products to damp hair and allow it to air dry or use a diffuser attachment.
- On the smaller side of the part, take a section from temple to ear and twist it back smoothly.
- Secure the twisted section with decorative medieval-style clips or jeweled bobby pins behind your ear.
- Allow the larger section to cascade freely over the opposite shoulder in voluminous waves or curls.
- Curl any sections that need additional definition using a curling wand for consistent wave pattern throughout.
- Apply shine spray to enhance the healthy appearance and create a luminous finish worthy of royalty.
- This versatile style transitions beautifully from daytime castle activities to evening banquet halls with ease.
19. The Heart Braid
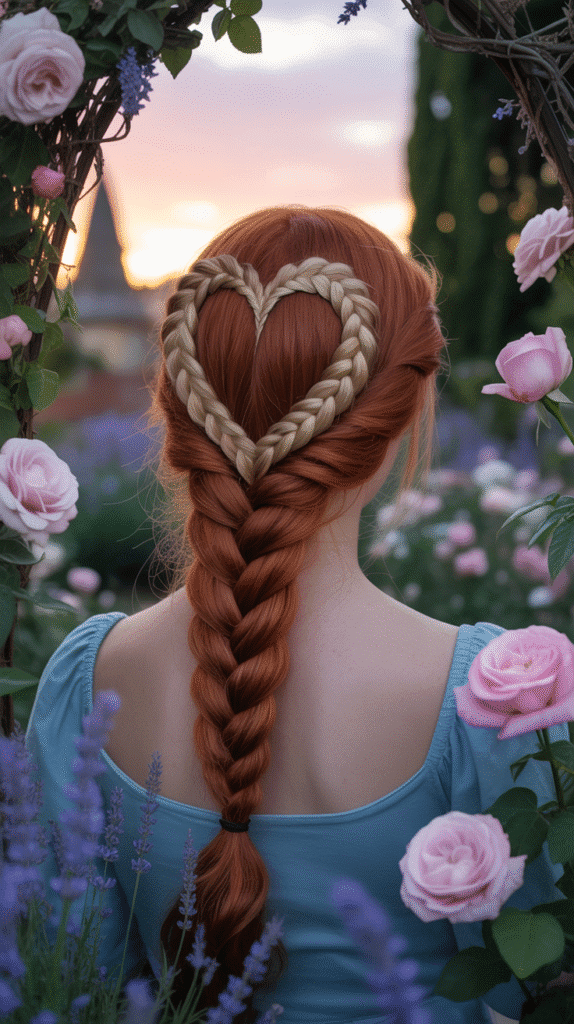
The heart braid creates a romantic symbol directly in your hair, perfect for love-themed medieval events or fantasy weddings.
This eye-catching design works best on the back of the head where it can be admired.
- Section off the top portion of your hair from temple to temple creating a horizontal division line.
- Create a center part in this top section and divide it into two equal portions for symmetry.
- Braid each side in a Dutch or French braid following a curved path that forms half a heart shape.
- Bring both braids together at the back center and secure them where the bottom point of the heart should meet.
- The braids should curve outward then inward to create the recognizable rounded top and pointed bottom of a heart.
- Pin the meeting point securely and allow the remaining hair to flow freely from this junction point downward.
- Gently pull at the outer edges of the heart braids to enhance the curves and make the shape more pronounced.
- Add small ribbon bows or rose pins at the heart’s top curves for additional romantic embellishment and color.
20. Crowned Headband Braid
The headband braid creates a natural-looking band across the crown while keeping the rest of your hair loose.
This practical yet pretty style was perfect for medieval maidens engaging in daily activities.
- Part your hair horizontally from ear to ear creating a top section that will form the headband braid.
- Clip the back section away temporarily to keep it separate and prevent it from mixing with the braid.
- Begin a Dutch braid on one side starting at the part line near the ear working across the head.
- Braid tightly to keep the headband secure and neat as it travels across your crown to the opposite side.
- When you reach the other ear, secure the braid temporarily and prepare to blend it with the loose hair.
- Release the back section and allow it to cover the end of the braid for a seamless integrated appearance.
- Pin the braid end securely behind the opposite ear using multiple bobby pins for lasting hold throughout the day.
- Weave small flowers or decorative pins through the headband braid for added medieval charm and personality.
21. The Princess Leia-Inspired Medieval Buns
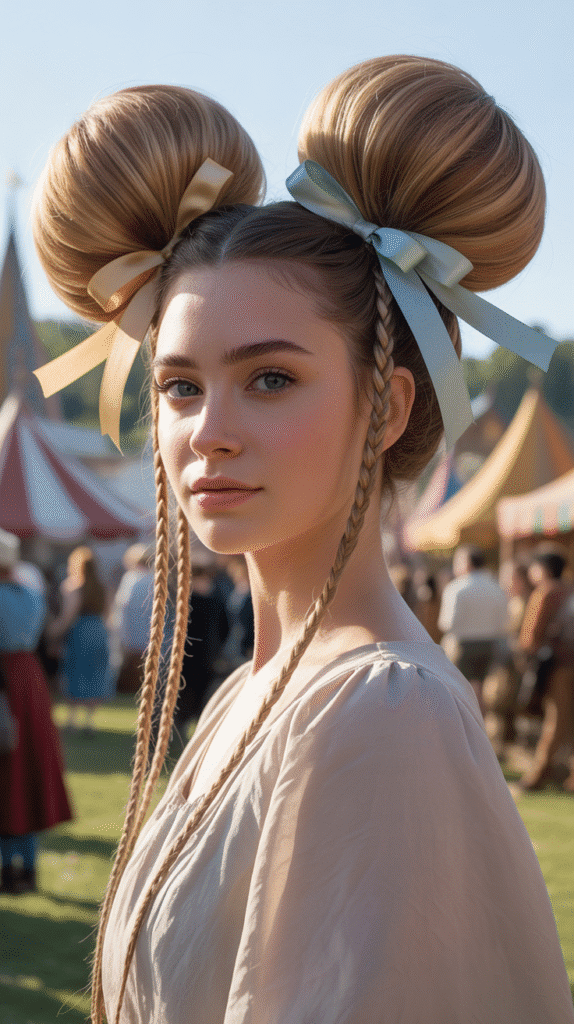
While Princess Leia belongs to a galaxy far away, her iconic side buns translate surprisingly well into medieval aesthetics.
These structured buns on either side of the head create a youthful, playful royal look.
- Part your hair straight down the middle from forehead to nape for perfect symmetry between both sides.
- Gather one half into a high ponytail positioned above and slightly behind the ear on that side.
- Twist the ponytail and wrap it around the base in a circular pattern to form a round bun shape.
- Secure the bun with bobby pins inserted all around its perimeter and through the center for stability.
- Repeat the exact process on the opposite side ensuring both buns are positioned at matching heights and angles.
- Wrap decorative ribbons around each bun or place jeweled pins strategically throughout them for medieval embellishment.
- Spray with firm-hold hairspray to prevent any loosening during extended wear time at events or festivals.
- This style works particularly well for younger maidens or those wanting a more whimsical interpretation of medieval princess hair.
22. Fishtail Braid with Gold Chains
The fishtail braid offers a more intricate appearance than standard three-strand braids while actually being quite simple to execute.
The addition of gold chains elevates it to true medieval royalty status.
- Divide all your hair into two equal sections rather than the traditional three used for standard braiding.
- Take a small piece from the outer edge of the left section and cross it over to join the right section.
- Take a small piece from the outer edge of the right section and cross it over to join the left section.
- Continue this alternating pattern all the way down the length of your hair maintaining consistent small section sizes.
- Weave thin gold chains through the braid as you work, looping them through sections at regular intervals.
- The smaller your sections, the more intricate and detailed the fishtail pattern will appear in the finished braid.
- Secure the end with an elastic wrapped in gold thread or ribbon for a cohesive metallic theme throughout.
- Gently pull at the outer edges to pancake the braid slightly creating width and showcasing the chain detail better.
23. Half Crown Braid with Curls
This style combines the elegance of a partial crown braid with the romance of loose curls flowing beneath.
It offers the best of both worlds—structured and free-flowing elements working in harmony.
- Section off hair from one temple across the top of the head to just past the center back point.
- Create a Dutch or French braid following the natural curve of your head from temple toward the back.
- When you reach approximately the center back of your head, secure the braid with an elastic or pins.
- Leave the remaining hair from this point down completely loose and free-flowing for contrast with the structured braid.
- Curl all the loose hair using a curling iron or wand for volume and movement that complements the braid.
- The braid essentially creates a crown on one side while the opposite side remains untouched and flowing naturally.
- Tuck small flowers or decorative pins along the length of the braid for medieval garden party aesthetics.
- This asymmetrical style provides visual interest while remaining elegant and appropriate for various medieval-themed occasions.
24. The Burgundian Horned Headdress Style
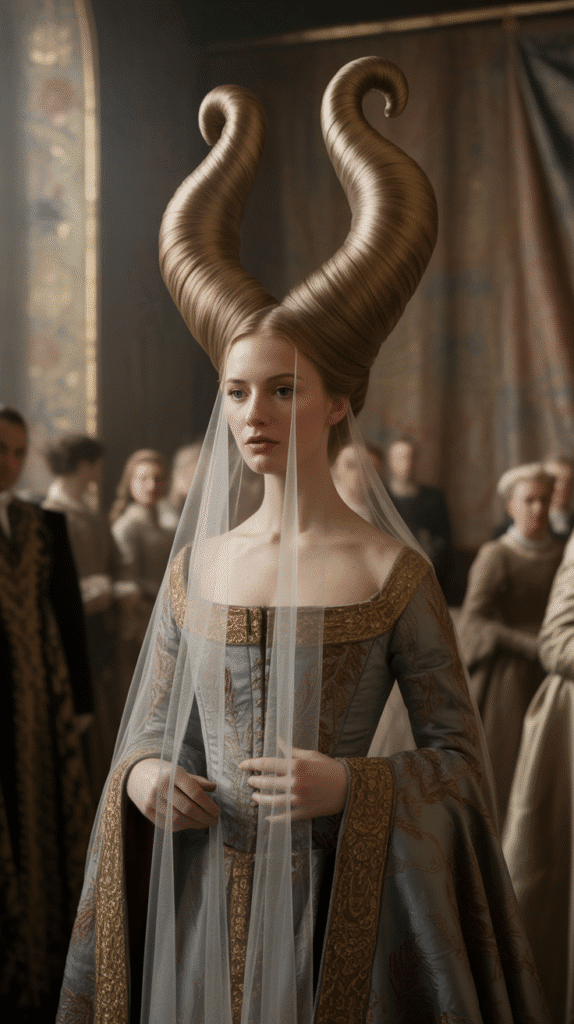
This dramatic style recreates the iconic medieval Burgundian fashion where hair was shaped over structures to create horn-like protrusions on either side of the head.
While ambitious, it creates an unforgettable historical statement.
- Create or purchase padded wire frames that can be secured to the head and extend outward like horns or crescents.
- Secure the frames to your head with bobby pins and ensure they’re stable enough to support hair wrapped around them.
- Section your hair into manageable pieces and wrap each section smoothly around the frames covering them completely.
- Pin each wrapped section securely to the frame underneath using multiple bobby pins for lasting structural integrity.
- Both sides should be symmetrical in height, angle, and shape to maintain the aesthetic balance of this style.
- Drape a sheer veil over the horned structure and allow it to flow down your back for authentic medieval accuracy.
- Finish with decorative elements like gold cord wrapped around the base or jeweled pins placed strategically throughout.
- This advanced style requires patience and practice but creates an authentic recreation of 15th-century Burgundian court fashion.
25. Elven-Inspired Medieval Half-Up
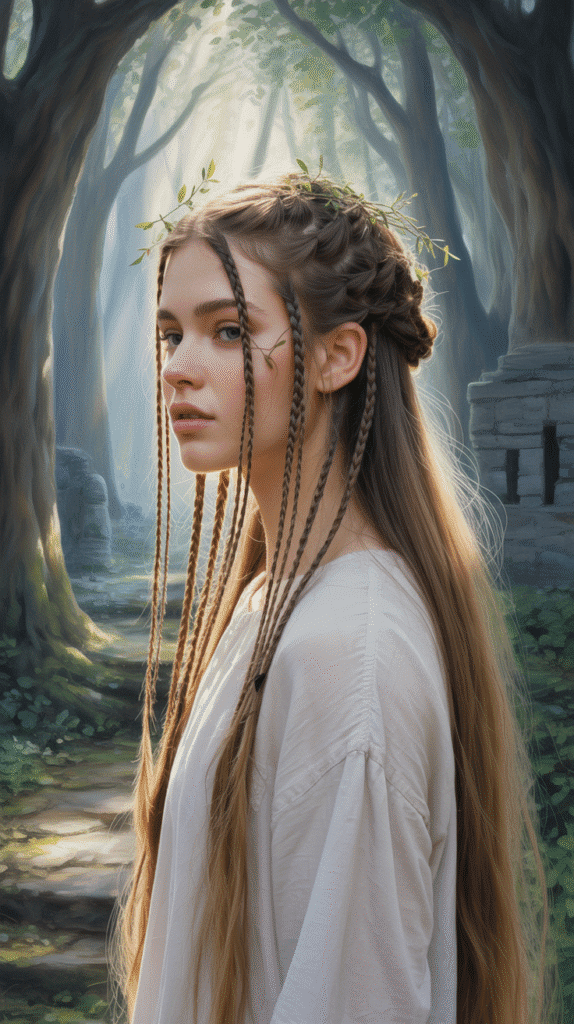
Drawing from both medieval and fantasy traditions, this style features multiple small braids combined with loose flowing hair.
The elvish influence brings an otherworldly quality to traditional medieval aesthetics.
- Create several very thin braids starting at various points around your face and temples on both sides.
- Keep these braids small and delicate to achieve the characteristically elvish look rather than using thick chunky braids.
- Pull all the small braids together at the back of your head along with some unbraided sections for fuller coverage.
- Secure everything together with a decorative clasp, leather cord, or twist the sections together before pinning them.
- Leave the bottom half of your hair completely loose and flowing for the signature half-up configuration that defines this style.
- Weave small natural elements like tiny leaves, twigs, or miniature flowers through the braids for an ethereal woodland quality.
- Allow a few wispy pieces to escape around your face for a softer more natural appearance rather than overly polished perfection.
- This style bridges medieval human princesses and elvish fantasy queens creating a unique crossover aesthetic perfect for fantasy events.
26. The Twisted Infinity Braid
The infinity braid creates a figure-eight pattern that symbolizes eternal love and continuity.
This complex braid technique results in a stunning three-dimensional effect that catches eyes at any medieval gathering.
- Divide your hair into two equal sections to form the basic structure needed for infinity braiding patterns.
- Take a small piece from the outside of the left section and wrap it in a figure-eight pattern around both main sections.
- Continue taking small pieces alternately from each side and wrapping them in the continuous figure-eight or infinity symbol shape.
- The braid should begin to show a clear pattern where strands weave through the center creating the characteristic loops.
- Maintain consistent tension and section sizes throughout to keep the infinity pattern uniform and recognizable from start to finish.
- This braid requires practice to master but creates a stunning effect unlike any other braiding technique available.
- Secure the end and gently pull at the loops to enhance the three-dimensional sculptural quality of the pattern.
- Add small jeweled pins at the crossing points of the figure-eight for emphasis and additional medieval ornamentation throughout the length.
27. Renaissance Ribbon-Wrapped Ponytail
This simple yet elegant style features a ponytail with ribbons wrapped spirally down its length.
Popular during the Renaissance period, it combines practicality with decorative beauty.
- Gather your hair into a high or mid-level ponytail and secure it tightly with a strong elastic band.
- Choose wide silk or satin ribbons in medieval-appropriate colors like burgundy, forest green, gold, or deep blue.
- Starting at the base of the ponytail, wrap the ribbon around the hair in a spiral pattern moving downward.
- Keep the wrapping tight enough to stay in place but not so tight that it creates uncomfortable tension on the hair.
- You can use multiple ribbons of different colors for a more elaborate striped effect down the ponytail length.
- Secure the ribbon at the bottom by tying it into a bow or tucking the end under and pinning it discreetly.
- For extra security, use small bobby pins every few inches to anchor the ribbon to the hair underneath.
- This versatile style works beautifully for both daytime activities and evening festivities at Renaissance events.
28. The Crown of Thorns Braid
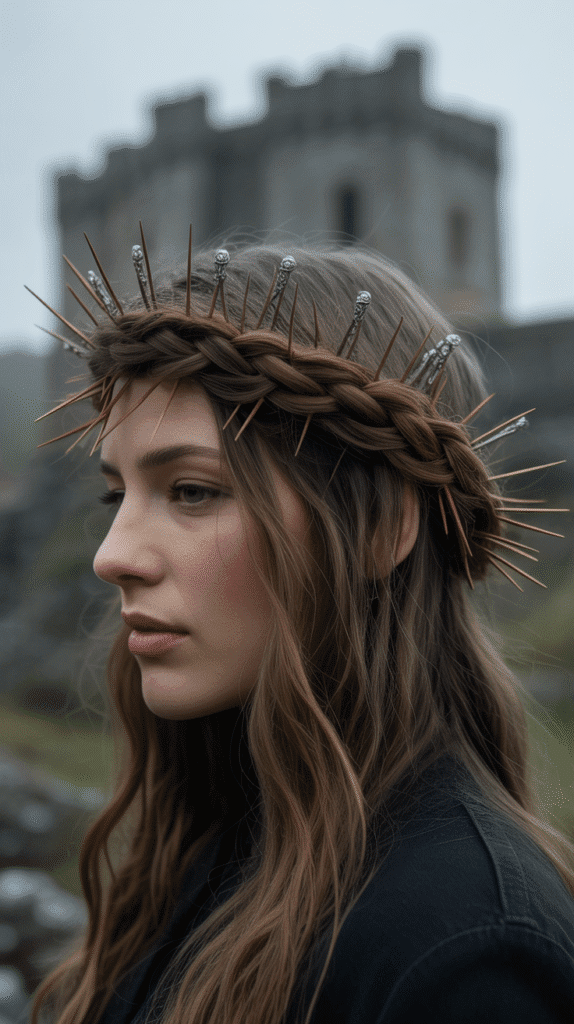
Despite its dramatic name, this style creates a beautiful thorny crown effect using braided sections twisted and pinned in a circular pattern.
The result is both delicate and striking, perfect for a fairy tale princess with an edge.
- Section your hair into multiple small portions around the perimeter of your head working in a circular pattern.
- Create very tight thin braids from each section to serve as the “thorns” in this crown design.
- Begin twisting and pinning the braids around your head in a circular crown pattern with some standing slightly upward.
- Pin some braids flat against the head while allowing others to twist upward creating the characteristic thorny dimensional effect.
- Layer the braids over and under each other to create depth and complexity within the crown structure.
- The remaining hair can be left loose, gathered into a low bun, or braided down the back depending on preference.
- Insert silver or dark metal pins throughout the crown to enhance the thorny appearance and provide additional security.
- This dramatic style works particularly well for gothic medieval themes or darker fairy tale interpretations.
29. Looped Braid Updo

The looped braid updo creates elegant swoops and curves pinned against the head.
This sophisticated style resembles decorative metalwork or embroidery patterns translated into hair.
- Create three to five separate braids throughout your hair starting from different points around your head.
- Rather than hanging straight down, loop each braid back on itself creating U-shaped or S-shaped curves.
- Pin each loop securely against your head using multiple bobby pins inserted through the braid into the hair beneath.
- Vary the sizes and directions of your loops to create an organic flowing pattern rather than rigid symmetry.
- Layer the loops over each other building dimension and complexity within the overall updo structure.
- Tuck all ends invisibly within the structure or pin them underneath other loops to hide them from view.
- Place decorative pins with pearls or crystals at the top of each loop to draw attention to the curved shapes.
- Finish with strong-hold hairspray and check all angles to ensure the updo is secure and polished from every viewpoint.
30. The Sleeping Beauty Loose Waves with Crown
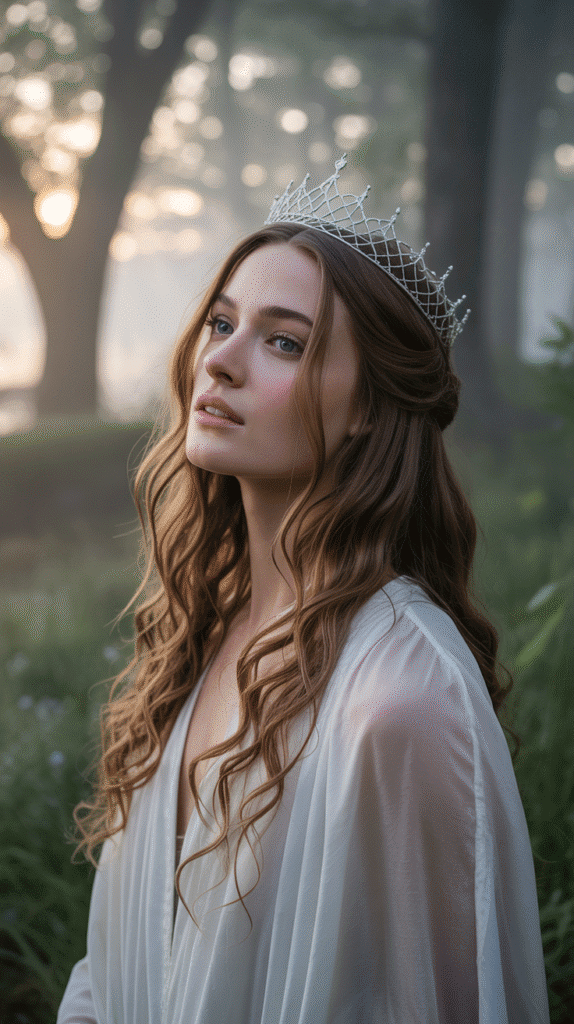
Simple, timeless, and utterly romantic, this final style captures the essence of a sleeping princess awakening.
Loose waves combined with a delicate crown create effortless fairy tale beauty.
- Start with clean hair and apply a heat protectant before using any hot styling tools on your strands.
- Use a large-barrel curling iron or wand to create loose waves throughout your hair working in large sections.
- Alternate the direction you wrap hair around the iron for each section to create more natural-looking organic waves.
- Allow the waves to cool completely then gently run your fingers through them to soften and separate the curls.
- Apply a light texturizing spray or sea salt spray for added movement and a natural windswept quality.
- Place a delicate crown or tiara on top of your head positioning it where it sits most naturally and comfortably.
- Secure the crown with bobby pins inserted through the crown’s base into your hair on both sides for stability.
- Pull a few face-framing pieces forward and allow the rest to cascade naturally over your shoulders creating the ultimate princess silhouette.
- This timeless style requires minimal effort but delivers maximum fairy tale impact perfect for any medieval or fantasy occasion.
Essential Medieval Hair Accessories
To truly capture the essence of medieval princess hairstyles, the right accessories make all the difference between a modern look and an authentic historical or fantasy appearance.
- Circlets and Crowns: Metal headbands ranging from simple to ornate, often featuring Celtic knots, gemstones, or intricate metalwork that sits across the forehead or crown.
- Ribbons and Cords: Silk, velvet, or satin ribbons in rich jewel tones like burgundy, emerald, sapphire, and gold for weaving through braids or wrapping ponytails.
- Jeweled Pins and Clips: Decorative bobby pins featuring pearls, crystals, or colored stones that secure styles while adding sparkle and medieval authenticity.
- Veils and Nets: Sheer fabric or decorative netting that drapes over hairstyles, often secured with circlets or pinned into elaborate updos for formal occasions.
- Floral Elements: Fresh or silk flowers including roses, baby’s breath, lavender, and ivy that can be woven through braids or formed into crowns.
- Metal Hair Jewelry: Chains, charms, and linked pieces that hang through braids or across the forehead creating dramatic medieval embellishment.
- Decorative Combs: Ornate hair combs featuring medieval designs, often used to secure French twists or add decoration to the side of updos.
- Leather Wraps: Thin leather cords or suede strips for wrapping ponytails or binding braids, perfect for warrior princess or huntress aesthetics.
Hair Care Tips for Medieval Styling
Maintaining healthy hair is essential when creating elaborate medieval hairstyles, especially those requiring extensive braiding, pinning, or heat styling for curls and waves.
- Deep Conditioning: Use intensive conditioning treatments weekly to keep hair strong and prevent breakage from repeated styling and manipulation of strands.
- Heat Protection: Always apply heat protectant spray before using curling irons, flat irons, or other hot tools to minimize damage and maintain hair health.
- Gentle Detangling: Use wide-tooth combs or specialized detangling brushes to work through knots before styling, starting from the ends and working upward gradually.
- Braiding on Textured Hair: Slightly dirty or day-old hair actually holds braids better than freshly washed hair, so plan your hair washing schedule accordingly.
- Pin Placement Technique: Insert bobby pins in an X-pattern for maximum hold and always open them slightly before inserting to grip more hair effectively.
- Minimize Elastic Damage: Use fabric-covered elastics or ribbon ties instead of rubber bands which can break and damage hair with repeated use.
- Nighttime Protection: Sleep with hair in a loose braid or silk cap to prevent tangling and breakage while maintaining style longevity for multi-day events.
- Regular Trims: Maintain healthy ends with regular trims every 8-12 weeks to prevent split ends from traveling up the hair shaft and compromising your styles.
Modern Applications for Medieval Hairstyles
These fairytale-inspired medieval hairstyles aren’t just for costumes and fantasy events. They translate beautifully into modern contexts with contemporary adaptations and styling adjustments.
- Wedding Hairstyles: Many brides choose medieval-inspired styles for romantic, vintage, or outdoor weddings, particularly for Renaissance or castle venue ceremonies.
- Festival Fashion: Music festivals, Renaissance fairs, and medieval festivals provide perfect opportunities to showcase these elaborate historical hairstyles with full authenticity.
- Cosplay and Conventions: Fantasy and historical cosplayers rely on these techniques to accurately portray characters from medieval settings, games, and literature.
- Themed Photography: Portrait photographers and models use medieval hairstyles for fairy tale shoots, fantasy portraits, and historical recreation photography projects.
- Theater and Film: Costume designers and hair stylists in productions regularly adapt these techniques for period pieces and fantasy productions requiring historical accuracy.
- Prom and Formal Events: Teenagers and young adults often choose medieval-inspired updos and braided styles for prom, homecoming, and other formal school dances.
- Everyday Elegance: Simplified versions of these styles like braided crowns, side braids, and half-up twists work beautifully for professional settings and daily wear.
- Cultural Celebrations: Historical reenactment groups, medieval societies, and cultural heritage events showcase these authentic hairstyles as part of living history demonstrations.
Conclusion
The enchanting world of medieval princess hairstyles offers endless possibilities for those seeking to embody the grace, elegance, and romance of fairy tales.
From the intricate lattice braid updo to the simple beauty of loose waves crowned with a delicate tiara, these 30 Fairytale-Inspired Medieval Hairstyles for Princesses provide something for every skill level and occasion.
Whether you’re preparing for a Renaissance fair, planning a fantasy wedding, creating a cosplay masterpiece, or simply want to feel like royalty for a day, these styles connect us to a timeless aesthetic that continues to captivate imaginations across generations.
The combination of historical authenticity and fantastical interpretation allows for creative expression while honoring the beautiful hair traditions of medieval times.
With practice, patience, and the right accessories, anyone can transform their hair into a crown-worthy masterpiece.
Remember that the true magic of these hairstyles lies not just in their technical execution, but in the confidence and joy they bring when you wear them.
So gather your ribbons, braids, and crowns, and step into your own fairy tale with these stunning medieval princess hairstyles that prove beauty truly is timeless.