
Winter is the perfect season to experiment with your short hair and transform it into stunning styles that combine warmth, elegance, and practicality.
Whether you’re braving the cold weather or attending holiday gatherings, the right hairstyle can elevate your entire look and boost your confidence throughout the season.
Short hair offers incredible versatility during winter months, allowing you to create everything from cozy textured waves to sleek sophisticated styles that complement scarves, beanies, and winter accessories.
This comprehensive guide to 30 Trendy Cute Winter Hairstyles for Short Hair will walk you through a diverse collection of looks ranging from effortless everyday styles to glamorous evening options, each designed to keep you looking chic and feeling fabulous during the coldest months of the year.
From protective styles that shield your hair from harsh winter elements to festive updos perfect for seasonal celebrations, you’ll discover hairstyles suitable for various hair textures, face shapes, and personal preferences.
Each style includes practical tips on achieving the look, maintaining it throughout winter conditions, and adapting it to your unique features, ensuring you’ll never run out of fresh, creative ways to style your short hair this season.
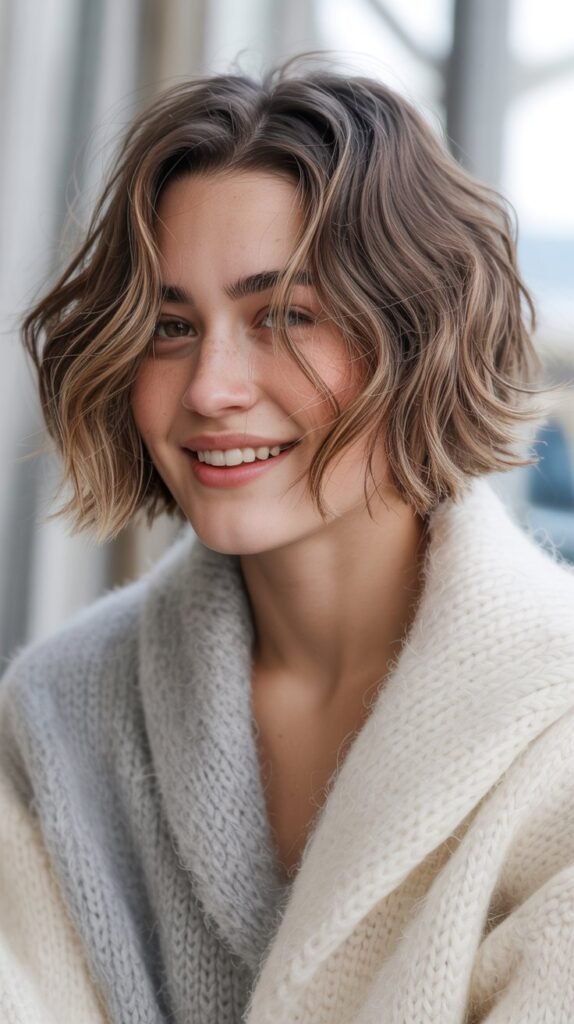
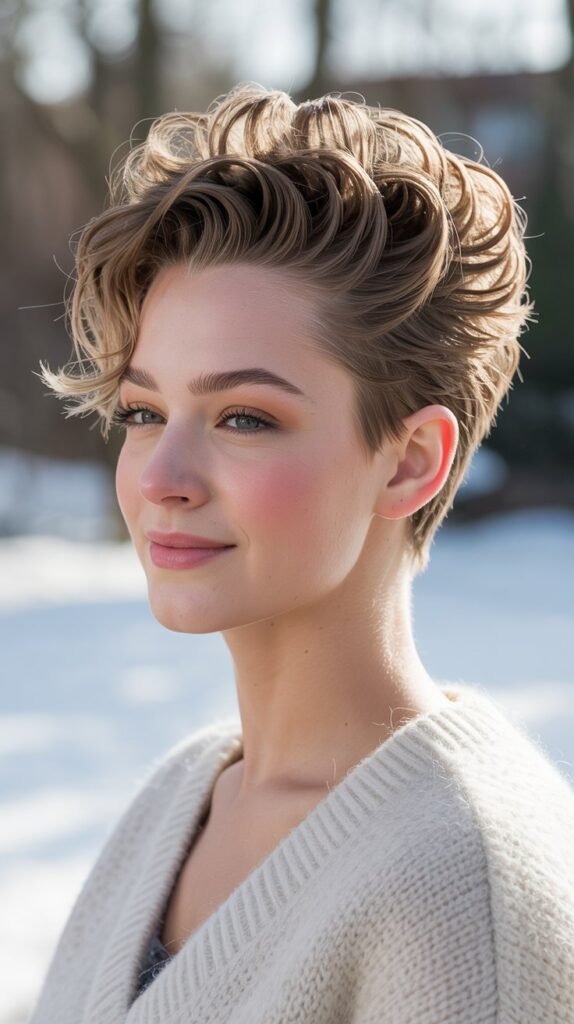
1. Textured Winter Waves
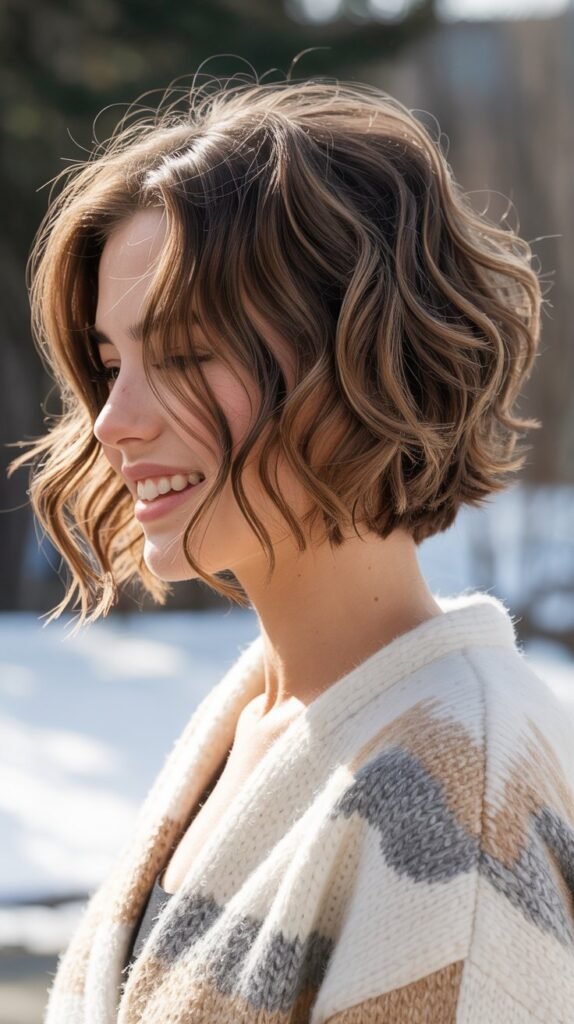
Textured winter waves bring softness and movement to short hair while creating a cozy, romantic aesthetic perfect for the season.
This style works beautifully with the natural volume that winter humidity can create, turning potential frizz into gorgeous, touchable texture.
The loose, undone waves add dimension and interest to any short haircut, making it ideal for both casual daytime looks and dressier evening occasions.
How to Achieve This Look:
- Start with damp hair and apply a volumizing mousse from roots to ends.
- Use a diffuser attachment on your blow dryer to enhance natural texture while drying.
- Take small sections of hair and wrap them around a 1-inch curling iron, alternating directions.
- Hold each section for 5-7 seconds, then release without disturbing the curl shape.
- Allow the curls to cool completely before touching them.
- Gently separate the curls with your fingers to create soft, natural-looking waves.
- Finish with a light-hold texturizing spray to maintain the tousled appearance.
Winter Maintenance Tips:
- Apply a nourishing hair oil to combat dryness from indoor heating.
- Use a silk or satin pillowcase to prevent frizz overnight.
- Refresh the style with dry shampoo and re-curl a few pieces as needed.
- Protect hair from static by using anti-humidity products.
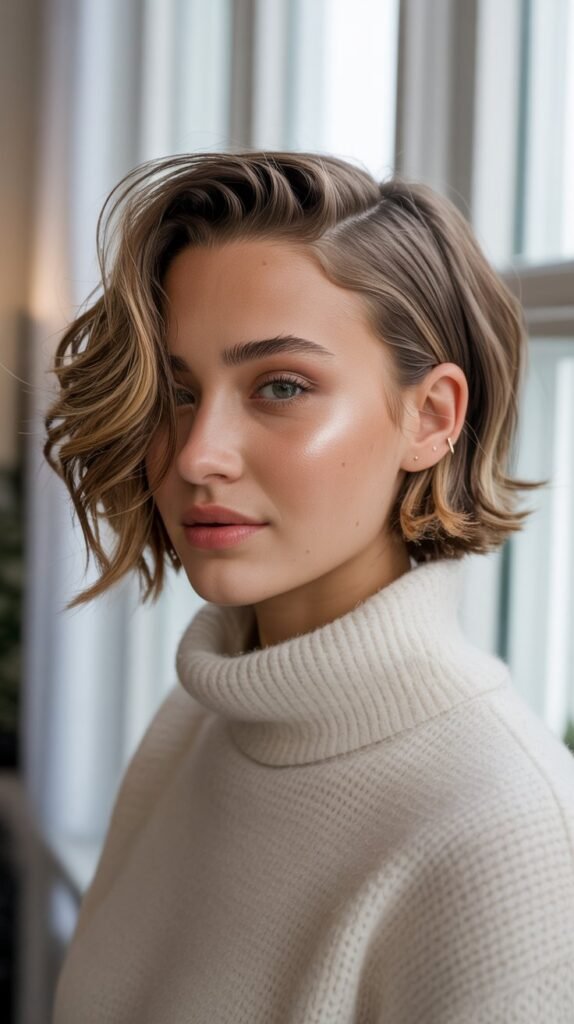
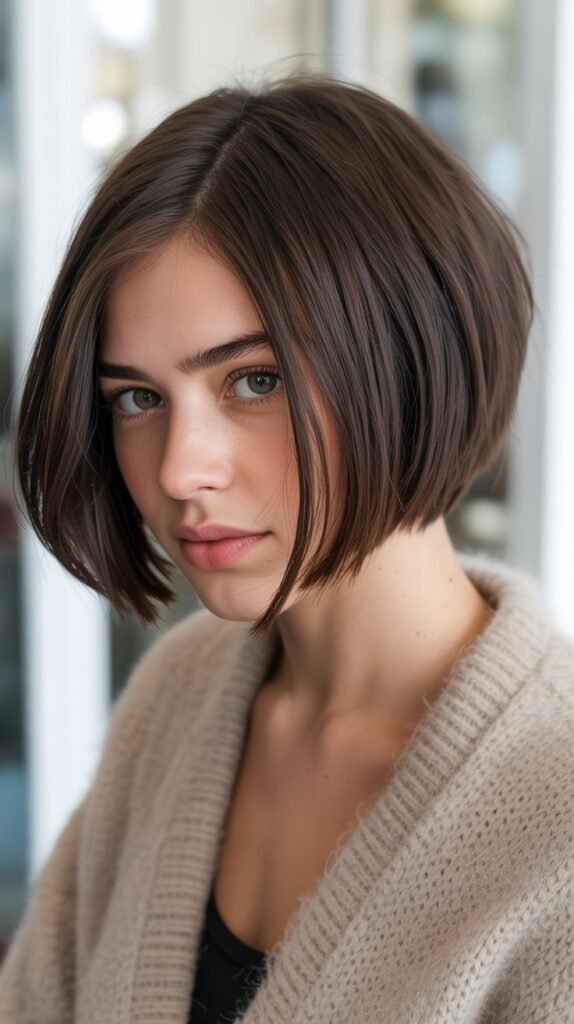
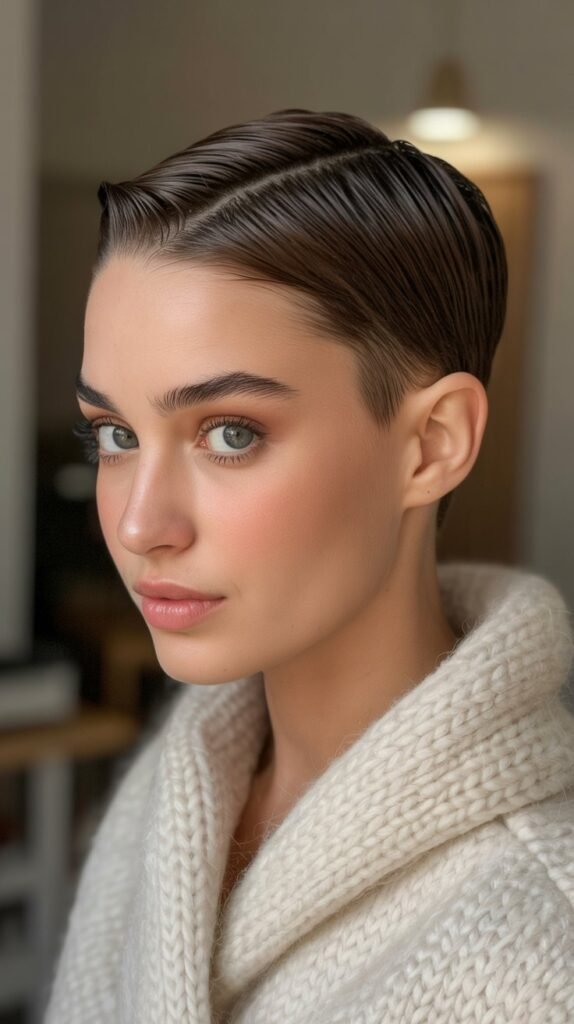
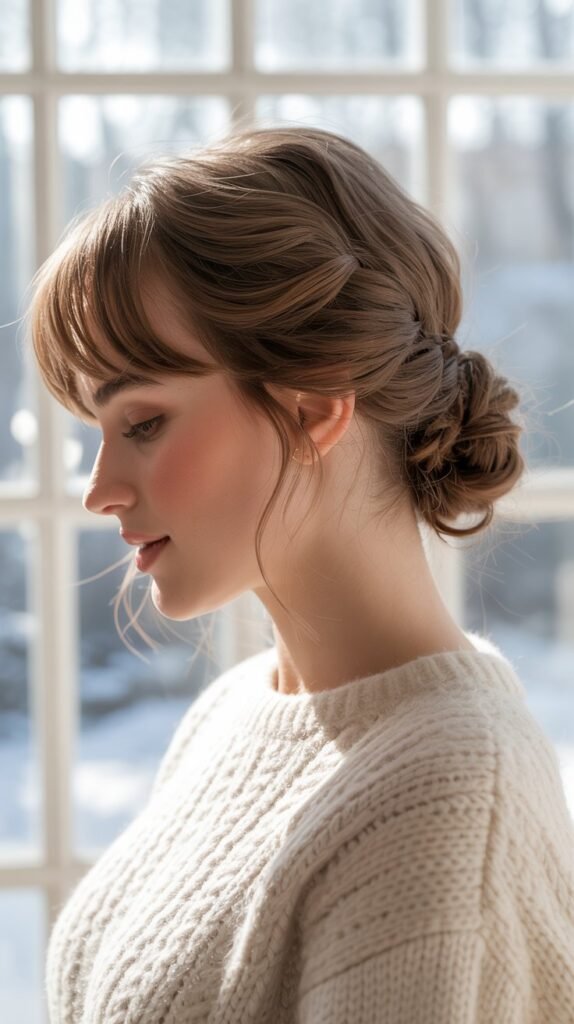
2. Sleek Side Part Bob
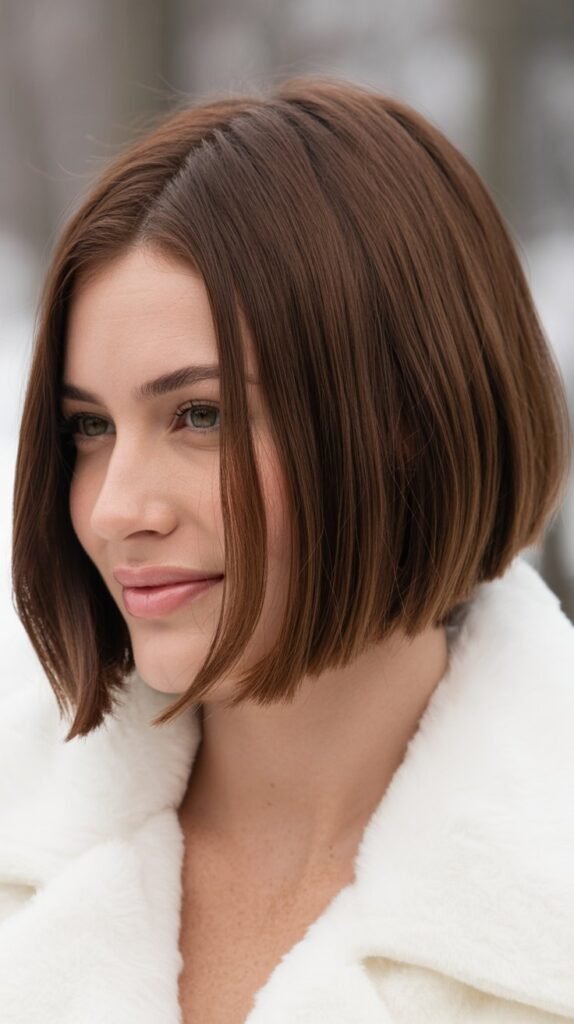
The sleek side part bob exudes sophistication and timeless elegance, making it a go-to winter style for professional settings and formal events.
This polished look works exceptionally well with winter fashion, complementing structured coats and turtlenecks beautifully.
The deep side part creates asymmetry that flatters most face shapes while the smooth finish reflects light gorgeously.
Styling Steps:
- Begin with freshly washed hair and apply a heat protectant spray.
- Blow dry hair completely smooth using a paddle brush and directing airflow downward.
- Create a deep side part using a fine-tooth comb, positioning it above the arch of one eyebrow.
- Section hair and use a flat iron to straighten each piece, starting close to the roots.
- Apply a small amount of shine serum to add gloss and tame flyaways.
- Use a light-hold hairspray to set the style without stiffness.
- For extra sleekness, run the flat iron over the surface once more.
Best Occasions:
- Business meetings and professional presentations
- Formal winter weddings and galas
- Holiday office parties
- Date nights and upscale dining experiences
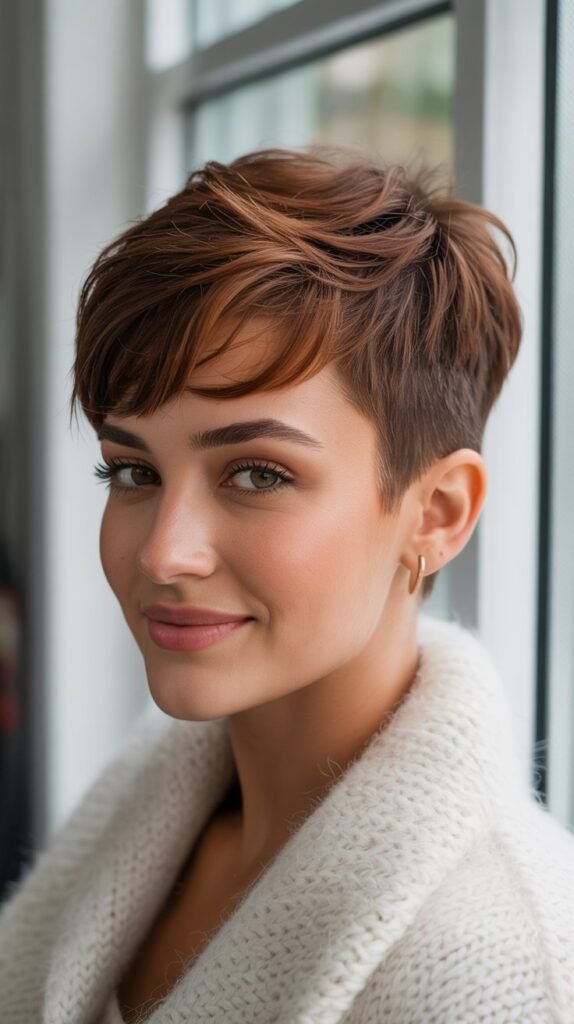
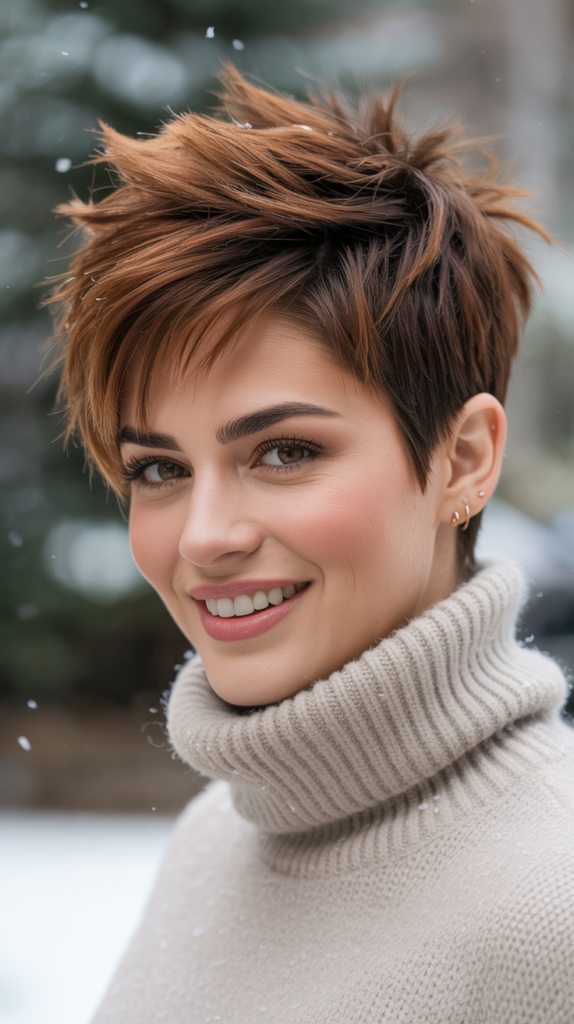
3. Messy Pixie with Texture
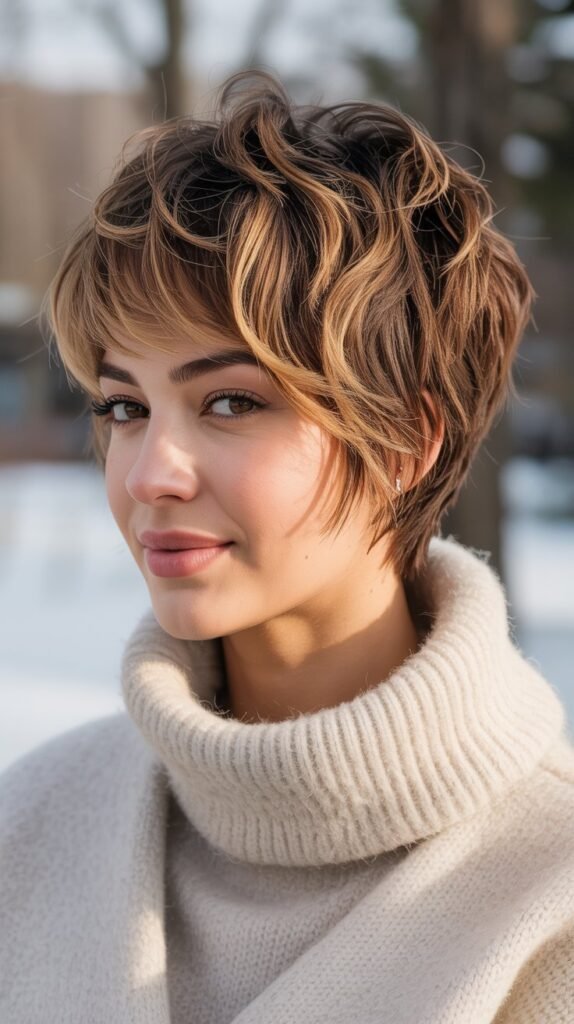
The messy pixie with texture embraces the carefree, effortless beauty that winter styling can offer.
This style celebrates natural movement and creates an edgy, modern look that’s surprisingly easy to maintain.
The deliberately tousled appearance adds youthful energy and works wonderfully with winter’s relaxed, cozy vibe.
Creating the Perfect Mess:
- Start with slightly damp or dry hair for maximum texture.
- Apply a small amount of texturizing paste or clay to your palms.
- Rub your hands together to warm and distribute the product evenly.
- Work the product through hair using your fingers, focusing on the crown and top sections.
- Twist and pinch small pieces to create separation and definition.
- Use your fingers to push hair forward and create a piece-y, disheveled effect.
- Spray with a dry texturizing spray for added grip and hold.
Product Recommendations:
- Matte finish styling clay for hold without shine
- Sea salt spray for beachy texture
- Dry shampoo for volume and refreshing between washes
- Lightweight texturizing powder for added lift at the roots
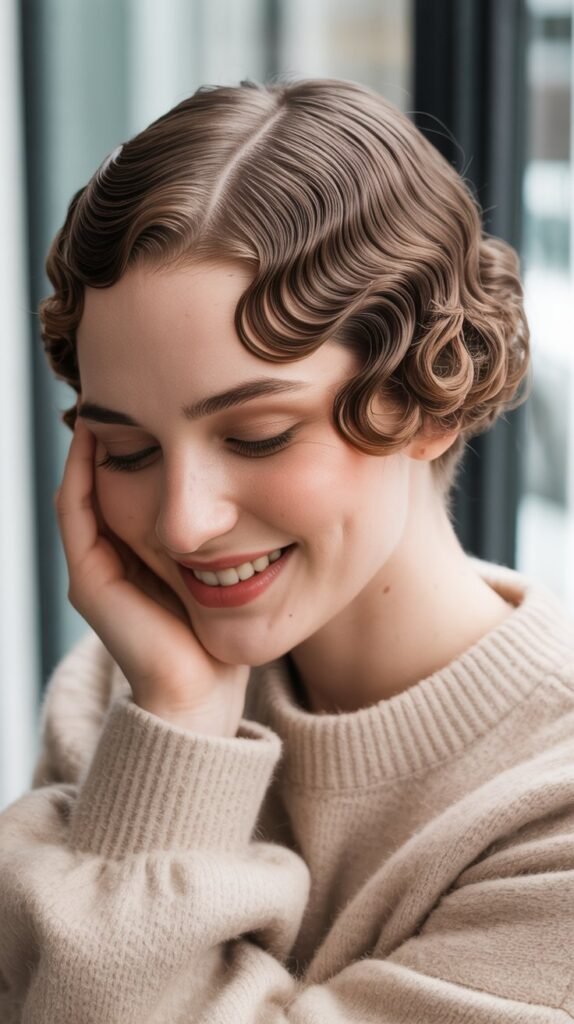
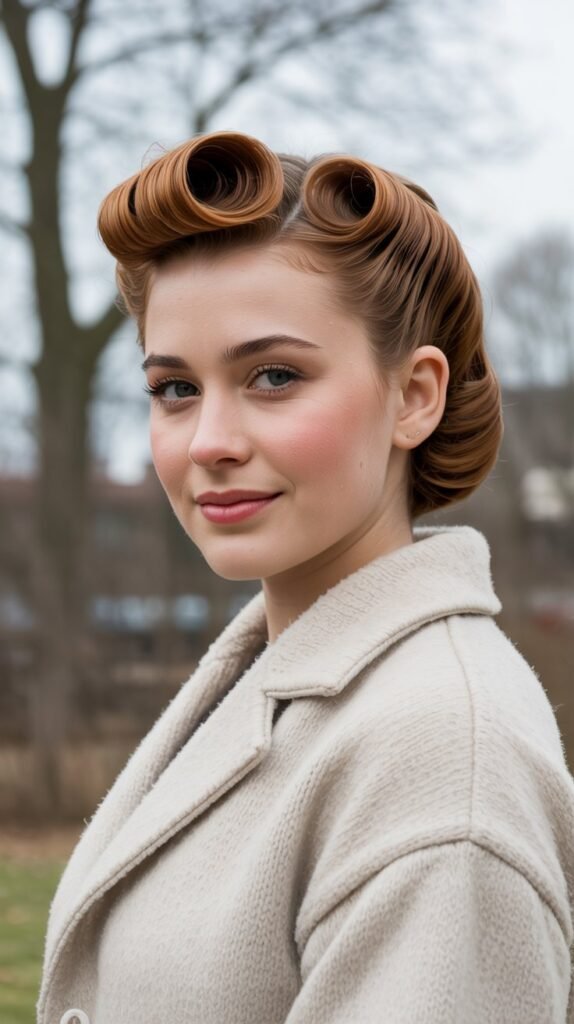
4. Vintage Pin Curls
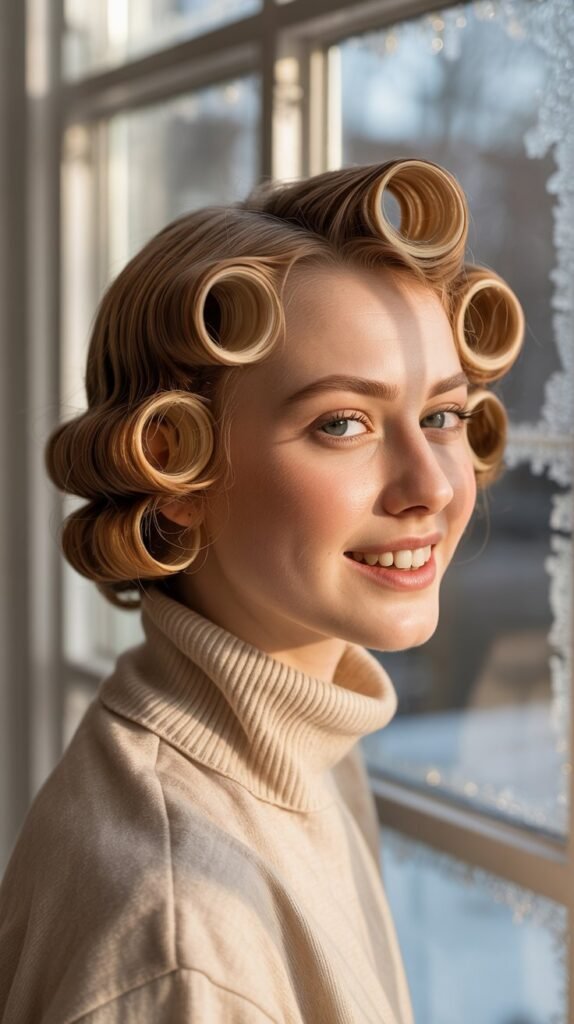
Vintage pin curls bring glamorous old-Hollywood elegance to short winter hair, creating a sophisticated look perfect for holiday parties and special occasions.
This classic styling technique produces beautiful S-shaped waves that lie close to the head, offering both style and warmth during cold weather.
The retro aesthetic pairs wonderfully with winter’s vintage-inspired fashion trends.
Step-by-Step Pin Curl Process:
- Begin with damp, freshly washed hair for best results.
- Apply a strong-hold setting lotion throughout the hair.
- Section hair into 1-inch squares, working systematically across the head.
- Take each section and wrap it around two fingers to create a flat circle.
- Secure each curl to the scalp with two bobby pins in an X formation.
- Cover hair with a silk scarf and allow to air dry completely or use a hooded dryer.
- Once fully dry, carefully remove all bobby pins without disturbing the curl pattern.
- Gently brush through curls with a paddle brush to create soft waves.
- Set the style with a firm-hold hairspray for longevity.
Styling Variations:
- Create tighter curls for more defined waves
- Alternate curl directions for a more natural appearance
- Brush out more thoroughly for softer, looser waves
- Leave some curls intact for a more structured vintage look
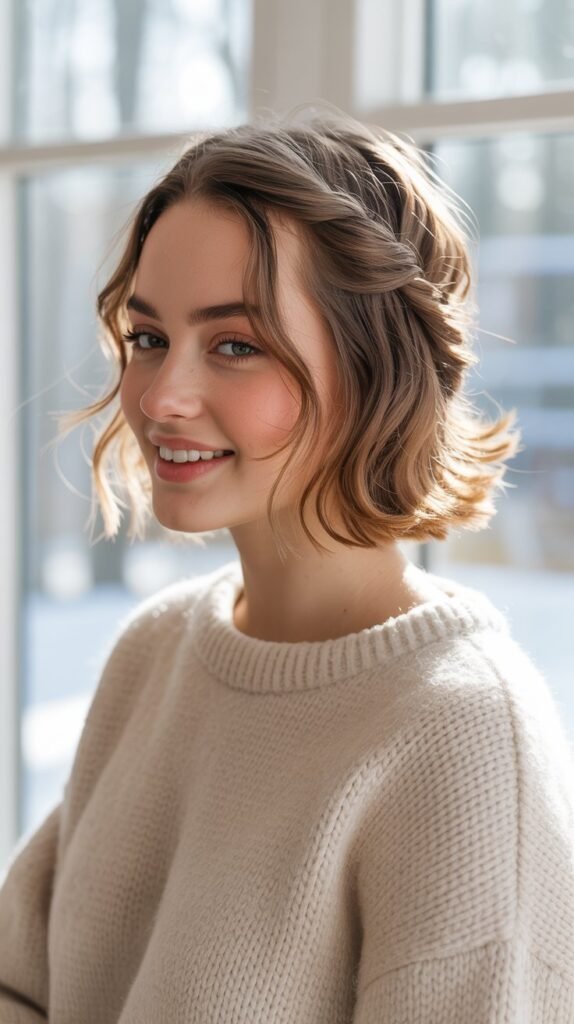
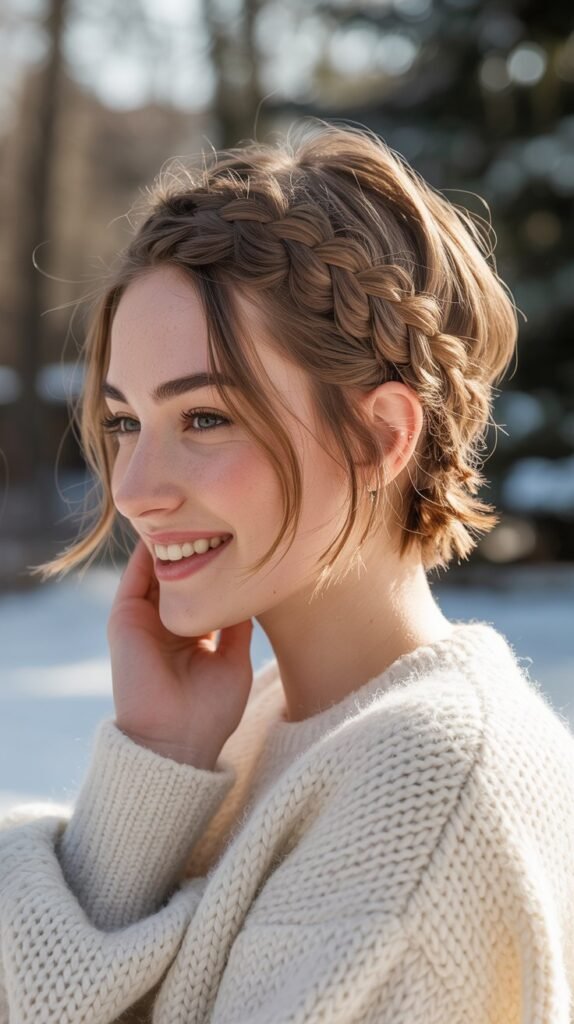
5. Braided Crown Halo
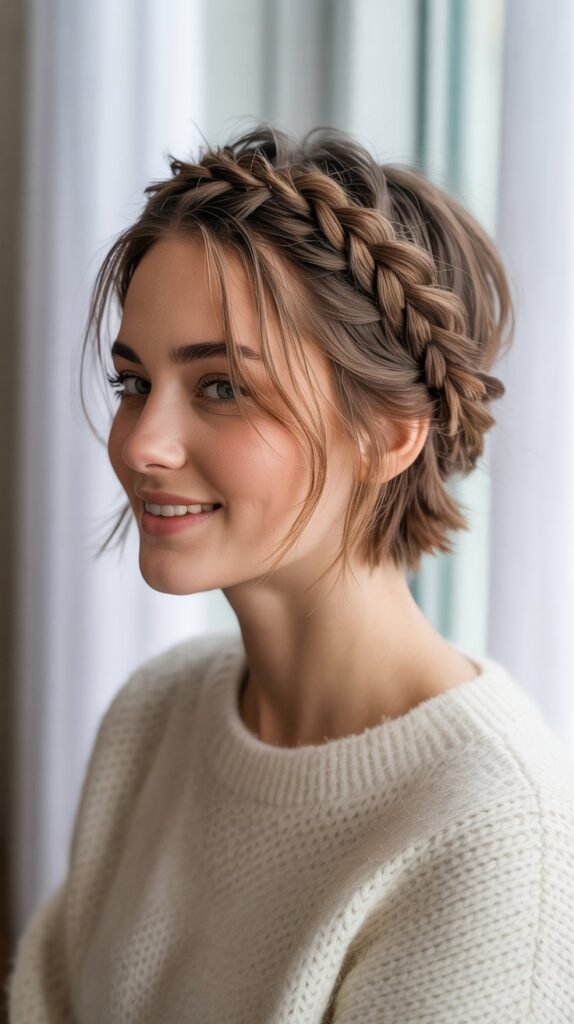
The braided crown halo transforms short hair into a romantic, ethereal style that’s surprisingly achievable even with limited length.
This elegant look keeps hair neatly secured while creating the illusion of a delicate crown, making it ideal for winter weddings, holiday gatherings, or any occasion requiring a touch of fairy-tale magic.
The style also provides extra warmth by keeping hair close to the head.
Braiding Technique for Short Hair:
- Start with second-day hair or add texture with dry shampoo for better grip.
- Create a deep side part and separate a section of hair along the hairline.
- Begin a Dutch braid (reverse French braid) starting at one temple.
- Braid along the hairline, incorporating small sections as you work around the head.
- When you run out of hair to add, continue with a regular three-strand braid.
- Wrap the braid around the crown area and secure with bobby pins.
- Use small pins to tuck any loose ends underneath the braid.
- Gently pull on the braid sections to create a fuller, more relaxed appearance.
- Finish with flexible-hold hairspray to maintain the style.
Accessorizing Options:
- Add small pearl pins throughout the braid for elegance
- Incorporate seasonal flowers or greenery for winter events
- Use metallic hair cuffs for a modern twist
- Weave thin ribbons through the braid for added color
6. Slicked Back Undercut
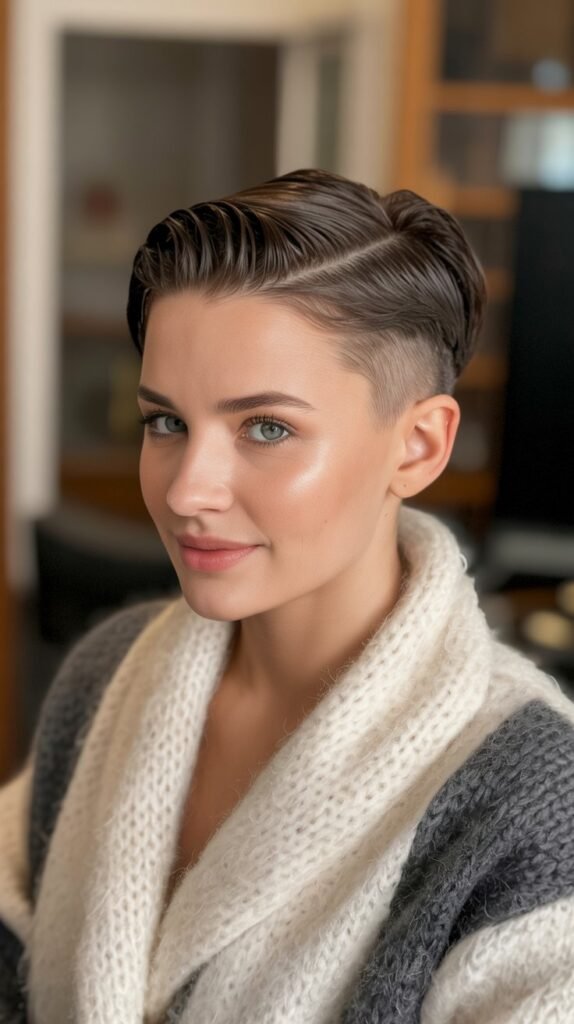
The slicked back undercut delivers bold, modern sophistication with an edge that perfectly captures winter’s sleek aesthetic.
This style showcases the dramatic contrast between longer top sections and shaved or closely cropped sides, creating a striking silhouette that looks effortlessly cool.
The streamlined appearance works beautifully under winter hats and hoods.
Achieving the Slicked Look:
- Apply a strong-hold gel to damp hair, focusing on the longer top section.
- Use a fine-tooth comb to slick hair straight back from the hairline.
- Ensure even product distribution by combing through multiple times.
- Create clean, defined lines along the sides where the undercut begins.
- Allow hair to air dry for a natural finish or blow dry for extra hold.
- Apply additional gel or pomade to any areas that need reinforcement.
- Finish with a high-shine spray for maximum impact.
Maintenance Requirements:
- Regular trims every 3-4 weeks to maintain the undercut shape
- Daily styling with strong-hold products for consistency
- Touch-ups throughout the day with a small comb and product
- Protecting the style when wearing hats by adjusting carefully
7. Soft Romantic Curls
Soft romantic curls bring gentle femininity and warmth to short hair during winter months, creating a look that’s both elegant and approachable.
These bouncy, voluminous curls add dimension and movement while maintaining a polished appearance suitable for various occasions.
The style works especially well for celebrating winter’s romantic holiday season and special moments.
Curling Technique:
- Prep dry hair with a heat protectant and light styling cream.
- Use a 1-inch to 1.5-inch curling iron with a clip for more control.
- Section hair into workable areas, starting at the bottom layers.
- Wrap small sections around the barrel, holding for 8-10 seconds.
- Release curls into your hand and allow them to cool in a coiled position.
- Pin each cooled curl to your head with a clip to set the shape.
- Once all curls are created and cooled, remove clips and gently separate.
- Use your fingers to soften curls and create a more natural appearance.
- Set with a light, flexible-hold hairspray that won’t make hair crunchy.
Curl Longevity Tips:
- Start with hair that hasn’t been washed the same day for better hold
- Use smaller sections for tighter, longer-lasting curls
- Allow curls to cool completely before touching them
- Sleep with hair in a loose pineapple updo to preserve the style overnight
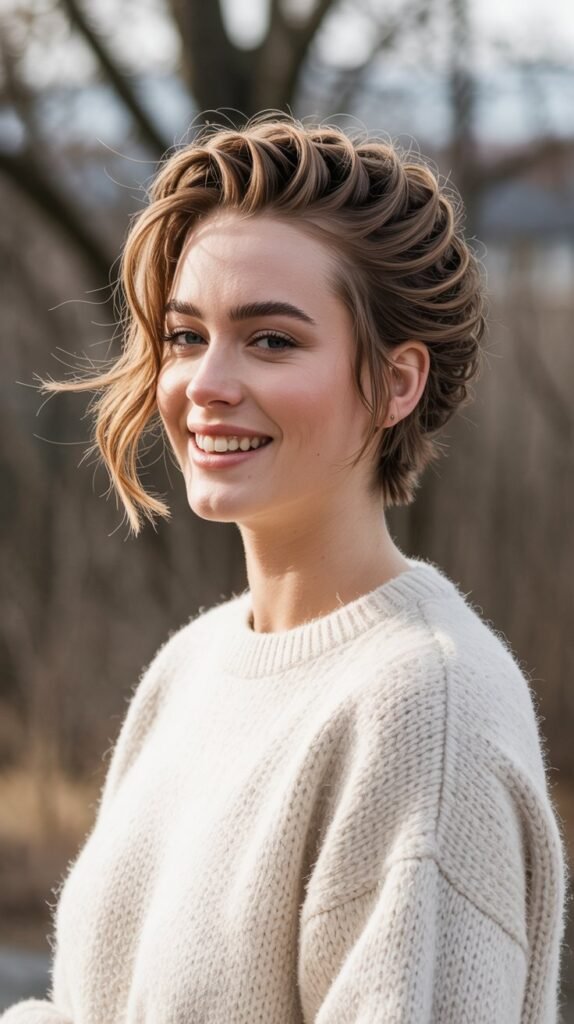
8. Tousled Shag Cut
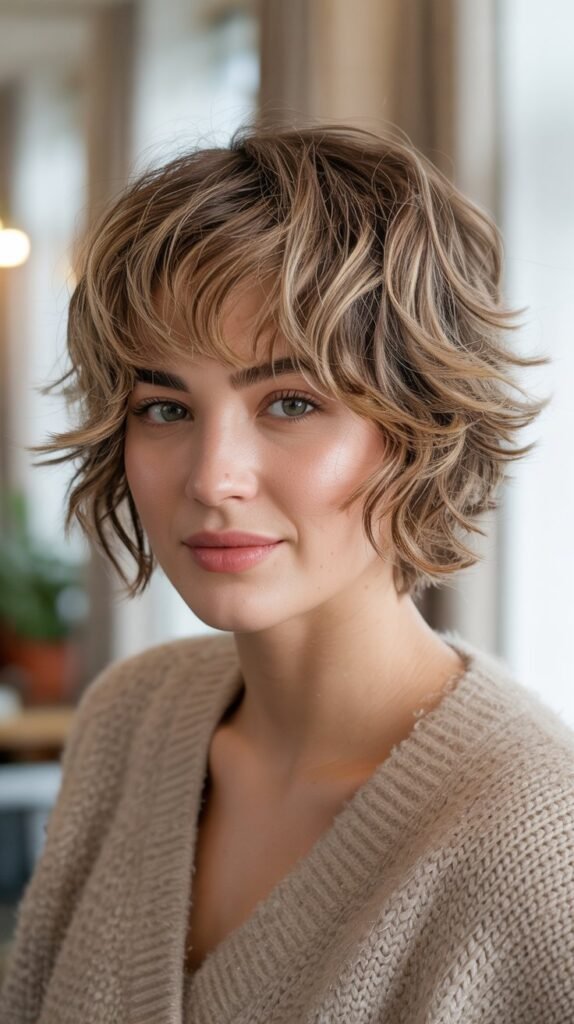
The tousled shag cut embodies effortless cool with its layered, piece-y texture that moves beautifully and requires minimal styling.
This style captures the relaxed, undone aesthetic that’s perfect for winter’s casual moments while still looking intentionally stylish.
The multiple layers create dimension and prevent short hair from looking flat or heavy.
Styling Your Shag:
- Apply volumizing mousse to damp hair, concentrating on the roots.
- Rough-dry hair with your hands, scrunching as you go to enhance texture.
- Use a diffuser attachment to dry while maintaining natural movement.
- Take random sections and twist them with a small amount of texturizing cream.
- Create separation by running your fingers through the layers.
- Spray with a sea salt spray for added texture and a slightly matte finish.
- Shake your head to allow layers to fall naturally into place.
Layer Maintenance:
- Schedule regular trims every 6-8 weeks to maintain the shag shape
- Ask your stylist to point-cut the ends for a softer, more textured appearance
- Focus on keeping the layers distinct and avoiding blunt lines
- Communicate your desired level of texture and movement with your stylist
9. Faux Hawk Style
The faux hawk style brings rebellious edge and contemporary flair to short hair, creating a bold statement that stands out during winter months.
This style concentrates volume at the crown while keeping sides smooth or textured, producing a striking silhouette that exudes confidence.
The dramatic height and shape make it perfect for those wanting to push style boundaries.
Creating Height and Volume:
- Start with completely dry hair for maximum lift and hold.
- Apply a strong-hold mousse or volumizing spray at the roots.
- Blow dry the crown section upward using a round brush for added volume.
- Backcomb or tease the hair at the crown to create a solid foundation.
- Smooth the top layer over the teased section using a brush or comb.
- Apply strong-hold gel or pomade to the sides, slicking them down or back.
- Use your fingers to shape the center section into the desired hawk shape.
- Secure with bobby pins if needed for extra hold.
- Finish with maximum-hold hairspray, focusing on the elevated sections.
Style Variations:
- Keep sides sleek for a more polished faux hawk
- Add texture to sides for a softer, more wearable version
- Create a more dramatic height for evening events
- Opt for subtle volume for professional settings
10. Vintage Finger Waves
Vintage finger waves transport short hair back to the glamorous 1920s and 1930s era, creating sculptural S-shaped patterns that lie elegantly against the head.
This sophisticated style requires patience and technique but delivers stunning results perfect for winter’s most formal occasions.
The smooth, glossy waves reflect light beautifully and pair wonderfully with vintage-inspired winter fashion.
Mastering Finger Wave Technique:
- Begin with freshly washed, damp hair for the best moldability.
- Apply a generous amount of strong-hold setting lotion or gel.
- Create a deep side part using a fine-tooth comb.
- Place your index finger flat against the hair where you want the first wave curve.
- Use the comb to form an S-curve, pushing hair in the opposite direction of the first curve.
- Hold each wave in place with metal wave clips while you create the next section.
- Continue forming waves down the length of the hair, maintaining consistent size and shape.
- Allow hair to dry completely (air dry or use a hooded dryer) before removing clips.
- Once dry, carefully remove clips without disturbing the wave pattern.
- Apply a high-shine finishing spray to enhance the glossy appearance.
Historical Context:
- Finger waves originated in the 1920s during the flapper era
- The style was popularized by Hollywood screen sirens of the 1930s
- Modern interpretations can be softer and more wearable
- The technique remains a valuable skill in professional hairstyling
11. Choppy Bob with Fringe
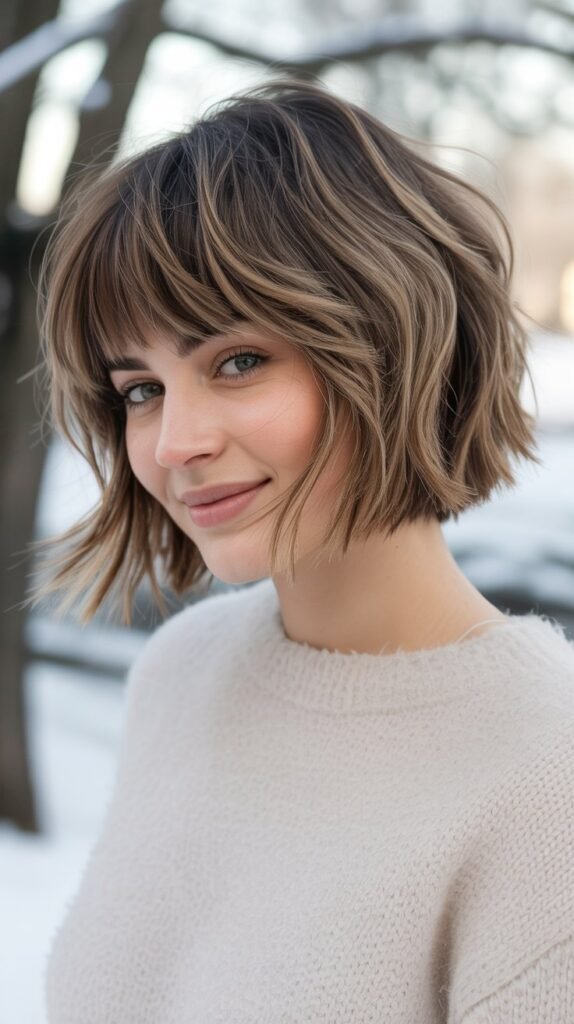
The choppy bob with fringe delivers contemporary edge through intentionally uneven lengths and textured fringe that frames the face beautifully.
This style embraces imperfection and creates movement through strategic layering and point-cutting techniques.
The combination of choppy texture and face-framing fringe makes this an ideal winter style for those seeking a modern, youthful appearance.
Styling the Choppy Bob:
- Apply a lightweight styling cream to damp hair for separation.
- Blow dry hair using your fingers to enhance the piece-y texture.
- Use a small flat iron to create bends and kinks in random sections.
- Apply a small amount of fiber paste to the ends, twisting and separating.
- Style the fringe by blow-drying it forward with a round brush.
- Use your fingers to piece out the fringe, creating texture and separation.
- Finish with a light texturizing spray for hold without stiffness.
Fringe Styling Options:
- Sweep fringe to the side for a softer look
- Style fringe straight down for bold impact
- Create choppy, piece-y fringe for added texture
- Grow out fringe to blend with longer layers
12. Low Sleek Bun
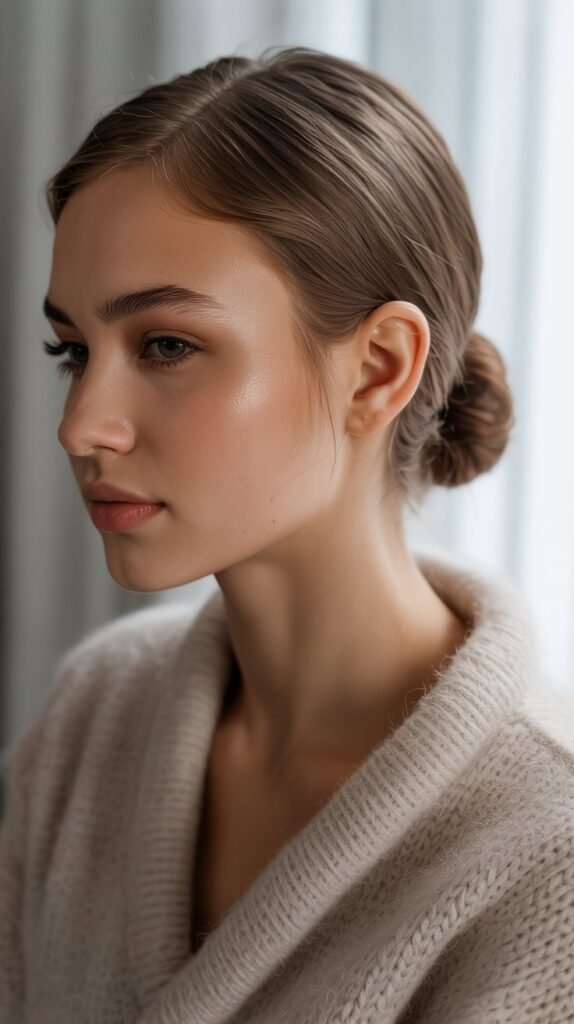
The low sleek bun transforms short hair into an elegant updo that exudes sophistication and polish, perfect for winter’s formal events and professional occasions.
While challenging with shorter lengths, this style can be achieved with the right techniques and products, creating a chic look that keeps hair neatly secured.
The low placement at the nape provides warmth while maintaining an elevated aesthetic.
Creating a Bun with Short Hair:
- Start with second-day hair or apply dry shampoo for texture and grip.
- Brush hair back smoothly, using gel or pomade to control flyaways.
- Gather hair at the nape of the neck into a low ponytail.
- Secure tightly with a small elastic that matches your hair color.
- Twist the ponytail and wrap it around the base to form a small bun.
- Use bobby pins to secure the bun, inserting them at different angles.
- For hair that’s too short to wrap, use a small bun maker or hair donut.
- Pin any loose pieces or shorter layers flat against the head.
- Finish with strong-hold hairspray and smooth flyaways with a fine-tooth comb.
Extension Options:
- Consider using a clip-in bun piece for added volume
- Match extensions carefully to your hair color
- Secure extensions firmly to prevent slipping
- Blend your natural hair with extensions seamlessly
13. Beachy Textured Bob
The beachy textured bob captures summer’s carefree spirit while adapting beautifully to winter styling, creating effortless waves with a slightly undone appearance.
This style brings lightness and movement to short hair, making it perfect for those who prefer relaxed, low-maintenance looks even during colder months.
The tousled texture adds dimension and interest without requiring precision styling.
Achieving Beachy Texture:
- Spray damp hair generously with sea salt spray from roots to ends.
- Scrunch hair with your hands to encourage natural wave formation.
- Allow hair to air dry partially before using a diffuser on low heat.
- Continue scrunching while drying to enhance texture and volume.
- Once dry, apply a small amount of lightweight texturizing cream.
- Twist random sections around your finger and release for added definition.
- Finish with a texturizing spray for a slightly matte, tousled appearance.
Winter Adaptation:
- Use moisturizing sea salt sprays to combat dryness
- Apply a nourishing oil to ends before styling
- Protect hair from harsh winter winds with a light serum
- Refresh the style with dry shampoo and additional texturizing spray
14. Side-Swept Glamour
Side-swept glamour creates dramatic elegance by sweeping all hair to one side, producing an asymmetrical look that’s both sophisticated and romantic.
This style works beautifully for winter formal events, showcasing jewelry and necklines while creating a soft, feminine silhouette.
The concentration of volume on one side adds interest and draws attention to the face.
Styling Steps:
- Begin by creating a deep side part on dry hair.
- Apply smoothing serum to control frizz and add shine.
- Use a flat iron to create smooth, polished sections on both sides.
- Take small sections and curl them toward the face using a medium-barrel curling iron.
- Brush through curls gently to create soft waves.
- Sweep all hair dramatically to one side, securing behind the ear with bobby pins.
- Use decorative pins or clips on the pinned side for added glamour.
- Apply strong-hold hairspray to maintain the side-swept position.
- Tuck any shorter pieces behind the ear and secure with pins.
Accessory Ideas:
- Add jeweled bobby pins for sparkle
- Use a decorative hair comb on the pinned side
- Incorporate fresh flowers for winter weddings
- Try vintage-inspired clips for retro elegance
15. Spiky Pixie
The spiky pixie delivers bold, contemporary edge through strategically placed spikes that create texture and dimension.
This style celebrates confidence and individuality, making a strong statement that’s perfect for those who embrace daring fashion choices.
The vertical elements add height and interest, transforming a simple pixie cut into something extraordinary.
Creating Perfect Spikes:
- Start with dry or slightly damp hair for best results.
- Apply a strong-hold styling gel or wax to your palms.
- Rub hands together to warm and evenly distribute product.
- Take small sections of hair and twist them upward between your fingers.
- Pull gently upward while twisting to create defined spikes.
- Vary the direction and height of spikes for a more natural appearance.
- Use your fingers to shape and refine each spike.
- Allow product to dry completely before touching.
- Finish with a maximum-hold hairspray for all-day staying power.
Spike Variations:
- Create uniform spikes for a more structured look
- Vary spike sizes for added texture and interest
- Keep spikes shorter and softer for professional settings
- Make dramatic, tall spikes for evening events or concerts
16. Half-Up Twist
The half-up twist cleverly works with limited length to create an elegant updo effect while leaving some hair down for softness and movement.
This versatile style strikes the perfect balance between casual and dressy, making it suitable for various winter occasions.
The twisted sections add dimension and visual interest while keeping hair off the face.
Twisting Technique:
- Begin with hair that has some texture, either natural or created with products.
- Section the top half of hair from ear to ear across the crown.
- Divide this section into two equal parts on either side of a center part.
- Take one section and begin twisting it away from the face.
- Continue twisting while pulling gently to create tension.
- Secure the twist at the back of the head with bobby pins.
- Repeat the twisting process with the opposite section.
- Cross the twists at the back and pin securely together.
- Gently pull on the twists to create a fuller, more relaxed appearance.
- Leave the remaining hair down, adding waves or curls if desired.
Styling the Down Section:
- Add loose curls for a romantic look
- Keep it straight and sleek for modern elegance
- Create beachy waves for casual styling
- Add texture with a sea salt spray
17. Curly Mohawk Style

The curly mohawk style celebrates natural curl patterns while creating bold height and drama through the center of the head.
This look works wonderfully for those with naturally curly or coily short hair, showcasing texture while making a confident style statement.
The combination of defined curls and shaved or slicked sides creates stunning contrast perfect for winter’s fashion-forward moments.
Enhancing Natural Curls:
- Start with freshly washed, conditioned hair while still very damp.
- Apply a curl-defining cream or gel throughout the hair.
- Use the praying hands method to smooth product onto each section.
- Scrunch hair upward to encourage curl formation at the crown.
- Use gel or pomade to slick down or define the sides.
- Allow curls to air dry or use a diffuser on low heat and speed.
- Once completely dry, gently fluff curls at the crown for added height.
- Use a pick or your fingers to lift curls at the roots.
- Set with a light mist of flexible-hold hairspray.
Curl Care for Winter:
- Use moisturizing products to combat dry indoor air
- Apply a leave-in conditioner before styling
- Refresh curls with a curl-reviving spray between washes
- Protect curls with a satin bonnet or pillowcase at night
18. Retro Victory Rolls
Retro victory rolls bring 1940s wartime glamour to modern short hair, creating iconic rolled sections that frame the face with vintage sophistication.
This style requires practice but delivers show-stopping results perfect for themed events, vintage-inspired winter parties, or anyone wanting to channel old Hollywood elegance.
The sculptural rolls add height and drama while maintaining a polished, feminine appearance.
Rolling Technique:
- Begin with dry hair that has been set with pin curls or hot rollers.
- Apply a strong-hold setting spray to the front sections.
- Section off the hair where you want to create the rolls, typically at the front temples.
- Backcomb each section at the roots to create a foundation for rolling.
- Smooth the top layer over the teased section using a brush.
- Roll the section back toward the crown, keeping it smooth and tight.
- Secure the roll with bobby pins inserted vertically and horizontally.
- Repeat on the opposite side, ensuring both rolls are symmetrical.
- Use additional pins to secure any loose sections.
- Finish with a firm-hold hairspray to maintain the structure.
Styling Variations:
- Create double victory rolls for extra drama
- Make smaller, subtler rolls for everyday wear
- Combine victory rolls with pin curls for full vintage styling
- Add a decorative hair scarf between the rolls
19. Asymmetrical Angled Bob
The asymmetrical angled bob creates modern sophistication through intentionally uneven lengths that are longer in front and shorter in back.
This geometric style delivers contemporary edge while maintaining wearability, making it an excellent choice for those wanting a statement haircut.
The dramatic angle draws attention and creates a sleek, fashion-forward silhouette perfect for winter’s chic aesthetic.
Maintaining the Angle:
- This style requires a precise cut from a skilled stylist familiar with angular cuts.
- Schedule regular trims every 4-6 weeks to maintain the sharp angle.
- Blow dry hair straight using a paddle brush for maximum sleekness.
- Use a flat iron to enhance the smooth, polished finish.
- Apply shine serum to emphasize the clean lines and reflective quality.
- Style with a deep side part to showcase the length difference.
- Keep the shorter side tucked behind the ear to highlight the asymmetry.
Styling Options:
- Wear it sleek and straight for maximum impact
- Add subtle waves for a softer interpretation
- Create volume at the crown while keeping lengths smooth
- Experiment with different parting positions
20. Twisted Updo
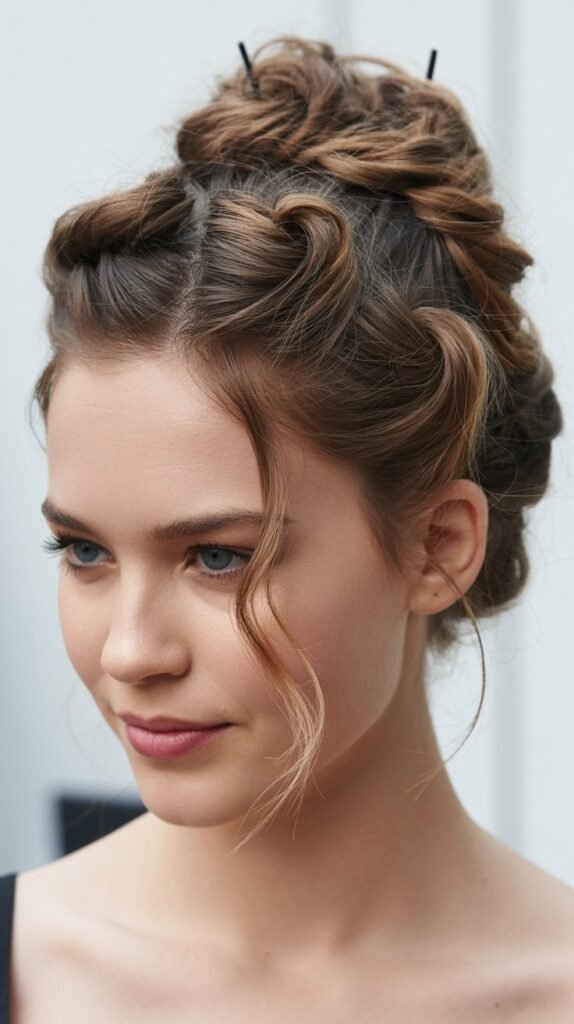
The twisted updo cleverly works with short hair lengths to create an elegant raised style perfect for winter’s formal occasions.
This technique uses strategic twisting and pinning to give the illusion of an elaborate updo even with limited length.
The result is a sophisticated style that keeps hair secure while maintaining a polished, put-together appearance.
Creating the Twisted Look:
- Start with textured, second-day hair or add dry shampoo for grip.
- Section hair into multiple small sections across the head.
- Take each section and twist it tightly away from the face.
- Roll the twisted section up toward the scalp and pin securely.
- Continue this process with all sections, creating a raised, textured appearance.
- Arrange the twisted sections in a pleasing pattern.
- Use bobby pins that match your hair color for seamless securing.
- Pull gently on some twists to create a fuller, more voluminous look.
- Finish with strong-hold hairspray to maintain the style throughout the event.
Embellishment Ideas:
- Add pearl pins throughout the twists
- Incorporate small flowers or greenery
- Use decorative hair pins with jeweled ends
- Try metallic bobby pins for a modern accent
21. Tousled French Twist
The tousled French twist adapts the classic updo for short hair by creating a relaxed, undone version that’s both elegant and achievable.
This style captures sophistication while maintaining an effortless, slightly messy aesthetic that’s perfect for modern winter styling.
The loosened structure makes it more forgiving and easier to create with shorter lengths.
Loose French Twist Method:
- Begin with hair that has texture, either natural or enhanced with product.
- Gather hair at the nape as if creating a low ponytail, but don’t secure.
- Twist the gathered hair vertically along the back of the head.
- Keep the twist loose and slightly messy rather than tight and controlled.
- Tuck the ends of hair into the twist and secure with bobby pins.
- Allow some pieces to escape and frame the face naturally.
- Gently pull on sections of the twist to create volume and texture.
- Leave shorter pieces around the hairline loose for a softer appearance.
- Finish with a light mist of flexible-hold hairspray.
Adding Romance:
- Pull out a few face-framing pieces before creating the twist
- Incorporate small braids into sections before twisting
- Add baby’s breath or small flowers for a ethereal touch
- Keep the overall look soft and feminine
22. Slicked Down Pixie
The slicked down pixie creates ultra-modern sophistication through smooth, controlled styling that hugs the head closely.
This minimalist approach delivers maximum impact, showcasing facial features and creating a sleek, androgynous aesthetic.
The glossy, polished finish reflects light beautifully and pairs perfectly with winter’s streamlined fashion trends.
Achieving Maximum Sleekness:
- Start with damp, freshly washed hair for best control.
- Apply a generous amount of strong-hold gel or pomade.
- Use a fine-tooth comb to distribute product evenly from roots to ends.
- Comb hair in the desired direction, creating clean, defined sections.
- Blow dry on low heat while continuing to comb hair flat against the head.
- Apply additional product to any areas that resist lying flat.
- Use the comb to create precise parts or lines if desired.
- Finish with a high-shine spray for maximum gloss.
- Smooth any flyaways with product on your fingers or a small brush.
Maintenance Throughout the Day:
- Carry a small comb and travel-size gel for touch-ups
- Reapply shine spray as needed
- Smooth hair with clean hands if products aren’t available
- Protect the style when removing winter hats
23. Voluminous Crown
The voluminous crown creates dramatic height and fullness at the top of the head while keeping sides smooth or textured.
This style delivers instant impact and elegance, making short hair appear fuller and more glamorous.
The elevated crown works wonderfully for special occasions and adds a regal quality perfect for winter celebrations.
Building Volume:
- Begin with completely dry hair for maximum lift potential.
- Apply a volumizing powder or spray directly at the roots.
- Section the crown area and backcomb thoroughly at the roots.
- Build the teasing gradually, working in layers from bottom to top.
- Smooth the top layer gently over the teased sections.
- Use bobby pins to secure the volume from underneath.
- Spray the teased sections with strong-hold hairspray before smoothing.
- Create a small bump or dramatic height depending on the occasion.
- Keep sides sleek or add texture based on personal preference.
Volume-Boosting Products:
- Volumizing powder for invisible lift
- Texturizing spray for grip and hold
- Root-lifting spray applied before blow drying
- Strong-hold hairspray to maintain height
24. Side Braid Accent
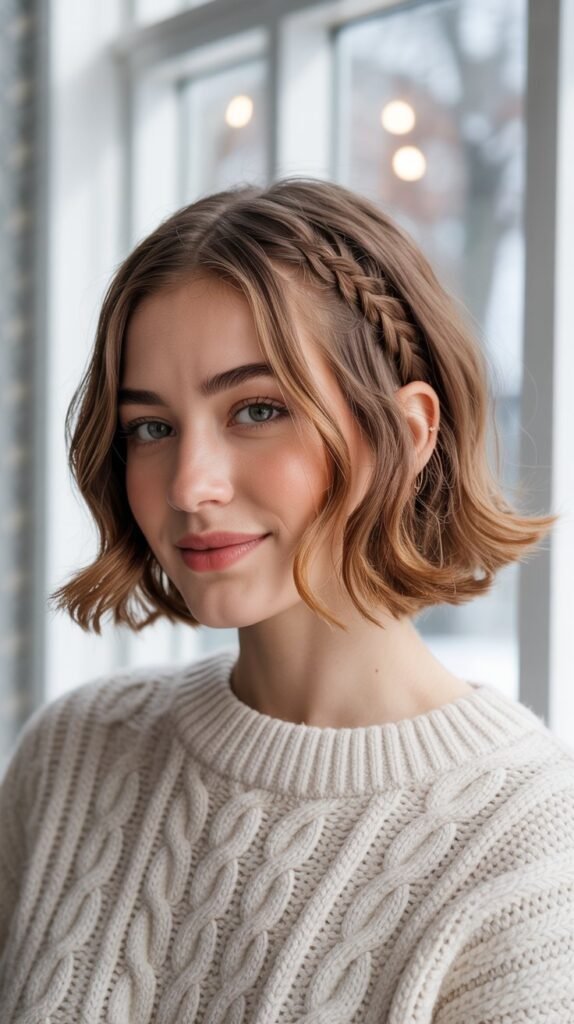
The side braid accent adds intricate detail to short hair by incorporating a small decorative braid along one side.
This style creates visual interest without requiring extensive length, making it perfect for adding a special touch to everyday winter looks or elevating simple styles for occasions.
The braid serves as a beautiful accent that draws the eye while keeping the overall style wearable and practical.
Creating the Side Braid:
- Start with textured hair or apply dry shampoo for better grip and hold.
- Section off a small portion of hair along the side from temple to ear.
- Divide this section into three equal strands for a classic three-strand braid.
- Begin braiding tightly to ensure the detail remains visible and secure.
- Continue braiding as far as the length allows, typically to just past the ear.
- Secure the end with a small clear elastic that won’t show.
- Tuck the end behind the ear or pin it discreetly underneath other hair.
- Leave the rest of the hair styled as desired, creating contrast with the braid.
- Apply a light hairspray to keep the braid neat and prevent flyaways.
Braid Variations:
- Create a tiny Dutch braid for added dimension
- Make multiple small braids for a more bohemian feel
- Add a fishtail braid for intricate texture
- Incorporate small beads or rings into the braid
Best Combinations:
- Pair with loose waves for romantic styling
- Combine with sleek straight hair for modern contrast
- Add to a textured pixie for unexpected detail
- Include in half-up styles for additional interest
25. Wet Look Style
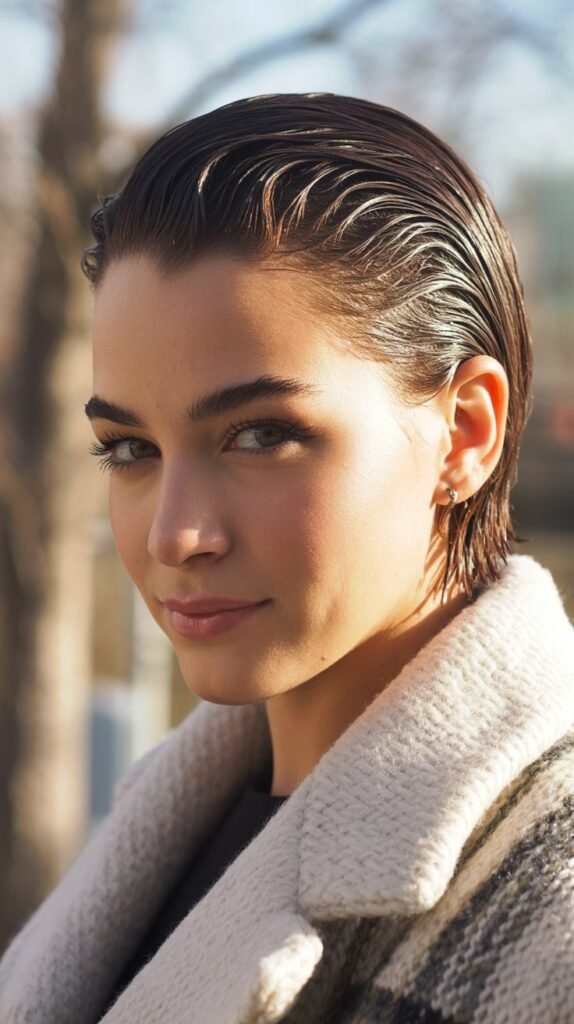
The wet look style creates an ultra-modern, fashion-forward appearance by mimicking the look of freshly wet hair.
This bold aesthetic delivers high-shine drama and works beautifully for evening events, fashion-conscious occasions, or anyone wanting to make a contemporary statement.
The glossy finish reflects light dramatically and pairs perfectly with winter’s sleek, sophisticated fashion.
Achieving the Wet Effect:
- Start with either damp or completely dry hair depending on product choice.
- Apply a generous amount of wet-look gel throughout all hair sections.
- Use your fingers or a wide-tooth comb to distribute product evenly.
- Slick hair back or style in the desired direction while still coated with gel.
- For extra shine, layer a glossing serum over the gel.
- Allow the gel to dry naturally without disturbing for best results.
- Avoid touching hair as it dries to prevent disrupting the smooth finish.
- Once dry, apply additional shine spray if needed for maximum glossiness.
- The style should look intentionally wet and shiny, not sticky or crunchy.
Product Selection:
- Choose alcohol-free gels to prevent dryness
- Look for products specifically labeled as “wet look” or “high shine”
- Consider water-based pomades for easier removal
- Use shine-enhancing serums as a finishing layer
Removing the Style:
- This look requires thorough washing to remove all product
- Use a clarifying shampoo to ensure complete cleansing
- Follow with a deep conditioning treatment to restore moisture
- Allow hair to rest between wet-look styling sessions
26. Braided Headband
The braided headband creates a charming, bohemian accent by transforming a section of hair into a natural headband that wraps around the head.
This style works beautifully with short hair, adding a feminine touch while keeping hair controlled and secure.
The braid headband is perfect for casual winter days and adds a whimsical element to simple outfits.
Creating Your Hair Headband:
- Begin with second-day hair or add texture spray for better braiding grip.
- Create a side part and section off hair from one side along the hairline.
- Start a tight three-strand braid beginning at the part.
- Braid along the hairline, following the natural curve around the face.
- Continue the braid behind the ear and toward the back of the head.
- Secure the braid end with a small elastic that matches your hair color.
- Bring the braid across the top of your head like a headband.
- Pin the end securely on the opposite side, tucking it underneath other hair.
- Adjust the braid positioning to sit comfortably like a traditional headband.
- Leave the remaining hair down and styled as preferred.
Styling the Rest:
- Add soft waves throughout for a romantic look
- Keep hair straight for a more polished appearance
- Create texture with sea salt spray for bohemian vibes
- Add volume at the crown for extra dimension
27. Pompadour Style
The pompadour style brings vintage rock-and-roll glamour to short hair through dramatic volume and height at the front.
This bold look combines retro inspiration with modern edge, creating a statement style that exudes confidence.
The swept-back volume works wonderfully for winter events where you want to make an unforgettable impression.
Creating the Pompadour:
- Start with completely dry hair that’s been texturized at the roots.
- Apply volumizing mousse to the front section before blow drying.
- Use a round brush to blow dry the front section up and back.
- Once dry, backcomb the roots heavily to create a strong foundation.
- Smooth the top layer gently over the teased section with a brush.
- Roll the front section back and slightly forward to create the pompadour shape.
- Secure the rolled section with bobby pins placed horizontally underneath.
- Use your fingers to shape the pompadour to the desired height and curve.
- Apply strong-hold hairspray liberally to maintain the structure.
- Keep the sides slicked down or add complementary texture.
Height Variations:
- Create subtle lift for everyday professional wear
- Build dramatic height for evening events and parties
- Make a rounded pompadour for softer femininity
- Form a more angular pompadour for edgy modern style
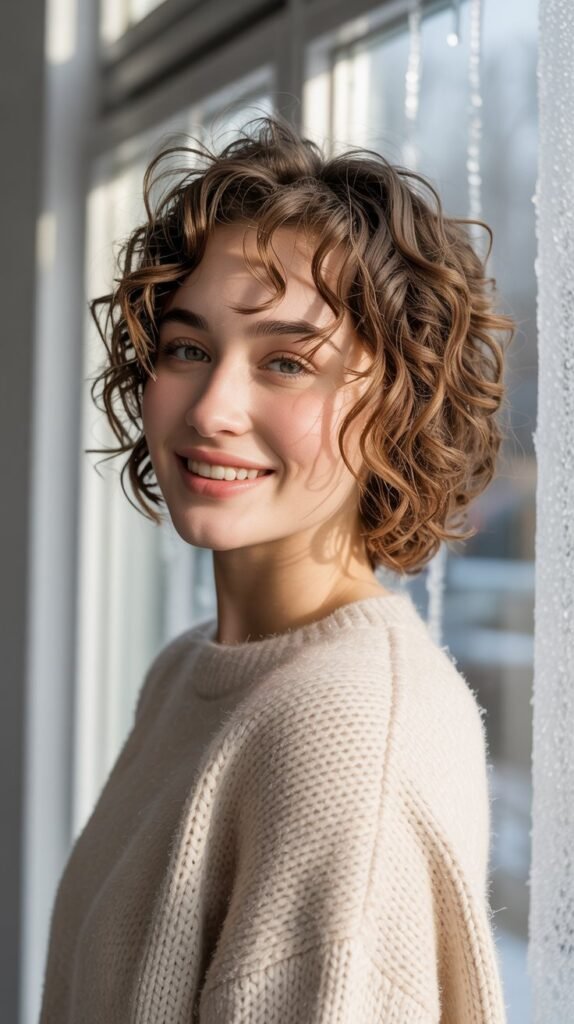
28. Curly Bob with Definition
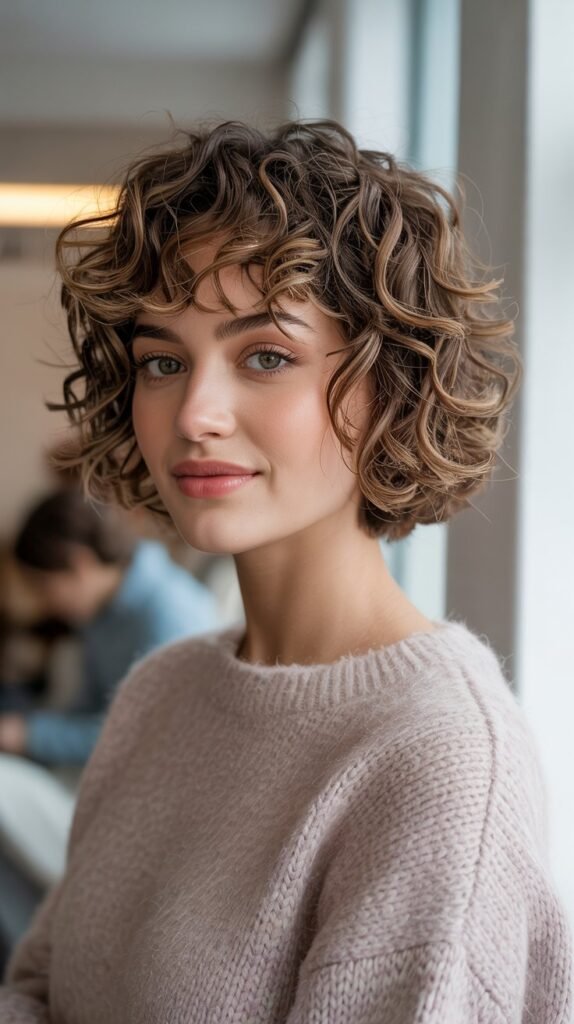
The curly bob with definition celebrates natural curl patterns by enhancing and defining each curl for maximum beauty and bounce.
This style showcases the gorgeous texture of curly hair while maintaining a neat, polished shape.
The defined curls create dimension and movement, making it an ideal winter style that embraces natural hair texture.
Defining Your Curls:
- Begin with freshly washed hair that’s still soaking wet for best product absorption.
- Apply a leave-in conditioner first to provide moisture and slip.
- Section hair into manageable portions to ensure even product distribution.
- Apply curl-defining cream or gel using the praying hands method.
- Scrunch each section upward to encourage curl formation and definition.
- Use a denman brush or your fingers to create curl clumps and definition.
- Allow hair to air dry completely or use a diffuser on low heat.
- Once fully dry, scrunch out any product crunch for soft, touchable curls.
- Avoid touching curls while they dry to prevent frizz and disruption.
Winter Curl Care:
- Use a humidifier indoors to combat dry air that affects curls
- Apply a rich leave-in conditioner before styling
- Refresh curls between washes with a curl-reviving spray
- Protect curls at night with a silk or satin bonnet
- Deep condition weekly to maintain moisture and definition
29. Sleek Pixie with Baby Bangs
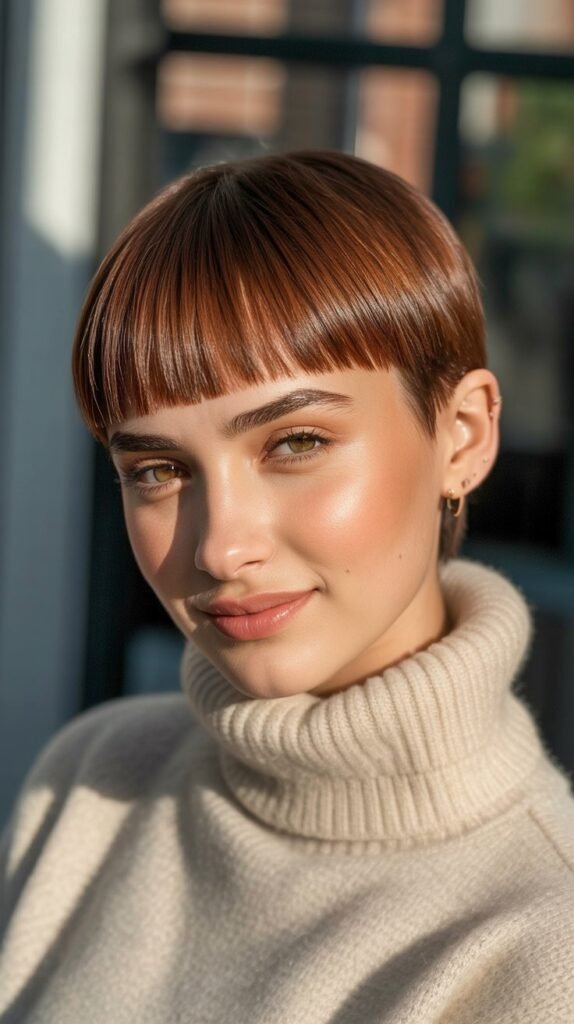
The sleek pixie with baby bangs combines ultra-short fringe with smooth, polished styling for a bold, fashion-forward look.
This daring style showcases confidence and creates a striking silhouette that’s perfect for winter’s most stylish moments.
The baby bangs add an unexpected element while the sleek finish maintains sophistication.
Styling Baby Bangs:
- Start with dry hair and apply a smoothing serum throughout.
- Use a small flat iron to straighten and smooth the baby bangs forward.
- Ensure the bangs lie flat and even across the forehead.
- Apply gel or pomade to keep bangs in place without movement.
- Blow dry the rest of the hair smooth using a paddle brush.
- Create sleek sections using a flat iron for maximum polish.
- Keep everything smooth, controlled, and intentionally styled.
- Finish with a light mist of shine spray for glossiness.
- Use a fine-tooth comb to perfect any uneven sections.
Maintaining Baby Bangs:
- Trim bangs every 2-3 weeks to maintain the ultra-short length
- Style bangs daily as they show every imperfection
- Use strong-hold products to keep them in place
- Be prepared for commitment to this high-maintenance fringe
30. Romantic Low Chignon
The romantic low chignon creates an elegant, timeless updo by gathering short hair into a soft, loosened bun at the nape.
This sophisticated style works beautifully for winter weddings, formal dinners, and special occasions requiring polished elegance.
The soft, romantic interpretation makes the style more forgiving and easier to achieve with limited length.
Creating the Chignon:
- Start with hair that has been curled or waved for added texture and volume.
- Apply a texturizing spray throughout for grip and hold.
- Gather hair loosely at the nape, allowing some pieces to escape naturally.
- Twist the gathered hair gently, keeping it loose and relaxed.
- Coil the twisted section into a low, soft bun shape.
- Secure with bobby pins, placing them strategically throughout the bun.
- Pull gently on sections of the bun to create a fuller, more voluminous appearance.
- Allow face-framing pieces to fall naturally for romantic softness.
- Use a light-hold hairspray to maintain the style while keeping it touchable.
Adding Elegance:
- Incorporate pearl pins throughout the chignon
- Add fresh flowers or greenery for natural beauty
- Use a decorative hair comb above or beside the bun
- Wrap a delicate ribbon around the base of the chignon
Length Solutions:
- Use a small hair donut or bun maker if length is insufficient
- Pin shorter sections individually into the bun area
- Focus on creating the illusion of fullness rather than perfection
- Consider adding subtle extensions for important events
Essential Winter Hair Care Tips
Protecting Hair from Winter Elements:
- Apply a leave-in conditioner before going outside to create a protective barrier.
- Wear silk or satin-lined winter hats to prevent breakage and static.
- Use a humidifier indoors to combat dry air from heating systems.
- Deep condition weekly to restore moisture lost to cold weather.
- Trim hair regularly to prevent split ends caused by dryness.
- Switch to moisturizing shampoos and conditioners during winter months.
- Apply hair oil to ends before styling to lock in hydration.
Fighting Static and Frizz:
- Run a dryer sheet over hair to eliminate static quickly
- Use anti-static spray or hairspray on brushes before styling
- Apply a small amount of hand lotion to smooth flyaways in emergencies
- Choose wooden or natural bristle brushes over plastic ones
- Keep a travel-size anti-frizz serum in your bag for touch-ups
Product Recommendations for Winter:
- Moisturizing masks for weekly deep conditioning
- Thermal protection sprays for heat styling
- Anti-humidity products to combat indoor/outdoor temperature changes
- Nourishing oils like argan, coconut, or jojoba for daily hydration
- Leave-in conditioners for added protection and moisture
Styling Tools for Short Winter Hair
Essential Tools:
- Quality blow dryer with multiple heat settings and cool shot button
- Ceramic or titanium flat iron for sleek styles
- Small-barrel curling iron (3/4 inch to 1 inch) for short hair
- Round brushes in various sizes for blow drying volume
- Fine-tooth comb for precise parting and sectioning
- Bobby pins in multiple colors to match hair shades
- Hair elastics designed for short hair (small and tight)
Specialized Accessories:
- Diffuser attachment for enhancing natural texture and curls
- Teasing brush or comb for creating volume
- Hair donuts or bun makers for creating updos with limited length
- Decorative pins, clips, and accessories for embellishment
- Travel-size styling tools for on-the-go touch-ups
Winter Hair Health
Maintaining Healthy Short Hair:
- Schedule regular trims every 4-6 weeks to maintain shape and health.
- Minimize heat styling when possible by embracing natural texture.
- Use heat protectant products before every thermal styling session.
- Alternate between different styling methods to prevent damage to specific areas.
- Give hair breaks between elaborate styles to recover.
- Stay hydrated and maintain good nutrition for hair health from within.
- Consider taking biotin or hair-specific vitamins during winter months.
Signs of Winter Hair Damage:
- Increased breakage and split ends
- Dullness and lack of shine
- Excessive static and flyaways
- Difficulty maintaining styles
- Rough, straw-like texture
- Increased tangling
External Resources for Winter Hair Care:
For comprehensive information about protecting hair during winter, visit the American Academy of Dermatology at aad.org for expert dermatological advice on hair care.
The International Society of Hair Restoration Surgery at ishrs.org provides valuable resources about maintaining healthy hair.
For styling tutorials and techniques, professional hairstyling organizations like Beauty Schools Directory offer educational content about various hairstyling methods and trends.
Conclusion
Winter doesn’t mean compromising on style or limiting your options with short hair—in fact, it opens up a world of creative possibilities that combine practicality with stunning aesthetics.
These 30 Trendy Cute Winter Hairstyles for Short Hair demonstrate that shorter lengths can be just as versatile, elegant, and fashion-forward as longer hair, offering options for every occasion, skill level, and personal style preference.
From the effortless beauty of textured waves to the bold statement of a faux hawk, from vintage glamour of finger waves to the modern edge of an undercut, each style has been designed to help you navigate the winter season with confidence and flair.
The key to successful winter styling lies in understanding your hair’s unique texture, investing in quality products that protect against harsh elements, and being willing to experiment with different techniques until you find the looks that make you feel most beautiful.
Remember that maintaining healthy hair is just as important as styling it—consistent moisture, regular trims, and protection from winter’s damaging effects will ensure your short hair remains vibrant and manageable throughout the season.
Whether you’re preparing for holiday celebrations, professional engagements, casual everyday activities, or romantic winter dates, this collection of hairstyles provides the inspiration and guidance you need to keep your short hair looking absolutely spectacular.
Embrace the versatility of your short hair this winter, try new styles, and don’t be afraid to step outside your comfort zone—after all, hair grows back, but the confidence and joy that comes from expressing yourself through beautiful hairstyles is truly priceless during the magical winter season.