
Dealing with hair that constantly falls into your face can be frustrating whether you’re working, exercising, or simply going about your daily routine.
Finding the perfect hairstyle that keeps your hair secure while still looking stylish doesn’t have to be complicated or time-consuming.
This comprehensive guide presents 37 easy hairstyles to keep hair out of your face, offering solutions for every hair type, length, and occasion.
From classic ponytails and braids to modern twists and buns, you’ll discover practical techniques that take just minutes to create.
Whether you have long flowing locks, medium-length hair, or shorter styles, these hairstyles will help you stay comfortable and confident throughout your day.
Each style includes simple steps and helpful tips to ensure your hair stays perfectly in place while maintaining a polished, attractive appearance that suits any setting from the gym to the office.
1. Classic High Ponytail
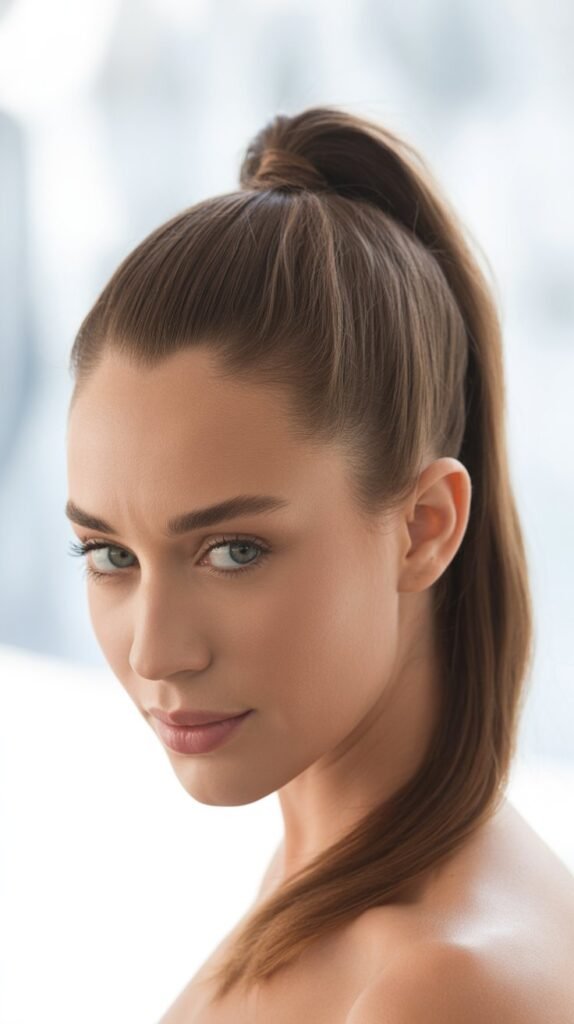
The classic high ponytail remains one of the most effective and timeless solutions for keeping hair completely off your face and neck.
This versatile style works beautifully for any occasion and takes less than two minutes to create.
- Brush your hair thoroughly to remove all tangles and create a smooth base for the ponytail.
- Tilt your head back slightly and gather all your hair at the crown of your head using both hands.
- Secure the ponytail with a strong elastic band, wrapping it multiple times to ensure a tight hold.
- For extra staying power, spray the hairline with hairspray or apply a small amount of gel to tame flyaways.
- Pull the ponytail tight to create tension that keeps all hair away from your face throughout the day.
- Wrap a small section of hair around the elastic band to conceal it and create a polished finish.
Pro Tip: For fine hair that tends to slip, tease the crown section slightly before gathering into a ponytail to add grip and volume.
2. Low Messy Bun
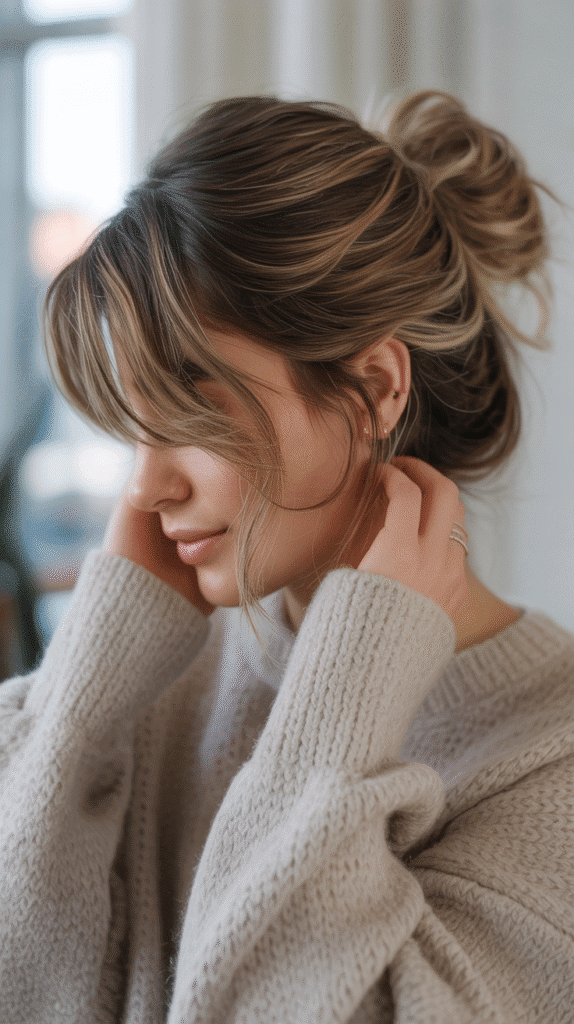
The low messy bun offers an effortlessly chic solution that keeps hair secured at the nape of your neck while maintaining a relaxed, casual aesthetic.
This style is perfect for second-day hair and takes minimal effort to achieve.
- Gather your hair into a low ponytail at the nape of your neck without worrying about perfect smoothness.
- Twist the ponytail loosely around itself to create a coiled bun shape.
- Secure the bun with bobby pins, inserting them at various angles to lock the style in place.
- Pull out a few strategic pieces to create texture and dimension while ensuring face-framing sections stay tucked back.
- Use your fingers to gently loosen and expand the bun for a fuller, more relaxed appearance.
- Mist with texturizing spray to enhance the lived-in, effortless quality of the style.
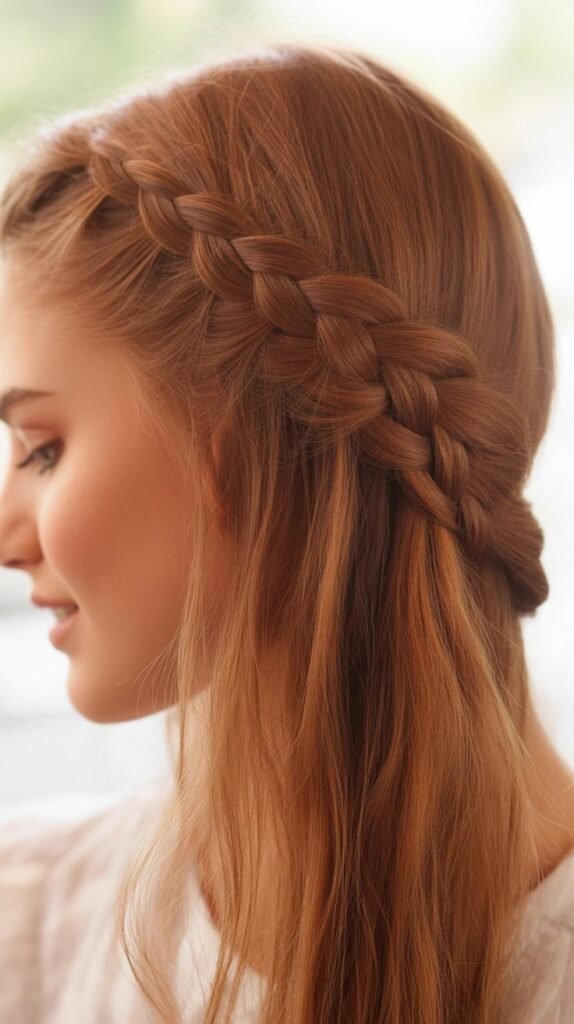
3. French Braid Crown
The French braid crown wraps around your head like a halo, securing every strand away from your face while creating an elegant, romantic appearance.
This style is ideal for active days when you need maximum security.
- Part your hair deeply on one side to establish the starting point for your crown braid.
- Begin French braiding from the deep part side, incorporating hair from the hairline as you braid along the perimeter.
- Continue braiding along your hairline, moving from one side around the back to the opposite side.
- Keep the braid close to your hairline to ensure all face-framing pieces are incorporated and secured.
- Secure the end with a small elastic and tuck it under the opposite side of the braid.
- Pin the tucked section securely with bobby pins that match your hair color for an invisible finish.
- Apply hairspray to set the style and prevent any pieces from escaping throughout the day.
4. Sleek Side Part with Bobby Pins

The sleek side part with bobby pins offers a sophisticated, minimalist approach to keeping shorter hair or bangs swept away from your face.
This technique works exceptionally well for professional settings and formal occasions.
- Create a deep side part using a fine-tooth comb for precision and clean lines.
- Apply smoothing serum or gel to the side you’ll be pinning back to eliminate frizz and flyaways.
- Sweep the smaller section of hair smoothly behind your ear, keeping it flat against your head.
- Insert bobby pins in an X-pattern or parallel arrangement, depending on your preferred aesthetic and hold requirements.
- Use decorative bobby pins or metallic clips to add visual interest while maintaining functionality.
- Spray the pinned section with strong-hold hairspray to lock everything in place for all-day wear.
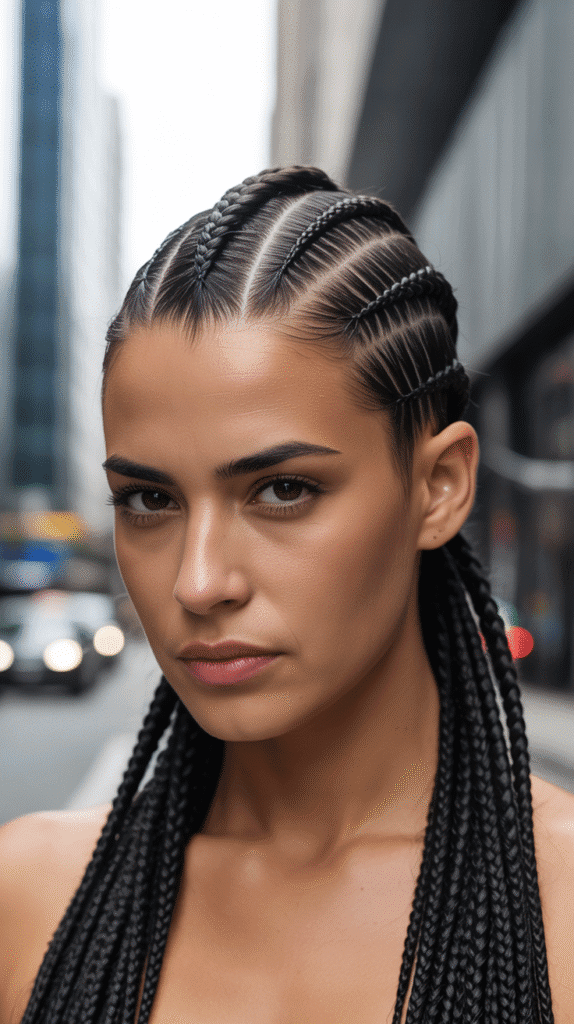
5. Double Dutch Braids
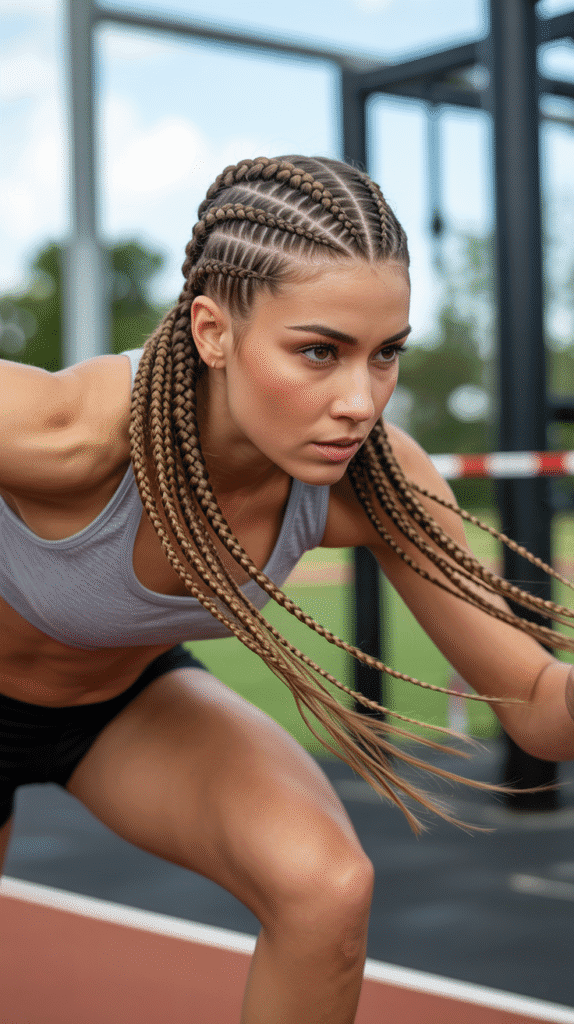
Double Dutch braids create two raised, inverted braids that keep all your hair securely contained while adding a sporty, youthful energy to your look.
These braids are perfect for high-intensity workouts and active lifestyles.
- Part your hair straight down the middle from forehead to nape, creating two equal sections.
- Clip one section away while working on the first Dutch braid to maintain clean separation.
- Begin the Dutch braid at the front hairline by crossing sections under rather than over for the raised effect.
- Incorporate hair from the hairline and part as you continue braiding down the length of your hair.
- Keep tension consistent throughout the braiding process to ensure the braid stays tight and secure.
- Repeat the same process on the opposite side, checking that both braids are symmetrical and positioned evenly.
- Secure both ends with small elastics and apply edge control product to smooth any baby hairs along the hairline.
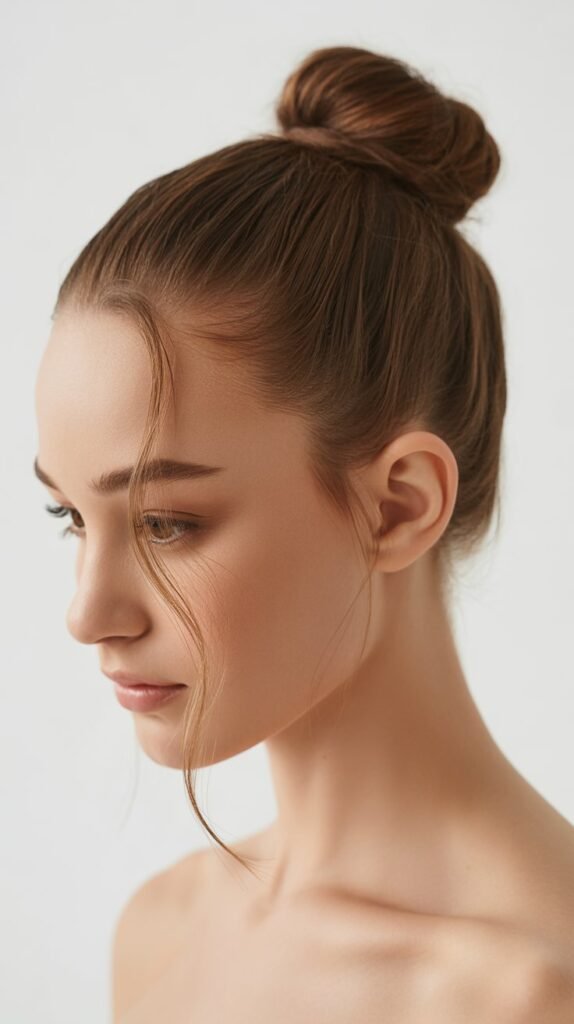
6. Top Knot Bun
The top knot bun positions your hair in a high bun directly on top of your head, providing maximum clearance from your face, neck, and shoulders.
This style is both practical and trendy for casual and active wear.
- Flip your head upside down and gather all hair into a high ponytail at the crown of your head.
- Twist the ponytail tightly while wrapping it around the base to form a compact bun shape.
- Secure the bun with another elastic band wrapped around the entire bun for maximum hold.
- Insert bobby pins through the bun and into the base to anchor it firmly to your head.
- Smooth any bumps or flyaways with a brush and hairspray for a polished finish.
- For a fuller appearance, gently pull and loosen sections of the bun while keeping the base tight.
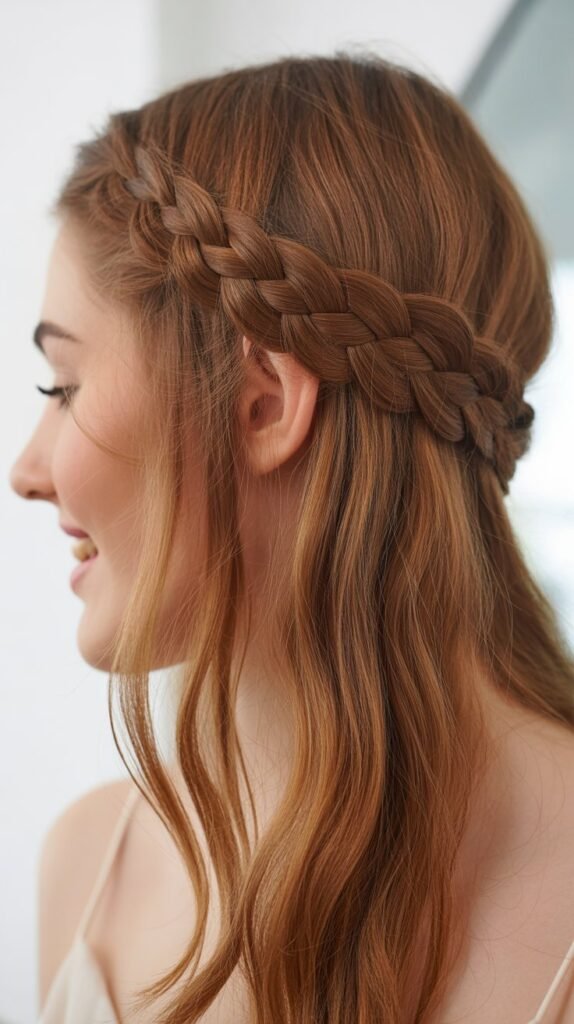
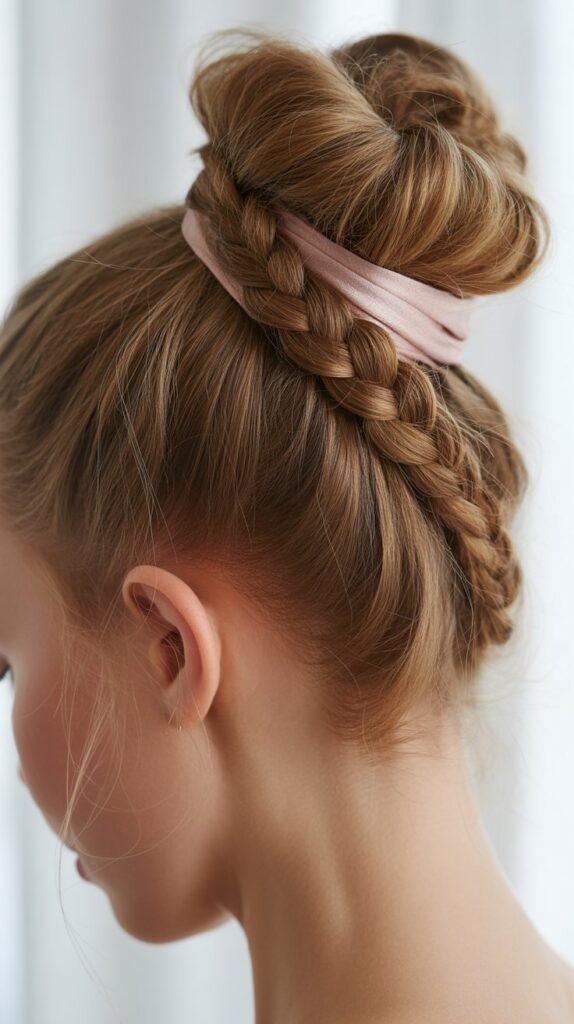
7. Braided Headband Style

The braided headband style uses a thin braid created from your own hair to act as a functional headband that keeps face-framing pieces secured.
This bohemian-inspired look combines beauty with practicality.
- Section off a one-inch strip of hair from behind one ear, separating it from the rest of your hair.
- Create a tight three-strand braid with this section, braiding all the way to the ends.
- Bring the braid across your forehead like a headband, positioning it where a regular headband would sit.
- Secure the end of the braid behind your opposite ear with bobby pins that blend with your hair color.
- Adjust the braid position to catch any bangs or shorter pieces that tend to fall forward.
- Leave the remaining hair down or style it as desired while the braided headband keeps your face clear.
8. Half-Up Half-Down with Twist
The half-up half-down style with twist combines the security of an updo with the beauty of flowing hair, using twisted sections to elegantly frame and clear your face.
This style balances functionality with femininity perfectly.
- Section off the top half of your hair from temple to temple, leaving the bottom section loose.
- Divide the top section into two parts, one on each side of your head.
- Twist each section tightly as you bring them toward the back center of your head.
- Cross the twisted sections over each other and secure them together with an elastic band or decorative clip.
- Ensure the twists incorporate all the hair around your face to keep your features completely visible.
- Gently pull on the twists to add volume and dimension while maintaining the secure hold.
- Style the lower section with curls or leave it straight depending on your preference and occasion.
9. Low Ponytail with Middle Part

The low ponytail with middle part creates a sleek, sophisticated look that keeps hair contained at the base of your neck while the center part ensures no hair falls forward into your face.
This timeless style suits professional and casual settings equally well.
- Create a precise center part from your forehead to the crown using a rattail comb.
- Brush all hair smoothly back and down, ensuring both sides are equally smooth and balanced.
- Gather hair at the nape of your neck and secure with an elastic band positioned at your desired height.
- Apply smoothing cream or serum to eliminate any bumps or texture along the part and sides.
- Wrap a small section of hair around the elastic to conceal it and add polish to the finished look.
- Use a fine-mist hairspray to set the style and prevent any pieces from slipping forward throughout the day.
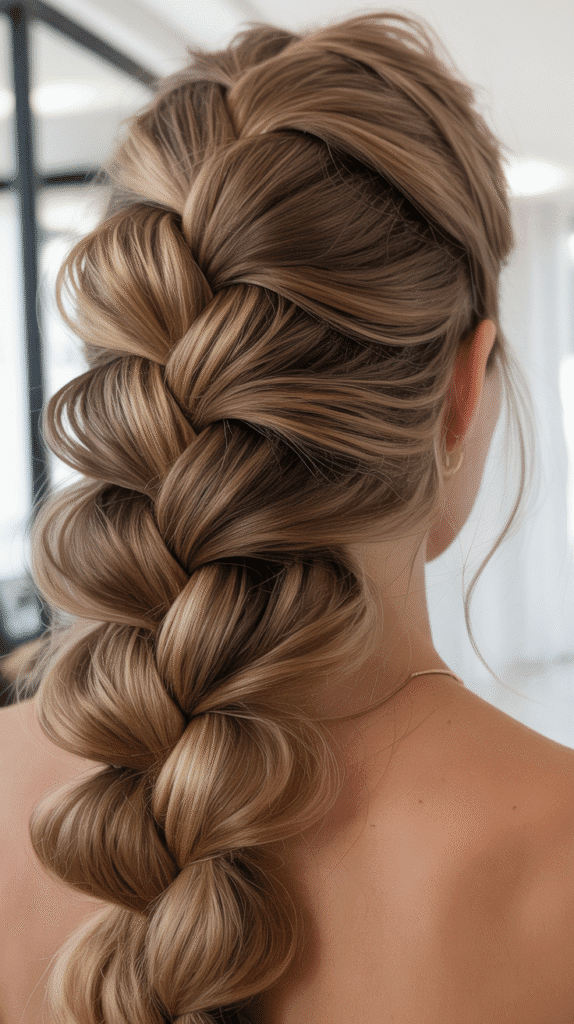
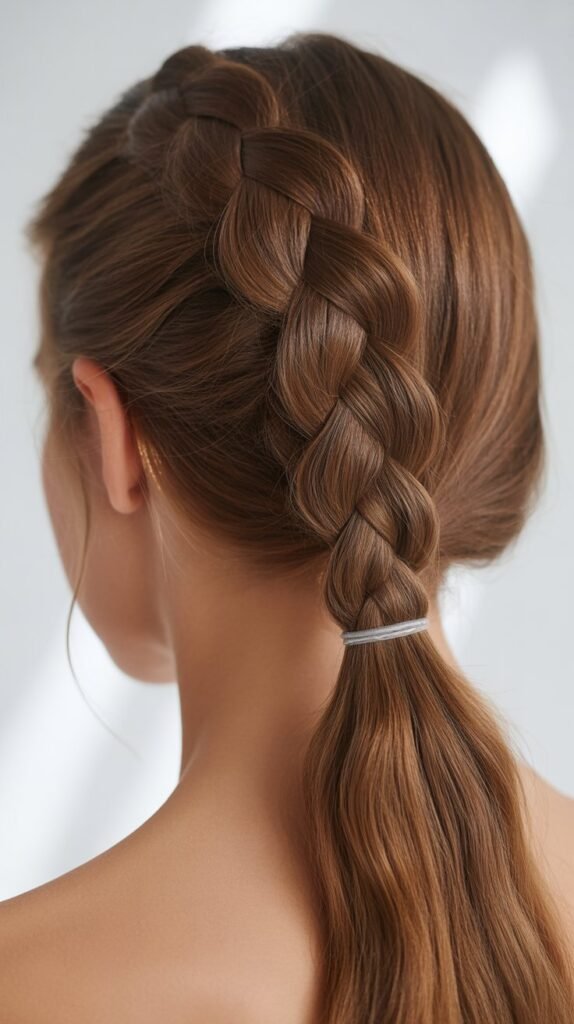
10. Fishtail Braid

The fishtail braid offers an intricate, textured alternative to traditional braids while effectively keeping all hair secured and away from your face.
This eye-catching style appears complex but becomes simple with practice.
- Divide your hair into two equal sections rather than the three sections used in regular braiding.
- Take a thin strand from the outer edge of the left section and cross it over to join the right section.
- Repeat on the opposite side, taking a thin strand from the outer right and crossing to the left.
- Continue alternating sides, keeping the strands thin and tension consistent for a defined fishtail pattern.
- Gather all front hairline pieces into the braid sections to ensure complete face clearance.
- Secure the end with a small elastic and gently pull on the braid edges to create width and texture.
- Apply light-hold hairspray to maintain the style without making it stiff or crunchy.
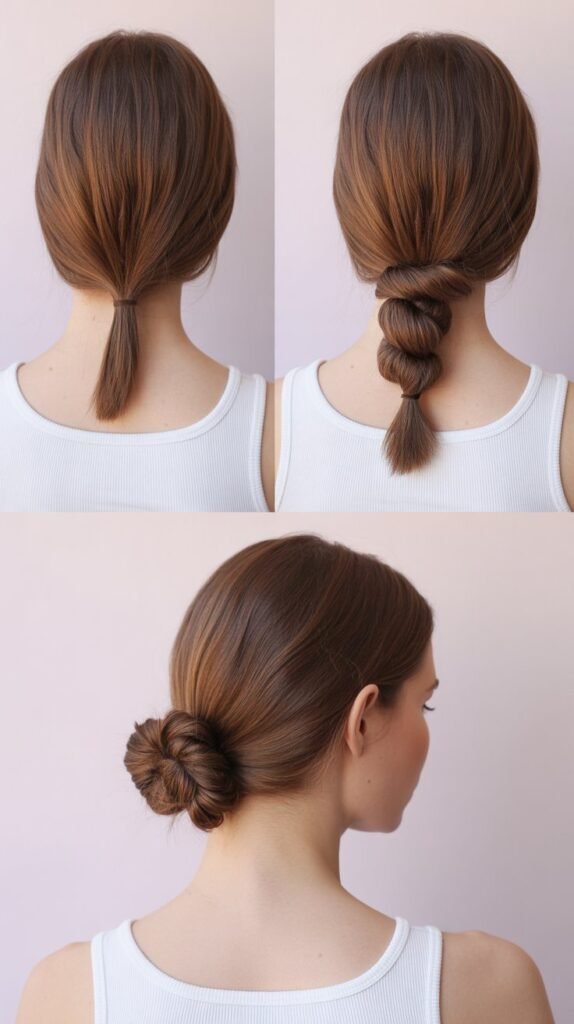
11. Twisted Side Bun
The twisted side bun positions your hair elegantly at one side of your head, combining twisted texture with the security of a low bun.
This asymmetrical style adds visual interest while keeping hair completely off your face and neck.
- Gather all your hair to one side, bringing it over your shoulder to work with it comfortably.
- Divide the gathered hair into two sections and twist them individually in the same direction.
- Wrap the two twisted sections around each other in the opposite direction to create a rope-like texture.
- Coil the twisted rope into a bun shape at the base of your neck, just behind and below your ear.
- Secure the bun with bobby pins inserted at multiple angles to ensure it stays in place.
- Pull out a few face-framing pieces if desired, or keep everything sleek and tucked for maximum face clearance.
12. Bubble Ponytail
The bubble ponytail creates a playful, dimensional look by sectioning a regular ponytail with multiple elastics to form “bubbles” along the length.
This fun style keeps hair secured while adding personality and flair.
- Create a high or mid-level ponytail and secure it tightly with a strong elastic band.
- Place additional elastic bands down the length of the ponytail at evenly spaced intervals.
- Gently pull and pancake each section between the elastics to create the bubble effect.
- Ensure the first bubble starts close to your head to keep all hair firmly away from your face.
- Use your fingers to carefully expand each bubble to your desired fullness while maintaining the segmented structure.
- Finish with hairspray to hold the bubbles in place and prevent the sections from deflating throughout the day.
13. Slicked Back Wet Look
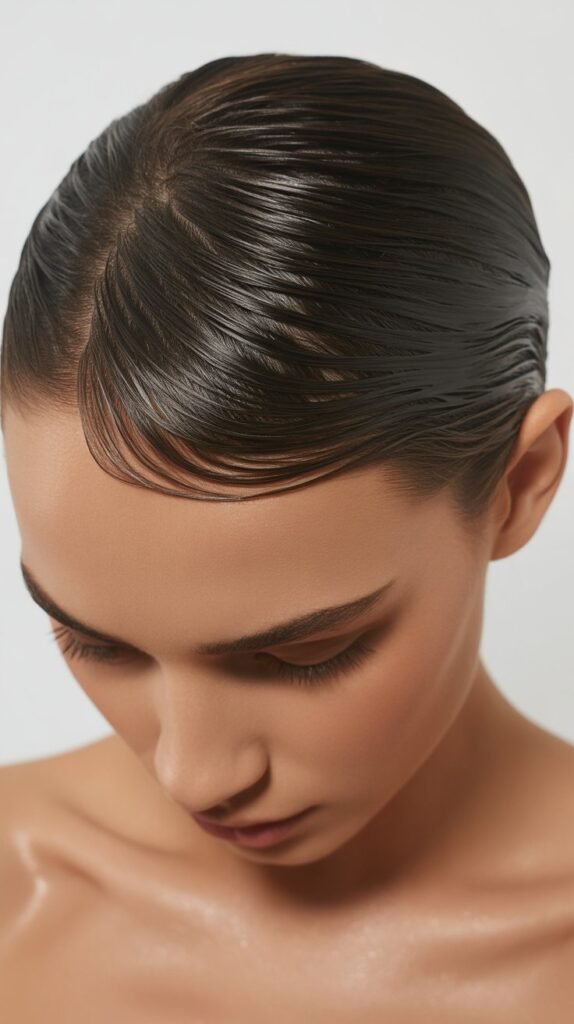
The slicked back wet look uses gel or pomade to create a smooth, glossy style that keeps every strand plastered against your head and away from your face.
This bold, editorial style makes a strong fashion statement.
- Apply generous amounts of strong-hold gel or pomade to damp hair for maximum control and shine.
- Use a fine-tooth comb to distribute the product evenly from roots to ends.
- Comb all hair straight back from your hairline, ensuring complete coverage and smoothness.
- Continue combing to eliminate any part lines or texture, creating a uniform slicked surface.
- For longer hair, secure the back in a low ponytail or bun to maintain the sleek front appearance.
- Allow the gel to dry completely or use a blow dryer on low heat to set the style faster.
- Apply additional gel or pomade to any areas that dry without the desired sleekness or shine.
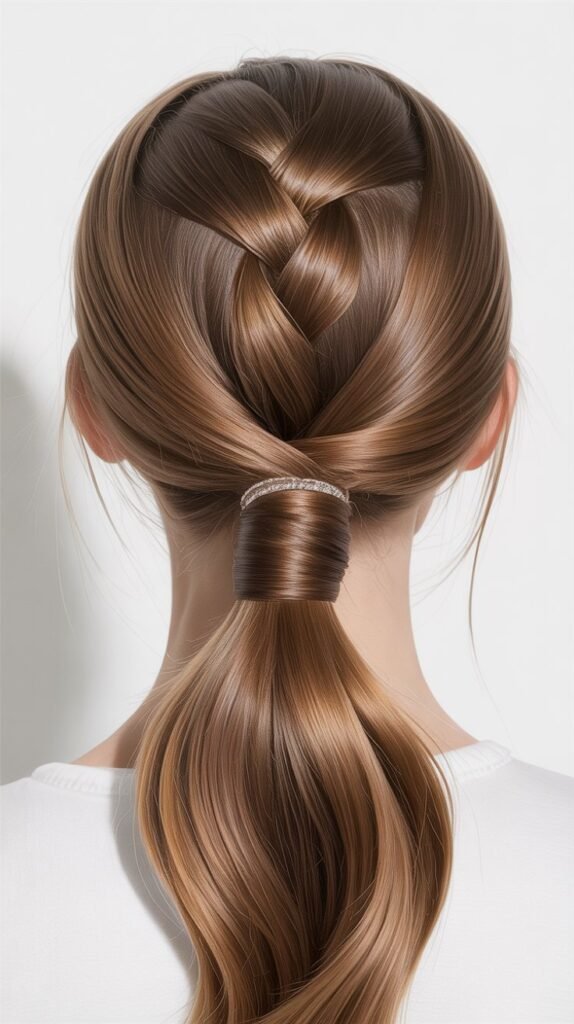
14. Rope Braid Ponytail

The rope braid ponytail combines the simplicity of a ponytail with the added security and texture of a twisted rope braid.
This style is quick to create and provides excellent hold for active days.
- Pull your hair into a ponytail at your desired height and secure with an elastic band.
- Divide the ponytail into two equal sections for the rope braiding technique.
- Twist both sections individually in a clockwise direction until they’re tightly coiled.
- Wrap the two twisted sections around each other in a counterclockwise direction to create the rope effect.
- Continue twisting and wrapping all the way to the ends of your hair.
- Secure the end with another elastic band and adjust the tightness of the rope braid as needed.
- Pull slightly on the rope sections to add dimension while ensuring the style stays secure.
15. Headband Tuck
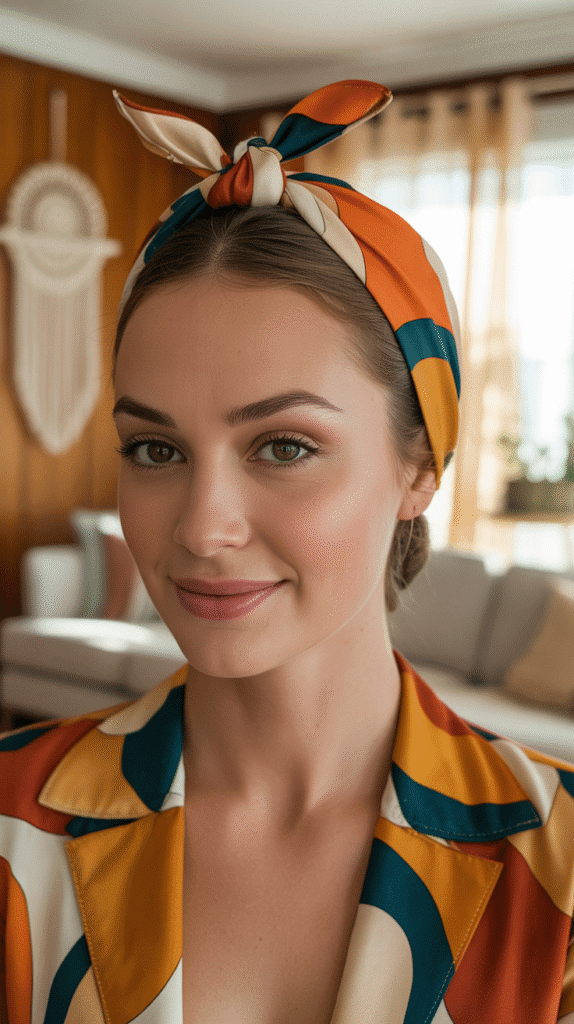
The headband tuck uses a fabric or elastic headband as both a decorative element and functional tool to tuck and secure all your hair away from your face.
This quick method works beautifully for various hair lengths.
- Place a wide headband or elastic band over your head, positioning it where you want it to rest.
- Gather small sections of hair from around your face and tuck them under and through the headband.
- Continue tucking hair sections around the entire perimeter of the headband until all face-framing hair is secured.
- For shorter hair, the tucked sections will hold easily; for longer hair, use bobby pins to secure tucked sections.
- Adjust the headband position and tucked hair to ensure everything sits comfortably and securely.
- Style the remaining loose hair as desired or continue tucking for a complete updo effect.
16. Braided Pigtails

Braided pigtails divide your hair into two sections and braid each side, creating a youthful, secure style that keeps all hair firmly contained and away from your face.
This classic style works for all ages and activities.
- Part your hair straight down the middle from forehead to nape with a comb for even division.
- Secure one section with a clip while you work on braiding the first pigtail.
- Create a standard three-strand braid on one side, starting from just behind your ear.
- Keep the braid tight near the scalp to ensure all shorter pieces around your face stay incorporated.
- Secure the end of the first braid with an elastic band before moving to the second side.
- Repeat the braiding process on the opposite side, checking that both braids are positioned symmetrically.
- Apply edge control or gel to smooth down any baby hairs or flyaways along your hairline and part.
17. High Bun with Face-Framing Pieces
The high bun with face-framing pieces creates an elevated, ballerina-inspired look while strategically leaving a few soft tendrils to gently frame your face without obstructing your vision or getting in the way.
- Brush your hair into a high ponytail at the crown, leaving out small sections at your temples intentionally.
- Twist the ponytail and wrap it around its base to create a neat, compact bun shape.
- Secure the bun with bobby pins, ensuring it’s tight enough to last through movement and activity.
- Take the face-framing pieces you left out and use a curling iron to add soft bends or waves.
- Apply a small amount of styling cream to these pieces to define them without making them greasy.
- Pin back any additional pieces that might fall into your eyes, keeping only the intentional face-framing sections loose.
18. Criss-Cross Ponytail
The criss-cross ponytail uses an innovative technique of crossing elastic bands to create a lifted, secure ponytail with extra staying power.
This method prevents the sagging that often occurs with traditional single-elastic ponytails.
- Create a standard ponytail at your desired height and secure it with one elastic band.
- Take a second elastic band and wrap it around the ponytail base, but position it to cross over the first elastic in an X formation.
- The criss-crossed elastics create tension that lifts the ponytail and prevents it from sliding down.
- Ensure all hair around your face and hairline is pulled smoothly into the ponytail before securing.
- Tease the ponytail length slightly for added volume and fullness that complements the lifted base.
- Spray the roots with hairspray for extra grip and longevity throughout your day.
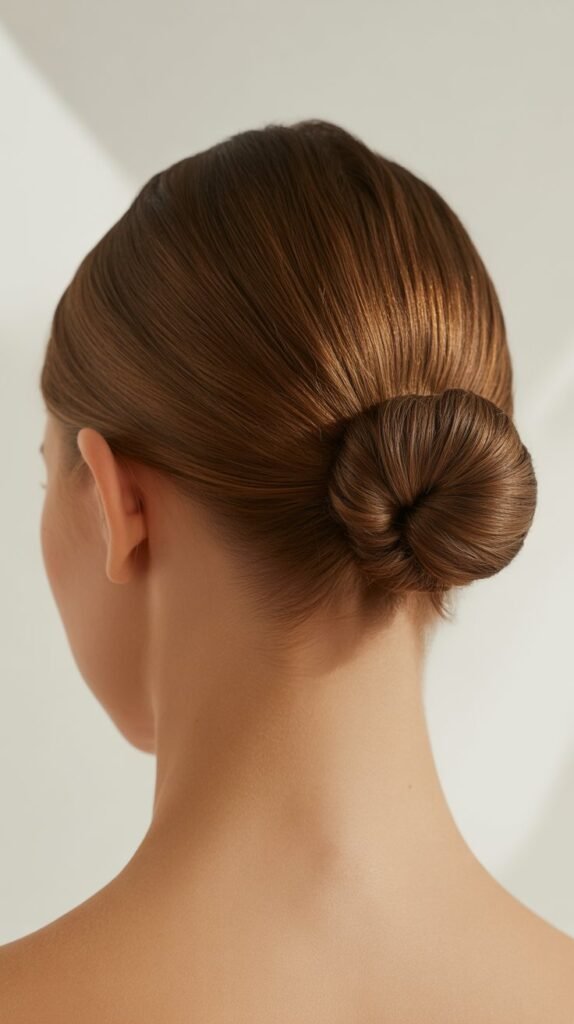
19. French Twist Updo
The French twist updo rolls your hair vertically along the back of your head, creating a sophisticated, timeless style that completely clears your face, neck, and shoulders.
This elegant option suits formal occasions perfectly.
- Gather all your hair at the nape of your neck, smoothing it with a brush to eliminate bumps.
- Twist the gathered hair upward along the back of your head in one continuous motion.
- Continue twisting until you reach the crown area and the hair naturally forms a vertical roll.
- Tuck the ends of your hair into the twist to conceal them and create a finished appearance.
- Secure the twist with bobby pins inserted horizontally into the roll at various heights.
- Apply strong-hold hairspray to set the style and ensure it maintains its shape throughout the day.
- Smooth any flyaways or baby hairs with a small amount of pomade or edge control product.
20. Space Buns

Space buns create two high buns positioned on either side of your head, offering a playful, trendy look that keeps all hair completely off your face.
This fun style has gained popularity across various age groups and fashion aesthetics.
- Part your hair straight down the middle from forehead to nape, dividing it into two equal sections.
- Gather one section into a high ponytail positioned above and slightly behind your ear.
- Twist the ponytail and wrap it around its base to form a tight, compact bun shape.
- Secure the first bun with bobby pins and an additional elastic if needed for extra hold.
- Repeat the process on the opposite side, ensuring both buns are positioned at the same height and size.
- Apply gel or edge control to smooth your hairline and eliminate any bumps along the part.
- Pull slightly on the buns to create fuller, more voluminous shapes if desired.
21. Pull-Through Braid
The pull-through braid creates the illusion of an intricate braid without actual braiding, using a series of ponytails pulled through each other.
This voluminous style keeps hair secured while looking impressively complex.
- Create a ponytail at the crown of your head and secure it with a small elastic band.
- Make a second ponytail directly below the first one, leaving a few inches of space between them.
- Split the first ponytail in half and bring each half around the sides of the second ponytail.
- Create a third ponytail below the second, incorporating the split sections from the first ponytail.
- Continue this pattern down the length of your hair, always splitting the top ponytail around the one below.
- Gently pull on each ponytail section to create width and volume, giving the appearance of a full, thick braid.
- Secure the end with an elastic and spray with hairspray to maintain the pulled-out volume.
22. Low Braided Bun
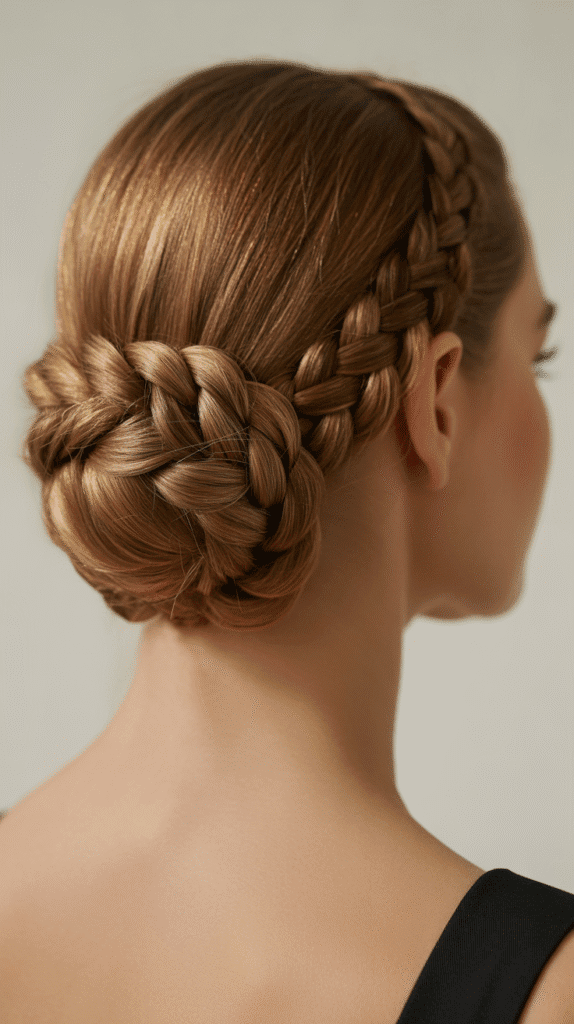
The low braided bun combines the texture of braiding with the security of a low bun, creating an intricate style that keeps hair completely contained.
This elegant option works beautifully for both professional and formal settings.
- Create a low ponytail at the nape of your neck and secure it with an elastic band.
- Braid the entire length of the ponytail using a three-strand or fishtail braid technique.
- Wrap the braided ponytail around its base to form a circular bun shape.
- Secure the bun with bobby pins inserted through the braid and into the base for maximum hold.
- Tuck the end of the braid into the bun to hide it and create a seamless finish.
- Gently pull on the braid loops to add dimension and fullness to the bun.
- Apply hairspray and smooth any flyaways for a polished, finished appearance.
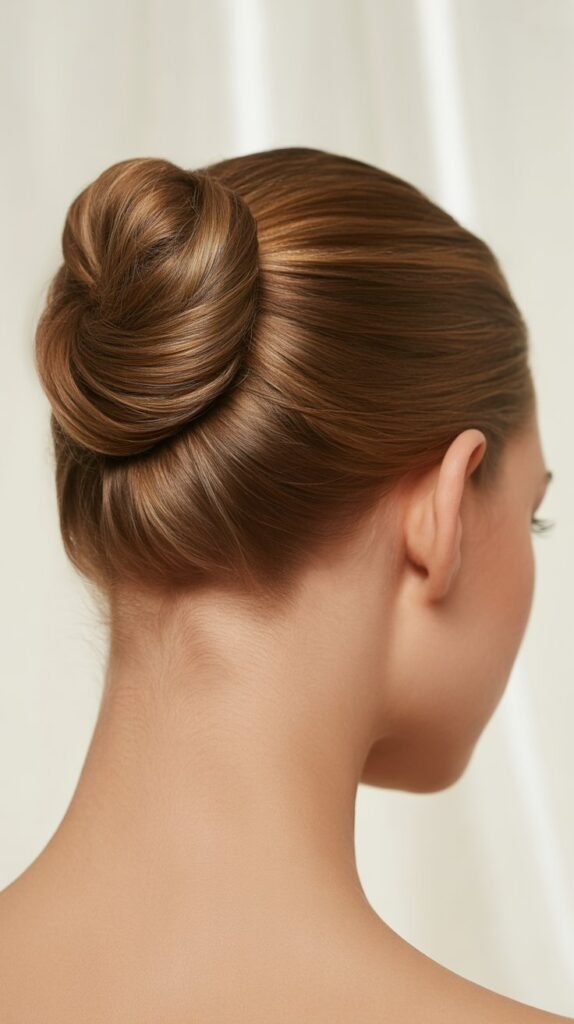
23. Sleek Ballerina Bun
The sleek ballerina bun sits high on the head with perfectly smooth sides, embodying classical elegance while providing maximum clearance from your face and neck.
This refined style requires precision but delivers stunning results.
- Brush your hair thoroughly with a fine-bristle brush to remove all tangles and create a smooth base.
- Apply smoothing serum or gel throughout your hair, focusing especially on the roots and sides.
- Gather all hair into a high ponytail at the crown, using a brush to ensure there are no bumps.
- Secure the ponytail tightly with a strong elastic band, checking that every hair is smooth and in place.
- Twist the ponytail tightly and wrap it around the base to create a neat, compact bun.
- Secure with bobby pins and a hair net if needed for performances or all-day wear.
- Apply strong-hold hairspray and use a soft brush to smooth any remaining flyaways against your head.
24. Waterfall Braid
The waterfall braid creates a cascading effect where sections of hair “fall” through the braid like a waterfall, while the braided portion secures hair away from your face.
This romantic style combines beauty with functionality.
- Begin at your temple area with a small three-strand braid positioned along your hairline.
- After the first cross, drop the bottom strand and let it fall, picking up a new section from above to replace it.
- Continue braiding along the curve of your head, always dropping the bottom strand and adding new hair from the top.
- This technique keeps the face-framing hair secured in the braid while allowing length to flow freely.
- Continue the waterfall pattern until you reach behind your opposite ear or desired endpoint.
- Secure the end with a small elastic or bobby pins that blend with your hair color.
- Curl the loose cascading sections for added romance and dimension.
25. Braided Mohawk
The braided mohawk creates a bold, edgy look by braiding the center section of hair from front to back while keeping the sides slicked down or pinned.
This statement style ensures hair stays completely off your face.
- Section off a wide strip of hair down the center of your head from hairline to crown.
- Slick the side sections flat against your head using gel, securing them with bobby pins if needed.
- Begin a Dutch or French braid at your front hairline with the center section.
- Keep the braid tight and raised to create the mohawk effect with maximum height and definition.
- Continue braiding all the way back to your crown or down the length depending on your hair length.
- Secure the end and pancake the braid to increase its width and prominence.
- Apply strong-hold gel or pomade to the sides to maintain the sleek contrast with the textured center braid.
26. Twisted Crown

The twisted crown encircles your head with twisted sections of hair, creating a halo effect that keeps all face-framing hair secured.
This romantic style works beautifully for weddings and special occasions.
- Part your hair down the middle and separate the front sections from the back.
- Take a section from one front side and twist it tightly as you bring it across your forehead.
- Pin the twisted section behind your opposite ear with bobby pins.
- Repeat on the other side, twisting and bringing the section across to pin behind the opposite ear.
- The two twisted sections should meet at the back or cross over each other for a continuous crown effect.
- Leave the remaining hair down or style it into a bun or ponytail at the base of the crown.
- Pull gently on the twists to add volume and secure any loose pieces with additional pins.
27. Half Bun Top Knot
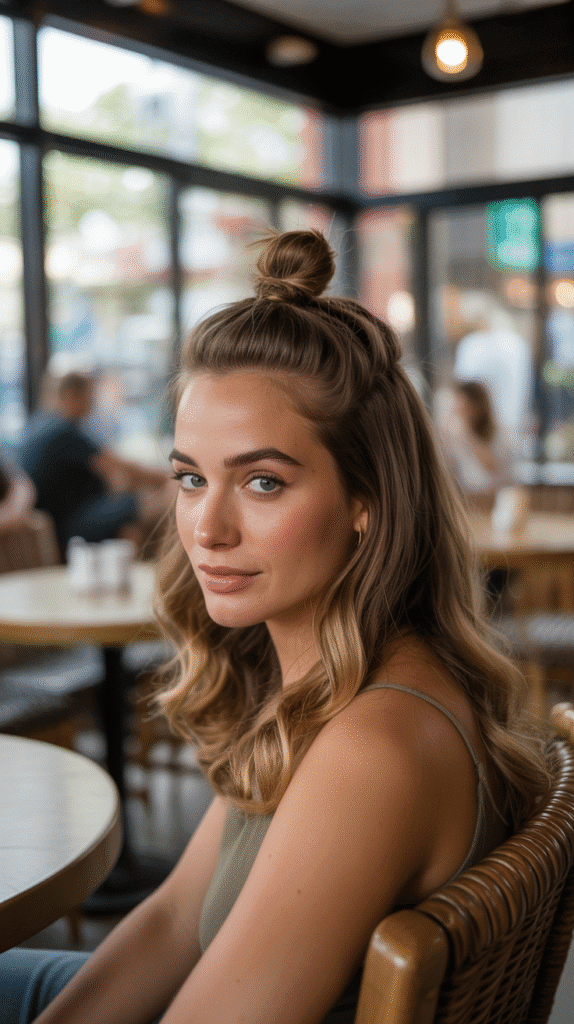
The half bun top knot secures the top portion of your hair in a small bun at the crown while leaving the rest flowing freely.
This trendy style keeps face-framing pieces secured while maintaining a relaxed, casual vibe.
- Section off the top half of your hair from temple to temple, gathering it at the crown.
- Pull this section into a small ponytail positioned exactly where you want the bun to sit.
- Twist the ponytail and wrap it around its base to create a compact mini bun.
- Secure with bobby pins and an additional elastic if needed for extra hold.
- Ensure all the hair from your hairline is incorporated into the top section for complete face clearance.
- Leave the bottom section loose and straight, wavy, or curled depending on your preference.
- Use your fingers to gently loosen the bun for a more relaxed, effortless appearance.
28. Side Swept with Clips
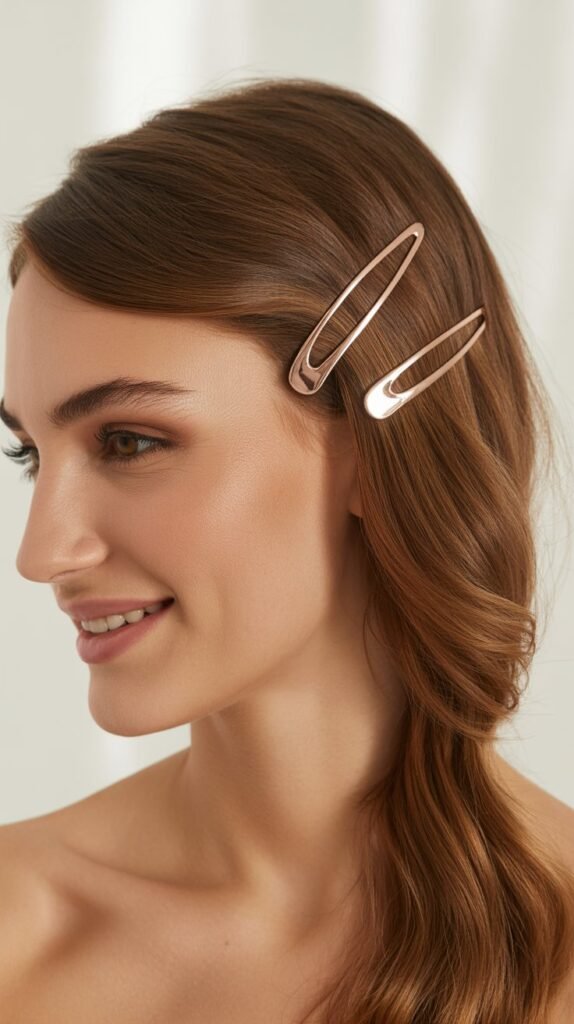
The side swept style uses decorative clips or pins to secure all hair to one side of your head, creating an asymmetrical look that keeps your face completely clear.
This glamorous style works perfectly for evening events.
- Create a deep side part using a rattail comb for precision and definition.
- Apply smoothing cream to the larger section and brush it all to one side.
- Secure the hair behind your ear with multiple bobby pins or decorative clips arranged vertically.
- Use enough pins to ensure the weight of your hair won’t cause it to fall forward.
- Style the swept hair with curls or waves for added glamour and volume.
- Apply strong-hold hairspray to the pinned side to maintain the sleek, swept appearance.
- Add jeweled or metallic clips for special occasions to enhance the decorative aspect of the style.
29. Braided Bun with Wrap
The braided bun with wrap features a braid that encircles a bun, adding intricate detail while ensuring every strand stays secured.
This sophisticated style combines multiple techniques for an impressive finished look.
- Create a ponytail at your desired bun height and secure with an elastic band.
- Separate out a small section from the ponytail before forming the bun.
- Twist the remaining ponytail and wrap it into a bun shape, securing with pins.
- Braid the section you separated using a three-strand technique.
- Wrap the braid around the perimeter of the bun like a decorative frame.
- Secure the braid with bobby pins, tucking the end under the bun to hide it.
- Pull gently on the braid to add width and dimension while ensuring it frames the bun completely.
30. Athletic Headband Style
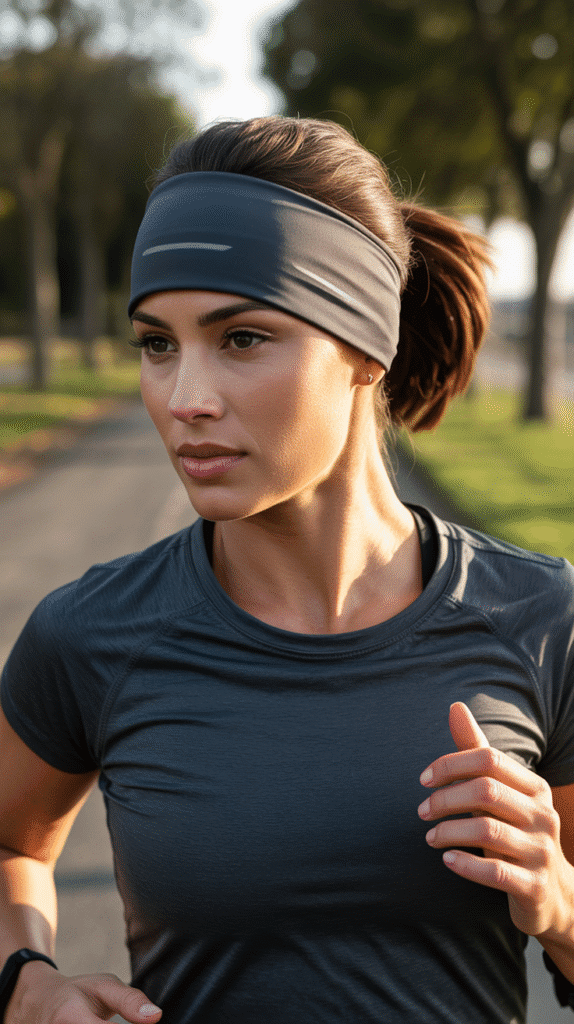
The athletic headband style uses a sports headband to push all hair back from your face while keeping everything secure during intense physical activity.
This functional style prioritizes performance without sacrificing appearance.
- Choose a non-slip athletic headband with silicone grips or textured interior for maximum hold.
- Place the headband over your head, positioning it approximately one to two inches back from your hairline.
- Push the headband forward slightly to catch all baby hairs and shorter pieces around your face.
- Ensure the headband sits snugly against your head without causing discomfort or pressure points.
- Pull the remaining hair back into a ponytail or bun for complete containment during workouts.
- Adjust the headband as needed throughout your activity to maintain coverage and comfort.
- Look for moisture-wicking headband materials to manage sweat during intense exercise sessions.
31. Knotted Ponytail
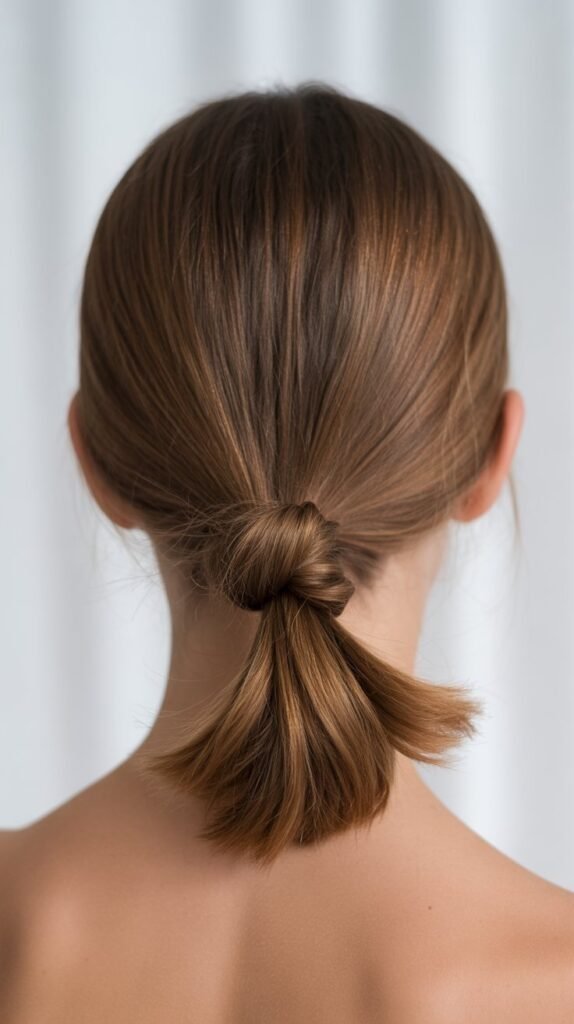
The knotted ponytail creates visual interest by tying sections of the ponytail into actual knots rather than braiding.
This unique style keeps hair secured while offering a fresh alternative to traditional techniques.
- Gather your hair into a ponytail at your preferred height and secure with an elastic band.
- Divide the ponytail into two equal sections for creating the knots.
- Tie these two sections together in a simple overhand knot, pulling it snug but not too tight.
- Continue tying knots down the length of the ponytail at evenly spaced intervals.
- Each knot should be secure but loose enough to create volume and texture.
- Secure the end of the knotted ponytail with a small elastic band.
- Gently pull on the sides of each knot to expand them and create a fuller, more dimensional appearance.
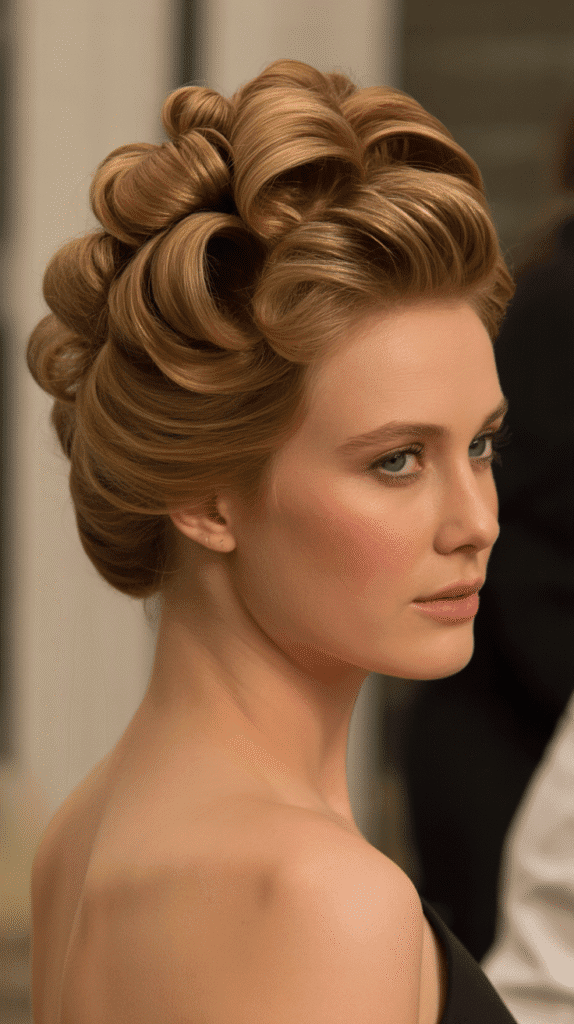
32. Victory Rolls
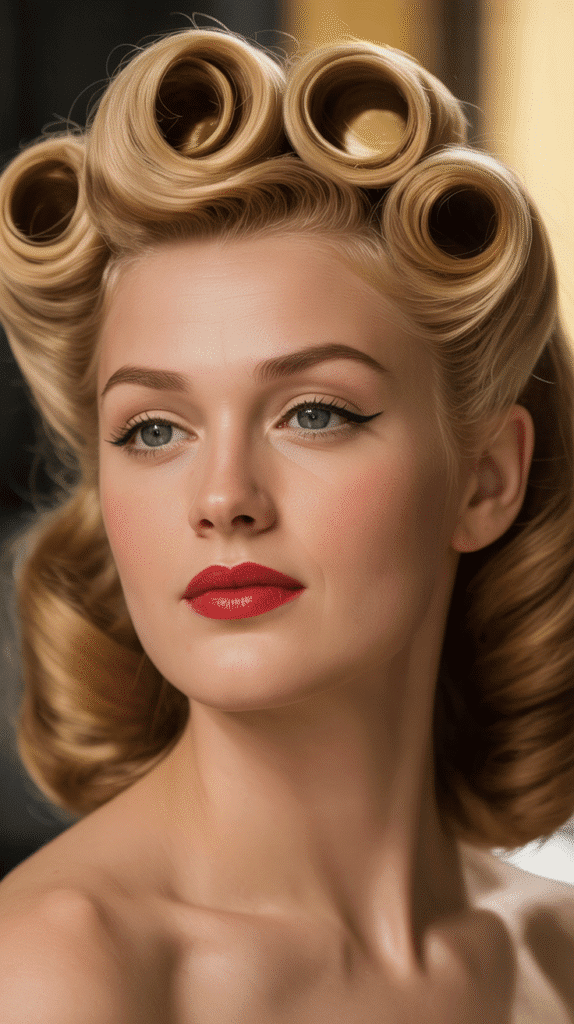
Victory rolls create vintage-inspired rolled sections at the front of your hair that sweep upward and away from your face.
This retro style originated in the 1940s and remains a striking option for keeping face-framing hair secured.
- Section off the front portions of your hair on each side of your part, leaving the back section free.
- Backcomb each front section at the roots to create volume and grip for the roll.
- Roll one section upward and toward your face, then flip it back and pin the roll against your head.
- Repeat on the opposite side, ensuring both rolls are symmetrical in size and height.
- Use multiple bobby pins to secure each roll firmly so they maintain their shape.
- Style the remaining back section in loose curls or waves to complement the vintage aesthetic.
- Apply generous hairspray to set the rolls an
33. Pretzel Bun
The pretzel bun creates a twisted, interwoven bun that resembles a pretzel shape, offering a unique and secure way to keep all your hair contained.
This artistic style combines functionality with visual appeal.
- Create a low ponytail at the nape of your neck and secure it with an elastic band.
- Divide the ponytail into two equal sections for the pretzel-twisting technique.
- Loop one section over and under to create a pretzel-like twist pattern at the base of your neck.
- Weave the second section through the first in an interlocking pattern to complete the pretzel shape.
- Secure the interwoven sections with bobby pins at multiple points to ensure stability.
- Tuck any loose ends into the bun structure to maintain the clean pretzel appearance.
- Apply hairspray to set the style and keep the intricate pattern intact throughout wear.
34. Scarf-Wrapped Ponytail
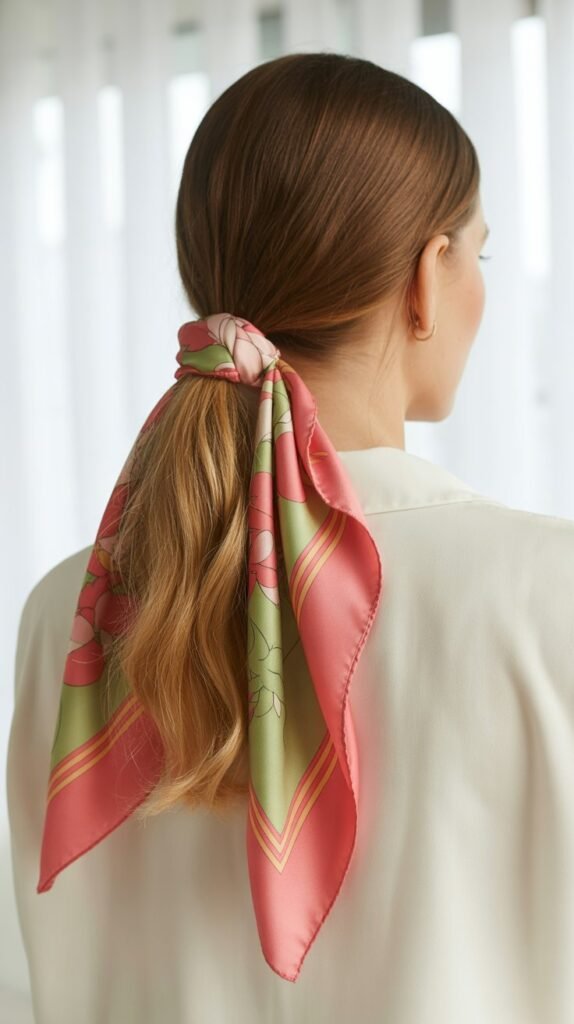
The scarf-wrapped ponytail incorporates a decorative scarf or ribbon woven through or wrapped around your ponytail, adding color and pattern while providing extra security.
This accessorized style keeps hair firmly in place with added flair.
- Create a standard ponytail at your desired height and secure it tightly with an elastic band.
- Fold a long scarf or ribbon and position the center point at the base of your ponytail.
- Wrap both ends of the scarf around the elastic to conceal it and create a decorative base.
- Continue wrapping the scarf down the length of the ponytail in a spiral or braided pattern.
- Alternatively, tie the scarf into the ponytail as you would add a fourth strand to a braid.
- Secure the ends of the scarf with a knot or bow at the bottom of your ponytail.
- Choose scarves with colors and patterns that complement your outfit for a coordinated appearance.
35. Rolled Updo
The rolled updo involves rolling sections of hair upward and pinning them to create a textured, dimensional style that keeps everything off your face and neck.
This versatile technique works for various occasions from casual to formal.
- Divide your hair into horizontal sections starting from the nape of your neck.
- Take the bottom section and roll it upward toward your crown, tucking the ends under as you roll.
- Secure the rolled section with bobby pins inserted horizontally through the roll.
- Continue with the next section, rolling it upward and pinning it just above the previous roll.
- Repeat this process until all hair is rolled and pinned, creating a stacked, sculptural effect.
- Ensure each roll is secure and positioned to keep all hair away from your face and neck.
- Finish with strong-hold hairspray and smooth any flyaways with a light touch of pomade.
36. Infinity Braid Ponytail
The infinity braid ponytail creates a figure-eight pattern within a ponytail, offering an intricate, eye-catching design that keeps hair secured.
This advanced technique produces a unique braided texture that stands out.
- Create a ponytail and divide it into two equal sections for the infinity braiding technique.
- Take a small piece from the outer edge of the left section and weave it through both sections in a figure-eight motion.
- Cross the small piece over the right section, under the left section, and back to rejoin the right section.
- Repeat with a small piece from the right side, creating the opposite figure-eight pattern.
- Continue alternating sides, maintaining consistent tension to create the distinctive infinity pattern.
- Keep the weaving tight near the ponytail base to ensure face-framing hair stays completely secured.
- Secure the end with an elastic and gently tug on the braid edges to enhance the figure-eight definition.
37. Pin-Curled Updo

The pin-curled updo involves creating small pin curls all around your head and securing them flat, resulting in a vintage-inspired style that keeps every strand controlled.
This classic technique offers complete face clearance with timeless elegance.
- Section your hair into small one-inch squares all around your head for systematic pin curling.
- Take each section and wrap it around your finger to create a flat spiral curl shape.
- Pin each curl flat against your head using bobby pins crossed in an X pattern for security.
- Work methodically from the front hairline backward, ensuring all face-framing sections are curled and pinned.
- Continue until your entire head is covered with pinned curls creating a smooth, sculpted surface.
- Apply setting lotion or mousse before creating the curls for better hold and definition.
- Allow the pin curls to set completely (or use a hooded dryer), then carefully remove the pins to reveal the styled pattern.
- Gently brush or comb the curls into your desired updo shape while maintaining the vintage aesthetic.
Tips for Making Hairstyles Last Longer
Product Selection and Application
- Choose styling products based on your hair type and the hold duration you need for your activities.
- Apply texturizing spray or dry shampoo to clean hair before styling to create grip and prevent slipping.
- Use strong-hold hairspray as a finishing step to lock your style in place for extended wear.
- Consider hair type when selecting elastics: thicker bands for thick hair, and coated elastics for fine hair to prevent damage.
Strategic Pinning Techniques
- Insert bobby pins with the wavy side down against your scalp for maximum grip and security.
- Cross two bobby pins in an X formation at stress points to distribute weight and prevent slipping.
- Use pins that match your hair color for an invisible finish that doesn’t distract from the style.
- Replace old stretched-out elastics regularly as they lose their grip and fail to hold hair securely.
Hair Preparation Methods
- Style second-day hair when possible as natural oils provide better texture and hold than freshly washed hair.
- Apply a small amount of dry shampoo to roots before creating updos to absorb oil and add volume.
- Avoid heavy conditioning treatments on the day you plan to create secured hairstyles as they can make hair slippery.
- Backcomb or tease sections at the roots before styling to create a foundation that grips better and lasts longer.
Common Mistakes to Avoid
Tension and Tightness Errors
- Pulling hair too tight can cause headaches, hair breakage, and damage to your hairline over time.
- Creating styles that are too loose will result in hair falling out and the style collapsing throughout the day.
- Find the balance between secure hold and comfortable tension that doesn’t strain your scalp or hair follicles.
- Pay attention to discomfort during styling as a warning sign that you’re pulling too tightly.
Product Application Issues
- Using too much product creates buildup, makes hair heavy and greasy, and can actually reduce hold.
- Applying products unevenly leads to some sections staying in place while others fall out prematurely.
- Skipping hairspray altogether often results in styles that don’t last past the first few hours of wear.
- Using the wrong products for your hair type can cause either insufficient hold or excessive stiffness.
Technique and Timing Problems
- Rushing through the styling process leads to uneven, messy results that won’t hold properly.
- Forgetting to smooth the hairline allows baby hairs and flyaways to escape and frame your face annoyingly.
- Attempting complex styles without practice often results in frustration and unsatisfactory outcomes.
- Styling hair when it’s too wet causes styles to loosen and fall apart as the hair dries and contracts.
Conclusion
Finding the perfect solution among these 37 easy hairstyles to keep hair out of your face ensures you’ll never again struggle with distracting, annoying hair during important moments of your day.
Each style offers unique benefits suited to different hair types, lengths, and occasions, from the quick simplicity of a classic ponytail to the intricate elegance of braided updos.
Whether you’re heading to the gym, preparing for a professional meeting, or getting ready for a special event, these versatile techniques provide reliable methods to keep your hair beautifully secured and your face completely clear.
The key to mastering these styles lies in regular practice, using quality products appropriate for your hair type, and understanding which techniques work best for your specific needs and lifestyle.
By experimenting with different options from this comprehensive guide, you’ll develop a personal collection of go-to hairstyles that keep you comfortable, confident, and looking polished no matter what your day brings.
Remember that the best hairstyle is one that not only keeps your hair out of your face but also makes you feel beautiful and empowered throughout every activity and occasion you encounter.