Winter is the perfect season to protect your natural hair while looking absolutely stunning, and sew-in hairstyles offer the ideal solution for Black women who want both versatility and low maintenance.
When temperatures drop and indoor heating threatens to dry out your strands, a well-installed sew-in becomes your secret weapon for maintaining healthy hair beneath while showcasing gorgeous styles that turn heads everywhere you go.
This comprehensive guide to 26 Flawless Winter Sew-In Hairstyles for Black Women That Look Effortless will walk you through everything from sleek straight looks to voluminous curls, practical braided styles to elegant updos, and protective options that keep your natural hair thriving through the coldest months.
Whether you’re heading to holiday parties, professional meetings, or simply running errands in the snow, you’ll discover sew-in styles that complement your lifestyle, enhance your natural beauty, and require minimal daily styling.
Each hairstyle featured here combines protective benefits with aesthetic appeal, ensuring your hair stays moisturized underneath while you enjoy the confidence that comes with a flawless look that appears effortlessly chic.
Contents
- 1 1. Classic Straight Sew-In with Middle Part
- 2 2. Voluminous Curly Sew-In
- 3 3. Sleek Low Ponytail Sew-In
- 4 4. Body Wave Sew-In with Side Part
- 5 5. Blunt Cut Bob Sew-In
- 6 6. Long Layered Sew-In
- 7 7. Deep Side Part with Finger Waves
- 8 8. Kinky Straight Sew-In
- 9 9. High Ponytail Sew-In
- 10 10. Asymmetrical Bob Sew-In
- 11 11. Loose Wave Sew-In with Highlights
- 12 12. Braided Crown with Sew-In
- 13 13. Textured Pixie Cut Sew-In
- 14 14. U-Part Wig Sew-In Hybrid
- 15 15. Goddess Locs Sew-In
- 16 16. Center Part with Beachy Waves
- 17 17. Sleek Bun Sew-In
- 18 18. Twisted Half-Up Half-Down Sew-In
- 19 19. Ombre Curly Sew-In
- 20 20. Micro Braids Sew-In Combination
- 21 21. Side-Swept Curly Sew-In
- 22 22. Faux Hawk Sew-In
- 23 23. Long Straight Sew-In with Blunt Bangs
- 24 24. Spiral Curl Sew-In
- 25 25. Low Bun with Pulled Out Curls
- 26 26. Natural Texture Sew-In with Defined Coils
- 27 Maintenance Tips for Winter Sew-Ins
- 28 Common Mistakes to Avoid with Winter Sew-Ins
- 29 Best Hair Types for Different Sew-In Styles
- 30 Styling Products Essential for Winter Sew-Ins
- 31 Cost Breakdown for Winter Sew-In Hairstyles
- 32 How to Make Your Sew-In Last Longer
- 33 Finding the Right Stylist for Your Winter Sew-In
- 34 Transitioning from Sew-In to Natural Hair
- 35 Winter Sew-In Inspiration from Celebrities and Influencers
- 36 Conclusion
1. Classic Straight Sew-In with Middle Part

The timeless straight sew-in with a middle part remains one of the most elegant and versatile options for winter.
This style creates a sleek, polished appearance that works beautifully for both professional settings and social occasions, while the middle part elongates your face and adds symmetry to your overall look.
- This hairstyle works exceptionally well with Brazilian or Peruvian straight hair bundles that maintain their sleekness even in humid winter indoor environments.
- The middle part creates a sophisticated frame for your face and can be adjusted slightly off-center if you prefer a more asymmetrical look.
- For winter protection, ensure your braids underneath are not too tight, allowing proper blood circulation to your scalp during cold weather.
- Maintain the sleekness by wrapping your hair at night with a silk scarf and using minimal heat styling to preserve the hair’s natural shine.
- This style typically lasts 6-8 weeks with proper maintenance, making it ideal for the entire winter season without frequent salon visits.
2. Voluminous Curly Sew-In
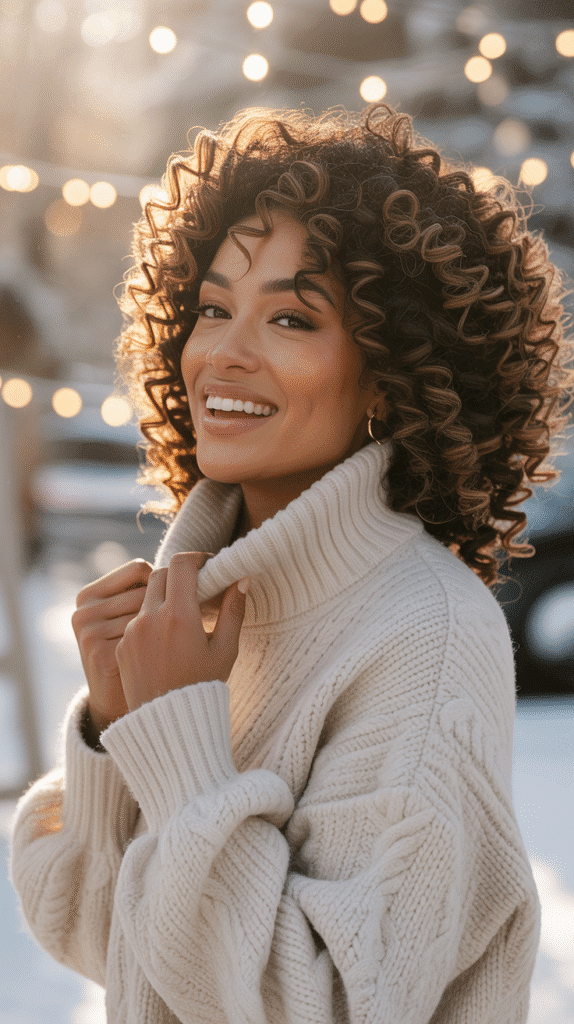
Big, bouncy curls bring life and movement to your winter look while providing excellent coverage and fullness.
The voluminous curly sew-in adds dimension and personality to your appearance, making it perfect for women who love statement hairstyles that require minimal daily styling.
- Deep wave or water wave bundles work best for achieving that voluminous curly texture that holds up well in winter conditions.
- The natural volume of curls helps insulate your scalp during cold weather while creating a glamorous aesthetic.
- Use a leave-in conditioner spray specifically designed for curly textures to maintain moisture and prevent the curls from becoming frizzy in winter air.
- Finger-detangle the curls gently rather than using a brush to preserve the curl pattern and prevent unnecessary shedding.
- Sleep with your hair in a high pineapple using a silk scrunchie to maintain the volume and curl definition overnight.
3. Sleek Low Ponytail Sew-In
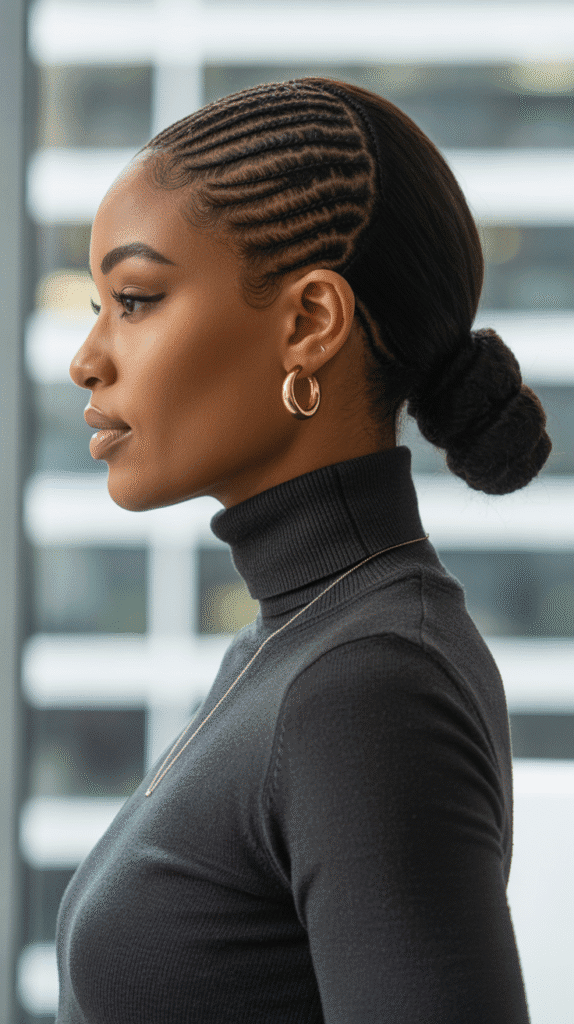
The sleek low ponytail sew-in combines sophistication with practicality, offering a polished look that keeps hair away from winter scarves and coats.
This style is perfect for women who want an elegant appearance without the hassle of loose hair getting tangled in winter accessories.
- The low placement of the ponytail prevents tension headaches that can occur with high ponytails, especially when wearing winter hats.
- Achieve maximum sleekness by using edge control on your natural hairline and wrapping the base of the ponytail with a small section of hair.
- This style allows for easy maintenance since you can moisturize your scalp more easily without disrupting the overall look.
- The ponytail can be styled straight, wavy, or curly depending on your preference and the occasion you’re dressing for.
- Consider using a ponytail holder that matches your hair color to create a seamless, natural appearance.
4. Body Wave Sew-In with Side Part
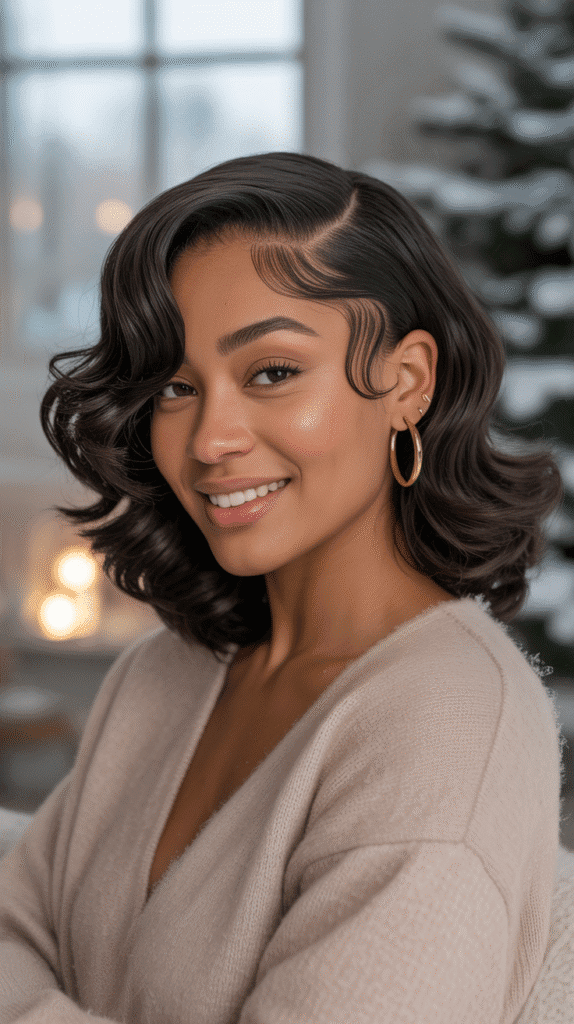
Body wave hair creates a natural, relaxed look that appears as though you were born with perfectly tousled waves.
The side part adds sophistication and allows you to showcase more hair on one side, creating an asymmetrical elegance that’s perfect for winter events.
- Body wave texture is one of the most versatile options because it can be styled straight with a flat iron or enhanced into tighter curls with a curling wand.
- The side part creates natural volume at the crown and can help minimize forehead size if that’s a concern.
- This texture blends beautifully with relaxed or texlaxed natural hair, making it ideal for women transitioning between styles.
- Use a mousse or curl-enhancing cream to define the waves without making them stiff or crunchy during winter months.
- The body wave pattern typically requires less maintenance than tighter curl patterns, making it perfect for busy winter schedules.
5. Blunt Cut Bob Sew-In
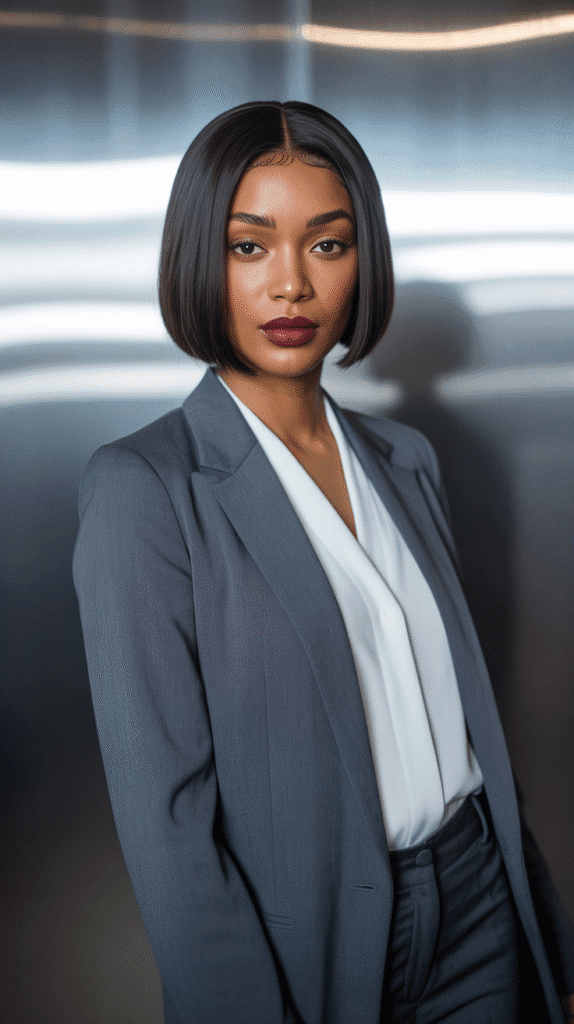
This sophisticated look is ideal for professional environments and offers a fresh, youthful appearance while protecting your natural hair throughout winter.
- The blunt cut creates the illusion of thicker, fuller hair since all the ends are cut at the same length without layers.
- This length is particularly practical for winter because it’s short enough to tuck into coats but long enough to style in various ways.
- Maintain the sharp edges by trimming the ends every 3-4 weeks to prevent the hair from looking wispy or uneven.
- The bob length makes it easier to care for your sew-in during winter, requiring less product and styling time than longer lengths.
- You can customize the bob with or without bangs, straight or angled cuts, depending on your face shape and personal style preferences.
6. Long Layered Sew-In
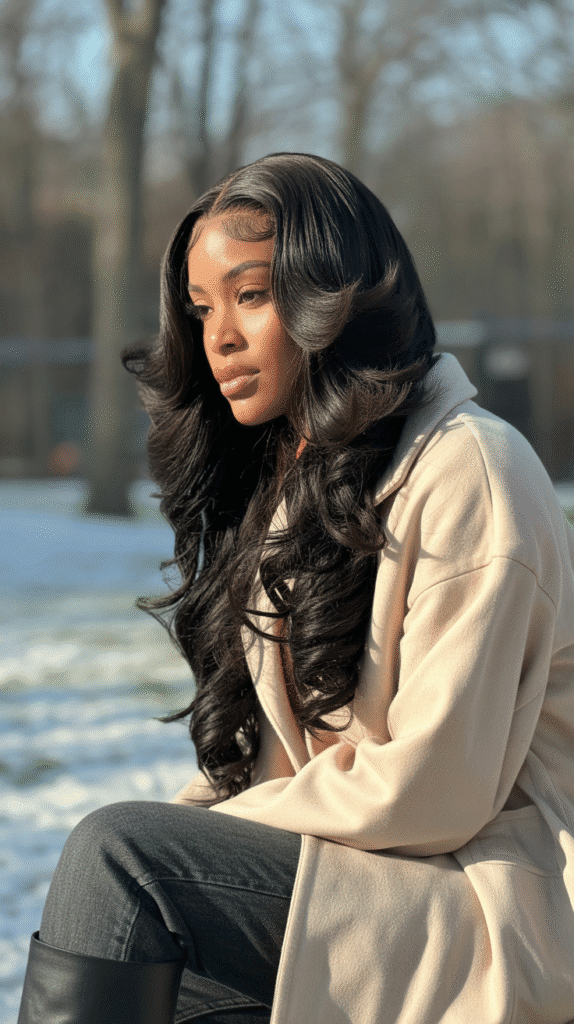
Layers add movement, dimension, and life to long sew-in hairstyles, preventing the flat appearance that sometimes occurs with single-length installations.
The layered approach creates a more natural look that mimics how real hair grows and moves.
- Layers are strategically cut to frame your face and create volume at the crown while maintaining length at the bottom.
- This style works beautifully with various textures including straight, wavy, and curly hair, adapting to different looks.
- The layers make it easier to create updos and half-up styles since you have different lengths to work with for more dynamic styling.
- For winter maintenance, focus moisturizing products on the ends where layers are most concentrated to prevent dryness and breakage.
- Layers also distribute the weight of the hair more evenly, reducing strain on your natural hair and scalp underneath.
7. Deep Side Part with Finger Waves
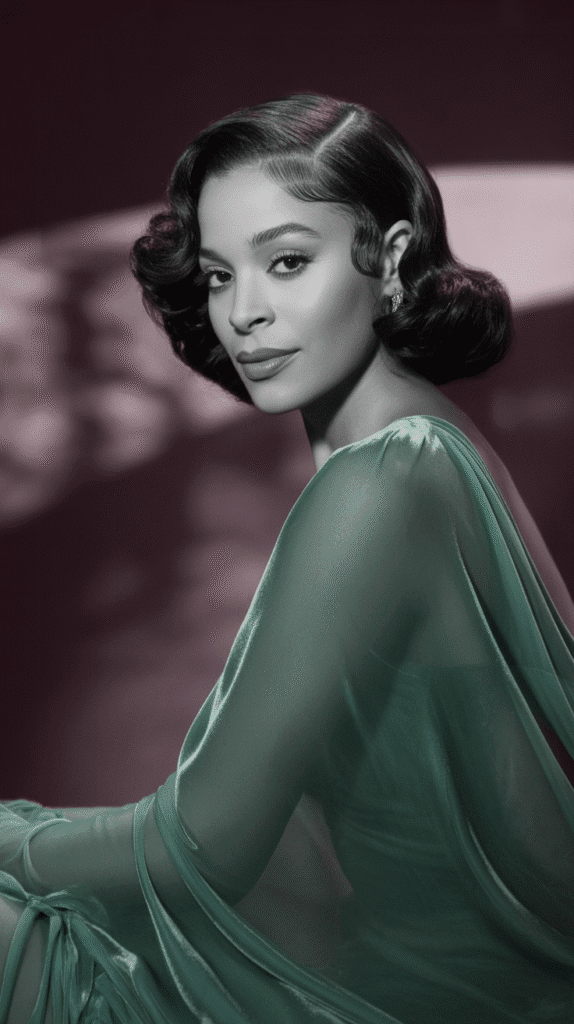
This vintage-inspired style brings old Hollywood glamour to modern sew-in hairstyles with elegant finger waves that cascade from a dramatic deep side part.
The sophisticated look is perfect for winter weddings, holiday parties, and formal events.
- Finger waves require hair with some hold and structure, making them ideal for straight or body wave textures rather than very curly hair.
- The deep side part should sit approximately at the arch of your eyebrow for the most flattering and dramatic effect.
- Use a strong-hold mousse or gel to create and set the waves, allowing them to dry completely before touching for long-lasting results.
- This style works best for special occasions rather than everyday wear since the waves require maintenance to keep their definition.
- Protect the waves overnight by carefully covering them with a silk scarf using the pin-curl method to preserve the wave pattern.
8. Kinky Straight Sew-In
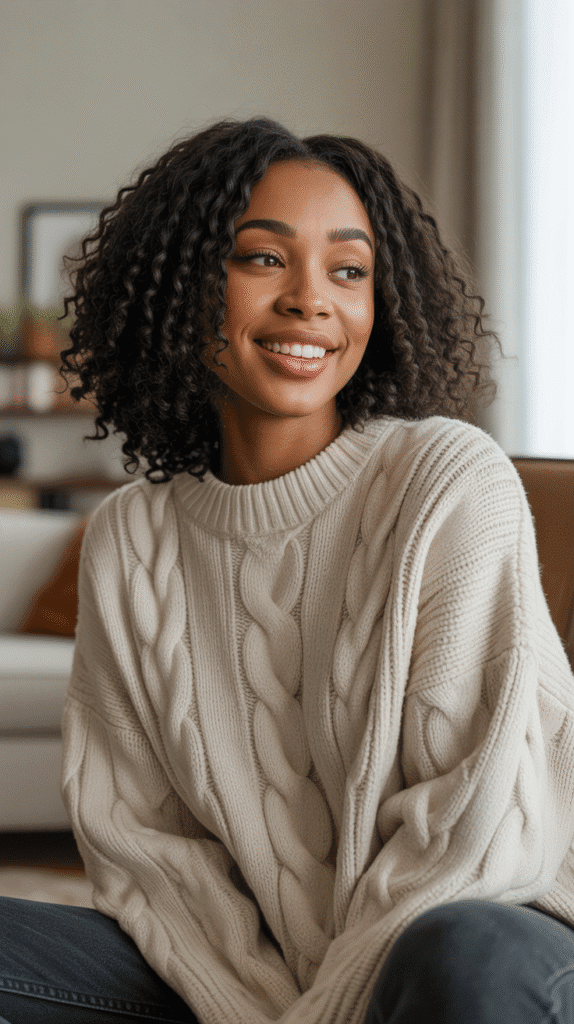
The kinky straight texture perfectly mimics freshly blown-out natural hair, offering a seamless blend with your natural texture.
This style is ideal for women who want a natural-looking protective style that doesn’t appear obviously like a weave or extensions.
- Kinky straight hair has a slightly coarse texture that moves like natural African American hair, making it virtually undetectable when properly installed.
- This texture is excellent for winter because it doesn’t require daily heat styling to maintain its appearance.
- The kinky straight texture blends seamlessly if you choose to leave some of your natural hair out at the perimeter.
- Maintenance involves minimal products – just light oil or serum on the ends to prevent dryness during winter months.
- This style can last 8-10 weeks with proper care since the texture is less prone to tangling than silkier textures.
9. High Ponytail Sew-In
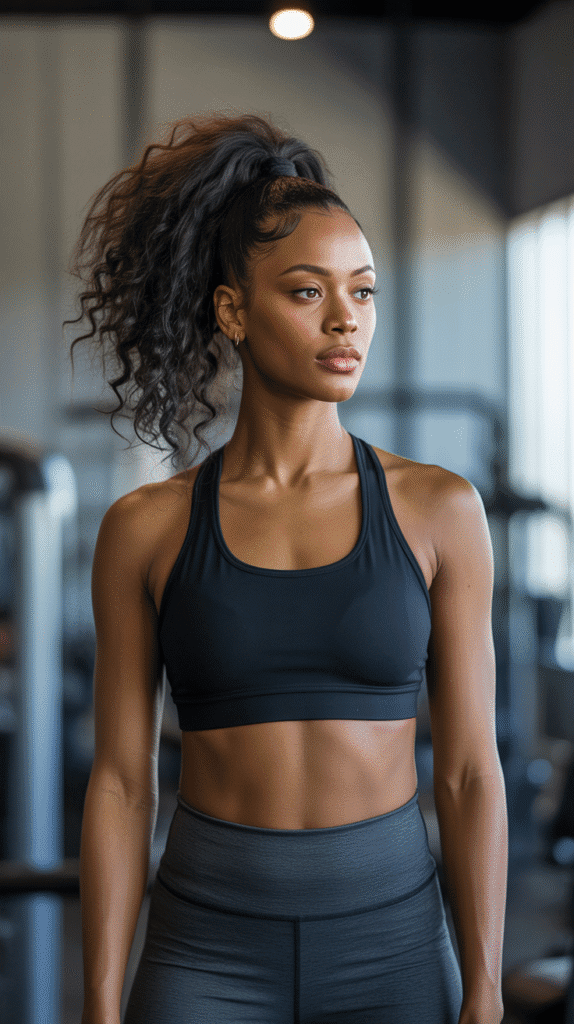
The high ponytail sew-in creates a youthful, energetic look while keeping all your hair swept up and away from your face and neck.
This style offers versatility with the ponytail itself, which can be styled in numerous ways to suit different occasions.
- The high placement of the ponytail provides a natural facelift effect, making it particularly flattering for all face shapes.
- Ensure the cornrows underneath are braided in a pattern that supports the weight of the ponytail without creating excessive tension.
- You can wrap your natural hair into the ponytail base or braid it underneath for complete protection during winter.
- The ponytail can be customized with straight, curly, or wavy hair depending on whether you want a sleek or voluminous appearance.
- This style is practical for active lifestyles and works well under winter hats or hoodies without causing flattening at the crown.
10. Asymmetrical Bob Sew-In
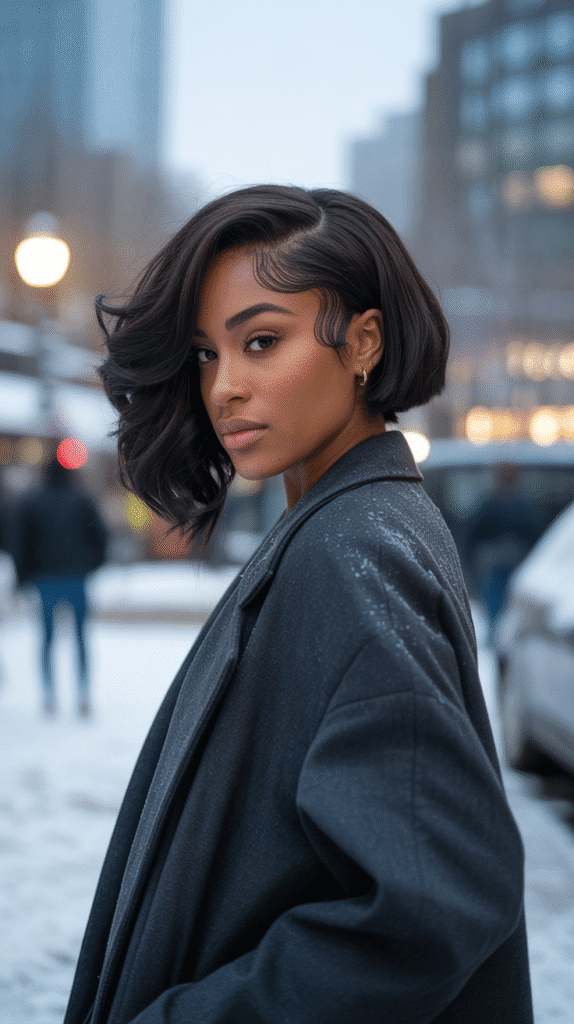
The asymmetrical bob features one side longer than the other, creating a bold, edgy look that’s both modern and sophisticated.
This contemporary style makes a fashion statement while providing the protective benefits of a sew-in installation.
- The longer side typically falls between chin and shoulder length, while the shorter side sits around ear level or slightly below.
- This style works best on straight or body wave textures where the length difference is clearly visible and intentional.
- The asymmetry draws attention to your facial features and can be positioned to highlight your best side.
- Style the longer side behind your ear or swept forward depending on your mood and the look you’re creating.
- The dramatic angle requires precision cutting, so choose an experienced stylist familiar with asymmetrical styles.
11. Loose Wave Sew-In with Highlights
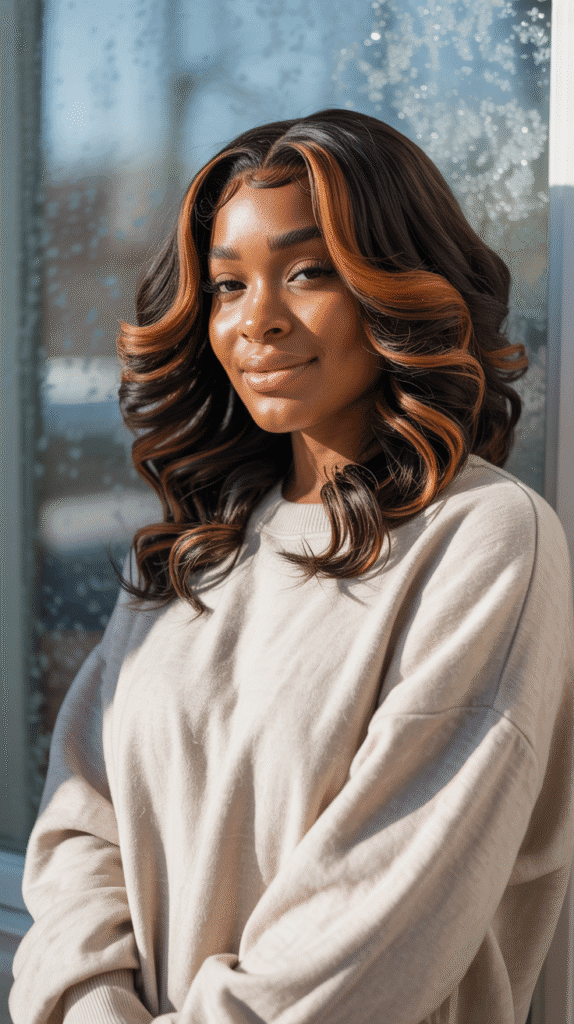
Loose waves combined with strategically placed highlights create a sun-kissed, dimensional look that adds warmth to winter styles.
The color contrast enhances the wave pattern and creates movement that makes the hairstyle appear more dynamic and natural.
- Highlights should be chosen based on your skin’s undertones – warm undertones pair well with golden or caramel shades, while cool undertones suit ash or honey tones.
- The loose wave pattern shows off highlights better than tight curls, allowing the dimensional color to be visible throughout the hair.
- Consider balayage or ombre techniques rather than traditional foils for a more natural, blended appearance.
- Colored hair requires additional moisture, so invest in color-safe, sulfate-free products to maintain vibrancy through winter.
- The combination of texture and color creates a multi-dimensional look that appears expensive and professionally styled.
12. Braided Crown with Sew-In
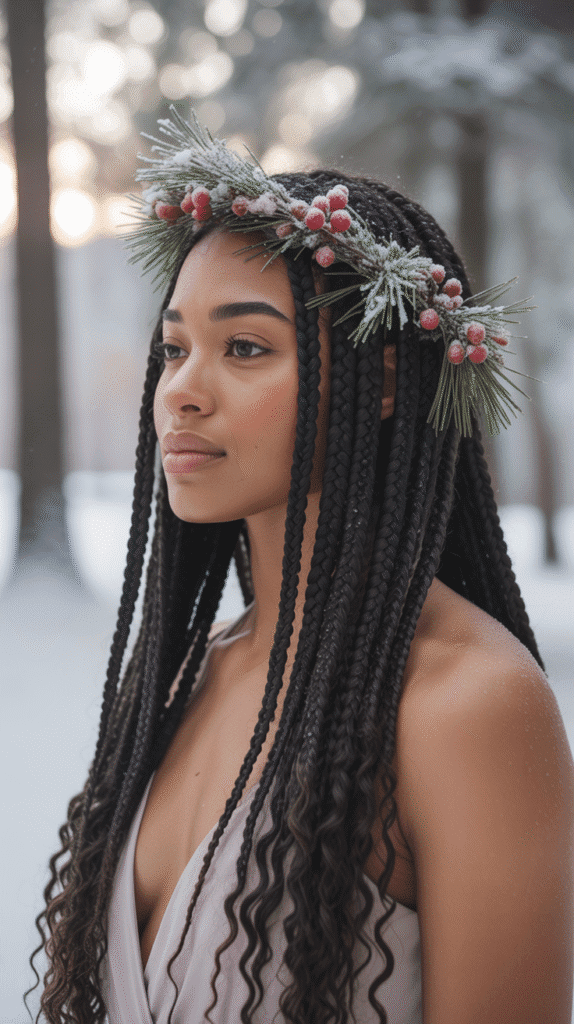
This romantic style features braids that wrap around the crown of your head like a halo, while the rest of your sew-in hair flows freely.
The braided crown adds an ethereal, feminine touch that’s perfect for winter formal events and holiday gatherings.
- The braided crown can be created with your natural leave-out hair or with extensions from the sew-in itself for seamless integration.
- This style keeps hair away from your face while showcasing the length and texture of your sew-in installation.
- The crown braid can be thick and bold or thin and delicate depending on the aesthetic you’re trying to achieve.
- Secure the braids with bobby pins that match your hair color and finish with a light-hold hairspray to prevent flyaways.
- This style offers protection for your edges and hairline since the braiding technique doesn’t create tension in those delicate areas.
13. Textured Pixie Cut Sew-In
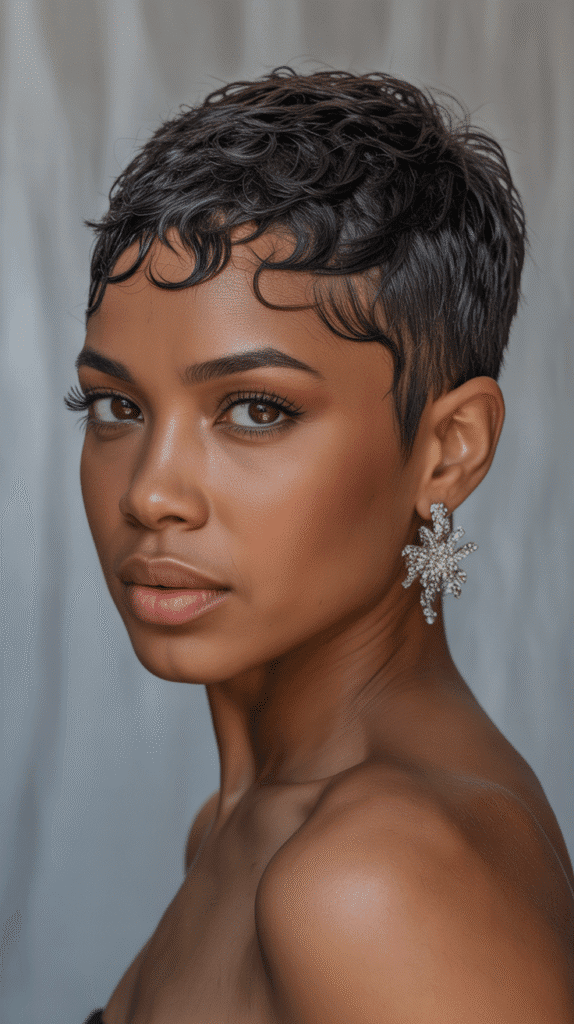
The textured pixie cut sew-in is a bold, short style that showcases confidence and individuality.
This low-maintenance option is perfect for women who want the protective benefits of a sew-in without the weight and styling demands of longer hair.
- The pixie cut typically features shorter sides and back with more length and texture on top, creating dimension and style.
- This cut is incredibly practical for winter since it dries quickly, requires minimal product, and won’t get tangled in scarves or coats.
- The short length makes scalp access easy, allowing you to moisturize and care for your natural hair underneath without difficulty.
- Style the top section with a texturizing cream or pomade to create piece-y definition and movement.
- Despite being short, this style makes a strong fashion statement and pairs beautifully with bold accessories and makeup.
14. U-Part Wig Sew-In Hybrid
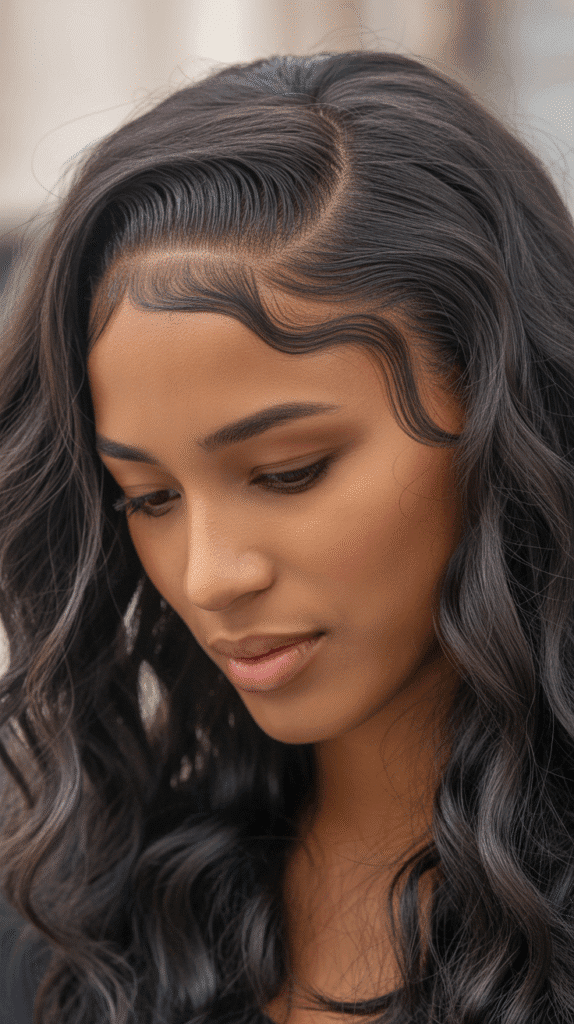
The U-part design allows you to leave out a U-shaped section of your natural hair at the crown while the rest is protected beneath the sew-in.
This hybrid approach creates the most natural-looking hairline and part while offering versatility in styling.
- The U-shaped opening typically extends from temple to temple across the crown, allowing your natural hair to blend with the installed extensions.
- This method is ideal for women who want to maintain access to their natural hair for styling and blending purposes.
- Your leave-out hair should be straightened, curled, or textured to match the sew-in bundles for seamless integration.
- The U-part reduces the amount of extension hair needed, making this option more affordable than full sew-in installations.
- Regular maintenance of your leave-out section is crucial to match the pristine condition of your installed hair.
15. Goddess Locs Sew-In
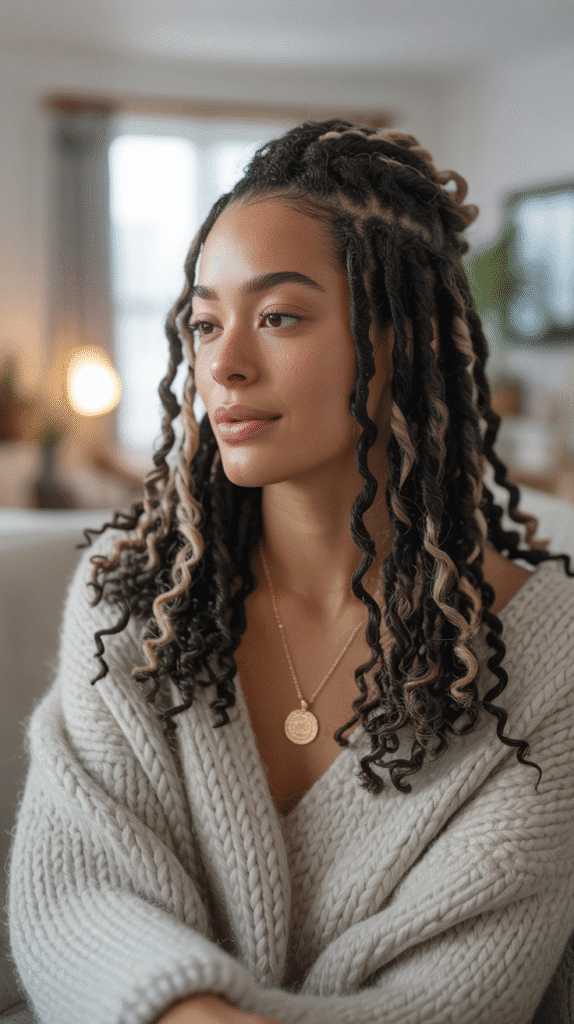
Goddess locs combine the bohemian appeal of faux locs with curly or wavy ends that create a soft, romantic aesthetic.
This protective style offers a unique texture that stands out while keeping your natural hair completely protected throughout winter.
- Goddess locs are created by wrapping hair around a loc pattern and leaving the ends unraveled for a curly or wavy finish.
- This style is lighter than traditional locs, making it more comfortable for extended wear during winter months.
- The combination of smooth locs and textured ends creates visual interest and prevents the style from appearing too uniform or stiff.
- Goddess locs require minimal daily maintenance – simply spray with a loc refresher spray and go about your day.
- The bohemian aesthetic pairs beautifully with casual winter wear, from oversized sweaters to layered accessories.
16. Center Part with Beachy Waves
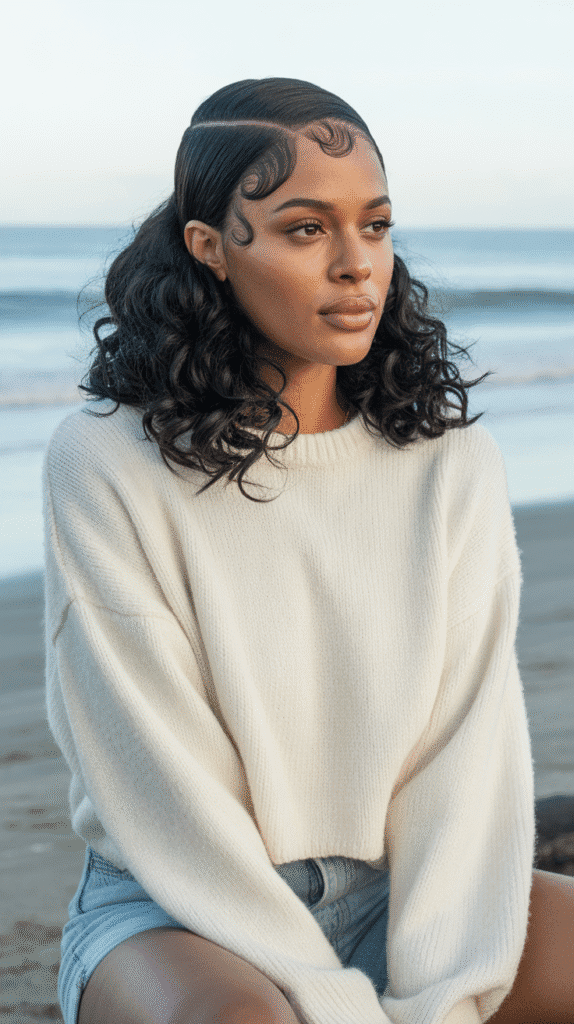
Beachy waves evoke a relaxed, carefree vibe even in the coldest winter months, bringing a touch of summer warmth to your overall aesthetic.
The center part with beachy waves creates a balanced, effortlessly cool look that appears naturally tousled.
- Beachy waves differ from structured curls in that they appear more random and undone, creating a lived-in texture.
- Create this look by braiding damp hair overnight or using a flat iron with a wave motion rather than traditional curling.
- The center part keeps the style balanced and allows the waves to frame both sides of your face equally.
- Use a sea salt spray or texturizing mist to enhance the beachy texture without making the hair feel sticky or heavy.
- This low-maintenance style requires minimal refreshing – simply scrunch with damp hands and allow to air dry for renewed texture.
17. Sleek Bun Sew-In
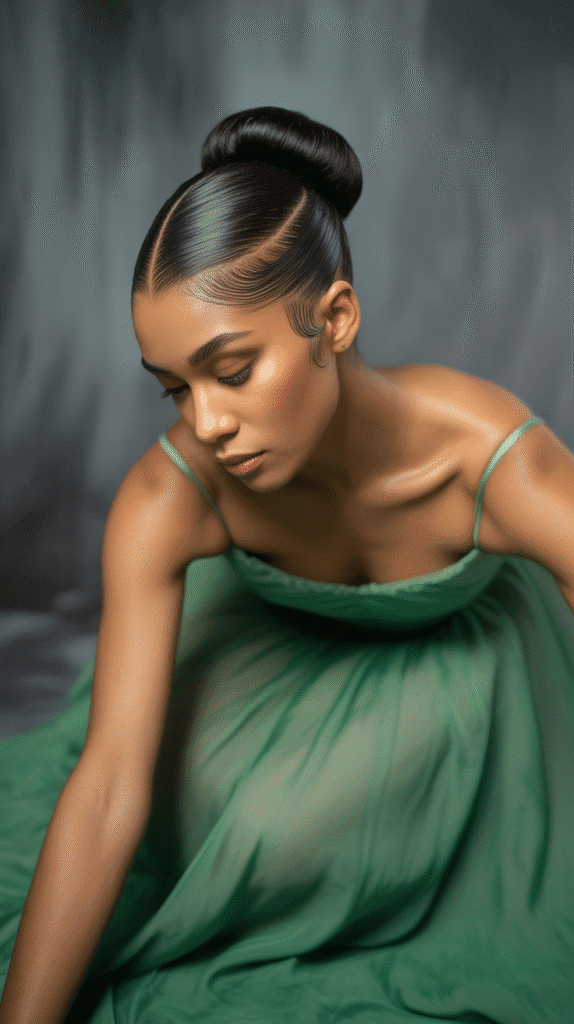
The sleek bun sew-in creates an ultra-polished, sophisticated look perfect for professional environments and formal winter events.
This style keeps all your hair secured while showcasing a smooth, elegant aesthetic from roots to the bun placement.
- The bun can be positioned high for a ballerina-inspired look, mid-level for classic elegance, or low for sophisticated simplicity.
- Achieve maximum sleekness by using edge control on your hairline and gel or mousse on the length before securing into the bun.
- This style is excellent for winter because it protects your ends, which are most vulnerable to cold weather damage and dryness.
- The bun should be secured with a hair tie that won’t cause breakage, then wrapped with a section of hair to conceal the elastic.
- Add accessories like jeweled pins, silk scarves, or decorative hair jewelry to elevate the bun for special occasions.
18. Twisted Half-Up Half-Down Sew-In
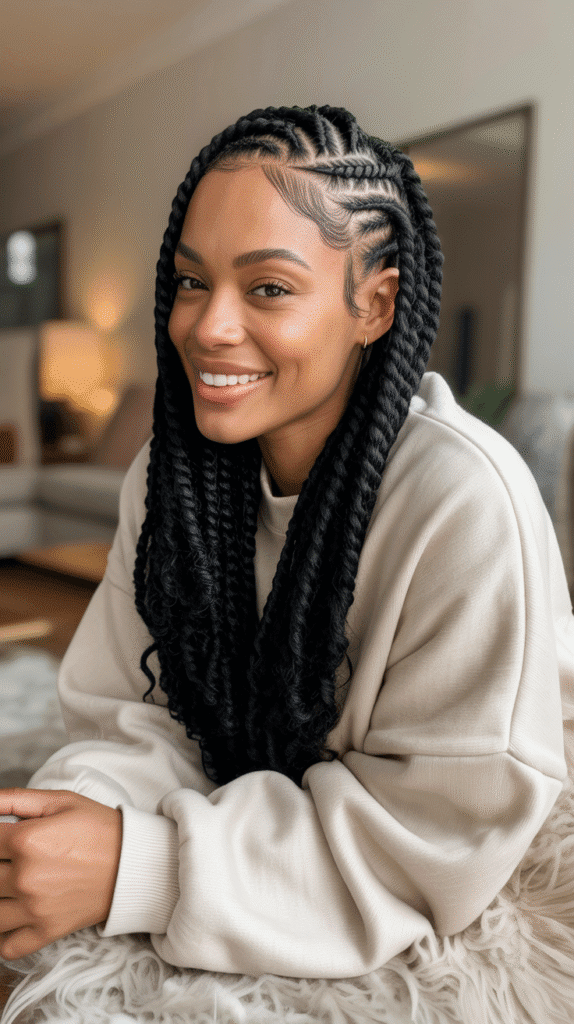
This versatile style features twists that pull back the front sections of hair while leaving the rest to flow freely down your back.
The twisted half-up half-down look combines the sophistication of an updo with the beauty of wearing your hair down.
- The twists can be simple two-strand twists, flat twists, or rope twists depending on the texture and security you prefer.
- This style keeps hair away from your face without the commitment of a full updo, making it perfect for everyday wear.
- The half-up portion can be secured with decorative pins, a clear elastic, or by tucking the twist ends into the gathered hair.
- This versatile style works with any hair texture from straight to kinky curly, adapting beautifully to different sew-in types.
- Change up the look by adjusting how much hair you pull up – more for a higher half-up or less for a subtle pulled-back effect.
19. Ombre Curly Sew-In
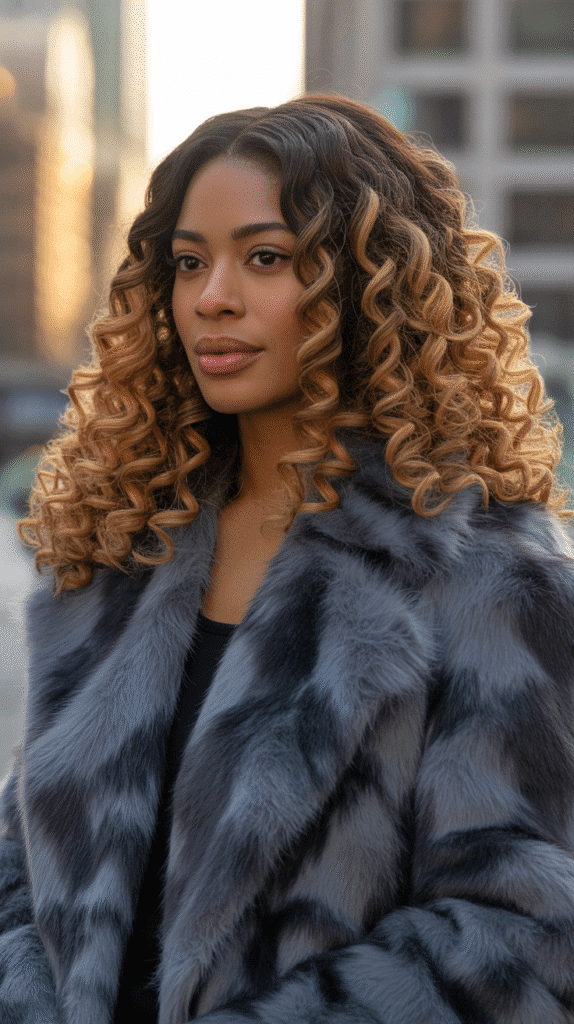
The ombre effect transitions from darker roots to lighter ends, creating a dramatic color gradient that adds dimension and visual interest to curly sew-in styles.
This color technique is particularly striking on curly hair where the color variation is visible from multiple angles.
- The most flattering ombre transitions occur gradually over 6-8 inches rather than abruptly, creating a natural sun-kissed appearance.
- Curly texture showcases ombre coloring beautifully because the curls create dimension that makes the color transition more visible.
- Choose end colors that complement your skin tone – warm undertones pair well with golden or auburn shades, while cool undertones suit ash or platinum tones.
- Ombre hair requires quality products to maintain color vibrancy and prevent the lighter ends from becoming dry or brassy.
- The darker roots eliminate the need for frequent touch-ups, making this a low-maintenance color option for winter months.
20. Micro Braids Sew-In Combination
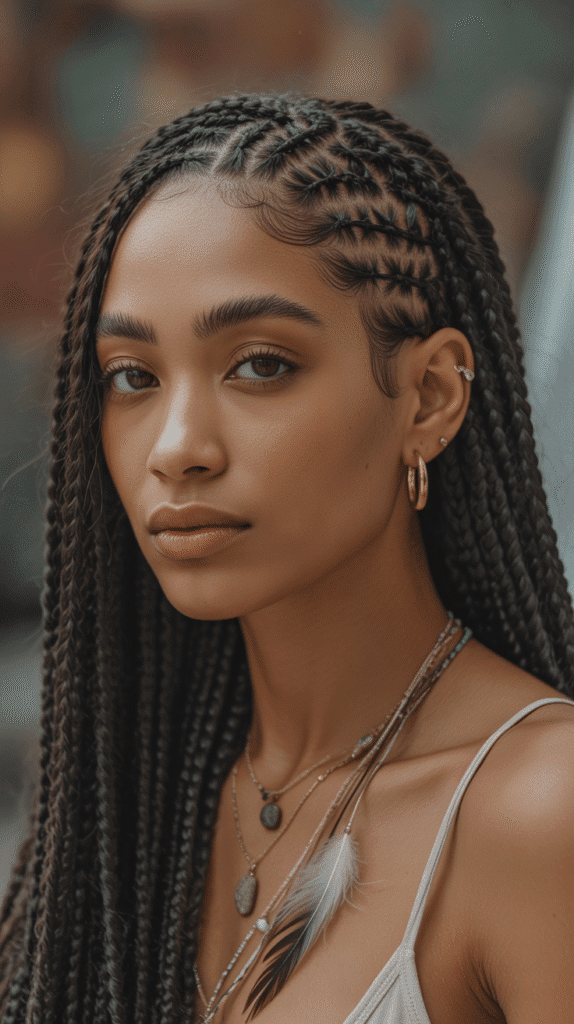
This style combines the protective benefits of micro braids with the versatility of a sew-in, creating a unique look where thin braids are interspersed throughout loose hair.
The combination offers texture variation that’s both protective and stylish.
- Micro braids can be created with your natural leave-out hair or with extension hair that matches your sew-in bundles.
- Strategic placement of braids throughout the loose hair creates visual interest and prevents the style from appearing flat or one-dimensional.
- The braids add a bohemian, artistic element to the overall look while providing extra protection for scattered sections of hair.
- This style allows for creative parting and styling since the braids can be positioned to create patterns or designs.
- The combination texture makes this style unique and customizable to your personal aesthetic preferences.
21. Side-Swept Curly Sew-In
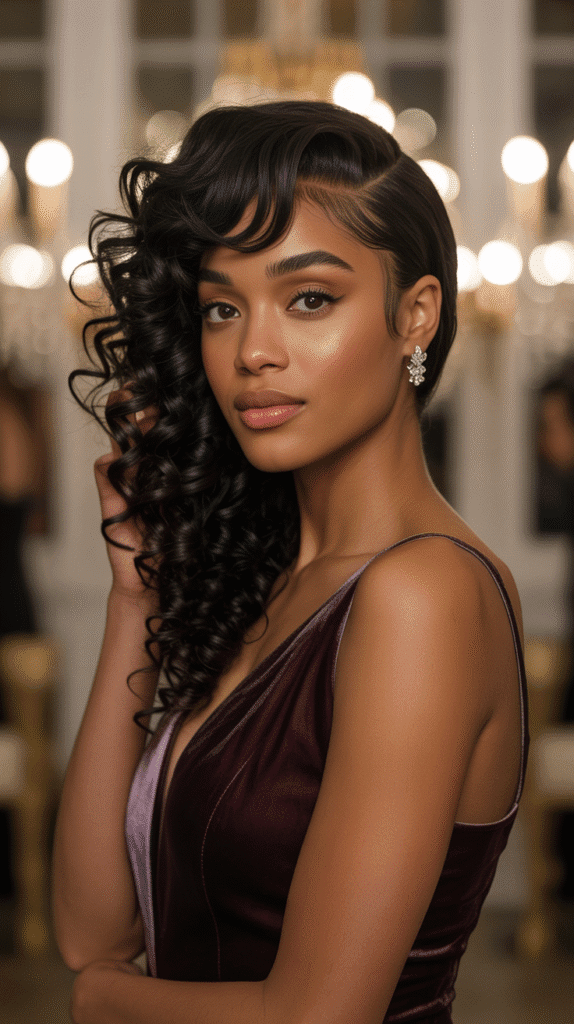
The side-swept curly sew-in features voluminous curls that cascade over one shoulder, creating a romantic, glamorous look reminiscent of old Hollywood starlets.
This asymmetrical styling adds drama and elegance to any winter ensemble.
- The side-swept style works best with medium to long length hair that has enough weight to stay positioned over one shoulder.
- Create the sweep by parting your hair deeply on one side and allowing the majority to fall over the opposite shoulder.
- This style is particularly photogenic, making it perfect for winter weddings, holiday parties, and special events.
- Secure the sweep with decorative pins or clips on the lighter side to prevent hair from falling forward throughout the evening.
- The curls should be well-defined and moisturized to create that luxurious, touchable texture that makes this style so appealing.
22. Faux Hawk Sew-In
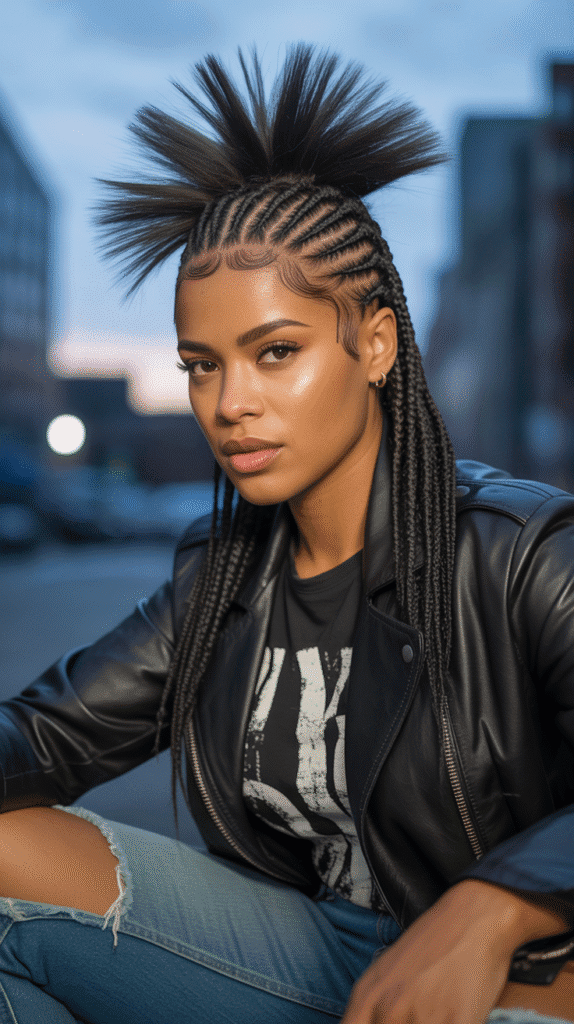
The faux hawk creates an edgy, avant-garde look by braiding or slicking down the sides while leaving height and volume at the center crown area.
This bold style makes a fashion statement while keeping the sides protected and the center showcased.
- The sides can be cornrowed flat against the head or slicked down with gel, creating contrast with the voluminous center section.
- The center hawk section can be styled straight up for maximum drama or swept back for a more subdued interpretation.
- This style is incredibly versatile – dress it up with sleek edges for formal events or add accessories for casual edginess.
- The faux hawk provides excellent scalp access on the sides for moisturizing and maintenance during winter months.
- This protective style eliminates daily heat styling while still allowing you to make a bold fashion statement.
23. Long Straight Sew-In with Blunt Bangs
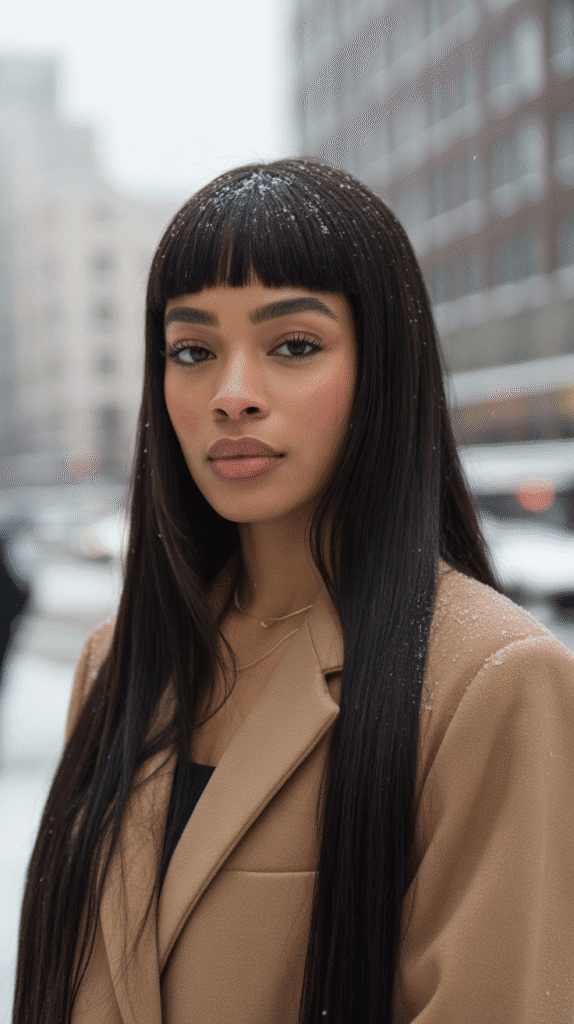
Blunt bangs paired with long straight hair create a striking, high-fashion look that frames the face beautifully.
The bangs add a youthful element while the length maintains versatility for various styling options throughout winter.
- Blunt bangs should be cut straight across at eyebrow level or just above, creating a bold horizontal line that draws attention to your eyes.
- The bangs require regular trimming every 2-3 weeks to maintain their blunt edge and prevent them from growing too long.
- This style is particularly striking in photographs and creates a memorable, distinctive appearance.
- Style the bangs by flat ironing them straight each morning and using a light serum to prevent frizz in winter weather.
- The combination of bangs with long hair offers styling versatility – wear the length straight, curled, or pulled up while the bangs remain consistent.
24. Spiral Curl Sew-In
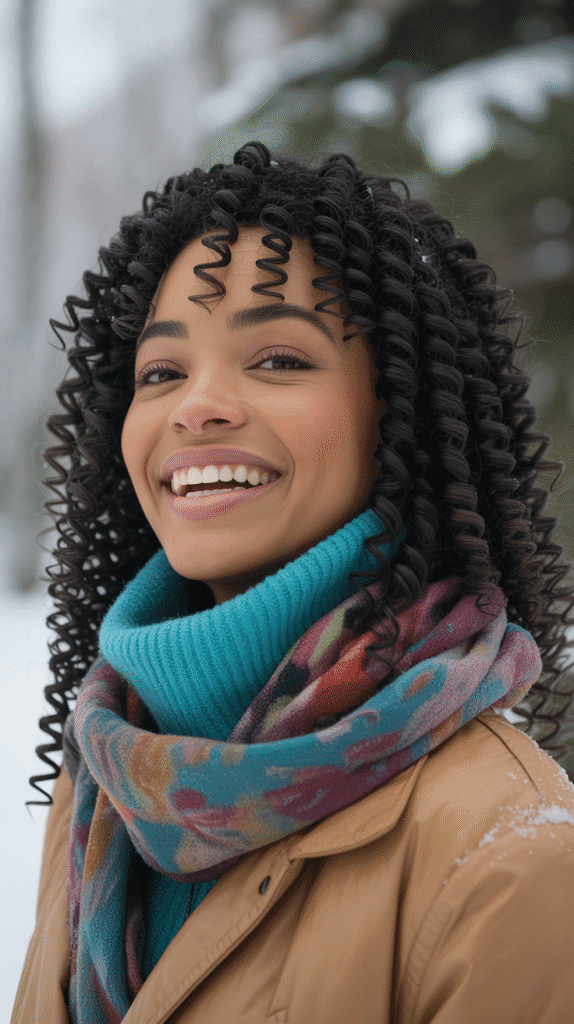
Spiral curls feature tight, defined ringlets that cascade down with bounce and volume, creating a playful, youthful appearance.
This curl pattern offers maximum volume and movement while maintaining definition that lasts throughout winter weather changes.
- Spiral curls are created using perm rods or small curling rods on the extension hair, resulting in uniform, bouncy ringlets.
- This curl pattern is one of the most voluminous options, making it ideal for women who want maximum fullness and presence.
- Maintain the curl definition by using a curl refresher spray and scrunching daily without disturbing the curl pattern with brushing.
- The tight curl pattern helps protect your ends from winter dryness by keeping them coiled and secured rather than exposed.
- Separate individual curls gently with your fingers for more volume or leave them as defined ringlets for a more structured look.
25. Low Bun with Pulled Out Curls
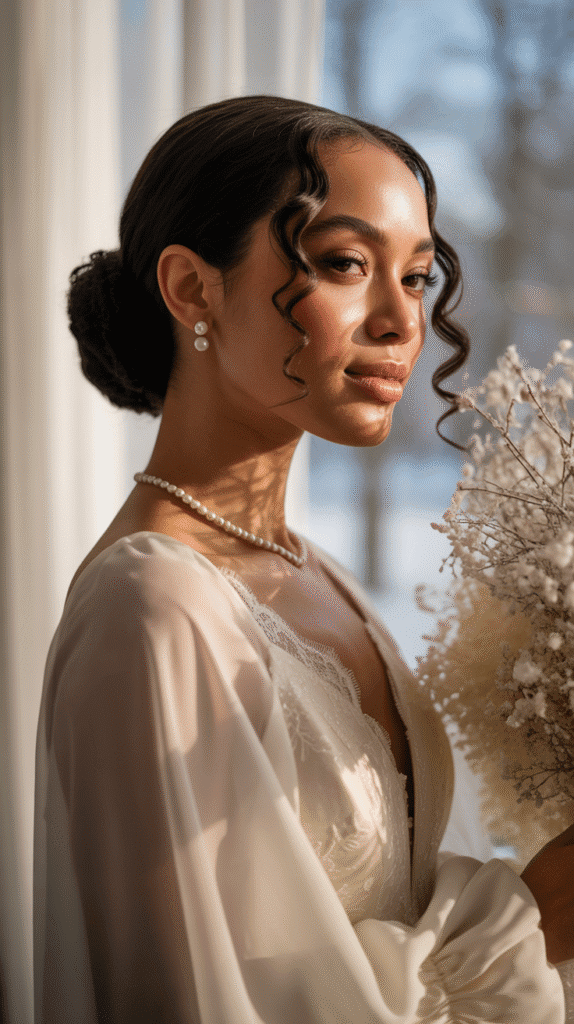
This elegant style features a low bun at the nape with strategically pulled out curly pieces that frame the face and add softness.
The combination of secured and loose hair creates a romantic, effortlessly chic aesthetic perfect for winter events.
- The low bun sits at the nape of the neck, creating an elegant foundation while the pulled-out curls add dimension and femininity.
- Pull out thin sections around the hairline and ears, then curl them with a small barrel curling iron for soft, delicate tendrils.
- This style is perfect for formal winter events like weddings, galas, or holiday parties where elegant sophistication is required.
- The bun protects the majority of your hair from winter elements while the face-framing pieces provide softness and movement.
- Secure the bun with bobby pins and finish with medium-hold hairspray to ensure the style lasts throughout your event.
26. Natural Texture Sew-In with Defined Coils
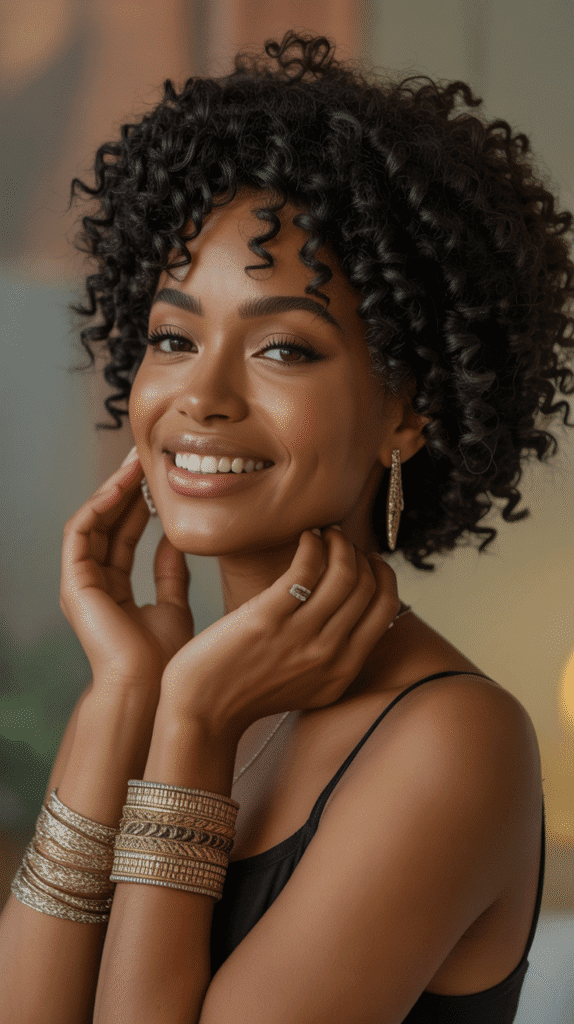
This style celebrates natural texture by using sew-in hair that mimics tightly coiled, kinky hair patterns.
The defined coils create an authentic, natural appearance that’s both protective and beautiful, honoring the natural texture of Black hair.
- Natural texture sew-ins use hair with tight curl patterns that resemble 4a to 4c natural hair types for seamless blending.
- This style eliminates the need for heat styling entirely, making it one of the most protective winter options available.
- Define the coils using a twist-out or braid-out method on damp hair, then separate once dry for maximum definition.
- Use moisturizing products specifically designed for kinky hair types to maintain softness and prevent winter dryness.
- This style celebrates natural beauty and allows women to enjoy the versatility of a sew-in while maintaining an authentically natural appearance.
Maintenance Tips for Winter Sew-Ins
Moisturizing Your Scalp
- Use a nozzle-tip applicator bottle to apply lightweight oil directly to your scalp between the tracks without disrupting your style.
- Focus on oil-based products that won’t cause buildup, such as jojoba oil, sweet almond oil, or specialized scalp treatments.
- Massage your scalp gently with your fingertips in circular motions to stimulate blood circulation and distribute products evenly.
- Apply scalp moisturizer 2-3 times per week during winter months when indoor heating causes excessive dryness.
Protecting Your Sew-In at Night
- Wrap your hair in a silk or satin bonnet before bed to prevent friction that causes tangling and frizz.
- For longer styles, consider using a silk pillowcase in addition to a bonnet for double protection against friction.
- If you have curly or wavy hair, pineapple the hair at the crown using a silk scrunchie to maintain volume and curl pattern.
- Braid straight hair loosely before wrapping to prevent tangling while you sleep.
Washing Your Sew-In
- Wash your sew-in every 1-2 weeks using a sulfate-free shampoo that won’t strip moisture from the hair or your scalp.
- Dilute shampoo with water in an applicator bottle and apply directly to your scalp, massaging gently between tracks.
- Rinse thoroughly by directing water flow from roots to ends, ensuring all product is removed to prevent buildup.
- Apply conditioner from mid-length to ends, avoiding the tracks and your natural hair underneath to prevent slippage.
- Allow your sew-in to air dry completely or use a hooded dryer on low heat to prevent mildew from forming in the braids underneath.
Winter-Specific Care
- Apply a light serum or oil to the ends of your sew-in before going outside in cold weather to prevent wind damage and dryness.
- Tuck your hair into your coat collar when possible to protect it from harsh winter elements and reduce exposure to cold air.
- Use a silk or satin-lined winter hat rather than wool or cotton materials that cause friction and absorb moisture from your hair.
- Avoid sudden temperature changes from cold outdoor air to hot indoor heating, which can cause frizz and damage the hair cuticle.
Common Mistakes to Avoid with Winter Sew-Ins
Installing Braids Too Tight
- Tight braids can cause traction alopecia, especially in winter when blood circulation to the scalp is already reduced by cold temperatures.
- If you experience pain, bumps, or tenderness after installation, your braids are too tight and may need to be redone.
- Request that your stylist braid with medium tension, leaving room for your scalp to breathe and your natural hair to maintain its health.
- Tight installations are particularly problematic under winter hats, which add additional pressure to already stressed areas.
Neglecting Your Natural Hair Underneath
- Your natural hair still needs moisture and care even though it’s protected beneath the sew-in.
- Use the applicator bottle method to moisturize your scalp and the roots of your natural hair regularly.
- Don’t leave a sew-in in longer than 8 weeks, as this can cause matting, tangling, and damage to your natural hair underneath.
- When removing the sew-in, deep condition your natural hair immediately to restore moisture and protein balance.
Using Heavy Products
- Heavy oils, thick creams, and excessive product buildup can make your sew-in look greasy and weigh it down.
- Choose lightweight serums, water-based moisturizers, and products specifically designed for extensions.
- Product buildup is especially problematic in winter when you’re washing less frequently due to cold weather and indoor heating.
- If your sew-in feels heavy or looks dull, you may be using too much product or products that are too thick for extension hair.
Excessive Heat Styling
- While some heat styling is acceptable, excessive use of flat irons and curling irons can damage extension hair that cannot repair itself like natural hair.
- Always use a heat protectant spray before applying any heat tools to your sew-in.
- Keep heat settings at 350°F or below for synthetic blends and 400°F or below for human hair to prevent damage.
- Allow your sew-in to air dry when possible rather than relying on blow dryers, which can cause unnecessary wear on the hair.
Best Hair Types for Different Sew-In Styles
Brazilian Hair
- Known for its thickness, durability, and ability to hold curls well while also straightening beautifully.
- Blends seamlessly with most natural African American hair textures, especially those with medium to coarse strands.
- Ideal for women who want versatility to switch between straight and curly styles throughout the winter season.
- Brazilian hair typically lasts 6-12 months with proper care, making it a worthwhile investment for multiple installations.
- Works best for body wave, loose wave, and straight sew-in styles that require hair to maintain style memory.
Peruvian Hair
- Features a silky texture that’s lighter in weight than Brazilian hair, making it comfortable for extended wear during winter months.
- The natural luster and shine of Peruvian hair creates a healthy, vibrant appearance that looks expensive and well-maintained.
- Ideal for straight sew-ins, sleek ponytails, and styles where you want hair that moves naturally with minimal product.
- Blends well with relaxed or naturally straight hair textures for women who prefer smoother, less textured looks.
- Peruvian hair is less prone to tangling than other hair types, reducing daily maintenance requirements.
Malaysian Hair
- Known for being extremely soft and silky with a natural sheen that doesn’t appear overly shiny or artificial.
- Works beautifully for women who want a natural-looking sew-in that doesn’t obviously appear to be extensions.
- Malaysian hair is lightweight yet full, providing volume without the heaviness that can strain your natural hair and scalp.
- Best suited for loose wave, body wave, and straight styles where natural movement and bounce are desired.
- This hair type maintains its texture well in winter humidity and doesn’t frizz easily when transitioning between cold and warm environments.
Indian Hair
- Features a natural thickness and density that creates full, voluminous styles perfect for dramatic winter looks.
- Indian hair is versatile and can be found in various textures from straight to deep wave, accommodating different style preferences.
- The natural strength of Indian hair makes it ideal for styles that require manipulation, such as updos and braided combinations.
- Blends well with natural hair that has been texturized, relaxed, or heat-styled regularly.
- Indian hair accepts color well if you’re considering highlights, ombre, or full color changes for your winter sew-in.
Virgin Hair
- Virgin hair has never been chemically processed, making it the healthiest and most durable option available.
- This hair type can be colored, bleached, and heat-styled repeatedly without significant damage or deterioration.
- Virgin hair is the most expensive option but offers the longest lifespan and most natural appearance.
- Ideal for women who want to invest in quality extensions that will last through multiple installations and styling changes.
- The cuticles remain intact and aligned, creating a smooth texture that doesn’t tangle or shed excessively.
Synthetic Hair
- More affordable than human hair options but limited in styling versatility since it cannot withstand heat styling.
- Modern synthetic options look increasingly natural and work well for temporary styles or budget-conscious installations.
- Best for women who want a specific curl pattern or texture that will remain consistent without daily styling.
- Synthetic hair is lighter in weight, making it comfortable for women with fine or thinning natural hair.
- Not recommended if you plan to use heat tools, but excellent for pre-curled or pre-styled looks that require no manipulation.
Styling Products Essential for Winter Sew-Ins
Leave-In Conditioners
- Provide ongoing moisture to extension hair that cannot produce natural oils like your natural hair does.
- Apply leave-in conditioner after washing your sew-in and weekly between washes for continuous hydration.
- Look for lightweight, water-based formulas that won’t cause buildup or make your hair feel heavy and greasy.
- Essential in winter when indoor heating strips moisture from hair, causing dryness, brittleness, and frizz.
Edge Control
- Creates sleek, smooth edges along your hairline for polished, professional-looking sew-in styles.
- Choose edge control with strong hold that lasts throughout the day without flaking or leaving white residue.
- Apply sparingly with a soft brush or your fingertips, smoothing edges down and allowing to dry completely.
- Particularly important for styles with ponytails, buns, or slicked-back looks where edges are prominently visible.
Heat Protectant Spray
- Forms a protective barrier on hair strands before using flat irons, curling irons, or blow dryers.
- Prevents heat damage that can cause extension hair to become dry, brittle, or lose its natural texture.
- Apply heat protectant to damp hair before blow-drying or to dry hair before using hot styling tools.
- Essential for maintaining the longevity and appearance of your sew-in investment throughout the winter season.
Lightweight Oils and Serums
- Add shine, reduce frizz, and seal moisture into your sew-in hair without creating greasy buildup.
- Argan oil, jojoba oil, and grapeseed oil are excellent choices that absorb well without weighing hair down.
- Apply small amounts to the mid-lengths and ends of your hair, avoiding the scalp area and tracks.
- Use oil-based products before exposing your sew-in to cold winter weather for added protection against harsh elements.
Dry Shampoo
- Extends time between washes by absorbing excess oil and refreshing your scalp without water.
- Particularly useful in winter when frequent washing can be impractical and uncomfortable in cold weather.
- Apply dry shampoo directly to your scalp between tracks, massage in, then brush through to distribute.
- Choose formulas without heavy fragrances that might clash with your regular hair products or perfume.
Curl Refresher Spray
- Revives curly and wavy sew-in styles between washes without making hair wet or requiring complete restyling.
- Spray lightly on curls, scrunch with your hands, and allow to air dry for renewed definition and bounce.
- Look for curl refreshers with moisturizing ingredients that also provide hold to maintain curl pattern.
- Essential for curly winter sew-ins that lose definition from wearing hats, scarves, and winter accessories.
Cost Breakdown for Winter Sew-In Hairstyles
Hair Bundles
- Quality human hair bundles range from $50-$200 per bundle depending on origin, length, and texture.
- Most sew-in installations require 2-4 bundles, with longer lengths and fuller styles requiring more hair.
- Brazilian, Peruvian, and Malaysian hair typically cost more than Indian or synthetic options but offer superior quality.
- Virgin hair represents the highest price point but provides the longest lifespan and most styling versatility.
- Consider your budget and how long you plan to wear the style when deciding on hair quality.
Installation Costs
- Professional sew-in installation typically costs $100-$300 depending on your location, salon reputation, and style complexity.
- Intricate styles like braided designs, multiple textures, or custom cuts require more time and expertise, increasing cost.
- Urban areas and high-end salons generally charge more than suburban or independent stylists.
- Some stylists include hair in their service price, while others charge separately for labor and materials.
- Request a detailed price quote before your appointment to avoid unexpected costs.
Maintenance Expenses
- Plan to budget $30-$80 monthly for quality hair care products including shampoo, conditioner, oils, and styling products.
- Optional maintenance appointments for tightening or adjusting your sew-in cost $50-$100 every 3-4 weeks.
- Protective sleeping accessories like silk bonnets and pillowcases range from $10-$40 for quality options.
- Deep conditioning treatments and scalp care products add approximately $20-$50 to monthly maintenance costs.
Removal and Takedown
- Professional removal services cost $50-$100, though some stylists include removal in the price of your next installation.
- If you choose to remove the sew-in yourself, invest in proper tools including scissors, a seam ripper, and detangling products.
- Budget for a deep conditioning treatment immediately after removal to restore moisture to your natural hair.
- Plan for a trim or treatment for your natural hair between installations, typically costing $30-$75.
Total Investment
- A complete winter sew-in including quality hair, professional installation, and 6-8 weeks of maintenance costs approximately $400-$800.
- This investment protects your natural hair from winter damage while providing a beautiful, low-maintenance style.
- Compare this cost to the expense of regular salon visits, heat styling damage, and daily hair maintenance to determine value.
- Quality sew-ins that use virgin or premium human hair can be reused for multiple installations, reducing long-term costs.
How to Make Your Sew-In Last Longer
Proper Initial Installation
- Choose an experienced stylist who specializes in sew-in installations and has a portfolio of their work to review.
- Ensure your natural hair is clean, detangled, and properly moisturized before the installation appointment.
- Request braids that are secure but not overly tight, with uniform tension throughout to prevent premature loosening.
- The tracks should be sewn close together without gaps, using strong thread that won’t break or unravel easily.
Weekly Maintenance Routine
- Dedicate time each week to properly care for your sew-in rather than neglecting it between salon visits.
- Wash your sew-in every 7-14 days using proper technique to prevent buildup while maintaining cleanliness.
- Moisturize your scalp and the base of your natural hair underneath the sew-in 2-3 times weekly.
- Check for any loose tracks or threads and address minor issues immediately before they become major problems.
Nighttime Protection
- Never sleep on your sew-in without proper protection, as this is the primary cause of tangling and premature wear.
- Invest in multiple silk bonnets or scarves so you always have a clean one available.
- For very long sew-ins, braid or twist the hair loosely before wrapping to prevent tangling while you sleep.
- Consider sleeping on a silk pillowcase as a backup layer of protection if your bonnet slips off during the night.
Avoiding Common Damage
- Minimize excessive touching, pulling, or manipulating your sew-in throughout the day to reduce wear on the tracks.
- Avoid getting your sew-in wet unnecessarily – cover it while showering if you’re not planning to wash it.
- Don’t apply heavy products directly to the tracks or your natural hair underneath, as this causes buildup and slippage.
- Limit heat styling to 1-2 times per week maximum, allowing your sew-in to air dry when possible.
Timely Adjustments
- Schedule a maintenance appointment 4-6 weeks after installation to tighten any loose tracks before they cause problems.
- Address shedding, tangling, or dryness immediately rather than waiting until the issues become severe.
- Don’t push your sew-in beyond 8 weeks, even if it still looks good, as this can damage your natural hair underneath.
- Remove the sew-in promptly when it’s time, giving your natural hair a break before reinstalling if desired.
Finding the Right Stylist for Your Winter Sew-In
Research and Recommendations
- Ask friends, family members, or coworkers with beautiful sew-ins for stylist recommendations and honest reviews.
- Search Instagram, TikTok, and Facebook for local stylists who specialize in sew-in installations and regularly post their work.
- Read online reviews on Google, Yelp, and salon-specific platforms to understand other clients’ experiences.
- Look for stylists who specialize in protective styles and have extensive experience with various sew-in techniques.
Evaluating Portfolios
- Review the stylist’s portfolio carefully, looking for installations similar to the style you want to achieve.
- Pay attention to the neatness of their work, including clean parts, secure tracks, and natural-looking results.
- Notice whether their sew-ins look comfortable and not overly tight, which indicates gentle, scalp-healthy techniques.
- Look for variety in their portfolio showing they can execute different styles, textures, and techniques successfully.
Consultation Questions
- Ask about their experience level and how long they’ve been specializing in sew-in installations.
- Inquire about the specific braiding pattern they use and why they prefer that technique for your desired style.
- Discuss their recommended hair type, texture, and amount for achieving your desired look within your budget.
- Request information about their maintenance recommendations and whether they offer adjustment appointments.
Red Flags to Watch For
- Stylists who can’t provide a clear price quote or who have hidden fees not mentioned upfront should be avoided.
- Anyone who rushes through the consultation without asking about your hair goals, concerns, or natural hair condition.
- Stylists who insist on excessively tight installations claiming “it will loosen” or that you’ll “get used to it.”
- Professionals who can’t explain their technique, products used, or aftercare instructions clearly and thoroughly.
Building a Long-Term Relationship
- Once you find a skilled stylist you trust, maintain regular appointments to build rapport and ensure consistent results.
- Communicate openly about what you like and don’t like about each installation to help them perfect your preferred style.
- Respect their time by arriving promptly, bringing the agreed-upon materials, and following their aftercare instructions.
- Refer other clients to them and leave positive reviews to support their business and show appreciation for quality work.
Transitioning from Sew-In to Natural Hair
Proper Removal Process
- Never attempt to rush sew-in removal, as this is when the most damage to your natural hair can occur.
- Use small, sharp scissors to carefully cut the thread holding each track without cutting your natural hair.
- Work systematically from bottom to top, removing one track at a time and setting the extension hair aside.
- Once all tracks are removed, carefully unbraid your cornrows using your fingers or a rattail comb to separate braids.
Detangling Your Natural Hair
- Apply a generous amount of conditioner or detangling product to your natural hair before attempting to detangle.
- Start detangling from the ends of your hair and work your way up to the roots using your fingers or a wide-tooth comb.
- Be patient with any shed hair that has accumulated in the braids – this is normal and expected after weeks of protective styling.
- Work in small sections, fully detangling each area before moving to the next to prevent breakage from rushing.
Deep Conditioning Treatment
- Apply a protein-rich deep conditioner immediately after detangling to strengthen your natural hair.
- Cover your hair with a plastic cap and sit under a hooded dryer for 20-30 minutes to allow deep penetration.
- Follow protein treatment with a moisture-rich deep conditioner to restore hydration balance.
- Consider a hot oil treatment with coconut, olive, or avocado oil for additional moisture restoration.
Scalp Care
- Gently cleanse your scalp with a clarifying shampoo to remove any product buildup that accumulated during your sew-in wear.
- Massage your scalp thoroughly to stimulate blood circulation that may have been restricted by braiding.
- Apply a soothing scalp oil or treatment to any tender or irritated areas where braids were located.
- Allow your scalp time to rest and breathe before immediately installing another protective style.
Rest Period
- Give your natural hair a minimum 1-2 week break between sew-in installations to prevent damage and allow recovery.
- During this rest period, wear low-manipulation styles like twist-outs, braid-outs, or loose buns.
- Focus on deep conditioning, protein treatments, and gentle handling to restore your hair’s health.
- Trim any split ends or damaged pieces before reinstalling your next sew-in for optimal results.
Winter Sew-In Inspiration from Celebrities and Influencers
Red Carpet Glamour
- Celebrities like Beyoncé, Zendaya, and Taraji P. Henson frequently wear flawless sew-ins for red carpet events that inspire everyday women.
- Long, flowing styles with loose waves or sleek straight looks dominate formal events and translate beautifully to winter occasions.
- Notice how celebrity stylists add volume at the crown and length at the ends for dramatic, photogenic results.
- The sophisticated elegance of celebrity sew-ins proves that protective styling can be both glamorous and practical.
Social Media Trends
- Instagram and TikTok influencers showcase innovative sew-in styles that push creative boundaries and introduce new techniques.
- Hashtags like #sewinhairstyles, #winterprotectivestyles, and #blackhairmagic provide endless inspiration for your next installation.
- Influencers often share honest reviews of hair companies, products, and maintenance tips that help you make informed decisions.
- Video tutorials from content creators demonstrate styling techniques you can recreate at home between salon visits.
Everyday Style Icons
- Look to style bloggers and everyday women who share their sew-in journeys for realistic, achievable inspiration.
- These authentic representations show how sew-ins perform in real life, including challenges and solutions for common issues.
- Everyday inspiration often includes budget-friendly options and accessible styling techniques suitable for busy lifestyles.
- Following diverse creators ensures you see sew-ins on various skin tones, face shapes, and personal styles.
Conclusion
26 Flawless Winter Sew-In Hairstyles for Black Women That Look Effortless proves that protective styling during the coldest months doesn’t mean sacrificing beauty, versatility, or personal expression.
From sleek and sophisticated straight styles to voluminous curly installations, textured natural looks to elegant updos, the options for winter sew-ins are truly limitless and adaptable to every lifestyle, face shape, and aesthetic preference.
The key to success lies in choosing quality hair that suits your desired texture, finding a skilled stylist who understands proper installation techniques, and committing to a maintenance routine that keeps both your sew-in and natural hair healthy throughout the season.
Winter sew-ins offer the unique advantage of protecting your natural hair from harsh weather conditions while giving you the freedom to experiment with lengths, colors, and styles you might not achieve with your natural hair alone.
Remember that the most beautiful sew-in is one that makes you feel confident, requires maintenance you can realistically manage, and protects your natural hair so it emerges healthy and strong when spring arrives.
Whether you prefer the low-maintenance appeal of a sleek ponytail, the dramatic flair of ombre curls, or the edgy sophistication of an asymmetrical bob, there’s a winter sew-in style perfectly suited to your unique personality and needs.
Embrace the protective power and stunning versatility of sew-in hairstyles this winter season, and enjoy the compliments that come with looking effortlessly flawless every single day.