The holiday season brings endless opportunities to make your little ones shine, and what better way to celebrate than with festive hairstyles that capture the magic of Christmas?
25 Adorable Christmas Hairstyles for Kids That Spark Holiday Joy is your ultimate guide to transforming everyday looks into enchanting holiday styles that will have your children beaming with confidence at every seasonal gathering.
Whether you’re preparing for family photos, school parties, Christmas concerts, or cozy gatherings with loved ones, the right hairstyle can elevate the entire outfit and create memories that last long after the decorations come down.
This comprehensive collection features styles for every hair type, length, and skill level—from simple five-minute fixes for busy mornings to elaborate creations that showcase your creativity and patience.
You’ll discover classic braided wreaths, sparkling ribbon accents, candy cane-inspired twists, snowflake bun designs, and so much more, each carefully selected to bring that special touch of holiday wonder to your child’s appearance.
These hairstyles aren’t just about aesthetics; they’re about creating moments of joy, building traditions, and watching your children’s faces light up when they see themselves transformed into holiday royalty.
Get ready to explore festive styles that are practical enough for active kids yet stunning enough to steal the show at any Christmas celebration.
1. Classic Christmas Bow Ponytail
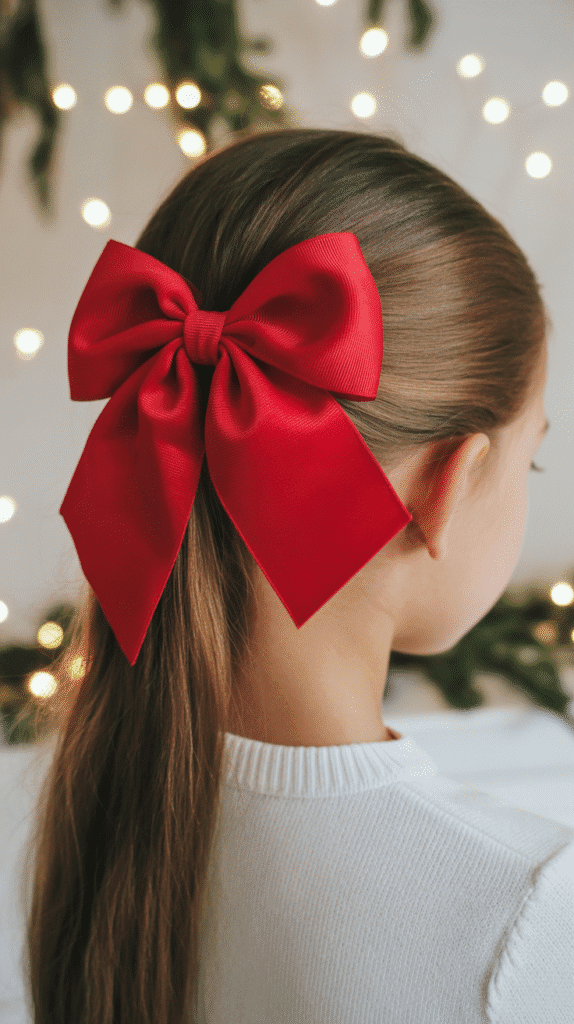
The Christmas bow ponytail combines simplicity with festive elegance, making it perfect for parents who want maximum impact with minimal effort.
This timeless style works beautifully for school events, church services, or casual holiday gatherings.
How to Create:
- Brush hair thoroughly to remove all tangles and create a smooth base for styling
- Gather hair into a high or low ponytail depending on your child’s preference and secure with a clear elastic band
- Choose a large velvet bow in red, green, gold, or plaid pattern to complement the Christmas theme
- Attach the bow securely to the ponytail base using bobby pins or by wrapping the bow’s attached wire around the elastic
- Smooth any flyaways with a light hairspray or styling gel for a polished finish
Best For:
- All hair lengths from shoulder-length to long hair
- Quick morning routines when time is limited
- Children who prefer comfortable styles that won’t pull or feel tight throughout the day
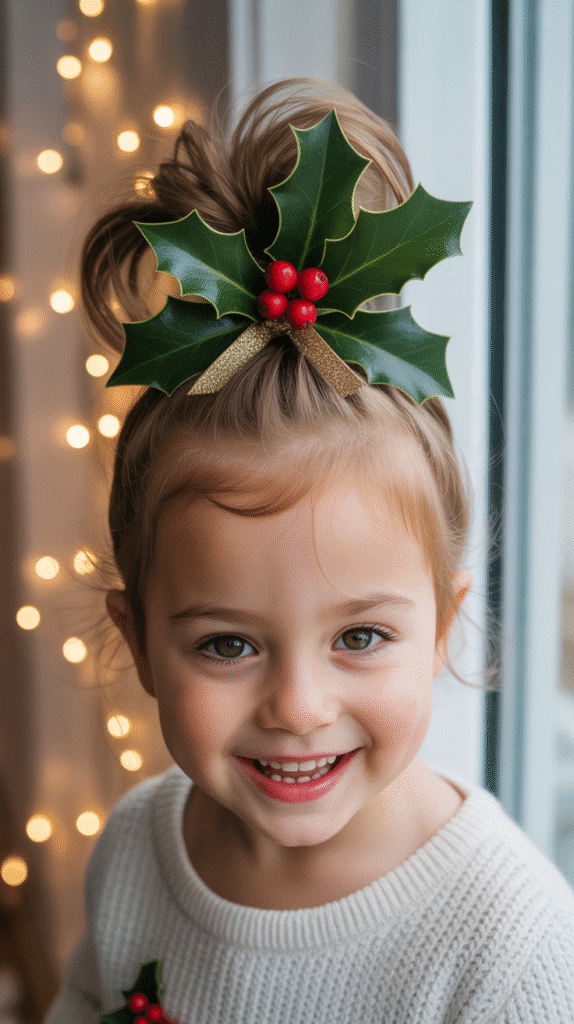
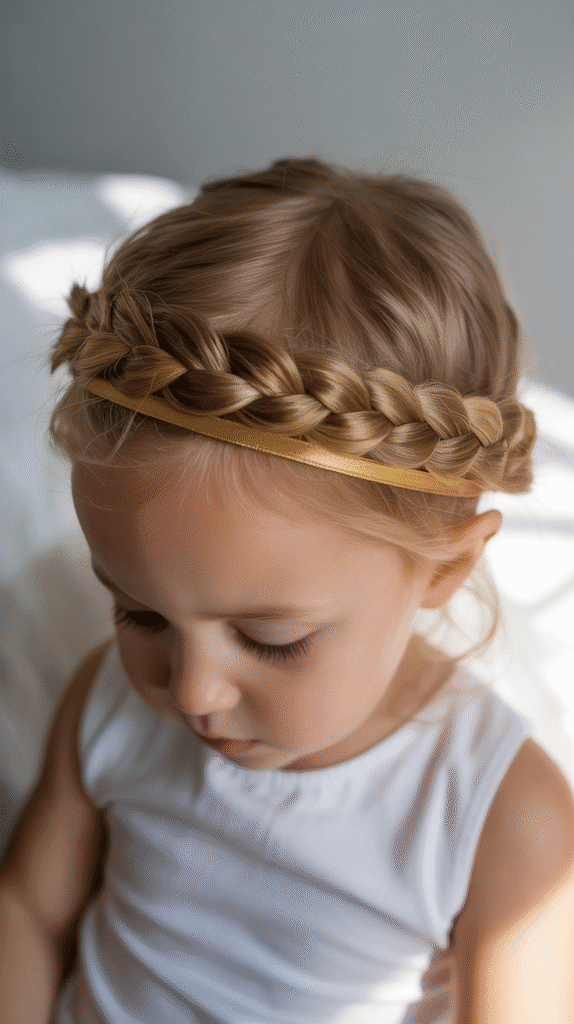
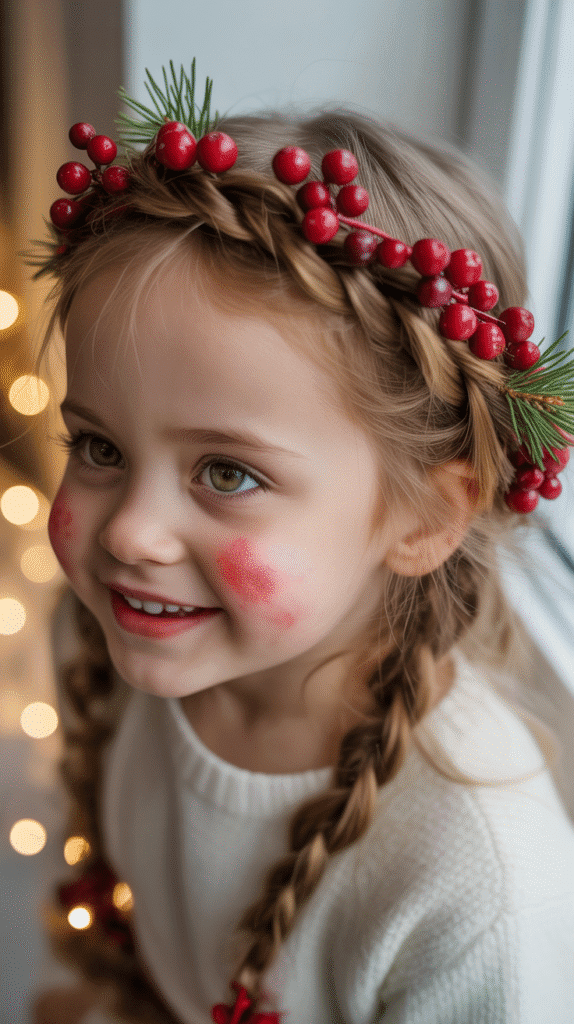
2. Festive Braided Crown with Holly Accents
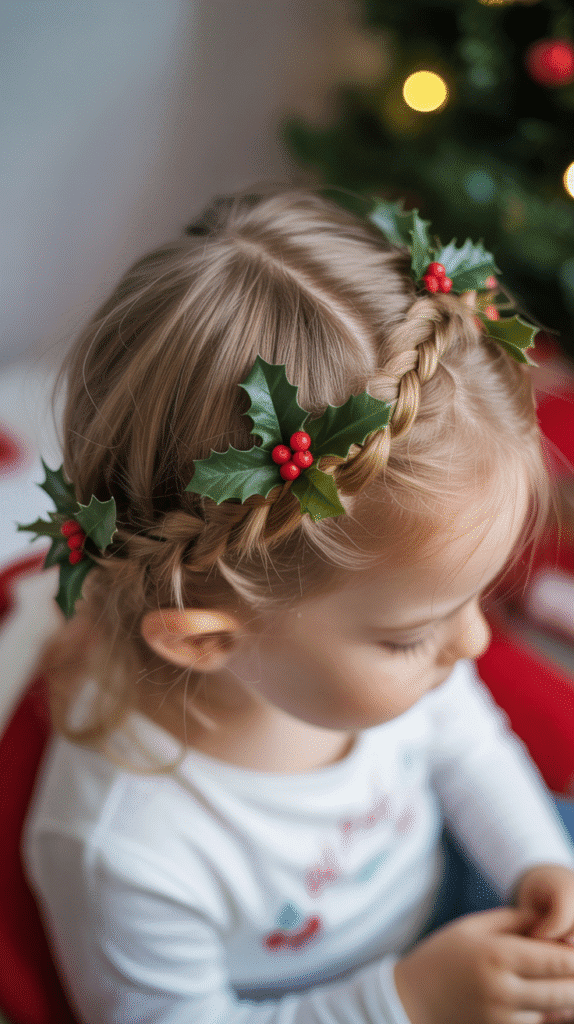
The braided crown creates a regal, princess-like appearance that makes children feel extra special during the holidays.
Adding small holly accessories transforms this classic style into a Christmas masterpiece.
Styling Steps:
- Part hair down the middle to create two equal sections for balanced braiding
- Begin a Dutch braid (reverse French braid) on one side, starting at the temple and braiding along the hairline
- Continue the braid around the back of the head, incorporating all hair as you move toward the opposite side
- Repeat the process on the other side, meeting the first braid at the back
- Secure both braids together and tuck the ends underneath, pinning them discreetly with bobby pins
- Insert small holly hair clips or artificial holly sprigs evenly throughout the braided crown
Ideal Occasions:
- Christmas pageants and holiday performances where your child will be on stage
- Formal family portraits and professional photography sessions
- Holiday parties where your child wants to feel like Christmas royalty
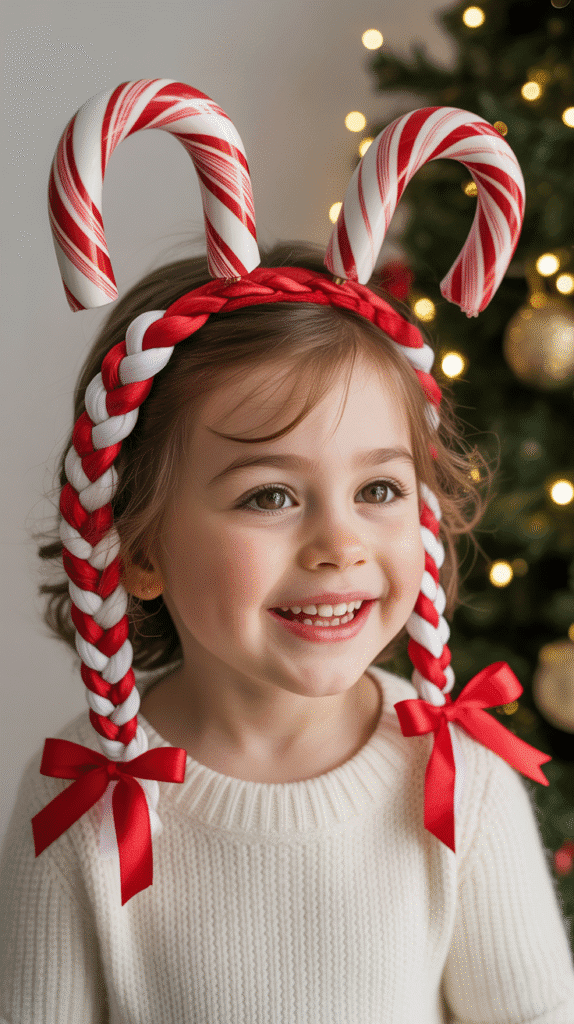
3. Candy Cane Twist Pigtails
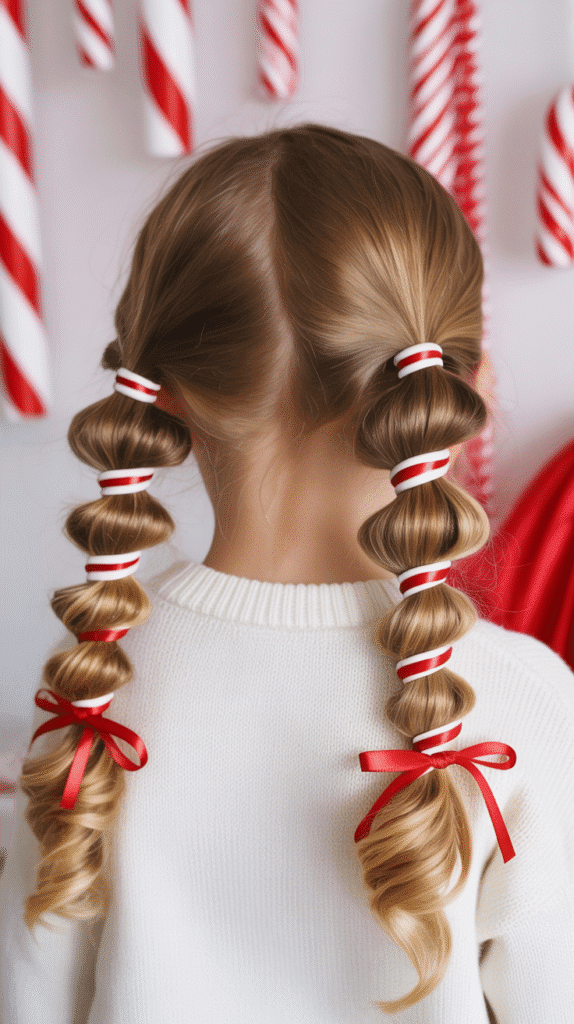
This playful style captures the whimsical spirit of Christmas candy through creative use of red and white ribbons woven into traditional pigtails.
It’s a delightful choice for younger children who love colorful, fun hairstyles.
Creation Process:
- Divide hair into two equal sections with a straight center part from forehead to nape
- Secure each section into a ponytail at the desired height (mid-level works best for this style)
- Take a red ribbon and a white ribbon, each about three times the length of the ponytail
- Fold both ribbons in half and attach them to the base of one ponytail using a small elastic band
- Divide the ponytail and ribbons into two sections, keeping one red and one white ribbon in each section
- Twist the two sections around each other, creating a candy cane spiral effect, and secure at the bottom
- Repeat the entire process on the second ponytail for symmetrical candy cane pigtails
Why Kids Love It:
- The colorful ribbons add movement and visual interest that children find exciting
- It’s comfortable to wear and doesn’t require tight braiding that might cause discomfort
- The candy cane theme connects directly to one of kids’ favorite Christmas treats
4. Sparkly Snowflake Bun
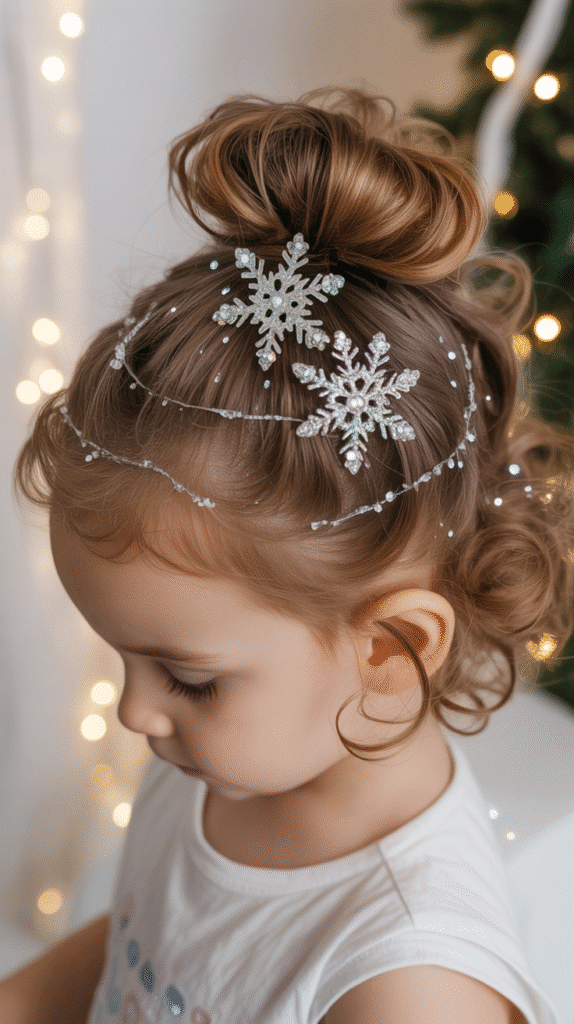
The snowflake bun transforms a simple updo into a winter wonderland masterpiece using strategic bobby pin placement and glittering accessories.
This sophisticated style works wonderfully for formal holiday events.
Assembly Instructions:
- Brush hair into a high ponytail and secure tightly with a strong elastic band
- Twist the ponytail and wrap it around the base to create a classic bun shape
- Secure the bun with multiple bobby pins, ensuring it feels stable and won’t slip during activities
- Create a snowflake pattern using silver or crystal bobby pins arranged in a six-pointed star design on top of the bun
- Add a light mist of glitter hairspray to make the style shimmer under holiday lights
- Optional: secure a small snowflake hair accessory in the center of the bobby pin pattern for extra dimension
Perfect For:
- Evening holiday parties and formal dinners where elegance is appreciated
- Dance recitals and performances with Christmas themes
- Older children and teens who want a more mature, sophisticated holiday look
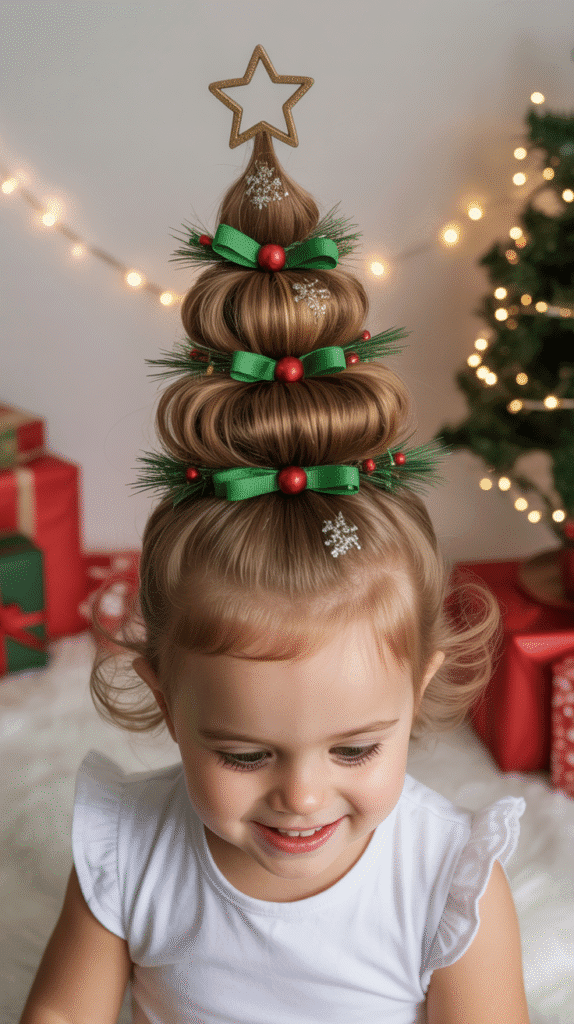
5. Christmas Tree Half-Up Style
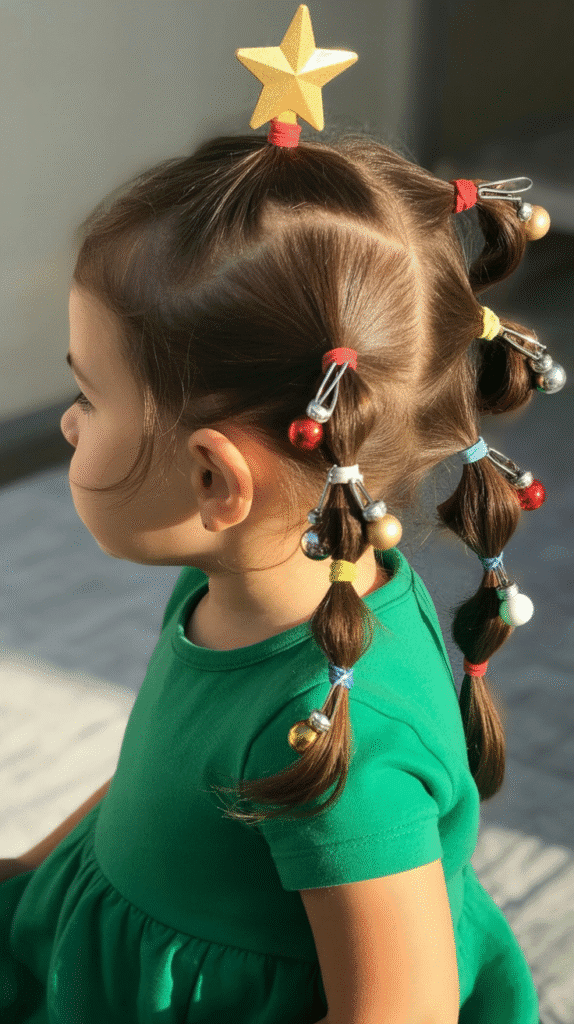
This creative half-up style literally shapes the hair into a Christmas tree silhouette, complete with decorative “ornaments” made from small hair accessories.
It’s a conversation starter that showcases both creativity and holiday spirit.
Building Your Tree:
- Brush the top section of hair and create a small ponytail at the crown of the head
- Create another ponytail about two inches below the first, slightly larger in circumference
- Add a third ponytail below the second, making it even wider to create the triangular tree shape
- Continue adding ponytails (typically 4-6 total) each progressively wider until you reach the desired tree height
- Gently pull and loosen each section to create fuller, more defined layers resembling tree branches
- Clip small, colorful hair accessories (mini baubles, tiny bows, or jeweled clips) throughout the “branches” as ornaments
- Top the highest ponytail with a small star hair clip to complete the Christmas tree illusion
What Makes It Special:
- The unique design is guaranteed to receive compliments and questions about how it was created
- It keeps hair partially pulled back while allowing length to flow freely in the back
- Children feel proud wearing such a creative and obviously handmade hairstyle
6. Ribbon Waterfall Braid
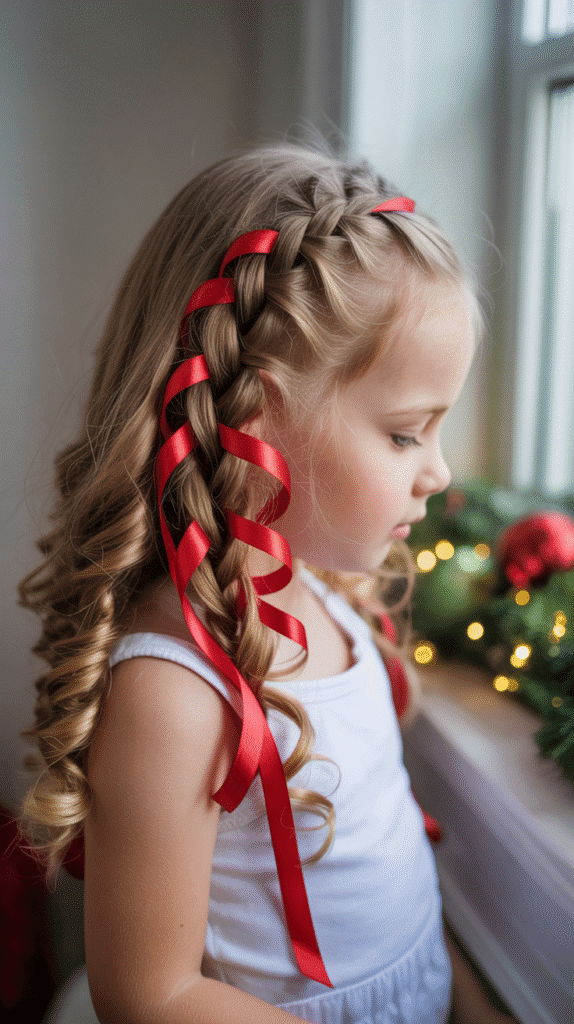
The waterfall braid gains instant holiday charm when colorful Christmas ribbons are incorporated into the cascading sections.
This flowing style is both romantic and festive, perfect for capturing that magical Christmas feeling.
Weaving Technique:
- Begin with a deep side part to create the most dramatic waterfall effect
- Take a small section near the part and divide it into three strands, adding a thin ribbon to one strand
- Start a standard braid, but after the first cross-over, drop the front strand and pick up a new section from the top
- Continue this pattern across the head, allowing strands to “waterfall” down while incorporating the ribbon throughout
- The ribbon should weave through the braid continuously, creating a decorative strand that enhances the cascading effect
- Secure the braid behind the ear or continue it all the way around the head depending on hair length
- Curl the loose, fallen strands with a curling iron for added texture and volume
Recommended Ribbon Colors:
- Red and gold for traditional Christmas elegance
- Silver and white for a winter wonderland theme
- Green and red plaid for a cozy, rustic holiday feel
7. Santa Hat Topknot
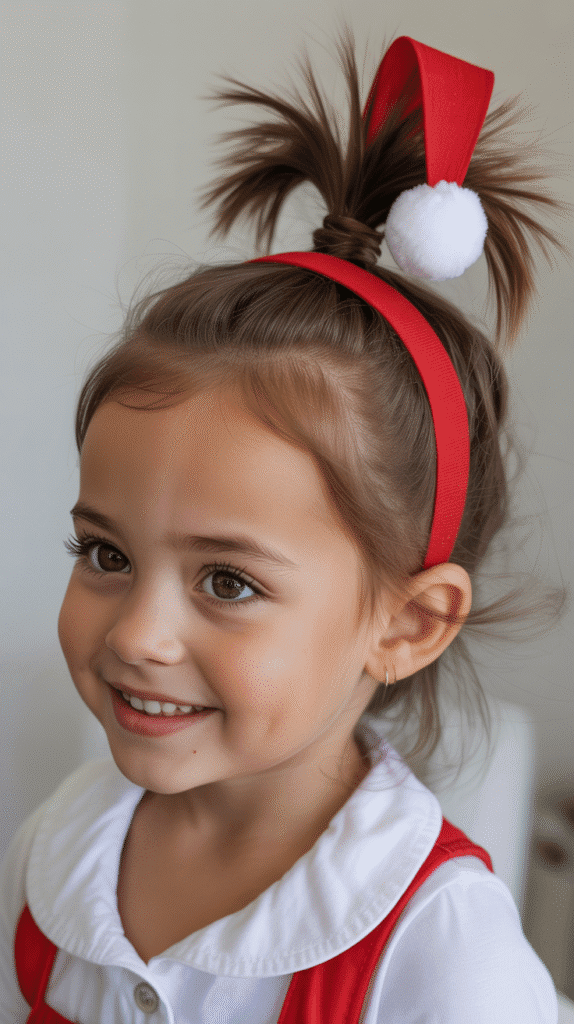
This fun and whimsical style creates the illusion of a Santa hat using the child’s own hair, finished with a fluffy white pompom.
It’s playful, easy to create, and absolutely perfect for Christmas morning photos.
Hat Construction:
- Flip head upside down and brush all hair toward the top front of the head
- Gather hair into a very high ponytail positioned at the front of the crown
- Tease the ponytail slightly to add volume and texture
- Fold the ponytail forward toward the forehead, creating a triangular “hat” shape
- Secure the folded section with bobby pins along the sides and at the tip
- Spray with red temporary hair color spray or attach a red fabric cone over the folded hair
- Attach a white fluffy pompom at the tip of the topknot to complete the Santa hat appearance
- Add a thin white ribbon or fabric strip at the base to simulate the hat’s trim
Best Features:
- Takes less than ten minutes to create even for styling beginners
- No special tools required beyond basic elastics, pins, and a pompom
- Guaranteed to make children giggle and feel festive
8. Twisted Halo with Bells
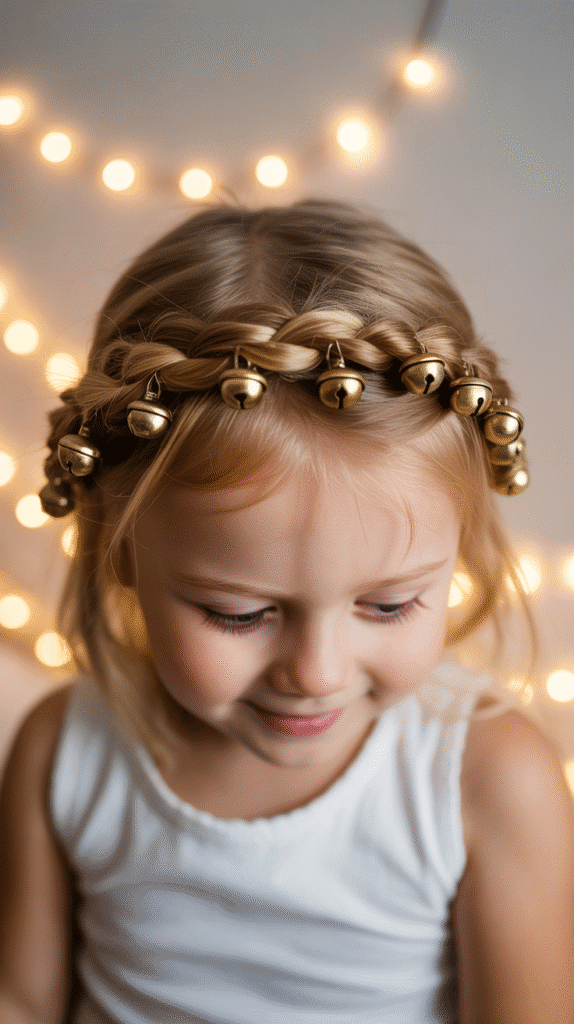
The twisted halo creates an angelic frame around the face while tiny jingle bells add a musical element that children absolutely love.
Every movement creates soft jingling sounds that enhance the holiday atmosphere.
Twisting Method:
- Create a deep side part on either the left or right side of the head
- Take a two-inch section from the front hairline on the heavier side of the part
- Divide this section into two strands and begin twisting them around each other tightly
- Continue twisting while adding small sections of hair from the front, similar to a rope twist technique
- Bring the twist across the front of the head like a headband, securing temporarily with a clip
- Repeat the process on the opposite side, meeting the first twist at the back
- Secure both twists together and attach tiny silver or gold jingle bells along the twisted sections using small elastic bands or thread
- Leave the remaining hair down and loose, or style it into curls for added elegance
Why It Works:
- The gentle twisting puts minimal tension on delicate children’s hair
- The bells provide sensory feedback that kids find delightful without being overwhelming
- It frames the face beautifully for photos while keeping hair out of eyes during activities
9. Reindeer Antler Space Buns

These adorable space buns are transformed into reindeer antlers through strategic positioning and the addition of brown pipe cleaners or antler headbands.
It’s a costume-style hairdo that works perfectly for themed parties.
Antler Assembly:
- Part hair straight down the middle from forehead to nape, creating two equal sections
- Position each section high on the head, slightly toward the back to mimic antler placement
- Create tight buns by twisting each section and wrapping it around itself, securing with multiple elastics
- Shape brown pipe cleaners into antler shapes with multiple branches and insert them into each bun
- Alternatively, position a reindeer antler headband so it sits just behind the buns for a similar effect
- Add a small red pompom bobby pin to the front of the hair as Rudolph’s nose for extra character
- Use bobby pins to secure any loose pieces and ensure the buns stay positioned correctly
Party-Perfect Details:
- Coordinate with a brown or red outfit to complete the reindeer costume look
- Add face paint (a black nose and whiskers) to fully embrace the reindeer character
- This style works exceptionally well for school Christmas parties where costumes are encouraged
10. Glittery Christmas Star Ponytail
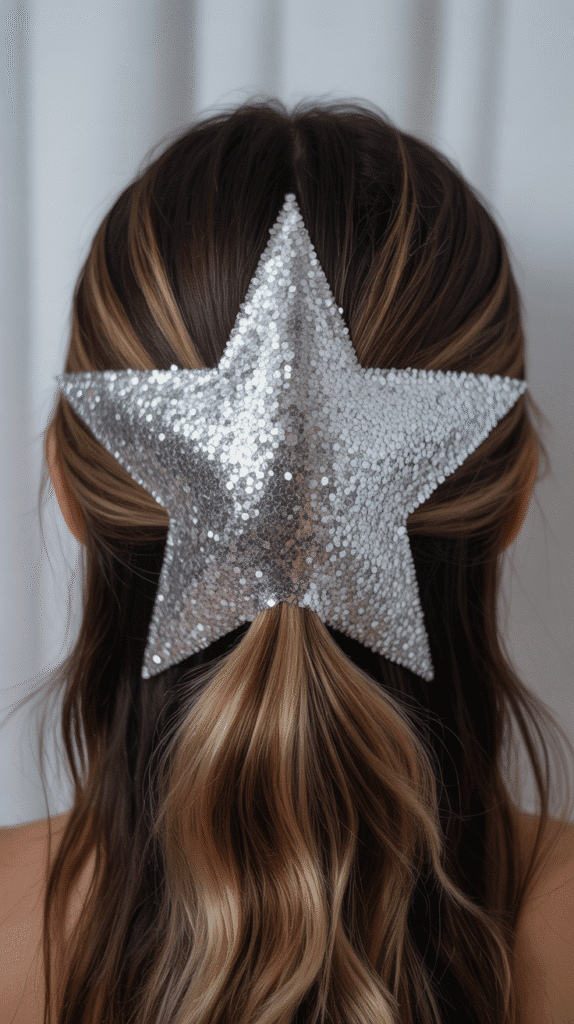
A simple ponytail becomes extraordinary when styled into a star shape and dusted with festive glitter.
This style proves that even the most basic hairstyles can be transformed into Christmas masterpieces with creativity.
Star Formation:
- Gather hair into a high ponytail positioned at the crown or slightly toward the back
- Secure very tightly with a strong elastic band to provide a stable base
- Divide the ponytail into five equal sections using small clear elastic bands spaced evenly down the length
- Pull each section outward and flatten it, creating the points of a star when viewed from above
- Pin each section in place with bobby pins to maintain the star shape throughout the day
- Apply hair gel to each section and sprinkle with silver, gold, or multicolored cosmetic glitter
- Seal the glitter with a light mist of hairspray to prevent fallout and mess
- Optional: weave a thin gold ribbon through the ponytail before creating the star shape for added dimension
Glitter Application Tips:
- Use cosmetic-grade glitter specifically designed for hair and skin to ensure safety
- Apply glitter over a towel or in the bathroom for easy cleanup of any fallen sparkles
- Consider glitter hairspray as a less messy alternative to loose glitter powder
11. Peppermint Swirl Low Bun
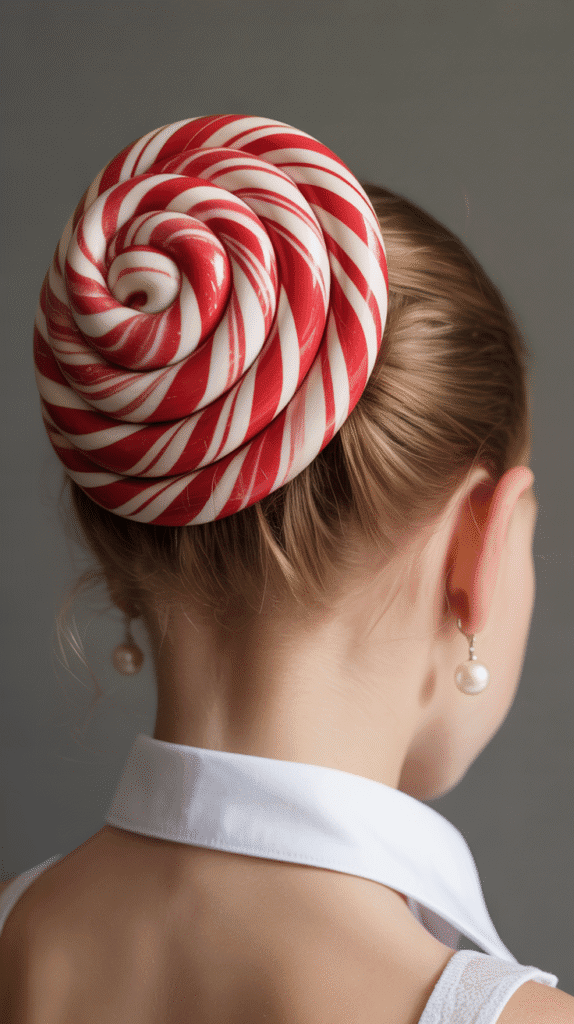
This elegant low bun incorporates red and white sections twisted together to resemble a peppermint candy swirl.
It’s sophisticated enough for formal events while maintaining a playful holiday theme.
Swirl Creation:
- Brush all hair back into a low ponytail positioned at the nape of the neck
- Divide the ponytail into two equal sections
- Apply temporary red hair color spray or chalk to one section while leaving the other natural or applying white temporary color
- Allow the color to dry completely before proceeding to prevent transfer and smudging
- Twist the two colored sections around each other tightly to create a candy-cane spiral effect
- Wrap the twisted ponytail around the base to form a bun, maintaining the spiral pattern visibility
- Secure with bobby pins that match the hair color and add a light finishing spray
- Add a small peppermint-themed hair accessory or red and white striped ribbon for emphasis
Color Options:
- Natural brunette or black hair with red temporary color creates a striking contrast
- Blonde hair with both red and white temporary colors creates the most authentic peppermint appearance
- Use fabric ribbons in red and white instead of temporary color for a mess-free alternative
12. Christmas Lights Hair Tinsel
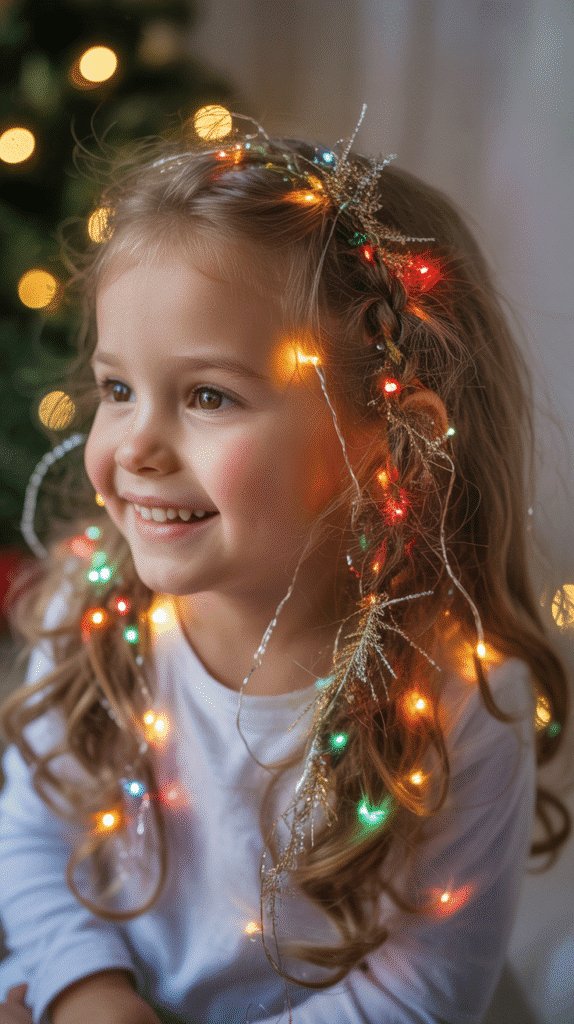
Transform your child’s hair into a strand of Christmas lights by weaving colorful tinsel throughout their natural style.
This versatile technique works with nearly any base hairstyle from braids to loose curls.
Tinsel Weaving:
- Choose thin, flexible hair tinsel in multiple Christmas colors (red, green, gold, silver, and blue)
- Select the base hairstyle (braids, ponytails, or loose curls work best)
- Cut tinsel strands approximately six inches longer than the hair length
- Fold each tinsel piece in half and loop it around small sections of hair using a latch hook or by hand
- Distribute tinsel evenly throughout the hairstyle, alternating colors to mimic multicolored Christmas lights
- Ensure tinsel pieces are secured by knotting them close to the scalp but not so tight as to cause discomfort
- Style the hair as desired, allowing the tinsel to catch light and create a twinkling effect with movement
Maintenance Tips:
- Hair tinsel can typically last through multiple washes if secured properly with the knotting technique
- Brush gently to avoid pulling out tinsel strands prematurely
- Remove tinsel by carefully cutting it close to the knot when you’re ready to change the style
13. Holly Berry Top Knot
This elevated bun style incorporates red accessories positioned to resemble holly berries, creating a festive focal point that draws the eye upward.
It’s perfect for children with medium to long hair.
Berry Positioning:
- Brush hair upward and gather into a very high ponytail at the crown of the head
- Twist the ponytail tightly and wrap it around the base to create a neat, compact bun
- Secure the bun thoroughly with bobby pins, ensuring it can withstand a full day of activity
- Attach three or five small red pompoms or beaded hair pins in a cluster at the base of the bun
- Position artificial or fabric holly leaves around the red “berries” to complete the holly berry appearance
- Use green bobby pins to secure the leaves and blend them naturally with the overall design
- Spray with medium-hold hairspray to keep everything in place throughout holiday festivities
Accessory Alternatives:
- Small red silk flowers can substitute for pompoms with an equally festive effect
- Red rhinestone bobby pins create a more elegant, sparkly holly berry interpretation
- For a DIY option, create berries from red felt balls attached to bobby pins with hot glue
14. Braided Candy Cane Headband
This charming style creates a candy cane-striped headband effect using braiding technique and ribbon, keeping hair off the face while maintaining full length in the back.
It’s both practical and adorable.
Headband Braiding:
- Take a two-inch section of hair from just above one ear along the hairline
- Divide this section into three strands and incorporate a red and white striped ribbon or two separate ribbons
- Braid the section traditionally while keeping the ribbon visible as one of the strands or woven between them
- Continue the braid across the front of the hairline to the opposite ear, maintaining even tension
- Secure the end of the braid behind the ear with small bobby pins that match the hair color
- Adjust the braid to ensure it sits comfortably as a headband without pulling or creating tension
- Leave the remaining hair loose, curled, or styled as desired to complement the braided headband
Ribbon Selection:
- Candy cane-striped ribbon creates the most obvious Christmas connection and requires no additional explanation
- Alternating individual red and white ribbons allows for more flexibility in braid pattern
- Satin ribbons photograph beautifully and hold their shape better than grosgrain for this application
15. Angel Halo Braid
The angel halo braid wraps completely around the head, creating the appearance of a golden halo when paired with blonde hair or gold accessories.
This heavenly style is perfect for Christmas pageants and nativity plays.
Halo Construction:
- Create a center part from forehead to nape, dividing hair into two equal sections
- Begin a Dutch braid at the front of one section, braiding along the hairline toward the back
- Continue braiding around the entire head, following the hairline all the way around
- When you reach the starting point, continue braiding the remaining hair length regularly
- Wrap the braid tail around to complete the circle and tuck the end underneath the starting point
- Secure invisibly with bobby pins, creating a continuous halo effect with no visible beginning or end
- For extra angelic appearance, weave thin gold ribbon through the braid or attach small gold star clips
- Loosen the braid slightly by gently pulling on the edges for a softer, fuller halo appearance
Costume Coordination:
- Pair with a white dress or outfit for a complete angel costume
- Add simple angel wings for Christmas pageants or holiday performances
- Consider a small gold or silver headband worn over the braid to enhance the halo effect
16. Snowflake French Braid
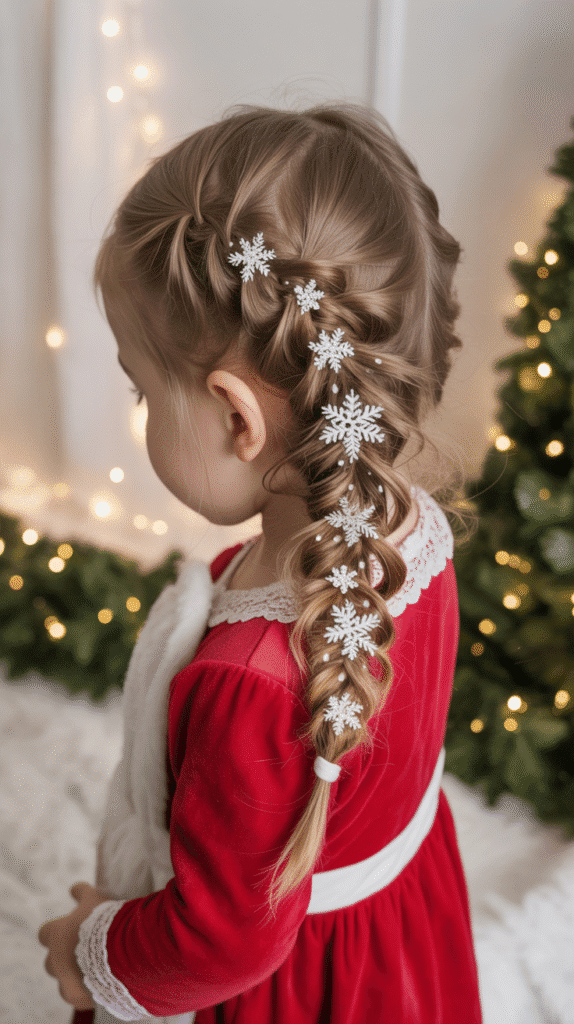
A classic French braid becomes winter-worthy through the strategic placement of snowflake accessories throughout its length.
This style combines the reliability of traditional braiding with festive seasonal flair.
Braiding with Snowflakes:
- Brush hair thoroughly and decide on braid placement (center back, side, or double braids)
- Begin a traditional French braid from the crown, incorporating sections from both sides as you move down
- Maintain consistent tension throughout the braid for a neat, uniform appearance
- After completing approximately every two inches of braid, clip a snowflake accessory into the braid
- Continue this pattern of braiding and adding snowflakes until you reach the end of the hair
- Secure the braid end with a clear elastic and attach one final, slightly larger snowflake at the bottom
- Gently pancake the braid by pulling on the edges to create a fuller, more dimensional appearance
- Finish with a light mist of hairspray and silver glitter spray for extra winter magic
Snowflake Variety:
- Mix different sizes of snowflake clips for visual interest and dimension
- Choose between silver, crystal, or white snowflakes depending on the outfit and overall look desired
- Rhinestone-studded snowflakes add extra sparkle for formal holiday occasions
17. Christmas Bow Pigtails

These classic pigtails receive a holiday upgrade through oversized Christmas bows that become the focal point of the entire hairstyle.
It’s a sweet, youthful style perfect for younger children.
Pigtail Perfection:
- Part hair down the center from forehead to nape, creating two perfectly equal sections
- Brush each section thoroughly to remove any tangles and create smooth pigtails
- Position the pigtails at the desired height (low, mid, or high) depending on hair length and personal preference
- Secure each pigtail with a clear elastic band wrapped multiple times for security
- Attach large decorative Christmas bows to each pigtail base, choosing coordinating or contrasting colors
- Ensure bows are secured firmly with bobby pins or built-in attachments to prevent them from slipping
- Optional: wrap the pigtails around a curling iron or use foam rollers to add curl and volume
- Spray lightly with flexible-hold hairspray to maintain the style while allowing natural movement
Bow Selection Guide:
- Velvet bows in jewel tones (emerald, ruby, sapphire) create an elegant, rich appearance
- Plaid bows offer a cozy, traditional Christmas feeling perfect for casual gatherings
- Oversized bows make a bold statement and work best with solid-colored outfits
18. Festive Fishtail Braid with Ribbon
The intricate appearance of a fishtail braid becomes even more impressive when a festive ribbon is woven throughout its structure.
This style looks complex but is surprisingly achievable with practice.
Fishtail Technique:
- Gather hair into a ponytail and secure it temporarily (remove elastic after learning the technique)
- Divide the ponytail into two equal sections
- Take a thin strand from the outer edge of the left section and cross it over to join the right section
- Take a thin strand from the outer edge of the right section and cross it over to join the left section
- Before crossing each strand, weave ribbon over and under to integrate it throughout the braid
- Continue this pattern down the entire length, keeping tension consistent for a uniform appearance
- Secure the end with a clear elastic and remove the temporary ponytail elastic from the top if used
- Gently pull on the edges of the braid to create width and showcase the ribbon detail
- Tie a bow with the remaining ribbon at the bottom of the braid for a polished finish
Ribbon Tips:
- Thin ribbons (¼ inch wide) work best for weaving without overwhelming the braid structure
- Start with the ribbon secured at the top of the braid using a small bobby pin for easier weaving
- Metallic ribbons catch light beautifully and photograph exceptionally well
19. Christmas Tree Bun
This creative updo transforms a simple bun into a three-dimensional Christmas tree through layering, shaping, and decorating.
It’s an ambitious style that delivers impressive results for special occasions.
Tree Building:
- Brush all hair into a high ponytail positioned at the crown of the head
- Divide the ponytail into three or four sections of decreasing size (largest at bottom, smallest at top)
- Create a bun with the largest section at the base of the ponytail, spreading it wide into a circular shape
- Stack the next section above the first, creating a smaller bun to begin the triangular tree shape
- Continue stacking progressively smaller buns until all sections are used, forming a cone shape
- Secure each layer with bobby pins, ensuring the structure is stable and won’t collapse
- Decorate the “tree” with small hair accessories as ornaments (colorful clips, jeweled pins, mini bows)
- Top the highest point with a star-shaped clip or pin to complete the Christmas tree appearance
- Use hair gel or pomade to smooth any flyaways and create clean, defined tree layers
Decoration Ideas:
- Tiny colored rubber bands can serve as “Christmas lights” wrapped around each layer
- Small silk flowers in red and gold serve as elegant tree ornaments
- A thin strand of tinsel garland can be wrapped around the tree for authentic decoration
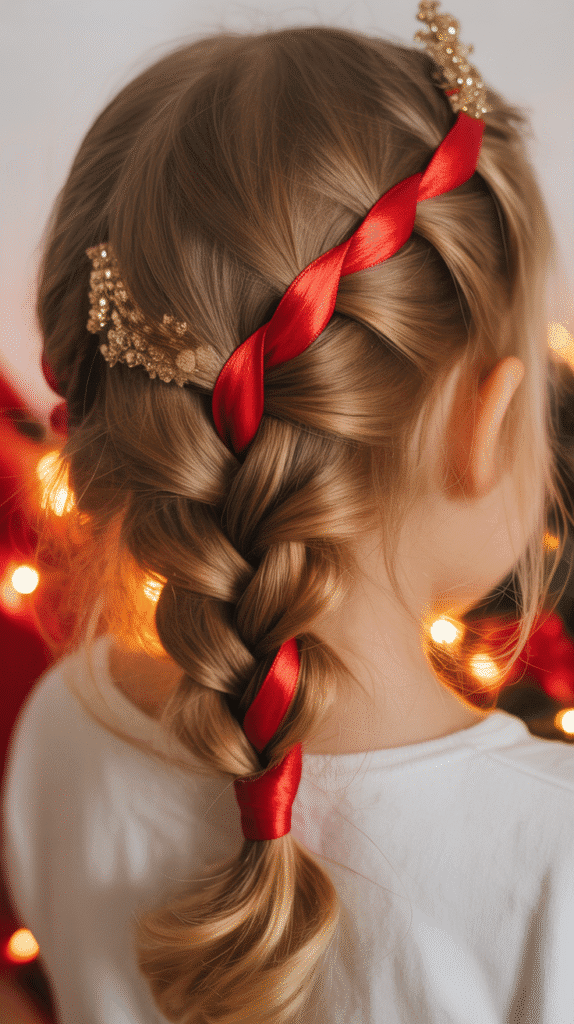
20. Twisted Crown with Berries
This elegant style combines the sophistication of a twisted crown with the festive charm of berry accessories strategically placed throughout.
It’s perfect for children who want to look grown-up but age-appropriate.
Crown Twisting:
- Create a deep side part on either left or right side of the head
- Take a two-inch section from the front on the heavier side and divide it into two strands
- Twist these strands around each other while gradually adding more hair from the top with each twist
- Continue the twist across the front of the head like a headband, securing temporarily with clips
- Repeat the same twisting technique on the opposite side, bringing it toward the back to meet the first twist
- Secure both twists together at the back and either pin the ends underneath or incorporate them into a bun
- Place small clusters of red berry picks (artificial berries on wire stems) throughout the twisted crown
- Space the berry clusters evenly for balance, securing each with bobby pins hidden beneath the twists
Berry Options:
- Traditional red holly berries create the most obvious Christmas reference
- White or pearl berries offer a sophisticated winter wonderland interpretation
- Cranberry picks from the floral section of craft stores look remarkably realistic
21. Santa’s Helper High Ponytail
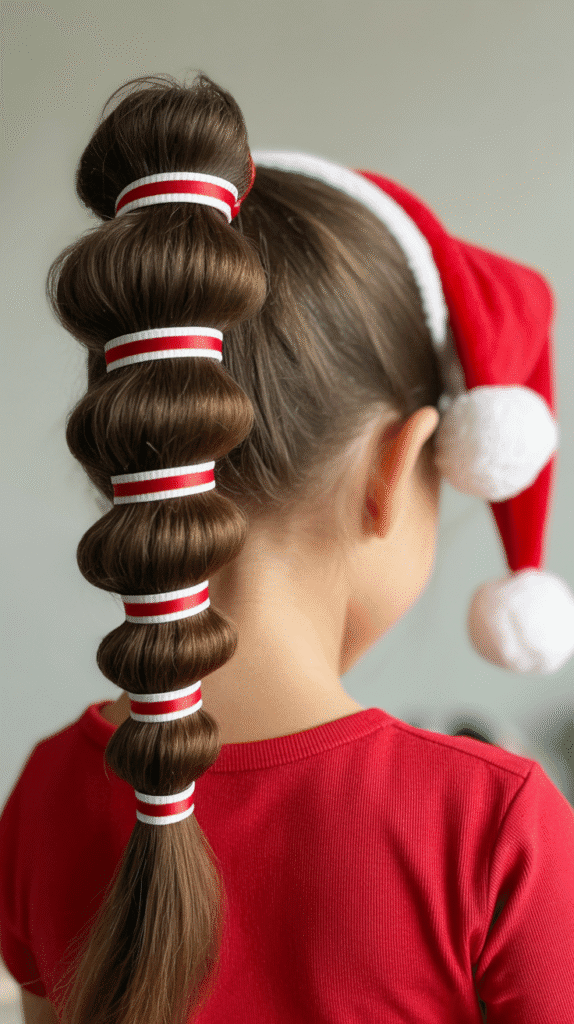
A sleek high ponytail wrapped in red and white striped ribbon mimics the classic candy cane or Santa’s helper aesthetic.
This sporty yet festive style works perfectly for active children who need their hair secure.
Helper Style Creation:
- Brush hair upward into the highest possible ponytail position on the crown
- Secure tightly with a strong elastic band, ensuring no bumps or loose sections
- Smooth any flyaways with gel, edge control product, or light pomade for a sleek finish
- Take a long piece of red and white striped ribbon (or one of each color)
- Beginning at the base of the ponytail, wrap the ribbon around the elastic to hide it completely
- Continue wrapping the ribbon down the length of the ponytail in a spiral or candy cane pattern
- Secure the ribbon at the bottom with another elastic or by tying it in a bow
- Optional: curl the ponytail ends for added bounce and volume
Activity-Friendly Features:
- The high, tight placement keeps hair completely off the neck and out of the face
- The ribbon adds festive flair without heavy accessories that might fall out during play
- This style can withstand running, dancing, and typical childhood activities without falling apart
22. Winter Wonderland Side Braid

A romantic side braid adorned with white, silver, and crystal accessories creates a winter wonderland effect that’s both elegant and age-appropriate.
This style works beautifully for formal holiday events.
Wonderland Braiding:
- Create a deep side part, sweeping the majority of hair to one side
- Begin a loose French or Dutch braid starting at the front and working diagonally toward the opposite shoulder
- Keep the braid loose and romantic rather than tight and structured for a softer appearance
- Incorporate small sections of hair gradually to create a flowing, cascading effect
- When the braid reaches the shoulder, continue with a regular three-strand braid down the remaining length
- Secure at the bottom with a clear elastic and gently pull on the braid edges to create fullness
- Place white flowers, silver snowflakes, or crystal accessories throughout the braid at irregular intervals
- Finish by wrapping a strand of hair around the bottom elastic to conceal it and create a polished look
Color Palette:
- Stick to whites, silvers, pale blues, and crystals for an authentic winter wonderland theme
- Avoid warm colors like red and gold which shift the aesthetic away from winter wonderland
- Iridescent or holographic accessories add magical sparkle without introducing color
23. Elf Ears Double Buns
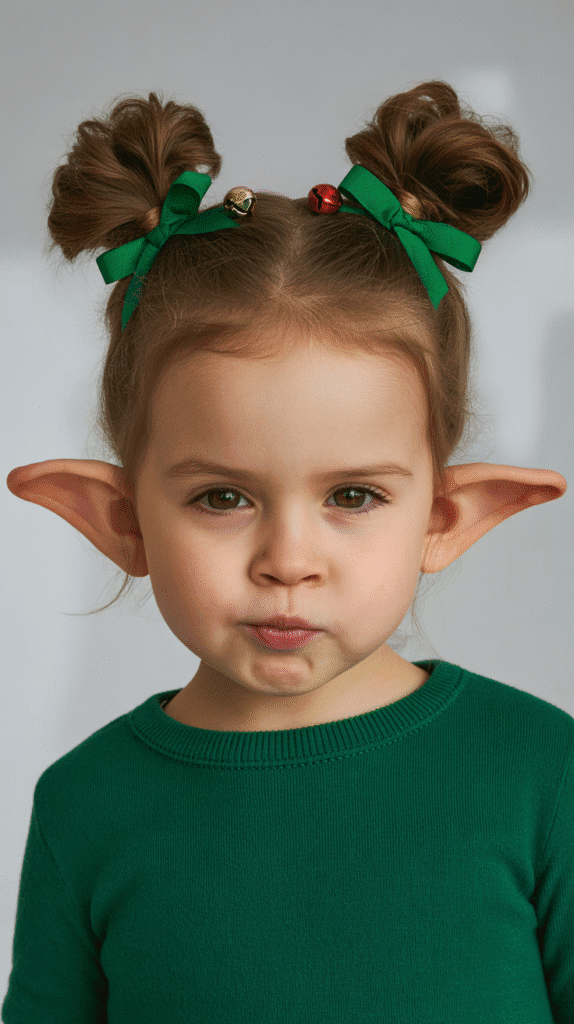
These whimsical space buns are positioned specifically to suggest elf ears, making them perfect for children who want to embody Santa’s helpers.
The playful placement creates an instantly recognizable character effect.
Elf Ear Positioning:
- Part hair down the center from forehead to nape, creating two equal sections
- Position each section slightly forward and to the side, approximately where elf ears would naturally sit
- The placement should be higher and more forward than traditional space buns to suggest the pointed ear shape
- Create tight buns by twisting each section and coiling it around itself into a compact shape
- Secure each bun with multiple elastics and bobby pins to ensure they maintain position throughout activities
- Gently pull small sections outward from the top of each bun to create a subtle pointed effect
- Optional: attach pointed felt pieces (green or skin-toned) to the buns to make the ear effect more obvious
- Add small jingle bells on bobby pins at the base of each bun for extra elf authenticity
Costume Completion:
- Coordinate with green and red clothing for a traditional elf appearance
- Add striped knee socks and a jingle bell necklace to complete the helper ensemble
- Consider elf ear prosthetics worn in addition to the buns for maximum effect at costume parties
24. Gingerbread Swirl Buns
These brown-toned buns decorated with white accessories create a gingerbread cookie effect that’s delicious and adorable.
Best suited for children with naturally brown or dark hair, though temporary color can achieve the look on any hair tone.
Gingerbread Styling:
- Part hair down the middle and create two sections for symmetrical bun placement
- Position the buns at medium height on either side of the head for a balanced appearance
- Twist each section tightly and wrap around itself to create round, compact buns resembling gingerbread cookies
- Secure each bun thoroughly with elastics and bobby pins in brown or matching hair color
- Apply white fabric paint, chalk, or temporary hair color around the edges of each bun to simulate “icing”
- Alternatively, use white ribbon wrapped around the base and edges of the buns for mess-free icing effect
- Add small rhinestone or pearl bobby pins arranged as “buttons” down the center of each bun
- Place a small white bow or ribbon at the top of each bun to represent decorative icing details
- For extra authenticity, add tiny red accessories to represent candy decorations on gingerbread cookies
Creative Enhancements:
- Use brown temporary hair color spray on lighter hair to enhance the gingerbread cookie appearance
- Create zigzag patterns with white eyeliner or face paint around the buns for detailed icing design
- Add cinnamon-scented hair spray or a small drop of vanilla extract to the finished style for authentic gingerbread scent
25. Elegant Christmas Updo with Pearls
This sophisticated updo combines the elegance of a low twisted bun with the timeless beauty of pearl accessories, creating a style suitable for the most formal holiday occasions.
It’s perfect for older children and teens attending elegant events.
Elegant Assembly:
- Brush all hair back smoothly, removing any tangles and creating a sleek surface
- Gather hair into a low ponytail positioned at the nape of the neck
- Divide the ponytail into two or three sections and twist each section individually
- Wrap the twisted sections around the ponytail base, layering them to create an intricate, textured bun
- Secure the bun with bobby pins placed strategically to hold the twisted sections in place
- Ensure the bun feels secure and will withstand several hours of wear without slipping
- Thread pearl bobby pins throughout the bun at various angles, creating an organic scattered effect
- Add a pearl hair comb or decorative clip at the side or base of the bun as a focal point
- Smooth any flyaways with a light serum or anti-frizz spray for a polished, elegant finish
- Set the entire style with a flexible-hold hairspray that won’t make the hair stiff or crunchy
Pearl Selection:
- Choose between classic white pearls for timeless elegance or colored pearls (champagne, blush) for subtle variation
- Mix pearl sizes for dimensional interest, using larger pearls as focal points and smaller ones as accents
- Consider pearl accessories with additional rhinestones for extra sparkle at evening events
Formal Occasion Pairing:
- This updo pairs beautifully with formal dresses for Christmas Eve church services
- Perfect for holiday concerts, recitals, and performances where elegance is expected
- Coordinates with any color palette while adding sophisticated detail
Additional Tips for Christmas Hairstyle Success
Preparation Essentials:
- Always start with clean, dry, or slightly damp hair depending on the style requirements for easier manipulation
- Keep a spray bottle of water nearby to dampen sections that become too dry during styling
- Invest in quality hair elastics that won’t snap or damage delicate children’s hair during styling
- Organize all accessories before beginning to avoid interrupting the styling process to search for items
- Have your child sit comfortably with access to entertainment (tablet, book, TV) for styles requiring longer time
Comfort Considerations:
- Check in frequently with your child about tension and comfort levels, especially with braided styles
- Avoid pulling hair too tightly, which can cause headaches and damage to hair follicles over time
- Position buns and ponytails at heights that won’t interfere with car seats, headrests, or sleeping
- Consider your child’s activity level and choose styles that will stay secure during their planned activities
- Keep bobby pins smooth and snag-free, discarding any that have lost their protective coating
Making Styles Last:
- Apply a light styling product before creating the hairstyle to improve hold and manageability
- Use hairspray in short bursts from 8-10 inches away to avoid over-saturating hair
- Teach children to avoid touching or playing with their hairstyles to maintain neatness throughout the day
- Bring extra accessories and bobby pins to events in case repairs are needed during longer occasions
- Take photos early in the event while the hairstyle is still perfect for the best documentation
Accessory Safety:
- Choose accessories without sharp edges or points that could injure scalps or eyes during active play
- Ensure all clips, pins, and decorations are securely attached and won’t become choking hazards if they fall out
- Avoid accessories with small parts for very young children who might remove and mouth them
- Test new accessories on yourself first to ensure they grip properly and won’t slip or fall easily
- Store hair accessories in organized containers to keep them clean and ready for use
Conclusion
The holiday season provides the perfect opportunity to experiment with creative hairstyles that make your children feel special and celebratory, and 25 Adorable Christmas Hairstyles for Kids That Spark Holiday Joy delivers exactly that magic.
From simple five-minute ponytails adorned with festive bows to elaborate braided creations that showcase your growing styling skills, these hairstyles offer something for every skill level, hair type, and occasion throughout the Christmas season.
The key to success lies not in perfection but in the joy and confidence these styles bring to your children as they participate in holiday traditions and create lasting memories.
Whether you’re preparing for Christmas morning photos in pajamas, formal holiday concerts where your child will perform, casual parties with friends and classmates, or elegant family dinners at grandparents’ homes, you now have a comprehensive collection of festive hairstyles at your fingertips.
Remember that the most important element of any hairstyle isn’t flawless execution but rather the smile on your child’s face when they see themselves transformed into holiday royalty, and the precious moments you spend together creating these seasonal looks will become cherished memories that last far beyond the holiday season.
So gather your ribbons, clips, elastics, and accessories, set aside some quality time with your little ones, and let these adorable Christmas hairstyles spark genuine holiday joy in your home this season and for many festive celebrations to come.