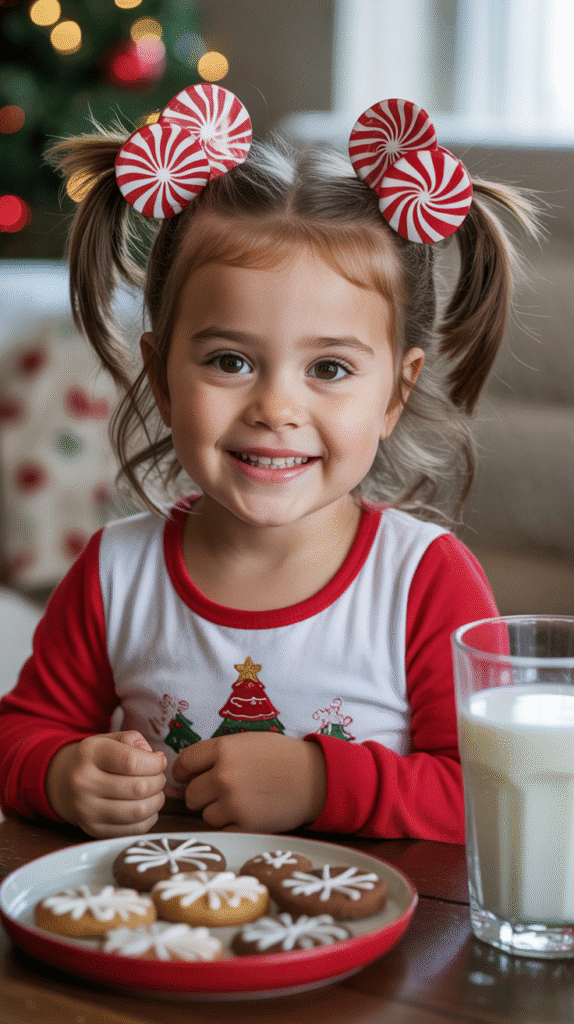
The holiday season brings joy, excitement, and countless festive gatherings where your little ones deserve to look their absolute best.
Finding the perfect hairstyle that captures the Christmas spirit while being quick and manageable can feel overwhelming for busy parents juggling holiday preparations.
This comprehensive guide to 25 Easy Christmas Hairstyles for Kids You Can Do in Minutes offers practical, creative solutions that transform ordinary hair into festive masterpieces without requiring professional skills or hours of styling time.
From sparkly braids adorned with ribbons to playful ponytails decorated with Christmas accessories, each hairstyle has been carefully selected to suit different hair types, lengths, and skill levels.
Whether you’re preparing for a school holiday party, family photo session, church service, or Christmas morning celebration, these styles will help your children shine throughout the season.
Every hairstyle includes simple step-by-step guidance, recommended accessories, and styling tips that ensure success even for beginners.
The collection features classic elegant looks for formal events and fun whimsical styles for casual celebrations, ensuring you’ll find the perfect match for any Christmas occasion.
These time-saving styles prove that creating memorable holiday looks doesn’t require salon visits or complicated techniques, just a few minutes, basic supplies, and a touch of festive creativity.
1. Classic Christmas Bow Ponytail
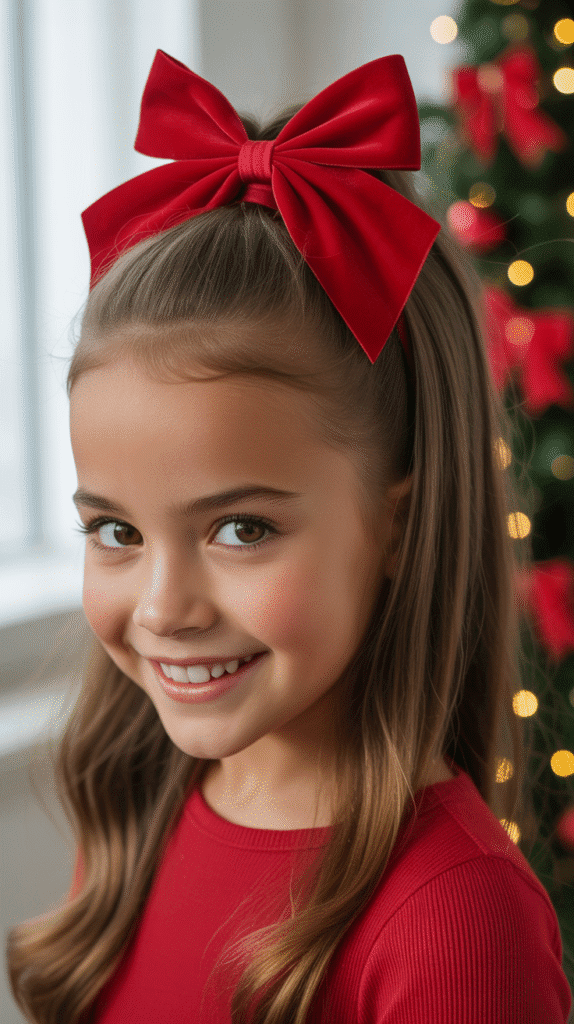
This timeless style combines simplicity with festive elegance, making it perfect for children of all ages who want to celebrate the season with minimal styling time.
The Christmas bow ponytail requires only a hair tie and a festive bow, creating an instantly recognizable holiday look that works beautifully for school events, family gatherings, or quick morning preparations.
Step-by-Step Instructions:
- Brush the hair thoroughly to remove all tangles and create a smooth base for styling.
- Gather all the hair at the desired height on the head, whether high for a playful look or mid-level for classic elegance.
- Secure the ponytail tightly with an elastic band that matches the hair color for a seamless appearance.
- Attach a large red, green, gold, or plaid Christmas bow directly above or below the elastic band.
- Smooth any flyaways with a light hairspray or styling gel for a polished finish.
- Optional: curl the ponytail ends with a curling iron for added bounce and festivity.
Best For:
- All hair types and lengths from shoulder-length to long hair.
- Quick morning routines when time is limited.
- Children aged 3-12 who enjoy classic, comfortable styles.
Recommended Accessories:
- Velvet Christmas bows in traditional holiday colors.
- Glittery or sequined bows for extra sparkle.
- Plaid ribbon bows for a rustic farmhouse Christmas aesthetic.
2. Candy Cane Braided Pigtails
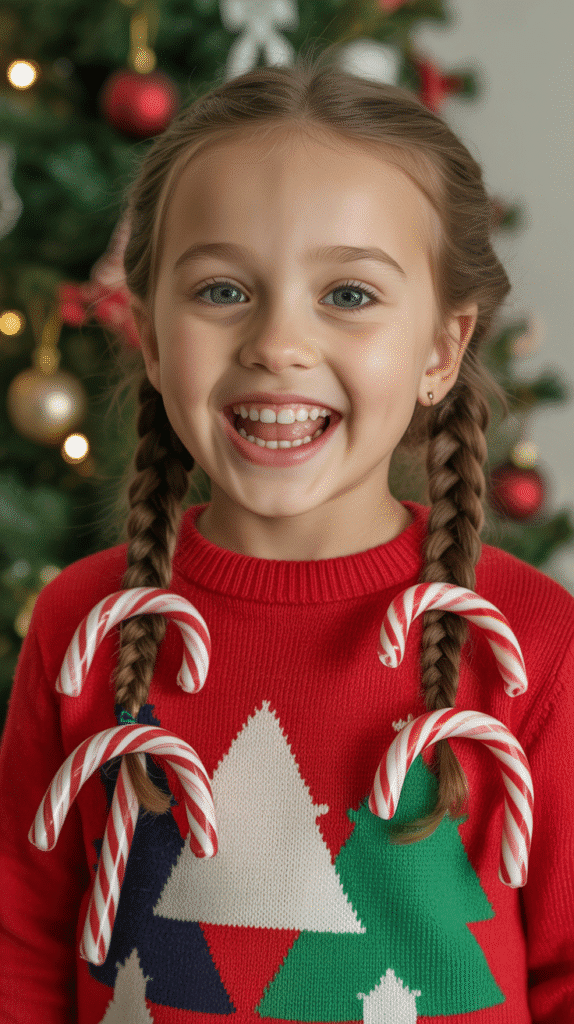
Candy cane braids bring the iconic Christmas treat to life through creative hair styling that combines red and white ribbons woven into traditional braids.
This playful style captures childhood Christmas magic while keeping hair neatly secured throughout active holiday celebrations and activities.
Creating the Look:
- Part the hair down the middle from forehead to nape, creating two equal sections.
- Secure one side temporarily while working on the other to maintain the clean center part.
- Begin a standard three-strand braid on one section, starting from the hairline.
- Weave thin red and white ribbons alternately into the braid as you progress downward.
- Secure the braid end with a clear elastic, then tie the ribbons in a small bow.
- Repeat the identical process on the opposite side for symmetrical pigtails.
- Ensure both braids are the same tightness and length for a balanced appearance.
Styling Tips:
- Use satin or grosgrain ribbons that won’t slip out of the braids easily.
- Spray ribbons lightly with hairspray before weaving to reduce slipping.
- Create tighter braids for active children who will be playing or running.
- Position braids slightly forward over the shoulders for maximum visibility of the candy cane effect.
Perfect Occasions:
- Christmas classroom parties and school events.
- Casual family gatherings and cookie decorating sessions.
- Holiday photos with Santa or Christmas card pictures.
3. Sparkly Christmas Tree Bun
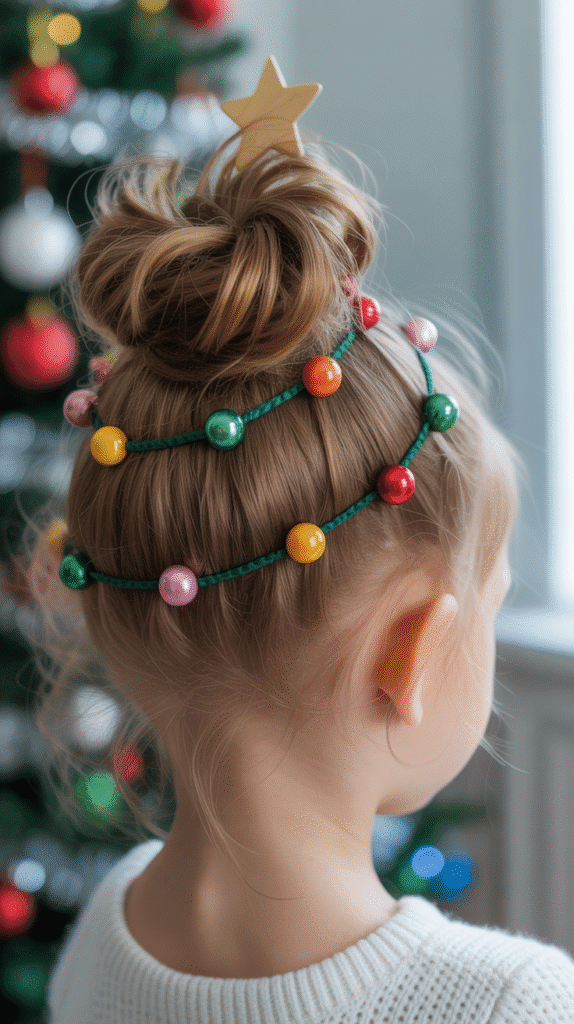
Transform a simple top bun into a miniature Christmas tree complete with decorative “ornaments” and sparkle for a show-stopping holiday hairstyle.
This creative style works wonderfully for special occasions and demonstrates how ordinary updos can become festive masterpieces with strategic accessory placement.
Construction Method:
- Brush hair into a high ponytail positioned at the crown of the head.
- Twist the ponytail tightly while wrapping it around the base in a circular motion.
- Secure the bun with bobby pins, ensuring it sits firmly without wobbling.
- Shape the bun into a cone or triangular form resembling a Christmas tree silhouette.
- Insert small colorful bobby pins, beads, or tiny ornament clips throughout the bun as “decorations.”
- Add a star-shaped hair clip or gold bobby pin at the very top point.
- Mist with glitter hairspray for a magical sparkling finish.
Decoration Ideas:
- Use green hair chalk or temporary color spray to tint the bun tree-green.
- Attach miniature jingle bells on bobby pins throughout the bun.
- Incorporate small red berry picks typically used in floral arrangements.
- Add a thin gold or silver garland wrapped delicately around the bun.
Skill Level:
- Intermediate – requires basic bun-making ability and creative decoration placement.
4. Festive Ribbon Headband Curls
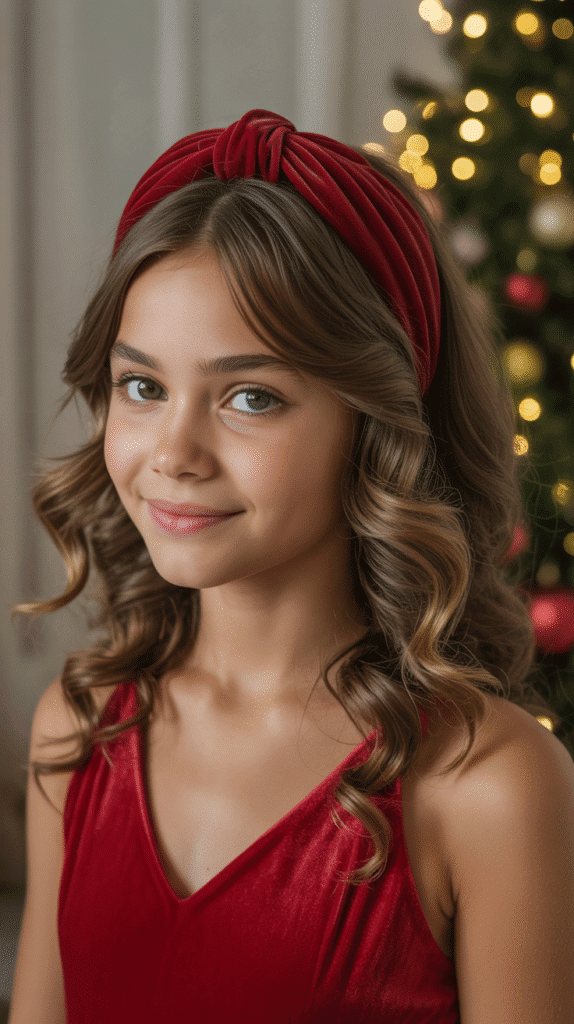
Loose romantic curls paired with a velvet ribbon headband create an effortlessly elegant Christmas look that works beautifully for formal holiday events.
This style requires minimal technique while delivering maximum impact, making it ideal for parents who want sophisticated results without complex braiding or updos.
Creating the Style:
- Curl hair in sections using a curling iron or hot rollers, working from bottom layers to top.
- Allow curls to cool completely before touching them to ensure they hold their shape.
- Gently separate curls with fingers rather than brushing to maintain volume and texture.
- Place a velvet or satin ribbon headband approximately one inch back from the hairline.
- Arrange front sections of curls to frame the face softly on both sides.
- Secure the headband with bobby pins at both temples if needed for active children.
- Finish with light-hold hairspray to maintain the curls throughout the day.
Headband Selection:
- Wide velvet headbands in burgundy, forest green, or navy blue for classic elegance.
- Embellished headbands featuring pearls, rhinestones, or small bows for formal events.
- Twisted metallic gold or silver headbands for a modern festive touch.
Hair Type Suitability:
- Works best on medium to long hair that holds curls well.
- Naturally curly hair can skip the curling step and simply add the headband.
- Fine hair benefits from texturizing spray before curling for better hold.
5. Double Dutch Braids with Ornaments
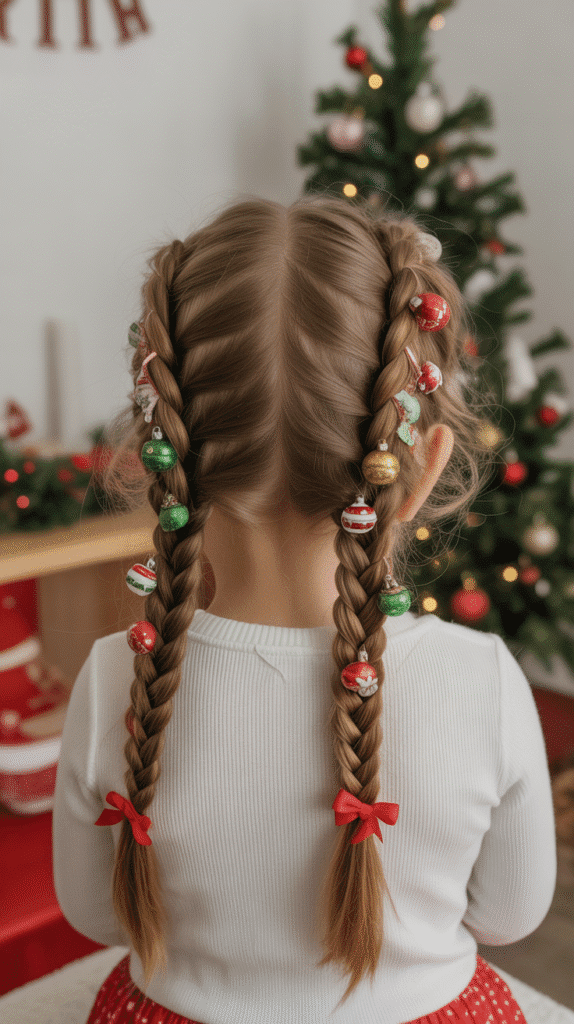
Dutch braids create stunning texture and dimension while providing a secure foundation for attaching festive Christmas ornaments throughout the braided pattern.
This style combines athletic practicality with holiday creativity, keeping hair completely off the face while making a memorable festive statement.
Braiding Technique:
- Create a clean center part from forehead to the nape of the neck.
- Begin a Dutch braid (reverse French braid) on one side by crossing sections under rather than over.
- Keep the braid tight and close to the scalp for a raised, prominent appearance.
- Continue braiding all the way to the hair ends and secure with a clear elastic.
- Repeat the identical Dutch braid on the opposite side, matching the tightness and position.
- Attach small ornament clips, jingle bells, or decorative bobby pins along both braids.
- Space decorations evenly or cluster them randomly for different effects.
Ornament Attachment Tips:
- Use lightweight plastic or foam ornaments designed specifically for hair to prevent pulling.
- Secure decorations by sliding clips between braid sections rather than clipping onto hair strands.
- Test attachment security before events to ensure ornaments won’t fall out during activity.
- Limit decorations to 3-5 per braid to avoid overwhelming the style or causing discomfort.
Duration:
- Braiding time: 10-15 minutes depending on hair length and thickness.
- The style can last 1-2 days if slept in carefully with a satin bonnet.
6. Simple Side Braid with Holly Clips
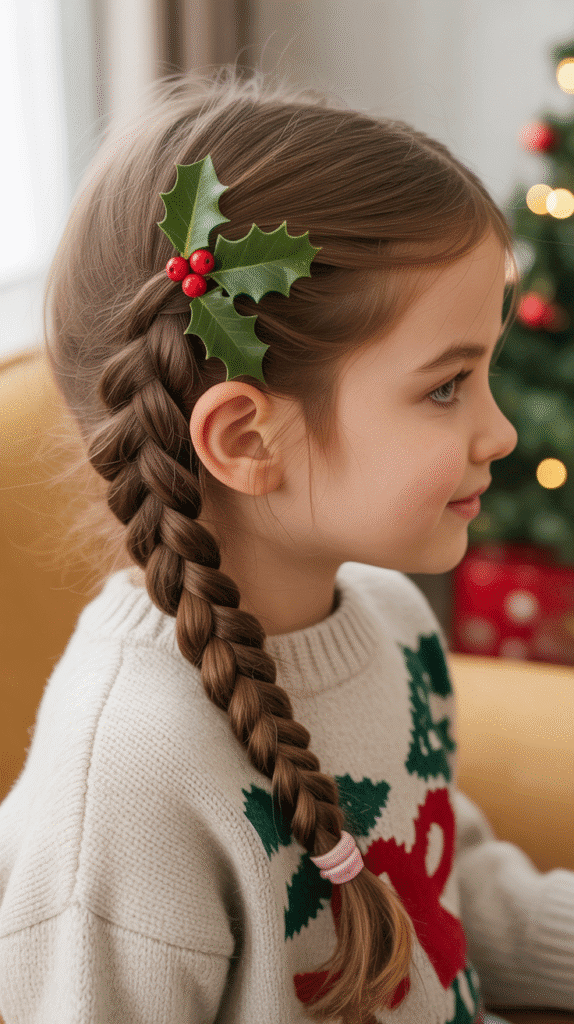
A single side braid adorned with holly berry clips offers understated Christmas elegance perfect for children who prefer simpler, more comfortable styles.
This asymmetrical look provides visual interest without requiring complex techniques or extensive styling time.
Creating the Side Braid:
- Brush all hair over to one shoulder, choosing the side based on the child’s preference.
- Begin a standard three-strand braid starting just below the ear on the chosen side.
- Maintain medium tension throughout the braid—not too tight, not too loose.
- Braid all the way to the ends and secure with a small elastic band.
- Gently pancake the braid by pulling the outer edges of each section for fuller appearance.
- Attach holly berry clips at strategic points along the braid length.
- Add one special clip at the top where the braid begins for extra festive detail.
Holly Clip Placement:
- Position clips on the outer edge of the braid for maximum visibility.
- Space clips 2-3 inches apart for balanced decoration coverage.
- Mix sizes of holly clips for visual variety and interest.
Comfort Considerations:
- This style works well for children who find tight braiding uncomfortable.
- The side positioning prevents the braid from pressing against the back during rest or sleep.
- Easy to remove quickly if the child becomes uncomfortable during long events.
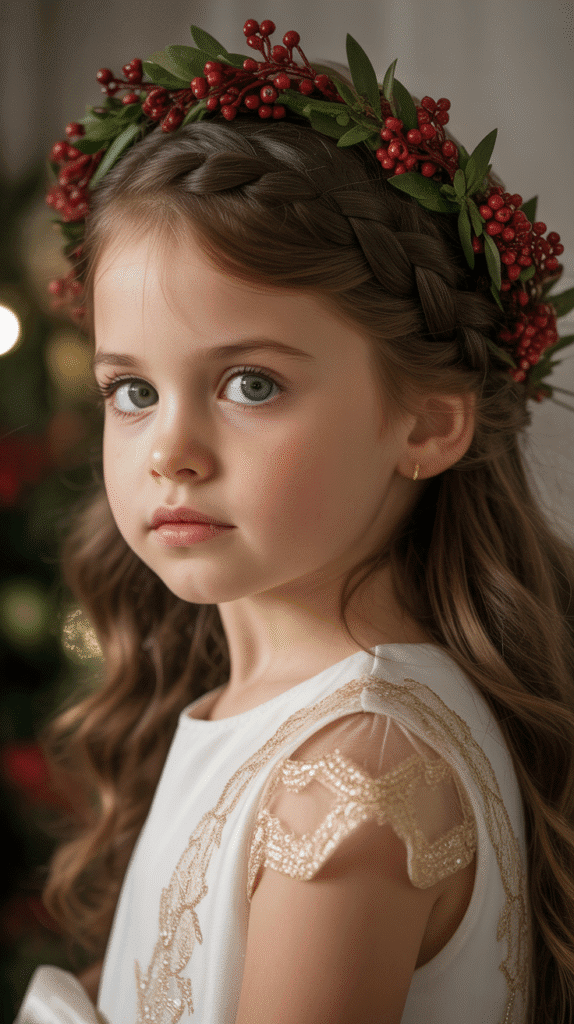
7. Twisted Crown with Greenery
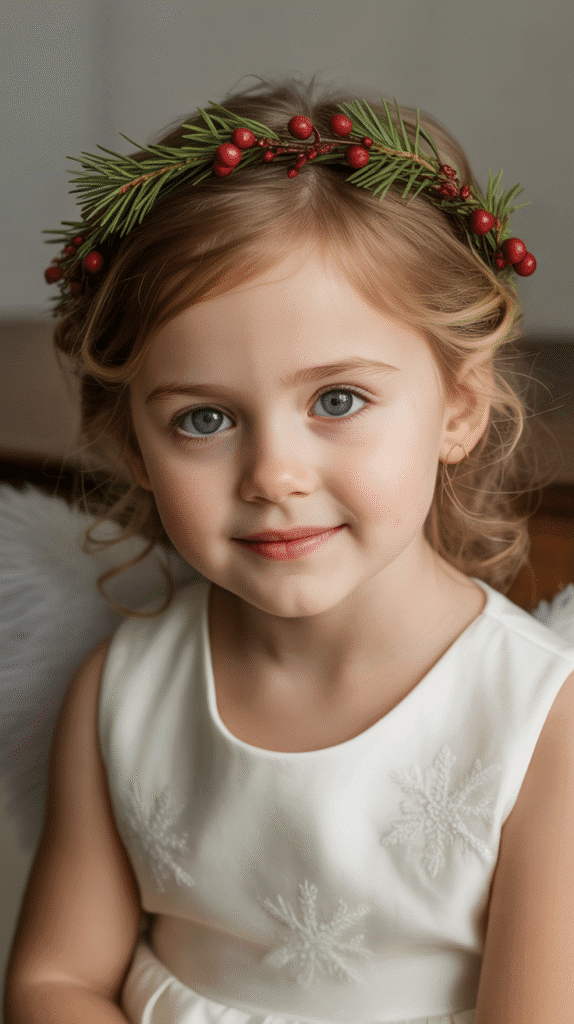
A twisted crown hairstyle encircling the head creates a princess-worthy look when embellished with artificial pine sprigs and red berries.
This romantic style works beautifully for Christmas pageants, church services, or formal family portraits requiring an elevated festive appearance.
Crown Construction:
- Create a deep side part on the preferred side of the head.
- Take a two-inch section of hair from the front on the heavier side of the part.
- Divide this section into two strands and twist them around each other tightly.
- Continue twisting while gradually adding small amounts of hair from along the hairline.
- Work the twist around the head like a crown, following the natural hairline curve.
- Secure the twist with bobby pins every few inches to keep it firmly in place.
- Tuck the end of the twist behind the opposite ear and pin securely.
- Weave small artificial pine picks and berry clusters into the twisted crown.
Greenery Selection:
- Choose flexible artificial greenery that won’t break when woven through hair.
- Avoid real evergreen branches that may cause scalp irritation or shed needles.
- Select greenery pieces 2-3 inches long for appropriate scale with children’s hair.
Styling Duration:
- Initial twist creation: 8-12 minutes.
- Greenery addition: 3-5 additional minutes.
8. High Ponytail with Striped Ribbon Wrap
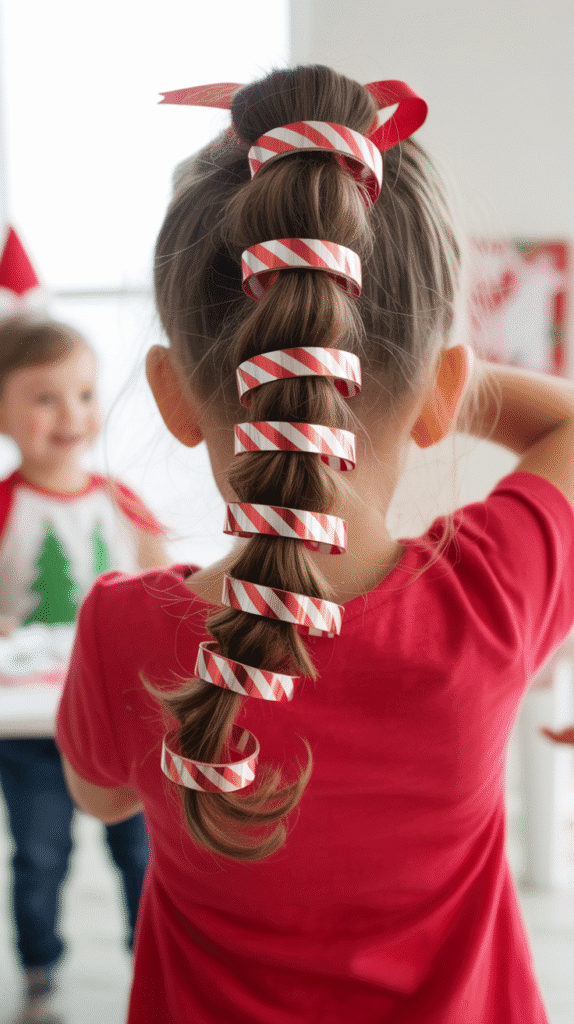
Transform an everyday ponytail into a festive statement by wrapping the length with alternating red and white striped ribbon.
This quick style adds instant Christmas cheer while requiring virtually no advanced hair styling skills.
Wrapping Technique:
- Create a high, smooth ponytail secured tightly with an elastic band.
- Begin wrapping ribbon at the base of the ponytail, covering the elastic completely.
- Wind the ribbon down the ponytail length in a spiral pattern with slight overlap.
- Keep consistent tension on the ribbon to prevent loosening throughout the day.
- Secure the ribbon end at the bottom with a small clear elastic or by tying it off.
- Trim any excess ribbon length leaving about two inches for movement.
- Optional: curl the ponytail hair that extends beyond the ribbon wrapping.
Ribbon Options:
- Classic candy cane striped ribbon for traditional Christmas appeal.
- Wired ribbon that holds its shape and creates more dramatic wrapping.
- Multiple thin ribbons in different colors wrapped together for varied effect.
Quick Modification:
- Add a large bow at the ponytail base before wrapping for extra festivity.
- Use glitter ribbon for parties requiring more sparkle and shine.
9. Braided Heart Shape Bun
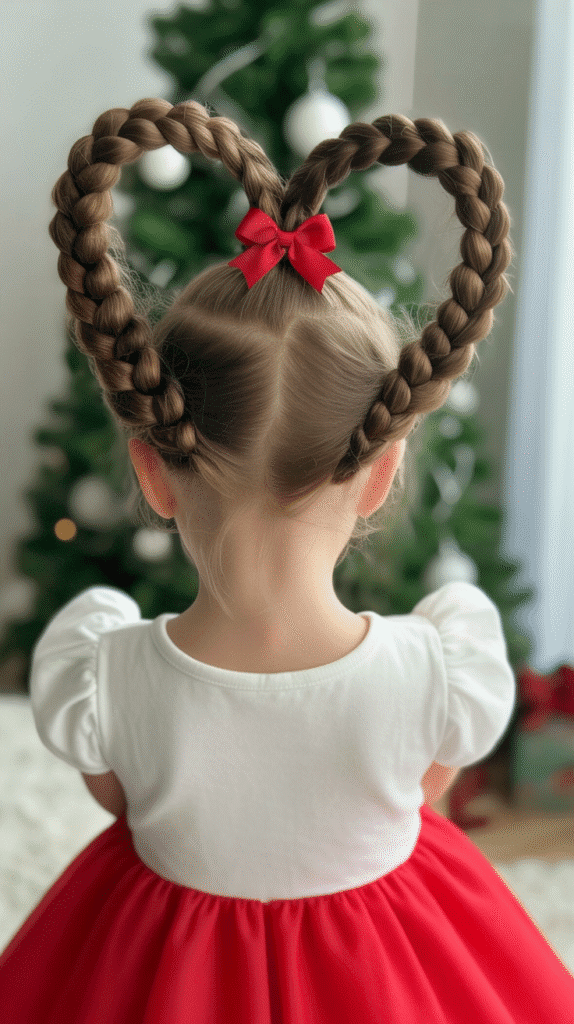
Create an adorable heart-shaped bun perfect for showing Christmas love and spreading holiday joy.
This intermediate style requires patience but delivers an eye-catching result that photographs beautifully for Christmas cards and social media.
Heart Formation Steps:
- Part hair down the center creating two equal sections from forehead to nape.
- Create a low ponytail on each side positioned behind and slightly below the ears.
- Braid each ponytail completely from base to ends using simple three-strand braids.
- Take the right braid and curve it upward and over, forming the right half of a heart shape.
- Pin the braid securely at the top center point where the heart curves meet.
- Take the left braid and mirror the same curved shape forming the left heart half.
- Pin both braids where they meet at the top center of the heart.
- Cross the ends at the bottom point of the heart and tuck them underneath, pinning securely.
- Adjust the heart shape by repositioning pins until the curves are symmetrical and prominent.
Enhancement Ideas:
- Weave thin red ribbon through both braids before shaping the heart.
- Attach a decorative bow or heart-shaped clip at the top center point.
- Use decorative bobby pins with pearl or rhinestone ends throughout the heart outline.
Best Occasions:
- Christmas family photos and portrait sessions.
- Valentine’s Day (works beyond Christmas season).
- Special church services or holiday concerts.
10. Messy Top Knot with Gold Tinsel
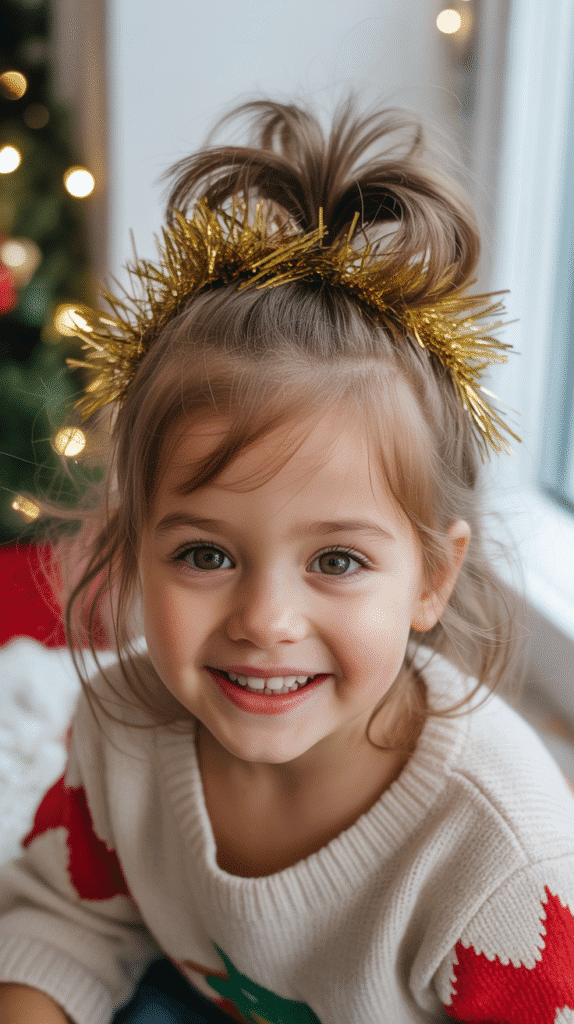
A deliberately tousled top knot wrapped with gold tinsel creates an effortlessly chic holiday look ideal for modern Christmas celebrations.
This style embraces imperfection while still delivering festive sparkle and style.
Messy Knot Creation:
- Flip the head upside down and gather all hair at the crown without brushing.
- Twist the hair loosely while forming a bun shape, allowing pieces to escape naturally.
- Secure the bun with an elastic band, leaving the ends sticking out rather than tucking them in.
- Gently pull sections of the bun to create intentional messiness and volume.
- Leave face-framing pieces loose at the front for a soft, casual appearance.
- Wrap gold tinsel garland around the base of the bun 2-3 times.
- Secure tinsel ends with bobby pins hidden within the bun structure.
Tinsel Selection:
- Choose thicker tinsel that won’t tangle excessively with hair strands.
- Gold and silver mixed tinsel creates a sophisticated bi-metallic effect.
- Avoid overly sharp metallic tinsel that might scratch the scalp.
Style Personality:
- Perfect for tweens and teens who want trendy rather than cutesy looks.
- Works beautifully with casual Christmas outfits like sweaters and jeans.
- Suitable for relaxed family gatherings and informal holiday parties.
11. Zigzag Part with Snowflake Clips
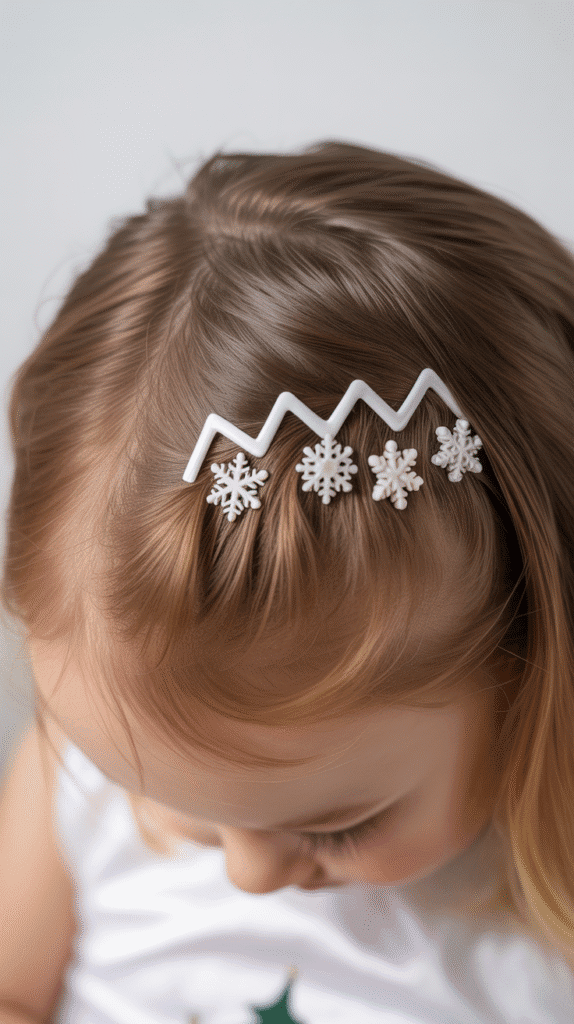
A creative zigzag part decorated with snowflake clips transforms the most basic down hairstyle into something special for Christmas.
This style works particularly well for children with shorter hair or those who prefer wearing their hair loose.
Creating the Zigzag Part:
- Use the pointed end of a rat-tail comb to create the part rather than fingers.
- Start at the front hairline center point and draw the comb back in a zigzag motion.
- Make each zigzag angle approximately one inch wide for visible but not extreme pattern.
- Continue the zigzag pattern all the way to the crown or nape depending on preference.
- Comb each section of hair smoothly to either side of the zigzag part.
- Attach snowflake clips directly along the zigzag part line.
- Space clips evenly, placing one at each peak and valley of the zigzag pattern.
Snowflake Clip Varieties:
- Silver or white snowflake clips for traditional winter wonderland appearance.
- Blue and white snowflakes for Frozen-themed Christmas styling.
- Clear crystal snowflakes that catch and reflect Christmas lights beautifully.
Finishing Touches:
- Apply anti-frizz serum or light oil to keep hair smooth and shiny.
- Curl the ends slightly for added polish and movement.
- Use shine spray to make the overall style look healthy and festive.
Time Required:
- Zigzag part creation: 2-3 minutes with practice.
- Clip placement: 1-2 minutes.
- Total styling time: under 5 minutes.
12. French Braid Mohawk Style
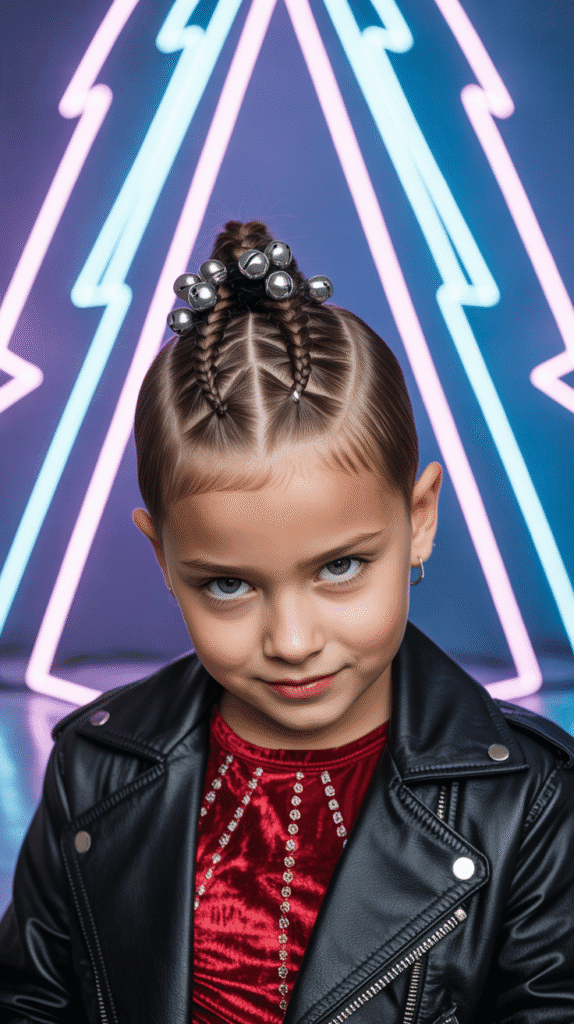
A row of French braids down the center of the head creates an edgy mohawk-inspired look perfect for adventurous kids who want to stand out this Christmas.
This style keeps hair secure while making a bold festive fashion statement.
Mohawk Braiding Method:
- Section off a wide strip of hair down the center from forehead to nape (3-4 inches wide).
- Clip or tie the side sections away temporarily to keep them out of the braiding area.
- Begin a tight French braid at the front hairline within the center section.
- Add hair from both sides of the center section as you braid backward.
- Keep the braid very tight and raised for prominent mohawk appearance.
- Continue French braiding all the way to the nape where center section hair ends.
- Finish with a regular braid if there’s remaining length and secure with elastic.
- Release side sections and style them sleek against the head with gel or spray.
Festive Additions:
- Weave red and green ribbon through the center braid for Christmas colors.
- Attach small jingle bells along the braid at regular intervals.
- Use glitter root spray on the side sections for extra sparkle.
Ideal For:
- Active children participating in sports or energetic holiday activities.
- Kids with bold personalities who love standing out in photos.
- Boys with longer hair who want a cool Christmas style.
13. Low Pigtails with Peppermint Bows
Sweet low-set pigtails adorned with large peppermint-inspired bows create an adorable, young Christmas look reminiscent of classic holiday candy.
This gentle style works beautifully for toddlers and young children attending festive gatherings.
Pigtail Placement:
- Create a center part from the front hairline to the nape of the neck.
- Brush each section smooth, removing all tangles for neat pigtails.
- Position ponytails low, just behind and below the ears rather than at the sides.
- Secure each pigtail with a clear or matching elastic band wrapped several times.
- Ensure both pigtails are at exactly the same height for symmetrical appearance.
- Attach large peppermint-striped bows (red and white swirled pattern) above each elastic.
- Adjust pigtails so they rest comfortably without pulling on the scalp.
Bow Styling Options:
- Use actual peppermint candy-printed ribbon formed into bows.
- Choose oversized bows that make a statement while remaining proportional to the child’s head.
- Mix in white bows with red polka dots for candy cane variation.
Comfort Features:
- Low placement reduces tension and pulling discomfort.
- Loose enough for comfort while remaining secure throughout activities.
- Easy for children to sleep in if needed for overnight holiday events.
14. Waterfall Braid with Star Clips
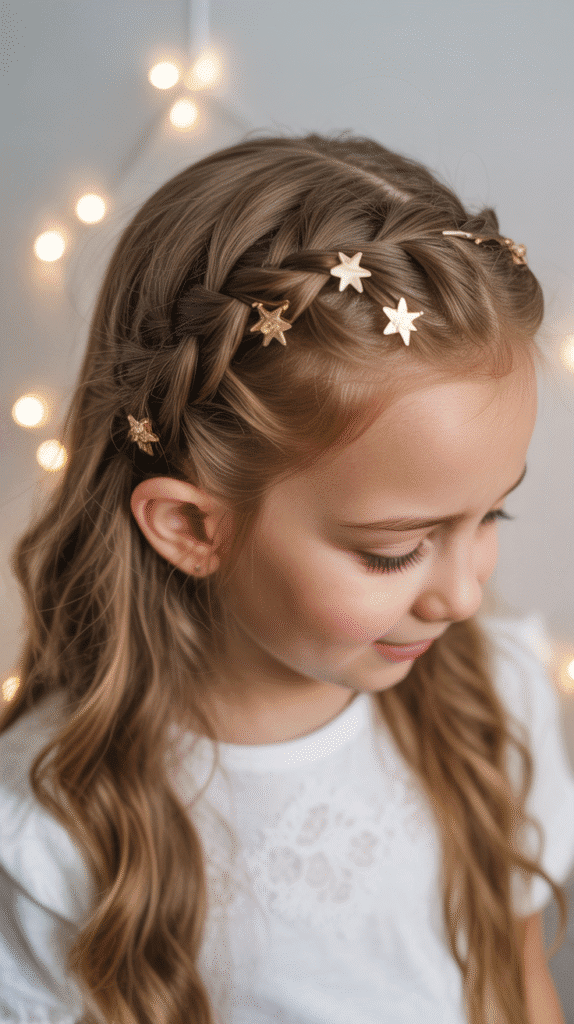
The ethereal waterfall braid creates flowing cascades of hair interwoven with braid sections, enhanced with sparkly star clips for magical Christmas appeal.
This romantic style requires intermediate braiding skills but creates stunning results for special holiday occasions.
Waterfall Braiding Technique:
- Start at one temple area with a three-inch section of hair divided into three strands.
- Begin a regular three-strand braid for the first cross-over motion.
- On the second cross, drop the bottom strand allowing it to fall like a waterfall.
- Pick up a new section from the top to replace the dropped strand and continue braiding.
- Repeat this drop-and-replace pattern while braiding horizontally toward the opposite ear.
- Keep the braid positioned at ear level for consistent beautiful cascading effect.
- Secure the braid end behind the opposite ear with bobby pins or a small elastic.
- Attach star-shaped clips at intervals along the braid between the cascading sections.
Star Clip Placement:
- Position stars where the dropped sections flow through for magical effect.
- Use various sizes of stars from small to medium for dimensional interest.
- Choose gold, silver, or iridescent stars that catch Christmas lights beautifully.
Styling Tips:
- Curl the cascading sections before or after braiding for enhanced romantic effect.
- This style works best on medium to long hair with some natural texture.
- Practice the waterfall technique before the actual event day to build confidence.
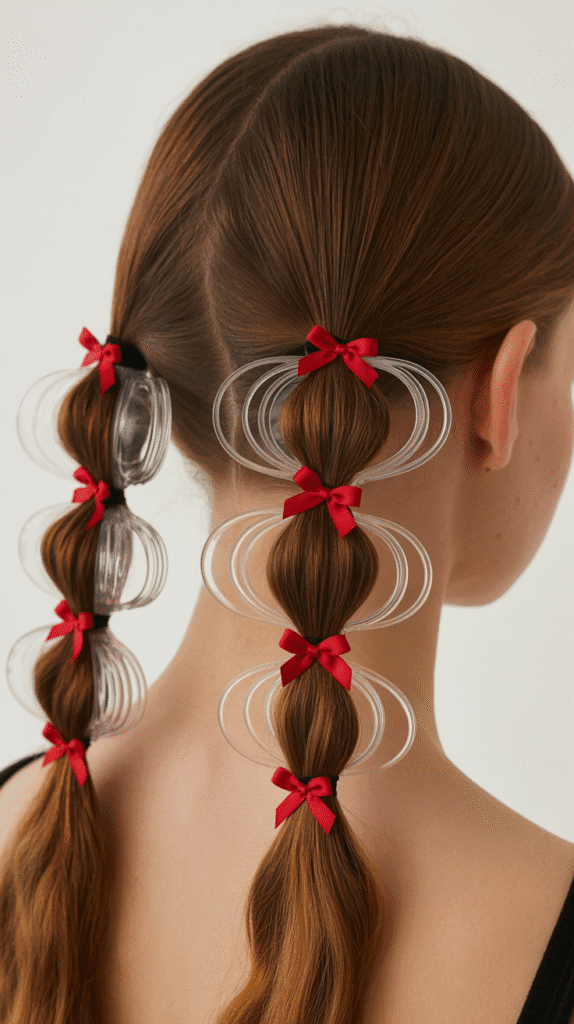
15. Bubble Ponytail with Bells
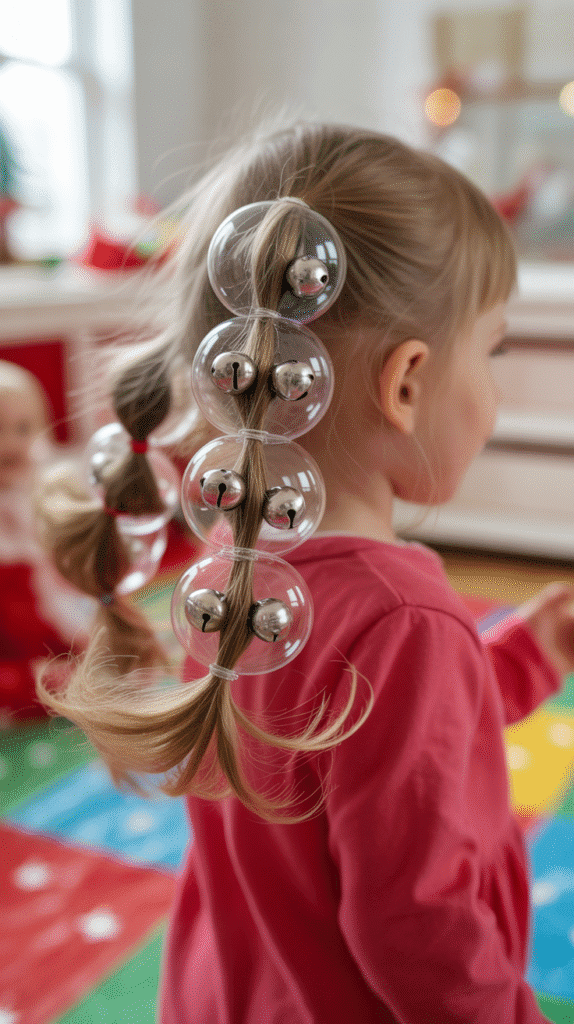
Transform an ordinary ponytail into a playful bubble design accented with tiny jingle bells that create delightful Christmas sounds with every movement.
This fun style captivates young children who love interactive elements in their hairstyles.
Bubble Creation Process:
- Start with a high or mid-height ponytail secured with a strong elastic band.
- Measure down approximately 2-3 inches from the base and add another clear elastic band.
- Gently pull the hair between the two elastics outward on all sides to create a bubble shape.
- Continue adding elastics every 2-3 inches down the ponytail length.
- Create 3-5 bubbles depending on the hair length available.
- Pancake each bubble section by pulling gently for fuller, more pronounced bubbles.
- Attach a small jingle bell on a bobby pin or clip between each bubble section.
Bell Attachment Methods:
- Thread small bells onto bobby pins before inserting them into the bubbles.
- Use Christmas bell picks designed for crafts that easily clip into hair.
- Secure bells with thread around each elastic band for permanent attachment during the event.
Sound Considerations:
- Choose bells with gentle pleasant sound rather than loud jarring jingles.
- Limit to 3-4 bells maximum to avoid overwhelming noise during quiet activities.
- Remove bells for church services or formal settings where noise is inappropriate.
16. Half-Up Christmas Tree Style
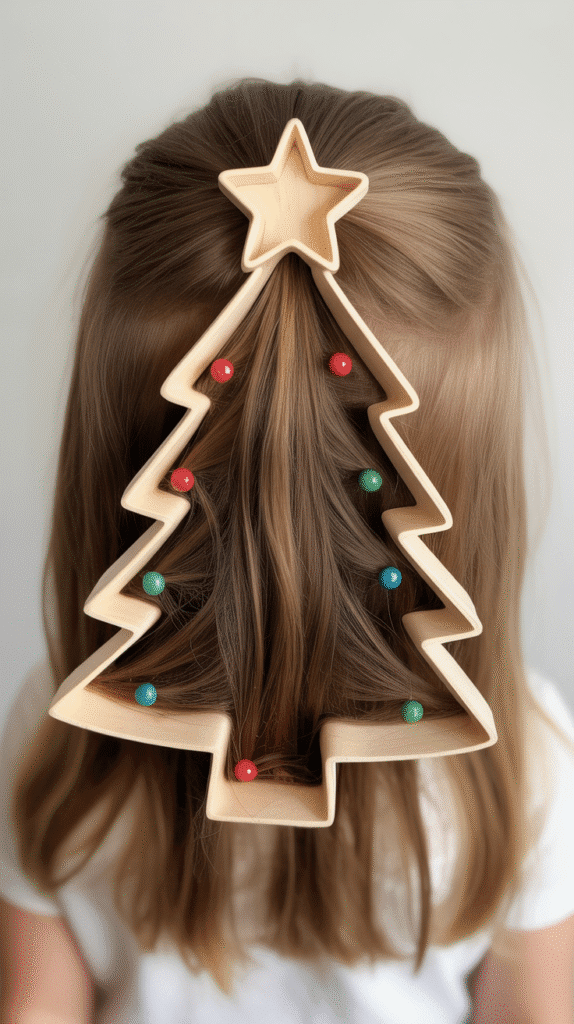
Create an actual Christmas tree shape in the hair using strategic sectioning and securing techniques that form a triangle silhouette.
This creative style showcases holiday spirit in an unexpected, Instagram-worthy way.
Tree Shape Formation:
- Brush the top half of hair smooth while leaving the bottom half down.
- Take a small triangular section at the crown and secure it with a clear elastic.
- Create a second larger triangular section below the first, including the first ponytail within it.
- Secure this second section with another elastic positioned below the first.
- Continue this pattern with 3-4 more increasingly larger sections moving downward.
- Each section should create a visible triangle or tree shape when viewed from behind.
- Arrange and spread each section slightly to emphasize the layered tree appearance.
- Decorate with colored bobby pins as “ornaments” and a star clip at the top point.
Decoration Strategy:
- Use red, gold, silver, and green bobby pins scattered throughout the tree sections.
- Add a special star hair clip or pin at the very top point of the tree.
- Weave thin tinsel or ribbon through the elastics for garland effect.
- Apply temporary green hair chalk to the sectioned area for realistic tree color.
Complexity Level:
- Intermediate skill required for proper sectioning and symmetry.
- Allow 15-20 minutes for creation and decoration.
17. Braided Headband with Red Roses
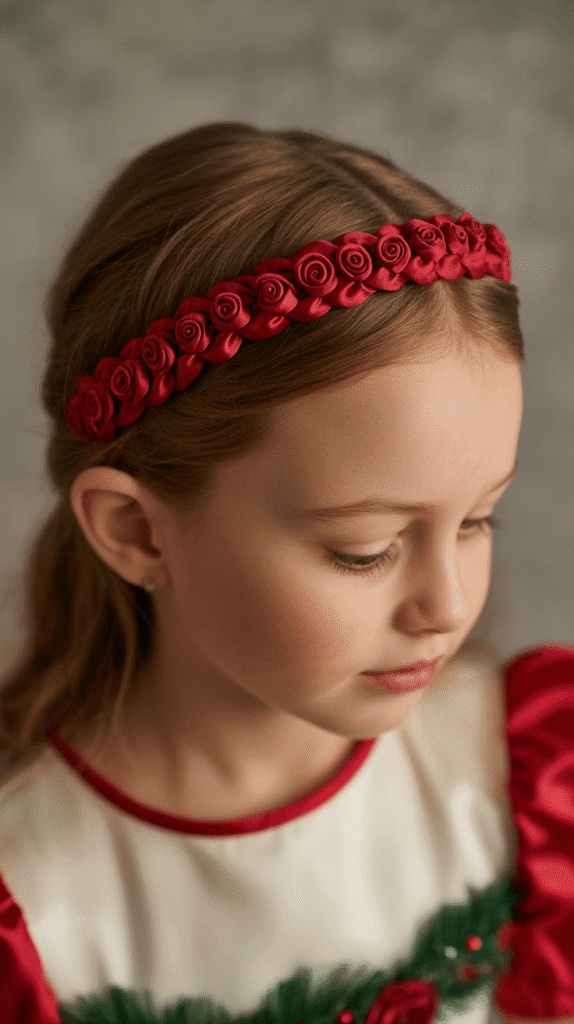
A braid fashioned into a headband across the front hairline and decorated with small red silk roses creates vintage Christmas elegance.
This classic style channels old-world holiday charm while remaining simple enough for modern busy parents.
Headband Braid Construction:
- Part hair from ear to ear across the top of the head, separating front from back sections.
- Clip the back section away temporarily to focus on the front headband area.
- Starting at one temple, create a standard three-strand braid using only the front section hair.
- Braid across the forehead area moving toward the opposite temple.
- Keep the braid relatively flat against the head rather than raised for headband appearance.
- Secure the braid end at the opposite temple with bobby pins hidden underneath.
- Tuck the braid end behind the ear or blend it into the remaining loose hair.
- Attach small red silk roses or rose clips along the braided headband.
Rose Selection and Placement:
- Choose roses approximately 1-1.5 inches in diameter for appropriate scale.
- Space roses evenly along the braid or cluster them on one side for asymmetrical look.
- Use roses with flexible stems or clips that easily attach to the braid structure.
Complementary Styling:
- Leave remaining hair down in loose waves or straightened sleek.
- This style works beautifully with velvet or satin Christmas dresses.
- Pair with minimal other accessories to let the roses be the focal statement.
18. Twisted Side Updo with Mistletoe
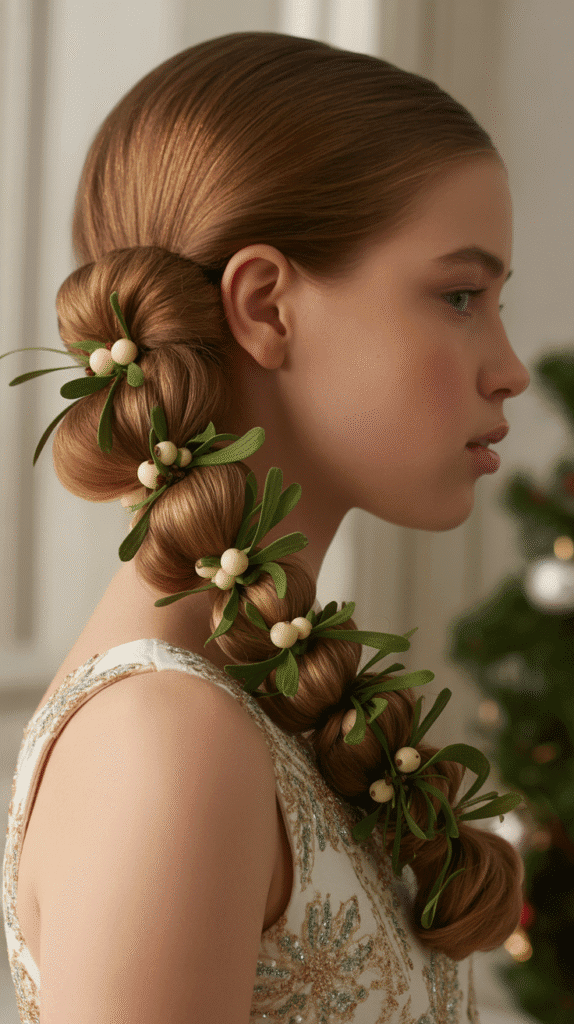
A swept side updo featuring twisted sections and mistletoe decoration creates romantic Christmas magic perfect for formal holiday events.
This elegant style keeps hair off the shoulders while showcasing festive greenery in an unexpected placement.
Twisted Updo Steps:
- Create a deep side part on the preferred side of the head.
- Gather all hair to the opposite side from the part, sweeping it behind one ear.
- Divide the gathered hair into 3-4 sections of equal size.
- Twist each section individually from roots to ends, keeping twists relatively tight.
- Pin each twist vertically against the head, creating a textured updo on one side.
- Layer the twists slightly overlapping for dimensional fullness.
- Secure every twist with multiple bobby pins to ensure stability throughout the event.
- Attach a small mistletoe pick or clip at the top or side of the twisted updo.
Mistletoe Options:
- Artificial mistletoe picks with white berries and green leaves.
- Mistletoe hair clips specifically designed for secure attachment.
- Combine mistletoe with small red ribbon bow for enhanced color contrast.
Event Suitability:
- Perfect for Christmas Eve dinners and formal family gatherings.
- Excellent for holiday concerts, pageants, or theatrical performances.
- Sophisticated enough for tween and teen Christmas parties.
19. Space Buns with Glitter
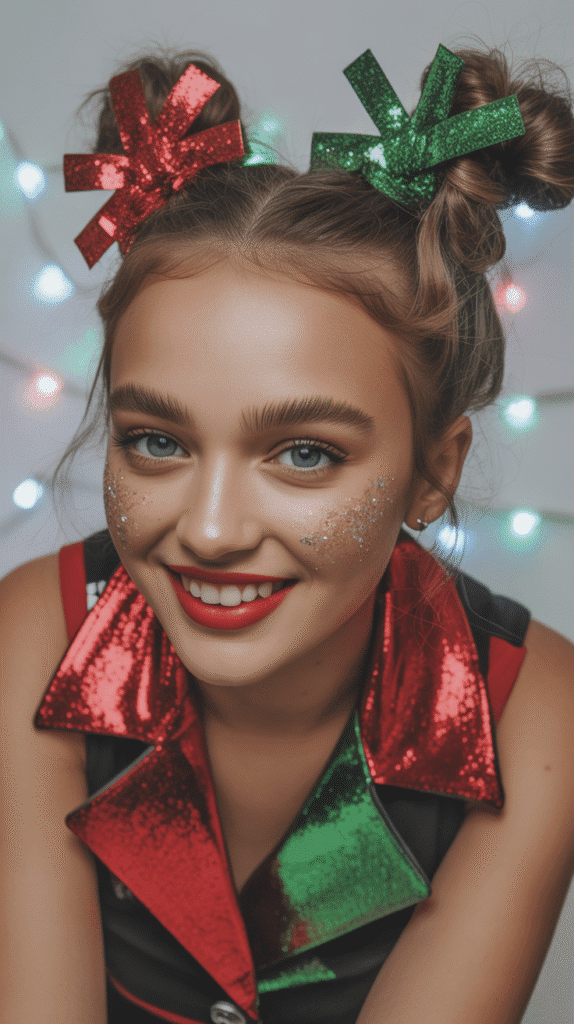
Double buns positioned high on the head and coated with festive glitter create a fun, youthful Christmas look popular with contemporary kids.
This trendy style combines comfort, security, and sparkle in one easy-to-create package.
Space Bun Formation:
- Create a center part from forehead to nape dividing hair into two equal sections.
- Gather one section into a high ponytail positioned above and slightly behind the ear.
- Twist the ponytail hair while wrapping it around the base to form a bun shape.
- Secure with bobby pins inserted through the bun into the base ponytail.
- Repeat the identical process on the opposite side, matching height and size.
- Ensure both buns are symmetrical and equally tight for balanced appearance.
- Apply hair glitter spray or glitter gel liberally over both buns.
- Optional: leave face-framing pieces loose at the front for softer effect.
Glitter Application Tips:
- Apply glitter outdoors or over a protected surface to minimize mess.
- Use hair-specific glitter that won’t transfer excessively to clothing or furniture.
- Red, green, gold, or silver glitter works best for Christmas themes.
- Mix multiple glitter colors for multicolored sparkle effect.
Maintenance Notes:
- Glitter will shed throughout the day—warn children to avoid touching buns.
- Remove glitter thoroughly during hair washing to prevent buildup.
- Take photos early in the event before glitter falls significantly.
20. Fishtail Braid with Ribbon Weave
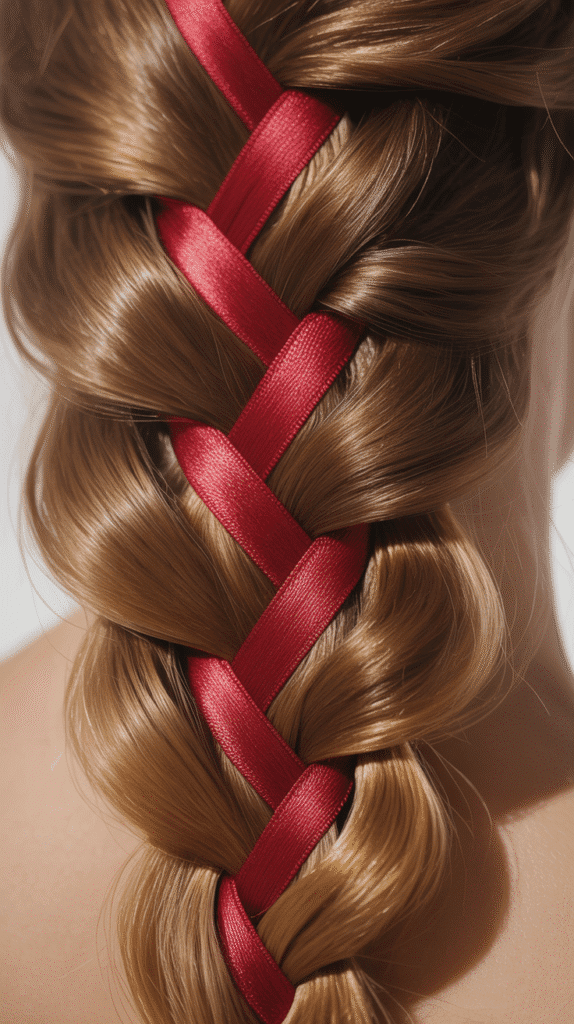
The intricate appearance of a fishtail braid enhanced with woven ribbon creates impressive Christmas styling that looks complex but becomes manageable with practice.
This textured braid showcases dimension and detail while incorporating festive color through strategic ribbon placement.
Fishtail Braiding Method:
- Brush hair thoroughly and gather it into a low ponytail to make fishtail braiding easier.
- Divide the ponytail into two equal sections rather than three.
- Take a thin strand from the outer edge of the right section and cross it over to join the left section.
- Take a thin strand from the outer edge of the left section and cross it over to join the right section.
- Continue this alternating pattern, taking small strands from outer edges and crossing over.
- Maintain even tension throughout to create consistent texture and pattern.
- Before securing the end, weave thin Christmas ribbon vertically through the braid loops.
- Thread ribbon alternating sides or create patterns like zigzag or straight vertical lines.
Ribbon Weaving Techniques:
- Use a bobby pin to help pull ribbon through tight braid sections.
- Choose ribbons 1/4 to 1/2 inch wide for appropriate scale with the braid.
- Weave multiple ribbons in different colors for varied visual interest.
- Secure ribbon ends by tying them to the braid elastic or using small clips.
Visual Impact:
- The fishtail creates beautiful herringbone texture that catches light beautifully.
- Ribbon weaving adds contrasting color that emphasizes the braid’s intricate pattern.
- Pancaking the braid after completion creates fuller, more dramatic appearance.
raid texture and ribbon detail, child with long hair, Christmas setting, intricate holiday styling, professional hair photography*
21. Crown Braid with Berry Clusters
A continuous braid encircling the entire head like a crown, decorated with clusters of red berry picks, creates a regal Christmas look fit for holiday royalty.
This all-around braid keeps hair completely secured while delivering maximum festive impact through strategic berry placement.
Crown Braid Construction:
- Part hair from ear to ear over the top of the head, creating front and back sections.
- Begin a Dutch or French braid starting behind one ear using the back section.
- Braid around the back of the head, gradually adding hair as you progress.
- Continue braiding around the entire head circumference, staying close to the hairline.
- When you reach the starting point, continue braiding any remaining length without adding new hair.
- Tuck the braid end underneath the crown braid and secure with hidden bobby pins.
- Arrange the crown braid to sit evenly around the head at consistent height.
- Insert red berry cluster picks at intervals around the crown, spacing them 2-3 inches apart.
Berry Cluster Styling:
- Choose artificial berry picks with flexible wire stems that easily insert into braids.
- Group berries in clusters of 3-5 for visual impact rather than single berries.
- Mix berry sizes for more natural, organic appearance.
- Add small green leaves with berries for traditional holly effect.
Durability:
- This style stays secure for extended periods, even overnight if needed.
- Perfect for all-day Christmas events requiring long-lasting hairstyles.
- The complete encircling structure distributes tension evenly, preventing discomfort.
22. Ponytail with Curled Ribbons
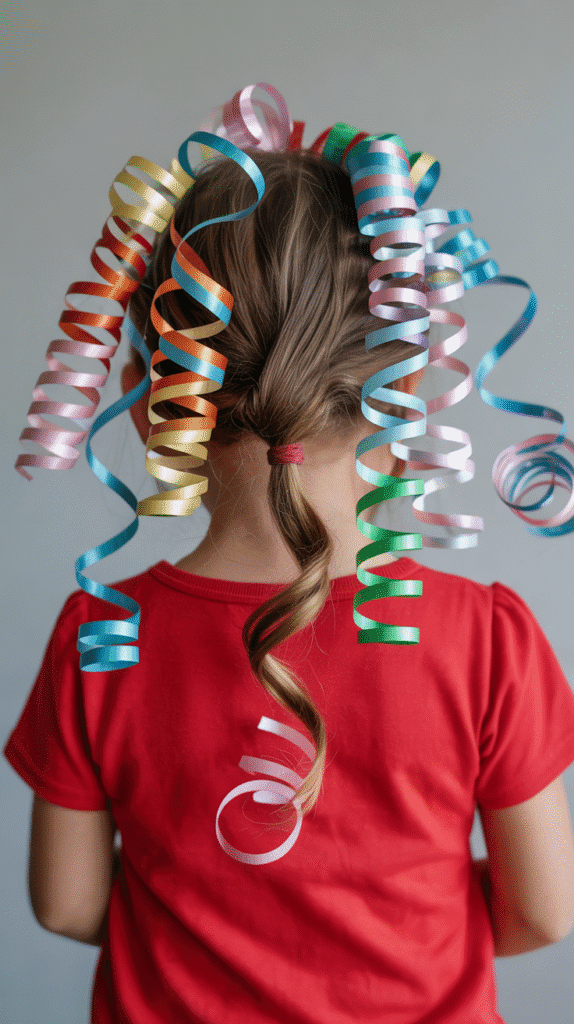
A simple ponytail elevated with multiple curled ribbons streaming from the base creates movement and festive flair with minimal effort.
This dynamic style uses ribbon curling techniques traditionally seen on wrapped presents, bringing gift-wrapping aesthetics directly into hair styling.
Creating the Curled Ribbon Effect:
- Create a ponytail at the desired height and secure tightly with elastic band.
- Cut 5-7 ribbons in various Christmas colors, each approximately 12-15 inches long.
- Tie each ribbon around the ponytail base, knotting it securely over the elastic.
- Leave both ribbon ends hanging down, creating double streamers from each knot.
- Use scissors to curl each ribbon end by running the blade firmly along the ribbon length.
- The ribbon will naturally curl into spirals, creating bouncy curled streamers.
- Arrange the curled ribbons to cascade around the ponytail for full coverage.
- Optional: curl the actual ponytail hair with a curling iron to match the ribbon texture.
Ribbon Selection:
- Use curling ribbon specifically designed for gift wrapping as it holds curls best.
- Mix metallic and matte ribbons for textural variety.
- Choose ribbons in red, green, gold, silver, and white for traditional Christmas palette.
Movement Factor:
- The curled ribbons bounce and move with every head motion, creating playful effect.
- This style photographs beautifully, especially in action shots.
- Perfect for children who love dynamic, eye-catching hairstyles.
23. Triple Twisted Ponytails
Three stacked ponytails, each twisted and pulled through the one above, create a sophisticated cascading effect perfect for medium to long hair.
This geometric style appears complex but uses simple twist-through techniques that anyone can master quickly.
Triple Twist Technique:
- Create the first ponytail high on the head at crown level and secure with elastic.
- Split this first ponytail in half vertically, creating a hole above the elastic.
- Create a second ponytail 2-3 inches below the first, incorporating all loose hair at that level.
- Pull the second ponytail up and thread it through the hole created in the first ponytail.
- Pull the second ponytail through completely, creating a twisted connection between them.
- Split the second ponytail in half and create a third ponytail 2-3 inches below it.
- Pull the third ponytail up through the hole in the second ponytail.
- Adjust each twisted section so they sit evenly and prominently, creating clear definition.
Enhancement Options:
- Attach a decorative bow or clip at each ponytail connection point.
- Weave thin ribbon through each twist for continuous color.
- Add small ornament clips along the twisted sections.
- Curl the ends of the final ponytail for polished finish.
Best Hair Types:
- Works excellently on straight to slightly wavy hair.
- Medium to thick hair creates more prominent twists.
- Hair should be at least shoulder-length for three distinct levels.
24. Half-Up Bow with Loose Curls
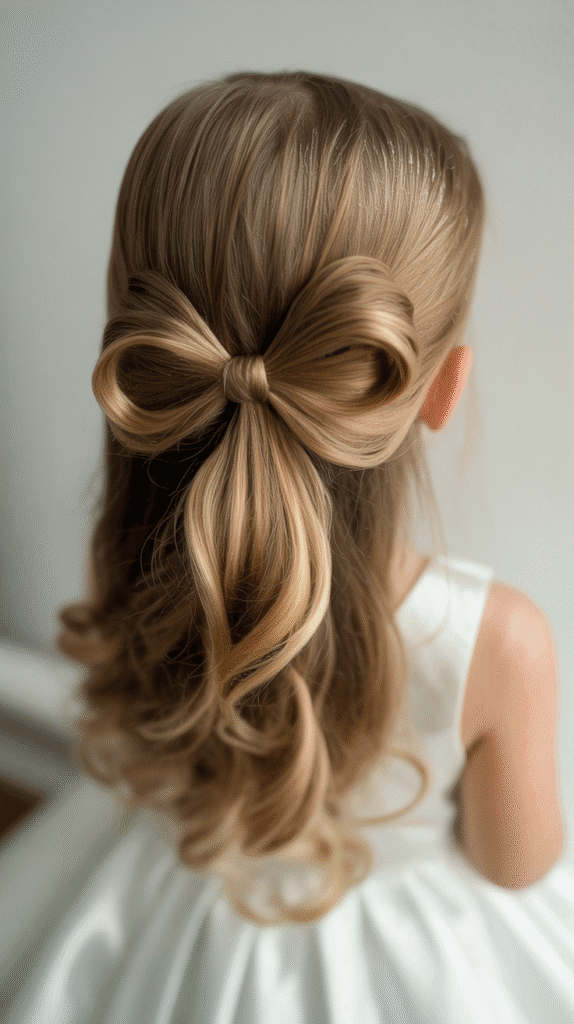
Creating an actual bow shape from the hair itself in a half-up style, combined with cascading loose curls, delivers impressive results that look professionally styled.
This showstopper hairstyle works beautifully for Christmas performances, pageants, or any event requiring extra special hair.
Hair Bow Formation:
- Section off the top half of hair from temples to crown in a half-up style.
- Gather this section into a ponytail at the desired position (usually crown or slightly below).
- On the final wrap of the elastic, don’t pull hair completely through—leave a loop.
- Divide this loop into two equal sections, forming the two sides of the bow.
- Spread each loop section outward and pin flat against the head, creating bow loops.
- Take the remaining tail end from the ponytail center and pull it up and over the elastic.
- Bring this tail section down between the two bow loops, creating the bow’s center knot.
- Secure the center tail with bobby pins underneath, hiding the ends.
- Curl all remaining loose hair below the bow for flowing romantic effect.
Bow Perfection Tips:
- Use hairspray or gel on the bow loops to keep them flat and defined.
- The loops should be symmetrical in size and shape for realistic bow appearance.
- Pin the loops securely as they tend to lose shape throughout the day.
Curl Styling:
- Use 1-1.5 inch curling iron barrel for age-appropriate curl size.
- Curl away from the face for flattering framing effect.
- Leave the bottom 1-2 inches uncurled for modern, natural-looking ends.
25. Simple Down Style with Christmas Barrettes
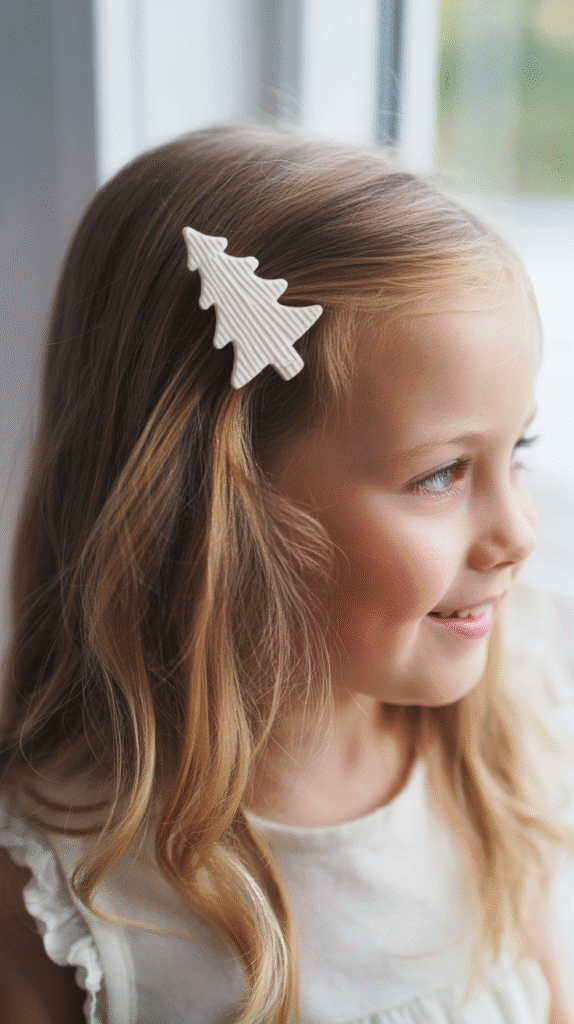
Sometimes the most elegant approach is letting beautiful hair flow naturally while adding festive Christmas barrettes for subtle holiday spirit.
This effortless style works perfectly for children with gorgeous hair texture that deserves to be showcased or for rushed mornings requiring instant festive transformation.
Barrette Placement Strategy:
- Brush hair thoroughly until completely smooth and tangle-free.
- Create a side part or center part based on the child’s natural hair growth pattern.
- Take a small section of hair from one side near the temple area.
- Pull this section back slightly from the face and secure with a decorative Christmas barrette.
- Repeat on the opposite side if desired for symmetrical styling.
- Position barrettes at temple height or slightly above ears for optimal visibility.
- Ensure barrettes grip securely to prevent sliding throughout the day.
- Leave all remaining hair flowing loose down the back and shoulders.
Barrette Selection:
- Choose oversized statement barrettes featuring Christmas trees, snowflakes, or Santa designs.
- Metallic barrettes in gold or silver provide subtle festive shimmer.
- Vintage-inspired barrettes with red stones or enamel work for classic looks.
- Mix and match different Christmas-themed barrettes on each side for playful asymmetry.
Additional Touches:
- Add slight wave or curl to the loose hair for enhanced texture.
- Apply shine serum or spray for healthy, glossy Christmas-ready hair.
- This style works as a foundation that can be upgraded with more accessories if desired.
Time Investment:
- Total styling time: 2-3 minutes maximum.
- Perfect solution for extremely busy Christmas mornings.
- Provides festive look without any complex techniques or skills required.
Essential Tools and Accessories for Christmas Hairstyling
Basic Supplies Needed:
- Clear elastic bands in various sizes for invisible hold.
- Bobby pins in colors matching your child’s hair for secure pinning.
- Rat-tail comb for precise parting and sectioning.
- Wide-tooth comb for gentle detangling without breakage.
- Hair brush with soft bristles for smooth styling.
- Light-hold hairspray for maintaining styles without stiffness.
- Small hair clips for sectioning during styling process.
Festive Decorative Elements:
- Christmas-themed bows in velvet, satin, and grosgrain ribbons.
- Curling ribbon in holiday colors for gift-wrap inspired effects.
- Hair-safe ornament clips designed specifically for attachment to hairstyles.
- Snowflake, star, and Christmas tree shaped hair clips and pins.
- Artificial berry picks and pine sprigs with flexible wire stems.
- Jingle bells on bobby pins or with built-in clips.
- Glitter hairspray in red, green, gold, and silver.
- Tinsel garland in metallic colors for wrapping and decorating.
- Silk or fabric flower roses for vintage Christmas styling.
Styling Tools:
- Curling iron with adjustable temperature settings for different hair types.
- Straightening iron for sleek smooth styles.
- Hair dryer with diffuser attachment for enhancing natural curl patterns.
- Hot rollers for creating vintage Hollywood curls.
Product Recommendations:
- Anti-frizz serum for smooth polished appearance in all styles.
- Texturizing spray for creating grip in fine slippery hair.
- Shine spray for healthy glossy finish.
- Temporary hair color chalk or spray in Christmas colors.
- Hair gel for slicking sides in mohawk and crown styles.
Tips for Making Christmas Hairstyles Last All Day
Preparation Strategies:
- Start with clean, completely dry hair for maximum hold and cooperation.
- Apply styling products appropriate for the child’s hair type before beginning.
- Ensure hair is thoroughly brushed and detangled to prevent bumps in finished styles.
- Avoid heavy conditioners on styling day as they can make hair too slippery.
Securing Techniques:
- Use multiple bobby pins rather than relying on a single pin for important sections.
- Cross bobby pins in an X pattern for maximum grip and stability.
- Wrap elastics multiple times to ensure ponytails and buns stay tight.
- Choose quality hair accessories that grip firmly without sliding.
Throughout the Day:
- Pack a small emergency kit with extra bobby pins, elastics, and the main decorative accessory.
- Bring travel-size hairspray for touch-ups during long events.
- Take photos early in the event before styles naturally loosen.
- Have the child avoid excessive touching or playing with decorated areas.
Weather Considerations:
- Apply anti-humidity products in damp or rainy conditions to prevent frizz.
- Use extra hairspray in windy conditions to maintain style integrity.
- Keep hair covered with a hood when traveling in snow or rain.
- Allow time for final touch-ups upon arrival at destination events.
Comfort Maintenance:
- Check periodically that pins and accessories aren’t causing discomfort or headaches.
- Loosen styles slightly if the child complains of pulling or tightness.
- Remove jingle bells during quiet activities if the sound becomes distracting.
- Have a backup simple style plan if the elaborate style becomes uncomfortable.
Age-Appropriate Christmas Hairstyle Guidelines
Toddlers (Ages 2-4):
- Prioritize comfort and simplicity over elaborate styling.
- Choose styles that don’t require sitting still for extended periods.
- Avoid heavy accessories that might bother sensitive scalps.
- Best options: Simple bows, low pigtails, basic barrettes, minimal accessories.
- Keep styling time under 5 minutes for cooperation.
Young Children (Ages 5-8):
- Can handle slightly more complex styles with breaks during styling.
- Enjoy playful elements like jingle bells and colorful decorations.
- Appreciate styles that match their favorite Christmas characters or themes.
- Best options: Candy cane braids, bubble ponytails, space buns, ribbon wraps.
- Maximum styling time: 10-15 minutes with patience.
Preteens (Ages 9-12):
- Capable of sitting still for more elaborate styling processes.
- Beginning to develop personal style preferences and opinions.
- May want trendy modern looks rather than overly childish styles.
- Best options: Waterfall braids, crown braids, fishtail braids, hair bows.
- Can handle 15-20 minute styling sessions.
Teens (Ages 13+):
- Prefer sophisticated elegant styles appropriate for their age.
- May want to participate in the styling process or style themselves.
- Appreciate subtle festive touches rather than obvious childish decorations.
- Best options: Messy buns with tinsel, twisted updos, simple elegant accessories.
- Willing to invest 20+ minutes for special occasion styling.
Adapting Styles for Different Hair Types and Textures
Straight Fine Hair:
- Requires texturizing products to create grip for braids and updos.
- Benefits from teasing at roots for volume in bun and ponytail styles.
- Use smaller accessories to maintain proportion with finer hair texture.
- May need more bobby pins and tighter elastics for security.
- Curled styles hold better with strong-hold hairspray application.
Thick Straight Hair:
- Naturally holds styles well due to hair density and weight.
- May require larger hair accessories to maintain proper scale.
- Benefits from sectioning during styling to manage volume.
- Can support heavier decorations like multiple ornaments without problem.
- Requires more time for curling due to hair quantity.
Wavy Hair:
- Works beautifully for romantic loose styles with minimal styling needed.
- Natural texture enhances braided styles with built-in dimension.
- May frizz in humidity requiring anti-frizz products.
- Enhances messy intentional styles naturally without extra effort.
- Can be straightened for sleek looks or enhanced for fuller curls.
Curly Hair:
- Requires moisture-rich products to prevent dryness and frizz during styling.
- Natural curls create beautiful volume in down styles and ponytails.
- Braiding may require stretching hair first for easier manipulation.
- Buns and updos look fuller naturally due to curl volume.
- Define curls with curl cream before adding accessories for polished appearance.
Coily/Kinky Hair:
- Benefits from protective styling techniques that minimize manipulation.
- May require pre-stretching through banding or braiding before complex styles.
- Works beautifully for styles like space buns, twisted updos, and decorated ponytails.
- Use accessories on bobby pins rather than clips that may not grip texture well.
- Moisture is essential—apply leave-in conditioner before styling.
Common Christmas Hairstyling Mistakes to Avoid
Over-Complicating Simple Styles:
- Resist the urge to add excessive decorations that overwhelm the hairstyle.
- More accessories don’t always equal better results—choose quality over quantity.
- Simple styles with one or two statement pieces often photograph better.
Ignoring Comfort:
- Styles that hurt or pull will ruin the child’s holiday experience.
- Check tension regularly during styling—tight doesn’t always mean secure.
- Remove styles immediately if the child complains of headache or discomfort.
Timing Issues:
- Starting complicated styles too close to departure time creates stress.
- Allow extra time for first attempts at new unfamiliar techniques.
- Practice complex styles days before the actual event.
Using Adult Products on Children:
- Children’s hair and scalps are more sensitive than adult hair.
- Avoid harsh chemicals, strong-hold products, and heat-styling without protection.
- Choose gentle formulas specifically designed for children when possible.
Forgetting Hair Type Limitations:
- Not all styles work equally well on all hair types and lengths.
- Forcing a style inappropriate for your child’s hair causes frustration.
- Adapt and modify styles to work with your child’s natural hair characteristics.
Neglecting the Child’s Opinion:
- Children have preferences and comfort levels that should be respected.
- Involve them in choosing styles they’ll feel confident wearing.
- A cooperative happy child makes styling infinitely easier.
Christmas Hairstyle Safety Considerations
Heat Styling Safety:
- Always use heat protectant spray before applying hot tools to children’s hair.
- Test iron temperature on your own wrist before using on child’s hair.
- Never leave hot tools unattended when children are present.
- Allow tools to cool completely before storage.
- Keep hot tools away from the child’s face, ears, and scalp.
Accessory Safety:
- Check all accessories for sharp edges, points, or rough areas before use.
- Ensure clips and pins are designed specifically for hair use, not craft supplies.
- Remove accessories before bed to prevent tangling or scalp irritation.
- Avoid accessories small enough to pose choking hazards for young children.
- Replace worn or broken accessories that might snag or pull hair.
Product Safety:
- Read labels and check for age-appropriate formulas.
- Test new products on a small area first to check for allergic reactions.
- Avoid getting products in eyes—keep spray bottles at arm’s length.
- Use products in well-ventilated areas, especially glitter sprays and hairsprays.
- Remove all products thoroughly during washing to prevent buildup.
Chemical Safety:
- Avoid permanent dyes and harsh chemicals on children’s hair.
- Use only temporary washable color products designed for children.
- Check that glitter products are cosmetic-grade and safe for hair use.
- Remove temporary colors promptly according to product directions.
Physical Comfort and Well-being:
- Never force a child to maintain an uncomfortable style for photos or events.
- Watch for signs of headache, scalp pain, or neck strain from heavy styles.
- Allow breaks during long styling sessions for movement and stretching.
- Keep styling sessions age-appropriate in length and complexity.
Conclusion
Creating beautiful festive looks for your children doesn’t require professional training, expensive salon visits, or hours of precious holiday time.
These 25 Easy Christmas Hairstyles for Kids You Can Do in Minutes prove that with basic supplies, simple techniques, and a dash of creativity, any parent can transform ordinary hair into holiday magic.
From the playful charm of candy cane braids to the sophisticated elegance of twisted crown styles, this collection offers versatile options for every occasion, hair type, and skill level throughout the Christmas season.
The key to successful holiday hairstyling lies in choosing appropriate styles that match your child’s comfort level, your available time, and the specific event requirements rather than attempting overly complex designs that create stress instead of joy.
Remember that the perfect Christmas hairstyle enhances your child’s natural beauty while allowing them to feel confident, comfortable, and ready to embrace all the wonder the season brings.
Whether you’re preparing for Christmas morning gift opening, festive parties, formal church services, or casual family gatherings, these practical yet beautiful hairstyles ensure your little ones look picture-perfect while you preserve your sanity during the busiest time of year.
The memories created during these special styling moments—the laughter, conversation, and bonding time—often become as treasured as the beautiful photographs that result.
Start practicing these techniques now so you’ll approach Christmas Day confident in your ability to create stunning festive looks that make your children shine as brightly as the lights on your Christmas tree.