
Have you ever wondered how a simple change in hairstyle could transform your entire appearance?
Whether you’re preparing for a wedding, heading to a formal event, or simply want to add a touch of magic to your everyday look, the right updo can make all the difference.
In this comprehensive guide, we’ll explore 27 Elegant Whimsical Updo Hairstyles to Elevate Your Look, each offering its own unique blend of sophistication and playful charm.
From romantic twisted buns adorned with delicate accessories to ethereal braided crowns that seem straight out of a fairytale, these hairstyles combine classic elegance with whimsical touches that capture attention without trying too hard.
You’ll discover step-by-step approaches, styling tips, and creative variations that work for different hair types, lengths, and occasions.
Each updo has been carefully selected to inspire your next hairstyle adventure, whether you’re a complete beginner or someone who loves experimenting with new looks.
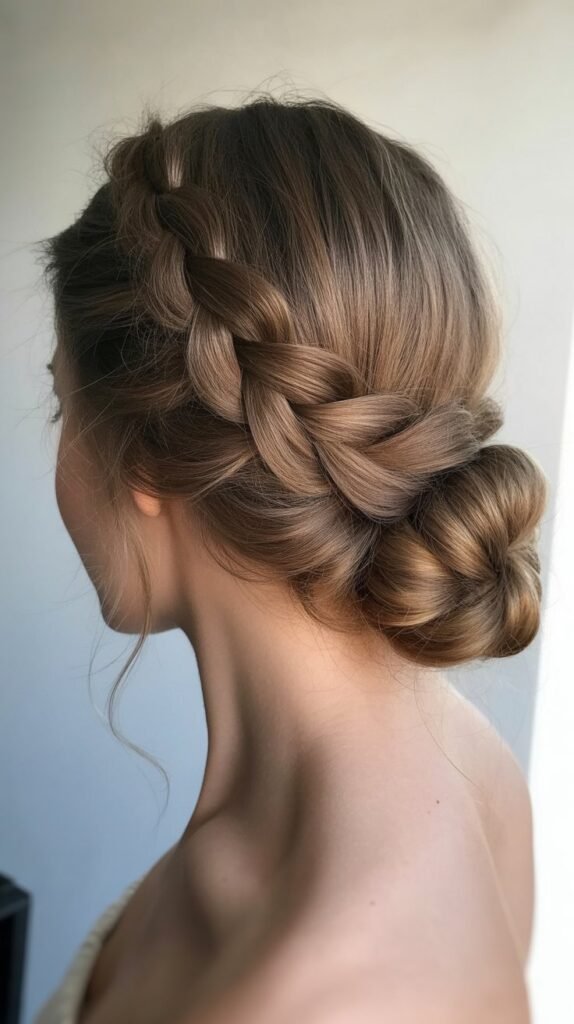
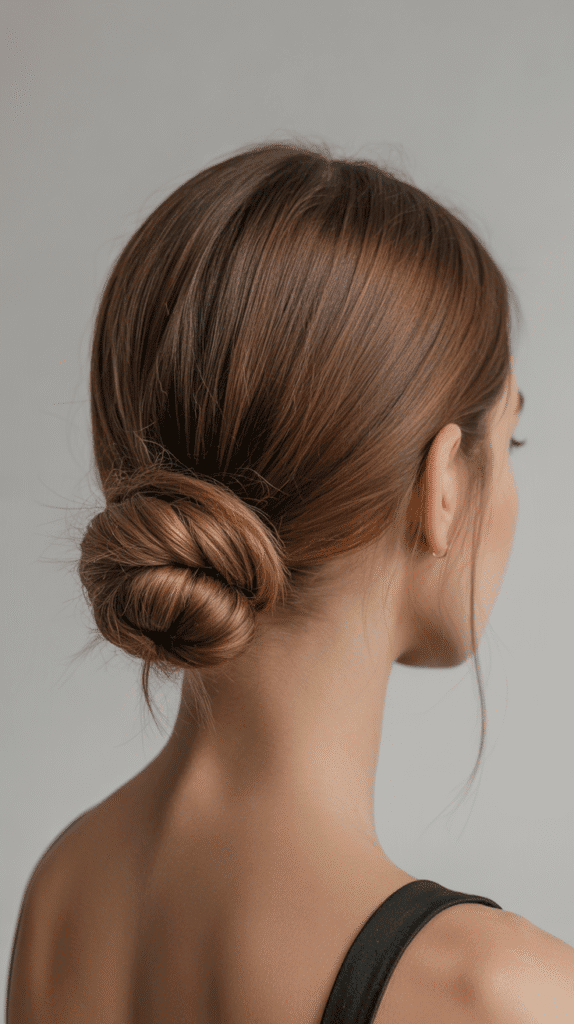
1. Romantic Twisted Low Bun
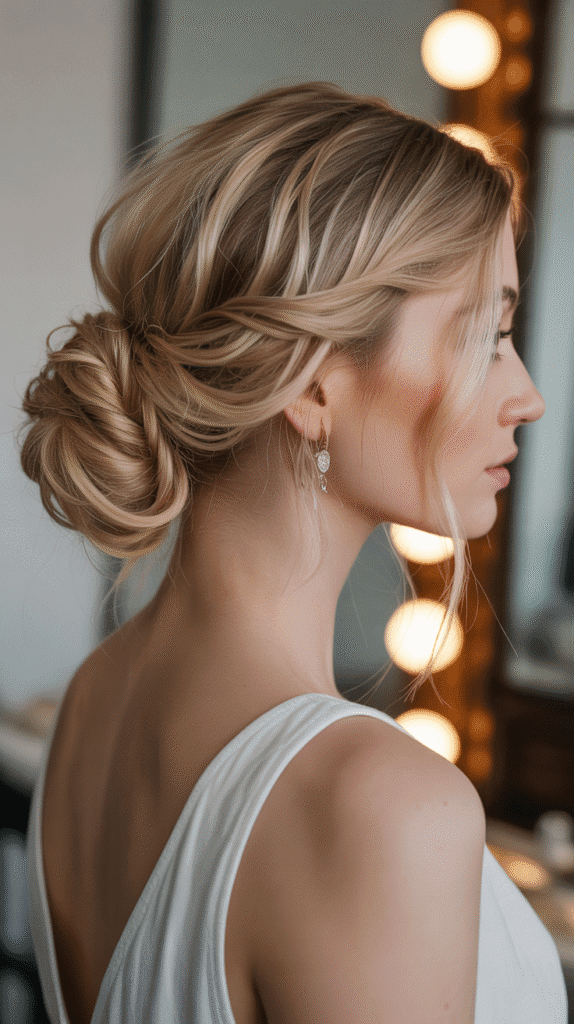
The romantic twisted low bun combines graceful simplicity with elegant sophistication, making it perfect for weddings, date nights, or any occasion where you want to feel effortlessly beautiful.
This hairstyle features soft twists that wrap around a low-sitting bun, creating texture and visual interest while maintaining a polished appearance.
Styling Approach:
- Begin by applying a volumizing mousse to damp hair and blow-dry with a round brush to create smooth, manageable texture
- Part your hair deeply to one side for an asymmetrical, romantic effect
- Take a two-inch section from the heavier side of your part and divide it into two equal strands
- Twist these strands around each other, working your way down toward your neckline while keeping the twist loose and soft
- Secure the twisted section temporarily with a clip while you gather the remaining hair into a low ponytail at the nape of your neck
- Create a classic bun by twisting the ponytail and wrapping it around its base, securing with bobby pins
- Release the twisted section and wrap it around the bun, tucking the ends underneath and pinning securely
- Pull out a few face-framing pieces to soften the look and enhance the romantic feel
- Finish with a light-hold hairspray to maintain the style without making it stiff
Ideal Occasions:
- Garden weddings as a bridesmaid or guest
- Romantic dinner dates
- Spring and summer outdoor events
- Graduation ceremonies
- Anniversary celebrations
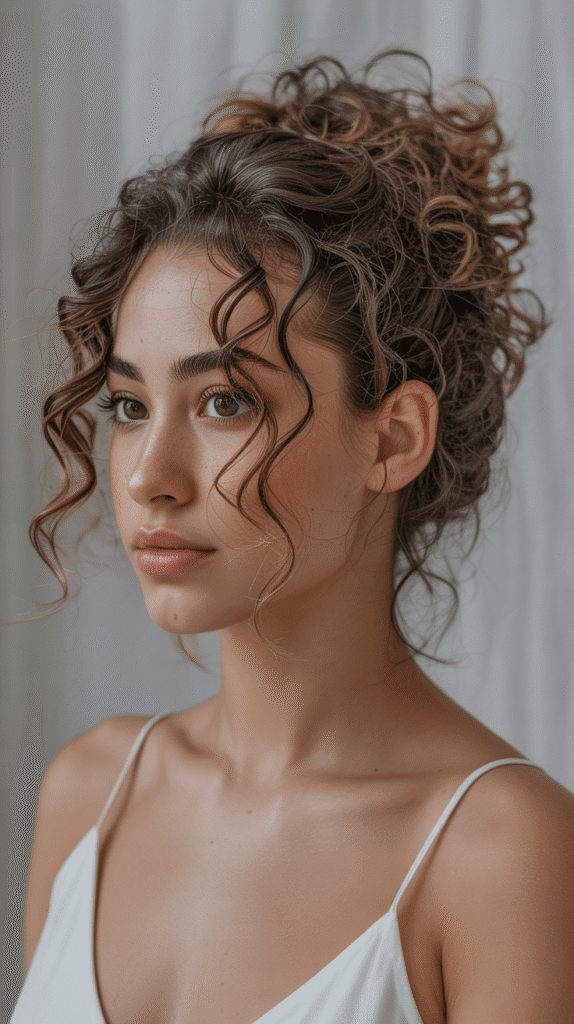
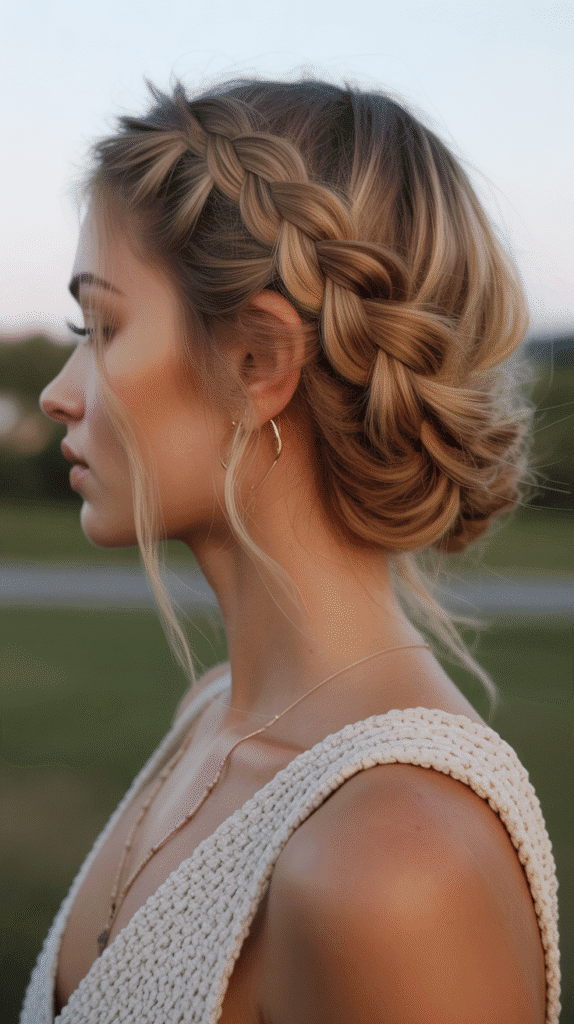
2. Braided Crown with Loose Curls
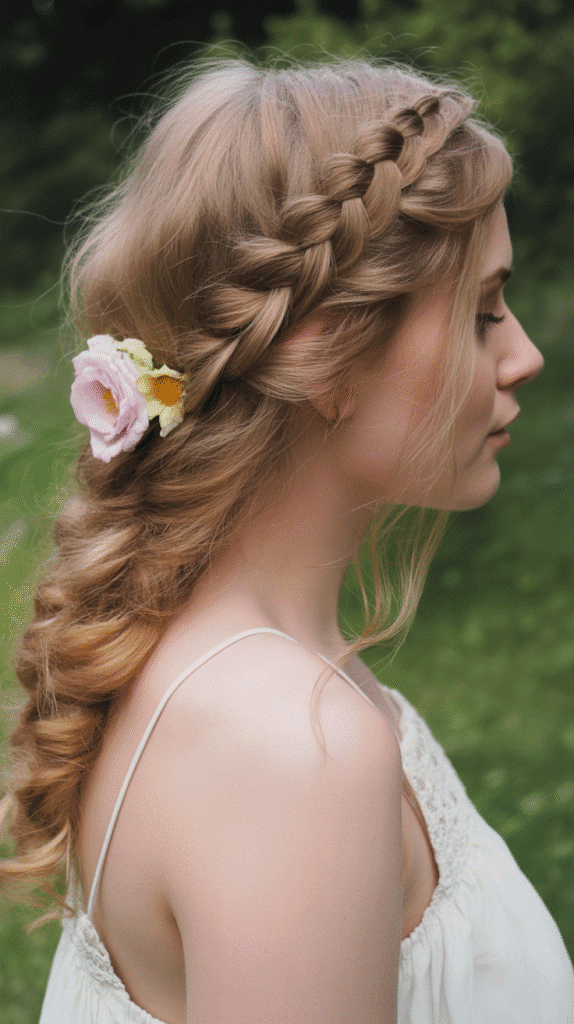
The braided crown with loose curls creates an enchanting bohemian princess aesthetic that works beautifully for both casual and formal settings.
This hairstyle features braids that wrap around the head like a crown, while the remaining hair cascades in soft, voluminous curls.
Creating the Look:
- Start with second-day hair or apply dry shampoo to add grip and texture
- Create a deep side part and separate the front sections of hair from ear to ear
- Divide one front section into three strands and begin a Dutch braid (reverse French braid) along your hairline
- Continue braiding around the back of your head, keeping the braid close to your scalp for a crown-like effect
- Repeat the Dutch braid on the opposite side, working toward the back where both braids will meet
- Secure both braids together with small elastic bands and tuck the ends under the braids, pinning them discreetly
- Use a curling wand with a one-inch barrel to curl the remaining loose hair in alternating directions
- Gently separate the curls with your fingers to create soft, romantic waves
- Apply a texturizing spray to enhance the whimsical, effortless appearance
Hair Type Compatibility:
- Works best with medium to long hair
- Suitable for all hair textures, though naturally wavy hair achieves the look most easily
- Fine hair benefits from added volumizing products before styling
- Thick hair may require sectioning the curls more carefully for even heat distribution
3. Messy Textured Top Knot
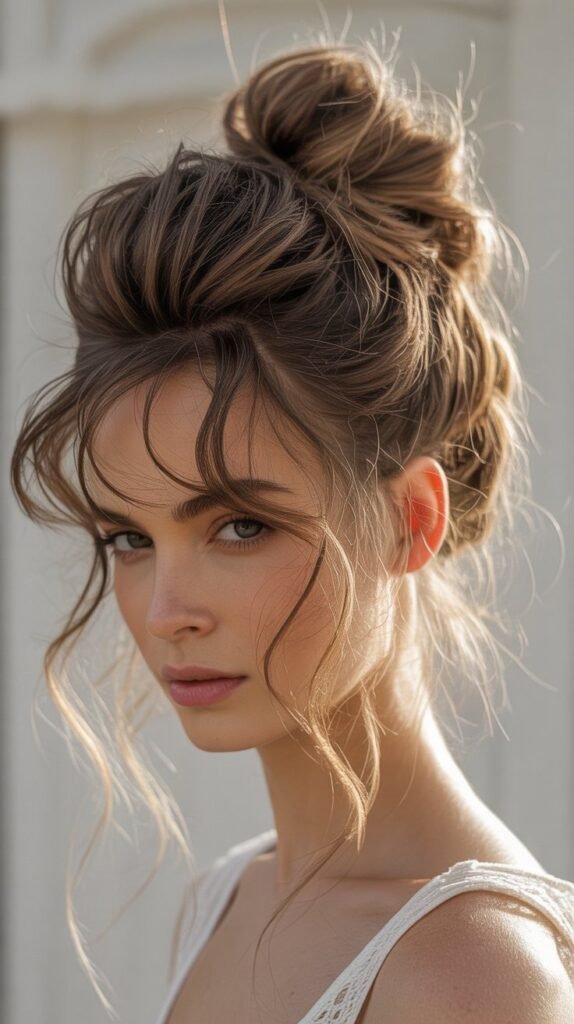
The messy textured top knot embodies effortless chic, offering a perfectly imperfect style that looks sophisticated yet relaxed.
This elevated casual updo adds height and drama while maintaining a carefree, whimsical vibe that works from brunch to evening events.
Step-by-Step Construction:
- Apply a sea salt spray to dry hair to enhance natural texture and create grip
- Flip your head upside down and gather all hair into a high ponytail at the crown of your head
- Don’t worry about smoothing flyaways—this style embraces natural texture and movement
- Twist the ponytail loosely and wrap it around the base, allowing sections to fall naturally rather than forcing them into place
- Secure the bun with bobby pins, inserting them at various angles for maximum hold
- Gently pull apart sections of the bun to create volume and that sought-after “messy” appearance
- Pull out a few strands around your hairline and ears to frame your face
- Use your fingers to slightly tease the bun for additional texture and fullness
- Set with a flexible-hold hairspray that won’t make the hair crunchy or stiff
Versatility Benefits:
- Transitions seamlessly from gym to social events
- Takes less than five minutes to create once you’ve practiced
- Suits both professional and casual environments depending on accessories
- Works exceptionally well for second or third-day hair
- Adds instant height for petite individuals
4. Vintage-Inspired Victory Rolls
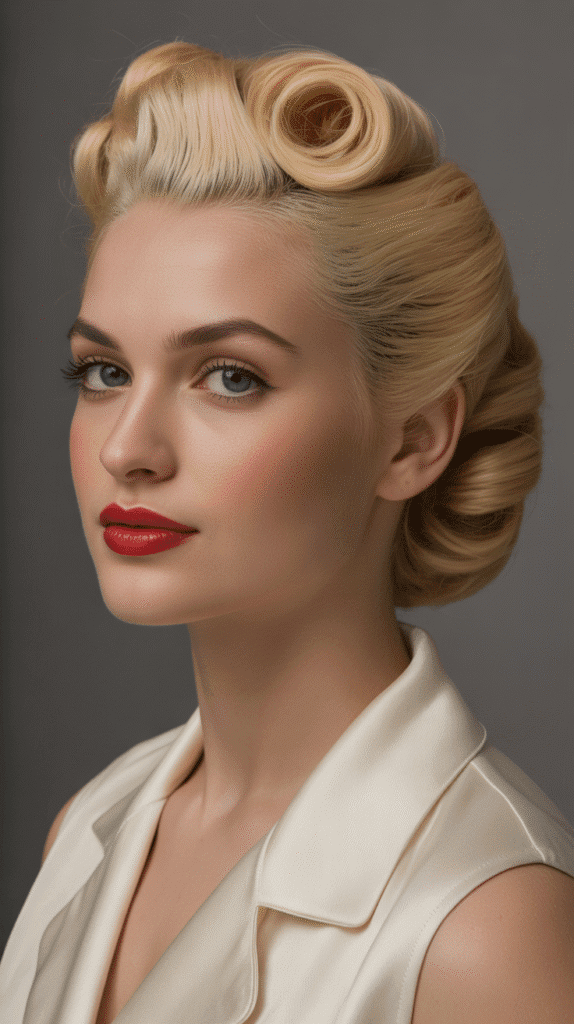
Victory rolls bring a touch of 1940s glamour to modern styling, creating a distinctive vintage aesthetic with whimsical charm.
These rolled sections of hair sit prominently at the front of the head, offering a bold statement that celebrates retro elegance.
Mastering the Technique:
- Start with clean, dry hair and apply a smoothing serum to reduce frizz and add shine
- Create a deep side part, separating a three-inch section of hair near your part
- Backcomb the section at the roots to create a foundation that will hold the roll’s shape
- Roll the section upward and toward your face, creating a tube-like shape that sits on top of your head
- Pin the roll securely from underneath using bobby pins that match your hair color
- Repeat on the opposite side, ensuring both rolls are symmetrical in size and placement
- Gather the remaining hair into your preferred updo style—a low bun, chignon, or twisted arrangement works beautifully
- Apply a strong-hold hairspray to lock everything in place
- For authentic vintage appeal, add a decorative hair clip or small fascinator near one of the rolls
Historical Context and Modern Adaptation:
- Originally popularized during World War II as a practical yet stylish solution for women working in factories
- Modern versions often feature softer, less structured rolls for a more wearable everyday look
- Can be adapted to suit various hair lengths, though medium to long hair works best
- Pairs wonderfully with vintage-inspired clothing and makeup for themed events
- Represents empowerment and timeless beauty standards
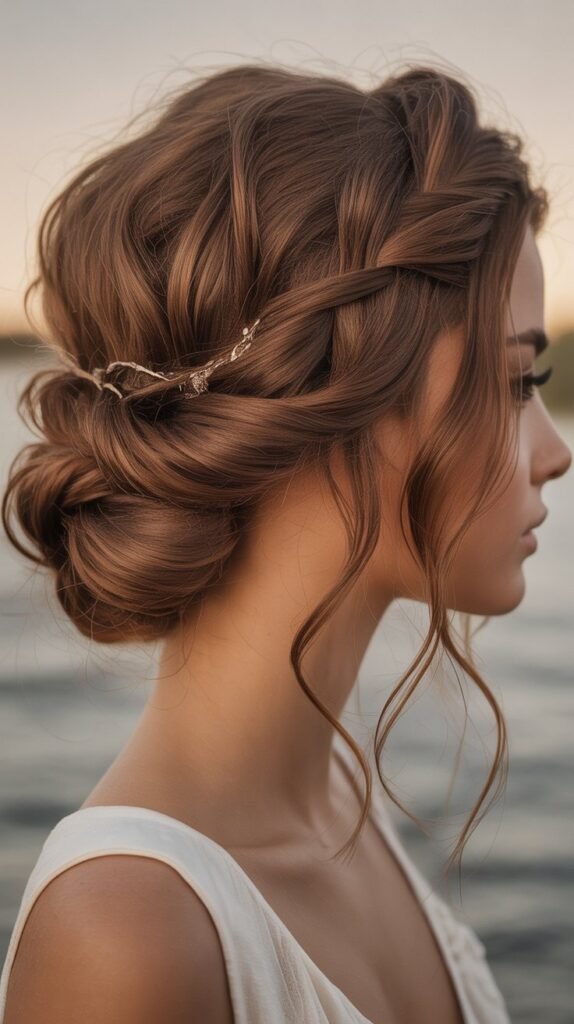
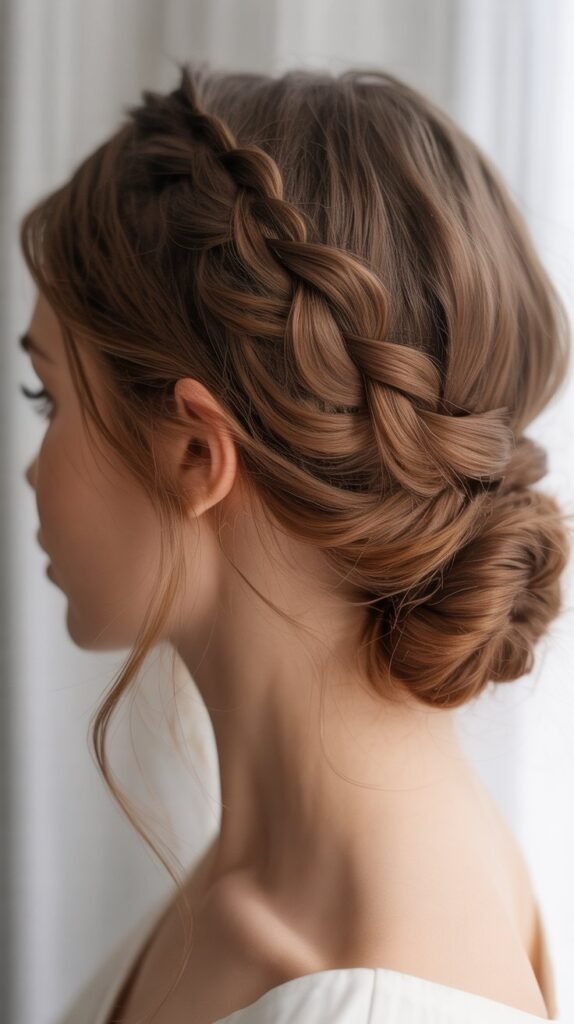
5. Twisted Halo Updo
The twisted halo updo creates an angelic, ethereal appearance through a continuous twisted section that encircles the head like a crown.
This romantic style works beautifully for weddings, festivals, and any occasion where you want to channel goddess-like elegance.
Construction Method:
- Begin with hair that has natural texture or create waves with a curling iron for better grip
- Part your hair down the middle from forehead to nape
- Starting at the nape on one side, take a small section and divide it into two pieces
- Create a rope twist by wrapping the two sections around each other, adding small amounts of hair as you work upward
- Continue the twist along the side of your head, following your hairline toward the front
- When you reach the front, pin the twist temporarily and repeat the process on the opposite side
- Both twists should meet at the front center of your head
- Cross the ends of the twists and tuck them under the opposite twist, pinning securely
- Gently pull on the twists to create fuller, more voluminous sections
- Spray with a medium-hold hairspray and add small pearl or crystal pins for embellishment
Styling Variations:
- Incorporate small flowers into the twist for a bohemian garden party look
- Add ribbon woven through the twists for a more structured, formal appearance
- Create a double halo by making two twisted sections on each side instead of one
- Leave some curled tendrils loose at the nape for a softer, more romantic finish
- Use metallic hair accessories for evening events and formal occasions
6. Braided Ballerina Bun
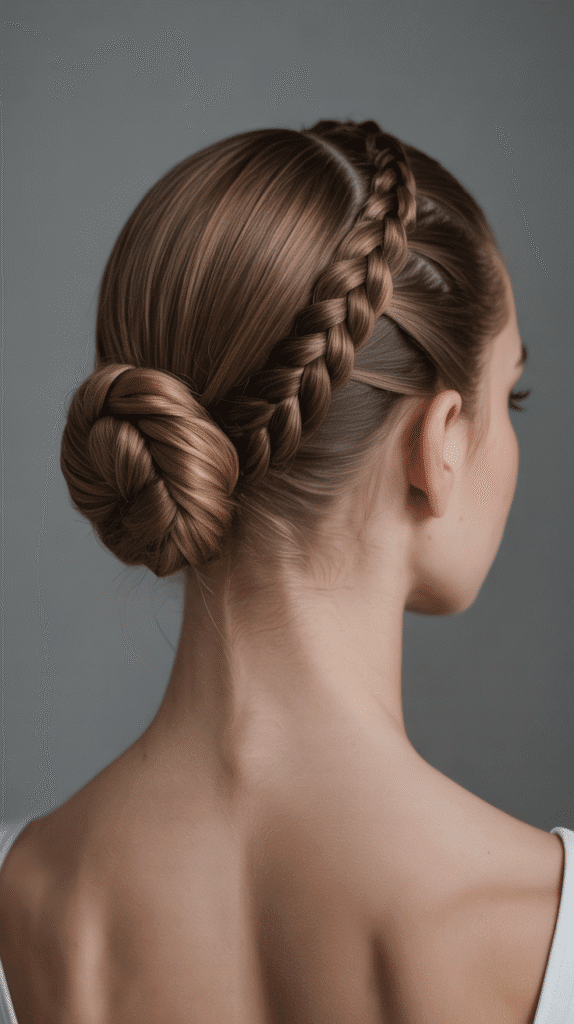
The braided ballerina bun elevates the classic ballet bun by incorporating intricate braids that add texture and visual sophistication.
This refined updo maintains the sleek elegance of traditional ballet styling while introducing whimsical braided details.
Creating Ballet-Perfect Polish:
- Start with smooth, detangled hair and apply a smoothing cream for a sleek finish
- Gather hair into a high ponytail at the crown, ensuring it sits exactly where you want the finished bun
- Divide the ponytail into three equal sections
- Create a standard three-strand braid with the entire ponytail, braiding tightly all the way to the ends
- Wrap the braided ponytail around the elastic base in a circular motion, creating a rounded bun shape
- Secure the bun with numerous bobby pins placed strategically around the perimeter
- Take any loose ends and tuck them under the bun, pinning them out of sight
- Smooth any flyaways with a small amount of gel on a soft-bristle brush
- Apply a strong-hold hairspray for all-day security
- Optional: Add a decorative hair net or embellished hair pins for performance or formal events
Performance and Formal Applications:
- Perfect for dance recitals, ballet performances, and theatrical productions
- Maintains its structure during physical activity and movement
- Presents a professional, refined appearance for corporate settings
- Works beautifully for black-tie events and galas
- Suits both young dancers and sophisticated adult styling
7. Bohemian Side-Swept Updo
The bohemian side-swept updo captures free-spirited elegance through asymmetrical styling that appears effortlessly romantic.
This hairstyle gathers hair to one side in a loose, textured arrangement that feels organic and whimsical.
Bohemian Styling Technique:
- Create natural-looking waves throughout your hair using a curling wand or braiding damp hair overnight
- Apply a texturizing spray to enhance the piecey, undone quality
- Create a deep side part, sweeping the majority of hair to one side
- On the heavier side, begin loosely twisting small sections while working toward the back
- Gather all hair at the nape behind the opposite ear from where most hair originates
- Loosely pin sections as you gather them, allowing pieces to fall naturally rather than forcing them into place
- Create a loose bun or twisted arrangement at the gathering point
- Pull out strategic pieces around the face and throughout the updo to enhance the relaxed, bohemian feel
- Leave the style intentionally imperfect—smoothness contradicts the bohemian aesthetic
- Finish with a light mist of flexible-hold hairspray
Complementary Accessories:
- Fresh or dried flowers tucked into the updo for garden party charm
- Delicate chains or hair jewelry that drapes through the style
- Feathers for festival or boho-chic events
- Vintage brooches positioned near the gathering point
- Natural elements like small branches or baby’s breath for outdoor weddings
8. French Twist with Modern Volume
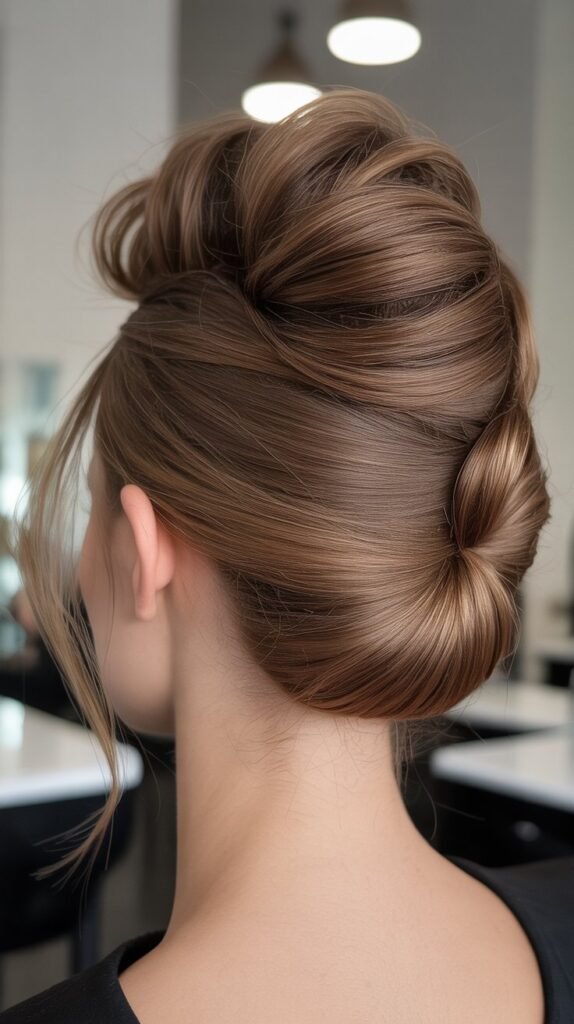
The French twist receives a contemporary update through added volume and texture that transform this classic updo into something fresh and whimsical.
This sophisticated style maintains timeless elegance while incorporating modern fullness.
Modern French Twist Method:
- Begin by backcombing the crown section to create substantial volume at the roots
- Smooth the top layer lightly with a brush to conceal the teasing while maintaining the lift
- Gather all hair to one side at the back of your head, holding it firmly
- Twist the gathered hair upward and toward the opposite side, creating a vertical roll
- As you twist, tuck the ends into the roll itself, creating a seamless finish
- Secure the twist with bobby pins inserted horizontally into the roll at various points
- Instead of making the twist tight and smooth, gently pull on sections to create soft volume
- Release small pieces near the temples and nape for a softer, less severe appearance
- Apply a shine spray for a polished finish that catches the light
- Consider adding a decorative comb or pins along the twist for embellishment
Professional Styling Tips:
- Works exceptionally well for corporate events and business formal occasions
- Hair that’s slightly dirty holds this style better than freshly washed hair
- Use pins that match your exact hair color for invisible hold
- Practice the twisting motion several times to develop muscle memory
- Consider professional styling for important events until you’ve mastered the technique
9. Waterfall Braid into Low Bun
The waterfall braid creates a cascading, whimsical effect as sections of hair appear to “fall” through the braid like a waterfall.
When combined with a low bun, this creates a romantic, multi-dimensional hairstyle perfect for special occasions.
Waterfall Technique Explained:
- Start with brushed, tangle-free hair with slight waves for better texture
- Take a section near your temple and divide it into three strands
- Begin braiding normally, but when you cross the top strand down and over the middle, release it completely
- Pick up a new section from the top to replace the dropped strand and continue braiding
- This creates the signature waterfall effect where strands cascade through the braid
- Continue the waterfall braid along your head toward the opposite ear
- Once you reach the desired endpoint, transition to a regular braid with the working strands
- Gather all hair, including the “waterfall” strands, into a low ponytail at the nape
- Create a classic bun by twisting the ponytail and wrapping it around the elastic base
- Secure with bobby pins and gently pull on the bun edges to create a fuller, softer appearance
Complexity Considerations:
- Requires practice to maintain even tension while releasing and picking up strands
- Works best with hair that’s at least shoulder-length
- Creates a stunning side profile that photographs beautifully
- Can be simplified by creating a waterfall braid on just one side instead of wrapping around the head
- Pairs wonderfully with floral crowns or delicate hair accessories
10. Double Dutch Braids into Top Knot
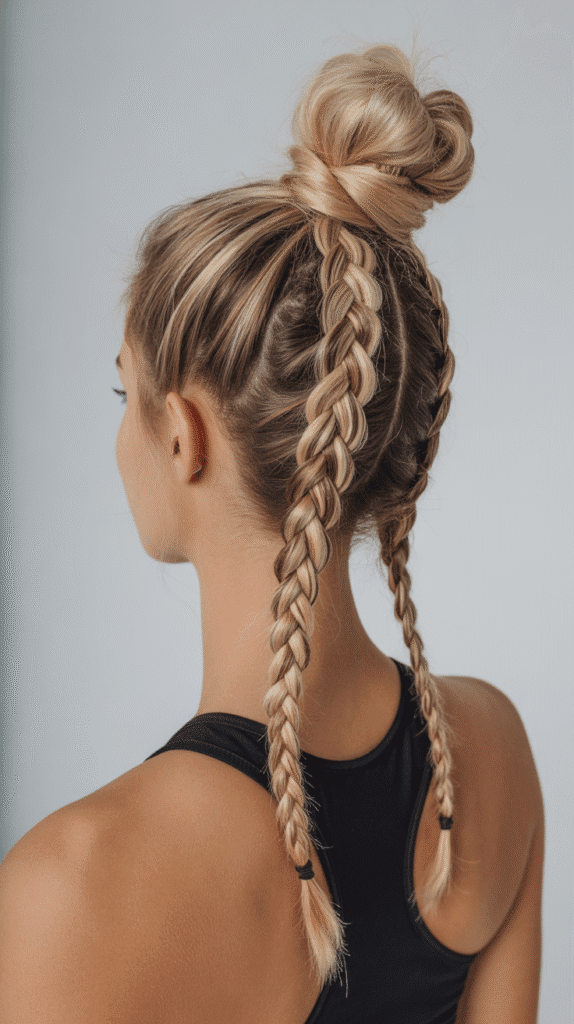
Double Dutch braids channeled into a high top knot create an athletic yet elegant style that keeps hair completely secured while maintaining visual interest.
This practical updo works beautifully for active individuals who want style and function.
Athletic Elegance Creation:
- Start with damp hair and apply a light gel for control and sleekness
- Create a center part from forehead to nape, dividing hair into two equal sections
- Beginning on one side at the front hairline, start a Dutch braid by crossing strands under rather than over
- Add small sections of hair to the braid as you work toward the crown, keeping the braid tight against the scalp
- Repeat the Dutch braid on the opposite side, ensuring both braids are symmetrical
- When both braids reach the crown area, stop adding new hair and continue with regular braids
- Gather both braided sections along with any remaining loose hair at the crown
- Twist all hair together and wrap around the base to create a secure top knot
- Pin the knot thoroughly from multiple angles for stability during movement
- Smooth any flyaways with hairspray applied to a clean mascara wand or toothbrush
Activity-Friendly Features:
- Remains secure during exercise, sports, or dancing
- Keeps hair completely off the face and neck
- Won’t unravel even with vigorous movement
- Transitions well from workout to social settings
- Prevents breakage by eliminating the need for tight elastic bands throughout the day
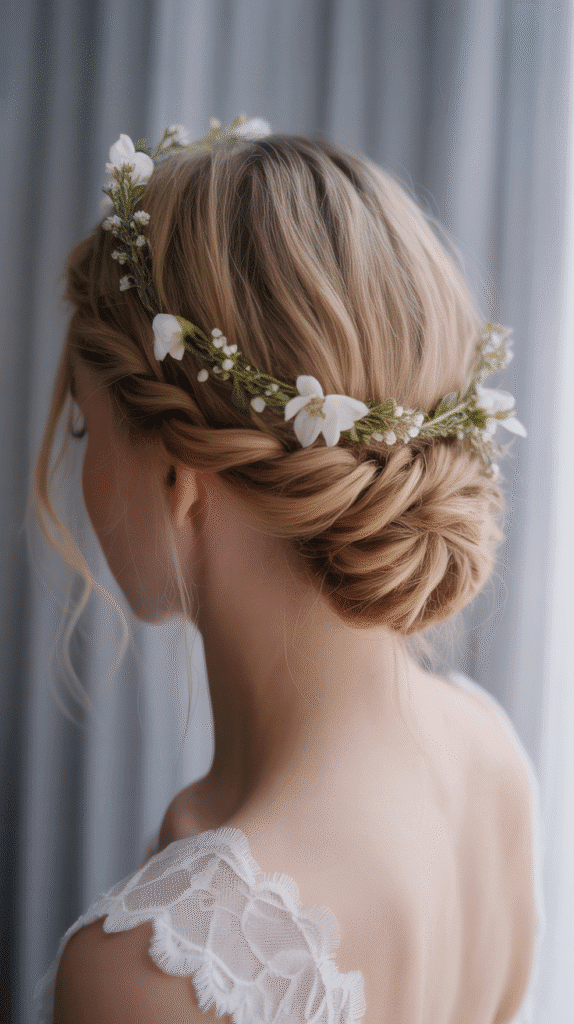
11. Flower Crown Updo
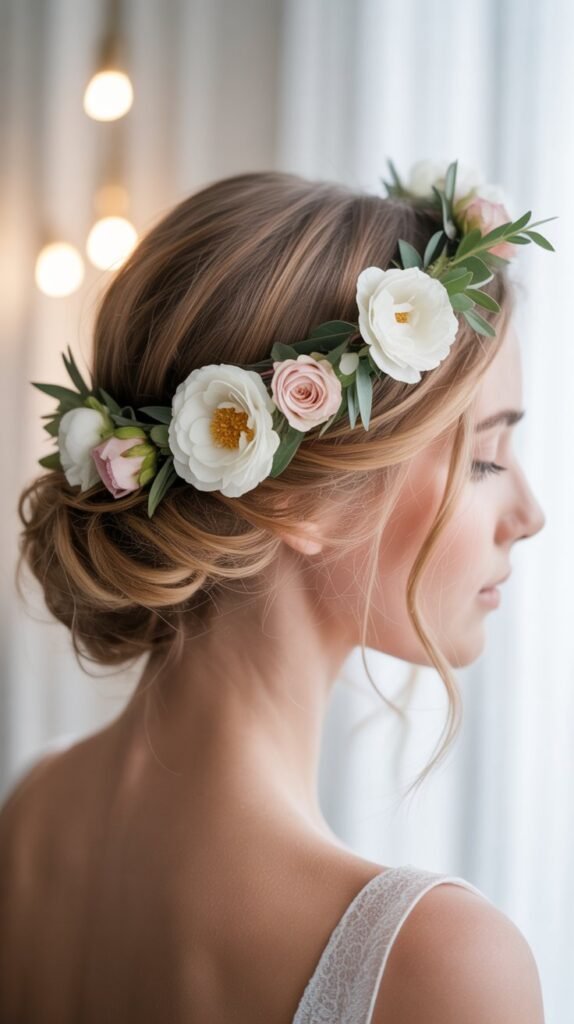
The flower crown updo integrates fresh or artificial blooms directly into an elegant updo structure, creating a nature-inspired, whimsical hairstyle.
This romantic style works beautifully for outdoor weddings, festivals, and garden parties.
Floral Integration Method:
- Create your chosen updo base—loose buns, braided arrangements, or twisted styles work well
- Ensure the updo has enough texture and volume to support flower placement
- Select flowers that complement your outfit and the occasion’s color scheme
- Prepare flowers by cutting stems to about one inch and removing excess leaves
- Wrap stem ends with floral tape to prevent moisture damage to hair
- Insert flowers strategically throughout the updo using bobby pins to secure stems
- Create a crown effect by placing larger blooms near the front and sides
- Fill gaps with smaller flowers and greenery for a lush, garden-picked appearance
- Mist flowers lightly with water to keep them fresh throughout the event
- Secure any loose elements with additional pins and light hairspray
12. Sleek Low Ponytail Twist
The sleek low ponytail twist offers minimalist elegance through clean lines and subtle texture.
This understated updo proves that simplicity can be just as stunning as elaborate arrangements when executed with precision.
Minimalist Precision Styling:
- Wash hair and apply a smoothing serum while it’s still damp
- Blow-dry hair completely straight using a paddle brush and concentrating the airflow downward
- Once dry, run a flat iron through hair in sections for ultra-sleek texture
- Apply a small amount of pomade to smooth any remaining flyaways
- Gather hair into a low ponytail at the nape, positioning it either center or slightly off to one side
- Secure with a hair elastic that matches your hair color
- Take a small section from underneath the ponytail and wrap it around the elastic to conceal it
- Secure the wrapped section with a bobby pin tucked underneath the ponytail
- Twist the length of the ponytail loosely for added interest
- Pin the twisted ponytail up toward the head, creating a low twisted bun effect
Sleek Styling Secrets:
- This style works best on freshly washed hair for maximum shine and smoothness
- Use a boar bristle brush for final smoothing before creating the ponytail
- Hair oils add shine but use sparingly to avoid a greasy appearance
- Consider adding a geometric hair clip for modern sophistication
- This style complements sharp, tailored outfits and professional settings
13. Curly Updo with Pinned Tendrils
The curly updo with pinned tendrils celebrates natural curl patterns while creating an elegant updo structure.
This style allows curly-haired individuals to embrace their texture while achieving formal sophistication.
Curl-Friendly Technique:
- Start with clean, conditioned hair and apply a curl-enhancing cream
- Allow hair to air-dry or diffuse on low heat to maintain natural curl definition
- Do not brush curls—instead, use fingers to gently separate and arrange them
- Section hair into manageable portions while working
- Take curled sections and pin them randomly at the back and crown of your head
- Rather than forcing curls into a specific shape, work with their natural pattern
- Create dimension by pinning some curls higher and others lower
- Leave strategic curled tendrils loose around the face and nape
- Use bobby pins that match your hair color and insert them into the curl’s natural spiral
- Finish with a curl-defining spray rather than traditional hairspray to maintain bounce
Natural Texture Celebration:
- This style works with any curl type from loose waves to tight coils
- Embraces the volume and texture that straight-hair updos often work to eliminate
- Requires fewer products and tools than styles that fight natural texture
- Allows personality and individuality to shine through
- Reduces heat damage by working with rather than against natural curl patterns
14. Criss-Cross Braided Updo
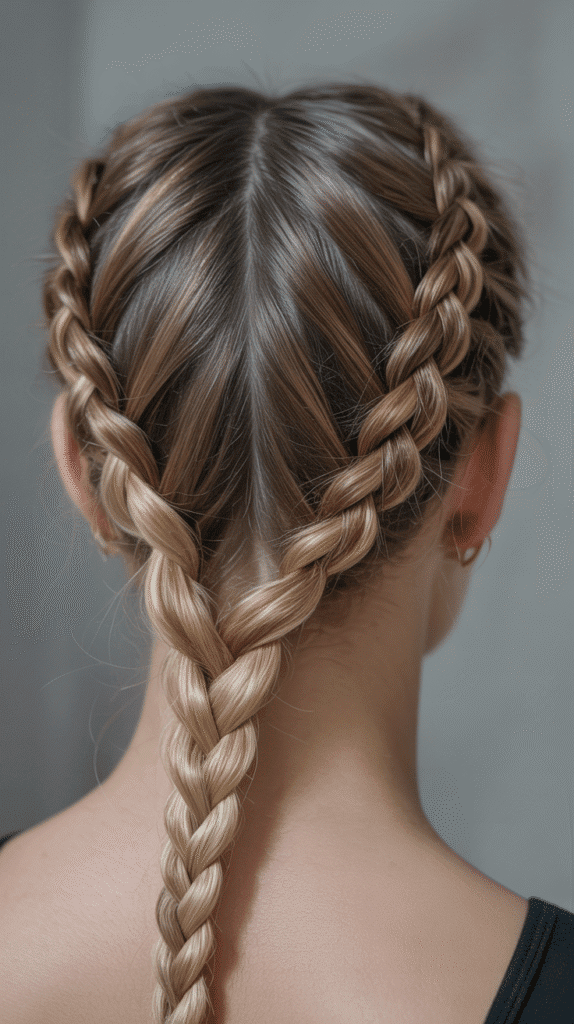
The criss-cross braided updo creates visual intrigue through intersecting braids that form geometric patterns across the back of the head.
This intricate style appears complex but follows logical patterns that make it achievable with practice.
Pattern Creation Process:
- Begin with detangled, slightly textured hair for better grip
- Section hair from temple to temple across the back of your head, creating an upper and lower section
- From the upper section, create two standard three-strand braids starting at each temple
- Braid toward the center back, keeping tension even for neat, uniform braids
- Create two additional braids from the lower section, starting behind the ears
- Here’s where the criss-cross magic happens: cross the upper right braid over to the lower left side
- Pin it securely against the head using several bobby pins
- Cross the upper left braid over to the lower right side and pin
- Take the lower braids and cross them over in the opposite direction, creating an X pattern
- Tuck all braid ends underneath the crossed sections, creating a seamless finish
Advanced Variations:
- Add ribbon or colored thread woven through braids for festival looks
- Create three or four braids on each side for even more intricate patterns
- Vary braid thickness for dimensional interest
- Incorporate fishtail or Dutch braids instead of standard three-strand braids
- Add small crystals or beads to the intersecting points for sparkle
15. Romantic Chignon with Face-Framing Pieces
The romantic chignon combines classic sophistication with softening face-framing elements that add whimsy and approachability.
This timeless updo works for virtually any formal occasion while maintaining romantic charm.
Classic Chignon Construction:
- Create soft waves throughout your hair using a large-barrel curling iron
- Brush through the waves gently to soften them into flowing texture
- Pull hair back toward the nape, leaving face-framing pieces out intentionally on both sides
- Gather hair into a low, loose ponytail without securing it too tightly
- Split the ponytail into two sections and twist them around each other
- Wrap the twisted sections into a low bun at the nape, allowing the twists to show
- Pin the chignon securely at multiple points, ensuring it sits low and slightly to one side
- Take the face-framing pieces and gently curl them away from the face
- Adjust the tightness of the chignon by gently pulling on edges to create fuller sections
- Set everything with a light, flexible hairspray that maintains movement
Face Shape Considerations:
- Oval faces: Can wear any variation of this style
- Round faces: Keep face-framing pieces longer and swept back to create length
- Square faces: Soften with wispy, textured face-framing pieces
- Heart-shaped faces: Add volume at the chignon rather than at the crown
- Long faces: Create width by pulling sections of the chignon outward for a wider appearance
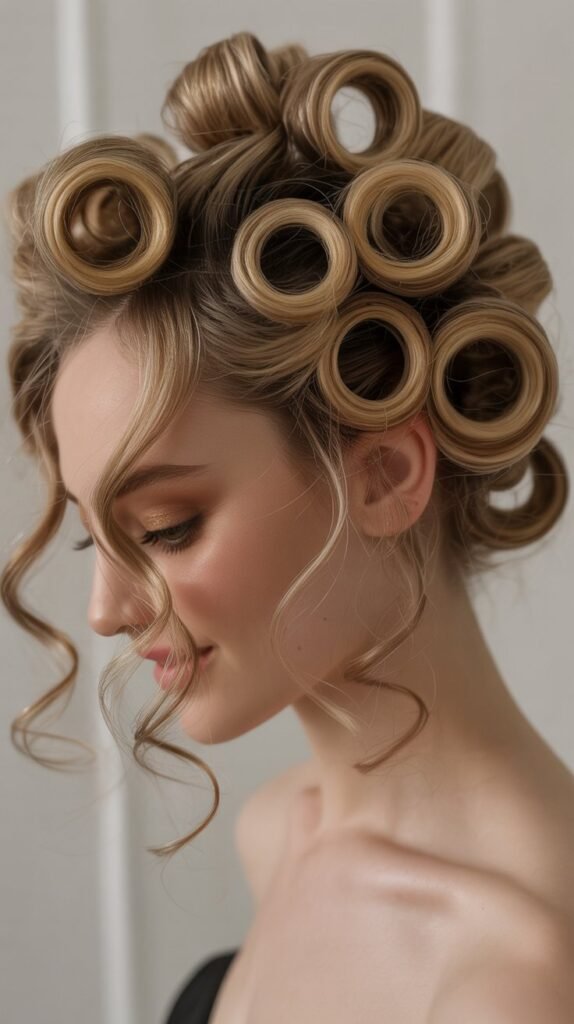
16. Voluminous Pompadour Updo
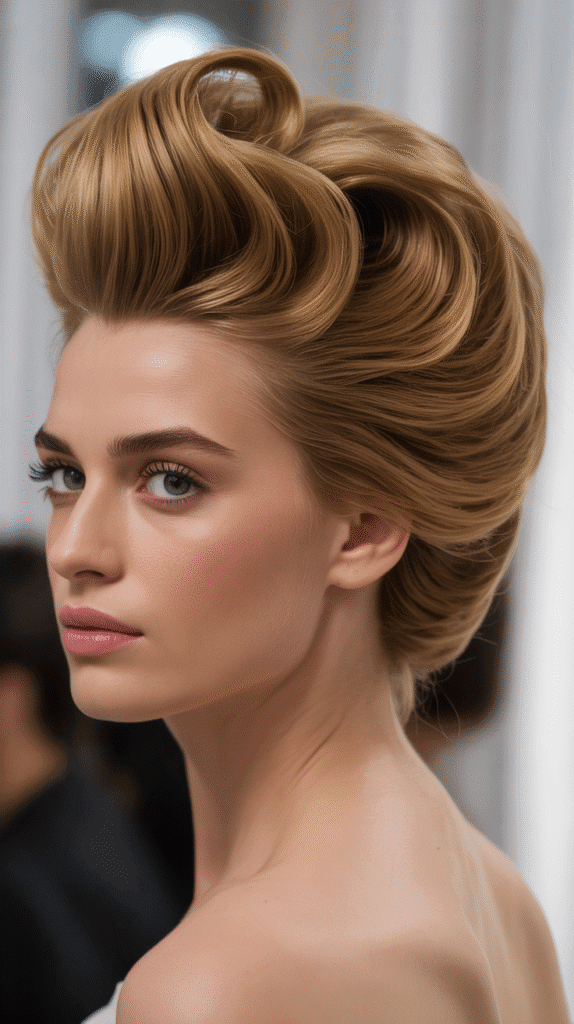
The voluminous pompadour updo brings dramatic height and vintage glamour to contemporary styling.
This bold style makes a statement through exaggerated volume at the crown combined with a sleek updo at the back.
Creating Dramatic Height:
- Start with completely dry hair and section off the front portion from temple to temple
- Apply volumizing powder directly to the roots of this front section
- Backcomb the front section vigorously, creating substantial volume and height
- Smooth just the surface layer with a brush, maintaining the volume underneath
- Roll the volumized section backward toward the crown, creating a prominent wave or roll
- Pin the roll securely from underneath using criss-crossed bobby pins
- Gather the remaining hair into your chosen updo style—a sleek bun or twist works beautifully
- The contrast between the voluminous front and sleek back creates the pompadour’s signature drama
- Use strong-hold hairspray to maintain the height throughout the day
- Consider adding a small decorative clip at the base of the pompadour for embellishment
Era-Appropriate Styling:
- Originated in the 1950s and 1960s as a symbol of glamorous femininity
- Modern versions often feature even more exaggerated height than vintage styles
- Pairs perfectly with winged eyeliner and bold lipstick for full retro impact
- Works beautifully for rockabilly and vintage-themed events
- Celebrities have brought this style back into contemporary fashion on red carpets
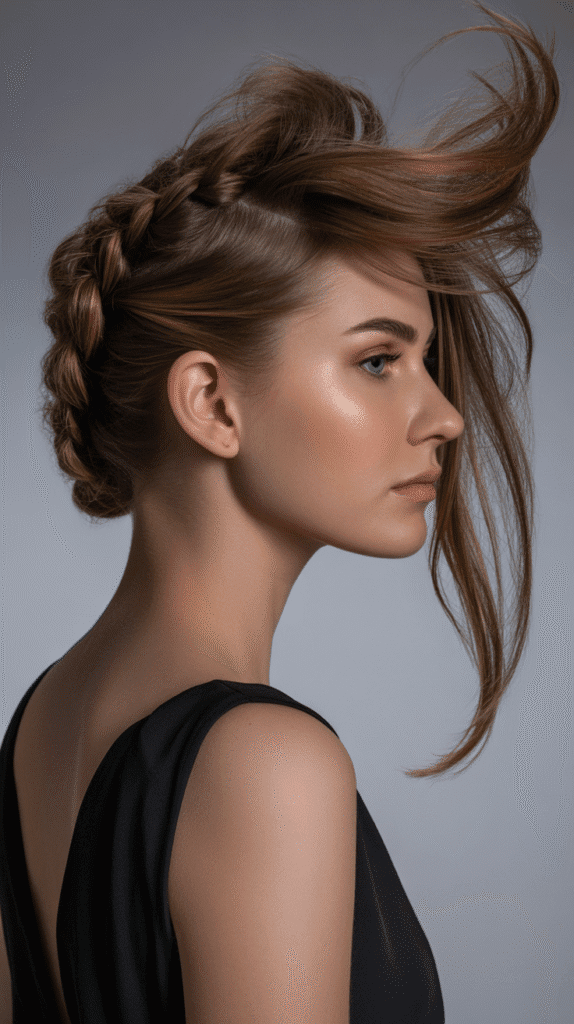
17. Braided Faux Hawk Updo
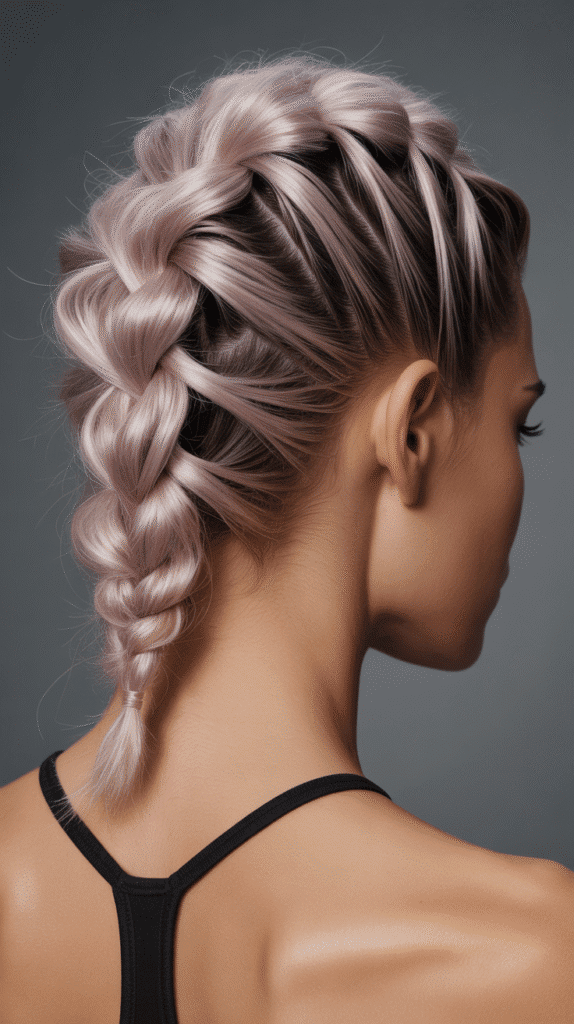
The braided faux hawk updo combines edgy, modern styling with elegant braiding techniques.
This bold style creates the illusion of a mohawk through strategically placed braids and pinned sections that run down the center of the head.
Edgy Elegance Creation:
- Section hair down the center from forehead to nape, creating a three-inch-wide mohawk section
- Clip the side sections out of the way temporarily
- Starting at the hairline, begin a Dutch braid with the center section
- As you braid, pull the outer edges of the braid outward to create width and dimension
- Continue braiding all the way down the center section
- Gently pull on the braid’s edges to create a wide, voluminous effect
- For the side sections, slick them back tightly using gel or pomade
- Pin the side sections behind the ears and at the nape, keeping them flat and sleek
- The contrast between the voluminous center braid and sleek sides creates the faux hawk effect
- Secure any loose ends and finish with strong-hold hairspray
Personality Expression:
- Perfect for individuals who want to show confidence and edginess
- Works for alternative weddings, music festivals, and fashion-forward events
- Can be toned down or amplified based on how much you pull on the center braid
- Allows for creative expression while maintaining hair in a controlled updo
- Demonstrates that braids can be bold and modern, not just sweet and traditional
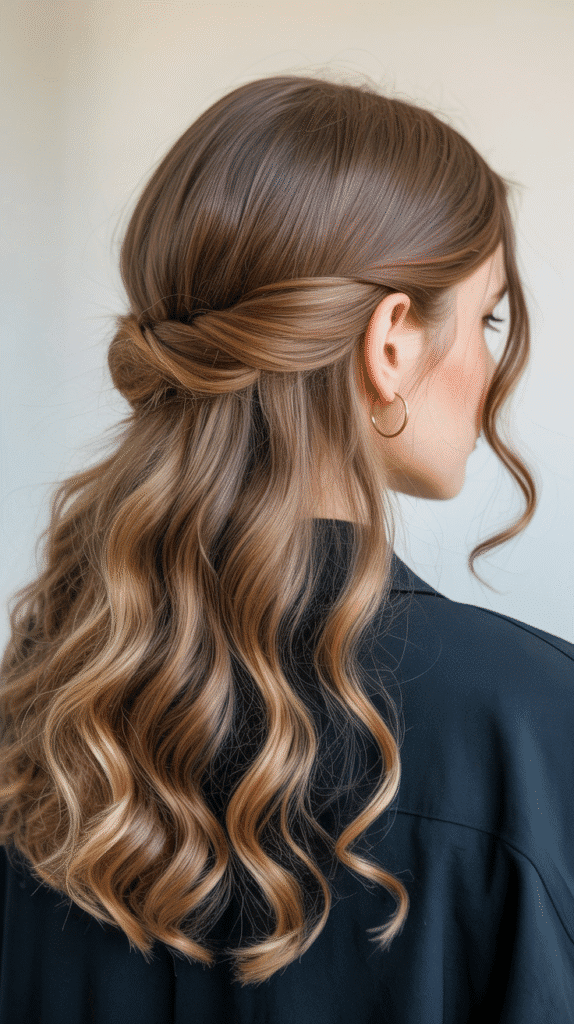
18. Half-Up Twisted Crown
The Gibson tuck creates vintage sophistication through a tucking technique that conceals hair ends while creating a rolled appearance at the nape.
When enhanced with carefully chosen accessories, this classic style becomes whimsically elegant.
Gibson Tuck Technique:
- Begin with hair that has some texture—add waves if your hair is very straight
- Create a low ponytail at the nape but don’t pull it completely through the elastic on the final loop
- This creates a small opening above the elastic band
- Take the ponytail ends and tuck them upward through this opening, rolling them under
- Continue tucking and rolling the hair until all ends are concealed within the roll
- Pin the tucked sections securely from multiple angles
- Gently pull on the sides of the Gibson tuck to create width and fullness
- Smooth the top section of hair for a polished appearance
- This is where accessories transform the look from simple to spectacular
- Add decorative combs, vintage brooches, or jeweled pins to the tucked section
Accessory Enhancement Guide:
- Pearl-tipped pins for classic bridal elegance
- Vintage brooches positioned at the side of the tuck for retro charm
- Decorative combs with crystals for evening glamour
- Fresh flowers tucked into the roll for garden party whimsy
- Art deco hair clips for 1920s-inspired sophistication
- Delicate chains draped along the tuck for modern bohemian flair
19. Half-Up Twisted Crown
The half-up twisted crown keeps the lower hair flowing freely while creating an elegant crown effect on top.
This versatile style works for both casual and formal occasions, offering the best of both updos and down styles.
Dual-Level Styling:
- Start with hair that has natural waves or create loose curls throughout
- Section the hair horizontally from temple to temple across the top of your head
- Leave the bottom section down and free-flowing
- Divide the top section into two equal parts
- Take the right section and twist it away from your face as you work toward the back
- Secure the twisted section temporarily at the center back with a clip
- Repeat the twisting process with the left section, working toward the same meeting point
- Cross the twisted sections over each other at the back crown
- Pin both sections securely where they meet, creating a crown effect
- Gently pull on the twists to create fuller, more voluminous sections
Versatility Advantages:
- Less formal than full updos but more polished than wearing hair completely down
- Keeps hair off the face while showing length and beauty
- Works beautifully for afternoon events that transition to evening
- Suitable for various hair lengths from medium to very long
- Can be quickly created in under ten minutes with practice
- Easily dressed up with accessories or kept simple for everyday wear
20. Spiral Curls Pinned Updo
The spiral curls pinned updo showcases well-defined curls arranged in an updo structure rather than hidden away.
This style celebrates curl definition while creating formal elegance.
Curl Definition Method:
- Wash and condition hair with curl-enhancing products
- Section hair into one-inch sections while still wet
- Apply curl cream to each section individually
- Use a small-barrel curling iron or curling wand to create tight spiral curls in each section
- Allow curls to cool completely before touching them
- Do not brush or comb the curls—this is crucial for maintaining definition
- Beginning at the nape, pin curls up toward the crown randomly
- Pin each curl at its base to preserve the spiral shape
- Create a cascading effect by pinning some curls higher and others lower
- Leave a few defined curls loose around the face and nape for romantic softness
Curl Care Considerations:
- Use a diffuser on low heat if blow-drying rather than air-drying
- Sleep with hair in a silk bonnet or on silk pillowcase to prevent frizz before styling
- Avoid touching curls while styling to minimize friz
- Apply anti-humidity products in damp environments to maintain curl definition
- Refresh any limp curls with a curling iron before pinning
Formal Curl Styling:
- Creates a romantic, feminine aesthetic perfect for weddings and formal dances
- Shows off the natural beauty and dimension of well-defined curls
- Photographs beautifully from all angles due to the three-dimensional nature
- Works for various curl patterns from loose spirals to tight coils
- Allows curly-haired individuals to embrace texture in formal settings
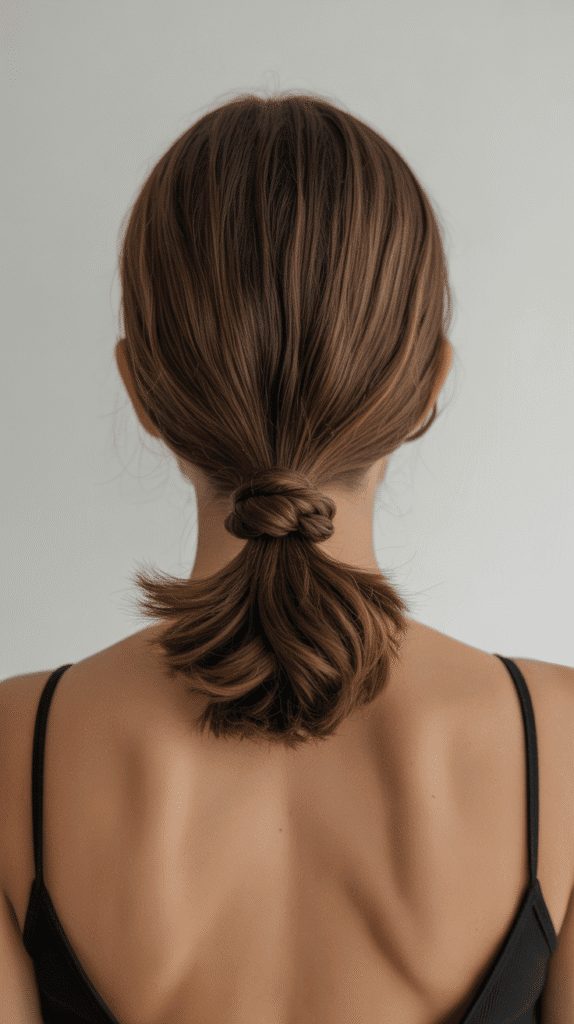
21. Knotted Low Bun
The knotted low bun creates visual interest through visible knots that form the structure of the bun itself.
This unique technique produces a sophisticated updo with unexpected textural details that feel both modern and whimsical.
Knotting Technique:
- Start with smooth, detangled hair that’s been straightened for easier manipulation
- Gather hair into a low ponytail at the nape without securing it with an elastic
- Divide the ponytail into two equal sections
- Tie these two sections into a simple overhand knot, just like tying shoelaces
- Continue tying knots with the same two sections, creating a chain of connected knots
- When you reach the ends, wrap the knotted chain around the base where the ponytail began
- Pin the knotted bun securely from multiple angles, ensuring the knots remain visible
- Tuck any loose ends underneath the bun and pin them out of sight
- Gently adjust the knots to make them more prominent and visually interesting
- Apply a light-hold hairspray to maintain structure while keeping the style touchable
Unique Visual Appeal:
- Creates conversation-starting detail that sets this apart from ordinary buns
- The knotted texture photographs exceptionally well
- Demonstrates advanced styling skill and creativity
- Works for modern minimalist weddings and contemporary events
- Suitable for professional environments while maintaining personality
Styling Variables:
- Create looser knots for a more relaxed, bohemian appearance
- Tie tighter knots for structured, geometric precision
- Position the knotted bun at different heights—low, mid, or high nape
- Add small pearls or crystals between knots for embellishment
- Create multiple smaller knotted sections for more complex patterns
22. Asymmetrical Braided Updo
The asymmetrical braided updo embraces off-center design through braids that sweep dramatically to one side.
This dynamic style creates movement and visual interest through intentional imbalance that feels fashion-forward and whimsical.
Off-Center Construction:
- Create a deep side part that falls far to one side of your head
- On the heavier side with more hair, begin a French braid that starts at the part
- Braid diagonally across the back of your head toward the opposite lower side
- Keep the braid loose and voluminous rather than tight and flat
- Once the French braid incorporates all hair from the heavy side, continue with a regular braid
- On the lighter side, gather the smaller amount of hair and twist it back toward where the braid ends
- Combine the twisted section with the braided section at the lower opposite side
- Coil the combined sections into a low side bun
- Pin the bun securely, allowing the braid to remain prominently visible
- Pull gently on the braid sections to create dimension and fullness
Asymmetrical Design Benefits:
- Creates a modern, editorial look that stands out in photos
- Flatters all face shapes through strategic placement
- Draws the eye across the head, creating visual journey and interest
- Allows for creative expression beyond traditional symmetrical styles
- Works beautifully for fashion-forward events and artistic occasions
Camera-Ready Considerations:
- Ensure the braided side faces the camera for maximum impact in photos
- The asymmetry creates flattering angles from both sides
- Professional photographers appreciate the dimensional quality
- Style works particularly well for engagement photos and fashion shoots
- The movement in the design translates beautifully to video
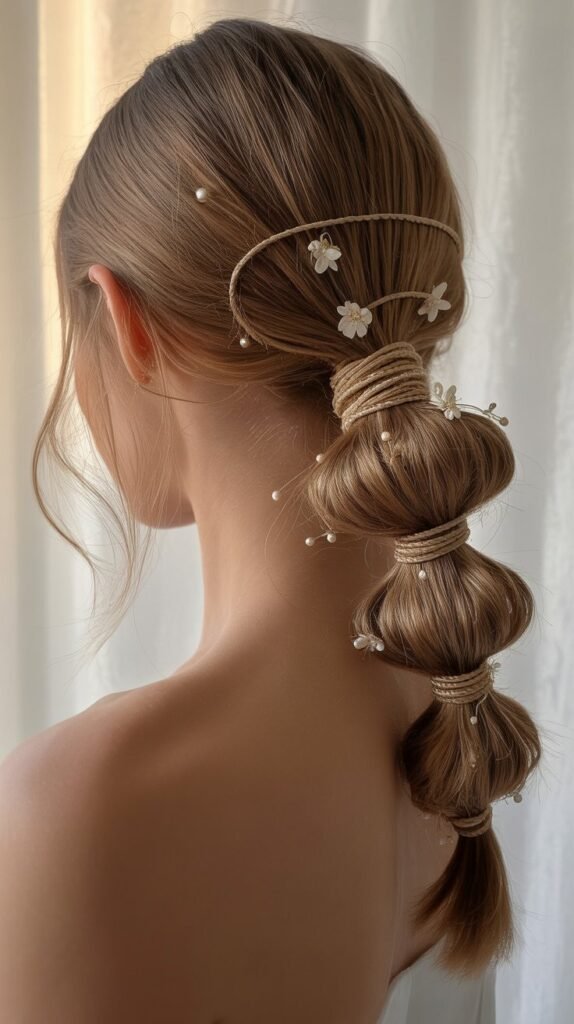
23. Bubble Ponytail Updo
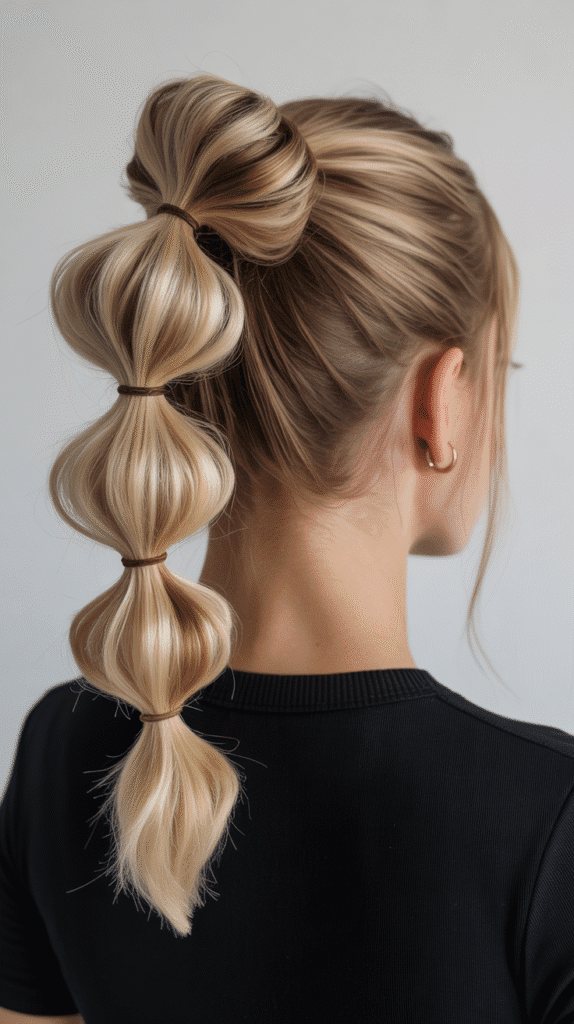
The bubble ponytail updo transforms the playful bubble ponytail trend into an elegant updo by coiling the bubbled sections into an artistic arrangement.
This contemporary style feels youthful and sophisticated simultaneously.
Bubble Creation Process:
- Begin with a high ponytail secured with a clear elastic band
- Apply texturizing spray to the ponytail for better grip and volume
- Measure approximately two inches down from the first elastic and add another clear elastic
- Gently pull on the hair between the two elastics, creating a rounded “bubble” shape
- Continue adding elastics at two-inch intervals down the length of the ponytail
- Create uniform bubbles by pulling each section outward evenly
- Once all bubbles are created, you’ll transform this into an updo
- Starting from the bottom, coil the bubbled ponytail upward toward the head
- Pin each bubble section as you work your way up, securing it against the head
- The finished look shows dimensional rounded sections arranged vertically
Modern Styling Appeal:
- Bridges the gap between trendy and timeless styling
- Popular on social media platforms for its photogenic quality
- Surprisingly easy to create despite the impressive appearance
- Works for various occasions from casual brunches to semi-formal events
- Appeals to younger demographics while maintaining sophistication
Creative Enhancements:
- Wrap small sections of hair around each elastic to conceal them
- Add small ribbons or decorative elastics for playful color
- Create mini bubbles for more intricate detailing
- Vary bubble sizes for organic, less uniform appearance
- Incorporate small flowers or pins at each bubble section
24. Wrapped Ponytail Updo
The wrapped ponytail updo elevates a simple ponytail through strategic wrapping of hair sections around the base and length.
This technique creates sophisticated polish from a foundational style everyone knows.
Wrapping Enhancement Method:
- Create a sleek, smooth ponytail at your desired height—mid or low placement works best
- Ensure the ponytail is brushed completely smooth and secured tightly
- Section out a thin piece of hair from underneath the ponytail
- Wrap this section around the elastic band to conceal it completely
- Secure the wrapped section with a bobby pin tucked underneath the ponytail
- Now for the transformative part: take the remaining ponytail and divide it into two sections
- Twist both sections individually in the same direction
- Wrap the twisted sections around the base of the ponytail in opposite directions
- This creates a wrapped, coiled effect that resembles a sophisticated low bun
- Pin securely at multiple points, ensuring the wrapped sections won’t unravel
Polished Perfection Tips:
- Use a smoothing serum before creating the ponytail for sleek shine
- Hair that’s one or two days old holds this style better than freshly washed hair
- Keep bobby pins close to your natural hair color for invisible hold
- A small amount of pomade helps control flyaways around the hairline
- This style works in professional settings, formal events, and elegant occasions
Quick Transformation Advantage:
- Can be created in under five minutes once technique is mastered
- Easily done on yourself without assistance
- Requires minimal products and tools
- Transitions seamlessly from day to evening with accessory additions
- Perfect for those who prefer understated elegance over elaborate styles
25. Crown Braid with Low Bun
The crown braid with low bun combines two classic elements into one cohesive, romantic style.
The braid encircles the head like a crown while the remaining hair forms an elegant low bun, creating dimension and interest at multiple levels.
Dual-Element Construction:
- Part hair from ear to ear across the top of your head, creating front and back sections
- Clip the back section away temporarily
- Starting at one temple, begin a Dutch braid along the hairline with the front section
- Braid around the head following the hairline, creating a crown effect
- When you reach the opposite temple, secure the braid temporarily
- Release the back section and combine it with the braided section
- Gather all hair into a low ponytail at the nape
- Create a classic twisted bun with the ponytail, wrapping it around the elastic base
- Ensure the crown braid remains prominently visible while the bun sits below it
- Pin the bun securely and gently pull on the crown braid for added dimension
Dimensional Styling Benefits:
- Creates visual interest at two levels—crown and nape—drawing the eye around the entire head
- The crown braid frames the face beautifully while the low bun provides elegant foundation
- Works exceptionally well for bridesmaids who want coordinated but not identical styles
- Suits medium to long hair lengths
- Offers security and comfort for all-day wear
Occasion Versatility:
- Perfect for outdoor weddings where wind might affect less structured styles
- Appropriate for religious ceremonies requiring modest hair coverage
- Works beautifully for prom and formal dances
- Suitable for professional headshots and corporate events
- Ideal for destination weddings in various climates
26. Textured Fishtail Braid Updo
The textured fishtail braid updo showcases the intricate, woven appearance of fishtail braiding while arranging it into an updo formation.
This style offers bohemian sophistication through detailed braiding that creates mesmerizing patterns.
Fishtail Braiding Technique:
- Start with hair that has natural texture or waves for better grip and visual interest
- Gather hair into a low ponytail but don’t secure it—you’ll braid the loose hair
- Divide all hair into two large sections
- Take a thin strand from the outer edge of the left section
- Cross it over the left section and add it to the right section
- Take a thin strand from the outer edge of the right section
- Cross it over the right section and add it to the left section
- Continue this pattern all the way down—this is fishtail braiding
- The smaller your strands, the more intricate and detailed the braid appears
- Once braided completely, gently pull on the edges to create width and texture
Updo Transformation:
- Take the completed fishtail braid and coil it at the nape of your neck
- Pin the coiled braid as you wrap it, creating a low side bun
- Position the bun slightly off-center for bohemian asymmetry
- Continue pulling on sections of the braided bun to enhance texture
- The fishtail pattern should remain visible and prominent
- Leave some pieces loose around the face for softness
- Apply texturizing spray for enhanced piecey, undone quality
Bohemian Elegance Characteristics:
- Perfect for outdoor festivals, vineyard weddings, and garden parties
- The intricate pattern creates visual interest without requiring accessories
- Works beautifully with flowing, romantic clothing styles
- Suits various hair colors and highlights show beautifully through the woven pattern
- Achieves the effortlessly elegant aesthetic popular in boho styling
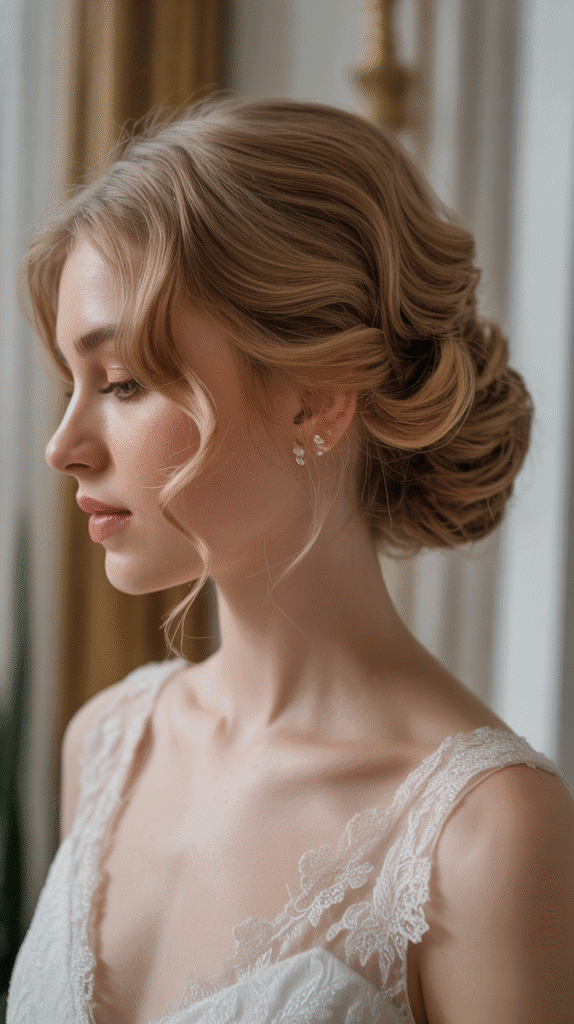
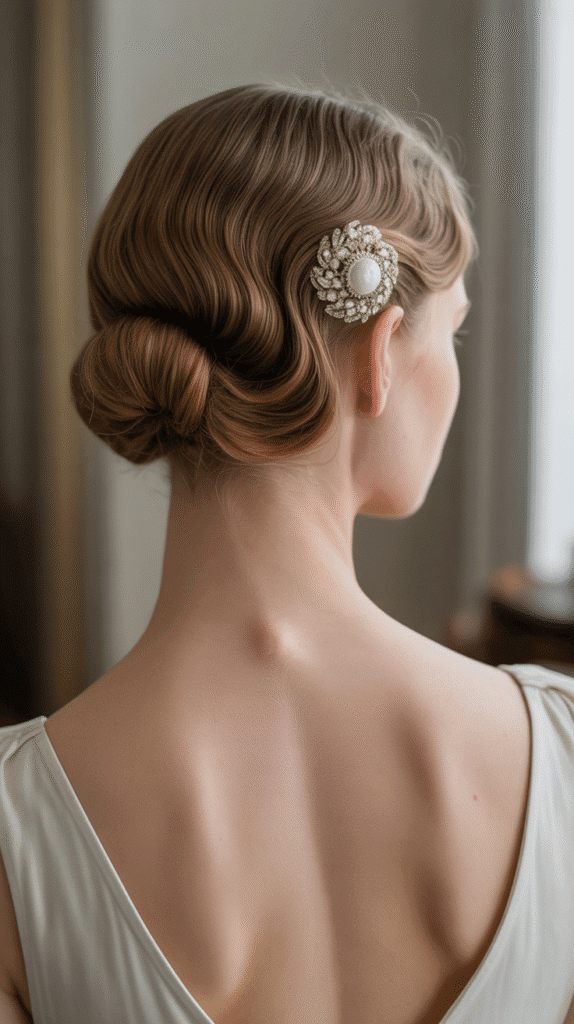
27. Classic Chignon with Pearl Details
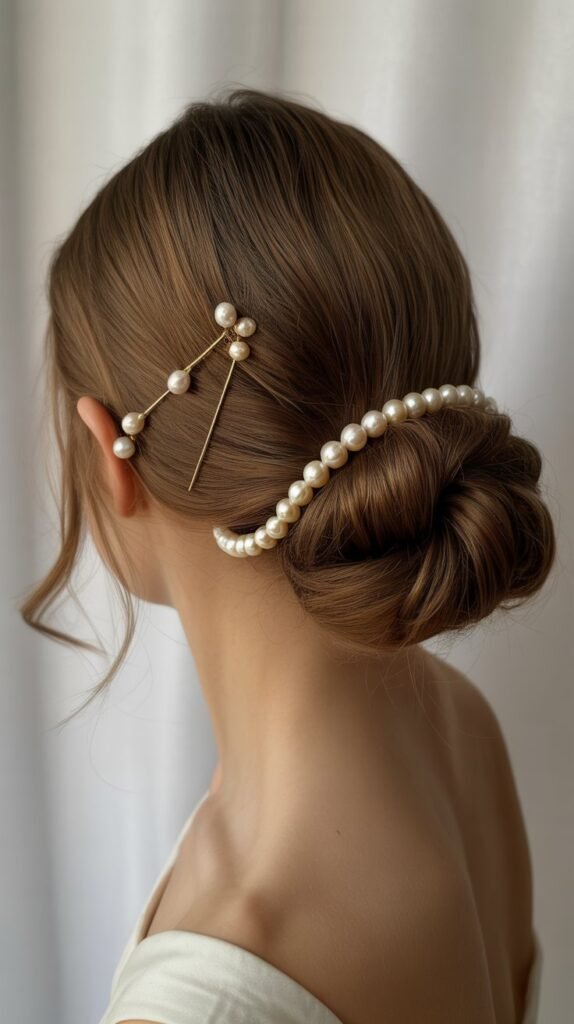
The classic chignon with pearl details brings timeless sophistication elevated by delicate pearl embellishments.
This refined updo represents the pinnacle of elegant hairstyling, perfect for the most formal occasions.
Refined Chignon Creation:
- Begin with smooth, well-brushed hair free of tangles
- Apply a smoothing cream throughout for sleek texture and shine
- Gather hair at the nape into a low ponytail, positioning it centrally
- Divide the ponytail into two or three sections
- Twist each section individually before twisting them around each other
- Wrap the twisted sections around the ponytail base, creating a rounded, elegant shape
- Pin the chignon meticulously, ensuring every section is secured without visible pins
- Smooth the top section of hair from crown to chignon with a boar bristle brush
- Check from all angles to ensure the chignon appears polished and symmetrical
- Now comes the pearl embellishment that elevates the classic style
Pearl Embellishment Application:
- Select pearl-tipped bobby pins, pearl hairpins, or a pearl hair vine
- Insert pearl pins strategically throughout the chignon at regular intervals
- Create a pattern such as a diagonal line, scattered placement, or concentrated cluster
- Ensure pearls catch the light from various angles for maximum elegance
- Balance the pearl placement so it enhances rather than overwhelms
- Consider the formality of your event when deciding on pearl quantity
Timeless Sophistication Elements:
- This style has graced formal events for decades and remains perpetually elegant
- Perfect for black-tie weddings, galas, opera performances, and formal balls
- Pairs beautifully with classic jewelry like pearl or diamond earrings
- Complements formal gowns and sophisticated attire
- Photographs beautifully in both color and black-and-white
- Represents traditional beauty standards while incorporating whimsical pearl details
Bridal Application:
- Extremely popular choice for brides seeking classic elegance
- Works with various veil placements and styles
- Stays secure throughout long wedding ceremonies and receptions
- Looks sophisticated in wedding photography from ceremony through reception
- Can be paired with a tiara, hair comb, or remain simply adorned with pearls
Conclusion
As we’ve explored throughout this comprehensive guide, 27 Elegant Whimsical Updo Hairstyles to Elevate Your Look offer endless possibilities for transforming your appearance with grace and creativity.
From the vintage charm of victory rolls to the modern edge of braided faux hawks, from the romantic allure of flower crown updos to the timeless sophistication of pearl-detailed chignons, each hairstyle brings its own unique character and beauty.
These updos prove that hair styling is truly an art form where technique meets imagination, allowing you to express your personality while achieving polished elegance.
Whether you’re drawn to bohemian textures, sleek minimalism, intricate braiding, or classic Hollywood glamour, there’s an updo in this collection that speaks to your aesthetic and suits your occasion.
Remember that the most beautiful hairstyle is one that makes you feel confident and comfortable, so don’t be afraid to practice these techniques, adapt them to your personal style, and add your own creative touches.
With patience, the right tools, and a willingness to experiment, you can master these elegant whimsical updos and discover the transformative power of a truly stunning hairstyle.
Let these 27 styles inspire your next hair adventure, and embrace the joy of elevating your look with updos that are as unique and special as you are.
