
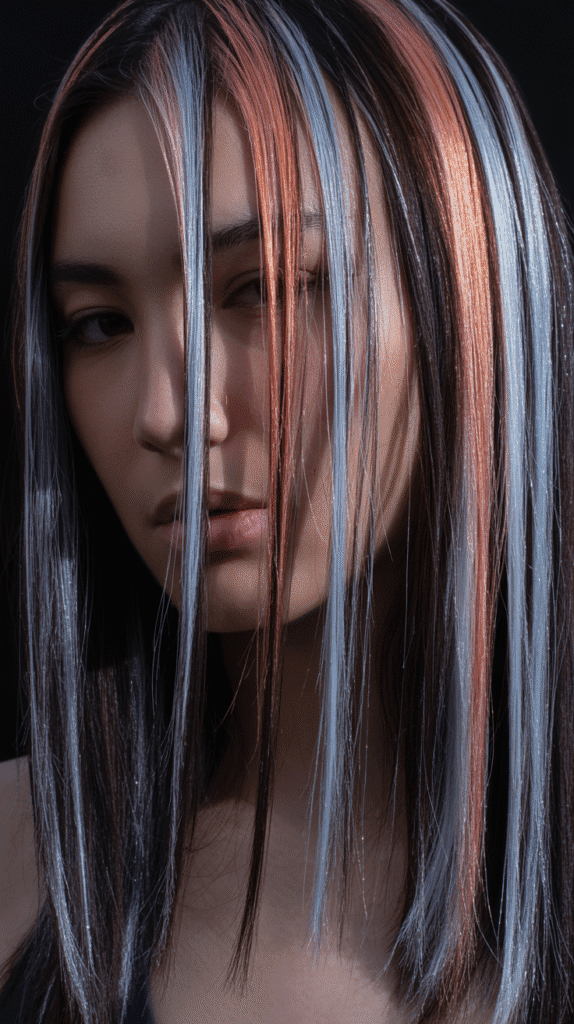
Straight hair often gets labeled as simple or one-dimensional, but nothing could be further from the truth.
When you explore the world of whimsical hairstyles designed specifically for straight locks, you’ll discover endless possibilities that transform sleek strands into graceful works of art.
Whether you’re preparing for a special occasion or simply want to elevate your everyday look, 27 Chic Whimsical Hairstyles for Straight Hair That Add a Touch of Grace offers you a carefully curated collection that celebrates the natural beauty of straight hair while adding ethereal charm.
This comprehensive guide walks you through romantic braids, elegant twists, playful accessories, and sophisticated updos that work harmoniously with your hair’s natural texture.
Each style has been selected to help you express your personality while maintaining that coveted touch of whimsy and grace that makes heads turn.
From office-appropriate looks to dreamy date-night styles, you’ll find inspiration for every moment of your life, proving that straight hair is the perfect canvas for creativity and elegance.
1. Ribbon-Woven Half-Up Style
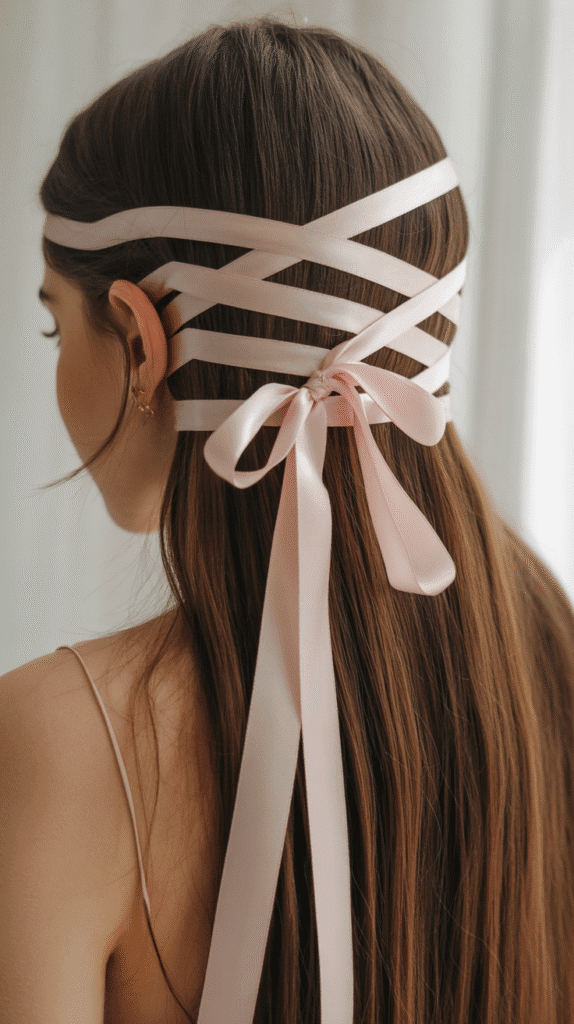
The ribbon-woven half-up style brings a fairy-tale quality to your straight hair by incorporating delicate ribbons through sectioned pieces.
This look works beautifully for both casual outings and semi-formal events, offering versatility that adapts to your lifestyle.
- Take a horizontal section from ear to ear across the crown of your head, leaving the bottom half down for a balanced silhouette.
- Divide the top section into three equal parts and secure each temporarily with clips to maintain organization.
- Thread a thin ribbon (approximately 1/4 inch wide) through the first section by weaving it over and under small subsections.
- Repeat the weaving process with the remaining two sections, ensuring the ribbon maintains consistent tension throughout.
- Secure all three sections together at the back with a clear elastic band, then tie the ribbon ends into a delicate bow.
- Leave some face-framing pieces loose near your temples to soften the overall look and add dimension.
- Apply a light-hold hairspray to keep flyaways in check without making the style appear stiff or unnatural.
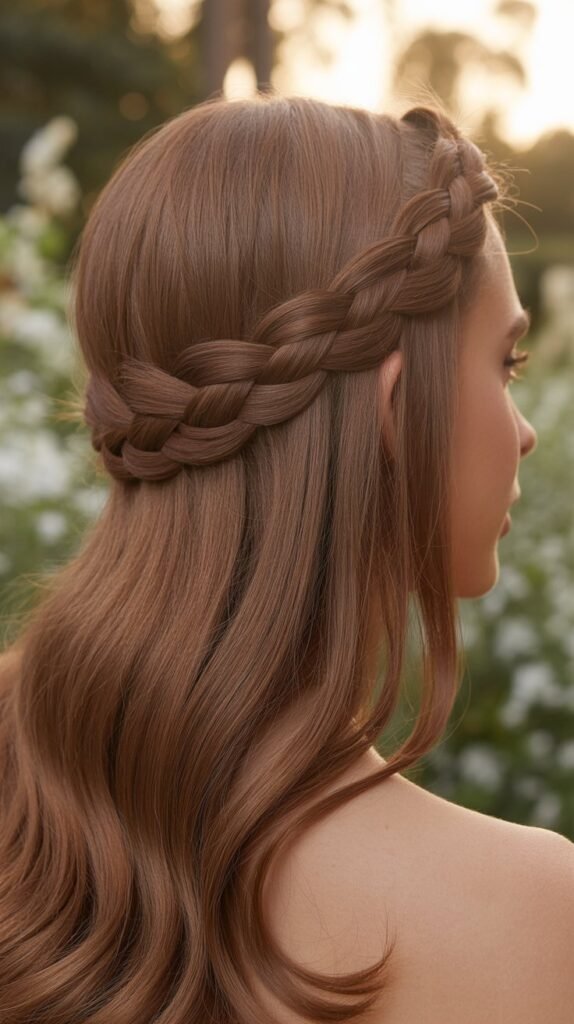
2. Twisted Crown with Loose Ends
This twisted crown creates a romantic halo effect around your head while showcasing the sleek beauty of straight hair cascading down your back.
The style combines structure with softness, making it ideal for garden parties or brunch gatherings.
- Part your hair down the middle to create two equal sections that will form the foundation of your crown.
- Take a small section from the front of one side and begin twisting it backward toward your ear.
- Continue adding small amounts of hair to the twist as you work your way around the head, similar to a rope braid technique.
- Secure the first twist at the back of your head with bobby pins that match your hair color for seamless blending.
- Repeat the process on the opposite side, ensuring both twists meet symmetrically at the back.
- Cross the ends of both twists over each other and pin them securely beneath the crown for a polished finish.
- Gently pull and loosen the twists slightly to create fuller, more relaxed-looking texture while maintaining the structure.
3. Pearl-Adorned Low Ponytail
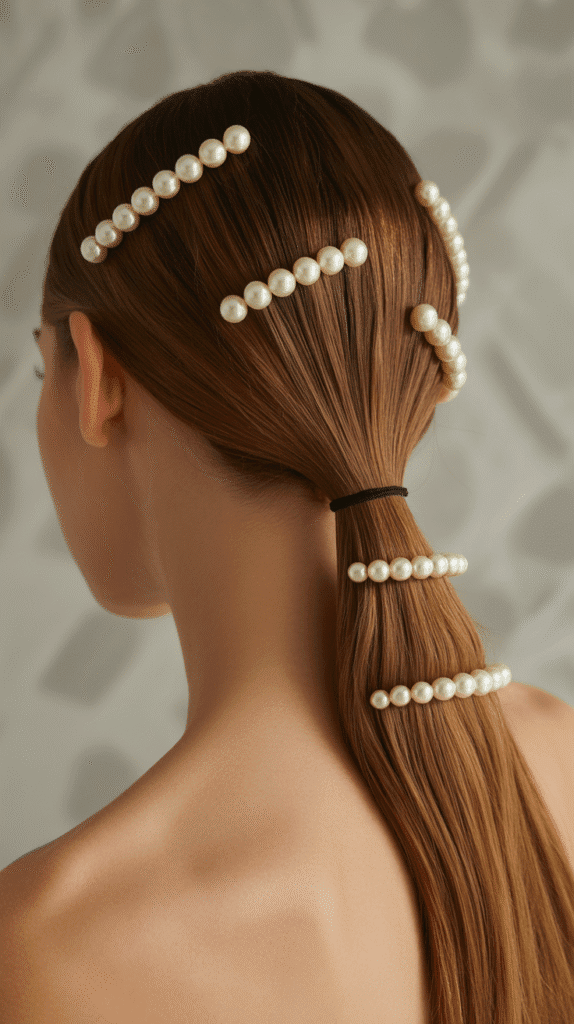
A pearl-adorned low ponytail transforms a classic style into something extraordinary by incorporating lustrous pearls throughout the length.
This elegant option works perfectly for evening events where you want to appear sophisticated yet approachable.
- Brush your hair thoroughly to remove any tangles and create the smooth foundation necessary for this polished style.
- Gather all your hair at the nape of your neck and secure it with a hair elastic that matches your hair color.
- Take a small section of hair from the ponytail and wrap it around the elastic to conceal it completely.
- Secure the wrapped section with a bobby pin tucked underneath the ponytail for invisible hold.
- Insert pearl hairpins at varying intervals throughout the length of the ponytail, spacing them approximately 2-3 inches apart.
- Alternate the placement of pearls slightly to the left and right of center for a more organic, scattered appearance.
- Apply a shine serum to the ponytail to enhance the glossy finish that complements the pearl accessories beautifully.
4. Side-Swept Waterfall Braid
The side-swept waterfall braid creates cascading sections that fall like gentle waterfalls, adding movement and dimension to straight hair.
This romantic style works exceptionally well for weddings, proms, or any occasion where you want to feel like a princess.
- Create a deep side part on your preferred side to establish the starting point for your waterfall braid.
- Take a small three-strand section near your hairline and begin braiding a standard three-strand braid.
- After the first stitch, drop the bottom strand and let it fall freely instead of incorporating it back into the braid.
- Pick up a new section of hair from above to replace the dropped strand and continue the braiding pattern.
- Continue this waterfall technique as you work diagonally across your head toward the opposite ear.
- Secure the braid with a small clear elastic when you reach the desired endpoint behind your ear.
- Curl the dropped sections gently with a curling iron on low heat if you want to add extra dimension and texture.
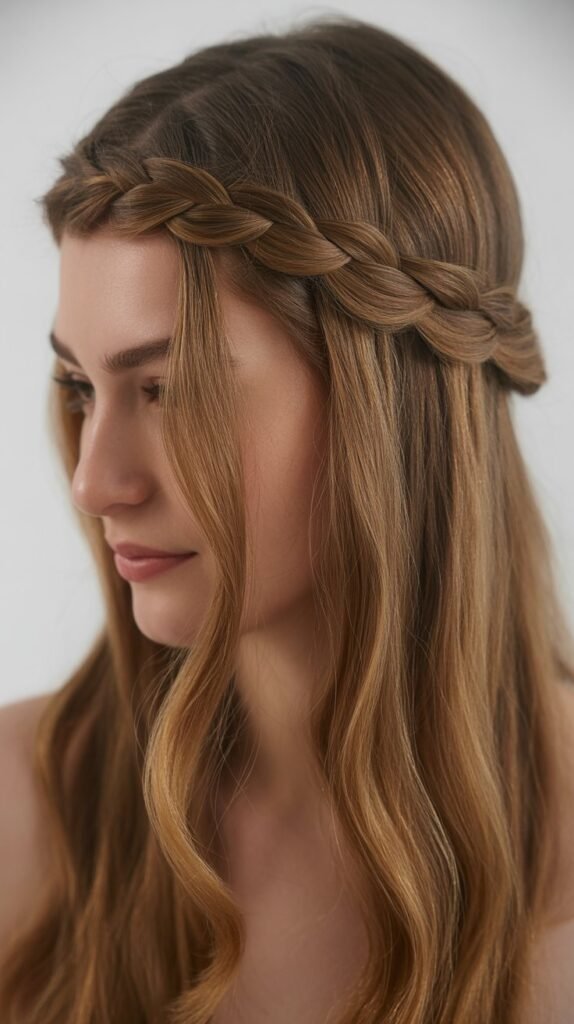
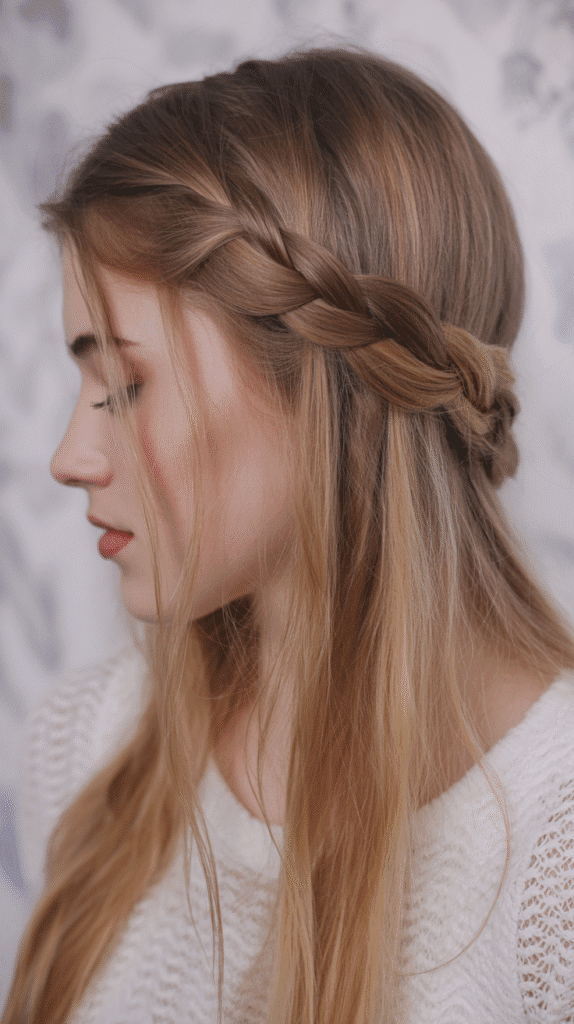
5. Braided Headband with Flowing Hair
This braided headband style uses your own hair to create a natural-looking accessory that frames your face beautifully.
The contrast between the structured braid and flowing straight hair creates visual interest without overwhelming your features.
- Section off hair from temple to temple, approximately one inch back from your natural hairline.
- Divide this section into three equal strands and begin creating a standard three-strand braid.
- Keep the braid tight and close to your head to ensure it stays in place throughout the day like a true headband.
- Braid all the way across to the opposite temple, maintaining consistent tension for an even appearance.
- Secure the end with a small elastic band, then tuck it behind your ear and pin it in place.
- Use a texturizing spray on the loose flowing hair to create subtle separation and prevent it from looking too flat.
- Adjust face-framing pieces around your cheeks and forehead to soften the overall look and add dimension.
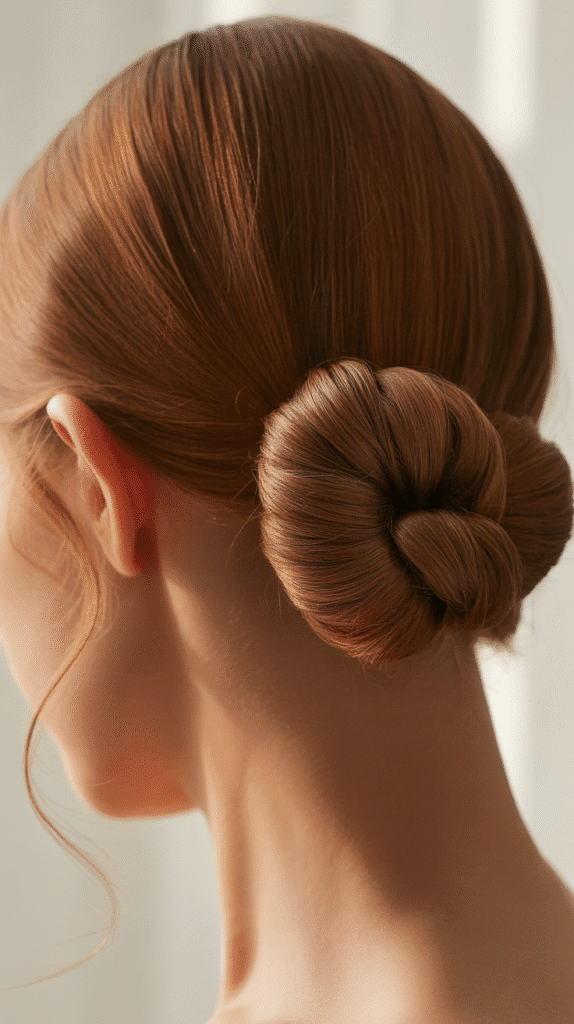
6. Low Twisted Chignon
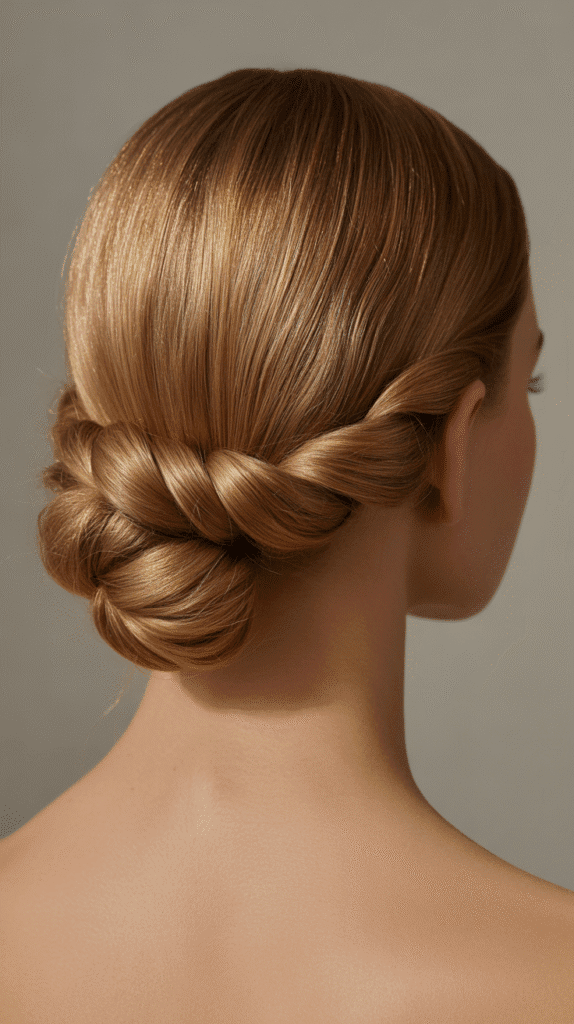
The low twisted chignon offers timeless elegance with a whimsical twist, perfect for professional settings or formal occasions.
This style keeps hair securely in place while maintaining a soft, romantic appearance.
- Gather your hair into a low ponytail at the nape of your neck without using an elastic band yet.
- Divide the ponytail into two equal sections and twist each section individually in the same direction.
- Wrap the twisted sections around each other in opposite directions to create a rope-like texture.
- Coil the twisted rope around the base where your ponytail would be, forming a circular chignon shape.
- Secure with bobby pins inserted at various angles through the chignon to lock it firmly in place.
- Pull small pieces from the chignon gently to create a fuller, more voluminous appearance.
- Finish with light hairspray and smooth any flyaways around your hairline with a small amount of pomade.
7. Zigzag Part with Sleek Styling
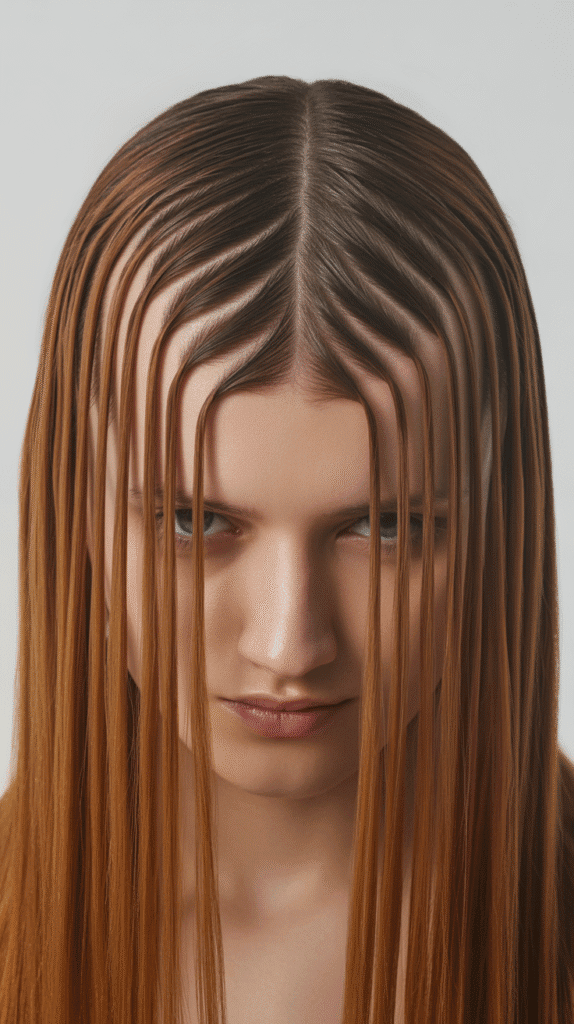
A zigzag part adds unexpected playfulness to otherwise sleek, straight hair, creating visual intrigue without requiring complex styling techniques.
This quick style works perfectly for casual days when you want something different.
- Use a rattail comb to create your zigzag pattern, starting at the front of your hairline.
- Move the comb back and forth in sharp angles as you work toward the crown of your head.
- Keep the zigzag pattern consistent in width and angle for a deliberate, polished appearance rather than random.
- Continue the part all the way to your crown, then let it blend into your natural hair fall.
- Apply smoothing serum to both sections of hair to enhance the sleek, glossy finish.
- Use a flat iron on low heat if needed to ensure perfectly straight sections that showcase the part clearly.
- Set with anti-humidity spray to maintain the crisp part line throughout the day, especially in humid conditions.
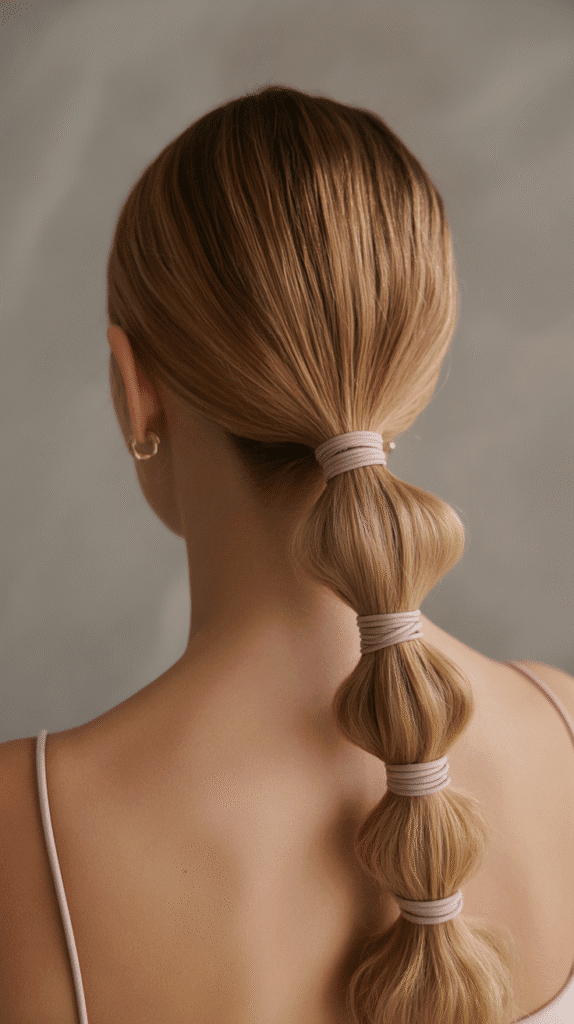
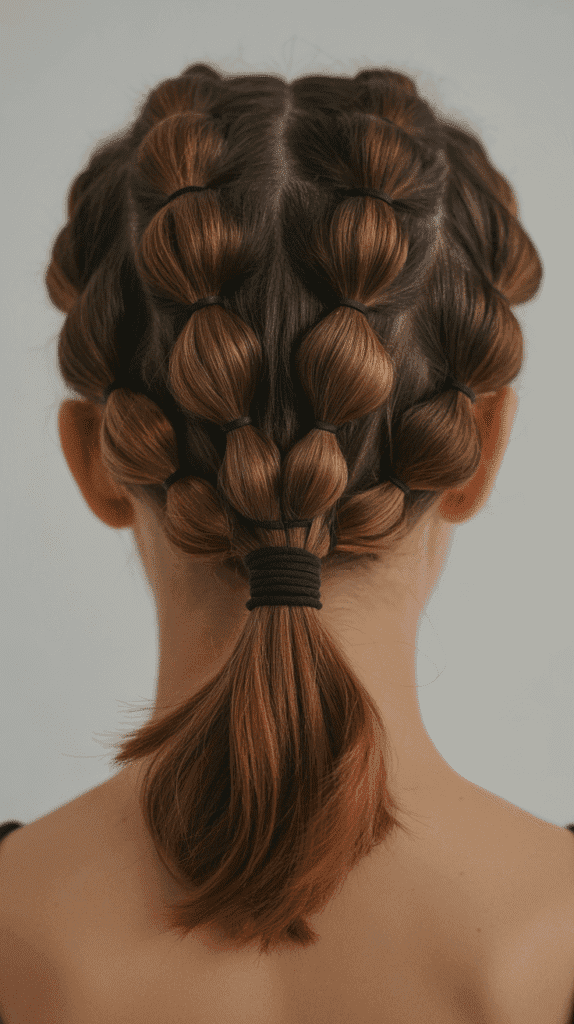
8. Half-Up Bubble Ponytail
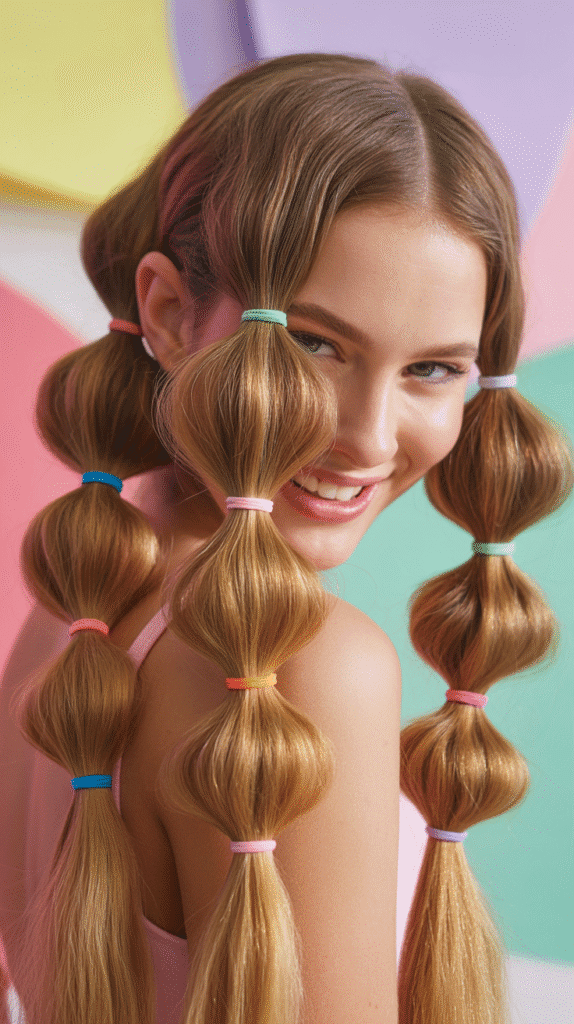
The half-up bubble ponytail creates dimensional spheres along the length of a half-ponytail, adding playful volume and visual interest.
This trendy style works beautifully for festivals, casual outings, or whenever you want to express your creative side.
- Section the top half of your hair from ear to ear and secure it into a ponytail at your crown.
- Place elastic bands down the length of the ponytail at 2-3 inch intervals, depending on your hair length.
- Gently pull and pancake each section between the elastics to create rounded bubble shapes.
- Ensure each bubble is evenly sized by pulling the same amount of hair from each section.
- Leave the bottom portion of your hair flowing freely to create contrast with the structured bubbles above.
- Apply texture spray to the loose hair for added dimension and to prevent it from looking flat.
- Secure flyaways around the elastic bands with a small amount of gel or pomade for a polished finish.
9. Floral Crown with Straight Lengths
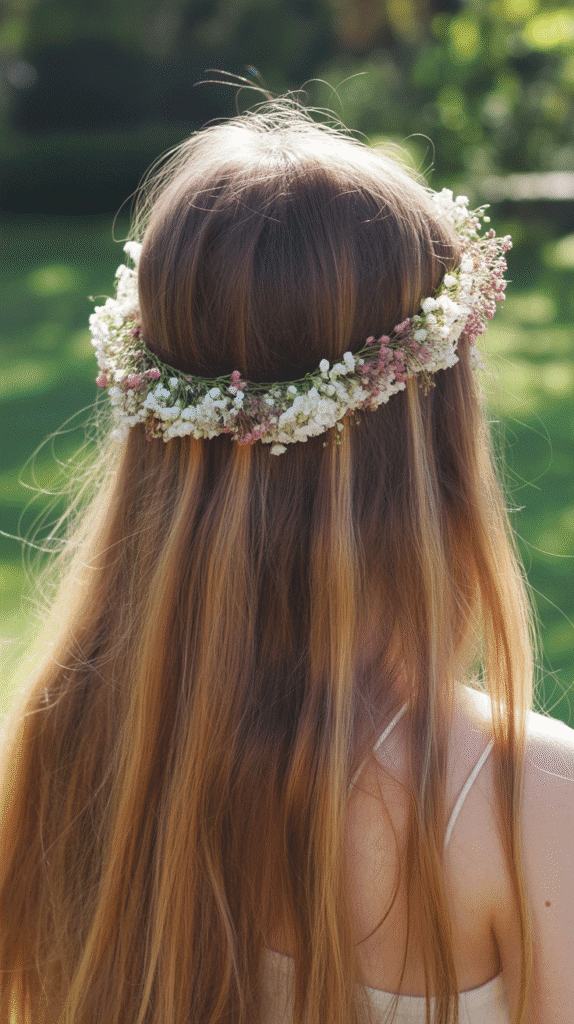
Incorporating fresh or artificial flowers into your straight hair creates an instantly romantic, garden-inspired look.
This style celebrates the natural beauty of straight hair while adding a whimsical, ethereal quality perfect for outdoor celebrations.
- Choose flowers that complement your hair color and the occasion, opting for smaller blooms for a more delicate appearance.
- Create a base by braiding a thin section of hair from temple to temple if you want a more secure foundation.
- Attach flowers using small floral wire or bobby pins, starting at one temple and working across.
- Space the flowers evenly or cluster them asymmetrically, depending on your preferred aesthetic.
- Tuck greenery between flowers to create a more lush, natural-looking crown arrangement.
- Leave your straight hair flowing freely behind the floral crown to showcase its sleek texture as a beautiful contrast.
- Set with flexible-hold hairspray to keep everything in place without making the style appear stiff or artificial.
10. Side-Braided Ponytail
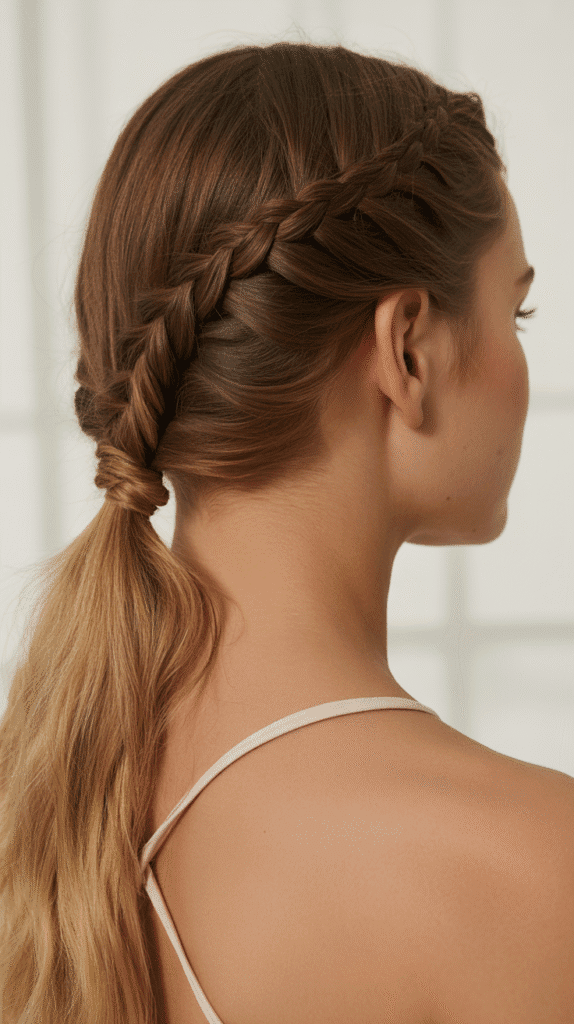
This style combines the elegance of a braid with the simplicity of a ponytail, creating a look that’s both practical and beautiful.
The side placement adds asymmetrical interest that’s particularly flattering for most face shapes.
- Create a deep side part to establish which side will feature your ponytail and braid.
- Take a section from the heavier side of your part near your hairline to begin your braid.
- Braid this section in your preferred style (three-strand, Dutch, or French) working toward your ear.
- Gather all your hair including the braid to one side and secure it into a ponytail behind your ear.
- Wrap a small section of hair around the elastic to conceal it and create a polished appearance.
- Apply shine serum to the ponytail to enhance the glossy, healthy appearance of your straight hair.
- Gently pull at the braid to create slight fullness if you want a more relaxed, bohemian feel.
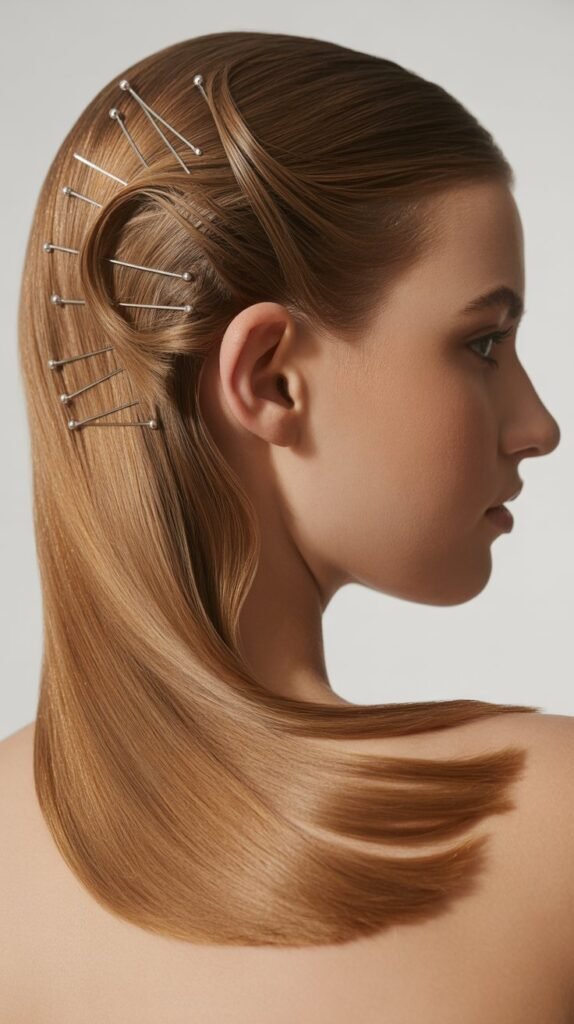
11. Criss-Cross Bobby Pin Design
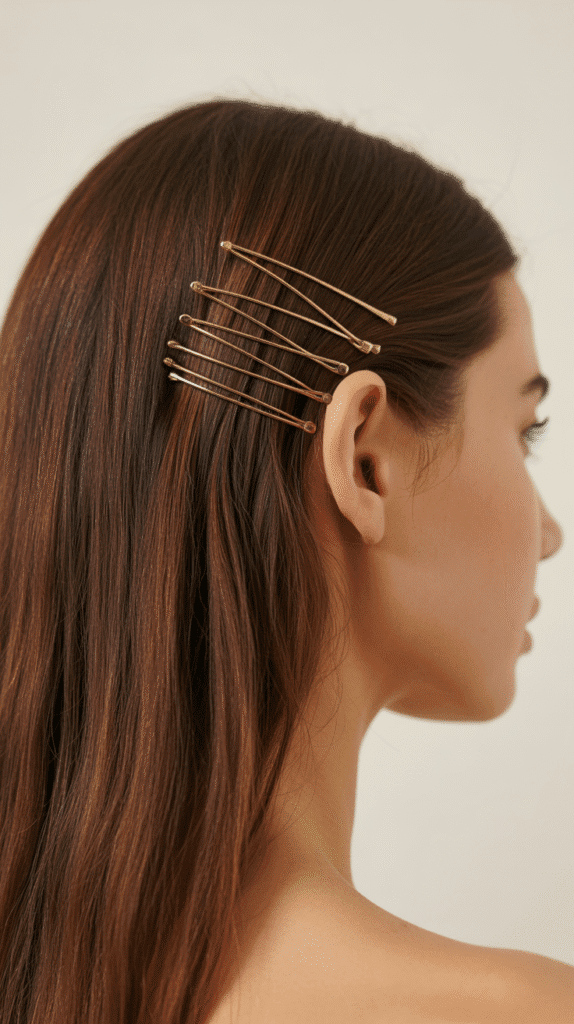
Creating patterns with bobby pins transforms functional hair accessories into decorative elements that add artistic flair to straight hair.
This minimalist approach works perfectly for modern, fashion-forward looks.
- Start with completely smooth hair by flat ironing if necessary to create the perfect canvas for your pin design.
- Section off a small area where you want to create your bobby pin pattern, typically near the temple.
- Choose coordinating bobby pins in metallic gold, rose gold, or colors that complement your outfit.
- Create your pattern by placing pins in criss-cross formations, parallel lines, or geometric shapes.
- Space the pins evenly for a deliberate, intentional appearance rather than random placement.
- Secure each pin properly by sliding it in the direction of hair growth and pushing it flat against your scalp.
- Balance the look by keeping the opposite side simple and sleek to prevent overwhelming the overall style.
12. Low Ponytail with Wrapped Sections
This elevated ponytail features wrapped sections throughout its length, creating visual breaks and added dimension.
The wrapped segments give the illusion of a more complex style while remaining relatively simple to execute.
- Create a low ponytail at the nape of your neck, securing it with a hair elastic that matches your color.
- Take a small section from the ponytail and wrap it around the elastic to conceal it completely.
- Secure this wrapped section with a bobby pin hidden underneath the ponytail.
- Move down approximately 3 inches and take another small section from the ponytail to wrap around it.
- Continue this wrapping pattern down the length of your ponytail, spacing wraps evenly.
- Secure each wrapped section with a small clear elastic hidden underneath before adding the next wrap.
- Finish with shine spray to enhance the polished, sophisticated appearance of this segmented style.
13. Twisted Side Bun
The twisted side bun brings asymmetrical elegance to straight hair, positioning the focal point at an unexpected angle.
This style works beautifully for formal events while maintaining an approachable, romantic quality.
- Create a deep side part and gather all your hair to one side, behind your ear.
- Divide the gathered hair into two equal sections for twisting.
- Twist each section individually in the same direction, keeping the twists tight and controlled.
- Wrap the twisted sections around each other, then coil them into a bun shape.
- Secure the bun with bobby pins inserted at multiple angles for maximum hold.
- Pull out a few face-framing pieces on the opposite side to balance the asymmetrical placement.
- Use texturizing spray on the loose pieces to create soft, wispy texture around your face.
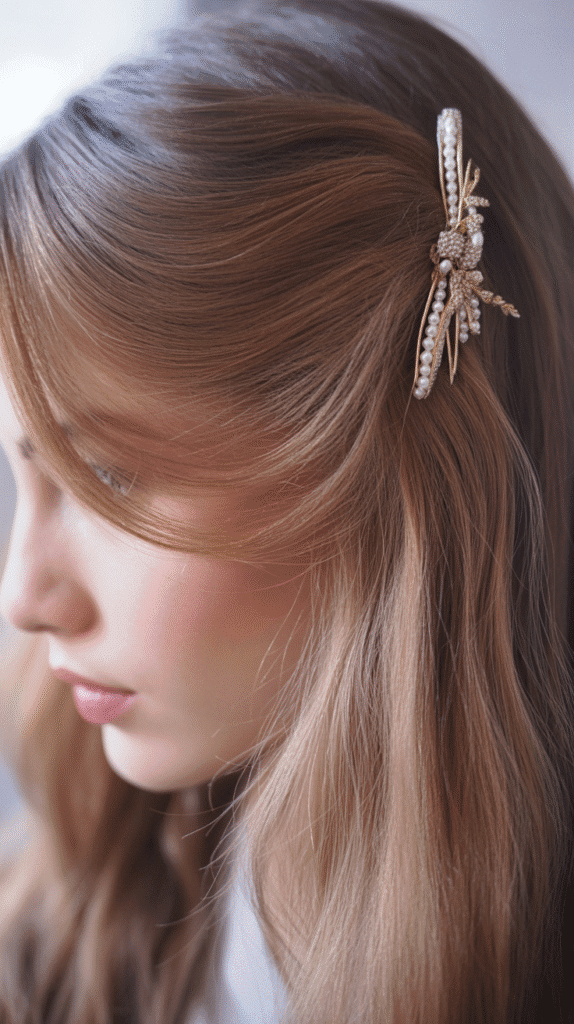
14. Straight Hair with Decorative Clips
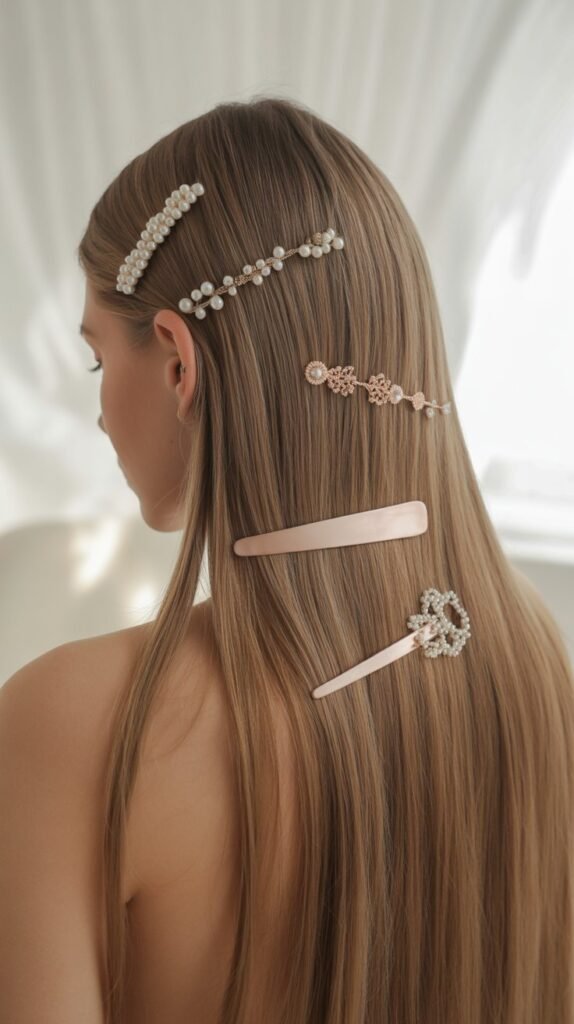
Strategic placement of decorative hair clips adds instant personality and whimsy to straight hair without requiring any complex styling.
This approach celebrates the natural beauty of straight locks while incorporating trendy accessories.
- Select a collection of clips that share a common theme or color palette for cohesive styling.
- Choose one side of your head as the focal point for your clip arrangement.
- Place the largest clip first as your anchor point, typically near the temple or behind the ear.
- Add smaller clips around the anchor in a cluster or scattered pattern, depending on your preference.
- Vary the angles of clips to create visual interest and prevent a flat, uniform appearance.
- Keep the opposite side simple and tucked behind your ear to maintain balance in the overall look.
- Use clips functionally to actually hold hair back while also serving as decorative elements for dual purposes.
15. Half-Up Top Knot with Loose Waves
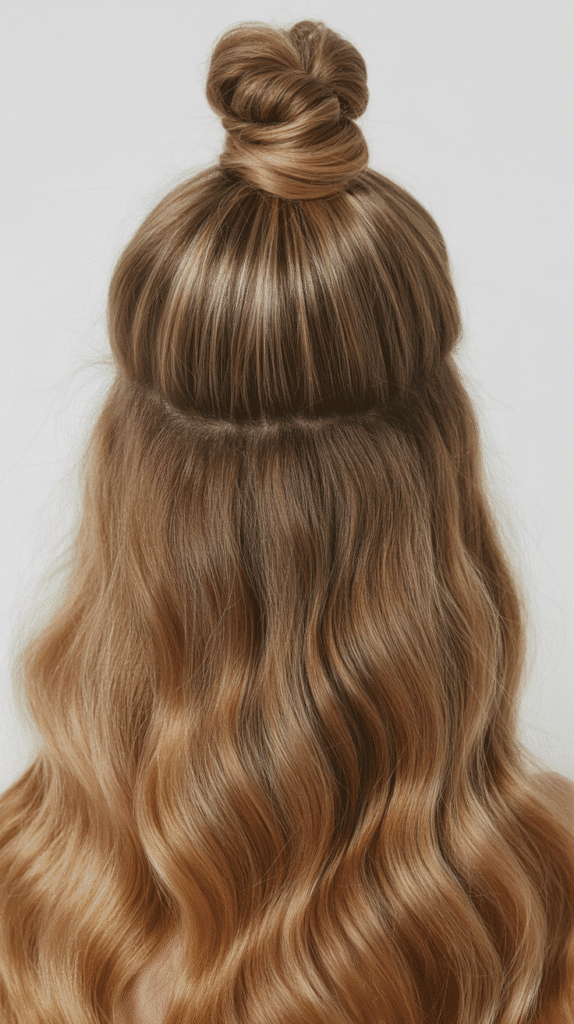
While your straight hair provides the foundation, adding loose waves to the bottom half creates beautiful contrast with a sleek half-up top knot.
This style offers the best of both worlds—structure and softness.
- Section the top half of your hair from ear to ear, creating a clean horizontal division.
- Smooth the top section with a brush and gather it at the crown of your head.
- Twist the gathered section into a rope and wrap it around itself to form a compact top knot.
- Secure with bobby pins and a hair elastic, ensuring the knot sits firmly at your crown.
- Use a large-barrel curling iron on the bottom section to create loose, beachy waves for contrast.
- Apply texturizing spray to the waved section to enhance separation and create a more relaxed appearance.
- Leave some pieces around your face unwaved for a natural, effortless transition between sections.
16. Ribbon-Tied Low Braid
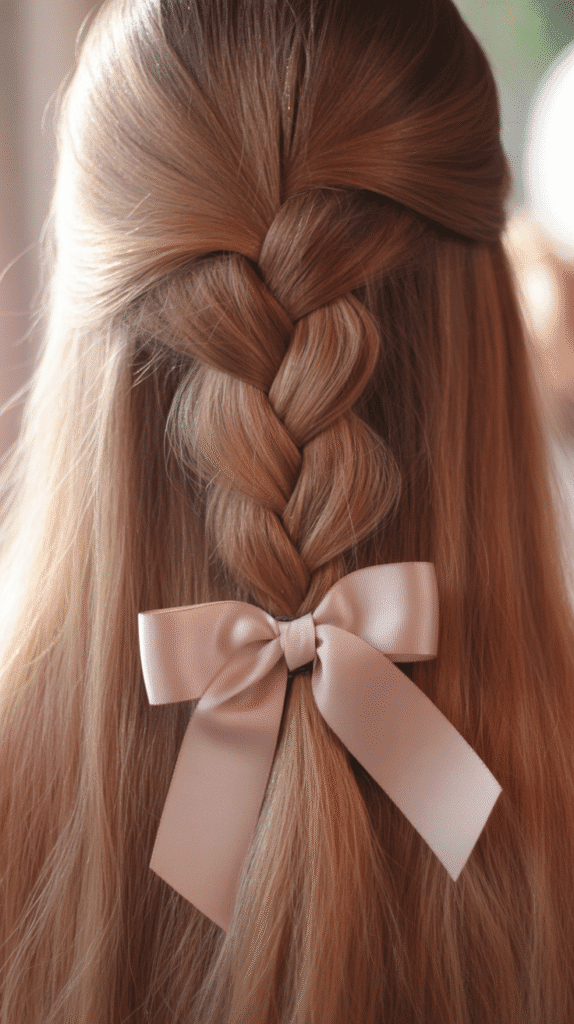
A single braid adorned with a ribbon bow at the end creates simple elegance perfect for everyday wear.
This style showcases the sleekness of straight hair while adding a touch of feminine charm.
- Brush your hair thoroughly to remove all tangles and create a smooth starting point.
- Gather all your hair at the nape of your neck without securing it yet with an elastic.
- Divide into three equal sections and begin a classic three-strand braid down the length.
- Keep the braid slightly loose rather than tight for a more relaxed, whimsical appearance.
- Secure the end with a small clear elastic band approximately one inch from the ends.
- Tie a ribbon around the elastic, concealing it completely, then create a bow with the ribbon ends.
- Gently pull at the braid sections to create slight fullness and a softer overall look.
17. Asymmetrical Tuck and Pin
This sleek style features hair tucked behind one ear and secured with pins while the opposite side drapes forward, creating striking asymmetry.
The look is modern, minimalist, and highlights the glossy beauty of straight hair.
- Create a deep side part to establish the asymmetrical foundation of this style.
- Take the smaller section (on the side with less hair) and smooth it back behind your ear.
- Apply smoothing gel to this section to ensure it stays flat and sleek against your head.
- Secure with multiple bobby pins placed vertically behind your ear, spacing them evenly down the length.
- Leave the opposite side completely free to drape forward naturally over your shoulder.
- Use a flat iron on both sections to maximize shine and create the sleekest possible finish.
- Set with strong-hold hairspray on the pinned side only to maintain the tucked position throughout the day.
18. Braided Crown Updo
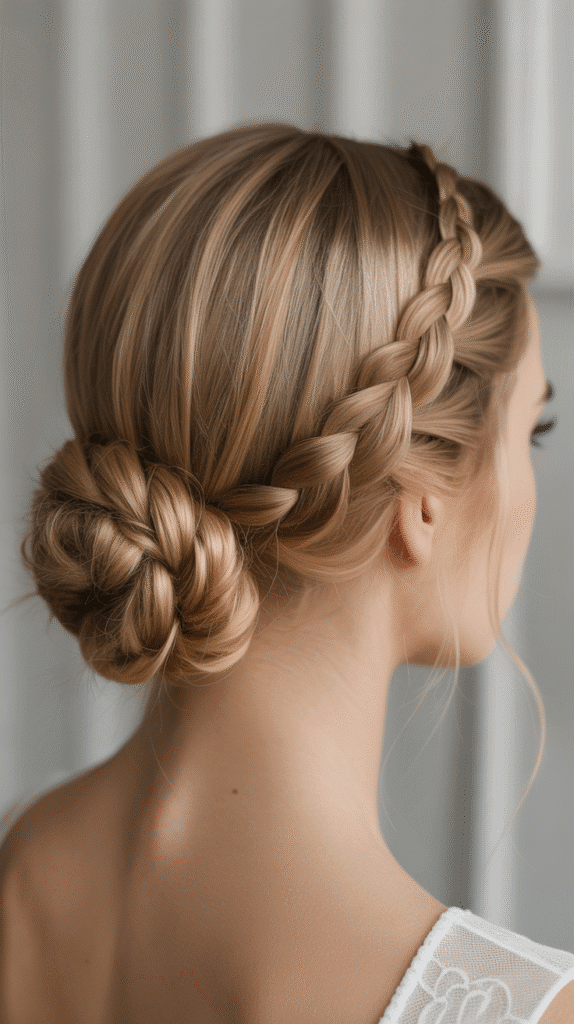
The braided crown updo wraps braids around your head like a halo while incorporating all your hair into an elegant updo.
This sophisticated style works beautifully for weddings or formal events where you want to appear polished and graceful.
- Part your hair down the center and divide it into two equal sections.
- Begin braiding each section from the front, working backward along the sides of your head.
- Continue braiding until you reach the nape of your neck on both sides.
- Cross the braids over each other at the back and pin them securely in place.
- Gather any remaining length and twist it into a low bun at the nape.
- Tuck the braid ends into the bun and secure everything with multiple bobby pins for stability.
- Gently pull at the braids to create fuller, more dimensional texture that softens the overall appearance.
19. Side Part with Deep Wave
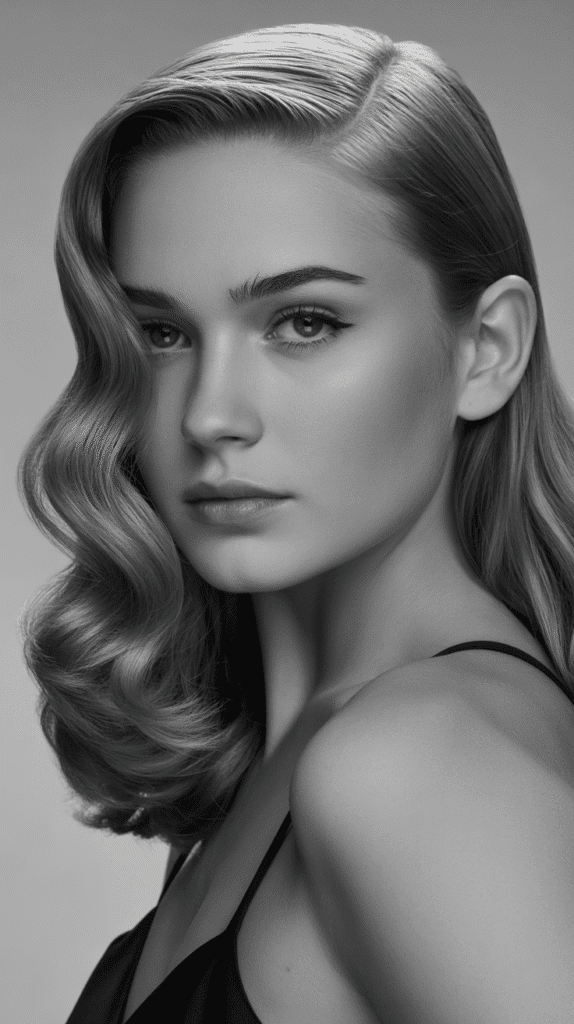
While straight hair is your natural texture, creating one deep, dramatic wave on the heavier side of a part adds vintage Hollywood glamour.
This style combines sleekness with movement for timeless elegance.
- Create an extremely deep side part positioned well to one side of your head for maximum drama.
- Apply setting lotion to the hair on the heavier side where you’ll create your wave.
- Use your fingers or a comb to mold the hair into an S-curve shape near your temple.
- Secure the wave with duckbill clips while it sets, positioning them along the curves you’ve created.
- Allow the style to dry completely (use a hair dryer on low heat if necessary) before removing clips.
- Remove clips carefully without disturbing the wave pattern you’ve created.
- Finish with strong-hold hairspray to maintain the wave throughout your event, ensuring it doesn’t fall flat.
20. Ponytail with Braided Wrap
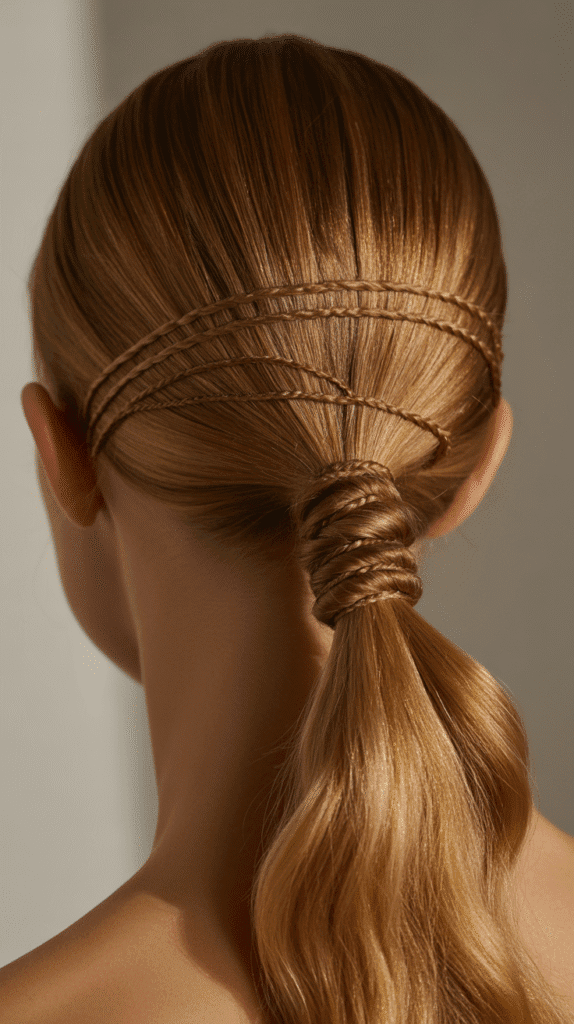
This style elevates a simple ponytail by wrapping a braid around the elastic, creating the illusion of a more complex hairstyle.
The braided wrap adds texture and visual interest while maintaining practicality.
- Create a ponytail at your desired height (high, mid, or low) and secure with a strong elastic.
- Before gathering all hair, leave out one small section specifically for creating the braid wrap.
- Braid this small section in a three-strand braid all the way down to the ends.
- Wrap the braid around the base of your ponytail multiple times, covering the elastic completely.
- Secure the braid end by tucking it under the wrapped sections and pinning it in place.
- Apply smoothing serum to the ponytail itself to enhance shine and sleekness.
- Use hairspray on the braided wrap to prevent it from loosening throughout the day.
21. Double Twisted Half-Up
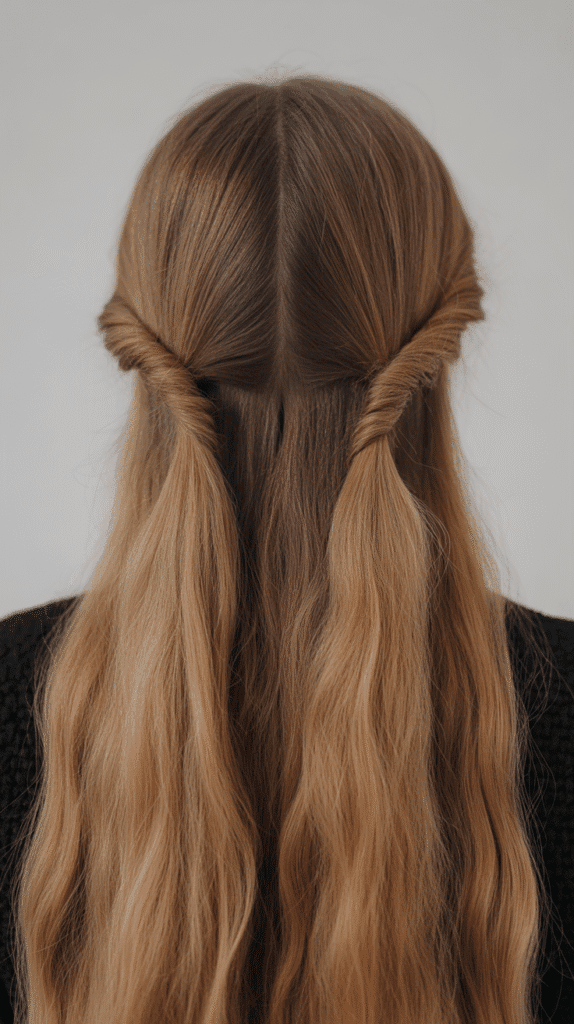
Two separate twisted sections meet at the back in this charming half-up style that adds dimension without overwhelming straight hair’s natural beauty.
The double twists create balanced symmetry that’s universally flattering.
- Take a section of hair from one temple, approximately 1-2 inches wide.
- Twist this section backward toward the center of your head, keeping tension consistent.
- Secure temporarily with a clip at the back of your head while you work on the opposite side.
- Repeat the twisting process on the other side, ensuring both twists are symmetrical in size.
- Bring both twists together at the center back and secure them with a clear elastic band.
- Cross the twisted sections over each other before securing for added dimension and texture.
- Gently pull at the twists to create fuller volume and a softer, more romantic appearance throughout.
22. Low Ponytail with Silk Scarf

Wrapping a silk scarf through and around a low ponytail adds color, texture, and a touch of vintage sophistication.
This style works perfectly when you want to elevate a simple ponytail into something special.
- Create a low ponytail at the nape of your neck and secure it with a clear elastic band.
- Choose a silk scarf in a color or pattern that complements your outfit and personal style.
- Fold the scarf lengthwise into a long, narrow strip approximately 2-3 inches wide.
- Wrap the scarf around the elastic base of your ponytail, covering it completely with the fabric.
- Thread one end of the scarf through the ponytail from underneath, pulling it through to the top.
- Tie the scarf ends in a bow or knot on top of the ponytail, allowing the ends to flow with your hair.
- Adjust the scarf placement to ensure it’s centered and the bow or knot looks intentional and polished.
23. Straight Hair with Glitter Roots
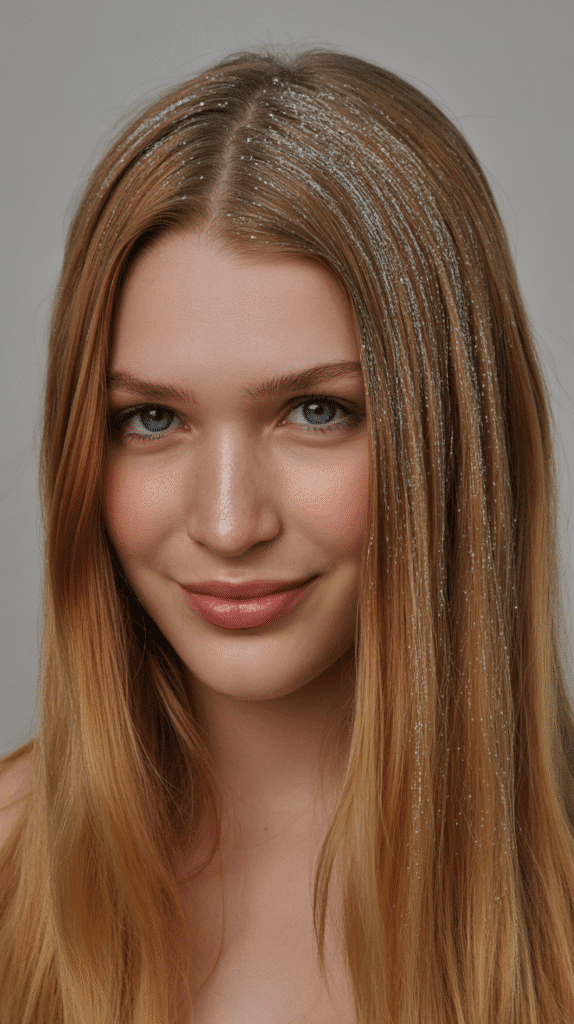
Adding glitter to your part or roots creates festival-ready glamour that catches light beautifully.
This temporary embellishment transforms straight hair into something magical without permanent commitment.
- Choose hair-safe glitter gel or spray specifically designed for use on hair rather than craft glitter.
- Section your hair along your desired part line to access the roots clearly.
- Apply the glitter product directly to your part using the applicator or a small brush.
- Work in small sections to ensure even coverage and prevent clumping or excess product.
- Let the glitter dry completely before touching or styling further to prevent smudging.
- Add glitter strategically to other areas like your temples or crown for additional sparkle if desired.
- Carry the product with you for touch-ups throughout the day, especially if dancing or in humid conditions.
24. Pinned-Back Waves Section
Pinning back one side while leaving the opposite side flowing creates asymmetry that’s both practical and stylish.
This simple technique instantly updates your look while keeping hair out of your face.
- Create a side part positioned slightly off-center for the most flattering asymmetry.
- Take a section from the side with less hair, starting at your temple.
- Smooth this section back toward your ear using a brush and light smoothing product.
- Secure with decorative pins or clips placed horizontally behind your ear.
- Layer multiple pins if desired for added security and visual interest.
- Leave the opposite side completely free to flow naturally forward over your shoulder.
- Apply shine serum to both sides to enhance the glossy finish that straight hair displays so beautifully.
25. Twisted Low Ponytail
Multiple twists combine into a single low ponytail, creating texture and dimension before the hair flows freely.
This style offers complexity in the construction but simplicity in the final appearance.
- Section your hair into 4-6 vertical sections from your hairline to your crown.
- Twist each section individually from root to end, maintaining consistent tension throughout.
- Keep the twists loose enough that they create dimension but tight enough to maintain their structure.
- Gather all twisted sections together at the nape of your neck.
- Secure with a hair elastic that matches your hair color for seamless blending.
- Leave the length of the ponytail untwisted and straight for beautiful contrast with the twisted top.
- Wrap a small section of hair around the elastic to conceal it and create a polished finishing touch.
26. Straight Hair with Metallic Temporary Color
Applying metallic temporary hair color to select sections adds dimension and edge to straight hair.
This bold choice works perfectly for special events where you want to make a statement.
- Choose a temporary metallic spray or chalk that washes out easily for non-permanent color experimentation.
- Section off the areas you want to color, typically the top layers or face-framing pieces for maximum visibility.
- Protect your clothing with a cape or towel, as temporary colors can transfer while wet.
- Apply the color product according to package directions, working in thin layers for even coverage.
- Allow each layer to dry before adding additional product to prevent clumping or uneven color.
- Set the color with hairspray or a setting spray to minimize transfer onto clothing throughout the day.
- Style as desired using heat tools on low settings to avoid affecting the temporary color’s staying power.
27. Cascading Side Braid
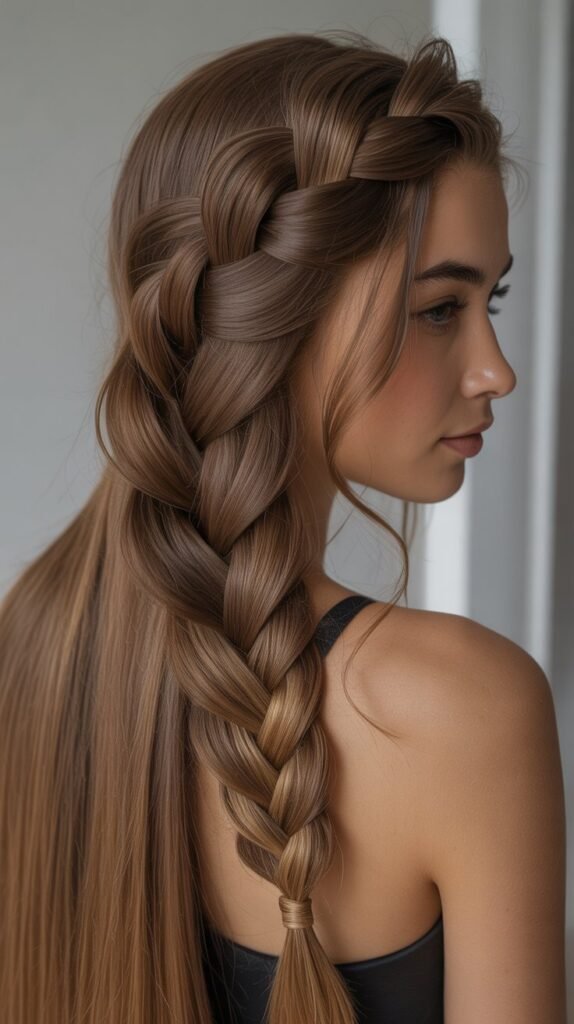
This romantic side braid falls over one shoulder, creating a focal point that showcases the sleek beauty of straight hair within a braided structure.
The cascading placement adds femininity and grace to any outfit.
- Create a deep side part and brush all your hair over to one shoulder.
- Divide the hair into three equal sections at the point where your shoulder meets your neck.
- Begin a loose three-strand braid, keeping tension relaxed for a softer, more romantic appearance.
- Continue braiding all the way down the length, maintaining consistent looseness throughout.
- Secure the end with a clear or decorative elastic approximately 2 inches from the ends.
- Gently pull and pancake the braid by tugging lightly at the edges of each section for fuller volume.
- Apply a light texturizing spray to create separation in the braid and enhance its dimensional appearance.
Common Mistakes to Avoid
- Over-processing with heat can damage straight hair’s natural sleekness and make it appear dull or fried over time.
- Using too much product weighs down straight hair quickly, making styles appear greasy rather than polished and intentional.
- Skipping heat protectant when using hot tools leads to cumulative damage that affects hair’s natural shine and smoothness.
- Pulling styles too tight creates tension headaches and can lead to breakage around the hairline and temples over time.
- Neglecting to secure bobby pins properly results in styles falling apart throughout the day, requiring constant readjustment.
- Choosing accessories that don’t match your hair color or style aesthetic can make the overall look appear disjointed rather than cohesive.
- Failing to prep hair properly with the right products means styles won’t hold as long or look as polished as intended.
Conclusion
Creating beautiful hairstyles for straight hair doesn’t require salon visits or professional expertise—just creativity, patience, and the right techniques.
expression and style transformation. From ribbon-woven creations to pearl-adorned ponytails, twisted crowns to cascading braids, each style celebrates the inherent beauty of straight hair while adding that magical touch of whimsy that makes you feel special.
These hairstyles prove that straight hair is far from boring—it’s actually the perfect canvas for both simple and intricate designs that adapt to every occasion in your life.
Whether you’re drawn to romantic, vintage-inspired looks or prefer modern, minimalist aesthetics, you now have a diverse collection of options that work harmoniously with your hair’s natural texture.
The key to mastering these styles lies in practice, patience, and understanding that each attempt brings you closer to perfection. Remember that the most beautiful hairstyle is one that makes you feel confident, comfortable, and authentically yourself.
As you experiment with these 27 Chic Whimsical Hairstyles for Straight Hair That Add a Touch of Grace, don’t be afraid to add your personal touches, combine elements from different styles, or adapt techniques to suit your unique preferences and lifestyle needs.
Your straight hair journey is uniquely yours, and these styles are simply tools to help you express the graceful, whimsical, and beautiful person you already are.
