
Finding the perfect hairstyle when you have a round face shape can feel overwhelming, but it doesn’t have to be.
Your round face, characterized by soft curves, full cheeks, and a gently rounded jawline, is incredibly versatile and can be beautifully complemented by strategic styling choices.
The key lies in understanding which hairstyles create visual length and angles that balance your natural proportions while enhancing your best features.
Top 27+ Slimming Hairstyles For Round Faces to Boost Confidence explores an extensive collection of flattering cuts, styles, and techniques specifically designed to elongate your face shape, define your features, and help you feel absolutely stunning.
This comprehensive guide will walk you through long layered cuts that create movement, textured bobs that add dimension, strategic bangs that frame your face perfectly, and styling techniques that professionals use to create the illusion of length.
Whether you prefer short, medium, or long hair, straight or curly textures, bold or subtle styles, you’ll discover numerous options that will transform how you see yourself and dramatically boost your confidence every single day.
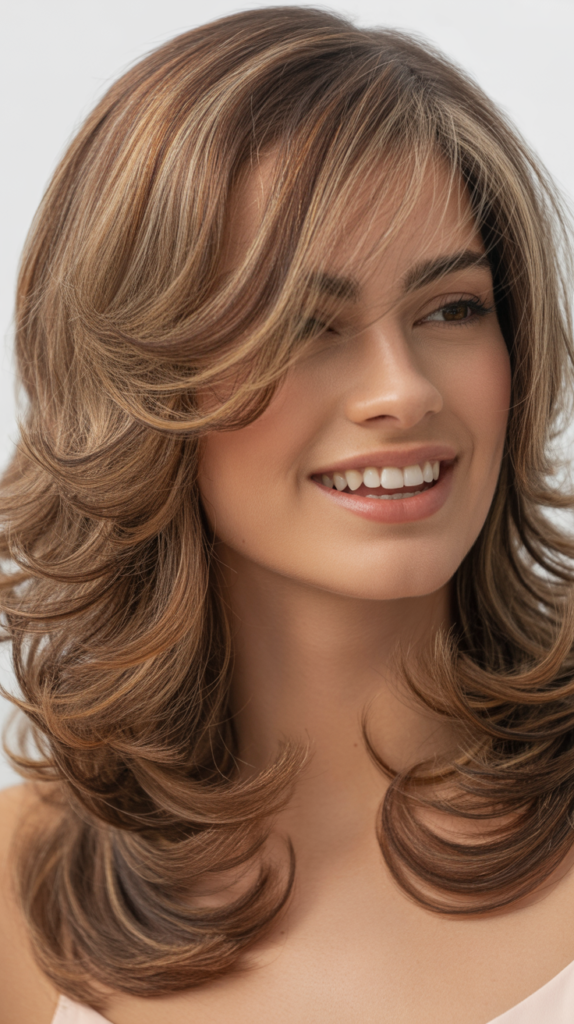
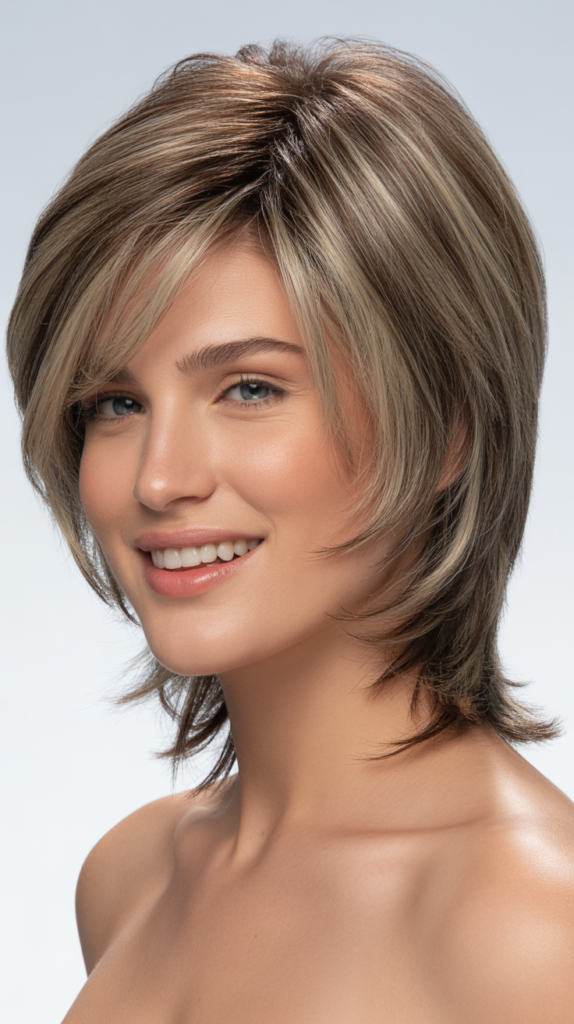
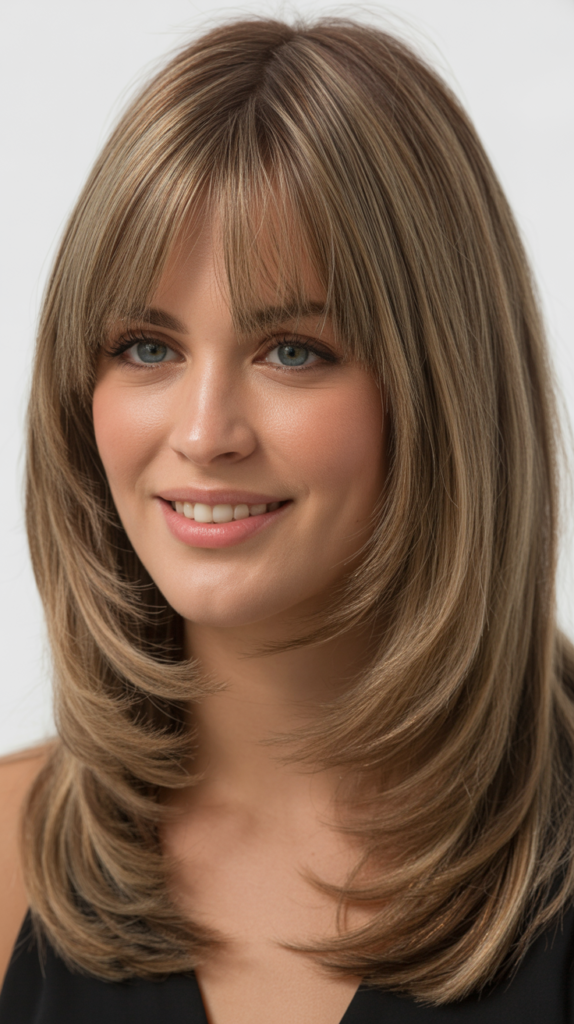
1. Long Layered Cuts with Face-Framing Pieces
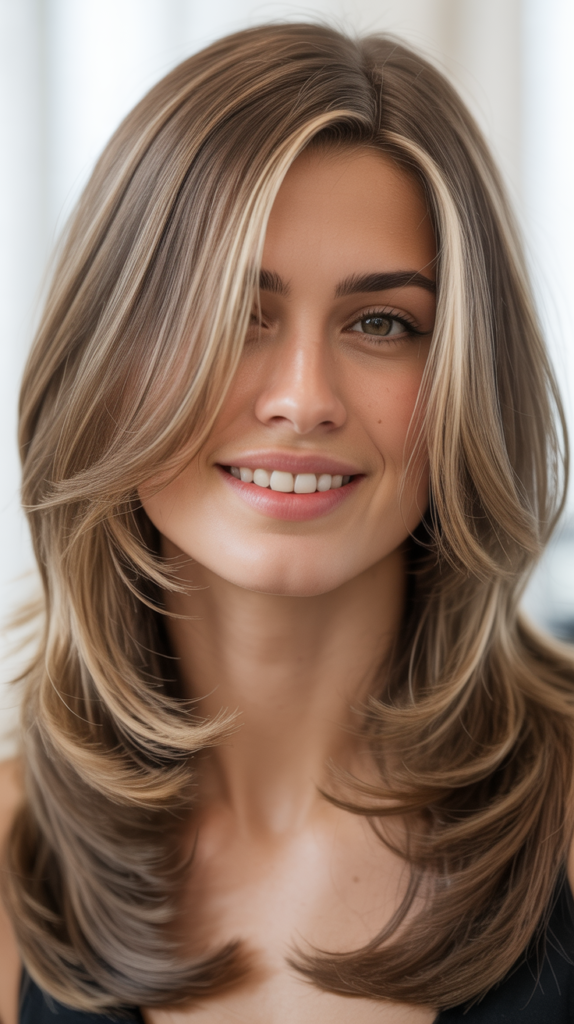
Long layered hairstyles with face-framing pieces are absolute game-changers for round faces because they create vertical lines that visually elongate your face shape.
The strategic placement of layers starting from the chin or below draws the eye downward rather than emphasizing width, while the face-framing pieces add angularity around the cheeks and jawline.
Why This Works:
- Long layers prevent the hair from creating a rounded silhouette that mirrors your face shape, instead establishing length and movement that slims your appearance.
- Face-framing pieces that start at the chin or collarbone create diagonal lines that guide the eye vertically, making your face appear longer and more oval.
- The layering technique removes bulk and weight from the sides of your face, preventing the hair from adding width to your cheeks.
- This style works beautifully with all hair textures, from straight to wavy to curly, making it universally flattering.
Styling Tips:
- Ask your stylist to begin the face-framing layers at chin level or slightly below to create maximum elongation.
- Use a round brush while blow-drying to add volume at the crown, which further lengthens your face shape.
- Apply a lightweight texturizing spray to enhance the movement of the layers without weighing them down.
- Part your hair slightly off-center or in a deep side part to add asymmetry and break up roundness.
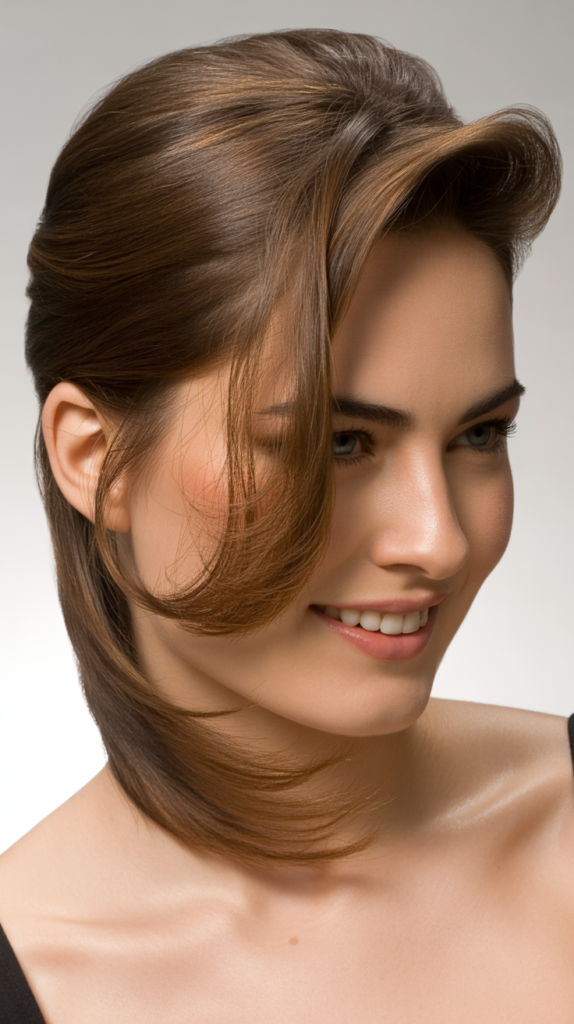
2. Side-Swept Bangs for Angular Definition
Side-swept bangs are incredibly effective at creating the illusion of angles and asymmetry on round faces, instantly breaking up the circular appearance.
These bangs sweep diagonally across the forehead, creating a flattering diagonal line that adds dimension and visual interest while drawing attention to your eyes.
Benefits of Side-Swept Bangs:
- The diagonal sweep creates an angular line that counteracts the soft curves of a round face, adding definition and structure.
- Side-swept bangs naturally draw the eye across the face rather than emphasizing its width, creating a slimming visual effect.
- This style adds sophistication and versatility, working equally well with casual and formal looks.
- The asymmetry prevents your face from appearing too symmetrical or round, adding dynamic movement to your overall appearance.
How to Style Them:
- Blow-dry your bangs using a round brush, directing them to sweep across your forehead from one side to the other.
- Use a flat iron to gently curve the ends of your bangs for a polished, face-framing effect.
- Apply a small amount of lightweight styling cream to keep bangs in place without making them stiff or greasy.
- Trim them regularly to maintain the perfect length—ideally, they should graze your eyebrows or sit just below them.
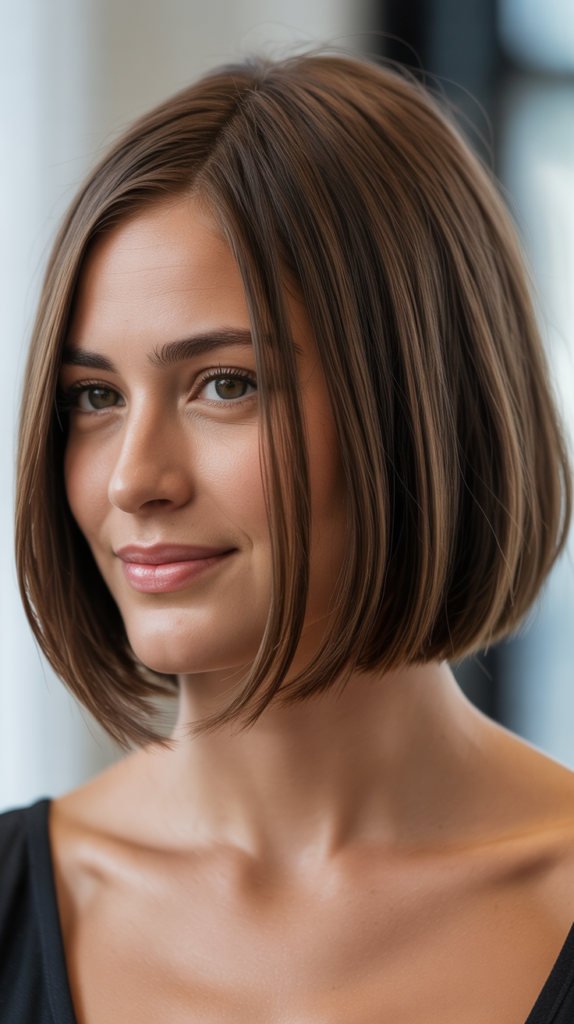
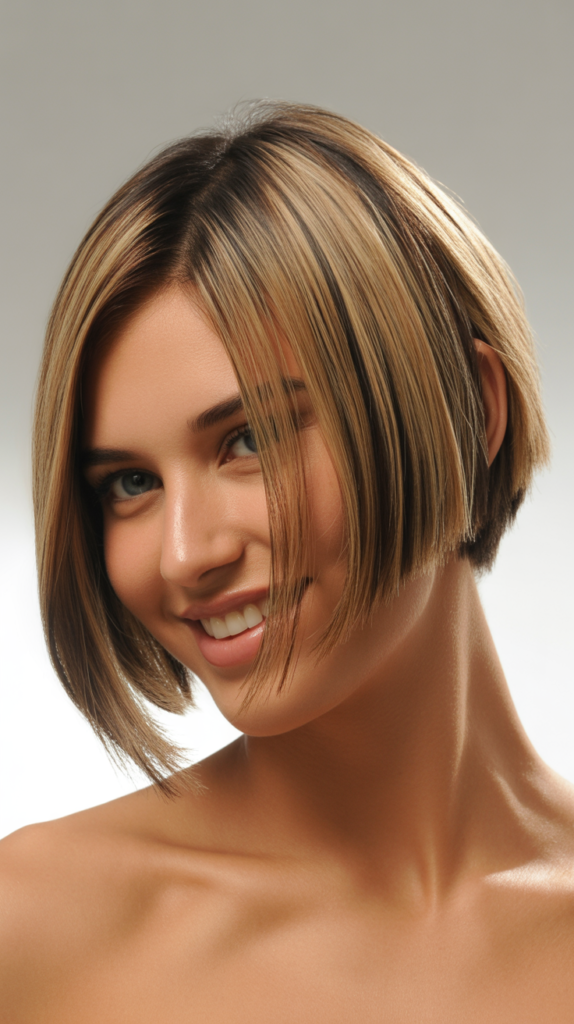
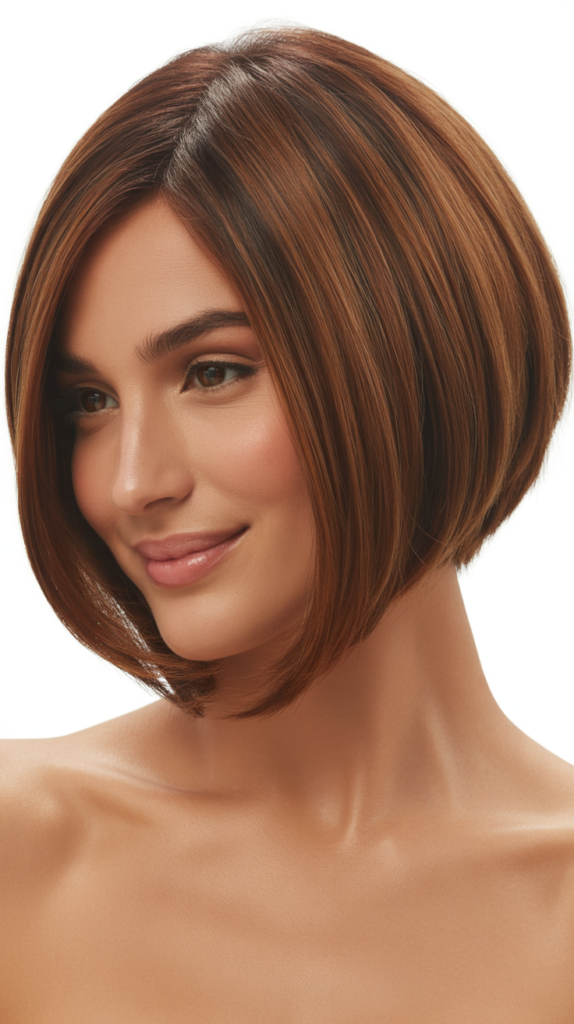
3. Textured Lob (Long Bob) with Layers
The textured long bob, affectionately known as the “lob,” sits somewhere between chin and shoulder length and incorporates strategic layers that add movement and dimension.
This contemporary style is particularly flattering for round faces because the length and texture work together to create a slimming effect without sacrificing style or versatility.
Why the Lob Flatters Round Faces:
- The length typically falls between the chin and shoulders, creating vertical lines that elongate the face rather than emphasizing its roundness.
- Texturizing techniques remove excess weight and bulk, preventing the hair from adding width at the sides of your face.
- Layers create movement and dimension that draw attention away from the fullness of your cheeks.
- The lob can be styled multiple ways—straight, wavy, or with beachy texture—offering incredible versatility for different occasions.
Cutting and Styling Recommendations:
- Request that your stylist cut the front pieces slightly longer than the back to create an angled effect that frames your face.
- Add internal layers throughout to remove weight and create texture without losing the overall length and shape.
- Style with a texturizing spray or sea salt spray to enhance natural texture and create piece-y, dimensional waves.
- Use a curling wand to create loose, effortless waves that add volume at the crown while keeping the sides sleek.
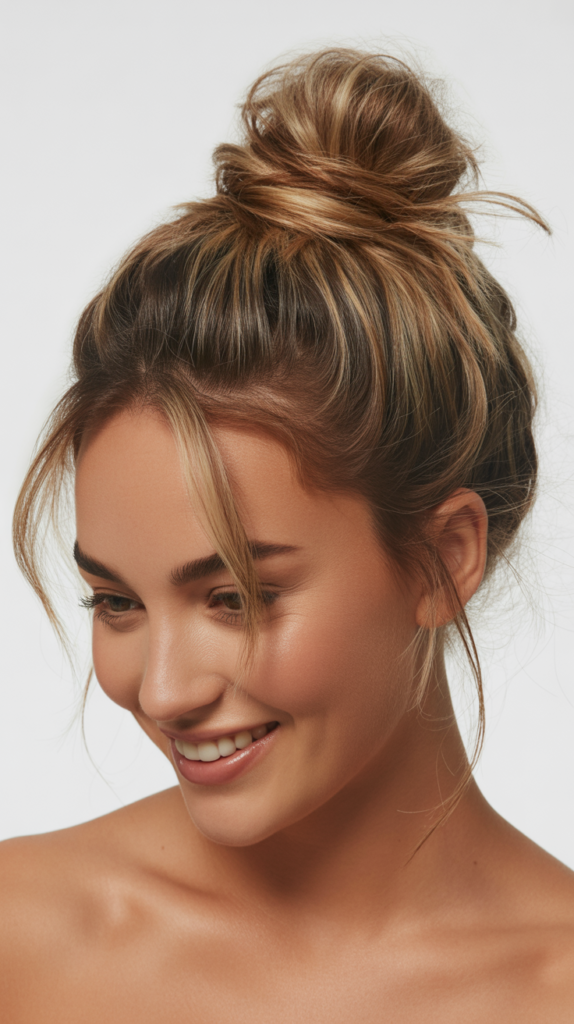
4. High Ponytail with Volume at the Crown
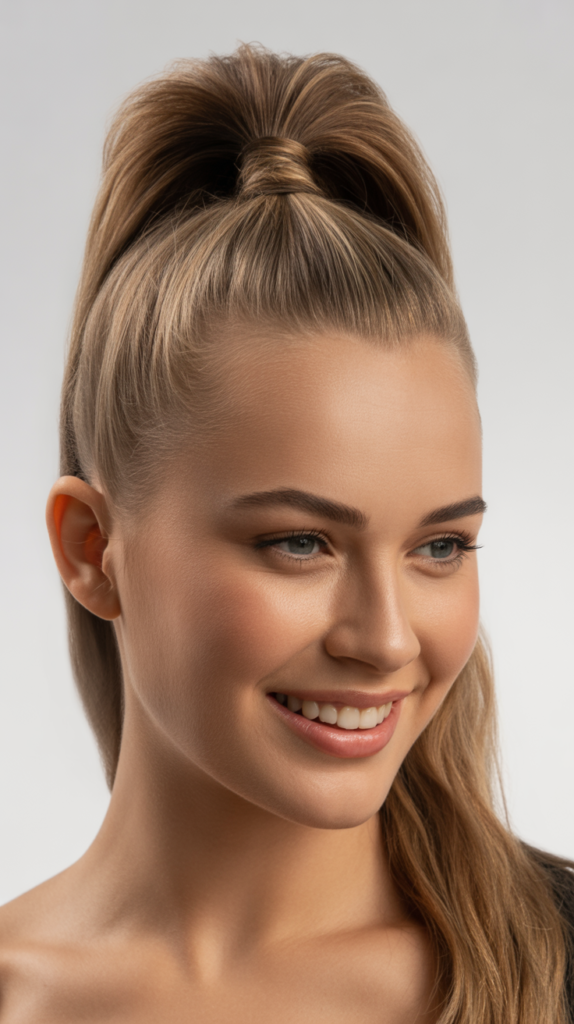
A high ponytail positioned at the crown of your head is a simple yet incredibly effective style for creating the illusion of a longer, slimmer face.
The height and lift at the crown visually elongate your face shape, while pulling the hair away from your face emphasizes your facial features in the most flattering way.
Slimming Benefits:
- The upward positioning of the ponytail draws the eye vertically, creating length that counteracts the roundness of your face.
- Adding volume and height at the crown extends your face shape upward, making it appear more oval and less circular.
- This style exposes your neck and jawline, creating clean vertical lines that naturally slim your appearance.
- Leaving some face-framing pieces loose softens the look while maintaining the elongating effect.
Creating the Perfect High Ponytail:
- Flip your head upside down and gather your hair at the highest point of your head, securing it with a hair elastic.
- Tease the hair at your crown before creating the ponytail to add maximum height and volume.
- Wrap a small section of hair around the elastic to conceal it and create a polished, sophisticated finish.
- Pull out a few thin, wispy pieces around your face to soften the look and add a romantic touch.
- Use a texturizing powder at the roots to maintain volume throughout the day.
5. Asymmetrical Bob with Angled Front
The asymmetrical bob features one side cut shorter than the other, creating a dramatic diagonal line that is extraordinarily flattering for round faces.
This edgy, modern style instantly adds angles and visual interest while drawing attention away from the rounded contours of your face shape.
Why Asymmetry Works:
- The uneven lengths create a strong diagonal line that counteracts the horizontal width of a round face.
- Asymmetrical cuts inherently add edge and dimension, preventing your face from appearing too soft or circular.
- The longer front pieces frame your face and create vertical lines that guide the eye downward, slimming your appearance.
- This bold style makes a confident statement while serving the practical purpose of balancing your proportions.
Cutting Specifications:
- The back should be cut shorter, typically at or above the nape of the neck, while the front extends to chin length or beyond.
- One side should be noticeably longer than the other, with the difference being at least one to two inches for maximum impact.
- Add subtle layers throughout to prevent bulk and create movement that enhances the asymmetrical shape.
- Consider adding an undercut on the shorter side for additional edge and to remove even more weight.
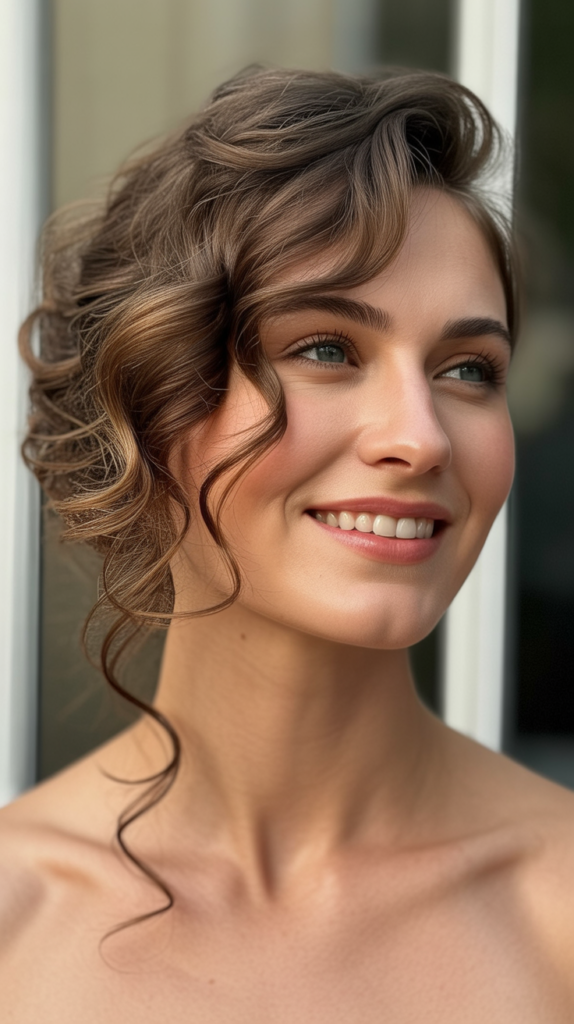
6. Voluminous Curls with Height at the Crown
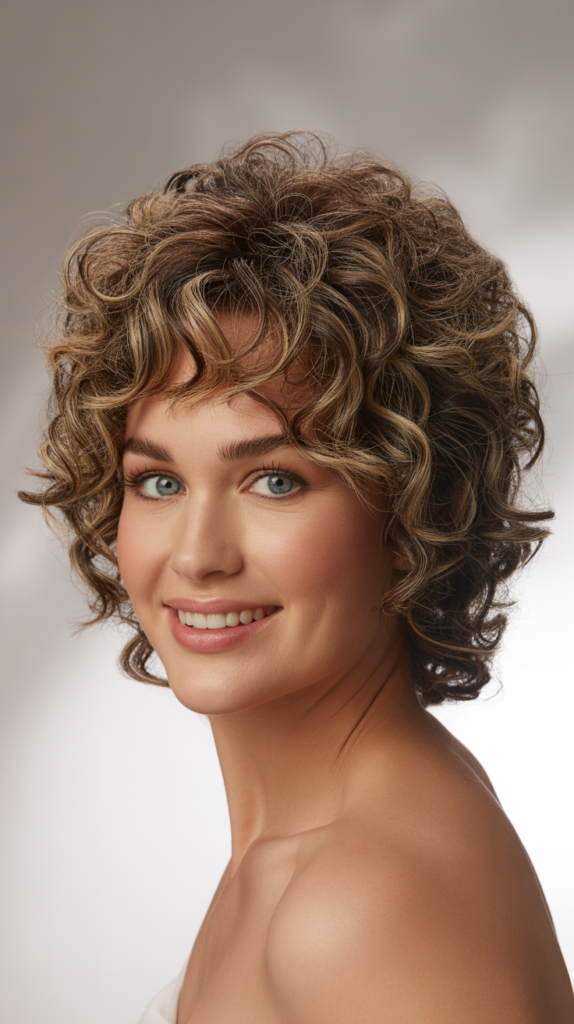
Voluminous curls styled with significant height at the crown create a stunning elongating effect for round faces by adding vertical dimension.
he key is concentrating the volume upward rather than outward, which creates the illusion of length while the cascading curls add movement and femininity.
Strategic Curl Placement:
- Focus on creating maximum volume and height at the crown and top of your head to extend your face shape upward.
- Keep curls looser and more elongated at the sides of your face to avoid adding width to your cheeks.
- Allow curls to cascade downward past your shoulders, creating vertical lines that slim your overall appearance.
- Use larger barrel curling tools at the sides and smaller barrels at the crown for optimal dimension and shape.
Achieving the Look:
- Apply volumizing mousse to damp hair, concentrating on the roots at the crown area.
- Use a diffuser attachment when blow-drying to enhance natural curl pattern while maintaining volume.
- Tease the hair at your crown gently before styling to create a lifted foundation for your curls.
- Curl hair in vertical sections using a curling wand, wrapping hair away from your face for the most flattering direction.
- Finish with a flexible-hold hairspray to maintain volume and curl definition throughout the day.
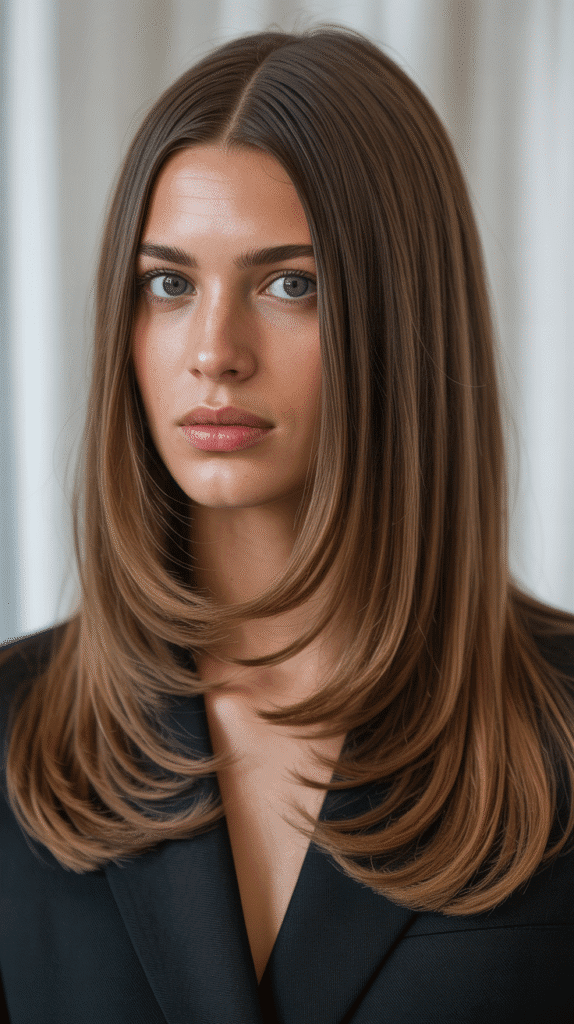
7. Long Straight Hair with Center Part
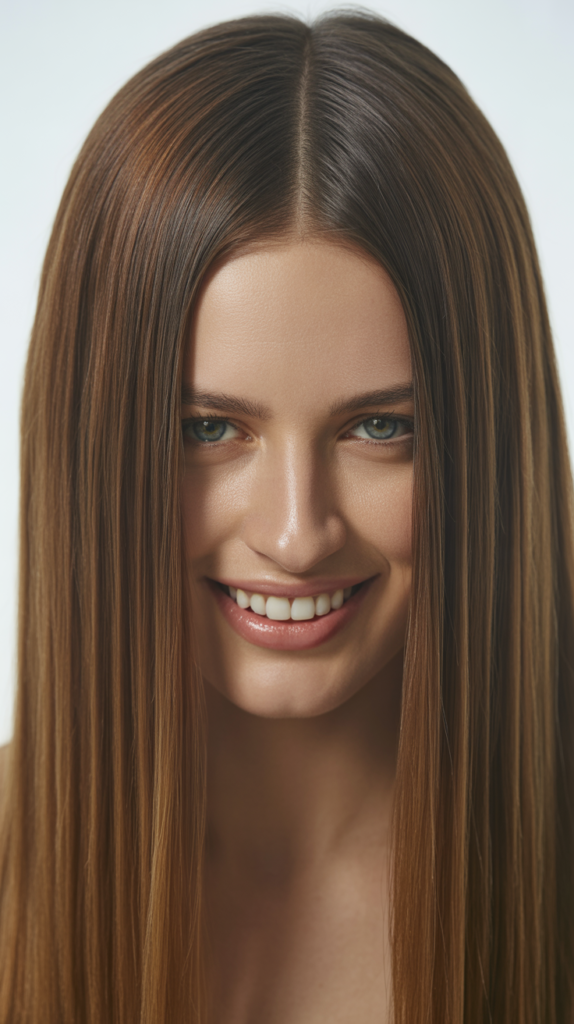
Long, sleek straight hair with a center part might seem counterintuitive for round faces, but when styled correctly with the right length and texture, it creates beautiful framing lines that elongate your face.
The key is ensuring the hair is long enough to create vertical lines and adding subtle movement to prevent it from lying too flat.
Making This Style Work:
- The hair must extend well past your shoulders—ideally to mid-back or longer—to create sufficient vertical lines for elongation.
- Add very subtle, long layers starting below the chin to create movement without disrupting the sleek silhouette.
- The center part creates symmetry that can work if the hair has enough length and falls forward to frame your face.
- Incorporate a slight bend or wave near the ends to prevent the hair from looking too heavy or flat.
Styling for Maximum Flattery:
- Use a flat iron to create sleek, smooth strands, but add a gentle bend at the ends using the iron to prevent a blunt, harsh line.
- Apply a smoothing serum or oil to add shine and create that glossy, polished appearance.
- Ensure the hair falls forward in front of your shoulders rather than behind them to frame your face.
- Add subtle highlights around the face to create dimension and draw the eye vertically along the length.
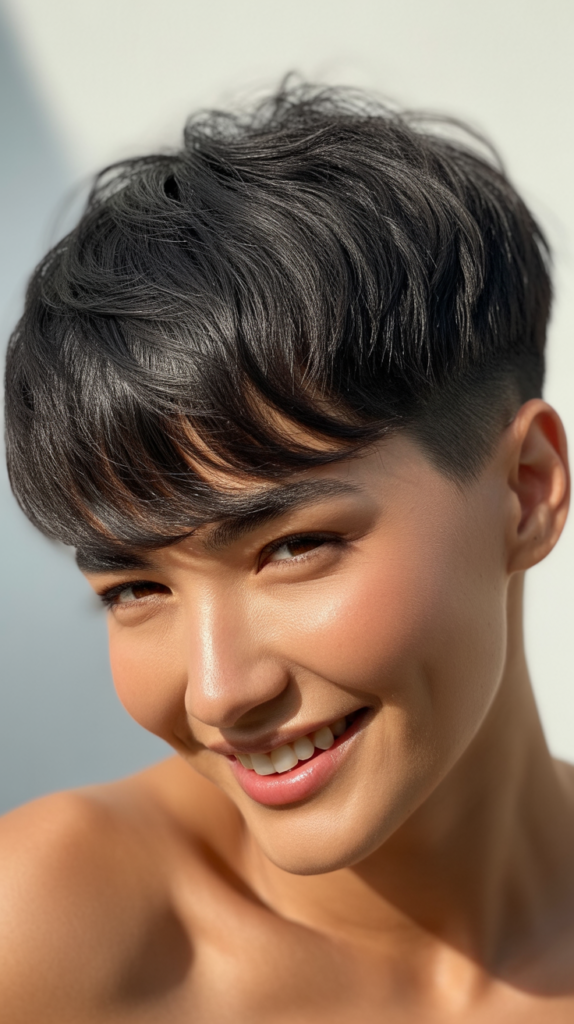
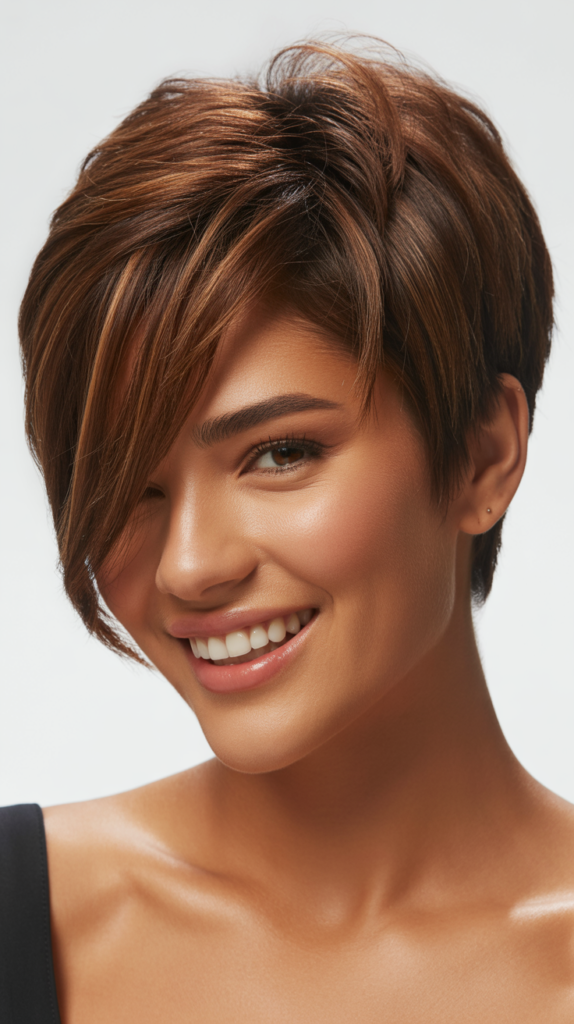
8. Pixie Cut with Elongated Top

A pixie cut with significant height and length on top is surprisingly flattering for round faces when executed with the right proportions.
The dramatic volume and texture on top create vertical dimension that elongates your face, while the shorter sides prevent width from being added to your cheeks.
Design Elements:
- The top section should be significantly longer than the sides, typically 3-5 inches, allowing for styling versatility and height.
- Keep the sides and back closely cropped or tapered to create contrast and prevent the style from adding width.
- Incorporate texture and piece-y definition on top to create dimension and visual interest.
- Consider leaving slightly longer pieces near the front to create face-framing angles.
Styling Techniques:
- Use a volumizing powder or texturizing paste to create height and separation in the longer top section.
- Style the top forward and upward, creating a lifted pompadour or quiff effect that extends your face shape.
- Keep the sides sleek and close to the head to maintain the elongating contrast.
- Experiment with styling the longer pieces in different directions to find the most flattering angle for your face.
9. Shoulder-Length Hair with Outward Flipped Ends
Shoulder-length hair with ends that flip outward creates an unexpected slimming effect by directing attention away from the center of your face and preventing the hair from adding width at the cheeks.
This retro-inspired style, when executed with modern techniques, offers a fresh and flattering option for round faces.
Why Outward Flips Work:
- The outward movement at the ends creates horizontal lines below your face rather than at the widest part of your cheeks.
- This direction draws the eye outward and downward, away from the fullness of your face.
- The style adds a playful, feminine element while serving the practical purpose of balancing your proportions.
- The shoulder length hits at the perfect spot to elongate your neck and face without overwhelming your frame.
Creating the Flip:
- Use a large round brush while blow-drying, rolling the ends outward as you direct heat onto the hair.
- Finish with a curling iron or flat iron, wrapping the ends under and then flipping them outward for a polished curve.
- Apply a light-hold hairspray to maintain the flip throughout the day without making the hair stiff.
- Add subtle layers throughout to create movement and prevent the style from looking too blunt or heavy.
10. Deep Side Part with Swept Volume
A deep side part positioned far to one side of your head creates instant asymmetry that breaks up the roundness of your face while adding dramatic volume and movement.
This classic styling technique is universally flattering and works with virtually any hair length or texture.
The Power of the Deep Side Part:
- Moving the part significantly to one side creates asymmetry that counteracts the symmetrical roundness of your face shape.
- The heavy side adds volume and weight that creates diagonal lines across your face, guiding the eye at a slimming angle.
- The lighter side reveals more of your face in an asymmetrical way that adds interest and dimension.
- This simple change can transform any hairstyle from ordinary to extraordinarily flattering.
Styling for Maximum Impact:
- Create your part at least two inches from the center of your head, positioning it closer to one side.
- Apply volumizing mousse to the roots on the heavier side before blow-drying to create lift and body.
- Use a round brush to direct the hair on the heavier side across your forehead, creating sweeping movement.
- Pin or tuck the lighter side behind your ear to emphasize the asymmetry and create clean lines.
11. Shaggy Layers with Piece-y Texture
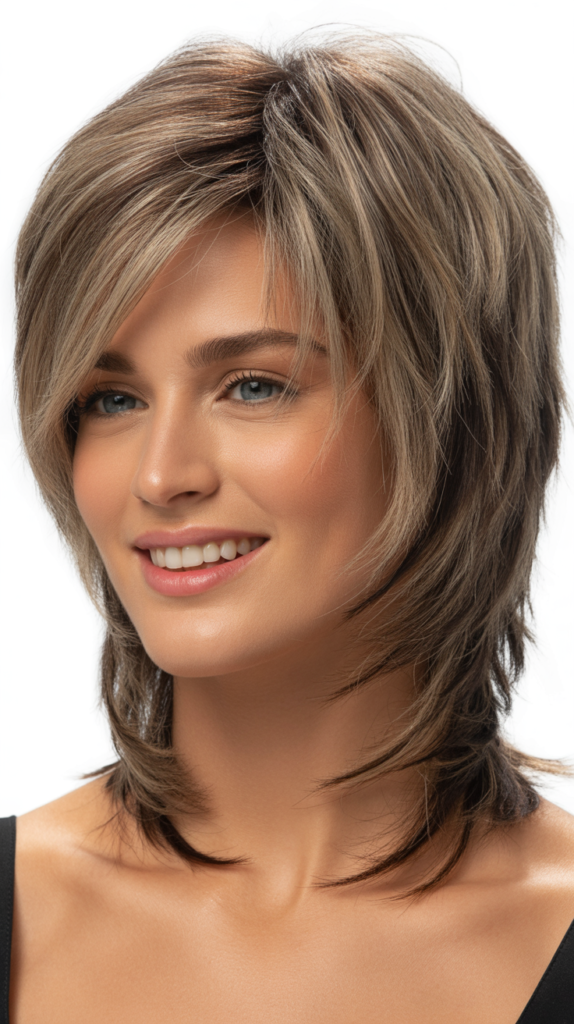
The shag haircut has made a major comeback, and its piece-y, textured layers are incredibly flattering for round faces.
This style removes weight and bulk while creating dimension and movement that draws the eye in multiple directions, preventing focus on the roundness of your face.
Shag Benefits:
- The heavily layered construction removes bulk from the sides of your face, preventing width from being added to your cheeks.
- Piece-y texture creates dimension and visual interest that distracts from face shape concerns.
- The choppy, disconnected layers create angles and lines that counteract soft, curved features.
- This style works beautifully with natural texture, making it low-maintenance and effortlessly cool.
Layer Placement:
- Layers should begin around the chin or cheekbone area, creating face-framing pieces that add angles.
- The layers should be heavily textured and disconnected, creating separation and movement rather than blending smoothly.
- Incorporate shorter pieces throughout the crown to create volume and lift that elongates your face.
- Use razoring or point-cutting techniques to create soft, feathered ends that enhance the piece-y texture.
12. Half-Up, Half-Down with Crown Volume
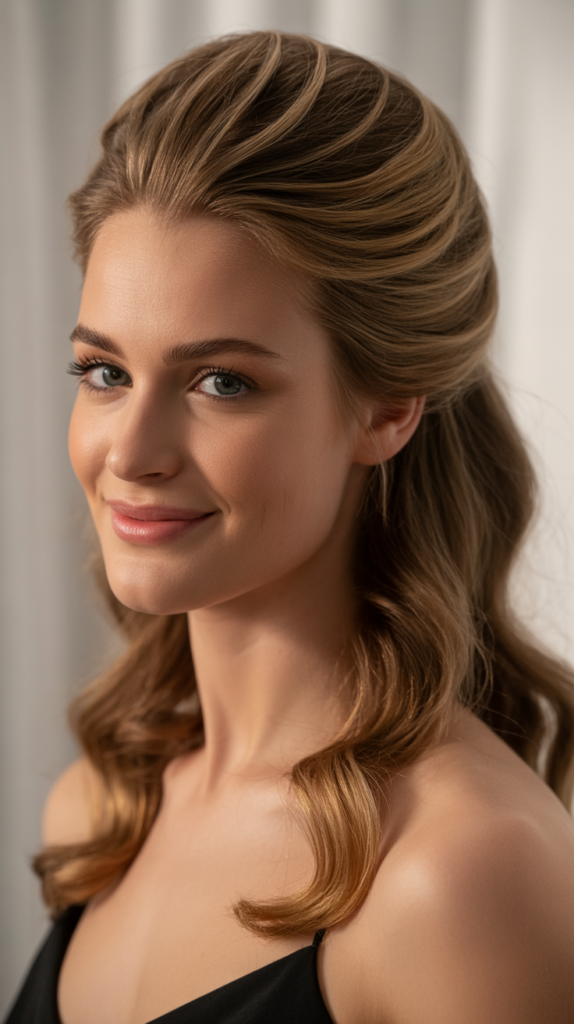
The half-up, half-down hairstyle becomes incredibly flattering for round faces when you emphasize volume and height in the pulled-back section.
This versatile style combines the face-framing benefits of loose hair with the elongating effect of lifted crown volume.
Creating the Perfect Balance:
- Tease the crown section generously before pulling it back to create maximum height and vertical dimension.
- Leave face-framing pieces loose around your face to soften the look and add angles.
- Position the half-up section higher on your head rather than at mid-level for greater elongation.
- Keep the pulled-back section loose and textured rather than sleek and tight for a more flattering, relaxed appearance.
Styling Steps:
- Section off the top half of your hair from temple to temple, leaving the bottom section loose.
- Backcomb the crown area thoroughly to create a lifted foundation.
- Smooth the surface layer gently with a brush while maintaining the volume underneath.
- Secure with bobby pins or a clear elastic, then gently pull and loosen the section for a voluminous, romantic effect.
- Curl or wave the loose bottom section to add movement and femininity.
13. Sleek Low Bun with Lifted Crown
A low bun positioned at the nape of your neck becomes incredibly slimming when you add height and volume at the crown.
This elegant, sophisticated style creates clean vertical lines while the lifted crown extends your face shape upward for maximum elongation.
Elements of This Style:
- The smoothed-back hair creates clean lines that showcase your facial features without adding bulk or width.
- Volume at the crown lifts the hair upward, creating the illusion of additional height and length in your face.
- The low positioning of the bun creates a graceful line down the back of your head, further elongating your silhouette.
- A few strategically placed face-framing pieces soften the look and prevent it from appearing too severe.
Creating the Look:
- Apply smoothing serum to damp hair and blow-dry with a paddle brush for a sleek foundation.
- Tease the crown section before smoothing hair back to create hidden volume and height.
- Gather hair at the nape of your neck and secure with an elastic, then wrap into a bun shape.
- Pull the crown section upward gently to enhance the height, and secure any loose pieces with bobby pins.
- Release a few thin pieces around your face and temples for a softer, more romantic finish.
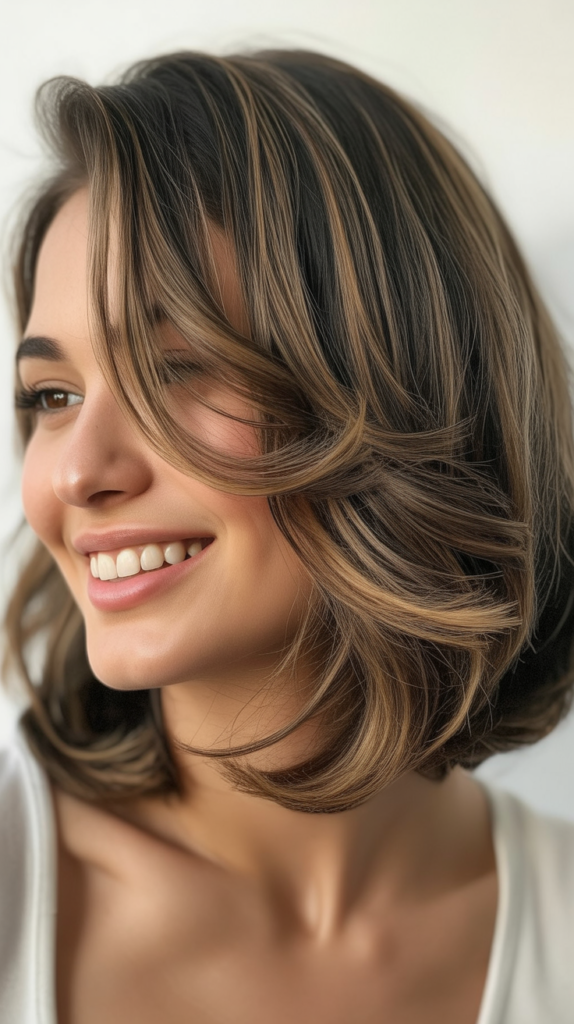
14. Layered Wavy Hair with Side Swept Styling
Layered wavy hair swept dramatically to one side creates beautiful asymmetry and movement that flatters round faces exceptionally well.
The combination of texture, layers, and directional styling works together to create angles and vertical lines that slim your appearance.
Why This Combination Works:
- Waves add texture and dimension that prevent the hair from lying flat against your face and emphasizing its roundness.
- Layers create movement and remove bulk, ensuring the hair doesn’t add width to your cheeks.
- Side-swept styling creates dramatic asymmetry that breaks up the circular appearance of your face.
- The cascading waves create diagonal and vertical lines that guide the eye in slimming directions.
Achieving the Style:
- Cut long layers throughout your hair, with the shortest layers beginning at chin length or slightly below.
- Use a curling wand with a 1.5-inch barrel to create loose, natural-looking waves throughout.
- Apply texturizing spray while the waves are still warm to enhance definition and create separation.
- Sweep all of your hair dramatically to one side, securing behind your ear with bobby pins if necessary.
- Allow the waves to cascade over your shoulder on one side, creating beautiful dimension and movement.
15. Graduated Bob with Shorter Back
A graduated bob, also known as a stacked bob, features hair that is shorter in the back and gradually becomes longer toward the front.
This architectural cut creates stunning angles and lines that are incredibly flattering for round faces by drawing attention to the jawline and creating vertical dimension.
Structural Benefits:
- The angled cut creates diagonal lines that counteract the horizontal width of a round face.
- Shorter hair in the back exposes the nape of your neck, creating vertical lines that elongate your overall appearance.
- The longer front pieces frame your face and create angles that define your jawline.
- The graduated shape prevents bulk from accumulating at the sides of your face.
Cut Specifications:
- The back should be cut short, typically at or above the occipital bone, with visible graduation and stacking.
- The front pieces should extend to chin length or slightly below, creating a distinct angle from back to front.
- Use point-cutting or razoring techniques throughout to remove weight and create texture.
- Consider adding subtle layers in the front sections for additional movement and face-framing.
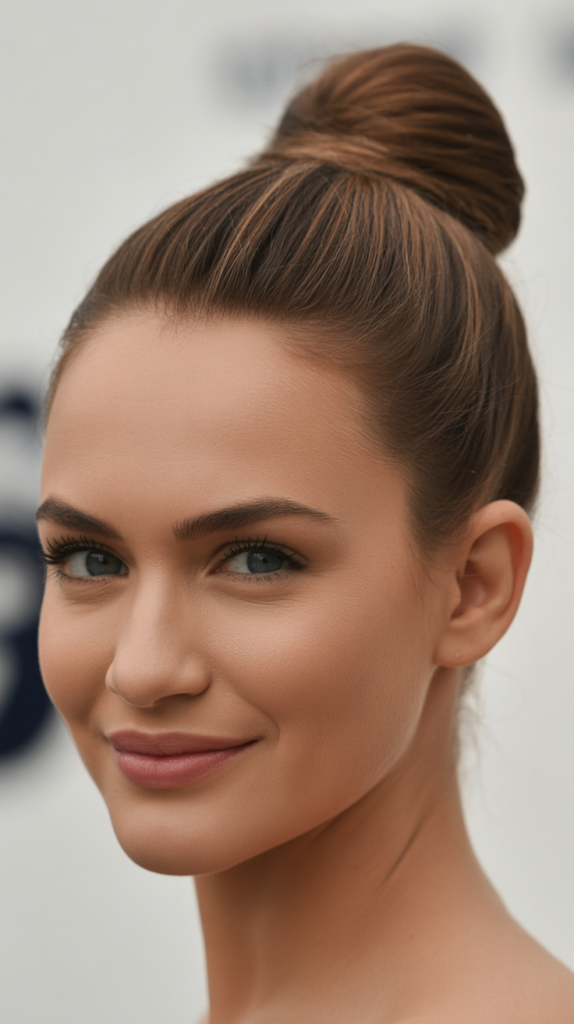
16. Messy Top Knot with Loose Tendrils
A messy top knot positioned high on your head combines the elongating benefits of upswept hair with the softening effect of deliberately loose, undone styling.
This casual yet chic style creates height and exposes your face in a flattering way while maintaining an approachable, effortless vibe.
Style Advantages:
- The high positioning creates instant vertical dimension that extends your face shape upward.
- The messy, textured quality prevents the style from looking too severe or harsh.
- Loose tendrils around your face add softness and create angles that frame your features.
- This style is incredibly versatile, working for everything from gym sessions to casual outings to relaxed events.
Creating the Perfect Messy Top Knot:
- Flip your head upside down and gather hair at the crown, securing loosely with an elastic to create natural volume.
- Twist the ponytail loosely and wrap it around the base, securing with bobby pins while maintaining a deliberately undone texture.
- Pull sections of the bun gently to create volume and a fuller, messier appearance.
- Release face-framing pieces and a few random strands to soften the look and add romantic appeal.
- Use texturizing spray throughout the bun to enhance the piece-y, undone texture.
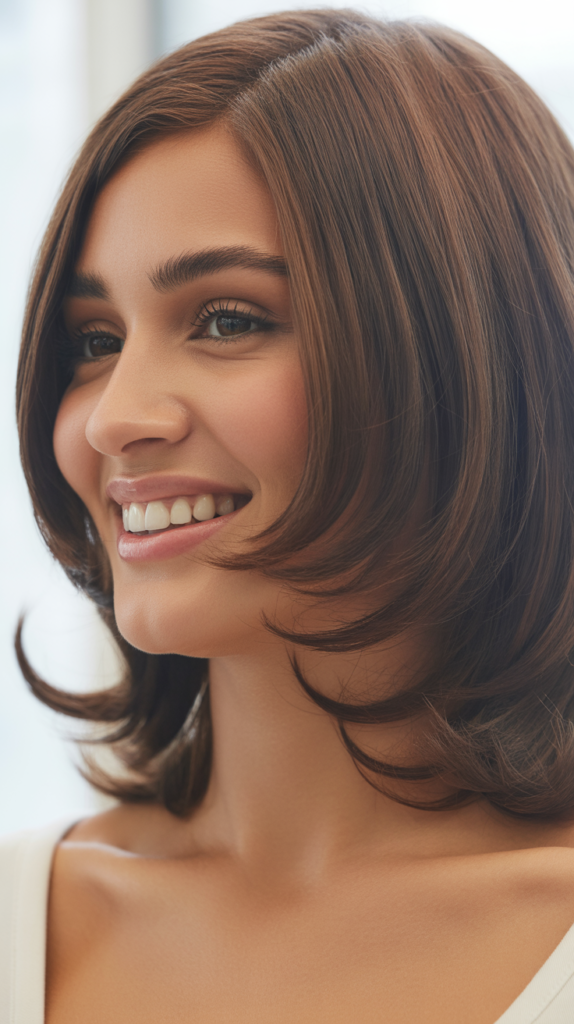
17. Blunt Long Hair with Slight Inward Bend
Long blunt-cut hair that bends slightly inward at the ends creates a sophisticated, polished look that subtly frames your face without adding width.
The key is ensuring the hair is long enough to create vertical lines while the gentle inward curve provides just enough shaping to be flattering without overwhelming.
Flattering Elements:
- The blunt cut creates a strong horizontal line at the bottom that draws the eye downward, away from the width of your face.
- Sufficient length ensures the hair creates vertical lines along the sides of your face for maximum elongation.
- The subtle inward bend prevents the ends from flipping outward and adding width at shoulder level.
- This polished style projects confidence and sophistication while remaining universally flattering.
Styling Recommendations:
- Hair should extend at least to the collarbone, with mid-back or longer being ideal for maximum elongation.
- Use a flat iron or large round brush to create a gentle inward curve at the ends—not a flip, just a soft bend.
- Apply smoothing serum throughout for a sleek, glossy finish that enhances the polished appearance.
- Maintain the blunt cut with regular trims every 6-8 weeks to prevent split ends from disrupting the clean line.
18. Feathered Layers Around Face
Feathered layers concentrated around your face create soft, wispy texture that frames your features while adding angles and dimension.
This classic technique, modernized for contemporary styling, removes weight from the sides of your face while creating movement that distracts from roundness.
Feathering Benefits:
- The light, wispy texture of feathered layers creates softness that’s more flattering than blunt, heavy ends.
- Layers frame your face at varying lengths, creating multiple points of visual interest that prevent focus on face shape.
- Feathering removes bulk and weight specifically where you need it most—around your cheeks and jawline.
- This technique works beautifully with all hair textures and can be incorporated into any length.
Application and Styling:
- Ask your stylist to use point-cutting or razor-cutting techniques to create soft, feathered ends throughout the face-framing layers.
- Layers should begin around the cheekbone or chin area and feather outward in varying lengths.
- Blow-dry with a round brush, directing the feathered pieces away from your face to create lift and separation.
- Use a flat iron to add slight bends in the feathered pieces, creating movement and dimension.
- Finish with texturizing spray to enhance the piece-y, feathered texture.
19. Braided Crown with Loose Waves
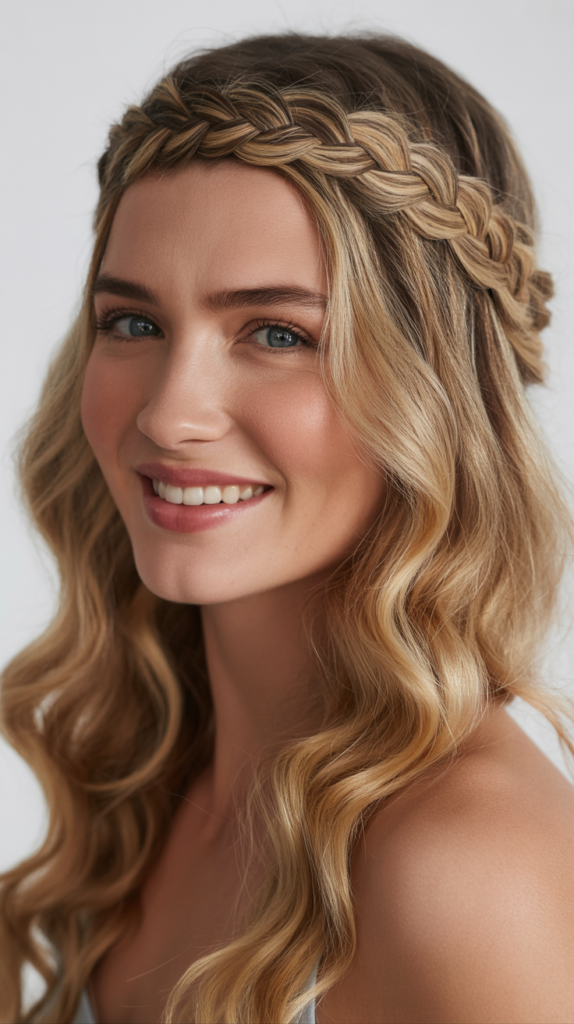
A braided crown that wraps around the top of your head creates instant height and dimension while the loose waves below add movement and softness.
This romantic, feminine style combines the elongating benefits of lifted hair with the flattering qualities of flowing texture.
Why This Style Flatters:
- The crown braid adds height at the top of your head, creating vertical dimension that extends your face shape upward.
- Wrapping the braid around your head creates an architectural element that adds visual interest above your face.
- Loose waves below provide softness and movement while creating vertical lines that slim your appearance.
- This style is incredibly versatile and appropriate for everything from casual daytime events to formal occasions.
Creating the Look:
- Part your hair deeply to one side or in the center, depending on your preference.
- Create a Dutch braid (inverted French braid) along your hairline from one side, around the crown, to the other side.
- Wrap the braid around the top of your head like a crown, securing with bobby pins as you go.
- Gently pull the braid to create volume and a fuller, more textured appearance.
- Curl the remaining loose hair with a curling wand to create soft, romantic waves that cascade down.
20. Textured Crop with Longer Fringe
A textured crop cut short all over with a longer, piece-y fringe creates modern edge while providing surprising flattery for round faces.
The key is maintaining significant length and texture in the front while keeping the sides and back closely cropped for contrast and dimension.
Style Components:
- The longer fringe creates vertical lines that draw the eye downward and add length to your face.
- Closely cropped sides and back remove bulk and prevent width from being added to your cheeks.
- Heavy texture throughout creates dimension and visual interest that distracts from face shape.
- This bold, contemporary style makes a confident statement while being incredibly low-maintenance.
Cut and Style Details:
- The sides and back should be cut short with clippers or scissors, creating a tapered or undercut effect.
- The top and fringe sections should be significantly longer—at least 2-3 inches—to allow for styling versatility.
- Use point-cutting and texturizing techniques throughout the longer sections to create piece-y separation.
- Style the fringe forward and slightly to the side, creating movement and asymmetry.
- Apply texturizing paste or clay to create definition and separation in the longer sections.
21. Waterfall Braid with Volume
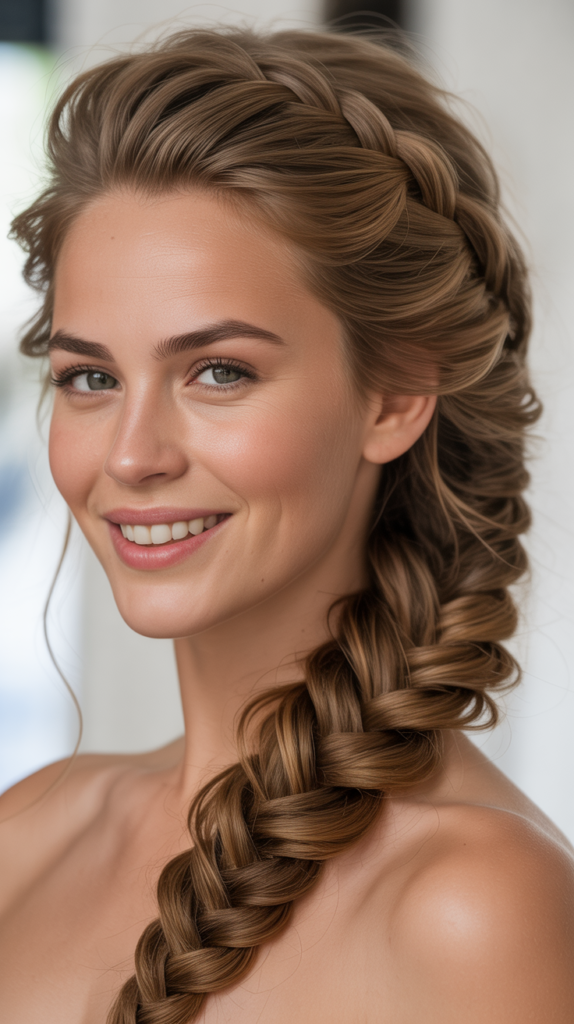
A waterfall braid creates a cascading, romantic effect that adds texture and dimension while creating diagonal lines across your face.
When styled with significant volume at the crown, this intricate style becomes exceptionally flattering for round faces by adding height and visual interest.
Flattering Qualities:
- The diagonal path of the waterfall braid creates slimming angles that counteract the horizontal width of a round face.
- Cascading strands create movement and texture that draw the eye in multiple directions.
- Volume at the crown adds vertical dimension that elongates your face shape upward.
- This intricate, feminine style creates a focal point that distracts from any face shape concerns.
Creating the Waterfall Braid:
- Begin with volumized, textured hair—add curls or waves before starting the braid for maximum impact.
- Create a deep side part and begin a French braid near the part, working toward the opposite side.
- With each stitch, drop the bottom strand and pick up a new strand from the top, creating the “waterfall” effect.
- Continue the braid in a diagonal line across your head, securing at the opposite side behind your ear.
- Tease the crown before braiding to ensure maximum height and volume throughout the style.
22. Long Layers with Curtain Bangs
Long layers combined with curtain bangs create a perfectly balanced look that frames your face beautifully while adding length and dimension.
Curtain bangs part in the center and sweep to both sides, creating soft angles that flatter round faces without overwhelming your features.
Perfect Partnership:
- Curtain bangs create gentle angles on both sides of your face, adding dimension without the severity of straight-across bangs.
- The center-parted bangs draw the eye vertically down the center of your face, creating an elongating effect.
- Long layers throughout add movement and remove bulk, preventing the hair from adding width to your face.
- This trendy combination works beautifully with all hair textures and is incredibly versatile for different styling options.
Styling Guidelines:
- Curtain bangs should be cut to frame your face, typically starting shorter at the bridge of your nose and gradually lengthening toward your cheekbones.
- Use a round brush to blow-dry curtain bangs away from the center part, creating the signature swooping curtain effect.
- Apply volumizing mousse at the roots throughout for body and movement.
- Style the length with loose waves or straight, depending on your preference and the occasion.
23. Slicked-Back Ponytail with Height

A sleek ponytail pulled back tightly with dramatic height at the crown creates a sophisticated, editorial look that significantly elongates round faces.
This high-impact style exposes your entire face while the lifted crown extends your face shape upward for maximum slimming effect.
Dramatic Impact:
- Slicking hair back tightly creates clean, defined lines that showcase your facial structure without adding bulk or softness.
- Maximum height at the crown creates dramatic vertical dimension that makes your face appear longer and more sculpted.
- The exposed face and neck create uninterrupted vertical lines from head to shoulders that naturally slim your silhouette.
- This polished, high-fashion style projects confidence and sophistication while being surprisingly easy to achieve.
Creating Maximum Impact:
- Apply strong-hold gel or pomade to damp hair, distributing evenly from roots to ends for a sleek foundation.
- Use a fine-tooth comb to smooth hair back tightly, eliminating any bumps or flyaways for a polished finish.
- Tease the crown section extensively before smoothing the surface layer to create hidden volume and dramatic height.
- Secure the ponytail at the crown or slightly behind it, ensuring the position is high enough to create elongation.
- Wrap a section of hair around the elastic to conceal it and add a refined finishing touch.
- Apply strong-hold hairspray and edge control product to maintain the sleek appearance throughout the day.
24. Choppy Pixie with Side-Swept Styling
A choppy pixie cut styled to sweep dramatically to one side combines the boldness of short hair with strategic styling that flatters round faces beautifully.
The textured, piece-y quality adds dimension while the directional styling creates asymmetry that breaks up roundness.
Design Features:
- Choppy, textured cutting throughout creates separation and dimension that adds visual interest and prevents the style from looking too soft.
- Side-swept styling creates diagonal lines across your forehead that counteract the horizontal width of your face.
- Longer pieces on top allow for styling versatility and the creation of height that elongates your face shape.
- The closely cropped sides and back remove weight and prevent the style from adding width to your cheeks.
Cutting and Styling:
- Request heavy texturizing throughout using point-cutting or razor techniques to create piece-y separation.
- Keep the top section significantly longer than the sides—at least 2-3 inches for styling versatility.
- Use texturizing paste or pomade to create definition and piece-y texture throughout.
- Style the longer top section to sweep dramatically from one side to the other, creating movement and asymmetry.
- Add volume at the roots of the swept section to enhance the elongating effect.
25. Beach Waves with Deep Side Part
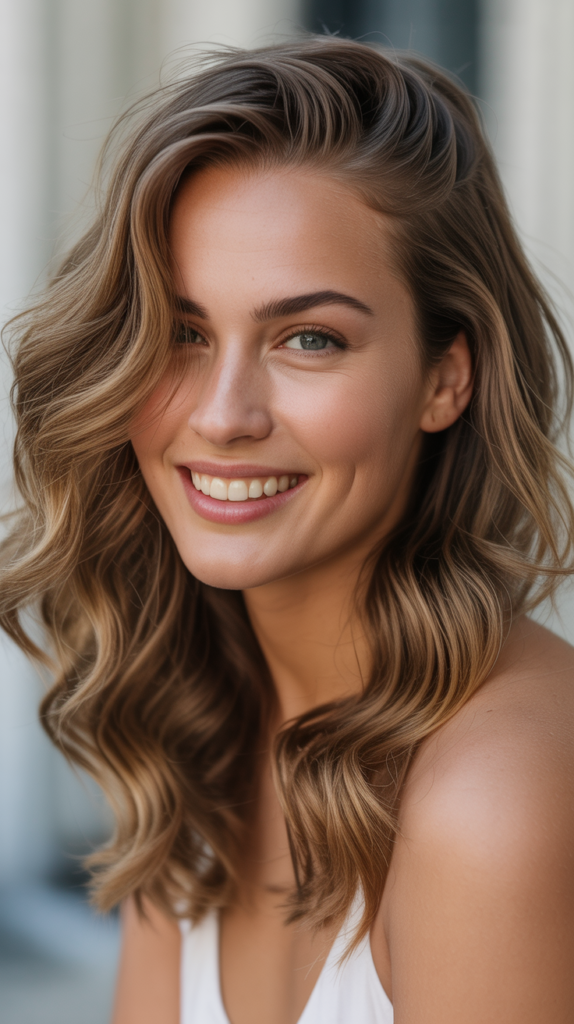
Effortless beach waves combined with a deep side part create a relaxed, romantic look that flatters round faces through texture, asymmetry, and movement.
This universally beloved style works for any occasion and can be adjusted to suit your personal preference and hair texture.
Flattering Combination:
- Beach waves add texture and dimension that prevent hair from lying flat against your face and emphasizing roundness.
- The deep side part creates instant asymmetry that breaks up the circular appearance of your face shape.
- Waves create natural movement and flow that guide the eye in multiple directions, distracting from face shape.
- This relaxed, undone style has a youthful, approachable quality while remaining incredibly flattering.
Achieving Perfect Beach Waves:
- Apply sea salt spray or texturizing spray to damp hair for enhanced texture and grip.
- Use a curling wand or flat iron to create loose, irregular waves throughout your hair, varying the direction for a natural effect.
- Position your part at least two inches from center, creating a dramatic side part with volume on the heavier side.
- Use your fingers to gently separate and tousle the waves, creating piece-y, undone texture.
- Scrunch additional texturizing spray into the waves to enhance definition and create that perfectly imperfect beachy finish.
- Allow the heavier side to sweep across your forehead, creating flattering diagonal movement.
26. Mohawk-Inspired Updo with Shaved Sides
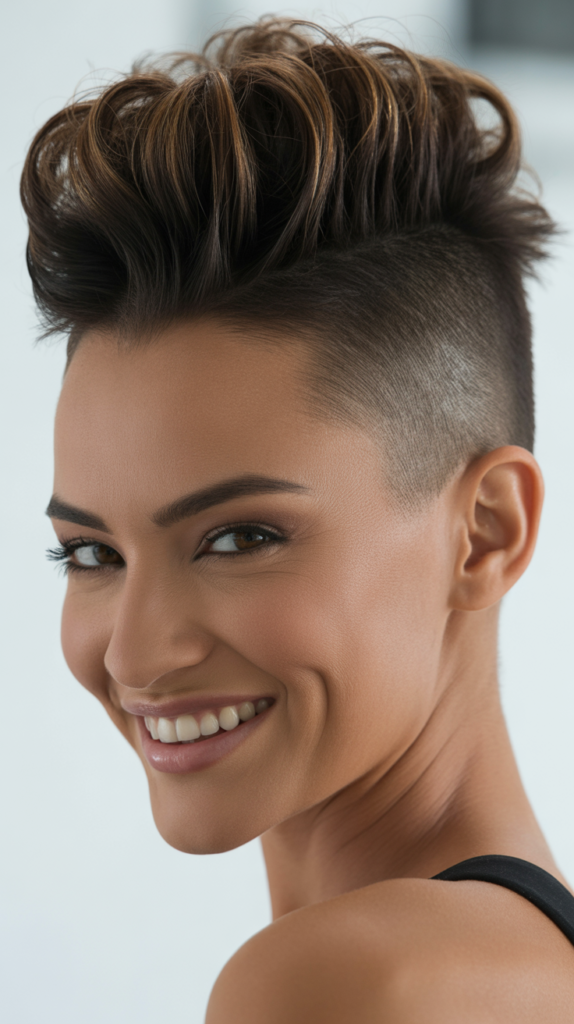
A mohawk-inspired updo with shaved or closely cropped sides creates dramatic vertical dimension while removing all bulk from the sides of your face.
This bold, edgy style makes a powerful statement while being surprisingly flattering for round faces through its emphasis on height and structure.
Bold Structure:
- The dramatic height through the center of your head creates maximum vertical dimension that elongates your face significantly.
- Shaved or very short sides eliminate all width and bulk from your cheeks, creating clean lines that slim your appearance.
- The architectural, sculptural quality of this style creates angles and edges that counteract soft, rounded features.
- This fearless style projects confidence and individuality while serving the practical purpose of flattering your face shape.
Creating the Look:
- The sides should be buzzed short with clippers or cut very close to the head, creating maximum contrast with the top section.
- The center section should be left significantly longer—at least 4-6 inches—to allow for dramatic styling.
- Apply strong-hold gel or pomade to the longer center section, then brush or comb it upward and back.
- Secure sections with bobby pins along the center of your head, creating a ridge or mohawk effect.
- Tease sections before pinning to create maximum height and volume throughout the updo.
- Finish with strong-hold hairspray to maintain the dramatic structure throughout the day or evening.
27. Loose Romantic Curls with Side Gathering
Loose, romantic curls gathered and pinned to one side create beautiful asymmetry and volume that flatters round faces through texture, movement, and strategic positioning.
This elegant, feminine style works beautifully for special occasions while remaining surprisingly easy to create.
Romantic Elements:
- Gathering all curls to one side creates dramatic asymmetry that breaks up the symmetrical roundness of your face.
- Loose, soft curls add volume and dimension without appearing too structured or stiff.
- The exposed side of your neck and face creates clean vertical lines that elongate your silhouette.
- This glamorous style has timeless appeal and works for everything from weddings to formal events to date nights.
Styling Process:
- Curl all of your hair with a large-barrel curling iron, creating loose, bouncy ringlets throughout.
- Brush through the curls gently with your fingers to create softer, more romantic waves.
- Gather all of your hair to one side at approximately ear level, allowing curls to cascade over your shoulder.
- Secure with bobby pins hidden within the gathered section, ensuring the pins are invisible from the front.
- Leave a few face-framing pieces loose on the opposite side to soften the look and add delicate detail.
- Apply flexible-hold hairspray to maintain the romantic, cascading curls throughout your event.
Additional Tips for Maximizing Face-Slimming Effects
Beyond specific hairstyles, certain universal principles and techniques can enhance the slimming effect of any cut or style you choose for your round face.
Color and Highlighting Strategies:
- Place lighter highlights around your face and through the crown to draw the eye vertically and create dimension that slims your appearance.
- Use darker tones at the sides near your cheeks to create subtle shadowing that makes your face appear narrower.
- Balayage and ombre techniques that create vertical color graduation naturally guide the eye up and down rather than side to side.
- Avoid heavy, horizontal color blocking that can emphasize the width of your face and create unflattering lines.
Volume Placement:
- Always concentrate volume at the crown and top of your head rather than at the sides to create vertical rather than horizontal dimension.
- Avoid adding volume at the sides of your head at cheek level, as this will make your face appear wider.
- Use teasing, volumizing products, and strategic blow-drying to create lift at the roots specifically at the crown area.
- When creating curls or waves, keep them looser and more elongated at the sides while adding more volume at the top.
Length Considerations:
- Very short cuts that end at chin level can sometimes emphasize roundness, so if going short, ensure there’s significant height on top.
- The most universally flattering lengths for round faces extend past the chin, with hair falling to the shoulders or beyond creating optimal elongation.
- If you prefer shorter hair, incorporate dramatic height, texture, or asymmetry to create the visual length your face shape benefits from.
- Avoid blunt cuts that end exactly at the widest part of your face—typically at cheek level—as these can emphasize width.
Parting Strategies:
- Center parts can work for round faces but require sufficient hair length to create framing and should include volume at the crown.
- Deep side parts are almost universally flattering because they create instant asymmetry that breaks up roundness.
- Zigzag parts add visual interest and prevent the hair from lying too flat, which can emphasize a round face shape.
- Experiment with different parting positions to find which creates the most flattering frame for your unique features.
Styling Products and Tools:
- Volumizing mousse and root-lifting sprays are essential for creating the crown volume that elongates your face.
- Texturizing sprays and pastes create piece-y separation that adds dimension and prevents hair from looking too flat or heavy.
- Round brushes in various sizes help create volume at the crown and smooth, face-framing curves throughout your style.
- Teasing combs or brushes allow you to create hidden volume that provides lift without looking overdone or unnatural.
Conclusion
Discovering the right hairstyle for your round face shape is truly transformative, and the extensive options presented in Top 27+ Slimming Hairstyles For Round Faces to Boost Confidence prove that you have countless flattering choices available.
From dramatic pixie cuts with elongated tops to flowing romantic curls gathered to one side, from sleek high ponytails to textured shaggy layers, each style offers unique benefits that can enhance your natural beauty while creating the illusion of length and angles.
The key principles remain consistent throughout: creating height at the crown, incorporating face-framing layers that add angles, using asymmetry to break up roundness, and ensuring your chosen style draws the eye vertically rather than horizontally.
Remember that the most flattering hairstyle is ultimately the one that makes you feel confident, beautiful, and authentically yourself. Your round face is not a limitation but rather a lovely canvas that can be beautifully complemented by strategic styling choices.
Embrace experimentation, work with skilled stylists who understand face-flattering techniques, and most importantly, wear your chosen style with the confidence that comes from knowing you look absolutely stunning.
Whether you opt for bold and edgy or soft and romantic, short and sassy or long and flowing, the right hairstyle will not only flatter your features but will genuinely boost your confidence every single day.
