
Side-part braided hairstyles have revolutionized the way we approach hair styling, offering an elegant asymmetry that flatters every face shape and hair texture.
Whether you’re preparing for a casual brunch, a formal wedding, or simply want to elevate your everyday look, side-part braids provide the perfect combination of sophistication and practicality.
This comprehensive guide explores over 36 stunning side-part braided hairstyles that range from simple three-strand braids to intricate bohemian masterpieces, each designed to inspire your next hair transformation.
You’ll discover step-by-step guidance, styling tips, maintenance advice, and creative variations that work for short, medium, and long hair lengths.
From classic side French braids to modern twisted updos, protective styles, and festival-ready looks, these hairstyles offer versatility for every occasion and skill level.
The beauty of “36+ Stunning Side-Part Braided Hairstyles to Try Right Now!” lies in their ability to adapt to your personal style while providing a flattering frame for your face that draws attention to your best features.
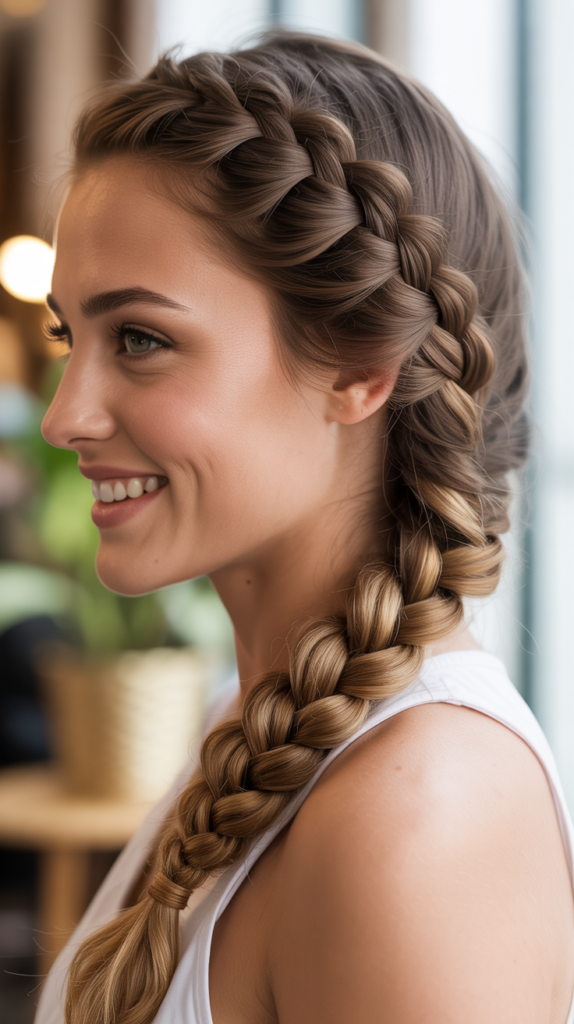
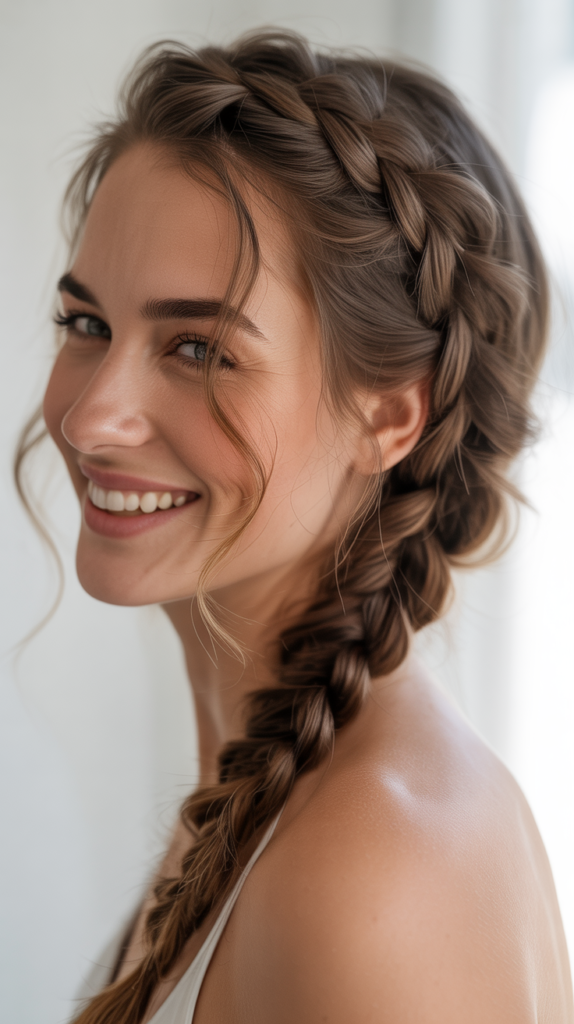
1. Classic Side French Braid
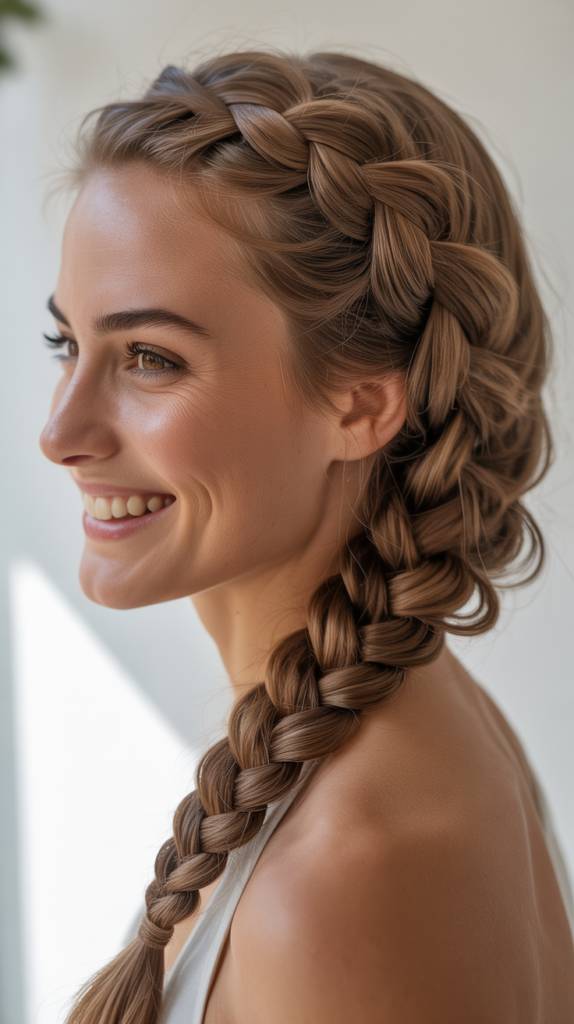
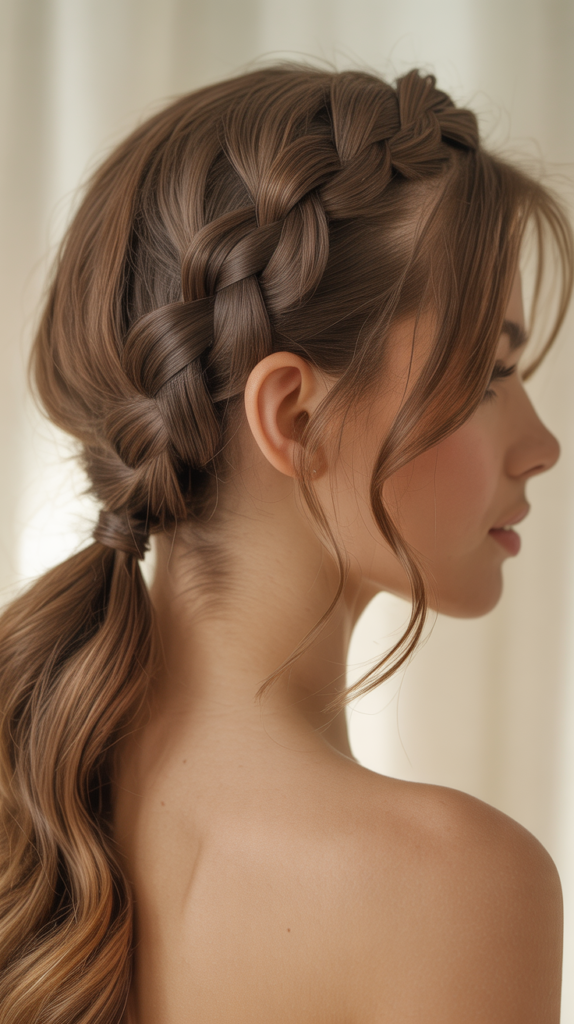
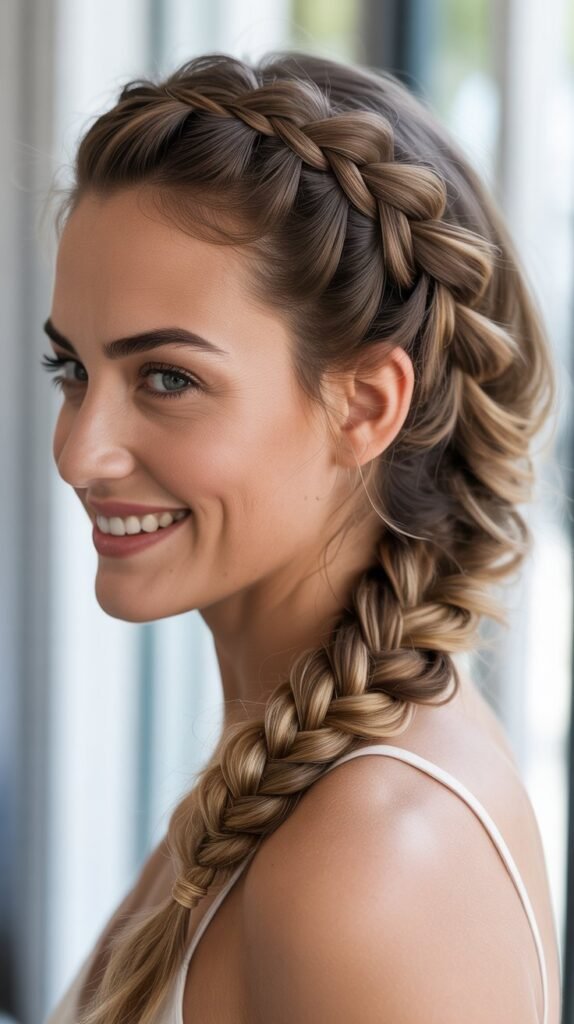
The classic side French braid remains one of the most timeless and versatile hairstyles that combines elegance with practicality.
This foundational style involves sweeping all your hair to one side and incorporating sections as you braid down the length, creating a sophisticated rope-like texture that sits beautifully over your shoulder.
Perfect for beginners and experts alike, this style works exceptionally well for second-day hair and can transition seamlessly from office meetings to evening events.
How to Create the Perfect Side French Braid:
- Begin by creating a deep side part using a tail comb, positioning it approximately two inches from your natural center part for optimal asymmetry.
- Gather a three-inch section of hair near your hairline on the heavier side of the part and divide it into three equal strands.
- Start braiding by crossing the right strand over the middle, then the left strand over the new middle, maintaining even tension throughout.
- As you continue braiding, add small sections of hair from the sides into each strand before crossing it over, ensuring you’re picking up hair only from the front and back, not from the lighter side of the part.
- Continue this pattern down past your ear, gradually angling the braid toward your opposite shoulder for a graceful diagonal flow.
- Once you’ve incorporated all the hair, finish with a regular three-strand braid to the ends and secure with a clear elastic or decorative hair tie.
Styling Tips:
- Apply a lightweight texturizing spray before braiding to add grip and prevent slippery strands from escaping.
- Gently pancake the braid by pulling apart the outer edges of each section to create a fuller, more romantic appearance.
- Secure flyaways along the part and around the face with a light mist of hairspray and a soft-bristle brush.
- For a more casual look, leave a few face-framing pieces loose before you begin braiding.
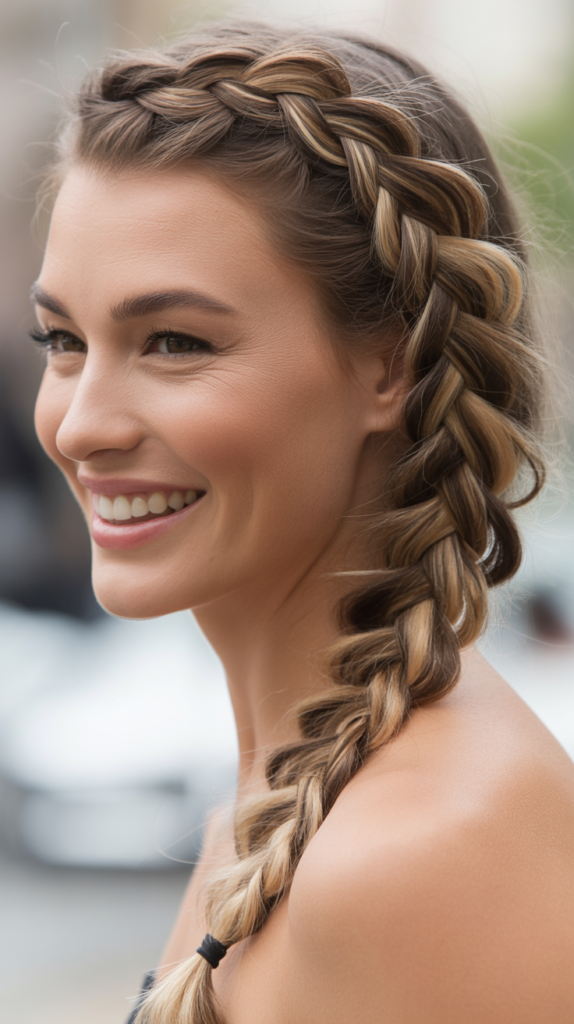
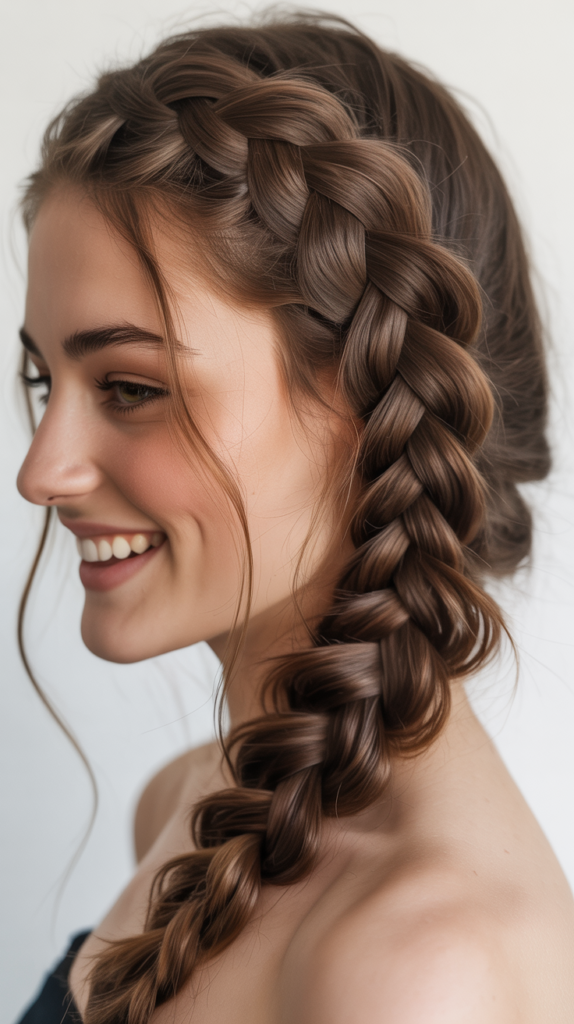
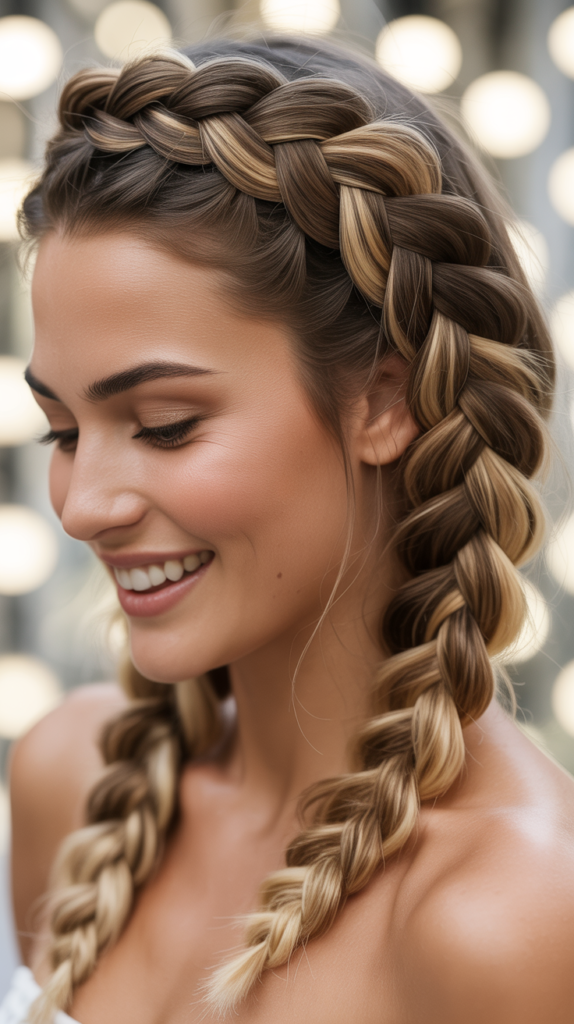
2. Dutch Side Braid (Reverse French Braid
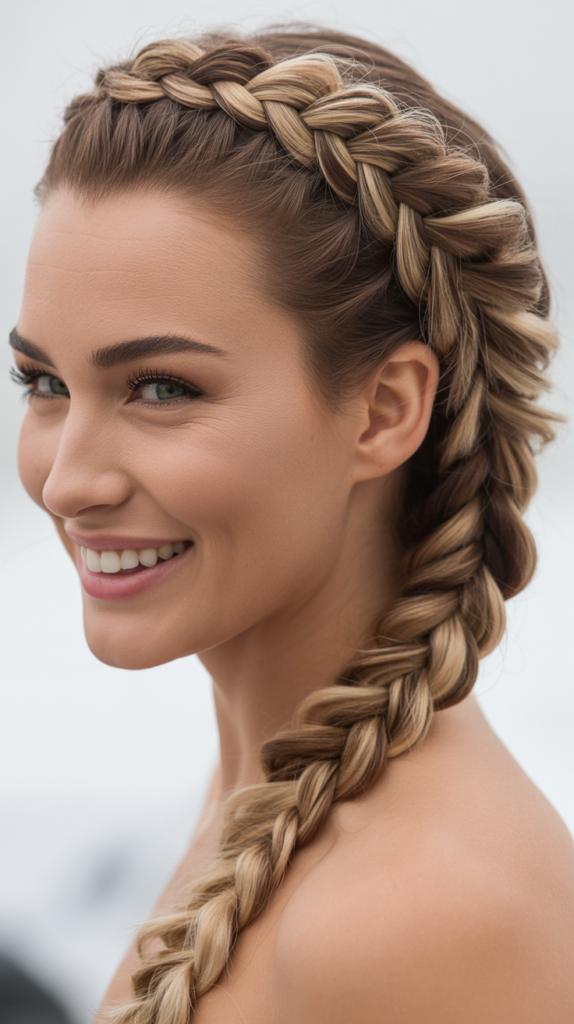
The Dutch side braid, often called the reverse or inside-out French braid, creates a stunning three-dimensional effect that sits on top of your hair rather than embedding within it.
This eye-catching variation adds dramatic texture and dimension, making it ideal for those who want their braid to stand out as a bold statement piece.
The elevated appearance of the Dutch braid makes it particularly photogenic and perfect for special occasions or when you want to showcase intricate braiding skills.
Technique Breakdown:
- Part your hair deeply to one side, using the arch of your eyebrow as a guide for where the part should end.
- Take a section of hair near the part line and divide it into three equal pieces, positioning your hands close to the scalp for better control.
- Unlike the French braid, cross each outer strand under the middle strand rather than over it, which creates the reverse effect.
- Add hair to each section before crossing under, pulling the additions from both the front hairline and the back of the head.
- Maintain consistent tension slightly tighter than a French braid to ensure the raised pattern remains prominent and doesn’t flatten throughout the day.
- Continue the underhand crossing pattern until all hair is incorporated, then complete with a standard braid underneath.
Enhancement Ideas:
- Weave a thin ribbon through the braid after completion for a bohemian or romantic touch.
- Insert small flowers or decorative pins along the raised braid for wedding or festival styles.
- Create a messier, textured look by pulling the braid apart more aggressively and allowing strategic pieces to fall loose.
- Combine with a side-swept bang or face-framing layers for added dimension around your facial features.
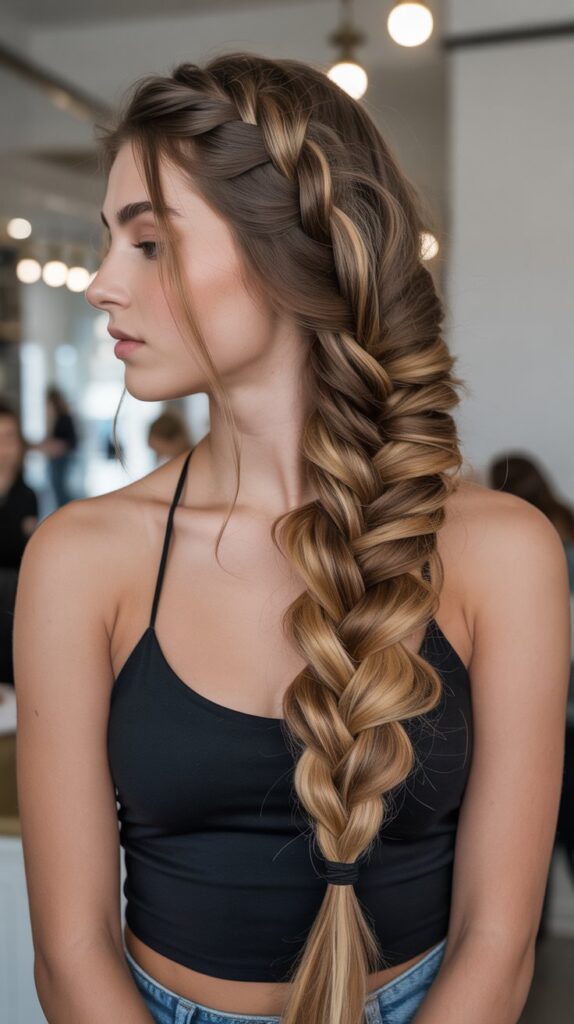
3. Side Fishtail Braid
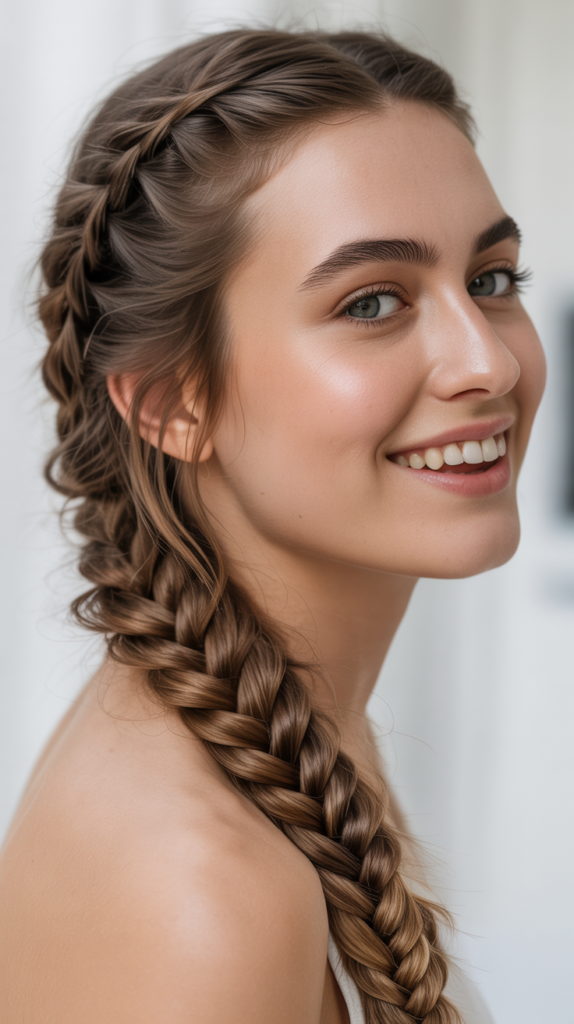
The side fishtail braid offers an intricate, woven appearance that looks far more complex than its surprisingly simple two-strand technique.
This bohemian-inspired style creates a beautiful herringbone pattern that adds texture and visual interest to any hair color or length.
The fishtail’s distinctive appearance makes it a favorite for music festivals, beach days, and romantic occasions where effortless beauty is the goal.
Step-by-Step Instructions:
- Create your desired side part and sweep all hair over one shoulder, securing the base loosely with your hand.
- Divide all your hair into just two equal sections rather than the traditional three.
- Take a thin piece (about half an inch) from the outer edge of the right section and cross it over to join the left section.
- Immediately take a thin piece from the outer edge of the left section and cross it over to join the right section.
- Continue this alternating pattern, always pulling from the outer edges and crossing over to the opposite side.
- Keep the sections you’re pulling relatively thin and consistent in size for a more defined, intricate pattern.
- The tighter you pull, the more structured your fishtail will appear, while looser tension creates a relaxed, beachy vibe.
- Secure the end with an elastic and gently pull apart sections to create fullness and that signature messy-chic appearance.
Customization Options:
- Start the fishtail at different heights—begin at the crown for an all-over fishtail or at the nape for a combination style with loose hair on top.
- Create a “pull-through” fishtail illusion by using multiple elastics down the length of a ponytail and pulling sections through.
- Incorporate colored hair chalk or temporary hair color on the sections you’re pulling over for a rainbow or ombre effect.
- Wrap a small section of hair around the elastic at the end to conceal it for a more polished finish.
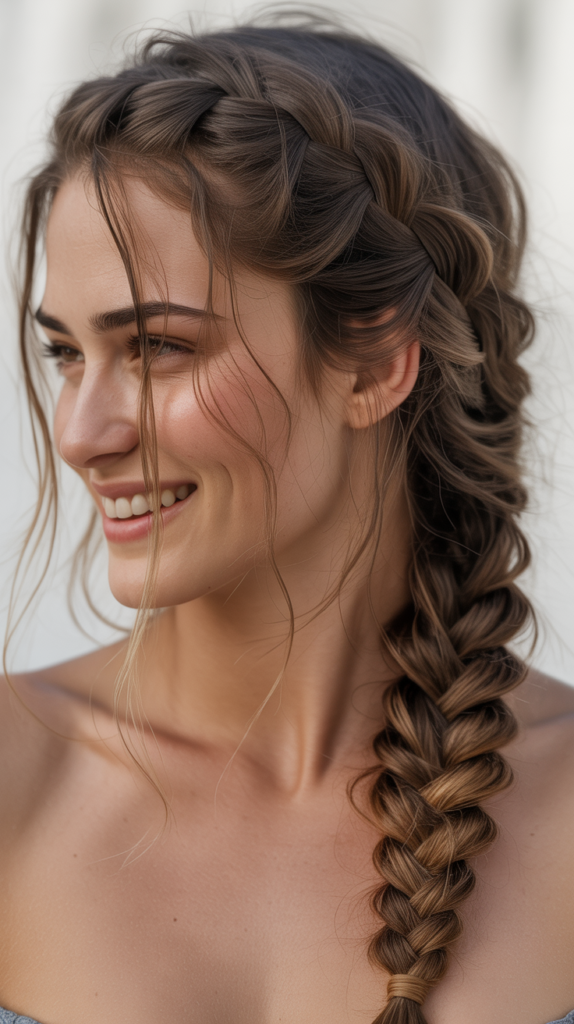
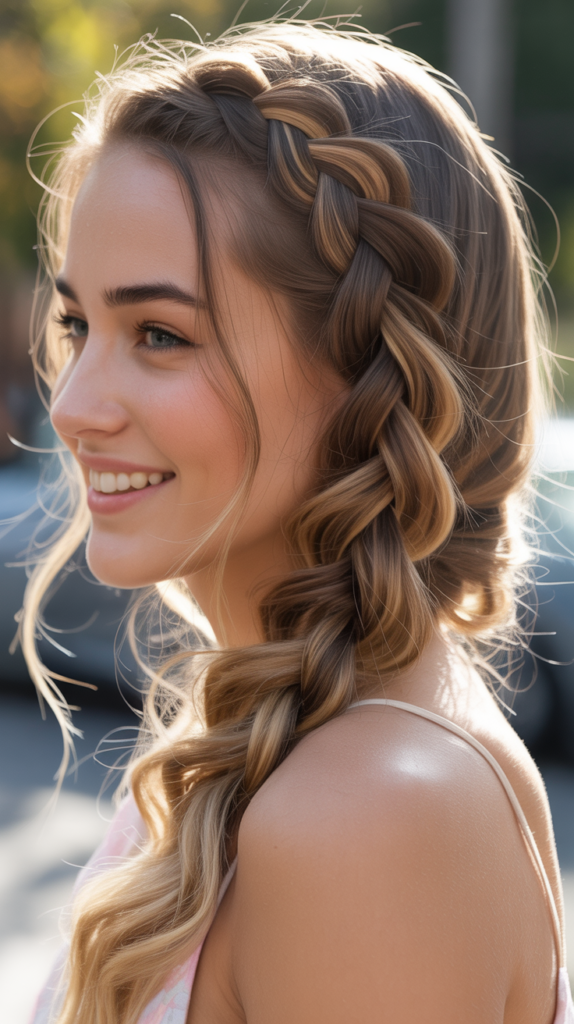
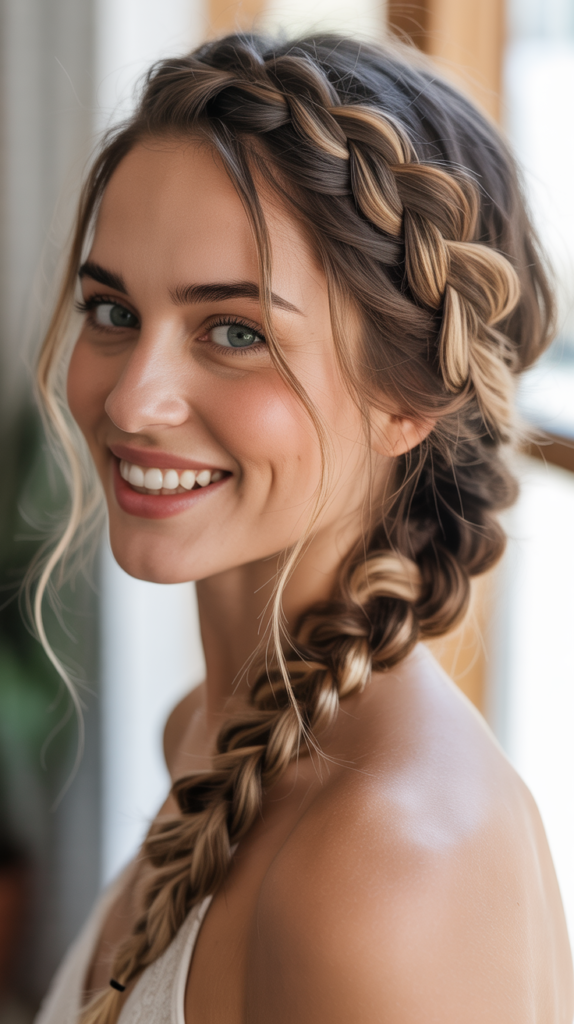
4. Side Fishtail Braid
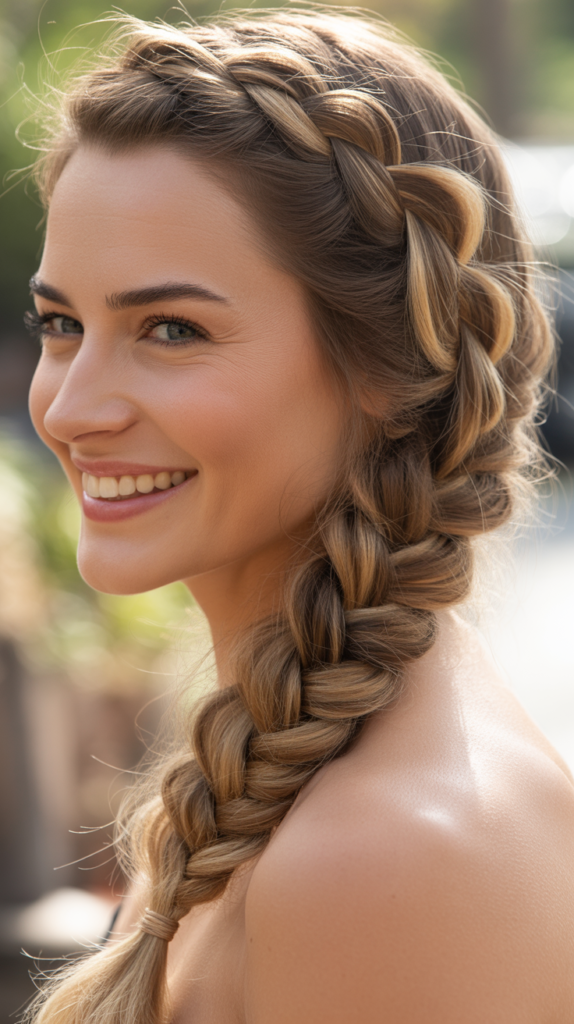
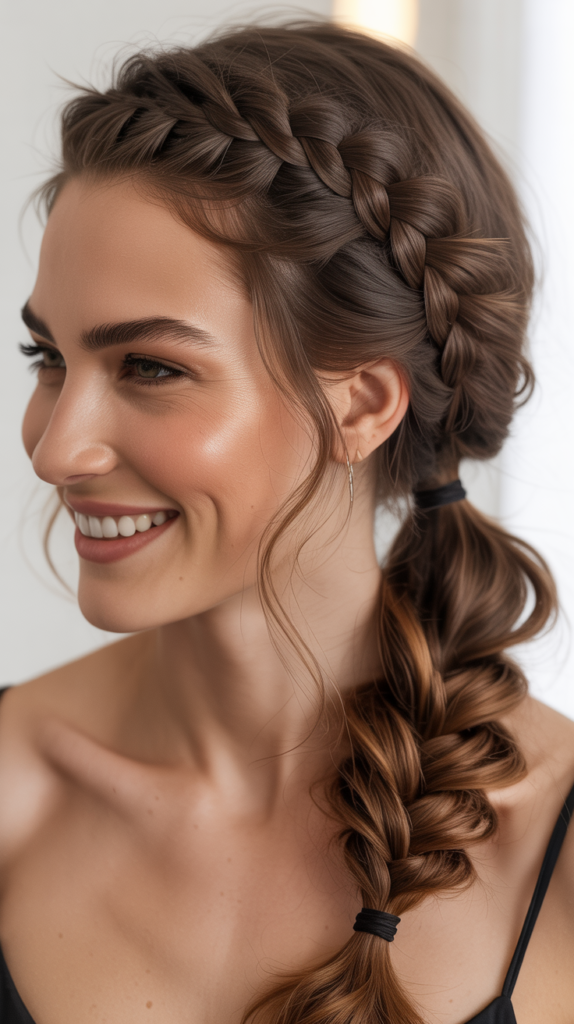
The side braid with loose waves combines the structure of braiding with the romantic softness of flowing curls, creating a harmonious balance between polished and relaxed.
This hybrid style is particularly flattering for formal events like proms, weddings, or date nights where you want to showcase both texture and movement.
The contrast between the secured braid and the flowing waves creates dimensional interest that photographs beautifully from every angle.
Creating the Perfect Combination:
- Start with clean, dry hair and curl the bottom two-thirds of your hair using a 1.5-inch barrel curling iron, leaving roots straight for a modern effect.
- Allow curls to cool completely, then gently brush through with a wide-tooth comb or your fingers to create soft, separated waves.
- Create a deep side part and begin a French or Dutch braid on the heavier side, starting at the part line.
- Braid along the hairline, incorporating hair from the crown and temple area, but stop the braid at or just behind your ear.
- Secure the braid with a small clear elastic or bobby pins tucked discreetly into the braid’s underside.
- Allow the remaining curled hair to flow freely over your opposite shoulder, adjusting waves with your fingers for optimal placement.
Volume and Texture Tips:
- Tease the roots at the crown before braiding to create lift and prevent the style from appearing flat.
- Apply a volumizing mousse to damp hair before curling to ensure waves hold throughout your event.
- Use a texturizing spray on the loose waves for enhanced separation and a more piece-y, modern appearance.
- Secure the transition point between braid and waves with decorative pins, small flowers, or jeweled accessories.
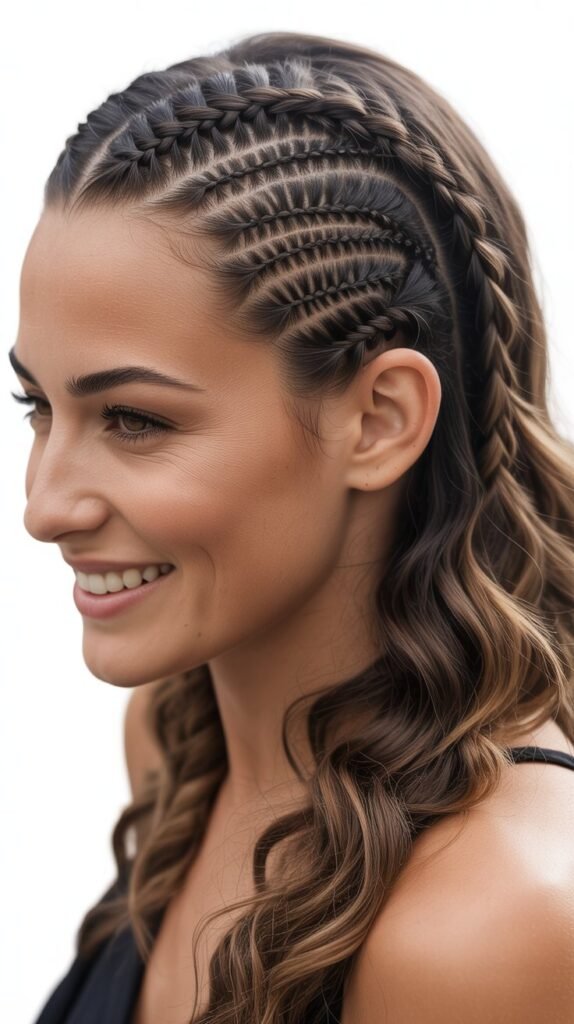
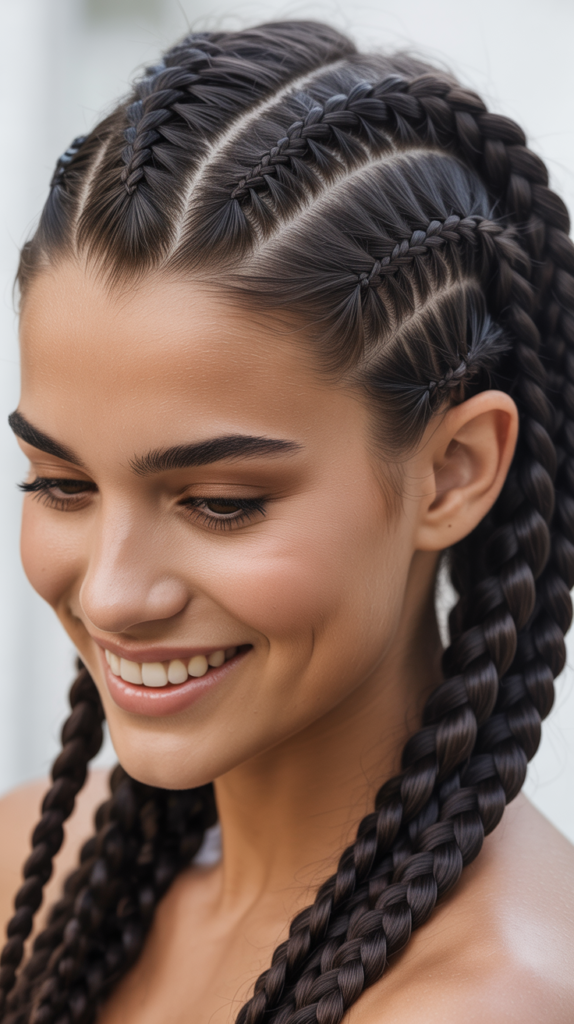
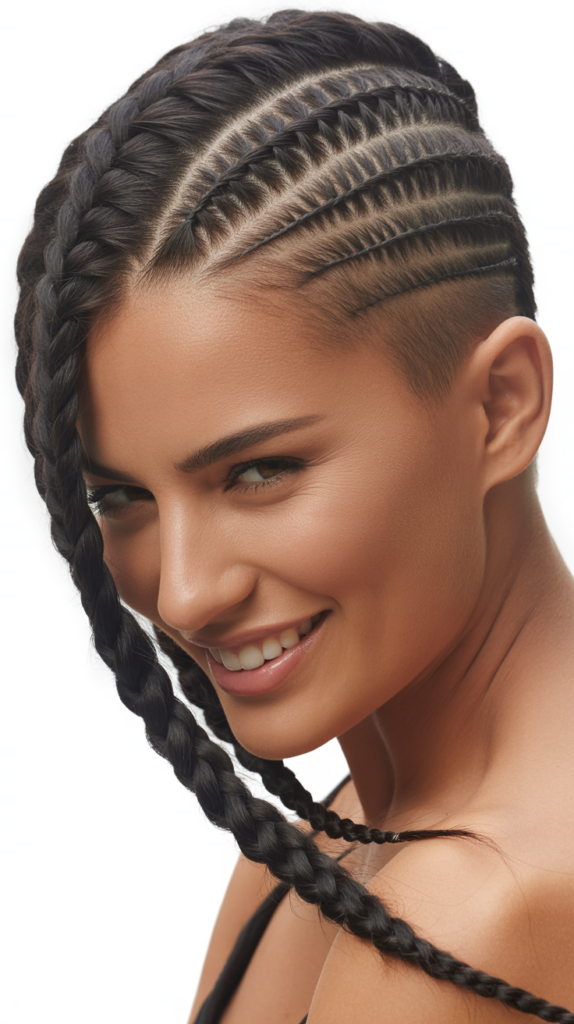
5. Side Cornrow Braids
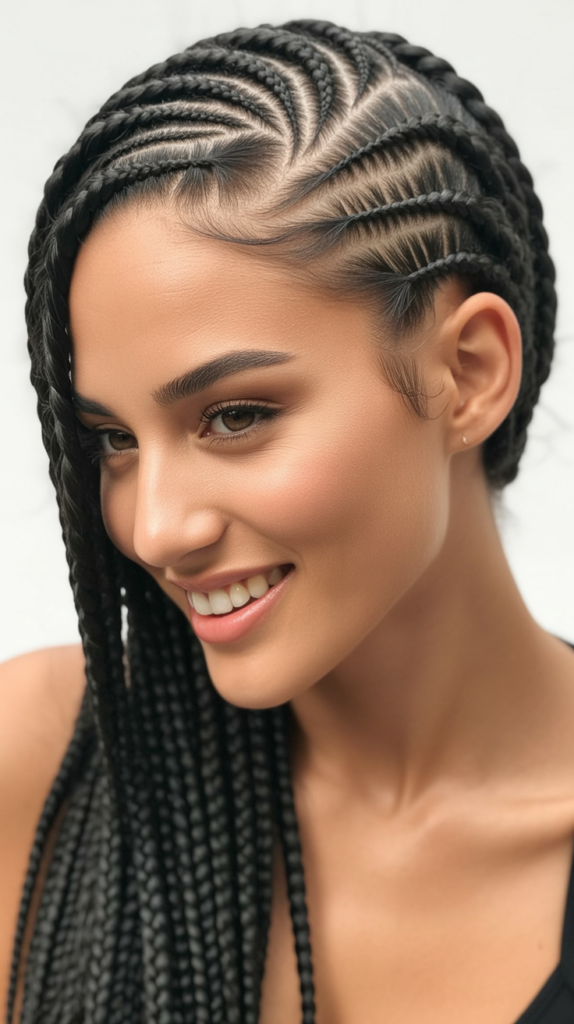
Side cornrow braids offer a protective styling option that celebrates textured hair while providing a sleek, sculptural aesthetic that can last for weeks.
This traditional African braiding technique involves creating tight, flat braids that follow the contour of your head, swept dramatically to one side for contemporary flair.
Beyond their stunning visual appeal, side cornrows protect natural hair from environmental damage and manipulation while allowing for countless creative pattern possibilities.
Professional Installation Process:
- Begin with freshly washed, deep-conditioned, and completely detangled hair to ensure smooth braiding and scalp health.
- Create a deep side part, then section the hair into horizontal or diagonal rows depending on your desired pattern direction.
- Apply a lightweight braiding gel or edge control to each section before braiding to ensure sleek, frizz-free results.
- Start each cornrow at the part line, taking small sections and braiding tightly against the scalp using the underhand technique.
- Direct all cornrows toward the opposite side of the part, creating a sweeping pattern that can be straight, curved, or geometrically designed.
- Depending on preference, leave the ends in individual braids, gather them into a side ponytail, or tuck them under for a cleaner finish.
Maintenance and Care:
- Wrap hair with a silk or satin scarf at night to prevent frizzing and maintain the sleekness of the style.
- Apply a lightweight oil to the scalp every few days to prevent dryness and itching, focusing on the parts between braids.
- Use a spray bottle with diluted leave-in conditioner to refresh the style and keep edges smooth without rebraiding.
- Plan to keep cornrows in for 2-4 weeks maximum to prevent matting and ensure proper scalp cleansing.
Styling Variations:
- Incorporate contrasting colored extensions for bold, eye-catching dimension.
- Create geometric patterns like zigzags, curves, or triangle sections on the lighter side of the part.
- Add metallic hair cuffs, beads, or thread wrapping along the cornrows for cultural authenticity and personal expression.
- Combine different braid thicknesses—keep some cornrows thin and others chunky for textural contrast.
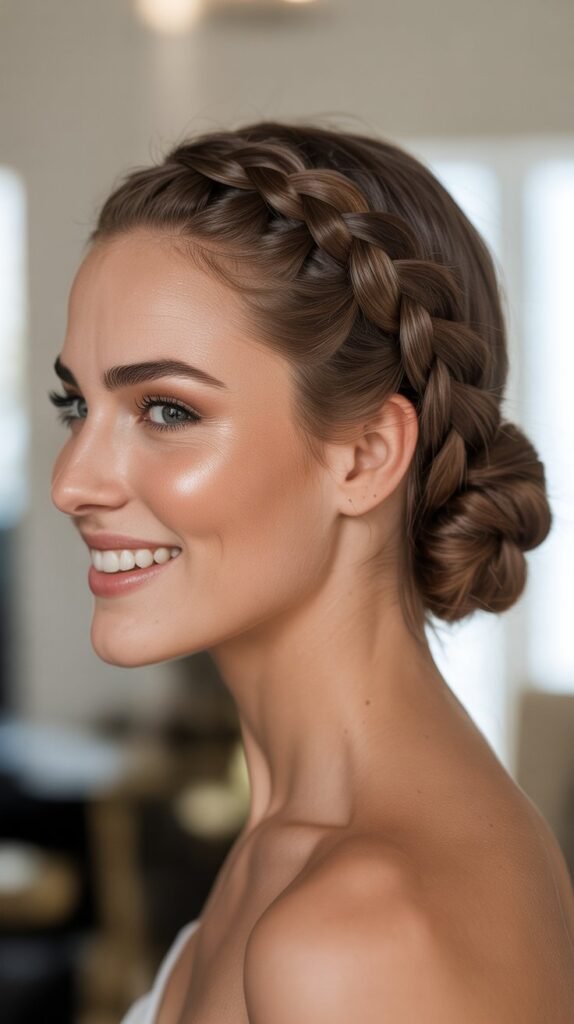
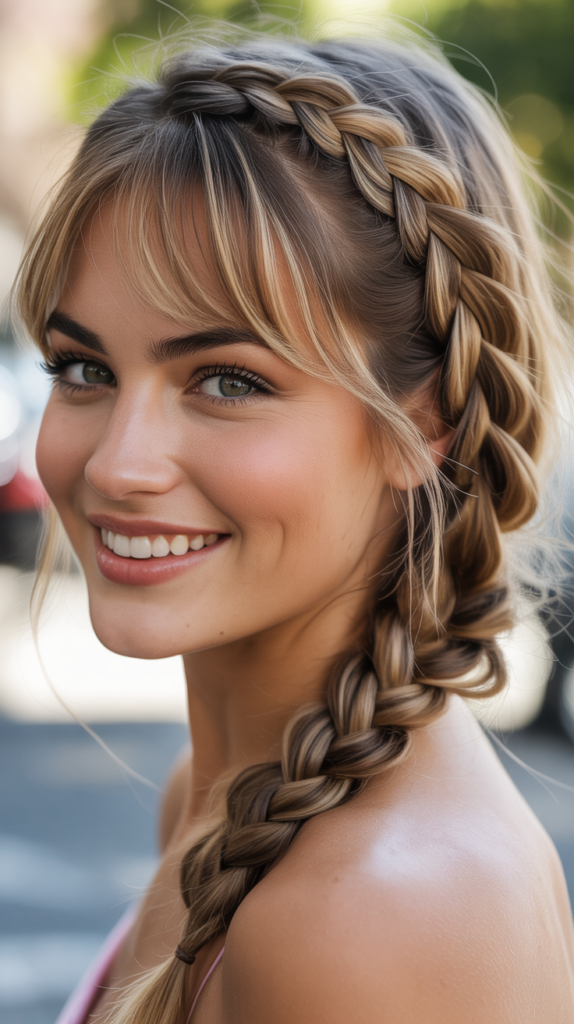
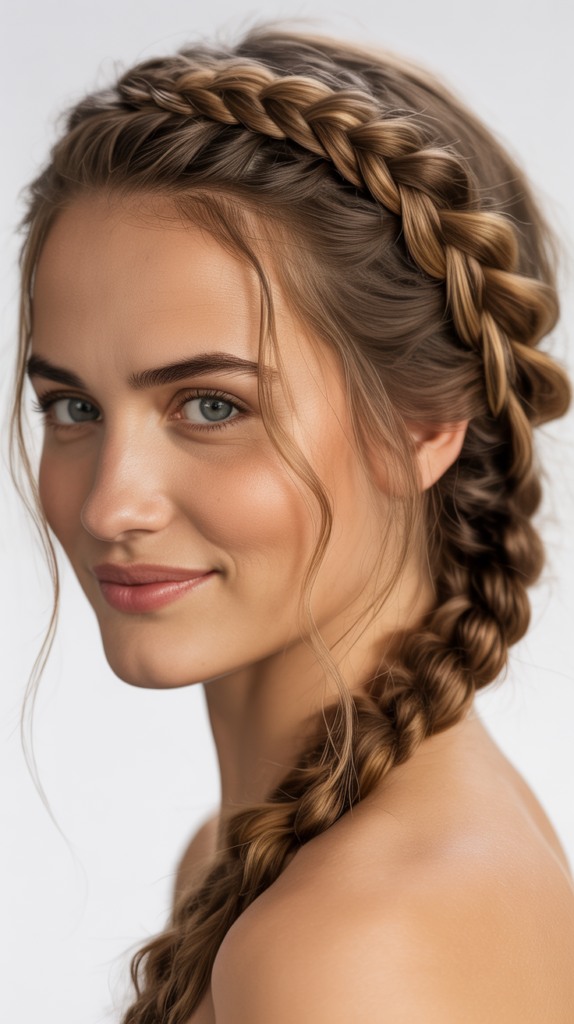
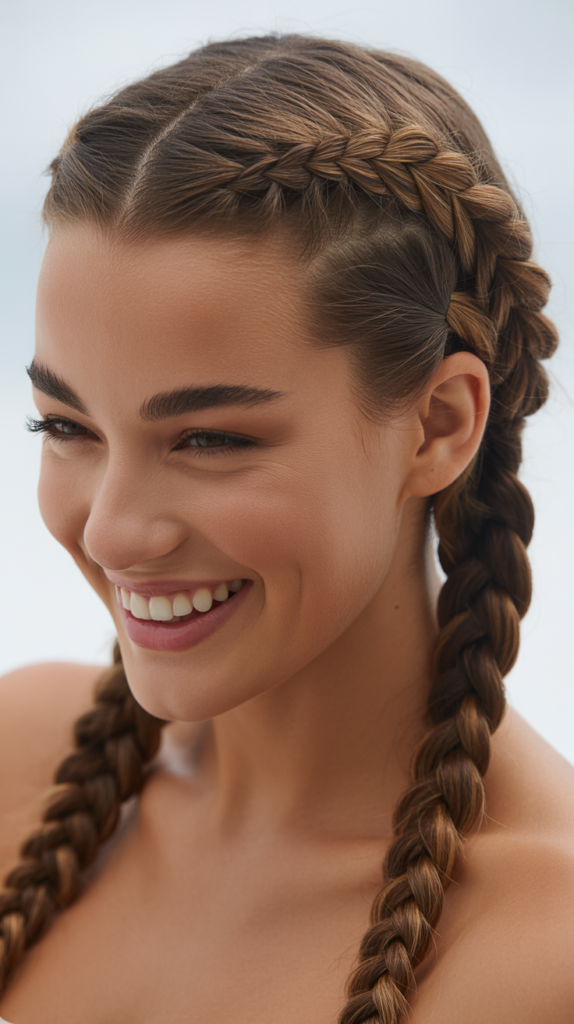
6. Side-Swept Braided Crown
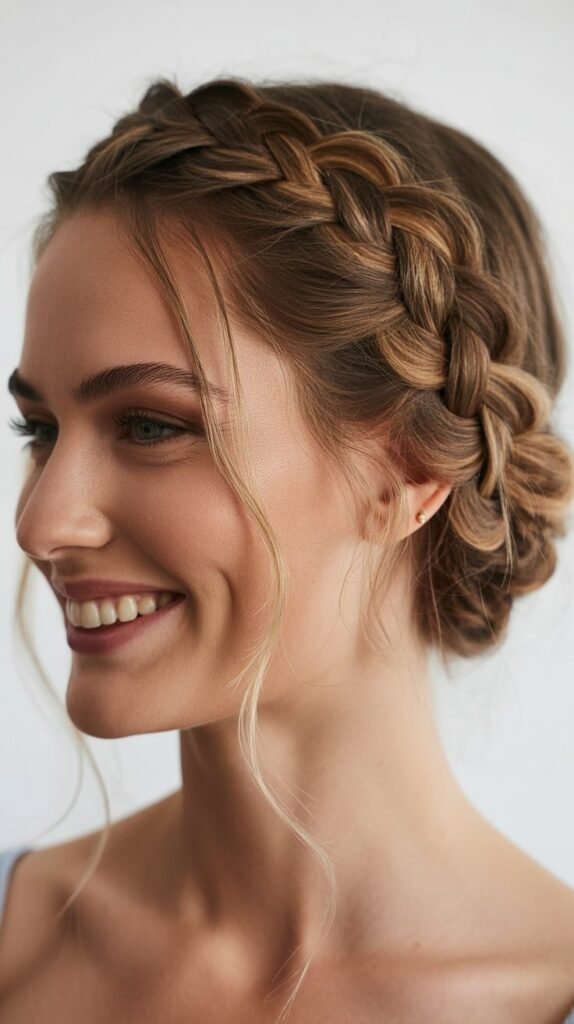
The side-swept braided crown creates an ethereal, goddess-like appearance by wrapping a braid around the head like a natural headband, with all elements directed toward one side.
This elegant style works exceptionally well for weddings, formal events, or when you want to feel particularly regal.
The crown braid frames the face beautifully while keeping hair secure and off the neck, making it both practical and stunning.
Construction Method:
- Part your hair deeply to one side, establishing which side will feature the most prominent braid display.
- On the heavier side, take a section near the temple and begin a Dutch or French braid that follows your hairline.
- Braid along the hairline toward and around your ear, curving the braid to follow the natural head shape.
- Continue braiding across the back of your head, staying relatively close to the hairline to create that crown effect.
- As you reach the opposite side, either pin the braid end discreetly behind your ear or allow it to cascade down with the remaining hair.
- The lighter side of the part should remain smooth and sleek, swept back to meet the crown braid.
Finishing Touches:
- Secure the crown braid with bobby pins color-matched to your hair, inserting them horizontally into the braid’s underside for invisible hold.
- Pancake the crown braid generously to create width and the appearance of a thicker, fuller braid.
- Leave the remaining hair down in soft waves, gather it into a low side ponytail, or create a loose side bun.
- Add small flowers, pearl pins, or a delicate hair vine woven through the crown braid for bridal or formal occasions.
7. Messy Side Braid (Bohemian Style
The messy side braid embodies effortless, bohemian chic with its deliberately undone appearance that suggests you casually created a masterpiece without trying.
This intentionally imperfect style celebrates texture, movement, and a carefree attitude while still maintaining structure and style.
Perfect for festival season, casual weekends, or beach vacations, the messy side braid proves that sometimes the most beautiful looks are those that appear naturally effortless.
Achieving Perfectly Imperfect:
- Start with second or third-day hair, as clean hair often appears too sleek and slippery for this textured style.
- Apply a dry texturizing spray or sea salt spray throughout your hair, scrunching to enhance natural texture and create grip.
- Create a loose side part—precision isn’t necessary here, embracing a more organic placement adds to the casual aesthetic.
- Loosely braid your hair to one side using any technique you prefer, intentionally keeping your tension relaxed and inconsistent.
- Leave face-framing pieces out completely before you begin, and allow small sections to escape naturally as you braid.
- Once completed, aggressively pull apart the braid sections, stretching them wider and creating gaps that reveal the hair beneath.
Texture Enhancement:
- Before braiding, backcomb random sections throughout your hair to create internal volume that will make the pulled-apart braid appear fuller.
- Use your fingers rather than a brush to detangle before braiding, preserving natural texture and preventing the hair from becoming too smooth.
- Vary the size of sections you incorporate into the braid randomly rather than keeping them uniform for an organic, unstructured appearance.
- Finish with a light-hold texturizing spray rather than firm hairspray to maintain movement and allow pieces to shift naturally.
8. Side Braid with Undercut Design
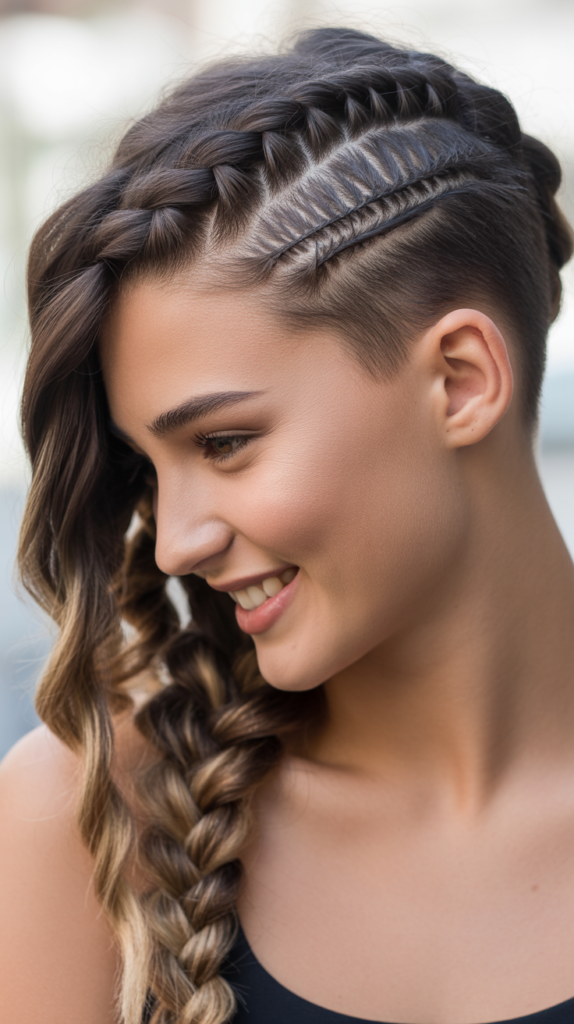
The side braid with undercut design represents the edgier side of braided hairstyles, combining feminine braiding techniques with bold, shaved patterns that express individuality and confidence.
This style works particularly well when you want to showcase a creative undercut pattern while maintaining length and styling versatility on top.
The contrast between the shaved design and the intricate braid creates a striking visual that makes a powerful style statement.
Design Considerations:
- Consult with a professional barber or stylist to create your undercut pattern, choosing from geometric shapes, lines, curves, or custom artwork.
- The undercut is typically placed on one side of the head, from the temple area extending behind the ear and potentially to the nape.
- Popular undercut patterns include straight lines, waves, triangles, stars, or even intricate mandalas that complement your personal aesthetic.
- The remaining hair with length should be sufficient to braid and can be swept to the opposite side to fully reveal the undercut.
Styling the Combination:
- Create a dramatic side part that clearly delineates between the shaved side and the side with length.
- Braid the longer side using any technique—Dutch braids work particularly well as they sit on top and create additional dimension.
- Consider using multiple thinner braids rather than one thick braid to create parallel lines that echo geometric undercut patterns.
- Style the braid to drape over your opposite shoulder, ensuring the shaved design remains completely visible.
Maintenance Requirements:
- Undercuts require regular maintenance every 2-4 weeks to keep the pattern sharp and prevent the design from growing out and becoming unclear.
- Apply SPF to the shaved area when spending time outdoors, as this newly exposed skin may be more sensitive to sun damage.
- Moisturize the shaved scalp regularly to prevent dryness and irritation, especially immediately after fresh shaves.
- When growing out the undercut, be prepared for an awkward length phase where styling products and creative pinning become essential.
9. Side Waterfall Braid
The side waterfall braid creates a cascading, romantic effect where sections of hair are deliberately dropped through the braid to flow freely like a waterfall.
This intricate-looking style is surprisingly achievable and offers a softer, more feminine alternative to traditional braids.
The interplay between structured braiding and loose, flowing sections creates dynamic movement and works beautifully on wavy or curly hair where the dropped sections blend seamlessly.
Waterfall Technique Explained:
- Begin with a deep side part and take a three-inch section of hair near your temple on the heavier side.
- Divide this section into three strands and begin a standard braid, crossing right over middle, then left over middle.
- On the next sequence, drop the bottom strand entirely instead of crossing it over, allowing it to fall freely.
- Pick up a new section of hair from above to replace the dropped strand and continue braiding.
- Repeat this pattern—braid once normally, drop the bottom strand, pick up a replacement from above—working your way around the head.
- The dropped strands create the “waterfall” effect, cascading down through the horizontal braid that wraps around your head.
Placement Variations:
- Create a waterfall braid that follows your hairline from temple to temple for a full crown effect with the heavy side of the part determining direction.
- Alternatively, start at the deep part and braid diagonally across to the opposite lower side for a more dramatic angle.
- For longer hair, create multiple waterfall braids at different levels, stacking them for an ultra-romantic, intricate appearance.
- Combine the waterfall braid with curls on the dropped sections for enhanced texture and definition.
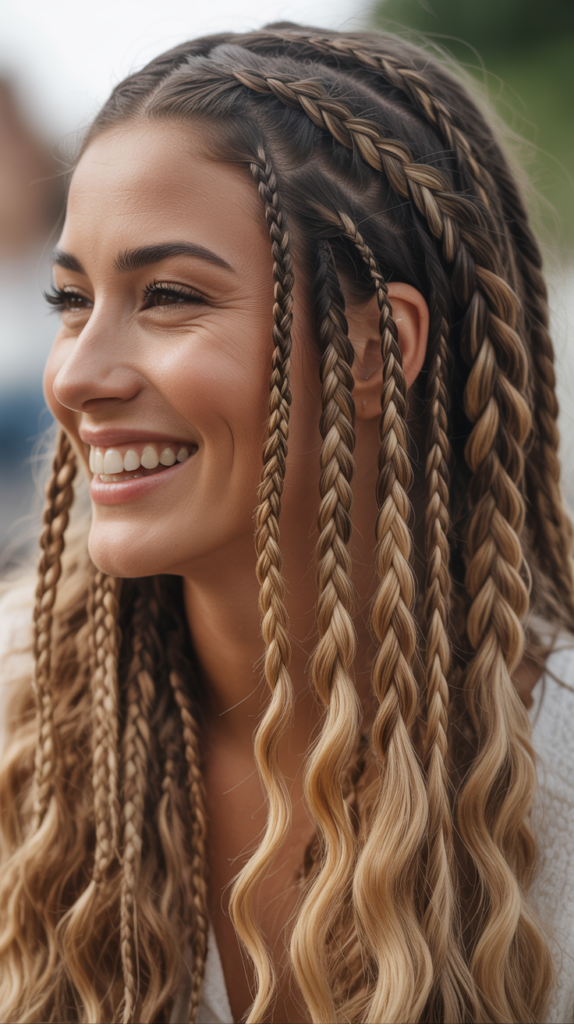
10. Side Box Braids
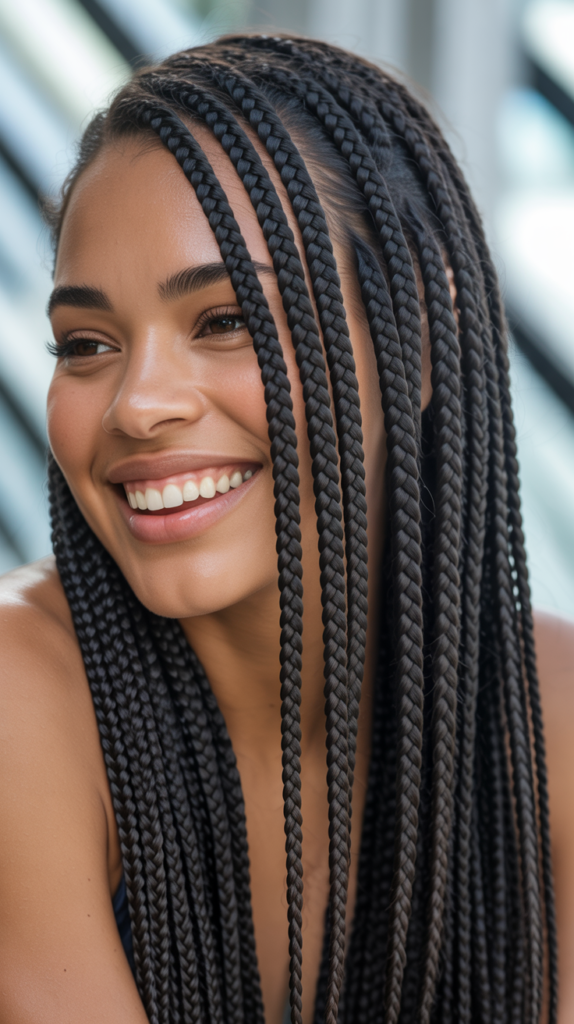
Side box braids offer a classic protective style that combines traditional box braiding techniques with asymmetrical styling that creates contemporary edge.
By parting all box braids to one side, you create a dramatic cascade of braids that can be styled in countless ways while protecting natural hair for extended periods.
This style works beautifully on all hair textures and can be customized in thickness, length, and color to match your personal aesthetic.
Installation Specifications:
- Professional installation typically takes 4-8 hours depending on the size of braids and desired length, with smaller braids taking longer but lasting longer.
- Hair is sectioned into uniform square or rectangular “boxes” across the entire head, with sections typically ranging from half-inch to one-inch squares.
- Extensions are added to each section and braided from root to tip using synthetic or human hair in your choice of colors.
- For a side-swept look, create a deep side part during installation so all braids naturally fall to one side when styling.
Styling Your Side Box Braids:
- Sweep all braids over one shoulder for a classic asymmetrical look that showcases the braid length and texture.
- Create a side ponytail by gathering braids at or behind one ear, securing with a fabric-covered elastic designed for protective styles.
- Braid the box braids themselves into larger side braids for a braid-on-braid effect that adds another layer of texture.
- Accessorize individual braids with beads, cuffs, or thread wrapping in complementary or contrasting colors.
Longevity and Care:
- Box braids can be maintained for 4-8 weeks with proper care, though 6 weeks is generally recommended for optimal scalp health.
- Sleep with a satin bonnet or on a satin pillowcase to prevent frizzing and preserve the neat appearance of the braids.
- Clean your scalp weekly using a diluted shampoo applied with an applicator bottle, focusing on the scalp rather than the braids themselves.
- Apply lightweight oil to your scalp and a braid spray to the length of the braids to maintain moisture and prevent brittleness.
11. Side Braid with Hair Accessories
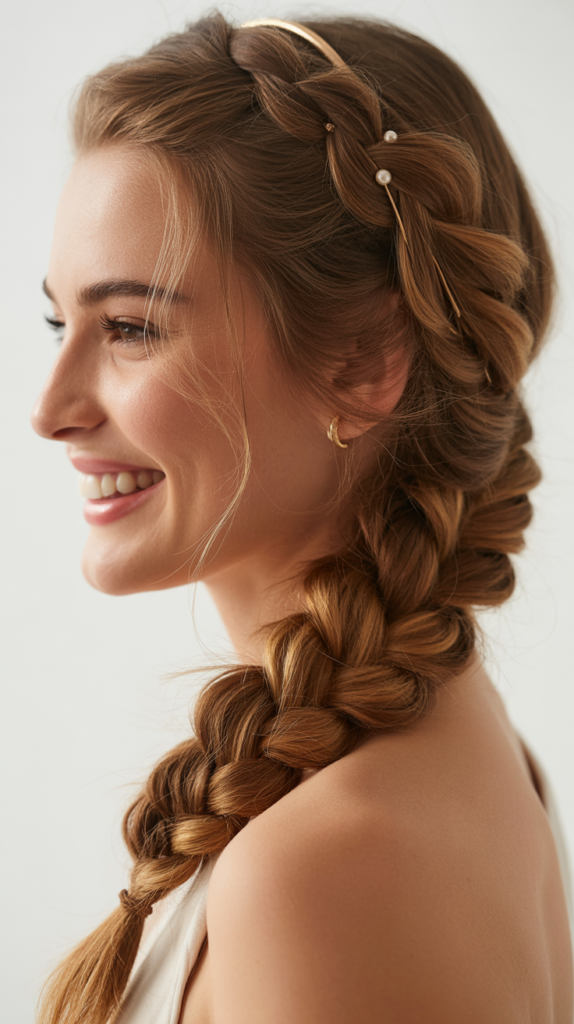
Side braids with hair accessories elevate simple braiding techniques into eye-catching statements that reflect your personality and the occasion.
From delicate pearl pins to bold metallic cuffs, accessories transform a basic side braid into a customized work of art.
This approach allows you to adapt the same braiding technique for different events simply by changing the accessories you incorporate.
Accessory Categories and Usage:
- Decorative Pins and Clips: Insert jeweled bobby pins, decorative clips, or ornate barrettes along the braid’s length or at the base for instant glamour.
- Hair Cuffs and Rings: Slide metallic cuffs over individual braid sections or the entire braid width for an edgy, modern aesthetic popular in festival fashion.
- Ribbons and Scarves: Weave thin ribbons through your braid as a fourth strand, or wrap a silk scarf around the finished braid and tie at the bottom.
- Fresh or Artificial Flowers: Tuck small blooms into the braid at intervals for romantic, garden-party elegance or bohemian festival vibes.
- Chains and Jewelry: Drape delicate chains through the braid or attach hair jewelry specifically designed to cascade down braided styles.
Strategic Placement:
- Place larger statement pieces at the base of the braid near the crown where they’ll be most visible and won’t interfere with shoulder movement.
- Distribute smaller accessories evenly down the braid’s length for a scattered, organic appearance rather than clustering them.
- Use accessories to conceal the elastic at the end of your braid by wrapping, covering, or drawing attention away with a statement piece.
- Match accessories to your outfit’s metal tones, colors, or overall aesthetic for a cohesive, intentionally styled appearance.
12. Half-Up Side Braid

The half-up side braid offers the best of both worlds by securing the top section of hair in a braid while leaving the bottom half flowing freely.
This versatile style works for casual and formal occasions alike, providing face-framing structure while showcasing your hair’s length and natural texture.
It’s particularly effective for adding interest to medium-length hair or when you want to keep hair out of your face without committing to a full updo.
Construction Steps:
- Section the top half of your hair from temple to temple, creating a horizontal part approximately at the top of your ears.
- Create a side part in the top section, determining which side will feature the most prominent braid.
- Begin braiding on the heavier side of the part, starting near your temple and working toward the opposite side.
- You can choose a French braid that incorporates hair as you go, a Dutch braid for raised texture, or a simple three-strand braid with the sectioned hair only.
- Once the braid reaches behind your ear or the center back, secure it with a clear elastic or pins, allowing it to blend with the loose hair below.
- The bottom section remains completely loose, which you can leave straight, curl, or style with waves depending on your preference.
Variation Ideas:
- Create two thinner side braids on the heavier side of the part that merge together at the back before joining the loose hair.
- Braid across the crown from one side to the other, pinning behind the opposite ear to create an asymmetrical crown effect.
- Add volume to the loose bottom section by curling it while keeping the braided top section sleek for beautiful contrast.
- Incorporate a small braid from the lighter side of the part as well, crossing both braids at the back and pinning for a more intricate half-up design.
13. Side Braid Bun
The side braid bun combines the elegance of an updo with the textured interest of braiding, creating a sophisticated style perfect for weddings, formal events, or professional settings.
By positioning the bun to one side rather than center, you create asymmetry that adds visual interest and appears more contemporary than traditional centered buns.
This style keeps hair completely secured while maintaining a soft, romantic aesthetic.
Creating the Style:
- Start by creating a deep side part and sweeping all hair to one side, gathering it at the desired height—low for classic elegance, higher for more casual vibes.
- Secure the hair in a side ponytail with a hair elastic, positioning it behind and slightly below your ear for optimal placement.
- Braid the entire ponytail using your preferred technique—fishtail creates texture while three-strand is quicker for busy mornings.
- Wrap the completed braid around the base of the ponytail, circling it to create a coiled bun shape.
- Secure the bun with bobby pins inserted vertically into the coil, ensuring you catch both the bun and the hair underneath for stability.
- Gently pull apart sections of the braid within the bun to create fuller, softer texture and a more romantic, less severe appearance.
Customization Options:
- Leave a small section out of the initial ponytail, wrap it around the elastic, and pin to conceal the hair tie for a polished finish.
- Create a braided wrap by making a separate small braid from face-framing hair and wrapping it around the bun’s base.
- Position the bun at varying heights and angles on the side of your head—lower and more forward for vintage vibes, higher and back for modern styling.
- Incorporate fresh or silk flowers into the bun by tucking stems into the bobby pins for garden party or wedding guest perfection.
14. Side Mohawk Braid
The side mohawk braid creates a bold, statement-making style that combines edgy aesthetic with intricate braiding technique.
This look features a raised center braid or series of braids running from the forehead toward the back, with sides slicked smooth or shaved, all swept dramatically to one side.
Perfect for those who want to express confidence and individuality, this style works beautifully for concerts, parties, or whenever you want to stand out from the crowd.
Creating the Mohawk Effect:
- Section hair into a wide stripe down the center of your head, approximately 3-4 inches wide from hairline to crown.
- Slick the sides smooth using strong-hold gel or pomade, brushing tightly toward the center section to create definition.
- Within the center section, create a Dutch braid or multiple cornrows that run from front to back, building height by pulling sections tight as you braid.
- Direct the entire mohawk section to sweep toward one side of your head rather than keeping it centered, creating asymmetrical drama.
- Secure the sides with bobby pins color-matched to your hair, placing them horizontally and close together for a sleek, polished appearance.
- The braid(s) should sit prominently raised above the smooth sides, creating that signature mohawk silhouette with a braided twist.
Alternative Approaches:
- For those not ready for shaved sides, create the illusion by braiding the sides in tight cornrows flat against the head, making them nearly invisible.
- Use colored extensions in the center mohawk braid for bold color contrast against natural hair on the sides.
- Create a faux hawk by pinning the center section up and over itself in a roll rather than braiding it, maintaining the swept-to-side direction.
- Add metallic accessories along the raised braid—cuffs, chains, or threaded wrapping—for extra edge and festival-ready flair.
15. Side Braid with Bangs
Side braids with bangs create a youthful, face-framing style that balances the structure of braiding with the softness of fringe.
This combination works particularly well for those with existing bangs who want to incorporate them into braided styles without sweeping them back completely.
The bangs add dimension and draw attention to the eyes while the side braid provides texture and keeps the remaining hair controlled and styled.
Bang Integration Techniques:
- Leave Bangs Out Completely: For straight-across or curtain bangs, leave them styled as normal while braiding begins behind the bang line for clear separation.
- Side-Swept Integration: Gradually incorporate side-swept bangs into the beginning of your side braid, starting the braid at the temple where bangs naturally begin.
- Partial Incorporation: Leave the front-most pieces of your bangs out while braiding the rest, creating a soft, face-framing effect with dimension.
- Braided Bang: Create a tiny accent braid within the bang section itself that joins the main side braid, adding intricate detail.
Styling Considerations:
- Style bangs first before beginning the braid—blow-dry, flat iron, or curl them into your desired shape so they maintain separation from the braid.
- Use a light pomade or styling cream on bangs to add definition and prevent them from frizzing or blending too much with the braid.
- Consider the bang length and style when choosing your braid type—heavier, blunt bangs pair well with messy braids while wispy bangs complement neat, tight braids.
- Apply dry shampoo or texturizing powder at the roots of the bang area to maintain volume and prevent the bangs from appearing flat against your forehead.
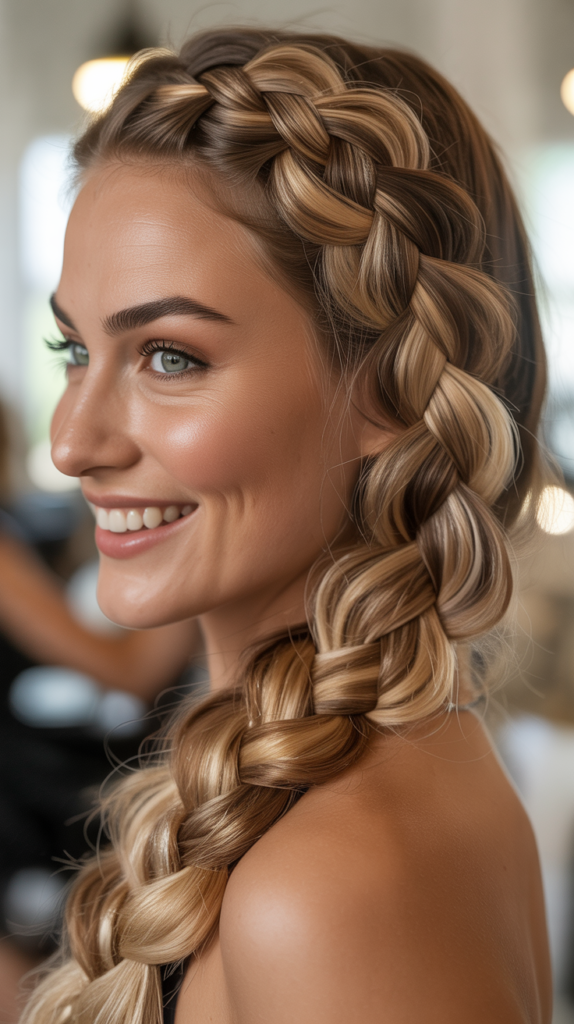
16. Twisted Side Braid (Rope Braid)
The twisted side braid, also known as a rope braid, offers a stunning alternative to traditional braiding techniques by using only two strands twisted in opposite directions.
This creates a spiral, rope-like appearance that’s both elegant and easier to create than complex braiding patterns.
The rope braid works exceptionally well when you want texture and definition without the intricate technique required for French or Dutch braids.
Rope Braid Technique:
- Create a deep side part and gather all hair over one shoulder, securing it in a low side ponytail if desired, or work with loose hair for a more organic look.
- Divide your hair into two equal sections, holding one in each hand with firm grip.
- Twist the right section clockwise (toward the right) several times until it begins to coil on itself slightly.
- Twist the left section clockwise (toward the right) the same number of times, matching the tightness of the first section.
- Now wrap the right twisted section over the left in a counterclockwise direction (toward the left), which is the opposite direction from the individual twists.
- Continue this pattern: twist both sections clockwise individually, then wrap them together counterclockwise, working down the entire length.
- The opposing twist directions create tension that holds the rope braid together without requiring any actual braiding motion.
- Secure the end with an elastic and gently pull apart the twists to create fullness while maintaining the rope structure.
Success Tips:
- Keep strong tension throughout the entire process, as rope braids can unravel more easily than traditional braids if the twists are loose.
- Twist the individual sections more than feels necessary—the wrapping motion will loosen them slightly, so over-twisting compensates.
- Apply light-hold hairspray to each section before twisting to add grip and help the style hold throughout the day.
- For hair that’s very slippery or fine, create the rope braid on second-day hair or hair with dry shampoo for added texture and grip.
17. Side Ladder Braid
The side ladder braid creates an illusion of intricate weaving that resembles a ladder running down the side of your head, though it’s surprisingly achievable once you understand the technique.
This eye-catching style is perfect for special events where you want your hair to be a conversation starter.
The dimensional appearance of the ladder effect creates visual interest that photographs beautifully and looks impressive from every angle.
Ladder Braid Construction:
- Begin with a deep side part and take a rectangular section about two inches wide following your hairline from temple toward the back.
- Divide this section into two equal strands, which will form the “rails” of your ladder.
- Take a small horizontal section of hair from below the two main strands and bring it up and over the first strand, then under the second strand, creating the first “rung.”
- Continue taking small horizontal sections from below, alternating the weaving pattern—over the first strand, under the second—as you work your way down.
- Keep the two main strands taut and parallel to each other throughout the process to maintain the ladder structure.
- Once you’ve incorporated all available hair from below, secure the ends of the two main strands together and leave the remaining hair loose or incorporate it into a secondary style.
Visual Enhancement:
- Use contrasting colored hair extensions or temporary color on the horizontal “rungs” to make the ladder effect even more visible and dramatic.
- Keep the two main vertical strands slightly looser and pancake them gently to create thicker “rails” that frame the horizontal sections.
- Position the ladder braid to run along your hairline for maximum visibility, or place it further back for a more subtle effect.
- Combine with loose curls in the remaining hair to create beautiful contrast between the structured ladder and flowing texture.
18. Side Braid with Curled Ends
The side braid with curled ends combines structured braiding with bouncy, romantic curls that add movement and femininity to the overall style.
This technique works beautifully for medium to long hair and creates a polished yet playful look suitable for dates, parties, or any occasion where you want to feel effortlessly pretty.
The contrast between the smooth braid and the textured curls creates dimensional interest that elevates a simple side braid.
Creating the Perfect Combination:
- Start by curling the bottom 4-6 inches of your hair using a curling iron or wand, working in sections to create uniform ringlets.
- Allow the curls to cool completely while pinned up, which helps them set and last longer throughout your event.
- Once curled sections have cooled, create your side part and begin braiding from the heavy side using your preferred technique.
- Braid only until you reach the point where the curls begin, typically mid-length or lower depending on how much curl you’ve created.
- Secure the braid with a clear elastic placed strategically at the transition point between braided and curled sections.
- Release the curled ends and gently separate them with your fingers, creating voluminous, bouncy curls that cascade from the braid.
- The curls should appear to bloom from the end of the braid, creating a flower-like effect that adds softness to the structured top portion.
Curl Customization:
- Use different barrel sizes to create varied curl patterns—larger barrels for loose waves, smaller barrels for tighter ringlets.
- Alternate the direction you wrap hair around the curling iron for a more natural, varied curl pattern that appears less uniform.
- Apply a heat protectant before curling and finish with a flexible-hold hairspray that maintains movement while preventing frizz.
- For extra drama, curl more of the length and braid less, or vice versa depending on whether you want to emphasize the structure or the softness.
19. Side Braided Ponytail
The side braided ponytail elevates a classic ponytail with the addition of braiding elements that add texture, interest, and sophistication.
This versatile style works for athletic activities, casual outings, or can be dressed up for evening events depending on how you finish it.
By positioning the ponytail to one side and incorporating braids, you create asymmetrical appeal that’s more fashion-forward than a centered ponytail.
Style Variations:
- Braided Wrap Ponytail: Create a side ponytail, then braid a small section from the ponytail and wrap it around the elastic to conceal it, securing with bobby pins.
- Accent Braid Ponytail: Braid a section along the hairline from the heavy side of your part toward the ponytail, incorporating this braid into the ponytail itself.
- Fully Braided Ponytail: Gather hair into a side ponytail, then braid the entire length of the ponytail using fishtail, three-strand, or rope braid techniques.
- Multiple Braid Ponytail: Create several small braids on the heavy side of your part, gathering them with the remaining loose hair into one side ponytail.
Placement and Height:
- Position the ponytail at varying heights based on your desired aesthetic—low and behind the ear for elegance, mid-level for casual style, or high on the side for athletic energy.
- Angle the ponytail slightly forward over your shoulder rather than hanging straight down the back for better asymmetrical effect.
- Tease the crown area before gathering the ponytail to create lift and prevent the style from appearing flat or pulled too tight.
- Leave face-framing pieces out before creating the ponytail for a softer, more romantic appearance that balances the pulled-back hair.
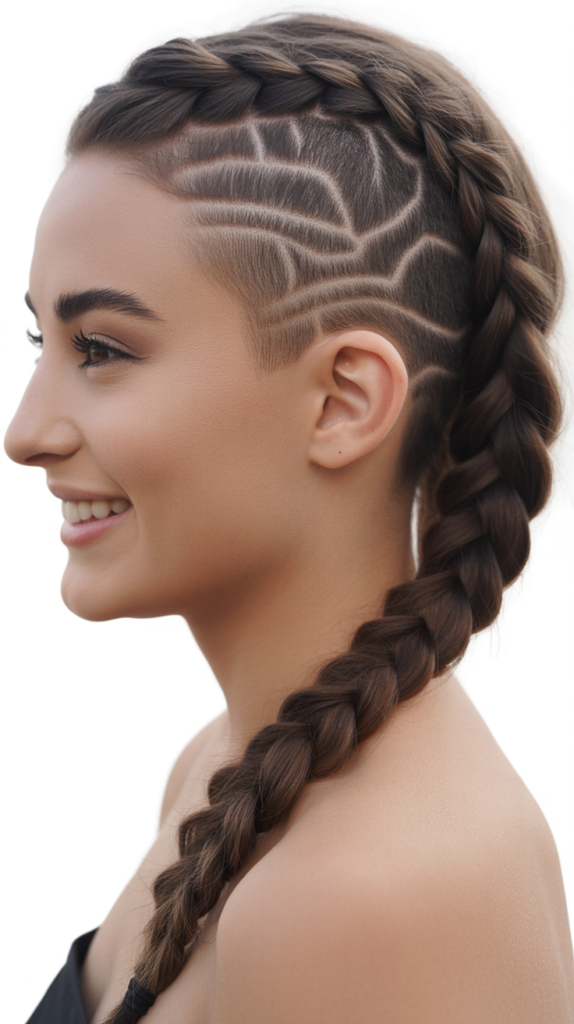
20. Side Braid with Shaved Side
The side braid with shaved side represents bold, fashion-forward styling that embraces contrast between edgy undercuts and feminine braiding.
This dramatic look works exceptionally well when you want to make a statement while maintaining styling versatility.
The shaved side can be kept simple and clean or decorated with designs, while the braided side showcases length and intricate technique.
Achieving the Look:
- Consult a professional stylist to create a clean undercut on one side, determining how high the shave should extend (just above the ear, temple height, or higher toward the part).
- The shaved side can be maintained at various lengths from skin-close to a longer buzz, depending on your preference and how stark you want the contrast.
- Create a dramatic side part that clearly separates the shaved side from the side with length, positioning the part 2-3 inches from center.
- Braid the long side using techniques that showcase the braid prominently—Dutch braids work particularly well as they sit on top of the hair.
- Style the braid to drape over your opposite shoulder, ensuring the shaved side remains completely visible and becomes a focal point.
Maintenance Schedule:
- Plan to maintain the shaved side every 2-3 weeks to keep it looking crisp and intentional rather than grown-out and messy.
- Between salon visits, you can touch up the shaved area at home using clippers if you’re comfortable, or embrace slight growth for a softer transition.
- Apply moisturizer or lightweight oil to the shaved scalp regularly to prevent dryness, flaking, or irritation from frequent shaving.
- Protect the shaved area from sun exposure with SPF products or hats, as this skin may not be accustomed to direct sunlight.
21. Halo Side Braid
The halo side braid creates an angelic, crown-like effect by braiding around the circumference of the head, with the braid positioned to be more prominent on one side.
This ethereal style works beautifully for weddings, formal events, or whenever you want to channel goddess-like elegance. The halo effect keeps hair completely off your face and neck while creating a soft, romantic silhouette.
Creating the Halo:
- Part your hair deeply to one side, then create a second part from ear to ear across the back, dividing hair into front and back sections.
- Begin with the front section on the heavy side of your part, starting a Dutch or French braid right at the part line near your forehead.
- Braid along the hairline, following the natural curve of your head, moving toward and around your ear.
- Continue braiding across the back of your head at the occipital bone level, keeping the braid relatively high to maintain the crown effect.
- As you approach the opposite side, angle the braid slightly downward and tuck the end underneath the beginning of the braid, pinning securely.
- The back section of hair can be left down, incorporated into the braid as you work around, or styled into a low bun at the nape.
Styling Refinements:
- Pancake the braid generously on the heavier side of your part where it’s most visible, creating the appearance of a thick, full crown.
- Keep the braid tighter and less pulled-apart on the back and opposite side for a more subtle transition and to prevent the style from appearing too bulky.
- Insert small flowers, pearl pins, or a delicate hair vine along the most visible portion of the halo for bridal or special occasion enhancement.
- Ensure the braid sits at a consistent height around your head by checking in a mirror from multiple angles and adjusting with pins as needed.
22. Side Pull-Through Braid
The side pull-through braid creates the illusion of an incredibly complex, voluminous braid while actually requiring no traditional braiding technique at all.
This innovative style uses strategic ponytails and pulling sections through to create a dimensional, textured look that photographs beautifully.
Perfect for those who struggle with traditional braiding or want maximum volume and impact with minimal technical skill.
Pull-Through Technique:
- Create a deep side part and sweep all hair over one shoulder, preparing to work with the entire length on one side.
- Take a section from the top near your part and secure it with a clear elastic, creating the first small ponytail.
- Below the first ponytail, gather another section of hair (leaving the first ponytail hanging free) and secure it with another elastic about 2-3 inches below the first.
- Split the first ponytail in half vertically, bringing one half forward over each shoulder temporarily to keep it out of the way.
- Take the second ponytail and pull it up through the split sections of the first ponytail, then secure it temporarily with a clip above the first elastic.
- Gather another section of hair below, incorporating the two halves of the first ponytail into this new section, and secure with an elastic.
- Repeat this pattern of splitting, pulling through, and gathering down the entire length of your hair.
- Once complete, gently pull apart each “link” of the pull-through braid to create maximum volume and fullness.
Maximizing Volume:
- Tease each ponytail section lightly before securing it with an elastic to create additional fullness within each link.
- Use small, clear elastics for a more invisible finish, or contrasting colored elastics for an intentionally edgy, deconstructed appearance.
- Pull apart each section asymmetrically, making some areas fuller than others for a more organic, natural-looking braid.
- Spray each completed section with texturizing spray before moving to the next to help the pulled-apart volume hold throughout the day.
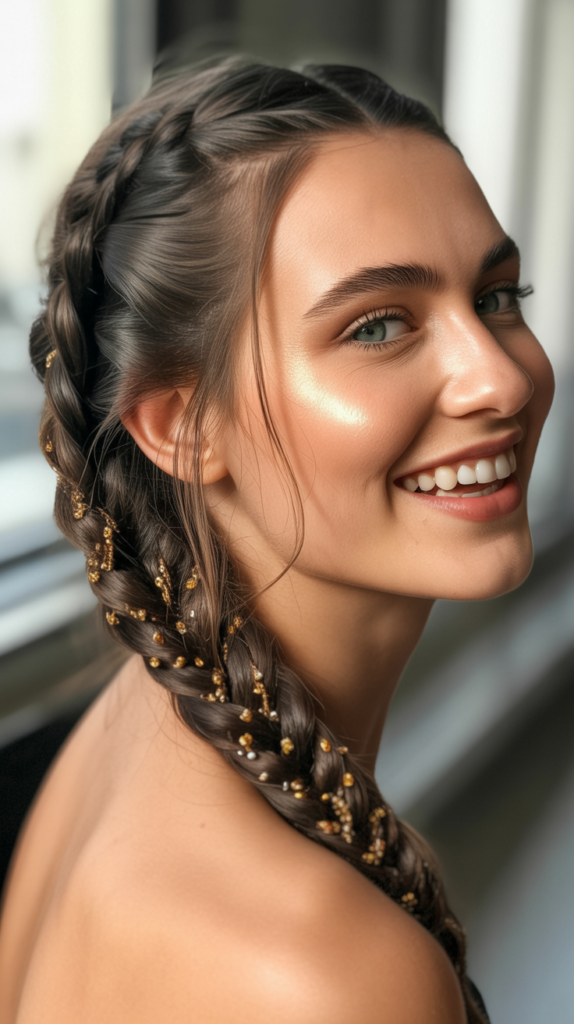
23. Side Braid with Highlights Lowlights
The side braid with highlights or lowlights leverages dimensional hair color to create depth and visual interest within the braided structure.
Strategic color placement makes each twist and turn of the braid more visible and emphasizes the intricate pattern.
This approach works particularly well when you want your braiding efforts to be more noticeable and creates a sophisticated, multi-tonal effect.
Color Placement Strategy:
- Consult with a professional colorist about placing highlights specifically where braids will be positioned for maximum visibility.
- Face-framing highlights on the heavy side of your part will be incorporated into the beginning of your braid and remain visible throughout.
- Balayage or ombre techniques work particularly well with braids as they create natural-looking dimension that enhances the three-dimensional nature of braiding.
- Contrasting lowlights add depth in the under-layers of braids, creating shadow and dimension that makes the braid appear more textured and full.
Braiding Colored Hair:
- Looser, pulled-apart braids showcase color dimension better than tight, compact braids where individual strands become less visible.
- Choose braid styles where you can see multiple layers—fishtail and pull-through braids are excellent choices for displaying color variation.
- Position your braid to catch natural or artificial light, which will make highlights shimmer and lowlights create depth for maximum color impact.
- Consider temporary color options like chalk or spray-in color if you want to experiment with bold colors specifically for a braided style without commitment.
Color Maintenance:
- Use color-safe, sulfate-free shampoos to preserve the vibrancy of highlights and lowlights, especially if you braid frequently.
- Apply leave-in treatments with UV protection before styling to prevent color fading from sun exposure while wearing braided styles.
- Schedule regular toning appointments to prevent highlights from becoming brassy, which can appear more obvious in braided styles where hair is on display.
24. Side Infinity Braid
The side infinity braid creates a mesmerizing figure-eight pattern that appears incredibly complex but follows a rhythmic, repeatable technique.
This stunning style gets its name from the infinity symbol shape created by the continuous looping pattern of the strands. Perfect for special occasions when you want a conversation-starting hairstyle that showcases advanced braiding skills.
Infinity Braid Method:
- Create a deep side part and gather a section of hair from the heavy side, dividing it into two equal strands.
- Hold one strand in each hand, with your palms facing upward and thumbs positioned in the center between the strands.
- Take a small piece from the outside of the right strand, bring it over the right strand, under the left strand, and join it to the outside of the right strand (creating a figure-eight motion).
- Repeat on the left side: take a small piece from the outside of the left strand, bring it over the left strand, under the right strand, and join it to the outside of the left strand.
- Continue this alternating pattern, adding new hair from the sides as you work your way down in a French braid fashion if desired.
- The continuous over-under motion creates the distinctive infinity symbol pattern throughout the length of the braid.
Success Tips:
- Practice the motion without adding new hair first to master the over-under rhythm before attempting a full French-style infinity braid.
- Keep consistent tension throughout, as this braid can loosen easily if your grip relaxes during the process.
- The pieces you pull from the outside should be relatively thin for a more defined pattern—thicker sections create a bulkier, less visible infinity pattern.
- Film yourself creating the braid from above if learning, as this angle makes the infinity pattern most visible and helps you understand the technique.
25. Side Braid with Ribbon Woven Through

The side braid with ribbon woven through adds a delicate, feminine touch that transforms a simple braid into an accessorized work of art.
This technique works beautifully for special occasions, holidays, or whenever you want to add a pop of color or texture to your hairstyle.
The ribbon becomes an integral part of the braid itself, creating a cohesive look rather than appearing as an afterthought.
Ribbon Integration Techniques:
- Weaving Method: Begin your braid and attach a ribbon to the middle strand using a small bobby pin at the base, then braid the ribbon as if it’s part of that strand throughout.
- Lacing Method: Complete your braid first, then use a large-eyed needle or bobby pin to weave ribbon through the braid in a zigzag pattern from top to bottom.
- Four-Strand Method: Use three sections of hair plus one ribbon as your fourth strand, braiding in a four-strand pattern where the ribbon remains visible throughout.
- Wrapped Method: Spiral wrap a thin ribbon around the outside of a completed braid, securing at the top and bottom with small knots or pins.
Ribbon Selection:
- Choose ribbons that are 1/4 to 1/2 inch wide for optimal visibility without overwhelming the braid structure.
- Satin and silk ribbons provide a luxurious appearance and slide smoothly through hair without catching or creating friction.
- Grosgrain ribbons offer more texture and grip, making them ideal for braids that need extra security or a more casual aesthetic.
- Consider matching the ribbon to your outfit, choosing complementary colors, or going with metallic or velvet ribbons for special occasions.
26. Side Braided Space Buns
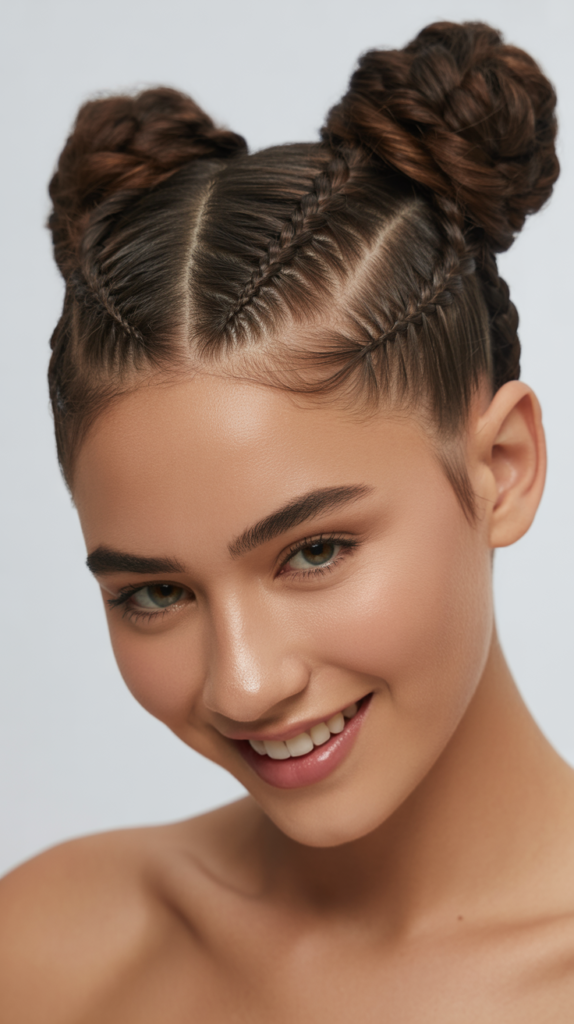
Side braided space buns create a playful, youthful style that combines braiding technique with the fun, quirky appeal of space buns positioned asymmetrically.
This style works particularly well for festivals, concerts, or casual events where you want to express personality and creativity. The side placement makes the style more sophisticated than centered space buns while maintaining the fun, energetic vibe.
Creating the Style:
- Part your hair deeply to one side, then create a vertical part from the side part down to your nape, dividing hair into two uneven sections.
- The heavier side with more hair will create a larger bun, while the lighter side creates a smaller accent bun for asymmetrical balance.
- Braid each section separately using your preferred technique—Dutch braids create more visible texture while three-strand braids are quicker.
- Coil each braided section into a bun at the point where you want it positioned, typically one higher on the heavy side and one lower on the light side.
- Secure each bun with bobby pins inserted in a crisscross pattern through the coil and into your scalp for maximum security.
- Pull apart the buns gently to create fullness, or leave them tight and compact for a neater, more structured appearance.
Styling Variations:
- Add colorful hair elastics down the length of each braid before coiling into buns for a fun, deconstructed aesthetic.
- Create multiple small braided buns instead of two large ones for a more intricate, editorial appearance.
- Leave some face-framing pieces out and curl them for a softer transition between your face and the structured buns.
- Accessorize the buns with scrunchies, decorative pins, or wrap fabric around them for added color and personality.
27. Side Braid with Extensions
Side braids with extensions offer the opportunity to add dramatic length, volume, or bold color to your braided styles without the commitment of permanent changes.
Extensions integrate seamlessly when properly installed and can transform a shoulder-length braid into a waist-length statement or add thickness that makes braids appear fuller and more impressive.
This technique works for all braid types and provides endless customization possibilities.
Extension Application Methods:
- Clip-In Extensions: Secure clip-in wefts at the crown and sides before braiding, positioning them strategically where hair will be incorporated into the braid.
- Tape-In Extensions: Have these professionally applied beforehand, providing permanent length and volume that’s ready whenever you want to create side braids.
- Braiding Hair Extensions: Fold synthetic or human braiding hair in half and secure it at your natural part line, then incorporate both halves into your braid as you work.
- Feed-In Method: Gradually add small pieces of extension hair as you braid, creating a natural-looking transition from your natural hair to added length.
Choosing Extensions:
- Match extension color as closely as possible to your natural hair for seamless blending, or intentionally choose contrasting colors for bold, fashion-forward looks.
- Synthetic braiding hair (Kanekalon or Xpression) works well for protective braiding styles and offers heat resistance for certain styles.
- Human hair extensions provide the most natural appearance and can be heat-styled, curled, or treated like your own hair.
- Consider the weight of extensions—longer, thicker extensions can strain your scalp, so balance your desired drama with comfort.
Blending Techniques:
- Tease your natural hair slightly at the roots before adding extensions to create texture that helps everything grip together.
- Start the braid with only your natural hair for the first few crosses, then gradually introduce extension pieces for a more natural transition.
- Apply light-hold hairspray or texturizing spray to both your natural hair and extensions before braiding to increase grip and cohesion.
- Use bobby pins color-matched to your hair to secure the base where extensions are attached, ensuring they don’t slip during wear.
28. Side Braid Updo

The side braid updo combines the elegance of formal updo styling with the textured interest of braiding, creating a sophisticated look perfect for weddings, galas, or black-tie events.
This style keeps hair completely secured and off the neck while maintaining romantic, soft aesthetic through strategic braiding placement.
The side-swept nature adds modern appeal to traditional updo elegance.
Construction Steps:
- Begin by creating texture throughout your hair with curling iron or hot rollers, as updos hold better with styled rather than straight hair.
- Create a deep side part and begin a Dutch or French braid on the heavy side, starting near the part and working toward your opposite ear.
- Continue the braid loosely to allow for fullness, stopping at approximately ear level on the opposite side.
- Gather all remaining hair (including the braid) into a low ponytail positioned at the nape on the heavier side of your head.
- Twist or braid the ponytail, then coil it upward and pin it into place, creating a low chignon or twist that sits to one side.
- The initial braid should wrap around from one side to the other, creating a crown-like effect that transitions into the low updo.
- Pancake the braid and pull out a few strategic pieces around the face for a softer, more romantic finish.
Securing the Updo:
- Use U-shaped pins for the main structure of the updo, pushing them upward into the coil for better hold than bobby pins alone.
- Add bobby pins around the perimeter of the updo in an X-pattern to secure edges and prevent shifting throughout your event.
- Apply strong-hold hairspray in layers as you build the updo rather than only at the end for better longevity.
- For extremely long or thick hair, secure the base ponytail with two elastics for added security before creating the updo.
29. Side Braided Faux Hawk
The side braided faux hawk creates an edgy, mohawk-inspired silhouette using braiding techniques rather than shaved sides or extreme product.
This bold style works beautifully for those who want to experiment with edgier aesthetics without permanent alterations.
By directing the faux hawk to one side rather than keeping it centered, you add contemporary asymmetry that’s more wearable for various occasions.
Creating the Faux Hawk:
- Section hair into three vertical zones: a wide center section (3-4 inches) from hairline to nape, and two side sections.
- Temporarily clip or tie the side sections to keep them separate from your working area.
- Within the center section, create multiple Dutch cornrows, regular Dutch braids, or one large Dutch braid that runs front to back.
- The Dutch braiding technique is essential as it creates raised texture that sits on top of the hair, forming the “hawk” ridge.
- Angle all center section braids to sweep toward one side of your head rather than keeping them perfectly vertical down the center.
- Tightly sleek the side sections using strong-hold gel or pomade, brushing them smooth and flat against your head.
- Pin the sleek sides with bobby pins placed horizontally and close together, creating sharp definition between the raised center and smooth sides.
Height and Drama:
- Backcomb the roots of the center section before braiding to create additional lift and height for more dramatic hawk silhouette.
- Create multiple thinner braids rather than one thick braid in the center for more texture and dimension in the raised section.
- Pull apart the raised braids after securing to increase width and create a fuller, more impressive faux hawk appearance.
- Apply strong-hold gel or edge control to the sides and finish with hairspray for all-day hold that maintains the sleek-versus-textured contrast.
30. Side Four-Strand Braid
The side four-strand braid creates a complex, woven pattern that appears intricate and impressive while following a learnable sequence once you master the rhythm.
This advanced braiding technique produces a flat, wide braid with beautiful dimensionality that works particularly well on thicker hair or when you want to create statement-making texture.
The four-strand pattern creates more visual interest than traditional three-strand braids.
Four-Strand Technique:
- Create a deep side part and sweep all hair over one shoulder, dividing it into four equal sections.
- Number the sections mentally from left to right (1, 2, 3, 4) to help remember the pattern sequence.
- Cross section 1 over section 2, then cross section 4 over section 3—this is the basic rhythm you’ll repeat.
- Now cross what was originally section 2 (currently in the second position) over what was section 4 (currently in third position).
- Repeat this pattern: outer strands cross toward center (1 over 2, 4 over 3), then the new center strands cross each other.
- Keep consistent tension on all four sections, which can be challenging but is essential for maintaining the pattern definition.
- Once you establish the rhythm, the braid creates itself through repetition of these motions down the entire length.
Mastering the Technique:
- Practice with four ribbons in different colors until the crossing pattern becomes automatic and you no longer need to think about which strand goes where.
- Keep sections relatively equal in size throughout—uneven sections create an asymmetrical braid that loses its distinctive four-strand pattern.
- Work with slightly damp hair or hair with product for better grip, as the four-strand technique requires more control than simpler braiding.
- Film yourself from above while practicing to see the pattern from the same perspective shown in tutorials and identify where you might be crossing incorrectly.
31. Side Braid with Face-Framing Pieces
The side braid with face-framing pieces creates a softer, more romantic version of traditional side braids by intentionally leaving strategic sections loose around the face.
These loose pieces draw attention to your facial features while preventing the braided style from appearing too severe or pulled-back.
This technique works particularly well for oval, round, or heart-shaped faces where softness is flattering.
Selecting Face-Framing Sections:
- Before beginning your braid, identify sections you want to leave out—typically thin pieces at the temples, thicker sections in front of ears, or both.
- Pull these sections forward and clip them temporarily to keep them separate and ensure you don’t accidentally incorporate them into the braid.
- The pieces should be thin enough to frame without overwhelming but substantial enough to make an intentional statement rather than appearing like escaped hair.
- Consider your face shape: longer pieces elongate round faces, shorter pieces soften angular faces, and varied lengths create versatile framing.
Styling the Loose Pieces:
- After completing your braid, style the face-framing pieces separately using a small curling iron or flat iron.
- Curl pieces away from the face for an opening, flattering effect, or toward the face for a more sultry, intimate appearance.
- Apply a small amount of lightweight styling cream or serum to the loose pieces to add definition and prevent them from appearing frizzy or separated from the overall style.
- Adjust the pieces after viewing yourself from multiple angles, ensuring they fall naturally and don’t block your face or appear too heavy on one side.
32. Side Braid with Flowers
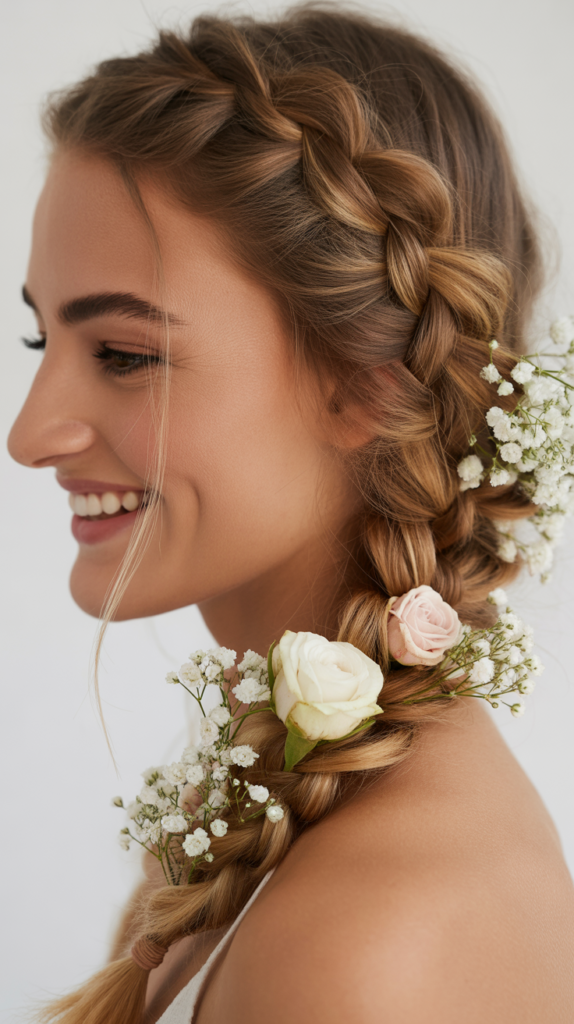
Side braids with flowers create an ethereal, garden-inspired aesthetic perfect for outdoor weddings, spring events, or bohemian-themed occasions.
The combination of structured braiding and delicate florals produces romantic, feminine beauty that photographs gorgeously and makes a memorable style statement.
Whether using fresh or artificial flowers, this enhancement transforms a simple side braid into special-occasion-worthy artistry.
Flower Selection and Preparation:
- Fresh Flowers: Choose hardy blooms like roses, orchids, baby’s breath, or carnations that can withstand hours without water and won’t wilt quickly.
- Faux Flowers: High-quality silk or fabric flowers provide durability without wilting concerns and can be kept as mementos after your event.
- Prepare fresh flowers by cutting stems to about 2 inches and wrapping stem ends with floral tape to prevent moisture damage to hair.
- Select flowers that complement your outfit colors and the overall event aesthetic—pastels for romance, bright colors for festivals, white for weddings.
Insertion Techniques:
- Tuck individual flower stems directly into the braid’s woven sections, sliding them diagonally into the gaps between braided pieces for natural integration.
- Use small bobby pins or floral pins to secure larger blooms, inserting pins through the flower base and into the braid structure beneath.
- Create clusters of smaller flowers (like baby’s breath) rather than single stems for more organic, garden-like abundance.
- Distribute flowers throughout the entire braid length, concentrate them at the base or end, or create a graduated pattern that increases in density.
Styling Considerations:
- Fresh flowers should be added as close to your event as possible to ensure they look vibrant and alive rather than wilted.
- Apply hairspray to your completed braid before adding flowers to create a slightly sticky surface that helps blooms adhere better.
- Balance flower size with braid size—delicate braids pair well with small blooms, while thick, messy braids can handle larger, more dramatic flowers.
- Consider adding greenery like eucalyptus or ferns between flowers for additional texture and to help fill gaps naturally.
33. Side Milkmaid Braid
The side milkmaid braid creates a crown-like effect by wrapping braids around the head like a headband, with asymmetrical positioning that emphasizes one side more prominently.
This timeless style combines vintage charm with modern wearability, keeping hair completely secured while creating a soft, romantic silhouette.
Perfect for warm weather, active days, or when you want an elegant style that feels effortlessly pretty.
Creating the Look:
- Part your hair deeply to one side, then create a second horizontal part from ear to ear, dividing hair into front and back sections.
- Braid each section separately using standard three-strand braids, starting from near the part on each side and braiding to the ends.
- Take the braid from the heavier side and wrap it across your forehead like a headband, positioning it where a headband would naturally sit.
- Pin this first braid behind your opposite ear using bobby pins inserted horizontally into the braid’s underside.
- Take the second braid and wrap it across the back of your head at crown level, meeting and overlapping with the end of the first braid.
- Tuck all ends underneath the wrapped braids, pinning securely to conceal any elastics or loose ends.
Asymmetrical Variation:
- Instead of centering the braids evenly, position the front braid to sweep more prominently across one side of your forehead, creating deeper asymmetry.
- Make the braid on the heavier side thicker and more pulled-apart for emphasis, while keeping the opposite side sleeker and more subtle.
- Angle both braids slightly rather than keeping them perfectly horizontal for a more dynamic, less traditional milkmaid appearance.
- Leave the back section unbraided on the lighter side, allowing some hair to flow freely for a half-up interpretation with side emphasis.
34. Side Snake Braid
The side snake braid creates a dramatic, serpentine pattern that wraps and curves around your head in an eye-catching design.
This editorial-worthy style features strategic placement that creates visual movement and flow, resembling a snake’s path as it travels from one side across your head.
Perfect for fashion-forward events, photoshoots, or when you want a hairstyle that serves as a true conversation starter and artistic statement.
Creating the Snake Pattern:
- Begin with a deep side part and take a section near your temple on the heavier side, starting your braid close to the hairline.
- Create a Dutch braid that initially follows your hairline toward your ear, incorporating hair from both above and below as you braid.
- After reaching approximately ear level, curve the braid’s direction by angling it upward toward your crown, creating the first curve of the snake pattern.
- Continue braiding while changing direction again, this time angling downward and back, creating an S-shaped or serpentine pathway across your head.
- The key is intentionally changing the braid’s angle every few inches, creating curves and bends rather than a straight line.
- Pin sections of the braid flat against your head as you work to maintain the curved pattern and prevent the braid from pulling straight.
- Continue the winding pattern across the back or side of your head, creating as many curves as your hair length and desired drama allow.
Design Tips:
- Plan your snake pattern before beginning by visualizing or sketching where you want curves to occur for a cohesive, intentional design.
- Use a tail comb to create clean, defined parts that separate the braided section from surrounding hair, making the snake pattern more visible.
- Secure the snake braid’s curves with bobby pins color-matched to your hair, placed on the inside of each curve to hold the shape without being visible.
- Pancake the braid significantly on the outer edges of curves while keeping the inner curves tighter to emphasize the serpentine movement.
Styling Variations:
- Create a double snake pattern with two thinner braids winding parallel to each other across your head for increased intricacy.
- Leave the remaining loose hair in waves or curls that cascade on the opposite side, creating beautiful contrast with the structured snake braid.
- Add small metallic hair cuffs at each curve point of the snake to emphasize the pattern and add editorial edge.
- Use colored hair chalk or temporary spray on the snake braid to make it stand out even more dramatically against your natural color.
35. Side Braid with Beads
Side braids with beads add cultural richness, personal expression, and playful texture through the incorporation of decorative beads throughout the braided structure.
This styling approach celebrates African and African American hair traditions while offering endless customization through bead color, size, placement, and material choices.
The clicking sound and visual movement of beads create a dynamic element that makes the hairstyle come alive.
Bead Application Methods:
- Threading Method: Use a beading needle or thin wire loop to thread individual beads onto small sections of braid, securing them by tying the hair beneath or using small elastics.
- Cuff Style: Slide larger barrel beads directly over thin braids, allowing them to move freely along the braid length or securing them with tiny elastics above and below.
- End Placement: Secure beads at the very ends of braids using the hair itself tied through the bead hole, creating decorative endpoints that also serve as fasteners.
- Scattered Application: Place beads randomly throughout the braid rather than in uniform patterns for an organic, personalized appearance.
Bead Selection:
- Wooden beads provide lightweight comfort and natural aesthetic, available in various stains and sizes for versatile styling.
- Metal beads (gold, silver, bronze, or copper) add sophistication and work particularly well for formal events or when matching jewelry.
- Acrylic or plastic beads offer the widest color range and lightest weight, perfect for vibrant, playful styles without strain.
- Glass or crystal beads create elegance and sparkle, catching light beautifully for special occasions though weighing more than other options.
Cultural Considerations:
- Recognize that braid beading has deep roots in African and African American culture, representing everything from age and status to tribal affiliation and personal expression.
- When wearing beaded braids, approach the style with respect for its cultural significance rather than treating it purely as a trend.
- Support Black-owned businesses when purchasing beading supplies and seek guidance from stylists familiar with traditional beading techniques.
- Understand that protective styles with beads serve practical purposes beyond aesthetics, helping maintain hair health while celebrating cultural heritage.
36. Side Braided Mohawk with Shaved Sides
The side braided mohawk with shaved sides represents the boldest expression of side-part braided styling, combining dramatic undercuts with intricate braiding concentrated in a mohawk stripe that’s swept to one side.
This high-impact style makes an unmistakable statement about confidence, individuality, and willingness to embrace unconventional beauty.
Perfect for those ready to commit to an edgy transformation that turns heads wherever you go.
Creating the Full Look:
- Work with a professional stylist to shave both sides of your head, leaving a 3-4 inch wide strip of hair from forehead to nape.
- The shaved sides can be maintained at skin-close length or slightly longer, with optional designs, patterns, or faded effects.
- Within the remaining center strip, create multiple tight cornrows, one thick Dutch braid, or several medium braids that run from front to back.
- Sweep all braids dramatically to one side of your head rather than keeping them centered, pinning them to angle across rather than straight back.
- The combination of completely shaved sides and prominent braiding creates extreme contrast that emphasizes both elements.
- Style the braids with edge control and strong-hold gel to maintain sleek precision, or leave them slightly textured for softer appeal.
Maintenance Requirements:
- Shaved sides require frequent upkeep every 1-2 weeks to maintain clean lines and prevent the style from appearing grown-out and unkempt.
- The braided mohawk section needs re-braiding every 2-4 weeks depending on your hair texture and how quickly roots become loose or frizzy.
- Protect your scalp from sun exposure on the shaved areas using SPF products, hats, or strategic sunscreen application when outdoors.
- Moisturize both the shaved scalp and the braided section regularly with appropriate products for each area’s different needs.
Styling Flexibility:
- Despite the bold cut, you can vary the styling by changing how the mohawk section is braided—try different patterns, thicknesses, or techniques.
- Add temporary color to the braided section for even more drama without coloring shaved areas where regrowth would show quickly.
- Accessorize with metallic cuffs, chains, or thread wrapping on the braids to customize the look for different occasions or moods.
- When growing out, the shaved sides can transition through various short styles while you maintain length in the mohawk section for continued styling options.
37. Side Braided Pigtails
Side braided pigtails offer a playful, youthful twist on traditional pigtails by positioning them asymmetrically rather than symmetrically on each side of the head.
This fun style works beautifully for casual outings, theme parties, or whenever you want to channel carefree, spirited energy.
The side placement adds modern sophistication to what could otherwise read as childish, making it wearable for adults who want playful style.
Creating Asymmetrical Pigtails:
- Create a deep side part that extends all the way from forehead to nape, dividing hair into two very unequal sections.
- The heavier side should contain approximately 60-70% of your hair, while the lighter side has just 30-40%.
- Position the larger pigtail lower and further back on the heavy side—perhaps at or behind the ear at a downward angle.
- Place the smaller pigtail higher and more forward on the light side—near the temple or above the ear.
- Braid each pigtail using any technique, with the larger braid being thicker and potentially more elaborate than the smaller one.
- The uneven sizing and positioning creates intentional asymmetry that feels fashion-forward rather than accidental.
Variation Ideas:
- Use different braiding techniques for each pigtail—Dutch braid the larger one and three-strand braid the smaller one for contrasting texture.
- Create multiple small braids on one side while doing a single larger braid on the other for punk-inspired asymmetry.
- Position both pigtails on the same side of your head at different heights for ultra-asymmetrical, editorial styling.
- Leave significant length un-braided at the ends and curl these sections for a combination of structured braids with flowing, feminine curls.
Styling Tips for Long-Lasting Side Braids
Maintaining the beauty and integrity of your side-part braided hairstyles requires proper technique, quality products, and strategic care throughout the wear time. Whether you’re creating an elaborate updo for a special event or a casual everyday braid, these universal tips ensure your style stays fresh, secure, and gorgeous from morning until night.
Preparation is Key:
- Start with hair that has the right texture for your chosen style—slightly dirty hair (day 2 or 3) provides better grip than freshly washed, slippery hair.
- Apply appropriate products before braiding based on your hair type: texturizing spray for fine hair, smoothing cream for thick or coarse hair, and curl cream for naturally textured hair.
- Detangle thoroughly before beginning any braid to prevent painful snags mid-braid and ensure smooth, even sections throughout.
- Consider your desired braid appearance—tighter braids last longer but can cause tension, while looser braids offer comfort but may not hold as long.
During Braiding:
- Maintain consistent tension throughout the entire braid, as inconsistent tightness creates sections that loosen at different rates and a messy appearance over time.
- Secure sections periodically with small clips if braiding complex styles, preventing already-braided portions from loosening while you work on other sections.
- Use clear elastics for invisible hold or choose fabric-covered elastics that won’t damage hair or create creases when removed.
- Apply light-hold hairspray section by section as you braid rather than only at the end for better staying power without stiffness.
Extending Wear Time:
- Sleep on a satin or silk pillowcase to reduce friction that causes frizzing and loosening overnight.
- Wrap braids gently in a silk scarf before bed, avoiding tight wrapping that creates dents or pressure points on the braid structure.
- Refresh braids in the morning using a light mist of water mixed with leave-in conditioner, smoothing any flyaways with your palms.
- Avoid touching, playing with, or adjusting your braid throughout the day, as constant manipulation loosens the structure faster.
Occasions and Appropriate Side Braid Styles
Choosing the right side-part braided hairstyle for your specific occasion ensures you look appropriately styled while feeling confident and comfortable. Different events call for varying levels of formality, drama, and practicality, and matching your braid style to the occasion demonstrates thoughtful styling and social awareness.
Professional/Work Settings:
- Opt for sleek, polished braids like the classic side French braid, side braided bun, or neat side ponytail with minimal accessories.
- Keep the style secure and controlled so it doesn’t require adjustment or maintenance during your workday, allowing you to focus on tasks rather than hair.
- Choose neutral or minimal accessories if any—simple pins or subtle elastics rather than bold flowers or colorful beads.
- Ensure the style doesn’t obstruct your vision, interfere with phone calls, or appear too casual or costume-like for your professional environment.
Casual/Everyday Wear:
- Embrace comfortable, easy styles like the messy side braid, half-up side braid, or simple three-strand side braid that take minimal time to create.
- These styles should withstand daily activities—errands, gym sessions, casual social outings—without falling apart or requiring constant fixes.
- Feel free to experiment with textured, undone aesthetics that prioritize comfort and practicality over perfection.
- Quick styles you can create in 5-10 minutes work best for daily wear, saving elaborate techniques for special occasions.
Formal Events (Weddings, Galas, Proms):
- Choose intricate, polished styles like the side braid updo, braided crown, halo braid, or any style incorporating fresh flowers or elegant accessories.
- These occasions justify the time investment of complex techniques and professional styling assistance if needed.
- Coordinate your braid style with your outfit’s formality level—ultra-formal events call for more structured, polished braids rather than messy, casual versions.
- Plan to have your style completed close to the event start time to ensure it looks fresh and pristine for photos and the duration.
Athletic/Active Pursuits:
- Prioritize security and functionality with styles like tight Dutch braids, side cornrows, or side braided ponytails that won’t come loose during movement.
- Avoid styles with loose pieces, delicate accessories, or elements that could get caught in equipment or become safety hazards.
- Choose styles that keep all hair completely off your face and neck for maximum comfort during physical activity.
- Use sport-specific products like sweat-resistant hairspray or anti-slip elastics designed for athletic wear.
Festivals/Concerts:
- Embrace bold, creative styles like the bohemian messy braid, braids with colorful accessories, mohawk braids, or any style incorporating temporary color, glitter, or statement accessories.
- These environments celebrate self-expression and creative styling, making them perfect for experimenting with dramatic, unconventional braid variations.
- Consider the duration of the event—festivals lasting all day or multiple days require styles that can withstand weather, movement, and limited access to mirrors.
- Incorporate practical elements like keeping hair secure while still looking stylish and festival-appropriate.
Tools and Products You’ll Need
Having the right tools and products makes creating beautiful side-part braided hairstyles significantly easier while ensuring professional-looking results that last. Investing in quality items specifically designed for braiding saves time, reduces frustration, and produces superior outcomes compared to using makeshift or inappropriate tools.
Essential Braiding Tools:
- Tail Comb: Critical for creating clean, precise parts and sectioning hair evenly—look for one with a long, thin tail and fine teeth.
- Bobby Pins: Stock color-matched pins for your hair color (black, brown, blonde) in both standard and long lengths for different securing needs.
- Clear Elastics: Small, clear elastics provide invisible hold without creating visible bulk or color contrast at braid ends.
- Hair Clips: Section clips or alligator clips help manage hair you’re not currently working with, preventing tangling and keeping your workspace organized.
- Paddle Brush and Wide-Tooth Comb: For initial detangling and smoothing before you begin braiding, preventing painful snags mid-braid.
- Hand Mirror: Essential for seeing the back and sides of your head while braiding, allowing you to monitor your work and maintain even tension.
Styling Products:
- Texturizing Spray: Adds grip to slippery, fine hair and creates the slightly rough texture that makes braiding easier and more secure.
- Smoothing Serum or Cream: Tames frizz and flyaways on thick, coarse, or curly hair, creating sleeker braids with polished finish.
- Edge Control: Specifically designed for smoothing baby hairs and edges, particularly important for cornrows and styles where sleek sides are desired.
- Hairspray: Choose flexible-hold for natural movement or strong-hold for styles that need maximum security throughout long wear times.
- Dry Shampoo: Refreshes roots and adds texture to day-old hair, making it ideal for braiding while extending time between washes.
- Leave-In Conditioner: Provides moisture and slip for detangling while protecting hair from manipulation damage during braiding.
Optional Enhancement Items:
- Beading needle or wire loop for threading beads onto braids with precision
- Hair extensions in various colors and textures for added length, volume, or bold color without commitment
- Decorative accessories including ribbons, flowers, cuffs, pins, and chains for customizing your braided styles
- Heat protectant spray if you plan to curl or straighten sections before or after braiding
- Anti-humidity spray for maintaining sleek braids in humid climates or during outdoor events
Common Mistakes to Avoid
Even experienced braiders can fall victim to common mistakes that compromise the appearance, longevity, or health of their side-part braided hairstyles. Understanding these pitfalls helps you avoid them, creating more successful styles while protecting your hair from damage. Learning what not to do is often as valuable as learning proper technique.
Tension-Related Errors:
- Braiding Too Tightly: Creates painful tension on the scalp, can cause headaches, and may lead to traction alopecia with repeated tight styling.
- Inconsistent Tension: Results in braids that are tight in some areas and loose in others, creating an uneven, messy appearance that doesn’t hold well.
- Solution: Maintain moderate, consistent tension throughout, stopping if you experience pain, and regularly checking your braid’s tightness as you work.
Preparation Failures:
- Skipping Detangling: Leads to painful snags mid-braid, visible knots within the braid structure, and potential hair breakage from forcing through tangles.
- Braiding Freshly Washed Hair: Clean hair is often too slippery and soft to hold braided structures effectively, causing styles to fall apart quickly.
- Solution: Always detangle thoroughly before starting, and work with second or third-day hair, or add texturizing products to freshly washed hair.
Sectioning Issues:
- Uneven Sections: Creates braids with varying thicknesses that appear unprofessional and don’t hold uniformly.
- Poor Part Placement: Results in asymmetry that appears accidental rather than intentional, or parts that don’t flatter your face shape.
- Solution: Use a tail comb for precise parting, measure sections visually or with your fingers to ensure consistency, and plan your part placement before beginning.
Finishing Mistakes:
- Visible Elastics: Detracts from the polished appearance of otherwise beautiful braids.
- Not Securing Properly: Causes braids to unravel prematurely or fall apart during wear.
- Over-Pulling/Pancaking: Can cause braids to fall apart completely or create holes that look messy rather than intentionally full.
- Solution: Wrap hair around elastics to conceal them, secure with adequate pins placed correctly, and pull apart braids gently with strategic precision.
Hair Health Oversights:
- Leaving protective styles in too long, causing matting, buildup, or scalp health issues
- Not moisturizing the scalp or hair while wearing braided styles for extended periods
- Repeatedly braiding in the exact same pattern, causing tension on the same hair follicles and potential breakage along those lines
- Using elastics with metal parts that snag and damage hair when removed
Conclusion
The world of side-part braided hairstyles offers endless possibilities for self-expression, from elegant updos to edgy mohawks, protective cornrows to romantic flower-adorned braids.
Whether you’re drawn to the classic sophistication of a French side braid, the intricate beauty of a four-strand weave, or the bold statement of shaved sides with braided accents, there’s a perfect style waiting for you to discover within these “36+ Stunning Side-Part Braided Hairstyles to Try Right Now!”
The beauty of these styles lies not only in their visual appeal but in their versatility across hair types, lengths, and occasions, making them accessible to everyone regardless of experience level or natural hair texture.
By mastering the fundamental techniques, investing in proper tools and products, and avoiding common mistakes, you can create salon-worthy braided styles in the comfort of your own home.
From quick five-minute everyday braids to elaborate special-occasion updos, side-part braiding opens up a world of styling creativity that keeps hair healthy, looks stunning, and allows you to express your unique personality through your hair.
So gather your tools, choose your favorite style from this comprehensive guide, and embark on your braiding journey—your perfect side-part braided hairstyle is just a few twists and crosses away, ready to transform your look and boost your confidence with every beautifully woven strand.
