
There’s something magical about boho hairstyles that captures the spirit of freedom, creativity, and natural beauty all at once.
If you’ve been blessed with long hair and you’re searching for ways to embrace that effortlessly chic, bohemian aesthetic, you’ve landed in exactly the right place.
The beauty of boho hairstyles lies in their versatility—they work for beach days, music festivals, casual brunches, weddings, or even just a regular Tuesday when you want to feel a little more carefree.
This comprehensive guide to 26 Trendy Boho Hairstyles for Long Hair for Effortless Vibes will walk you through an array of stunning styles that range from simple braided looks to intricate updos, each designed to bring out your inner free spirit.
Whether you’re a braiding novice or a hair styling expert, you’ll discover looks that suit your skill level, hair texture, and personal style.
Get ready to transform your long locks into bohemian masterpieces that turn heads and make you feel absolutely radiant.
1. Loose Bohemian Waves
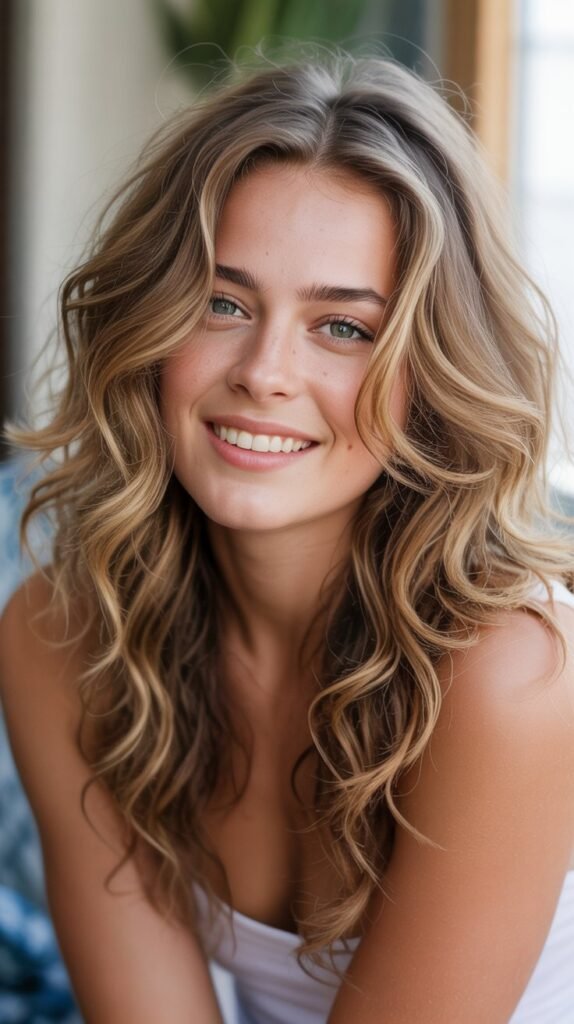
Loose bohemian waves are the foundation of almost every boho hairstyle and represent the quintessential effortless beauty that defines the bohemian aesthetic.
This style works beautifully on all hair textures and can be achieved with minimal effort, making it perfect for busy mornings or last-minute plans.
How to Create the Look:
- Start with clean, slightly damp hair and apply a texturizing spray or sea salt spray throughout your lengths.
- Divide your hair into 2-3 large sections depending on your hair thickness.
- Use a large-barrel curling iron (1.5 to 2 inches) and wrap sections of hair around the barrel, leaving the ends out for a more natural finish.
- Alternate the direction of curls—wrap some sections away from your face and others toward your face for dimension.
- Let the curls cool completely before touching them to help them set properly.
- Once cooled, gently run your fingers through the curls to break them up and create soft, flowing waves.
- Finish with a light-hold hairspray or texturizing spray for hold without stiffness.
Pro Tips:
- For heat-free waves, braid damp hair before bed and unravel in the morning.
- Add a bit of argan oil to the ends to combat frizz and add shine.
- This style works exceptionally well as a base for adding braids, headbands, or floral accessories.
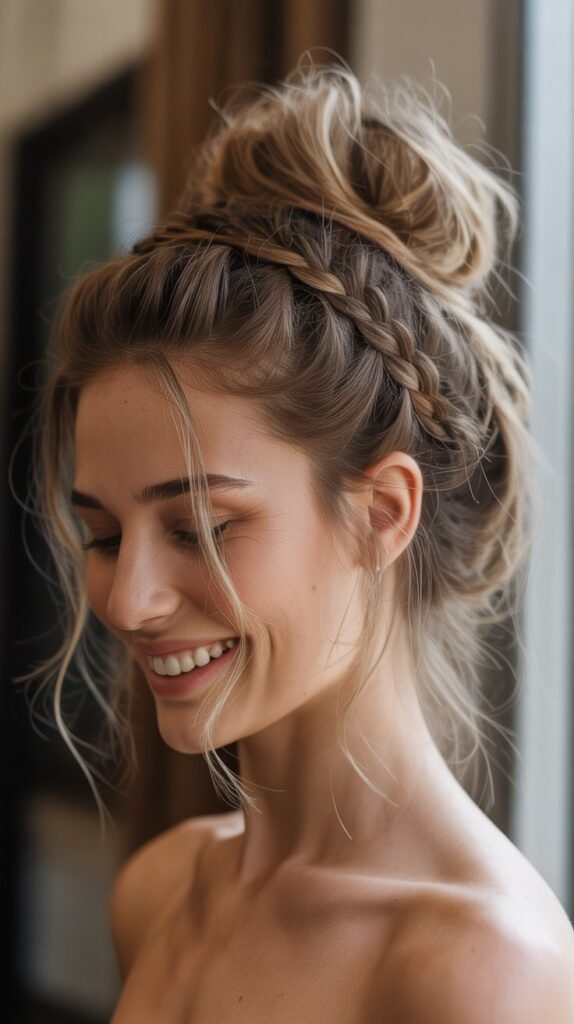
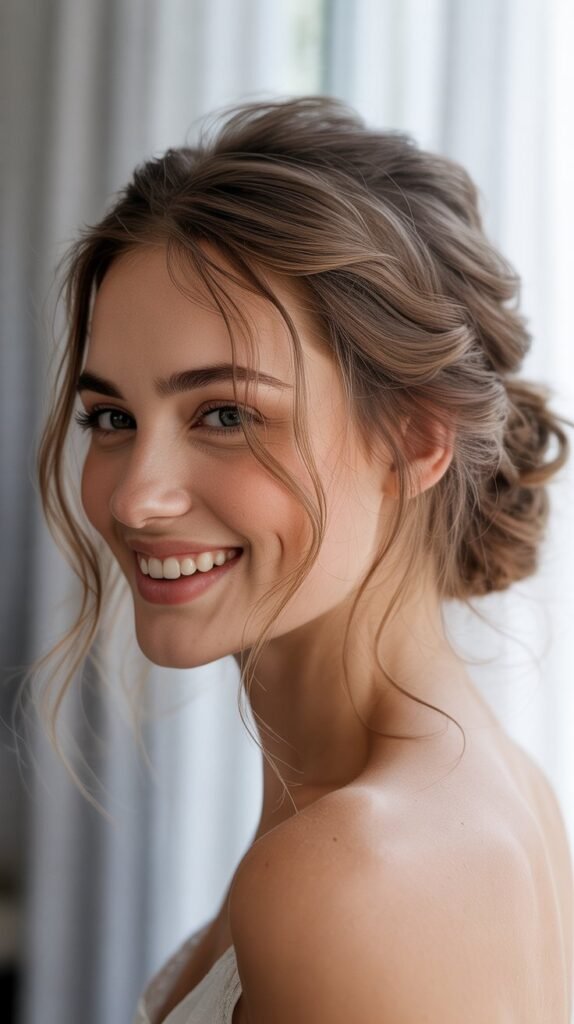
2. Crown Braid Halo
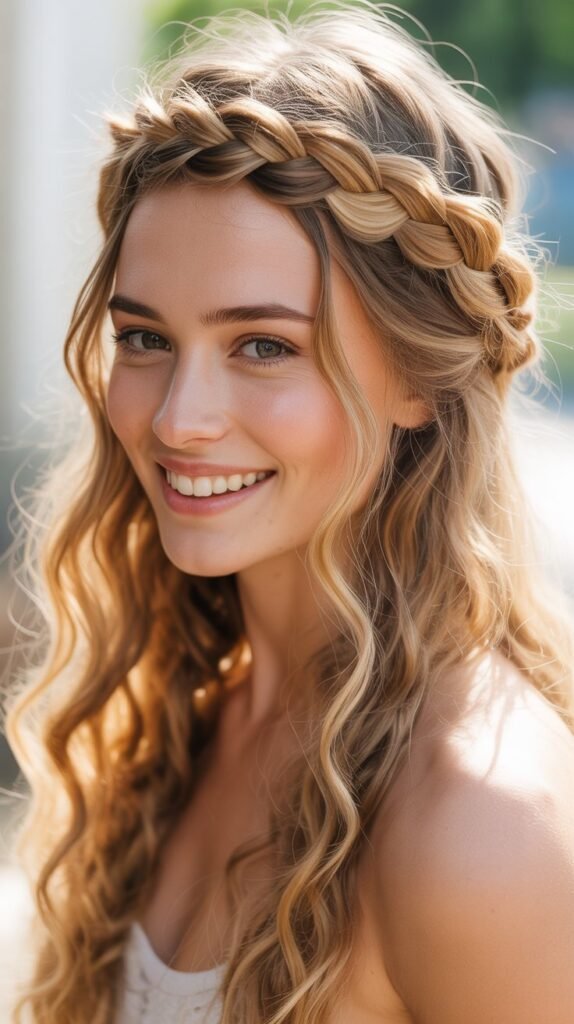
The crown braid halo is an ethereal, romantic style that wraps around your head like a natural crown, making it ideal for weddings, festivals, or any occasion where you want to feel like a bohemian princess.
This style keeps hair off your face while still showcasing your length.
Step-by-Step Instructions:
- Begin with brushed, tangle-free hair and create a deep side part.
- Take a small section of hair from the heavier side of your part near your hairline.
- Start a Dutch braid (reverse French braid where you cross sections under rather than over) by dividing the section into three parts.
- Continue the Dutch braid along your hairline, adding small sections of hair as you work your way around your head.
- Braid all the way around, following the natural curve of your head until you reach where you started.
- Secure the end with a small elastic and tuck it under the braid, pinning it discreetly.
- Gently pull on the outer edges of the braid to create volume and a fuller, more relaxed appearance.
- Set with a flexible-hold hairspray and add small flowers or decorative pins if desired.
Styling Variations:
- Create a double crown braid by making two parallel braids around your head.
- Leave some face-framing pieces loose for a softer, more romantic look.
- Incorporate ribbon or thin leather cord into the braid for added bohemian flair.
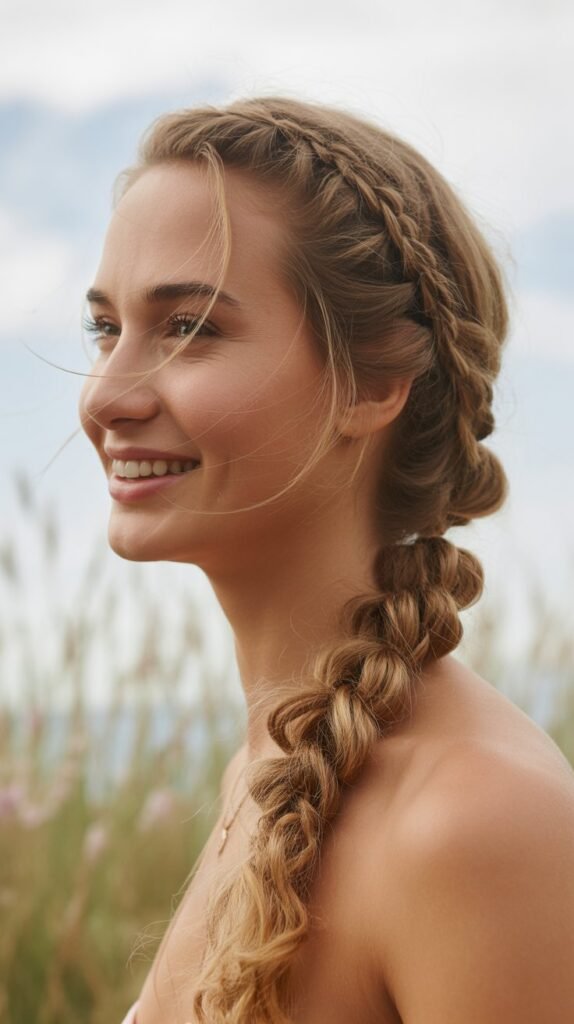
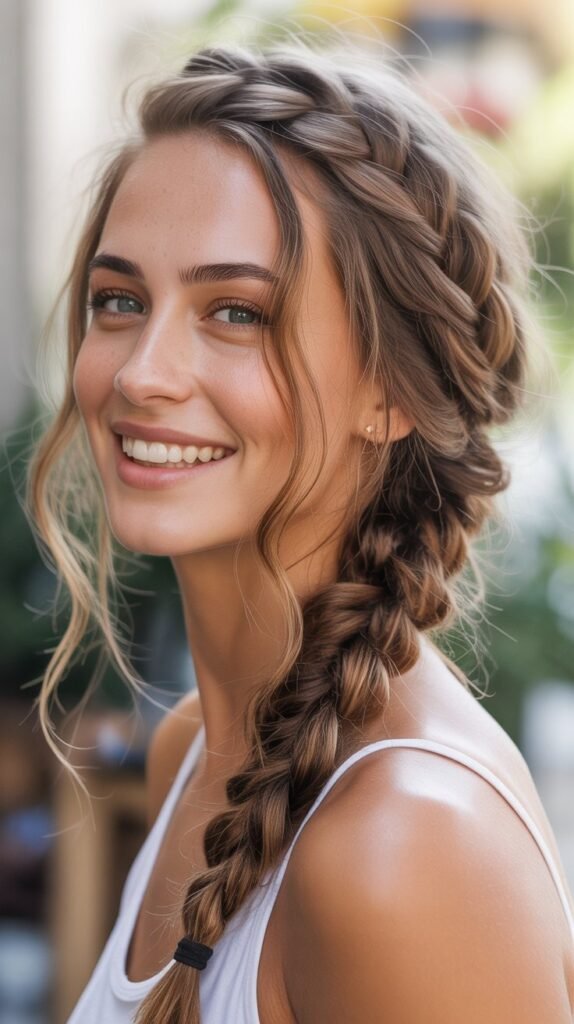
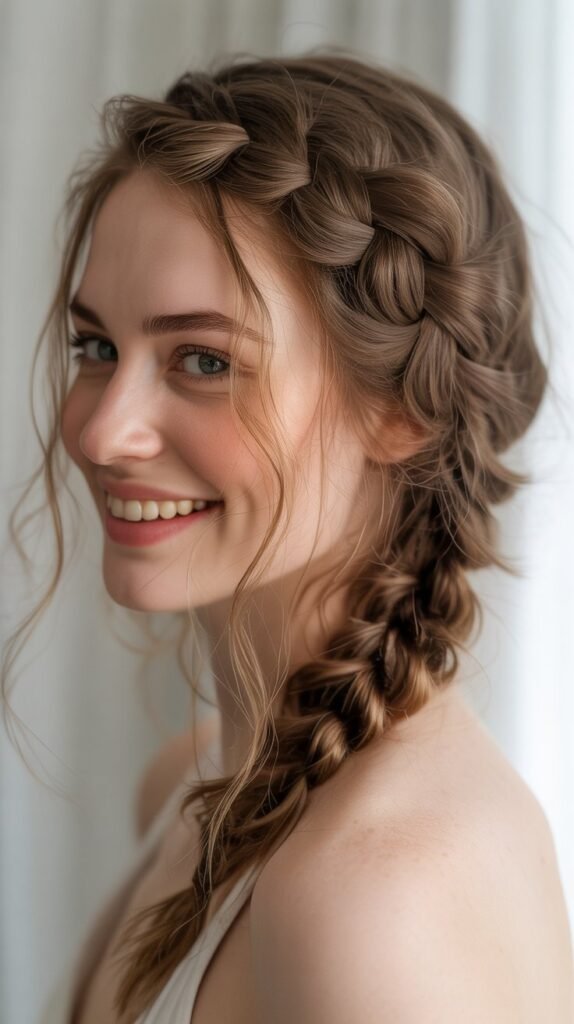
3. Messy Fishtail Braid
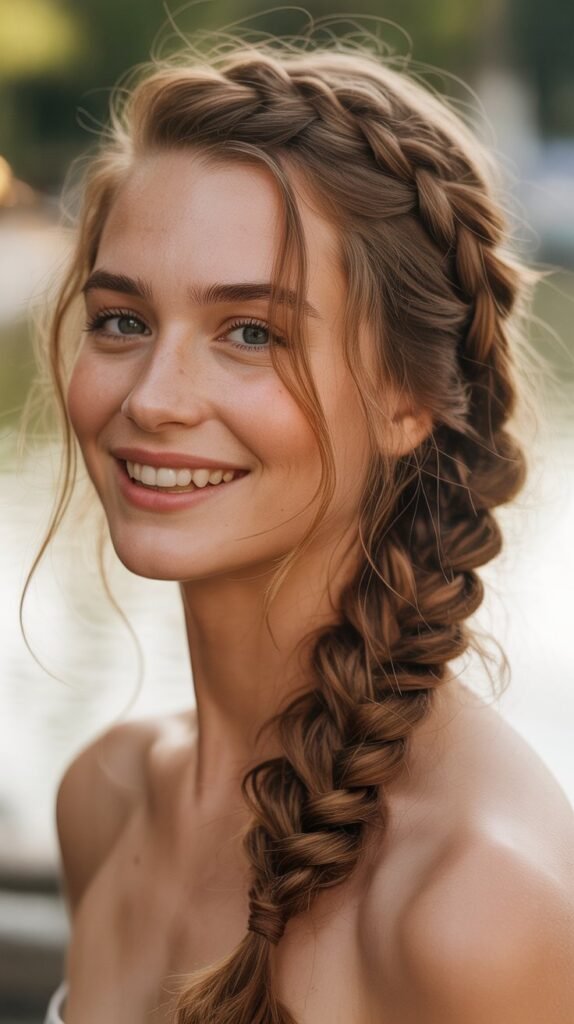
The messy fishtail braid offers an intricate-looking style that’s surprisingly simple to create and perfectly embodies the undone, carefree vibe of bohemian fashion.
Unlike traditional three-strand braids, the fishtail technique creates a beautiful herringbone pattern that looks complex but becomes easier with practice.
Creating Your Fishtail:
- Brush your hair smooth and gather it into a low ponytail at the nape of your neck (you can remove the elastic later or leave it for extra security).
- Divide your hair into two equal sections.
- Take a thin strand from the outer edge of the left section and cross it over to join the right section.
- Then take a thin strand from the outer edge of the right section and cross it over to join the left section.
- Continue this alternating pattern all the way down your hair, keeping the strands relatively thin for a more defined fishtail pattern.
- Secure the end with a clear or matching elastic band.
- Gently pull on the outer edges of the braid to create width and texture, making it appear fuller and messier.
- Pull out a few wispy pieces around your face and hairline for that perfectly imperfect finish.
Enhancement Ideas:
- Wrap a piece of leather cord or thin ribbon around the base or throughout the braid.
- Add small decorative pins or hair jewelry at intervals down the braid.
- Create a side fishtail braid that drapes over one shoulder for a different look.
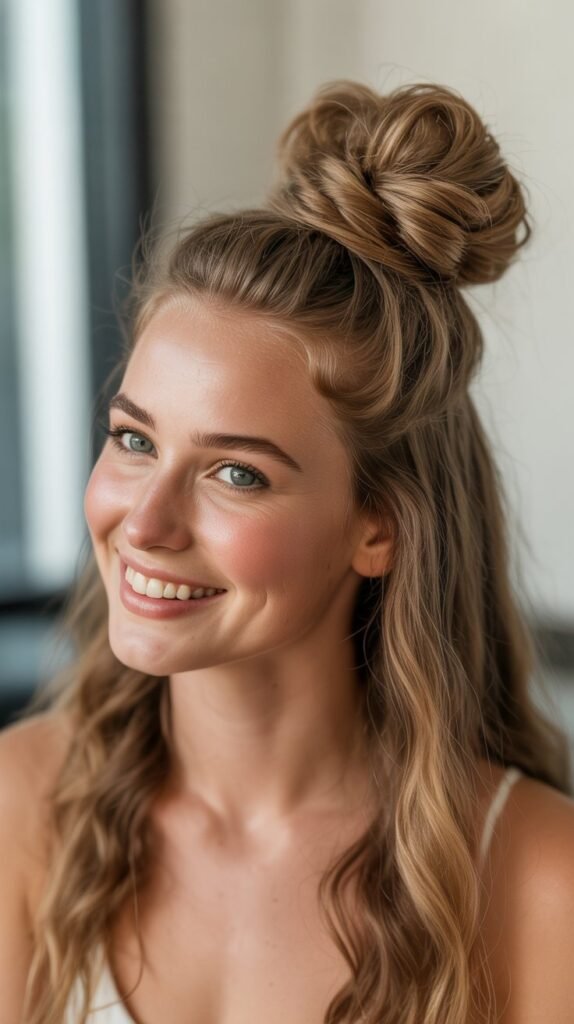
4. Half-Up Twisted Crown

The half-up twisted crown is a simple yet elegant style that combines the best of both worlds—hair pulled away from your face while still showing off your length.
This versatile look transitions seamlessly from day to night and requires minimal time or skill to achieve.
How to Style:
- Start by creating a center or side part according to your preference.
- Take a section of hair from one side of your head, about 2-3 inches back from your hairline.
- Twist this section back and away from your face, adding small amounts of hair as you twist to create a rope-like effect.
- Secure the twist temporarily with a clip at the back of your head.
- Repeat the same process on the opposite side, twisting the hair back.
- Bring both twists together at the back center of your head and secure them with bobby pins or a small elastic.
- Gently pull on the twists to create volume and a softer, more relaxed appearance.
- Leave the remaining hair down in natural waves or curls for the complete bohemian effect.
Customization Options:
- Create multiple smaller twists on each side instead of one large twist for added texture.
- Cross the twists over each other before securing for a more intricate appearance.
- Add a decorative hair clip, barrette, or small flowers where the twists meet.
5. Waterfall Braid
The waterfall braid is a stunning technique that creates the illusion of hair cascading through a braid like a waterfall, making it one of the most romantic and eye-catching bohemian styles.
While it looks incredibly intricate, the technique becomes manageable with a bit of practice.
Mastering the Technique:
- Begin with a small section of hair near your part at the front of your head.
- Divide this section into three strands and start a regular braid for one stitch.
- On the next stitch, drop the bottom strand and let it fall, replacing it with a new section of hair from above.
- Continue this pattern—braiding once, dropping the bottom strand, and picking up a new section from the top.
- Work the waterfall braid along your hairline from one side of your head toward the other.
- The dropped strands create the “waterfall” effect as they cascade through the braid.
- Secure the end with a small elastic or bobby pins behind your ear or continue all the way around your head.
- Curl the loose, dropped strands with a curling iron for added definition and a more polished appearance.
Advanced Variations:
- Create a double waterfall braid by starting a second waterfall braid below the first, incorporating the dropped strands from the first braid.
- Combine with a half-up style by gathering the waterfall braid with other back sections.
- Add small pearls or decorative pins along the waterfall braid for special occasions.
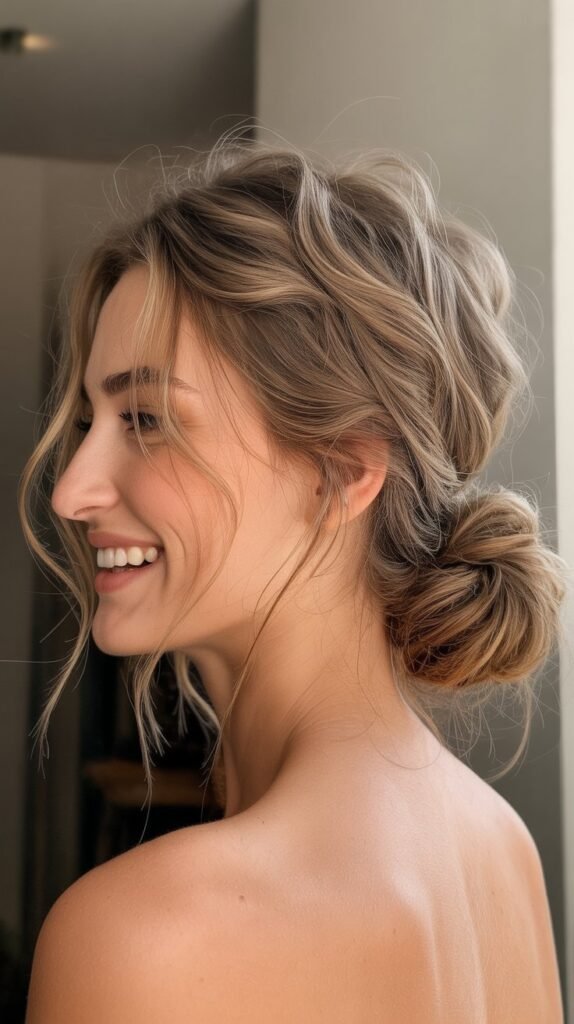
6. Low Messy Bun with Braided Detail
The low messy bun with braided detail is the epitome of effortless elegance, combining the relaxed appeal of a loose bun with the intricate beauty of braided accents.
This style is perfect for days when you want your hair up but still want to maintain that bohemian aesthetic.
Construction Steps:
- Start by creating loose waves or texture throughout your hair for added volume and grip.
- Take a small section from one side of your head near the hairline and create a simple three-strand braid.
- Repeat on the opposite side, creating a matching braid.
- Gather all your hair (including the braids) into a low ponytail at the nape of your neck, leaving a few face-framing pieces loose.
- Don’t pull the hair all the way through on the last wrap of the elastic—create a loop instead.
- Wrap the remaining tail around the base of the loop and secure with bobby pins.
- Pull and adjust the bun to create a fuller, messier appearance, allowing pieces to fall naturally.
- Pull out small sections around the crown for added volume and texture.
- Secure any loose pieces with bobby pins and finish with a flexible-hold hairspray.
Styling Enhancements:
- Incorporate small flowers or greenery into the bun for a romantic garden party look.
- Use decorative bobby pins or hair jewelry as functional accessories.
- Try fishtail braids or Dutch braids instead of regular braids for more intricate detail.
7. Bohemian Braided Ponytail
The bohemian braided ponytail elevates the classic ponytail by incorporating braided details that add texture, dimension, and that signature boho flair.
This style is practical yet stylish, making it perfect for active days when you need your hair secured but still want to look put-together.
Creating the Style:
- Begin by texturizing your hair with dry shampoo or texturizing spray for better grip and volume.
- Create a deep side part or center part based on your preference.
- Take a section of hair from the front on one side and create a small Dutch braid along the hairline.
- Continue the braid back toward where you’ll position your ponytail.
- Repeat with another small section on the opposite side.
- Gather all your hair (including the braids) into a ponytail at your desired height—mid-level or low works best for the boho aesthetic.
- Secure with an elastic band, then take a small section from the underside of the ponytail and wrap it around the elastic to conceal it.
- Pin the wrapped section underneath and set with hairspray.
- Gently pull on the braids to create more volume and a relaxed, undone appearance.
Additional Ideas:
- Create a fishtail or three-strand braid with the ponytail itself for even more texture.
- Add a decorative hair wrap, leather cord, or ribbon throughout the ponytail.
- Pull out small pieces around your face and hairline for a softer, more romantic effect.
8. Twisted Half-Up Bun
The twisted half-up bun, often called the “festival bun,” is a playful and practical style that keeps hair out of your face while creating a statement focal point at the crown of your head.
This look has become iconic at music festivals and bohemian gatherings worldwide.
How to Achieve:
- Part your hair down the middle or create a slight side part.
- Section off the top half of your hair from ear to ear across the crown.
- Gather this top section into a high ponytail and secure with an elastic.
- Divide the ponytail into two equal sections.
- Twist each section individually in the same direction (clockwise or counterclockwise).
- Then twist both sections around each other in the opposite direction to create a rope braid effect.
- Wrap this twisted rope around the base of the ponytail to form a bun shape.
- Secure with bobby pins, tucking the ends underneath the bun.
- Gently pull on the bun to create more volume and a slightly messy, lived-in appearance.
- Pull out a few face-framing pieces and tousle the remaining hair that’s left down.
Customization Tips:
- Create the bun without twisting for a simpler, quicker version.
- Add braided sections leading into the half-up bun for more detail.
- Incorporate decorative pins, small scarves, or bandanas around or through the bun.
9. Side Swept Waves with Braid Accent
Side swept waves with a braid accent offer a glamorous yet relaxed approach to bohemian styling, perfect for special occasions or when you want to add a touch of elegance to your everyday look.
The asymmetry creates visual interest while the braid adds that essential boho detail.
Step-by-Step Process:
- Create deep, voluminous waves throughout your hair using your preferred method (curling iron, flat iron, or heatless techniques).
- Once waves are set and cooled, create a deep side part—far to one side for maximum impact.
- On the side with less hair, take a small section near the part and create a small Dutch or French braid.
- Braid along the hairline, following the natural curve toward the back of your head.
- Secure the braid temporarily with a small elastic or clip.
- Sweep all your hair over one shoulder, bringing the braid along with it.
- Pin the braid discreetly behind your ear on the opposite side with bobby pins.
- Arrange the waves over your shoulder, allowing them to cascade beautifully.
- Finish with a light mist of hairspray to hold the swept style in place.
Enhancement Suggestions:
- Create multiple thin braids instead of one for a more intricate look.
- Add decorative pins or small flowers along the braid for special occasions.
- Use a texturizing spray on the waves for added dimension and a more lived-in appearance.
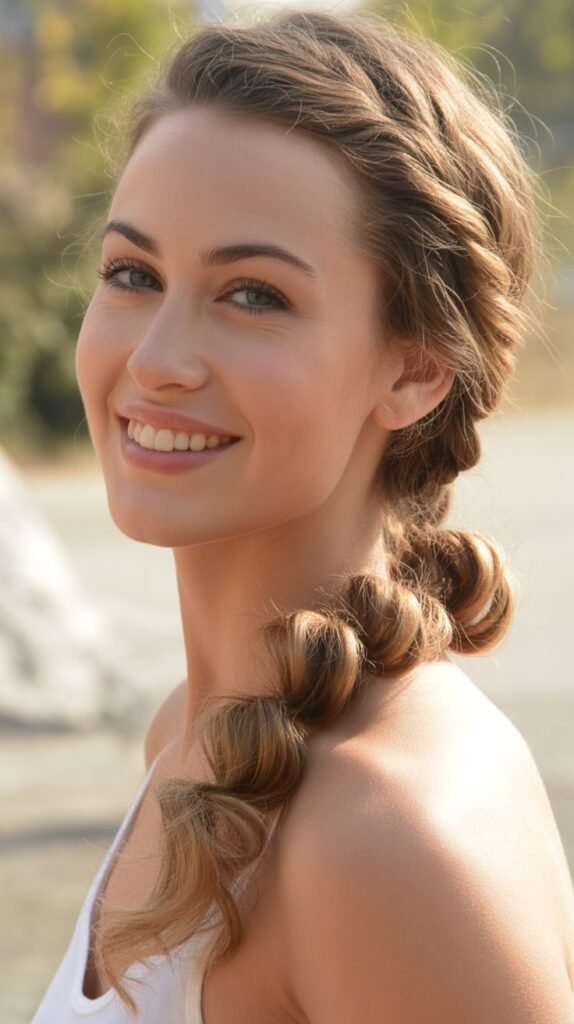
10. Boho Bubble Braid
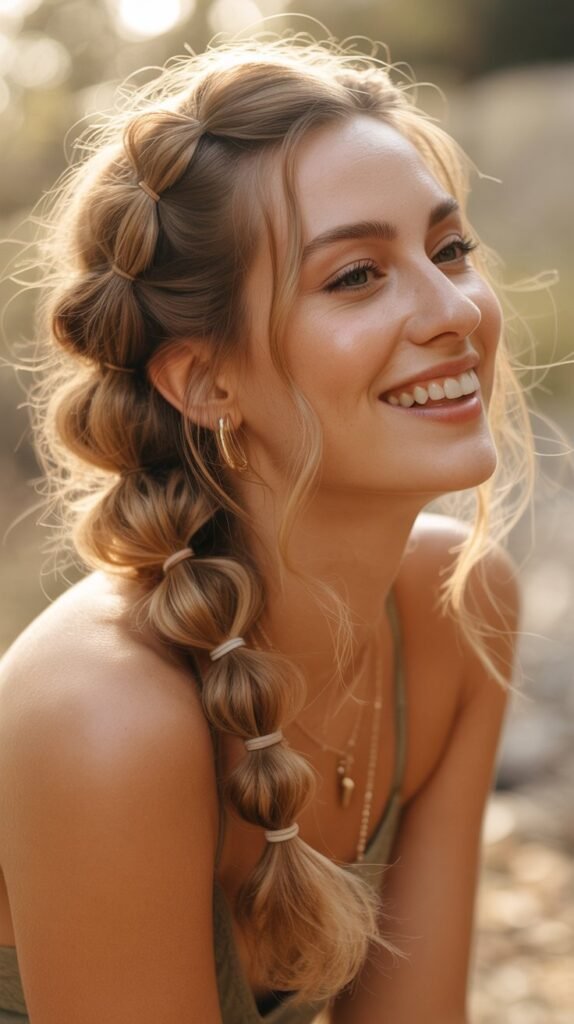
The boho bubble braid is a modern take on the classic ponytail that creates dimensional “bubbles” down the length of your hair, offering a playful and eye-catching style that’s surprisingly simple to create.
This trend has exploded in popularity and works beautifully for the bohemian aesthetic.
Creating Bubble Magic:
- Start by gathering your hair into a ponytail at your desired height (low, mid, or high all work well).
- Secure with a hair elastic that matches your hair color.
- About 2-3 inches down from the first elastic, add another elastic around the ponytail.
- Gently pull on the hair between the two elastics, tugging outward to create volume and form the first “bubble.”
- Continue adding elastics every 2-3 inches down the length of your ponytail.
- Create bubbles between each set of elastics by pulling the hair outward gently and evenly.
- For a more voluminous effect, lightly tease the hair between elastics before creating the bubbles.
- Pull out a few face-framing pieces and soften the look around the hairline.
Creative Variations:
- Create multiple bubble braids by dividing your hair into sections and making smaller bubble ponytails.
- Incorporate small braids leading into the bubble ponytail for added detail.
- Use decorative elastics, ribbons, or hair jewelry at each bubble interval for enhanced visual appeal.
- Try a diagonal or side bubble braid for an asymmetrical look.
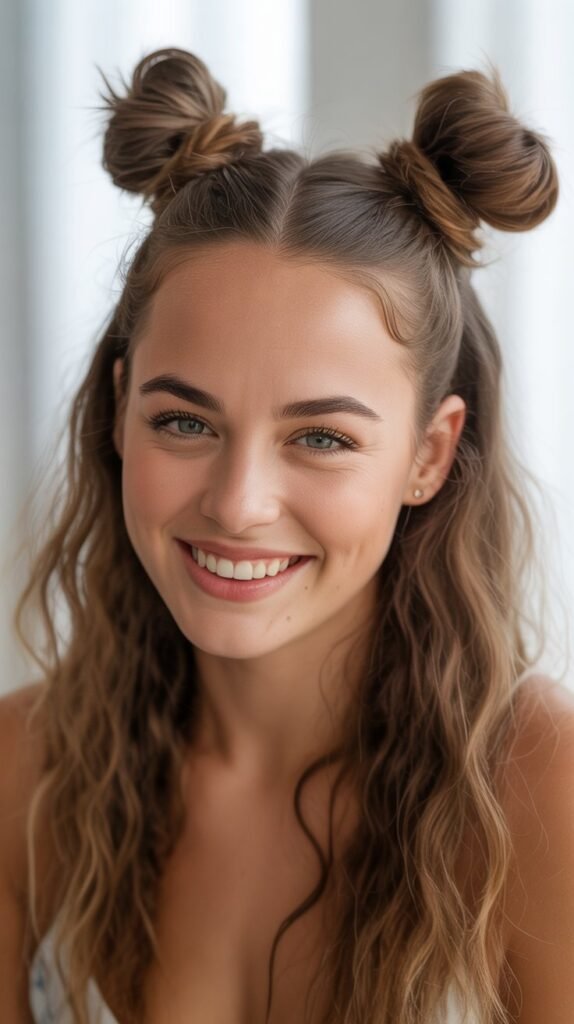
11. Bohemian Space Buns
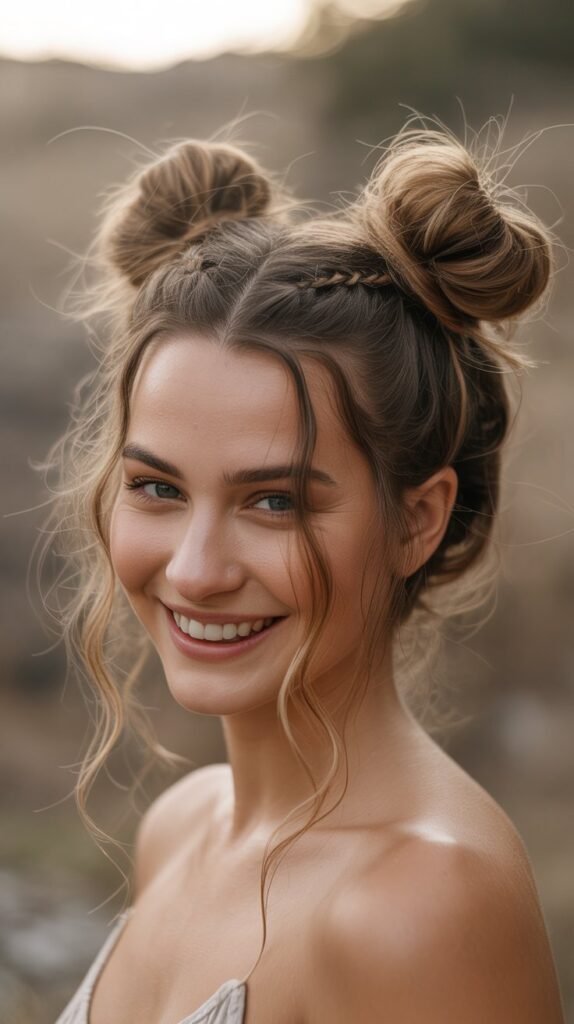
Bohemian space buns offer a fun, youthful twist on traditional bun styles, creating two buns positioned on either side of the head.
When styled with a boho aesthetic—loose, textured, and slightly undone—they become perfect for festivals, concerts, or any casual outing.
How to Create:
- Part your hair down the center from forehead to nape, creating two equal sections.
- Secure one section temporarily while you work on the other side.
- Gather one section into a high ponytail positioned where you want the bun (typically above and slightly behind the ear).
- Twist the ponytail and wrap it around the base to form a bun shape.
- Secure with bobby pins, leaving the ends slightly loose and textured rather than tucking them all in.
- Repeat the process on the opposite side, trying to match the height and size of the first bun.
- Gently pull on both buns to create a fuller, messier appearance.
- Pull out small pieces around your face, ears, and neck for a softer, more bohemian finish.
Styling Tips:
- Braid the ponytails before wrapping them into buns for added texture.
- Position the buns higher for a more playful look or lower for something more subtle.
- Add headbands, scarves, or flowers around or between the buns for extra boho flair.
- Use different colored elastics or ribbons wrapped around the buns for a pop of color.
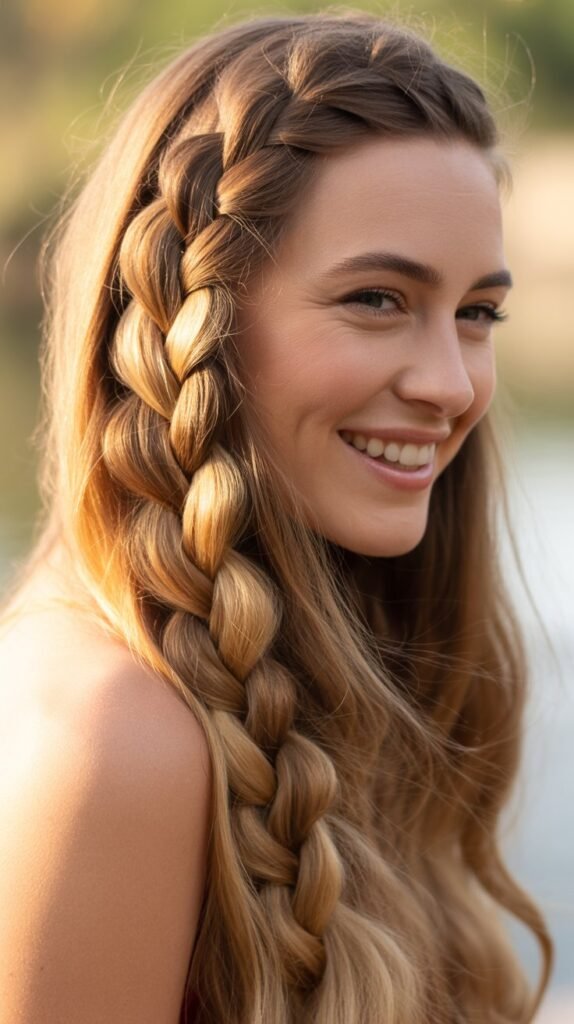
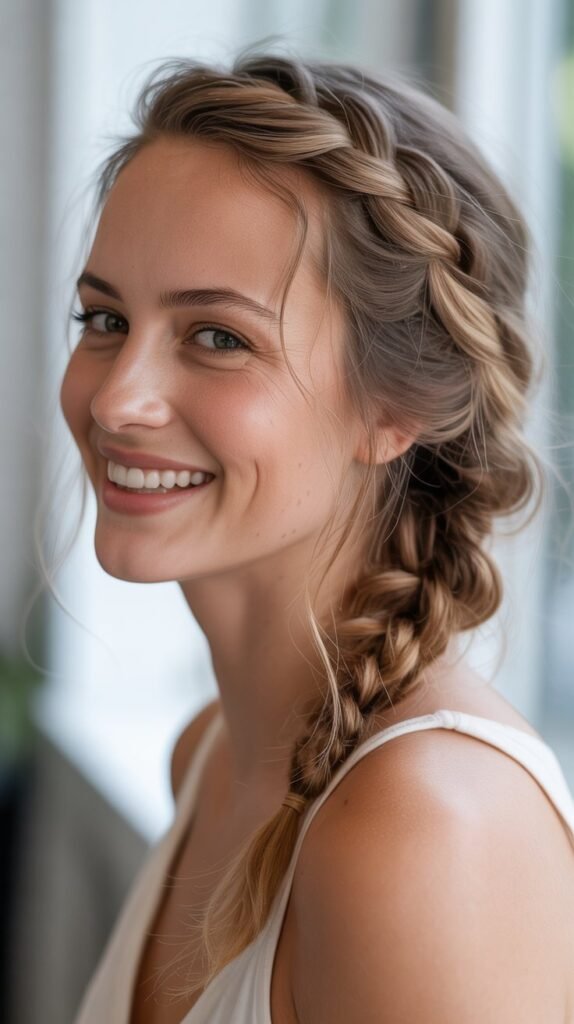
12. Loose Dutch Braid
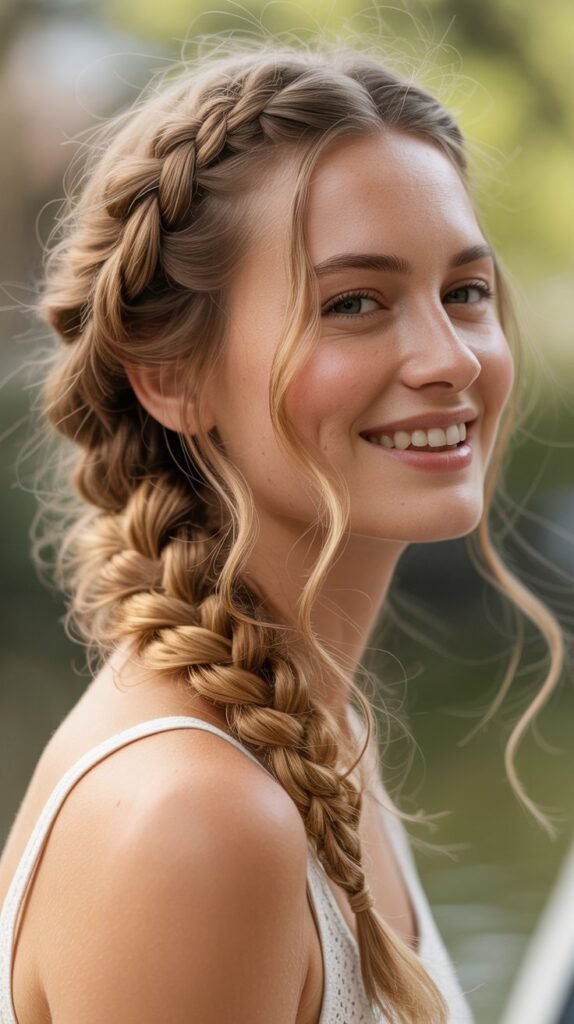
The loose Dutch braid, sometimes called a reverse French braid, creates a beautiful raised braid that sits on top of your hair rather than woven into it.
When styled loosely with pulled-out sections, it becomes the perfect bohemian statement that works for any occasion.
Braiding Instructions:
- Start with brushed, textured hair—add some dry shampoo or texturizing spray if your hair is too silky.
- Create your preferred part (center, side, or no part) and begin at the top of your head.
- Take a section of hair and divide it into three equal strands.
- Cross the right strand under the middle strand, then cross the left strand under the middle strand.
- Add a small section of hair from the right side to the right strand before crossing it under again.
- Add a small section from the left side to the left strand before crossing it under.
- Continue this pattern down your head, adding hair from each side as you go.
- Keep the braid loose from the beginning rather than trying to loosen it afterward.
- Secure the end with an elastic and gently pull on the outer edges of the braid to create width and dimension.
- Pull out small wispy pieces around your face and along the braid for that perfectly imperfect boho finish.
Advanced Techniques:
- Create a side Dutch braid that drapes over one shoulder for a romantic look.
- Make two Dutch braids for a double-braid style that’s both practical and stylish.
- Incorporate ribbon, leather cord, or hair jewelry into the braid as you work.
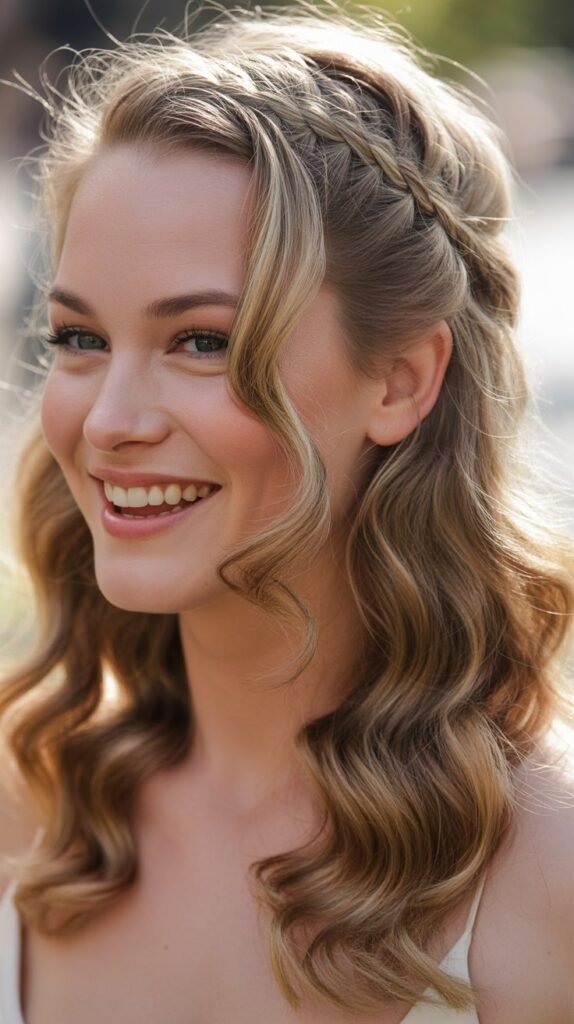
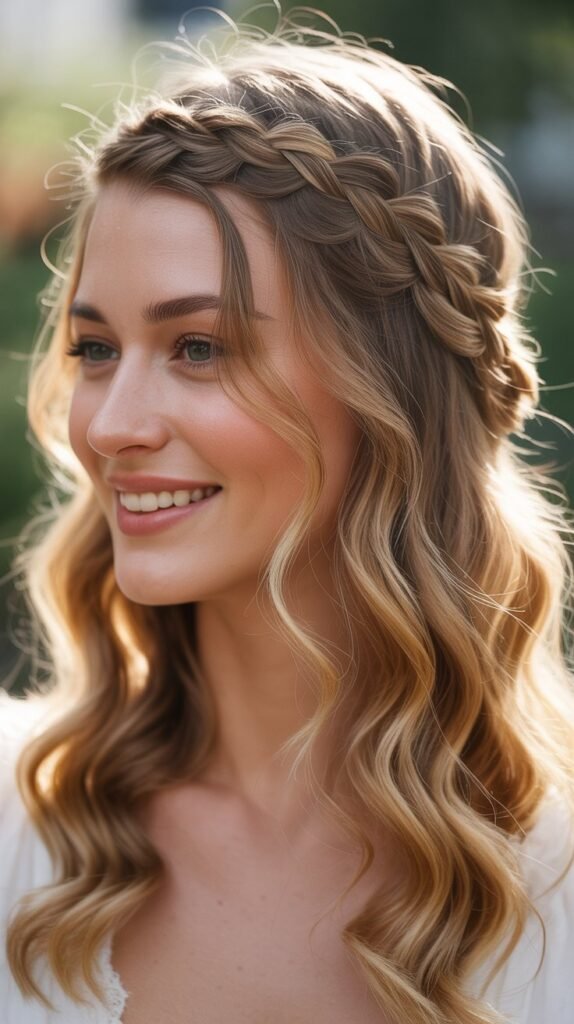
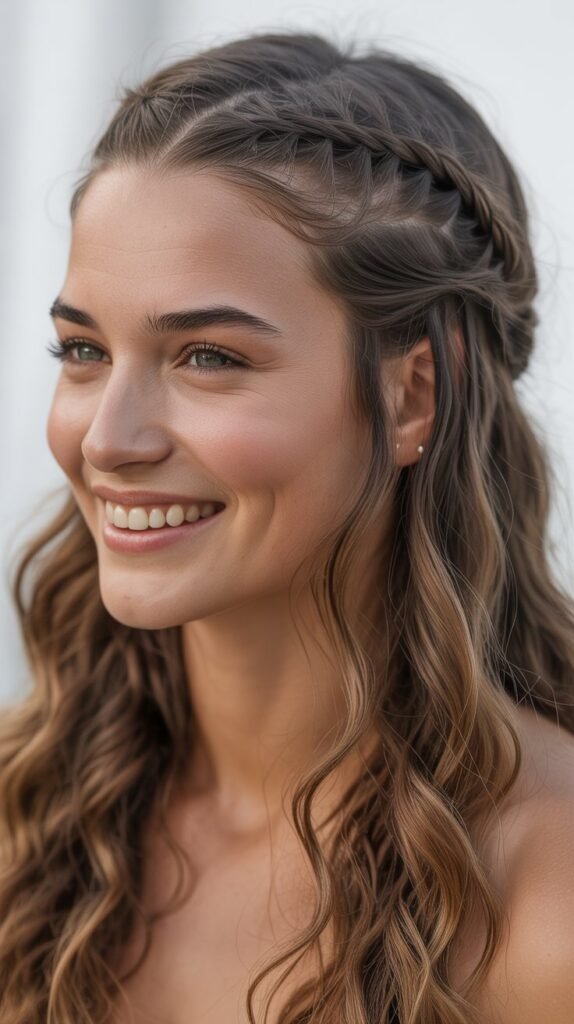
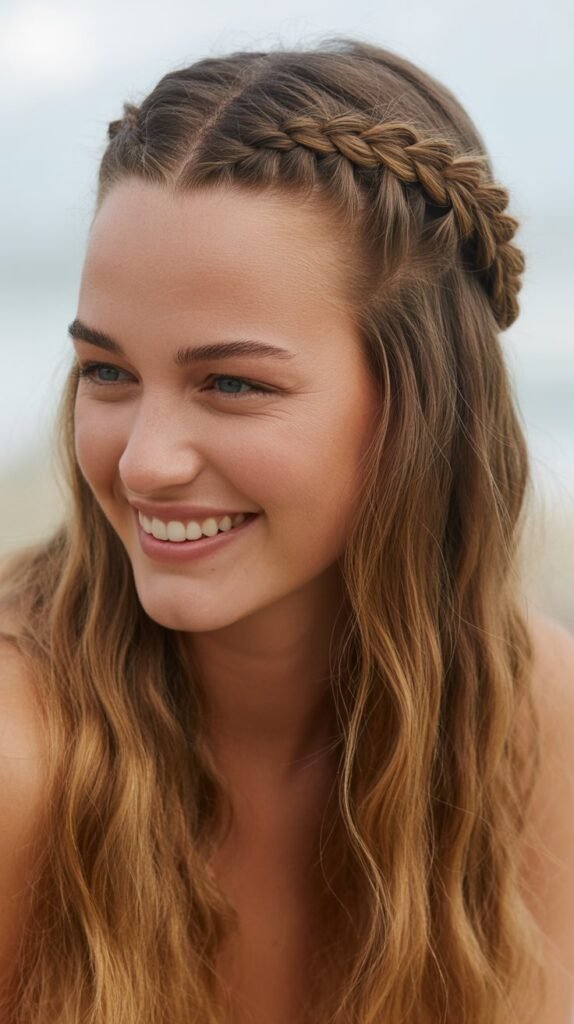
13. Headband Braid with Flowing Waves
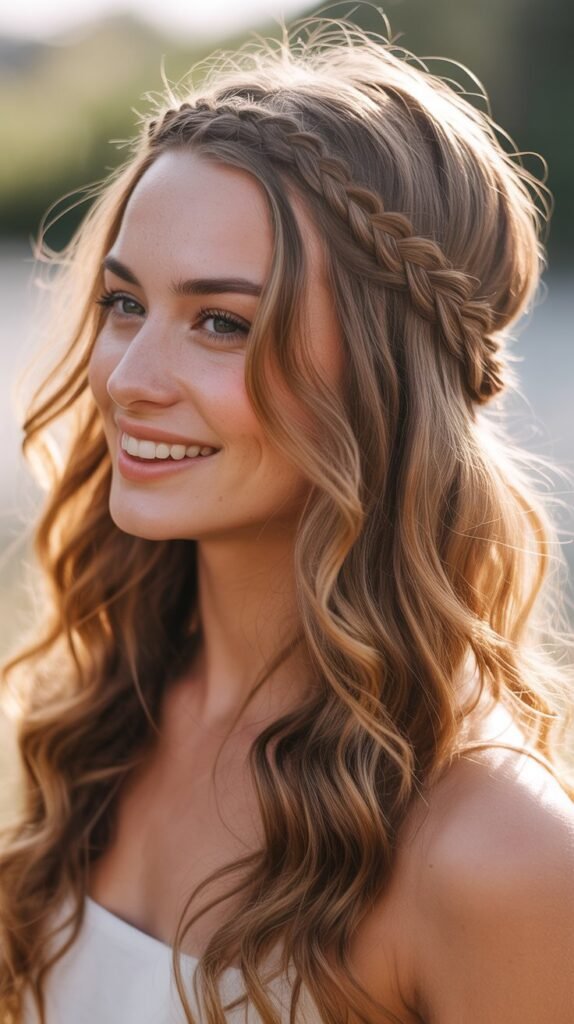
The headband braid with flowing waves combines the functionality of keeping hair off your face with the beauty of loose, cascading waves.
This style creates a natural “headband” from your own hair, making it perfect for days when you want something special without actual accessories.
Creating Your Hair Headband:
- Start with wavy or textured hair for the best results.
- Create a deep side part on one side of your head.
- Take a section of hair from behind your ear on the side with less hair.
- Divide this into three strands and begin a regular or Dutch braid.
- Braid along your hairline like a headband, working from behind one ear, across the forehead, to behind the other ear.
- Keep the braid relatively thin and tight so it stays in place like an actual headband.
- Secure the end with a small elastic behind your opposite ear and pin it discreetly.
- Style the remaining loose hair in soft waves using a curling iron or natural methods.
- Pull out a few pieces around the braid to soften the look and create a more relaxed appearance.
Styling Enhancements:
- Create a double headband by adding a second braid parallel to the first.
- Weave small flowers, greenery, or decorative pins into the headband braid.
- Use a fishtail technique for the headband braid instead of a traditional braid for variety.
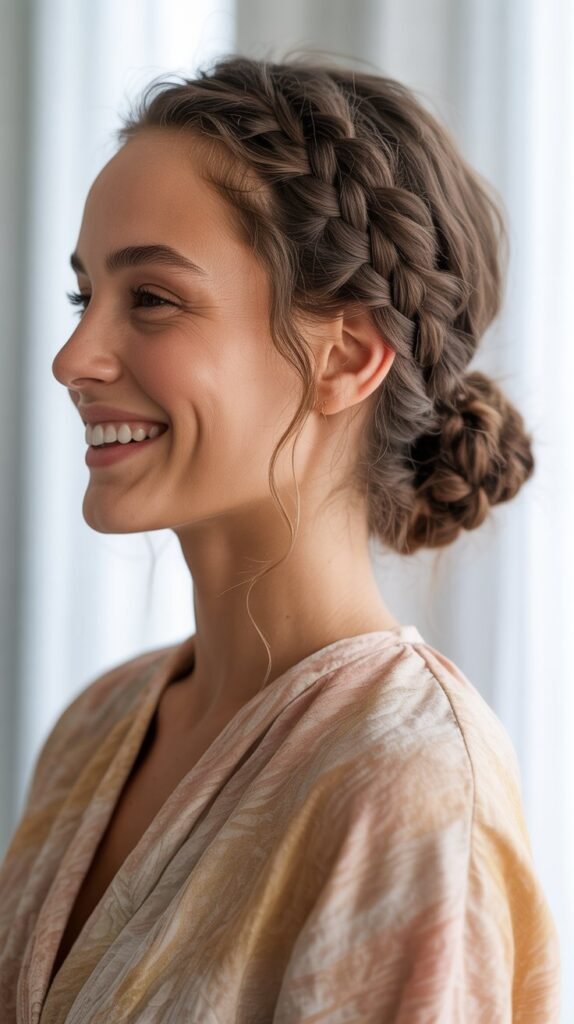
14. Messy Twisted Low Bun
The messy twisted low bun is an elegant yet effortless style that perfectly captures bohemian sophistication.
This versatile updo works beautifully for both casual days and special occasions, offering a polished look without appearing overly formal or structured.
Construction Method:
- Begin with second-day hair or hair with texturizing spray for better grip and volume.
- Gather your hair into a low ponytail at the nape of your neck, positioning it to one side rather than center for added interest.
- Don’t pull the hair too tight—allow some looseness and volume at the crown.
- Divide the ponytail into two equal sections.
- Twist each section individually in the same direction until they begin to coil.
- Wrap both twisted sections around each other to create a rope-like effect.
- Coil this twisted rope around the base of the ponytail to form a low bun.
- Secure with bobby pins, inserting them vertically for the strongest hold.
- Gently pull and loosen sections of the bun to create a fuller, messier appearance.
- Pull out face-framing pieces and soften the hair around your hairline and ears.
Refinement Ideas:
- Add a braid leading into the low bun for extra detail.
- Incorporate decorative pins, pearls, or flowers throughout the bun for special occasions.
- Leave some length out of the bun so tendrils hang down for a more romantic effect.
15. Braided Crown with Low Waves
The braided crown with low waves combines the ethereal beauty of a crown braid with the flowing elegance of loose waves, creating a style that’s both romantic and practical.
This look has become increasingly popular for brides, festival-goers, and anyone seeking a goddess-inspired bohemian aesthetic.
Step-by-Step Creation:
- Start by curling or waving the bottom half of your hair and allowing it to set.
- Create a center part from forehead to crown, then part the hair horizontally from ear to ear.
- Begin with the front section on one side, dividing it into three strands near the part.
- Create a Dutch or French braid that follows your hairline from the part to behind your ear.
- Continue braiding without adding more hair once you’ve incorporated all the hair from that front section.
- Repeat the exact process on the opposite side, creating a matching braid.
- Bring both braids together at the back of your head, slightly above where the back hair meets the braids.
- Cross the braids over each other and secure with bobby pins.
- Tuck the ends of the braids under themselves to hide them or leave them trailing into the loose waves.
- Gently pull on the braids to create volume and a softer crown effect.
- Finish by styling and arranging the loose waves below the braided crown.
Customization Options:
- Add flowers, greenery, or decorative pins along the crown for enhanced beauty.
- Create fishtail braids instead of traditional braids for different texture.
- Pull more pieces loose around the face for a softer, more romantic framing.
16. Side Braid with Flowers
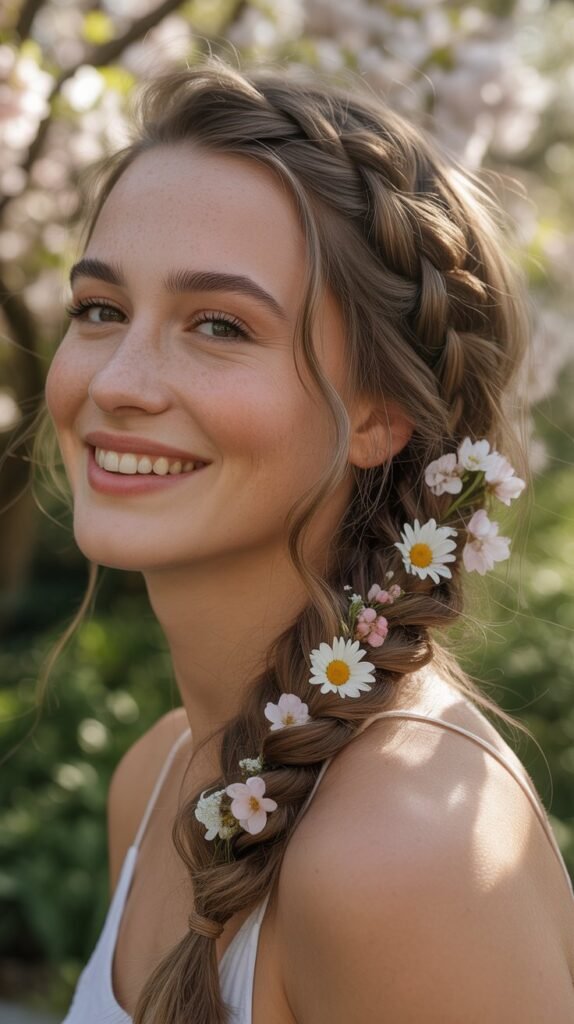
The side braid with flowers is perhaps the most quintessentially bohemian hairstyle, combining the simplicity of a classic braid with the natural beauty of fresh or artificial flowers.
This style is perfect for outdoor events, festivals, weddings, or any occasion where you want to channel your inner flower child.
Creating the Look:
- Brush your hair smooth and sweep it all to one side over your shoulder.
- Decide on your braid type—traditional three-strand, fishtail, or Dutch braids all work beautifully.
- Begin braiding from just below your ear, keeping the braid loose and relaxed.
- Continue braiding down the length of your hair, maintaining consistent tension for an even appearance.
- Secure the end with a small elastic, leaving a few inches unbraided for a softer finish.
- Gently pull on the outer edges of the braid to create volume and width.
- Select your flowers—small blooms like baby’s breath, daisies, or wildflowers work particularly well.
- Tuck flower stems into the braid, securing with bobby pins if needed (hairpins that match your hair color work best).
- Distribute flowers evenly throughout the braid or concentrate them in specific areas for different effects.
- Pull out a few face-framing pieces and around the hairline for a softer overall appearance.
Flower Selection Tips:
- Use fresh flowers for special occasions, ensuring they’re pesticide-free and won’t wilt quickly.
- Artificial flowers from craft stores offer a longer-lasting and often more affordable option.
- Choose flowers that complement your outfit color palette.
- Consider adding greenery like eucalyptus or ferns alongside flowers for added texture.
17. Half-Up Space Buns
Half-up space buns offer a playful, youthful take on the space bun trend by positioning two small buns at the crown of the head while leaving the rest of the hair flowing freely.
This style perfectly balances fun and femininity with that signature bohemian ease.
How to Style:
- Part your hair down the center from forehead to crown, stopping at the point where you want the buns to be positioned.
- Leave the bottom half of your hair completely loose—this will remain down.
- Section the top half into two equal parts on either side of the center part.
- Take one section and gather it into a small, high ponytail, securing with an elastic.
- Twist this ponytail and wrap it around the base to create a small bun.
- Secure the bun with bobby pins, intentionally leaving it slightly messy and textured.
- Repeat the exact process on the opposite side, matching the size and position of the first bun.
- Gently pull on both buns to create more volume and texture.
- Style the bottom half in loose waves or leave it natural, depending on your preference.
- Pull out small pieces around your face and at the hairline for a softer, more undone appearance.
Variation Ideas:
- Braid the ponytails before wrapping them into buns for added texture.
- Position the buns lower on your head for a more subtle look.
- Add colorful ribbons, scarves, or decorative pins to or around the buns.
- Create three or four even smaller buns across the crown for a unique twist.
18. Romantic Loose Updo
The romantic loose updo is an elegant yet effortlessly beautiful style that gathers hair up while maintaining that essential undone, organic quality that defines bohemian aesthetics.
This versatile style works beautifully for weddings, formal events, or any day you want to feel special.
Construction Steps:
- Start by creating texture throughout your hair with waves or curls.
- Create a loose, low ponytail but don’t pull it tight—leave volume and looseness throughout.
- Divide the ponytail into 2-3 sections.
- Take each section, twist it loosely, and pin it randomly around the base of the ponytail, creating an organic, flowing updo shape.
- Don’t worry about precision—the beauty is in the imperfection.
- Continue until all hair is pinned up, allowing pieces to fall and drape naturally.
- Pull out face-framing pieces around your hairline and ears.
- Gently pull on the pinned sections to create more volume and texture.
- Allow some pieces to fall loose intentionally for that romantic, just-done feeling.
- Secure any pieces that feel too loose with additional bobby pins.
Enhancement Suggestions:
- Incorporate small braids into sections before pinning them up.
- Add flowers, greenery, decorative pins, or hair jewelry throughout the updo.
- Leave a few curled tendrils hanging down for added romance.
- Use a texturizing spray before styling for better hold and more natural-looking texture.
19. Chunky Side Braid
The chunky side braid offers a bold, statement-making alternative to more delicate braiding styles while maintaining that relaxed bohemian vibe.
By keeping sections large and pulling the braid apart generously, you create a voluminous, textured look that’s both dramatic and easy to achieve.
Creating Volume:
- Begin with texturized hair—use dry shampoo or texturizing spray at the roots for extra volume.
- Sweep all your hair to one side, bringing it over your shoulder.
- Divide your hair into three very large, chunky sections rather than small delicate ones.
- Begin a traditional three-strand braid, crossing sections over one another.
- Keep your hold somewhat loose from the start rather than braiding tightly.
- Continue braiding down the length of your hair, maintaining those large sections.
- Secure the end with an elastic band, leaving a few inches of hair unbraided.
- This is where the magic happens—generously pull on the outer edges of each section of the braid.
- Pull outward and slightly upward on each section to create maximum width and volume.
- Continue pulling until the braid is significantly fuller and has that chunky, statement-making appearance.
- Pull out a few face-framing pieces for softness.
Styling Tips:
- The chunkier and messier, the better for this style—don’t hold back when pulling the braid apart.
- Add texture spray or dry shampoo after pulling the braid apart for enhanced hold and texture.
- Wrap a piece of leather cord, ribbon, or decorative hair wrap around sections of the braid for added interest.
20. Braided Half-Up Half-Down
The braided half-up half-down style is a versatile classic that incorporates braided details into the timeless half-up style, creating a look that’s both practical and beautiful.
This style keeps hair off your face while showcasing your length and can be adapted to suit any occasion.
Step-by-Step Instructions:
- Start with brushed or lightly textured hair.
- Create your preferred part—center or side both work well.
- Take a section of hair from one side of your head, starting at the temple area.
- Create a small braid—traditional, Dutch, or fishtail all work beautifully.
- Braid back toward the crown, securing temporarily with a clip.
- Repeat on the opposite side, creating a matching braid.
- Gather both braids along with additional hair from the sides and crown to create the “half-up” portion.
- Secure everything together at the back of your head with an elastic or decorative clip.
- Gently pull on the braids to loosen them and create more volume and texture.
- Leave the bottom half of your hair down in natural waves or curls.
- Pull out a few face-framing pieces around your hairline for a softer appearance.
Creative Variations:
- Create multiple thin braids on each side instead of just one.
- Cross the braids over each other before securing for added visual interest.
- Add flowers, decorative pins, or hair jewelry where the braids meet.
- Leave the braids long and incorporate them into the half-up section without adding additional hair.
21. Twisted Side Ponytail
The twisted side ponytail elevates the simple side ponytail with twisted details that add dimension, texture, and visual interest.
This style is perfect for active days when you need your hair secured but still want to maintain that bohemian aesthetic.
How to Create:
- Brush your hair smooth and apply texturizing spray for grip.
- Create a deep side part, positioning it far to one side for maximum impact.
- On the side with more hair, take a section near the part and divide it into two pieces.
- Twist these two pieces around each other, creating a rope-twist effect.
- Continue twisting, adding small sections of hair as you work back toward where the ponytail will sit.
- Secure the twist temporarily with a clip.
- Gather all your hair to one side (the same side as your twist) into a low or mid-level ponytail.
- Incorporate the twisted section into the ponytail and secure everything with an elastic.
- Take a small section from the underside of the ponytail and wrap it around the elastic to conceal it.
- Pin the wrapped section underneath with a bobby pin.
- Gently pull on the twist to create more volume and a looser appearance.
- Pull out a few pieces around your face for softness.
Enhancement Ideas:
- Create multiple twists leading into the ponytail for a more intricate look.
- Add a decorative hair wrap, ribbon, or leather cord around the ponytail.
- Braid the ponytail itself for additional texture and detail.
22. Boho Pigtail Braids

Boho pigtail braids bring a youthful, carefree energy while maintaining sophistication through loose, textured styling.
Unlike tight, traditional pigtails, the bohemian version is intentionally messy, voluminous, and relaxed, making it perfect for festivals, beach days, or casual outings.
Creating the Look:
- Part your hair down the center from forehead to nape, creating two equal sections.
- Secure one section temporarily while you work on the other.
- Starting with one section, position where you want the braid to begin—at ear level or slightly lower works well for a boho aesthetic.
- Create your chosen braid style (traditional three-strand, Dutch, or fishtail) down the length of the hair.
- Keep the braid somewhat loose from the beginning rather than pulling it tight.
- Secure the end with an elastic, leaving a few inches unbraided for a softer finish.
- Repeat the exact process on the opposite side, trying to match the starting position and braid type.
- Once both braids are complete, generously pull on the outer edges to create volume and width.
- Pull out small wispy pieces around your face, ears, and along the braids.
- The goal is intentional messiness rather than perfect symmetry.
Styling Enhancements:
- Weave ribbons, leather cords, or colorful threads through the braids for added color.
- Add small flowers, beads, or decorative hair jewelry throughout both braids.
- Create different types of braids on each side for an intentionally mismatched look.
- Position the braids at different angles rather than perfectly straight down for more interest.
23. Infinity Braid
The infinity braid, also called the figure-eight braid, creates a stunning interwoven pattern that resembles the infinity symbol throughout the braid.
While it looks incredibly complex, this technique becomes manageable with practice and creates a truly unique bohemian statement.
Mastering the Technique:
- Start with smooth, brushed hair gathered to one side or positioned down the back.
- Divide your hair into two large sections of equal size.
- Take a small piece from the outer edge of the left section and create a figure-eight pattern by bringing it over the left section, under the right section, and back to join the left section.
- Then take a small piece from the outer edge of the right section and create the same figure-eight pattern in reverse—over the right section, under the left section, and back to join the right section.
- Continue this alternating pattern down the length of your hair, maintaining consistent tension for an even appearance.
- The key is remembering the figure-eight motion: take from outside, go over your section, under the opposite section, and back to your side.
- Secure the end with an elastic band once you’ve braided the desired length.
- Gently pull on the sections of the braid to create more volume and clearly define the infinity pattern.
- Pull out a few face-framing pieces if worn to the front, or leave the hairline soft if worn down the back.
Pro Tips:
- Practice the motion with just two sections before adding hair to understand the pattern.
- Take very small pieces from the outside for a more defined, intricate infinity pattern.
- Use hair elastics or clips to hold sections while learning the technique.
24. Low Braided Bun with Wrap
The low braided bun with wrap combines the elegance of a low bun with braided texture and the bohemian touch of a decorative wrap or scarf.
This sophisticated style works beautifully for both casual and formal occasions, offering versatility and timeless appeal.
Construction Process:
- Begin by creating two or three braids throughout your hair—you can braid all of your hair or just sections.
- Gather all the braids (and any unbraided hair) into a low ponytail at the nape of your neck.
- Twist the ponytail and wrap it around the base to create a low bun shape.
- Secure the bun with bobby pins, inserting them vertically through the bun into your scalp for maximum hold.
- Don’t worry about making it perfectly smooth—embrace texture and slight imperfections.
- Take your chosen wrap—this could be a thin scarf, ribbon, leather cord, or specialty hair wrap.
- Wrap it around the base of the bun, either concealing the elastic or creating decorative loops and patterns.
- You can wrap it tightly for a cleaner look or loosely for more bohemian flair.
- Secure the ends of the wrap by tucking them into the bun or tying them in a small knot or bow.
- Pull out a few face-framing pieces and soften the hairline for a more romantic finish.
Wrap Selection:
- Silk scarves in paisley or floral patterns offer classic bohemian style.
- Leather or suede cords provide an earthy, natural aesthetic.
- Colorful ribbons add playfulness and can match your outfit.
- Metallic or beaded wraps create an elegant, elevated look for special occasions.
25. Rope Braid Half-Up Style
The rope braid half-up style uses the simple rope braiding technique (also called a twist braid) to create elegant texture in a half-up hairstyle.
This method is one of the easiest braiding techniques to master, making it perfect for those who struggle with traditional braiding.
Creating Rope Braids:
- Start by sectioning off the top half of your hair from ear to ear across the crown.
- Divide this top section into two equal pieces.
- Twist each piece individually in the same direction (either both clockwise or both counterclockwise)—this step is crucial.
- Once both pieces are twisted, wrap them around each other in the opposite direction from which you twisted them.
- Continue twisting the pieces individually and wrapping them around each other as you work down the length.
- The rope braid will naturally start to form as you continue this motion.
- Secure the end temporarily with an elastic.
- You can create this rope braid down to the ends or just for a few inches before securing it at the back of your head.
- Secure the rope braid at the back center of your head with bobby pins or an elastic, creating the half-up effect.
- Leave the remaining hair down in loose waves or your natural texture.
- Gently pull on the rope braid to create more volume and a softer, more relaxed appearance.
Variation Ideas:
- Create two rope braids (one on each side) and join them at the back instead of one central rope braid.
- Wrap the rope braid into a small bun at the back for a different take on the half-up style.
- Add decorative elements like small flowers or pins along the rope braid for enhanced beauty.
26. Messy Side French Braid
The messy side French braid is a deliberately undone take on the classic French braid, positioned to drape over one shoulder for maximum visual impact.
This style beautifully combines technique with that perfectly imperfect bohemian aesthetic.
Step-by-Step Guide:
- Brush your hair to remove tangles and add texturizing spray for better grip.
- Sweep all your hair to one side, bringing it over your shoulder.
- Starting near your temple on that side, take a section of hair and divide it into three strands.
- Begin a French braid by crossing the right strand over the middle, then the left strand over the middle.
- Add small sections of hair from the front and back edges as you braid, incorporating all the hair as you work down.
- Continue French braiding down the side, following the natural line of your shoulder.
- Keep your hands and the braid somewhat loose rather than pulling tight—this creates the foundation for the messy aesthetic.
- Once all hair is incorporated, continue with a regular braid down to the ends.
- Secure with an elastic, leaving a few inches unbraided.
- Generously pull on the outer edges of the braid, working from top to bottom, to create width, volume, and that intentionally messy appearance.
- Pull out small pieces throughout the braid and around your face for maximum texture and softness.
Finishing Touches:
- Use a texturizing spray after pulling the braid apart to help maintain the messy texture.
- Pull a few larger face-framing pieces out before beginning the braid for softness.
- Add small decorative elements like flowers, pins, or beads throughout the braid.
Essential Products for Bohemian Hairstyles
Creating and maintaining beautiful bohemian hairstyles requires the right products to achieve that perfect balance of texture, hold, and natural-looking finish.
Here are the essential categories and what to look for:
Texturizing Products:
- Sea salt spray creates beachy, lived-in texture that’s essential for most boho styles.
- Dry shampoo adds volume at the roots and provides grip for braiding and styling.
- Texturizing powder or dust creates maximum volume and hold for updos and braided styles.
- Look for products that add texture without making hair feel stiff, crunchy, or overly product-heavy.
Heat Protection:
- Heat protectant spray is non-negotiable if you’re using curling irons, flat irons, or other hot tools.
- Choose products that protect up to 450°F and don’t leave residue or weigh hair down.
- Some heat protectants also offer light hold or texture, serving double duty.
Holding Products:
- Flexible-hold hairspray maintains style without stiffness, allowing movement and touch-ups throughout the day.
- Bobby pins in multiple colors (matching your hair color, plus metallics for decorative use) are essential.
- Small clear elastics prevent breakage and are less visible than traditional hair ties.
- Hair pins and decorative clips serve both functional and aesthetic purposes.
Finishing Products:
- Lightweight hair oil or serum tames frizz and adds shine without greasiness (apply sparingly to ends only).
- Anti-frizz or smoothing cream helps control flyaways while maintaining texture.
- Shine spray adds luminosity for special occasions without weighing hair down.
Accessories:
- Ribbons, scarves, and fabric wraps in various colors and patterns for styling versatility.
- Fresh or artificial flowers for that quintessential boho look.
- Decorative pins, jeweled accessories, and hair jewelry to elevate basic styles.
- Headbands, both traditional and braided, offer quick styling solutions.
Tips for Long-Lasting Boho Hairstyles
Creating a beautiful bohemian hairstyle is only half the battle—making it last throughout the day (or even multiple days) requires some strategic techniques and know-how.
Preparation is Key:
- Start with the right base—second or third-day hair often holds styles better than freshly washed hair due to natural oils providing grip.
- If you must start with clean hair, apply texturizing spray or dry shampoo before styling to create hold.
- Protect your hair from heat damage by always using heat protectant products before hot tools.
Securing Techniques:
- Use bobby pins correctly—insert them vertically with the wavy side down for maximum grip and hold.
- Cross two bobby pins in an X formation for extra security on heavy sections or updos.
- Mist bobby pins with hairspray before inserting them for added grip.
- Use small, clear elastics for braids as they’re less likely to snag or break hair while providing strong hold.
Setting Your Style:
- Allow curls and waves to cool completely before touching or styling them—this helps them set properly.
- After creating updos or braids, mist with flexible-hold hairspray and allow to dry before moving around actively.
- For maximum hold, use a stronger hairspray initially, then finish with a lighter, flexible-hold spray for natural movement.
Maintaining Throughout the Day:
- Carry a few extra bobby pins and a small comb or brush for touch-ups.
- Keep a travel-size texturizing or dry shampoo for refreshing and adding volume if styles start to fall.
- Bring small hair elastics for quick adjustments if needed.
- If braids begin to look too neat, gently pull on sections to restore that messy, bohemian appearance.
Making Styles Last Multiple Days:
- Before bed, loosely gather braids or styled hair into a very loose, high bun or wrap in a silk scarf to protect the style.
- Sleep on a silk or satin pillowcase to reduce friction and prevent frizz.
- In the morning, gently shake out or use your fingers to refresh the style.
- Add more texturizing spray or dry shampoo to revive volume and texture on day two or three.
Weather Considerations:
- In humid conditions, use anti-frizz products and stronger-hold hairspray to combat moisture.
- On windy days, consider updos or styles that gather more hair to prevent tangling.
- In dry climates, use hydrating products and avoid excessive heat styling to prevent brittleness and breakage.
Common Mistakes to Avoid
Even experienced hair stylists can fall into certain traps when creating bohemian hairstyles.
Avoiding these common mistakes will help ensure your styles turn out beautifully every time.
Over-Perfecting:
- The biggest mistake is making styles too neat, clean, or symmetrical—bohemian beauty lies in imperfection.
- Don’t be afraid to pull pieces out, create asymmetry, or embrace messiness intentionally.
- If your style looks too polished, it’s missing that essential boho spirit—loosen it up.
Product Overload:
- Using too much product makes hair look greasy, stiff, or weighed down rather than naturally textured.
- Start with small amounts and add more only if needed—you can always add product but removing excess is difficult.
- Focus products on mid-lengths and ends rather than saturating roots, which can appear oily quickly.
Braiding Too Tightly:
- Tight braids look severe and can cause discomfort or even damage to hair and scalp over time.
- Loose braids are not only more comfortable but also create the relaxed, voluminous look that defines boho style.
- If your braid feels tight or pulls on your scalp, it’s too tight—start over with a looser hand.
Ignoring Hair Health:
- Heat styling without protection damages hair over time, making it difficult to achieve those beautiful, healthy-looking boho styles.
- Neglecting regular trims leads to split ends that make braids and styles look messy in the wrong way.
- Skipping deep conditioning treatments results in dry, brittle hair that doesn’t hold styles well or photograph beautifully.
Wrong Products for Your Hair Type:
- Fine hair needs lightweight products that add texture without weighing it down.
- Thick hair requires stronger-hold products and more bobby pins to secure styles properly.
- Curly or textured hair benefits from moisturizing products to prevent frizz while maintaining definition.
Rushing the Process:
- Bohemian hairstyles often require time and patience, especially braided styles that need precision despite their relaxed appearance.
- Rushing through braids results in uneven sections, loose pieces falling out, and styles that don’t last.
- Take your time, especially when learning new techniques—speed will come naturally with practice.
Forgetting Face-Framing:
- Even the most beautiful hairstyle can look harsh without soft pieces around the face and hairline.
- Always pull out a few strategic face-framing pieces before finishing any style.
- These soft pieces create a flattering frame and add to the relaxed, effortless bohemian aesthetic.
Adapting Styles for Different Hair Types
Bohemian hairstyles are wonderfully inclusive and can be adapted to work beautifully on various hair textures, lengths (within the long hair category), and densities.
Understanding how to modify techniques for your specific hair type ensures the best results.
For Fine or Thin Hair:
- Use volumizing products and texturizing sprays generously to create the appearance of fuller, thicker hair.
- Tease roots gently before creating updos or half-up styles to add height and volume.
- Pull braids apart more generously to create width and the illusion of thicker braids.
- Use smaller sections when braiding to create fuller-looking braids despite less hair density.
- Consider extensions or clip-ins for especially voluminous styles if desired.
- Avoid heavy oils or creams that can weigh down fine hair and make it appear limp.
For Thick or Coarse Hair:
- Use strong-hold products and extra bobby pins to secure styles properly.
- Section hair into smaller, more manageable pieces when creating intricate styles.
- Consider using hair elastics with metal clasps for stronger hold on ponytails and buns.
- Blow-dry hair with tension before styling for a smoother, more manageable base.
- Embrace the natural volume and texture—thick hair creates incredibly full, dramatic bohemian styles.
- Use smoothing products on outer layers if frizz is a concern, while maintaining texture underneath.
For Curly or Textured Hair:
- Moisturizing products are essential to prevent frizz and maintain curl definition.
- Work with your natural texture rather than fighting it—curly bohemian styles have incredible dimension and beauty.
- Use curl-defining products before creating waves if you want more uniform texture.
- Braid on slightly damp hair if you want braids to hold better and show more definition.
- Avoid brushing curly hair when dry—use fingers or a wide-tooth comb to prevent frizz.
- Consider protective styling benefits—many bohemian braided styles work as gentle protective styles for natural hair.
For Straight Hair:
- Add texture before styling using braiding, curling, or texturizing products—straight hair can appear too sleek for boho styles.
- Use strong-hold styling products as straight hair can be slippery and harder to secure.
- Create waves or curls as a first step for most bohemian styles to add dimension and movement.
- Tease or backcomb sections to create grip and volume where needed.
- Mist hair with dry shampoo or texturizing spray before braiding for better hold.
For Very Long Hair (Past Waist):
- Extra length requires additional bobby pins and stronger securing techniques for updos.
- Consider the weight of your hair when choosing styles—very long hair can be heavy and pull on scalp.
- Braid your hair before bed regularly to prevent tangling and damage.
- Be patient—styling very long hair takes additional time, but the results are spectacular.
- Show off your length with styles that let it cascade down like side braids and loose wave styles.
Conclusion
Throughout this comprehensive exploration of 26 Trendy Boho Hairstyles for Long Hair for Effortless Vibes, we’ve journeyed through a diverse collection of styles that celebrate the beauty of freedom, creativity, and natural elegance.
From the simplicity of loose bohemian waves to the intricate artistry of waterfall and infinity braids, each style offers its own unique way to express your personal bohemian spirit.
The beauty of these hairstyles lies not just in their aesthetic appeal but in their versatility—they adapt to your skill level, hair type, and the occasion, whether you’re heading to a music festival, attending a wedding, or simply embracing a more carefree approach to your everyday style.
Remember that the essence of bohemian hair styling is found in the imperfections, the loosened braids, the wisps of hair framing your face, and the confidence with which you wear each look.
With the techniques, tips, and inspiration provided here, you now have a complete toolkit to transform your long locks into bohemian masterpieces that reflect your free-spirited nature.
So gather your texturizing spray, bobby pins, and perhaps a few flowers, and start creating beautiful, effortless boho hairstyles that make you feel as radiant and carefree as you truly are.