Braiding your child’s hair doesn’t have to be a morning battle or require professional skills.
Whether you’re preparing for school, a special occasion, or just want to keep those locks neat and stylish, braided hairstyles offer the perfect solution for busy parents and active kids.
This comprehensive guide presents 27 easy braided hairstyles for kids that range from simple three-strand braids to more creative styles that look complicated but are surprisingly simple to master.
You’ll discover classic braids, trendy patterns, protective styles, and fun designs that work for different hair types, lengths, and textures.
Each style includes practical tips to help you create beautiful, long-lasting braids that your child will love to wear, making hair time easier and more enjoyable for everyone.
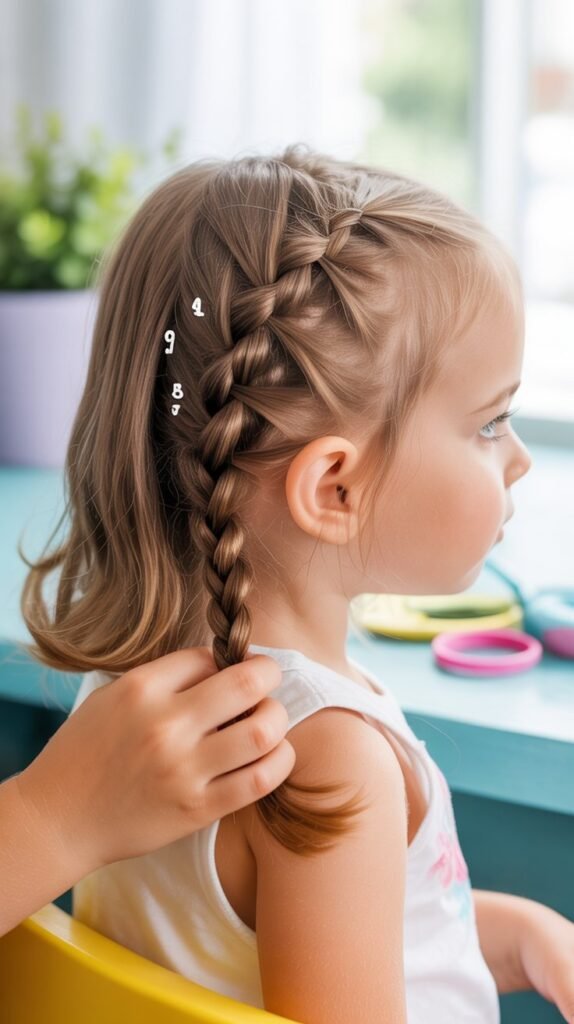
1. Classic Three-Strand Braid
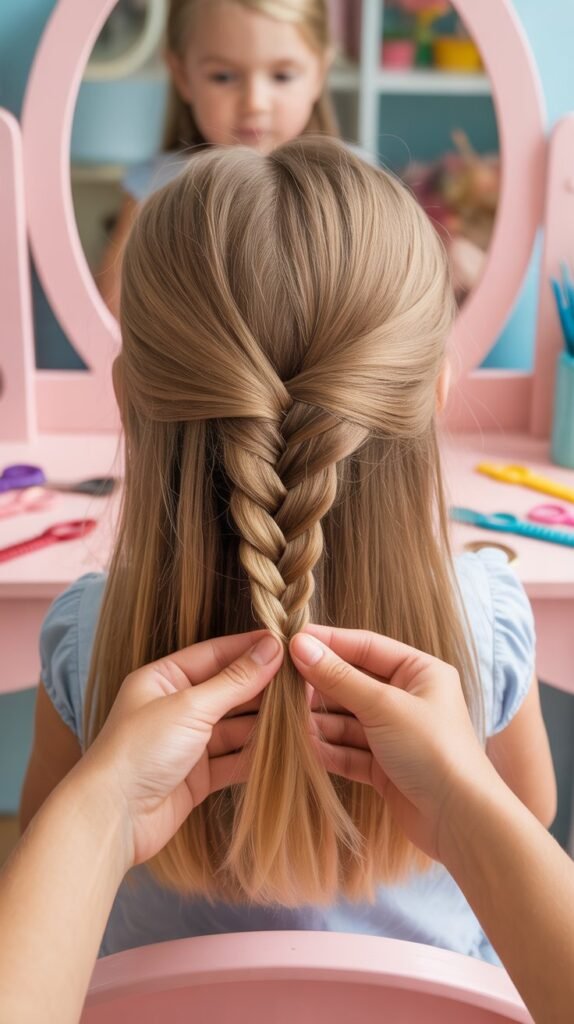
The classic three-strand braid is the foundation of all braiding techniques and the perfect starting point for beginners.
This timeless style works beautifully on all hair types and lengths, taking just minutes to complete while keeping hair secure all day long.
How to Create:
- Brush hair thoroughly to remove all tangles and knots from root to tip.
- Divide the hair into three equal sections at the nape of the neck or desired starting point.
- Cross the right section over the middle section, then cross the left section over the new middle section.
- Continue alternating sides, keeping consistent tension throughout the braid for an even appearance.
- Secure the end with a hair elastic, leaving about an inch of hair at the bottom.
Best For:
- School days when you need a quick, reliable style that stays put.
- All hair types including straight, wavy, curly, and coily textures.
- Beginners who are just learning to braid and want to build confidence.
- Active children who play sports or engage in vigorous activities.
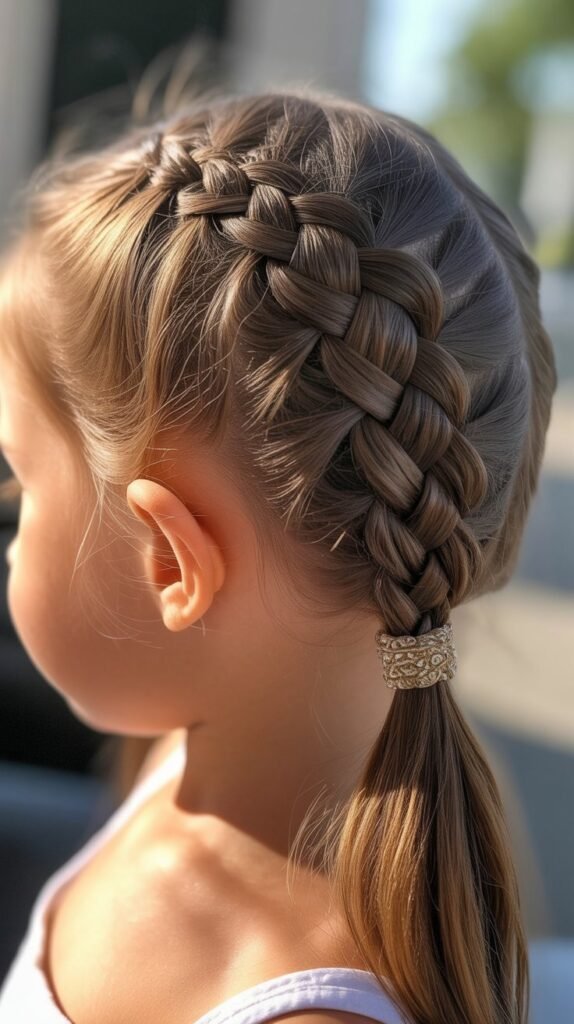
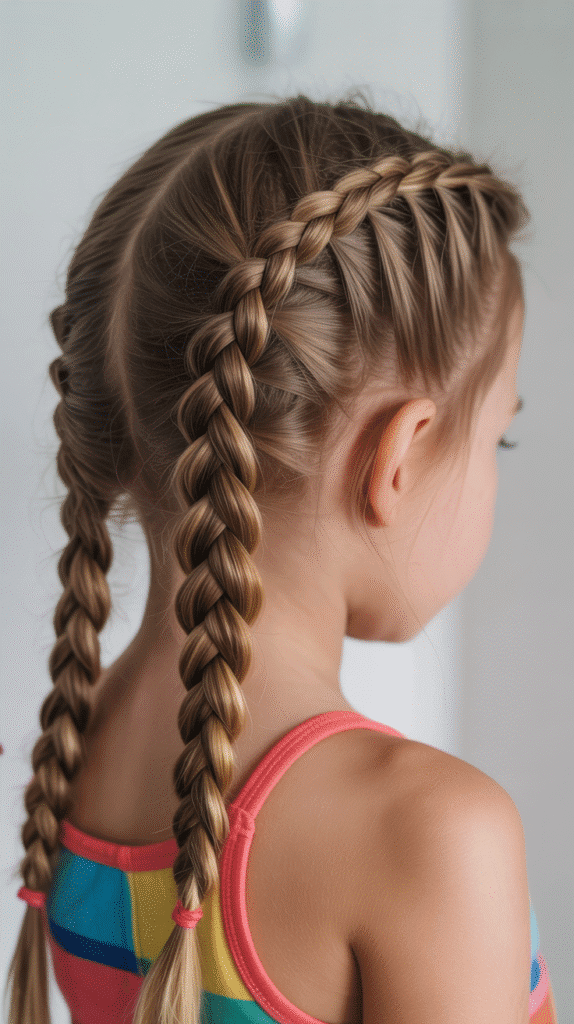
2. Double Dutch Braids
Double Dutch braids, also known as boxer braids, create a sporty and stylish look that keeps hair completely off the face and neck.
These inverted braids sit raised on the scalp, making them more secure than regular braids and perfect for active kids.
How to Create:
- Part hair down the middle from forehead to nape, creating two equal sections.
- Starting on one side near the hairline, take a small section and divide it into three parts.
- Cross the side strands under the middle strand instead of over, adding small sections of hair with each crossing.
- Continue braiding down to the nape, then finish with a regular braid to the ends.
- Repeat the exact same process on the other side, ensuring both braids are symmetrical.
Styling Tips:
- Keep sections even and tension consistent for professional-looking results.
- Spray with water or leave-in conditioner for easier handling of fine or slippery hair.
- These braids typically last 2-3 days with proper nighttime care.
- Secure flyaways with bobby pins or a light hold hairspray designed for children.
3. Side Braid with Ribbon
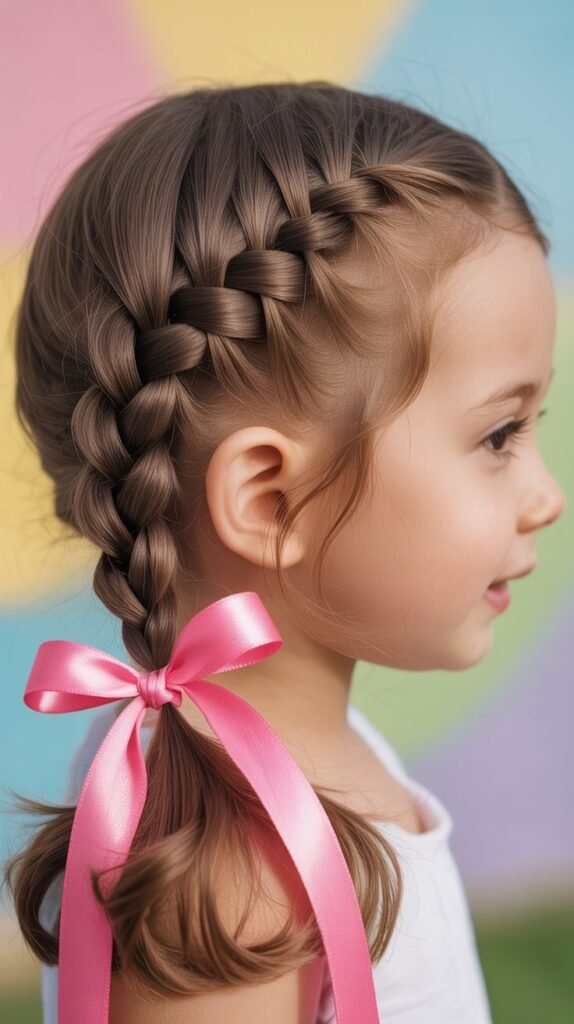
Adding a colorful ribbon transforms a simple side braid into a special occasion hairstyle that kids absolutely love.
This sweet style combines practicality with personality, allowing children to express their favorite colors while keeping hair beautifully managed.
How to Create:
- Brush all hair to one side of the head, over the shoulder.
- Select a ribbon approximately 2-3 times the length of the hair.
- Tie the ribbon around the top section of hair where you’ll begin braiding.
- Incorporate one strand of ribbon with each of the three hair sections as you braid.
- Continue braiding down to the ends, allowing the ribbon to weave through naturally.
- Tie off with the ribbon itself or add a matching elastic for extra security.
Ribbon Selection:
- Choose satin or grosgrain ribbons that won’t fray easily during the day.
- Match ribbons to outfit colors for coordinated looks at parties or photo sessions.
- Consider seasonal colors like pastels for spring or jewel tones for fall.
- Opt for ribbons between ¼ inch and ½ inch wide for the best visual balance.
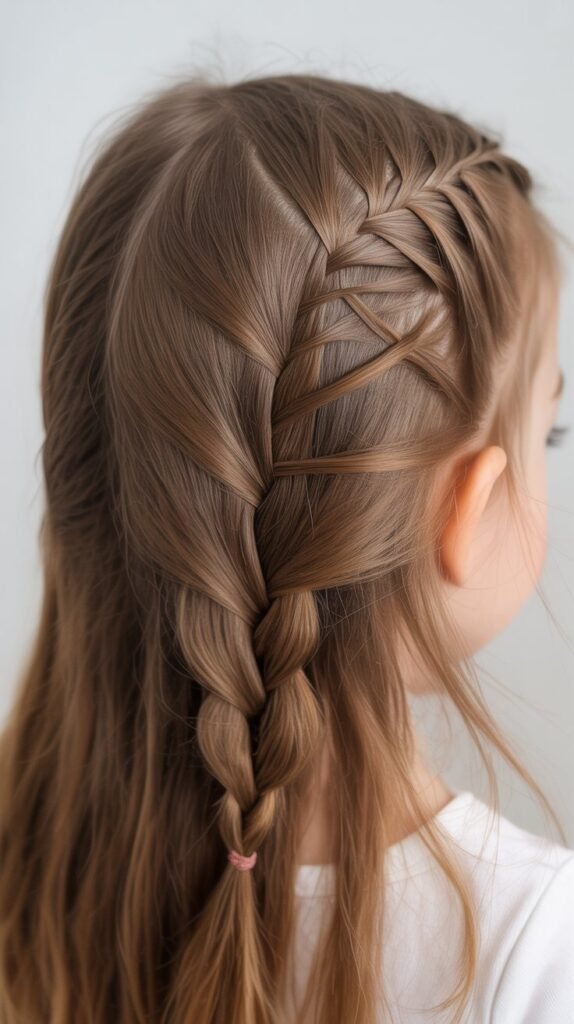
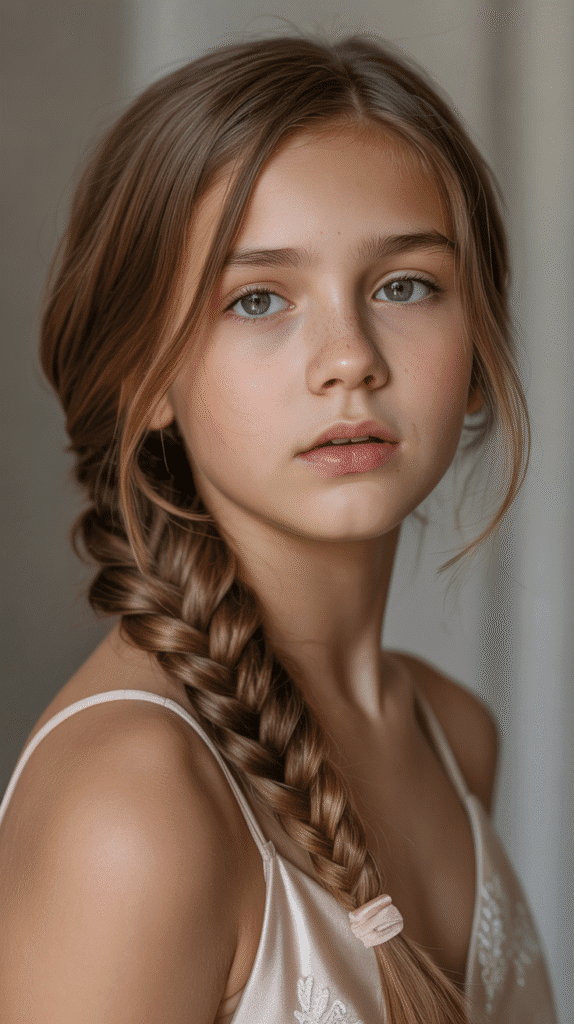
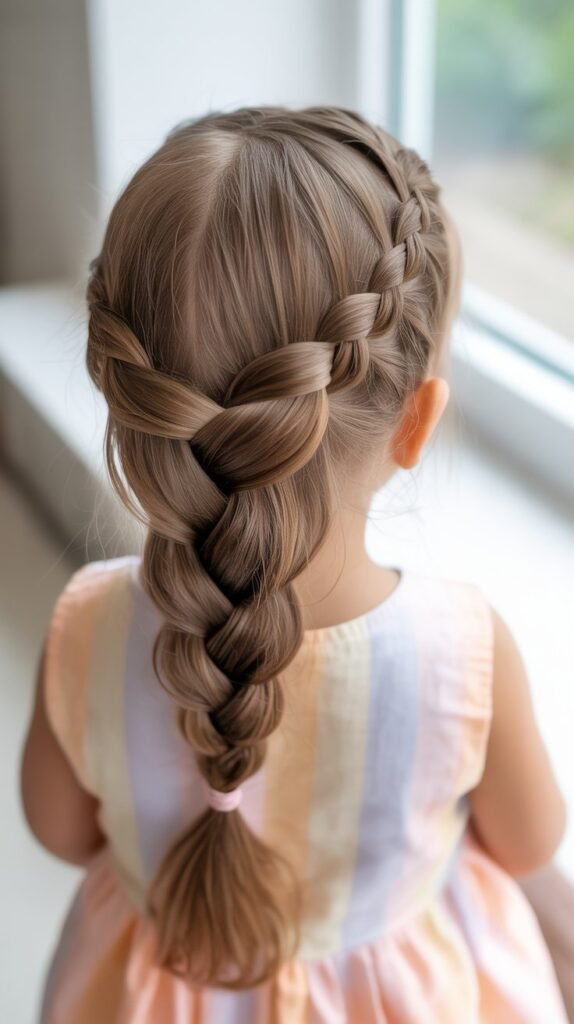
4. Fishtail Braid
The fishtail braid looks intricate and impressive but uses a simple two-section technique that’s easier than traditional three-strand braiding.
This textured style creates a beautiful herringbone pattern that works wonderfully for both casual and dressy occasions.
How to Create:
- Divide all hair into two large equal sections instead of three.
- Take a thin strand from the outer edge of the left section and cross it over to join the right section.
- Take a thin strand from the outer edge of the right section and cross it over to join the left section.
- Continue alternating sides, keeping the strands thin for a more defined pattern.
- Secure at the bottom with an elastic, then gently pull apart the braid sections for a fuller appearance.
Pro Tips:
- Thinner strands create a more intricate pattern while thicker strands work faster for busy mornings.
- This style works best on hair that’s at least shoulder length or longer.
- Slightly dirty or day-old hair holds the fishtail pattern better than freshly washed hair.
- Practice on yourself or a doll first to master the alternating pattern rhythm.
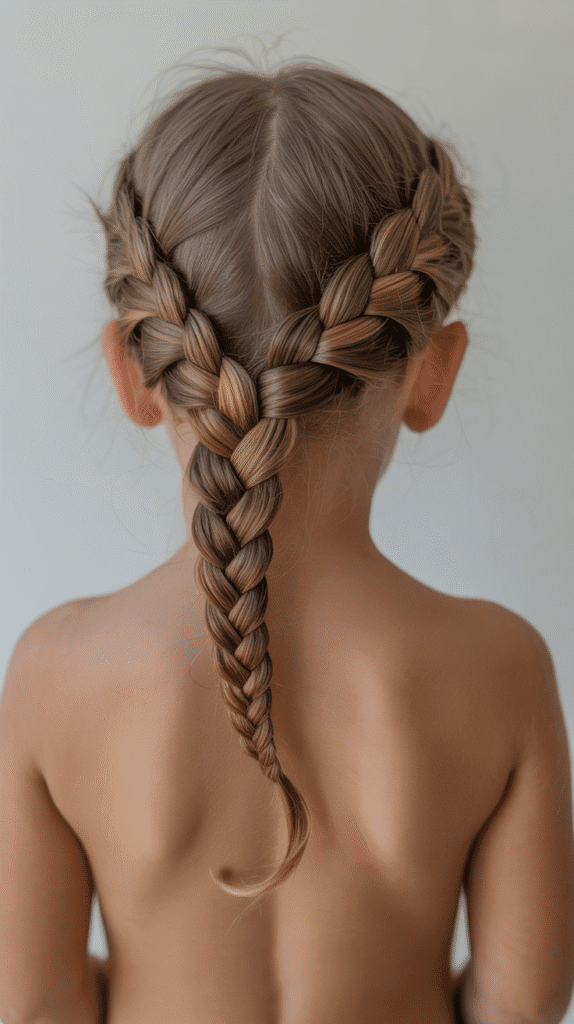
5. Crown Braid
The crown braid creates a regal halo effect around the head, perfect for flower girls, special celebrations, or when you want your child to feel like royalty.
This elegant updo keeps all hair secured while maintaining a soft, romantic appearance.
How to Create:
- Part hair down the middle and create two low pigtails at the nape of the neck.
- Braid each pigtail using a standard three-strand technique all the way to the ends.
- Lift the right braid up and across the top of the head like a headband, securing with bobby pins.
- Bring the left braid up and across the top, tucking the end under the first braid and securing well.
- Hide all elastic bands and ends under the braids for a seamless finish.
Enhancement Ideas:
- Weave small flowers or decorative pins throughout the crown for special occasions.
- This style works beautifully for weddings, birthdays, and holiday celebrations.
- Use clear elastic bands that disappear against any hair color.
- Consider using a texturizing spray before braiding for better grip and hold.
6. Waterfall Braid
The waterfall braid creates a cascading effect where sections of hair appear to flow through the braid like a waterfall.
This stunning half-up style looks complicated but follows a simple pattern of dropping and adding sections.
How to Create:
- Begin with a small three-strand braid near the temple on one side of the head.
- After the first stitch, drop the bottom strand and let it fall, replacing it with a new section from above.
- Continue across the head, dropping the bottom strand each time and picking up new hair from the top.
- The dropped sections create the “waterfall” effect as they cascade down with the rest of the hair.
- Secure the braid behind the ear with bobby pins or continue to the other side.
Styling Notes:
- This style works best on wavy or curled hair to showcase the waterfall effect.
- You can create one waterfall braid on each side for a symmetrical look.
- Add small clips or flowers where the braid ends for decorative touches.
- Practice the drop-and-add rhythm slowly at first until it becomes natural.
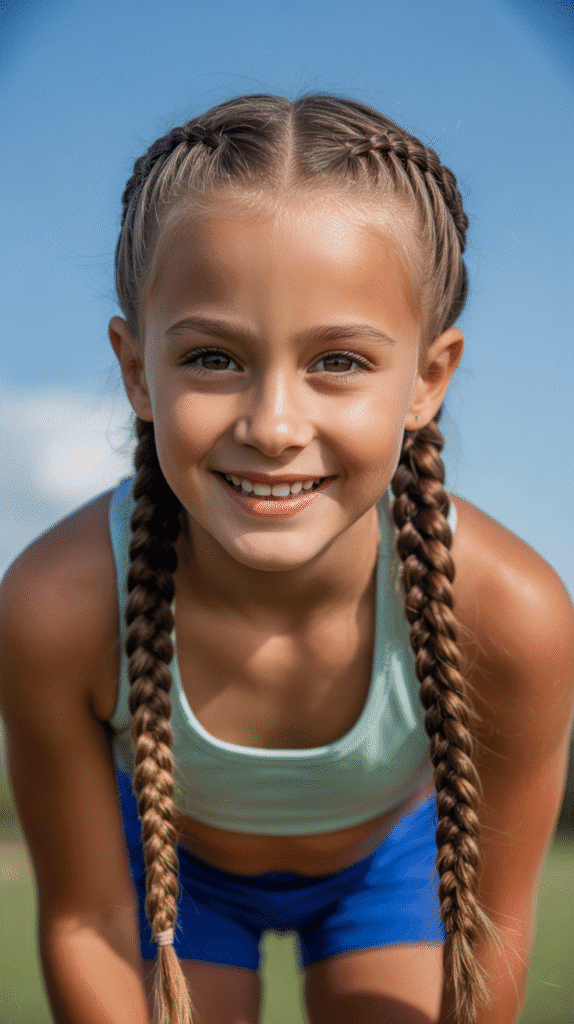
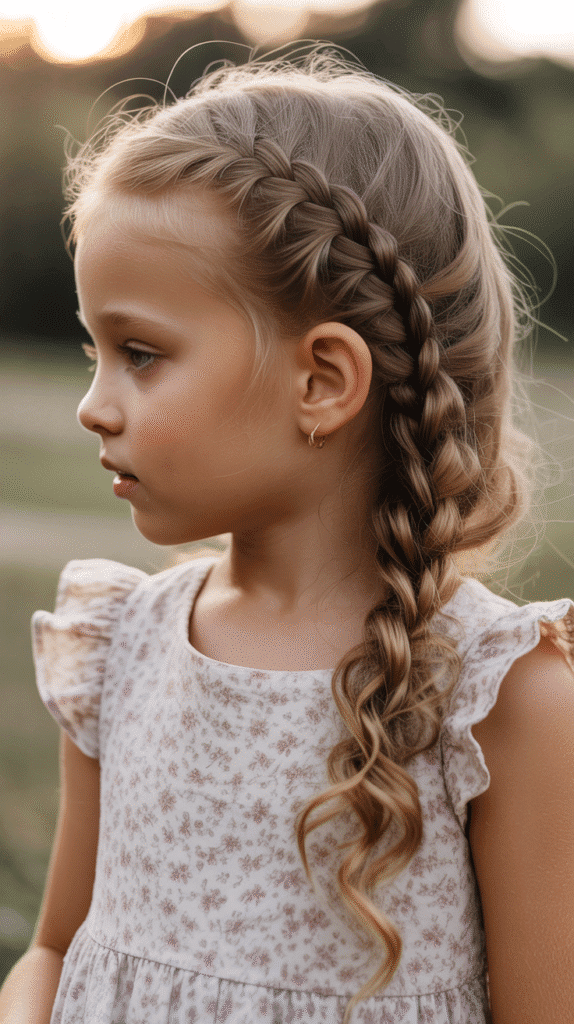
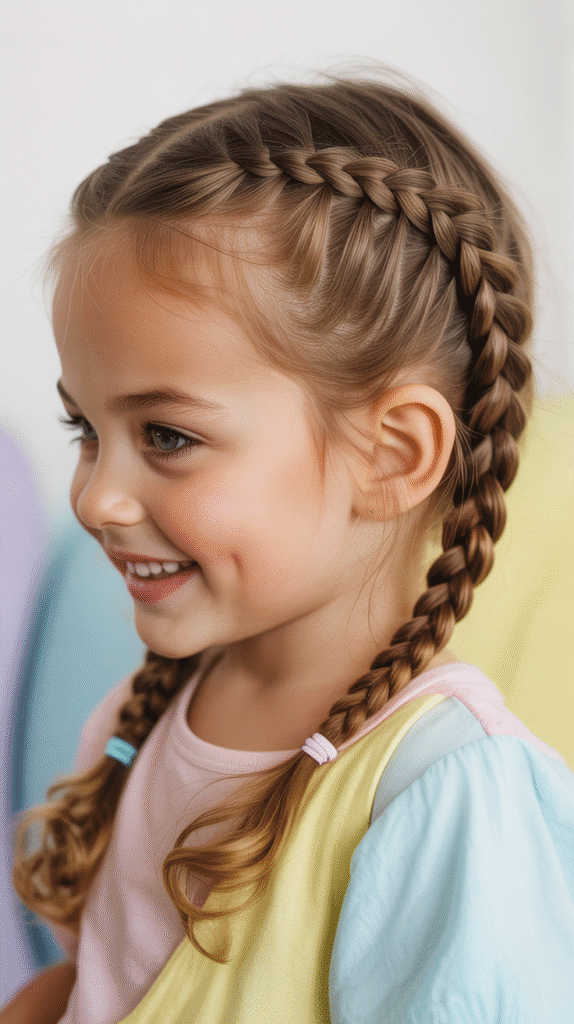
7. French Braid Pigtails

French braid pigtails combine the security of braids that start at the scalp with the youthful charm of pigtails.
This style keeps hair completely controlled from root to tip, making it ideal for younger children and very active days.
How to Create:
- Create a clean center part from the forehead straight back to the nape.
- Starting at the hairline on one side, take a section and divide into three parts.
- Begin a French braid by crossing outer sections over the middle while adding small amounts of hair with each stitch.
- Continue braiding down toward the ear and then straight down, adding all loose hair before finishing as a regular braid.
- Repeat on the other side, ensuring both braids start at the same height for symmetry.
Best Practices:
- Keep sections equal in size as you add hair for a uniform appearance.
- Angle the braids slightly back rather than straight down for a more flattering look.
- These braids work wonderfully for school, sports, and sleep to prevent tangles.
- Finish with colorful hair ties that match your child’s personality or outfit.
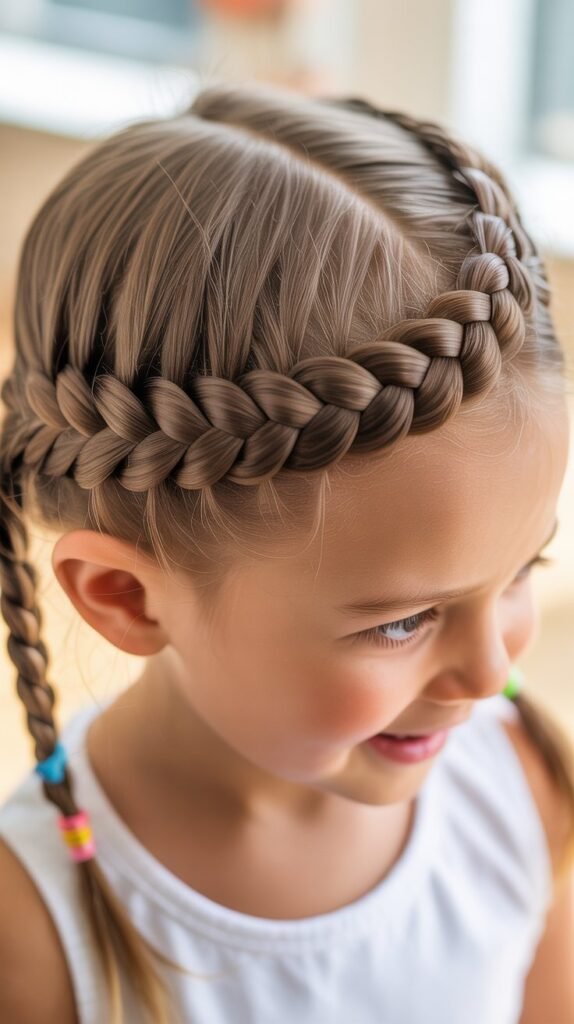
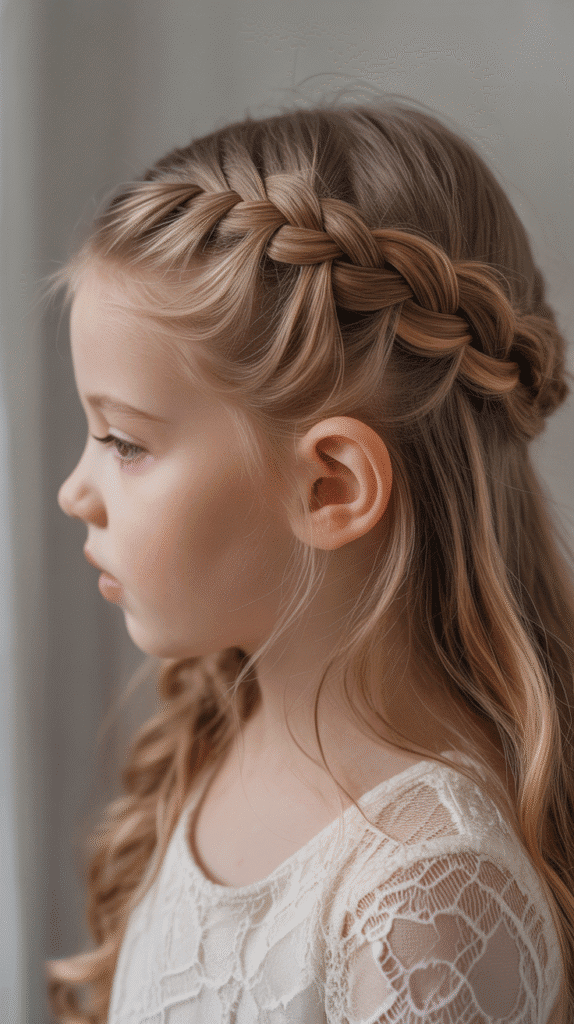
8. Braided Headband
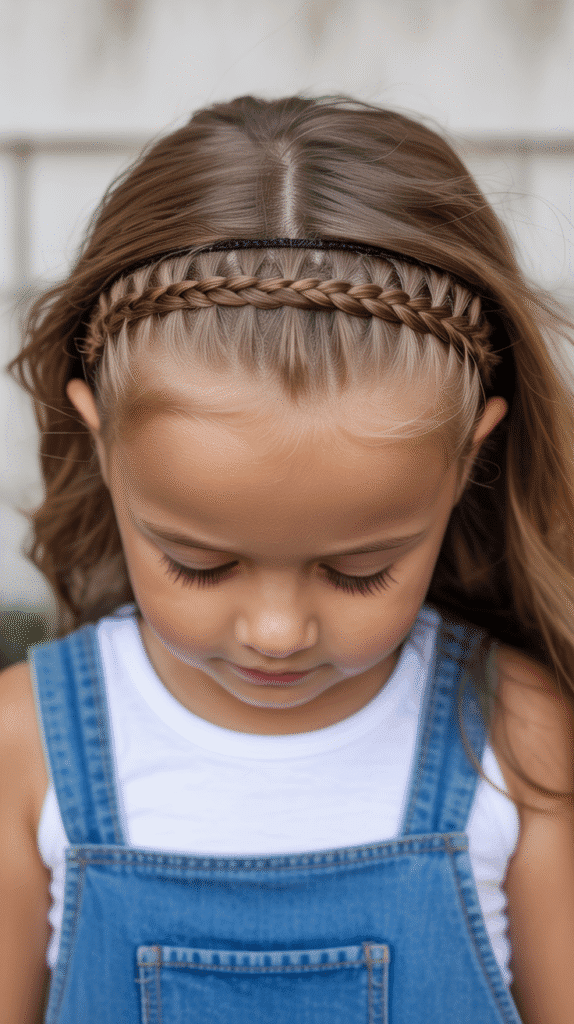
The braided headband style uses a thin braid across the hairline to create a natural headband effect while leaving the rest of the hair down.
This versatile look works for any occasion and helps keep bangs and face-framing pieces secured.
How to Create:
- Section off a horizontal strip of hair from ear to ear across the front hairline, about one inch deep.
- Create a standard three-strand or Dutch braid along this section from one side to the other.
- Secure the end behind the ear with bobby pins or a small elastic.
- Leave the rest of the hair down or style it in loose waves for added texture.
- You can also bring the braid all the way around the head for a full halo effect.
Variations:
- Create a thicker braid for a more prominent headband statement.
- Add two or three thin parallel braids for a stacked headband look.
- Incorporate small beads or clips along the braid for decorative flair.
- This style helps keep growing-out bangs away from the face during the awkward stage.
9. Twist Braids
Twist braids, also known as rope braids, use a two-strand twisting technique instead of traditional braiding.
This quick method creates a spiral effect that’s easier for beginners and faster to complete than standard braids.
How to Create:
- Divide hair into two equal sections instead of three.
- Twist each section clockwise (or counterclockwise, but be consistent) multiple times until tight.
- Then wrap both twisted sections around each other in the opposite direction (counterclockwise if you twisted clockwise).
- The opposing twist directions create tension that keeps the braid secure without unraveling.
- Continue to the ends and secure with an elastic band.
Advantages:
- This technique is often easier for people who struggle with traditional braiding coordination.
- Twist braids work exceptionally well on thick or textured hair.
- The style takes significantly less time than three-strand braiding.
- You can create double twist braids for a pigtail look that’s quick for rushed mornings.
10. Zigzag Braid
The zigzag braid creates visual interest by changing direction multiple times down the back of the head.
This playful style turns a simple French braid into something special and unique that kids love to show off.
How to Create:
- Start a French braid on one side of the head near the temple.
- Braid diagonally across toward the opposite ear, adding hair as you go.
- When you reach the other side, change direction and braid back across diagonally.
- Continue zigzagging back and forth down the head until all hair is incorporated.
- Finish with a regular braid to the ends and secure with an elastic.
Creative Tips:
- Make sharp angles for a dramatic zigzag or gentle curves for a softer wave pattern.
- This style works best when you can see the back, so perfect for updos and ponytails.
- Use a rat-tail comb to create clean sections as you change direction.
- The zigzag technique can also be applied to Dutch braids for a more raised effect.
11. Bubble Braid Ponytail
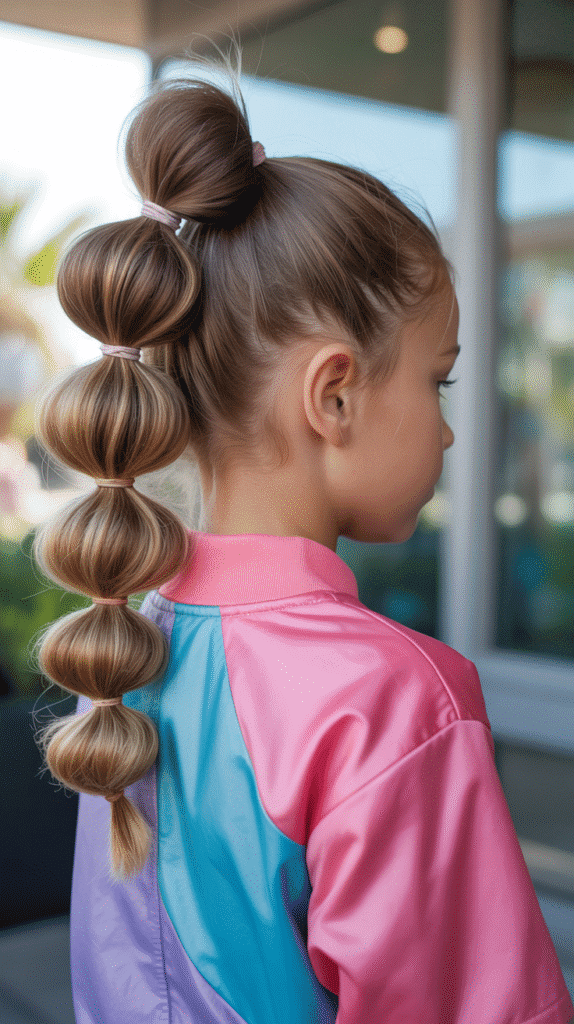
Bubble braids create a fun, segmented look using strategically placed elastics down a ponytail.
This trendy style requires no actual braiding skills but delivers an impressive, voluminous result that kids think is incredibly cool.
How to Create:
- Gather hair into a high, medium, or low ponytail depending on preference.
- Place elastic bands down the length of the ponytail at regular intervals, about 2-3 inches apart.
- Gently pull and pancake each section between the elastics to create volume and the bubble effect.
- Continue down the entire length of the ponytail, adjusting bubbles to be equal in size.
- You can use clear elastics for a seamless look or colorful ones for added fun.
Enhancement Options:
- Wrap small sections of hair around each elastic to hide them for a more polished appearance.
- Add ribbons, beads, or decorative elastics between bubbles for extra personality.
- This style works on all hair lengths and types, even relatively short ponytails.
- Bubble braids stay secure for active play and typically last all day without adjustment.
12. Heart-Shaped Braid
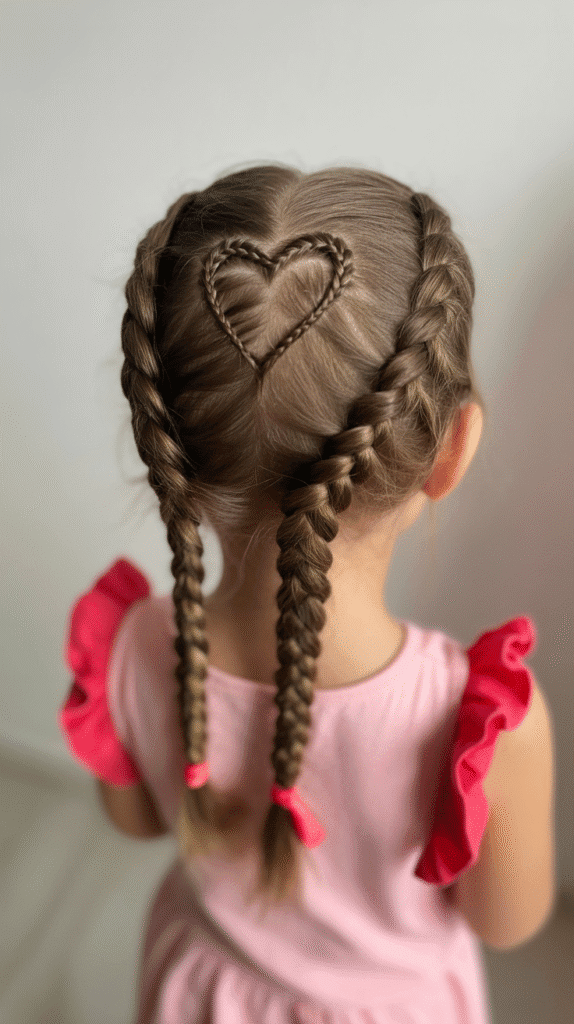
The heart-shaped braid creates an adorable heart outline on the back of the head using two Dutch braids that curve and join together.
This Valentine’s Day favorite works wonderfully for any day your child wants to spread love and cuteness.
How to Create:
- Part hair down the middle from the forehead to the crown of the head.
- Create two Dutch braids that start at the hairline and curve outward to form the top curves of a heart.
- As you reach the widest part of the head, angle both braids back inward so they meet at the center.
- Join both braids together at the point where they meet and continue as one braid down.
- The two curved braids form the top of the heart while the joined braid forms the point.
Special Occasion Styling:
- This style is perfect for Valentine’s Day, birthdays, or photo sessions.
- Use red or pink ribbons woven through the braids to emphasize the heart theme.
- You can create the heart higher on the head or lower near the nape depending on hair length.
- Practice the curved shape several times to perfect the heart outline.
13. Side-Swept Fishtail
A side-swept fishtail combines the elegant texture of a fishtail braid with a romantic over-the-shoulder placement.
This sophisticated style works beautifully for older kids and special occasions while remaining comfortable for all-day wear.
How to Create:
- Brush all hair smoothly to one side, bringing it over the shoulder.
- Divide the hair into two equal sections as you would for a standard fishtail.
- Take thin pieces from the outer edges and cross them over to the opposite section alternately.
- Continue the fishtail pattern all the way down to the ends of the hair.
- Gently pull apart the braid sections to create a fuller, more romantic appearance.
- Secure with a clear elastic or decorative hair tie that complements the outfit.
Styling Enhancements:
- Curl or wave hair before braiding for added texture and dimension.
- This style complements formal dresses for parties, recitals, or holiday gatherings.
- Leave out face-framing pieces at the front for a softer, more romantic effect.
- A light hairspray helps control flyaways while maintaining the braid’s soft texture.
14. Four-Strand Braid
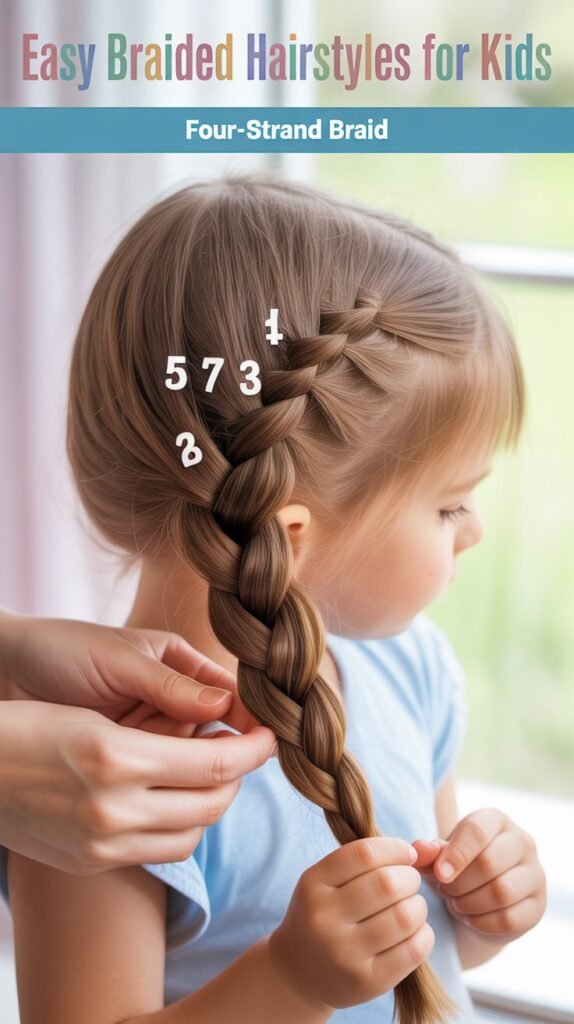
The four-strand braid creates a wider, more complex-looking pattern than traditional three-strand braids.
While it seems intimidating at first, following a consistent over-under pattern makes this impressive style achievable with a bit of practice.
How to Create:
- Divide hair into four equal sections, numbering them 1, 2, 3, and 4 from left to right in your mind.
- Cross section 1 under section 2, then over section 3 (it should now be in the third position).
- Cross section 4 under the section that’s now in position 3, then over the section in position 2.
- Repeat this pattern: outermost left strand goes under then over; outermost right strand goes under then over.
- Continue to the ends, maintaining even tension for a uniform braid pattern.
Learning Tips:
- Practice with four different colored ribbons first to learn the pattern without dealing with hair.
- This braid works best on longer hair, at least past the shoulders.
- Once you master the rhythm, this braid becomes just as quick as a regular braid.
- The four-strand technique creates a significantly thicker appearance than standard braids.
15. Braided Top Knot
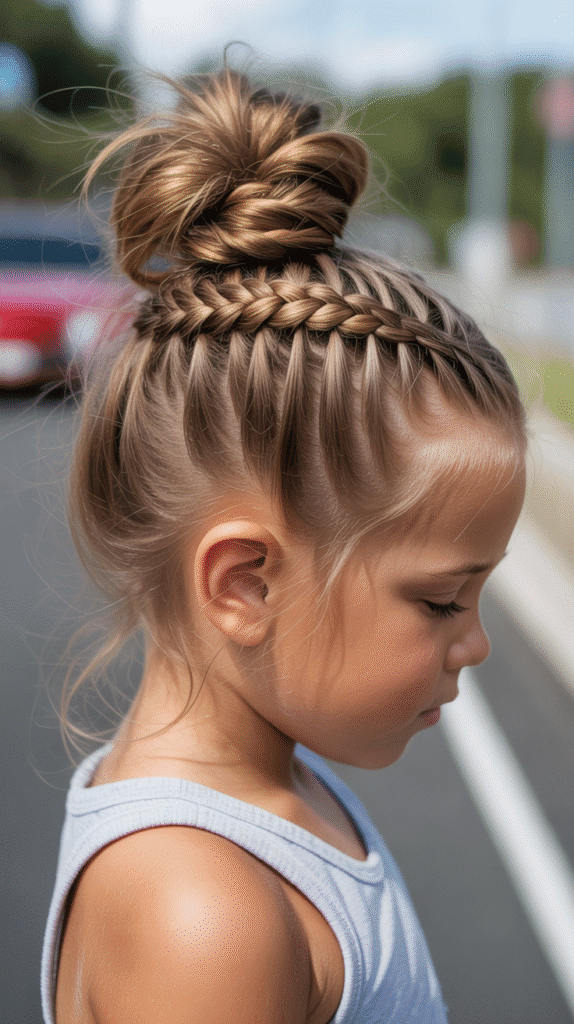
The braided top knot combines a braid leading into a messy bun at the crown of the head.
This trendy style keeps hair completely up and out of the way while looking stylish and age-appropriate for kids and teens alike.
How to Create:
- Flip the head forward and begin a Dutch or French braid starting at the nape of the neck.
- Braid upward toward the crown of the head, adding hair from both sides as you go.
- When you reach the crown, secure the braid with an elastic to create a high ponytail.
- Twist the remaining length of the ponytail and wrap it around the base to form a bun.
- Secure the bun with bobby pins and pull out a few small pieces for a relaxed, messy finish.
Style Variations:
- Create a neat, tight bun for dance class or formal events.
- Make a bigger, messier bun for a casual, bohemian look.
- This style is perfect for sports, swimming, or any activity requiring secure hair.
- You can create two braided top knots (space buns) for a playful double-bun look.
16. Ladder Braid
The ladder braid creates a unique appearance where thin sections appear to weave through a main braid like rungs on a ladder.
This eye-catching style looks complicated but uses a simple technique of pulling through saved sections at regular intervals.
How to Create:
- Create a regular three-strand braid down the length of hair.
- Before you begin braiding, separate and clip aside thin horizontal sections at regular intervals down the head.
- As you braid, thread the saved sections through the braid from side to side at their corresponding levels.
- The horizontal sections create the appearance of ladder rungs crossing through the vertical braid.
- Secure at the bottom and gently adjust the woven sections so they’re evenly spaced and visible.
Advanced Techniques:
- Use a topsy tail tool or bobby pin to help thread sections through more easily.
- This style requires more time and patience but creates an impressive, unique result.
- The ladder braid works best on straight or slightly wavy hair where the pattern shows clearly.
- Consider using this for special occasions when you have extra time for styling.
17. Braided Mohawk

The braided mohawk creates an edgy, fun look by Dutch braiding a center strip of hair while leaving the sides smooth or pulled back.
This bold style appeals to kids who want something different and works surprisingly well for both casual and dressy occasions.
How to Create:
- Section off a wide strip of hair from the forehead to the nape along the center of the head, about 2-3 inches wide.
- Smooth the hair on both sides of this section back toward the ears and secure or leave slicked.
- Create a Dutch braid along the center section, starting at the forehead and braiding back.
- Keep the braid tight and raised by crossing sections under rather than over.
- The raised braid creates the mohawk appearance down the center of the head.
Styling Options:
- Create multiple small braids in the center section instead of one large braid for a more intricate mohawk.
- Use gel or mousse on the side sections for a sleek, polished appearance.
- This style works wonderfully for sports, as everything stays secure during activity.
- Add temporary hair chalk or colored spray to the braided section for special events.
18. Pull-Through Braid
The pull-through braid creates the appearance of a complex braid using only ponytails and no actual braiding.
This illusion style is perfect for parents who struggle with braiding but want to achieve an impressive, voluminous look.
How to Create:
- Create a ponytail at the crown and secure it with a clear elastic.
- Create a second ponytail directly below the first one, leaving about 2 inches of space.
- Split the first ponytail in half and bring both halves around and behind the second ponytail.
- Create a third ponytail that incorporates the two halves from the first ponytail with new hair below.
- Continue this pattern down the head: split, pull around, combine with new hair, secure.
- Gently pull apart each section to create volume and the braided appearance.
Advantages:
- No braiding skills required, just the ability to make ponytails.
- This technique creates significantly more volume than traditional braids.
- The style looks intricate and impressive despite being technically simple.
- Works beautifully for fine or thin hair that needs extra body and presence.
19. Infinity Braid
The infinity braid creates a figure-eight pattern within the braid, producing a unique infinity symbol design.
This creative style is perfect for kids who love mathematical concepts or want something truly different from standard braiding patterns.
How to Create:
- Divide hair into two sections as you would for a rope twist.
- Take a small piece from the top of the left section and pass it under the left section, then over the right section.
- Take a small piece from the top of the right section and pass it under the right section, then over the left section.
- The continuous under-then-over motion from alternating sides creates the infinity pattern.
- Continue down the length of hair, maintaining consistent tension and section sizes.
Practice Tips:
- This braid requires patience to learn but becomes intuitive with practice.
- Watch video tutorials alongside written instructions for better understanding of the motion pattern.
- The infinity symbol becomes more visible when you gently pull apart the finished braid.
- This unique style is perfect for kids who want to stand out with creative hairstyles.
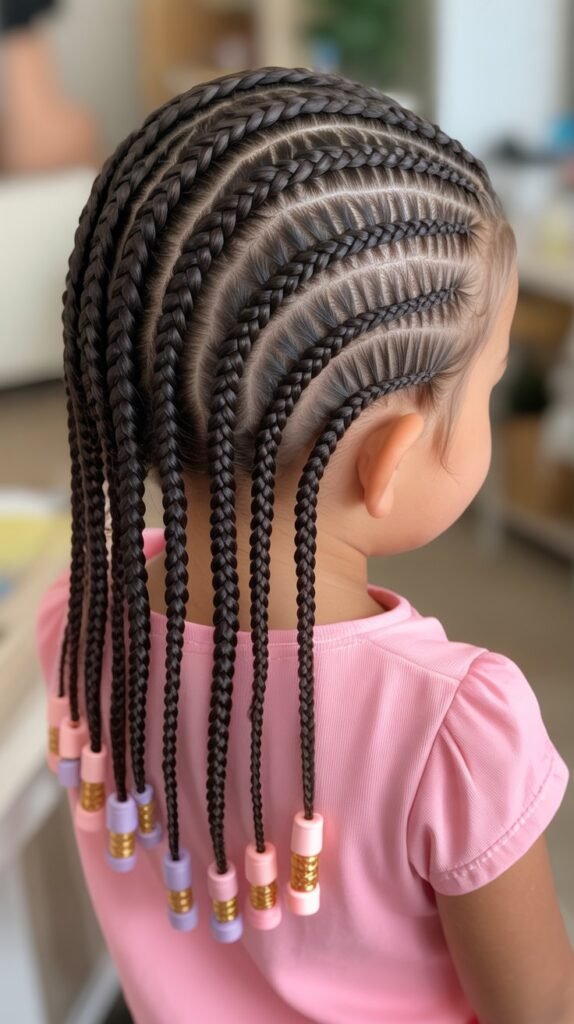
20. Cornrow Braids
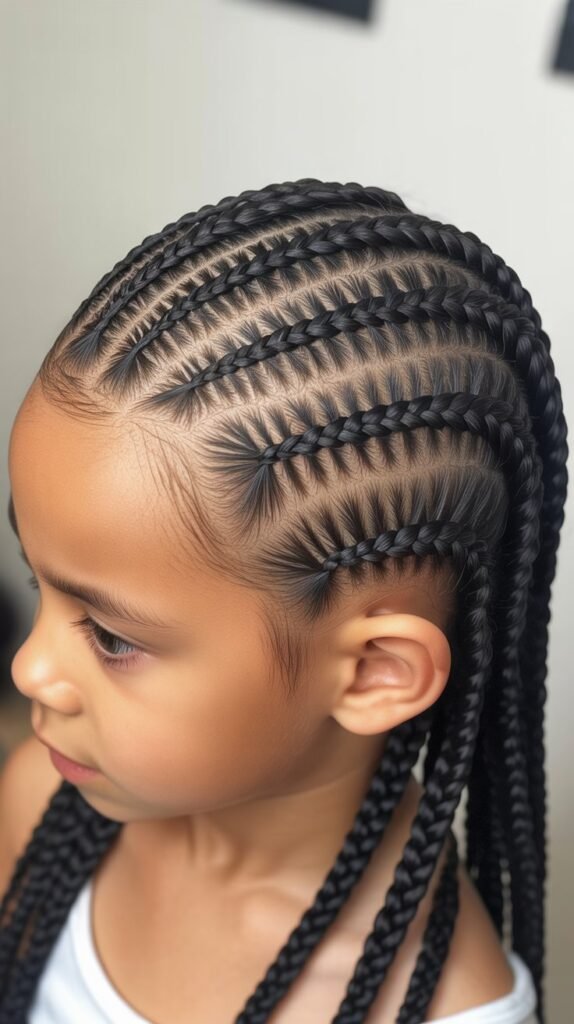
Cornrow braids are tight, close-to-the-scalp braids that create beautiful patterns and provide excellent protection for textured hair.
These braids can last for weeks with proper care, making them ideal for low-maintenance styling and hair health.
How to Create:
- Section hair into the desired pattern using a rat-tail comb, creating clean, straight parts.
- Apply a light oil or edge control to each section for easier braiding and a neat appearance.
- Take a small section at the hairline and divide it into three parts.
- Braid using the underhand technique (Dutch braid method) to keep the braid flat against the scalp.
- Continue adding small amounts of hair with each stitch until you reach the end of the section.
- Repeat for each sectioned row, ensuring consistent sizing and tension across all braids.
Care and Maintenance:
- Cornrows typically last 2-6 weeks depending on hair texture and growth rate.
- Protect braids at night with a silk or satin bonnet or pillowcase to prevent frizz.
- Keep the scalp moisturized by applying light oil along the parts every few days.
- This protective style helps retain length and minimize daily hair manipulation for healthier growth.
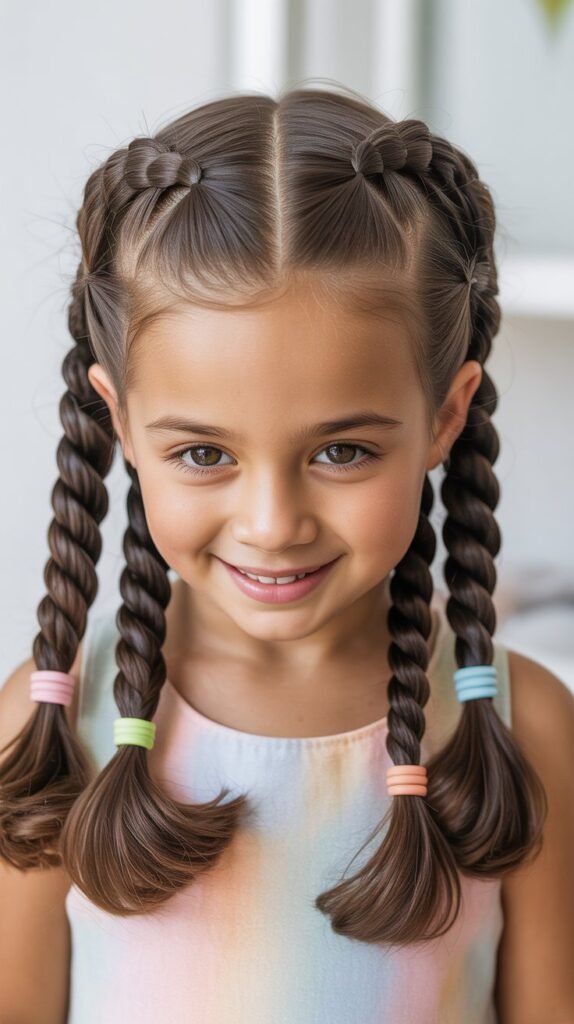
21. Braided Pigtails with Bows
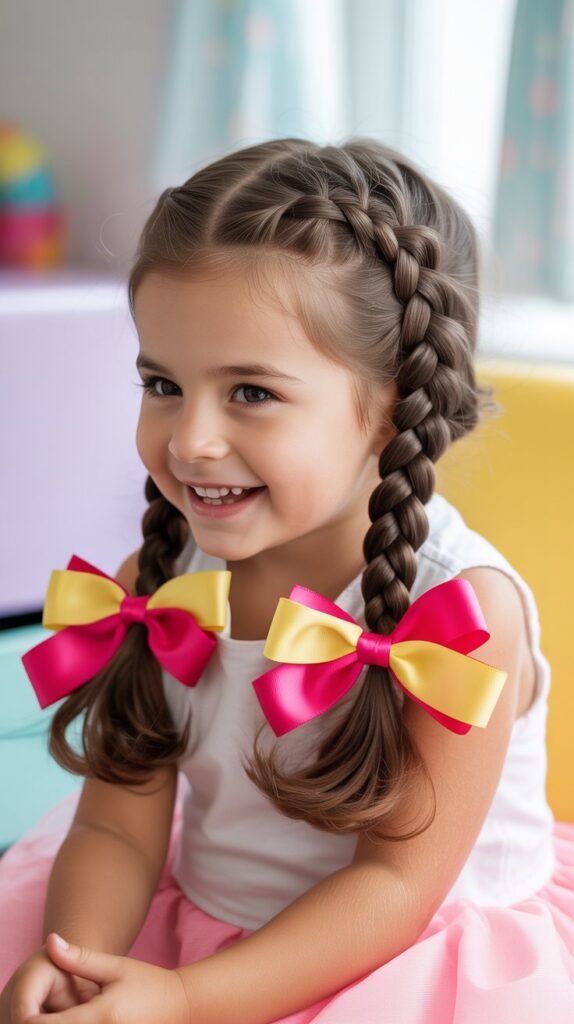
Classic pigtail braids become extra special when finished with large, colorful bows.
This sweet, youthful style is perfect for younger children and never goes out of fashion for school photos, holidays, and everyday cuteness.
How to Create:
- Part hair down the center from forehead to nape, creating two equal sections.
- Gather each section into a ponytail positioned at ear level or slightly higher.
- Braid each ponytail using a standard three-strand technique down to the ends.
- Secure each braid with a small elastic, then add large decorative bows on top.
- Ensure both braids are positioned at the same height for a balanced appearance.
Bow Selection:
- Choose bows in sizes proportionate to your child’s head and hair volume.
- Match bow colors to outfits for coordinated looks at special events.
- Grosgrain ribbon bows hold their shape better throughout the day than satin.
- Attach bows with alligator clips for easy removal or secure them directly over the elastics.
22. Snake Braid
The snake braid creates a winding, serpentine effect as it curves back and forth down the back of the head.
This creative style uses strategic direction changes to form a distinctive S-shaped pattern that kids find fascinating.
How to Create:
- Start a French or Dutch braid on one side of the head near the temple.
- Braid straight down for a few stitches, then gradually angle the braid toward the opposite side.
- When you’ve reached the middle of the head, begin angling back toward the original side.
- Continue curving the braid back and forth in an S-shape down the length of the head.
- The result should resemble a snake slithering down the back in smooth curves.
Technique Notes:
- Plan your curves before you start so the snake shape fits proportionally down the head.
- This braid requires more time than straight braids but creates impressive visual interest.
- Use a mirror to check your progress and ensure the curves are smooth and intentional.
- The snake braid works best on longer hair that provides enough length for multiple curves.
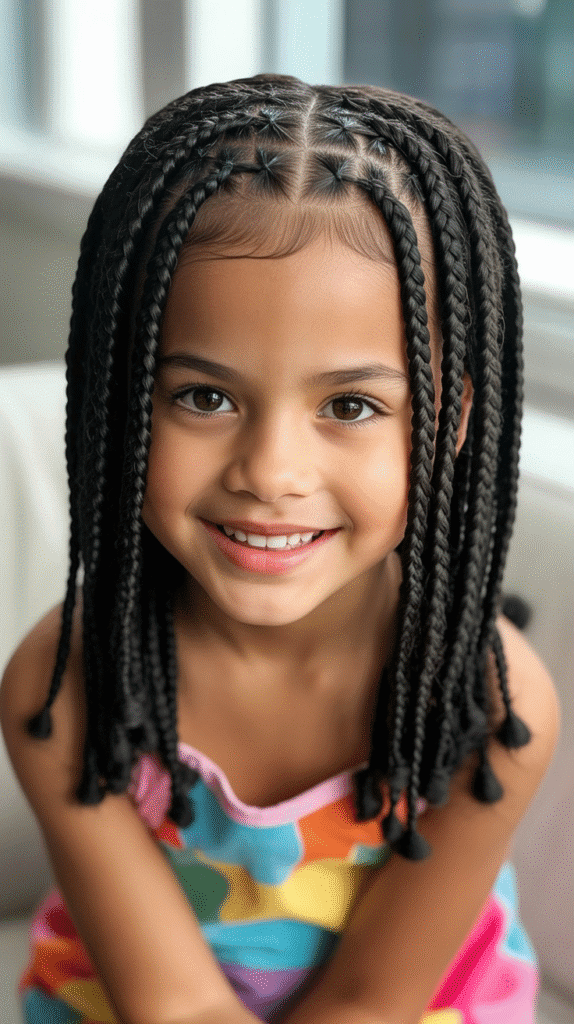
23. Micro Braids
Micro braids are very small, numerous braids that create texture and versatility while serving as a protective style.
Though time-intensive to install, these tiny braids can last several weeks and offer countless styling options once completed.
How to Create:
- Section hair into very small, uniform squares across the entire head using a rat-tail comb.
- Take one section at a time and create a tight three-strand braid from root to tip.
- Each braid should be approximately pencil-width or thinner for true micro braids.
- Continue across the entire head until all hair is braided into individual small braids.
- Seal the ends by dipping them in hot water (for synthetic extensions) or using small elastics (for natural hair).
Benefits and Styling:
- Micro braids protect natural hair from daily manipulation and environmental damage.
- Once installed, these braids can be styled into ponytails, buns, and other updos easily.
- The installation process takes several hours, so plan accordingly with breaks for comfort.
- This style works exceptionally well for children with active lifestyles or those growing out their hair.
24. Y-Braid Design
The Y-braid creates a distinctive Y-shape on the back of the head using three braids that start separately and converge into one.
This geometric design adds visual interest and works wonderfully for kids who love unique, attention-getting hairstyles.
How to Create:
- Section hair into three parts: one on top center starting at the crown, and one on each side near the temples.
- Create a French or Dutch braid with each section, braiding downward toward a predetermined meeting point.
- When all three braids reach the same level (typically at the nape), join them together.
- Continue braiding all three braids as one single braid down to the ends.
- The three separate braids forming the arms of the Y and joining together create the distinctive shape.
Design Variations:
- Adjust where the three braids meet to change the proportions of the Y-shape.
- You can use different braid types for each arm to add variety to the design.
- This style works particularly well when viewed from behind, perfect for recitals or performances.
- Consider using different colored elastics at the junction point to emphasize the Y-shape.
25. Lace Braid
The lace braid is a delicate, romantic style where hair is added to only one side of the braid rather than both.
This creates a beautiful lace-like appearance that follows the hairline or curves around the head like decorative trim.
How to Create:
- Start with a small section of hair near the temple or along the desired path.
- Begin a standard three-strand braid with the initial section.
- As you continue braiding, add small sections of hair only to the top strand (the strand closest to the hairline).
- Do not add hair to the bottom strand, which creates the characteristic lace appearance.
- Continue following the hairline or desired curve, maintaining the one-sided adding technique.
Best Uses:
- Lace braids work beautifully as decorative elements along the hairline or part.
- This delicate style is perfect for weddings, recitals, or special photographs.
- You can create multiple lace braids in parallel for a more intricate look.
- The lace braid pairs wonderfully with other styles like half-up hairstyles or low buns.
26. Box Braids
Box braids are individual plaits sectioned in square-shaped patterns across the entire head.
This classic protective style can incorporate synthetic hair for added length and thickness, lasting several weeks with proper maintenance.
How to Create:
- Part hair into square or rectangular sections across the entire head using a rat-tail comb.
- Each section should be approximately the same size for uniformity, typically 1
How to Create (continued):
- Each section should be approximately the same size for uniformity, typically 1-inch squares.
- If using extensions, fold the synthetic hair in half and place it at the root of the natural hair section.
- Divide the combined hair into three parts and braid from root to tip using a standard three-strand technique.
- Continue across the entire head until all sections are braided into individual plaits.
- Seal the ends by dipping them briefly in hot water for synthetic hair or using small elastics for natural hair only.
Maintenance and Care:
- Box braids typically last 4-8 weeks depending on hair growth and care routine.
- Cleanse the scalp weekly with diluted shampoo applied directly to the roots using a spray bottle.
- Apply light oil to the scalp and along the braids to prevent dryness and itching.
- Sleep with a satin bonnet or on a satin pillowcase to preserve the style and reduce frizz.
- This versatile protective style can be worn down, in ponytails, buns, or half-up styles for variety.
27. Halo Braid with Flowers
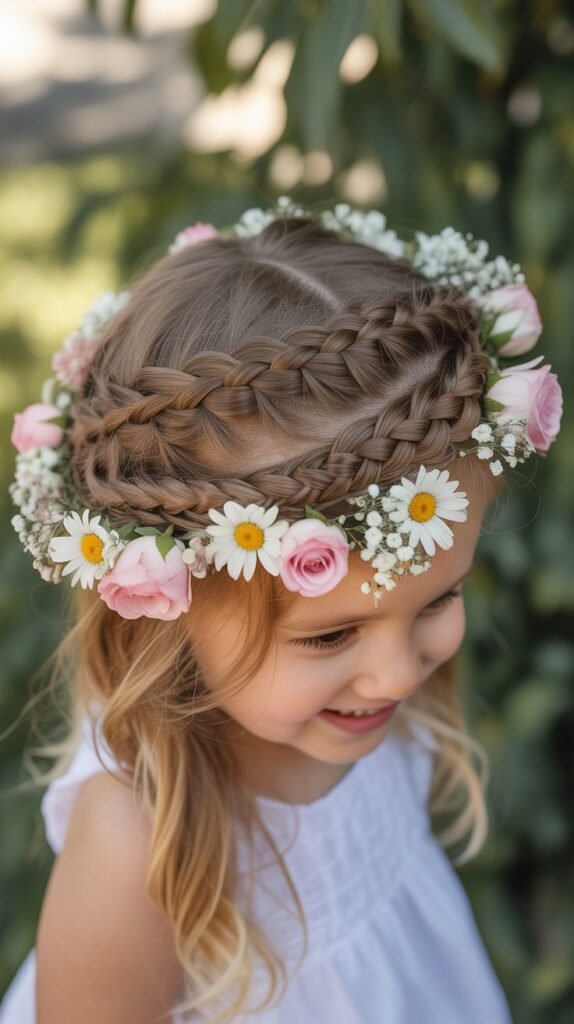
The halo braid with flowers creates an ethereal, fairy-tale appearance perfect for the most special occasions.
This romantic updo encircles the head like a crown while fresh or artificial flowers add a natural, garden-party elegance that children adore.
How to Create:
- Create a deep side part, then begin a Dutch braid starting at one side near the ear.
- Braid along the hairline across the forehead, following the natural curve of the head.
- Continue braiding around the entire perimeter of the head, adding hair from both sides as you go.
- When you reach the starting point, tuck the remaining braid tail under the beginning of the braid and pin securely.
- Gently insert small flowers throughout the braid, securing them with bobby pins or by tucking stems into the braid.
Flower Selection and Placement:
- Choose small flowers like baby’s breath, small roses, daisies, or gypsophila for the best visual balance.
- Artificial flowers work well for longer-lasting wear without wilting concerns.
- Distribute flowers evenly around the halo or concentrate them on one side for asymmetrical beauty.
- Fresh flowers should be added just before the event and kept lightly misted with water.
- This style is absolutely perfect for flower girls, first communions, spring photoshoots, and garden parties.
Essential Braiding Tools and Products
Basic Tools:
- Wide-tooth comb for detangling without causing breakage or pain.
- Rat-tail comb for creating clean, precise parts and sections.
- Hair elastics in various sizes and colors, preferably without metal components that can snag.
- Bobby pins and hair pins for securing braids and flyaway strands.
- Spray bottle filled with water or leave-in conditioner for easier handling of dry hair.
Helpful Products:
- Leave-in conditioner provides slip and moisture for easier braiding and healthier hair.
- Edge control or gel helps smooth flyaways and create neat, polished hairlines.
- Light hair oil keeps the scalp moisturized and adds shine to finished braids.
- Hairspray designed for children helps secure styles without stiffness or harsh chemicals.
- Hair accessories like ribbons, beads, clips, and flowers for personalized styling.
Product Recommendations:
- For detangling before braiding, consider using products specifically formulated for children’s hair, which tend to be gentler and tear-free.
- Natural oils like coconut oil, jojoba oil, or argan oil work excellently for sealing moisture without buildup.
- Look for sulfate-free and paraben-free products that are safer for children’s sensitive scalps and developing hair.
- Keep a dedicated braiding kit with all necessary tools organized in one place for convenient access during busy mornings.
Tips for Long-Lasting Braids
Installation Tips:
- Always start with clean, detangled hair for the smoothest braiding experience and best results.
- Slightly damp hair is often easier to braid than completely dry hair, but avoid braiding soaking wet hair.
- Maintain consistent tension throughout the braid to prevent loose sections that unravel quickly.
- Secure the ends properly with quality elastics that won’t slip or break throughout the day.
Maintenance Strategies:
- Protect braids at night by having your child sleep with a satin or silk bonnet or pillowcase.
- For multi-day styles, lightly mist braids with water and smoothing serum in the morning to refresh the appearance.
- Use a soft-bristle brush or edge brush to gently smooth flyaways rather than pulling braids tighter.
- Avoid excessive touching or playing with braids throughout the day to prevent frizzing and loosening.
When to Rebraid:
- Most standard braids last comfortably for one full day of school or activities.
- Protective styles like cornrows and box braids can last several weeks with proper care.
- Rebraid when you notice significant loosening at the roots or excessive frizz that affects appearance.
- Never leave protective braids in longer than recommended to avoid matting or scalp issues.
Hair Type Considerations
Straight Hair:
- Straight hair often requires texturizing spray or braiding on slightly dirty hair for better grip.
- Braids may slip out more easily, so secure ends well and consider using small amounts of styling product.
- Straight hair showcases intricate braid patterns beautifully with high definition and clarity.
Wavy Hair:
- Wavy hair braids beautifully with natural texture that helps hold braids securely.
- This hair type offers the perfect balance between easy braiding and long-lasting hold.
- Embrace natural texture rather than straightening before braiding for the best results.
Curly Hair:
- Curly hair benefits from thorough detangling with a wide-tooth comb and leave-in conditioner before braiding.
- Braiding helps stretch curls and can serve as a protective style that reduces daily manipulation.
- Keep curls moisturized during braiding to prevent breakage and maintain hair health.
Coily/Kinky Hair:
- Coily hair is ideal for protective braiding styles that promote length retention and health.
- Always moisturize thoroughly before braiding and maintain scalp moisture throughout the style’s duration.
- Protective styles like cornrows, box braids, and micro braids work exceptionally well for this hair type.
- Never braid too tightly, as excessive tension can cause traction alopecia around the hairline and edges.
Common Braiding Mistakes to Avoid
Tension Problems:
- Braiding too tightly causes discomfort, headaches, and can lead to hair breakage or traction alopecia over time.
- Braiding too loosely results in braids that fall apart quickly or look messy within hours.
- Find the middle ground where braids feel secure but comfortable without pulling on the scalp.
Section Issues:
- Uneven sections create asymmetrical braids that look less polished and professional.
- Taking sections that are too large makes braiding difficult and creates bulky, heavy braids.
- Taking sections that are too small requires excessive time without adding significant visual benefit for simple styles.
Product Mistakes:
- Using too much product makes hair greasy, weighs down braids, and attracts dirt quickly.
- Using products with harsh chemicals can damage children’s delicate hair and sensitive scalps.
- Skipping moisture products on dry hair leads to breakage during the braiding process.
Timing Errors:
- Rushing through braids creates sloppy results that won’t last and may disappoint your child.
- Choosing complex styles on busy school mornings sets everyone up for stress and frustration.
- Not accounting for hair drying time when working with damp hair can lead to late arrivals.
Age-Appropriate Styling Guidelines
Toddlers (Ages 2-4):
- Keep styles simple and quick, as toddlers have limited patience for sitting still during styling.
- Choose comfortable styles that won’t pull or cause discomfort during naps or play.
- Avoid styles that require excessive bobby pins or accessories that could be pulled out and pose choking hazards.
- Focus on fun, playful looks with colorful accessories that make styling feel like a game.
Young Children (Ages 5-8):
- This age group can sit for longer periods, allowing for more intricate braiding styles.
- Involve children in choosing their hairstyle to build excitement and cooperation during styling.
- Ensure styles are appropriate for school dress codes while allowing personal expression.
- Choose secure styles that survive recess, gym class, and active play without constant adjustment.
Tweens and Teens (Ages 9+):
- Older children often have specific style preferences influenced by friends, social media, and personal taste.
- Respect their growing independence by teaching them to create simple braids themselves.
- More sophisticated styles like fishtails, pull-through braids, and accent braids become appropriate.
- Consider the social dynamics of school when choosing styles, as this age group is very aware of peer opinions.
Teaching Your Child to Braid
Starting Simple:
- Begin by teaching the basic three-strand braid technique on a doll, stuffed animal, or thick rope.
- Practice on another person’s hair before attempting to braid their own hair, which is more challenging.
- Use different colored ribbons or yarn to help visualize the pattern and crossing technique.
Building Skills:
- Once the basic braid is mastered, introduce French braiding on someone else’s hair.
- Teach side braids before attempting braids at the back of their own head where they can’t see.
- Celebrate small successes and improvements rather than expecting perfection immediately.
Self-Braiding:
- Self-braiding requires significant coordination and practice, so be patient during the learning process.
- Set up a mirror system where they can see both the front and back of their head.
- Start with simple side braids that are easier to see and control.
- Once basic skills are established, your child gains independence and confidence in their styling abilities.
Cultural Appreciation and Respect
Understanding Cultural Significance:
- Many braiding techniques, especially protective styles, have deep cultural roots in African and African American communities.
- Cornrows, box braids, and other protective styles have been passed down through generations as both art and cultural tradition.
- These styles serve practical purposes for hair health and texture management beyond pure aesthetics.
Approaching with Respect:
- When trying styles from cultures different from your own, approach with appreciation rather than appropriation.
- Educate yourself and your children about the history and significance of different braiding traditions.
- Support and learn from stylists and creators from the cultures these styles originate from.
- Acknowledge that some styles work better for certain hair types and textures than others.
Educational Opportunities:
- Use braiding as an opportunity to teach children about different cultures and their beautiful traditions.
- Share age-appropriate information about the history of braiding across various cultures worldwide.
- Encourage respect for all hair types and textures, celebrating the diversity of beauty.
- Help children understand that hairstyles can be meaningful expressions of cultural identity and heritage.
Troubleshooting Common Issues
The Braid Keeps Falling Apart:
- You may not be maintaining consistent tension throughout the braiding process.
- Hair might be too clean and slippery, try braiding on second-day hair or using a small amount of texturizing product.
- Sections might be uneven in size, causing some parts to slip out more easily than others.
- The hair elastic at the end might not be secure enough or positioned too far from the end.
Braids Look Bumpy or Uneven:
- Tension is likely inconsistent, with some sections pulled tighter than others.
- You may be taking different sized pieces of hair as you add sections during French or Dutch braiding.
- Hair might not be properly detangled before starting, causing knots within the braid.
- Practice and muscle memory will naturally improve evenness over time.
Child Complains About Discomfort:
- Braids are too tight and pulling on the scalp, which can cause immediate pain and long-term damage.
- Loosen your grip and reduce tension significantly, braids should feel secure but never painful.
- Remove the braid and start over with gentler tension if discomfort continues.
- Some children have more sensitive scalps than others and may need looser styles overall.
Braids Don’t Last the Whole Day:
- The hair might need more grip, try braiding on slightly damp hair or using a small amount of product.
- Ends might not be secured properly, use quality elastics and consider doubling them.
- The child might be playing with or pulling on their braids throughout the day.
- Some very fine or slippery hair types simply don’t hold braids as long as thicker, textured hair.
Seasonal Braiding Ideas
Spring Styling:
- Incorporate pastel colored ribbons and accessories that match the season’s soft color palette.
- Add fresh flowers like daisies or baby’s breath to crown braids and halo styles for garden parties.
- Lighter, looser braids work well as temperatures begin to warm up after winter.
- Consider side braids and waterfall braids that feel romantic and match spring’s gentle aesthetic.
Summer Styles:
- Choose braids that keep hair completely off the neck and face for comfort in hot weather.
- Protective styles like cornrows and box braids are ideal for swimming, beach trips, and outdoor activities.
- Braided top knots and high braided ponytails provide maximum coolness during heat waves.
- These styles reduce the need for daily heat styling, giving hair a healthy break during summer.
Fall Fashion:
- Rich, jewel-toned hair accessories complement autumn’s color palette beautifully.
- Back-to-school season is perfect for teaching children new braiding skills as routines become established.
- Braided headbands keep hair secure under hats and hoodies as weather cools.
- More intricate braids work well as children settle into school routines with established morning timing.
Winter Warmth:
- Protective braiding helps maintain moisture in hair during dry winter months when heating systems reduce humidity.
- Braids prevent static electricity that commonly affects hair in winter conditions.
- Styles that keep hair contained work better with winter hats, coats, and scarves.
- Holiday celebrations provide perfect opportunities for festive braids with ribbons, bows, and special accessories.
Quick Emergency Fixes
For Flyaways and Frizz:
- Lightly spray a soft-bristle toothbrush with hairspray and gently brush along the braid to smooth flyaways.
- Apply a tiny amount of leave-in conditioner or oil to your hands, warm it, then smooth over the braid.
- Use a damp hand to gently press down flyaways without disturbing the overall braid structure.
For Loosening Braids:
- Gently pull sections of the braid slightly tighter if possible without redoing the entire style.
- Secure any particularly loose areas with small bobby pins that match the hair color.
- Add a decorative clip or bow at the loose spot to both secure it and make it look intentional.
For Last-Minute Touch-Ups:
- Keep a small emergency kit in your car or child’s backpack with elastics, bobby pins, and a small brush.
- A quick braid refresh spray (water mixed with a drop of leave-in conditioner) can revive day-old braids.
- If a braid fails completely, having supplies allows you to quickly switch to a simple ponytail or bun.
Professional vs. At-Home Braiding
When to Seek Professional Help:
- For intricate protective styles like professional cornrows, box braids, or micro braids that require hours and specialized skills.
- When you need a style to last several weeks for a special reason like vacation or extended camp.
- For special occasions where perfect execution matters greatly, such as weddings or professional photographs.
- When you’re unsure about proper technique for your child’s specific hair type and don’t want to risk damage.
Benefits of Home Braiding:
- Significant cost savings, especially for daily styles and simple braids that don’t require professional expertise.
- Flexibility to style on your own schedule without appointments or salon wait times.
- Bonding time with your child during the styling process creates special moments and memories.
- Learning braiding skills empowers both you and eventually your child with valuable self-sufficiency.
Finding the Right Professional:
- Ask for recommendations from friends with children who have similar hair types and textures.
- Look for stylists who specialize in children’s hair and understand age-appropriate styling needs.
- Review portfolios and photos of previous work to ensure their style matches your preferences.
- Discuss your child’s comfort level, sensitivity, and any specific needs before the appointment begins.
Conclusion
Throughout this comprehensive guide to 27 Easy Braided Hairstyles for Kids, we’ve explored everything from beginner-friendly three-strand braids to more advanced protective styles that last for weeks.
These versatile techniques offer solutions for every occasion, hair type, and skill level, ensuring that both parents and children can find styles that work perfectly for their unique needs and lifestyles.
Whether you’re creating a quick braid for a busy school morning, crafting an elaborate updo for a special celebration, or installing protective braids that promote hair health, the options are truly endless.
Remember that braiding is a skill that improves with practice, patience, and persistence—what feels challenging today will become second nature with time and repetition.
By mastering these braiding techniques, you’re not only creating beautiful hairstyles but also building confidence, fostering bonding moments with your child, and passing down valuable skills that they’ll carry throughout their lives.
The journey through these 27 easy braided hairstyles for kids empowers you to transform daily hair routines from stressful struggles into enjoyable creative experiences that both you and your child will treasure for years to come.