
Morning routines before school can feel like a race against time, especially when you’re trying to tame long hair into something presentable.
If you’ve ever found yourself throwing your hair into the same boring ponytail day after day, you’re not alone.
The good news is that having long hair opens up a world of styling possibilities that are both adorable and surprisingly quick to create.
This comprehensive guide to 27 Easy Hairstyles for Long Hair for School That Are Cute and Quick will transform your morning hair routine from stressful to effortless.
Whether you have five minutes or fifteen, whether you’re dealing with straight, wavy, or curly locks, you’ll discover styles that work for every hair type and skill level.
From classic braids with modern twists to innovative buns and playful ponytails, each hairstyle has been chosen for its simplicity, durability throughout a school day, and undeniable cute factor.
Get ready to say goodbye to bad hair days and hello to compliments in the hallways, because these hairstyles will have you looking polished and put-together without sacrificing precious sleep time or being late to first period.
1. Classic High Ponytail with a Twist
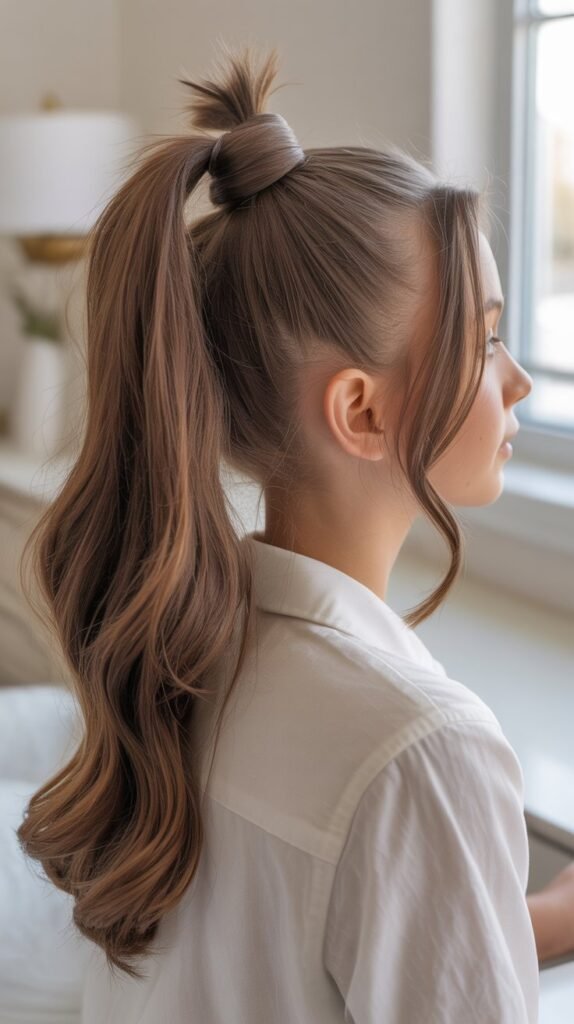
The high ponytail remains a school favorite because it keeps hair completely off your face during tests, gym class, and lunch.
This elevated version takes the basic ponytail and adds a sophisticated touch that makes it special enough for presentation days or school photos.
How to Create:
- Brush all your hair up to the crown of your head and secure it with a strong elastic band
- Take a small section of hair from the ponytail and wrap it around the elastic to hide it
- Secure the wrapped section with a bobby pin underneath the ponytail
- For extra volume, gently tease the ponytail at the base before wrapping the hair around the elastic
- Finish with a light mist of hairspray to keep flyaways in check throughout the day
Best For:
- All hair types, especially straight to slightly wavy hair
- Days when you have sports practice or physical education class
- When you want to look polished with minimal effort
Time Required: 3-4 minutes
2. Messy Bun with Face-Framing Strands
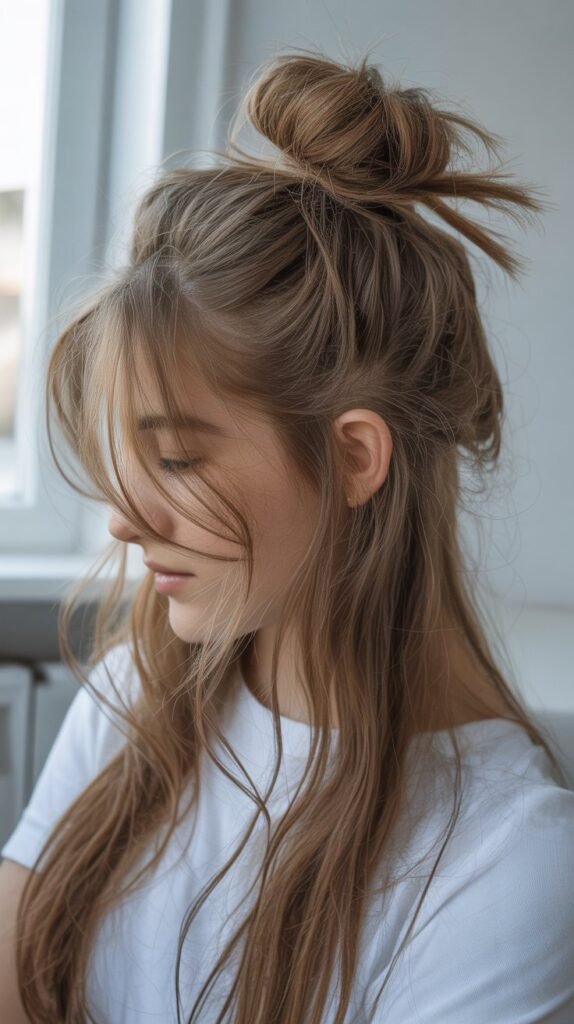
The messy bun strikes the perfect balance between looking effortlessly cool and keeping your hair secure all day long.
This hairstyle has become iconic among students because it manages to look intentional rather than rushed, even when you create it in under two minutes.
How to Create:
- Flip your head upside down and gather all hair into a high ponytail without brushing it smooth
- Twist the ponytail loosely and wrap it around the base in a circular motion
- Secure with another elastic or bobby pins, leaving the ends sticking out rather than tucking them in
- Pull out a few small sections around your face to frame it softly
- Gently pull on sections of the bun to make it fuller and more relaxed-looking
Best For:
- Medium to thick hair that holds volume well
- Casual school days or weekends
- Second or third-day hair when you want to embrace natural texture
Time Required: 2-3 minutes
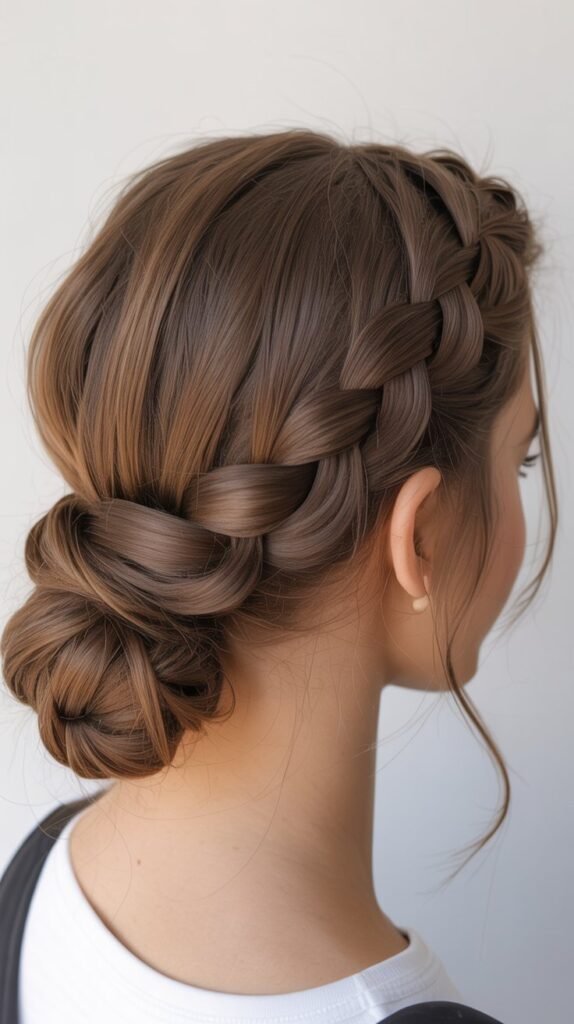
3. Dutch Braid Crown
The Dutch braid crown transforms you into a modern-day princess while keeping every strand of hair neatly in place.
Unlike a regular braid that sits on top of your hair, the Dutch braid technique creates a raised, three-dimensional effect that looks intricate but becomes easier with practice.
How to Create:
- Part your hair down the middle from forehead to nape
- Starting at the top of one side, take three small sections and begin a Dutch braid by crossing sections under rather than over
- Continue braiding along your hairline, adding new hair from the side as you go around your head
- When you reach the starting point, secure the braid and tuck the end underneath, pinning it invisibly
- Gently pull on the edges of the braid to make it wider and more prominent
Best For:
- All hair types, particularly effective on hair with some natural texture
- Special school events, picture day, or presentations
- Keeping hair completely away from your face during exams
Time Required: 8-10 minutes
4. Half-Up Top Knot
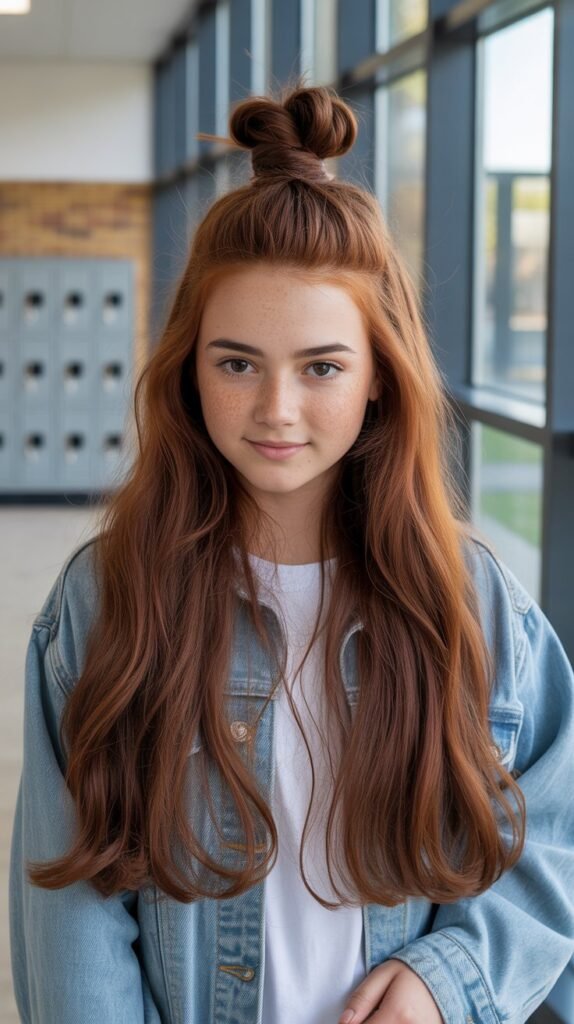
The half-up top knot gives you the best of both worlds by keeping the top section of hair secured while letting the rest flow freely down your back.
This style became wildly popular because it’s practical yet trendy, working equally well for a casual Monday or a special Friday event.
How to Create:
- Section off the top half of your hair from ear to ear across the crown
- Gather this top section into a high ponytail at the crown of your head
- Twist the ponytail and wrap it around itself to form a small bun or knot
- Secure with an elastic band and bobby pins as needed
- Leave the bottom half of your hair down, either straight, wavy, or curled
Best For:
- All hair lengths and textures
- Days when you want your hair partially out of your face but still want to show length
- Transitioning from school to after-school activities
Time Required: 3-4 minutes
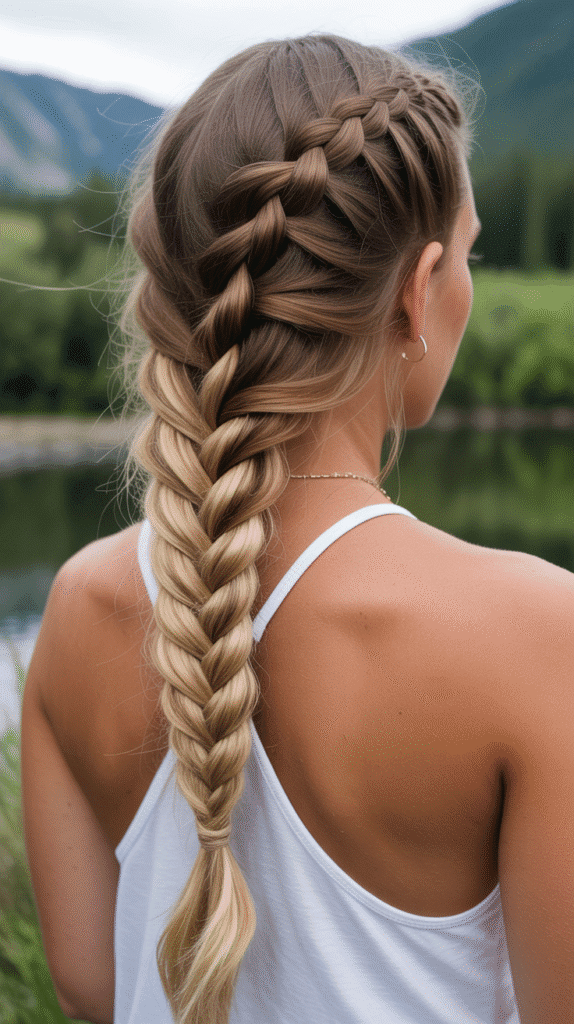
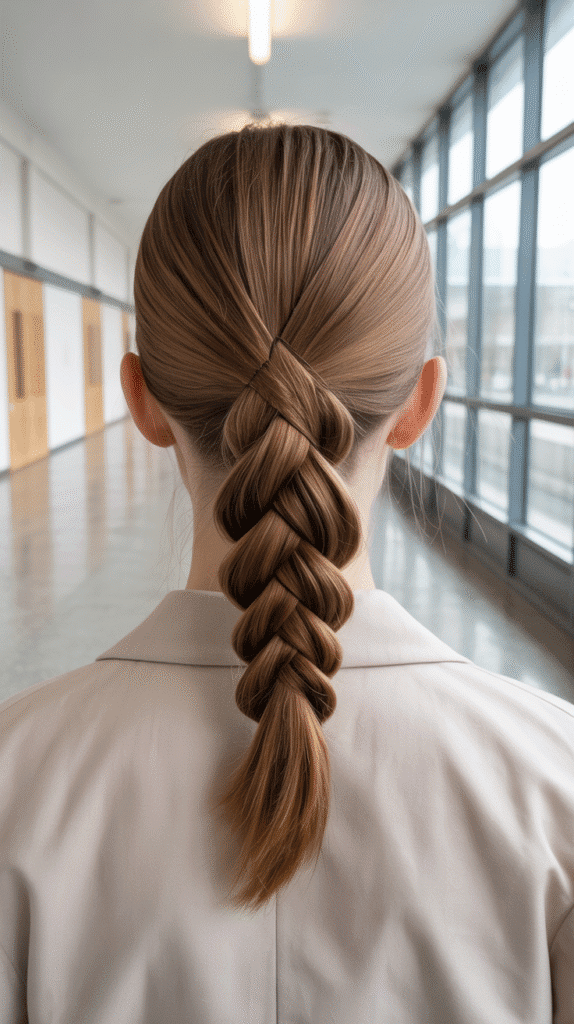
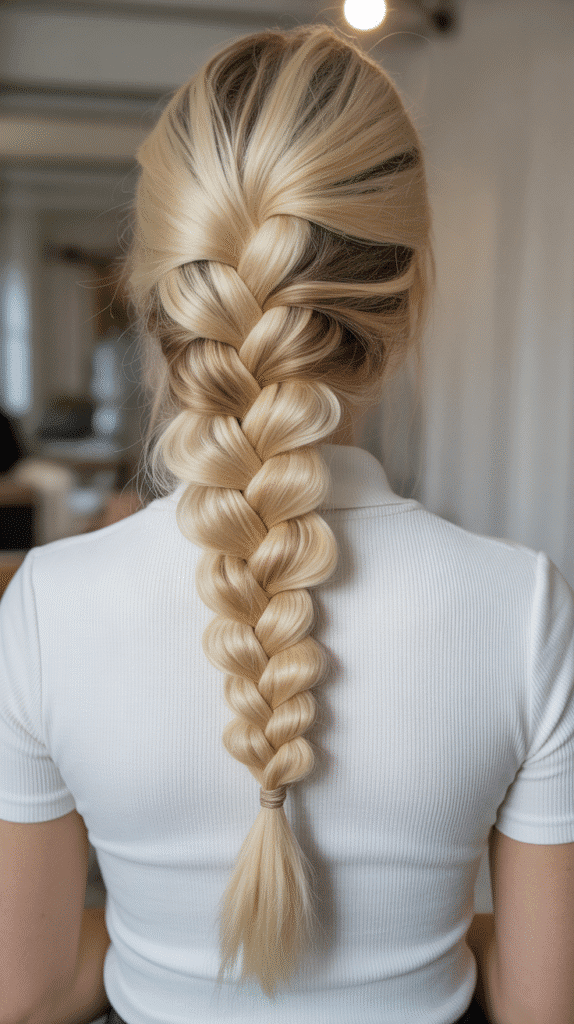
5. Braided Ponytail
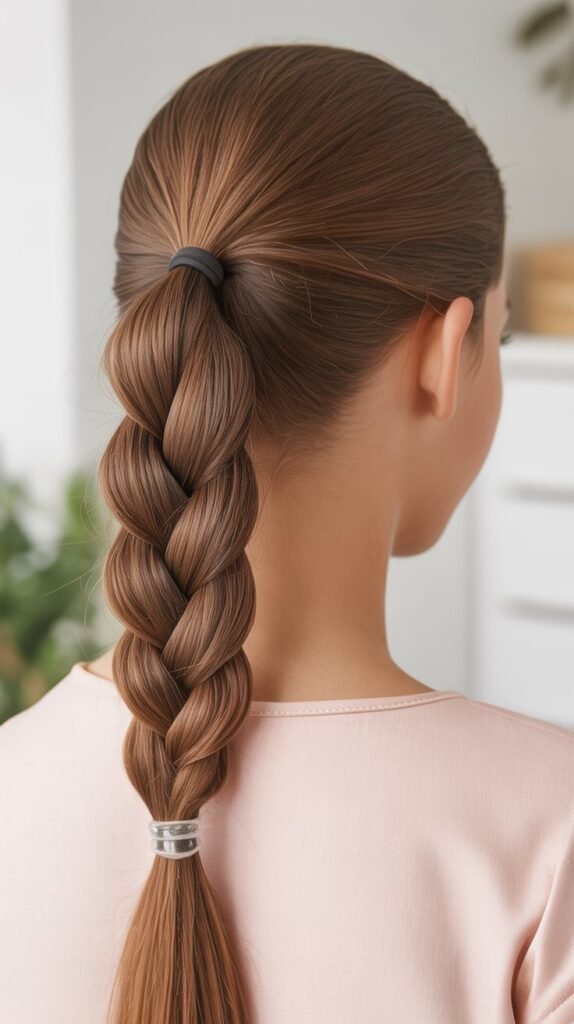
The braided ponytail adds texture and visual interest to a standard ponytail without requiring advanced braiding skills.
This style holds up exceptionally well throughout a busy school day and prevents your ponytail from looking flat or boring by lunchtime.
How to Create:
- Create a ponytail at your desired height (mid to high works best)
- Divide the ponytail into three equal sections
- Braid these sections all the way down to the ends
- Secure with a small elastic band
- For added dimension, gently pull on the outer edges of the braid to make it fuller and more textured
Best For:
- Straight to wavy hair that tends to fall flat in regular ponytails
- Athletic activities or gym class
- Simple sophistication for any school day
Time Required: 4-5 minutes
6. Low Twisted Bun
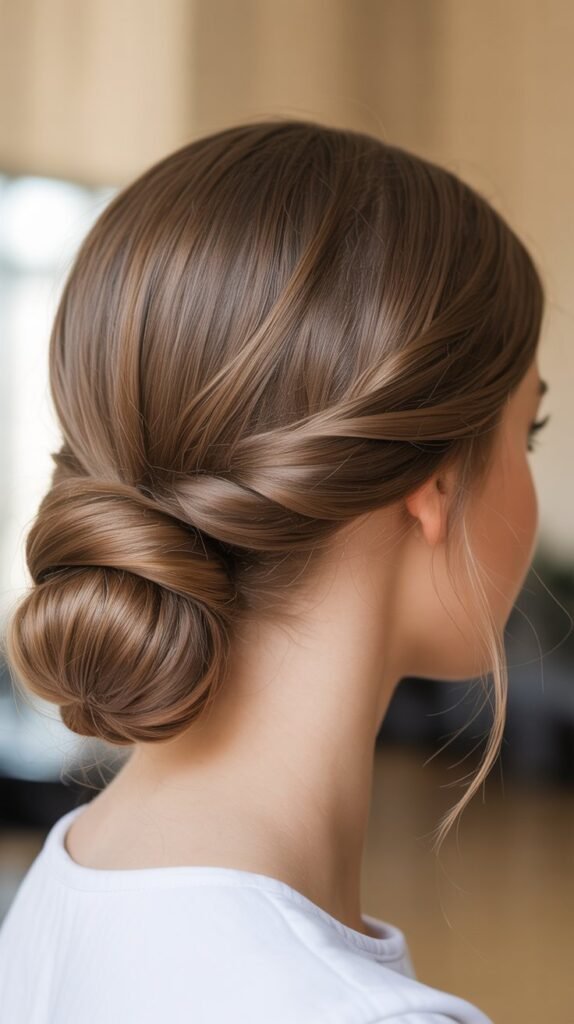
The low twisted bun exudes elegance and maturity, making it perfect for school presentations, debate competitions, or any day you want to feel more sophisticated.
The twisted technique creates beautiful rope-like texture that elevates this from a simple bun to something special.
How to Create:
- Gather your hair into a low ponytail at the nape of your neck
- Divide the ponytail into two equal sections
- Twist each section individually in the same direction (both clockwise or both counterclockwise)
- Wrap the two twisted sections around each other in the opposite direction
- Coil this rope-twisted ponytail around the base to form a bun
- Secure with bobby pins and finish with hairspray
Best For:
- Medium to thick hair with enough weight to hold the twist
- Formal school events or interviews
- Professional-looking style for older high school students
Time Required: 5-6 minutes
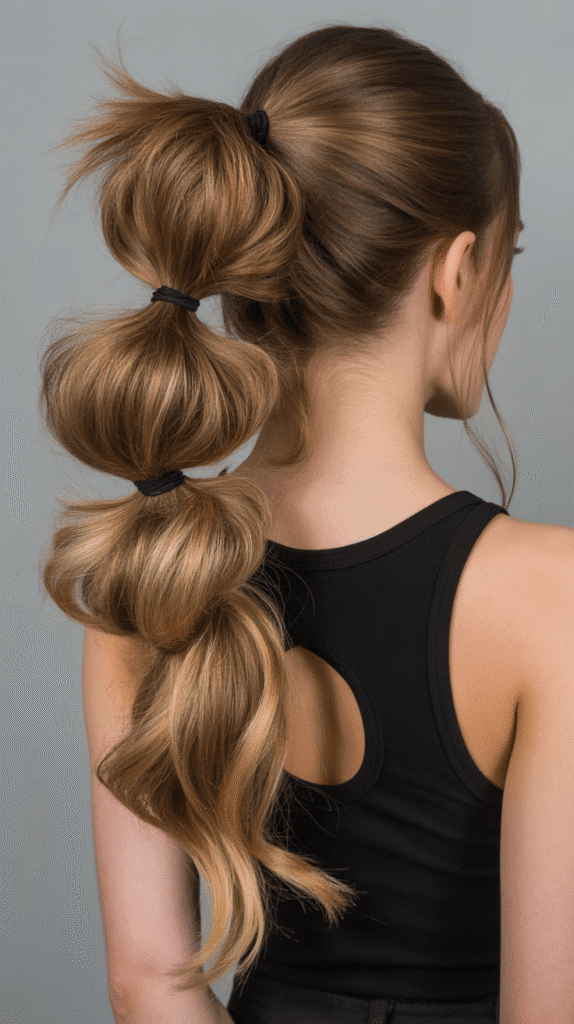
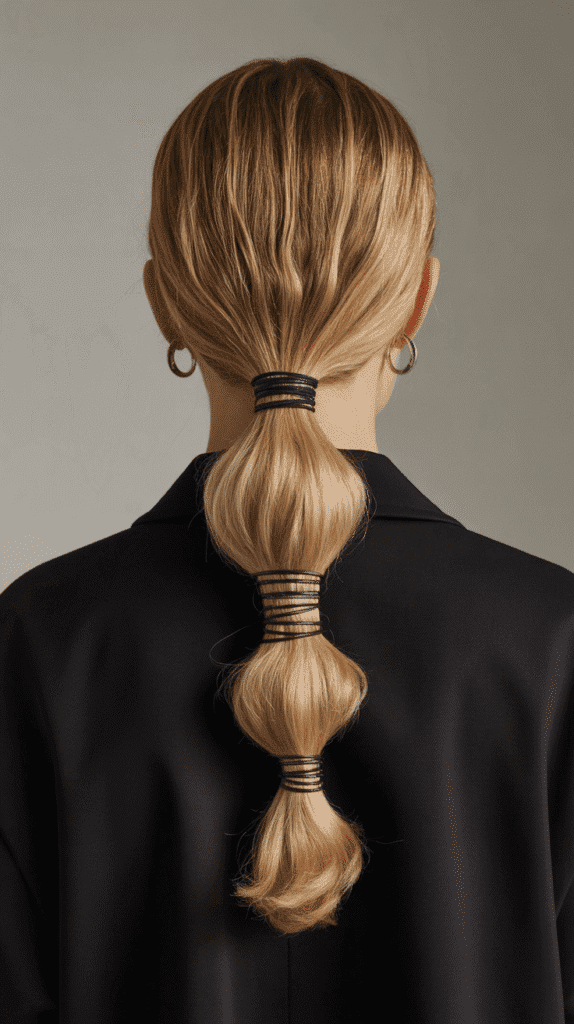
7. Bubble Ponytail
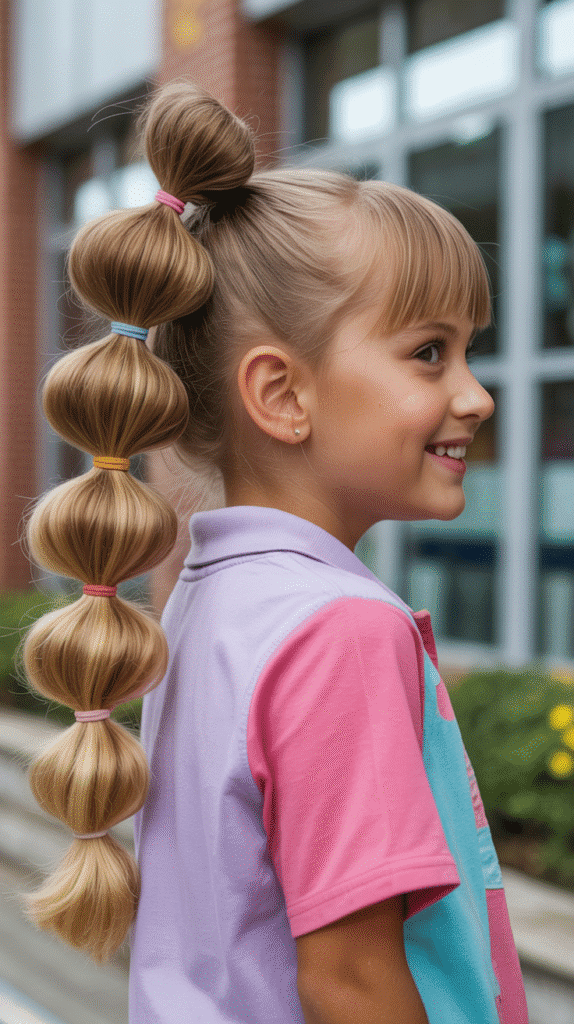
The bubble ponytail is playful, eye-catching, and surprisingly simple to create, making it a favorite for spirit days or when you want to stand out in a sea of regular ponytails.
The segmented bubbles add dimension and fun personality to your look without requiring any braiding skills whatsoever.
How to Create:
- Create a high or mid-height ponytail with a strong elastic
- Place additional elastics down the length of the ponytail at 2-3 inch intervals
- Gently pull on each section between elastics to create rounded bubble shapes
- Continue this pattern all the way down the ponytail
- For extra volume, lightly tease each bubble section before securing the next elastic
Best For:
- Medium to long hair with enough length for multiple bubbles
- Fun school days, spirit week, or casual Fridays
- Anyone who wants a statement hairstyle with minimal effort
Time Required: 5-6 minutes
8. Side Braid with Loose Waves
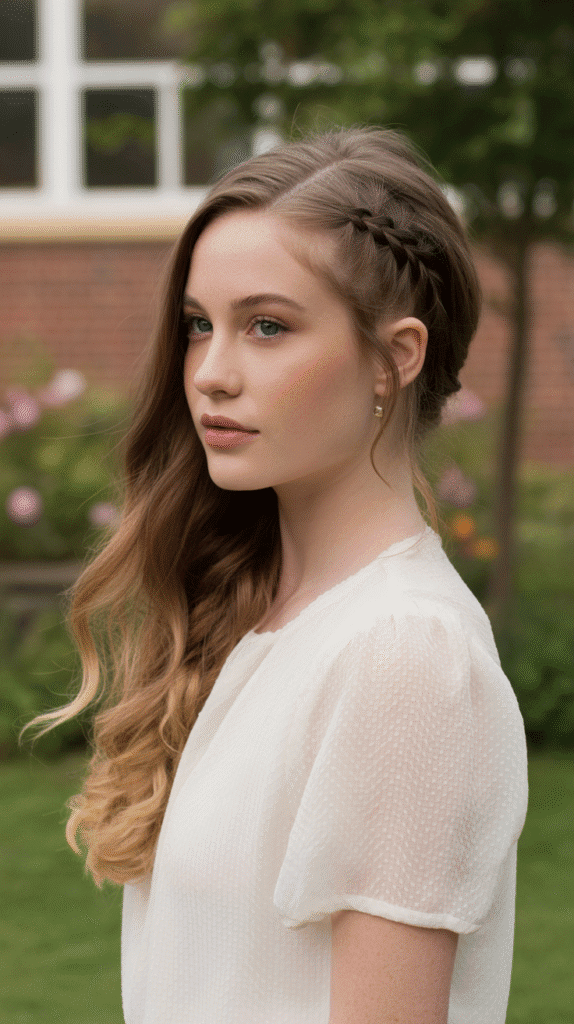
The side braid with loose waves combines romantic texture with practical styling, creating a look that’s both feminine and functional for school.
This asymmetrical style draws the eye and works beautifully for everything from regular school days to special dances.
How to Create:
- Part your hair deeply to one side
- On the side with more hair, take a section near your face and create a simple three-strand braid
- Braid down several inches and secure with a small clear elastic
- Leave the rest of your hair down in loose waves (use a curling iron or overnight braids for the waves)
- Pin the braid back slightly if desired, or let it hang naturally with the waves
Best For:
- Long hair that holds waves well
- Days when you want something pretty and romantic
- Works especially well on second-day hair
Time Required: 8-10 minutes (including wave creation)
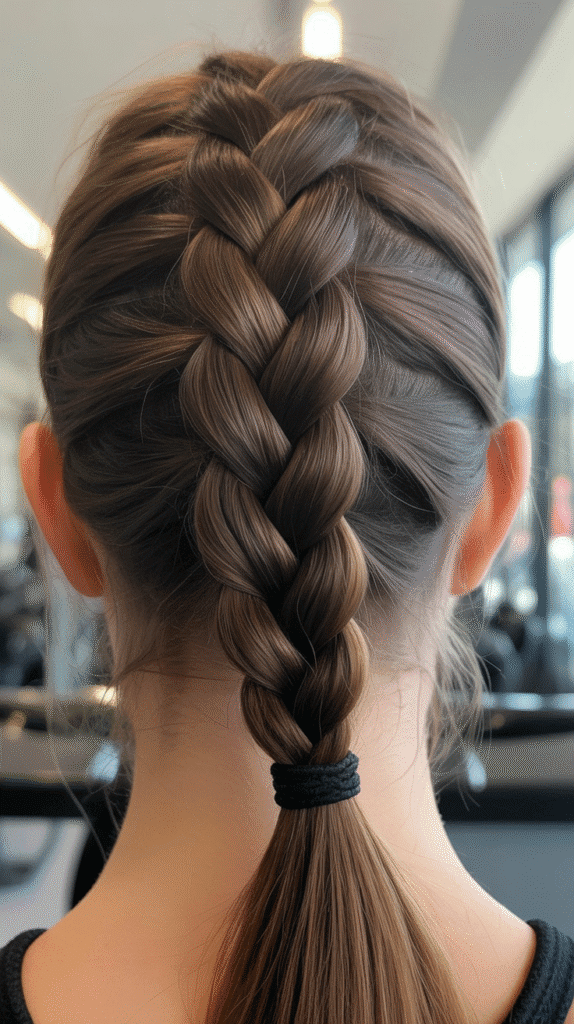
9. Double Dutch Braids
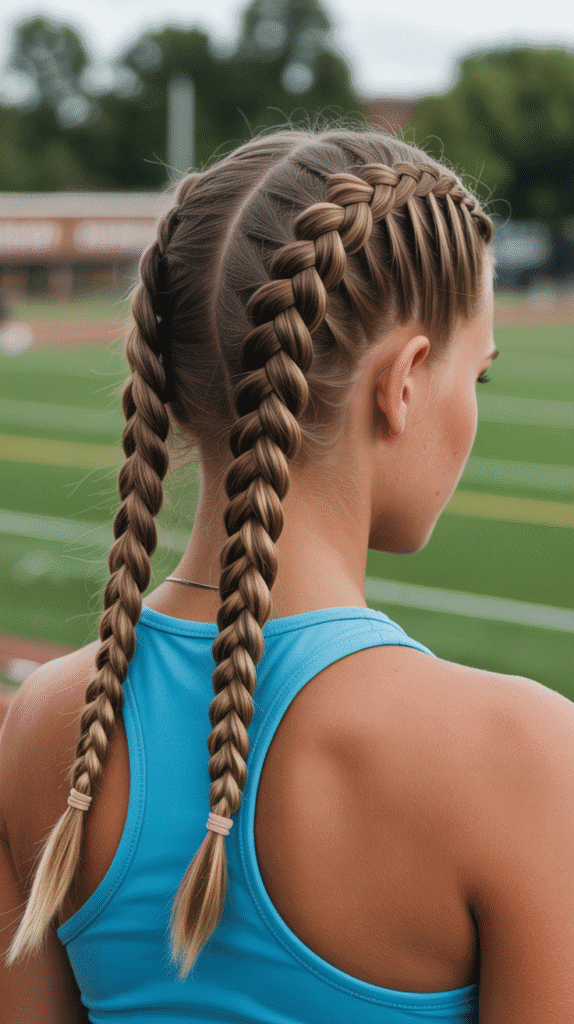
Double Dutch braids have become the go-to athletic hairstyle for students involved in sports because they keep hair completely secure while looking stylish and put-together.
The raised braid technique creates bold, defined lines that won’t fall apart during even the most intense activities.
How to Create:
- Part your hair straight down the middle from forehead to nape
- Working with one side, begin a Dutch braid at the hairline by crossing sections under instead of over
- Continue braiding down, adding hair from the sides as you go
- Braid all the way to the ends and secure with an elastic
- Repeat the exact process on the other side
- Pull gently on the braid edges to make them fuller if desired
Best For:
- Athletic students or those with gym class
- Thick or long hair that’s difficult to manage in other styles
- All-day security without needing adjustments
Time Required: 10-12 minutes
10. Twisted Half-Up Style

The twisted half-up style offers elegance with minimal effort by using simple twisting techniques to create something that looks far more complicated than it actually is.
This style flatters every face shape and works beautifully for both casual and dressy school occasions.
How to Create:
- Take a section of hair from each side of your head, about 2 inches wide at temple level
- Twist each section backward toward the back of your head
- Bring both twisted sections together at the back center of your head
- Secure them together with bobby pins or a small elastic
- Leave the rest of your hair down naturally
- For added security, cross the pins in an X shape
Best For:
- All hair types and lengths (shoulder-length or longer)
- Days when you want your hair mostly down but off your face
- Quick styling that looks more difficult than it is
Time Required: 3-4 minutes
11. Sleek Low Ponytail

The sleek low ponytail embodies minimalist sophistication, proving that sometimes the simplest styles make the strongest statement.
This polished look works exceptionally well for presentations, interviews, or any situation where you want to appear mature and professional while still being school-appropriate.
How to Create:
- Apply a smoothing serum or gel to damp or dry hair
- Brush all hair straight back without any bumps or flyaways
- Gather hair at the nape of your neck and secure with a sleek elastic band
- Take a small section from the ponytail and wrap it around the elastic to conceal it
- Apply hairspray and use a fine-tooth comb to smooth any remaining flyaways
- For extra sleekness, run a flat iron over the ponytail itself
Best For:
- Straight or easily straightened hair
- Professional or formal school settings
- Older students who want a more mature look
Time Required: 5-7 minutes
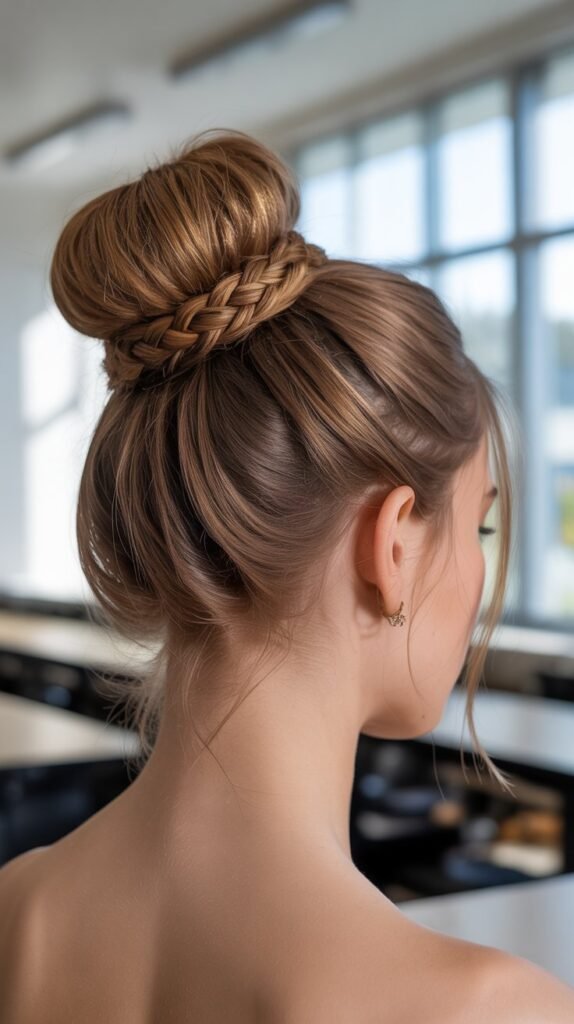
12. Waterfall Braid
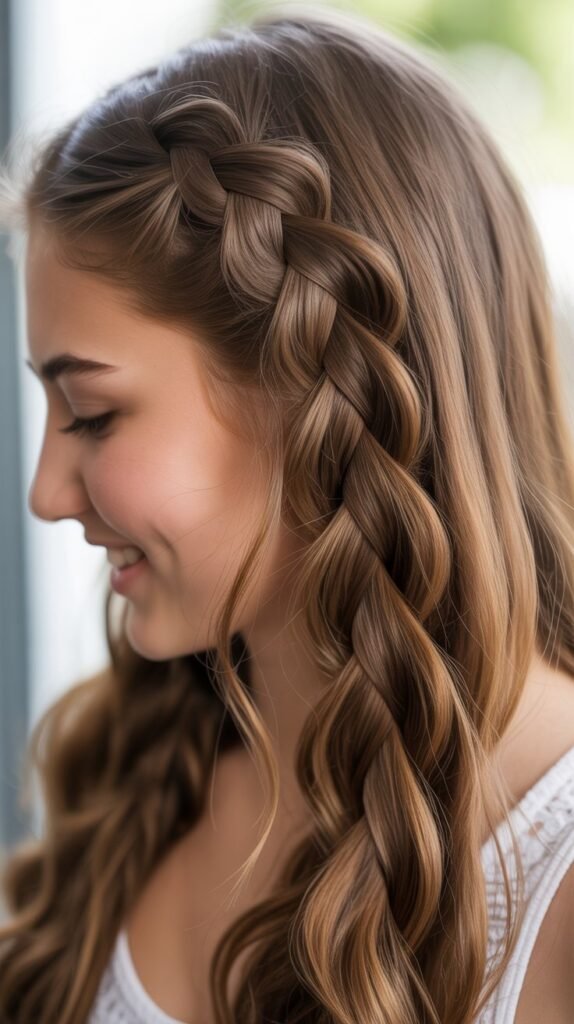
The waterfall braid creates a cascading effect that looks like strands of hair are literally falling like water through your braid.
This stunning style appears complex but follows a simple pattern that becomes intuitive once you practice it a few times.
How to Create:
- Start with a small section of hair near your temple on one side
- Begin a regular three-strand braid for one stitch
- On the next stitch, drop the bottom section and let it fall, picking up a new section from the top to replace it
- Continue this pattern of dropping the bottom strand and picking up a new top strand
- Braid across the back of your head, ending at the opposite temple
- Secure with a bobby pin hidden in your hair
Best For:
- Medium to long hair with some natural texture or waves
- Special school events or when you want to impress
- Those who’ve mastered basic braiding and want a challenge
Time Required: 12-15 minutes
13. Space Buns
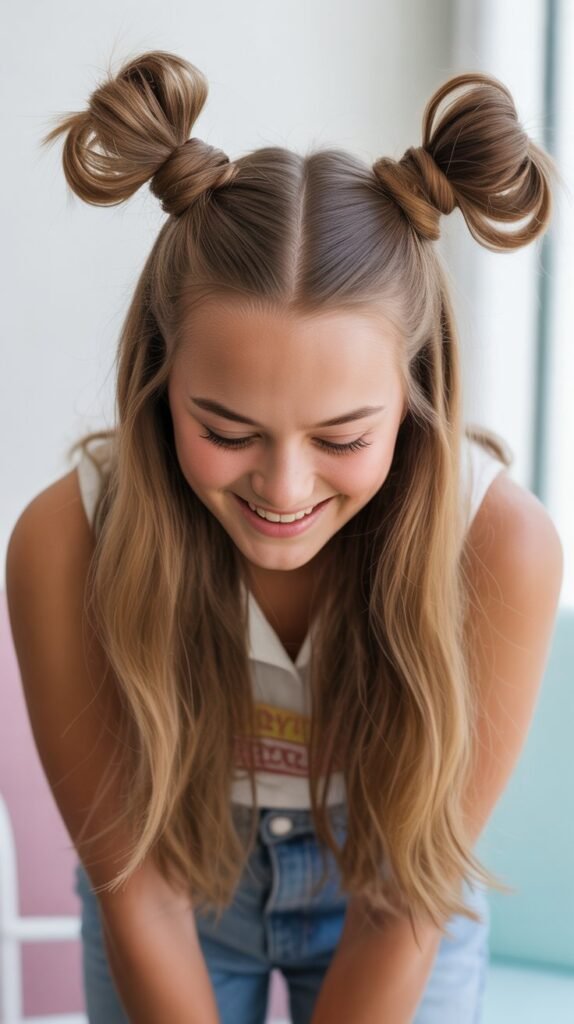
Space buns bring fun, youthful energy to your school look and have remained popular thanks to their playful yet practical design.
These double buns sit high on your head and work perfectly for spirit days, costume events, or any time you want to channel fun, retro vibes.
How to Create:
- Part your hair straight down the middle from forehead to nape
- Create two high ponytails on each side of the part, positioned above and slightly behind your ears
- Twist each ponytail and wrap it around its base to form a bun
- Secure each bun with bobby pins and elastic bands
- Leave a few face-framing pieces out if desired for a softer look
- Spray with hairspray to ensure they last all day
Best For:
- Medium to long hair with enough volume for two buns
- Casual, fun school days or themed events
- Anyone wanting a youthful, playful style
Time Required: 6-8 minutes
14. Fishtail Braid
The fishtail braid creates intricate-looking texture using only two sections of hair instead of the traditional three, making it easier than it appears.
This braid holds up beautifully throughout a school day and adds bohemian flair to any outfit.
How to Create:
- Divide your hair into two equal sections
- Take a small piece from the outer edge of the left section and cross it over to join the right section
- Take a small piece from the outer edge of the right section and cross it over to join the left section
- Continue alternating sides, keeping the pieces you cross over relatively small for a more defined pattern
- Secure at the bottom with an elastic
- Gently pull on the edges to make the braid wider and more textured
Best For:
- All hair types, especially long hair where the pattern really shows
- Casual to semi-formal school occasions
- Those who want an intricate look without complex techniques
Time Required: 8-10 minutes
15. Criss-Cross Ponytail
The criss-cross ponytail adds geometric interest to a basic style through simple overlapping sections that create visual appeal from every angle.
This modern take on the ponytail prevents that awkward ponytail bump while adding contemporary style points.
How to Create:
- Divide the top section of your hair horizontally into two layers
- Secure the bottom layer into a ponytail first
- Take the top layer and cross it over the first ponytail in an X pattern
- Secure both together with a second elastic, creating the criss-cross effect
- Smooth down any bumps and ensure both sections lie flat
- Wrap a section of hair around the final elastic to finish
Best For:
- Medium to long straight or slightly wavy hair
- When you want something different from a regular ponytail
- Holds well for active school days
Time Required: 5-6 minutes
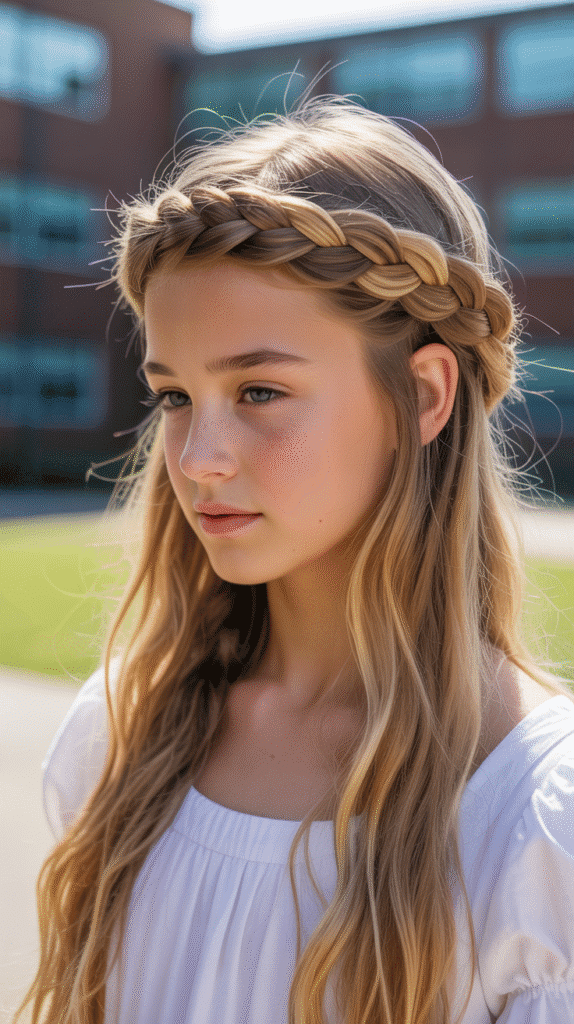
16. Braided Headband with Hair Down
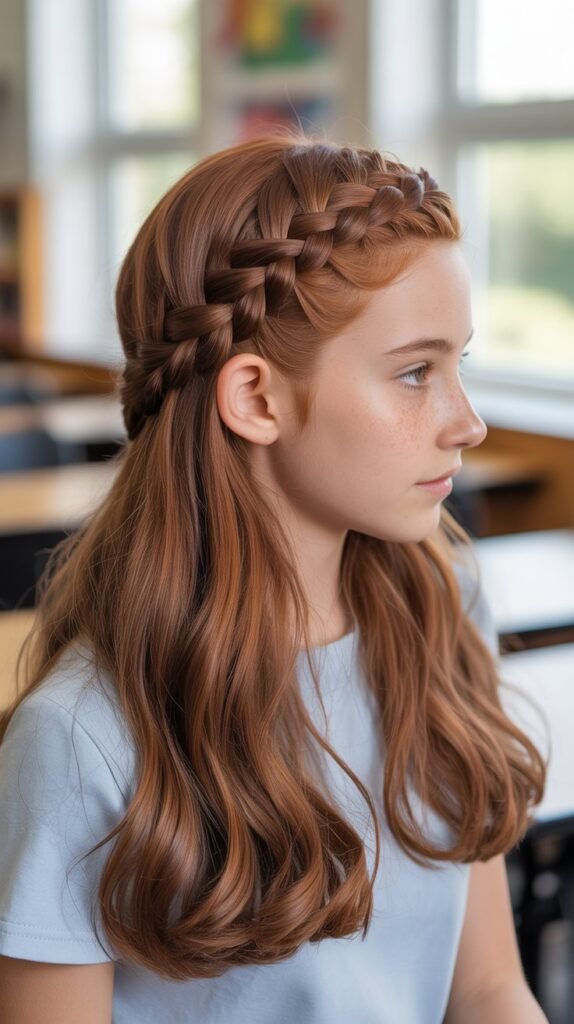
The braided headband creates a crown-like effect without requiring you to braid around your entire head, making it faster and easier while still delivering impressive results.
This style keeps your hair out of your face while maintaining a soft, romantic look with your hair flowing freely.
How to Create:
- Take a section of hair from behind one ear, about 1-2 inches wide
- Braid this section using a regular three-strand braid technique
- Bring the braid across the top of your head like a headband
- Secure behind the opposite ear with bobby pins
- Leave the rest of your hair down, either straight, wavy, or curled
- You can hide the braid’s end in your hair or tuck it decoratively
Best For:
- All hair types and lengths (long enough to braid across the head)
- Days when you want hair out of your face but still down
- Adds a bohemian, festival-inspired touch
Time Required: 5-7 minutes
17. Pull-Through Braid
The pull-through braid creates the illusion of a complex braid without actually braiding at all, using a series of ponytails that you pull sections through.
This volumous style looks impressive but relies on a simple, repetitive technique that anyone can master.
How to Create:
- Create a ponytail at the crown of your head and secure with a clear elastic
- Create a second ponytail directly below the first one
- Split the first ponytail in half and bring those halves around the second ponytail
- Secure those halves with the next section of hair in a third ponytail
- Continue this pattern down your head
- Gently pull on each section to create volume and hide the elastics
Best For:
- Medium to long hair that needs extra volume
- When you want a braid look but struggle with traditional braiding
- Makes fine hair appear thicker and fuller
Time Required: 10-12 minutes
18. Side Swept with Bobby Pins
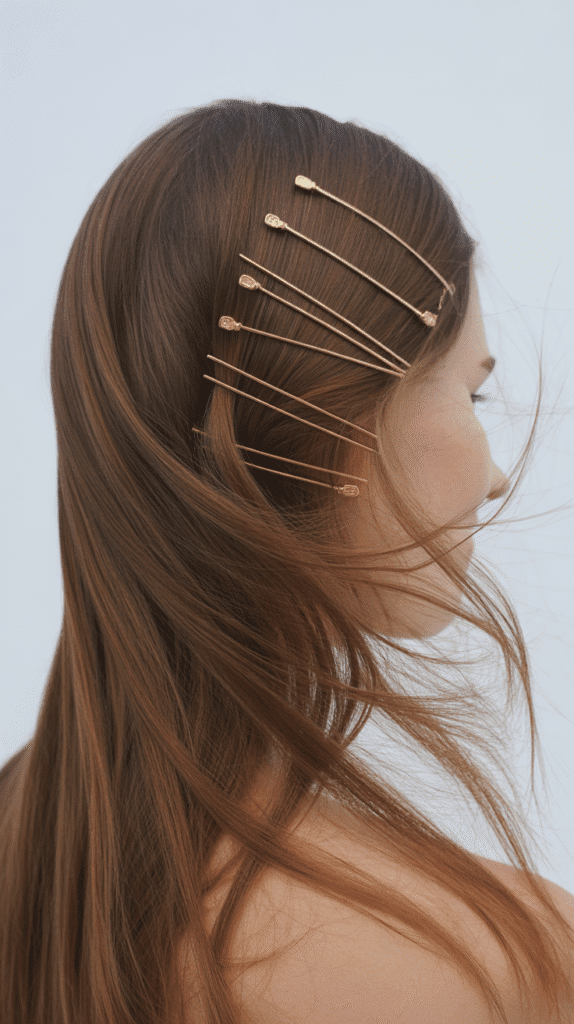
The side swept style using decorative bobby pins transforms a simple concept into something trendy and personalized.
This minimalist style works beautifully for showcasing your hair’s natural texture while keeping one side neatly secured throughout your school day.
How to Create:
- Part your hair deeply to one side
- Take the smaller section and sweep it back toward your ear
- Secure with 2-4 bobby pins in a decorative pattern (parallel lines, geometric shapes, or scattered placement)
- Use metallic, colored, or pearl bobby pins for extra style points
- Leave the rest of your hair down on the opposite side
- Apply a small amount of hairspray near the pinned section for security
Best For:
- All hair types, especially those showcasing natural texture
- Quick styling on rushed mornings
- Minimalist aesthetic with maximum style impact
Time Required: 2-3 minutes
19. Low Braided Bun
The low braided bun combines the elegance of a classic bun with the textured interest of braiding, creating a style that feels special enough for important school events while remaining comfortable for all-day wear.
This sophisticated style works particularly well for formal school functions.
How to Create:
- Create a low ponytail at the nape of your neck
- Braid the entire ponytail from base to ends
- Wrap the braid around the base of the ponytail in a spiral pattern
- Secure with bobby pins as you wrap, ensuring the bun feels secure
- Tuck the end of the braid under the bun and pin invisibly
- Pull gently on the braid edges within the bun for a fuller appearance
Best For:
- Medium to thick hair with good holding power
- School dances, presentations, or formal events
- Elegant, timeless style appropriate for any age
Time Required: 7-9 minutes
20. High Bun with Braided Detail
The high bun with braided detail takes the classic ballerina bun and elevates it with an added braid that wraps around the base.
This style provides maximum security for active days while maintaining a polished, dance-inspired aesthetic that looks intentional and put-together.
How to Create:
- Create a high ponytail at the crown of your head, but leave out a small section at the base
- Twist the ponytail and wrap it around the base to form a bun, securing with pins
- Braid the section you left out
- Wrap this braid around the base of the bun like a decorative band
- Secure the braid end with bobby pins tucked under the bun
- Spray with hairspray for all-day hold
Best For:
- Dance class, ballet, or performance days at school
- When you need your hair completely secured and out of the way
- Creates a polished, performance-ready appearance
Time Required: 6-8 minutes
21. Rope Twist Ponytail
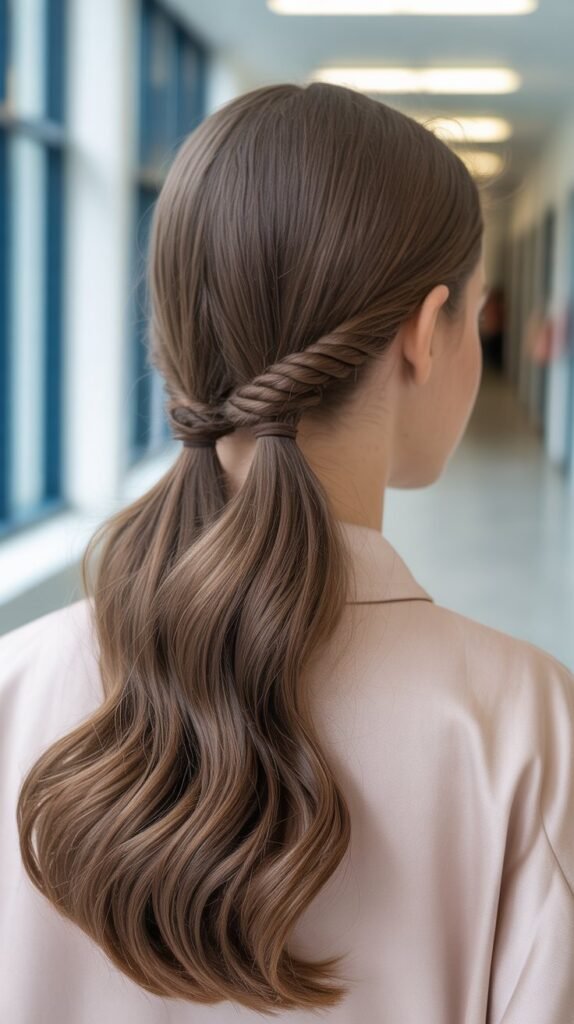
The rope twist ponytail creates beautiful dimension through a simple twisting technique that makes your ponytail look thick, textured, and far more interesting than a standard style.
This technique works particularly well for making fine hair appear fuller and more voluminous.
How to Create:
- Create a ponytail at your desired height
- Divide the ponytail into two equal sections
- Twist each section individually in the same direction (both clockwise)
- Then twist both sections together in the opposite direction (counterclockwise)
- Secure the end with an elastic band
- The opposing twist directions create the rope effect that holds itself together
Best For:
- All hair types, especially beneficial for fine or thin hair
- Adding texture without using heat tools
- Quick styling that looks more complex than it is
Time Required: 4-5 minutes
22. Bow Bun
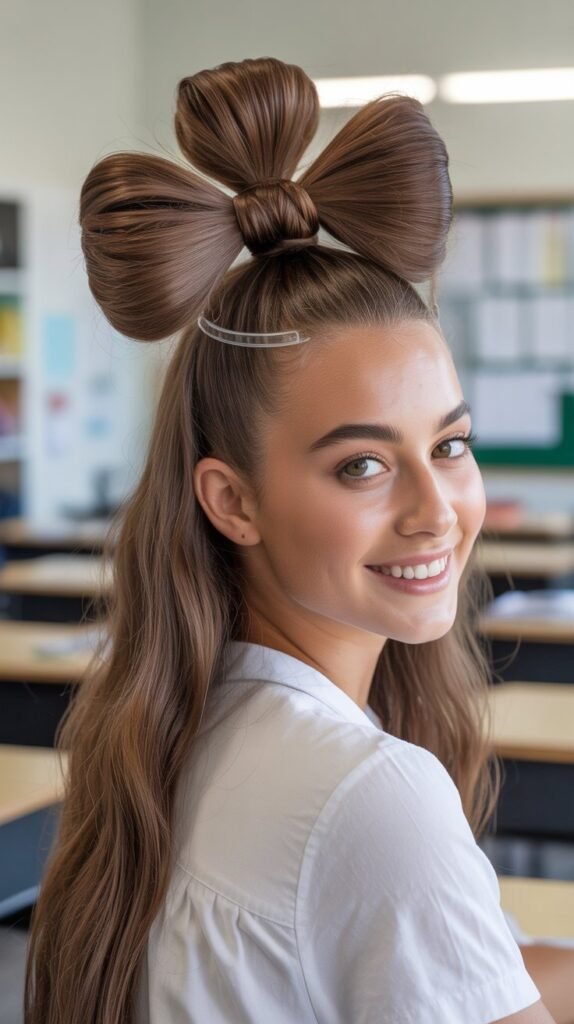
The bow bun creates an adorable, whimsical look by shaping your hair into an actual bow shape at the back of your head.
This playful style makes a statement while keeping your hair completely secured, perfect for spirit days or when you want to showcase your fun personality.
How to Create:
- Create a high ponytail but on the final wrap, don’t pull hair all the way through, leaving a loop
- Divide the loop in half to create two “bow loops”
- Take the remaining tail and bring it up and over the center where the loops meet
- Secure this center piece with bobby pins to complete the bow shape
- Adjust the loops to be symmetrical and spray with hairspray
- Pin each loop in place if needed for security
Best For:
- Fun school events, spirit week, or themed days
- Medium to long thick hair that holds shapes well
- Younger students or anyone who loves playful styles
Time Required: 7-10 minutes
23. Triple Ponytail Combo
The triple ponytail combo creates cascading layers that add incredible volume and interest by stacking three ponytails down the back of your head.
This optical illusion makes your hair appear much longer and fuller than a single ponytail while being surprisingly secure for active days.
How to Create:
- Create a ponytail at the crown of your head with the top section of hair
- Create a second ponytail at mid-head height with the middle section
- Create a third ponytail at the nape with the remaining hair
- Flip the first ponytail back over the second, creating volume
- Repeat with the second over the third
- Secure each layer with elastics and adjust for maximum volume
Best For:
- Making fine or thin hair appear thicker and longer
- Adding drama without complicated techniques
- Active school days when you need secure styling
Time Required: 5-7 minutes
24. Knotted Half-Up Style
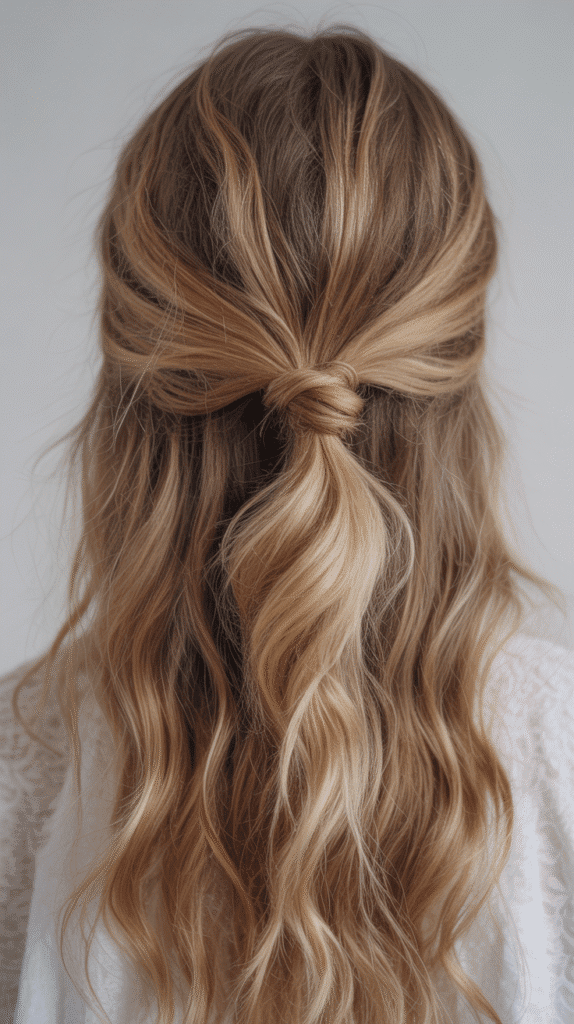
The knotted half-up style uses actual knots instead of elastics to secure your hair, creating a bohemian, effortless look that’s both trendy and practical.
This technique works beautifully for showcasing your hair’s natural texture while keeping the top section controlled.
How to Create:
- Take a section of hair from each side of your head at temple level
- Bring both sections to the back center of your head
- Tie them together in a simple overhand knot (like tying shoelaces)
- Pull the knot tight to secure it
- You can create a second knot below the first for extra security
- Leave the rest of your hair down naturally
Best For:
- All hair types, especially wavy or textured hair
- Casual school days with a bohemian vibe
- When you want to avoid using elastics that can break hair
Time Required: 2-3 minutes
25. Twisted Crown Braid
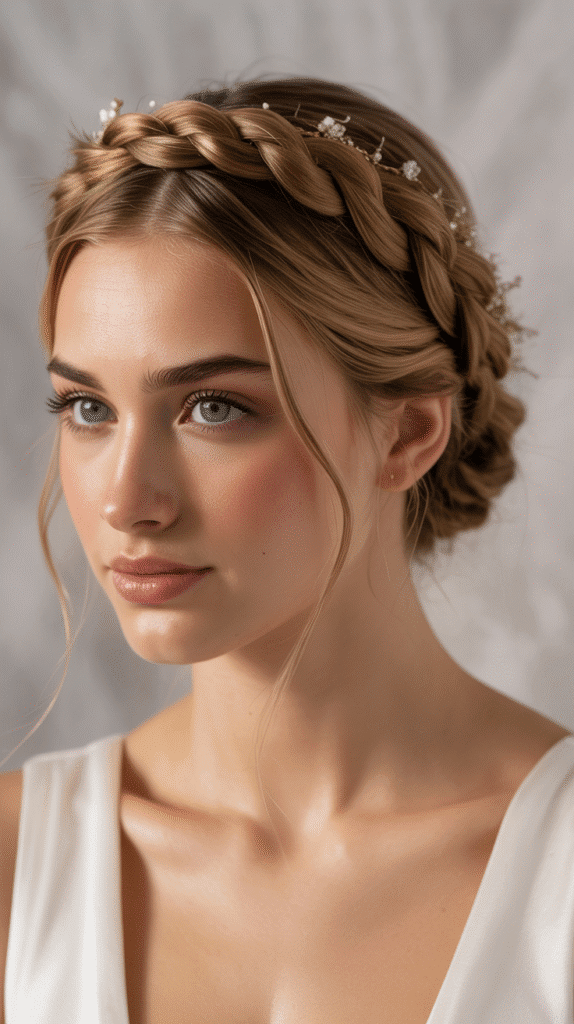
The twisted crown braid creates a halo effect around your head using twist techniques instead of traditional braiding.
This romantic style keeps hair completely away from your face while creating an ethereal, princess-like appearance that’s perfect for special school occasions.
How to Create:
- Part your hair down the middle
- Starting at one side, take a section near your forehead and divide it in two
- Twist the sections around each other, adding new hair from the hairline as you go
- Continue twisting around your head like a crown
- When you reach the starting point, secure and tuck the end underneath
- Pin throughout the crown for security
- Pull gently on the twists to make them fuller and more prominent
Best For:
- Long hair with good texture for holding twists
- Special events, picture day, or formal school functions
- Creating an elegant, timeless appearance
Time Required: 10-15 minutes
26. Braided Low Ponytail
The braided low ponytail features a braid that starts at the crown and transitions into a ponytail, combining two classic styles into one cohesive look.
This practical style keeps hair secure from root to mid-length while allowing the ends to flow freely, offering the best of both braids and ponytails.
How to Create:
- Start a French or Dutch braid at the crown of your head
- Continue braiding down the back of your head, adding hair from the sides
- When you reach the nape of your neck, secure the braid with an elastic into a ponytail
- Leave the remaining length loose as a ponytail
- Optional: braid the ponytail portion as well for a fully braided look
- Pull gently on the braid edges for added volume and texture
Best For:
- Athletic activities or gym class
- All hair types and lengths (shoulder-length or longer)
- Combination of security and movement
Time Required: 7-9 minutes
27. Wrapped Ponytail with Multiple Sections
The wrapped ponytail with multiple sections creates architectural interest by wrapping different portions of your ponytail separately with small sections of hair.
This editorial-looking style transforms a simple ponytail into something magazine-worthy while remaining appropriate and practical for school.
How to Create:
- Create a ponytail at your desired height
- Take a small section from the ponytail and wrap it around the elastic, securing with a bobby pin
- Move down 2-3 inches and take another small section from the ponytail
- Wrap this section around the entire ponytail at that point, creating a band effect
- Secure with a clear elastic or bobby pin
- Repeat 2-3 more times down the length of the ponytail
- Each wrapped section should be evenly spaced for the best visual effect
Best For:
- Medium to long hair with enough length for multiple wraps
- When you want to make a fashion statement
- School fashion shows, presentations, or special events
Time Required: 8-10 minutes
Helpful Tips for Styling Long Hair for School
Product Recommendations:
- Use a lightweight leave-in conditioner to prevent tangles and make hair more manageable
- Dry shampoo becomes your best friend for refreshing second-day styles
- Invest in quality elastics that won’t break or damage hair
- Keep bobby pins that match your hair color for invisible security
Tools You’ll Need:
- Wide-tooth comb for detangling without breakage
- Paddle brush for smooth styles
- Clear and colored elastics in various sizes
- Bobby pins in your hair color
- Small hair clips for sectioning
- Travel-sized hairspray for touch-ups
Time-Saving Strategies:
- Prepare your hair the night before with loose braids or a silk pillowcase to reduce morning tangles
- Keep your styling tools and products organized in one accessible location
- Practice new styles on weekends when you have more time
- Take progress photos when learning new techniques to track your improvement
Important Reminders:
- Never tie your hair when it’s soaking wet, as this can cause severe breakage
- Give your scalp breaks from tight hairstyles to prevent traction alopecia
- Trim your ends every 8-12 weeks to maintain healthy hair that’s easier to style
- Deep condition weekly to keep long hair moisturized and manageable
School-Appropriate Hair Accessories
Classic Options:
- Simple headbands in neutral colors or school colors
- Minimalist hair clips and barrettes
- Ribbon ties for ponytails and braids
- Small fabric flowers or bows for special occasions
Trendy Additions:
- Pearl bobby pins arranged in patterns
Claw clips in various sizes for quick updos
- Scrunchies in solid colors or subtle patterns
- Thin wire headbands for a delicate touch
- Metallic bobby pins in gold, silver, or rose gold
What to Avoid:
- Overly large or distracting accessories that violate dress codes
- Accessories with sharp edges that could be safety hazards
- Anything that makes noise during class
- Excessive glitter or decorations that shed throughout the day
Adapting Styles for Different Hair Textures
For Straight Hair:
- Add texture spray before styling to help styles hold better
- Tease at the roots for ponytails and buns to prevent slipping
- Use stronger hold elastics as straight hair tends to slide out more easily
- Consider adding waves or curls the night before for styles that need grip
For Wavy Hair:
- Embrace your natural texture by using it to add volume to buns and braids
- Apply a curl-enhancing cream to define waves in half-up styles
- Your texture naturally holds pins and elastics better than straight hair
- Use a wide-tooth comb instead of a brush to maintain wave pattern
For Curly Hair:
- Detangle gently when hair is wet and conditioned to prevent breakage
- Use a moisturizing leave-in product before styling to reduce frizz
- Braid and twist styles work exceptionally well with natural curl texture
- Protect your curls overnight with a satin bonnet or pillowcase
- Avoid over-manipulating curls throughout the day to maintain definition
For Thick Hair:
- Section your hair when braiding or twisting for better control
- Use extra bobby pins and larger elastics designed for thick hair
- Styles like buns and braids showcase your hair’s natural volume beautifully
- Apply products sparingly to avoid weighing down your hair
For Fine Hair:
- Create the illusion of thickness with pull-through braids and bubble ponytails
- Tease strategically at roots for added volume
- Use volumizing products at the roots before styling
- Styles with multiple layers like triple ponytails work exceptionally well
Quick Troubleshooting Guide
Problem: Style falls apart by lunchtime
- Solution: Use more bobby pins than you think necessary and spray with hairspray
- Prevention: Tease hair slightly at roots for better grip and use texturizing spray
Problem: Bumps or lumps in ponytails and sleek styles
- Solution: Use a fine-tooth comb to smooth sections as you gather hair
- Prevention: Apply smoothing serum to damp hair before styling
Problem: Braids look messy or uneven
- Solution: Keep sections equal in size and maintain consistent tension throughout
- Prevention: Practice on weekends and watch tutorial videos to improve technique
Problem: Hair too slippery to hold styles
- Solution: Style on second-day hair or use dry shampoo for added grip
- Prevention: Avoid over-conditioning your hair or applying conditioner to roots
Problem: Headache from tight hairstyles
- Solution: Loosen the style immediately and massage your scalp
- Prevention: Don’t pull hair too tightly when securing and take breaks from updos
Problem: Static and flyaways ruining polished looks
- Solution: Lightly spray hairspray on your hands and smooth over flyaways
- Prevention: Use a leave-in conditioner and avoid over-drying hair
Creating a Weekly Hairstyle Rotation
Planning your hairstyles for the week can save precious morning minutes and ensure you’re never stuck doing the same boring ponytail every day.
Here’s a sample rotation that balances quick styles with more elaborate ones:
Monday: Classic High Ponytail with a Twist
- Start the week feeling fresh and polished
- Quick 3-4 minute style perfect for groggy Monday mornings
- Professional enough for any Monday assignments or presentations
Tuesday: Messy Bun with Face-Framing Strands
- Embrace second-day hair with this effortless style
- Takes only 2-3 minutes on busy mornings
- Casual and comfortable for regular school days
Wednesday: Half-Up Top Knot
- Mid-week style that’s both practical and trendy
- Works well for hump day when you need a little boost
- Versatile enough for classes and after-school activities
Thursday: Dutch Braid Crown or Fishtail Braid
- Invest a few extra minutes for an impressive look
- Shows you put effort in as the weekend approaches
- These styles hold beautifully if you have sports or activities
Friday: Bubble Ponytail or Space Buns
- Fun, playful styles to celebrate the start of the weekend
- Perfect for spirit days or casual Fridays
- Express your personality as you head into the weekend
Hairstyles for Special School Events
Picture Day:
- Low Twisted Bun for timeless elegance
- Dutch Braid Crown for a special touch
- Twisted Crown Braid for princess vibes
- Avoid trendy styles that might look dated in future yearbooks
School Dances and Formal Events:
- Low Braided Bun for sophisticated elegance
- Waterfall Braid for romantic charm
- High Bun with Braided Detail for formal occasions
- Side Braid with Loose Waves for soft, feminine style
Spirit Week and Theme Days:
- Space Buns for retro or fun themes
- Bubble Ponytail for colorful, energetic days
- Bow Bun for school spirit and playfulness
- Add ribbons or accessories in school colors
Sports Days and Field Trips:
- Double Dutch Braids for maximum security
- Braided Low Ponytail for athletic activities
- High Bun with Braided Detail for dance or performance
- Styles that won’t require fixing throughout the day
Presentation and Interview Days:
- Sleek Low Ponytail for professional appearance
- Low Twisted Bun for mature sophistication
- Classic High Ponytail with a Twist for polished confidence
- Avoid overly trendy or casual styles
Frequently Asked Questions
How can I make my hairstyles last through gym class?
- Choose braided styles or secure buns that won’t move during activity
- Apply hairspray before physical activity for extra hold
- Use fabric elastics that grip better than traditional rubber bands
- Consider switching to a sporty style like double Dutch braids before gym
What if I’m running extremely late?
- Master the 2-minute messy bun or half-up top knot
- Keep a go-to emergency style that you can do without a mirror
- Sleep with your hair in a loose braid to reduce morning tangles
- Invest in time-saving tools like large claw clips for instant updos
How do I prevent my hairstyles from looking too “done” or formal?
- Pull out a few face-framing pieces for a more relaxed look
- Gently pull on braids and buns to make them appear fuller and less tight
- Embrace small imperfections rather than obsessing over perfection
- Choose styles described as “messy” or “effortless” in this guide
Can I do these styles if I have layers?
- Yes, though some styles work better than others with layers
- Shorter layers may stick out from braids, which can actually add texture
- Use bobby pins to secure shorter pieces that won’t reach ponytails
- Styles like half-up options and loose braids work beautifully with layers
How often should I wash my hair when wearing these styles?
- Most people with long hair wash 2-3 times per week
- Second-day hair actually holds styles better than freshly washed hair
- Use dry shampoo to refresh your scalp between washes
- Protective styles like braids can extend time between wash days
What if my school has strict hair regulations?
- Stick to classic styles like ponytails, braids, and simple buns
- Avoid extreme height or width in your hairstyles
- Use accessories in approved colors only (usually neutral or school colors)
- When in doubt, check your student handbook or ask administrators
Environmental Factors to Consider
Humid Weather:
- Opt for braided styles that embrace texture rather than fight it
- Apply anti-frizz serum before styling
- Avoid sleek styles that will fall flat in humidity
- Updos and buns protect your hair from environmental moisture
Rainy Days:
- Choose protective styles like buns and braids that keep hair contained
- Avoid leaving hair down where it will absorb moisture
- Bring a small umbrella to protect your style
- Keep emergency bobby pins in your bag for quick fixes
Windy Conditions:
- Secure styles are essential (buns, braids, tight ponytails)
- Avoid half-up styles where the bottom can blow around
- Use extra hairspray for added security
- Consider styles that look good even when slightly messed up
Hot Weather:
- Choose updos that keep hair off your neck
- High buns and ponytails allow for better air circulation
- Avoid styles that require heat tools which make you hotter
- Bring a hair tie to switch to an updo if you get too warm
Cold Weather:
- Styles that fit under hats and hoods work best
- Low ponytails and buns won’t create bumps under winter accessories
- Braids protect hair from harsh winter conditions
- Apply leave-in conditioner to combat dry, static winter hair
Building Your Hair Styling Skill Level
Beginner Level (Weeks 1-2):
- Master the basic high ponytail and messy bun
- Practice half-up styles and simple twists
- Focus on getting comfortable with bobby pins and elastics
- Don’t worry about perfection, just build confidence
Intermediate Level (Weeks 3-4):
- Learn basic three-strand braiding technique
- Try fishtail braids and Dutch braids
- Experiment with combining techniques (braided ponytails)
- Challenge yourself with one new style each week
Advanced Level (Month 2+):
- Tackle waterfall braids and crown styles
- Master pull-through braid techniques
- Create your own variations on the styles in this guide
- Help friends learn these styles too
Expert Level (Month 3+):
- Complete complex styles in under 10 minutes
- Adapt any style to your unique hair texture and length
- Teach others and share your favorite techniques
- Create original styles by combining different elements
Hair Care Routine for School-Ready Hair
Night Before:
- Detangle gently with a wide-tooth comb before bed
- Apply a leave-in treatment to ends if hair tends to be dry
- Sleep with hair in a loose braid or on a silk pillowcase
- Set out any accessories or tools you’ll need in the morning
Morning Routine:
- Start with manageable hair by following nighttime prep
- Apply any necessary products (smoothing serum, texturizing spray, etc.)
- Complete your chosen hairstyle
- Take 30 seconds to check from all angles
- Keep emergency supplies (bobby pins, elastic) in your bag
Throughout the Day:
- Avoid constantly touching or adjusting your hair
- If you need to fix something, step away to a bathroom rather than fixing in class
- Bring a small comb or brush for lunchtime touch-ups if needed
- Remember that small imperfections are normal and usually unnoticeable to others
After School:
- Remove elastics and pins gently to avoid breakage
- Shake out your hair and let your scalp breathe
- If you did a tight style, massage your scalp to restore circulation
- Brush through any tangles before bed
Conclusion
Navigating the world of 27 Easy Hairstyles for Long Hair for School That Are Cute and Quick opens up endless possibilities for expressing your personal style while maintaining practicality for busy school days.
These hairstyles prove that you don’t need to sacrifice precious sleep or morning study time to look polished and put-together.
From the simple elegance of a sleek low ponytail to the playful charm of space buns, each style in this collection has been chosen specifically for its combination of cuteness, speed, and durability throughout a full school day.
The beauty of having long hair lies in its versatility, and mastering even just a handful of these styles will ensure you never feel stuck in a hair rut again.
Remember that practice makes perfect, and what might take ten minutes today will soon become a five-minute routine as your skills develop.
Don’t be afraid to experiment with different styles to find which ones work best with your unique hair texture, face shape, and personal aesthetic.
Keep your hair healthy with regular trims and proper care, and your styling efforts will always look their best.
With these 27 options in your styling repertoire, you’ll head to school each day feeling confident, comfortable, and ready to take on whatever challenges come your way, all while looking absolutely adorable.