We’ve all been there—waking up to hair that’s seen better days, with roots that look a little too slick and strands that refuse to cooperate.
Instead of reaching for dry shampoo or spending precious time washing and styling, what if you could transform that greasy hair into a chic, intentional look in minutes?
The secret weapon hiding in your accessory drawer is simpler than you think: a headband.
This versatile piece can disguise oily roots, add instant polish, and create dozens of stunning styles that nobody would guess started with second (or third) day hair.
Whether you’re heading to work, meeting friends for brunch, or just running errands, mastering these 27 Greasy Hair Hairstyles with a Headband will revolutionize your bad hair days forever.
From bohemian braids to sleek updos, vintage-inspired waves to modern twists, you’ll discover how this single accessory can be your styling savior when time and hair cleanliness aren’t on your side. Get ready to bookmark this guide and never stress about greasy hair again.
1. Classic Slicked-Back Ponytail with Wide Headband
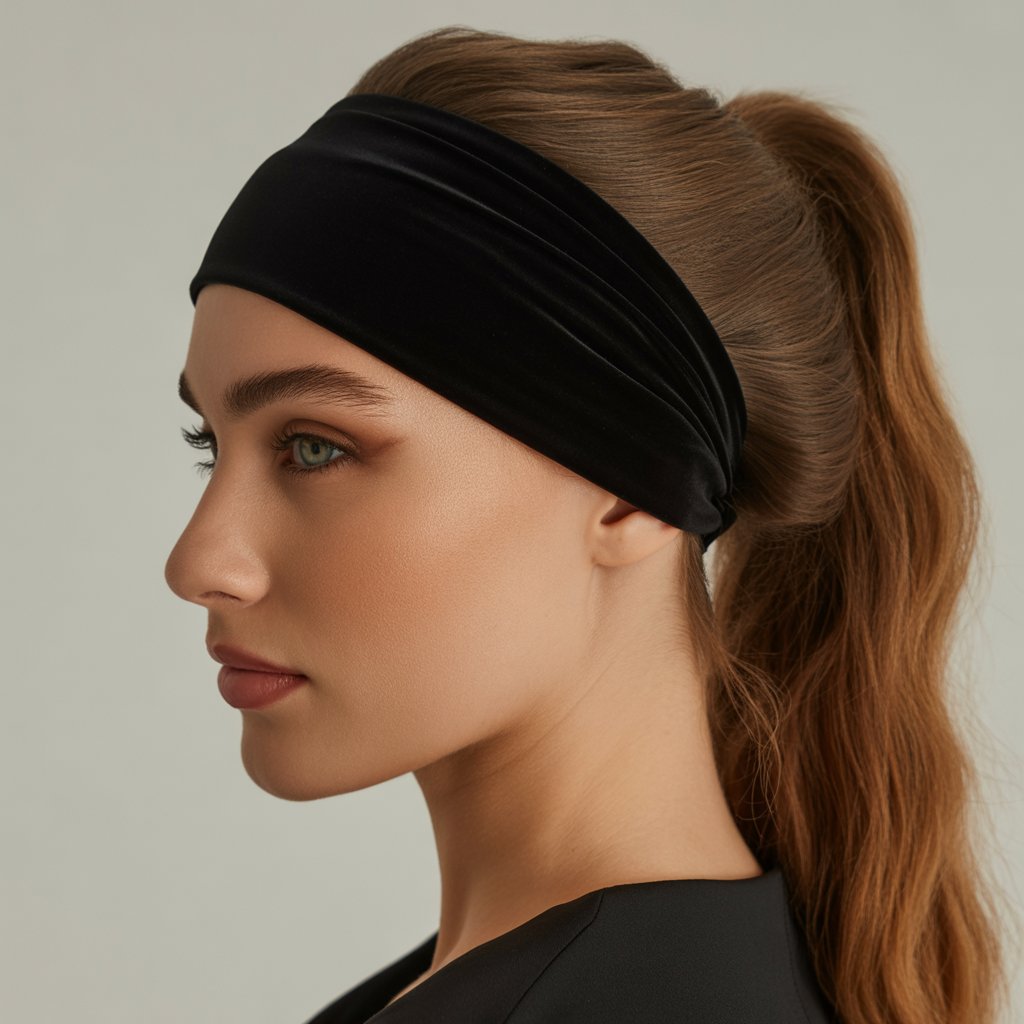
The slicked-back ponytail is one of those timeless styles that actually looks better with a bit of natural oil in your hair.
When you’re working with greasy roots, you already have the perfect foundation for that sleek, polished appearance that would otherwise require gels and serums.
How to Create This Look:
- Start by brushing all your hair straight back from your forehead, letting the natural oils work in your favor to create that glossy, intentional sheen.
- Position a wide headband about an inch back from your hairline, pressing it firmly against your head to hide any particularly oily roots at the crown.
- Gather all your hair into a high ponytail at the crown of your head, securing it tightly with a hair elastic that matches your hair color.
- Smooth down any flyaways or bumps using your palms, and the natural oils will help everything stay in place without additional products.
- Take a small section of hair from the ponytail and wrap it around the elastic to conceal it, securing the end with a bobby pin underneath.
Why This Works for Greasy Hair:
- The natural oils in your hair create the exact glossy finish that people spend money on shine serums to achieve.
- The wide headband covers the greasiest part of your hair—the roots and hairline—while drawing attention to the accessory itself.
- Pulling hair back tightly keeps oily strands away from your face, preventing that limp, weighed-down look.
2. Bohemian Braided Crown with Thin Headband
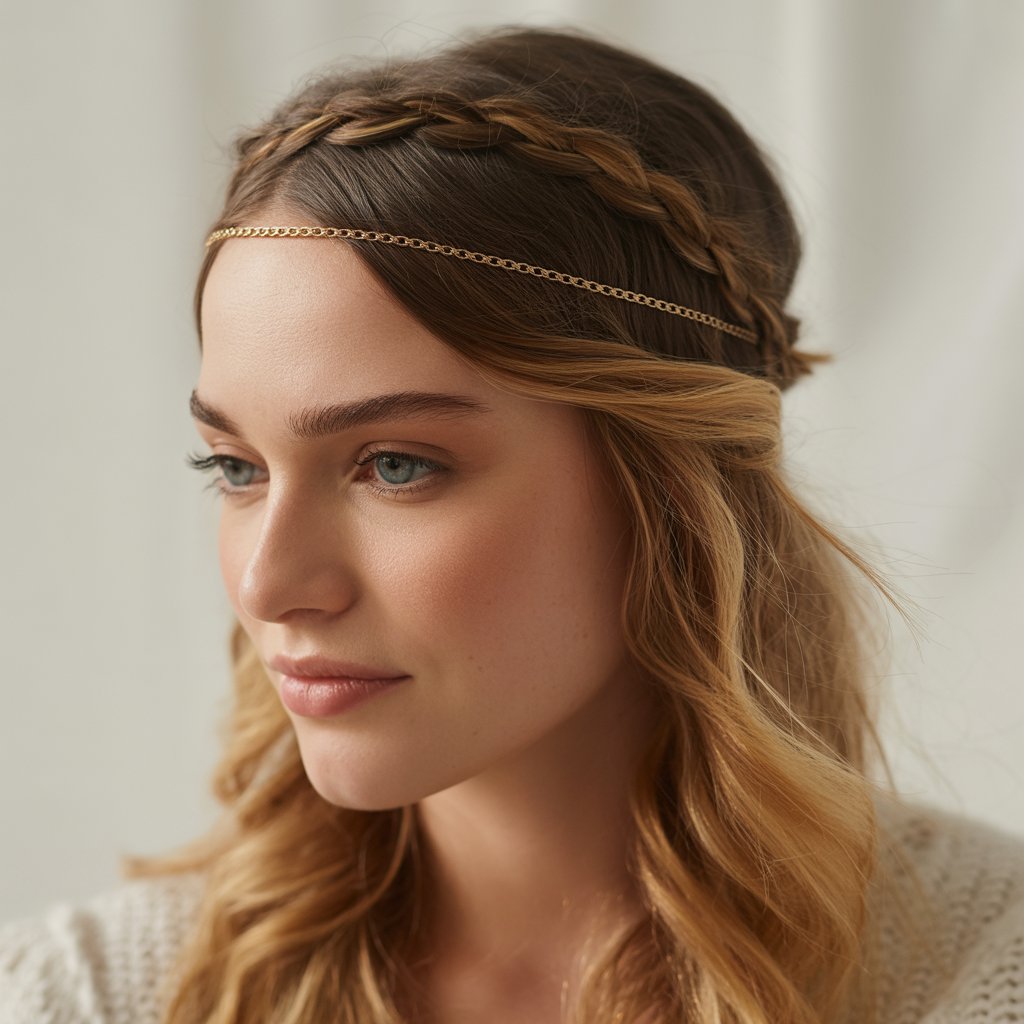
When your hair has that lived-in texture from natural oils, it’s actually the perfect time to create loose, bohemian braids that have amazing grip and hold without slipping apart.
Step-by-Step Instructions:
- Place a thin, delicate headband across your head at the hairline, choosing metallic or jeweled options to add a focal point to the style.
- Divide your hair into two equal sections, creating a part down the middle from your forehead to the nape of your neck.
- Take the left section and create a loose French braid or regular three-strand braid, starting just behind your ear and working toward the back.
- Repeat the braiding process on the right side, keeping the tension consistent but not too tight to maintain that effortless, bohemian vibe.
- Bring both braids up and over the top of your head, crisscrossing them to create a crown effect, and secure them with bobby pins that match your hair color.
- Gently pull and loosen the braids with your fingers to create volume and texture, which is much easier with greasy hair that has natural grip.
Benefits of This Style:
- Greasy hair holds braids better than freshly washed hair, which tends to be slippery and causes braids to fall apart quickly.
- The headband conceals your greasiest roots while adding a decorative element that elevates the entire look from basic to special.
- This style keeps hair completely off your face and neck, which is ideal when you don’t want oily hair touching your skin.
3. Vintage Victory Rolls with Statement Headband
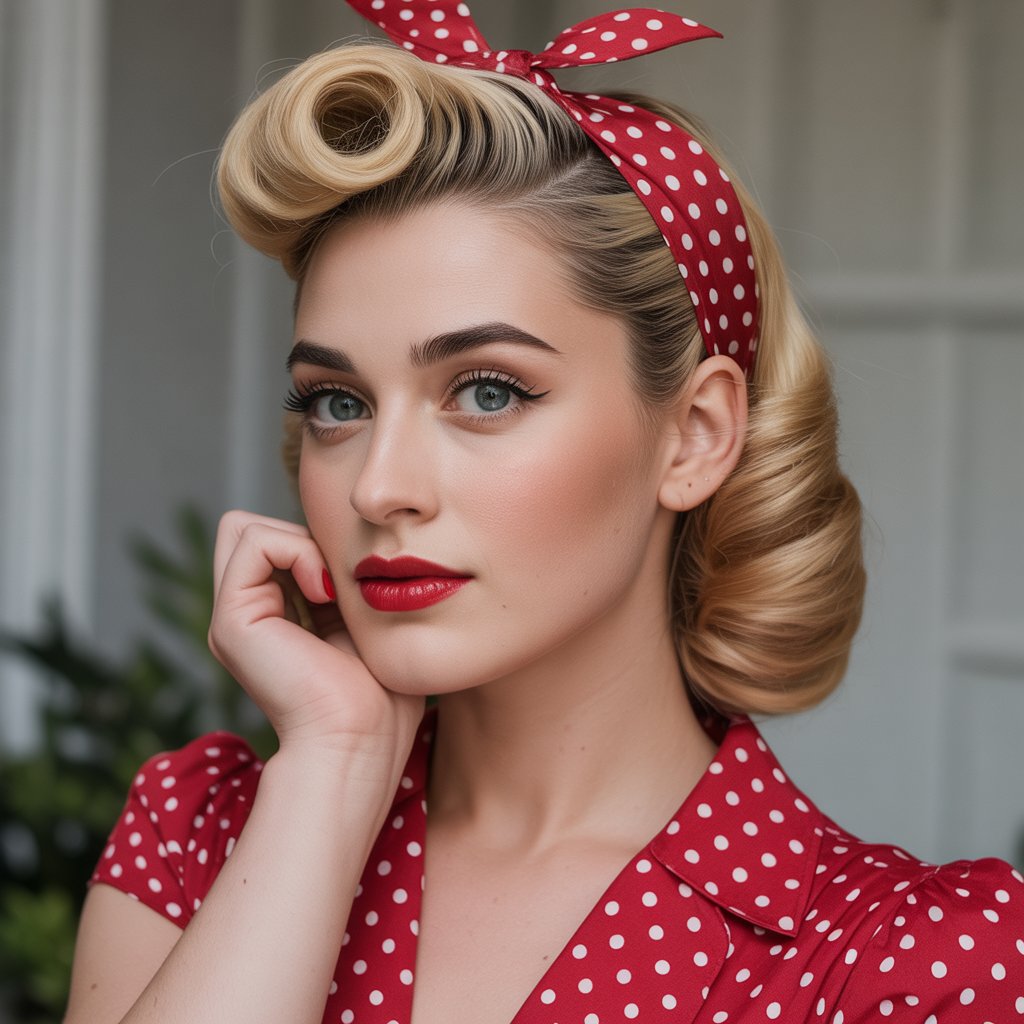
Nothing says glamorous quite like vintage victory rolls, and the secret that women from the 1940s knew is that slightly dirty hair is actually essential for creating these iconic rolls with staying power.
Creating Victory Rolls:
- Begin by placing a wide, statement headband—think polka dots, bows, or vibrant colors—about two inches back from your hairline.
- Section off the front portions of your hair on both sides, creating two rectangular sections that are about three inches wide.
- Take the right front section and backcomb it at the roots to create volume and texture, which works beautifully with greasy hair’s natural grip.
- Roll the section of hair up and over your fingers, creating a tube-like roll that curves backward, and secure it with bobby pins and hairspray.
- Repeat the rolling technique on the left side, making sure both rolls are symmetrical in size and placement for that authentic vintage look.
- Style the remaining hair in the back however you prefer—leave it down in soft waves, pin it up, or create a low bun.
Why Greasy Hair is Perfect:
- The natural oils provide the texture and hold that victory rolls require to stay in place all day without collapsing.
- Clean hair is too slippery and soft to maintain the structured shape that defines this classic style.
- The headband serves as both a decorative element and a strategic tool to hide oily roots while staying true to the vintage aesthetic.
4. Messy Low Bun with Braided Headband

The messy low bun is the ultimate “I didn’t try but somehow look effortlessly chic” hairstyle, and it’s exponentially easier to achieve when your hair has some natural texture and weight from oils.
How to Style:
- Start with a braided or fabric headband, positioning it across your forehead or slightly back, depending on where your greasiest roots are concentrated.
- Gather all your hair at the nape of your neck without worrying about smoothness—the messier, the more authentic this style looks.
- Twist the hair loosely and wrap it around itself to create a bun, leaving some pieces hanging out and not tucking everything in perfectly.
- Secure the bun with a hair elastic and several bobby pins placed randomly throughout to hold the structure without making it look too neat.
- Pull out a few face-framing pieces and some wispy bits from the bun itself to enhance that undone, just-rolled-out-of-bed-looking-gorgeous effect.
Advantages for Oily Hair:
- Greasy hair has more weight and texture, which makes it easier to manipulate into that perfectly imperfect messy bun shape.
- The oils prevent flyaways and that static-y, fluffy appearance that clean hair often has when attempting messy styles.
- The headband draws attention upward and away from your roots while adding a casual-chic element to an otherwise simple style.
5. Half-Up Top Knot with Sporty Headband

The half-up top knot has become a go-to style for everyone from athletes to influencers, and pairing it with a sporty headband makes it functional, fashionable, and perfect for concealing greasy roots.
Construction Steps:
- Choose a sporty, moisture-wicking headband in a color that complements your outfit, and position it about an inch back from your hairline.
- Section off the top half of your hair from ear to ear, leaving the bottom half down to flow naturally.
- Gather the top section into a high ponytail at the crown of your head, making it as tight or loose as you prefer.
- Twist the ponytail and wrap it around itself to create a small bun or knot, securing it with the original elastic or adding bobby pins for extra hold.
- Leave the bottom section of hair down, and consider adding some texture with your fingers or a quick braid for added interest.
Perfect for Greasy Hair Because:
- The headband covers the oiliest part of your hair where your forehead meets your hairline, instantly refreshing your appearance.
- Pulling just the top section up and back keeps greasy hair away from your face without committing to a full updo.
- The sporty aesthetic actually looks better with hair that has some natural texture rather than squeaky-clean strands that can appear too fluffy.
6. Side-Swept Waves with Jeweled Headband
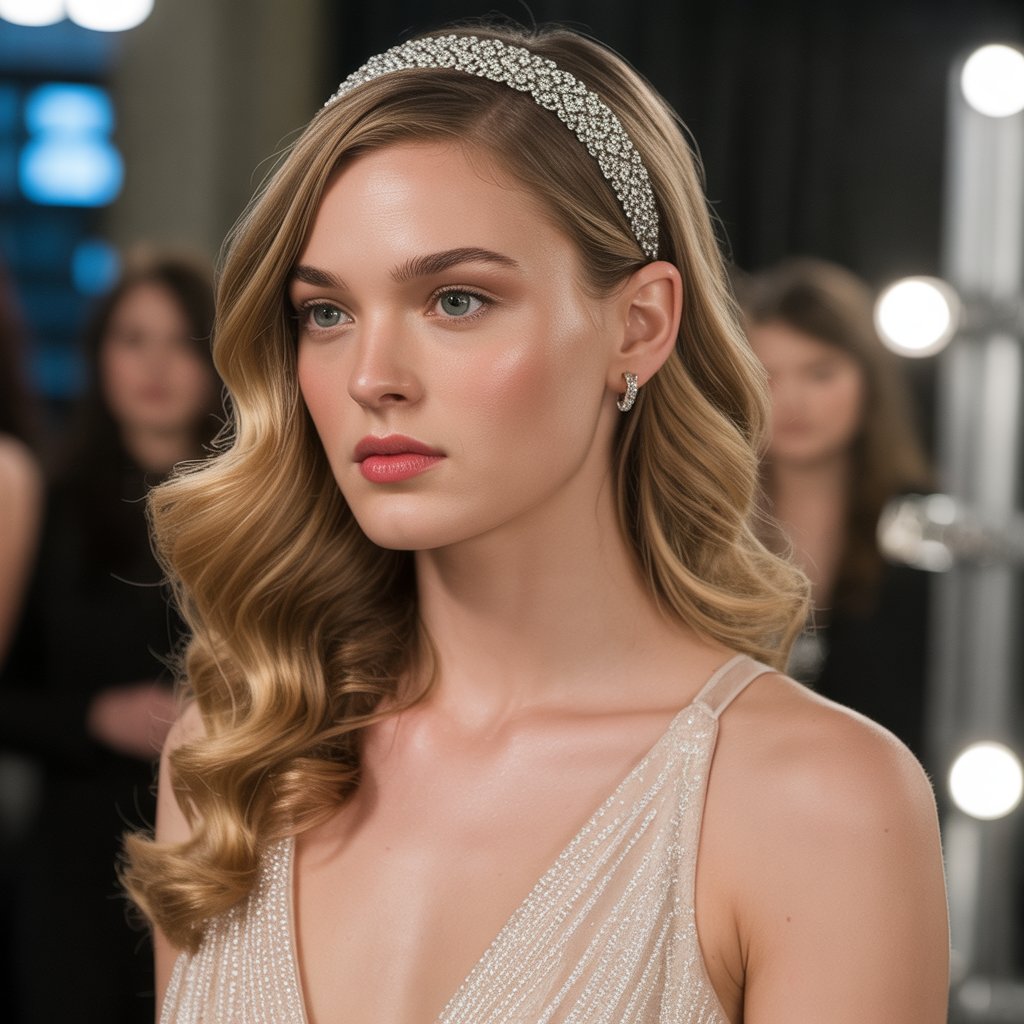
When your hair is greasy, it naturally holds waves better and creates that “beachy” texture that’s surprisingly difficult to achieve with freshly washed hair, making this an ideal time for glamorous side-swept waves.
Styling Process:
- Apply the jeweled or embellished headband across your hairline, choosing one with enough visual interest to become the focal point of your look.
- Create a deep side part on whichever side you prefer, using the natural oils to help the hair lay flat and stay in place.
- Sweep all your hair to one side, letting it drape over your shoulder in soft waves that the natural oils help define and separate.
- If your hair needs more wave definition, use a large-barrel curling iron on random sections, but chances are the natural oils give you enough texture.
- Pin the hair behind your ear on the opposite side of where your hair is swept, using bobby pins that match your hair color to secure everything.
- Apply a small amount of texturizing spray or work the natural oils through the waves with your fingers to enhance definition.
Why This Works:
- Greasy hair has a natural separation and piecey texture that makes waves look more defined and intentional rather than uniform and stiff.
- The jeweled headband adds instant glamour and becomes the star of the show, diverting attention from any oiliness at the roots.
- Side-sweeping creates asymmetry and interest, which is a smart styling trick when you’re working with less-than-perfect hair condition.
7. Double Dutch Braids with Athletic Headband
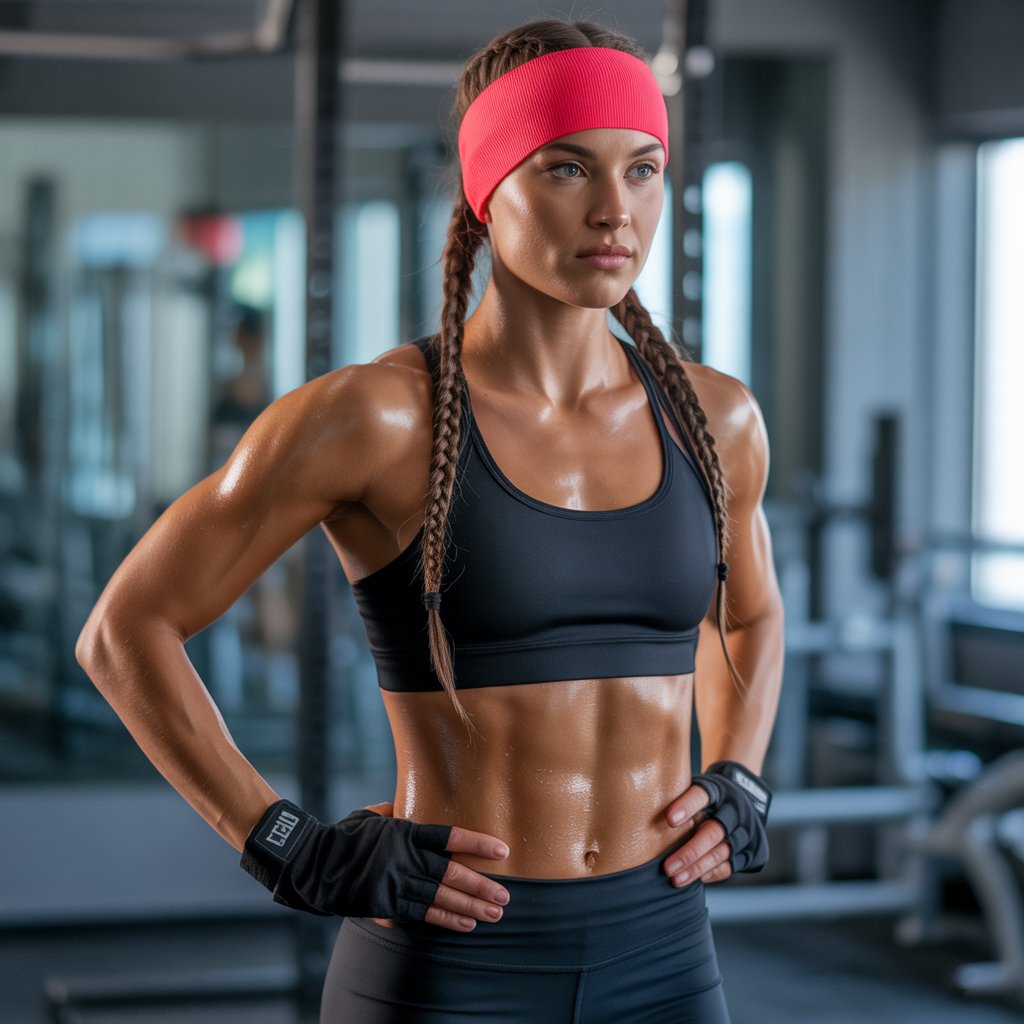
Double Dutch braids combined with a functional athletic headband create a sporty, put-together look that’s perfect for workouts, outdoor activities, or just running errands when your hair needs to stay completely out of your way.
How to Braid:
- Start by securing an athletic headband around your hairline, choosing one that’s non-slip and designed to stay in place during movement.
- Create a center part from your forehead down to the nape of your neck, dividing your hair into two perfectly equal sections.
- Beginning on one side, start a Dutch braid (where you cross sections under rather than over) as close to the headband as possible.
- Continue the Dutch braid down the length of your hair, incorporating small sections as you go and keeping the tension tight and consistent.
- Repeat the exact same process on the other side, making sure both braids are symmetrical in size and tightness.
- Secure both braids at the ends with small elastics, and consider wrapping the ends around themselves to create small buns for extra security.
Ideal for Oily Hair:
- Greasy hair provides the grip necessary to keep Dutch braids tight and secure without pieces slipping out during physical activity.
- The athletic headband absorbs any sweat or additional oils while keeping your greasiest roots completely covered and out of sight.
- This style keeps every single strand of hair pulled back and controlled, which is essential when you don’t want oily hair against your face or neck.
8. Twisted Low Chignon with Pearl Headband
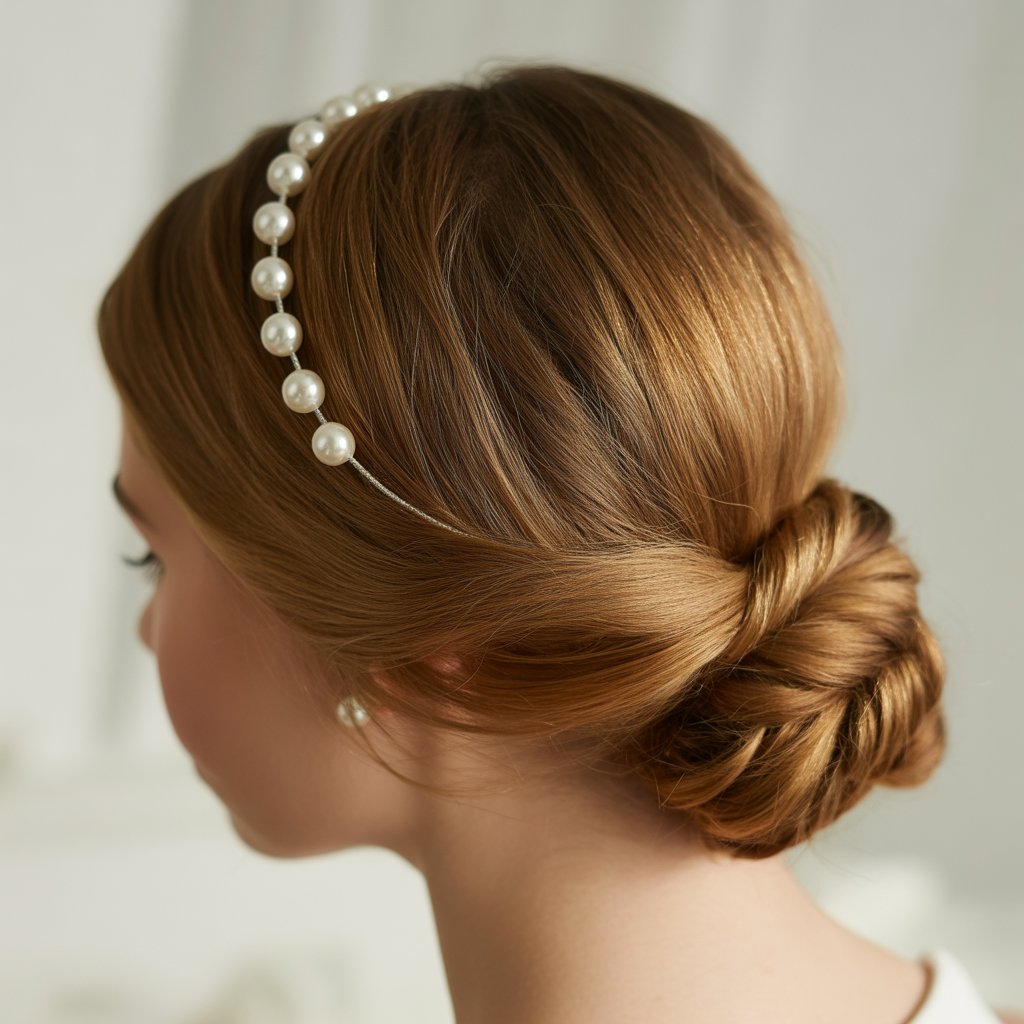
The twisted low chignon exudes elegance and sophistication, making it perfect for formal events, professional settings, or any occasion where you want to look polished despite dealing with greasy hair.
Creating the Chignon:
- Position a pearl or beaded headband about an inch back from your hairline, ensuring it sits securely and comfortably on your head.
- Gather all your hair at the nape of your neck as if you’re creating a low ponytail, but don’t secure it with an elastic yet.
- Divide the gathered hair into two equal sections and twist each section clockwise, keeping the twists tight enough to hold their shape.
- Cross the two twisted sections over each other and continue wrapping them around themselves to create a rope-like chignon at the base of your neck.
- Secure the chignon with bobby pins placed strategically throughout, making sure to hide the pins within the twists for a seamless appearance.
- Smooth down any flyaways at the crown with your palms, using the natural oils to your advantage for a sleek, polished finish.
Benefits of This Elegant Style:
- The sophisticated chignon puts greasy roots to work by creating the sleek, smooth appearance at the crown that this style requires.
- The pearl headband adds a touch of elegance and femininity while concealing your greasiest roots in the most flattering way possible.
- This style works for virtually any formal occasion and proves that greasy hair doesn’t have to limit your event-ready styling options.
9. Bubble Ponytail with Colorful Headband
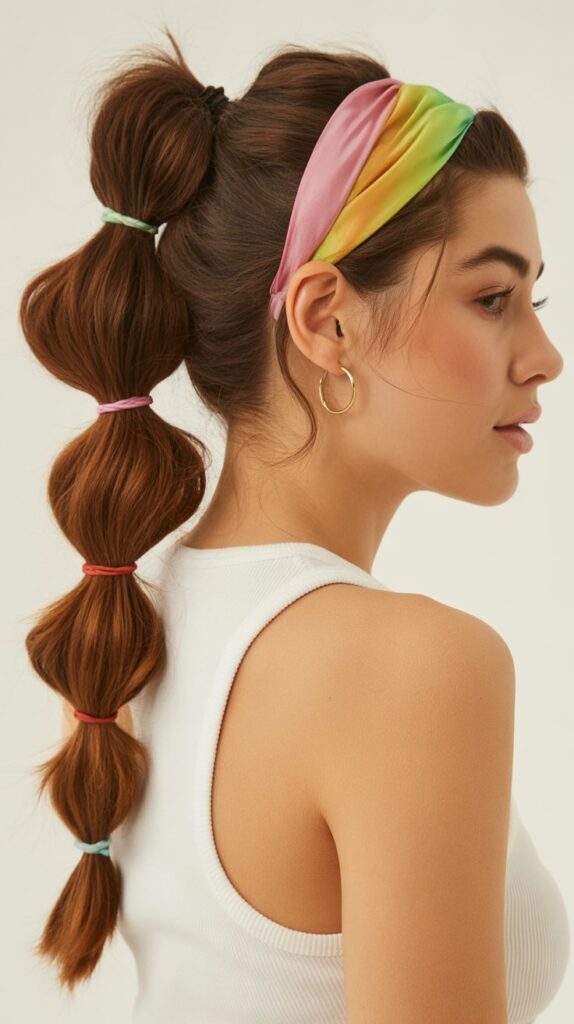
The bubble ponytail is a playful, trendy style that’s taken social media by storm, and the segmented structure actually helps disguise greasy roots while creating a fun, voluminous effect.
Step-by-Step Creation:
- Choose a colorful or patterned headband that reflects your personality and place it across your hairline to hide any visible oil.
- Gather all your hair into a high or mid-level ponytail, securing it tightly with a hair elastic at your desired height.
- Measure down about two to three inches from the first elastic and add another elastic, creating the first “bubble” section.
- Gently pull and tease the hair between the two elastics to create volume and that signature bubble shape.
- Continue adding elastics every few inches down the length of the ponytail, creating multiple bubble sections and pulling each one for volume.
- For extra dimension, you can pull small pieces from each bubble section to make them appear fuller and more dramatic.
Why Greasy Hair is Advantageous:
- The natural oils add weight to your hair, which makes each bubble section more defined and prevents that fluffy, static appearance.
- Greasy hair has better grip, which helps the elastics stay in place and prevents the bubbles from falling flat throughout the day.
- The colorful headband serves as a fun distraction while strategically hiding the oiliest part of your hair at the roots.
10. French Twist with Classic Headband
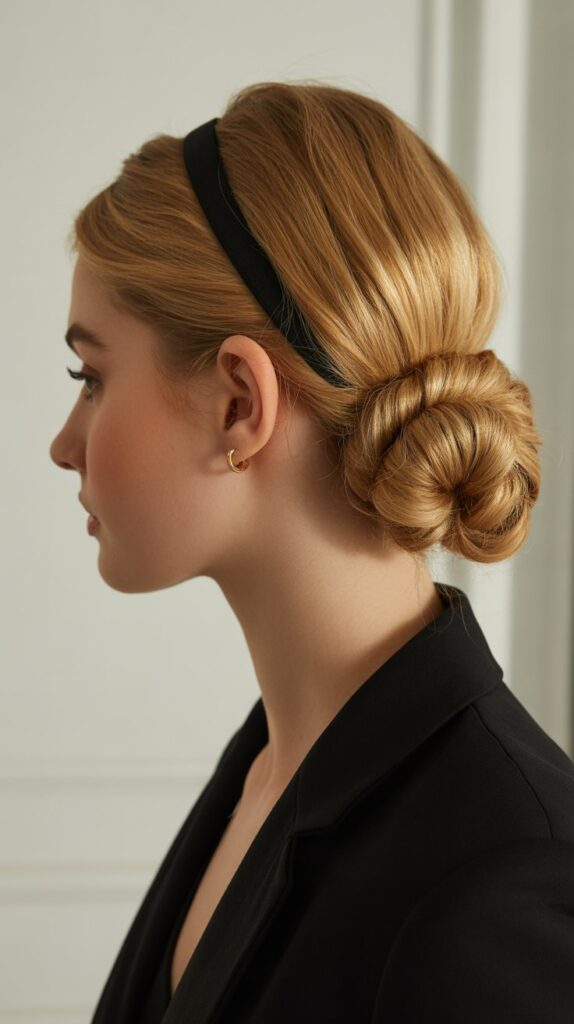
The French twist is the epitome of timeless elegance, and despite its sophisticated appearance, it’s actually much easier to create with hair that has some natural texture and oil for grip.
Mastering the French Twist:
- Begin by placing a classic, understated headband across your hairline—think thin, black, or metallic options that complement rather than compete with the hairstyle.
- Gather all your hair at the nape of your neck and hold it as if you’re about to create a low ponytail.
- Twist the gathered hair upward and to one side (usually right if you’re right-handed), keeping the twist tight and smooth.
- Continue twisting upward until you reach the crown of your head, then tuck the ends of your hair into the twist you’ve created.
- Secure the French twist with bobby pins placed vertically along the seam where the twist meets your head, using as many as needed for security.
- Smooth the crown and sides with your palms, and spray with hairspray to lock everything in place for all-day hold.
Perfect for Professional Settings:
- The natural oils in greasy hair create the smoothness and sleekness that a proper French twist requires to look polished.
- This style completely conceals oily roots and pulls all hair away from your face, making it ideal for important meetings or formal occasions.
- The classic headband adds a subtle finishing touch while hiding any remaining visible grease at the hairline.
11. Braided Pigtails with Ribbon Headband
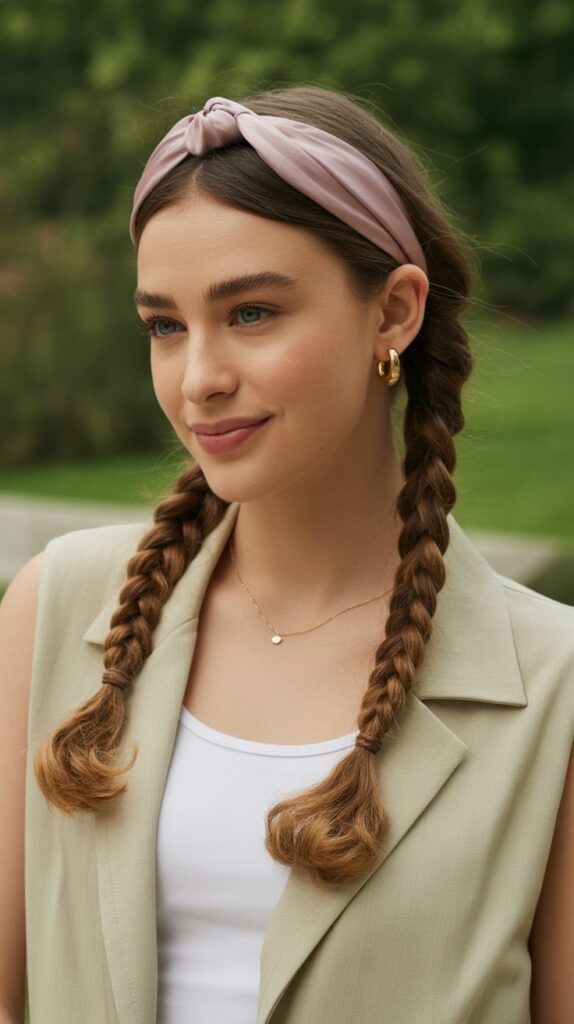
Braided pigtails might sound juvenile, but when styled correctly with a sophisticated headband, they create a youthful, fresh look that’s perfectly acceptable for adults and ideal for second-day hair.
Creating Grown-Up Pigtails:
- Choose a ribbon or fabric headband in a sophisticated color or pattern, positioning it across your hairline like a traditional headband.
- Create a clean center part from your forehead down to the nape of your neck, dividing your hair into two equal sections.
- On each side, create a three-strand braid starting from behind the ear and working down to the ends of your hair.
- Keep the braids slightly loose and pull them apart gently with your fingers to create a fuller, more textured appearance.
- Secure each braid with a small elastic at the ends, choosing clear elastics or ones that match your hair color for a more grown-up look.
- Position the braids either in front of your shoulders or behind them, depending on the look you’re going for and your outfit.
Why This Works for Adults:
- Greasy hair provides the perfect texture for braids that stay put without being too tight or causing headaches.
- The sophisticated headband elevates what could be a childish style into something fresh, modern, and age-appropriate.
- Braided pigtails keep oily hair completely controlled and away from your face without the severity of a single ponytail.
12. Sleek High Bun with Wire Headband
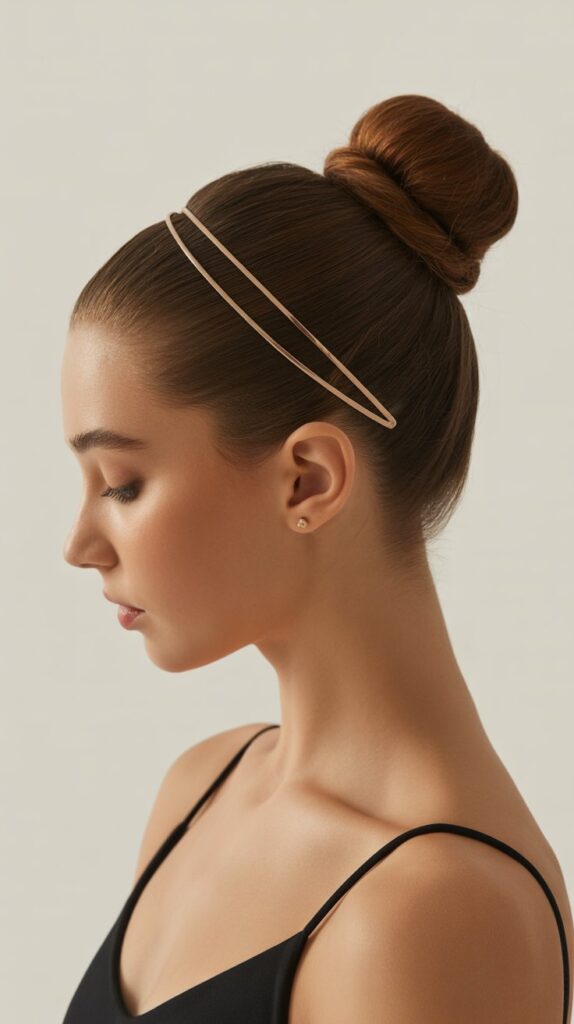
The sleek high bun is a go-to style for dancers and professionals alike because it’s classic, elegant, and incredibly practical—and greasy hair makes achieving that coveted sleekness effortless.
Building the Perfect Bun:
- Secure a wire or thin metal headband across your hairline, making sure it sits flat and comfortable without causing any pinching.
- Brush all your hair straight up toward the crown of your head, using the natural oils to create that glossy, smooth surface.
- Gather everything into a high ponytail at the very top of your head, positioning it where you want the finished bun to sit.
- Twist the entire ponytail tightly and wrap it around the base in a circular motion, creating a neat, compact bun shape.
- Secure the bun with bobby pins inserted at multiple angles, and use a hair elastic wrapped around the base for extra security if needed.
- Apply a small amount of hair gel or use your natural oils to smooth down any flyaways or bumps for that perfectly polished finish.
Advantages for Greasy Hair:
- The natural oils eliminate the need for gels or pomades to achieve that sleek, tight finish that defines this style.
- Greasy hair stays put better in a tight bun and doesn’t create the flyaways and frizz that freshly washed hair often produces.
- The wire headband keeps your greasiest roots hidden while adding a delicate, feminine touch to an otherwise severe hairstyle.
13. Waterfall Braid with Floral Headband
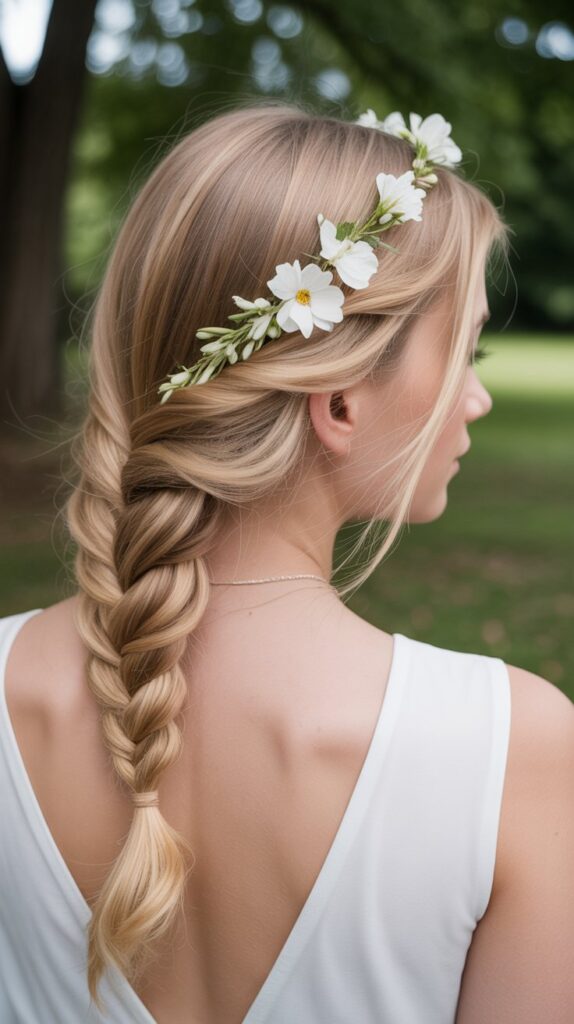
The waterfall braid is undeniably romantic and intricate-looking, but it’s surprisingly achievable even for beginners—and greasy hair actually helps the braid maintain its structure throughout the day.
Creating the Waterfall Effect:
- Begin by placing a floral or nature-inspired headband across your hairline, choosing one that complements the romantic vibe of this style.
- Take a small section of hair near your temple on one side and divide it into three equal strands to start a basic three-strand braid.
- Create one stitch of a regular braid, but when you bring the front strand over the middle, drop it and let it fall down with your loose hair.
- Pick up a new section from the top to replace the dropped section and continue braiding, repeating this drop-and-replace pattern.
- Continue the waterfall braid across the back of your head horizontally, following your natural head shape until you reach the opposite side.
- Secure the end of the braid with a small bobby pin hidden behind your ear or blend it into the rest of your hair seamlessly.
Why Greasy Hair Helps:
- The natural oils provide grip that keeps the intricate waterfall sections from slipping out or losing definition throughout the day.
- Greasy hair has more weight and separation, which makes the “waterfall” strands more visible and defined against the braid.
- The floral headband adds to the romantic aesthetic while hiding oily roots that might otherwise distract from the intricate braiding.
14. Space Buns with Velvet Headband
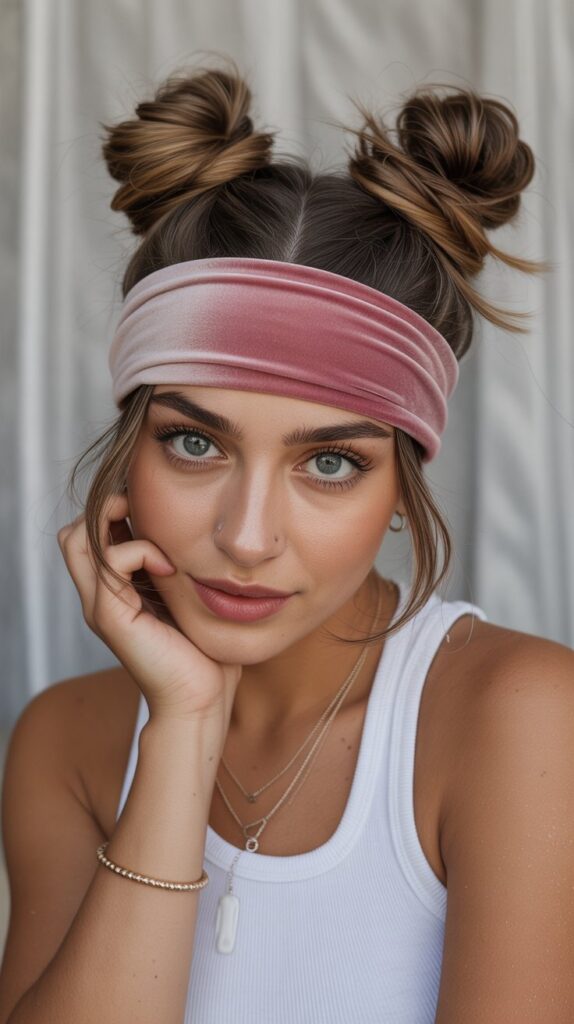
Space buns have evolved from a 90s trend to a modern style staple, and when paired with a luxe velvet headband, they transition from quirky to chic effortlessly—all while disguising greasy hair.
Constructing Space Buns:
- Position a wide velvet headband about an inch or two back from your hairline, choosing a rich color like burgundy, navy, or emerald for added sophistication.
- Create a center part from your forehead to the nape of your neck, dividing your hair into two perfectly symmetrical sections.
- Gather one section into a high ponytail on one side of your head, positioning it where you want the finished bun to sit.
- Twist the ponytail and wrap it around its base in a circular motion, creating a bun and securing it with bobby pins and a hair elastic.
- Repeat the exact same process on the other side, making sure both buns are positioned at the same height and are similar in size.
- Pull out a few face-framing pieces if desired, and gently pull the buns apart slightly to create more volume and a fuller appearance.
Perfect for Festival Season:
- Greasy hair has the texture and weight needed to create buns that hold their shape without collapsing or creating excessive flyaways.
- The velvet headband adds a touch of luxury to a playful style, making it appropriate for various settings beyond just casual wear.
- This style keeps all your oily hair pulled up and away from your face and neck, which is ideal for warm weather or active situations.
15. Low Ponytail with Hair Wrapped Around Elastic and Headband
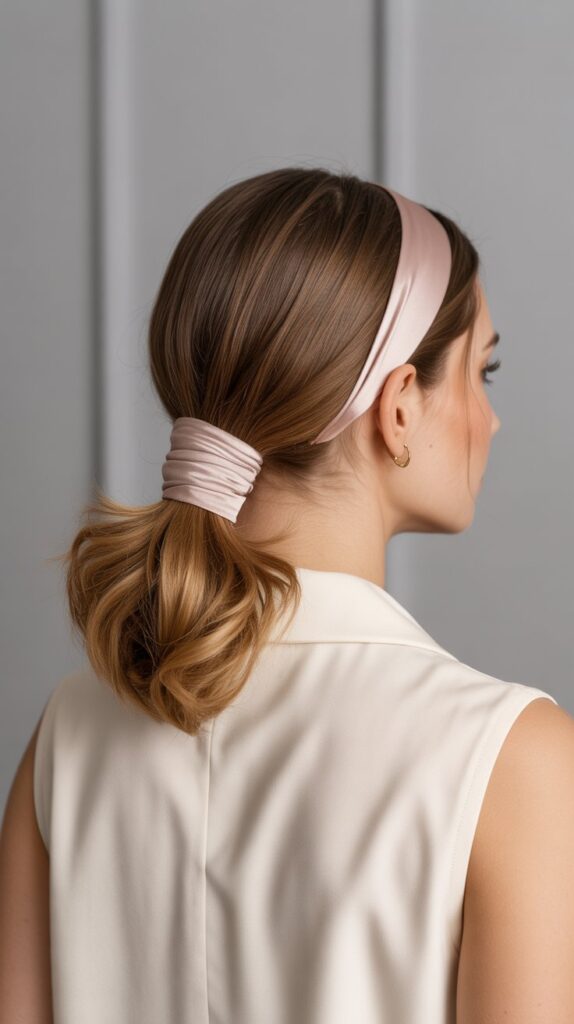
This polished low ponytail style proves that simple doesn’t have to mean boring, especially when you add the refined touch of wrapping a section of hair around the elastic and pairing it with a coordinating headband.
Achieving the Polished Look:
- Select a headband that matches your outfit or hair color and position it about an inch back from your hairline to cover any visible oil.
- Gather all your hair at the nape of your neck into a low ponytail, making sure it’s positioned exactly where you want it—center, side, or slightly off-center.
- Secure the ponytail with a hair elastic, then take a small one-inch section from the ponytail itself.
- Wrap this section around the elastic in a circular motion, covering it completely so the elastic is no longer visible.
- Secure the wrapped section underneath the ponytail with a bobby pin, making sure the pin is hidden and the wrap looks seamless.
- Smooth the crown and sides with your palms, using the natural oils to eliminate any bumps or flyaways for a sleek finish.
Professional Appeal:
- The natural oils in greasy hair make it easier to achieve the smooth, bump-free surface that this polished style requires.
- Wrapping hair around the elastic adds a sophisticated detail that elevates a basic ponytail into something office-appropriate and refined.
- The coordinating headband pulls the entire look together while strategically concealing your oiliest roots at the hairline.
16. Twisted Half-Up Style with Beaded Headband
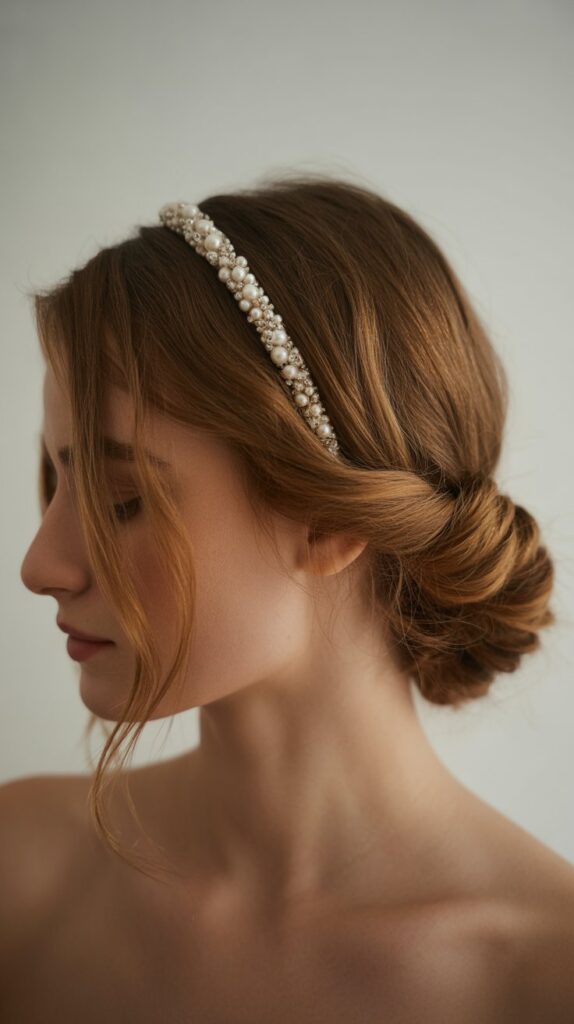
The twisted half-up style offers the perfect compromise between wearing your hair down and pulling it completely back, making it ideal for greasy hair days when you want to look put-together without committing to a full updo.
Creating Twisted Sections:
- Place a beaded or embellished headband across your hairline, selecting one with enough visual interest to serve as a focal point.
- Section off a piece of hair from each temple, creating two rectangular sections that are about two inches wide.
- Twist the right section clockwise as you bring it toward the back of your head, keeping the twist tight enough to hold its shape.
- Repeat with the left section, twisting it clockwise as well and bringing it to meet the right section at the back of your head.
- Secure both twisted sections together where they meet using bobby pins, creating a half-up style that leaves the rest of your hair down.
- Gently pull at the twists to loosen them slightly and create more volume, which is easier when working with hair that has natural grip from oils.
Versatility of This Style:
- The half-up configuration keeps greasy roots pulled back and away from your face while allowing the rest of your hair to flow naturally.
- Greasy hair holds twists better than clean hair, which tends to slip and lose its shape throughout the day.
- The beaded headband adds sophistication and draws attention upward while concealing the oiliest part of your hair at the crown.
17. Faux Hawk with Athletic Headband
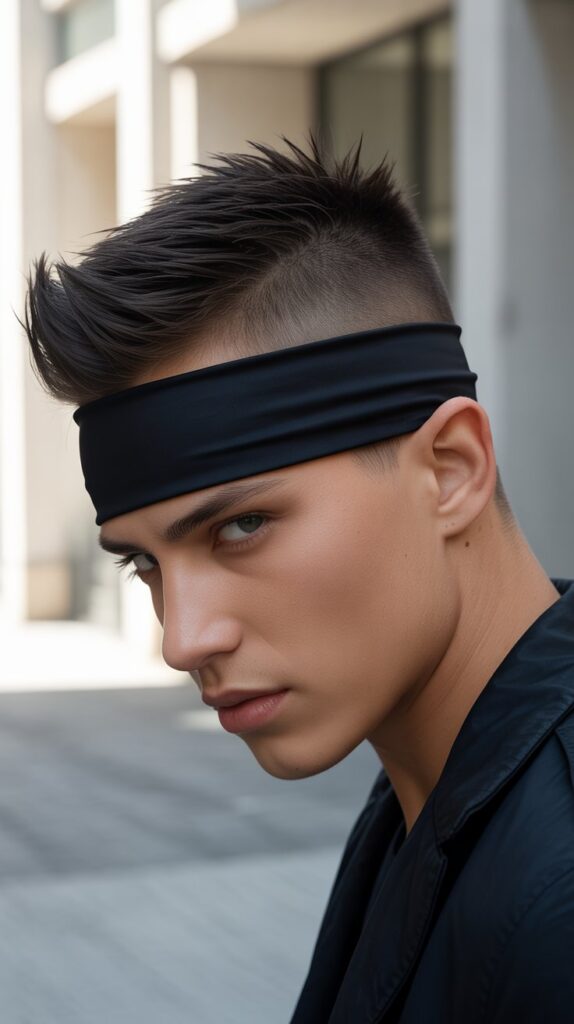
The faux hawk makes a bold statement and is surprisingly easy to create, especially when your hair has the natural texture and grip that greasy hair provides—perfect for edgy, contemporary looks.
Building the Faux Hawk:
- Start with a wide athletic or fabric headband positioned about an inch back from your hairline to hide greasy roots.
- Section your hair down the center from your forehead to the nape of your neck, creating a mohawk-shaped strip down the middle.
- Clip or tie the side sections out of the way temporarily so you can focus on creating volume in the center strip.
- Backcomb the center section at the roots to create height and volume, working in small sections from the front to the back.
- Smooth the top layer of the backcombed hair gently with a brush while maintaining the volume underneath.
- Tuck the side sections behind your ears or pin them flat against your head, creating that distinctive faux hawk silhouette.
Why Greasy Hair Works:
- The natural oils provide the grip and texture necessary for backcombing, allowing you to create dramatic height that actually stays in place.
- Greasy hair has more weight, which helps the sides lay flat against your head and emphasizes the contrast with the voluminous center.
- The athletic headband keeps everything secure while adding to the sporty, edgy aesthetic of this contemporary style.
18. Gibson Tuck with Vintage Headband
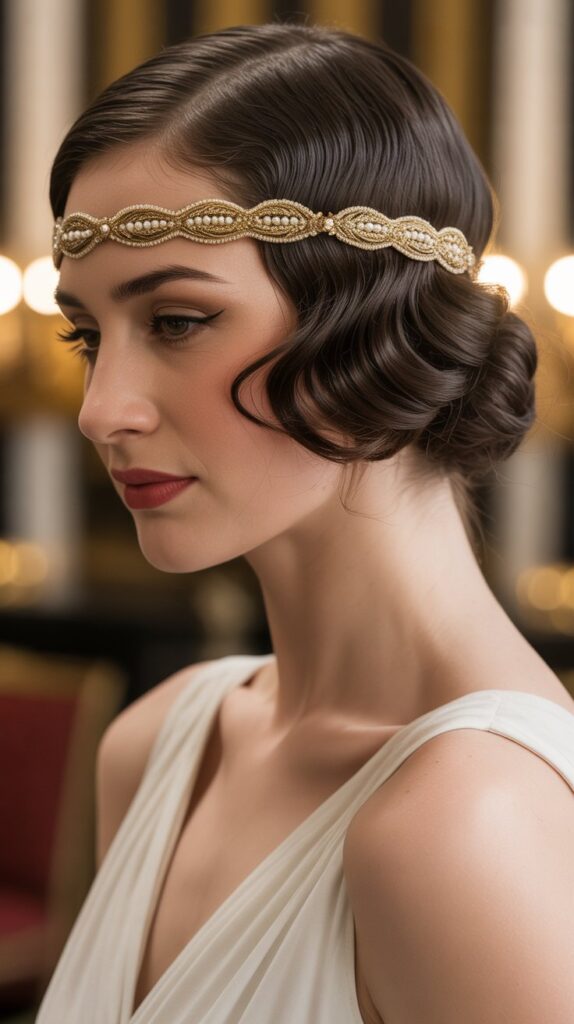
The Gibson Tuck is a vintage-inspired updo that looks incredibly intricate but is surprisingly simple to create, especially when your hair has the natural grip that comes from being slightly greasy.
Creating the Gibson Tuck:
- Choose a vintage-inspired headband—think Art Deco designs, feathers, or jeweled pieces—and position it across your hairline like a traditional headband.
- Gather all your hair into a loose, low ponytail at the nape of your neck, but don’t pull it tight—leave it somewhat relaxed.
- Create a hole in the hair above the elastic by dividing the section into two parts with your fingers.
- Flip the ponytail up and through the hole you’ve created, pulling it through completely to create the first tuck.
- Continue tucking the remaining length of the ponytail up and into the hair above the elastic, concealing the ends completely.
- Secure the tuck with bobby pins placed strategically throughout, and adjust the shape to ensure it looks full and elegant.
Vintage Elegance:
- Greasy hair has the texture and hold necessary to maintain the Gibson Tuck’s structure without everything slipping out.
- The vintage headband is essential to this look’s authenticity and conveniently hides any oily roots at the hairline.
- This sophisticated updo is perfect for formal events, proving that greasy hair doesn’t have to prevent you from looking elegant.
19. Textured Fishtail Braid with Boho Headband
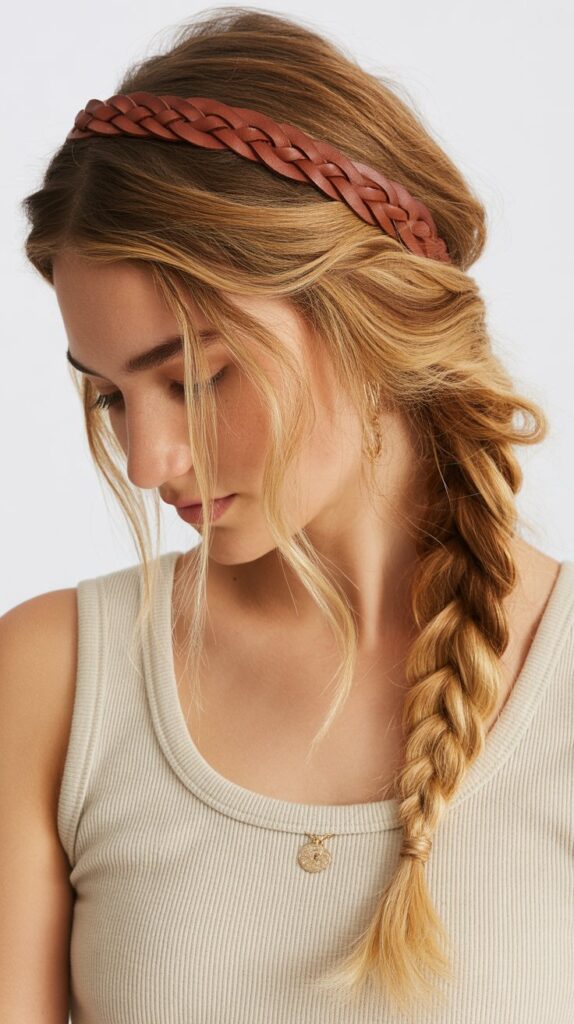
The fishtail braid is visually stunning and appears complex, but it’s actually quite simple to execute—and the textured, piecey appearance that everyone strives for is naturally achieved with greasy hair.
Fishtail Braiding Technique:
- Begin by placing a bohemian-style headband—leather, braided, or with natural elements—across your hairline to establish the aesthetic.
- Gather all your hair over one shoulder or down the back, depending on your preference and the look you’re going for.
- Divide the hair into two equal sections, holding one section in each hand firmly to begin the fishtail pattern.
- Take a thin piece from the outer edge of the right section and cross it over to join the left section.
- Take a thin piece from the outer edge of the left section and cross it over to join the right section.
- Continue this alternating pattern all the way down the length of your hair, keeping the sections relatively thin for a more intricate appearance.
- Secure the end with a clear or matching elastic, then gently pull the braid apart to create that coveted textured, voluminous effect.
Textured Perfection:
- Greasy hair naturally creates the separation and piecey texture that makes fishtail braids look dimensional and interesting rather than flat.
- The natural oils provide grip that prevents the thin sections from slipping out as you braid, making the technique easier to execute.
- The boho headband complements the relaxed aesthetic of a textured fishtail while hiding oily roots at the crown.
20. Rolled Updo with Pearl Headband
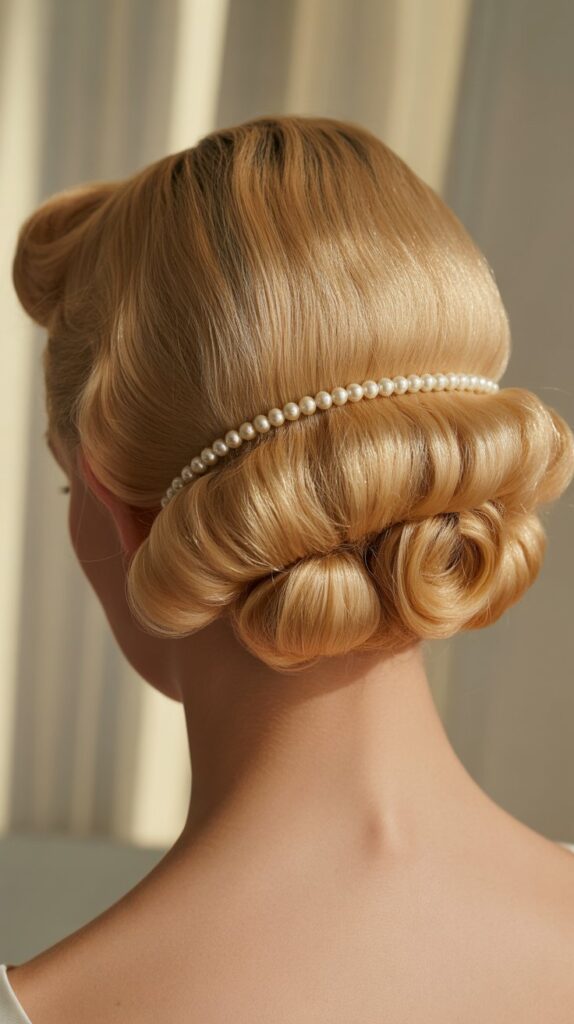
The rolled updo is sophisticated and formal, reminiscent of styles from the 1950s, and the natural oils in greasy hair actually make it easier to achieve the smooth rolls that define this elegant look.
Creating Smooth Rolls:
- Position a pearl or beaded headband about an inch back from your hairline, choosing one that adds elegance without overwhelming the style.
- Section your hair horizontally from ear to ear, creating a top section and a bottom section to work with separately.
- Start with the bottom section, gathering it at the nape of your neck and rolling it upward toward the crown, tucking the ends under as you roll.
- Secure the first roll with bobby pins placed horizontally along the roll, making sure it’s firmly attached to your head.
- Take the top section and smooth it over the first roll, continuing the rolling technique upward toward the headband.
- Secure the final roll with bobby pins, and use your fingers to gently shape and refine each roll for a polished, symmetrical appearance.
Formal Occasion Perfect:
- The natural oils in greasy hair provide the smoothness needed to create clean, defined rolls without bumps or flyaways.
- Greasy hair has more weight and is easier to manipulate into structured shapes that hold throughout extended events.
- The pearl headband adds a touch of luxury and femininity while concealing any remaining visible oil at the hairline.
21. Side Braid with Thin Gold Headband
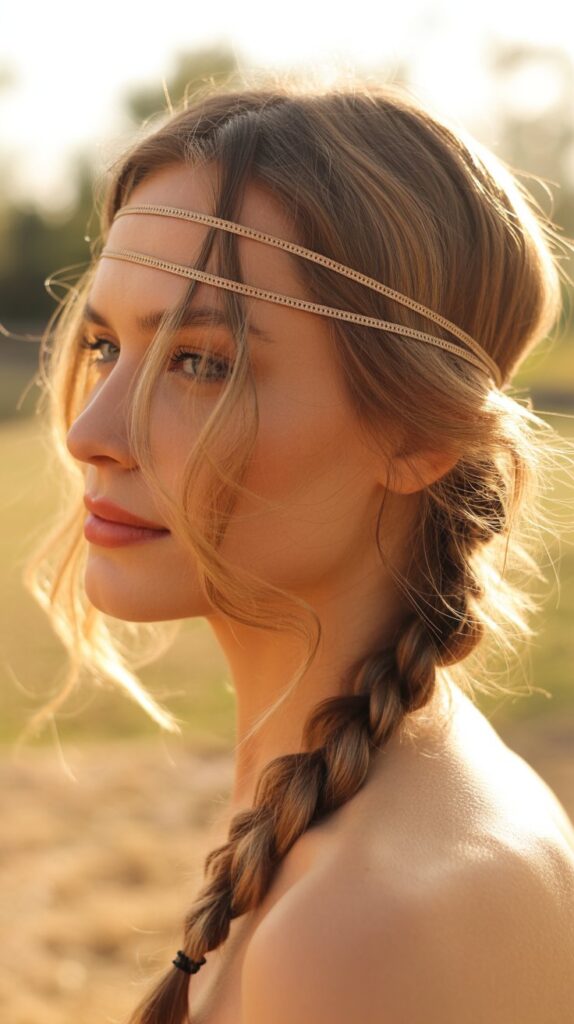
A simple side braid becomes instantly elevated when paired with a delicate gold headband, creating a look that’s effortlessly chic and perfect for various occasions from casual to semi-formal.
Braiding to the Side:
- Place a thin gold chain or metallic headband across your hairline, ensuring it sits comfortably and securely without pinching.
- Create a deep side part on whichever side you prefer, using the natural oils to help the hair lay flat at the part.
- Sweep all your hair over one shoulder, gathering it to the side where you want the finished braid to rest.
- Create a loose three-strand braid starting from just behind your ear, keeping the tension relaxed to maintain that effortless, undone appearance.
- Continue braiding down the length of your hair, and secure the end with a clear elastic or one that matches your hair color.
- Gently pull apart the braid sections with your fingers to create more volume and texture, which gives it that perfectly imperfect finish.
Effortless Elegance:
- Greasy hair holds the braid better and creates natural texture that makes the style look intentionally tousled rather than messy.
- The thin gold headband adds a touch of sophistication without competing with the braid itself for attention.
- This versatile style works for everything from coffee dates to dinner parties, proving that greasy hair can look intentionally stylish.
22. Crown Braid with Floral Wire Headband
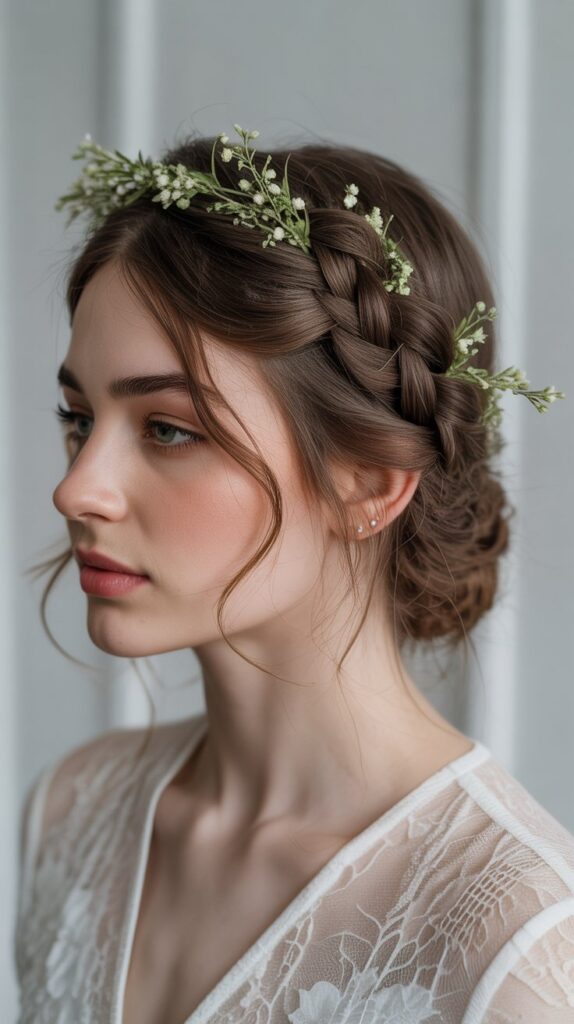
The crown braid wraps around your entire head like a halo, creating a romantic, ethereal look that’s perfect for special occasions—and greasy hair provides the grip needed to keep this intricate style secure.
Wrapping the Crown:
- Begin by positioning a floral wire headband across your hairline, selecting one with small flowers or delicate details that enhance the romantic vibe.
- Part your hair down the middle from forehead to nape, creating two equal sections to work with on each side.
- Start a Dutch braid on one side at the nape of your neck, working upward and around your head following your natural hairline.
- Continue the Dutch braid around the crown of your head, incorporating sections as you go and keeping the braid close to your head.
- When you reach the opposite side where you started, continue braiding any remaining length and tuck the end under the beginning of the braid.
- Secure everything with bobby pins placed strategically throughout, and gently pull the braid to create fullness and dimension.
Romantic Appeal:
- The natural oils in greasy hair provide the grip necessary to keep a crown braid secure throughout an entire event without pieces falling out.
- Greasy hair is easier to manipulate into tight braids that lay flat against your head, which is essential for achieving the crown effect.
- The floral wire headband enhances the romantic aesthetic while covering any visible oiliness at the very front of your hairline.
23. Twisted Ponytail with Fabric Headband
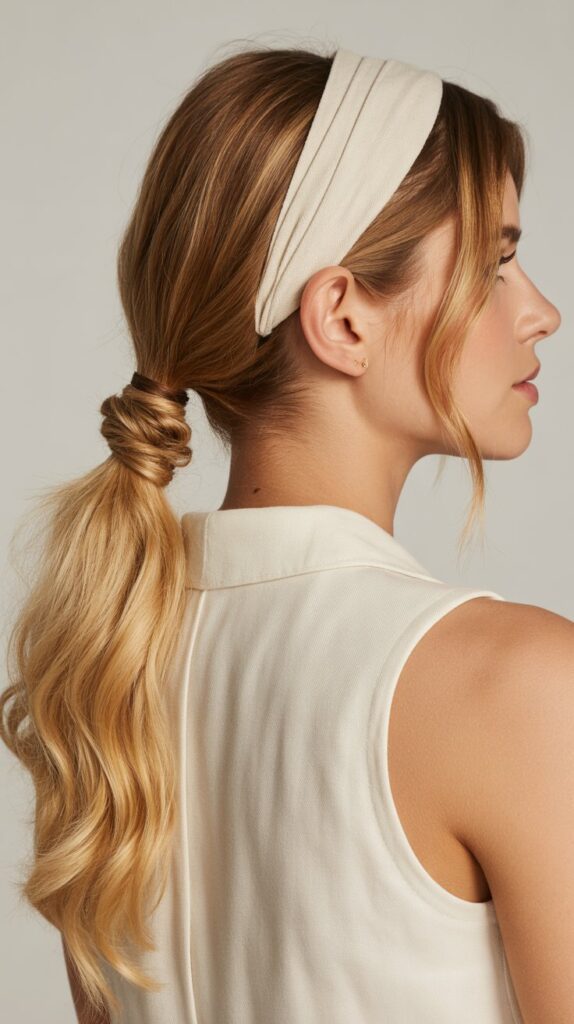
The twisted ponytail adds visual interest to a basic ponytail through simple rope twists, creating dimension and texture that’s enhanced by the natural grip of greasy hair.
Creating the Twists:
- Select a fabric headband in a complementary color or pattern and position it about an inch back from your hairline.
- Gather all your hair into a mid-level or low ponytail, securing it with a hair elastic at your desired height.
- Divide the ponytail into two equal sections, holding one section firmly in each hand.
- Twist each section individually in a clockwise direction, keeping the twists tight enough to hold their shape.
- Once both sections are twisted, wrap them around each other in a counter-clockwise direction to create a rope-like effect.
- Secure the end of the twisted ponytail with another elastic, and gently pull at the twists to create more volume and dimension.
Dimensional Interest:
- Greasy hair maintains the individual twists better than clean hair, which tends to be slippery and causes the twists to unravel.
- The natural oils create separation between the twisted sections, making the rope effect more visible and defined.
- The fabric headband adds color and interest while strategically hiding greasy roots at the crown and hairline.
24. Pinned-Back Curls with Jeweled Headband
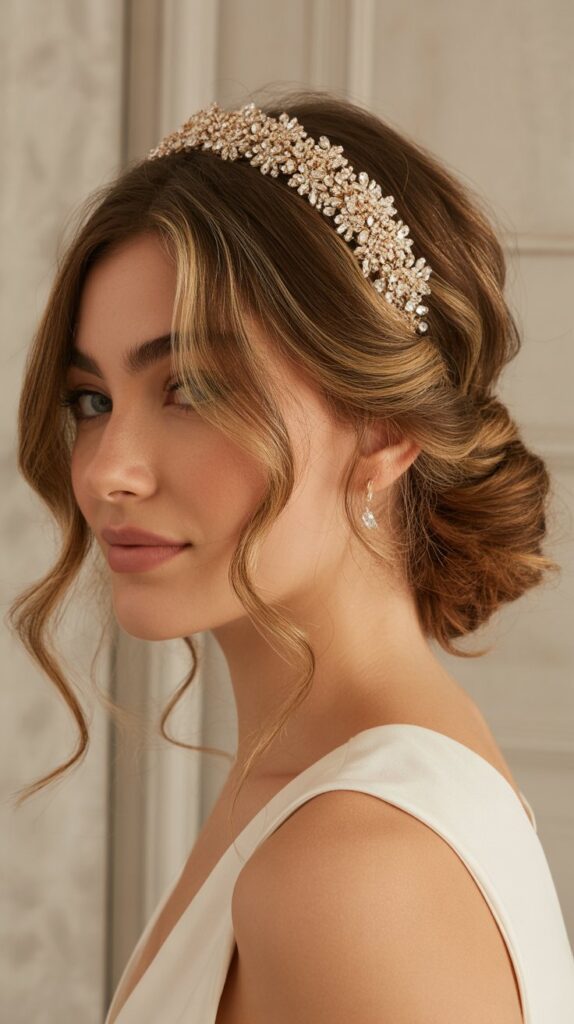
When your hair is greasy but you still want to wear it down, pinning back the front sections with a jeweled headband creates a polished look that keeps oil away from your face.
Styling Pinned Curls:
- Place a jeweled or crystal headband across your hairline, choosing one with enough sparkle or detail to serve as a statement piece.
- Section off the front portions of your hair on both sides, creating two sections that are about two to three inches wide.
- Pin each front section back behind your ears using bobby pins that match your hair color, keeping the sections smooth and flat.
- Leave the rest of your hair down, and if needed, use a curling iron to add waves or enhance your natural texture.
- Apply a small amount of texturizing spray or work through the natural oils to create separation and definition in the curls.
- Consider pinning back one side more dramatically than the other for an asymmetrical, modern twist on this classic style.
Keeping Hair Away from Face:
- This style strategically pulls the greasiest front sections away from your face while still allowing you to enjoy wearing your hair down.
- Greasy hair holds pins better and creates the smooth, sleek appearance where the sections are pinned back.
- The jeweled headband becomes the focal point while covering the area where your hair is greasiest—the roots at the hairline.
25. Braided Bun with Athletic Headband
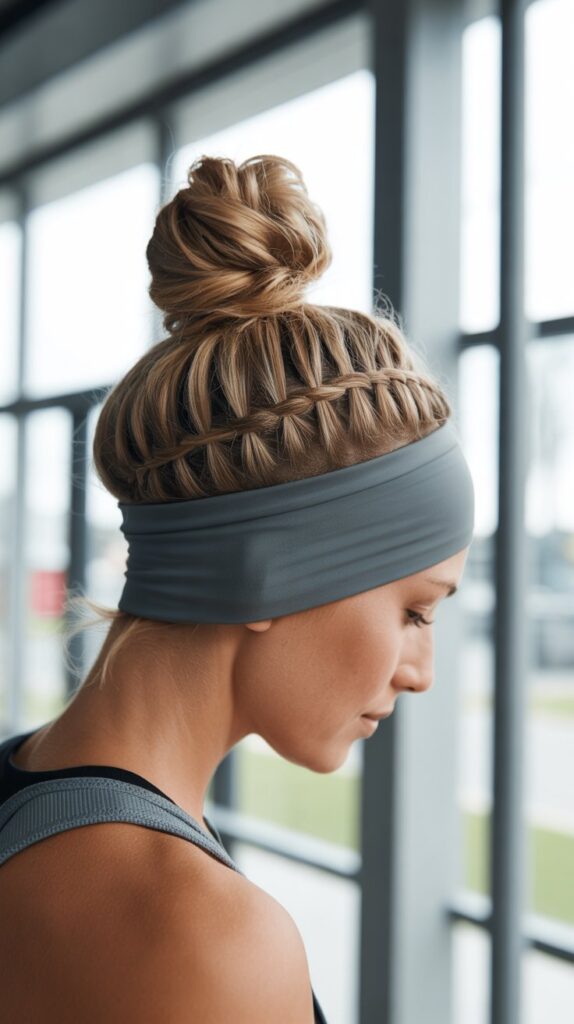
Combining braids with a bun creates a style that’s both functional and attractive, perfect for active days when you need your greasy hair completely secured and out of the way.
Constructing the Braided Bun:
- Start with a wide athletic headband positioned across your hairline to absorb sweat and cover greasy roots.
- Gather all your hair into a high ponytail at the crown of your head, securing it tightly with a strong elastic.
- Divide the ponytail into three equal sections and create a regular three-strand braid down the entire length.
- Wrap the completed braid around the base of the ponytail in a circular motion, creating a bun shape.
- Secure the braided bun with bobby pins placed throughout, making sure everything is firmly attached and won’t come loose during activity.
- Tuck any loose ends into the bun and spray with strong-hold hairspray if you’re planning particularly vigorous activity.
Active Lifestyle Perfect:
- Greasy hair provides the grip and texture needed to keep a braided bun secure during workouts or outdoor activities.
- The athletic headband keeps sweat and oils away from your face while adding a sporty aesthetic to the practical style.
- This style ensures that every single strand is controlled and secured, which is essential when you’re being physically active.
26. Asymmetrical Low Ponytail with Statement Headband
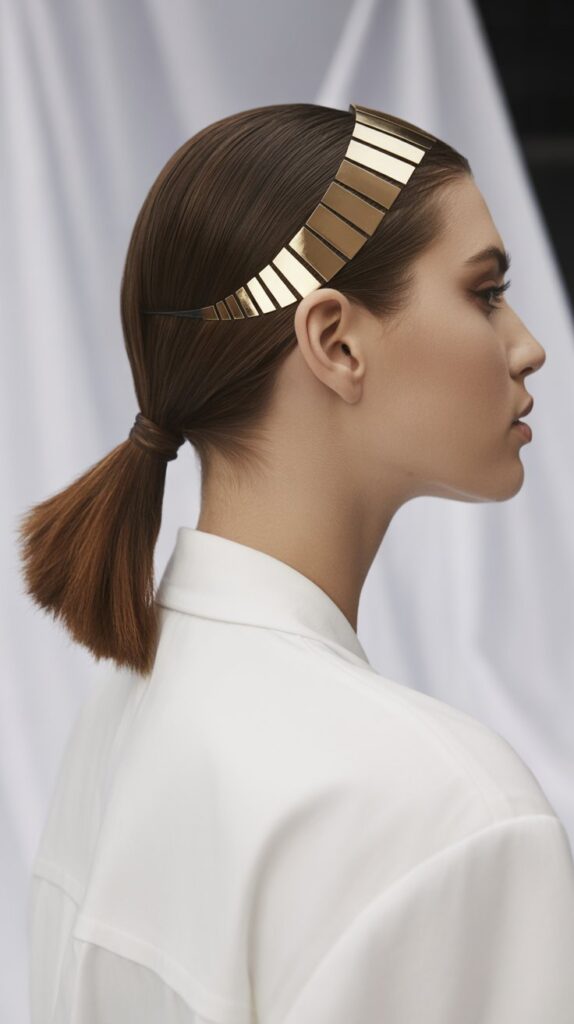
An asymmetrical approach to the classic low ponytail creates modern interest, and when paired with a statement headband, it becomes a fashion-forward style that disguises greasy roots beautifully.
Creating Asymmetry:
- Choose a bold, statement headband—think wide, colorful, or with unique details—and position it across your hairline at a slight angle for added interest.
- Create a deep side part that’s positioned much further to one side than a traditional part would be.
- Gather all your hair to one side at the nape of your neck, positioning the ponytail off-center rather than in the middle.
- Secure the ponytail with a hair elastic, and consider wrapping a small section of hair around it to conceal the elastic.
- Smooth the larger side of the part with your palms, using the natural oils to create a sleek, intentional appearance.
- Leave the smaller side slightly looser or pull out a few pieces for an undone, editorial effect.
Fashion-Forward Appeal:
- The asymmetrical placement creates visual interest and makes a simple ponytail look intentional and fashion-conscious.
- Greasy hair provides the weight and sleekness needed to make asymmetrical styles look polished rather than accidental.
- The statement headband serves as both a bold accessory and a strategic tool to hide greasy roots while making a style statement.
27. Knotted Half-Up with Beaded Headband
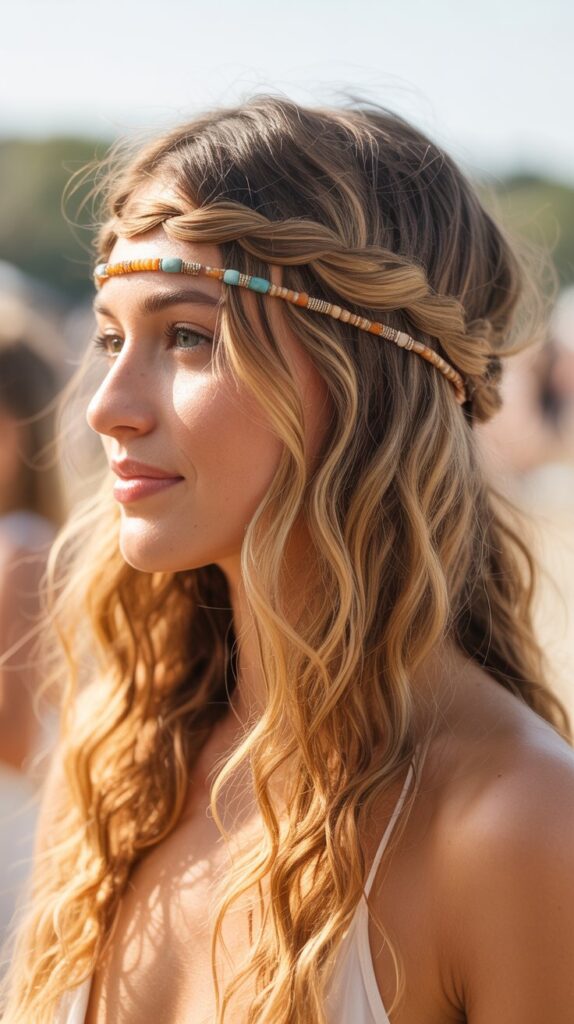
The knotted half-up style replaces traditional elastics with an actual knot, creating a bohemian, carefree look that’s perfect for greasy hair days when you want something easy but stylish.
Tying the Knot:
- Position a beaded or natural-element headband across your hairline, selecting one that fits the bohemian aesthetic of this relaxed style.
- Section off the top half of your hair from ear to ear, leaving the bottom half down to flow naturally.
- Divide the top section into two equal parts, holding one section in each hand.
- Tie the two sections together in a simple knot, just like you would tie a shoelace, pulling it tight enough to hold but not so tight it causes discomfort.
- Let the ends of the tied sections blend with the hair you left down, creating a seamless transition.
- Gently tug at the knot and the hair around it to create more volume and that intentionally undone, bohemian appearance.
Bohemian Simplicity:
- Greasy hair holds knots better than clean hair and provides the texture needed to keep the knot from slipping throughout the day.
- This style requires no elastics or complicated techniques, making it perfect for those days when you want something quick and easy.
- The beaded headband enhances the bohemian vibe while covering greasy roots and completing the relaxed, carefree aesthetic.
Conclusion
Greasy hair days no longer have to be a source of stress or frustration when you have these 27 Greasy Hair Hairstyles with a Headband in your styling arsenal.
From elegant updos perfect for formal occasions to sporty styles ideal for active days, from bohemian braids to sleek professional looks, you now have options for every situation and aesthetic preference.
The beauty of these styles lies not just in their ability to disguise oily roots, but in how they actually work better with greasy hair than freshly washed strands.
The natural oils provide grip, texture, hold, and that coveted sleekness that would otherwise require multiple styling products.
Your headband collection becomes a powerful styling tool rather than just a simple accessory—wide athletic bands for workouts, jeweled pieces for formal events, bohemian options for casual days, and everything in between.
The next time you wake up to greasy hair, instead of reaching for dry shampoo or resigning yourself to another wash day, try one of these creative styles that transform what you once considered a hair emergency into an opportunity for a stunning, intentional look.
Remember that some of the most iconic hairstyles throughout fashion history were created on second or third-day hair, proving that greasy hair isn’t a limitation—it’s actually an advantage when you know how to work with it.