
Winter brings a magical transformation to your style routine, and your hair deserves just as much attention as your cozy sweaters and boots.
27 Stylish Cute Winter Hairstyles for Teens is your ultimate guide to staying effortlessly chic while battling cold winds, static, and hat hair throughout the season.
Whether you’re heading to school, meeting friends at a winter café, or snapping the perfect snowy selfie, these hairstyles combine practicality with irresistible charm.
From quick five-minute styles to more elaborate weekend looks, this collection covers braids, buns, ponytails, and heat-free options that protect your hair while keeping you fashion-forward.
You’ll discover how to incorporate winter accessories like beanies and headbands seamlessly into your hairstyles, plus learn protective styling techniques that maintain healthy hair despite harsh weather conditions.
Get ready to transform your winter hair game with styles that work for every hair type, length, and texture, ensuring you look absolutely stunning from December through March.
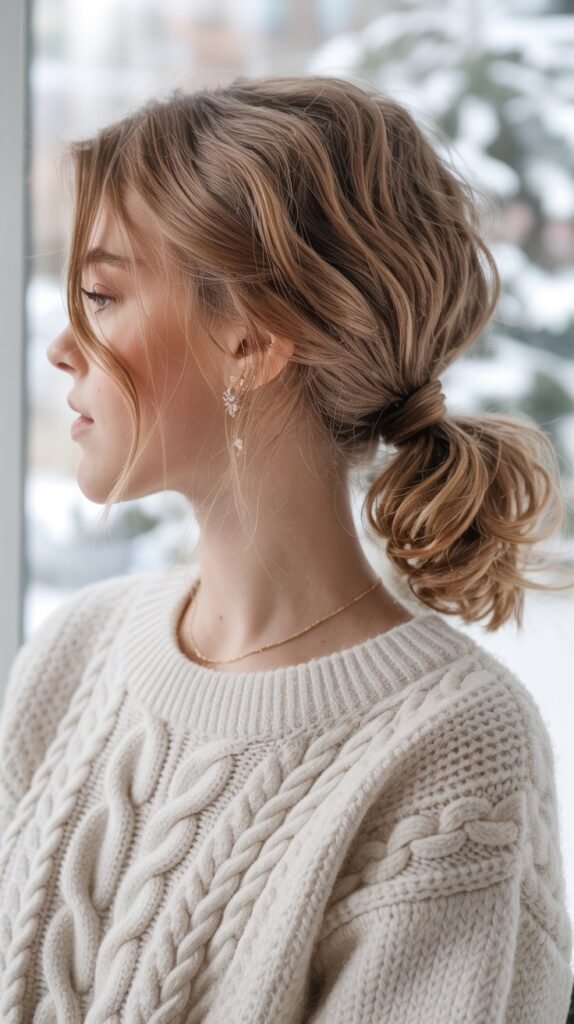
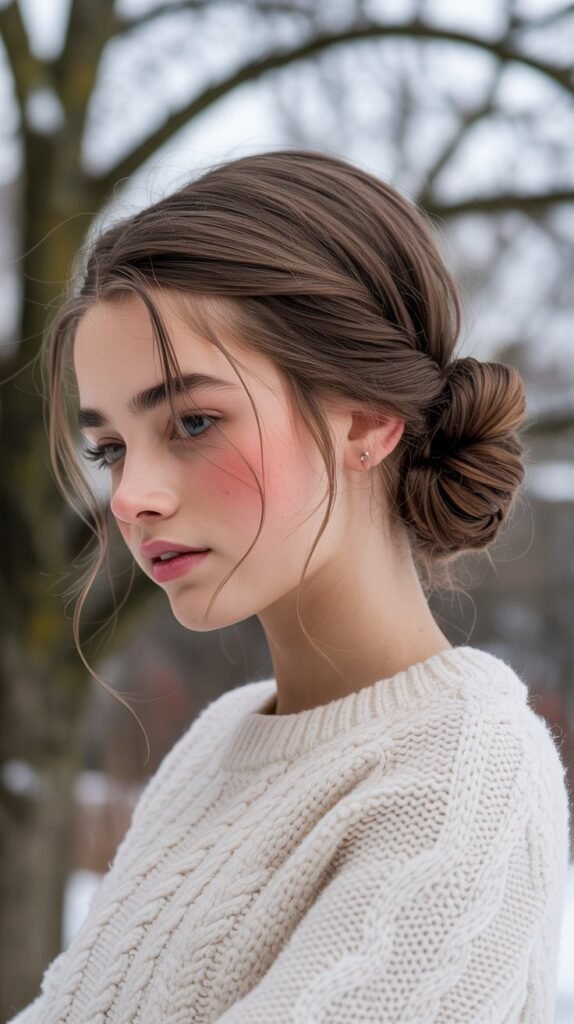
1. Messy Low Bun with Face-Framing Pieces
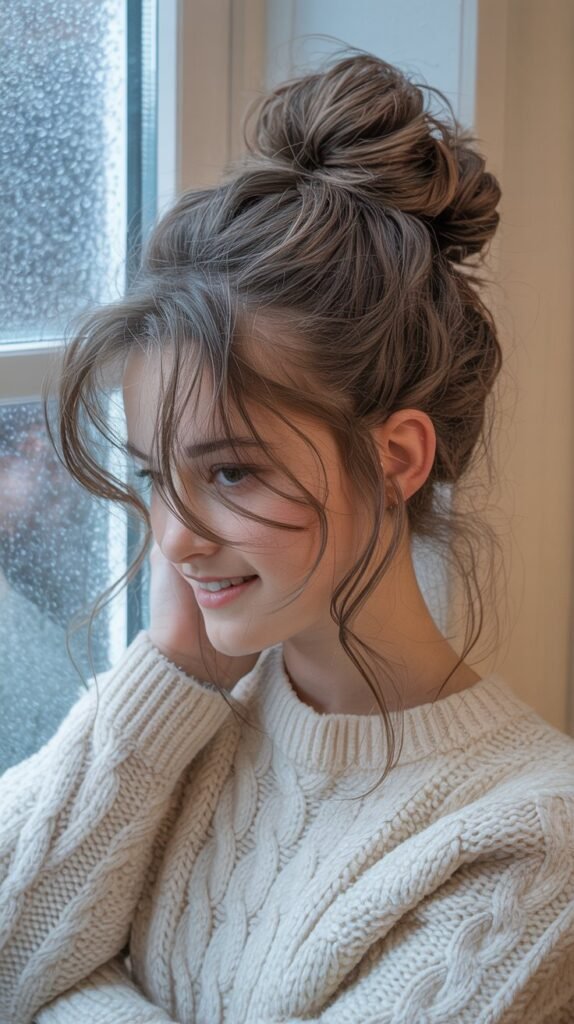
The messy low bun creates an effortlessly romantic look that’s perfect for teens who want style without appearing too formal.
This versatile hairstyle keeps hair secure under winter coats and scarves while maintaining a relaxed, approachable vibe.
Creating the Perfect Messy Bun:
- Gather your hair at the nape of your neck, leaving two front sections loose on either side of your face for a soft, flattering frame
- Twist the ponytail loosely and wrap it around the base, securing with bobby pins in a random pattern rather than a perfect circle
- Gently pull at sections of the bun to create volume and texture, making it appear fuller and more casual
- Pull out a few wispy strands around your hairline to enhance the undone aesthetic
- The face-framing pieces can be left straight, curled, or slightly waved depending on your preference
Winter Styling Tips:
- This style works exceptionally well after removing a beanie, as it embraces natural texture rather than fighting against hat hair
- Apply a lightweight texturizing spray before creating the bun to add grip and hold without stiffness
- The low placement protects your hair from cold wind exposure while keeping your neck warm
- Use a silk scrunchie instead of a regular elastic to prevent breakage and creasing
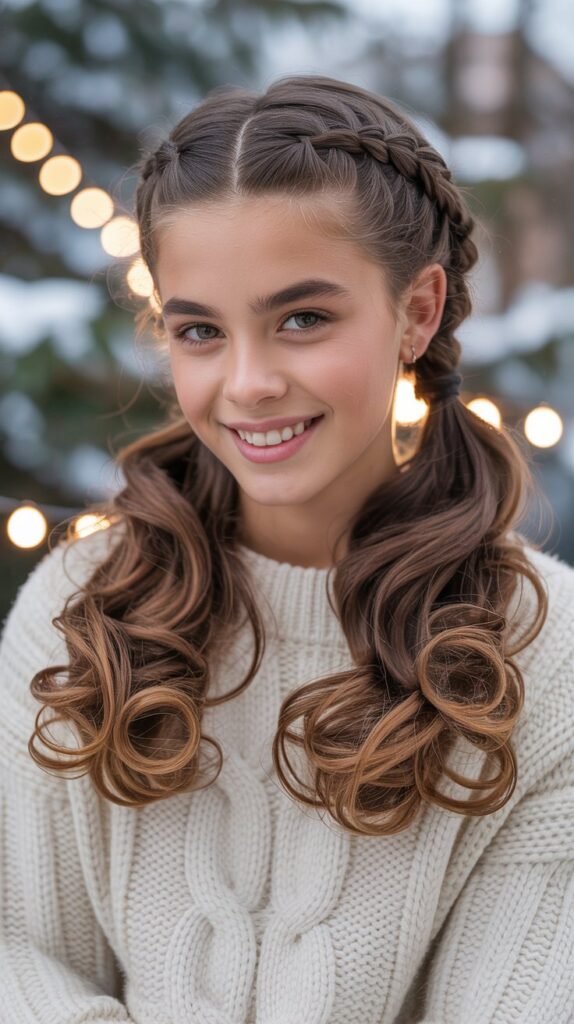
2. Dutch Braid Crown with Loose Ends
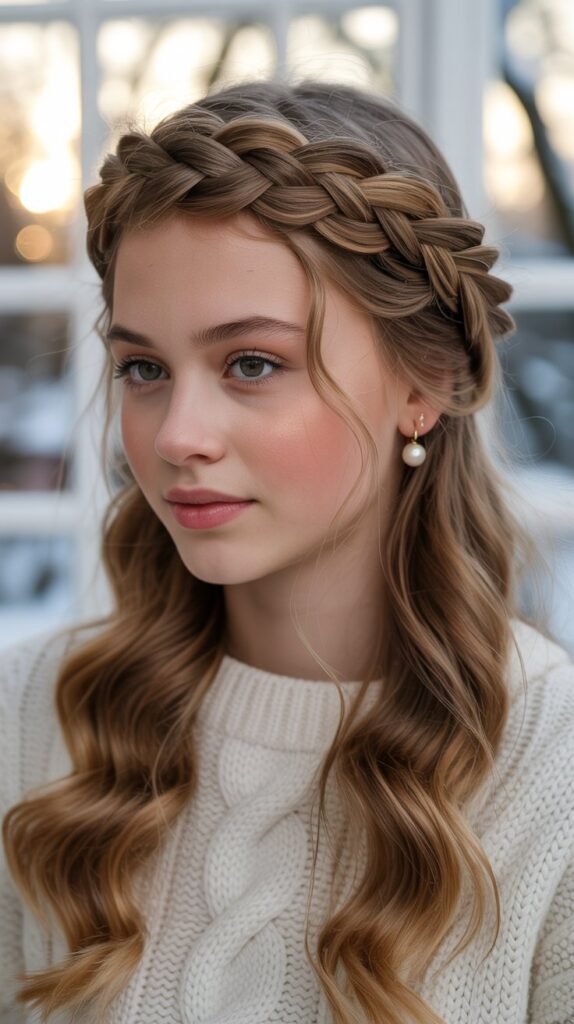
The Dutch braid crown offers a fairytale-inspired look that keeps hair completely off your face while showcasing your braiding skills.
This style works beautifully for both casual days and special winter occasions.
Step-by-Step Crown Creation:
- Part your hair down the middle from forehead to nape, creating two equal sections for symmetrical braiding
- Start a Dutch braid (reverse French braid) on one side at your temple, braiding along your hairline toward the back
- Continue the braid along the back of your head, keeping it close to your scalp for a crown-like appearance
- Repeat the process on the opposite side, ensuring both braids meet at the back center
- Secure the ends together with a clear elastic, leaving the remaining length loose for a romantic cascade
- Pull gently at the braid edges to create a fuller, more voluminous crown effect
Styling Variations:
- Wrap the loose ends into a low bun for a completely polished look suitable for formal winter events
- Add small decorative pins along the crown for sparkle during holiday gatherings
- This style stays secure all day, making it ideal for active teens participating in winter sports or outdoor activities
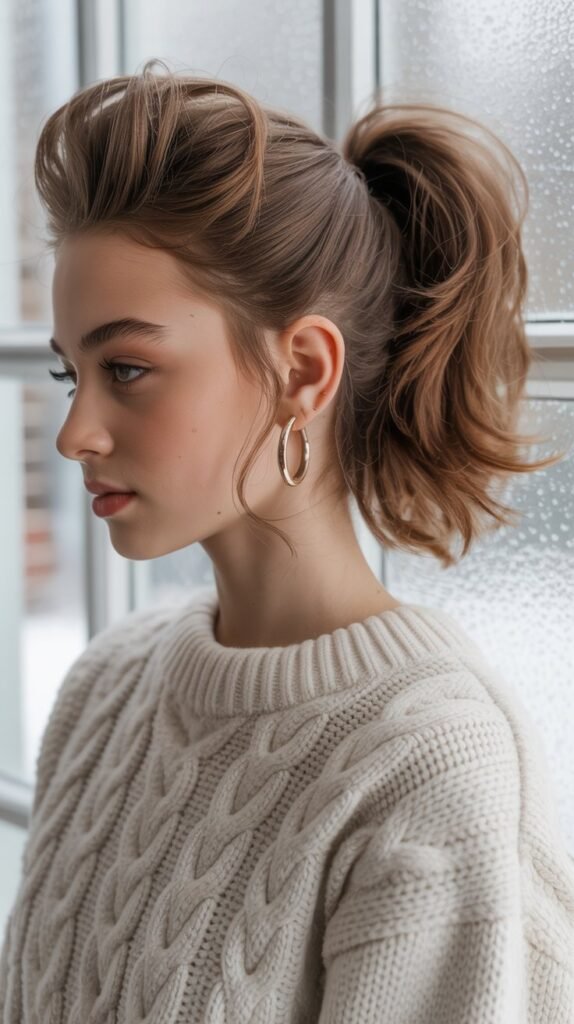
3. Sleek High Ponytail with Wrapped Base
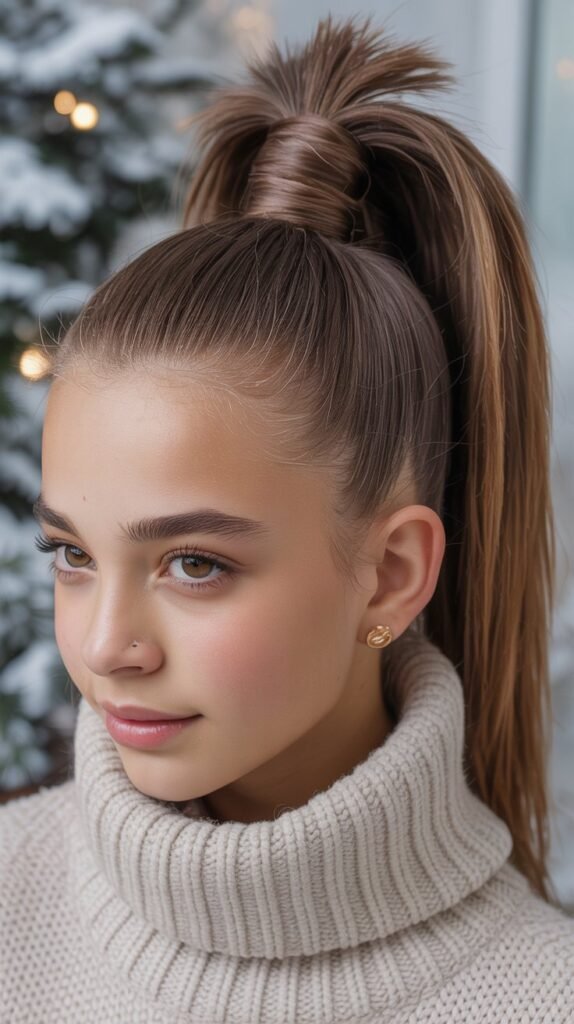
The sleek high ponytail radiates confidence and sophistication while being incredibly practical for winter activities.
This style keeps hair completely contained while elongating the neck and highlighting facial features.
Achieving Perfect Sleekness:
- Wash and blow-dry hair completely straight using a paddle brush and concentrating the dryer nozzle downward to seal the cuticle
- Apply a smoothing serum or anti-frizz cream throughout the hair to combat winter static and humidity
- Brush hair upward toward the crown of your head, using a fine-tooth comb to eliminate any bumps or imperfections
- Secure with a strong elastic, positioning the ponytail at the highest point of your head for maximum lift
- Take a small section from the ponytail and wrap it around the elastic base, securing underneath with a bobby pin to create a polished finish
Winter-Proofing Your Ponytail:
- Use a toothbrush sprayed with hairspray to tame flyaways along the hairline and part
- Apply a small amount of hair oil to the length of the ponytail to maintain shine despite dry indoor heating
- This style pairs perfectly with turtlenecks and keeps hair from getting caught in coat zippers
- Consider using a spiral hair tie to reduce tension and prevent ponytail dents
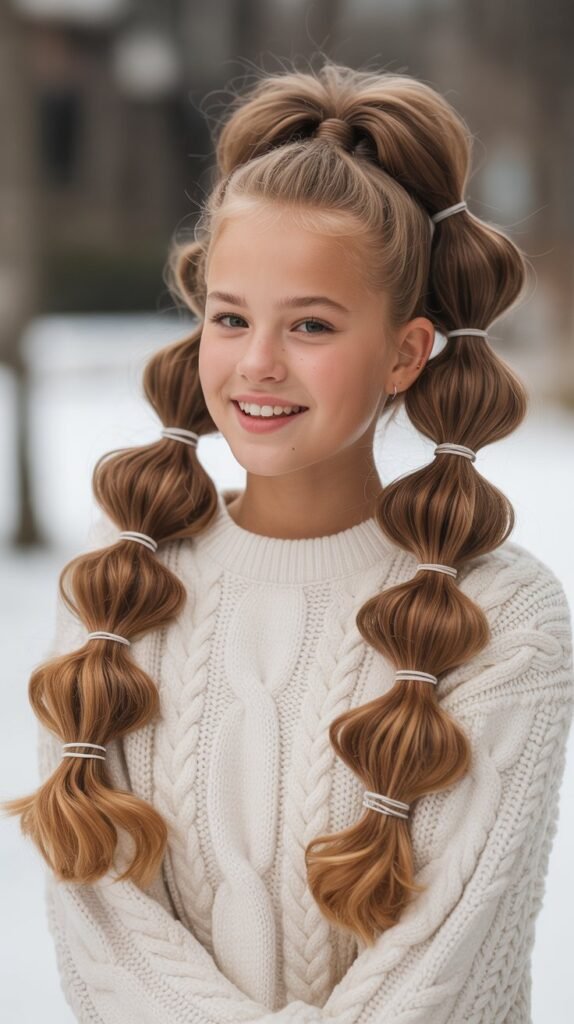
4. Bubble Braid Pigtails
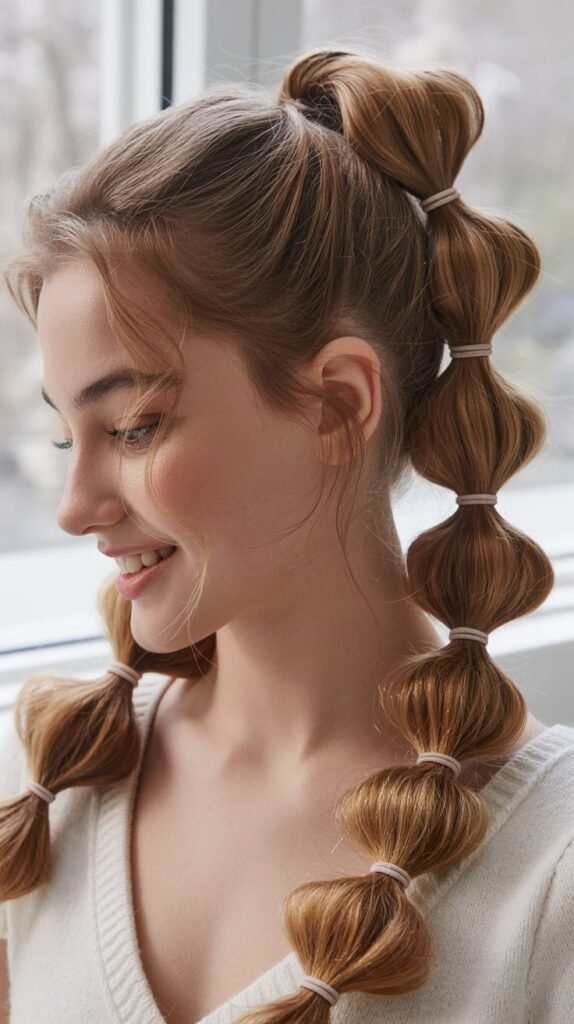
Bubble braid pigtails bring a playful, youthful energy to winter styling while being surprisingly sophisticated.
This trendy style adds dimension and volume to any hair type through strategic elastic placement.
Creating Perfect Bubbles:
- Part your hair down the center and create two high pigtails, securing each with a clear elastic at your desired height
- Measure approximately two to three inches down from the first elastic and add another clear elastic to create the first bubble section
- Gently pull at the hair between the elastics, tugging outward to create a rounded bubble shape with volume
- Continue adding elastics at regular intervals down the length of each pigtail, creating uniform bubbles
- Repeat the pulling and fluffing technique at each section to maintain consistent volume throughout
Customization Options:
- Use colorful elastics that match your winter wardrobe for a coordinated look
- Create larger or smaller bubbles by adjusting the spacing between elastics according to your hair length
- Add ribbon woven through the bubbles for a festive holiday variation
5. Half-Up Top Knot with Textured Ends
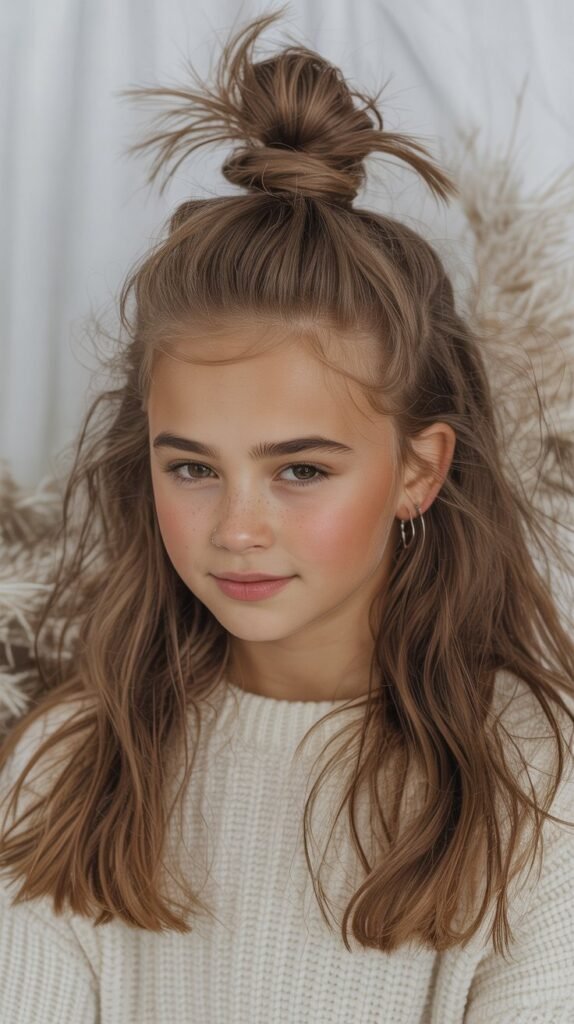
The half-up top knot perfectly balances keeping hair out of your face while showing off length and texture.
This effortless style works for any occasion and takes less than two minutes to create.
Quick Top Knot Tutorial:
- Section off the top half of your hair from ear to ear, leaving the bottom section completely loose and free
- Gather the top section at the crown of your head, smoothing it back with your fingers or a brush depending on desired sleekness
- Twist the gathered hair and wrap it around itself to form a small bun or knot at the crown
- Secure with an elastic or bobby pins, allowing the ends to stick out slightly for a casual, modern finish
- Leave the bottom section natural, or add waves and curls for enhanced texture and movement
Styling the Bottom Section:
- Use a flat iron or curling wand to create loose waves in the bottom section for added dimension
- Apply a volumizing mousse at the roots of the loose hair for extra body and fullness
- This style showcases highlights and balayage beautifully by displaying multiple hair colors simultaneously
- Perfect for transitioning from school to after-school activities without needing a complete restyle
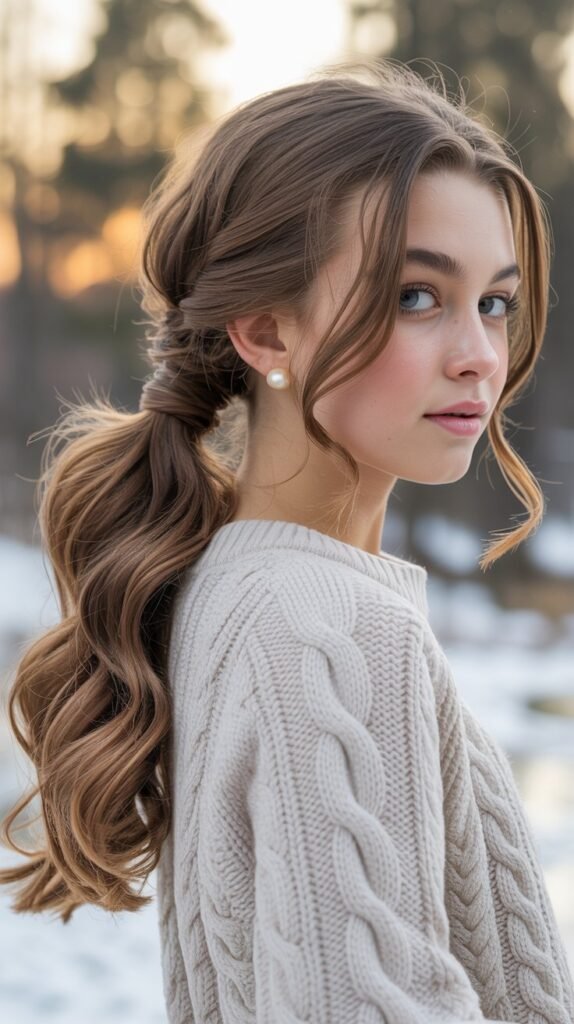
6. French Braid into Low Ponytail
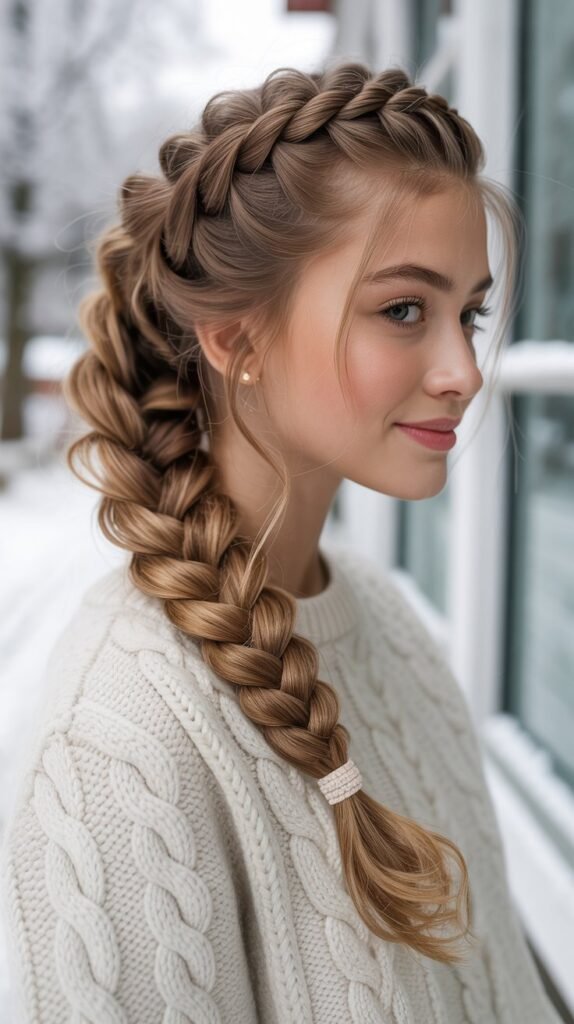
The French braid transitioning into a low ponytail combines elegance with practicality, creating a secure style that withstands winter wind and activity.
This classic technique never goes out of fashion.
Braiding Technique:
- Start at the crown of your head, taking three equal sections of hair to begin your French braid
- Cross the side sections over the middle section alternately while incorporating new hair from each side with every cross
- Continue French braiding down the back of your head, keeping consistent tension for a neat, uniform appearance
- Stop braiding at the nape of your neck and secure all remaining hair into a low ponytail with an elastic
- The braid portion should sit smoothly against your scalp while the ponytail hangs freely at the base
Enhancement Ideas:
- Wrap a small section of hair from the ponytail around the elastic for a polished finishing touch
- Add a decorative hair cuff or ribbon at the transition point between braid and ponytail
- Pull gently at the braid edges to create a fuller, more relaxed version called a “pancaked” braid
- This style keeps hair completely controlled under winter hats without causing uncomfortable bumps
7. Twisted Half-Crown with Loose Waves
The twisted half-crown creates a romantic, bohemian look perfect for teens who want something special without full updo commitment.
This style beautifully frames the face while maintaining flowing length.
Creating the Twisted Crown:
- Take a two-inch section of hair from just above your temple on one side of your head
- Twist this section backward toward the back of your head, adding small amounts of hair as you twist to keep it secure
- Pin the twisted section at the back center of your head with bobby pins that match your hair color
- Repeat the exact process on the opposite side, creating a symmetrical twisted section that meets the first
- Pin both twisted sections together at the back, creating a crown-like appearance across the top of your head
Finishing the Look:
- Apply a light-hold hairspray to the twisted sections to prevent unraveling throughout the day
- Add small decorative pins or pearls along the twists for holiday parties or special winter occasions
- This style works beautifully with all hair colors and highlights the natural dimension in your hair
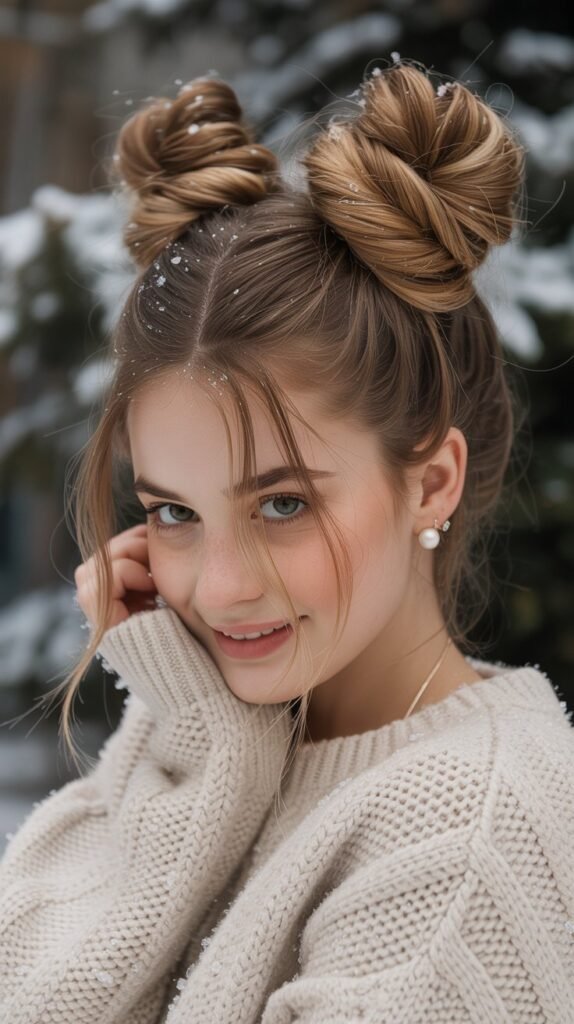
8. Space Buns with Braided Details
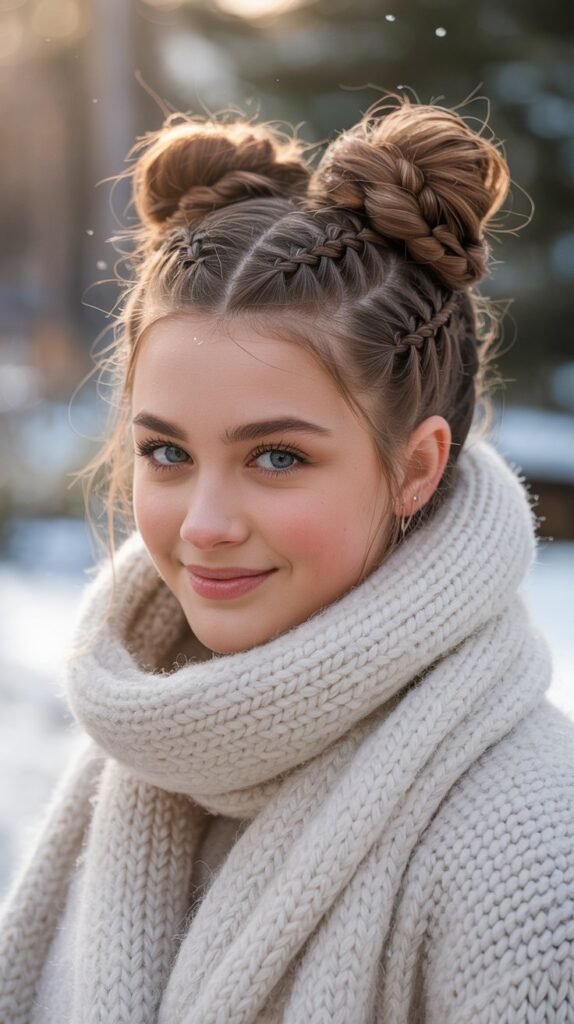
Space buns bring a fun, youthful vibe to winter styling while keeping hair completely secured and out of the way.
Adding braided details elevates this playful style from casual to Instagram-worthy.
Double Bun Construction:
- Part your hair straight down the middle from forehead to nape, creating two perfectly equal sections
- Create a high pigtail on each side, positioning them at the top corners of your head for the classic space bun placement
- Before forming the buns, create a simple three-strand braid with each pigtail, braiding all the way to the ends
- Wrap each braided section around its base in a circular motion, creating rounded bun shapes
- Secure each bun with bobby pins, tucking the ends underneath for a clean, polished finish
Styling Variations:
- Make mini space buns for a subtle look or large dramatic buns for maximum impact
- Leave small sections unbraided and wrap them around the finished buns for textural contrast
- Use colorful scrunchies at the base of each bun for a retro-inspired winter aesthetic
- This style pairs perfectly with beanies worn pushed back on the head, leaving the buns visible
9. Low Twisted Ponytail with Volume
The low twisted ponytail offers sophisticated simplicity with added interest through twisting and volumizing techniques.
This style looks far more complicated than it actually is to create.
Volume and Twist Method:
- Tease the crown section of your hair gently with a fine-tooth comb to create lift and height at the roots
- Gather all hair into a low ponytail at the nape, securing with a strong elastic that can hold the weight
- Divide the ponytail into two equal sections and twist each section individually in the same direction until tight
- Wrap the two twisted sections around each other in the opposite direction, creating a rope-like twisted effect
- Secure the end with another elastic and pull gently at the twists to create fuller, more voluminous sections
Finishing Details:
- Spray the crown area with hairspray and smooth gently to maintain volume without looking stiff or crunchy
- Pull a few face-framing pieces loose at the front for a softer, more romantic appearance
- Wrap a small section of hair around both elastics to hide them completely for a seamless look
- This style works beautifully for both straight and wavy hair textures and maintains its shape all day
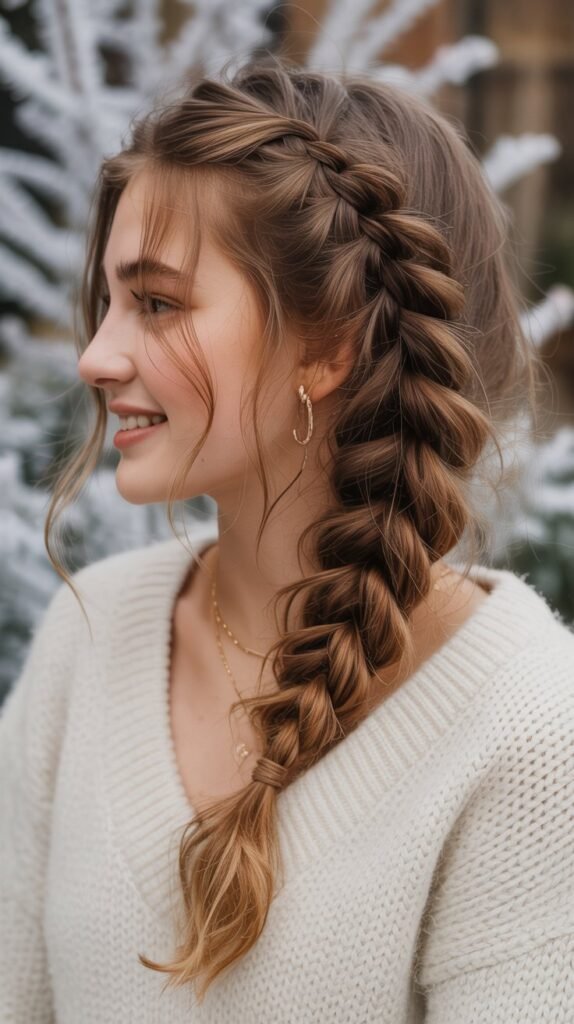
10. Fishtail Braid with Ribbon Weave
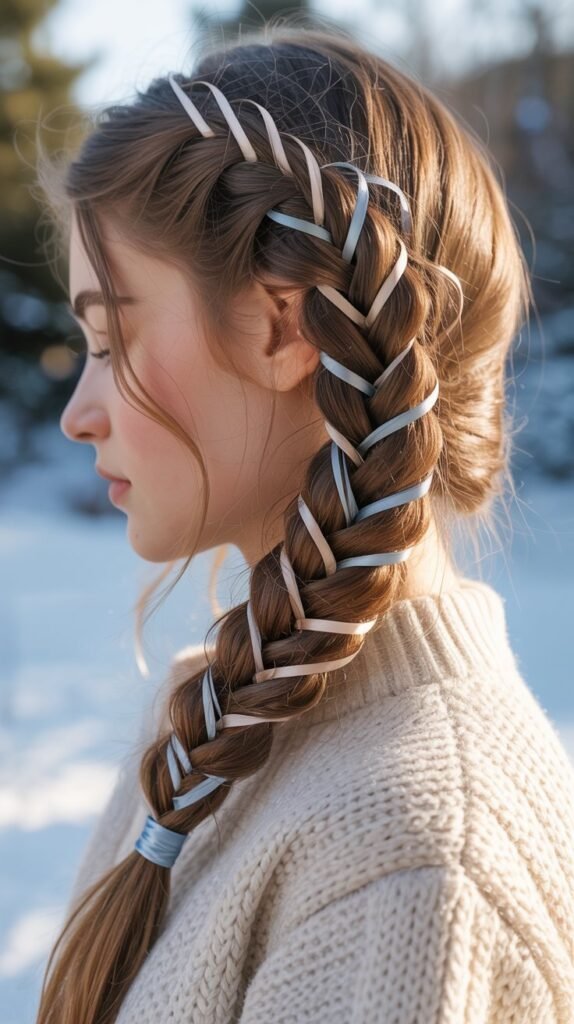
The fishtail braid creates an intricate, eye-catching pattern that’s surprisingly simple to master.
Adding a ribbon weave transforms this everyday braid into something truly special for winter events.
Fishtail Braiding Process:
- Gather all hair into a low ponytail or leave it loose, depending on whether you want a single braid or side braid
- Divide the hair into two large sections instead of the traditional three sections used in regular braiding
- Take a thin strand from the outer edge of the left section and cross it over to join the right section
- Take a thin strand from the outer edge of the right section and cross it over to join the left section
- Continue alternating sides, always taking small strands from the outer edges and crossing them to the opposite side
- The thinner your strands, the more intricate and detailed your fishtail pattern will appear
Adding the Ribbon:
- Choose a ribbon in a winter color like burgundy, navy, or silver that complements your outfit
- Secure the ribbon at the top of your braid with a bobby pin hidden underneath the starting point
- Incorporate the ribbon as if it were a strand of hair, weaving it through the fishtail pattern as you braid
- Tie the ribbon in a bow at the bottom of the braid, leaving the ends trailing for a romantic finish
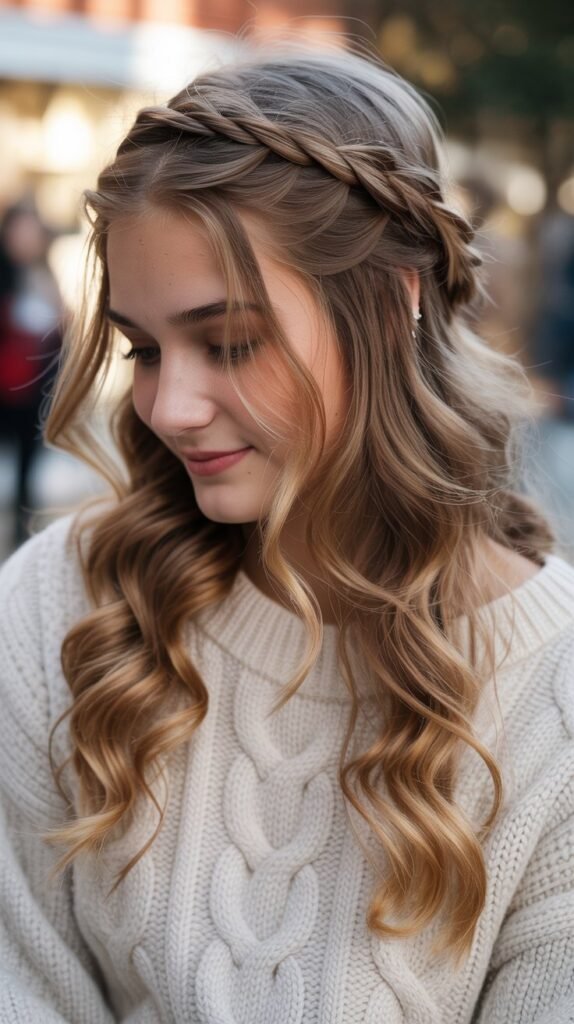
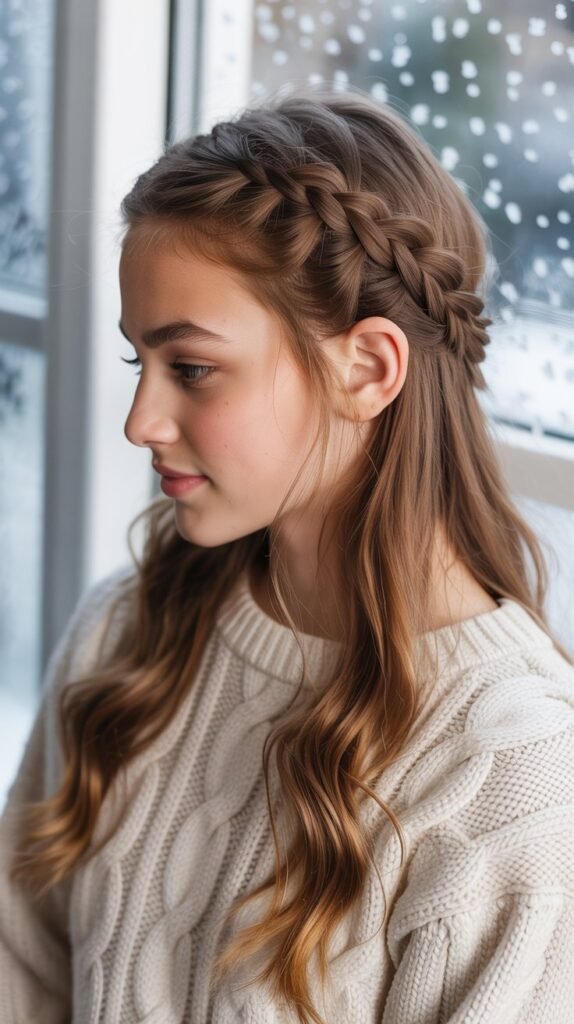
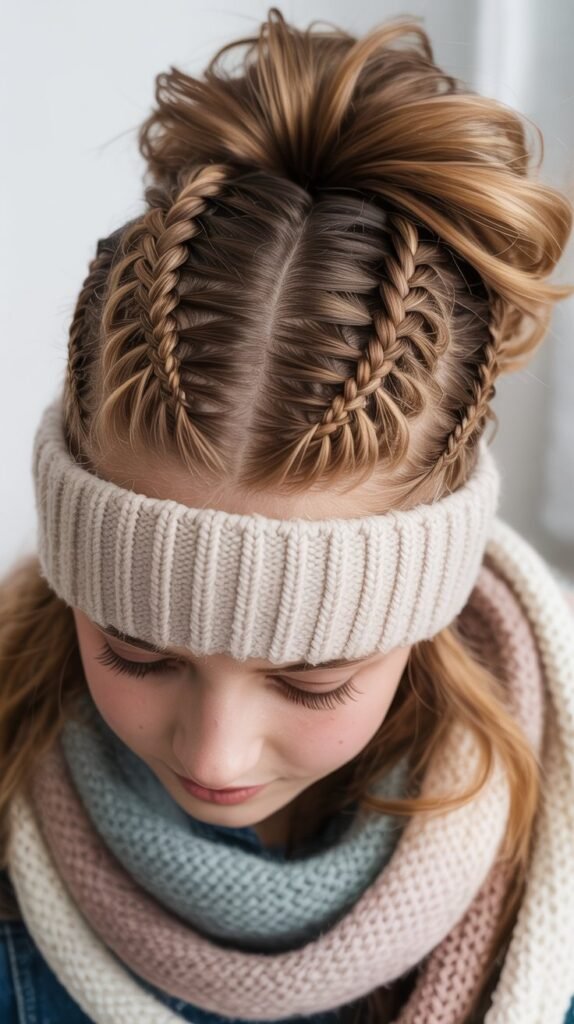
11. Braided Headband with Down Hair
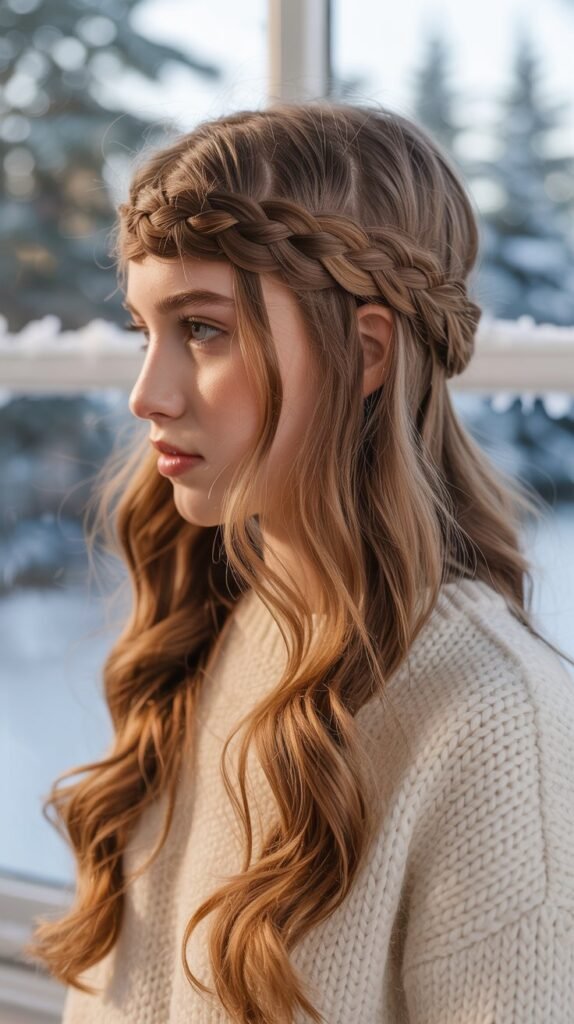
The braided headband creates a bohemian accessory from your own hair while keeping bangs and shorter layers elegantly contained.
This style works beautifully for teens with growing-out bangs or layers.
Creating Your Hair Headband:
- Take a two to three-inch section of hair from behind one ear, separating it from the rest of your hair
- Create a simple three-strand braid with this section, braiding all the way to the ends and securing with a small clear elastic
- Bring the braid across the top of your head like a headband, positioning it where an actual headband would sit
- Pin the braid securely behind the opposite ear with bobby pins that match your hair color for invisible hold
- Leave all remaining hair down, styled straight, wavy, or curly according to your preference
Styling Options:
- Create a thicker headband by braiding a larger section or making two smaller braids side by side
- Add small flowers or decorative pins to the braid for special occasions like winter formals or holiday parties
- Pull gently at the braid edges to create a softer, fuller headband appearance with more texture
12. High Bun with Braided Wrap
The high bun exudes ballet-inspired elegance while the braided wrap adds unique detail that sets this style apart.
This sophisticated look works perfectly for formal winter events and dress-up occasions.
Building the Foundation:
- Brush all hair up to the very top of your head, creating a sleek high ponytail with no bumps or irregularities
- Secure the ponytail with a strong elastic, ensuring it can support the weight of the bun you’ll create
- Take a one-inch section from the ponytail and set it aside – this will become your braided wrap
- Twist or wrap the remaining ponytail around the base, forming a classic ballerina-style bun shape
- Secure the bun with bobby pins placed in a star pattern around the base for maximum hold
Creating the Braided Detail:
- Take the reserved one-inch section and create a simple three-strand braid from base to ends
- Wrap this braid around the circumference of your bun like a decorative border
- Tuck the end of the braid underneath the bun and secure with bobby pins for a seamless finish
- Apply hairspray to smooth any flyaways and ensure the style lasts throughout your event
13. Side-Swept Curls with Deep Part
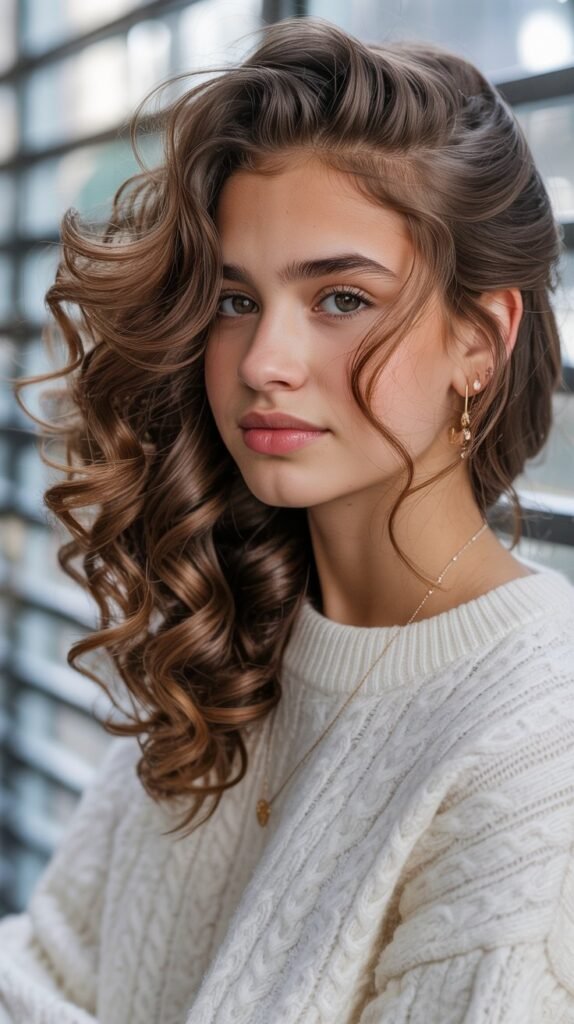
Side-swept curls create glamorous, red-carpet-worthy volume that’s perfect for winter formal events and holiday parties.
The deep side part adds drama and showcases beautiful curls cascading over one shoulder.
Curl Creation Process:
- Create a deep side part, positioning it about two inches from your natural part line for maximum dramatic effect
- Section your hair and curl it in one to two-inch sections using a curling iron or wand
- Curl away from your face for a more flattering, face-opening effect that enhances your features
- Allow curls to cool completely before touching them – this sets the curl pattern and ensures longer-lasting hold
- Apply a light-hold hairspray while curls are still in their coiled shape for better texture retention
Sweeping and Securing:
- Brush or finger-comb all curls to one side, sweeping them across your shoulder opposite the deep part
- Pin the hair on the lighter side behind your ear using decorative bobby pins or small clips
- Leave the heavy side completely loose, allowing curls to cascade freely over your shoulder and down your back
- Apply shine spray or hair oil to enhance the glossy, healthy appearance of your curls
14. Double Dutch Braids (Boxer Braids)
Double Dutch braids offer athletic functionality combined with street-style fashion appeal.
These secure braids keep hair completely controlled during winter sports while looking incredibly trendy.
Perfect Dutch Braid Technique:
- Part your hair straight down the middle from hairline to nape, creating two perfectly equal sections
- Clip one section away and begin working on the first side, starting at the front hairline
- Take three small sections and cross the outer strands under the middle strand instead of over (this creates the raised, 3D effect)
- Add small amounts of hair from the sides with each crossing, incorporating all hair from that section as you braid
- Continue braiding all the way to the ends, keeping consistent tension throughout for uniform, neat braids
- Repeat the identical process on the opposite side, ensuring both braids are symmetrical and evenly placed
Styling Enhancements:
- Pull gently at the edges of both braids to create fuller, more voluminous “pancaked” braids with texture
- Secure the ends with small elastics, or create small buns at the nape by wrapping the ends around themselves
- Add hair cuffs or decorative elastics at regular intervals for personalized style and extra security
15. Messy Side Braid with Pulled Sections
The messy side braid embodies effortless bohemian style while being incredibly practical for everyday winter wear.
This deliberately undone look appears carefree but actually requires strategic pulling and loosening techniques.
Creating Controlled Messiness:
- Sweep all hair over one shoulder and begin a loose three-strand braid starting at your neck rather than higher up
- Braid loosely without pulling the strands tight, maintaining a relaxed tension throughout the entire length
- Secure the end with a clear or decorative elastic, leaving a few inches of hair unbraided for a casual finish
- Starting from the top, pull small sections outward from the braid edges, creating wider, looser sections
- Focus on pulling the outer edges rather than the center to maintain the braid structure while adding volume
Perfecting the Undone Look:
- Pull more aggressively at some sections than others to create intentional irregularity and natural-looking texture
- Leave a few face-framing pieces out of the braid entirely, curling them softly for a romantic touch
- Gently tug at the hair near your scalp to create slight looseness and prevent the style from looking too tight
- Apply a texturizing spray after pulling sections to add grip and hold the messy texture in place
16. Low Bun with Crossed Bobby Pins
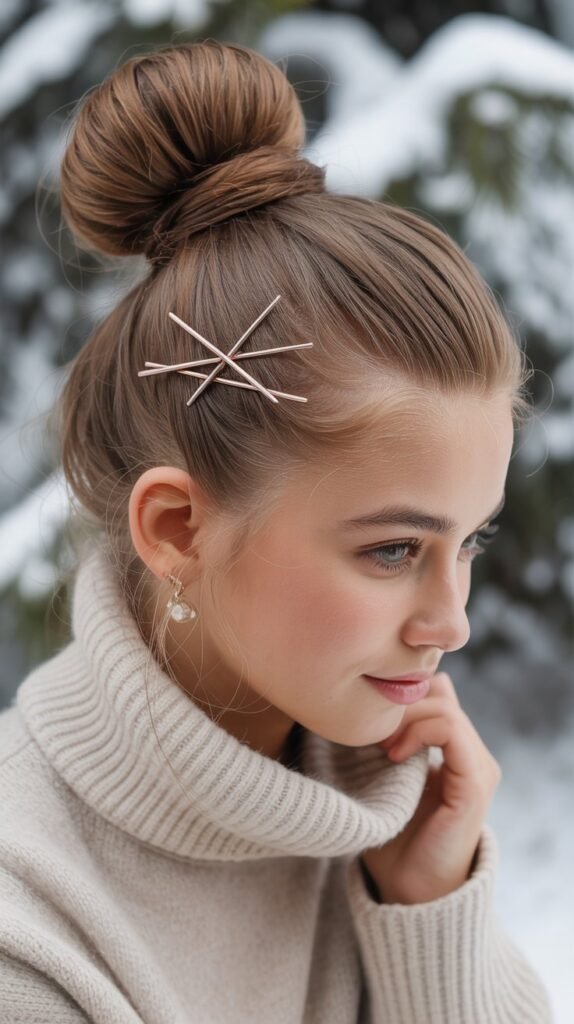
The low bun with decorative crossed bobby pins transforms a simple classic into an artistic statement.
This trend showcases bobby pins as fashion accessories rather than hiding them.
Basic Bun Construction:
- Gather all hair into a low ponytail at the nape of your neck, securing with an elastic that matches your hair color
- Twist the ponytail loosely and wrap it around the base, forming a rounded bun shape at the nape
- Secure the bun with regular bobby pins, placing them inside the bun where they won’t be visible
- Smooth any flyaways with hairspray or a small amount of gel for a polished, clean appearance
- The bun can be tight and sleek or loose and textured depending on your preferred aesthetic
Creating the Bobby Pin Design:
- Choose decorative bobby pins in gold, silver, or colors that coordinate with your winter wardrobe
- Arrange bobby pins in an X or cross pattern on one side of the bun, pressing them firmly into the hair
- Create multiple crossed patterns, geometric designs, or simply line up several pins in parallel rows
- Mix different colored bobby pins for an eclectic look or keep them uniform for minimalist elegance
- This styling technique works with <a href=”https://www.medicalnewstoday.com/articles/bobby-pin-hairstyles”>various bobby pin arrangements</a> to suit different occasions
17. Half-Up Bubble Ponytail
The half-up bubble ponytail combines the youthful playfulness of bubble styling with the versatility of keeping half your hair down.
This style adds instant dimension and interest to any hair length.
Creating the Bubbled Section:
- Section off the top half of your hair from temple to temple, leaving the bottom section completely loose
- Gather the top section into a high or mid-level ponytail, securing it with a clear elastic
- Add additional clear elastics down the length of the ponytail at two to three-inch intervals
- Pull gently at the hair between each elastic, creating rounded bubble shapes with volume and texture
- Continue adding elastics and creating bubbles until you reach the end of the ponytail section
Styling the Loose Section:
- Leave the bottom section straight for a sleek contrast against the textured bubbles above
- Add waves or curls to the loose hair for a more romantic, cohesive look throughout
- Apply volumizing products at the roots of the loose section to prevent it from looking flat in comparison
- This style showcases hair color beautifully by displaying both the top and bottom portions simultaneously
18. Twisted Low Chignon
The twisted low chignon delivers sophisticated elegance perfect for winter formal events, holiday gatherings, and special occasions.
his classic updo style never goes out of fashion and suits all face shapes.
Chignon Construction:
- Gather all hair into a low ponytail at the nape of your neck, positioning it slightly off-center for added interest
- Divide the ponytail into two equal sections and twist each section individually in the same clockwise or counterclockwise direction
- Wrap the two twisted sections around each other, creating a rope-like twist with both sections combined
- Coil this twisted rope around the base of the ponytail, forming a rounded chignon shape at the nape
- Secure with bobby pins placed strategically around the chignon, tucking the ends underneath for a seamless finish
Elegant Finishing Touches:
- Pull a few thin face-framing pieces loose before creating the ponytail for a softer, more romantic effect
- Add a decorative hair comb, jeweled pins, or a small barrette to one side of the chignon for sparkle
- Smooth the top section with a boar bristle brush and light hairspray for a polished, refined appearance
- This style pairs beautifully with statement earrings since it keeps the neck and ears completely visible
19. Waterfall Braid Half-Up
The waterfall braid creates a cascading, romantic effect that looks intricate but becomes surprisingly manageable with practice.
This stunning style works beautifully for semi-formal winter occasions and special events.
Waterfall Braiding Technique:
- Begin at your temple on one side, taking three small sections of hair to start a regular three-strand braid
- Cross the top section over the middle, then cross the bottom section over the new middle piece
- Drop the top section completely, letting it fall like a waterfall strand, and pick up a new section from above to replace it
- Continue this pattern of dropping the top strand and adding a new section with each crossing
- Braid along your head from one side to the other, following your hairline in a horizontal or slightly diagonal direction
- Secure the braid behind your opposite ear with bobby pins, hiding the end underneath other hair sections
Enhancing the Waterfall Effect:
- Curl all the hair that wasn’t braided, especially the dropped waterfall strands, to create beautiful cascading waves
- Pull gently at the braid edges to create fuller, more dimensional sections that stand out against the loose hair
- Create a double waterfall by making two parallel waterfall braids for even more intricate detail and impact
- Apply shine spray to the finished style to make the waterfall strands catch light beautifully
20. Top Knot with Wrapped Scarf
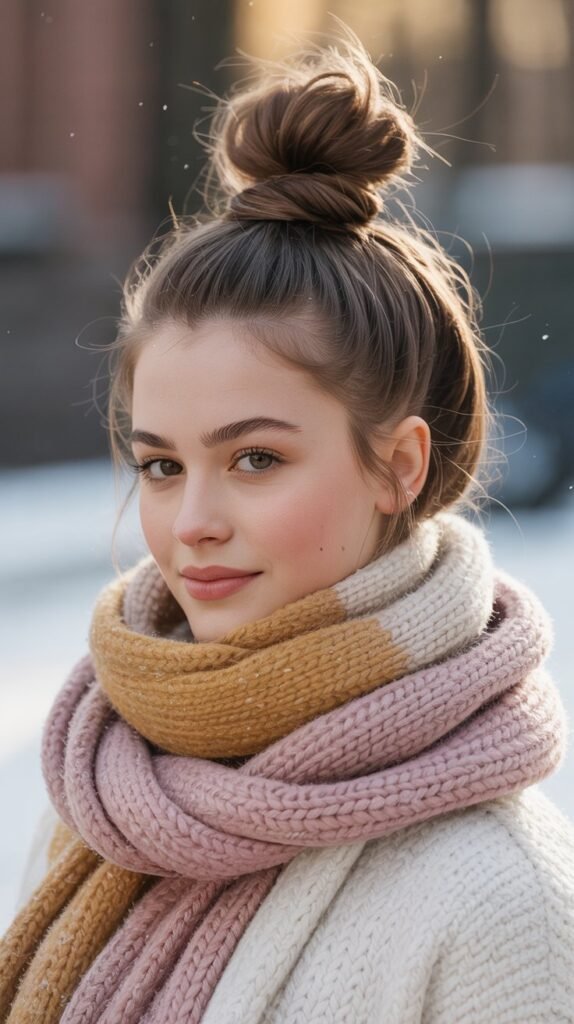
The top knot with wrapped scarf combines practical hairstyling with fashionable accessorizing.
This look keeps hair completely secured while adding a pop of color and pattern to your winter ensemble.
Creating the Base Knot:
- Flip your head upside down and gather all hair at the very top of your head for maximum volume and height
- Secure with a strong elastic, creating a high ponytail that sits at the crown of your head
- Twist the ponytail and wrap it around the base in a circular motion, forming a rounded topknot shape
- Secure with bobby pins placed around the circumference and through the center for stability
- Smooth any flyaways with a small amount of gel or edge control for a neat, polished foundation
Scarf Wrapping Method:
- Choose a silk or satin scarf in a winter pattern like plaid, paisley, or geometric designs
- Fold the scarf lengthwise into a band approximately two to three inches wide
- Wrap the scarf band around the base of your top knot, covering the elastic and bobby pins completely
- Tie the scarf in a bow on top of the knot, to the side, or underneath depending on your aesthetic preference
- Allow the scarf ends to trail artistically or tuck them into the wrap for a cleaner look
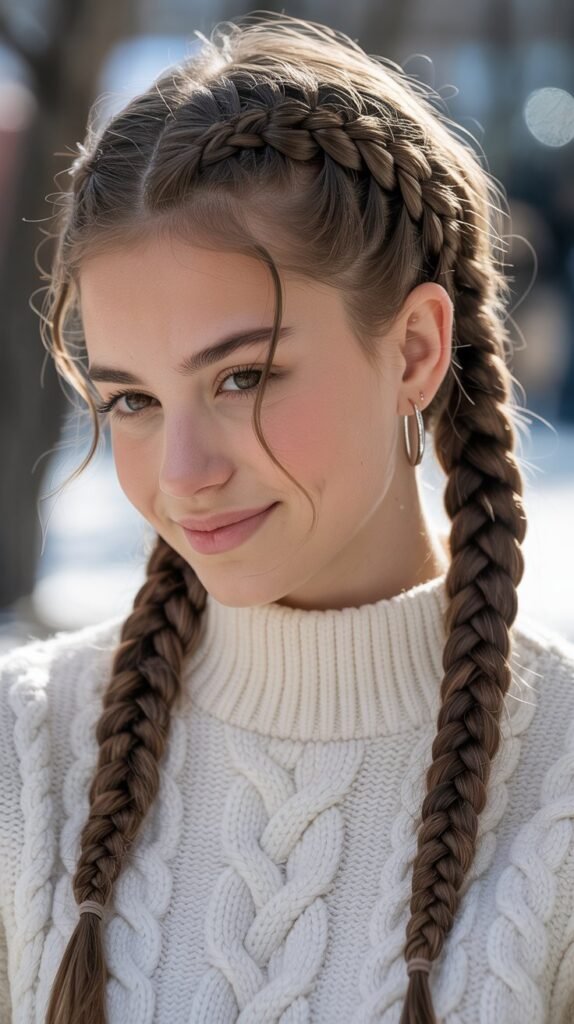
21. Braided Pigtails with Curled Ends
Braided pigtails with curled ends create a sweet, youthful look that’s both practical and adorable.
This style keeps hair controlled while the curled ends add movement and femininity.
Pigtail Braiding Process:
- Part your hair straight down the middle from forehead to nape, creating two perfectly equal sections
- Create high, mid, or low pigtails depending on your preference, securing each with matching elastics
- Begin braiding each pigtail using a three-strand technique, keeping consistent tension throughout the length
- Stop braiding about two to three inches from the ends, leaving enough hair to curl for maximum effect
- Secure each braid with a small clear elastic, ensuring the unbraided ends are firmly held
Curling the Ends:
- Use a curling iron or wand to curl the unbraided ends in uniform directions for a polished look
- Curl all ends away from your face for a more flattering, face-opening effect
- Apply a light-hold hairspray to the curled ends to maintain the curl pattern throughout the day
- Pull gently at the braid edges to create fuller, textured braids that contrast beautifully with the smooth curls
22. Low Ponytail with Volume Boost
The low ponytail with added volume transforms a basic style into something special through strategic teasing and product application.
This elevated take on a classic works for both casual and dressier winter occasions.
Volume Creation Method:
- Section off the crown area of your hair, separating it from the sides and back temporarily with clips
- Tease the crown section at the roots using a fine-tooth comb, creating lift and height with gentle backcombing
- Smooth the very top layer of the teased section with a brush to hide the teasing while maintaining volume underneath
- Gather all hair including the teased section into a low ponytail at the nape of your neck
- Secure with a strong elastic that can support the weight without slipping throughout the day
Ponytail Enhancement:
- Apply volumizing powder at the roots inside the ponytail itself for additional fullness throughout the length
- Wrap a small section of hair from the ponytail around the elastic to hide it and create a polished appearance
- Gently pull at the hair at your crown to enhance the volume and create a more dramatic lifted effect
- Use a boar bristle brush to smooth the sides while preserving the volume at the top for a balanced look
23. French Braid Mohawk
The French braid mohawk creates edgy, fashion-forward style that keeps hair completely controlled during winter activities.
This bold look makes a statement while being surprisingly practical.
Creating the Mohawk Effect:
- Create a rectangular section down the center of your head from hairline to nape, approximately three inches wide
- Clip the side sections away, leaving only the center strip loose for braiding
- Begin a tight French braid at your hairline, incorporating hair from the center section only
- Keep the braid extremely close to your scalp and pulled tight for the raised mohawk appearance
- Continue French braiding all the way down to your nape, securing the end with a small elastic
Styling the Sides:
- Slick the side sections down smoothly using gel or pomade for maximum contrast against the raised braid
- Pin the sides back behind your ears if you prefer even more dramatic distinction
- Pull gently at the edges of the center braid to create fuller, more pronounced sections that stand out
- Add small decorative pins or hair cuffs along the braid for additional edgy detail
24. Loose Side Ponytail with Wrapped Section
The loose side ponytail with wrapped section offers romantic, asymmetrical styling that’s both casual and chic.
This effortlessly pretty look works beautifully for everyday winter wear and relaxed social gatherings.
Creating the Side Ponytail:
- Sweep all your hair over to one side, positioning it just behind your ear rather than directly at the side
- Gather the hair loosely without pulling it tight, maintaining natural volume and softness at the crown
- Secure with a fabric-covered elastic that won’t damage hair or create harsh creasing
- Leave the ponytail intentionally loose and relaxed rather than pulling it into a tight, severe position
- Allow a few shorter layers to fall naturally around your face for a soft, romantic framing effect
Adding the Wrapped Detail:
- Before securing the ponytail, separate a one-inch section from underneath the gathered hair
- Create the ponytail with the remaining hair, then take your reserved section and wrap it around the elastic base
- Wind the section around the elastic three to four times, completely covering it for a seamless, polished appearance
- Secure the end of the wrapped section with a bobby pin tucked underneath the ponytail where it won’t be visible
- Pull gently at the wrapped section to loosen it slightly, creating texture that matches the relaxed ponytail aesthetic
Winter Styling Tips:
- This style pairs perfectly with oversized sweaters and allows the ponytail to drape over one shoulder elegantly
- Apply a lightweight oil or serum to the ponytail to combat winter dryness and add healthy shine
- The side placement prevents ponytail bumps when wearing winter coats with high collars
25. Double Twisted Buns
Double twisted buns create a playful yet sophisticated look that keeps hair completely secured while adding visual interest through twisted texture.
This style works for both active days and creative fashion statements.
Twisted Bun Construction:
- Part your hair straight down the middle from forehead to nape, dividing it into two equal sections
- Create two high ponytails, positioning them symmetrically on each side at the top corners of your head
- Twist each ponytail tightly from base to ends, allowing the hair to coil naturally as you twist
- Wrap each twisted section around its ponytail base in a circular motion, forming compact bun shapes
- Secure each bun with bobby pins inserted at different angles for maximum hold and stability
Styling Variations:
- Position the buns higher for a more youthful, playful appearance or lower for subtle sophistication
- Create larger, looser buns by twisting the hair less tightly before wrapping it around the base
- Pull small sections out from the twisted buns to create a deliberately messy, textured finish
- Add decorative scrunchies at the base of each bun for a pop of color that coordinates with your winter outfit
26. Braided Low Ponytail with Ribbon
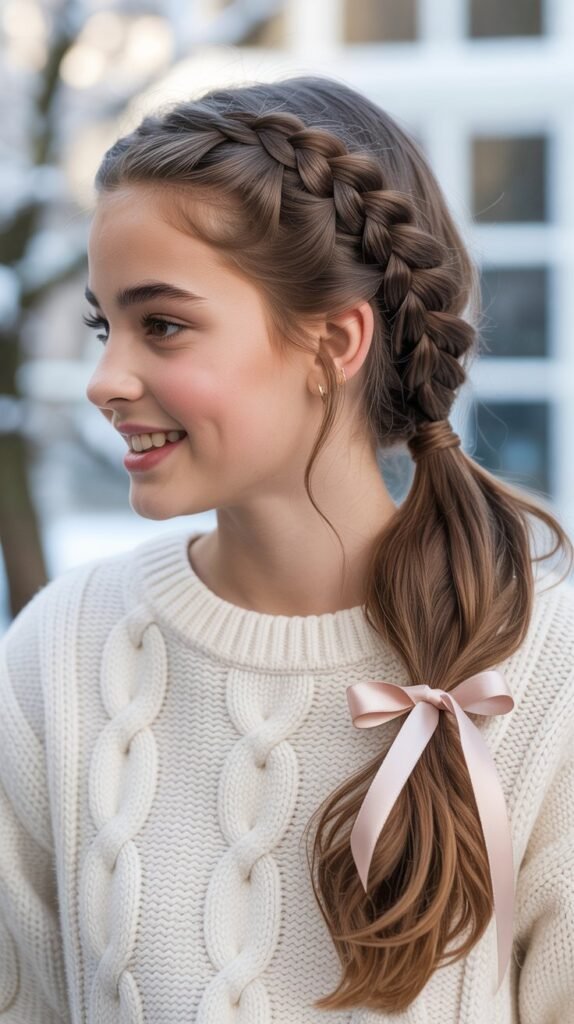
The braided low ponytail with ribbon combines classic elegance with a touch of whimsy.
This versatile style transitions seamlessly from school to special events throughout the winter season.
Building the Braided Ponytail:
- Gather all hair into a low ponytail at the nape of your neck, securing it with a clear or matching elastic
- Divide the ponytail into three equal sections for traditional three-strand braiding
- Begin braiding from the base of the ponytail down to the ends, maintaining even tension throughout
- Secure the braid end with a small elastic, leaving just the tips unbraided for a softer finish
- Pull gently at the braid edges to create fuller, more textured sections with enhanced volume
Incorporating the Ribbon:
- Choose a satin or velvet ribbon in winter colors like deep red, forest green, navy, or classic black
- Thread the ribbon through the elastic at the base of your ponytail, allowing equal lengths to hang on both sides
- Braid the ribbon alongside your hair sections, incorporating it as if it were an additional strand
- Alternatively, wrap the ribbon around the finished braid in a spiral pattern from top to bottom
- Tie the ribbon in a bow at the bottom of the braid, letting the ends trail elegantly for added movement
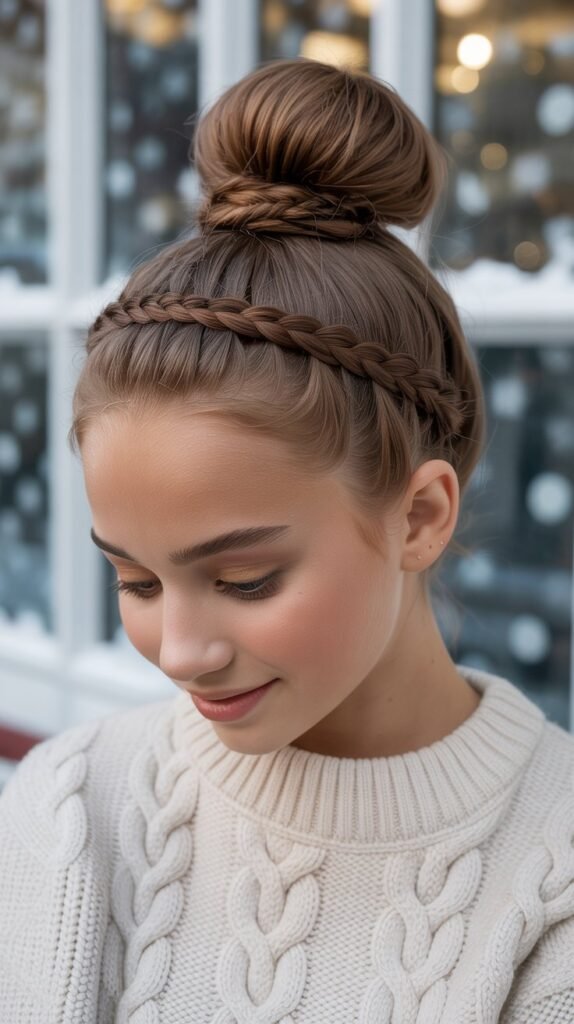
27. Half-Up Dutch Braid into Bun
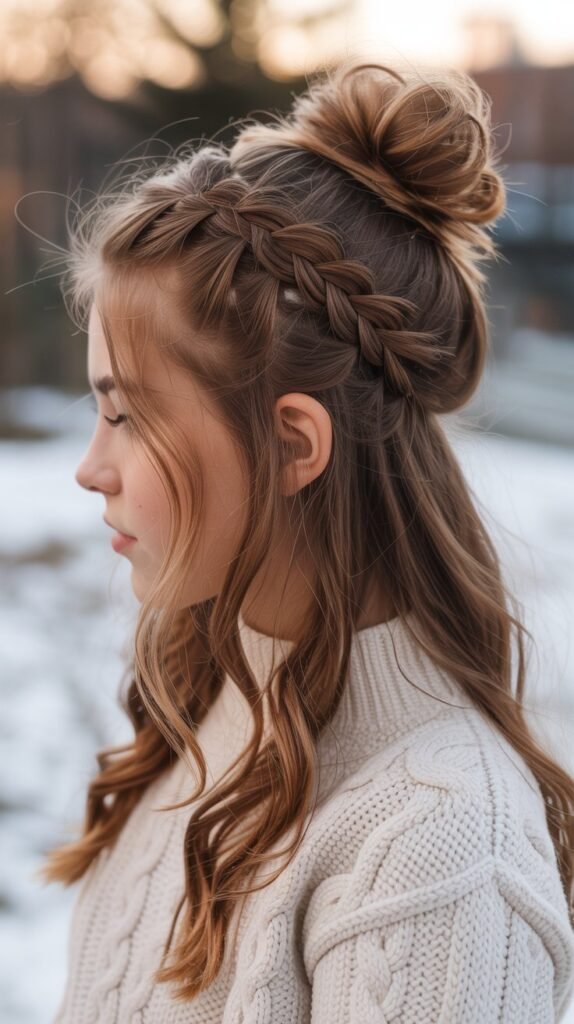
The half-up Dutch braid into bun creates a stunning combination of intricate braiding and classic bun styling.
This show-stopping look works beautifully for winter formals, holiday parties, and special occasions.
Dutch Braid Foundation:
- Section off the top half of your hair from temple to temple, leaving the bottom section loose
- Begin a Dutch braid at your hairline, starting with three small sections at the center of your forehead
- Braid using the under-crossing technique, adding hair from the sides as you braid backward toward your crown
- Continue the Dutch braid only through the top section, stopping when you reach the point where you sectioned the hair
- The braid should sit prominently on top of your head, creating a raised, 3D effect against your scalp
Creating the Bun:
- Gather the braided section along with any remaining hair from the top section into a high ponytail
- Twist or wrap this ponytail around itself, forming a rounded bun at the crown of your head
- Secure the bun with bobby pins placed in multiple directions for strong hold that lasts through events
- Pull gently at the Dutch braid edges to create fuller, more voluminous sections that stand out dramatically
- Leave the bottom section of hair completely loose, straight, wavy, or curled according to your preference
Final Touches:
- Apply strong-hold hairspray to the braided section to prevent any loosening throughout your event
- Add decorative pins, small flowers, or sparkly accessories to the bun for extra glamour during holiday celebrations
- Smooth the loose bottom section with shine serum to create beautiful contrast between the textured top and sleek bottom
Conclusion
27 Stylish Cute Winter Hairstyles for Teens provides you with an incredible variety of looks to keep you fashionable and confident throughout the coldest months of the year.
From quick five-minute styles like the messy low bun to more elaborate occasion hairstyles like the waterfall braid, you now have options for every winter scenario imaginable.
These hairstyles protect your hair from harsh winter conditions while ensuring you always look effortlessly put-together, whether you’re navigating windy school hallways, cozying up at winter cafés, or dancing at holiday parties.
Remember that the key to great winter hair is adapting these styles to your unique hair type, texture, and personal aesthetic while incorporating protective measures against cold, dry air.
Experiment with different variations, add your own creative touches through accessories and ribbon details, and don’t be afraid to combine elements from multiple styles to create something uniquely yours.
With these 27 hairstyles in your winter styling arsenal, bad hair days become a thing of the past, and you’ll greet each snowy morning with excitement about which beautiful look you’ll create.
Embrace the season with confidence, knowing your hair looks absolutely amazing no matter what winter throws your way.