
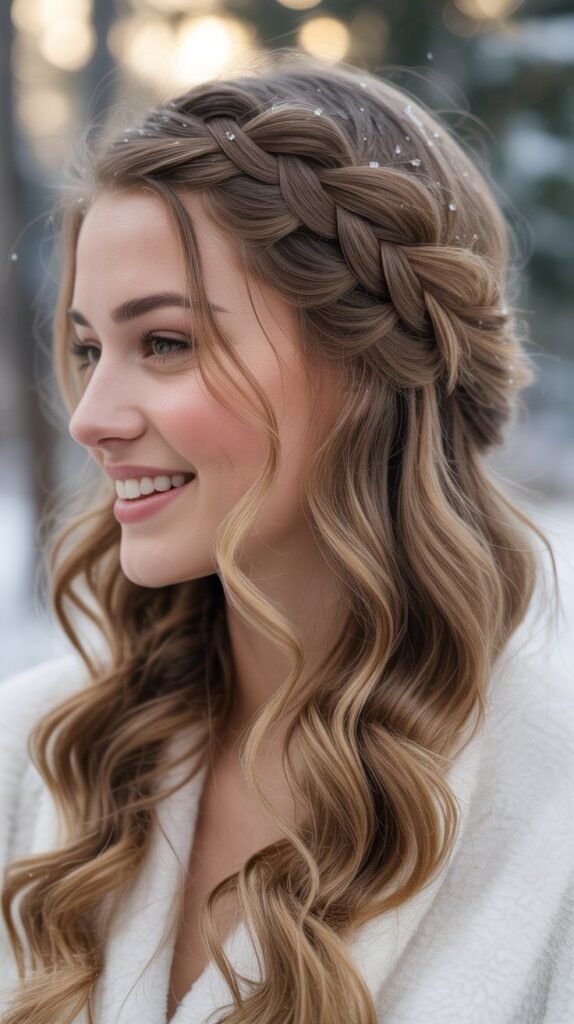
Winter 2025 brings an exciting revival of braided hairstyles that blend timeless elegance with modern creativity.
As temperatures drop and cozy fashion takes center stage, your hair deserves the same attention to detail as your winter wardrobe.
The 30 Must-Try Winter Hair Braid Trends for 2025 showcase everything from classic French braids with contemporary twists to bold, intricate patterns that turn heads at holiday gatherings.
Whether you’re heading to a festive party, enjoying a snowy weekend, or simply want to keep your hair stylish and protected during harsh winter weather, these braided looks offer versatility for every occasion.
This comprehensive guide explores chunky braids that pair perfectly with oversized sweaters, romantic styles ideal for winter weddings, protective braiding techniques that maintain hair health during cold months, and avant-garde designs that push creative boundaries.
Each trend has been carefully selected to reflect the season’s aesthetic while remaining practical for daily wear.
From minimalist single braids to elaborate crown designs adorned with winter accessories, you’ll discover styles suitable for all hair types, lengths, and skill levels.
1. Chunky Side Braid with Ribbon Weave
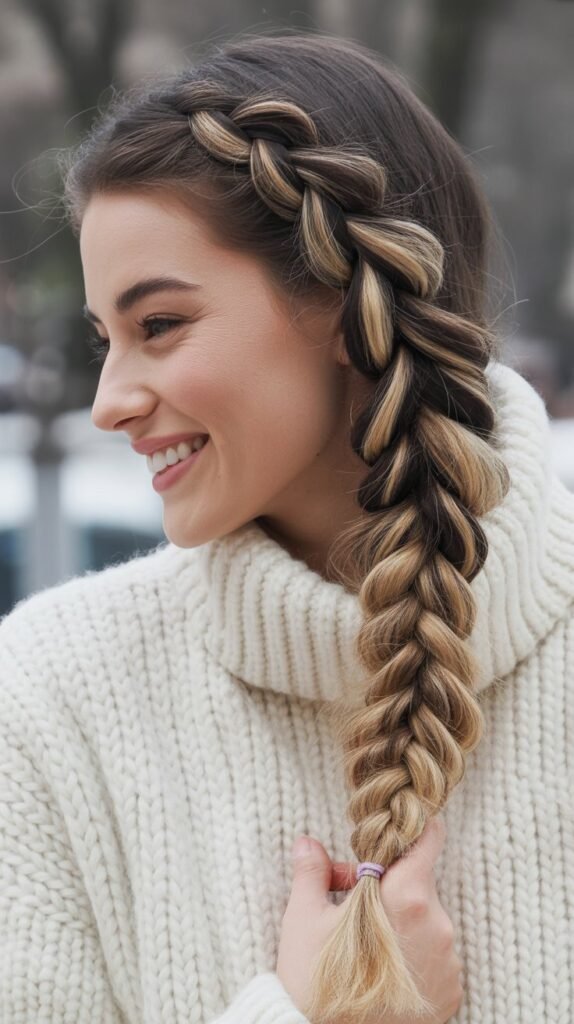
The chunky side braid makes a powerful statement this winter season by combining volume with delicate ribbon details.
This style works exceptionally well with thick winter scarves and creates a romantic, fairytale-inspired aesthetic.
The ribbon weaving technique adds dimension and can be customized with seasonal colors like deep burgundy, forest green, or classic winter white.
How to Achieve This Look:
- Begin by applying volumizing mousse to damp hair and blow-dry for maximum body
- Sweep all hair to one side, gathering it just behind your ear
- Divide the section into three equal parts for braiding
- Take a long ribbon (approximately 60 inches) and tie it around the middle section at the base
- Braid normally while incorporating the ribbon strands with your hair sections
- Gently pancake the braid by pulling apart the edges to create a fuller, chunkier appearance
- Secure the end with a clear elastic and tie the remaining ribbon in a bow
Best For:
- Medium to long hair lengths
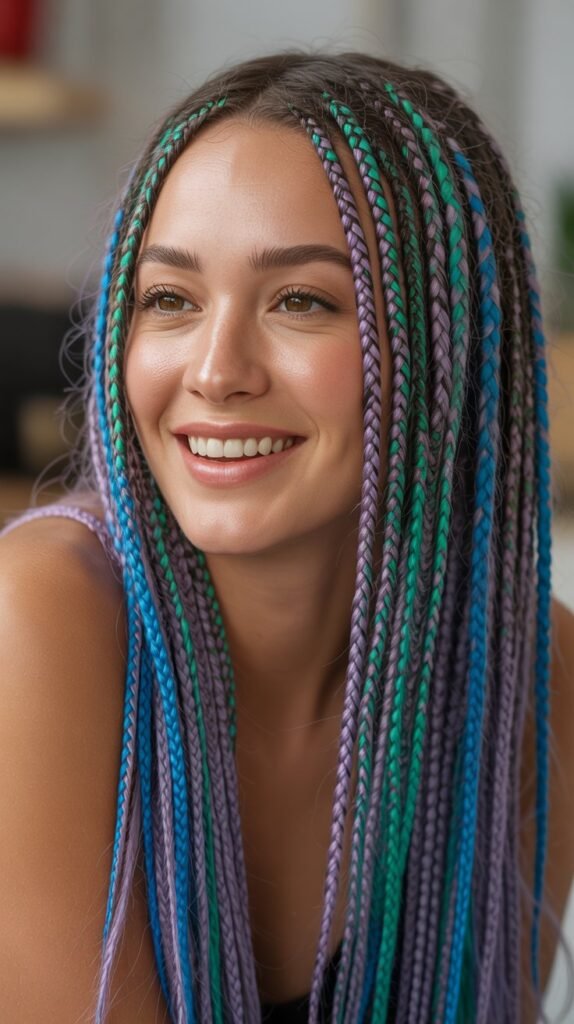
- Casual winter outings and holiday brunches
- Those seeking an effortlessly romantic look
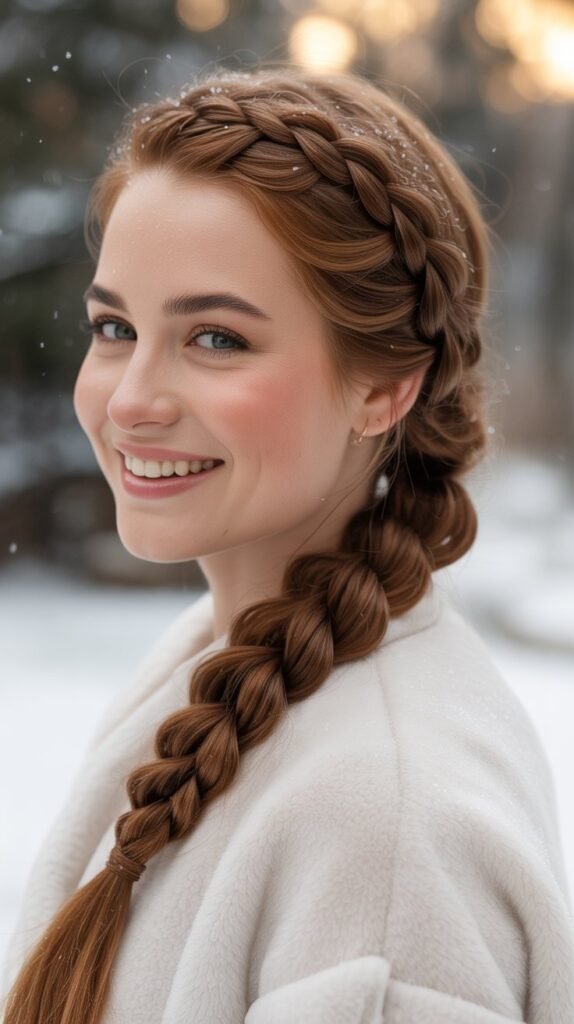
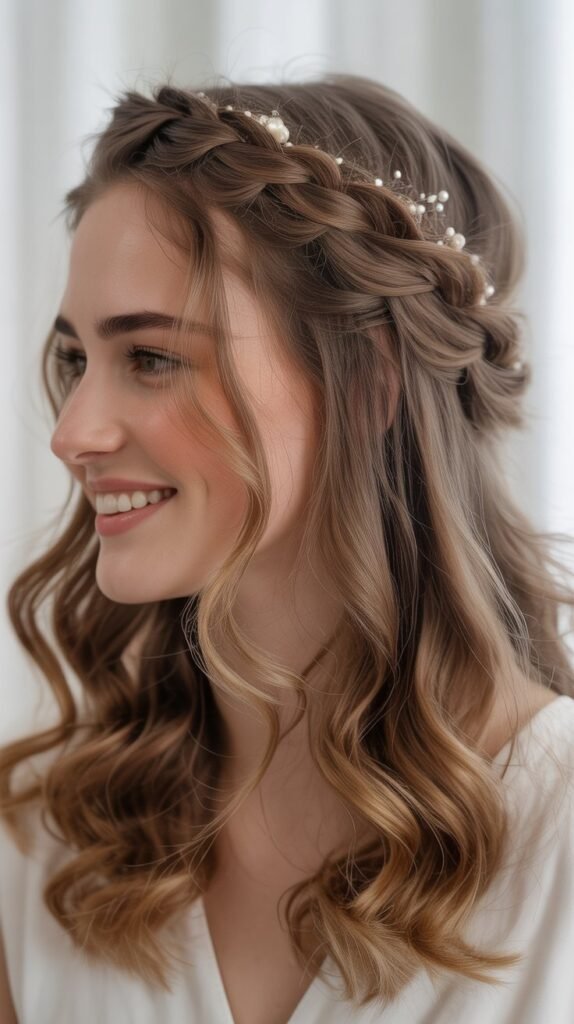
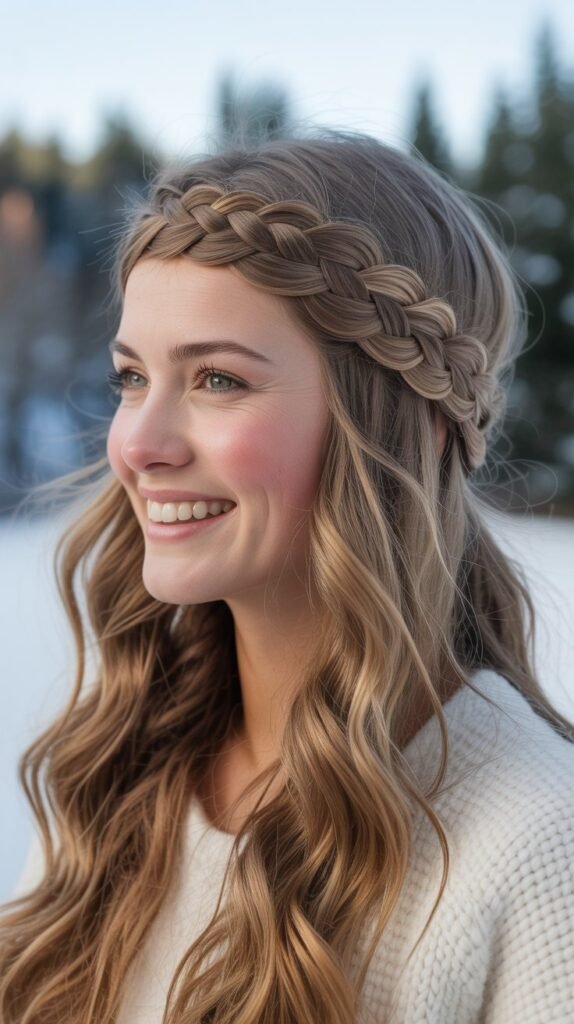
2. Dutch Braid Crown with Pearl Accessories
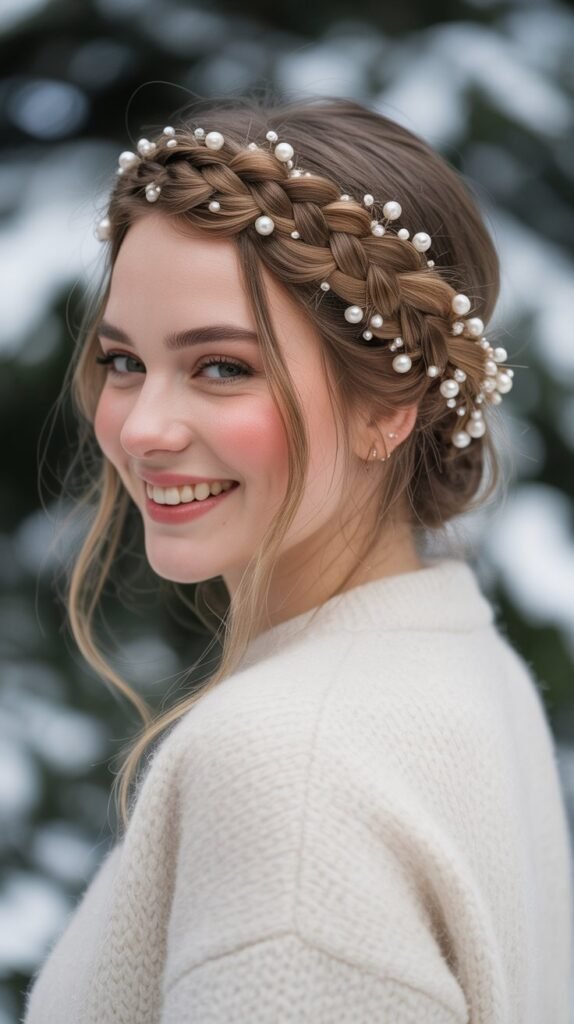
The Dutch braid crown elevates traditional braiding by creating a halo effect around your head.
This winter, pearl accessories transform this classic style into a sophisticated look perfect for formal winter events.
The Dutch technique (braiding under instead of over) creates more prominent, raised braids that stand out beautifully.
Styling Steps:
- Part your hair down the middle from forehead to nape
- Start at the left temple and begin a Dutch braid, incorporating small sections as you work around the head
- Continue braiding along your hairline, following the natural curve of your head
- When you reach the starting point, braid the remaining hair normally and tuck it under the crown
- Pin strategically with pearl-adorned bobby pins or add a delicate pearl hair vine along the braid
- Set with light-hold hairspray to maintain the structure throughout the day
Ideal Occasions:
- Winter weddings and formal celebrations
- Holiday office parties
- Special date nights during the season
3. Messy Fishtail Braid with Winter Florals
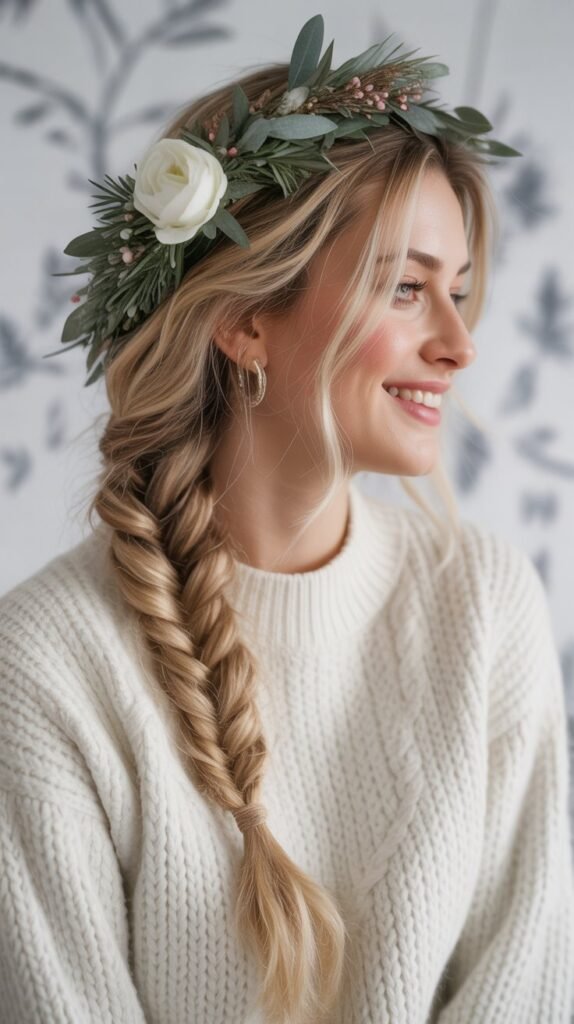
The messy fishtail braid embraces the undone texture trend while maintaining structure and style.
Winter florals like eucalyptus sprigs, dried lavender, or small pine branches add seasonal charm and organic beauty to this relaxed braiding technique.
Creating the Look:
- Apply texturizing spray to dry hair for enhanced grip and piece-y texture
- Divide hair into two equal sections at the nape
- Take a thin strand from the outer edge of the right section and cross it over to join the left section
- Repeat on the left side, taking a thin strand and crossing it to the right
- Continue alternating sides, keeping the tension relaxed for a looser finish
- Pull gently on the braid sections to create the messy, voluminous effect
- Tuck winter florals into the braid at intervals, securing with small pins if needed
- Allow face-framing pieces to fall naturally for a soft, romantic finish
Perfect For:
- Bohemian winter weddings
- Casual weekend styling
- Those with naturally textured or wavy hair
4. Boxer Braids with Metallic Thread
Boxer braids remain a winter favorite for their athletic functionality and sleek appearance.
Adding metallic thread in gold, silver, or rose gold elevates these practical braids into statement-making accessories that catch winter light beautifully.
Implementation Guide:
- Create a precise center part from hairline to crown
- Apply smoothing serum to eliminate flyaways and create a polished base
- Begin Dutch braiding on one side, starting at the hairline
- As you braid, weave metallic thread through one of the three sections
- Keep the braids tight and close to the scalp for the authentic boxer braid look
- Continue braiding down the entire length and secure with small elastics
- Repeat on the other side, ensuring both braids are symmetrical
- Wrap the elastic ends with additional thread for a cohesive finish
Best Suited For:
- Active winter activities and gym sessions
- Festival and concert events
- Those wanting to protect hair during winter sports
5. Romantic Waterfall Braid Half-Up Style
The waterfall braid creates an enchanting cascading effect that looks intricate but becomes easier with practice.
This half-up style keeps hair away from your face while allowing length to flow freely, making it ideal for showcasing winter hair color treatments.
Step-by-Step Process:
- Start with loose curls or waves throughout your hair for enhanced dimension
- Begin a French braid at the temple on one side
- Instead of continuing all three strands throughout, drop the bottom strand after each stitch
- Replace the dropped strand with a new section of hair from below
- Continue this waterfall pattern across the back of your head
- Stop at the opposite temple and secure with a decorative pin
- Leave the remaining hair down and curled
- Gently pull on the braid loops for added volume
Recommended For:
- Bridal parties and winter engagement photos
- Holiday dinner gatherings
- Showcasing highlights or ombré coloring
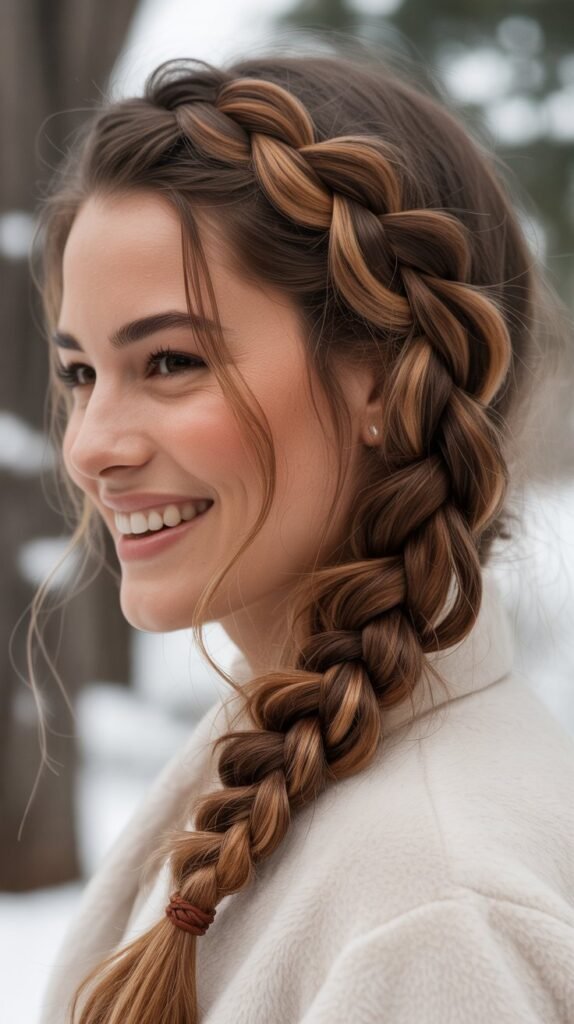
6. Twisted Rope Braid Ponytail
The twisted rope braid offers a sleek alternative to traditional three-strand braiding techniques.
This winter, wearing it as a high ponytail creates a sophisticated silhouette that pairs beautifully with turtlenecks and structured winter coats.
Creation Method:
- Gather hair into a high ponytail and secure with a strong elastic
- Divide the ponytail into two equal sections
- Twist each section tightly in the same direction (clockwise or counterclockwise)
- Wrap the two twisted sections around each other in the opposite direction
- This counter-twisting creates the rope effect that holds itself together
- Secure the end with another elastic
- Wrap a small section of hair around both elastics to conceal them
- Apply shine spray for a polished, glossy finish
Ideal For:
- Professional office environments
- Quick morning styling routines
- Those with fine hair seeking to create the illusion of thickness
7. Bubble Braid with Velvet Scrunchies
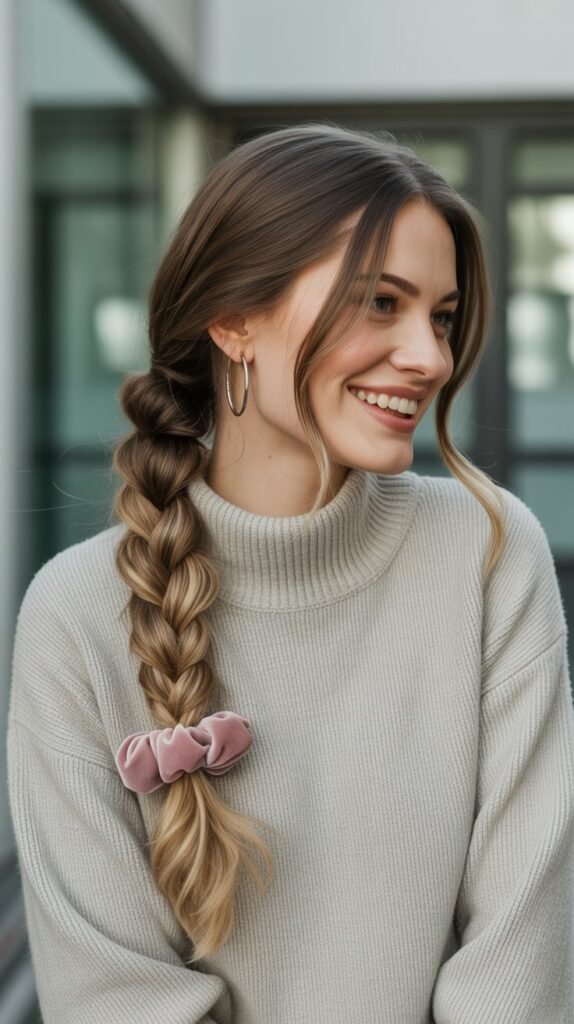
Bubble braids bring playful dimension to winter styling through strategic spacing and volume creation.
Using velvet scrunchies in winter jewel tones adds luxury and prevents hair damage that traditional elastics can cause.
Styling Instructions:
- Create a low ponytail with your first velvet scrunchie
- Measure down approximately three inches and add another scrunchie
- Gently pull the hair between scrunchies outward to create the bubble effect
- Continue adding scrunchies at even intervals down the length of your hair
- Create bubbles between each section by carefully tugging the hair
- Vary bubble sizes for a more organic, playful appearance
- The velvet texture prevents slipping and adds textural interest
Best For:
- Casual daytime activities and errands
- Young adults and teenagers
- Adding volume to thinner hair types
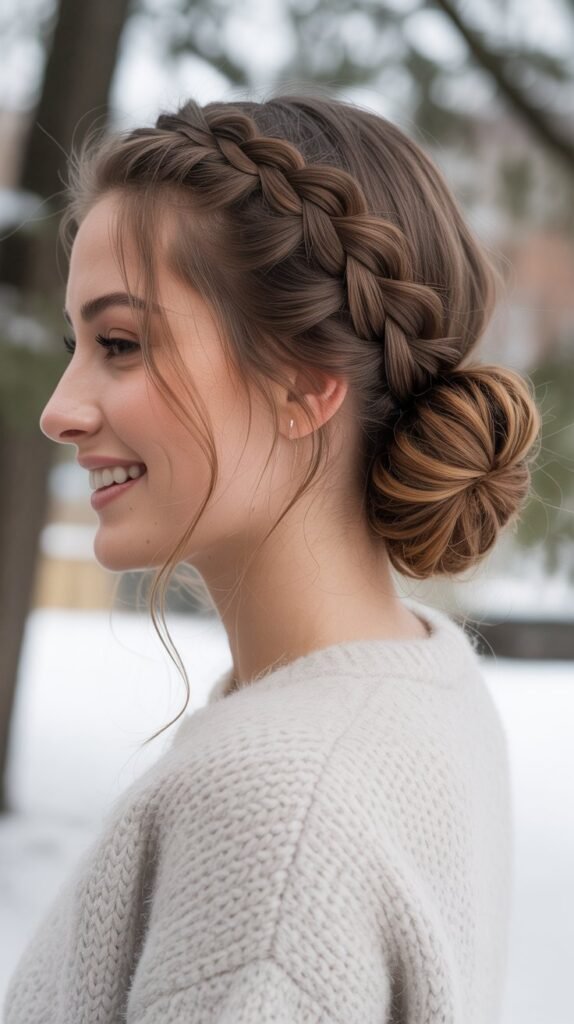
8. French Braid into Low Bun
This classic combination merges the elegance of French braiding with the sophistication of a low bun.
The style keeps hair secure and protected from winter elements while maintaining a refined appearance suitable for any professional or formal setting.
Execution Steps:
- Begin French braiding at the crown, incorporating hair from both sides as you work downward
- Keep the braid centered and maintain consistent tension for a polished look
- When you reach the nape, continue with a regular three-strand braid
- Wrap the braided length around itself to form a circular bun
- Secure with bobby pins, inserting them at angles for maximum hold
- Smooth any flyaways with a soft-bristle brush and light hairspray
- Optional: Add a decorative hair stick or pin for visual interest
Perfect For:
- Corporate meetings and presentations
- Classical winter performances and events
- Keeping hair protected during outdoor activities
9. Cornrow Patterns with Geometric Designs
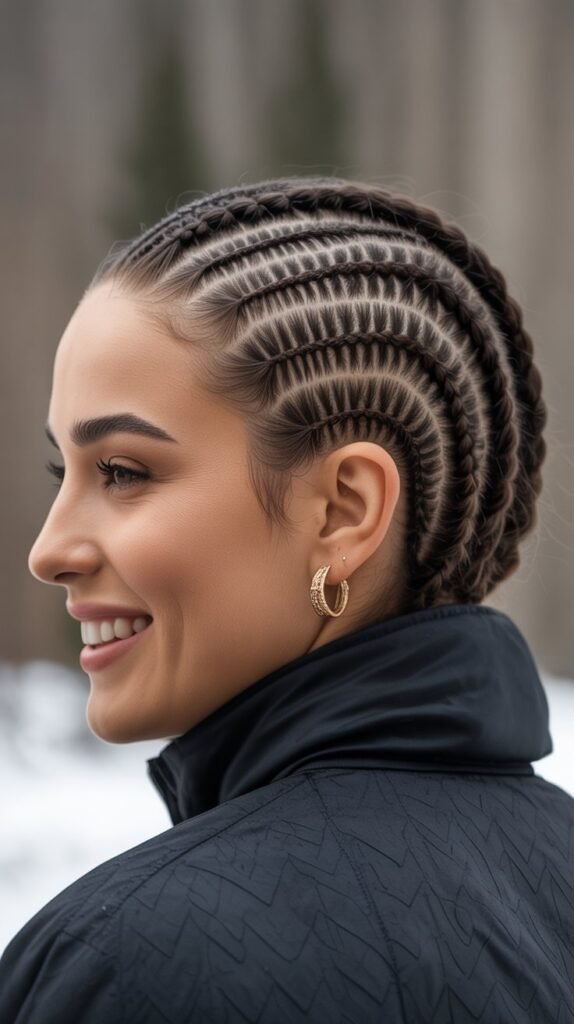
Cornrows offer both artistic expression and practical hair protection during winter months.
Geometric patterns—from triangular sections to curved lines—transform scalp braiding into wearable art that can last several weeks.
Design Considerations:
- Part hair according to your chosen geometric pattern before beginning
- Keep sections clean and uniform for professional results
- Braid tightly at the scalp while maintaining comfortable tension
- Use edge control gel to keep parts crisp and defined
- Alternate braid directions to create visual interest within the geometric design
- Seal ends with hot water method or small elastic bands
- Apply light oil to the scalp between braids to maintain moisture
Maintenance Tips:
- Wrap hair with a silk scarf nightly to preserve the pattern
- Moisturize scalp regularly to prevent dryness
- Can last 2-4 weeks with proper care
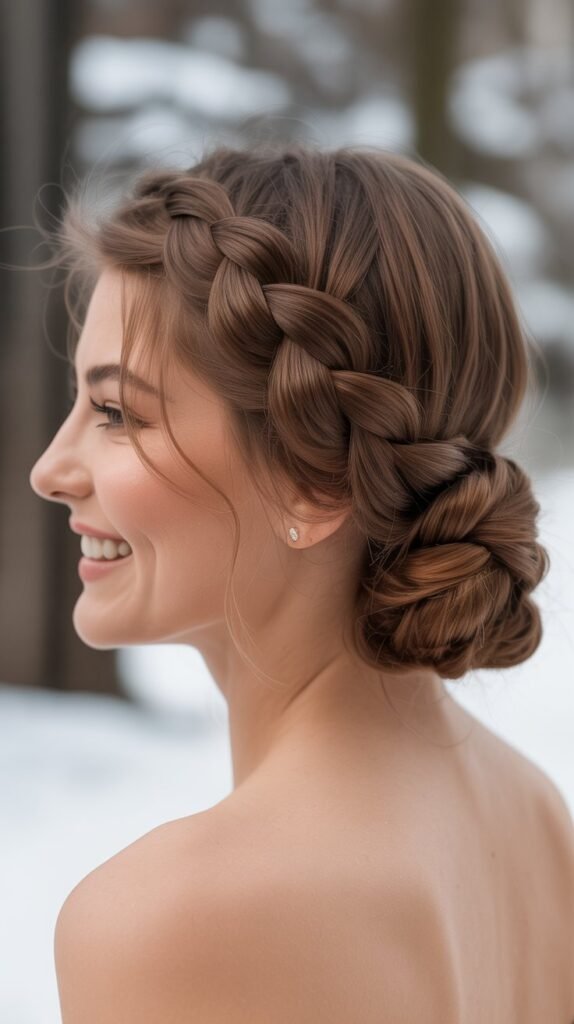
10. Milkmaid Braid with Winter Berries
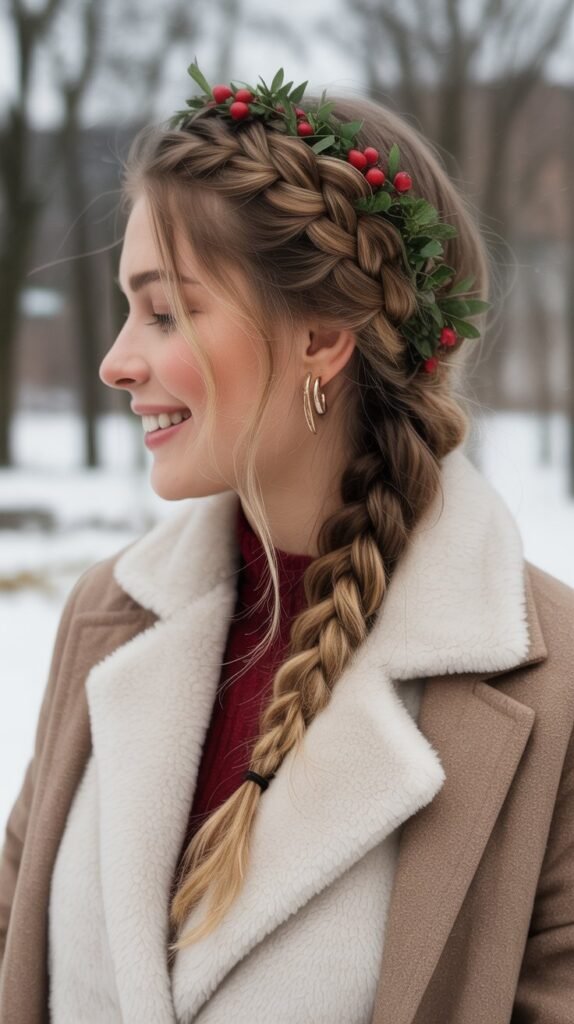
The milkmaid braid wraps around the head like a crown, creating a vintage-inspired look perfect for winter celebrations.
Adorning it with winter berries, holly, or cranberry accents adds festive seasonal flair.
Styling Approach:
- Part hair down the center into two equal sections
- Create a traditional three-strand braid on each side
- Lift the right braid over the top of your head and pin at the left temple
- Bring the left braid over the head and pin at the right temple
- Tuck the ends underneath the braids and secure with multiple bobby pins
- Weave artificial or preserved winter berries throughout the braids
- Pull gently on the braids to create a softer, more romantic texture
Ideal Settings:
- Holiday family gatherings
- Winter photo sessions
- Festive seasonal parties
11. Four-Strand Braid with Leather Cord
The four-strand braid introduces complexity that creates beautiful dimension and visual interest.
Incorporating leather cord adds an edgy, contemporary element that contrasts beautifully with the femininity of braiding.
Braiding Technique:
- Divide hair into four equal sections and add a leather cord as one of the strands
- The basic pattern: cross the far-right strand under the strand next to it, then over the third strand
- Take the far-left strand and cross it over the strand next to it, then under the third strand
- Repeat this under-over, over-under pattern until complete
- The leather cord will weave throughout, creating contrast and structure
- Practice on ribbon first if you’re new to four-strand braiding
- Secure with a small elastic and wrap with additional leather for cohesion
Suited For:
- Alternative fashion enthusiasts
- Music festivals and concerts
- Creating edge in your winter styling
12. Halo Braid with Faux Snow Accents
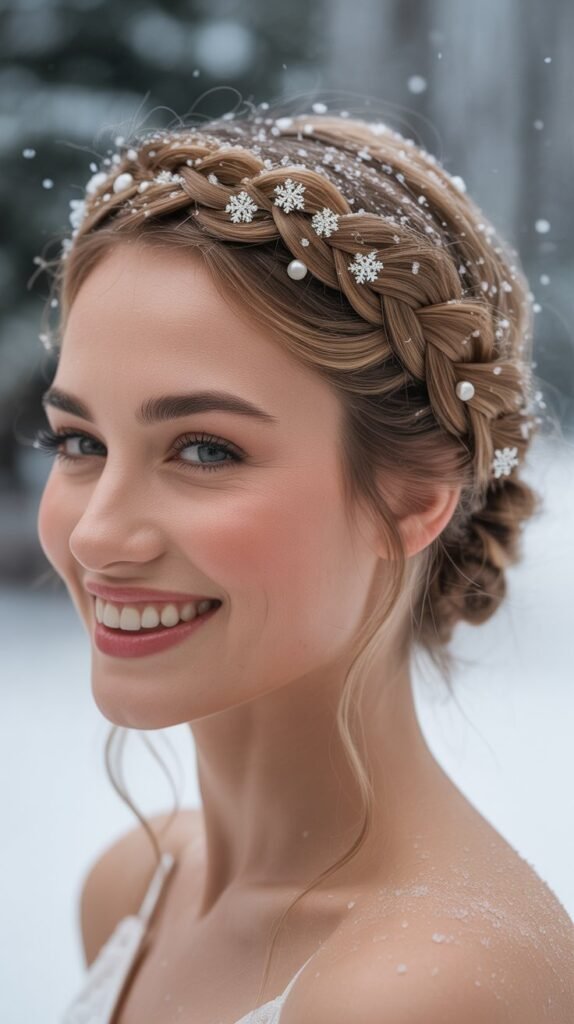
The halo braid creates an ethereal winter angel effect, especially when adorned with faux snow spray or white floral accents.
This style works beautifully for winter formal events and creates the illusion of a snowy crown.
Creating the Effect:
- Brush hair thoroughly and create a center part
- Begin Dutch braiding from behind one ear, working around the back of your head
- Continue the braid around your entire head, following your hairline
- When you return to the starting point, braid any remaining length and tuck under
- Secure the ends underneath the halo braid with multiple pins
- Apply faux snow spray lightly to the braid for winter wonderland effect
- Add small white flowers or baby’s breath for enhanced ethereal quality
Best Occasions:
- Winter wonderland themed events
- Bridal styling for winter weddings
- Holiday photoshoots and portraits
13. Zigzag Part with Double Dutch Braids
Double Dutch braids become extraordinary when paired with a creative zigzag part.
This geometric element adds visual interest and makes a classic style feel fresh and contemporary for winter 2025.
Implementation Process:
- Use a rat-tail comb to create a zigzag pattern from hairline to nape
- Apply gel or mousse to keep the part clean and defined
- Begin Dutch braiding on one side of the zigzag, starting at the hairline
- Keep braids tight and close to the scalp for maximum definition
- Repeat on the opposite side, ensuring symmetry in braid size
- Braid the entire length of hair on both sides
- Secure ends with small elastics
- Set the zigzag part with edge control for lasting definition
Perfect For:
- Athletic activities and sports
- Creating standout style at winter events
- Those seeking bold, geometric aesthetics
14. Pull-Through Braid with Sparkle Clips
The pull-through braid creates the illusion of complex braiding without the technical difficulty.
Adding sparkle clips between sections brings winter glamour and catches light beautifully at evening events.
Step-by-Step Guide:
- Create a half-up ponytail and secure with a clear elastic
- Divide this ponytail in half and clip the front section forward
- Create another ponytail below the first using the remaining hair
- Bring the clipped section down and divide it around the new ponytail
- Repeat this pattern down the length of your hair
- Gently pull on each loop section to create volume and the braided appearance
- Add sparkle clips at each elastic junction point
- The result mimics an intricate braid while being much easier to execute
Ideal For:
- Holiday parties and celebrations
- New Year’s Eve events
- Those wanting impressive results without advanced braiding skills
15. Braided Space Buns
Space buns take on sophistication when the buns themselves are created from braided sections.
This playful style works for casual winter outings and adds personality to everyday cold-weather styling.
Creation Method:
- Part hair down the center from forehead to nape
- Create two high pigtails positioned toward the top of your head
- Braid each pigtail in your preferred braiding style (three-strand, fishtail, or rope)
- Wrap each braid around its base to form a bun shape
- Secure with bobby pins, tucking the ends underneath
- Pull gently on the buns to create fuller, more textured shapes
- Leave out face-framing pieces for a softer, more flattering look
Best For:
- Casual weekend activities
- Festival and concert styling
- Adding playful energy to winter outfits
16. Infinity Braid Half-Crown
The infinity braid creates a figure-eight pattern that looks extraordinarily intricate.
When styled as a half-crown, it frames the face beautifully while allowing length to flow freely down the back.
Braiding Instructions:
- Section off hair from temple to temple across the top of your head
- Divide this section into two strands at one temple
- Take a small piece from underneath and loop it through the two strands in a figure-eight motion
- Continue adding small sections and creating the infinity loop pattern
- Work across the head to the opposite temple
- Secure with bobby pins and allow remaining hair to hang naturally
- This braid requires practice but creates stunning results
Recommended For:
- Special occasions requiring intricate styling
- Showcasing advanced braiding skills
- Creating conversation-starting hairstyles
17. Low Braided Ponytail with Wrapped Base
A low braided ponytail becomes elevated when the base is wrapped with a separate braided section.
This detail-oriented style appears polished and intentional, perfect for professional winter environments.
Styling Steps:
- Gather hair into a low ponytail at the nape and secure
- Take a small section from underneath the ponytail before securing
- Braid this small section tightly
- Wrap this braid around the elastic base of the ponytail
- Secure the wrapped braid with a bobby pin tucked underneath
- Braid the remaining ponytail length in your preferred style
- Apply shine serum for a polished, professional finish
Perfect For:
- Office and corporate settings
- Professional presentations
- Creating refined everyday styling
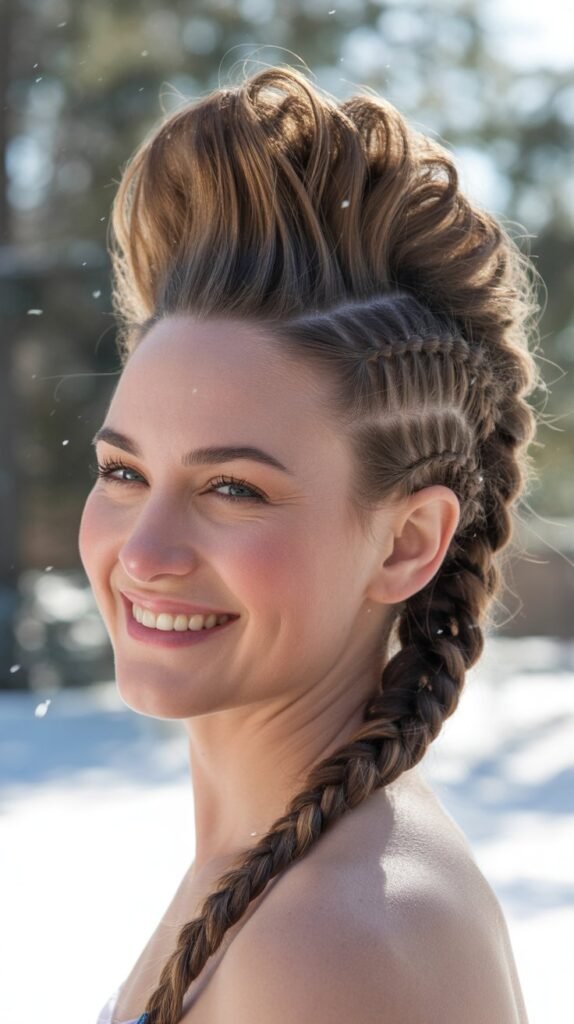
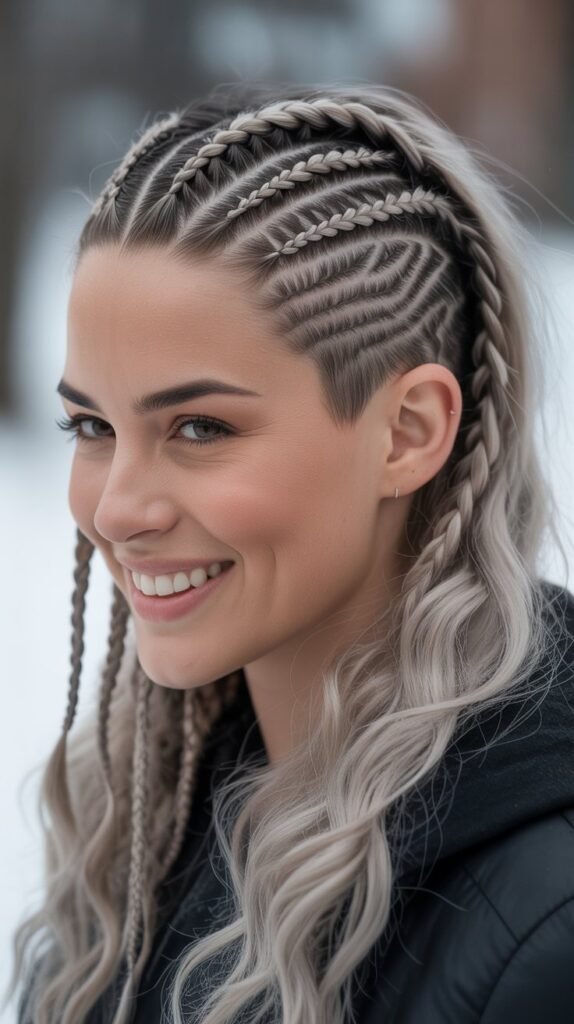
18. Viking-Inspired Warrior Braids
Viking warrior braids combine multiple braiding techniques into one powerful statement style.
These braids often feature shaved or undercut sides with elaborate braiding on top, creating a bold winter look.
Design Elements:
- Create a mohawk section by parting from forehead to nape
- Dutch braid the center section, incorporating small cornrows on the sides
- Add smaller accent braids throughout for complexity
- Weave leather cords or metal cuffs into the braids
- Pull sections of the braids to create texture and volume
- This style works best on medium to long hair
- Can incorporate temporary side braids without committing to an undercut
Best Suited For:
- Bold fashion statements
- Renaissance fairs and themed events
- Those seeking powerful, commanding hairstyles
19. French Braid Pigtails with Ribbon Bows
French braid pigtails receive a winter refresh with oversized ribbon bows at the ends.
This sweet, youthful style works for both children and adults seeking nostalgic, charming winter looks.
Implementation Guide:
- Part hair down the center creating two equal sections
- Begin French braiding on one side at the hairline
- Continue incorporating hair as you braid down toward the bottom
- Secure with a small elastic when complete
- Repeat on the opposite side, matching the tightness and placement
- Tie large ribbon bows at the ends of each braid
- Choose winter-appropriate ribbon colors like deep red, green, or classic plaid
- Pull gently on the braids for softer, more romantic texture
Ideal For:
- Holiday family photos
- Winter school events
- Creating sweet, approachable styling
20. Diagonal Braided Updo
The diagonal braided updo creates movement and visual interest through asymmetrical placement.
This architectural style works beautifully for formal winter events and showcases the neck and shoulders elegantly.
Creation Process:
- Begin a Dutch braid at one temple, angling it diagonally toward the opposite side
- Continue braiding across the back of the head on a diagonal path
- When you reach the opposite side, gather all remaining hair
- Twist and pin this hair into a low side bun
- Tuck the braid end into the bun and secure with multiple pins
- Pull gently on the braid for added dimension
- Finish with hairspray to secure the sculptural shape
Perfect For:
- Black tie winter events
- Formal evening occasions
- Showcasing elegant winter necklines
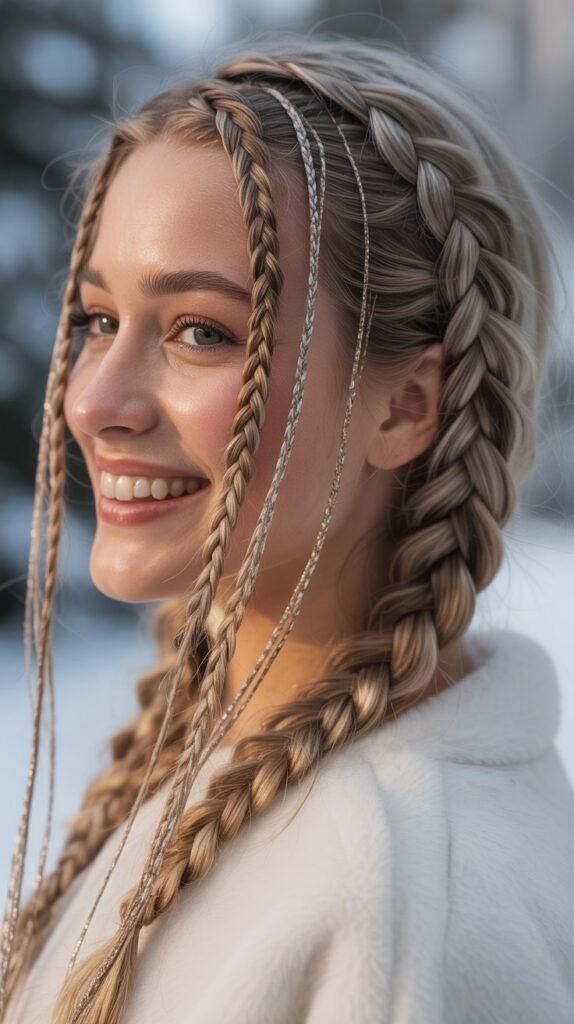
21. Micro Braids with Colored Extensions
Micro braids offer long-lasting style and hair protection throughout winter.
Adding colored extensions brings vibrant personality and allows for creative expression without permanent color commitment.
Installation Considerations:
- This style requires professional installation for best results
- Small sections of hair are braided from root to tip
- Colored synthetic or human hair extensions can be incorporated
- Popular winter colors include deep purples, blues, and burgundies
- Installation takes 4-8 hours depending on head size
- Can last 2-3 months with proper care
- Requires nighttime wrapping and regular scalp moisturizing
Maintenance Requirements:
- Cleanse scalp weekly with diluted shampoo
- Apply oil to scalp and braids regularly
- Wrap at night with silk scarf or bonnet
- Avoid excessive manipulation
22. Braided Faux Hawk
The braided faux hawk combines edgy styling with the elegance of braiding.
The sides are either braided flat or slicked down, while the center creates dramatic height through braiding and pinning.
Styling Technique:
- Slick down or cornrow the sides of your hair tightly
- Leave a mohawk section from hairline to crown loose
- French or Dutch braid the center section, pulling it upward
- Secure the braid vertically by pinning it standing up
- Pull sections of the braid to create height and volume
- Apply strong-hold gel to the sides for sleek contrast
- Finish with high-hold hairspray to maintain the vertical structure
Best For:
- Concert and festival styling
- Making bold fashion statements
- Those with adventurous personal style
23. Twisted Crown with Loose Waves
The twisted crown offers a softer alternative to braiding while creating similar visual impact.
When paired with loose waves flowing down, this romantic style perfectly captures winter elegance.
Step-by-Step Creation:
- Take a section of hair from one temple
- Twist this section tightly while moving toward the back of your head
- Secure with bobby pins at the center back
- Repeat on the opposite side, meeting at the same central point
- Allow the remaining hair to fall in loose waves
- Curl the loose sections with a large-barrel curling iron if needed
- Pull gently on the twists for added texture and volume
Recommended For:
- Romantic winter dates
- Bridal and bridesmaid styling
- Soft, feminine winter aesthetics
24. Ladder Braid Accent
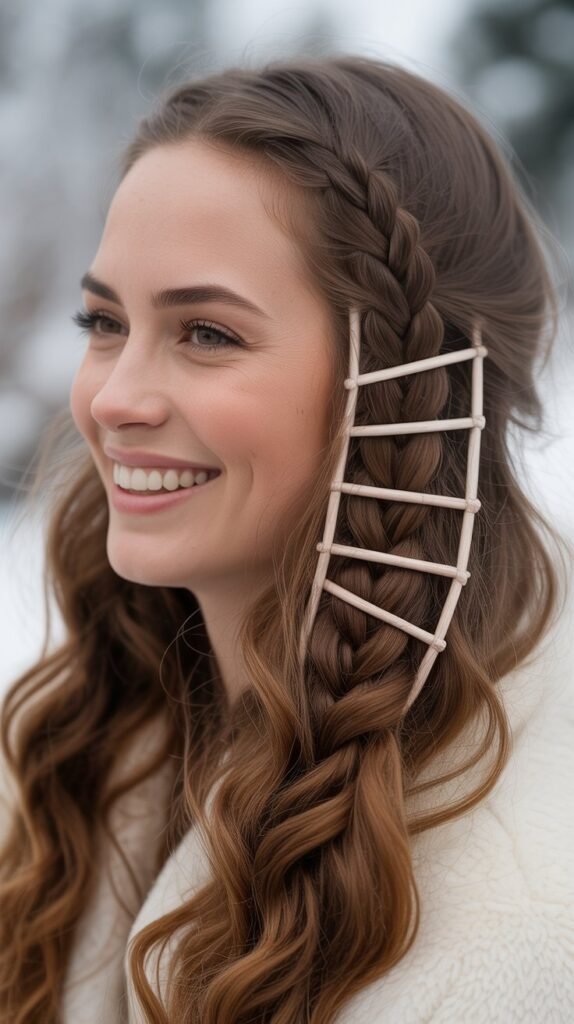
The ladder braid creates a unique woven appearance through its distinctive technique.
Used as an accent within other styles, it adds intricate detail that elevates simple winter hairstyles.
Braiding Method:
- Take a small vertical section of hair near the temple
- Divide into two strands with a small elastic at the top
- Create small horizontal rungs by picking up new hair and pulling through the two vertical strands
- Continue creating these ladder rungs down the section
- This technique works best as an accent rather than a full hairstyle
- Combine with half-up styles or integrate into larger braided designs
- Secure at the bottom and gently adjust the rungs for even spacing
Ideal For:
- Adding intricate detail to simple styles
- Showcasing advanced braiding techniques
- Creating unique, eye-catching accents
25. Braided Headband with Flowing Hair
The braided headband uses your own hair to create a bohemian accessory effect.
This style keeps hair away from your face while allowing length and volume to flow freely behind.
Implementation Steps:
- Section off hair from behind one ear in a thin horizontal line
- Braid this section tightly in a three-strand braid
- Bring the braid across your head like a headband
- Secure behind the opposite ear with bobby pins
- Allow all remaining hair to fall naturally
- Add waves or curls to the loose hair for enhanced texture
- This style works beautifully for showcasing highlights or balayage
Perfect For:
- Casual winter outings
- Keeping hair back without accessories
- Bohemian and festival styling
26. Stacked Braids with Undercut Design
Stacked braids create dimension by layering multiple horizontal braids on top of each other.
When combined with undercut designs, this creates an ultra-modern, edgy winter statement.
Design Approach:
- This style works best with an undercut or shaved section underneath
- Create horizontal Dutch braids stacked on top of the head
- Each braid should be tight and close to the scalp
- Stack 3-5 braids depending on hair density and length
- The undercut can feature shaved patterns or designs
- Bring remaining hair to one side or create a ponytail
- Requires regular maintenance to keep the undercut fresh
Suited For:
- Bold, fashion-forward individuals
- Alternative style communities
- Those comfortable with partial head shaving
27. Waterfall Twist into Low Bun
The waterfall twist mimics the waterfall braid technique but uses twisting instead of braiding.
When gathered into a low bun, this creates an elegant style suitable for the most formal winter occasions.
Styling Process:
- Begin at one temple with a small section of hair
- Twist the section while picking up new hair from the top
- Drop the bottom strand after each twist, creating the waterfall effect
- Replace dropped strands with new sections from below
- Continue across the back of your head to the opposite side
- Gather all hair including the waterfall twist into a low ponytail
- Twist the ponytail and wrap into an elegant bun
- Secure with pins and finish with smoothing spray
Ideal Occasions:
- Winter galas and formal dinners
- Opera and theater events
- Elegant wedding guest styling
28. Mohawk Braid with Shaved Designs
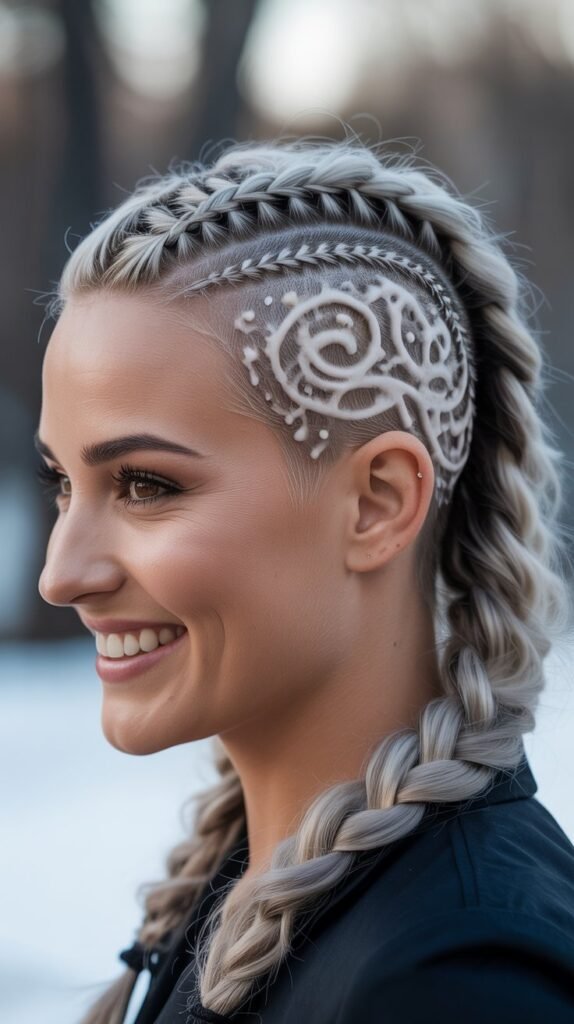
The mohawk braid makes a powerful statement by combining height, braiding, and potentially shaved side patterns.
This dramatic style works for those seeking maximum impact in their winter hair.
Creation Method:
- Shave or slick down the sides completely
- Leave a wide mohawk section from forehead to nape
- Dutch braid the mohawk section to create height and definition
- Pull aggressively on the braid sections for maximum volume
- Optional: Add designs to the shaved sections using clippers
- Secure the braid end and consider adding hair jewelry
- Apply strong-hold products to maintain height throughout the day
Best For:
- Alternative fashion and punk aesthetics
- Music performances and creative industries
- Bold self-expression through hair
29. Criss-Cross Braids into High Ponytail
Criss-cross braids add architectural interest to the simple high ponytail.
This geometric approach creates visual complexity while maintaining the practicality of having hair up and secured.
Styling Instructions:
- Section off the front portion of hair from temple to temple
- Create small Dutch braids starting at the hairline
- Angle these braids to criss-cross each other as they move toward the crown
- Secure all braids together at the crown
- Gather all remaining hair into a high ponytail at the same point
- The braids should integrate seamlessly into the ponytail
- Wrap a section of hair around the elastic to conceal it
- Add height by teasing the ponytail or using a volumizing product
Perfect For:
- Athletic activities and workouts
- Creating unique everyday styling
- Adding interest to basic ponytails
30. Knotted Braid Combination
The knotted braid technique creates a chain-link effect by tying sections of hair rather than traditional braiding.
This unconventional approach creates stunning visual texture perfect for standing out at winter events.
Implementation Guide:
- Divide hair into two sections
- Tie these sections in a simple overhand knot
- Before tightening completely, add new hair to each section from the sides
- Create another knot below the first
- Continue knotting down the length while incorporating new hair
- The result resembles a braided chain effect
- Secure at the bottom and gently pull on the knots to create volume
- This technique works best on medium to long hair
Recommended For:
- Unique occasion styling
- Fashion-forward winter events
- Those seeking unconventional braiding techniques
Choosing the Right Braid for Your Hair Type
Fine Hair:
- Pancaked braids create the illusion of thickness
- Bubble braids add dimension
- Avoid braiding too tightly to prevent breakage
- Use volumizing products before braiding
Thick Hair:
- Embrace chunky, statement braids
- Multiple smaller braids work well for management
- May require longer styling time
- Benefits from smoothing products to control volume
Curly/Textured Hair:
- Protective braiding styles work exceptionally well
- Moisturize thoroughly before braiding
- Consider professional installation for intricate styles
- Can maintain braids longer than other hair types
Short Hair:
- Focus on smaller braids and crown styles
- Braided headbands work beautifully
- Dutch braids can create the illusion of length
- Consider extensions for more complex styles
Essential Products for Winter Braiding
Before Braiding:
- Moisturizing leave-in conditioner to hydrate hair
- Smoothing serum for sleek, polished braids
- Texturizing spray for grip in messy styles
- Edge control gel for clean parts and smooth hairlines
During Braiding:
- Clear elastic bands in various sizes
- Bobby pins matching your hair color
- Sectioning clips for organization
- Rat-tail comb for precise parting
After Braiding:
- Light-hold hairspray for setting styles
- Shine spray for polished finishes
- Scalp oil for maintaining moisture
- Silk scarf for nighttime protection
Winter Braid Accessories to Elevate Your Style
Ribbons and Cords:
- Velvet ribbons in jewel tones complement winter aesthetics
- Leather cords add edgy, contemporary flair
- Metallic threads catch light beautifully at evening events
- Seasonal colors like burgundy, forest green, and winter white enhance festive looks
Hair Jewelry:
- Pearl pins create sophisticated elegance
- Crystal clips add sparkle for celebrations
- Metal cuffs provide warrior-inspired edge
- Decorative hair sticks secure buns while adding visual interest
Natural Elements:
- Winter florals like eucalyptus and dried lavender
- Berry accents for holiday gatherings
- Small pine branches for seasonal charm
- Baby’s breath creates ethereal winter wonderland effects
Tips for Long-Lasting Winter Braids
Preparation is Key:
- Start with clean, properly conditioned hair
- Apply appropriate styling products for your desired finish
- Ensure hair is completely dry before braiding tight styles
- Create clean parts with precision tools
During Styling:
- Maintain consistent tension throughout the braid
- Secure sections properly as you work
- Use enough bobby pins for elaborate updos
- Test the hold before leaving home
Maintenance Strategies:
- Wrap braids with silk scarves at night
- Avoid excessive touching throughout the day
- Refresh edges and flyaways with gel or spray
- Reapply shine products as needed
Extending Braid Life:
- Protective braiding styles can last 2-4 weeks
- Simple braids may need redoing after 1-3 days
- Address loose sections promptly
- Keep scalp moisturized to prevent itching
Braiding Tools Every Winter Stylist Needs
Essential Tools:
- Rat-tail comb for precise sectioning and parting
- Wide-tooth comb for detangling before braiding
- Paddle brush for smoothing and preparing hair
- Sectioning clips to organize hair while working
Securing Items:
- Clear elastic bands in multiple sizes
- Bobby pins in colors matching your hair
- Small rubber bands for micro braids
- Hair pins for securing updos and buns
Finishing Products:
- Travel-size hairspray for touch-ups
- Edge brush for smoothing flyaways
- Shine spray for polished results
- Texture powder for adding grip
Braiding Mistakes to Avoid This Winter
Tension Issues:
- Braiding too tightly causes headaches and hair breakage
- Braiding too loosely results in styles falling apart quickly
- Inconsistent tension creates uneven, messy appearances
- Always check comfort level before finishing
Product Problems:
- Using too much product makes hair stiff and unnatural
- Skipping product leads to flyaways and lack of hold
- Wrong product types for your hair texture cause issues
- Apply products strategically rather than coating entire head
Time Management:
- Rushing through braiding creates sloppy results
- Not allowing enough time leads to incomplete styles
- Practice complex braids before important events
- Start simple and build skills gradually
Hair Health:
- Braiding dirty hair traps oils and buildup
- Never braiding wet hair properly (depends on style)
- Keeping protective braids too long damages hair
- Ignoring scalp health while braided causes problems
Winter Hair Health While Braiding
Moisturizing Matters:
- Winter air is extremely drying to hair and scalp
- Apply light oils to braids and scalp regularly
- Use leave-in conditioner before creating protective braids
- Deep condition hair between braiding styles
Protecting Hair:
- Braiding provides protection from harsh winter elements
- Avoid over-manipulating braided styles
- Give hair breaks between tight braiding styles
- Monitor for any signs of traction or breakage
Scalp Care:
- Dry scalp is common during winter months
- Apply moisturizing oil directly to scalp between braids
- Use diluted shampoo to cleanse without disturbing braids
- Address itching promptly to avoid scratching damage
Healthy Practices:
- Drink adequate water for internal hydration
- Take hair vitamins if recommended by professionals
- Trim ends regularly to prevent split ends
- Choose appropriate braid tightness for your hair type
Transitioning Between Braid Styles
Safe Removal:
- Take time when removing braids to avoid breakage
- Use scissors carefully to cut elastics rather than pulling
- Apply conditioner or oil to help detangle
- Work from ends toward roots when unbraiding
Post-Braid Care:
- Expect some shedding after removing long-term braids (this is normal accumulated shedding)
- Deep condition immediately after removing braids
- Let hair rest for several days before re-braiding
- Trim any damaged ends before starting new styles
Style Rotation:
- Alternate between tight and loose braiding styles
- Mix protective braids with simple everyday braids
- Give your edges breaks from tension
- Change braid patterns to avoid stress on same areas
Celebrity-Inspired Winter Braid Trends
Red Carpet Influence:
- Sleek braided updos dominate winter award shows
- Romantic waterfall braids appear at premiere events
- Bold cornrow patterns make fashion statements
- Intricate braided crowns shine at formal occasions
Social Media Trends:
- Bubble braids gain popularity through viral tutorials
- Colored extension braids showcase personal creativity
- Geometric braiding patterns create artistic content
- Quick everyday braids resonate with busy audiences
Fashion Week Inspiration:
- Avant-garde braiding pushes creative boundaries
- Minimalist single braids complement high fashion
- Sculptural updos create editorial impact
- Cultural braiding traditions receive runway celebration
Quick Winter Braid Styles for Busy Mornings
5-Minute Styles:
- Simple three-strand side braid
- Low twisted ponytail
- Quick Dutch braid into bun
- Braided headband with loose hair
10-Minute Styles:
- French braid pigtails
- Waterfall braid half-up style
- Rope braid high ponytail
- Bubble braid with scrunchies
15-Minute Styles:
- Dutch braid crown
- Boxer braids with accessories
- Fishtail braid with texture
- Criss-cross braids into ponytail
Time-Saving Tips:
- Prep hair the night before
- Use texturizing spray on second-day hair
- Keep styling products accessible
- Practice techniques during free time
Braiding for Different Winter Occasions
Professional Settings:
- Low braided buns project sophistication
- Sleek French braids maintain polish
- Wrapped base ponytails show attention to detail
- Avoid overly decorative accessories in conservative environments
Casual Outings:
- Messy fishtail braids offer relaxed style
- Braided headbands keep hair manageable
- Simple side braids work for everyday wear
- Comfortable styles that last throughout activities
Formal Events:
- Elaborate crown braids create elegance
- Diagonal updos showcase architectural beauty
- Waterfall twists into buns exude sophistication
- Incorporate pearls and crystals for added glamour
Athletic Activities:
- Boxer braids stay secure during movement
- Dutch braids keep hair completely controlled
- High braided ponytails prevent interference
- Focus on function over fashion for sports
Cultural Appreciation in Braiding
Respecting Origins:
- Many braiding techniques have deep cultural significance
- Cornrows and protective braiding originate from African traditions
- Research the history behind styles you choose
- Give credit to cultural origins when sharing styles
Appropriate Adoption:
- Learn techniques from proper sources
- Support braiders from originating communities
- Understand the difference between appreciation and appropriation
- Use culturally significant styles respectfully
Celebrating Diversity:
- Braiding traditions exist across many cultures worldwide
- Each technique carries unique history and meaning
- Winter 2025 celebrates inclusive beauty standards
- Honor the artistry and skill of traditional braiders
Braiding for Special Winter Events
Holiday Parties:
- Festive accessories like berries and ribbons
- Sparkle clips for New Year celebrations
- Elegant updos for company gatherings
- Styles that photograph beautifully
Winter Weddings:
- Romantic waterfall and crown braids
- Sophisticated French braid updos
- Pearl-adorned styles for bridal parties
- Coordinate with winter wedding themes
Photoshoots:
- Dramatic styles that create visual impact
- Consider camera angles when choosing braids
- Intricate patterns photograph exceptionally well
- Weather-resistant styles for outdoor shoots
Travel and Vacations:
- Low-maintenance protective braids
- Styles that last multiple days
- Easy to refresh without many products
- Versatile enough for various activities
Conclusion
The 30 Must-Try Winter Hair Braid Trends for 2025 offer something beautiful for everyone, regardless of hair type, skill level, or personal style preference.
From the effortless elegance of a chunky side braid adorned with seasonal ribbons to the bold statement of warrior-inspired Viking braids, this winter’s trends celebrate both tradition and innovation.
These braided styles serve multiple purposes beyond aesthetics—they protect your hair from harsh winter elements, reduce daily styling time, and allow creative self-expression during the season’s many celebrations and gatherings.
Whether you’re mastering the intricate infinity braid for a special occasion, embracing protective micro braids for long-term wear, or simply adding a quick braided headband to your morning routine, each style has been thoughtfully curated to enhance your winter beauty regimen.
The key to successfully incorporating these trends lies in understanding your hair’s unique needs, practicing techniques before important events, maintaining proper hair health throughout the cold months, and choosing styles that align with your lifestyle and comfort level.
Winter 2025 invites you to experiment with texture, dimension, accessories, and creative braiding patterns that transform everyday looks into extraordinary statements.
As you explore these 30 must-try winter hair braid trends, remember that the most beautiful braid is one that makes you feel confident, comfortable, and authentically yourself throughout the magical winter season.