
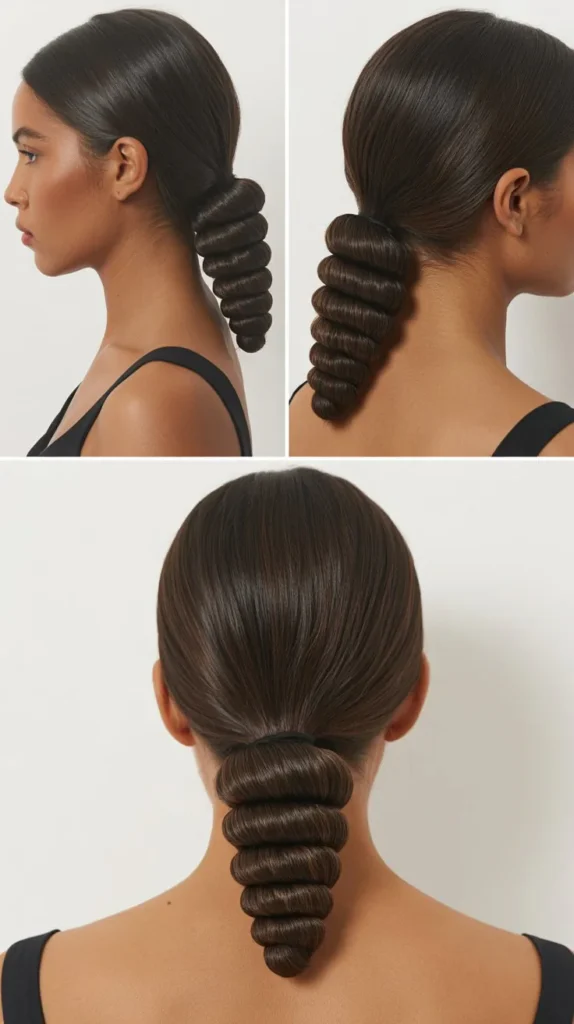
We’ve all been there—hitting snooze one too many times, rushing through your morning routine, and realizing there’s no time for a hair wash.
But here’s the beautiful truth: second-day (or third-day) hair is actually your secret weapon for creating stunning updos that hold better and look more polished than freshly washed locks.
Welcome to your ultimate guide on 30 Sleek Dirty Hair Updos for Busy Workdays, where we’ll transform your “bad hair day” into your most confident professional look.
Whether you’re heading to back-to-back meetings, presenting to clients, or simply need to look put-together without the fuss, these hairstyles will save you precious morning minutes while keeping you camera-ready all day long.
The natural oils in unwashed hair provide the perfect texture and grip for updos that stay in place, meaning less product, less effort, and more time for that essential coffee.
This comprehensive guide covers everything from classic buns and sophisticated twists to modern braided styles and elegant chignons, each specifically designed to work with your hair’s natural texture when it’s past wash day.
You’ll discover step-by-step techniques, styling hacks, time-saving tips, and professional tricks that will make you rethink your entire hair washing schedule.
Article Overview
This article presents 30 expertly curated updo hairstyles specifically designed for dirty hair on busy workdays. You’ll find detailed instructions for creating sleek, professional looks that take advantage of second or third-day hair’s natural texture and hold.
The guide is organized into practical categories including classic updos, twisted styles, braided options, and modern minimalist looks. Each hairstyle includes styling tips, time estimates, and difficulty levels to help you choose the perfect look for your schedule and skill level.
We’ll cover essential tools and products that enhance dirty hair updos, common mistakes to avoid, and professional secrets for making your styles last from morning meetings through after-work events. Additionally, you’ll discover a helpful comparison table of different updo types, their ideal hair lengths, and best occasions for wearing them.
The article also addresses frequently asked questions about styling unwashed hair and maintaining professional appearance throughout demanding workdays.
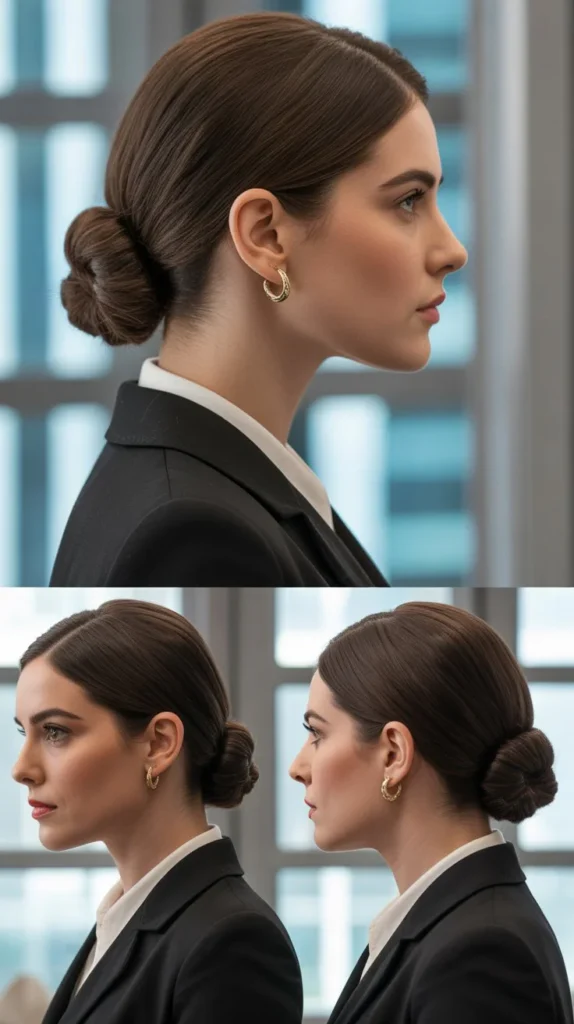
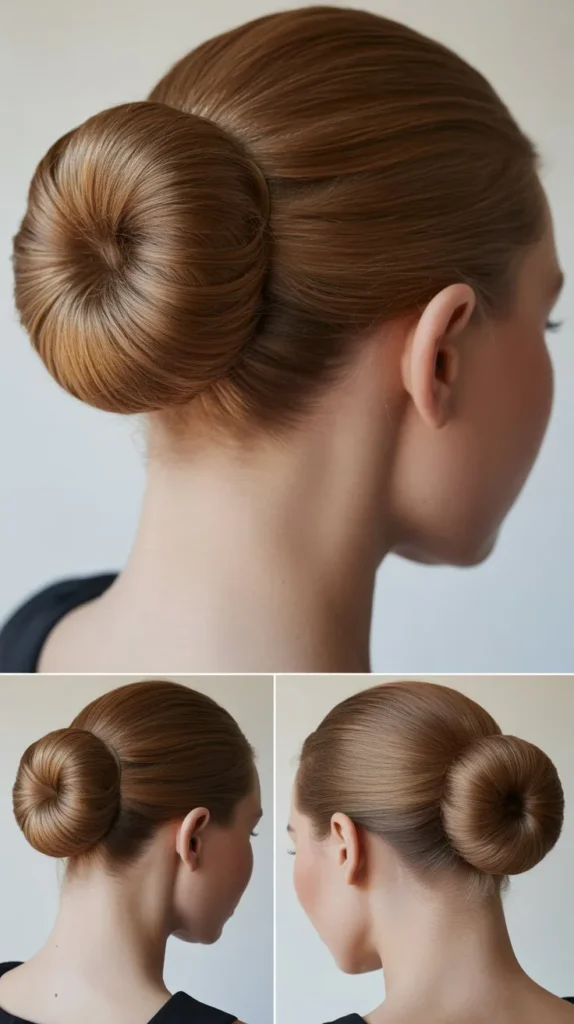
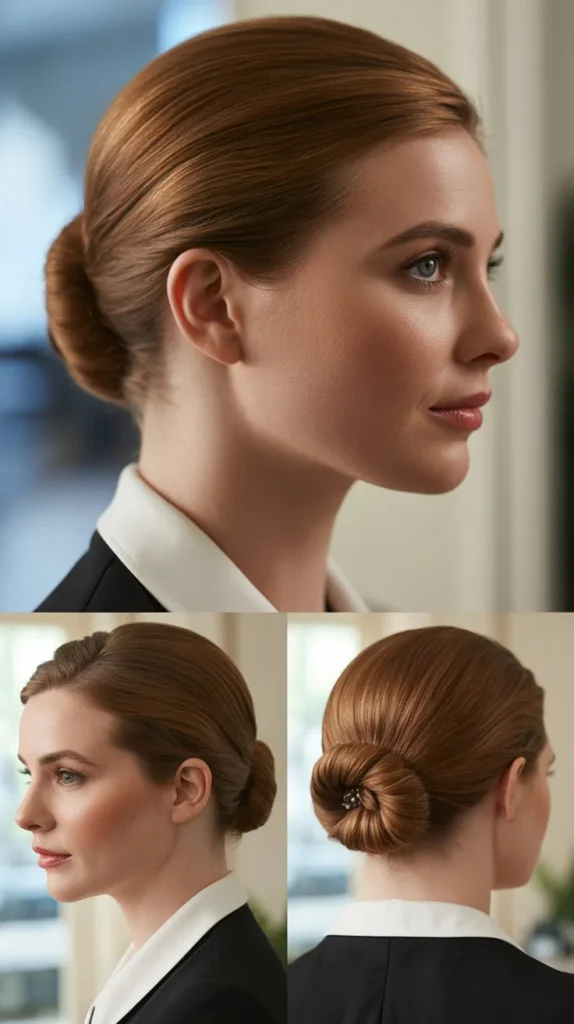
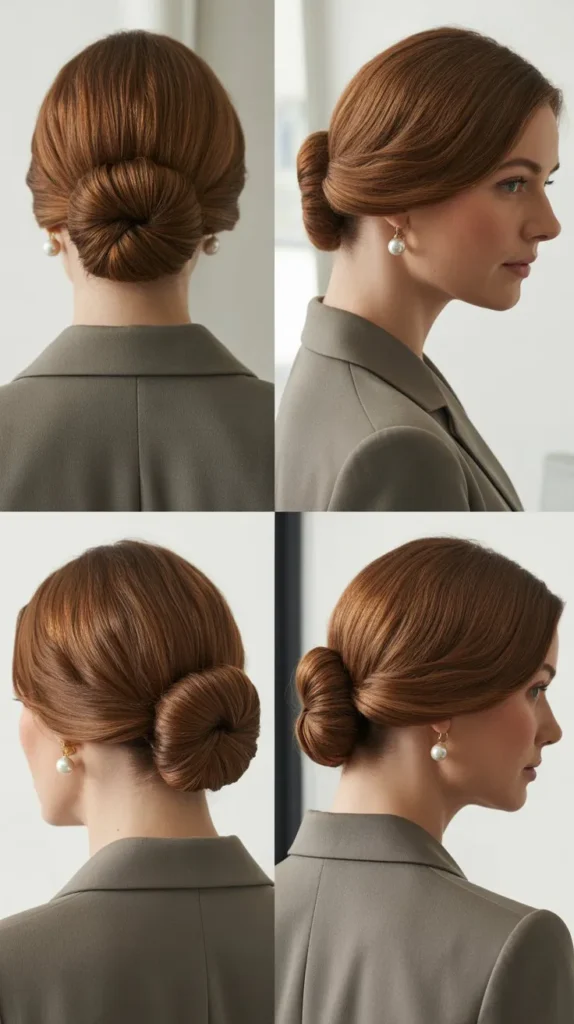
1. The Classic Low Bun with Center Part
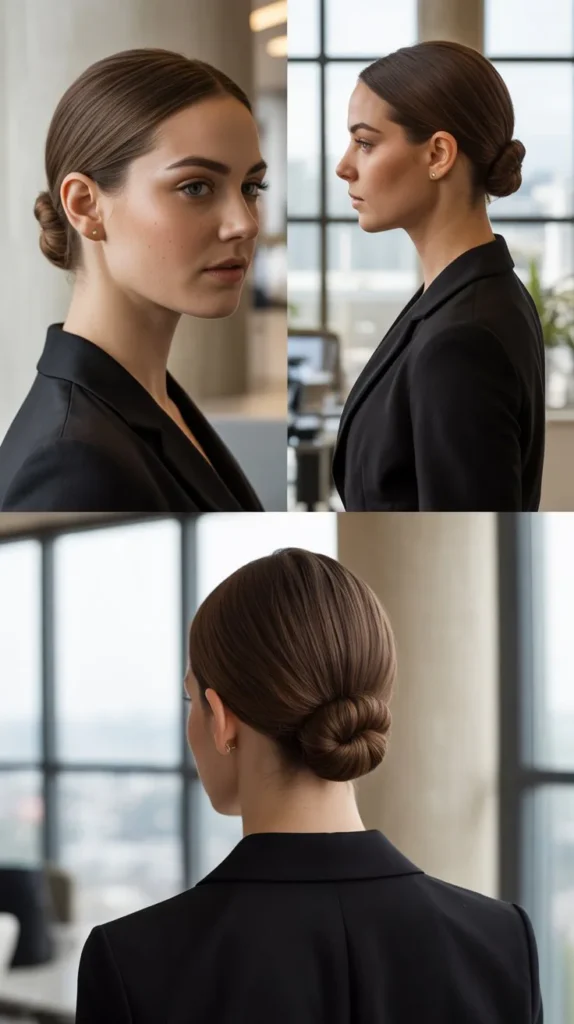
The timeless low bun is the cornerstone of professional hairstyling, and dirty hair makes it infinitely easier to achieve that coveted sleek finish.
This elegant style works beautifully for hair that hasn’t been washed in 1-3 days, as the natural oils help smooth flyaways and create a polished, sophisticated look that stays put through even the longest workday.
- Start by creating a sharp center part using a fine-tooth comb, working from your forehead straight back to your crown.
- Apply a small amount of smoothing serum or light oil to your palms and run them over the surface of your hair to tame any frizz.
- Brush your hair back into a low ponytail at the nape of your neck, ensuring the sides are smooth and tight.
- Secure with a hair elastic that matches your hair color for a seamless look.
- Twist the ponytail loosely and wrap it around the base, forming a neat bun shape.
- Secure the bun with bobby pins, inserting them vertically for maximum hold.
- Use a toothbrush sprayed with hairspray to smooth down any baby hairs or flyaways along your hairline.
- Finish with a light mist of flexible hold hairspray to maintain the sleek appearance without stiffness.
Time Required: 5-7 minutes Difficulty Level: Easy Best For: All hair types, professional meetings, conservative work environments
2. The Textured Topknot

The textured topknot brings an effortlessly chic vibe to your workday wardrobe while cleverly disguising that you skipped your morning shampoo.
This style leverages the natural grit and texture of dirty hair to create volume and interest, making it perfect for those days when you want to look polished but not overly formal.
- Flip your head upside down and gather all your hair at the crown of your head.
- Secure with a strong elastic, leaving the ends loose rather than pulling them all the way through on the final wrap.
- This creates a loop of hair that forms the base of your topknot.
- Gently pull and tease the loop to create volume and texture, making it look intentionally undone.
- Wrap the remaining tail around the base of the knot to hide the elastic.
- Secure with bobby pins, leaving some pieces slightly loose for that coveted lived-in texture.
- Pull out a few face-framing tendrils around your temples and ears for a softer, more modern look.
- Apply dry texture spray or dry shampoo to enhance the piece-y, textured appearance.
Time Required: 3-5 minutes Difficulty Level: Easy Best For: Casual Fridays, creative workplaces, oval and heart-shaped faces
3. The Sleek Side Bun
Asymmetry brings instant sophistication to any hairstyle, and the sleek side bun is no exception.
This elegant updo works particularly well with dirty hair because the natural oils provide the weight and control needed to keep hair smooth on one side while creating an interesting focal point with the off-center bun.
- Create a deep side part on your preferred side, typically where your hair naturally wants to part.
- Brush all your hair over to one side, gathering it at the base of your neck behind your ear.
- Apply smoothing cream or gel to the heavier side (where more hair is swept over) to achieve that glossy, sleek finish.
- Secure your hair with an elastic into a low side ponytail.
- Twist the ponytail and coil it into a bun shape against your neck.
- Pin securely with bobby pins that match your hair color, making sure the bun feels tight against your head.
- Use additional pins to secure any loose pieces on the swept-over side.
- Apply shine spray or a small amount of hair oil to add luminosity and tame any remaining flyaways.
Time Required: 6-8 minutes Difficulty Level: Medium Best For: Formal presentations, client meetings, medium to long hair
4. The Double Twisted Bun

When you want something more intricate but still achievable in minimal time, the double twisted bun delivers visual interest while maintaining professional polish.
This style works exceptionally well with dirty hair because the texture helps the twists grip and hold their shape without excessive pinning or product.
- Part your hair down the middle from forehead to nape, creating two equal sections.
- Take one section and divide it into two smaller strands.
- Twist these two strands around each other, creating a rope-like twist from roots to ends.
- Coil this twisted rope into a bun at the nape on one side and secure with pins.
- Repeat the exact same process with the other section, creating a matching twisted bun beside the first one.
- The two buns should sit side by side at the nape of your neck.
- Gently tug on the twists to create a fuller, more dimensional appearance.
- Secure any loose ends and finish with medium-hold hairspray.
Time Required: 8-10 minutes Difficulty Level: Medium Best For: Thick hair, special work events, those with braiding or twisting experience
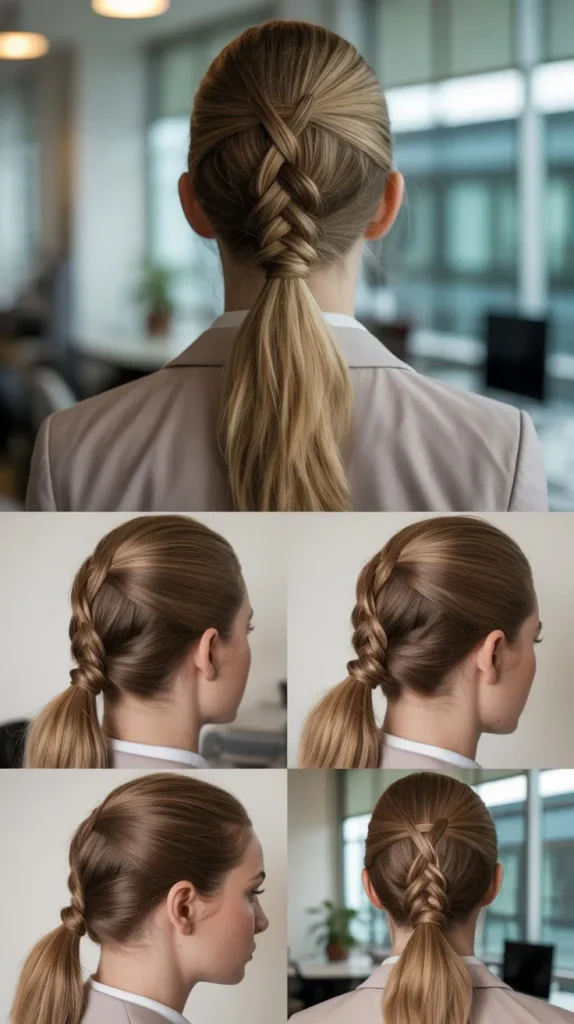
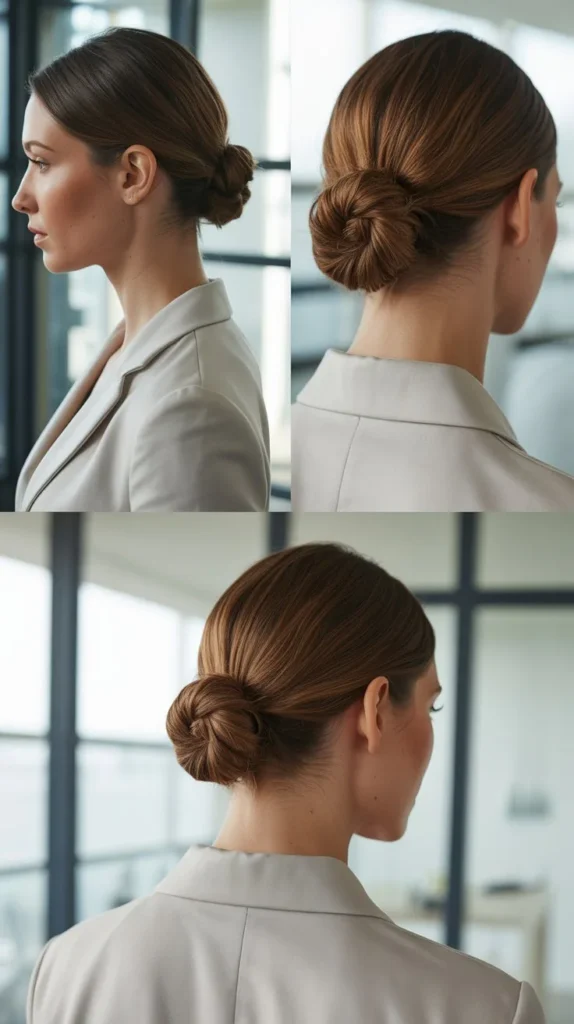
5. The Low Ponytail Wrap
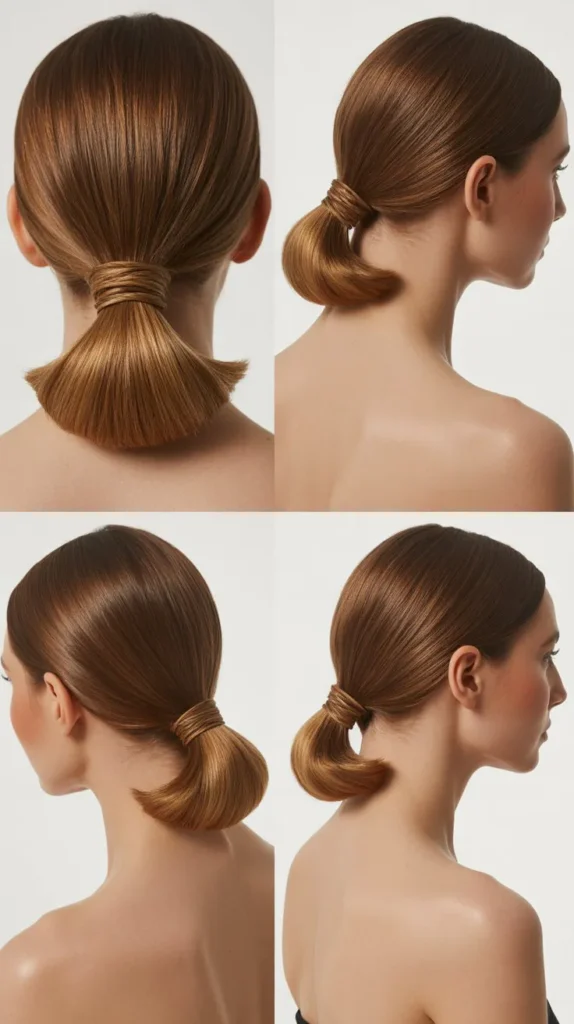
Sometimes the simplest styles make the strongest impact, and the low ponytail wrap is proof that you don’t need a complex updo to look polished and professional.
This sleek style uses dirty hair’s natural weight to create a smooth, sophisticated foundation while adding one elegant detail that elevates it beyond a basic ponytail.
- Brush your hair straight back or create a center part according to your preference.
- Gather your hair into a low ponytail at the nape of your neck.
- Secure tightly with a strong elastic that won’t slip throughout the day.
- Take a small section of hair from the underside of the ponytail, about one inch wide.
- Wrap this section around the elastic, covering it completely to create a polished, seamless look.
- Secure the end of the wrapped section underneath the ponytail with a bobby pin.
- Apply smoothing serum to the length of the ponytail for added shine and control.
- Use a flat iron on the ponytail if desired for an extra-sleek, straight finish.
Time Required: 4-6 minutes Difficulty Level: Easy Best For: All hair types and lengths (shoulder-length or longer), minimalist aesthetics
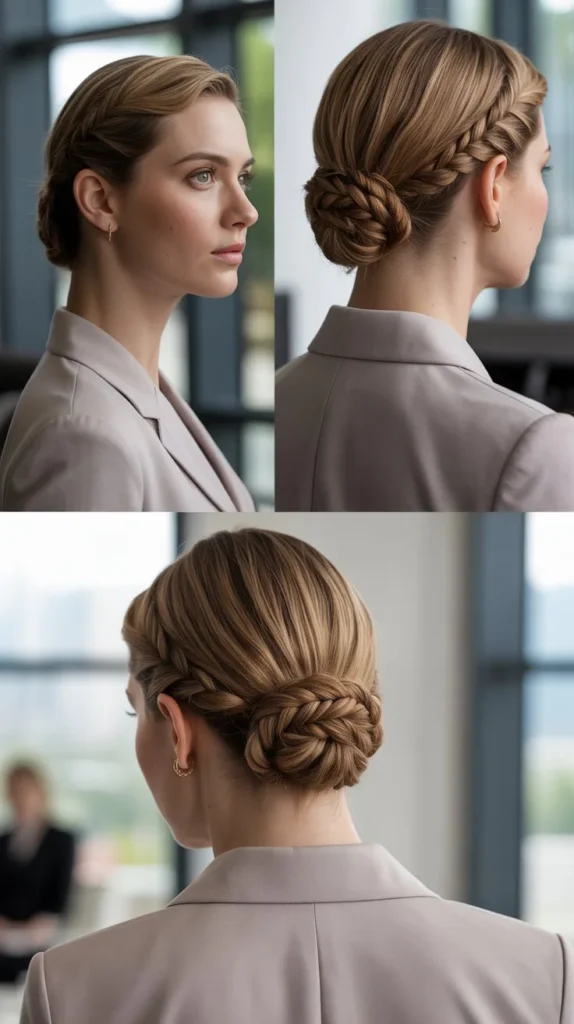
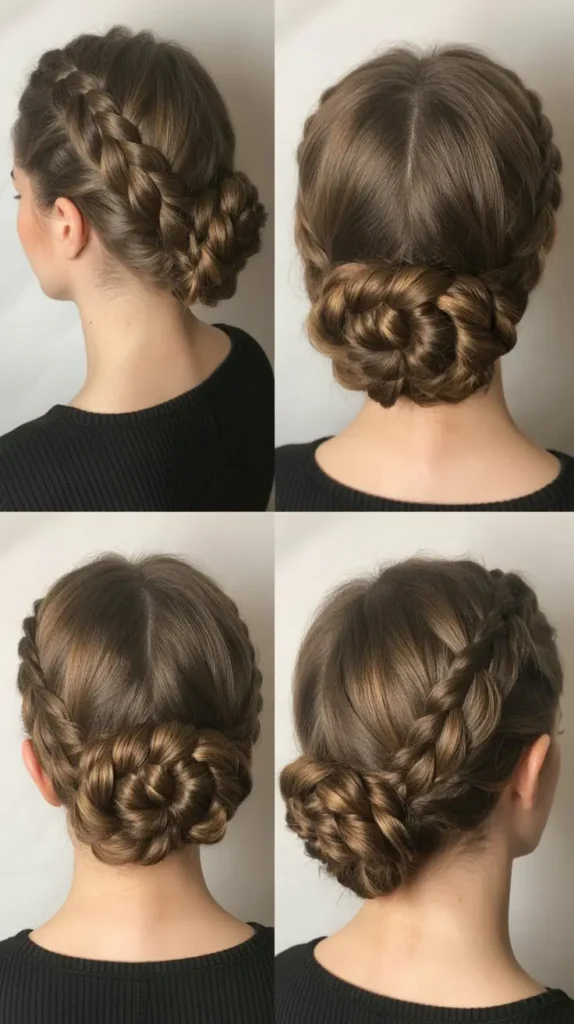
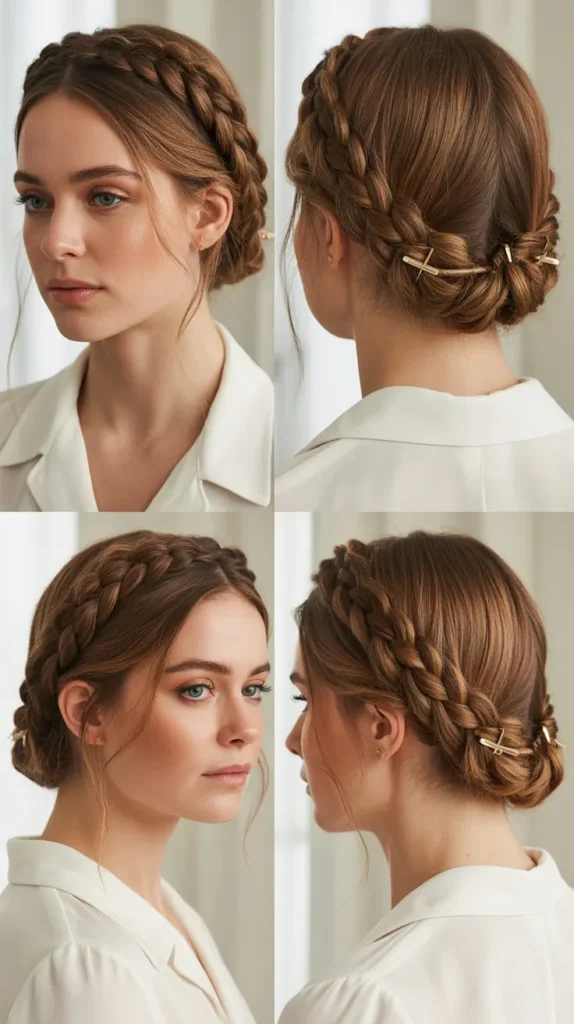
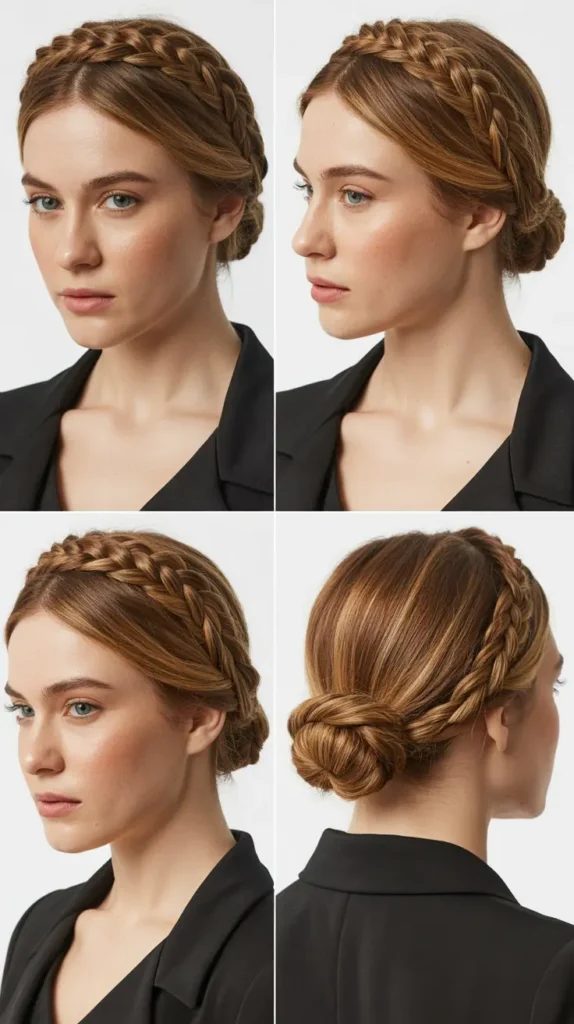
6. The Braided Crown Updo
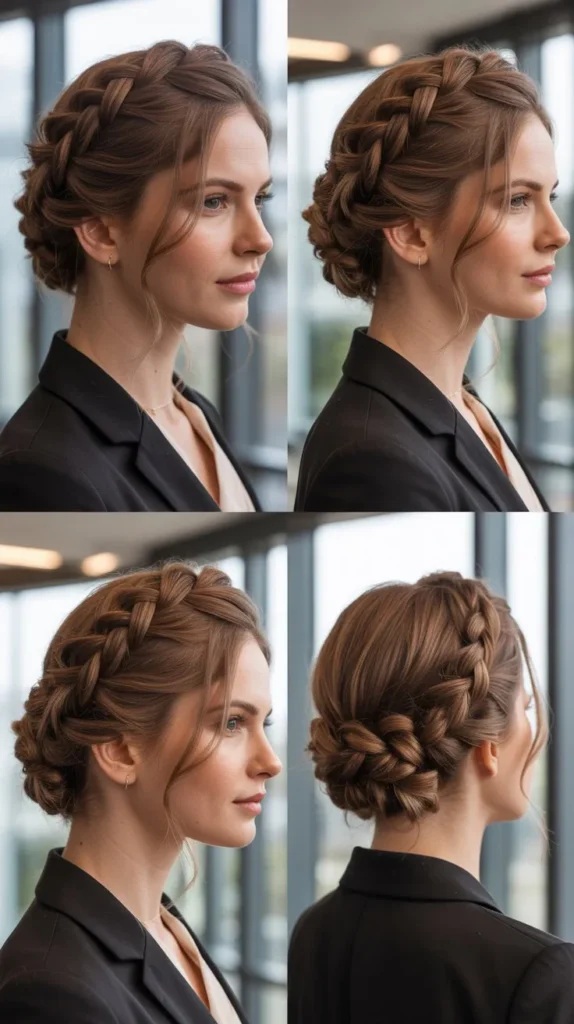
Channel your inner royalty with this elegant braided crown that transforms dirty hair into a sophisticated updo worthy of corner office status.
The natural texture and grip of unwashed hair actually makes braiding easier and helps the style hold throughout demanding workdays without constant touch-ups.
- Part your hair to one side or down the middle, depending on your preference.
- Take a section of hair from behind one ear and begin a traditional three-strand braid.
- Braid along your hairline, moving toward the other ear, keeping the braid close to your head.
- As you braid, you can either incorporate new hair (Dutch or French braid style) or keep it a simple braid.
- Continue braiding until you reach the other side of your head.
- Tuck the end of the braid under itself and secure with bobby pins along the back of your head.
- Take any remaining hair and twist or braid it, then pin it underneath the crown braid.
- Gently pull on the braid sections to create a fuller, more voluminous appearance.
- Secure any loose pieces and finish with light hairspray.
Time Required: 10-12 minutes Difficulty Level: Medium to Advanced Best For: Long hair, romantic or creative professional settings, those comfortable with braiding
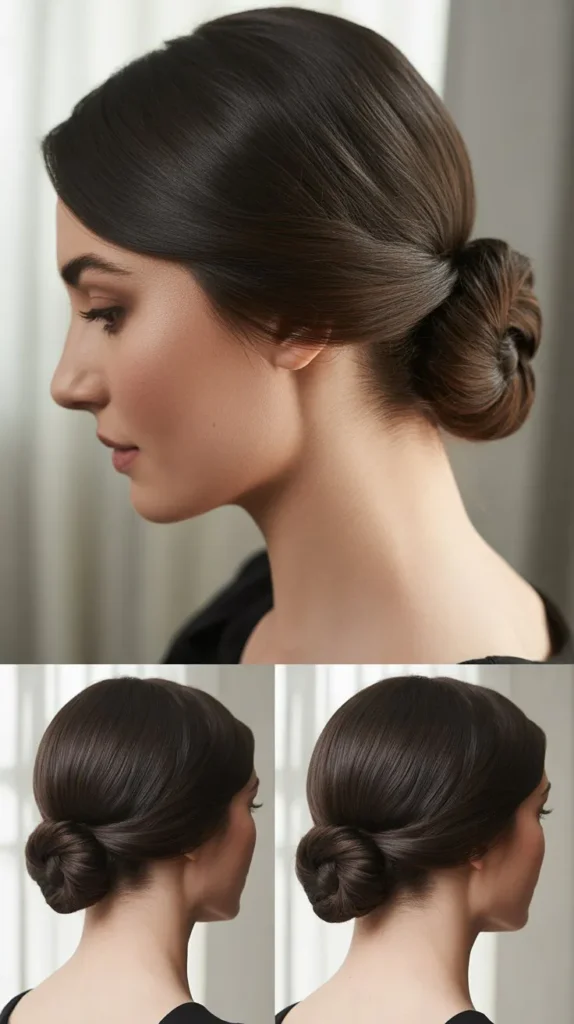
7. The Twisted Low Chignon
The twisted low chignon combines old Hollywood glamour with modern workplace practicality, making it perfect for days when you need to look exceptionally polished without washing your hair.
This style uses the natural oils in dirty hair to create definition in the twists and maintain the sleek finish throughout your entire workday.
- Create a low ponytail at the nape of your neck and secure with an elastic.
- Divide the ponytail into two equal sections.
- Twist each section individually in the same direction (both clockwise or both counterclockwise).
- Then twist the two sections around each other in the opposite direction, creating a rope effect.
- Fold this twisted rope upward and pin it against the base of your ponytail.
- Tuck the ends underneath and secure with multiple bobby pins for stability.
- Arrange the twisted sections into an elegant chignon shape, pinning as needed.
- Apply shine serum and hairspray to set the style.
Time Required: 7-9 minutes Difficulty Level: Medium Best For: Medium to long hair, formal work events, elegant professional presentation
8. The Half-Up Twisted Knot
When you’re not quite ready to commit to a full updo but need your hair off your face for productivity, the half-up twisted knot strikes the perfect balance.
This style works beautifully with dirty hair because the roots have natural volume and the texture helps the twist hold its shape without slipping.
- Section off the top half of your hair from temple to temple, about ear-level.
- Divide this top section into two equal parts.
- Twist the right section clockwise and the left section clockwise as well.
- Cross these two twisted sections over each other at the back of your head, creating a knot.
- Pull them tight to secure the knot, then twist the ends together.
- Coil the twisted ends into a small bun and secure with bobby pins.
- Leave the bottom section of hair down, either natural or styled with loose waves.
- Apply texture spray to the loose hair for added dimension and volume.
Time Required: 5-7 minutes Difficulty Level: Easy to Medium Best For: Medium to long hair, casual work environments, video calls where you want hair off your face
9. The Sleek High Ponytail Bun
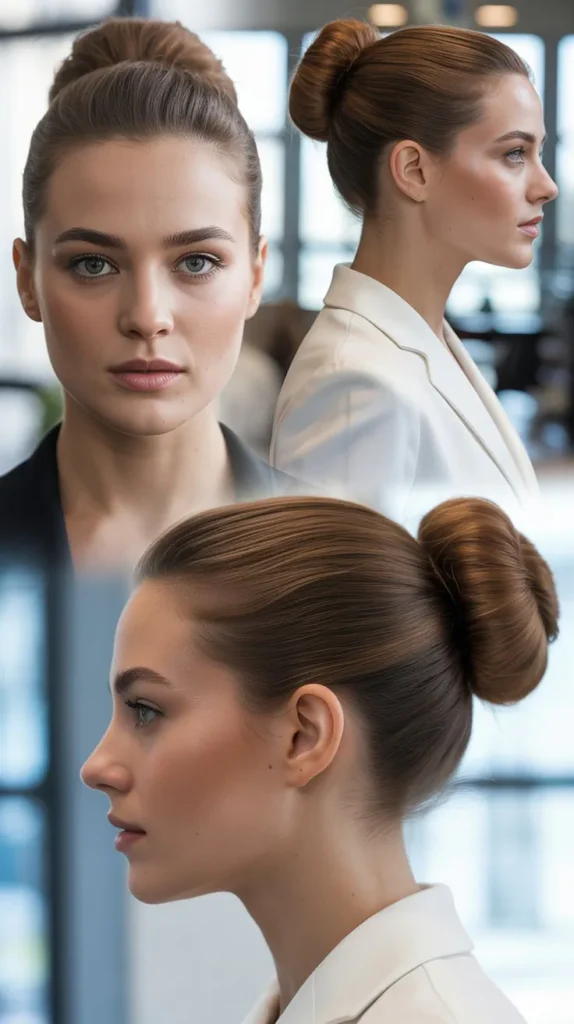
Power and polish meet in the sleek high ponytail bun, a style that means business while cleverly working with your hair’s natural oils for that coveted glossy finish.
This updo sits high on the crown, creating an elongated silhouette that’s both flattering and functional for busy professionals who need a secure style that won’t budge.
- Tilt your head back slightly and brush all your hair straight up toward the crown of your head.
- Gather your hair into a high ponytail at the highest point of your crown.
- Secure tightly with a strong elastic, wrapping it multiple times for maximum hold.
- Apply gel or smoothing cream to your palms and smooth over the entire head to eliminate bumps and flyaways.
- Twist the ponytail and wrap it around the base, forming a tight, neat bun.
- Secure the bun with bobby pins inserted in a crisscross pattern for stability.
- Use an edge control brush or toothbrush with hairspray to slick down edges perfectly.
- Finish with strong-hold hairspray for all-day wear.
Time Required: 6-8 minutes Difficulty Level: Medium Best For: Athletic builds, high-energy work environments, long faces
10. The Messy Low Bun with Side Part
Embrace the “undone done” aesthetic with this perfectly imperfect messy low bun that looks effortlessly chic while being intentionally structured.
Dirty hair is actually the secret ingredient here, providing the texture and grip needed to create that sought-after casual elegance that’s become a workplace staple.
- Create a deep side part using your fingers rather than a comb for a more relaxed look.
- Gather your hair loosely at the nape of your neck, leaving some pieces slightly loose.
- Secure with an elastic, but don’t pull it too tight—you want some softness.
- Don’t twist the ponytail; instead, loosely wrap it around the base in a casual, imperfect circle.
- Secure with bobby pins randomly rather than in a structured pattern.
- Gently pull apart sections of the bun to create volume and that “messy” texture.
- Pull out a few pieces around your face and ears for a soft, flattering frame.
- Lightly mist with flexible-hold hairspray to maintain the shape without making it stiff.
Time Required: 4-6 minutes Difficulty Level: Easy Best For: All hair types, creative industries, casual Friday, round and square faces
11. The Rolled Ballerina Bun
Grace and sophistication define the rolled ballerina bun, a dance-inspired style that brings unexpected elegance to your professional wardrobe.
This technique works particularly well with dirty hair because the natural oils help the hair roll smoothly and maintain the cylindrical shape without excessive product or complicated pinning.
- Brush your hair into a high ponytail at the crown and secure tightly with an elastic.
- Take a hair donut or bun form and slide it over the ponytail to the base.
- Spread the ponytail hair evenly around the donut, covering it completely.
- Take a second elastic and secure it over the donut, creating a smooth, round bun shape.
- Tuck any remaining hair ends under the bun and secure with bobby pins.
- Smooth any bumps or irregularities with your hands and a bit of gel or smoothing cream.
- The result should be a perfectly round, smooth bun sitting high on your crown.
- Finish with strong-hold hairspray and edge control for sleekness.
Time Required: 5-7 minutes Difficulty Level: Easy Best For: Long hair, formal presentations, those with hair donuts/bun forms
12. The Criss-Cross Ponytail Updo
Add architectural interest to your workday look with this criss-cross ponytail that transforms a basic style into something unexpectedly sophisticated.
The technique uses dirty hair’s natural grip to keep the crossed sections in place, creating a geometric pattern that’s both modern and professional.
- Create a center part and divide your hair into two sections from crown to ears.
- Take the right front section and cross it over to the left side, securing temporarily with a clip.
- Take the left front section and cross it over to the right side, creating an X pattern.
- Secure both crossed sections together at the back with bobby pins.
- Gather all remaining hair including the crossed sections into a low or mid-level ponytail.
- Secure tightly with an elastic.
- Take a small section from the ponytail and wrap it around the elastic to conceal it.
- Apply smoothing serum to the crossed sections to emphasize the pattern and add shine.
Time Required: 7-9 minutes Difficulty Level: Medium Best For: Medium to long hair, creative professionals, those who enjoy geometric patterns
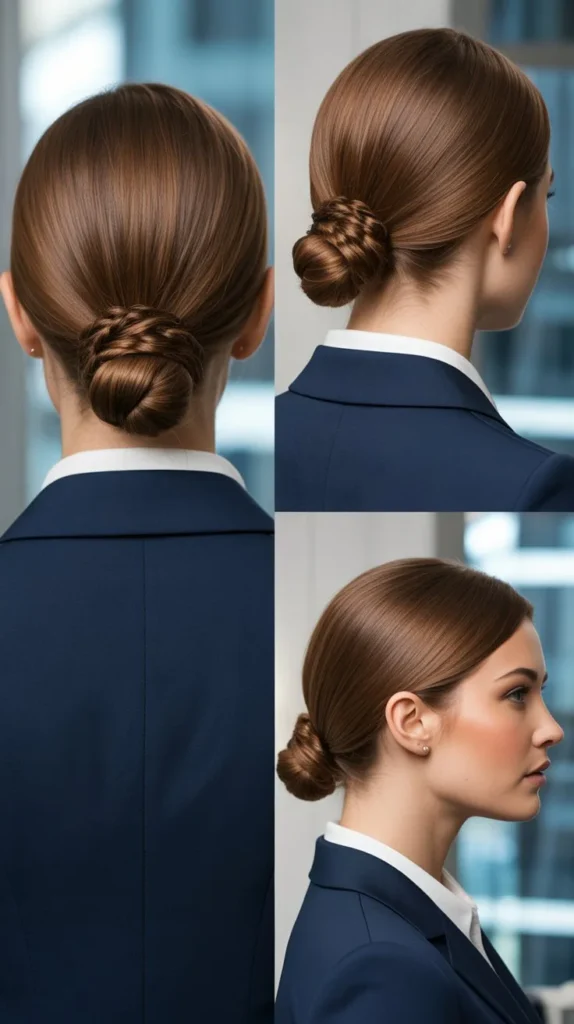
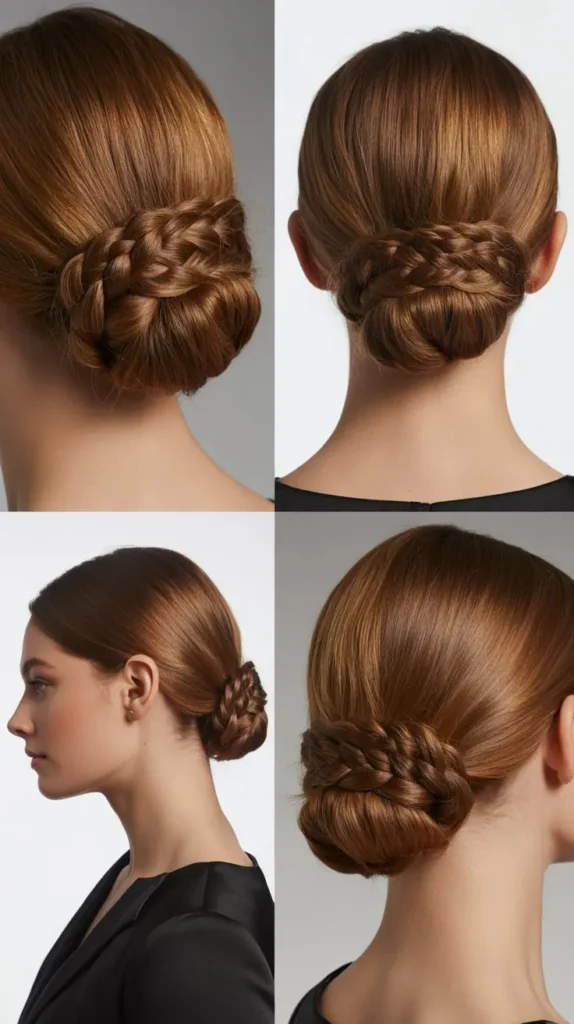
13. The Fishtail Braid Low Bun
Combine two classic techniques into one stunning updo with the fishtail braid low bun, a style that looks far more complicated than it actually is.
Dirty hair provides the perfect texture for fishtail braiding, helping the intricate pattern stay defined while preventing the slippery sliding that can happen with freshly washed hair.
- Gather all your hair into a low ponytail and secure with an elastic.
- Divide the ponytail into two equal sections.
- Take a small piece from the outer edge of the left section and cross it over to the right section.
- Take a small piece from the outer edge of the right section and cross it to the left section.
- Continue this alternating pattern down the entire length of the ponytail, creating the fishtail braid.
- Secure the end with a small elastic.
- Gently pull on the braid sections to create a fuller, more textured appearance.
- Wrap the fishtail braid around the base of the ponytail, forming a bun.
- Secure with bobby pins and finish with light hairspray.
Time Required: 10-12 minutes Difficulty Level: Medium to Advanced Best For: Long hair, those comfortable with braiding, special work occasions
14. The Side-Swept Low Twist
Elegance meets efficiency in this side-swept low twist that channels vintage glamour while working perfectly with dirty hair’s natural oils.
This style creates a sophisticated asymmetrical look that’s ideal for professional settings where you want to appear polished but not overly formal.
- Create a deep side part on your preferred side.
- Sweep all your hair to the opposite side, gathering it at the nape behind your ear.
- Apply smoothing cream to keep the swept side sleek and controlled.
- Divide the gathered hair into two sections.
- Twist these sections around each other, creating a rope twist.
- Continue twisting until you reach the ends.
- Coil the twisted rope into a low bun positioned to the side of your neck.
- Secure with bobby pins, making sure the bun sits flat against your head.
- Apply shine spray for a glossy, polished finish.
Time Required: 6-8 minutes Difficulty Level: Medium Best For: Medium to long hair, evening work events, oval and heart-shaped faces
15. The French Twist
No list of professional updos would be complete without the iconic French twist, a timeless style that has graced boardrooms and formal events for decades.
Dirty hair is actually your ally here, providing the grip and texture needed to create and maintain this classic roll without constant readjustment throughout your workday.
- Brush all your hair to one side (typically the left if you’re right-handed).
- Hold your hair vertically along the back of your head with one hand.
- Begin rolling your hair inward toward your head, creating a vertical twist.
- Continue rolling until all the hair is tucked into the twist and forms a vertical column.
- Secure the twist by inserting bobby pins vertically into the roll, catching both the twist and your scalp hair.
- Tuck the ends into the top of the twist and secure with additional pins.
- Smooth the surface with your hands and apply smoothing serum for shine.
- Finish with strong-hold hairspray to maintain the structure all day.
Time Required: 8-10 minutes Difficulty Level: Advanced Best For: Shoulder-length or longer hair, formal meetings, classic professional environments
16. The Double Dutch Braid Updo
Make a statement with this athletic-meets-professional style that keeps every strand secured while creating impressive visual texture.
The Dutch braiding technique (where sections cross under rather than over) creates raised, dimensional braids that look intricate and intentional, while dirty hair ensures they hold their shape beautifully.
- Part your hair down the center from forehead to nape, creating two equal sections.
- Working with one section, begin a Dutch braid at the hairline (crossing sections under instead of over).
- Continue the Dutch braid along the side of your head, incorporating new hair as you go.
- Braid all the way to the ends and secure with a small elastic.
- Repeat the exact process on the other side, creating a matching Dutch braid.
- Bring both braids together at the back of your head or at the crown.
- Twist the braids together or wrap them into a bun, securing with bobby pins.
- Gently pull on the braid sections to create fuller, more voluminous braids.
- Set with medium-hold hairspray.
Time Required: 12-15 minutes Difficulty Level: Advanced Best For: Long hair, active work environments, those skilled at braiding
17. The Knotted Ponytail Updo
Transform a simple ponytail into an architectural masterpiece with strategic knotting that creates visual interest and dimension.
This style capitalizes on dirty hair’s natural texture, which helps the knots hold their shape and prevents them from slipping loose during your busy workday.
- Brush your hair into a mid-height ponytail and secure with an elastic.
- Divide the ponytail into two equal sections.
- Tie these two sections together in a simple overhand knot, pulling it snug.
- Continue tying knots down the length of the ponytail, spacing them evenly.
- Create 3-4 knots depending on your hair length.
- Secure the end with an elastic.
- Fold the knotted ponytail upward and pin it against the base of the original ponytail.
- Tuck the end underneath and secure with bobby pins.
- Gently pull on the knots to create more volume and dimension.
Time Required: 7-9 minutes Difficulty Level: Medium Best For: Medium to long hair, creative work environments, modern aesthetics
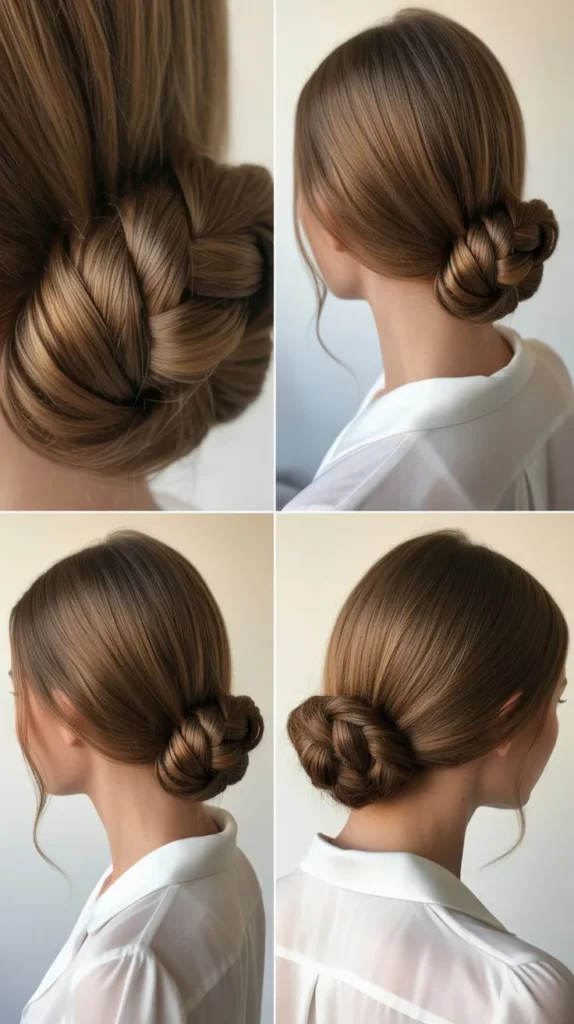
18. The Wrapped Low Ponytail Bun
Simplicity reaches new heights of sophistication with this wrapped low ponytail bun that requires minimal time but delivers maximum polish.
The wrapping technique works exceptionally well with dirty hair because the natural oils create a smooth, cohesive surface that photograph-ready glossy finish.
- Create a low ponytail at the nape of your neck and secure firmly with an elastic.
- Apply smoothing cream or light gel to the ponytail for added control and shine.
- Starting from the base, wrap the ponytail around itself in a circular motion, building a flat, disk-like bun.
- Keep the wraps tight and close together for a sleek, compact appearance.
- Continue wrapping until you reach the ends of your hair.
- Tuck the ends underneath the bun and secure the entire structure with bobby pins.
- Insert pins in a circular pattern around the bun for even distribution and stability.
- Apply shine spray and use your hands to smooth any irregularities.
Time Required: 5-7 minutes Difficulty Level: Easy Best For: All hair types, conservative work settings, quick morning routines
19. The Rope Braid Crown
Elegance takes on a new dimension with the rope braid crown, a style that frames your face beautifully while keeping hair completely secured for professional demands.
The rope braiding technique is actually easier than traditional braiding and works wonderfully with dirty hair’s natural grip and texture.
- Part your hair to one side or down the middle according to preference.
- Take a section of hair from one side near your temple and divide it into two strands.
- Twist both strands individually in the same direction (both clockwise).
- Then twist these two strands around each other in the opposite direction (counterclockwise), creating a rope effect.
- Continue the rope braid along your hairline toward the back, adding small sections of hair as you go.
- Secure the end temporarily when you reach behind your ear.
- Repeat the rope braiding process on the other side.
- Bring both rope braids together at the back and either pin them or twist them into a small bun.
- Secure with bobby pins and finish with flexible-hold hairspray.
Time Required: 10-12 minutes Difficulty Level: Medium Best For: Long hair, romantic professional settings, those comfortable with twisting techniques
20. The Pinned Roll Updo
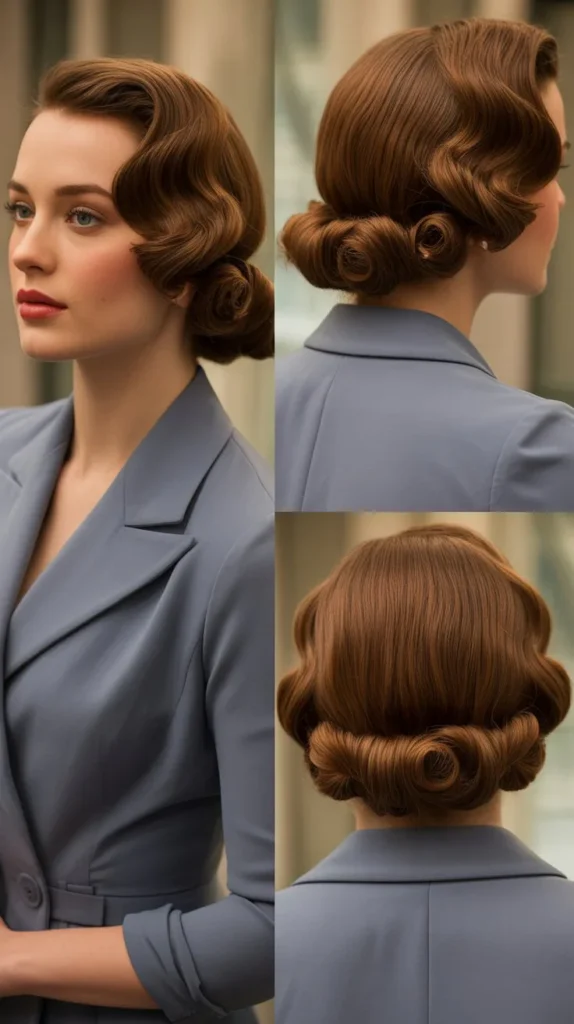
Channel 1940s sophistication with this pinned roll updo that brings vintage glamour to modern workdays.
This style particularly benefits from dirty hair because the natural oils help create the smooth rolls and provide the weight needed to keep them pinned securely in place throughout long meetings and presentations.
- Section your hair horizontally from ear to ear, creating a top and bottom section.
- Start with the bottom section and roll the ends under, creating a horizontal roll at the nape.
- Pin this roll securely to your head using bobby pins inserted horizontally.
- Take the top section and brush it smooth.
- Roll this section under as well, positioning it just above the first roll.
- Pin securely, creating a stacked, rolled appearance.
- For added height, you can place padding or a rolled sock underneath the rolls before pinning.
- Smooth the surface with pomade or smoothing cream for that authentic vintage finish.
- Set with strong-hold hairspray.
Time Required: 10-12 minutes Difficulty Level: Advanced Best For: Medium to long hair, retro enthusiasts, special work events
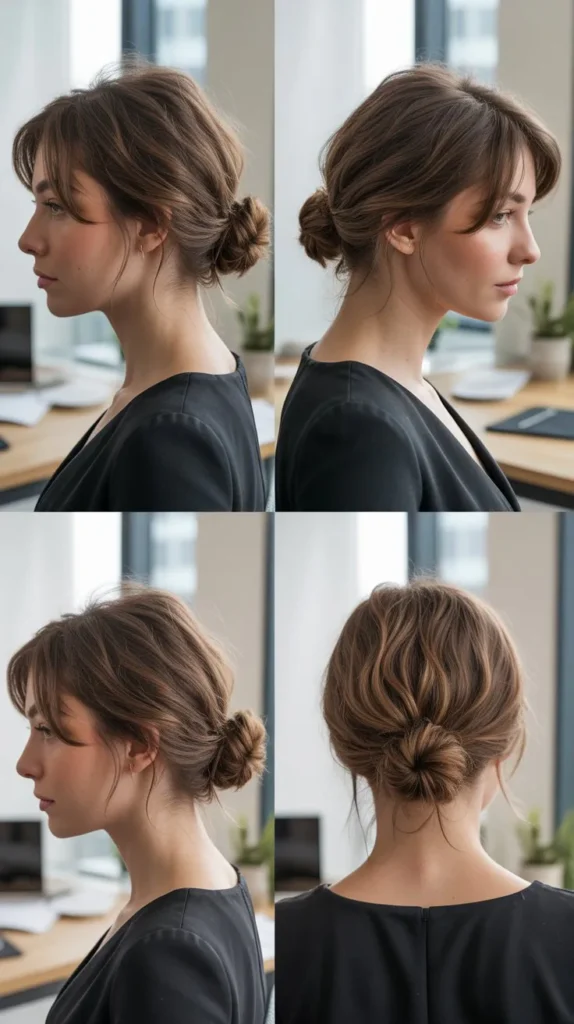
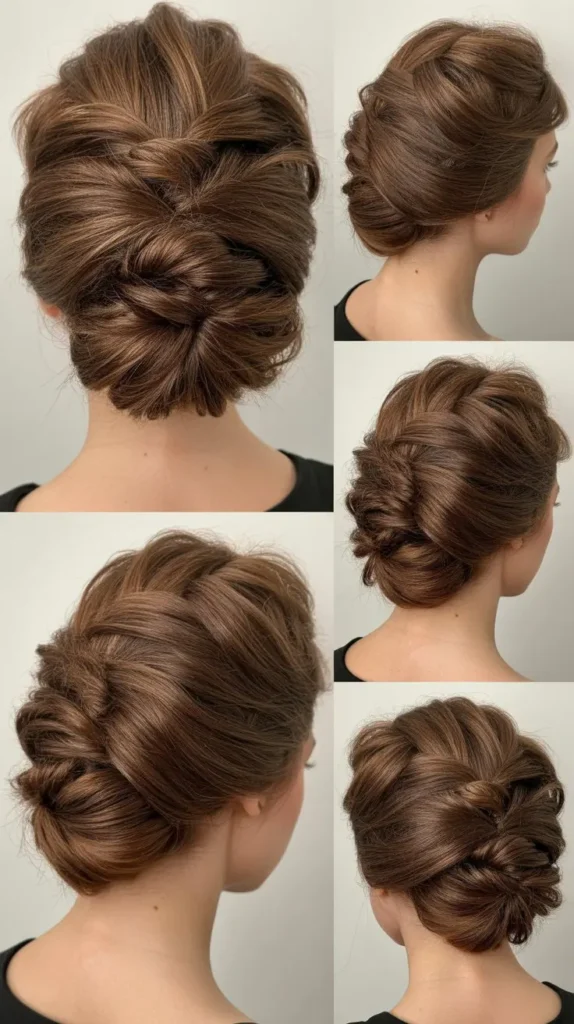
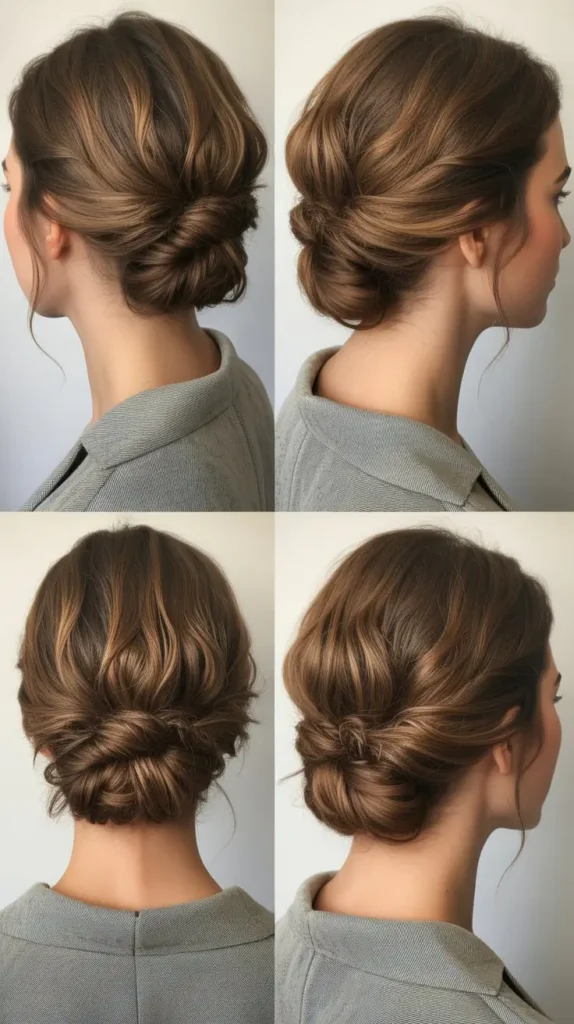
21. The Tucked and Pinned Updo
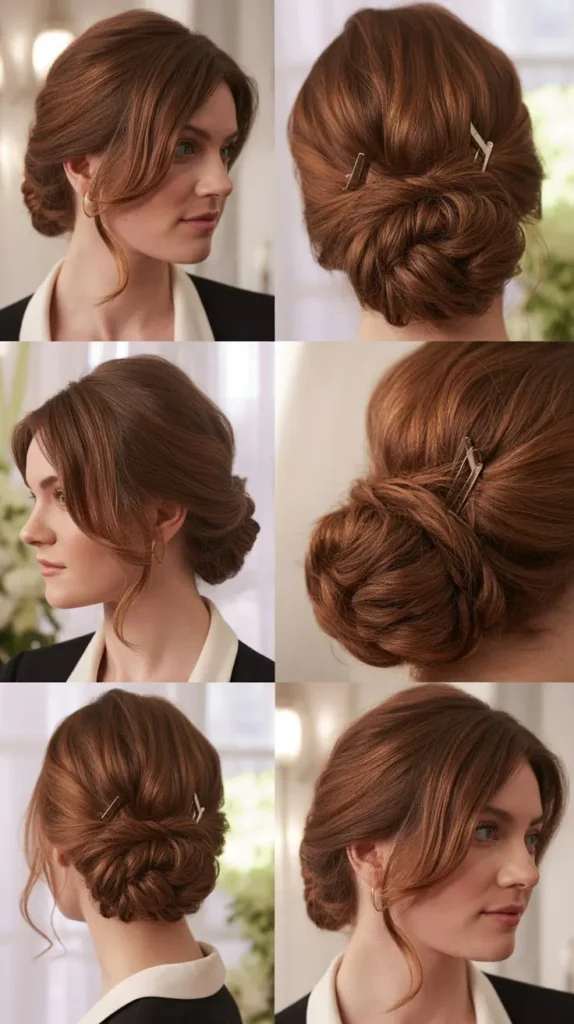
Sometimes the most elegant styles come from the simplest techniques, and the tucked and pinned updo proves that you don’t need complex braiding or twisting skills to achieve professional polish.
This method works beautifully with dirty hair, using its natural texture to create hold while tucking and securing sections for a customized, sophisticated result.
- Divide your hair into 4-6 sections randomly rather than in strict geometric patterns.
- Take one section and loosely twist it.
- Fold the twisted section back on itself and pin it against your head using bobby pins.
- Repeat this process with each section, tucking and pinning them in different directions.
- Create a nest of pinned sections at the back of your head, building volume and texture.
- Don’t worry about perfection—this style thrives on organic, irregular placement.
- Leave a few wispy pieces out around your face for softness.
- Finish with texture spray and light hairspray for hold without stiffness.
Time Required: 8-10 minutes Difficulty Level: Easy to Medium Best For: Medium to long hair, creative professionals, those new to updos
22. The Infinity Bun
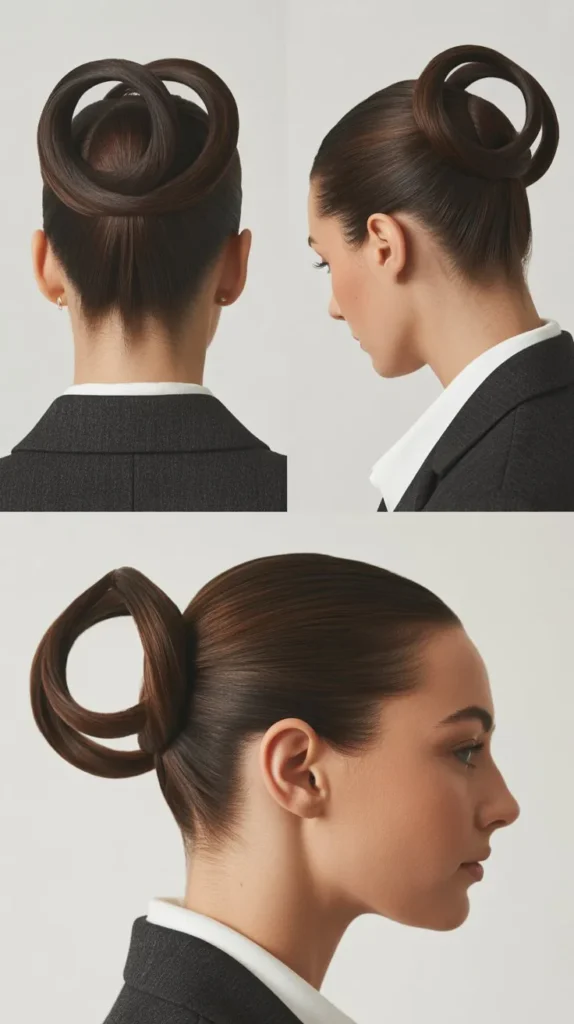
Mathematical elegance meets hairstyling with the infinity bun, a figure-eight shape that’s both visually striking and surprisingly practical for workdays.
Dirty hair’s natural texture helps maintain the distinctive double-loop shape, while the oils provide the smoothness needed to create clean, defined circles.
- Create a low ponytail at the nape of your neck and secure with an elastic.
- Divide the ponytail into two equal sections.
- Create a loop with the right section by folding it upward and pinning it to create a circle.
- Create a second loop with the left section, positioning it to form the other half of the figure-eight.
- Adjust both loops so they’re roughly equal in size and clearly form an infinity symbol or figure-eight.
- Secure each loop with bobby pins at multiple points for stability.
- Wrap any remaining ends around the center where the two loops meet.
- Apply smoothing serum to define the loops and add shine.
Time Required: 7-9 minutes Difficulty Level: Medium Best For: Long hair, mathematics teachers, modern professionals who appreciate geometric shapes
23. The Braided Headband Updo
Create a built-in accessory with your own hair through this braided headband updo that’s both functional and fashionable.
The braid keeps hair off your face while adding feminine detail, and dirty hair makes the braid easier to create and more likely to stay put without slipping.
- Take a section of hair from behind one ear, about 1-2 inches wide.
- Braid this section in a traditional three-strand braid across the top of your head like a headband.
- Continue the braid behind the opposite ear and secure with a small elastic.
- Gather all remaining hair including the braid into a low ponytail.
- Twist the ponytail and wrap it into a bun at the nape.
- Secure the bun with bobby pins.
- Gently pull on the braided headband section to widen it slightly for more presence.
- Tuck the end of the headband braid into the bun to hide it.
- Set with flexible-hold hairspray.
Time Required: 9-11 minutes Difficulty Level: Medium Best For: Long hair, those who like headbands but want a sleeker look, professional casual environments
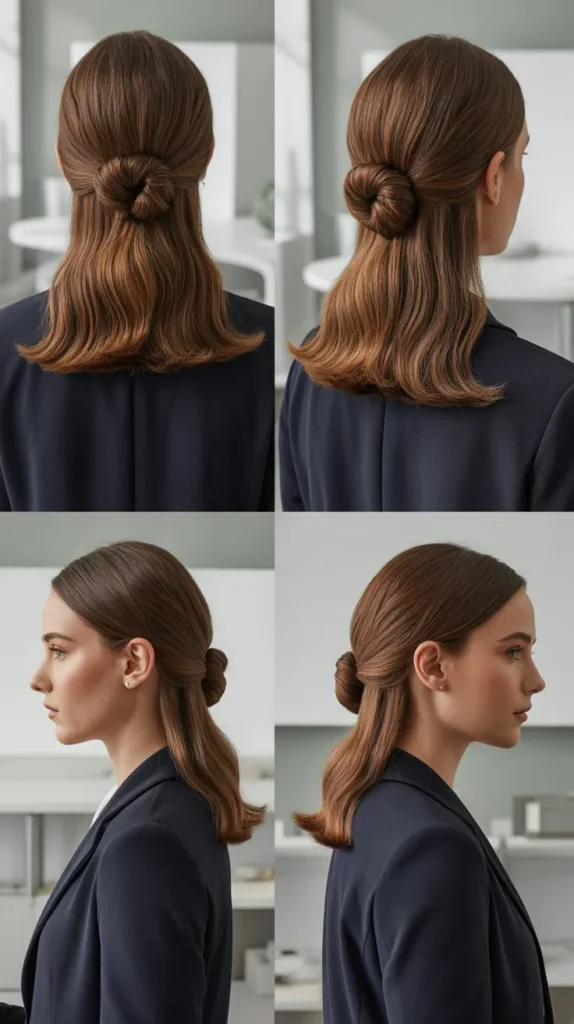
24. The Low Twisted Ponytail
Minimal effort yields maximum impact with this low twisted ponytail that adds just enough detail to elevate a basic style into something office-worthy.
The twisting technique works particularly well with dirty hair because the natural oils help define the rope-like texture while preventing frizz.
- Create a low ponytail at the nape and secure with a strong elastic.
- Apply a small amount of smoothing cream or light gel to the ponytail.
- Divide the ponytail into two equal sections.
- Twist each section individually in a clockwise direction down to the ends.
- Then twist both sections around each other in a counterclockwise direction, creating a rope braid effect.
- Secure the end with another elastic.
- Gently pull on the twisted sections to create a fuller, more dimensional rope.
- Take a small piece of hair from above the bottom elastic and wrap it around to hide the elastic.
- Secure with a bobby pin and apply shine serum to the twisted ponytail.
Time Required: 5-7 minutes Difficulty Level: Easy Best For: All hair types and lengths (shoulder-length or longer), minimalist professionals
25. The Stacked Twist Updo
Create architectural sophistication with this stacked twist updo that builds dimension and interest through layered twisting.
This technique particularly shines with dirty hair because each twisted section grips the one below it, creating a stable structure that requires fewer pins than you might expect.
- Divide your hair into three horizontal sections: bottom, middle, and top.
- Start with the bottom section and twist it into a horizontal roll at the nape, pinning it securely.
- Take the middle section and create another horizontal twist, positioning it just above the first one.
- Pin the middle twist securely, making sure it sits neatly on top of the bottom twist.
- Take the top section and twist it as well, stacking it above the previous two.
- Secure with bobby pins, creating a tiered, stacked appearance.
- Tuck any ends into the twists to hide them.
- Apply smoothing serum to add shine and definition to each twisted layer.
- Finish with medium-hold hairspray.
Time Required: 10-12 minutes Difficulty Level: Medium to Advanced Best For: Thick, medium to long hair, formal work events
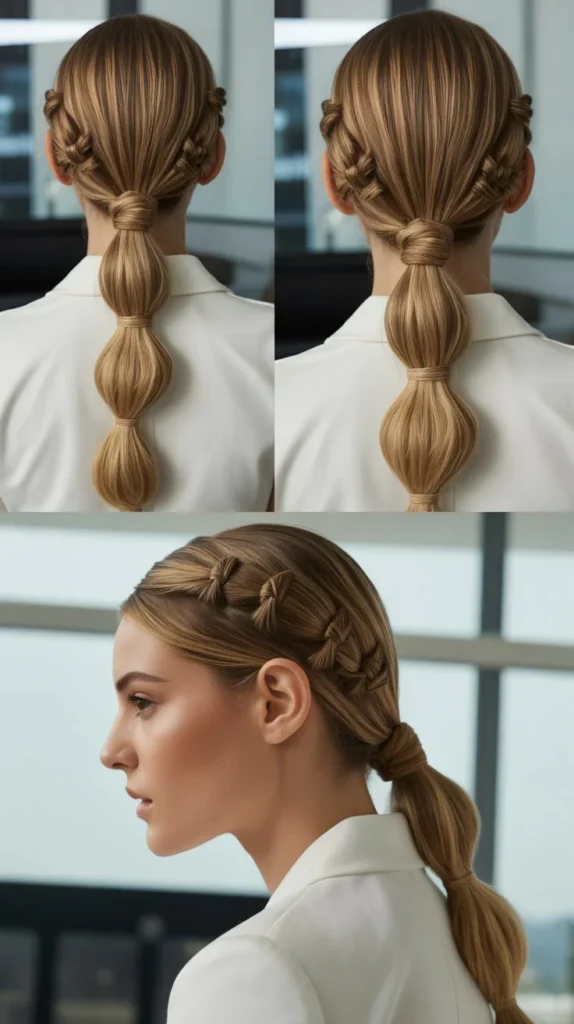
26. The Half-Up Bubble Ponytail
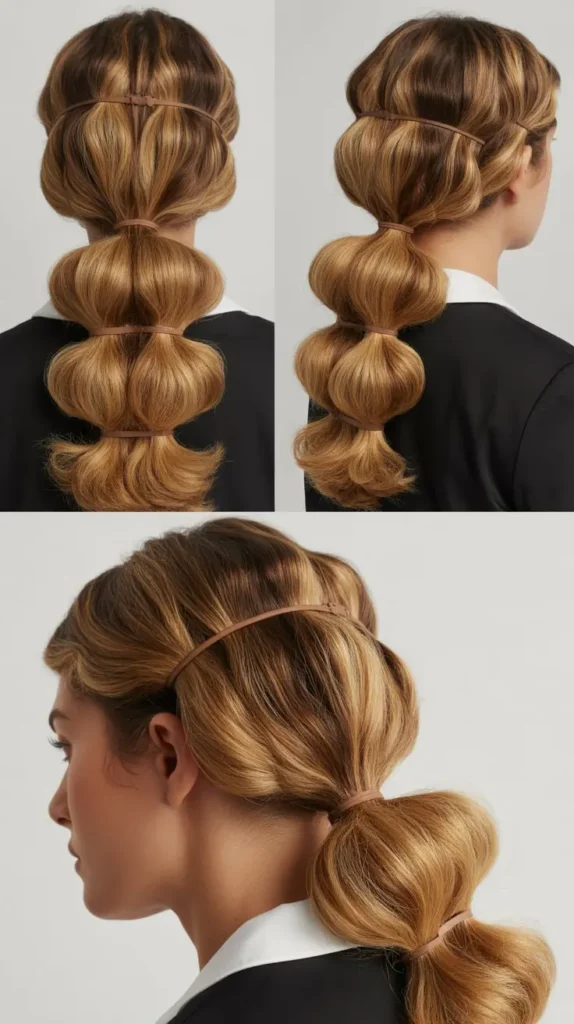
Modern and playful while still maintaining professional appropriateness, the half-up bubble ponytail brings unexpected dimension to your workday style.
Dirty hair’s natural texture helps create and maintain the bubble shapes, while keeping the overall look polished rather than juvenile.
- Section off the top half of your hair from temple to temple and create a ponytail.
- Secure this half-up ponytail with an elastic at the back of your head.
- Add another elastic about 2-3 inches down the ponytail.
- Gently pull the hair between the two elastics outward to create a bubble effect.
- Add another elastic 2-3 inches below the second one.
- Create another bubble by gently pulling the hair outward.
- Continue this pattern for 2-4 bubbles depending on your hair length.
- Leave the bottom section of hair down, either straight or with gentle waves.
- Apply texture spray to the bubbles to enhance their volume and definition.
Time Required: 6-8 minutes Difficulty Level: Easy Best For: Long hair, creative work environments, casual Fridays
27. The Gibson Tuck
Vintage elegance meets modern simplicity in the Gibson tuck, a classic updo that looks intricate but requires surprisingly minimal skill.
This style was practically designed for dirty hair, as the natural oils help the hair tuck smoothly into itself and stay secured without constant readjustment.
- Create a low ponytail at the nape of your neck, keeping it somewhat loose rather than tight.
- Don’t use an elastic; instead, hold it with one hand.
- Create a small opening in the hair above the ponytail by separating it into two sections.
- Flip the ponytail upward and through this opening, tucking it under.
- Continue tucking the ends upward and under, rolling them into the space at the nape.
- Secure the tucked sections with bobby pins inserted horizontally.
- The result should look like a smooth, rolled updo sitting at the nape.
- Apply smoothing cream or gel to the surface for a polished, sleek finish.
- Set with hairspray for all-day hold.
Time Required: 5-7 minutes Difficulty Level: Easy to Medium Best For: Medium to long hair, formal meetings, classic professional environments
28. The Asymmetrical Knot Bun
Break the rules of symmetry with this intentionally off-center knot bun that brings editorial flair to your professional wardrobe.
Dirty hair actually enhances this style by providing the texture needed to create a substantial, intentional-looking knot that won’t unravel during your workday.
- Gather your hair to one side, positioning it behind one ear rather than at the center.
- Divide the hair into two sections.
- Tie these two sections into an actual overhand knot, just like you’d tie a rope.
- Pull the knot tight so it sits securely.
- Gather any remaining length and wrap it around the base of the knot.
- Secure with bobby pins, making sure the knot stays positioned to the side.
- Gently pull on the knot to create more volume and dimension.
- Apply texture spray for a modern, lived-in finish.
Time Required: 4-6 minutes Difficulty Level: Easy Best For: All hair lengths (shoulder-length or longer), creative industries, asymmetrical face shapes
29. The Braided Low Bun with Wrap
Combine multiple techniques into one stunning updo with this braided low bun that features an elegant wrap detail.
Dirty hair makes the braiding process smoother and helps both the braid and the wrap maintain their definition throughout even the longest workdays.
- Create a low ponytail at the nape and secure with an elastic.
- Before braiding, remove a small section from the ponytail and set it aside.
- Braid the main ponytail in a traditional three-strand braid down to the ends.
- Secure the braid with a small elastic.
- Wrap the braid around the base of the ponytail, forming a circular bun.
- Secure the braided bun with bobby pins.
- Take the small section you set aside and wrap it around the base of the bun, covering the elastic.
- Secure the wrapped section with a bobby pin hidden underneath.
- Apply shine spray for a polished, professional finish.
Time Required: 8-10 minutes Difficulty Level: Medium Best For: Medium to long hair, important presentations, those comfortable with basic braiding
30. The Pulled-Back Textured Twist
Close out your updo arsenal with this effortlessly chic pulled-back textured twist that embraces dirty hair’s natural movement while maintaining professional polish.
This style strikes the perfect balance between structured and relaxed, making it ideal for work environments that appreciate both competence and approachability.
- Apply dry texture spray or dry shampoo throughout your hair for enhanced grip and volume.
- Loosely gather your hair at the back of your head, leaving the gathering intentionally imperfect.
- Don’t brush it smooth—embrace the natural texture and slight bumps.
- Twist the gathered hair loosely, keeping it relaxed rather than tight.
- Coil the twisted section into a low, loose bun or simply pin the twist against your head.
- Secure with bobby pins placed randomly rather than in a structured pattern.
- Pull out a few face-framing pieces and allow some texture at the crown.
- Gently pull on the twisted sections to create more volume and a lived-in appearance.
- Finish with flexible-hold hairspray that maintains movement.
Time Required: 4-6 minutes Difficulty Level: Easy Best For: All hair types, casual work environments, those who prefer relaxed professional styling
Hair Updo Comparison Table
| Updo Style | Best Hair Length | Difficulty Level | Time Required | Best For Workplace Type |
|---|---|---|---|---|
| Classic Low Bun | Medium to Long | Easy | 5-7 min | Conservative/Corporate |
| Textured Topknot | Medium to Long | Easy | 3-5 min | Creative/Casual |
| Sleek Side Bun | Medium to Long | Medium | 6-8 min | Formal/Client-Facing |
| Double Twisted Bun | Long | Medium | 8-10 min | Professional/Special Events |
| Low Ponytail Wrap | Shoulder-Length or Longer | Easy | 4-6 min | All Workplace Types |
| Braided Crown | Long | Medium-Advanced | 10-12 min | Creative/Romantic Settings |
| Twisted Low Chignon | Medium to Long | Medium | 7-9 min | Formal/Traditional |
| Half-Up Twisted Knot | Medium to Long | Easy-Medium | 5-7 min | Modern/Video-Call Friendly |
| Sleek High Ponytail Bun | Medium to Long | Medium | 6-8 min | Active/High-Energy |
| Messy Low Bun | Medium to Long | Easy | 4-6 min | Creative/Casual Friday |
| Rolled Ballerina Bun | Long | Easy | 5-7 min | Formal/Classical |
| French Twist | Shoulder-Length or Longer | Advanced | 8-10 min | Traditional/Formal |
| Gibson Tuck | Medium to Long | Easy-Medium | 5-7 min | Vintage/Classic |
| Infinity Bun | Long | Medium | 7-9 min | Modern/Geometric-Lovers |
| Braided Headband Updo | Long | Medium | 9-11 min | Professional Casual |
Essential Tools and Products for Dirty Hair Updos
Creating sleek, professional updos with unwashed hair requires the right tools and products to work with your hair’s natural texture rather than against it.
- Bobby pins in matching hair color: Invest in high-quality pins that grip well and won’t slip; you’ll need at least 20-30 for most updos.
- Strong elastics: Choose seamless elastics that won’t snag or damage hair; keep multiple sizes on hand for different ponytail thicknesses.
- Dry shampoo or dry texture spray: This absorbs excess oil at the roots while adding grip and volume for better hold.
- Smoothing serum or light oil: A small amount tames flyaways and adds shine without making hair look greasy.
- Fine-tooth comb: Essential for creating precise parts and smoothing sections before styling.
- Paddle brush or Mason Pearson brush: Quality brushes distribute natural oils from roots to ends while smoothing hair.
- Hair donut or bun forms: These create perfectly shaped, voluminous buns with minimal effort.
- Edge control brush or clean toothbrush: Perfect for slicking down baby hairs and flyaways along the hairline.
- Flexible-hold hairspray: Maintains style without creating stiffness or crunchiness.
- U-shaped pins for added security: These provide extra hold for heavy or thick hair sections.
Common Mistakes to Avoid with Dirty Hair Updos
Even with the right techniques, certain missteps can undermine your updo’s professional appearance and longevity.
- Using too much product: Dirty hair already has natural oils; adding excessive product makes it look greasy rather than polished—use products sparingly.
- Not securing the base properly: The foundation elastic or initial pins must be tight and secure; a loose base means the entire updo will fall throughout the day.
- Brushing too aggressively: Dirty hair can be more fragile; brush gently from ends to roots to avoid breakage and unnecessary frizz.
- Skipping dry shampoo at the roots: Even if you’re embracing dirty hair, refreshing the roots with dry shampoo prevents the “oily scalp” appearance.
- Creating updos on extremely oily hair: There’s a sweet spot; day 2-3 hair is ideal, but day 5-6 hair may be too oily to look professional.
- Not matching bobby pin color to hair: Mismatched pins are distracting and look unprofessional; always use pins that disappear into your hair color.
- Making it too perfect: Ironically, slightly imperfect updos often look more modern and flattering than overly controlled styles.
- Forgetting to check the back view: Always use a mirror or phone camera to ensure the back looks as polished as the front and sides.
Professional Tips for All-Day Updo Hold
Keeping your updo intact from morning meetings through evening commitments requires strategic techniques beyond basic styling.
- Start with day 2 or 3 hair: This is the ideal texture; day 1 is too slippery, while day 4+ may be too oily.
- Pin in a crisscross pattern: Insert bobby pins in X shapes rather than parallel for significantly better hold.
- Insert pins pointed downward: Pins should point toward the floor so gravity works with you, not against you.
- Use setting spray before and after: Spray your hair lightly before styling for grip, then finish with hairspray for hold.
- Create texture before styling: Apply dry shampoo or texture spray even to dirty hair for enhanced grip and volume.
- Secure in sections: Don’t try to pin everything at once; secure each section individually as you build the updo.
- Twist before pinning: Twisted sections stay put better than straight sections because they have more surface area and friction.
- Test the hold: Gently shake your head and move around before leaving home; if anything feels loose, add more pins.
- Keep emergency pins accessible: Stash a few extra bobby pins in your desk, purse, or car for midday touch-ups if needed.
Frequently Asked Questions
How many days after washing is best for updo styling? Day 2 or 3 hair provides the ideal balance of natural oils for grip and hold without appearing greasy or unkempt; day 1 hair is often too clean and slippery, while day 4+ may require additional dry shampoo to look professional.
Can I create these updos if I have very fine or thin hair? Absolutely; in fact, dirty hair benefits fine hair types by providing extra body and texture that freshly washed fine hair lacks—use volumizing dry shampoo, tease roots slightly, and consider using bun forms or padding for fuller-looking styles.
Will these styles work for curly or textured hair? Yes, though you may need to modify techniques slightly; curly hair often requires more bobby pins for security, and you might stretch curls first with braiding or banding overnight, or embrace the texture by opting for looser, more textured updo styles rather than ultra-sleek ones.
How do I prevent my updo from causing headaches? Avoid pulling hair too tightly, especially at the hairline and crown; position buns slightly lower rather than at the very top of your head; use fewer elastics or choose ones without metal parts; and take your hair down as soon as you’re home to give your scalp a break.
What if my hair is too short for most of these styles? Many styles like the half-up twisted knot, low ponytail wrap, and pulled-back textured twist work with shoulder-length hair; you can also use clip-in extensions specifically for adding length and volume to updos, or try the tucked and pinned updo which works with shorter lengths.
Should I use heat tools on dirty hair before creating an updo? Generally no, as dirty hair already has the texture you need; however, if you have very curly hair and want a sleeker updo, you can use a blow dryer with a smoothing brush or carefully use a flat iron on lower heat settings, always with heat protectant.
How can I make my updo look intentional rather than messy? The key is controlled imperfection: keep the base and structure neat and secure, with smoothness where it matters (hairline, nape, around the face), while allowing texture and looseness in less visible areas; also ensure all bobby pins are hidden and any pulled-out pieces look deliberate rather than accidental.
Conclusion
Mastering the art of 30 Sleek Dirty Hair Updos for Busy Workdays means you’ll never again view unwashed hair as a styling limitation but rather as your secret advantage for creating professional, polished looks with minimal time investment.
These versatile updos transform second and third-day hair into sophisticated styles that hold beautifully throughout demanding workdays, proving that you don’t need freshly washed hair to look put-together and confident. From classic low buns and elegant
French twists to modern textured topknots and creative braided styles, you now have an extensive repertoire of options suited to every professional setting, hair type, and skill level.
The natural oils in dirty hair provide the grip, texture, and hold that make these styles not only possible but actually superior to those created with freshly washed hair.
By understanding the techniques, using the right tools, avoiding common mistakes, and applying professional tips for all-day hold, you can confidently style your hair in minutes while looking like you spent far longer perfecting your appearance.
Remember that the most successful updos balance structure with softness, security with movement, and polish with personality—qualities that dirty hair naturally enhances.
So embrace those extra minutes of sleep, skip the morning shampoo, and let these 30 Sleek Dirty Hair Updos for Busy Workdays become your go-to solutions for looking professionally polished without the time-consuming wash-and-style routine.