Short hair doesn’t mean limited styling options, especially when you embrace the effortless elegance of French-inspired hairstyles.
French women have mastered the art of looking polished yet undone, sophisticated yet approachable, and their approach to short hair styling reflects this perfect balance.
Whether you’re working with a pixie cut, a bob, or a lob, French hairstyles offer a refreshing departure from overly structured looks, focusing instead on natural texture, strategic volume, and that coveted “just woke up like this” appeal.
This comprehensive guide explores 33 Easy French Hairstyles for Short Hair That Look Modern and Fresh, covering everything from classic techniques like the messy chignon and textured waves to contemporary twists on traditional styles.
You’ll discover how to create romantic braided accents, master the art of the effortless updo, add Parisian flair with accessories, and style your short hair for various occasions while maintaining that signature French nonchalance.
Each hairstyle is designed to work with your hair’s natural movement rather than against it, making morning routines simpler while elevating your overall aesthetic.
Get ready to transform your short hair into a canvas for chic, modern styles that capture the timeless appeal of French beauty.
Contents
- 1 1. The Textured French Bob
- 2 2. The Messy French Twist for Short Hair
- 3 3. Tousled Waves with Side Part
- 4 4. The Half-Up French Knot
- 5 5. Slicked-Back Pixie with Texture
- 6 6. Braided Headband on Short Hair
- 7 7. The Undone Low Bun
- 8 8. Finger Waves for Modern Edge
- 9 9. Twisted Side Updo
- 10 10. The Piecey Crop
- 11 11. Soft Rolled Edges
- 12 12. The French Girl Fringe
- 13 13. Braided Crown Accent
- 14 14. Slicked Side Part with Volume
- 15 15. Messy Textured Pixie
- 16 16. The Tucked Bob
- 17 17. Vintage Pin Curls
- 18 18. The Effortless Chignon
- 19 19. Textured Quiff
- 20 20. Soft Romantic Curls
- 21 21. The Side-Swept Undercut Style
- 22 22. Braided Side Detail
- 23 23. The Polished Slick Back
- 24 24. Curly Pixie with Definition
- 25 25. The Accessorized Bob
- 26 26. Voluminous Crown with Sleek Ends
- 27 27. The Faux Hawk
- 28 28. Asymmetrical Waves
- 29 29. The Twisted Headband Effect
- 30 30. Retro Victory Rolls
- 31 31. The Choppy Shag
- 32 32. Elegant Side Chignon
- 33 33. The Natural Texture Embrace
- 34 Conclusion
1. The Textured French Bob
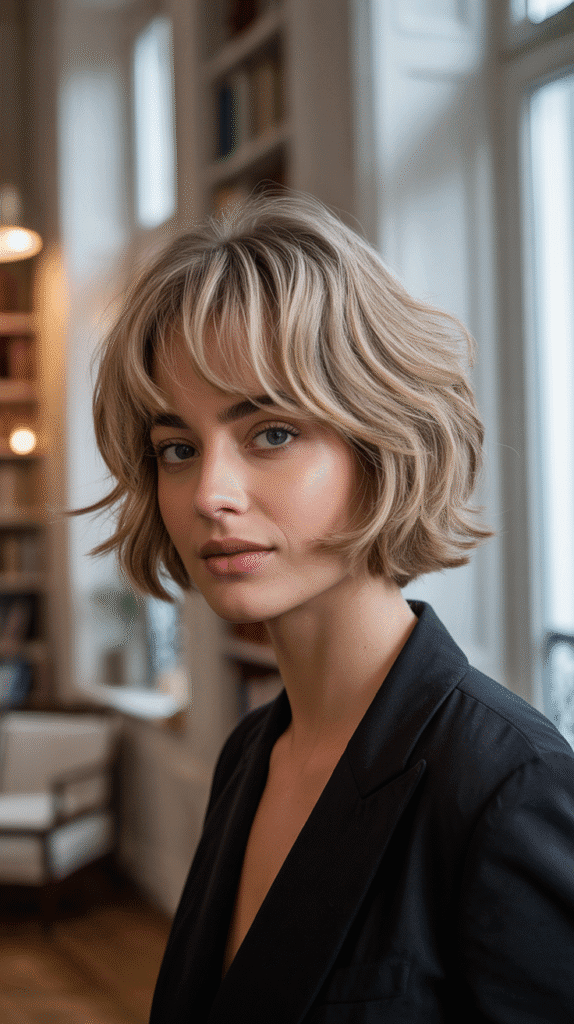
The textured French bob serves as the foundation for countless effortless hairstyles and embodies the Parisian approach to hair—naturally beautiful with just enough polish.
This versatile cut typically falls between chin and shoulder length with subtle layers that create movement and dimension.
Creating Natural Texture
- Apply a sea salt spray to damp hair to enhance your hair’s natural wave pattern and create that coveted beachy texture.
- Scrunch sections of hair gently while blow-drying with a diffuser attachment to encourage organic movement.
- Avoid over-styling or creating uniform curls, as the French aesthetic celebrates imperfection and variation.
- Finish with a lightweight texturizing spray rather than hairspray to maintain touchable, moveable hair.
- Let some sections air-dry partially before applying heat to preserve natural texture.
Styling Tips for Daily Wear
- Run your fingers through your bob instead of brushing to maintain separated, piece-y texture.
- Tuck one side behind your ear for an asymmetrical look that adds instant sophistication.
- Add a small amount of styling cream to the ends for definition without weighing hair down.
- Sleep with hair in a loose, low bun to wake up with natural bends and waves.
- Refresh second-day hair by misting with water and re-scrunching specific sections.
2. The Messy French Twist for Short Hair
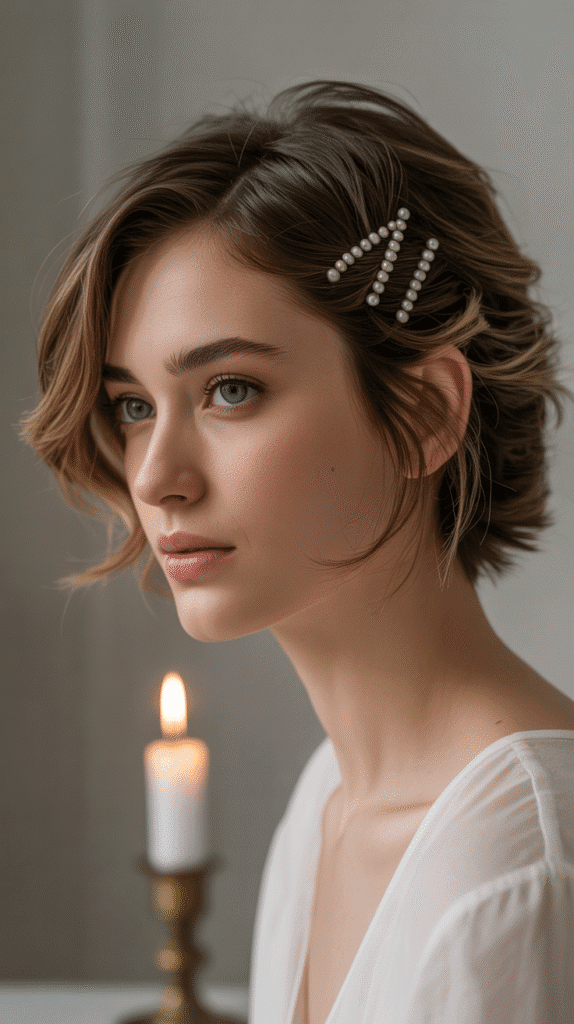
Contrary to popular belief, you don’t need long hair to achieve an elegant French twist—short hair versions offer even more modern appeal.
This adapted classic works beautifully for bobs and lobs, creating an unexpectedly chic updo for special occasions or professional settings.
Adapting the Twist for Shorter Lengths
- Start with slightly dirty hair or apply dry shampoo for better grip and texture.
- Gather hair at the nape of your neck, leaving face-framing pieces loose for a softer effect.
- Twist the gathered section upward along the back of your head, securing with bobby pins as you go.
- Don’t worry about perfection—loose sections and bumps add to the effortless French appeal.
- Use decorative pins or small barrettes to secure any pieces that won’t stay tucked.
Adding Volume and Interest
- Tease the crown section lightly before creating the twist to add height.
- Pull out a few strategic pieces around your hairline after securing the twist.
- Finish with a light-hold hairspray to maintain the style without creating stiffness.
- Consider adding small braided sections before twisting for additional texture.
- Accessorize with a silk scarf woven through the twist for extra Parisian flair.
3. Tousled Waves with Side Part
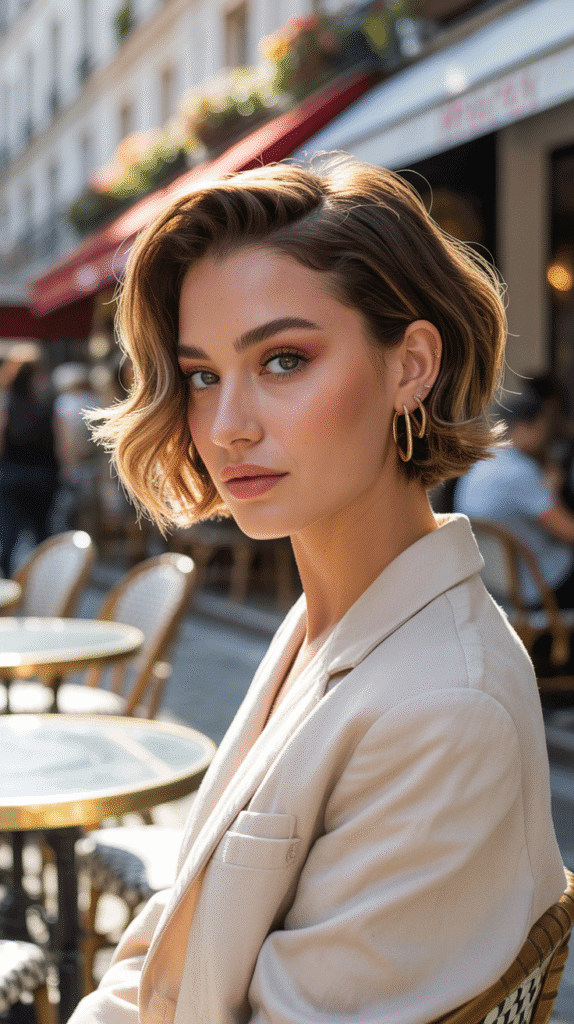
The tousled wave is perhaps the most quintessentially French hairstyle, combining effortless texture with subtle sophistication.
A deep side part adds drama and frame the face beautifully, making this style perfect for short to medium-length hair.
Creating Lived-In Waves
- Apply a heat protectant followed by a volumizing mousse to damp hair before styling.
- Use a 1-inch curling iron or wand, alternating the direction of curls for a more natural appearance.
- Curl sections away from your face on both sides to create an opening, flattering effect.
- Allow curls to cool completely before touching them to ensure they set properly.
- Break up the curls by running your fingers through them or gently shaking your head.
Perfecting the Deep Side Part
- Create your part when hair is wet for the cleanest, most defined line.
- Position the part approximately one inch from your natural part for subtle drama.
- Apply a small amount of smoothing serum along the part line to control flyaways.
- Pin the heavier side behind your ear or let it fall forward for different looks.
- Refresh the style throughout the day by re-parting and fluffing the roots.
4. The Half-Up French Knot
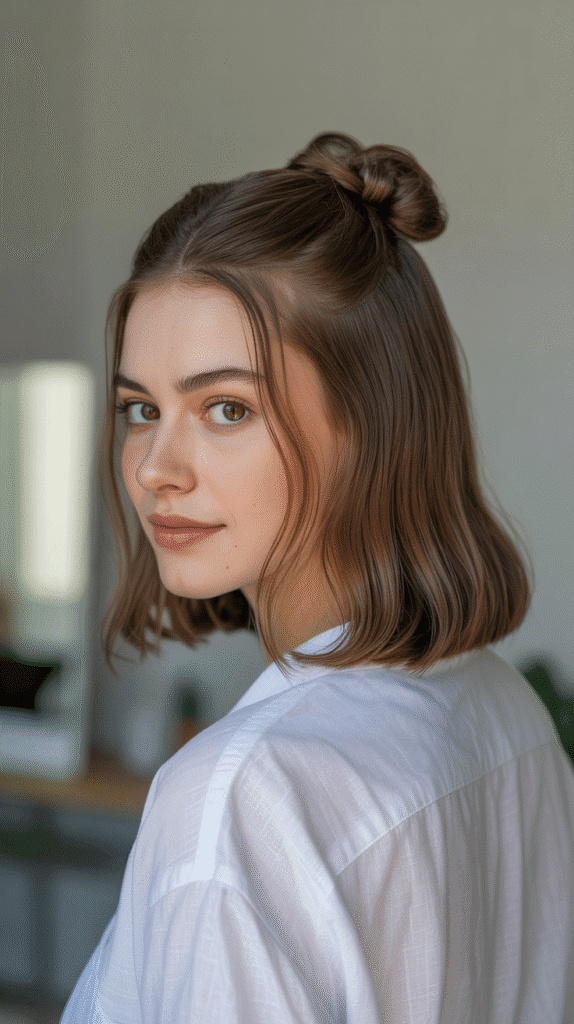
This charming style combines the practicality of pulled-back hair with the softness of leaving some hair down, creating a balanced look that’s ideal for everyday wear.
The French knot is essentially a twisted bun that sits at the crown or upper back of the head.
Creating the Perfect Half-Up Section
- Section the top half of your hair from ear to ear, leaving the bottom section free.
- Gather the top section at your desired height, typically at the crown or just below.
- Twist the gathered section clockwise until it begins to coil on itself naturally.
- Wrap the twisted section into a small bun shape and secure with bobby pins.
- Leave the knot slightly loose and imperfect for authentic French styling.
Styling the Lower Section
- Add texture to the remaining hair with a curling iron or texturizing spray.
- Create subtle bends rather than defined curls for a more relaxed appearance.
- Pull a few face-framing pieces loose before creating the knot for added softness.
- Consider adding a small braid to one side of the lower section for variation.
- Mist the entire style with a flexible-hold hairspray to maintain movement.
5. Slicked-Back Pixie with Texture
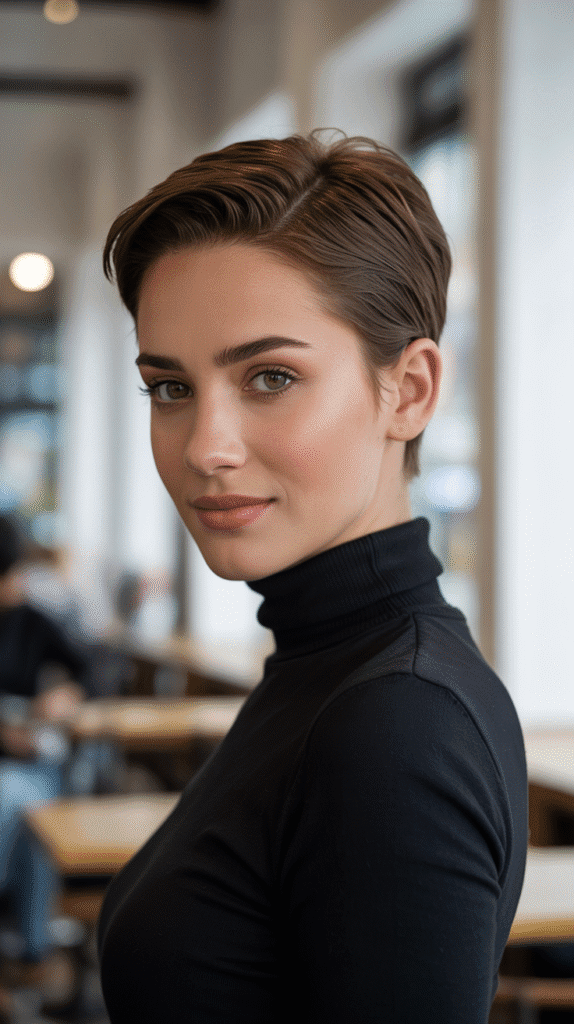
The slicked-back pixie offers a bold, modern interpretation of French minimalism, combining sleek sophistication at the roots with textured, piece-y ends.
This style works exceptionally well for very short hair and creates a striking, confident look.
Achieving the Slicked Effect
- Apply a strong-hold gel or pomade to damp hair, focusing on the roots and front sections.
- Use a fine-tooth comb to smooth hair straight back from the hairline.
- Create a defined part or slick everything directly back for different effects.
- Ensure the product is evenly distributed to avoid patches or uneven shine.
- Allow the slicked sections to dry completely before touching to prevent disruption.
Adding Texture to the Ends
- Leave the very ends of your hair free from heavy product to allow natural texture.
- Use your fingers to piece out and separate the tips for definition.
- Apply a small amount of matte pomade or clay to the ends for hold without shine.
- Consider adding slight color contrast at the tips for enhanced dimension.
- Refresh throughout the day by re-applying product to roots while leaving ends touchable.
6. Braided Headband on Short Hair
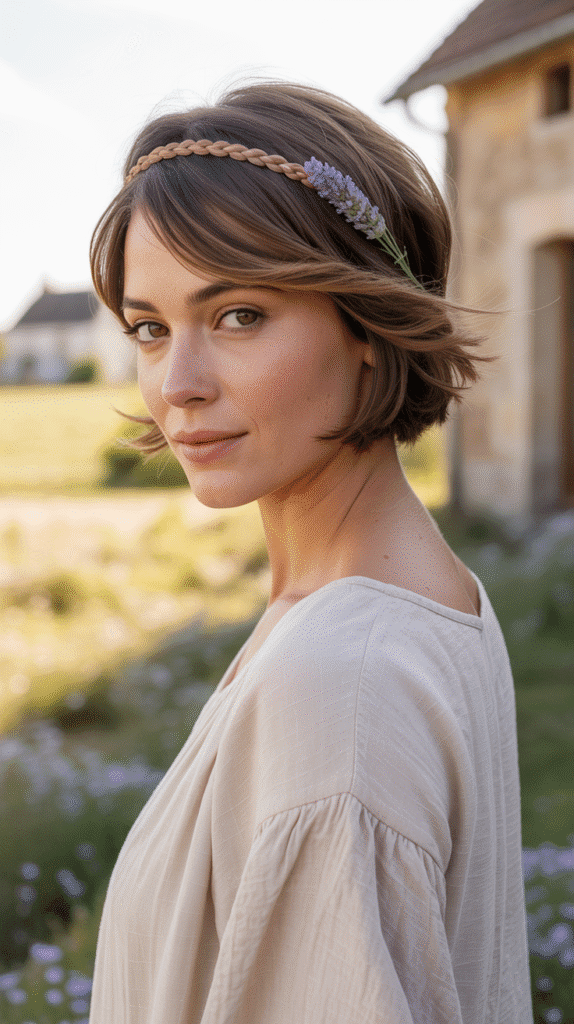
A delicate braid worn as a headband creates instant romance and bohemian charm while keeping hair off your face.
This style is surprisingly achievable with short hair and offers an elegant solution for growing-out phases or bad hair days.
Creating the Braid
- Start with a small section of hair just behind your ear on one side.
- Create a simple three-strand braid or try a delicate twist for variation.
- Braid toward the opposite ear, following the natural hairline.
- Secure the end with a small clear elastic or bobby pins tucked discreetly.
- Adjust the braid’s tightness based on whether you want a polished or relaxed look.
Integrating with Remaining Hair
- Add texture to the rest of your hair to blend with the braided element.
- Pull out small wisps around your face and at the nape for a softer appearance.
- Consider creating two braids on each side that meet at the back for fuller coverage.
- Weave small accessories like flowers or decorative pins into the braid.
- Use this technique to disguise regrowth or roots that need touching up.
7. The Undone Low Bun
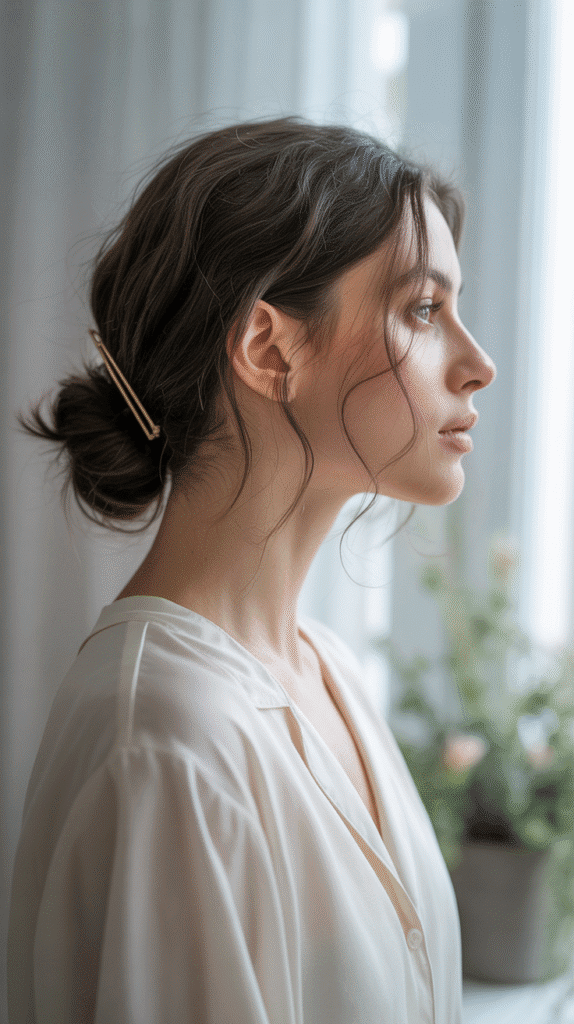
The undone low bun epitomizes French hair philosophy—structured enough to look intentional but loose enough to appear effortless.
This style works beautifully for short to medium hair and transitions seamlessly from day to evening.
Building the Foundation
- Begin with second-day hair or apply dry shampoo for better texture and grip.
- Gather hair at the nape of the neck without smoothing or brushing excessively.
- Allow face-framing pieces and shorter layers to fall naturally rather than forcing them into the bun.
- Twist the gathered hair loosely before wrapping it into a bun shape.
- Secure with bobby pins inserted at various angles for better hold.
Perfecting the Undone Aesthetic
- Gently pull apart sections of the bun to create volume and deliberate messiness.
- Leave the ends sticking out slightly rather than tucking everything perfectly.
- Pull down on the crown section to create slight volume and avoid a flat appearance.
- Resist the urge to smooth flyaways—they contribute to the relaxed French style.
- Add a decorative hair stick or vintage pin for an elevated finishing touch.
8. Finger Waves for Modern Edge
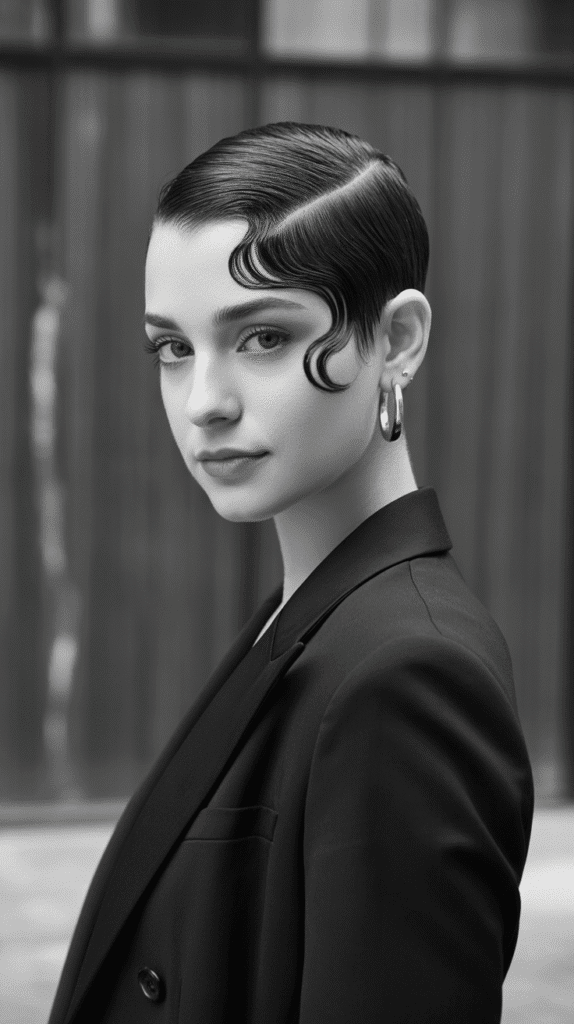
Finger waves bring vintage glamour with a contemporary French twist, creating sculptural S-shaped curves that add drama and sophistication.
This technique works exceptionally well on shorter hair and creates a striking, artistic effect.
Creating Contemporary Finger Waves
- Apply a strong-hold gel to freshly washed, damp hair for maximum control.
- Create a deep side part and begin forming waves on the heavier side first.
- Use a wide-tooth comb to form S-shaped curves, holding each wave with your fingers as you work.
- Secure each wave with long metal clips while the hair dries completely.
- Modern finger waves are typically looser and less rigid than vintage versions for a softer effect.
Styling Variations
- Create waves only on one side for an asymmetrical, contemporary look.
- Combine finger waves at the front with slicked-back sides for editorial appeal.
- Add subtle color like platinum or deep burgundy to emphasize the wave pattern.
- Keep waves small and tight for dramatic occasions or larger and looser for everyday wear.
- Finish with a high-shine serum to accentuate the sculptural quality of the waves.
9. Twisted Side Updo
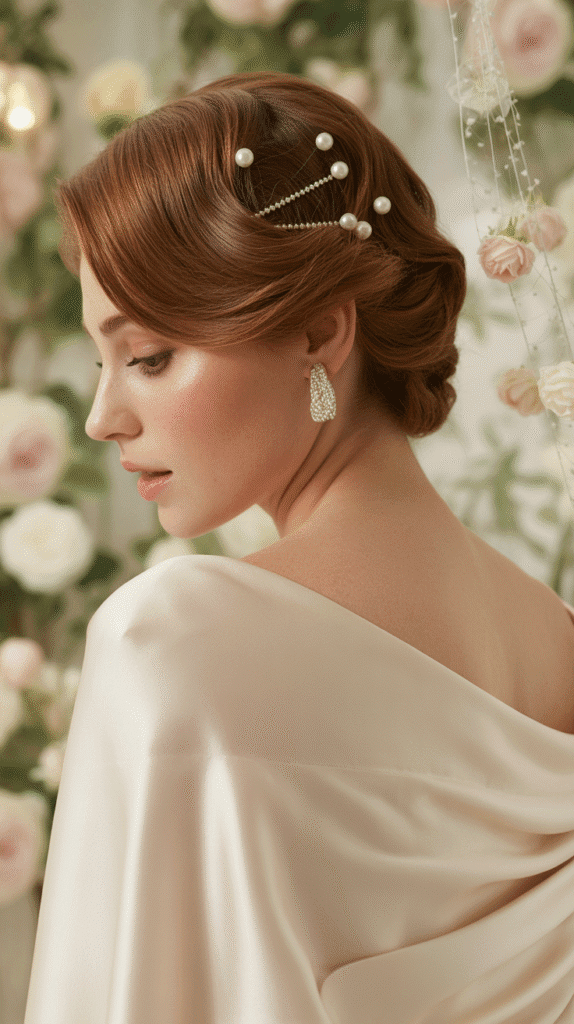
The twisted side updo offers an elegant alternative to traditional updos, with all the hair swept to one side and secured with strategically placed twists.
This asymmetrical style creates visual interest and works particularly well for formal occasions.
Executing the Side Sweep
- Begin with textured, dry hair that has some grip from products or natural oils.
- Create a deep side part and sweep all hair toward the opposite side.
- Divide the swept hair into several sections for twisting rather than creating one large twist.
- Twist each section individually before pinning it along the side of the head.
- Layer the twisted sections over each other to create depth and dimension.
Securing and Finishing
- Use bobby pins that match your hair color for invisible hold.
- Cross two bobby pins in an X pattern at each twist point for maximum security.
- Pull out a few strategic pieces around the face and at the nape for softness.
- Mist with medium-hold hairspray to maintain the style without creating stiffness.
- Add decorative elements like jeweled pins or fresh flowers for special occasions.
10. The Piecey Crop
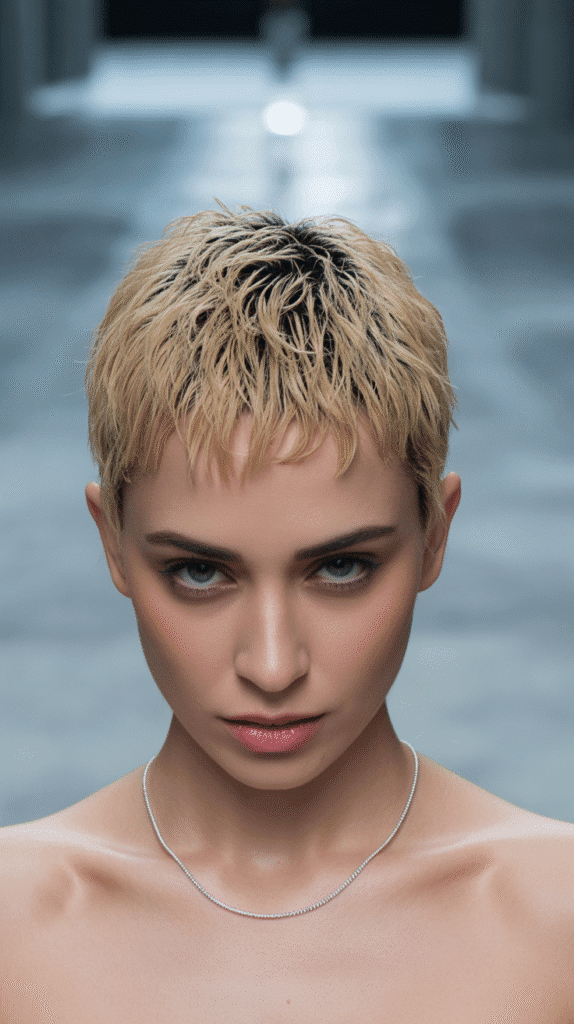
The piecey crop celebrates texture and separation, with individual pieces of hair defined and styled for maximum movement and dimension.
This contemporary take on short hair styling embodies the French love of natural texture with intentional styling.
Creating Separation and Definition
- Apply a texturizing paste or matte clay to dry hair, focusing on the mid-lengths and ends.
- Work the product through your hair using your fingertips to separate individual pieces.
- Twist small sections between your fingers to create defined, piece-y texture.
- Vary the direction in which you style different sections for natural-looking movement.
- Focus on creating texture at the crown for volume and at the ends for definition.
Maintaining the Style
- Refresh the look by applying a small amount of product to specific sections throughout the day.
- Avoid brushing or combing once the style is set, as this will disrupt the piece-y texture.
- Consider sleeping on a silk pillowcase to minimize flattening and preserve texture overnight.
- Add dry shampoo at the roots if your hair becomes oily while maintaining piece-y ends.
- Experiment with different products to find the right balance of hold and flexibility for your hair type.
11. Soft Rolled Edges
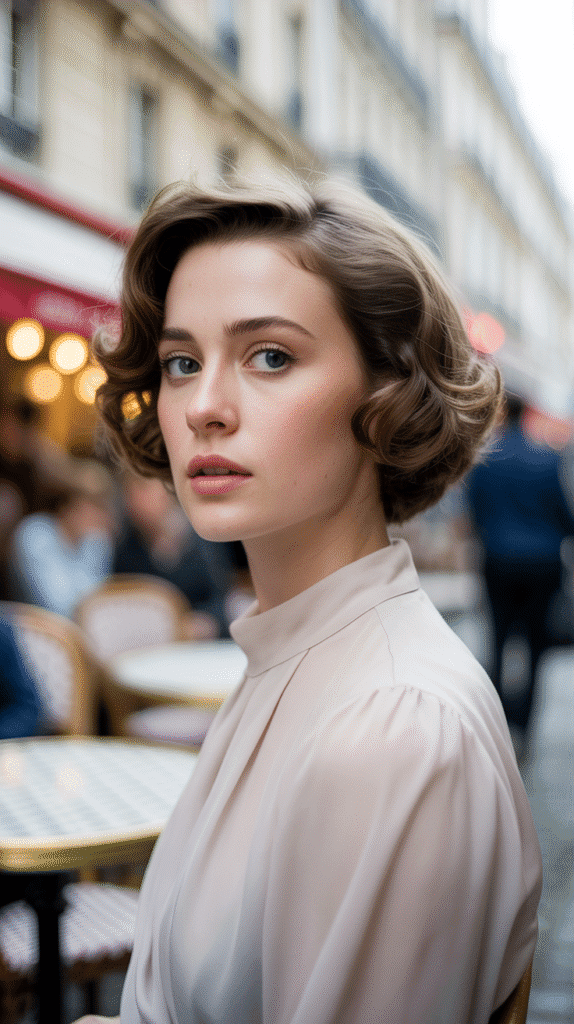
Soft rolled edges create vintage-inspired romance by curling the ends of your hair under or away from the face in a gentle roll.
This classic technique receives a modern update when styled with loose, imperfect curls rather than structured uniformity.
Rolling Technique for Short Hair
- Start with completely dry hair that has been prepared with a heat protectant.
- Use a medium-barrel round brush and blow dryer to create the rolled effect.
- Roll small sections of hair at the ends, directing the brush away from or toward your face depending on desired direction.
- Hold each section with heat for a few seconds before releasing to set the curl.
- Allow the rolls to cool in place before touching them for better hold.
Modern Styling Approaches
- Keep the rolls loose and varied rather than creating uniform, tight curls.
- Mix the direction of rolls throughout your hair for a more contemporary, tousled effect.
- Add texture spray after rolling to break up the curls slightly.
- Focus rolled ends primarily around the face for a flattering, face-framing effect.
- Combine soft rolled edges with a textured, slightly messy crown for contrast.
12. The French Girl Fringe
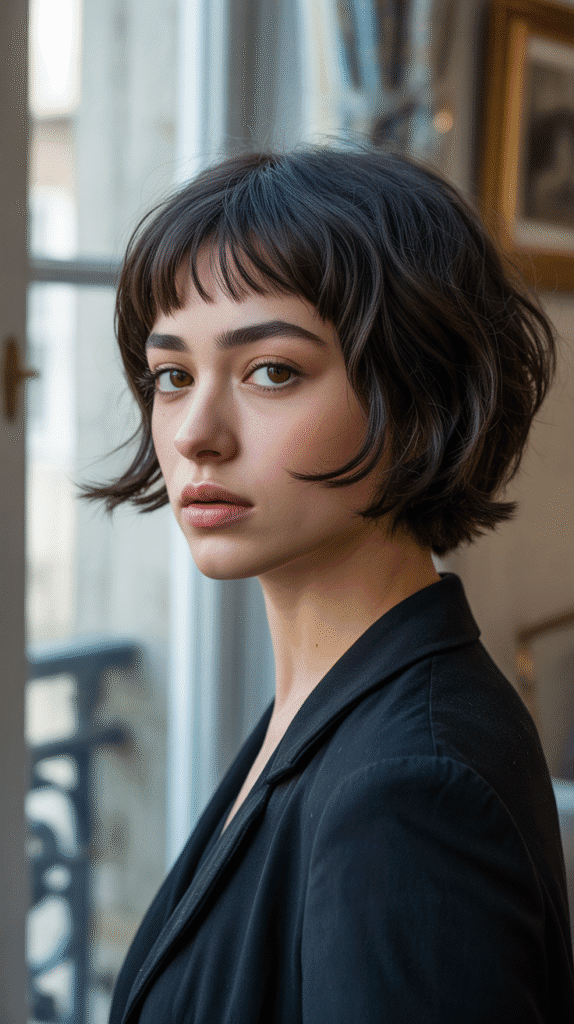
Wispy, textured bangs—often called a French fringe—completely transform short hairstyles by adding softness and face-framing appeal.
The key is maintaining the piece-y, slightly imperfect texture that defines French styling.
Cutting and Styling Your Fringe
- French fringes typically fall between the eyebrows and eyelashes with wispy, feathered ends.
- Style bangs by blow-drying them forward with a round brush for volume at the roots.
- Use your fingers to separate and piece out individual sections rather than keeping them unified.
- Apply a tiny amount of lightweight styling cream to the ends for definition without heaviness.
- Avoid over-straightening or creating too much uniformity across the fringe.
Maintenance and Variations
- Trim your fringe every 3-4 weeks to maintain the ideal length and prevent heavy, blunt edges.
- Try a curtain variation by parting your fringe in the center and sweeping pieces to each side.
- Pin bangs back with a small clip when you want a different look without commitment.
- Refresh bangs between washes with dry shampoo and a quick blow-dry.
- Consider slightly longer, eye-grazing bangs that can be swept to the side for versatility.
13. Braided Crown Accent
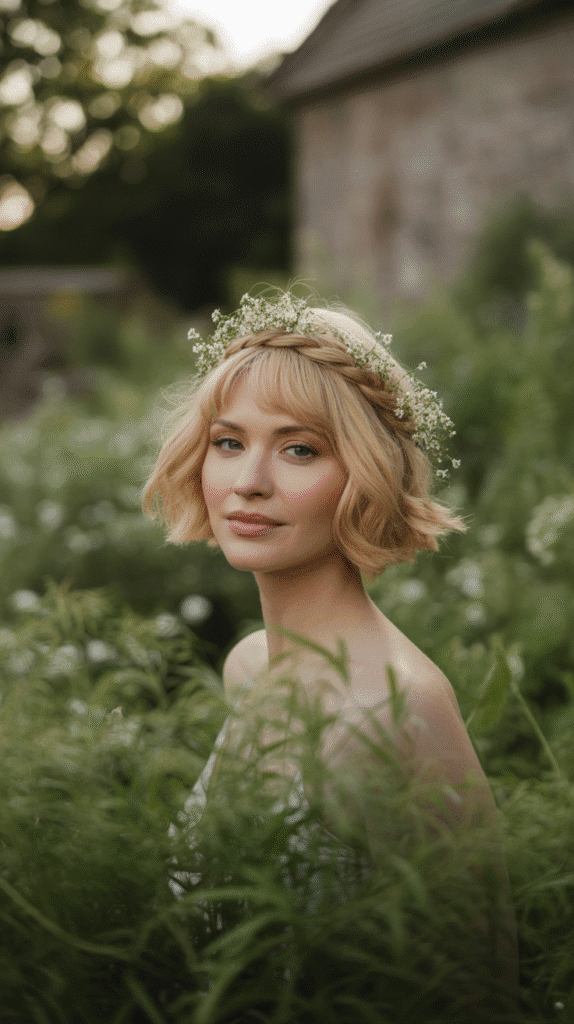
A delicate braid woven across the crown like a coronet adds instant elegance and bohemian charm to short hairstyles.
This technique works even with shorter lengths by creating a thin accent braid rather than attempting full crown coverage.
Creating the Crown Braid
- Begin with textured hair that has some grip from products or natural texture.
- Start a small braid on one side just above the ear, incorporating hair from along the hairline.
- Continue the braid across the crown, following the natural curve of your head.
- For shorter hair, create a partial crown that extends partway rather than fully around.
- Secure the end with a small elastic or pins tucked into the hair on the opposite side.
Enhancing the Overall Look
- Pull the braid gently to loosen and widen it for a more relaxed, romantic appearance.
- Add small flowers, decorative pins, or ribbon woven through the braid for special occasions.
- Texture the remaining hair with waves or curls to complement the braided element.
- Create two thin braids on each side that meet at the back for fuller crown coverage.
- Use this style to manage awkward growing-out lengths or to add interest to simple cuts.
14. Slicked Side Part with Volume
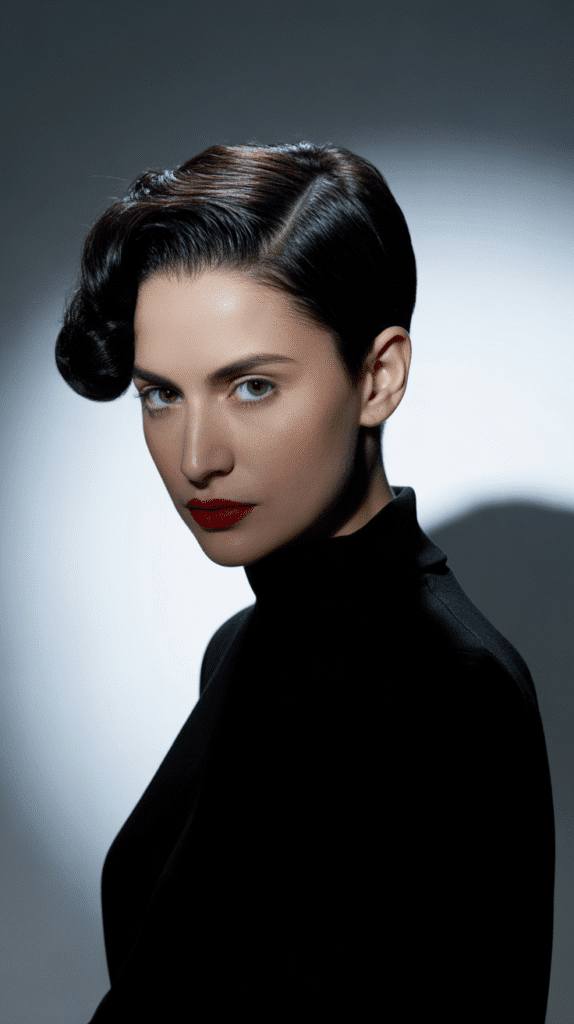
Combining a dramatic side part with voluminous roots and sleek sides creates a sophisticated contrast that feels both retro and contemporary.
This style showcases the French talent for balancing opposing elements into cohesive elegance.
Building Volume at the Crown
- Apply volumizing mousse to damp roots before blow-drying hair upside down.
- Use a round brush to lift the roots at the crown area while directing heat from below.
- Tease the crown section lightly with a fine-tooth comb for additional height.
- Smooth just the top layer over the teased section to hide the backcombing.
- Set the volume with a light mist of hairspray while still warm from styling.
Creating Sleek Contrast
- Create a deep side part positioned at least 1-2 inches from center.
- Apply smoothing serum or light gel to the sides of your hair for sleekness.
- Use a fine-tooth comb to smooth sides perfectly flat for dramatic contrast with the volume.
- Tuck one side behind your ear or leave it forward depending on your face shape and preference.
- Finish the look with shine spray on the sleek sections to emphasize the glossy texture.
15. Messy Textured Pixie
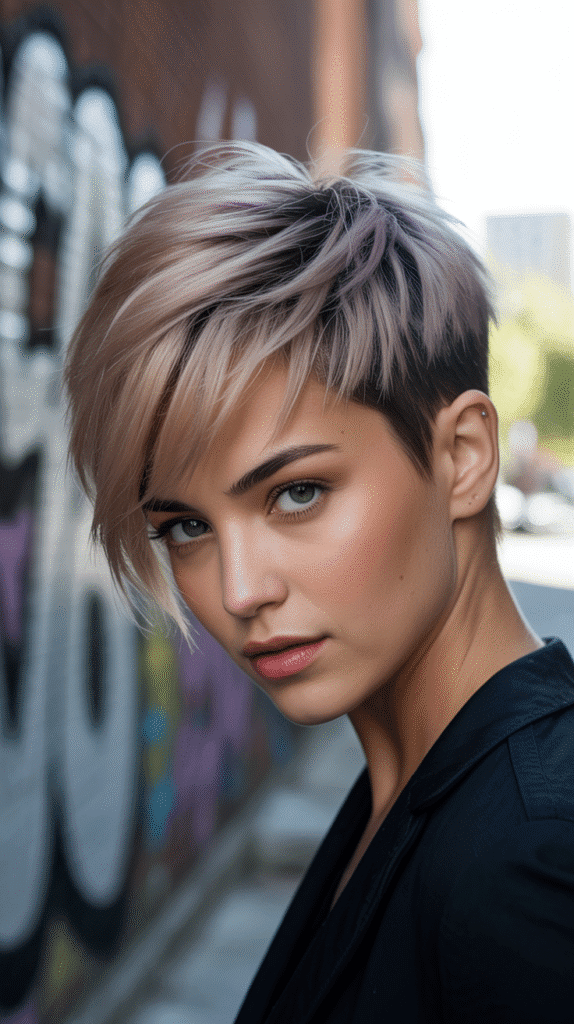
The messy textured pixie embraces controlled chaos, with hair styled in multiple directions to create dimension and movement.
This effortlessly cool style requires the right cut as foundation but can be styled in countless ways for daily variation.
Styling Techniques
- Apply a texturizing spray or mousse to damp hair before blow-drying with fingers instead of a brush.
- Direct different sections in various directions as you dry for natural-looking chaos.
- Use a small amount of matte pomade or clay to piece out and define individual sections.
- Create intentional height at the crown while keeping sides relatively flat for balanced proportions.
- Finish by roughing up the style with your fingers to enhance the tousled effect.
Daily Variations
- Style your pixie forward for a more editorial, fashion-forward appearance.
- Sweep it to one side for a softer, more feminine version of the cut.
- Add extra volume all over for dramatic evening looks or special occasions.
- Create a faux hawk effect by pushing sides down while building extreme height at the center.
- Embrace natural texture by letting your hair air-dry with minimal product for casual days.
16. The Tucked Bob
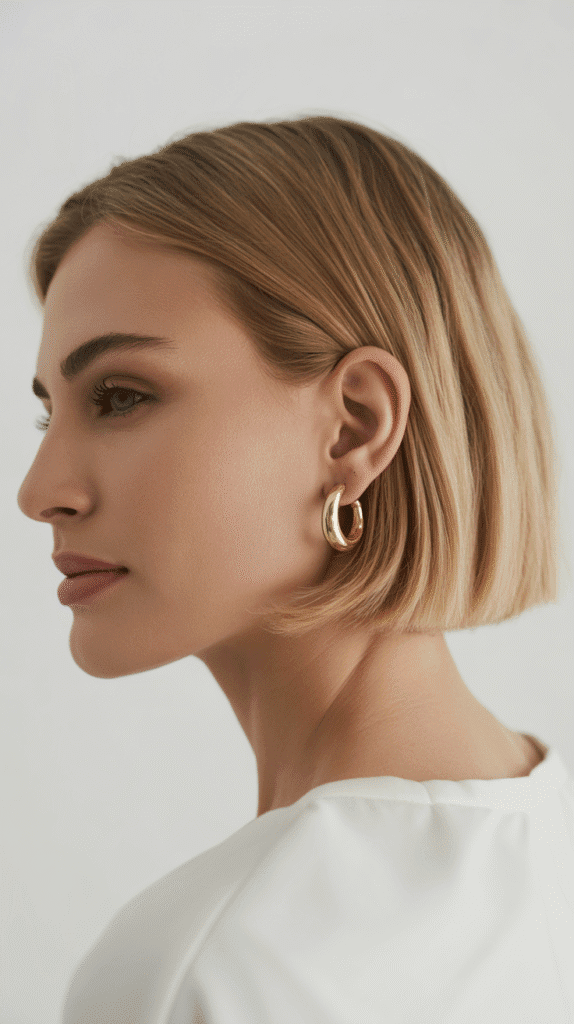
This simple yet sophisticated styling trick involves tucking one or both sides of your bob behind your ears, creating instant asymmetry and revealing facial features.
The tucked bob is perfect for transitioning a casual look to something more polished.
Mastering the Tuck
- Start with hair that has some natural texture or add waves for better hold.
- Tuck one side securely behind your ear, smoothing it back from your face.
- Leave the other side falling naturally forward for beautiful asymmetry.
- Secure the tucked section with a bobby pin if necessary for longer-lasting hold.
- Adjust the amount of hair tucked based on your face shape and desired look.
Creating Lasting Hold
- Apply a small amount of lightweight gel or spray near the ear before tucking.
- Use a flat iron to create a slight inward bend in the tucked section for better placement.
- Position bobby pins horizontally behind the ear for invisible security.
- Spray the tucked section with light-hold hairspray to prevent pieces from falling forward.
- Create a small braid in the tucked section for additional interest and improved hold.
17. Vintage Pin Curls
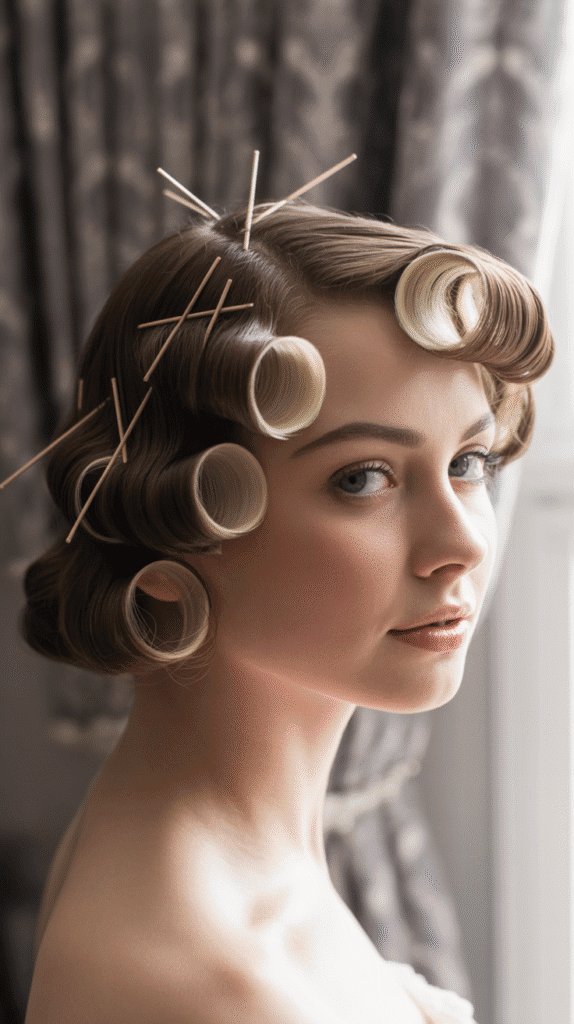
Pin curls offer a classic styling method that creates beautiful, structured curls with lasting hold.
Modern interpretations of this retro technique focus on strategic placement rather than covering the entire head, creating vintage charm with contemporary ease.
Creating Pin Curls
- Start with damp hair and apply a setting lotion or mousse for better hold.
- Take small sections of hair and wrap them around your finger to form flat spiral shapes against your head.
- Secure each curl with two crossed bobby pins to hold it in place while drying.
- Create curls in alternating directions for more natural-looking results.
- Allow curls to dry completely (overnight or under a dryer) before removing pins.
Modern Styling Applications
- Focus pin curls around the face and crown while leaving the back less structured.
- Create larger, looser curls for a softer effect rather than tight vintage spirals.
- Brush through the curls gently after removing pins for soft waves instead of defined spirals.
- Leave some curls intact and brush others for varied texture throughout your style.
- Set the finished style with flexible-hold hairspray to maintain movement while preserving the curl pattern.
18. The Effortless Chignon
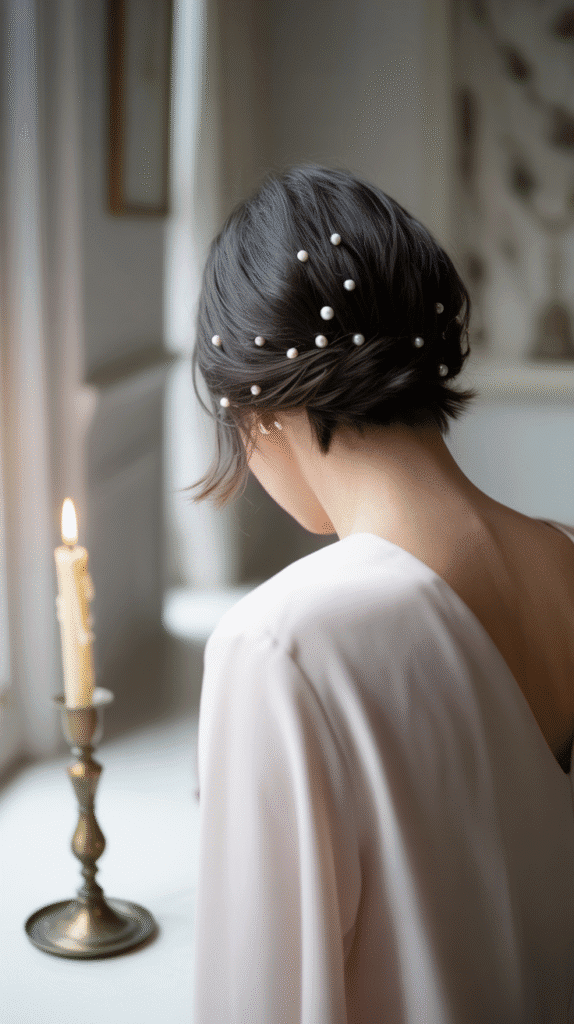
Adapting the classic chignon for short hair creates an unexpectedly elegant updo perfect for formal occasions.
The French approach keeps this style deliberately imperfect with wispy pieces and relaxed texture.
Building a Chignon with Limited Length
- Tease hair lightly throughout for better volume and grip before gathering.
- Pull hair into a very low ponytail at the nape, leaving face-framing pieces loose.
- Twist the ponytail loosely and wrap it around the base, tucking ends under.
- Pin the chignon securely with bobby pins, crisscrossing them for better hold.
- Don’t worry if all ends won’t tuck completely—let some stick out for authentic French charm.
Adding Elegance and Detail
- Pull gently on the chignon to loosen and enlarge it for a more romantic appearance.
- Wrap a small braid around the base of the chignon for added texture and interest.
- Strategically place decorative pins or small accessories throughout the updo.
- Pull down slightly on the crown area to create soft volume before the chignon begins.
- Use a texturizing spray before creating the style and a finishing spray after for lasting hold.
19. Textured Quiff
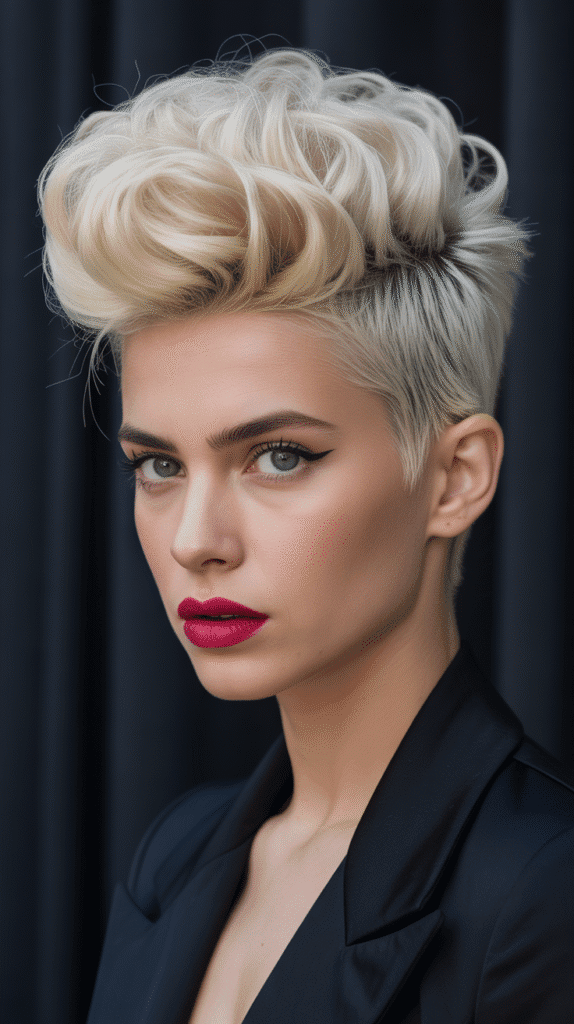
The textured quiff brings bold, modern edge to short hairstyles by creating dramatic height and volume at the front hairline.
This androgynous style exudes confidence and works beautifully for very short hair.
Creating Height and Volume
- Apply volumizing mousse to damp hair, concentrating on the front section.
- Blow-dry the front section upward and back using a round brush for maximum lift.
- Use a flat iron or small curling iron to create slight backward bends in the quiff section.
- Tease the underside of the quiff gently to create a foundation for the height.
- Smooth just the top layer to hide any teasing while maintaining the lifted shape.
Securing the Style
- Apply strong-hold pomade or gel to your fingers and shape the quiff into position.
- Use bobby pins inserted from the sides if necessary to secure particularly high quiffs.
- Finish with a strong-hold hairspray, directing it from below to maintain lift.
- Keep the sides either slicked down or closely cropped to emphasize the dramatic height contrast.
- Adjust the quiff’s angle based on your preference—straight back for classic looks or to the side for contemporary style.
20. Soft Romantic Curls
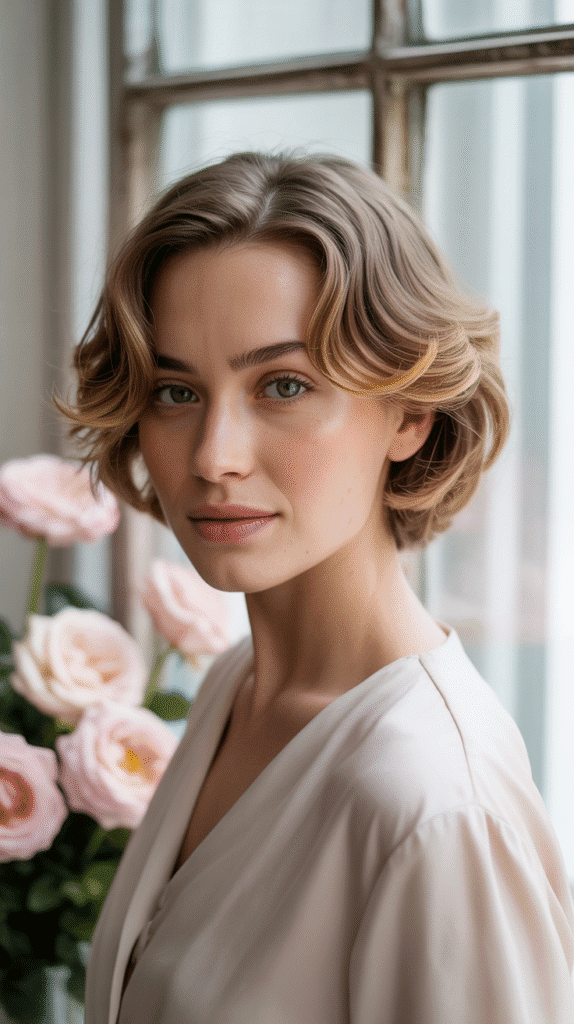
Soft romantic curls bring timeless femininity to short hair, creating gentle spirals and curves that feel elegant without being overly formal.
The French interpretation of this style emphasizes soft, touchable texture over rigid perfection.
Curling Short Hair
- Apply heat protectant followed by a lightweight mousse to damp hair before drying.
- Use a 1-inch to 1.5-inch curling iron depending on your hair length and desired curl size.
- Curl small sections away from your face, holding the iron vertically for more natural-looking spirals.
- Allow each curl to cool in your hand before releasing to help set the shape.
- Curl only the bottom half of each section, leaving roots straight for a more modern effect.
Softening the Curls
- Wait until all curls are completely cool before touching or separating them.
- Run your fingers gently through the curls to break them up into soft waves.
- Use a wide-tooth comb for more dramatic softening or fingers for subtle separation.
- Apply a small amount of lightweight oil or serum to add shine and reduce frizz.
- Mist lightly with flexible-hold hairspray to maintain the style without creating stiffness or crunch.
21. The Side-Swept Undercut Style
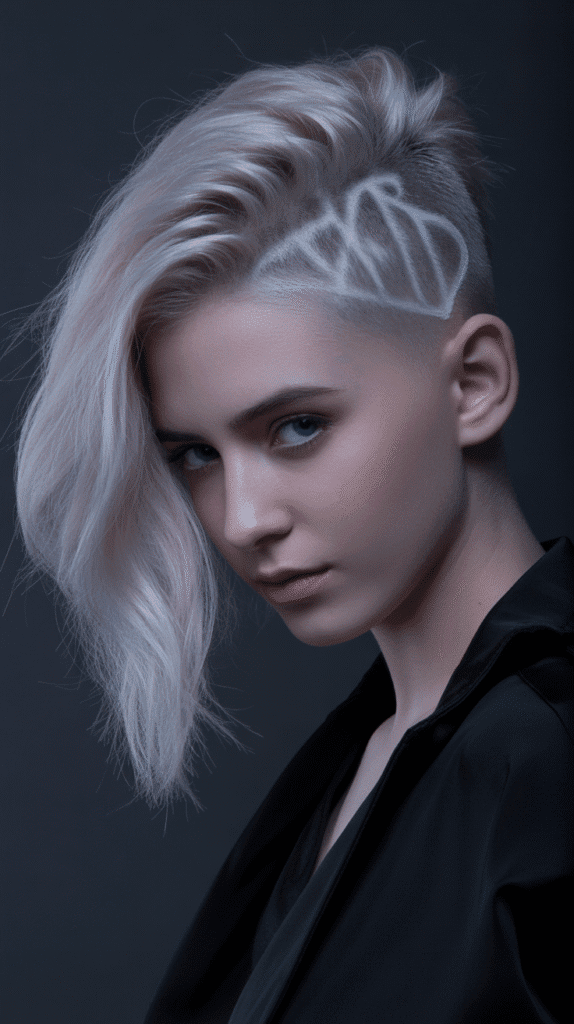
For those with undercut hairstyles, the side-swept look showcases the haircut’s dramatic contrast while maintaining French elegance.
This bold style balances edgy structural elements with soft, feminine styling on the longer section.
Styling the Longer Section
- Apply volumizing product to the roots of the longer section for lift and body.
- Blow-dry the longer portion to one side, using a paddle brush for smoothness.
- Create waves or curls in the longer section for softness that contrasts with the shaved area.
- Use strong-hold pomade or gel on the swept portion to keep it dramatically positioned.
- Finish with hairspray to lock the style in place throughout the day.
Maintaining the Undercut
- Keep the shaved section freshly trimmed every 2-3 weeks to maintain clean lines.
- Consider adding subtle designs or patterns to the undercut for additional visual interest.
- Use a small amount of oil on the shaved section to keep skin moisturized and prevent irritation.
- Experiment with different ways of styling the longer section—forward, back, or to either side.
- Add temporary color to the longer section for even more dramatic impact.
22. Braided Side Detail
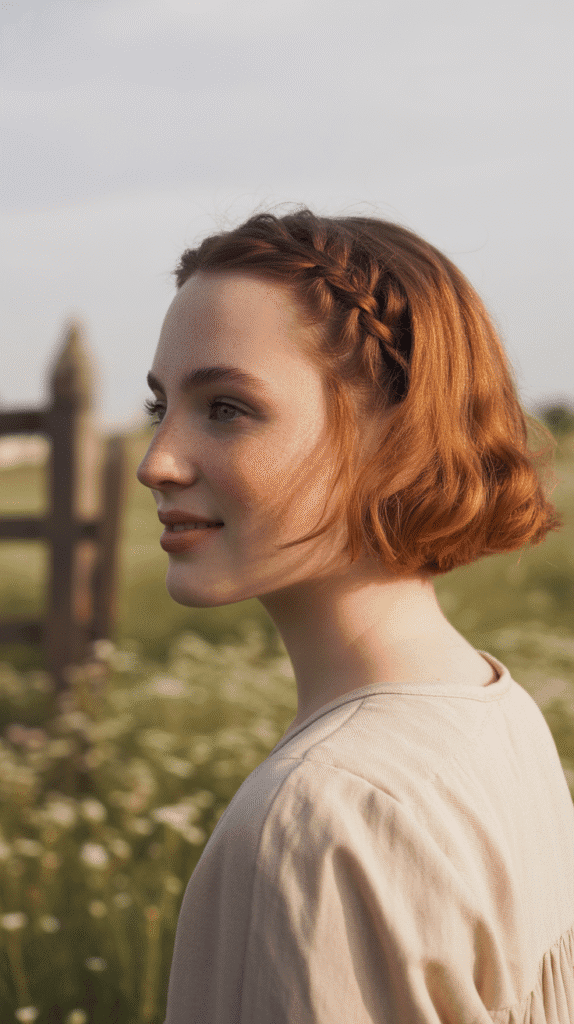
A small, intricate braid placed along one side of your hairstyle adds delicate detail and interest without overwhelming short hair.
This subtle accent brings bohemian romance to even the simplest short cuts.
Creating Accent Braids
- Section out a small strand of hair from your temple or near your part.
- Create a standard three-strand braid, keeping it thin and tight for definition.
- Braid all the way to the ends and secure with a tiny clear elastic.
- Position the braid along your hairline or slightly behind for different effects.
- Create multiple small braids of varying thicknesses for a more bohemian look.
Integration and Styling
- Style the rest of your hair with texture or waves to complement the braided detail.
- Add small accessories like beads or metallic thread woven into the braid.
- Pin the braid horizontally across the side of your head for a headband effect.
- Create a small fishtail or Dutch braid instead of a standard braid for variation.
- Use this technique to manage annoying face-framing pieces that are growing out.
23. The Polished Slick Back
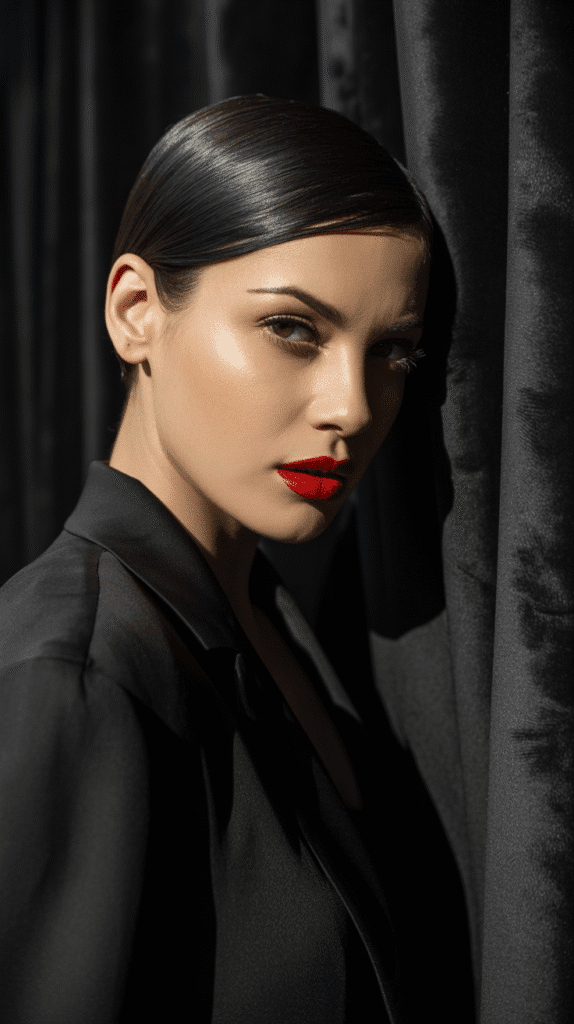
A completely slicked-back hairstyle exudes sophistication and confidence, showcasing facial features while creating a sleek, polished appearance.
This bold look requires commitment but delivers maximum impact.
Achieving Perfect Sleekness
- Start with damp, freshly washed hair for the smoothest results.
- Apply a generous amount of strong-hold gel or pomade from roots to ends.
- Use a fine-tooth comb to smooth hair straight back from the hairline.
- Continue combing while blow-drying on a low setting to set the sleek style.
- Work in small sections to ensure every hair is perfectly positioned.
Maintaining Throughout the Day
- Apply a finishing shine spray for a glossy, polished appearance.
- Keep a small amount of your styling product with you for touch-ups.
- Avoid touching your hair once styled, as this can disturb the sleek surface.
- Use bobby pins at the sides if necessary to secure hair that wants to fall forward.
- Consider this style for evening events where maximum polish is desired.
24. Curly Pixie with Definition
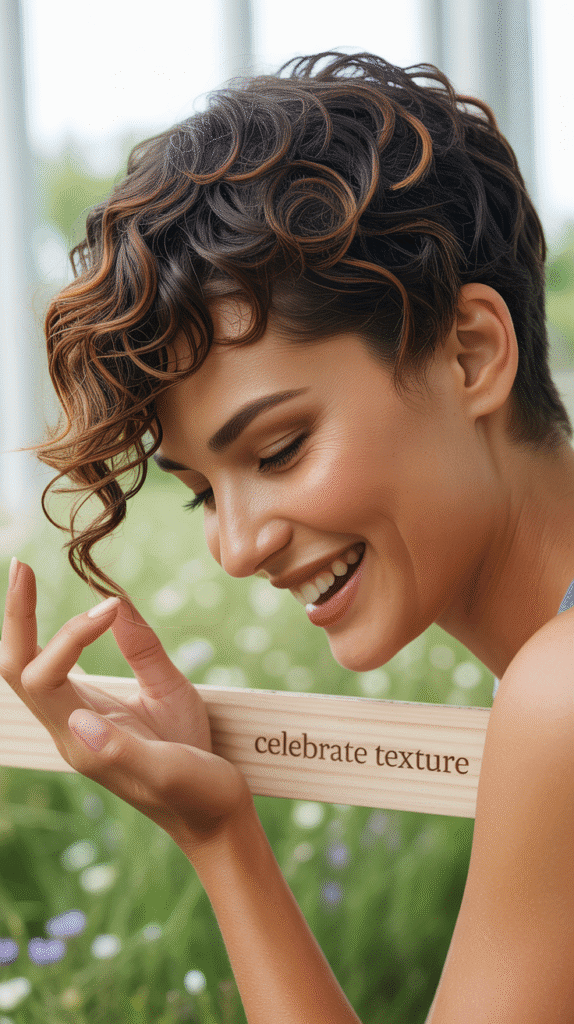
For naturally curly hair cut into a pixie, enhancing curl definition creates beautiful texture and volume.
The French approach celebrates natural curl patterns while adding strategic styling for polish.
Defining Natural Curls
- Apply a curl-defining cream or gel to soaking-wet hair immediately after washing.
- Use the “praying hands” method to smooth product over curls without disturbing the pattern.
- Scrunch curls gently upward to encourage their natural shape and add volume.
- Use a diffuser on low heat and speed to dry curls without creating frizz.
- Consider the “plopping” method—wrapping wet curls in a t-shirt—to enhance definition.
Maintaining Curl Health
- Deep condition curls weekly to maintain moisture and prevent frizz.
- Trim regularly to remove any damaged ends that could make curls appear frizzy.
- Sleep on a silk or satin pillowcase to minimize friction and preserve curl definition.
- Refresh curls between washes by misting with water and re-scrunching with a small amount of product.
- Embrace volume and fullness rather than trying to minimize your curls’ natural body.
25. The Accessorized Bob
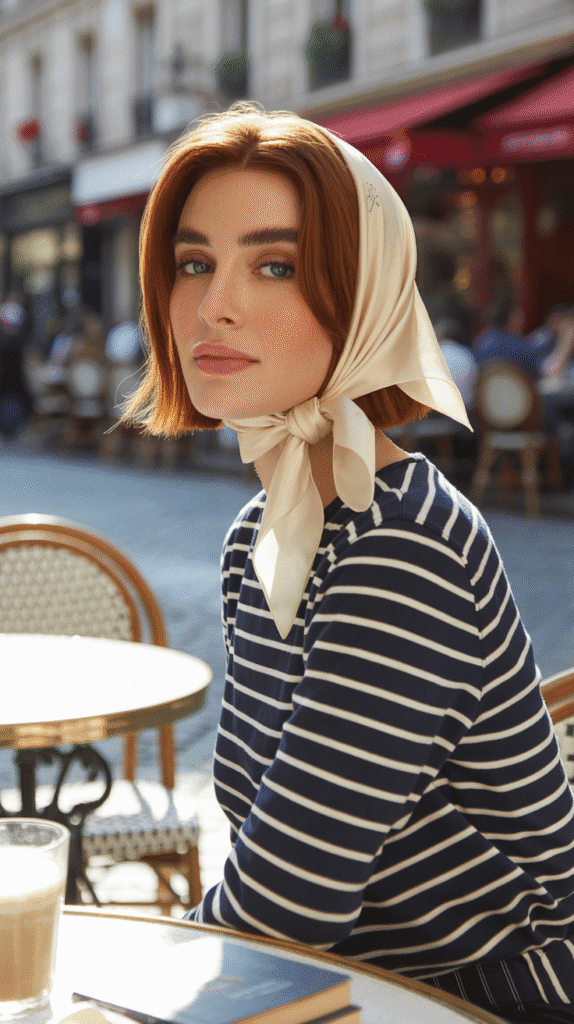
Strategic use of accessories transforms a simple bob into a statement hairstyle, adding personality and French flair without requiring complex styling techniques.
The key is choosing accessories that enhance rather than overpower your natural hair texture and style.
Choosing the Right Accessories
- Silk scarves tied as headbands create instant Parisian elegance and work beautifully with bobs of any length.
- Delicate metal barrettes or clips positioned at the side add subtle sophistication without appearing juvenile.
- Pearl or gold bobby pins arranged in geometric patterns transform functional pieces into decorative elements.
- Velvet or satin ribbon tied in a bow at the nape adds romantic femininity to low ponytails or half-up styles.
- Minimalist hair combs tucked into one side create polish while keeping hair off the face.
Placement and Styling Tips
- Position accessories slightly off-center rather than perfectly centered for a more modern, asymmetrical look.
- Layer multiple small accessories rather than using one large statement piece for French subtlety.
- Match accessory metals to your jewelry for a cohesive, intentional appearance.
- Use accessories to disguise bad hair days or cover areas where your hair won’t cooperate.
- Remove accessories for different looks throughout the day—wear them to work and remove for evening casualness.
26. Voluminous Crown with Sleek Ends
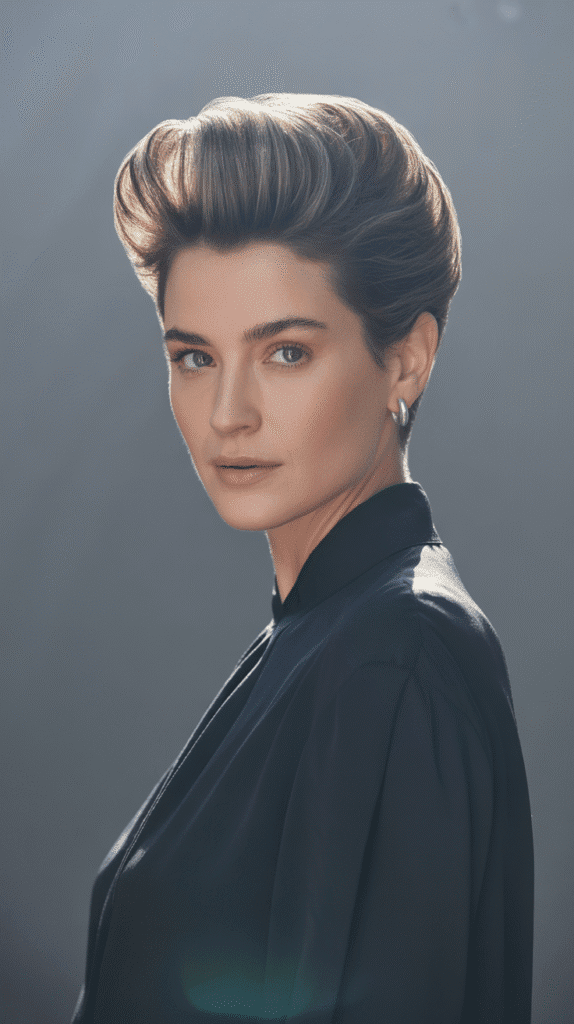
Creating dramatic volume at the crown while keeping ends sleek and polished produces a sophisticated contrast that adds height and elegance.
This technique works particularly well for fine or thin short hair that needs dimensional styling.
Building Crown Volume
- Apply volumizing powder or dry shampoo directly to the roots at the crown area.
- Section the crown area and backcomb gently at the roots to create a foundation for height.
- Smooth only the very top layer of hair over the backcombing to hide the teasing.
- Use a flat iron to create a slight inward bend at the root area for additional lift.
- Set the volume with hairspray applied from underneath while holding hair up.
Sleekening the Ends
- Apply a smoothing serum or lightweight oil to the mid-lengths and ends of your hair.
- Use a paddle brush while blow-drying to create sleekness and eliminate frizz.
- Finish ends with a flat iron for maximum smoothness and shine.
- Create a slight inward or outward bend at the very tips to prevent a blunt, harsh appearance.
- Apply shine spray specifically to the sleek sections to emphasize the contrast with the textured crown.
27. The Faux Hawk
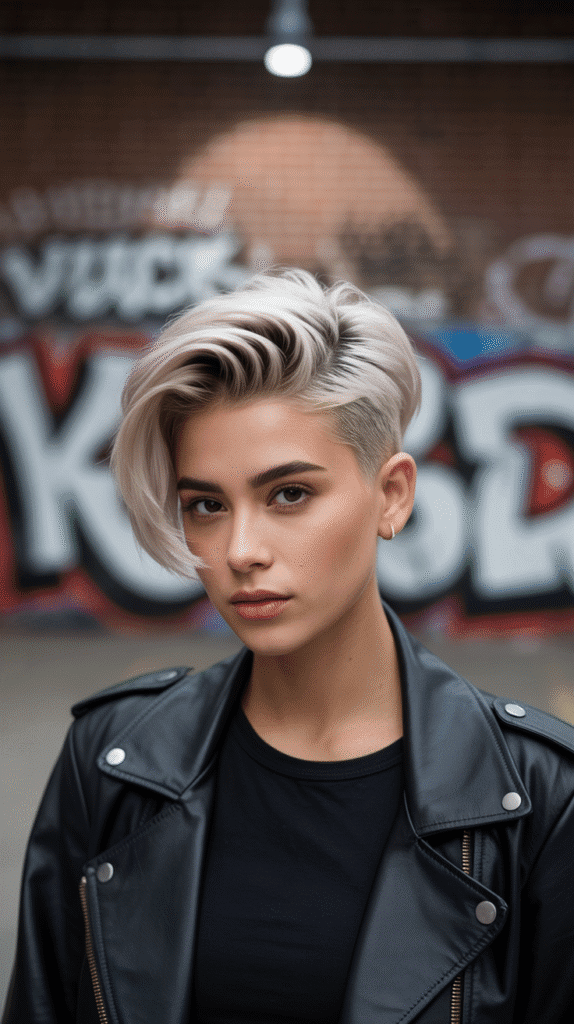
The faux hawk brings edgy, contemporary style to short hair by creating a mohawk-inspired silhouette without committing to shaved sides.
This bold look balances rock-and-roll attitude with feminine softness when styled with French finesse.
Creating the Faux Hawk Shape
- Apply strong-hold mousse to damp hair, focusing on the center section from front to back.
- Blow-dry the center section upward using your fingers or a round brush for lift.
- Smooth the sides down flat against your head using gel or pomade for contrast.
- Tease the center section at the roots to create additional height and fullness.
- Shape the lifted center section with your fingers, directing it slightly backward.
Styling Variations
- Create a softer version by making the center section less dramatically high.
- Add texture to the lifted section with piece-y separation rather than keeping it smooth.
- Incorporate braids along the smoothed sides for added detail and interest.
- Use temporary color spray on the faux hawk section for special occasions or events.
- Adjust the width of the center section based on your face shape and personal preference.
28. Asymmetrical Waves
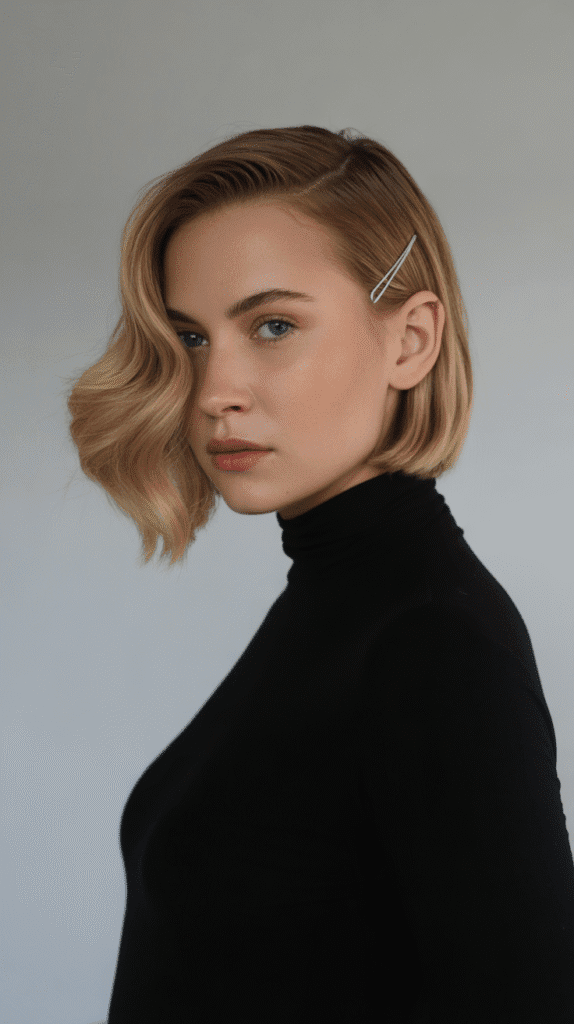
Asymmetrical styling creates visual interest by treating each side of your hair differently, with more dramatic waves or volume on one side.
This modern approach to short hair styling feels fresh and intentionally artistic.
Creating the Asymmetry
- Decide which side will feature more volume and texture, typically the side with more hair if you have a side part.
- Create defined waves on the fuller side using a curling iron or wand.
- Keep the opposite side relatively straight and sleek, either tucked behind the ear or smoothed down.
- Add more volume at the crown on the wavy side for additional dramatic effect.
- Use different products on each side—texturizing spray on the wavy side, smoothing serum on the sleek side.
Balancing the Look
- Ensure the contrast between sides is intentional and obvious rather than subtle.
- Consider your face shape when deciding which side should be fuller for the most flattering effect.
- Use this technique to work with natural growth patterns or cowlicks rather than fighting them.
- Adjust the degree of asymmetry based on the occasion—more dramatic for evening, subtle for professional settings.
- Refresh the style by re-curling the wavy side and re-smoothing the sleek side as needed throughout the day.
29. The Twisted Headband Effect
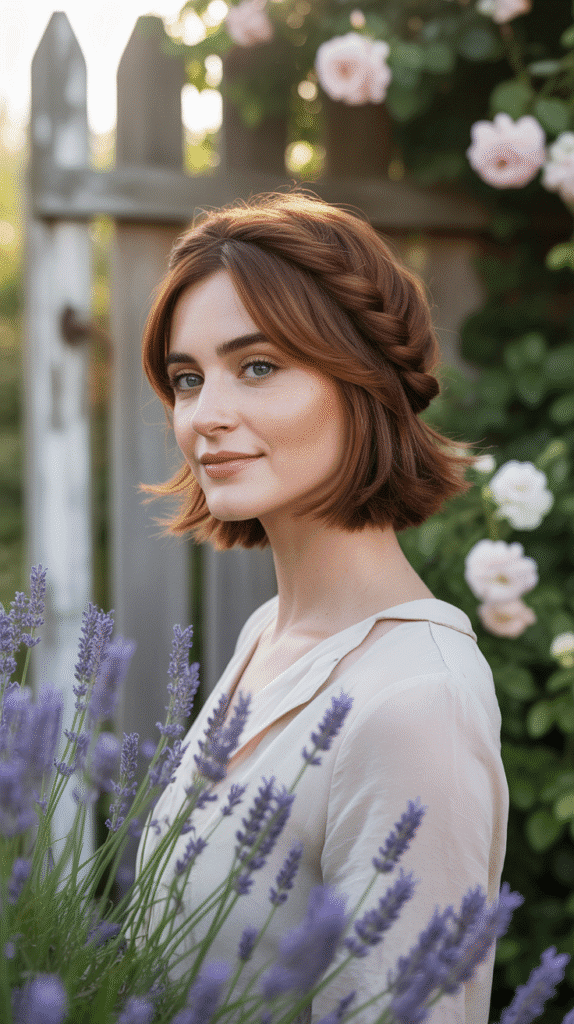
Creating a twisted headband using your own hair rather than an accessory produces an elegant, seamless look that keeps hair off your face while adding romantic detail.
This technique works beautifully for short to medium-length hair.
Creating the Twisted Headband
- Section out a small portion of hair from each temple, about an inch wide.
- Twist each section individually, moving toward the back of your head.
- Cross the twisted sections over each other at the back and secure with bobby pins.
- Tuck the ends of the twisted sections into the remaining hair or secure them underneath.
- Pull gently on the twists to loosen them slightly for a more relaxed appearance.
Styling the Remaining Hair
- Add texture to the hair below the twisted headband with waves or curls.
- Leave face-framing pieces loose in front of the twists for softness.
- Create additional small braids or twists to join the original twisted headband for more coverage.
- Pin small flowers or decorative elements where the twists meet at the back.
- Use this style to transition from day to evening by adding the twist to already-styled hair.
30. Retro Victory Rolls
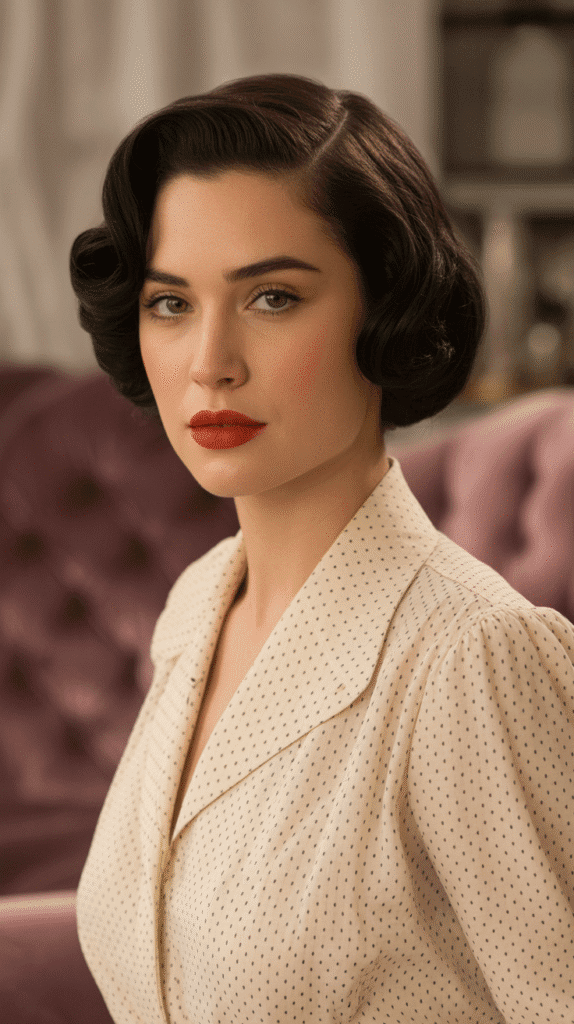
Victory rolls bring glamorous 1940s styling to contemporary short hair, creating sculptural volume at the front hairline.
Modern interpretations soften this vintage look while maintaining its distinctive shape and appeal.
Creating Victory Rolls
- Start with dry hair that has been set with mousse or styling spray for hold.
- Section the front portion of hair from your part to just behind your ear on each side.
- Backcomb each section at the roots for volume and to help the roll hold its shape.
- Roll each section backward toward your scalp, creating a tube-shaped roll that sits above the hairline.
- Secure each roll with bobby pins inserted both horizontally and vertically for stability.
Modernizing the Classic Style
- Create looser, less structured rolls for a contemporary interpretation.
- Make rolls on just one side rather than both for an asymmetrical modern twist.
- Combine victory rolls with textured, messy hair in the back instead of structured curls.
- Use this style for special occasions rather than everyday wear to maintain its impact.
- Finish with strong-hold hairspray to ensure the rolls maintain their shape throughout your event.
31. The Choppy Shag
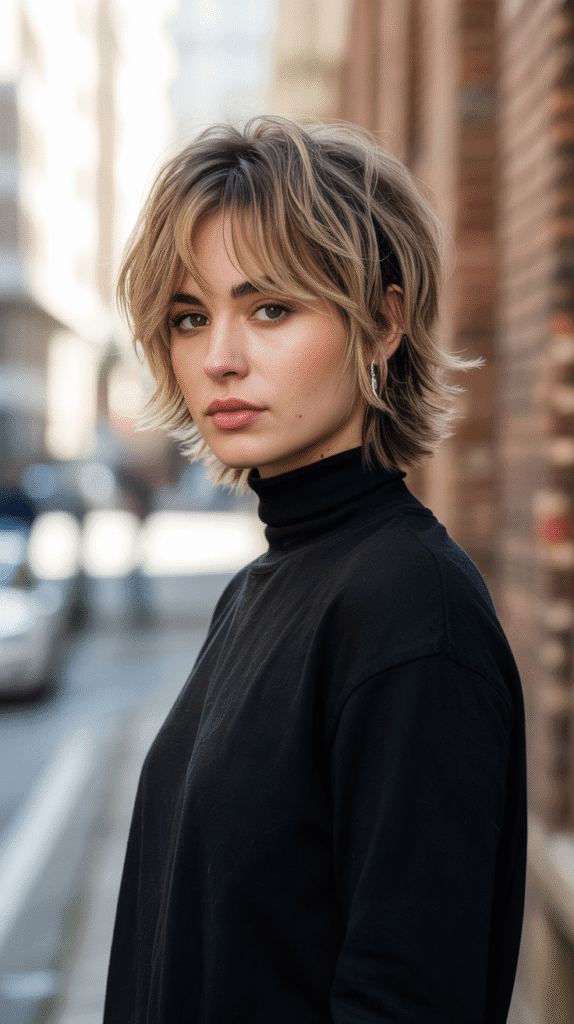
The choppy shag embraces layers, texture, and deliberate unevenness to create a cool, lived-in aesthetic.
This cut and styling approach epitomizes the French philosophy of effortless beauty through strategic imperfection.
Styling the Shag
- Apply texturizing spray or sea salt spray to damp hair before styling.
- Blow-dry hair in various directions using your fingers to enhance the choppy layers.
- Use a small amount of matte pomade on individual pieces to create separation and definition.
- Focus on creating volume at the crown while allowing the layers to fall naturally around the face.
- Embrace the messy, undone quality rather than trying to perfect or control every section.
Emphasizing the Layers
- Ask your stylist for point-cutting or razor-cutting techniques to enhance the choppy texture.
- Add subtle highlights or lowlights to emphasize the dimensional layers.
- Style different layers in different directions for maximum movement and interest.
- Refresh the style between washes by misting with water and re-applying texturizing product.
- Consider getting regular “dusting” trims every 6-8 weeks to maintain the shape without losing length.
32. Elegant Side Chignon
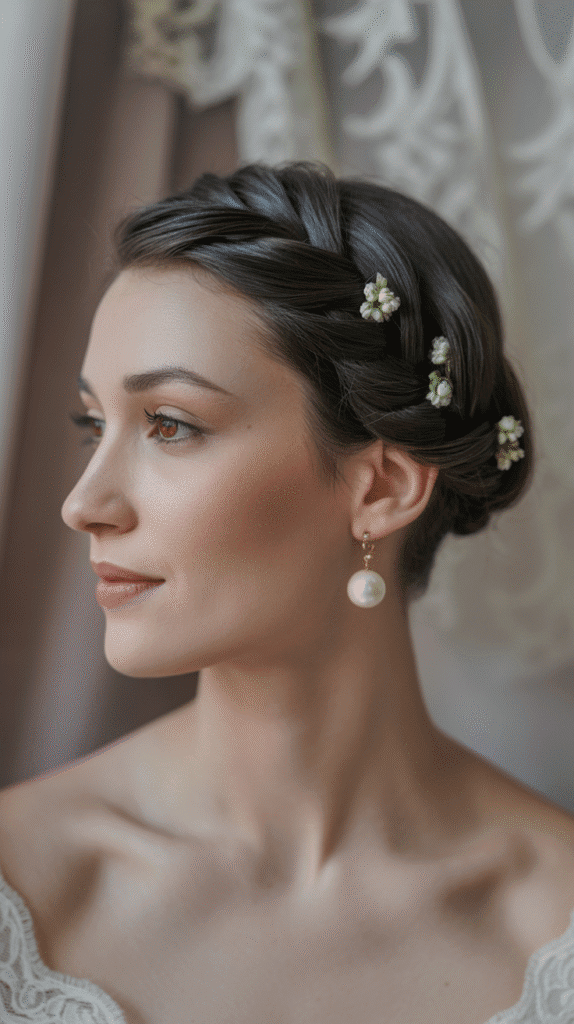
The side chignon offers a romantic alternative to center-back updos, creating an asymmetrical focal point that’s perfect for weddings and formal events.
This style manages to be both structured and soft simultaneously.
Constructing the Side Chignon
- Gather all hair to one side at the nape, below and behind your ear.
- Divide the gathered hair into two or three sections for twisting.
- Twist each section individually before coiling it into a bun shape at the side.
- Pin each twisted section securely, building the chignon in layers.
- Leave strategic wispy pieces loose around your face and at the nape for romantic softness.
Adding Special Occasion Details
- Weave a delicate ribbon through the chignon for color and texture contrast.
- Position fresh flowers or decorative pins throughout the updo for wedding-appropriate elegance.
- Create a small braid to wrap around the base of the chignon as a finishing detail.
- Apply shine spray for a polished, glossy appearance suitable for photographs.
- Consider having a professional stylist create this look for important events to ensure longevity and security.
33. The Natural Texture Embrace
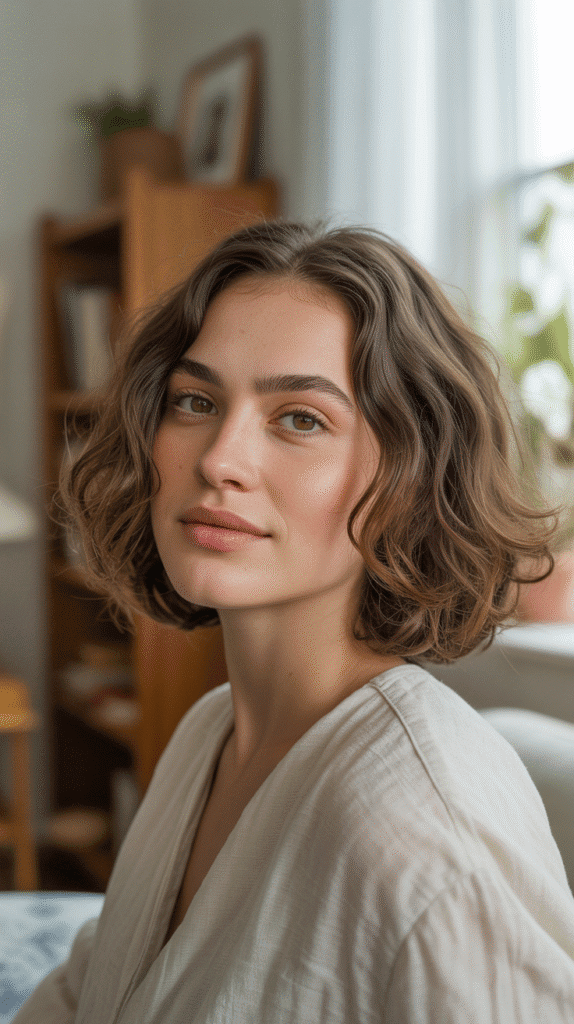
The ultimate French hairstyle for short hair involves celebrating your hair’s natural texture with minimal manipulation and maximum authenticity.
This approach prioritizes hair health and natural beauty over forced styling.
Working With Your Natural Texture
- Identify your hair’s natural pattern—straight, wavy, curly, or somewhere in between—and choose products that enhance it.
- Wash hair with sulfate-free products and condition appropriately for your texture type.
- Apply leave-in treatments while hair is still damp to provide moisture and definition.
- Allow hair to air-dry whenever possible, or use a diffuser on low heat for gentle drying.
- Resist the urge to constantly manipulate or “fix” your hair throughout the day.
Minimal Styling Approach
- Use your fingers instead of brushes or combs to maintain natural texture and prevent frizz.
- Apply products sparingly—less is more when working with natural texture.
- Refresh hair between washes with water mist and a small amount of product rather than re-washing.
- Get regular trims to maintain shape and remove damaged ends that could make natural texture appear messy.
- Embrace variations in texture and pattern throughout your head rather than forcing uniformity.
Conclusion
Mastering 33 Easy French Hairstyles for Short Hair That Look Modern and Fresh opens up a world of styling possibilities that prove short hair is anything but limiting.
From the effortlessly textured bob and romantic braided accents to bold faux hawks and elegant chignons, each style in this collection demonstrates the French philosophy of balancing sophistication with ease, polish with imperfection, and structure with natural movement.
The beauty of these hairstyles lies not in achieving perfection but in celebrating authenticity—working with your hair’s natural texture, embracing strategic messiness, and choosing styles that reflect your personal aesthetic while remaining practical for daily life.
Whether you’re preparing for a special occasion or simply refreshing your everyday look, these French-inspired techniques offer the tools to transform your short hair into a canvas for creative expression.
Remember that the most essential element of French styling isn’t a specific product or technique but rather an attitude: confidence in simplicity, appreciation for natural beauty, and the courage to look effortlessly chic rather than overly styled.
By incorporating these approaches into your hair routine, you’ll discover that short hair can be just as versatile, romantic, and captivating as any longer length—perhaps even more so when styled with French-inspired intention and ease.
