
Have you ever scrolled through social media and felt mesmerized by those dreamy, fairytale-inspired hairstyles that seem impossible to recreate?
The good news is that whimsical hairstyles are far more accessible than you might think, and they’re about to become your new favorite way to express creativity through your locks.
Whether you’re preparing for a special occasion, looking to add magic to your everyday routine, or simply want to experiment with playful styles, 30 Step-by-Step Whimsical Hairstyle Tutorials Anyone Can Try will guide you through enchanting looks that range from delicate braided crowns to romantic loose waves adorned with flowers.
This comprehensive guide breaks down each tutorial into manageable steps, ensuring that beginners and experienced hairstylists alike can achieve stunning results without frustration.
You’ll discover techniques for creating ethereal updos, bohemian-inspired braids, vintage-inspired rolls, and modern twists on classic styles that bring a touch of fantasy to reality.
Each tutorial is designed with clarity in mind, featuring detailed instructions that transform complex-looking styles into achievable masterpieces you can proudly wear.
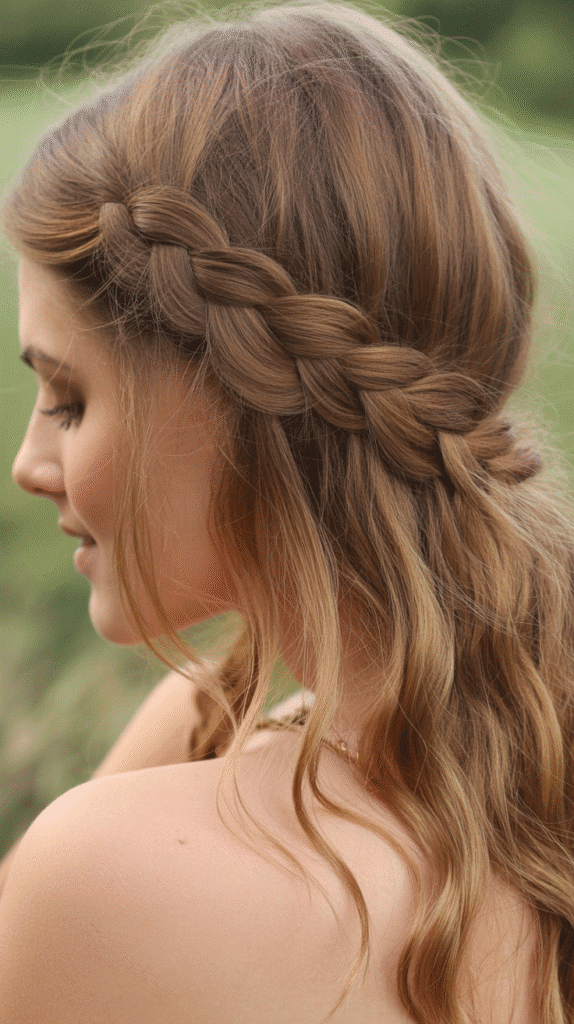
1. The Ethereal Flower Crown Braid
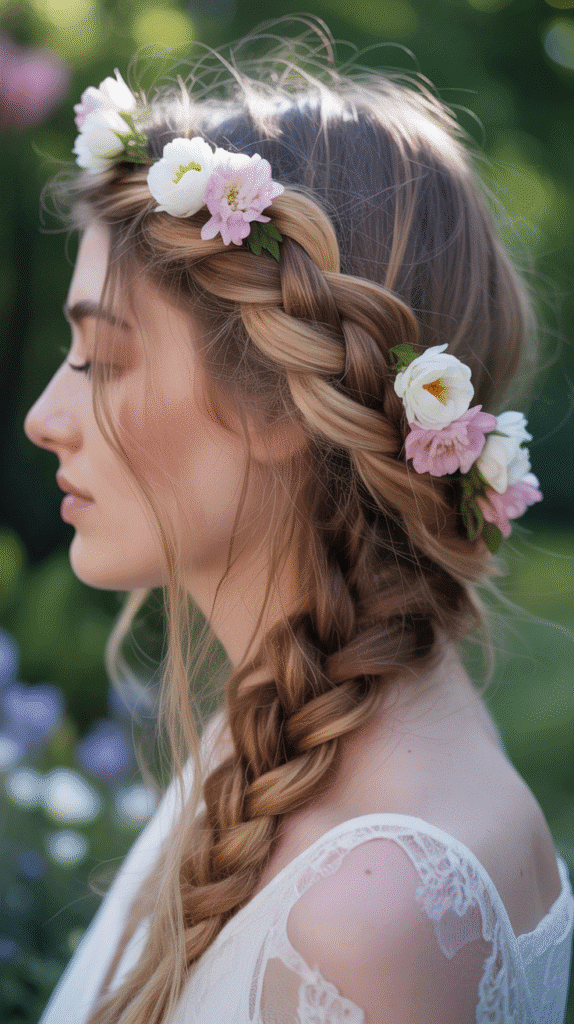
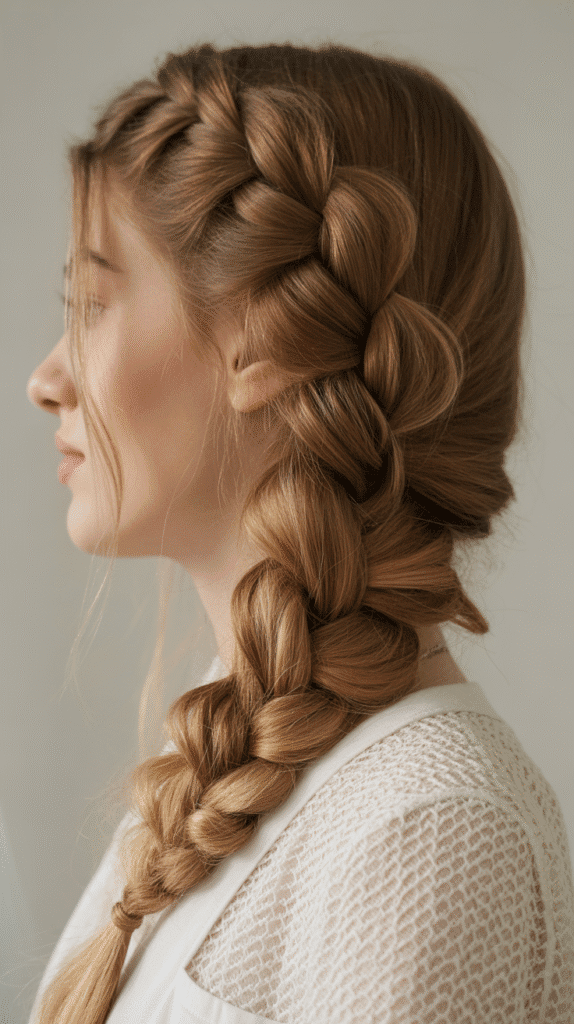
The flower crown braid combines the timeless elegance of a halo braid with the delicate placement of fresh or artificial flowers, creating a look that’s perfect for weddings, festivals, or garden parties.
This style works beautifully on medium to long hair and can be adapted for various hair textures.
Step-by-Step Instructions:
- Start with clean, dry hair that has a slight texture (you can add texturizing spray if your hair is very smooth).
- Create a deep side part on your preferred side.
- Take a small section of hair from the heavier side of the part, near your hairline.
- Begin a Dutch braid (reverse French braid) by crossing sections under rather than over.
- Continue the braid along your hairline, following the natural curve of your head like a crown.
- Add small sections of hair to the braid as you work around the back of your head.
- When you reach the opposite ear, continue braiding without adding new sections until you reach the end.
- Secure the braid with a clear elastic band.
- Gently pull at the edges of the braid to create a fuller, more romantic appearance.
- Tuck the tail of the braid underneath the crown section and pin it securely.
- Insert small flowers (baby’s breath, daisies, or roses work beautifully) into the braid at intervals.
- Set the style with a light-hold hairspray.
2. Mermaid Waves with Pearl Accessories
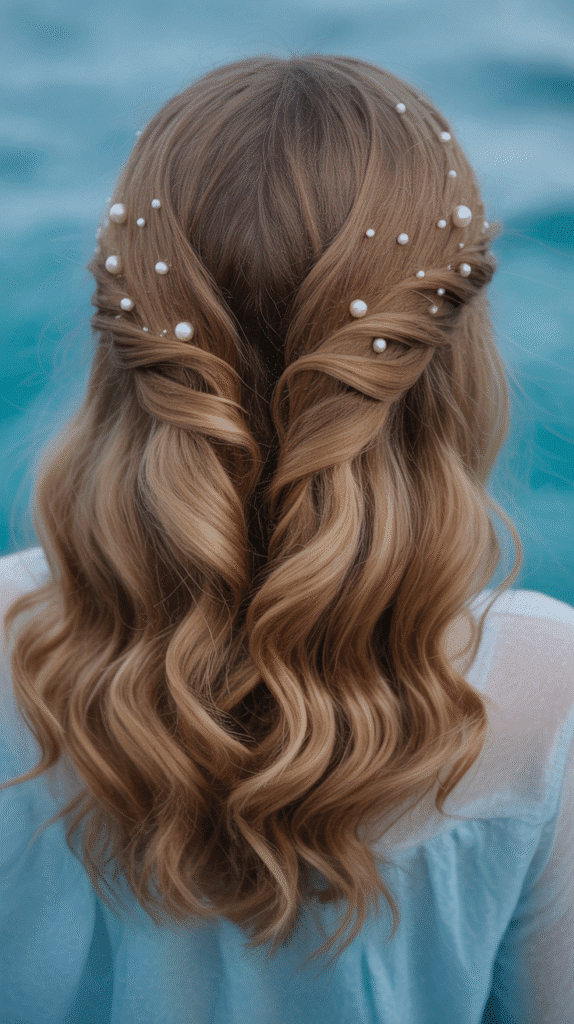
Mermaid waves evoke the mystical beauty of ocean dwellers with their loose, flowing texture and strategic placement of pearl hair accessories.
This style creates movement and dimension while maintaining an effortlessly romantic appearance.
Step-by-Step Instructions:
- Begin with damp hair and apply a sea salt spray for texture.
- Divide your hair into four equal sections.
- Take one section and twist it tightly from root to tip.
- Wrap the twisted section into a bun and secure it with a hair tie.
- Repeat with all remaining sections.
- Allow hair to air dry completely (or use a diffuser on low heat for faster results).
- Once dry, carefully release each bun and gently separate the waves with your fingers.
- Avoid brushing, as this will create frizz rather than defined waves.
- Take small pearl hair pins or decorative pearl clips.
- Place them strategically throughout your hair, concentrating on one side for asymmetrical elegance.
- Create varying heights and patterns with the pearl placement.
- Finish with a shine-enhancing serum on the mid-lengths and ends.
- Optional: Add a pearl hair comb behind one ear for extra whimsy.
3. The Romantic Twisted Low Bun
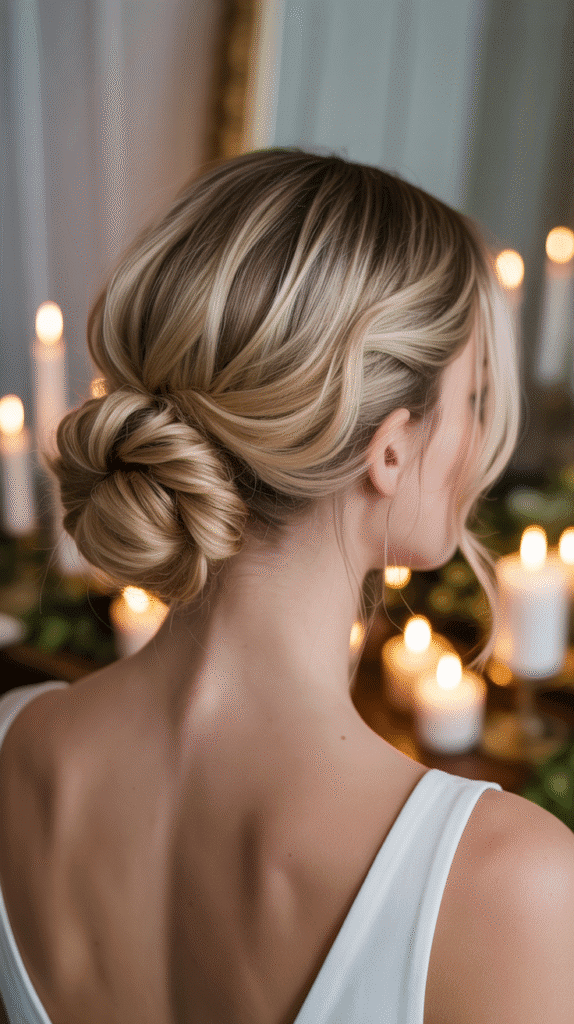
The romantic twisted low bun offers sophisticated simplicity with its elegant twists and soft, face-framing pieces that create a timeless look suitable for formal events or elevated everyday wear.
Step-by-Step Instructions:
- Start with second-day hair or add dry shampoo for grip and texture.
- Create a deep side part.
- Leave two face-framing pieces out on each side of your face.
- Gather all remaining hair at the nape of your neck.
- Divide the ponytail into two equal sections.
- Twist each section clockwise until it begins to coil on itself.
- Wrap the two twisted sections around each other counterclockwise.
- Continue wrapping until you create a rope-like texture.
- Coil the twisted rope around the base to form a low bun.
- Secure with bobby pins, hiding them within the twists.
- Gently pull at the bun to create strategic looseness and volume.
- Take the face-framing pieces and loosely curl them away from your face.
- Allow a few wispy pieces to fall naturally for a softer finish.
- Set with flexible-hold hairspray.
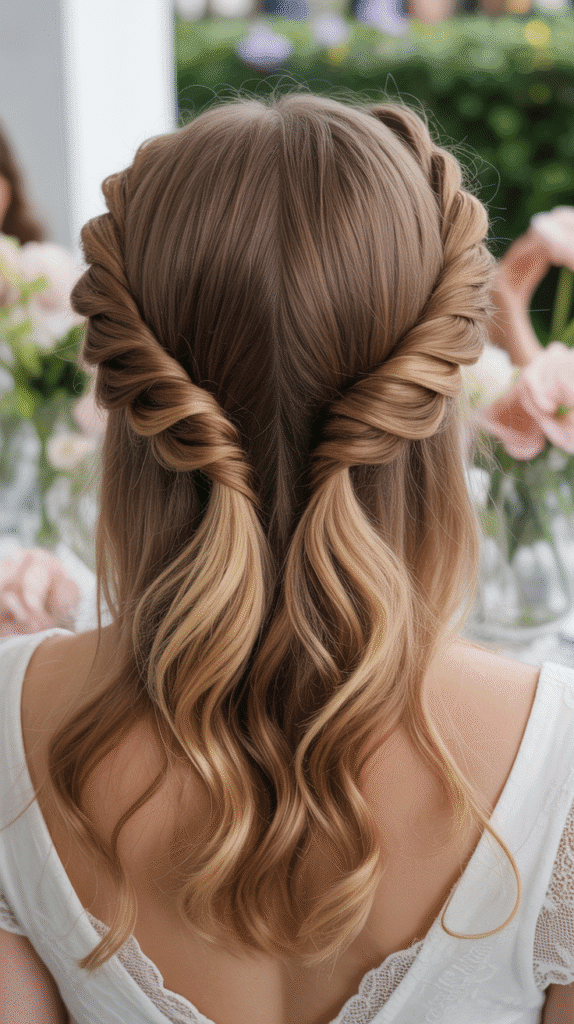
4. The Fairy Tale Half-Up Bubble Ponytail
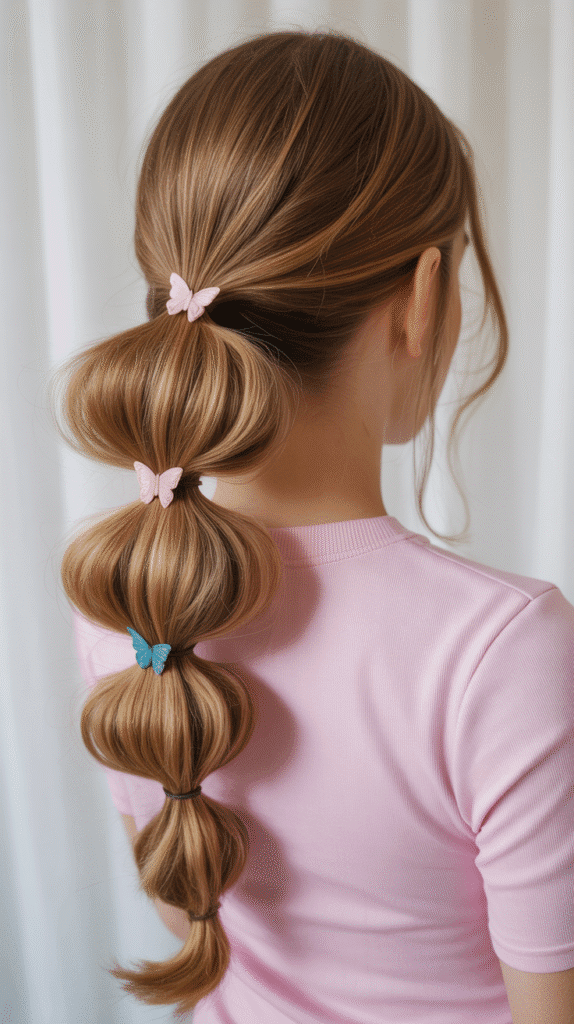
The half-up bubble ponytail transforms a simple ponytail into a playful, voluminous style through strategic sectioning and teasing, creating spherical “bubbles” that add dimension and whimsy.
Step-by-Step Instructions:
- Start with brushed, tangle-free hair.
- Section the top half of your hair from ear to ear.
- Gather this top section and secure it with a clear elastic at crown level.
- Gently tease the ponytail at the base for added volume.
- Measure approximately two inches down from the first elastic.
- Secure another clear elastic at this point.
- Gently pull and pancake the section between the two elastics to create a bubble shape.
- Continue adding elastics every two inches down the length of the ponytail.
- Create bubbles between each elastic by gently pulling the hair outward.
- Ensure each bubble is roughly the same size for uniform appearance.
- Optional: Wrap small sections of hair around each elastic to conceal them.
- Add small decorative clips or ribbons between bubbles for extra whimsy.
- Leave the bottom portion of hair loose and flowing.
- Finish with light-hold hairspray to maintain bubble structure.
5. The Bohemian Waterfall Braid
The waterfall braid creates the illusion of hair cascading through a braid like water flowing over rocks, resulting in a romantic, bohemian style that works beautifully for casual and formal occasions alike.
Step-by-Step Instructions:
- Begin with wavy or curled hair for the best visual effect.
- Create a side part on your preferred side.
- Take a three-strand section near your part at the front of your head.
- Begin a standard three-strand braid with one complete stitch.
- On the second stitch, drop the bottom strand and let it fall.
- Pick up a new section of hair from above to replace the dropped strand.
- Continue braiding across, always dropping the bottom strand and replacing it.
- The dropped strands create the “waterfall” effect cascading through the braid.
- Braid horizontally across the back of your head toward the opposite ear.
- Maintain consistent tension for even spacing between dropped strands.
- When you reach the opposite side, secure the braid with a small clear elastic.
- Optional: Create a second waterfall braid parallel to the first for added dimension.
- Gently pull at the braid edges to create a softer, more romantic appearance.
- The cascading strands naturally blend with the rest of your hair.
6. The Vintage Victory Rolls
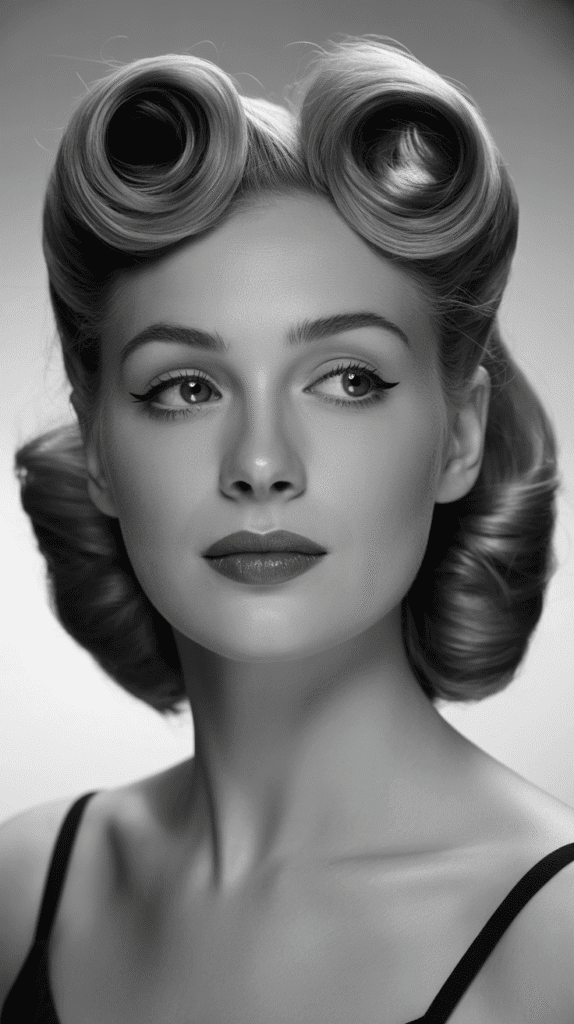
Victory rolls originated in the 1940s and bring vintage glamour with rolled sections at the front of the hair that frame the face with sculptural elegance and retro sophistication.
Step-by-Step Instructions:
- Start with completely dry hair that has been set with hot rollers or a curling iron.
- Apply a strong-hold mousse throughout your hair for grip.
- Create a center part or slightly off-center depending on preference.
- Section off the front portion of hair on one side, from part to ear.
- Comb this section upward and slightly backward.
- Place your fingers at the root and roll the section forward toward your face.
- Continue rolling until you create a cylindrical shape.
- Secure the roll against your head with bobby pins inserted vertically.
- Repeat the exact process on the opposite side.
- Ensure both rolls are symmetrical in size and placement.
- Smooth any flyaways with a fine-tooth comb and strong-hold gel.
- Style the remaining hair in your preferred way (curls, waves, or an updo).
- Set the entire style with firm-hold hairspray.
- The rolls should feel secure and maintain their shape throughout the day.
7. The Garden Party Twisted Crown
The twisted crown creates an elegant halo effect using simple two-strand twists from both sides that meet at the back, perfect for showcasing face features while maintaining romantic softness.
Step-by-Step Instructions:
- Begin with lightly textured hair (add texturizing spray if needed).
- Create a center part from forehead to crown.
- Take a two-inch section from the front of your part on one side.
- Divide this section into two equal strands.
- Twist the two strands around each other, moving toward the back of your head.
- As you twist, gradually add small sections of hair from below into the twist.
- Continue the twisting process along your hairline toward the back.
- Secure the twist temporarily with a clip when you reach behind your ear.
- Repeat the identical process on the opposite side.
- Both twists should meet at the center back of your head.
- Cross the twists over each other and secure with bobby pins.
- Tuck the ends under and pin them discretely.
- Gently pull at the twists to create fullness and texture.
- Leave the remaining hair down in loose waves or curls.
8. The Storybook Milkmaid Braids
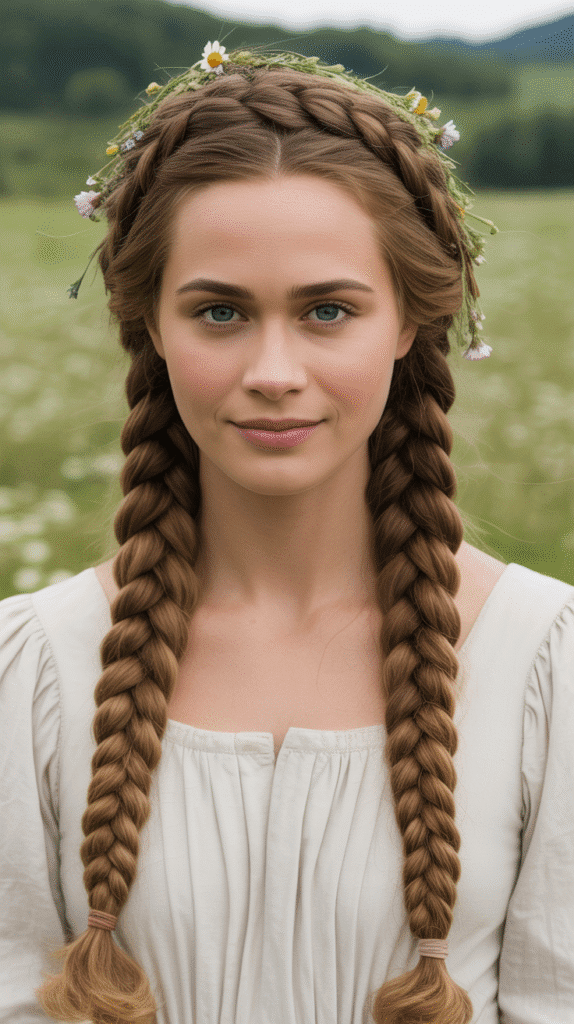
Milkmaid braids evoke pastoral charm with two braids wrapped around the head like a crown, creating a look that’s both practical and enchantingly whimsical for any outdoor adventure.
Step-by-Step Instructions:
- Start with brushed, tangle-free hair.
- Create a center part from forehead all the way to the nape.
- Divide your hair into two equal sections.
- Braid each section into a traditional three-strand braid.
- Secure each braid end with a clear elastic band.
- Take the right braid and bring it across the top of your head.
- Position it along your hairline like a headband.
- Secure it with bobby pins every few inches.
- Take the left braid and cross it over the top of the right braid.
- Continue pinning it securely in place.
- Tuck the end of each braid underneath the opposite braid.
- Hide all elastic bands and ends with strategic pinning.
- Gently pull at the braids to create a fuller, more relaxed appearance.
- Add small flowers or decorative pins for extra whimsy.
9. The Celestial Space Buns with Glitter
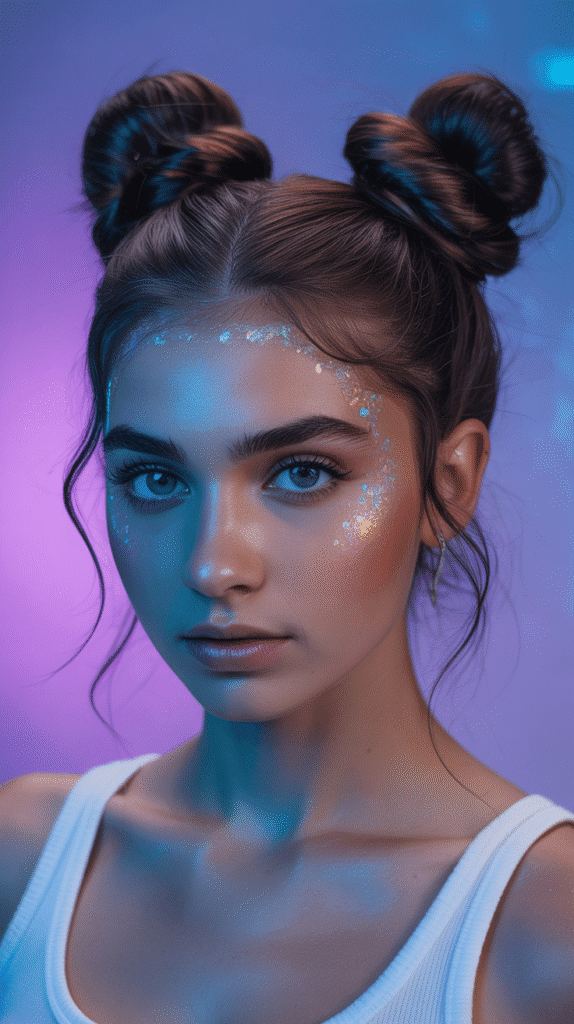
Space buns bring playful energy with two high buns positioned symmetrically on the head, elevated to whimsical perfection with strategic glitter placement for a cosmic, festival-ready appearance.
Step-by-Step Instructions:
- Begin with straightened or naturally smooth hair.
- Create a center part from forehead to nape, dividing hair into two equal sections.
- Gather the first section high on your head at a 45-degree angle.
- Secure it with a hair elastic to create a high ponytail.
- Twist the ponytail tightly until it begins to coil.
- Wrap the twisted ponytail around its base in a circular motion.
- Secure the bun with bobby pins inserted at various angles.
- Repeat the process on the opposite side.
- Ensure both buns are positioned at equal heights.
- Apply hair gel to your roots and any flyaways for a sleek appearance.
- Use cosmetic-grade hair glitter in your chosen color (silver, gold, or holographic).
- Apply the glitter to your part, around the buns, and along your hairline.
- Optional: Add glitter directly to the surface of the buns.
- Set everything with strong-hold hairspray to keep glitter in place.
10. The Enchanted Forest Loose Fishtail
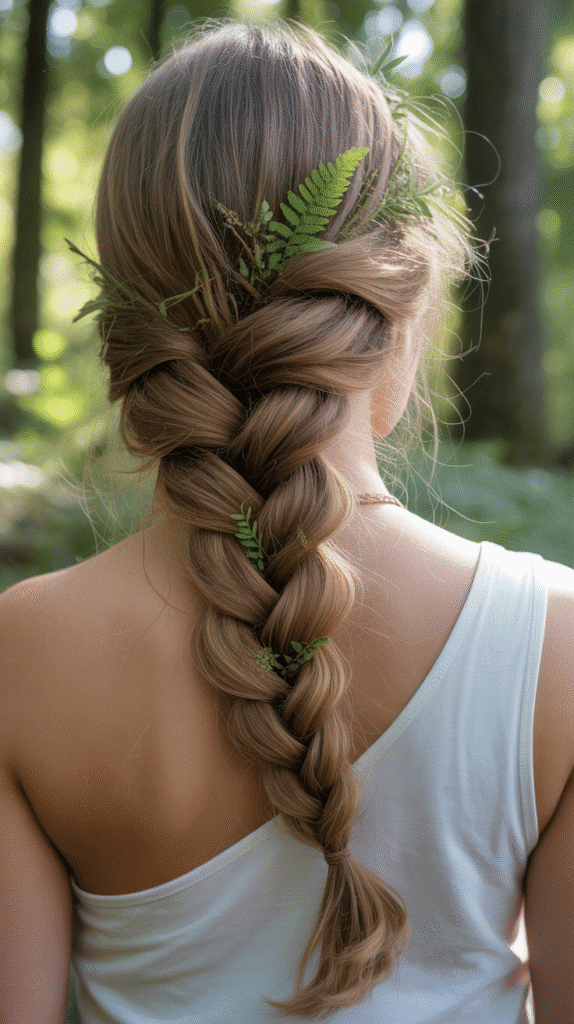
The loose fishtail braid offers intricate texture with a relaxed, undone quality that suggests forest-dwelling elegance, especially when adorned with natural elements like small branches or greenery.
Step-by-Step Instructions:
- Start with dry, textured hair (apply dry shampoo if hair is too clean and slippery).
- Brush hair thoroughly to remove all tangles.
- Gather all hair to one side and divide it into two equal sections.
- Take a thin strand from the outer edge of the right section.
- Cross it over to join the left section.
- Take a thin strand from the outer edge of the left section.
- Cross it over to join the right section.
- Continue this alternating pattern down the length of your hair.
- Maintain consistent strand thickness for uniform texture.
- Secure the end with a clear elastic band.
- Gently pull at the edges of the braid, loosening it significantly.
- This pancaking creates the signature loose, romantic appearance.
- Tuck small sprigs of greenery, ferns, or delicate branches into the braid.
- Allow some wispy pieces to frame your face naturally.
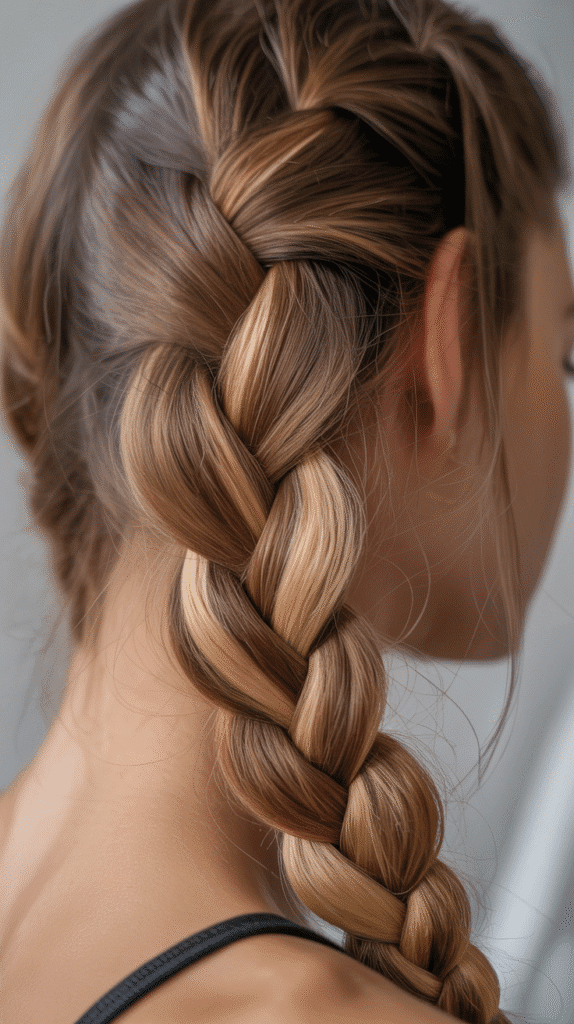
11. The Whimsical Rope Braid Ponytail
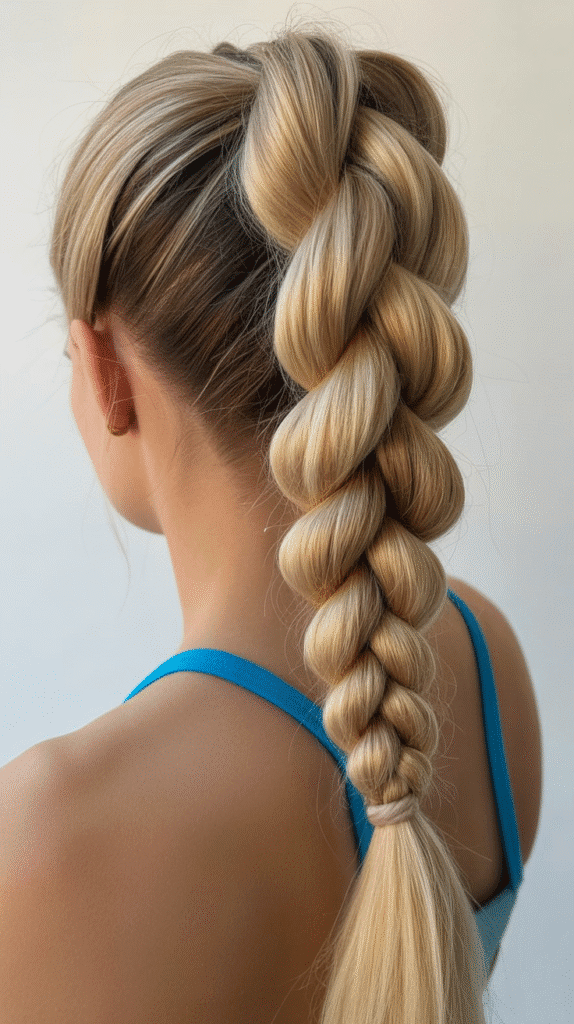
The rope braid ponytail combines the simplicity of a ponytail with the textured elegance of a rope braid, creating a style that’s both sophisticated and easy to achieve for any skill level.
Step-by-Step Instructions:
- Gather all hair into a ponytail at your desired height.
- Secure the ponytail with a strong elastic band.
- Divide the ponytail into two equal sections.
- Twist the right section clockwise until it’s tightly twisted from base to end.
- Twist the left section clockwise in the same manner.
- Hold both twisted sections firmly to prevent them from unraveling.
- Wrap the two sections around each other counterclockwise.
- The opposite direction creates the rope appearance and prevents unraveling.
- Continue wrapping until you reach the ends.
- Secure with another elastic band.
- The rope braid will naturally want to stay twisted due to the tension.
- Gently pull at the rope to create slight fullness without destroying the structure.
- Wrap a small section of hair around the elastic at the base to conceal it.
- Finish with light-hold hairspray for lasting wear.
12. The Dreamy Double Dutch Braids
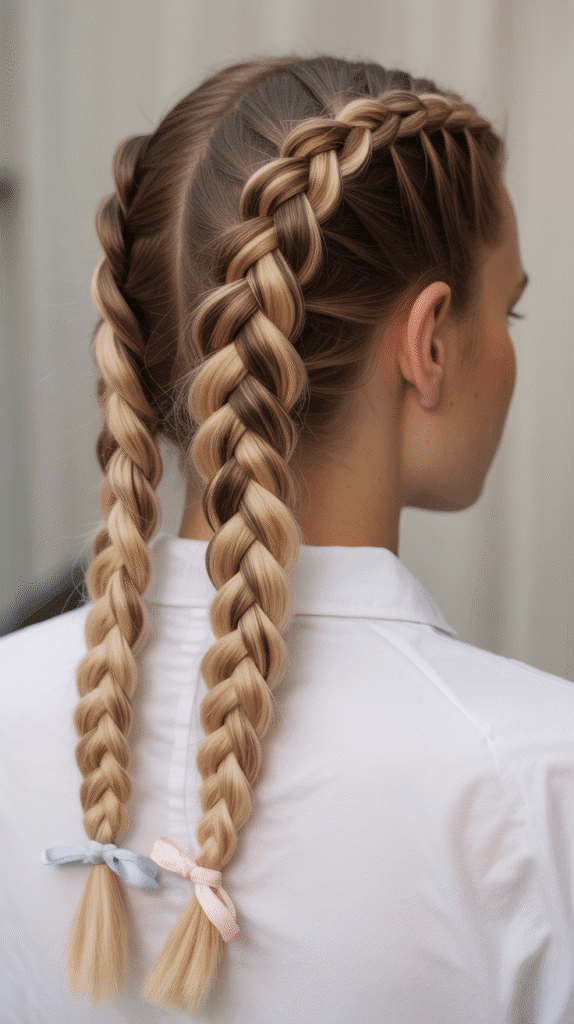
Double Dutch braids create athletic elegance with two raised braids that sit prominently on the head, offering a practical yet stylish option that maintains its whimsy through strategic loosening and accessorizing.
Step-by-Step Instructions:
- Start with slightly damp or dry textured hair.
- Create a precise center part from forehead to nape.
- Clip one section away to work on one side at a time.
- Beginning at the hairline, take a small three-strand section.
- Start a Dutch braid by crossing strands under (not over) the middle strand.
- Add small sections of hair to the braid with each stitch.
- Continue braiding straight down, following the natural line from part to nape.
- Maintain consistent tension for a neat, raised braid.
- Secure the end with a clear elastic when you run out of hair to add.
- Continue braiding the remaining length in a standard three-strand pattern.
- Repeat the entire process on the opposite side.
- Both braids should be symmetrical and equally tight.
- Gently pull at the edges of both braids to create fullness.
- Optional: Weave ribbon through the braids for added whimsy.
13. The Romantic Rolled Updo
The rolled updo channels vintage sophistication through strategic rolling and pinning techniques that create an elegant gathered style perfect for formal occasions requiring refined whimsy.
Step-by-Step Instructions:
- Begin with hair that has been set with hot rollers for body and hold.
- Apply volumizing mousse at the roots.
- Section the front portion of hair from ear to ear.
- Clip this section away temporarily.
- Gather the back section at the nape and twist it upward.
- Roll the twisted section inward toward your scalp.
- Pin the roll securely against your head with bobby pins inserted horizontally.
- Take the front section and divide it into three parts.
- Lightly backcomb each part at the roots for volume.
- Smooth the surface of each section over the backcombing.
- Roll each section backward and pin it into the main updo.
- Create a cohesive rolled shape at the back of your head.
- Pull a few small pieces around your face for softness.
- Set the entire style with firm-hold hairspray.
14. The Butterfly Braid Creation
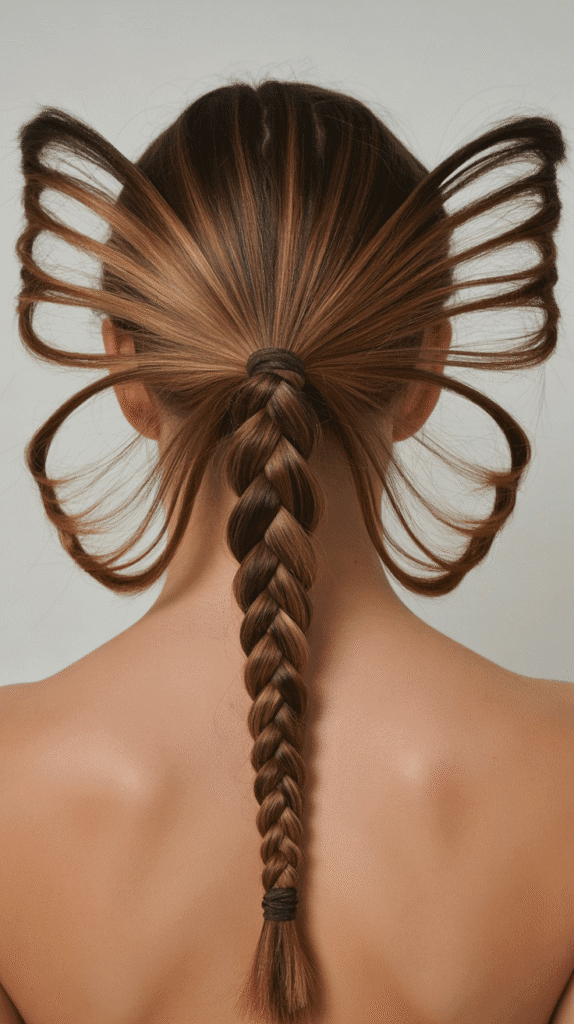
The butterfly braid creates dimensional sections that resemble butterfly wings through strategic pulling and shaping of a Dutch lace braid, resulting in a statement style with artistic flair.
Step-by-Step Instructions:
- Start with straightened, smooth hair for clean sections.
- Take a section of hair from the top center of your head.
- Begin a Dutch lace braid down the center back.
- Add hair only from one side with each stitch (this creates the lace effect).
- Braid approximately two inches, then secure temporarily with a small clip.
- Gently pull at the outer edges of this section to create wing shapes.
- The pulled sections should be dramatic and pronounced.
- Continue the braid another two inches and repeat the pulling process.
- Each pulled section creates one “butterfly” along the braid.
- Continue this pattern down the length of your hair.
- Secure the end with a clear elastic.
- Each butterfly section should be similar in size and shape.
- The center braid should remain tight while the wings are loose.
- Finish with strong-hold hairspray to maintain the butterfly shapes.
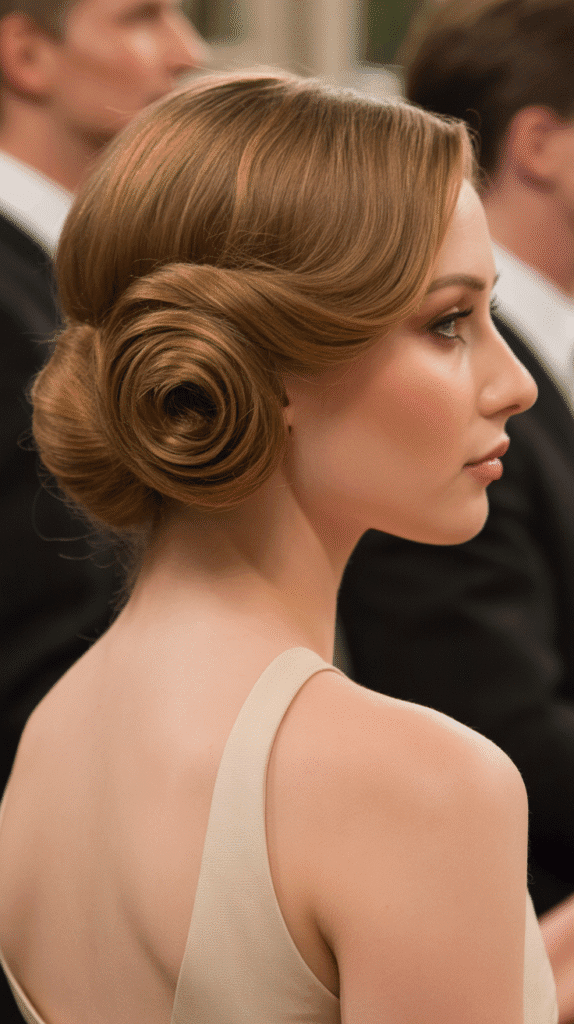
15. The Twisted Flower Bun
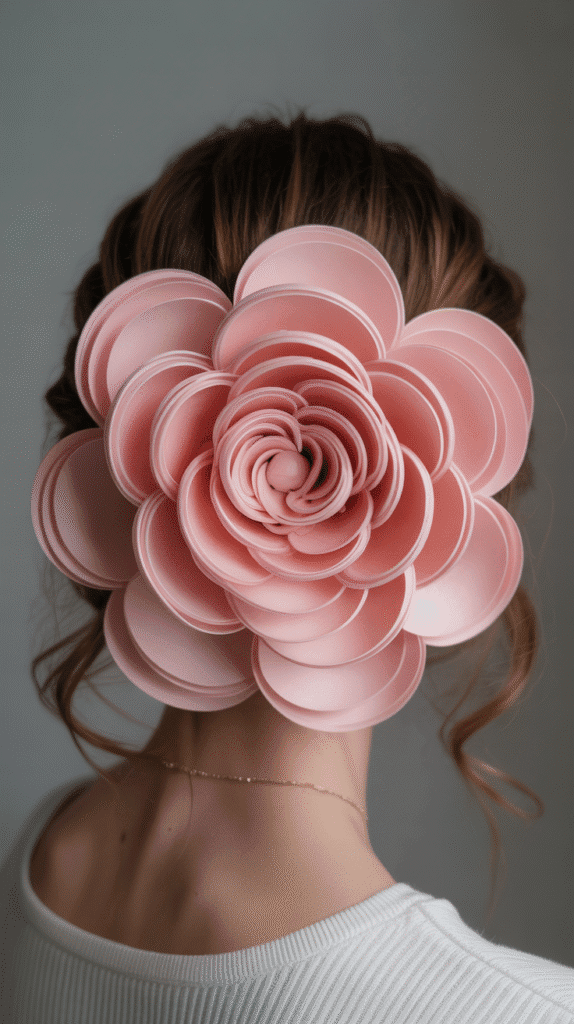
The twisted flower bun transforms a simple bun into a blooming rose through spiral twisting and strategic pinning that creates petal-like sections for a truly enchanting focal point.
Step-by-Step Instructions:
- Gather all hair into a high ponytail and secure with an elastic.
- Divide the ponytail into five equal sections.
- Take the first section and twist it tightly from base to end.
- Wrap this twisted section around the base in a circular motion.
- Pin the end underneath the base with bobby pins.
- Take the second section and twist it similarly.
- Wrap it around the existing center, creating a second layer.
- Continue with the remaining three sections.
- Each section should spiral around the previous layers.
- Arrange the twisted sections to create petal-like shapes.
- Pin each “petal” to maintain its position.
- Gently pull at the twists to create fuller, more defined petals.
- The finished bun should resemble a blooming flower.
- Set with light-hold hairspray to maintain the structure.
16. The Side-Swept Braided Romance
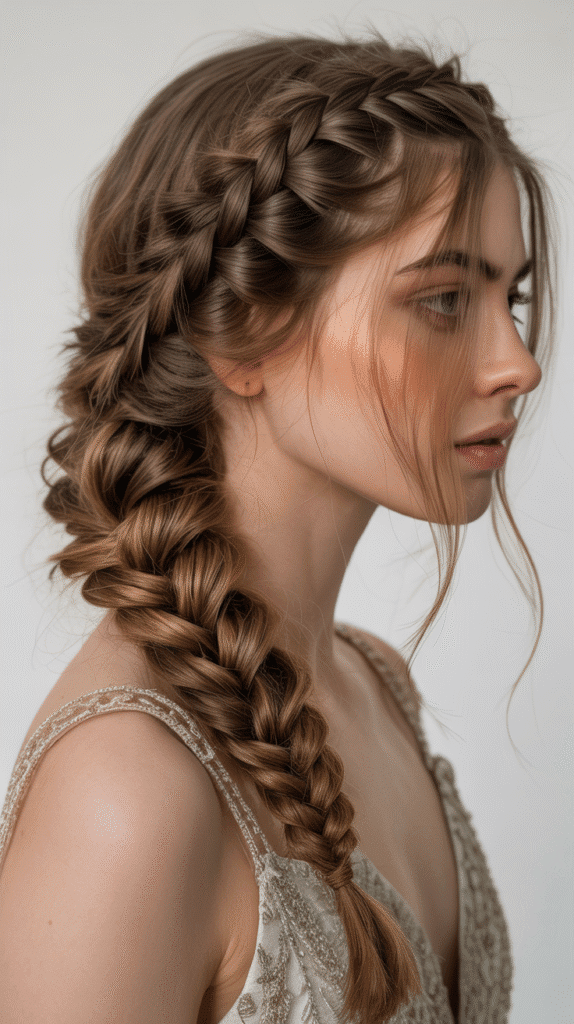
The side-swept braided romance combines multiple braid types gathered to one side, creating asymmetrical elegance with textured dimension that’s perfect for showing off statement earrings or formal wear.
Step-by-Step Instructions:
- Create a deep side part on your preferred side.
- On the heavy side, section off the front portion of hair.
- Create a small Dutch braid along your hairline on this side.
- Braid from your part toward your ear.
- On the lighter side, create a simple three-strand braid from the temple.
- Bring both braids together with all remaining hair at the nape.
- Position the gathering point on the same side as your heavy part.
- Secure everything together with a clear elastic.
- Create a loose fishtail braid with all the combined hair.
- Drape this final braid over one shoulder.
- Gently pancake the fishtail for romantic fullness.
- Pull a few wispy pieces around your face for softness.
- Optional: Wrap a piece of hair around the elastic to conceal it.
- Finish with flexible-hold hairspray.
17. The Pixie Princess Crown Braid
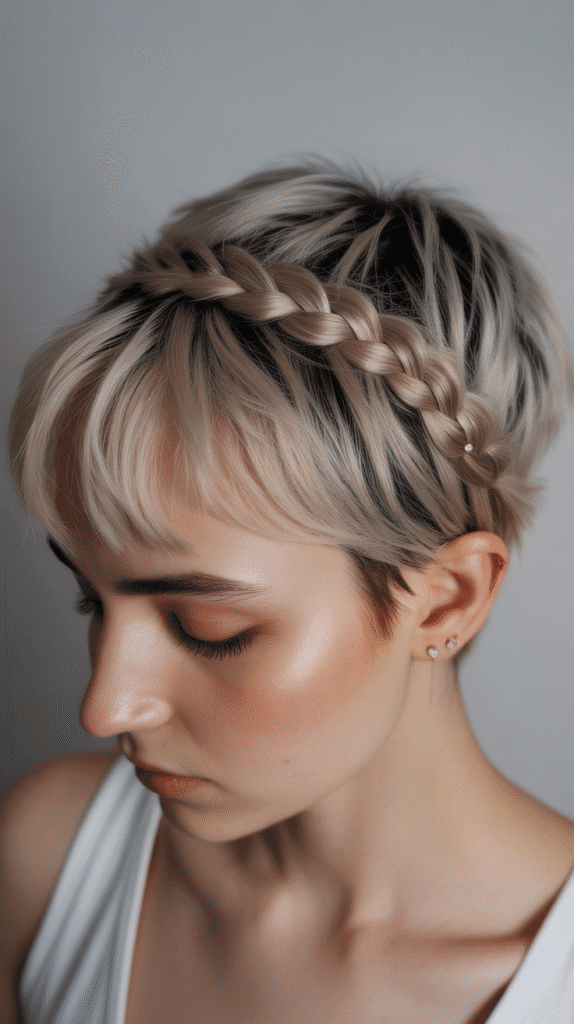
The pixie princess crown braid works beautifully on shorter hair lengths, creating a delicate braided crown around the head using whatever length is available for a magical pixie-inspired appearance.
Step-by-Step Instructions:
- This style works best on hair that’s at least four inches long.
- Apply texturizing spray throughout for grip.
- Create a side part on your preferred side.
- Starting near the part, take a small section of hair.
- Begin a simple three-strand braid along your hairline.
- Add tiny sections of hair with each stitch.
- Follow your hairline around toward the back of your head.
- The braid will be narrow due to shorter hair length.
- Continue braiding as far as your hair length allows.
- Secure the braid with small bobby pins along the way.
- The end of the braid can be tucked under and pinned.
- Add small decorative pins or clips throughout for extra sparkle.
- Allow the rest of your short hair to maintain its natural texture.
- Finish with light-hold hairspray.
18. The Cascading Waterfall Twists
Cascading waterfall twists offer an alternative to the waterfall braid using rope twists instead, creating a softer, more relaxed appearance with cascading sections that flow naturally downward.
Step-by-Step Instructions:
- Begin with wavy or curled hair for optimal visual effect.
- Create a side part on your preferred side.
- Take a two-inch section from the heavy side near the part.
- Divide this section into two strands.
- Twist these strands around each other twice.
- Drop one strand and let it cascade down.
- Pick up a new section from above to replace the dropped strand.
- Twist the continuing strand with the new section.
- Repeat this process: twist, drop, replace, twist.
- Work horizontally across the back of your head.
- The dropped sections create a cascading effect similar to the waterfall braid.
- Continue until you reach behind your opposite ear.
- Secure the twist with a small clear elastic or bobby pins.
- Gently pull at the twists to create fullness.
19. The Twisted Halo with Flowers
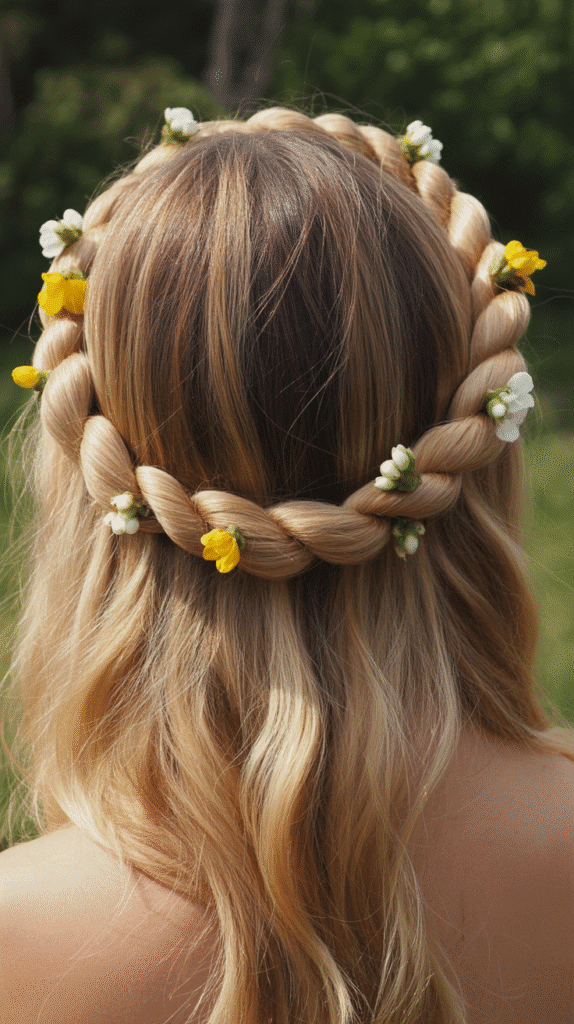
The twisted halo with flowers combines simple two-strand twists formed into a crown shape with strategic flower placement for a nature-inspired look perfect for outdoor celebrations and bohemian events.
Step-by-Step Instructions:
- Start with lightly textured, dry hair.
- Create a center part from forehead to crown.
- Take a two-inch section from one side of the part.
- Divide this section into two strands.
- Twist the strands around each other loosely.
- Continue twisting without adding hair as you move toward the back.
- Secure this twist temporarily with a clip behind your ear.
- Repeat the exact process on the opposite side.
- Bring both twists together at the center back.
- Cross them over each other and pin securely.
- Shape the twists into a halo formation around the crown.
- Pin the twists in place every few inches for security.
- Insert small flowers (fresh or artificial) throughout the halo.
- Focus flower placement at the intersections and along the twists.
20. The Braided Mohawk Updo
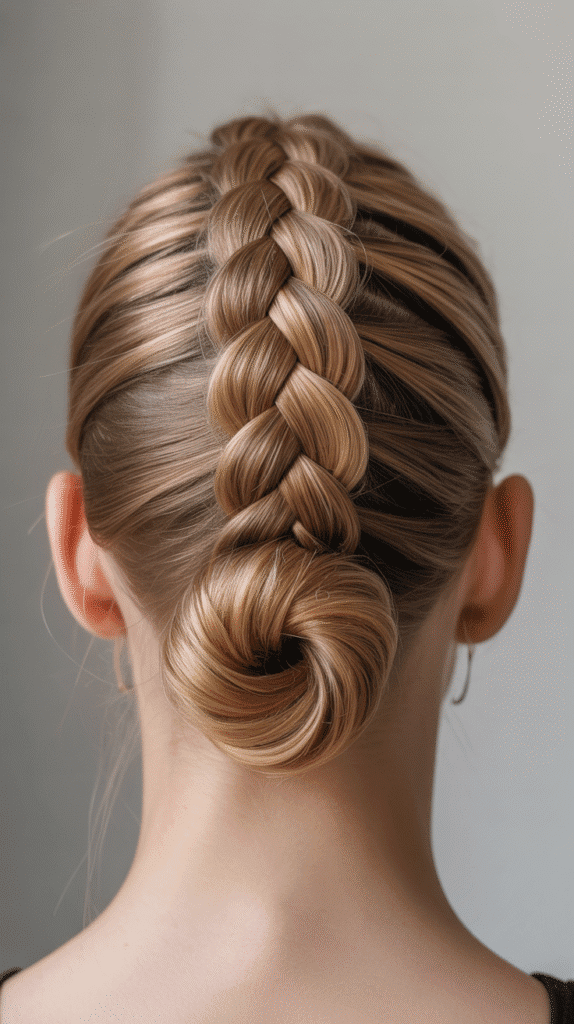
The braided mohawk updo creates edgy elegance through a center Dutch braid that transitions into an updo, offering volume at the crown while maintaining sophisticated gathering at the nape.
Step-by-Step Instructions:
- Begin with second-day hair or apply dry shampoo for texture.
- Create two partings from the top of each ear to the crown.
- This creates a mohawk section down the center of your head.
- Clip the side sections away temporarily.
- Starting at the hairline, begin a Dutch braid in the center section.
- Add hair with each stitch, keeping the braid tight and raised.
- Continue the Dutch braid down to the nape.
- When you reach the nape, include the side sections you clipped away.
- Gather all hair together at the nape.
- Twist the combined hair and roll it upward.
- Pin the rolled section securely against your head.
- Tuck the ends under and secure with additional bobby pins.
- Gently pull at the center braid for increased volume.
- The style should show dramatic height along the center.
21. The Ribbon-Woven Braid
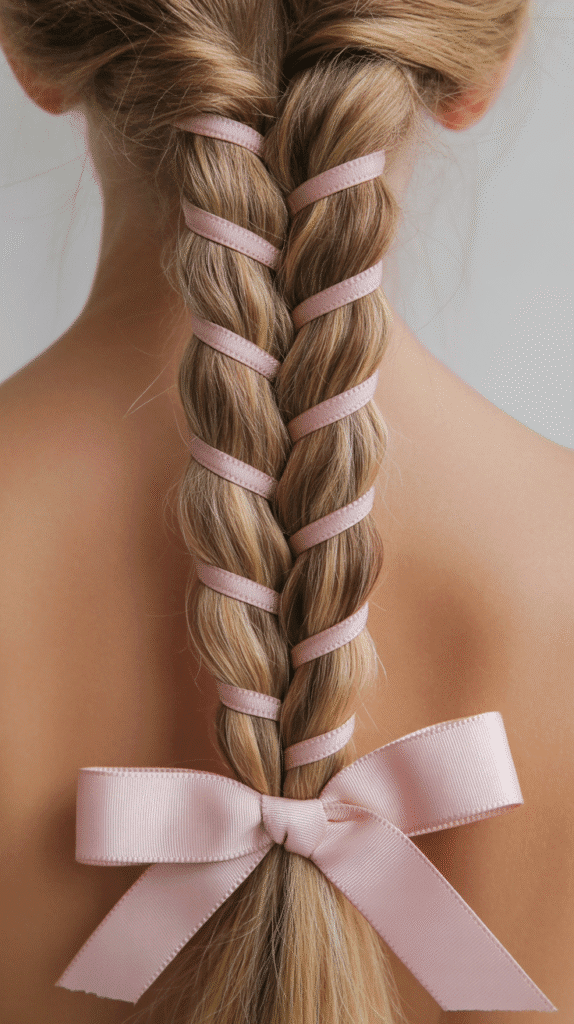
The ribbon-woven braid incorporates colorful ribbon as a fourth strand in a traditional braid, creating a charming storybook appearance that adds color and texture through simple weaving techniques.
Step-by-Step Instructions:
- Choose a ribbon that’s approximately half an inch wide.
- The ribbon should be at least twice the length of your hair.
- Brush hair thoroughly and gather it to your preferred position.
- Take a small section of hair at the top where you’ll start braiding.
- Fold the ribbon in half and secure the fold to this section with a bobby pin.
- You now have two ribbon strands plus your hair sections.
- Divide your hair into two sections.
- Arrange as: ribbon, hair section, hair section, ribbon.
- Braid these four strands in an over-under pattern.
- The ribbons act as two of your four strands.
- Continue braiding down the entire length.
- Secure the end with a clear elastic.
- Tie the ribbon ends into a bow at the bottom.
- The ribbon should be visible throughout the entire braid structure.
22. The Stacked Bubble Braid
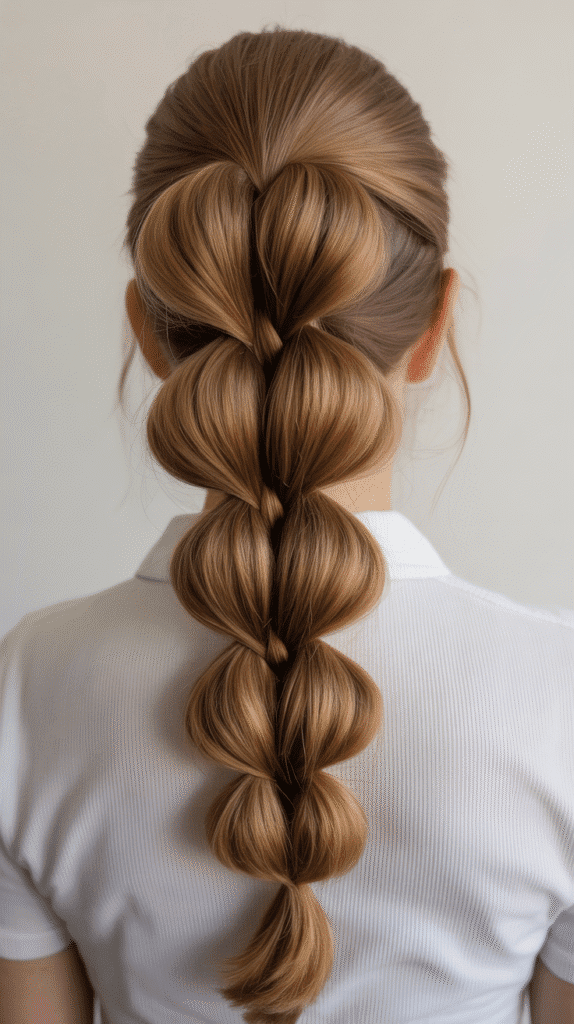
The stacked bubble braid creates dimension through multiple ponytails stacked vertically down the head, with each section teased into bubble shapes for a playful, contemporary appearance.
Step-by-Step Instructions:
- Start with brushed, smooth hair.
- Section off the top portion of hair from the crown area.
- Secure this section with a clear elastic.
- Tease the ponytail gently for initial volume.
- Approximately two inches below the first elastic, add a second elastic.
- Gently pull and pancake the section between elastics to create a bubble.
- Directly below this bubble, gather more loose hair from the sides.
- Combine it with the tail of the first ponytail and secure with elastic.
- Create another bubble with this new section.
- Continue this stacking process down the back of your head.
- Each new ponytail should incorporate hair from the sides.
- The bubbles will stack vertically down the center back.
- Ensure each bubble is roughly the same size.
- The final ponytail can be left loose or styled into a final bubble.
23. The Boho Infinity Braid
The boho infinity braid creates a figure-eight pattern through strategic strand crossing that results in an intricate appearance that’s surprisingly achievable with practice and patience.
Step-by-Step Instructions:
- Start with textured, dry hair.
- Gather hair to one side in a low position.
- Divide the hair into two equal sections.
- Take a thin strand from the outer edge of the right section.
- Cross it over the right section and under the left section.
- This creates the beginning of the infinity pattern.
- Take a thin strand from the outer edge of the left section.
- Cross it over the left section and under the right section.
- Continue this alternating over-under pattern.
- The key is consistency: always over your own section, under the opposite.
- The figure-eight pattern will become visible as you continue.
- Maintain even tension throughout for uniform appearance.
- Secure the end with a clear elastic.
- Gently pull at the braid edges to create romantic fullness.
24. The Crown Braid with Loose Curls
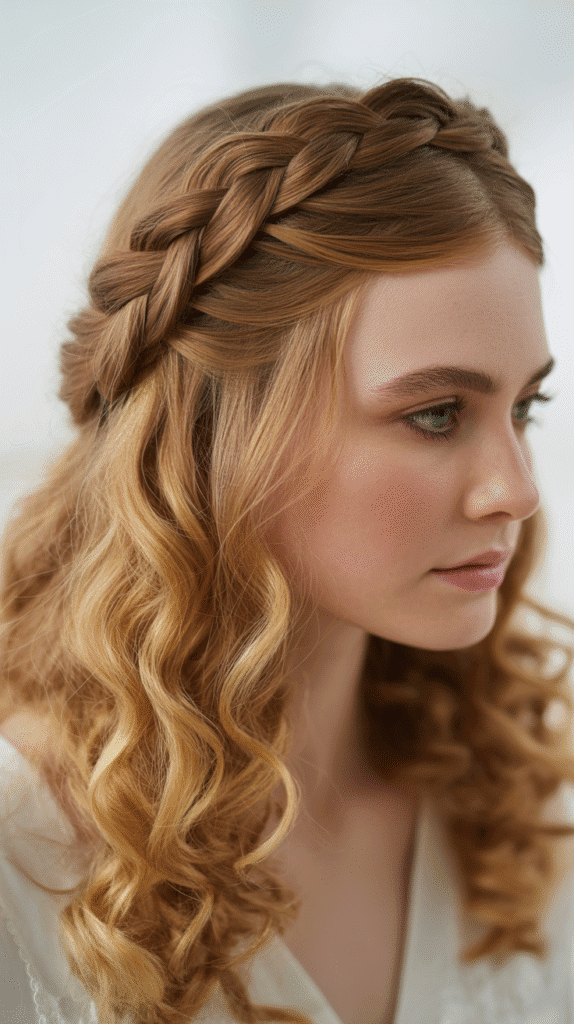
The crown braid with loose curls combines the structure of a halo braid with flowing curled sections left loose below, creating a style that balances elegance with romantic softness.
Step-by-Step Instructions:
- Begin by curling all hair with a 1.5-inch curling iron.
- Allow curls to cool completely.
- Section off the top half of hair from ear to ear.
- Leave the bottom half down in loose curls.
- Starting on one side, begin a Dutch braid along the top section.
- Follow the curve of your head like a headband.
- Add hair only from the sectioned top portion.
- Continue the braid across the back to the
opposite ear.
- When you reach the opposite ear, secure the braid with a clear elastic.
- Gently pull at the braid edges to create fullness and texture.
- Pin the braid in place along your head to secure it like a crown.
- Tuck the tail of the braid underneath and pin it invisibly.
- The loose curls below should cascade freely.
- Run your fingers through the bottom curls to soften them.
- Apply a light-hold hairspray to maintain the curl definition.
- The contrast between structured crown and flowing curls creates whimsical elegance.
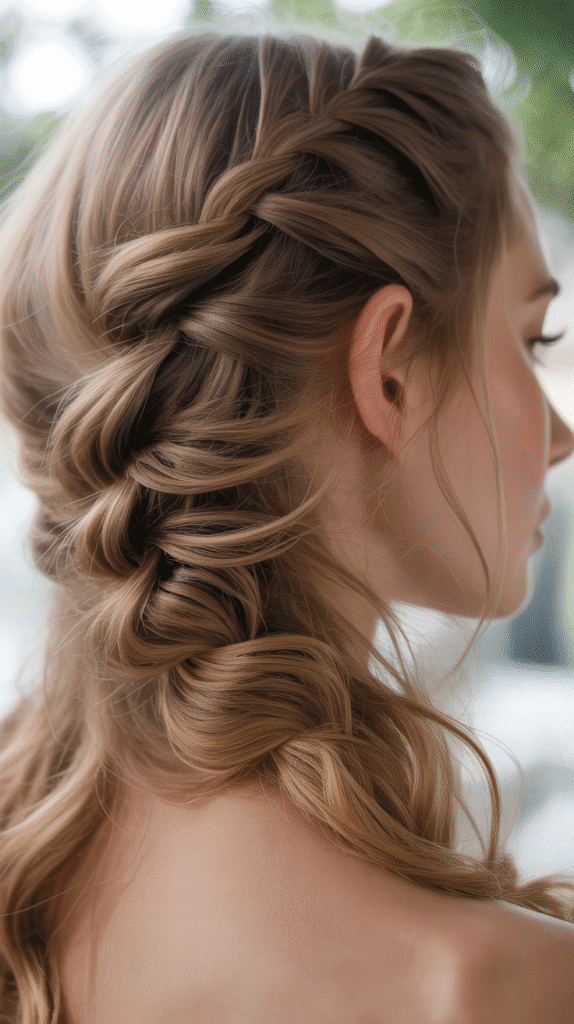
25. The Twisted Side Braid Cascade
The twisted side braid cascade combines multiple small twisted sections that join into a larger side braid, creating a waterfall effect with added dimension and intricate detail throughout.
Step-by-Step Instructions:
- Start with dry, textured hair.
- Create a deep side part on your preferred side.
- On the heavy side, take a one-inch section near the part.
- Divide this section into two strands and twist them together.
- Secure the end with a small clear elastic temporarily.
- Take another one-inch section directly below the first.
- Twist this section and secure it similarly.
- Continue creating three to four twisted sections vertically.
- Remove the elastics from each twist one at a time.
- Combine all the twists together with remaining hair on that side.
- Gather everything to drape over one shoulder.
- Create a loose three-strand braid with all the combined hair.
- The previous twists will be visible within the larger braid structure.
- Secure the braid end with a clear elastic.
- Gently pancake the entire braid for romantic fullness.
26. The Faux Hawk Braid
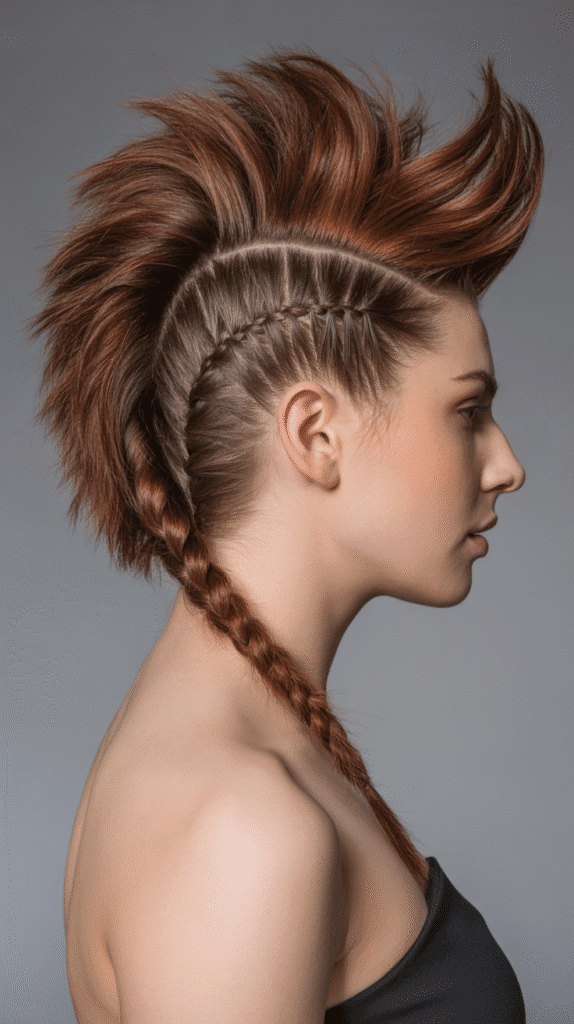
The faux hawk braid creates edgy sophistication through strategic teasing and a center braid that mimics the appearance of a mohawk without committing to shaved sides, perfect for adventurous styling.
Step-by-Step Instructions:
- Begin with completely dry hair.
- Create two parallel parts running from forehead to nape, about three inches apart.
- This creates a center strip of hair down the middle of your head.
- Pin the side sections tightly against your head with bobby pins.
- Take the center section and backcomb it at the roots for dramatic volume.
- Smooth the surface layer over the teasing to maintain a polished appearance.
- Begin a French braid down the center section.
- Keep the braid slightly loose to maintain height and volume.
- Continue braiding to the nape, adding hair from the center section only.
- Secure the braid with a clear elastic.
- Release the side sections and smooth them down.
- Apply gel or pomade to the sides for sleek contrast.
- The center braid should stand prominently above the smooth sides.
- Set with strong-hold hairspray to maintain the dramatic height.
27. The Braided Flower Garden Updo

The braided flower garden updo transforms multiple small braids into a gathered low bun with strategic flower placement throughout, creating a style reminiscent of a blooming garden.
Step-by-Step Instructions:
- Start with second-day hair or apply texturizing spray.
- Divide your hair into six equal sections throughout your head.
- Create a simple three-strand braid with each section.
- Secure each braid with a small clear elastic.
- Gently pull at each braid to create fullness and texture.
- Gather all six braids together at the nape of your neck.
- Twist the braids together loosely, intertwining them.
- Coil the twisted braids into a low bun shape.
- Pin the bun securely from multiple angles.
- The braids should be visible throughout the bun structure.
- Insert small flowers (roses, daisies, baby’s breath) throughout the bun.
- Concentrate flower placement at the center and edges.
- Pull a few face-framing pieces loose for softness.
- Finish with light-hold hairspray to secure flowers and hair.
28. The Pull-Through Braid Illusion
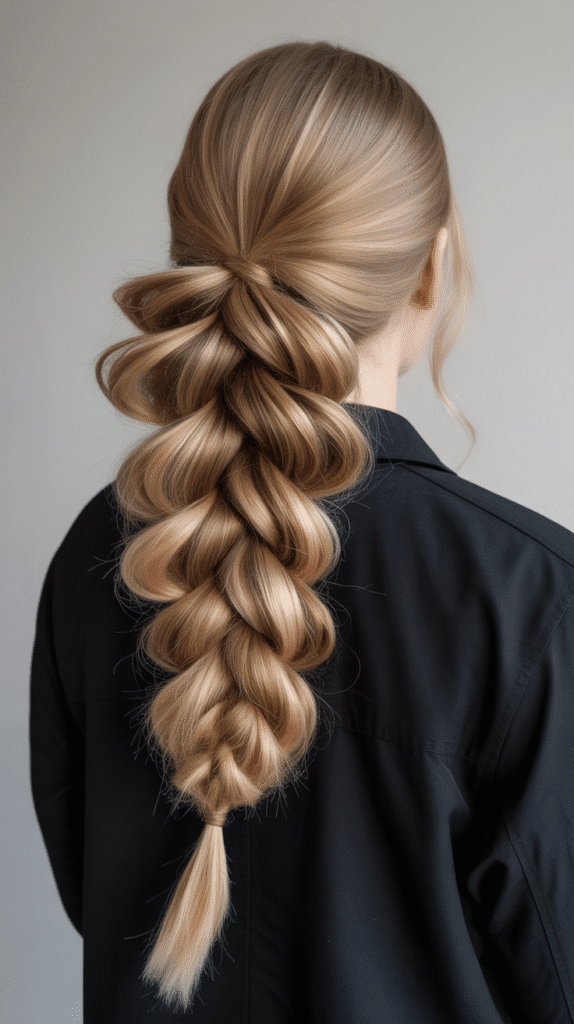
The pull-through braid creates the illusion of an intricate braid without actual braiding, using stacked ponytails that are pulled through each other for dramatic volume and impressive visual impact.
Step-by-Step Instructions:
- Start with brushed, smooth hair.
- Take a section from the crown and secure it with a clear elastic.
- This is your first ponytail.
- Take a second section directly below and create another ponytail.
- Split the first ponytail into two sections.
- Bring these sections around the sides of the second ponytail.
- Secure them together with the third section of hair below.
- This creates your third ponytail.
- Split the second ponytail and bring sections around the third ponytail.
- Continue this pattern down the length of your hair.
- After creating each new ponytail, gently pull and pancake it.
- This creates the signature voluminous appearance.
- The result looks like an intricate braid but requires no braiding.
- Secure the final section with a clear elastic.
29. The Twisted Ballerina Bun
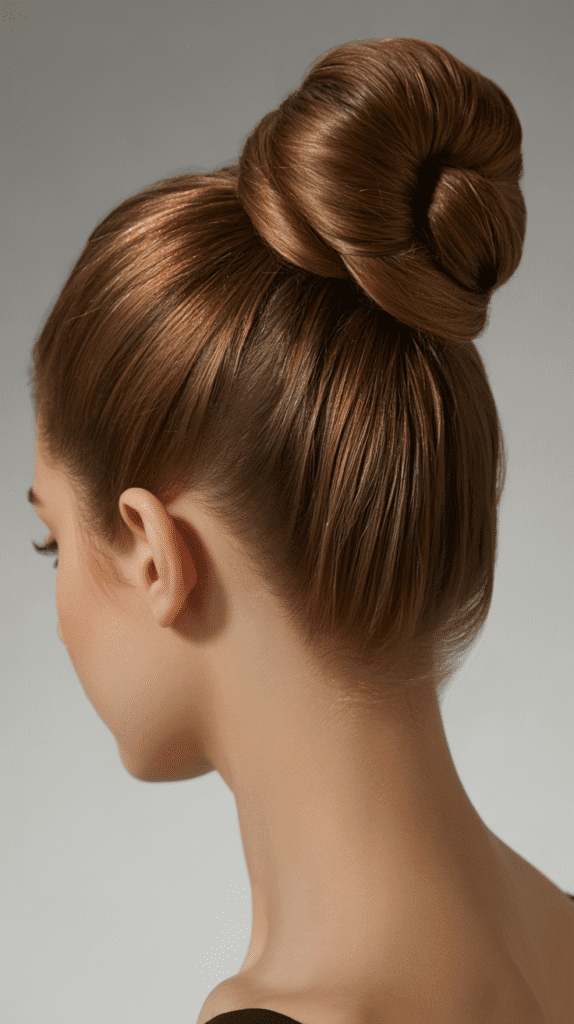
The twisted ballerina bun combines classic ballet elegance with twisted sections that create texture and interest in a traditionally simple style, perfect for dance performances or formal occasions.
Step-by-Step Instructions:
- Begin with hair smoothed into a high ponytail.
- Secure the ponytail tightly with a strong elastic.
- Apply a small amount of gel to smooth any flyaways.
- Divide the ponytail into four equal sections.
- Twist each section tightly from base to end.
- Take the first twisted section and wrap it around the base.
- Pin it securely with bobby pins.
- Take the second twisted section and wrap it in the same direction.
- Layer it over the first section and pin.
- Continue with the third and fourth sections.
- Each section should layer over the previous, creating dimension.
- Tuck all ends underneath the bun and pin securely.
- The twists should be visible and create texture.
- Spray with strong-hold hairspray for performance longevity.
- Optional: Add a small sparkly hair accessory at the base.
30. The Whimsical Wrapped Ponytail
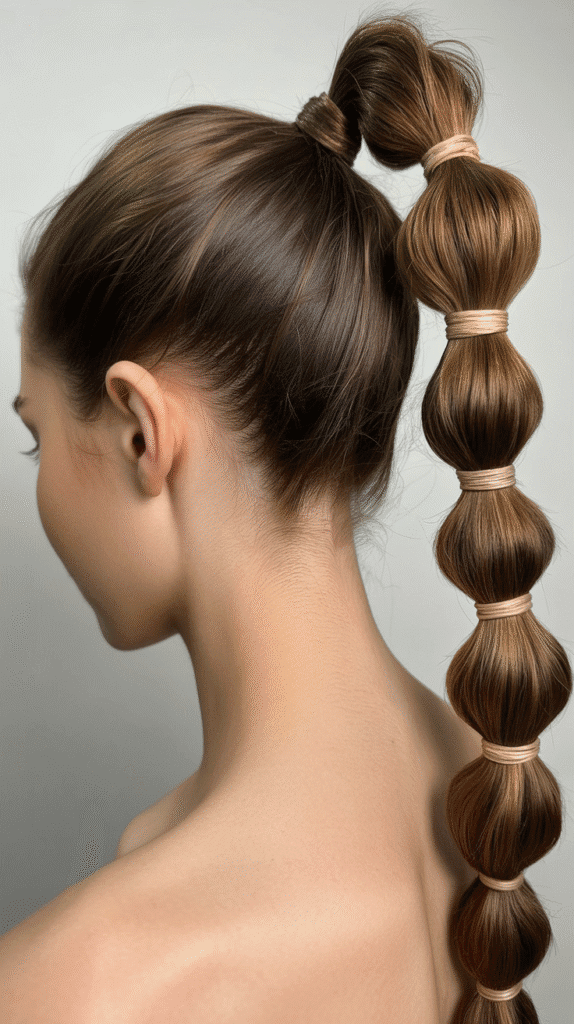
The whimsical wrapped ponytail elevates a simple ponytail through decorative wrapping with small sections of hair around the length, creating visual interest and segmented appearance with minimal effort.
Step-by-Step Instructions:
- Gather hair into a ponytail at your desired height.
- Secure with a strong elastic band.
- Take a small section of hair from the underside of the ponytail.
- Wrap this section around the elastic to conceal it.
- Secure the end with a bobby pin underneath.
- Measure approximately two inches down from the base.
- Take another small section from the underside at this point.
- Wrap it around the entire ponytail circumference.
- Secure the end with a bobby pin underneath.
- Continue this wrapping process every two inches.
- Create four to five wrapped sections down the length.
- Each wrapped section creates a segmented appearance.
- The wrapped sections should be evenly spaced.
- Finish with light-hold hairspray.
- Optional: Slightly tease the sections between wraps for added volume.
Conclusion
You’ve now discovered 30 Step-by-Step Whimsical Hairstyle Tutorials Anyone Can Try, each designed to bring enchantment and creativity to your daily hair routine or special occasions.
From the ethereal elegance of flower crown braids to the playful energy of space buns, these tutorials prove that magical hairstyles don’t require professional training or expensive salon visits.
Each style offers unique opportunities for self-expression, whether you’re drawn to bohemian romance, vintage glamour, or modern whimsy that celebrates your personal aesthetic.
The beauty of these tutorials lies in their adaptability—you can simplify complex styles, combine elements from different tutorials, or add your own creative touches with accessories, colors, and personalized modifications.
Remember that practice makes perfect, and even if your first attempt doesn’t match your vision, each try builds your skills and confidence with various techniques like braiding, twisting, and pinning.
These whimsical hairstyles transform ordinary days into extraordinary experiences, allowing you to carry a touch of magic wherever you go, and they remind us that creativity and self-care can coexist beautifully in the simple act of styling our hair.
Whether you’re preparing for a wedding, festival, date night, or simply want to feel more enchanted during your daily routine, these tutorials provide endless inspiration for expressing your most whimsical self through the art of hairstyling.
