
The magic of Christmas isn’t just in the decorations you buy—it’s in the memories you create while making them.
If you’re looking for a creative, budget-friendly way to bring festive charm into your home this holiday season, wooden Christmas trees offer the perfect solution that combines rustic elegance with personal craftsmanship.
Whether you’re a woodworking novice or an experienced DIY enthusiast, Top 33+ DIY Wooden Christmas Trees Anyone Can Make provides an extensive collection of projects that range from simple pallet designs to intricate geometric masterpieces.
These wooden alternatives to traditional trees are not only environmentally conscious but also serve as stunning focal points that can be customized to match any décor style.
From tabletop miniatures that add charm to your mantel to full-sized statement pieces that command attention in your living room, this guide walks you through diverse designs that require minimal tools and максimum creativity.
Get ready to discover projects using reclaimed wood, dowels, branches, plywood, and lumber that will transform your holiday decorating while giving you the satisfaction of saying “I made that myself.”
Let’s dive into these innovative wooden Christmas tree ideas that will make your home the talk of the neighborhood this festive season.
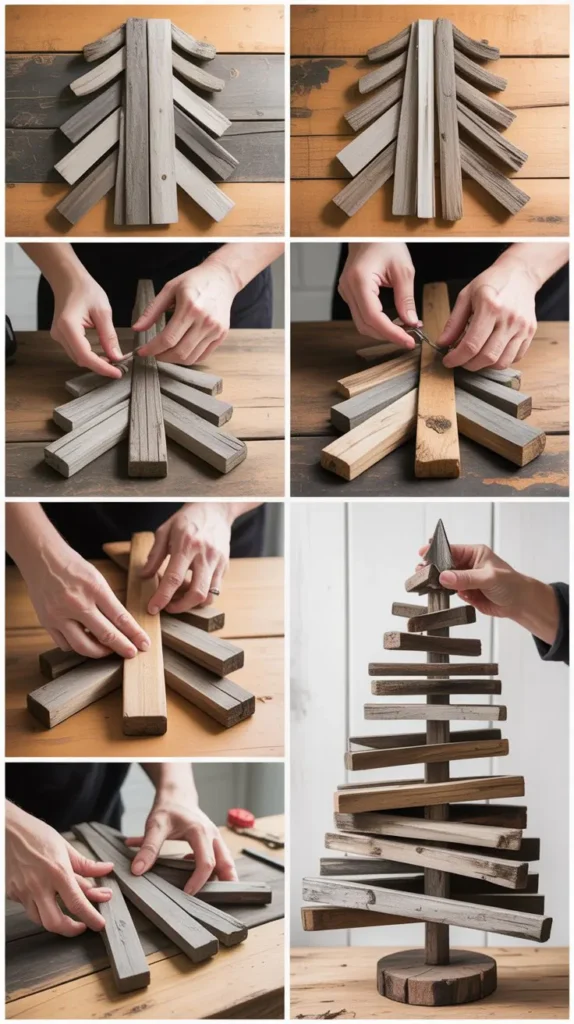
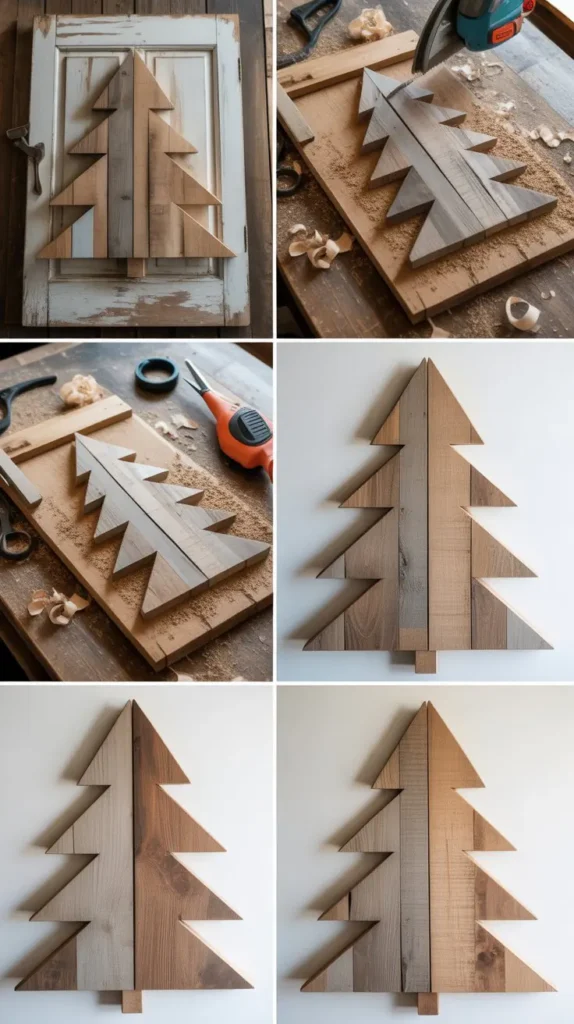
1. Rustic Pallet Wood Christmas Tree
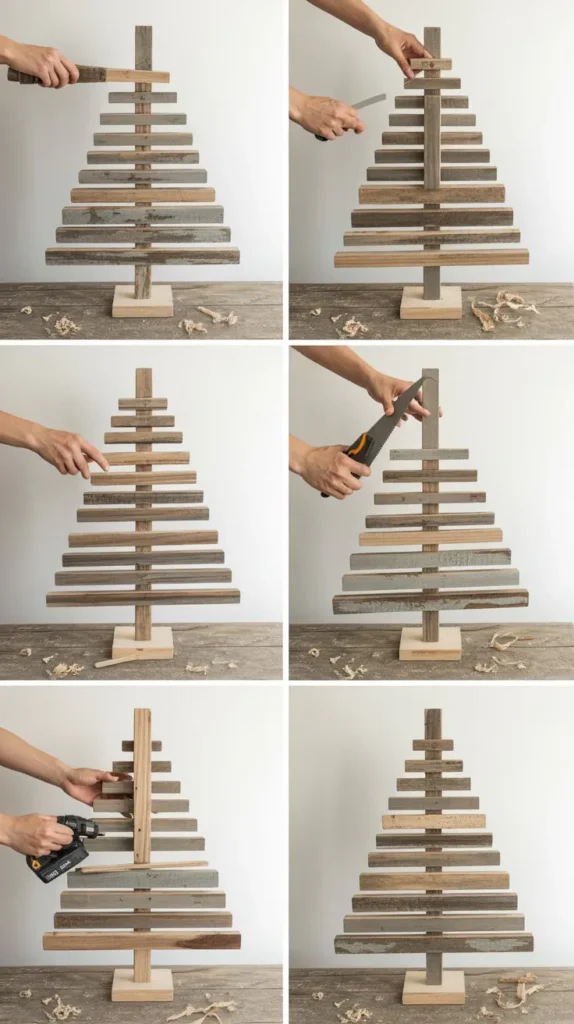
Creating a Christmas tree from reclaimed pallet wood brings an authentic farmhouse aesthetic to your holiday décor while being incredibly budget-friendly.
This project is perfect for beginners since it requires minimal cutting and basic assembly skills.
Materials and Construction:
- Source free or inexpensive wooden pallets from local businesses, ensuring the wood is heat-treated (marked HT) rather than chemically treated for safety.
- Disassemble the pallets carefully using a pry bar, hammer, and reciprocating saw to preserve as many intact boards as possible.
- Cut the boards into graduated lengths, typically starting from 36 inches at the base and decreasing by 2-4 inches for each ascending tier.
- Sand the wood lightly to remove splinters while preserving the weathered character that gives pallets their rustic charm.
- Attach the horizontal boards to a vertical support beam using wood glue and finishing nails or a brad nailer.
- Space the boards 2-4 inches apart to create visual interest and allow light to pass through if adding string lights.
Finishing and Decoration:
- Leave the wood natural for an authentic rustic look, or apply a light whitewash for a shabby-chic appearance.
- Stain the wood in darker tones like walnut or espresso for a more refined aesthetic that still honors the reclaimed material.
- Add metal hooks between the boards to hang lightweight ornaments that complement the farmhouse style.
- Weave warm white fairy lights through the spaces between boards to create a magical glow.
- Top with a wooden star, burlap bow, or galvanized metal star to complete the rustic theme.
Display Options:
- Mount on a wall to save floor space in smaller homes or apartments.
- Add a simple wooden base to create a freestanding piece that can be positioned anywhere in your home.
- Create multiple smaller versions in varying sizes to display as a grouped arrangement on a mantel or sideboard.
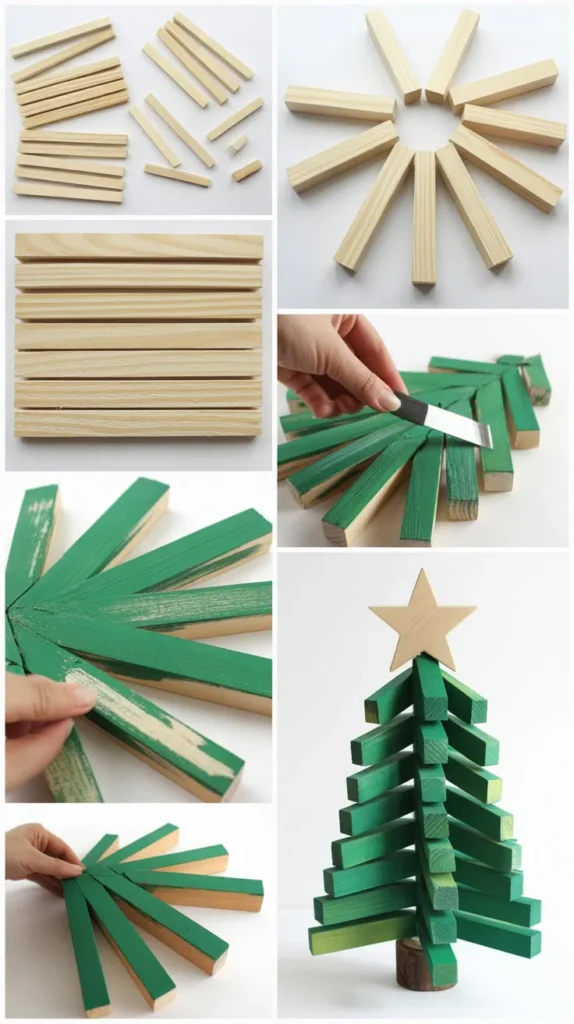
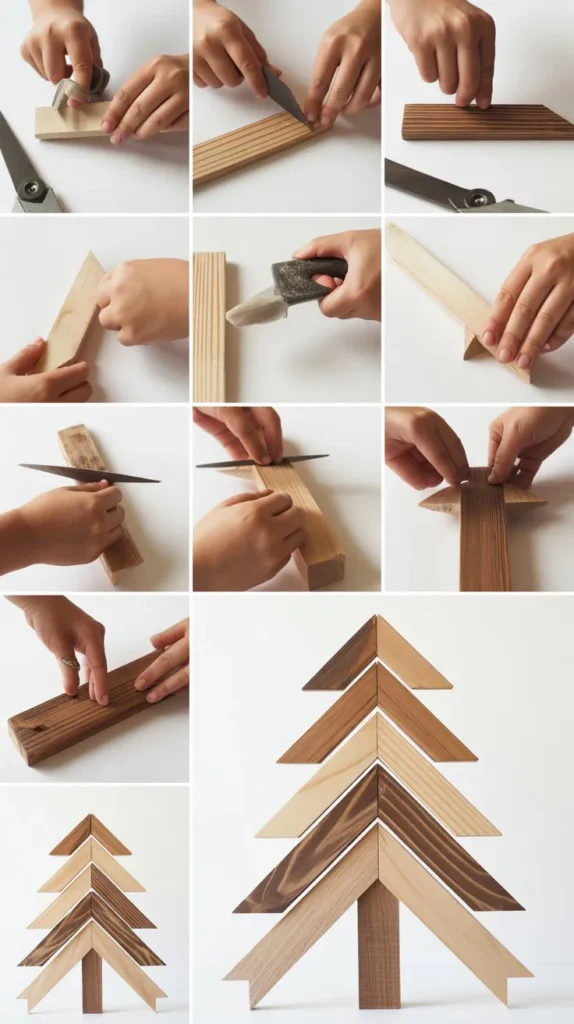
2. Modern Geometric Dowel Christmas Tree

This contemporary design uses wooden dowels arranged in a geometric pattern to create a minimalist yet striking Christmas tree that appeals to modern sensibilities.
The clean lines and open structure make it an ideal choice for those who prefer Scandinavian or contemporary décor styles.
Design and Assembly:
- Purchase wooden dowels in uniform diameter (½ inch or ¾ inch work well) from hardware stores in 36-48 inch lengths.
- Cut dowels into graduated lengths using a miter saw, creating 15-20 pieces that decrease in size from bottom to top.
- Drill pilot holes at consistent intervals along a central vertical dowel that serves as the tree’s spine.
- Insert horizontal dowels into the drilled holes, securing with wood glue for a permanent installation.
- Alternatively, use a rope or thick cord threaded through drilled holes in each dowel for a suspended version that can be easily disassembled for storage.
- Ensure even spacing between tiers (typically 3-4 inches) for balanced proportions and visual appeal.
Finishing Techniques:
- Paint all dowels in a single unified color like white, black, or metallics for a cohesive modern look.
- Create an ombré effect by gradually transitioning from darker shades at the bottom to lighter tones at the top.
- Leave the natural wood exposed and apply only a clear polyurethane finish to protect while showcasing the wood grain.
- Wrap sections of individual dowels with metallic washi tape or paint geometric patterns for added visual interest.
Styling Suggestions:
- Hang minimalist ornaments like glass balls, copper geometric shapes, or wooden beads at the dowel ends.
- Drape a single strand of Edison bulbs vertically through the center for industrial-chic lighting.
- Keep decorations sparse and intentional to maintain the clean, uncluttered aesthetic that defines modern design.
- Position against a contrasting wall color to make the geometric lines stand out dramatically.
3. Reclaimed Barn Wood Christmas Tree
Barn wood carries decades of character in every weathered grain and nail hole, making it an exceptional material for a Christmas tree that tells a story.
This project celebrates imperfection and authenticity while creating a substantial decorative piece with genuine historical presence.
Sourcing and Preparation:
- Find reclaimed barn wood through architectural salvage companies, estate sales, or farmers clearing old structures.
- Inspect boards carefully for hidden nails, staples, or metal fragments using a metal detector before cutting.
- Clean the wood gently with a soft brush and mild soap solution, avoiding excessive water that might damage the aged patina.
- Allow boards to acclimate to indoor humidity for several days before assembly to prevent warping.
- Choose boards with varying widths and thicknesses to create visual texture and dimensional interest.
Construction Method:
- Create a sturdy frame from 2×4 lumber cut into a triangular support structure.
- Attach barn wood planks horizontally across the frame, mixing board widths for an organic, irregular appearance.
- Leave gaps between boards intentionally to showcase the wall behind and create depth.
- Secure boards with finish nails or screws that become part of the rustic aesthetic.
- Reinforce the structure with corner braces if creating a large floor model that needs to be freestanding.
Preserving Authenticity:
- Avoid over-sanding or removing the natural weathering that gives barn wood its distinctive character.
- Apply only a clear matte sealer to protect the wood while preserving its aged appearance.
- Embrace imperfections like knots, cracks, and discoloration as features rather than flaws.
- Display vintage ornaments, antique bells, or reproduction farmhouse decorations that complement the historical nature of the wood.
4. Ladder-Style Christmas Tree

Transforming a wooden ladder into a Christmas tree creates an ingenious vertical display that maximizes space while offering multiple tiers for decorations.
This design works beautifully in small apartments, narrow hallways, or as a unique alternative to traditional trees.
Ladder Selection and Preparation:
- Choose an old wooden ladder from thrift stores, estate sales, or vintage markets for authentic character.
- Alternatively, build a new ladder-style structure from 2×3 or 2×4 lumber for a custom size that fits your space perfectly.
- Sand any rough spots or splinters while preserving the vintage charm of older ladders.
- Ensure the ladder is structurally sound with secure rung attachments before decorating with potentially heavy items.
- Consider the final height (5-7 feet typically works well) based on your ceiling height and available floor space.
Stability and Safety:
- Secure the ladder to the wall using L-brackets or picture-hanging hardware to prevent tipping.
- Add rubber feet or felt pads to the bottom to protect flooring and improve stability.
- Weight the base with sandbags or decorative heavy items if wall mounting isn’t possible.
- Angle the ladder slightly against the wall for additional stability rather than attempting to make it freestanding.
Decorating Techniques:
- Drape evergreen garland through the rungs to create fullness and add traditional Christmas greenery.
- Hang stockings from individual rungs to serve as both decoration and functional holiday storage.
- Place battery-operated candles or small potted plants on the steps for varying levels of visual interest.
- Wrap string lights in a zigzag pattern from top to bottom, securing with small hooks or twist ties.
- Display a mix of ornaments, photos in frames, and seasonal signs across different levels.
Customization Ideas:
- Paint the ladder in festive colors like deep green, classic red, or crisp white to match your décor scheme.
- Add wooden shelves between rungs to create more substantial display surfaces for larger decorations.
- Incorporate a fabric backdrop behind the ladder for added depth and to hide the wall if desired.
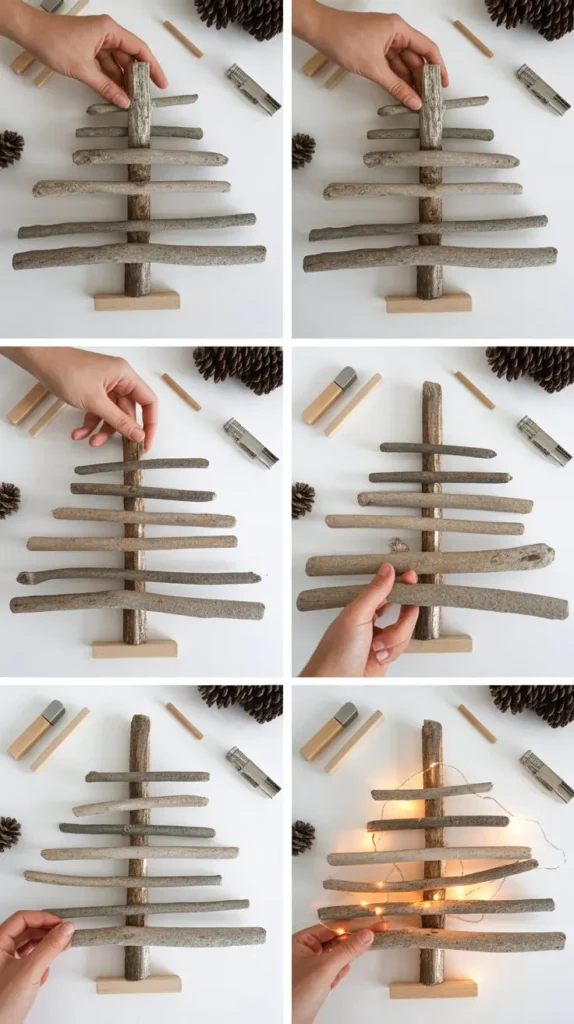
5. Branch and Twig Christmas Tree

Creating a Christmas tree from natural branches and twigs brings the organic beauty of the forest directly into your home.
This earth-friendly project celebrates nature’s imperfect forms while creating a deeply textured and visually captivating centerpiece.
Gathering Materials:
- Collect fallen branches from your yard, local parks (with permission), or wooded areas during autumn when dry branches are abundant.
- Select branches with interesting shapes, curves, or forks that add character to the final design.
- Choose a variety of thicknesses from substantial base branches (2-3 inches diameter) to delicate twigs for the upper portions.
- Ensure branches are completely dry to prevent insects, mold, or unwanted inhabitants from entering your home.
- Remove loose bark, spider webs, and debris while preserving the natural texture and small attached twigs.
Assembly Techniques:
- Drill holes at regular intervals down a central trunk piece or thick dowel to insert horizontal branches.
- Arrange branches in decreasing lengths from bottom to top to create the classic triangular tree silhouette.
- Secure each branch with wood glue, hot glue, or small screws depending on the branch thickness and weight.
- Wire smaller twigs together in bundles for fuller sections, wrapping with floral wire to create cohesive clusters.
- Build the tree in sections if creating a large version, allowing you to assemble and disassemble for easier storage.
Natural Finishing:
- Spray paint the entire structure white for a snow-covered winter wonderland effect that still showcases the organic textures.
- Apply metallic gold or silver paint for an elegant look that elevates natural materials to sophisticated décor.
- Leave branches in their natural state and simply seal with clear polyurethane for an authentic woodland aesthetic.
- Add artificial snow spray to branch tips for realistic winter beauty without the weight of real snow.
Eco-Friendly Decorating:
- Hang homemade salt dough ornaments, dried orange slices, or pinecones for decorations that complement the natural theme.
- Use LED string lights that won’t generate heat near the dry wood materials.
- Incorporate birds’ nests, feathers, or other natural elements found during nature walks.
- Top with a grapevine star or bundled twig star that continues the organic aesthetic throughout.
6. Plywood Silhouette Christmas Tree
A plywood silhouette tree offers a bold, graphic statement that can be customized in countless ways to suit any style preference.
This project requires basic woodworking tools but delivers impressive results that look professionally designed.
Planning and Cutting:
- Sketch a tree template on paper first, experimenting with proportions until you achieve a pleasing shape.
- Transfer the design to a full sheet of ¾-inch plywood (4×8 feet) using a projector, grid method, or printed template sections.
- Cut the tree shape using a jigsaw for curves and a circular saw for straight edges, following your drawn lines carefully.
- Sand all edges smooth with 120-grit sandpaper, rounding corners slightly for a refined finished appearance.
- Consider cutting interior geometric shapes or circles to create negative space that adds modern flair.
Standing Options:
- Create a cross-base from 2×4 lumber attached to the back of the tree for freestanding stability.
- Build an A-frame support structure from plywood triangles attached perpendicular to the main tree shape.
- Attach a 1×4 board horizontally across the back bottom to form a base that allows the tree to stand against a wall.
- Add decorative feet cut from matching plywood for a cohesive look that also provides stability.
Surface Treatment:
- Prime the plywood surface with quality primer to seal the wood and provide a smooth base for painting.
- Apply multiple coats of latex or acrylic paint in your chosen color, allowing proper drying time between applications.
- Create a chalkboard surface using chalkboard paint, allowing family members to write messages or draw designs throughout the season.
- Apply wood stain to enhance the plywood grain pattern, then seal with polyurethane for a natural wood finish.
- Use a projector to trace and paint intricate designs, patterns, or holiday scenes directly onto the surface.
Decorative Enhancements:
- Drill evenly-spaced holes across the surface to insert dowels that serve as ornament holders.
- Add 3D elements like wooden cutout stars, layered snowflakes, or raised lettering for dimensional interest.
- Install small hooks or nails in strategic locations to hang garland, lights, or favorite ornaments.
- Attach LED strip lights around the perimeter for a modern glow-from-within effect.
7. Scrap Wood Christmas Tree

Utilizing scrap wood pieces from previous projects demonstrates resourcefulness while creating a charmingly eclectic Christmas tree that celebrates varied textures and tones.
This zero-waste project transforms odds and ends into cohesive holiday décor.
Material Collection:
- Gather leftover wood pieces from your workshop including different species, thicknesses, and finishes for maximum variety.
- Include interesting architectural salvage pieces like crown molding, decorative trim, or spindles for unexpected visual elements.
- Collect wood scraps from home improvement stores that often have discount bins or free scrap piles.
- Sort pieces by approximate size to plan your tree structure, setting aside the longest pieces for the base.
- Clean each piece and remove any nails, staples, or hardware that could interfere with assembly.
Creative Assembly:
- Attach pieces horizontally to a vertical support in decreasing lengths without worrying about perfect alignment or spacing.
- Allow different wood types and colors to remain visible, celebrating the patchwork quality rather than hiding it.
- Overlap pieces at varying depths to create dimensional layers that cast interesting shadows.
- Incorporate unusual shapes like triangular cutoffs, curved pieces, or chunky blocks for added personality.
- Fill gaps with smaller wood scraps, creating a dense, textured surface that tells the story of many previous projects.
Unified Finishing:
- Paint the entire assembled tree in one solid color to unify disparate pieces into a cohesive whole.
- Apply whitewash technique by diluting white paint and allowing the varied wood tones to show through subtly.
- Stain the entire piece in a single color, which will absorb differently across various wood species creating natural variation.
- Embrace the mixed materials and leave different finishes intact for a truly eclectic, maximalist aesthetic.
8. Minimalist Wooden Plank Tree

Perfect for modern spaces where less is more, a minimalist wooden plank tree uses clean lines and negative space to suggest a tree form rather than explicitly depicting one.
This sophisticated approach appeals to those who appreciate subtle elegance over traditional holiday excess.
Design Philosophy:
- Plan a design using 3-7 horizontal planks in graduated lengths arranged vertically with generous spacing.
- Select smooth, knot-free wood like poplar, maple, or pine that provides clean surfaces without distracting grain patterns.
- Calculate proportions carefully so that each plank is noticeably shorter than the one below it, creating clear triangular suggestion.
- Space planks evenly (6-12 inches apart) to emphasize the negative space that is as important as the wood itself.
Construction Details:
- Use a single vertical support board (1×3 or 1×4) as the tree’s spine, attaching horizontal planks to its front face.
- Secure planks with countersunk screws filled with wood putty for invisible attachment points, or use biscuit joints for a cleaner look.
- Ensure perfect alignment by marking precise center points on both the spine and each horizontal plank before assembly.
- Sand the entire piece thoroughly with progressively finer grits (120, 180, then 220) for a flawless surface.
- Slightly ease (round) all edges with sandpaper to create a soft, refined appearance that feels modern rather than harsh.
Refined Finishing:
- Apply multiple thin coats of paint in sophisticated neutrals like soft gray, warm white, or matte black.
- Use high-quality furniture-grade polyurethane in satin finish to protect natural wood while maintaining subtle sheen.
- Consider a two-tone approach with the spine in one color and planks in a slightly contrasting shade for subtle depth.
- Leave the wood completely natural if using premium hardwood, allowing the material’s inherent beauty to speak for itself.
Minimalist Decoration:
- Limit ornaments to 3-5 carefully chosen pieces in matching metallic tones or simple glass balls.
- Hang a single strand of warm white lights in a clean vertical line down the center rather than wrapping chaotically.
- Place a simple geometric star at the top in matching finish to the overall color palette.
- Keep surrounding décor equally restrained, allowing the tree to be appreciated as a sculptural object.
9. Driftwood Christmas Tree
Collecting driftwood from beaches, riverbanks, or lakeshores provides wonderfully weathered materials that already possess the artistic character that craftspeople spend years trying to replicate.
Each piece tells a story of its journey through water and time.
Sourcing Driftwood:
- Gather driftwood during beach walks or river explorations, selecting pieces with smooth surfaces polished by water action.
- Look for naturally curved or twisted pieces that add organic movement and visual interest to the final design.
- Check local regulations regarding driftwood collection, as some protected areas prohibit removal of natural materials.
- Choose a variety of diameters and lengths to create depth and texture throughout the tree structure.
- Rinse thoroughly with fresh water and allow to dry completely before bringing indoors to prevent salt crystallization or lingering moisture.
Design Approaches:
- Arrange pieces horizontally in a wall-mounted design, attaching to a board or directly to wall studs using screws.
- Create a three-dimensional freestanding version by building a central support structure and radiating driftwood pieces outward.
- Layer smaller pieces over larger ones to build depth and create a fuller appearance despite working with individual sticks.
- Allow pieces to extend at slightly different angles rather than forcing perfect alignment, embracing the organic nature of the materials.
- Fill gaps with smaller driftwood fragments, beach glass, or shells to create a cohesive seaside-inspired composition.
Preserving Natural Beauty:
- Resist the urge to alter the color or texture that nature has created over years of exposure.
- Apply only a light mist of matte sealer to protect the wood without changing its appearance.
- If whitening is desired, use a very diluted whitewash that settles into crevices while leaving high points in natural colors.
- Incorporate natural elements like rope, jute, or hemp twine for attachments that complement the coastal aesthetic.
Coastal Decoration:
- Hang seashells, starfish, or sand dollars as ornaments that honor the driftwood’s oceanic origins.
- Use fishing net draped through the branches as a textural element that reinforces the maritime theme.
- Add string lights in cool white or pale blue tones to evoke moonlight on water.
- Top with a driftwood star created by lashing five pieces together with twine.
10. Painted Wood Block Christmas Tree

Building a Christmas tree from individual painted wood blocks creates a playful, deconstructed design that can be easily customized and even rearranged each season.
This project is particularly engaging for families with children who enjoy creative participation.
Block Preparation:
- Cut 2×4 or 4×4 lumber into blocks of varying lengths (4-12 inches) to create interesting dimensional variation.
- Sand all surfaces and edges smooth to prepare for painting and safe handling.
- Cut approximately 20-30 blocks depending on desired tree size, with more smaller blocks near the top.
- Drill small pilot holes in one end of each block if planning to attach them to a backing board or each other.
Painting Process:
- Prime all blocks with quality wood primer to ensure even color absorption and durability.
- Paint blocks in a coordinated color palette that complements your existing décor scheme.
- Create visual rhythm by painting blocks in alternating colors, ombré gradations, or themed patterns.
- Use painter’s tape to create geometric designs, stripes, or color-blocking on individual blocks for added visual interest.
- Apply multiple thin coats rather than one thick coat to prevent drips and achieve professional-looking results.
- Seal with clear polyurethane to protect painted surfaces from scratches during handling and rearrangement.
Assembly Options:
- Stack blocks in a pyramid formation without adhering them, allowing for easy rearrangement and interactive play.
- Mount blocks to a large backing board in tree formation using wood glue for a permanent wall-mounted installation.
- Connect blocks using dowels that fit into pre-drilled holes, creating a stackable but stable structure.
- Arrange blocks on stepped shelves or a bookcase in tree shape without any permanent attachment.
Interactive Elements:
- Paint chalkboard surfaces on some blocks where family members can write messages or wishes.
- Number blocks 1-25 to create an advent calendar where each block reveals a surprise or activity.
- Add small hooks to blocks for hanging lightweight ornaments or gift cards.
- Create blocks with letters spelling holiday messages that can be rearranged throughout the season.
11. Cedar Shingle Christmas Tree
Cedar shingles, typically used for roofing and siding, make surprisingly elegant Christmas tree materials due to their natural beauty, aromatic qualities, and weather-resistant properties.
The overlapping pattern creates rich texture and depth.
Material Selection:
- Purchase cedar shingles from lumber yards or home improvement centers in bundles of 25-30 pieces.
- Choose Grade A shingles with minimal knots for a refined appearance, or select rustic grades for character-filled designs.
- Consider pre-weathered shingles if available, which display beautiful silver-gray patina that adds instant aged charm.
- Inspect each shingle for splits or damage before purchasing, though minor imperfections can add to the rustic aesthetic.
Cutting and Shaping:
- Cut shingles to graduated lengths using a circular saw or table saw, creating smooth, straight edges.
- Start with 24-30 inch shingles at the base and reduce by 2 inches for each ascending row.
- Angle the side cuts slightly inward to create the classic tapered tree silhouette rather than a strict pyramid.
- Sand cut edges lightly to remove splinters while maintaining the natural texture on shingle faces.
Layered Construction:
- Build a plywood backing board cut in triangular tree shape to provide structural support.
- Attach shingles in overlapping rows working from bottom to top, similar to actual roofing installation.
- Offset each row by half a shingle width to create a traditional brick-pattern overlap.
- Secure each shingle with small finish nails or construction adhesive, ensuring edges remain loose enough to create dimensional shadow lines.
- Leave approximately 1-2 inches of exposure on each shingle so the layered effect remains visible.
Natural Finishing:
- Allow cedar to weather naturally to its characteristic silver-gray if planning long-term outdoor or covered porch display.
- Apply clear cedar sealer to maintain the fresh reddish-brown color and protect against moisture.
- Whitewash with diluted paint to create a coastal or Scandinavian-inspired appearance.
- Embrace the natural aromatic cedar scent that will provide subtle fragrance throughout the holiday season.
12. Herringbone Patterned Wood Tree

The herringbone pattern, with its distinctive V-shaped weaving design, brings sophisticated architectural detail to a wooden Christmas tree.
This pattern requires precise cutting and patience but delivers a stunning result that appears far more complex than it actually is.
Pattern Planning:
- Study herringbone patterns in flooring or tile installations to understand the alternating angular layout.
- Cut wood pieces (1×2 or 1×3 boards) into equal lengths typically 12-18 inches depending on tree size.
- Prepare twice as many pieces as you think necessary since the pattern requires doubling for the mirrored effect.
- Create a paper template first to work out the exact angles (typically 45 degrees) and spacing before cutting wood.
Precise Cutting:
- Set a miter saw to exactly 45 degrees to ensure consistent angles on all piece ends.
- Cut alternating pieces with opposite miters so they fit together in the characteristic zigzag pattern.
- Mark each piece lightly with pencil to indicate orientation before assembly to avoid confusion during construction.
- Sand all cut edges smooth since the precision of cuts is visible and critical to the pattern’s success.
Assembly Technique:
- Build on a large flat surface or backing board where you can lay out the entire pattern before securing.
- Start at the center of the base and work outward in both directions, maintaining the V-pattern symmetry.
- Use wood glue on both the mitered edges where pieces meet and on the backing surface for double security.
- Place weights or clamps on freshly glued pieces until they set to ensure tight seams and prevent shifting.
- Work row by row upward, decreasing the number of pieces in each row to create the tapered tree shape.
Finishing Details:
- Choose a single solid paint color to emphasize the geometric pattern rather than competing with wood tones.
- Stain in contrasting shades (light and dark alternating) to make the herringbone pattern even more pronounced.
- Apply high-gloss finish for a contemporary look or matte finish for subtle sophistication.
- Install the completed tree on a wall where lighting from an angle will cast shadows that enhance the dimensional pattern.
13. Log Slice Christmas Tree
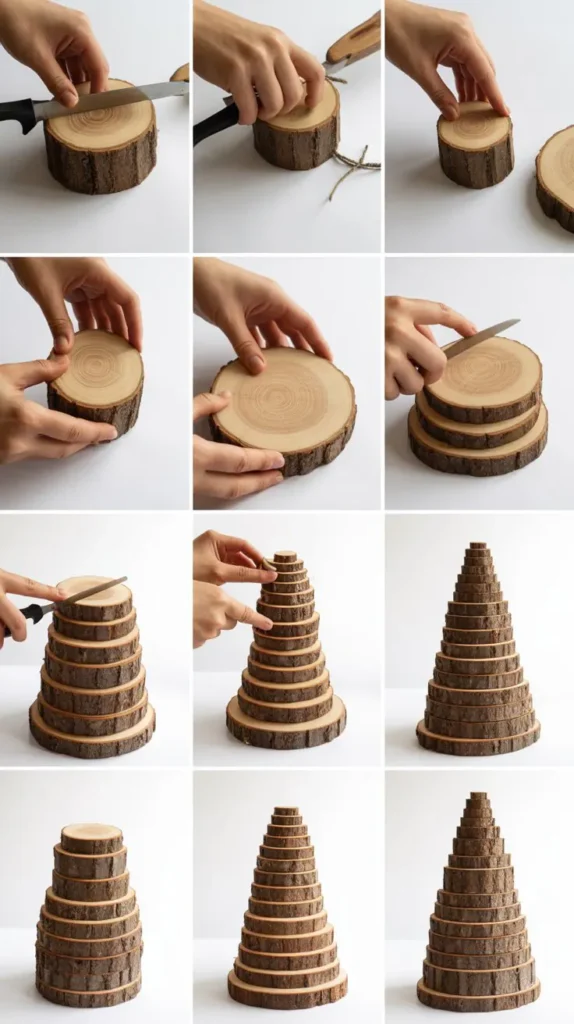
Cross-cut log slices (also called wood rounds or cookies) create a charming Christmas tree that showcases the natural beauty of tree ring patterns.
Each slice is unique, making this project a celebration of natural variation and organic forms.
Preparing Wood Slices:
- Cut logs into 1-2 inch thick slices using a chainsaw or have a tree service company cut them for you.
- Select logs ranging from 3-4 inches diameter for the top to 12-14 inches for the base pieces.
- Allow fresh-cut slices to dry for several weeks in a well-ventilated area to prevent cracking and reduce weight.
- Remove bark if desired for a cleaner look, or leave it attached for rustic character.
- Sand the flat faces with medium-grit sandpaper to smooth rough saw marks and splinters.
- Seal the faces and edges with wood sealer or thinned polyurethane to prevent excessive cracking and insect infestation.
Design Layout:
- Arrange slices on the floor in a triangular tree outline before permanently attaching anything.
- Vary the orientation and positioning of slices to create visual interest and showcase different ring patterns.
- Allow slices to touch or overlap slightly rather than floating in space for a more cohesive composition.
- Consider creating a three-dimensional version by mounting slices at varying depths from the wall surface.
Mounting Methods:
- Attach slices to a large plywood backing using construction adhesive and small finish nails through pre-drilled holes.
- Screw directly into wall studs through the center of each slice if creating a direct wall-mounted installation.
- Build a frame structure and suspend slices from wires or chains at different heights for a floating effect.
- Create a freestanding version by mounting slices to a wooden tree-shaped support structure.
Natural Enhancement:
- Maintain the natural color and allow the varied wood tones and ring patterns to be the star of the design.
- Apply wood stain to enhance grain patterns and create more uniform coloring across different wood species if using mixed logs.
- Paint slice edges in metallic gold or copper while leaving faces natural for an elegant contrast.
- Burn or rout numbers, designs, or messages into select slices before assembly for personalized touches.
14. Scandinavian Dowel and Rope Christmas Tree

Scandinavian design principles of simplicity, functionality, and natural materials come together beautifully in a dowel and rope Christmas tree.
This suspended design creates an airy, modern installation that appears to float ethereally in space.
Materials and Measurements:
- Purchase 1-inch diameter wooden dowels from hardware stores in 36-48 inch lengths.
- Cut dowels into graduated lengths (typically 8-12 pieces) ranging from 30 inches at the base to 6 inches at the top.
- Acquire approximately 40-50 feet of natural rope (jute, hemp, or cotton) in ½-inch thickness for suspension.
- Sand all dowels smooth with fine-grit sandpaper and ease the edges for a refined finish.
Assembly Process:
- Drill holes through both ends of each dowel approximately ½ inch from the ends, sized to accommodate your chosen rope.
- Thread rope through holes in the first (longest) dowel and tie secure knots underneath to prevent slipping.
- Continue threading upward, tying knots at measured intervals (4-6 inches apart) before adding each successive dowel.
- Ensure each dowel hangs level by adjusting knot placement and making the two rope sides exactly equal length.
- Gather rope ends together above the smallest dowel and tie into a loop for ceiling suspension.
Finishing Options:
- Leave dowels in natural wood finish, applying only clear matte sealer for protection.
- Paint all dowels in monochromatic white, gray, or soft pastels characteristic of Scandinavian palettes.
- Wrap portions of each dowel with leather cord or metallic wire for subtle decorative detail.
- Add geometric wooden beads to the rope between dowels for additional visual interest.
Display and Decoration:
- Hang from a ceiling hook using the rope loop, ensuring secure attachment to a ceiling joist or appropriate anchor.
- Position in a corner where it can be viewed from multiple angles to appreciate the three-dimensional form.
- Keep decorations minimal—a few fabric ornaments or simple wooden shapes hung from the dowels.
- Add a single strand of delicate string lights spiraling around the structure for gentle illumination.
15. Reclaimed Floor Board Christmas Tree
Vintage flooring materials bring instant character and history to a Christmas tree project.
Whether using authentic reclaimed hardwood or reproduction wood-look materials, the linear nature of floorboards creates pleasing rhythm and pattern.
Sourcing Materials:
- Find authentic reclaimed flooring at architectural salvage yards, demolition sites, or specialty retailers.
- Look for interesting features like original finish, nail holes, paint traces, or stamps that tell stories of previous installations.
- Consider water-damaged or otherwise “unusable” flooring sold at deep discounts since surface imperfections add character to this project.
- Ensure boards are completely dry and free from mold or structural rot that could compromise the installation.
Preparation Work:
- Remove old nails, staples, or flooring adhesive using pliers, pry bars, and scrapers.
- Assess whether to remove or preserve old finish—both approaches have aesthetic merit depending on your style preference.
- Cut boards to graduated lengths using a miter saw, creating smooth, square ends that will align cleanly during assembly.
- Sort boards by color, finish, or wear pattern if you want to create intentional gradations or keep similar boards together.
- Lightly sand only the cut ends and any hazardous splinters, leaving the face character intact.
Creative Arrangement:
- Mix board widths intentionally to create visual texture rather than seeking uniform appearance.
- Alternate the direction of wood grain or placement of distinctive markings for dynamic visual flow.
- Position boards with the most character (unique stains, paint drips, unusual markings) where they’ll be focal points.
- Space boards apart by ½ to 1 inch to allow wall color to show through and create graphic definition.
- Consider arranging boards at slight angles rather than perfectly horizontal for contemporary edge.
Mounting Strategies:
- Attach boards to a large triangular plywood backer using construction adhesive and finish nails for wall-mounting.
- Build a substantial wooden frame and attach floorboards to create a freestanding version with adequate support.
- Use French cleats on the back for secure wall mounting that can handle the significant weight of hardwood flooring.
- Reinforce corners and stress points with hidden brackets if creating a large-scale installation.
Preserving History:
- Apply only matte sealer to protect while maintaining the authentic aged appearance.
- Avoid painting or staining over original finishes that represent the material’s authentic history.
- Create a small plaque or tag noting the floor’s origin if known (e.g., “Reclaimed from 1920s Chicago Brownstone”).
- Display beside vintage photographs or period decorations that honor the era from which the flooring originated.
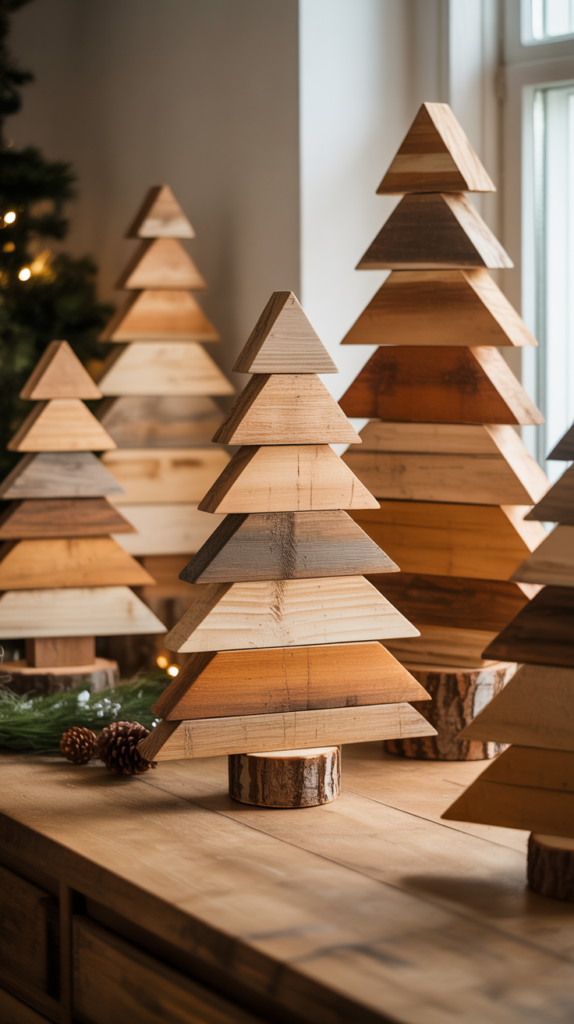
16. Modern Plywood Triangle Christmas Tree

Clean geometric shapes and plywood’s distinctive layered edges create a bold, contemporary Christmas tree that functions as much as sculptural art as holiday decoration.
This design appeals to those who appreciate form, material honesty, and architectural aesthetics.
Material Selection:
- Use ¾-inch Baltic birch plywood for superior quality with attractive edge grain and minimal voids.
- Consider standard construction plywood for budget-friendly options, using edge banding to cover less attractive layers.
- Calculate material needs carefully since a single 4×8 sheet can yield multiple triangular trees in different sizes.
Cutting and Shaping:
- Draw precise triangular templates using a straightedge and measuring carefully to ensure equal sides or desired proportions.
- Cut triangles using a circular saw with a guide for straight edges or a table saw for maximum precision.
- Experiment with equilateral triangles, tall narrow triangles, or wider proportions to find your preferred aesthetic.
- Cut multiple triangles in graduating sizes to create a stacked, layered effect with dimensional depth.
- Sand all surfaces and edges thoroughly, rounding corners slightly for a softer, more refined appearance.
Dimensional Assembly:
- Stack triangles from largest to smallest, spacing them with dowels or blocks to create separation and shadow lines.
- Mount triangles directly to the wall at varying depths using spacers for a floating, three-dimensional installation.
- Create a freestanding version by attaching triangles perpendicular to a central vertical support beam.
- Position triangles at slight angles to each other rather than perfect alignment for dynamic visual interest.
Surface Treatment:
- Seal plywood with clear finish to showcase the beautiful layered edge grain that is plywood’s signature characteristic.
- Paint in sophisticated monochrome colors like charcoal, navy, or blush that feel contemporary and intentional.
- Apply two-tone finish with faces in one color and edges in contrasting metallic for architectural emphasis.
- Create gradient effects across multiple triangles, transitioning from dark at the base to light at the top.
Minimalist Decoration:
- Mount a single LED strip along edges for clean linear lighting that accentuates geometric forms.
- Hang 2-3 carefully selected ornaments in complementary geometric shapes rather than covering the surface.
- Add a simple wooden or metal triangle at the peak to crown the design without overwhelming the minimalist aesthetic.
- Keep the surrounding area uncluttered, allowing the strong geometric form to command attention.
17. Wooden Bead Garland Tree
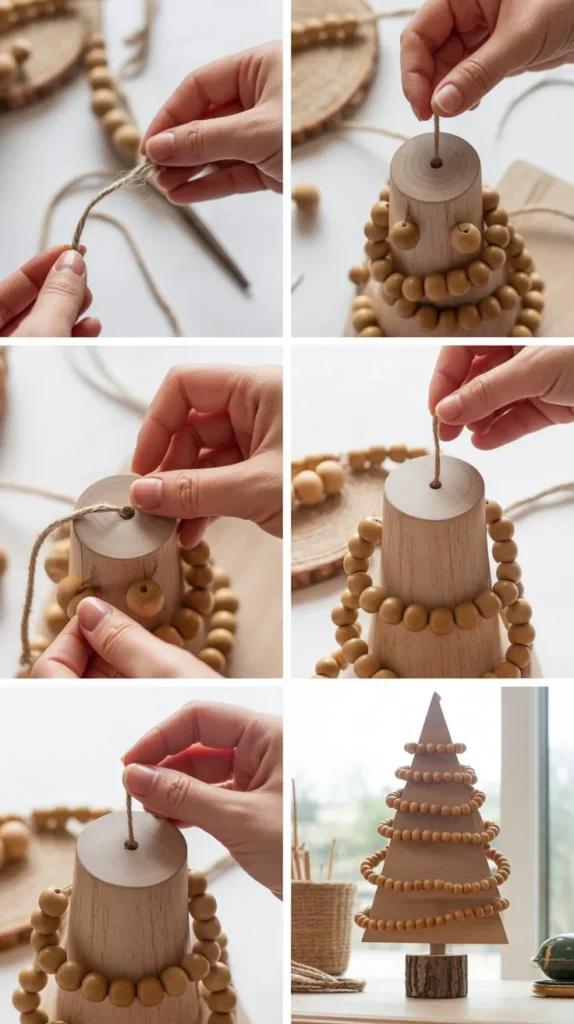
Wooden beads strung in carefully planned patterns create an unexpectedly elegant Christmas tree that combines traditional craft techniques with contemporary design sensibilities.
This lightweight option is perfect for renters or those wanting easily storable seasonal décor.
Bead Selection:
- Purchase natural wooden beads in various sizes (from ½ inch to 2 inches in diameter) from craft stores or online suppliers.
- Choose unfinished beads if planning to paint, stain, or leave natural for authentic wood appearance.
- Select beads with adequately sized holes for your chosen stringing material (typically 2-3mm holes work well).
- Calculate quantities by planning your design on paper first—a medium-sized tree might require 200-400 beads.
Design Planning:
- Sketch a tree outline on paper, marking where each horizontal strand will hang and approximately how many beads each strand needs.
- Plan for 8-12 horizontal strands in decreasing lengths to create traditional tree shape.
- Consider alternating bead sizes within strands or graduating from large at bottom to small at top for visual interest.
- Calculate strand lengths including extra for knots, loops, and adjustment—add 6-8 inches to finished hanging length.
Stringing Process:
- Use strong cotton cord, hemp rope, or waxed linen thread for durability and aesthetic appeal.
- Thread beads onto each strand, tying knots between beads to maintain spacing and prevent sliding.
- Space beads evenly (½ to 1 inch apart) or cluster them in groups with larger gaps for varied effects.
- Create loops at each end of strands for easy hanging from the mounting structure.
- Treat raw cord ends with clear nail polish or fabric sealant to prevent fraying.
Mounting Structure:
- Install a horizontal wooden board or dowel across the top from which to hang all bead strands.
- Use small cup hooks or nails spaced along the board to hang each strand at its predetermined position.
- Create a triangular wooden frame outline and hang beaded strands within it for defined structure.
- Suspend everything from a ceiling mount or wall hooks, ensuring secure attachment that can support the weight.
Finishing Touches:
- Paint beads in ombré gradients, traditional holiday colors, or sophisticated neutrals before stringing.
- Leave beads natural and apply only clear sealer to showcase authentic wood grain and color variations.
- Intermix painted and natural beads for subtle color interest that doesn’t overwhelm.
- Add small brass or copper spacer beads between wooden ones for metallic accent sparkle.
18. Stacked Wood Round Christmas Tree
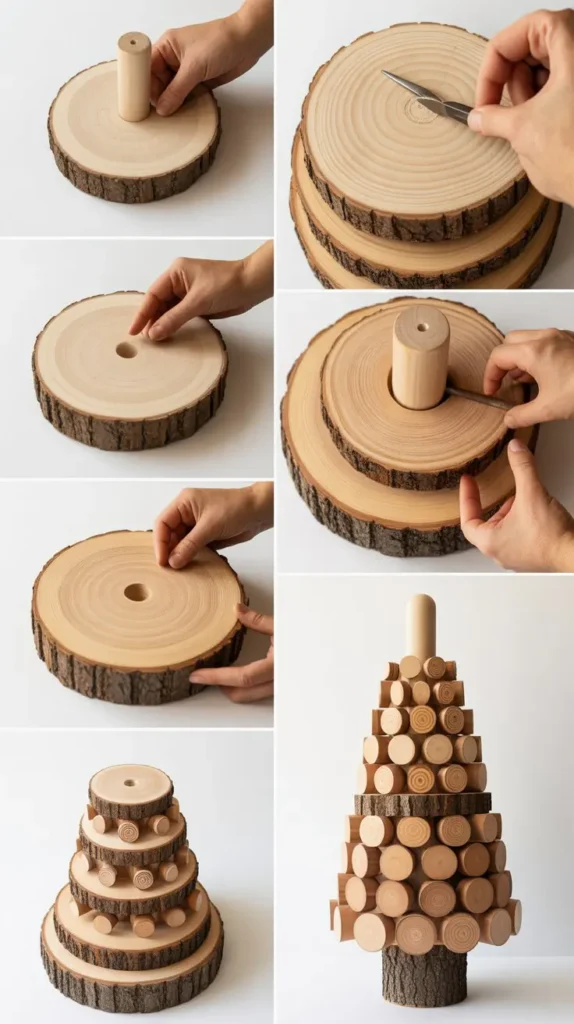
Creating vertical height by stacking wood rounds (cross-cut log sections) produces a three-dimensional Christmas tree with substantial presence and rustic charm.
This freestanding design works beautifully as a centerpiece or entryway statement.
Log Selection and Cutting:
- Source logs ranging from 4-6 inches in diameter for smaller tabletop versions or 10-16 inches for floor models.
- Cut rounds in varying thicknesses (2-5 inches) to create dimensional interest in the stacked structure.
- Select logs with interesting bark textures, burls, or natural markings that enhance visual appeal.
- Ensure cuts are reasonably flat and perpendicular to allow stable stacking without excessive wobbling.
- Allow freshly cut wood to dry for several weeks to reduce weight and moisture content before assembly.
Structural Planning:
- Calculate total height based on available space and desired impact—typical floor versions range from 3-6 feet tall.
- Plan the stack with the largest, heaviest rounds at the base and progressively smaller pieces toward the top.
- Create off-center stacks where each round is slightly offset from the one below for organic, natural appearance.
- Determine whether to secure rounds permanently with construction adhesive or leave them loose for disassembly.
Assembly Techniques:
- Drill a central vertical hole through each round if using a dowel or threaded rod to stabilize the stack.
- Thread rounds onto a ½-inch or ¾-inch dowel, using wood glue between pieces for permanent installation.
- Alternatively, stack rounds freely without attachment if bases are flat and stable enough for your environment.
- Add flat washers or wooden spacers between rounds if using a threaded rod system for industrial aesthetic.
- Weight or secure the base to a platform to prevent tipping, especially in homes with pets or children.
Natural Preservation:
- Remove loose bark if desired, or preserve it for authentic woodland character.
- Apply clear polyurethane or outdoor sealer to all surfaces to prevent drying cracks and insect infiltration.
- Embrace natural checking and cracks as they develop, understanding they’re part of wood’s organic beauty.
- Consider applying wood butter or beeswax finish for a subtle sheen that nourishes the wood naturally.
Decorating Ideas:
- Drill small holes into sides of rounds to insert evergreen sprigs for bursts of traditional Christmas greenery.
- Wrap copper wire or twine around the stacked structure, tucking in ornaments, pinecones, or dried flowers.
- Add battery-operated string lights wrapped around the stack or threaded through drilled holes.
- Place a natural element like a large pinecone, wooden star, or bundled twigs at the top.
19. Weathered Fence Board Christmas Tree
Old fence boards carry the weathered beauty of years exposed to the elements, developing silvery gray patinas and interesting texture that new lumber can’t replicate.
Transforming these retired materials into a Christmas tree gives them dignified second life.
Material Acquisition:
- Salvage old fence boards from properties undergoing fence replacement or demolition projects.
- Check online marketplaces, construction salvage sites, or ask neighbors planning fence renovations.
- Select boards with the most interesting weathering patterns, avoiding those that are rotted or structurally compromised.
- Look for variations in gray tones, with some boards showing more silver, blue-gray, or brown undertones.
- Collect approximately 15-25 boards depending on desired tree size and board widths.
Cleaning and Preparation:
- Remove old nails, staples, or wire using pliers and a hammer, filling remaining holes if desired or leaving for character.
- Brush off loose dirt, debris, and any surface mold using a stiff-bristled brush outdoors.
- Wash boards with mild soap solution if heavily soiled, allowing to dry completely before proceeding.
- Resist aggressive sanding that would remove the weathered surface you’re trying to preserve.
- Cut boards to graduated lengths while maintaining any interesting weathered ends or damage that adds character.
Assembly Approach:
- Maintain the varied gray tones by mixing board colors throughout rather than grouping similar shades together.
- Arrange boards horizontally with irregular spacing that mimics the organic nature of weathered materials.
- Allow some boards to extend slightly beyond others rather than creating perfectly aligned edges.
- Attach to a backing board or build a frame structure, positioning boards with attractive faces forward.
- Leave gaps between boards to create depth and allow shadows to enhance the dimensional quality.
Authenticity Preservation:
- Never paint or stain weathered fence boards—the natural patina is irreplaceable and represents years of authentic aging.
- Apply only a matte clear sealer if protection is necessary, testing on a hidden area first to ensure it doesn’t darken or alter appearance.
- Embrace imperfections like splits, nail holes, and wear patterns as design features rather than flaws to hide.
- Consider the boards’ history and display information about their origin if known (farm fence, garden enclosure, etc.).
20. Painted Wooden Shim Christmas Tree
Inexpensive wooden shims (thin tapered pieces used for leveling) become sophisticated Christmas décor when arranged thoughtfully and finished beautifully.
This budget-friendly project proves that elegant results don’t require expensive materials.
Shim Selection:
- Purchase cedar or pine shims bundled in packs of 40-50 pieces from home improvement stores for just a few dollars.
- Select uniform shims without excessive knots or damage for the cleanest finished appearance.
- Calculate quantities—a medium wall tree might require 100-150 shims depending on spacing and overlap.
- Choose cedar shims for aromatic quality and natural rot resistance if planning outdoor covered display.
Design Layout:
- Arrange shims in overlapping layers radiating from a central point to create a starburst or sunburst tree pattern.
- Alternate shim directions in each layer to create dynamic visual movement and prevent monotony.
- Plan for denser shim placement at the outer edges and more spacing near the center for interesting negative space.
- Create a traditional triangle outline with shims aligned horizontally in decreasing rows.
- Experiment with asymmetrical arrangements where shims radiate at various angles for modern artistic effect.
Painting Techniques:
- Prime shims first with spray primer for quick, even coverage that seals wood and prepares for topcoat.
- Apply multiple colors in ombré gradation from dark at the bottom to light at the top for dimensional effect.
- Create patterns by painting shims in alternating colors—gold and white, red and green, or monochromatic shades.
- Use metallic paints (gold, silver, copper) for elegant shimmer that elevates the humble material.
- Try dip-dye technique by dipping just the ends of shims in paint for subtle color that doesn’t overwhelm.
- Distress painted shims by lightly sanding edges after paint dries for vintage shabby-chic appearance.
Assembly Process:
- Glue shims to a circular or triangular plywood backing using hot glue or wood glue.
- Work from the outside in, overlapping shims slightly to create fullness and hide the backing board.
- Maintain consistent overlap (typically ½ to 1 inch) for professional appearance and rhythm.
- Attach a sawtooth hanger or D-rings to the back of the plywood for easy wall mounting.
- Consider mounting shims at slightly varied depths for three-dimensional interest rather than flat installation.
21. Rustic Twig Bundle Christmas Tree
Bundling natural twigs into a conical shape creates an organic, textural Christmas tree that brings the wild beauty of the forest indoors.
This design celebrates nature’s irregularity and the unique character of each branch.
Gathering Materials:
- Collect fallen twigs and small branches during autumn walks through wooded areas or your own yard.
- Select relatively straight pieces approximately 12-36 inches long in varying diameters from pencil-thin to finger-thick.
- Look for interesting features like remaining bark, small forks, or gentle curves that add visual character.
- Gather 100-200 twigs depending on desired tree size and fullness—more creates denser appearance.
- Ensure twigs are completely dry to prevent mold or deterioration once brought indoors.
Sorting and Preparation:
- Remove leaves, loose bark fragments, and any insects or debris by gently brushing or shaking.
- Sort twigs into groups by approximate length to make assembly more efficient.
- Trim particularly unruly protruding side branches if desired, though some asymmetry adds natural authenticity.
- Consider soaking twigs briefly in water with a small amount of bleach if concerned about insects, then drying thoroughly.
Construction Method:
- Create a central support structure from sturdy dowel or branch approximately 24-48 inches tall.
- Sort twigs by length and begin with longest pieces at the base, working upward with progressively shorter pieces.
- Bind twigs to the central support using floral wire, jute twine, or thin rope in horizontal bands every 3-4 inches.
- Allow twig ends to extend beyond the binding point, creating a full, bushy appearance rather than tightly bound bundles.
- Continue adding layers, checking from all angles to ensure relatively even distribution around the center pole.
- Secure the smallest, shortest twigs at the top, creating a natural pointed tip.
Finishing Options:
- Leave twigs in completely natural state for authentic woodland aesthetic.
- Spray paint white or silver for a frost-covered winter effect that still shows twig texture.
- Apply gold or copper spray paint lightly, allowing natural brown to show through for elegant shimmer.
- Mist with adhesive spray and sprinkle with artificial snow or glitter for magical sparkle.
Natural Decoration:
- Tuck in preserved eucalyptus, dried hydrangeas, or other natural elements among the twigs.
- Wire small pinecones directly onto twig ends throughout the tree.
- Wrap with simple string lights that tuck into the twig layers and create warm internal glow.
- Tie on small fabric or felt ornaments using jute string that complements the natural materials.
22. Plywood Shelf Christmas Tree

Combining form and function, a plywood shelf Christmas tree provides both festive decoration and practical display space for treasured holiday items, books, or everyday décor.
This dual-purpose design maximizes limited space while celebrating the season.
Design Planning:
- Sketch a side profile of a tree shape that incorporates horizontal shelves at regular intervals.
- Plan for 5-8 shelves in decreasing lengths from approximately 36 inches at the base to 8 inches at the top.
- Calculate shelf depth (typically 6-10 inches) based on what items you plan to display.
- Design triangular side supports that will hold shelves while creating the tree silhouette when viewed from the front.
- Ensure the bottom shelf is at practical height (12-18 inches from floor) for actual use.
Cutting and Construction:
- Cut side supports from ¾-inch plywood in triangular tree shape using a jigsaw or circular saw with guide.
- Cut rectangular shelf pieces from ¾-inch plywood to predetermined lengths and consistent depth.
- Mark shelf positions precisely on both side supports, ensuring they align perfectly for level installation.
- Attach shelves to side supports using wood glue and pocket screws for invisible, strong connections.
- Add a back support brace connecting the two side pieces for structural stability if creating a freestanding version.
- Sand all surfaces and edges smooth, rounding sharp corners for safety and refined appearance.
Stability Considerations:
- Anchor the tree to the wall using L-brackets hidden behind the side supports for safety with loaded shelves.
- Build a substantial base platform extending several inches beyond the front and sides for freestanding stability.
- Consider adding adjustable leveling feet to the bottom if floors are uneven.
- Calculate weight capacity and avoid overloading shelves with items heavier than the structure can safely support.
Finishing and Styling:
- Paint the entire structure in solid color for clean, unified appearance that lets displayed items be the focal point.
- Stain plywood to enhance grain patterns while maintaining natural wood aesthetic.
- Paint the back panel one color and shelves/sides in contrasting shade for visual definition.
- Add trim or edge banding to shelf fronts for polished, furniture-quality finish.
Display Ideas:
- Arrange holiday village pieces, nutcrackers, or seasonal figurines across the shelves in descending sizes.
- Display wrapped presents on lower shelves, creating a functional gift staging area.
- Mix books, plants, and seasonal décor for a lived-in look that functions beyond the holiday season.
- Install small battery-powered puck lights under each shelf for dramatic illumination.
- Top the tree with a decorative element that doesn’t interfere with the top shelf’s functionality.
23. Distressed Wood Pallet Art Tree

Elevating pallet wood through intentional distressing techniques creates an artistic Christmas tree that balances rustic materials with refined execution.
This approach transforms rough materials into gallery-worthy seasonal art.
Wood Selection and Prep:
- Choose pallet boards with existing character like nail holes, stamps, or varied weathering for built-in interest.
- Select boards with different widths and thicknesses to create visual texture in the final composition.
- Clean boards thoroughly, removing any grease, chemicals, or excessive dirt that might interfere with finishing.
- Lightly sand only areas with dangerous splinters, preserving most of the worn, aged surface character.
Distressing Techniques:
- Strike boards with chains, hammers, or bolts to create authentic-looking dings and impressions.
- Gouge edges and corners intentionally using screwdrivers or chisels for worn, aged appearance.
- Drill small random holes to simulate insect damage or old nail removals.
- Round edges unevenly with sandpaper, concentrating wear where natural handling would occur.
- Create paint wear patterns by applying paint, letting dry, then sanding specific areas to reveal wood beneath.
Color Layering:
- Apply a base coat of paint in a deep color, allowing it to dry completely.
- Add a second layer in a contrasting lighter color, creating intentionally uneven coverage.
- Sand through the top layer in strategic places to reveal the under-color, simulating years of wear.
- Dry-brush white or cream paint over dark-stained wood for aged, pickled appearance.
- Apply dark wax or stain over painted surfaces, wiping excess away, allowing darkness to settle into crevices.
Artistic Assembly:
- Arrange boards with attention to color placement, balancing lights and darks throughout the composition.
- Vary board angles slightly from horizontal for dynamic visual movement.
- Allow boards to extend beyond each other at irregular lengths rather than creating perfectly aligned edges.
- Space boards unevenly to reinforce the artistic rather than structural nature of the piece.
- Mount to a backing board or directly to wall studs for secure installation of this potentially heavy piece.
Gallery Presentation:
- Frame the completed tree with simple wooden molding or industrial metal edging for finished look.
- Install against a contrasting wall color that makes the distressed wood tones pop visually.
- Add focused lighting from above or sides to highlight texture and create dramatic shadows.
- Minimize decorative additions, treating the tree itself as the art rather than a base for ornaments.
24. Wooden Crate Christmas Tree

Vintage wooden crates stacked strategically form a unique Christmas tree that provides built-in storage and display while celebrating industrial, rustic, or vintage aesthetic.
This functional approach appeals to those who value versatility in their seasonal décor.
Crate Sourcing:
- Find vintage wooden crates at flea markets, antique stores, or online vintage retailers specializing in authentic aged pieces.
- Look for crates with interesting printing, labels, or stamps that identify their original contents or origin.
- Purchase reproduction crates from craft stores if vintage pieces are unavailable or too expensive.
- Collect approximately 8-15 crates in varying sizes to create sufficient height and tree shape.
- Ensure crates are structurally sound with secure corners and intact slats.
Stacking Strategy:
- Arrange crates in a pyramid formation with largest boxes at the base and smallest at the top.
- Experiment with both horizontal and vertical crate orientations for varied visual interest.
- Offset crates slightly rather than stacking in perfect alignment for more dynamic composition.
- Some crates can remain open and empty while others are filled with decorative items or actual storage.
- Test stability before finalizing arrangement, especially if not securing crates to each other.
Securing Methods:
- Use wood screws through adjacent crate corners to permanently attach crates into a stable structure.
- Apply construction adhesive between crates if planning a permanent seasonal installation.
- Add flat metal brackets inside corners where crates meet for reinforced connections.
- Strap the entire stacked structure to the wall using furniture straps for safety, especially important in homes with children or pets.
Functional Display:
- Fill some crates with wrapped gifts that become part of the decorative display while awaiting Christmas morning.
- Store actual holiday décor items like extra ornaments, wrapping supplies, or seasonal linens in lower crates.
- Display bottle brush trees, vintage ornaments, or holiday books inside the crate compartments.
- Tuck battery-operated candles or string lights inside crates for warm internal glow.
- Drape garland, tinsel, or evergreen swags cascading down the exterior of the crate stack.
Vintage Styling:
- Preserve original crate markings, stamps, and labels rather than painting over this authentic character.
- Add reproduction vintage ornaments in traditional colors (red, gold, silver) that honor the crates’ era.
- Incorporate vintage elements like old light bulbs, rusty bells, or antique ornaments.
- Top with a vintage-inspired tree topper like an old-fashioned star or angel.
25. Spalted Wood Art Christmas Tree
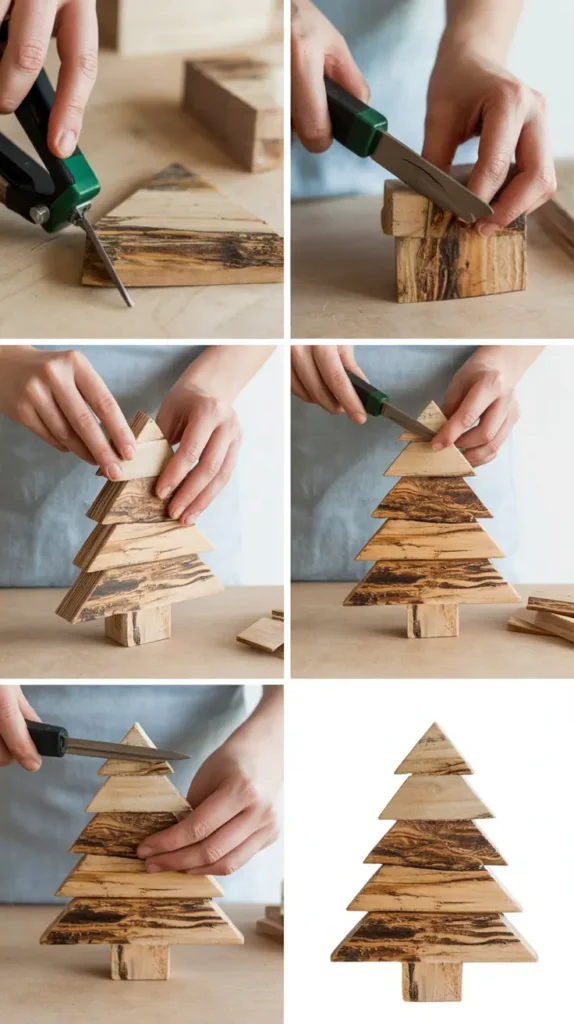
Spalting—the natural discoloration caused by fungal growth in dead wood—creates striking black zone lines and color variations that make each piece of spalted wood unique artwork.
A Christmas tree from this dramatic material becomes a statement piece.
Understanding Spalted Wood:
- Spalting occurs when fungi colonize dead or dying trees, creating black lines, color zones, and unique patterns before the wood rots.
- Look for spalted wood at specialty lumber yards, woodworking stores, or from tree services that process storm-damaged trees.
- Common spalted species include maple, beech, and birch, though many hardwoods can display spalting.
- Select pieces with dramatic zone lines but not so much decay that structural integrity is compromised.
- This wood can be more expensive due to its artistic character, so plan accordingly for your budget.
Material Preparation:
- Stabilize spalted wood by applying penetrating epoxy or thin CA glue to harden any punky or soft areas.
- Sand surfaces carefully with progressively finer grits to reveal the full beauty of zone lines and color variations.
- Wear a quality dust mask when working with spalted wood as fungal spores can be irritating to lungs.
- Cut pieces to desired sizes, orienting cuts to showcase the most dramatic spalting patterns.
- Seal all surfaces thoroughly since spalting indicates the wood is more susceptible to continued decay.
Artistic Design:
- Treat each piece as individual artwork, positioning spalted sections where they’ll be most visible and impactful.
- Mix spalted pieces with plain wood for contrast that makes the spalting appear even more dramatic.
- Create a feature section where the most stunning spalted piece becomes the focal point of the tree.
- Consider building a smaller, tabletop-sized tree since spalted wood’s impact is powerful even in modest quantities.
Finishing for Maximum Impact:
- Apply multiple coats of clear, high-gloss polyurethane or epoxy to deepen colors and make zone lines pop visually.
- Consider a matte finish for subtle sophistication that doesn’t compete with the wood’s natural drama.
- Avoid stains or colored finishes that would obscure the spalting patterns you want to showcase.
- Buff the final finish to a high shine if desired, creating glass-like surfaces that emphasize every detail.
26. Wooden Clothespin Christmas Tree

Simple wooden clothespins arranged in circular layers create a surprisingly sophisticated three-dimensional Christmas tree with built-in functionality for displaying cards, photos, or small ornaments.
This project transforms an everyday item into creative holiday décor.
Material Requirements:
- Purchase several packages of traditional wooden clothespins (not plastic) from craft or dollar stores.
- Calculate quantities based on tree size—a medium tabletop tree might require 150-200 clothespins.
- Choose quality clothespins with tightly wound springs that will maintain grip throughout the season.
- Select old-fashioned one-piece clothespins if desiring a smoother look without spring mechanisms.
Base Structure:
- Create circular plywood discs in graduating sizes to serve as platforms for attaching clothespins.
- Cut 6-10 discs decreasing in diameter from largest (12-14 inches) at bottom to smallest (2-3 inches) at top.
- Drill a center hole through each disc to accommodate a threaded rod or dowel that will become the central spine.
- Stack discs on the rod with appropriate spacing (typically 3-4 inches between layers) using washers and nuts as spacers.
- Ensure the bottom disc is large enough to provide stable base, or mount the completed tree on a separate base platform.
Clothespin Attachment:
- Attach clothespins around the perimeter of each disc with the gripping end facing outward.
- Use hot glue or wood glue to secure each clothespin to the edge of its disc.
- Space clothespins evenly around each circle, slightly overlapping for full coverage without gaps.
- Orient all clothespins at the same angle for uniform appearance, or vary angles slightly for more organic look.
- Double-layer clothespins on lower tiers for added fullness and dimensional texture.
Finishing Options:
- Leave clothespins natural for authentic wood appearance and warm, neutral tones.
- Spray paint the entire assembled tree in metallic gold, silver, or copper for elegant shimmer.
- Paint clothespins in ombré gradations before assembly, transitioning from dark at bottom to light at top.
- Dip just the clothespin tips in paint or glitter for subtle color accents.
- Apply whitewash for farmhouse-chic appearance that lets wood grain show through.
Functional Display:
- Clip holiday cards received throughout the season, creating an ever-changing, personalized decoration.
- Attach family photos showing holiday memories from previous years.
- Display children’s artwork, Christmas drawings, or letters to Santa.
- Clip lightweight ornaments, paper snowflakes, or fabric decorations.
- Create an advent calendar by numbering clothespins 1-25 and clipping activities or treats to each.
27. Reclaimed Door Panel Christmas Tree
Architectural salvage doors with raised panels, interesting molding, or vintage hardware become extraordinary Christmas trees that celebrate architectural history while creating substantial focal points.
These pieces bridge the gap between holiday décor and permanent art installation.
Door Selection:
- Source old doors from architectural salvage yards, home demolition sites, or renovation projects.
- Look for doors with raised panels, carved details, or interesting proportions that provide visual interest.
- Consider pairs of closet doors or cabinet doors if a full-sized door is too large or expensive.
- Select doors with minimal damage to the face, though edge wear and paint layers add desirable character.
- Ensure doors are dry, solid wood rather than hollow-core for adequate weight and quality.
Preparation Work:
- Remove all hardware including hinges, knobs, and strike plates unless keeping them as character elements.
- Fill hardware holes with wood filler if desired, or preserve them as part of the door’s authentic history.
- Clean painted surfaces gently, removing loose flaking paint but preserving layered paint history.
- Sand lightly if planning to paint, or leave surface as-is for maximum authentic patina.
- Cut doors to desired height if needed, though maintaining original proportions often yields best results.
Tree Shaping:
- Draw a tree outline on the door face, using the panels and molding to inform shape placement.
- Cut the door into tree shape using a jigsaw, following panel edges where possible for clean lines.
- Alternatively, keep the door rectangular and create the tree shape through painting or applied decoration rather than cutting.
- Preserve interesting architectural elements like decorative corners, central panels, or carved details in your tree design.
Mounting and Display:
- Install heavy-duty picture hangers or French cleats on the back for secure wall mounting of these substantial pieces.
- Create a base support to make the door/tree freestanding if preferred, using lumber or metal brackets.
- Lean smaller doors against the wall on a buffet or mantel for casual, non-permanent display.
- Light the tree from below or sides with uplights to cast shadows from raised panels and create drama.
Decorating Approaches:
- Keep decoration minimal to allow the door’s architectural beauty to be the star.
- Hang a simple wreath on the door’s original hardware or nail placement.
- Drape a single strand of greenery garland following the tree outline you’ve created.
- Add small hooks to hang a few treasured ornaments that complement rather than cover the door.
28. Modern Linear Wood Slat Tree

Clean horizontal wood slats arranged with precise spacing create a contemporary Christmas tree that emphasizes line, rhythm, and negative space.
This minimalist approach celebrates modern design principles while maintaining the warmth of natural wood materials.
Material Selection:
- Purchase smooth, straight lumber like poplar, pine, or oak in consistent dimensions (typically 1×2 or 1×3).
- Select knot-free boards if seeking the cleanest modern aesthetic, or embrace minimal knots for subtle character.
- Calculate linear feet needed based on your design—a 5-foot tall tree might require 30-40 linear feet.
- Choose premium boards that are straight without warping, twisting, or cupping for professional results.
Precision Cutting:
- Measure and cut slats to exact graduated lengths with precision using a miter saw or table saw.
- Create a mathematical progression where each slat is uniformly shorter than the previous one (typically 2-3 inches per tier).
- Sand all surfaces and edges thoroughly with fine-grit sandpaper for silky-smooth, splinter-free finish.
- Slightly round (ease) all edges with sandpaper for a softer, more refined appearance that feels intentional.
- Number slats lightly in pencil on the back to maintain your planned installation order.
Installation Planning:
- Mark horizontal lines on the wall at precisely measured intervals (typically 4-6 inches apart) using a level.
- Find and mark wall studs for secure mounting, planning to attach at least every other slat directly to studs.
- Create a center vertical reference line to ensure symmetrical slat placement on both sides.
- Consider using a laser level for perfectly aligned horizontal installation across the entire tree height.
Mounting Techniques:
- Attach slats directly to the wall using finish nails or small screws countersunk and filled for invisible mounting.
- Mount slats to a large plywood backer board first, then hang the entire board as one unit for easier installation and removal.
- Use heavy-duty command strips rated for appropriate weight if renting or avoiding wall damage.
- Install French cleats on the back of a backing board for secure, removable mounting system.
- Ensure each slat is perfectly level before final securing, making micro-adjustments as needed.
Finishing Excellence:
- Apply multiple coats of paint in sophisticated colors like charcoal, navy, soft sage, or classic white.
- Use high-quality furniture-grade stain to enhance wood grain while maintaining contemporary clean appearance.
- Apply clear matte or satin polyurethane to natural wood, protecting while preserving authentic wood character.
- Consider a two-tone finish with slats in one color and wall in contrasting shade for maximum visual impact.
Minimalist Styling:
- Select 5-7 identical ornaments in matching finish (all brass, all glass, all matte white) for cohesive look.
- Hang ornaments at mathematically consistent intervals for intentional, designed appearance.
- Install single-color LED strip lighting along one edge for subtle, modern illumination.
- Mount a simple geometric star or abstract topper that continues the linear design language.
- Keep the wall and surrounding area clear of clutter to allow the tree’s linear form to command attention.
29. Barnwood and Metal Industrial Christmas Tree

Combining weathered barnwood with industrial metal elements creates a Christmas tree that celebrates both rustic heritage and urban modern aesthetics.
This mixed-material approach appeals to those who appreciate eclectic, loft-style design.
Material Pairing:
- Select authentic barn wood with gray patina and visible weathering for genuine rustic character.
- Source metal elements like black iron pipe, galvanized steel, copper tubing, or reclaimed industrial brackets.
- Consider mixing metal finishes—aged copper with raw steel, black iron with galvanized silver—for layered visual interest.
- Ensure wood pieces are structurally sound even if heavily weathered, as they must support metal components.
Structural Framework:
- Build the tree’s skeleton from metal pipe fittings and black iron pipe in triangular or geometric framework.
- Weld steel angle iron or flat bar into a tree-shaped frame if you have welding capabilities.
- Use galvanized plumbing pipe and fittings for industrial aesthetic that’s readily available at hardware stores.
- Create a central spine from threaded pipe with flanges at base and top for mounting wood elements.
- Ensure metal structure is stable and properly weighted at the base to support wood additions.
Wood Integration:
- Attach barn wood horizontally across the metal framework using U-bolts, pipe clamps, or drilled mounting points.
- Mix board widths and thicknesses for textural variety that complements the industrial framework.
- Allow wood to extend beyond metal supports at irregular lengths for organic, non-uniform appearance.
- Preserve gaps between boards to reveal the metal structure underneath, celebrating both materials equally.
- Secure wood firmly to metal using appropriate fasteners that won’t split the aged wood.
Industrial Details:
- Leave all metal in raw, unsealed finish to develop authentic rust and patina over time if desired.
- Seal metal with clear coat to preserve current finish and prevent rust formation.
- Add industrial elements like exposed bolts, visible welds, rivets, or metal corner brackets as decorative features.
- Incorporate repurposed metal objects like gears, pulleys, or chains as both structural and decorative components.
- Install Edison bulb string lights with black cord that reinforces the industrial aesthetic.
Styling Approach:
- Hang ornaments from metal hooks, wire, or leather cord rather than traditional ribbon or string.
- Choose decorations with industrial character—metal stars, galvanized bells, wooden spools, burlap.
- Incorporate greenery sparingly in metal containers or test tubes attached to the structure.
- Keep colors muted and natural—grays, browns, blacks, metallics, cream—avoiding bright traditional Christmas colors.
30. Wooden Arrow Christmas Tree
Arranging wooden arrows pointing upward creates a dynamic Christmas tree with built-in directional energy and symbolic meaning.
This design works beautifully in modern, bohemian, or nature-inspired spaces.
Arrow Creation:
- Cut arrow shafts from ¾-inch dowels or square wooden craft sticks in graduated lengths.
- Create arrow points by cutting triangular pieces from thin plywood or basswood sheet.
- Fashion arrow fletching (feathers) from balsa wood, thin wood veneer, or even real feathers for authentic detail.
- Sand all components smooth before assembly, ensuring no rough edges or splinters.
- Glue components together using wood glue, ensuring points and fletching are securely attached to shafts.
Size Variation:
- Build 15-25 arrows in decreasing lengths from approximately 24 inches at the base to 4 inches at the top.
- Vary arrow proportions so some are longer and slender while others are shorter and more substantial.
- Create larger fletching on some arrows and minimal details on others for visual variety.
- Consider making a few arrows slightly curved rather than perfectly straight for organic character.
Assembly Design:
- Arrange arrows in a triangular tree outline with all points facing upward toward a common apex.
- Mount arrows to a backing board in symmetrical arrangement for formal appearance.
- Create asymmetrical, organic arrangement where arrows angle slightly differently for dynamic energy.
- Space arrows with varying gaps between them rather than uniform spacing for more natural composition.
- Layer some arrows over others at the center to create dimensional depth rather than flat installation.
Finishing Styles:
- Stain arrows in natural wood tones ranging from light pine to dark walnut for earthy, organic aesthetic.
- Paint in ombré gradation from dark at bottom to light at top for dimensional color effect.
- Apply metallic finishes—copper on points, gold on shafts, silver on fletching—for elegant mixed-metal look.
- Leave natural with only clear sealer, allowing varied wood grain and species to create subtle color variation.
- Create tribal-inspired painted patterns with geometric designs, stripes, or dots on arrow shafts.
Symbolic Display:
- Position arrows pointing upward to symbolize growth, aspiration, and reaching toward the heavens.
- Add meaningful text near the tree like “Aim High” or “Onward and Upward” to reinforce the symbolic nature.
- Hang small tags from arrows with family goals, wishes, or resolutions for the coming year.
- Use the arrow tree as a focal point for reflection and intention-setting during the holiday season.
31. Repurposed Wooden Ruler Christmas Tree

Vintage wooden rulers carry nostalgic charm and graphic appeal with their printed measurements, numbers, and often colorful markings.
Arranged into a Christmas tree, they create conversation-starting décor that appeals to teachers, students, and vintage enthusiasts.
Ruler Collection:
- Source vintage wooden rulers from antique shops, estate sales, thrift stores, or online vintage marketplaces.
- Look for rulers with interesting graphics, company names, advertising, or varied measurement systems (metric, imperial, specialized).
- Collect 20-40 rulers depending on desired tree size and whether you’ll overlap them or space them apart.
- Mix ruler lengths—yardsticks, meter sticks, 12-inch rulers—for varied visual rhythm.
- Seek out rulers in different colors and wood tones for maximum visual interest, or unify with similar aged patinas.
Preservation Preparation:
- Clean rulers gently with soft cloth and mild wood cleaner, avoiding harsh chemicals that might damage printing.
- Remove any tape residue, stickers, or debris while preserving the authentic wear and character.
- Resist the urge to sand or refinish—the aged condition and worn printing are essential to the vintage appeal.
- Apply only a light coat of clear matte sealer if protection is necessary, testing first to ensure it doesn’t darken or alter appearance.
Creative Arrangement:
- Overlap rulers at varying angles rather than perfectly horizontal alignment for dynamic, energetic composition.
- Create sections where measurements align or numbers create interesting patterns or sequences.
- Mix horizontal, vertical, and diagonal orientations for asymmetrical, artistic arrangement.
- Position rulers with the most interesting graphics or colors in prominent locations where they’ll be noticed.
- Allow some rulers to extend beyond others at irregular lengths for organic, unstructured appearance.
Assembly Methods:
- Attach rulers to large plywood backing board using small screws through existing holes in ruler ends.
- Use hot glue or construction adhesive for quick permanent attachment to backing.
- Mount directly to wall studs using small finish nails if creating a direct wall installation.
- Create a frame around the ruler tree using simple wooden molding for gallery-style presentation.
Thematic Styling:
- Complement with vintage school-themed ornaments like apples, pencils, small chalkboards, or alphabet blocks.
- Hang small photos with paperclip hangers for casual, nostalgic display.
- Add vintage-style Edison bulb string lights that honor the retro aesthetic.
- Display near bookshelves, desks, or study areas where the educational theme feels appropriate and intentional.
- Consider gifting to teachers or creating personalized versions with rulers from specific eras or locations.
32. Driftwood and Rope Wall Hanging Tree

Suspending driftwood pieces from ropes creates an ethereal, floating Christmas tree that celebrates both coastal aesthetics and bohemian style.
This lightweight design is perfect for small spaces or as additional holiday décor in unexpected locations.
Driftwood Curation:
- Select 5-9 driftwood pieces in graduated lengths from approximately 24 inches down to 4 inches.
- Choose pieces with similar character—all heavily weathered gray, all with remaining bark, all smooth and bleached—for cohesive appearance.
- Look for relatively straight pieces without excessive curves that would complicate the hanging arrangement.
- Ensure pieces are completely dry and free from sand, salt, or debris before bringing indoors.
- Select pieces with approximately similar diameter (1-2 inches) for visual consistency.
Rope Selection:
- Use natural fiber rope like jute, hemp, or cotton in ½ to ¾-inch thickness for substantial presence.
- Calculate rope length by planning vertical spacing between driftwood pieces (typically 6-8 inches apart) plus top and bottom extensions.
- Purchase approximately 10-15 feet of rope for a medium-sized tree, allowing extra for knots and adjustments.
- Choose rope color that complements your space—natural tan, bleached white, or even dyed colors for contemporary twist.
Assembly Process:
- Drill holes through each end of every driftwood piece approximately ½ inch from the ends.
- Thread two parallel ropes through holes in the longest piece first, tying secure knots underneath to prevent slipping.
- Continue adding progressively shorter pieces up the ropes, tying knots at measured intervals to maintain even spacing.
- Ensure each piece hangs level by adjusting knot positions so both sides are equal length.
- Gather rope ends together at the top and tie into a hanging loop or knot around a wooden dowel for mounting.
Hanging Installation:
- Mount on a ceiling hook, wall-mounted bracket, or over a door frame using the rope loop.
- Ensure mounting point is secure enough to support the weight of wood and any decorations added.
- Position where gentle air movement will cause subtle swaying motion that adds life to the display.
- Hang near a window where natural light creates changing shadows throughout the day.
Coastal Decoration:
- Tie seashells, starfish, or sand dollars to the ropes between driftwood pieces using twine or thin rope.
- Wrap cool white LED string lights loosely around the structure for soft, moonlight-like illumination.
- Hang lightweight fabric or paper ornaments in ocean-inspired colors—blues, aquas, sandy tans, pearl whites.
- Add natural elements like dried sea oats, grasses, or coastal greenery tucked between ropes and wood.
- Keep decoration sparse and lightweight to maintain the airy, floating quality of the design.
33. Reclaimed Wood Patchwork Christmas Tree
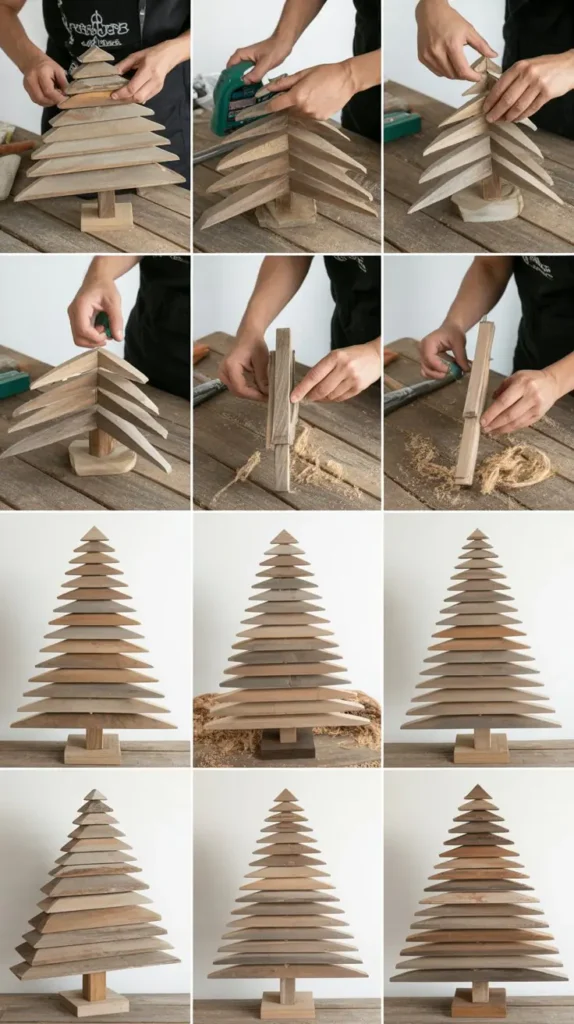
Creating a Christmas tree from a random assortment of reclaimed wood scraps in varying sizes, colors, and finishes celebrates resourcefulness while producing a truly one-of-a-kind piece.
This maximalist approach embraces chaos and variety as design principles.
Material Gathering:
- Collect wood remnants from any source—previous projects, construction sites, broken furniture, pallets, crates, flooring.
- Embrace complete variety in wood species, thickness, width, finish, color, and condition.
- Include painted pieces, stained pieces, natural wood, weathered gray, and everything in between.
- Gather pieces ranging from thin strips to chunky blocks, from 2 inches to 24 inches in length.
- Aim for approximately 50-100 pieces depending on sizes and desired tree dimensions.
Sorting Strategy:
- Organize pieces by approximate size to facilitate building from largest at bottom to smallest at top.
- Group by color or finish if you want to create intentional color zones or gradations within the tree.
- Alternatively, intentionally mix everything randomly for maximum patchwork eclectic effect.
- Set aside pieces with the most interesting character—unusual shapes, bright colors, distinctive markings—to place in prominent positions.
Creative Composition:
- Build on a large plywood backing board, arranging pieces before gluing to find the most pleasing composition.
- Fill the tree outline completely with no backing board visible, creating dense, rich texture.
- Overlap pieces at varied depths to create dimensional layers rather than flat surface.
- Orient pieces in different directions—some horizontal, some vertical, some diagonal—for dynamic energy.
- Fill gaps with the smallest pieces, creating a puzzle-like fit that maximizes material use and visual interest.
Attachment Method:
- Use construction adhesive or wood glue to secure pieces to the backing board.
- Add finishing nails or screws through larger, heavier pieces for extra security.
- Press firmly and allow adequate drying time for each section before adding more pieces.
- Work in sections from bottom to top, allowing lower areas to set before adding upper layers.
Unified Finishing:
- Leave the patchwork completely as-is with all original finishes intact for maximum eclectic character.
- Apply a single color of paint over everything to unify disparate pieces into cohesive whole while texture remains.
- Whitewash the entire tree to mute color variations while allowing some original character to show through.
- Apply clear sealer only to protect and slightly enrich colors without altering the patchwork nature.
Eclectic Styling:
- Decorate with equally eclectic ornaments—mix vintage with new, handmade with store-bought, traditional with quirky.
- Embrace a “more is more” philosophy where abundant decoration complements the abundant materials.
- Include non-traditional elements like buttons, keys, hardware, or small found objects as ornaments.
- Create a true maximalist statement that celebrates abundance, creativity, and resourcefulness.
34. Live Edge Wood Slab Christmas Tree
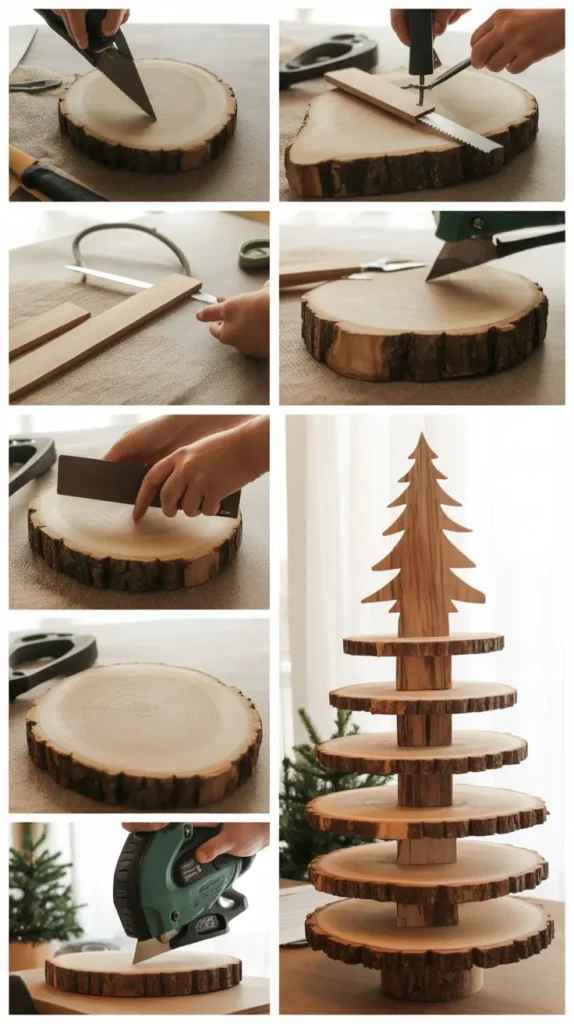
Premium live edge wood slabs—boards that retain the tree’s natural edge complete with bark and irregular contours—create luxury Christmas trees that function as both holiday décor and fine woodworking showcase.
This high-end approach celebrates wood as precious material.
Slab Selection:
- Source live edge slabs from specialty lumber dealers, sawmills, or craftsmen who work with premium hardwoods.
- Choose dramatic wood species like walnut, cherry, maple, or exotic woods with striking grain patterns.
- Select slabs approximately 1-2 inches thick for substantial presence without excessive weight.
- Look for interesting live edge features—dramatic curves, bark inclusions, burls, or figure in the grain.
- Calculate cost carefully as premium slabs can be expensive; this tree is an investment piece.
Preparation and Stabilization:
- Remove any loose bark while preserving bark that’s firmly attached to the wood edge.
- Fill any cracks, voids, or bark inclusions with clear or tinted epoxy for stabilization and visual drama.
- Sand faces progressively through grits from 120 to 320 for silky smooth surfaces.
- Take extra care sanding near live edges to preserve the natural contour without over-rounding.
Cutting and Shaping:
- Cut slabs to graduated widths that create tree silhouette while maximizing use of the live edge curves.
- Plan cuts to feature the most dramatic edge portions in visible positions.
- Each slab should showcase the live edge on both sides, creating organic, natural perimeter.
- Number slabs on the back to remember your planned stacking order.
Assembly Options:
- Stack slabs on a central threaded rod with spacers between each level for floating, modern appearance.
- Mount slabs to a wall backing at varying depths to create dimensional, sculptural installation.
- Create a freestanding version by attaching slabs perpendicular to a central support trunk.
- Space slabs generously (6-10 inches apart) to allow each beautiful piece to be appreciated individually.
Premium Finishing:
- Apply multiple coats of high-quality finishing oil or oil-based polyurethane to bring out grain depth and richness.
- Consider epoxy finish for glass-like surface that provides maximum grain enhancement and protection.
- Hand-rub finish to a soft luster using fine steel wool and paste wax for traditional craftsman approach.
- Allow natural color variations and grain patterns to be the star without stains or tints.
Refined Display:
- Treat this tree as a fine furniture piece or art installation rather than typical holiday decoration.
- Keep ornaments minimal and sophisticated—perhaps just a few high-quality handcrafted pieces.
- Light with warm LED spotlights that highlight the wood grain and create dramatic shadows.
- Display in a prominent location where the craftsmanship and material quality can be appreciated.
- Consider this a permanent or long-term seasonal investment that grows more beautiful with age.
Conclusion
Creating your own wooden Christmas tree offers far more than just holiday decoration—it provides an opportunity to craft meaningful, personalized pieces that reflect your style, values, and creativity.
The Top 33+ DIY Wooden Christmas Trees Anyone Can Make featured in this guide demonstrate that woodworking projects don’t require extensive experience or expensive tools to produce stunning results.
From simple pallet wood designs that beginners can complete in an afternoon to sophisticated live edge constructions that showcase advanced craftsmanship, there’s a perfect project waiting for every skill level and aesthetic preference.
These wooden alternatives to traditional evergreens are environmentally friendly, infinitely customizable, and become cherished heirlooms that tell the story of your creative journey.
Whether you choose rustic barn wood that celebrates history, modern geometric designs that embrace contemporary style, or coastal driftwood that brings nature indoors, your handmade wooden Christmas tree will become a conversation piece and source of pride for years to come.
The satisfaction of stepping back and saying “I built that” transforms holiday decorating from a task into a treasured tradition.
This season, pick a project that speaks to you, gather your materials, and discover the joy of creating something beautiful with your own hands. Your perfect wooden Christmas tree is waiting to be brought to life, and the memories you’ll create while building it will shine just as brightly as any ornament you hang upon its branches.
