
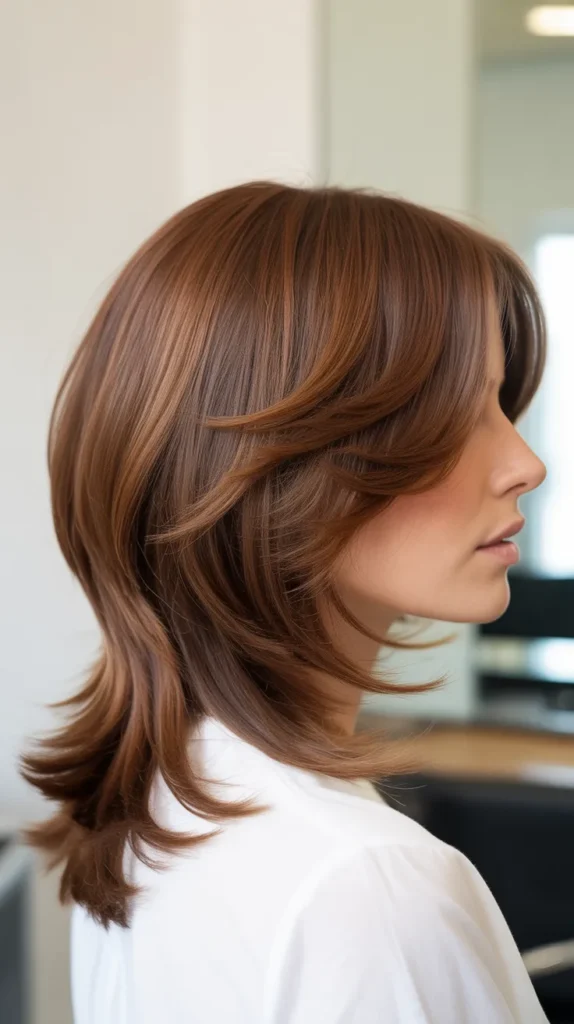
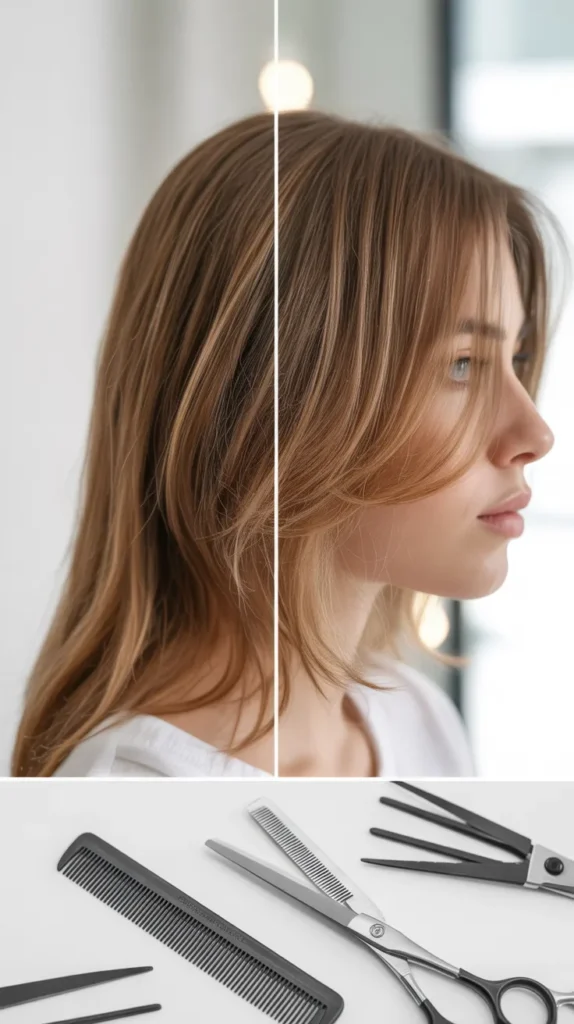
Have you ever walked out of a salon with perfectly layered hair and wondered if you could recreate that magic at home?
The truth is, learning to layer your hair at home is not only possible but can also save you time and money while giving you complete control over your style.
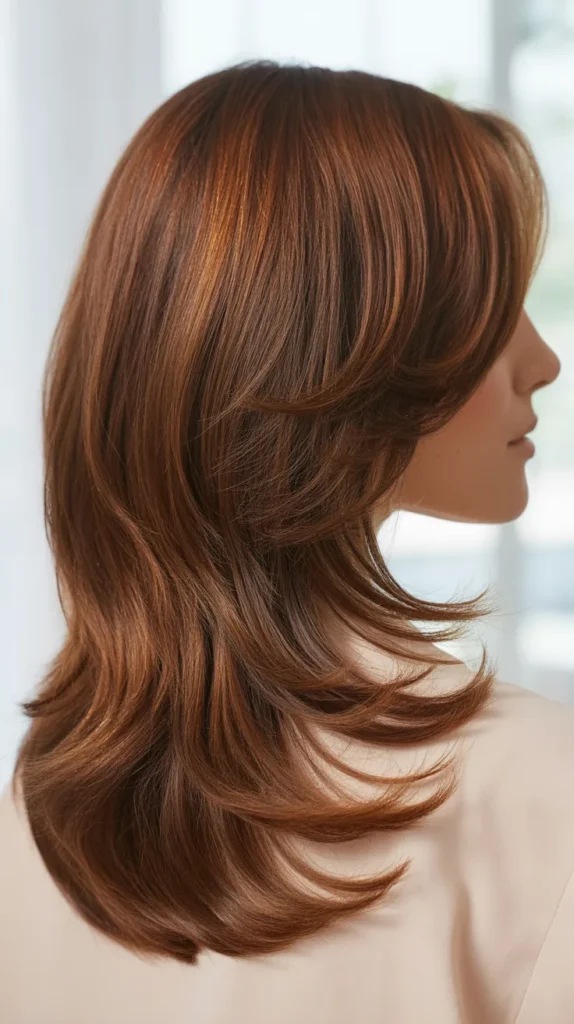
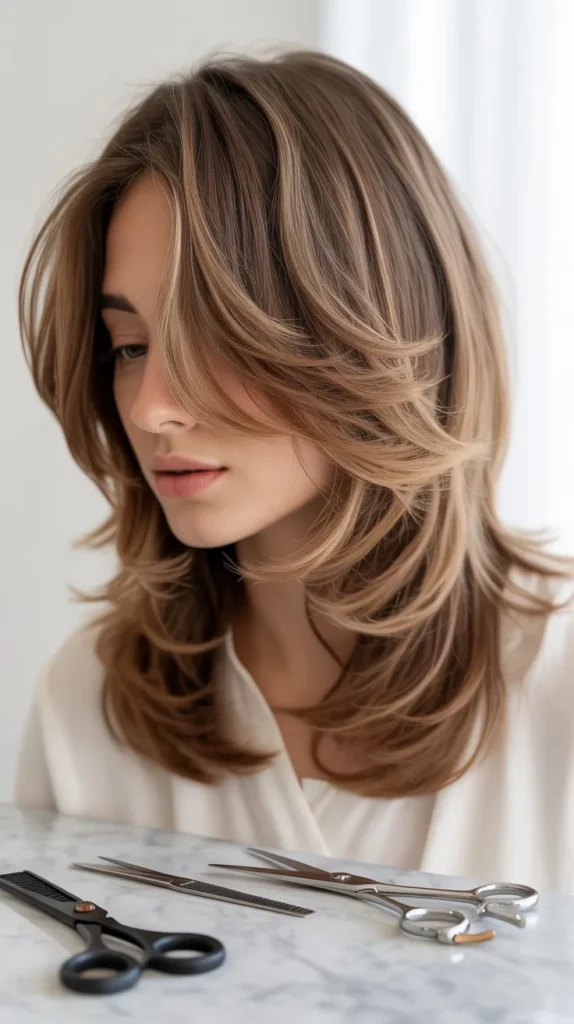
Whether you have long, flowing locks or a chic bob, mastering the art of layering can transform flat, lifeless hair into a voluminous, dynamic masterpiece.
This comprehensive guide on “Learn to Layer Your Hair at Home:
A Complete Guide” will walk you through everything you need to know—from understanding what layers actually are and choosing the right tools, to mastering various cutting techniques for different hair types and lengths.
You’ll discover professional tips, common mistakes to avoid, and step-by-step instructions that make the process surprisingly straightforward. By the end of this article, you’ll have the confidence and knowledge to pick up those scissors and create beautiful, salon-worthy layers in the comfort of your own bathroom.
1. Understanding Hair Layers and Their Benefits
Before you start cutting, it’s essential to understand what hair layers are and why they’re so transformative for your overall look.
Layers are sections of hair cut at different lengths to create dimension, movement, and shape throughout your hairstyle.
This foundational knowledge will help you make informed decisions about the type of layers that will work best for your hair type and face shape.
What Are Hair Layers?
- Layers are graduated sections of hair where the top sections are cut shorter than the bottom sections, creating a stacked or cascading effect.
- They work by removing weight from specific areas of your hair, allowing the remaining hair to move more freely and naturally.
- Unlike blunt cuts where all hair ends at the same length, layers create internal texture and dimension that adds visual interest.
- The placement of layers can be customized—face-framing layers around the front, long layers throughout, or short choppy layers for edgier styles.
Key Benefits of Layered Hair
- Adds volume and body to fine or thin hair by removing excess weight that pulls hair down flat.
- Creates movement and bounce that makes hair appear more dynamic and less static.
- Helps manage thick or heavy hair by reducing bulk while maintaining length.
- Enhances natural texture whether your hair is straight, wavy, or curly.
- Frames the face beautifully and can highlight your best features while softening harsh angles.
- Makes styling easier and faster because layered hair naturally falls into shape.
- Grows out more gracefully than blunt cuts, requiring less frequent maintenance trims.
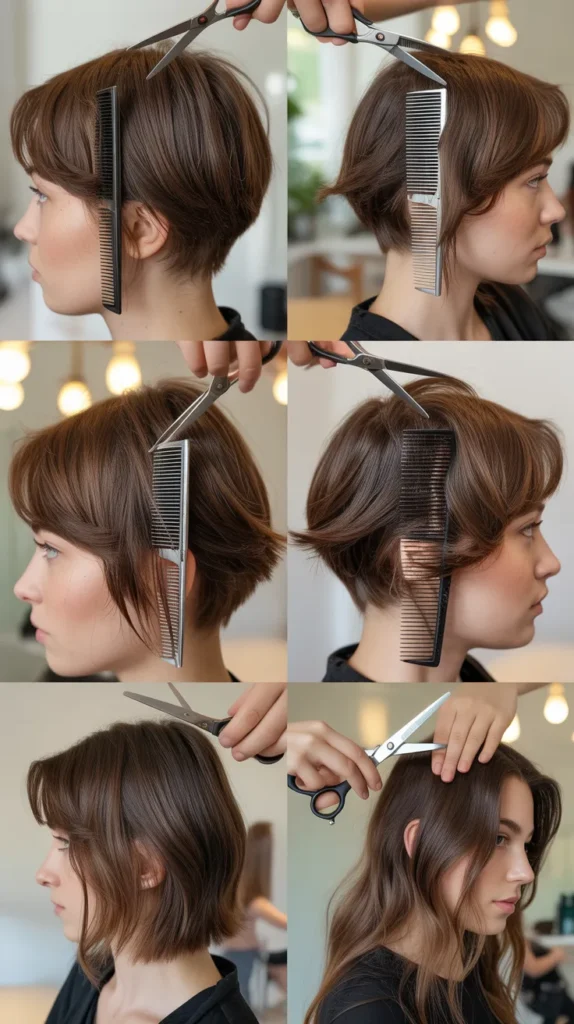
2. Essential Tools and Materials You’ll Need
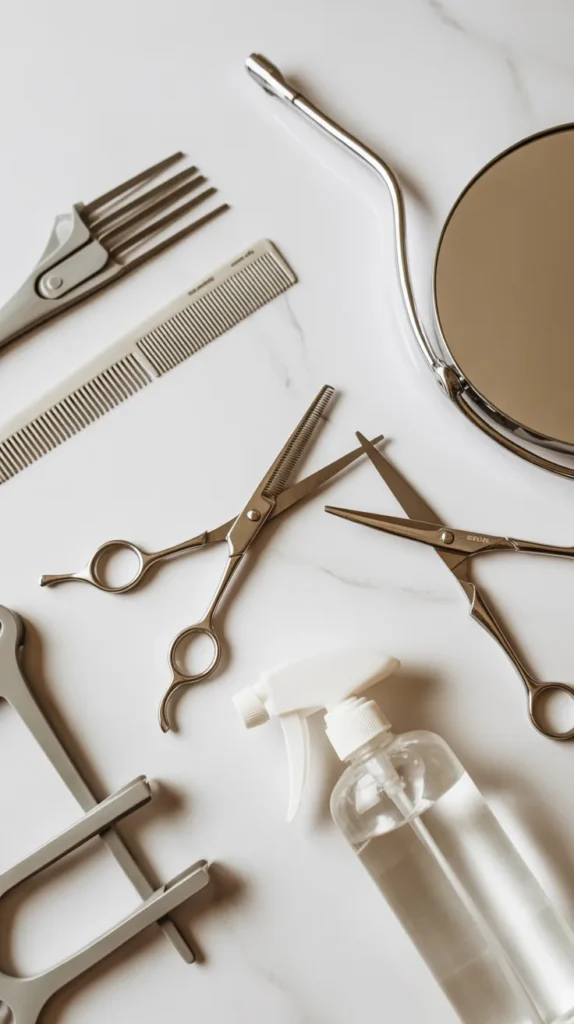
Having the right tools is half the battle when learning to layer your hair at home.
Professional-quality equipment makes the cutting process easier, safer, and ensures better results that rival salon work.
Must-Have Cutting Tools
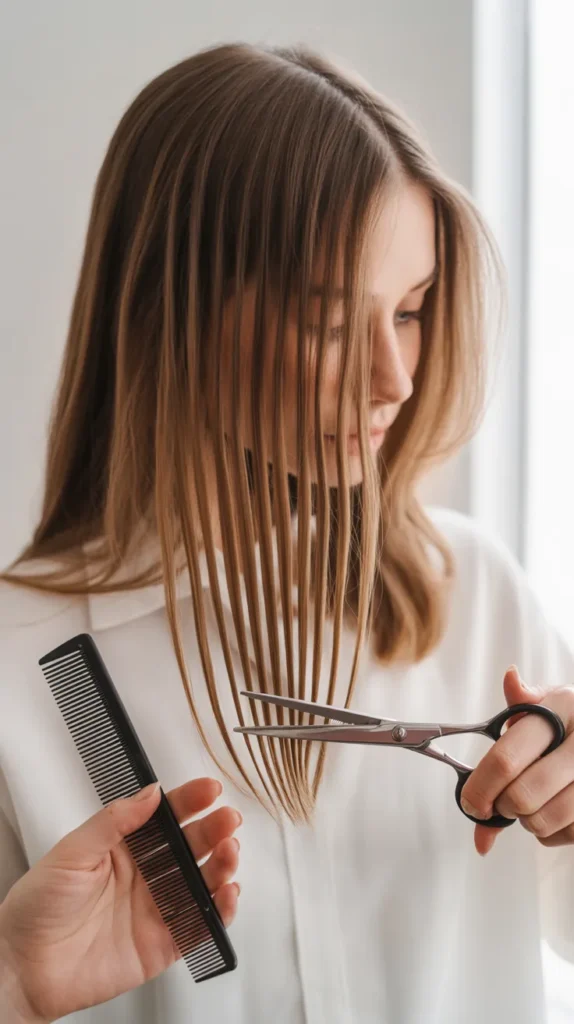
- Professional hair cutting shears (6-7 inches) with sharp, precise blades designed specifically for hair—regular household scissors will create split ends and uneven cuts.
- Thinning shears or texturizing scissors for blending layers and removing bulk without creating harsh lines.
- Fine-tooth comb for sectioning and creating clean parts that ensure even cutting.
- Wide-tooth comb for detangling wet hair without causing breakage.
- Hair clips or sectioning clips (at least 6-8) to keep hair organized and out of the way while working.
- Spray bottle filled with water to keep hair damp and manageable during cutting.
- Handheld mirror or dual mirror setup so you can see the back and sides of your head clearly.
Additional Helpful Items
- Cape or old towel to protect your clothes from hair clippings.
- Hair ties or elastics for creating ponytail methods of layering.
- Rat-tail comb for precise parting and sectioning.
- Good lighting setup including overhead and side lighting to see all angles clearly.
- Blow dryer and round brush for checking your work as you go.
3. Preparing Your Hair for Cutting
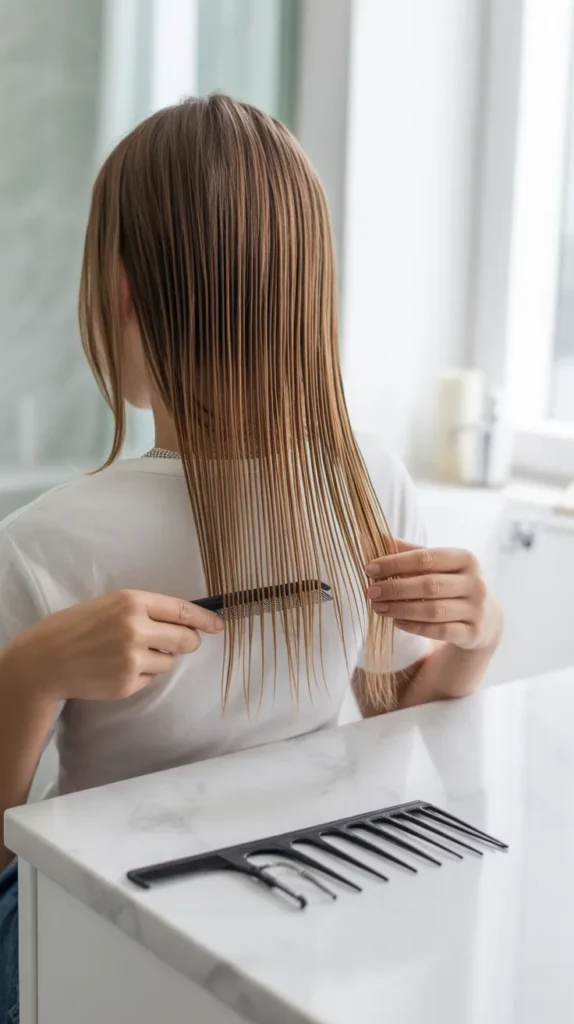
Proper preparation is crucial for achieving professional-looking layers at home.
Taking the time to prepare your hair correctly will make the cutting process smoother and help you avoid common mistakes that lead to uneven results.
Washing and Conditioning
- Wash your hair with your regular shampoo to remove any product buildup, oils, or dirt that could affect how the scissors glide through your hair.
- Apply conditioner from mid-length to ends to ensure hair is moisturized and tangle-free.
- Rinse thoroughly with cool water to seal the hair cuticle and add shine.
- Gently squeeze out excess water with a towel—avoid rubbing which creates frizz and tangles.
Detangling and Sectioning
- Use a wide-tooth comb to gently detangle hair starting from the ends and working your way up to the roots.
- Comb through hair multiple times until the comb glides smoothly without catching or pulling.
- Keep hair damp but not dripping wet—spray with water as needed throughout the cutting process.
- Divide hair into manageable sections using the four-quadrant method: part hair down the middle from forehead to nape, then part horizontally from ear to ear.
- Secure each section with clips to keep them separated and organized.
- Work in a well-lit area with mirrors positioned so you can see all angles of your head.
4. Basic Layering Techniques for Beginners
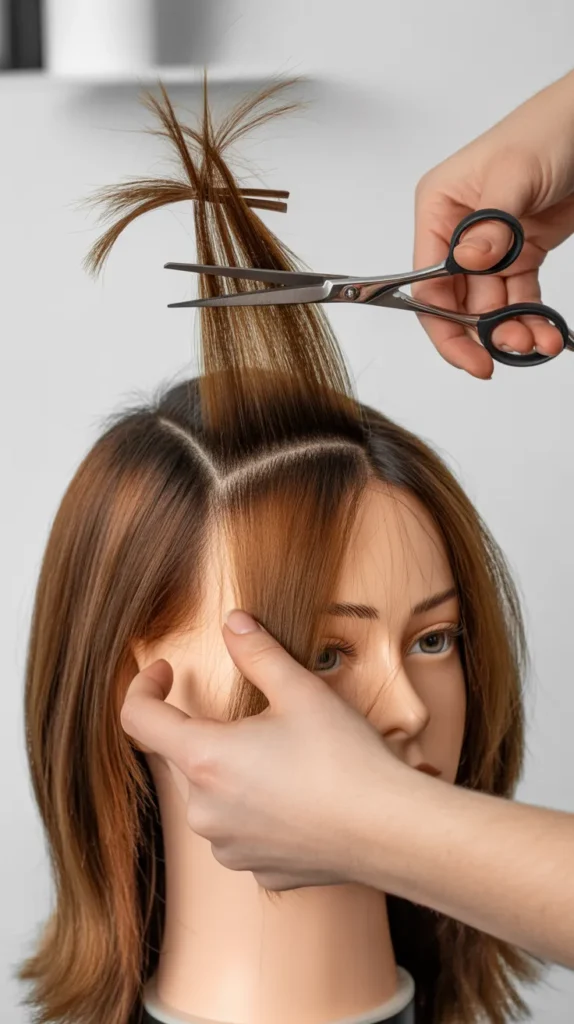
Starting with simple, beginner-friendly techniques will build your confidence and skills before moving on to more advanced layering methods.
These foundational approaches work for various hair types and are forgiving of minor mistakes.
The Ponytail Method
This technique is ideal for beginners because it’s simple, quick, and creates even layers throughout your hair.
- Flip your head upside down and brush all hair forward toward your forehead.
- Gather all hair into a high ponytail at the top center of your head (between your forehead and crown).
- Secure with a hair tie and make sure the ponytail is positioned exactly where you want the shortest layer to begin.
- Slide the hair tie down to where you want to cut, ensuring hair is straight and not twisted.
- Hold the ponytail straight up perpendicular to your head and cut straight across at your desired length.
- Remove the hair tie and shake out your hair to reveal graduated layers that are shorter at the crown and longer toward the ends.
The Twist and Cut Method
This technique is perfect for creating subtle, soft layers with minimal effort.
- Section hair into 2-4 large sections depending on thickness.
- Take one section and twist it loosely from root to end.
- Hold the twisted section away from your head at a 45-degree angle.
- Use scissors to point cut (cutting at an angle) into the twisted section at various points, removing small amounts.
- The twist creates natural graduation so hair falls in soft, blended layers when released.
- Repeat on all sections, ensuring you remove similar amounts from each for evenness.
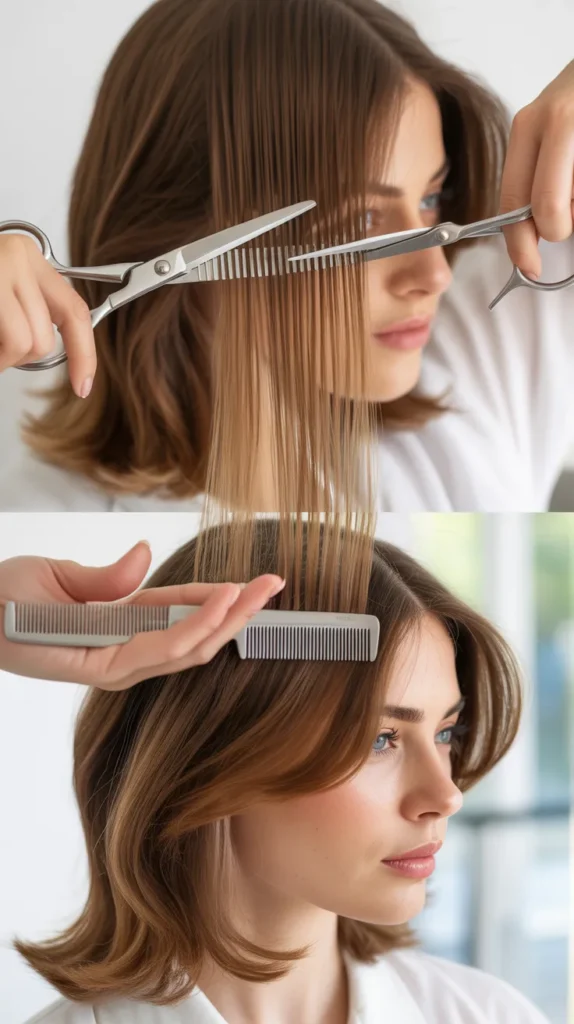
The Slide Cutting Technique
This method creates soft, feathered layers that blend seamlessly.
- Take a small section of hair (about 1 inch wide) and hold it between your fingers at a 45-degree angle from your head.
- Point your scissors downward along the hair shaft.
- Gently close and open the scissors as you slide them down the section, removing small amounts of hair.
- This creates a gradual taper rather than a blunt line.
- Work through all sections systematically, maintaining consistent angles and pressure.
5. Advanced Layering Methods for Different Hair Lengths
Once you’ve mastered basic techniques, these advanced methods allow you to create more customized, professional-looking layers tailored to specific hair lengths and styles.
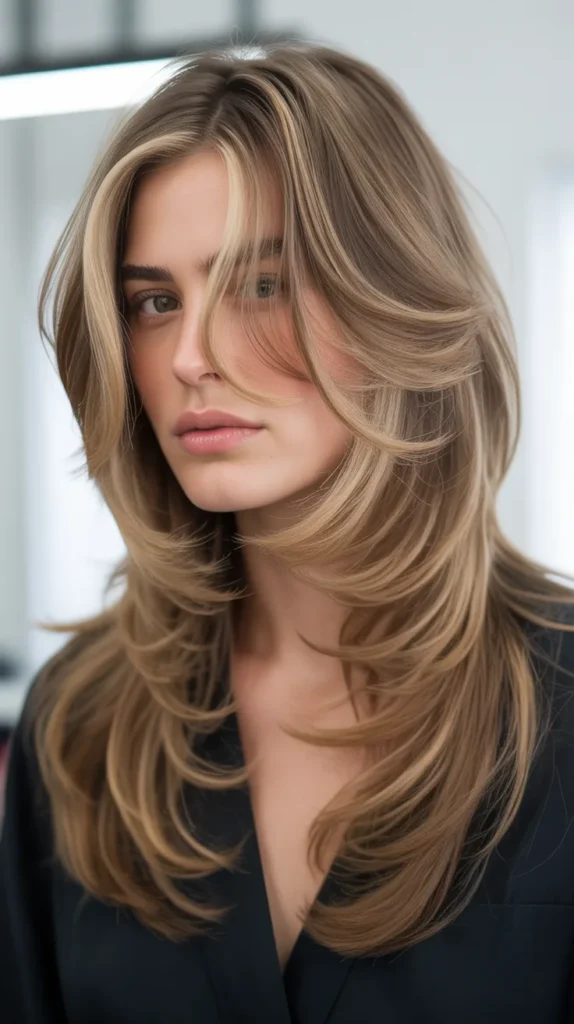
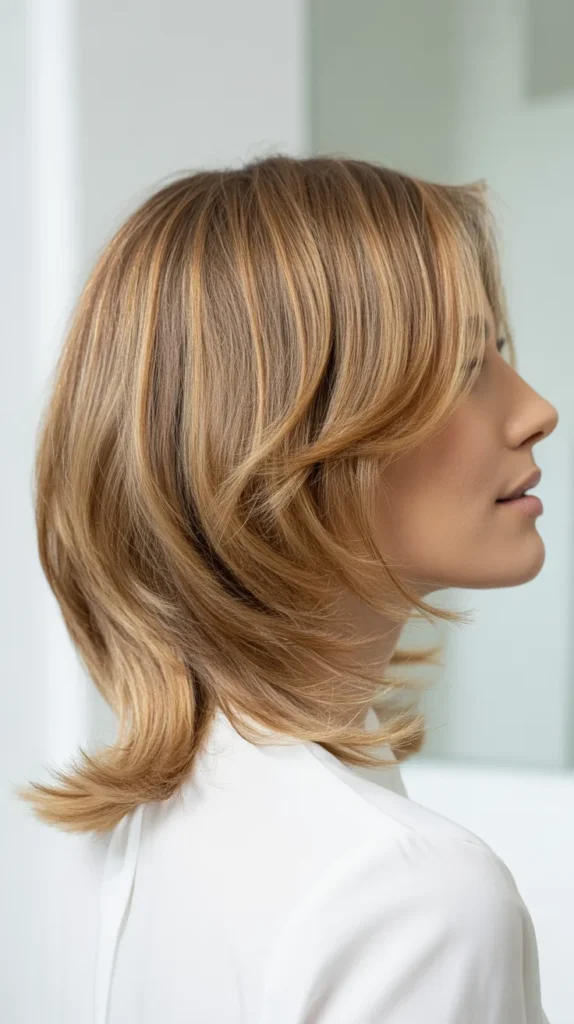
Long Hair Layering (Below Shoulders)
Long hair offers the most versatility for layering because you have more length to work with and can create dramatic or subtle effects.
- Use the U-shaped layering method by dividing hair into three sections: two front sections and one back section.
- Start with the back section and create a horizontal part at ear level.
- Hold the bottom section straight down and cut at your desired length to establish the baseline.
- Take the section above it, pull it down, and cut 1-2 inches shorter to create the first layer.
- Continue working up, making each section progressively shorter to create graduated layers.
- For face-framing layers, bring front sections forward and cut at an angle from chin-length to blend with the rest.
- Check symmetry by bringing both sides forward over your shoulders and comparing lengths.
Medium Hair Layering (Shoulder Length)
Medium-length hair benefits from layers that add movement without sacrificing too much length.
- Part hair down the middle and divide into four equal sections.
- Start with bottom sections and establish your longest length.
- Create layers by taking horizontal sections and cutting at a 45-degree angle from shorter at top to longer at bottom.
- For shoulder-length hair, keep the shortest layers around chin or jawline length to maintain fullness.
- Add face-framing pieces by pulling front sections forward and cutting from cheekbone to chin length.
- Blend mid-lengths by point cutting to avoid harsh lines.
Short Hair Layering (Above Shoulders)
Short hair requires more precision because there’s less room for error, but layers add crucial texture and shape.
- Section hair into five parts: top, two sides, and two back sections.
- Begin with the nape area, working in small horizontal sections.
- Use vertical cutting techniques to create layers that stack and add volume.
- The crown area should have the shortest layers to create lift and height.
- Texturize ends with thinning shears to prevent bulkiness and create a softer edge.
- Check layers by running fingers through hair to ensure smooth transitions between lengths.
| Hair Length | Ideal Layer Placement | Best Technique | Key Benefit |
|---|---|---|---|
| Long (Below Shoulders) | Start at cheekbone or chin | U-shaped method | Maximum movement and versatility |
| Medium (Shoulder Length) | Start at jawline | 45-degree angle cutting | Adds body without losing length |
| Short (Above Shoulders) | Throughout with emphasis on crown | Vertical sectioning | Creates lift and texture |
| Very Short (Pixie/Bob) | Concentrated at crown and top | Point cutting | Defines shape and adds interest |
6. Layering Techniques for Different Hair Types
Your hair’s natural texture significantly impacts how layers will fall and behave, so tailoring your approach to your specific hair type ensures the best possible results.
Straight Hair Layering
Straight hair shows every cut line clearly, so precision is essential for beautiful results.
- Straight hair benefits from long, sweeping layers that add movement without creating bulkiness.
- Cut layers at least 2-3 inches apart to create visible dimension without too many distinct lines.
- Use point cutting on the ends to soften the edge and prevent a blunt, harsh appearance.
- Face-framing layers should be subtle and graduated to avoid the “stepped” look.
- Avoid cutting too many short layers on top if your hair is fine, as this can make hair look stringy and flat.
- Consider adding internal layers to remove weight while maintaining a sleek surface.
Wavy Hair Layering
Wavy hair is the most forgiving texture for layering and can handle more dramatic cuts.
- Embrace layers throughout to enhance natural wave pattern and add definition.
- Cut layers when hair is dry so you can see how the waves will actually fall and bounce.
- Create layers that work with your wave pattern—if waves start at ear level, begin layers there.
- Use the twist method to add subtle texture that enhances natural movement.
- Don’t be afraid of shorter layers on top, as waves provide natural volume and texture.
- Texturize ends with thinning shears to reduce bulk and allow waves to form more freely.
Curly Hair Layering
Curly hair requires special consideration because it shrinks significantly when dry and has unique structural needs.
- Always cut curly hair when completely dry so you can see the true length and curl pattern.
- Cut curls individually, working curl by curl rather than in sections to maintain the natural pattern.
- Use the “curl by curl” method where you trim each spiral at its desired length without pulling or straightening.
- Create layers that follow the natural curl formation to enhance shape rather than fight it.
- Remove bulk from the interior using thinning shears while keeping length on the perimeter for definition.
- Avoid creating layers that are too short on top, which can lead to a triangular or pyramid shape.
- Focus on creating a rounded silhouette with layers that add width at the sides rather than just the top.
Thick/Coarse Hair Layering
Thick hair needs strategic layering to remove weight and bulk while maintaining a flattering shape.
- Use abundant layers throughout to significantly reduce weight and prevent the “mushroom” effect.
- Create internal layers by taking horizontal sections and cutting underneath hair shorter while leaving the surface longer.
- Employ thinning shears generously to remove bulk from ends without losing length.
- Make layers at least 1-2 inches apart to create noticeable lightness and movement.
- Focus on removing weight from the mid-lengths where bulk tends to accumulate most.
Fine/Thin Hair Layering
Fine hair requires careful layering to add volume without making hair look even thinner.
- Keep layers minimal and long to maintain the appearance of fullness and density.
- Avoid short layers on top which can make the scalp more visible and hair look sparse.
- Focus layers around the face and bottom third of hair length only.
- Use subtle point cutting rather than blunt cuts to create soft movement without removing density.
- Consider “invisible layers” where you remove tiny amounts throughout to add movement while maintaining thickness.
7. Face-Framing Layers and Their Impact
Face-framing layers are one of the most transformative elements of layered haircuts because they draw attention to your best features and can dramatically alter how your face shape appears.
Understanding Face-Framing Layers
Face-framing layers are shorter sections of hair that fall around your face, typically starting anywhere from cheekbone to chin length.
- These layers create a soft, flattering frame that draws attention to your eyes, cheekbones, and lips.
- They add dimension and movement to the front sections of your hair where it’s most visible.
- Face-framing layers can be subtle and blended or dramatic and distinct depending on your preference.
- The placement and length of these layers should complement your face shape for the most flattering result.
Cutting Face-Framing Layers
The technique for creating perfect face-framing layers requires careful measurement and precise cutting.
- Part your hair down the middle and separate the front sections from ear to ear.
- Clip back hair to keep it out of the way.
- Decide on your starting point—typically between cheekbone and chin length works for most face shapes.
- Take a diagonal section on one side and hold it straight down in front of your face.
- Cut at an angle from your chosen starting point (shorter) to blend into the rest of your hair (longer).
- Repeat on the other side, ensuring both sides are symmetrical by measuring frequently.
- Check symmetry by bringing both sides forward and comparing them directly in front of your nose.
- Blend the face-framing pieces into the rest of your layers using point cutting for a seamless transition.
Face-Framing Layers for Different Face Shapes
| Face Shape | Best Layer Placement | What to Avoid | Goal |
|---|---|---|---|
| Oval | Anywhere from cheekbone to chin | Going too short at temples | Maintain natural balance |
| Round | Chin length or below | Layers at cheek level | Elongate and slim the face |
| Square | Soft layers starting at jawline | Blunt, straight-across layers at jaw | Soften angular features |
| Heart | Chin to shoulder length | Very short layers at temples | Balance wider forehead with narrower chin |
| Long/Rectangle | Cheekbone to chin length | Extremely long layers only | Add width and break up length |
| Diamond | Layers at cheekbones and chin | Avoiding the temple area | Emphasize cheekbones, soften narrow forehead and chin |
8. Creating Volume with Strategic Layering
Strategic layer placement can transform flat, lifeless hair into voluminous, bouncy locks that appear fuller and healthier.
Crown and Top Layers for Lift
The crown area is key to creating overall volume and a flattering silhouette.
- Create shorter layers at the crown (the highest point of your head) to add lift and height at the roots.
- Section the crown area in a circular or square pattern, about 2-3 inches in diameter.
- Pull this section straight up perpendicular to your head and cut at your desired length—usually 3-4 inches for maximum lift.
- These shorter layers will stand up and support the longer hair around them, creating natural volume.
- Avoid cutting crown layers too short if you have fine hair, as this can create a “rooster tail” effect.
- Blend crown layers gradually into surrounding hair using point cutting to prevent obvious demarcation lines.
Removing Weight from Heavy Hair
Thick, heavy hair often lies flat due to its own weight, but internal layering can solve this problem.
- Create internal layers by taking horizontal sections and cutting the underneath hair 1-2 inches shorter than the top.
- This removes bulk from the interior while maintaining a smooth surface layer.
- Use thinning shears throughout the mid-lengths to remove additional weight without affecting the haircut’s shape.
- Focus weight removal on the densest areas, typically around the ears and nape.
- Leave more density at the roots and ends for a balanced appearance.
Layering Techniques That Add Body
- Use the elevation method where you hold each section at a 90-degree angle or higher from the head before cutting, creating layers that stand away from the scalp.
- Incorporate texturizing techniques like point cutting, notching, or slide cutting to create uneven edges that add dimension.
- Create shorter layers in the back and gradually longer layers toward the front for forward movement and body.
- Add subtle layers just on the underneath sections to create a lifted effect when the top layer lies smoothly over it.
9. Common Mistakes to Avoid When Layering at Home
Even experienced DIY hair cutters make mistakes, but knowing what to watch for can help you avoid the most common pitfalls that lead to unflattering results.
Cutting Too Much at Once
One of the most frequent and devastating mistakes is removing too much length in a single cutting session.
- Always start conservatively—you can always cut more, but you can’t put hair back once it’s gone.
- Cut in small increments of 1/4 to 1/2 inch at a time, checking your progress frequently.
- Step away from the mirror periodically to gain perspective on how your cut looks from a distance.
- Remember that wet hair appears longer than dry hair, so it will shrink up as it dries.
- If you’re unsure, cut less than you think you need and evaluate once your hair is dry and styled.
Not Checking Symmetry Regularly
Uneven layers are a telltale sign of amateur haircuts and can be difficult to correct.
- Compare both sides of your hair constantly throughout the cutting process by bringing them forward together.
- Use a ruler or measuring tape for precision if needed, especially when starting out.
- Check your work from multiple angles using a handheld mirror to see the back and sides.
- Take breaks to assess your progress with fresh eyes rather than cutting continuously.
- Ensure your head is level and straight when cutting—tilting your head will create uneven results.
Using Dull or Wrong Scissors
The tools you use are just as important as your technique for achieving professional results.
- Never use regular household scissors, craft scissors, or kitchen shears on your hair—they will damage hair and create split ends.
- Invest in professional hair cutting shears that cost at least $30-50 for decent quality.
- Keep your scissors sharp and have them professionally sharpened annually if you cut hair regularly.
- Hold scissors correctly with your thumb in the smaller hole and fingers in the larger hole for better control.
- Never cut with scissors fully closed—use the middle portion of the blades for better precision.
Cutting Hair When It’s Too Wet or Too Dry
The moisture level of your hair significantly affects how scissors move through it and how it will look once styled.
- Hair that’s too wet is heavy and lies differently than when it’s dry, leading to surprises once it dries.
- Hair that’s completely dry is harder to cut smoothly and can cause scissors to skip or catch.
- Keep hair damp but not dripping—it should be moist to touch but not leaving wet spots on your cape.
- Mist sections with water as you work to maintain consistent dampness throughout the cutting session.
- For curly hair, cut when completely dry so you can see the true curl pattern and length.
Ignoring Your Hair’s Natural Growth Patterns
Your hair has natural tendencies that affect how it falls, and fighting against them creates unflattering results.
- Pay attention to your part—cutting as if you have a middle part when you wear a side part will create uneven lengths.
- Notice cowlicks, especially at the crown or hairline, and avoid cutting too short in those areas where hair sticks up naturally.
- Respect the direction your hair naturally wants to fall and cut accordingly.
- If you have a strong natural part, section your hair following that part rather than forcing a different one.
Not Blending Layers Properly
Harsh, obvious lines between layers look unprofessional and unflattering.
- Always use point cutting or notching techniques to soften edges and create seamless transitions between layers.
- Blend each layer into the one below it by taking small sections where they meet and cutting at an angle.
- Check for “shelves” or obvious steps where one layer ends and another begins by running your fingers through your hair.
- Use thinning shears sparingly to blend without creating gaps or removing too much density.
10. Styling and Maintaining Your Layered Hair
Creating beautiful layers is only the first step—proper styling and maintenance ensure your layers always look their best and grow out gracefully.
Styling Techniques for Layered Hair
Different styling methods can dramatically change how your layers appear and behave.
- Use a round brush while blow-drying to add volume and direct layers where you want them to fall.
- Curl or wave different sections in alternating directions to create natural-looking movement and dimension.
- Apply styling products strategically—use volumizing products at roots and smoothing products on mid-lengths and ends.
- Rough-dry hair with your fingers for a tousled, textured look that emphasizes layers.
- Use a flat iron to create sleek, polished layers or to add subtle bends for movement.
- Scrunch wavy or curly layered hair with mousse or gel to enhance the natural texture and definition.
- Try different parting positions—side parts, middle parts, and deep side parts all showcase layers differently.
Products That Enhance Layers
- Volumizing mousse applied at roots before blow-drying lifts layers and creates lasting body.
- Texturizing spray or sea salt spray adds grit and separation to layers for a beachy, undone look.
- Lightweight serums or oils smooth frizz on ends without weighing down layers or eliminating movement.
- Root-lifting sprays target the crown area where layers begin, creating maximum lift.
- Dry shampoo adds texture and volume to second-day hair and helps layers maintain their shape.
- Heat protectant sprays are essential before using hot tools to style layers without damage.
Maintaining Your Layers Between Cuts
Proper care helps your layers stay fresh and grow out gracefully rather than becoming shapeless.
- Trim the very ends every 6-8 weeks to prevent split ends from traveling up and destroying your layer structure.
- Refresh face-framing layers every 4-6 weeks as they’re most visible and affect your overall look significantly.
- Use deep conditioning treatments weekly to keep layers healthy and prevent dryness.
- Avoid over-processing with color or chemical treatments that can damage layers and make them look fried.
- Sleep on a silk or satin pillowcase to reduce friction that causes frizz and disturbs layer formation.
- Protect layers from heat damage by using the lowest effective temperature on styling tools.
When to Refresh Your Layers
- When layers start to blend together too much and lose definition, typically after 8-12 weeks.
- If you notice your hair looking flat or heavy despite having layers—this means they’ve grown out and need reshaping.
- When face-framing pieces become long enough to tuck behind your ears rather than framing your face.
- If you see a clear line of demarcation where old layers meet new growth.
- When styling becomes more difficult because layers no longer fall into place naturally.
11. Troubleshooting and Fixing Layer Mistakes
Even with careful planning, mistakes happen—but most can be corrected or worked with until your hair grows out.
What to Do If You Cut Too Much
Taking off too much length is the most common and distressing mistake, but you have several options.
- Don’t panic—hair grows approximately half an inch per month, so even major mistakes will grow out with time.
- Work with what you have by styling your shorter layers with texturizing products to create an intentionally tousled, edgy look.
- Use hair extensions or clip-ins to temporarily add length while your hair grows back.
- Try new styling techniques like pinning sections back, using headbands, or creating updos that work with shorter layers.
- Consult a professional stylist who may be able to reshape your cut into something more intentional and flattering.
- Avoid cutting more in an attempt to “fix” it—this usually makes the problem worse.
Correcting Uneven Layers
Asymmetrical results are frustrating but usually easier to fix than cutting too much overall.
- Identify which side is shorter and carefully trim the longer side to match rather than evening up to the shorter side.
- Cut in very small increments (1/8 inch at a time) and check constantly by bringing both sides forward together.
- If the unevenness is throughout rather than side-to-side, consider having a professional blend the layers.
- Use strategic styling to camouflage minor unevenness—side parts and waves hide small differences well.
- Remember that perfect symmetry isn’t necessary or natural—slight variations aren’t noticeable in real life.
Dealing with Choppy or Harsh Layers
Obvious, abrupt transitions between layers look unfinished and unflattering but can be softened.
- Use point cutting along the harsh lines to break them up and create texture.
- Employ thinning shears very carefully on the ends of problematic layers to remove some density and create blend.
- Style with products that add texture and separation to disguise overly blunt cuts.
- Consider getting the layers professionally blended if they’re too harsh to fix at home.
- Grow out harsh layers while maintaining the general shape, then re-layer once you have more length to work with.
When to Seek Professional Help
Some situations require the expertise of a trained stylist rather than attempting a DIY fix.
- If you’ve made a significant mistake that you can’t figure out how to correct on your own.
- When you’ve cut unevenly and further self-correction is only making things worse.
- If you created an unflattering shape that needs professional reshaping and balancing.
- When you want to transition from a layered cut to a different style that requires precise blending.
- If you have a special event coming up and need your hair to look its absolute best quickly.
- When you’re feeling overwhelmed or frustrated—sometimes it’s worth the investment for peace of mind.
12. Expert Tips for Perfect At-Home Layers
These professional insights will elevate your home layering skills from amateur to surprisingly sophisticated.
Professional Cutting Secrets
- Always cut less than you think you need—conservative cutting prevents regret and allows you to gradually refine your work.
- Use your shoulders as a guide for symmetry by checking if both sides of your hair hit the same point.
- Cut hair in natural daylight whenever possible as artificial lighting can distort what you’re seeing.
- Take before photos from multiple angles so you can accurately assess your progress and results.
- Work on dry hair for your first pass if you’re nervous, then refine with damp hair for precision.
- Practice your cutting motion without actually cutting hair first to build confidence and muscle memory.
Techniques for Better Control
- Sit down while cutting to maintain a steady hand and consistent posture throughout the process.
- Take breaks every 10-15 minutes to rest your hands and reassess with fresh eyes.
- Cut in front of a large mirror with a handheld mirror nearby for checking the back.
- Use your fingers as a cutting guide by holding hair between your index and middle fingers at the desired length.
- Keep sections small (1-2 inches wide) for better control and more precise results.
- Cut when you’re well-rested and have plenty of time—rushing leads to mistakes.
How to Know When to Stop Cutting
- Step back from the mirror regularly to see how your hair looks from a normal viewing distance.
- Check your work by styling your hair as you normally would rather than just looking at wet, uncombed hair.
- If you’re starting to feel unsure or tired, stop—you can always refine later.
- Remember that hair looks different when dry, so don’t judge your work until you’ve styled it completely.
- Trust your instincts—if something feels wrong, stop and reassess before continuing.
Maintaining Sharp Scissors
- Wipe your scissors with a clean cloth after each use to remove hair and product buildup.
- Store scissors in a protective case rather than loose in a drawer where blades can get damaged.
- Never drop your scissors as this can misalign or damage the blades permanently.
- Have professional scissors sharpened by a specialist annually if you cut regularly.
- Test sharpness by cutting through a single strand of hair—it should slice cleanly without bending or pushing the hair.
Conclusion
Mastering how to “Learn to Layer Your Hair at Home:
A Complete Guide” is an empowering skill that gives you control over your style, saves money, and allows for creative expression whenever inspiration strikes.
Throughout this guide, you’ve discovered the fundamentals of hair layering—from understanding what layers are and gathering the right tools, to executing various cutting techniques for different hair types and lengths.
You’ve learned how to create face-framing layers that flatter your features, add volume through strategic placement, and avoid common mistakes that lead to unflattering results.
The techniques covered here work for straight, wavy, curly, thick, and fine hair, making this knowledge applicable regardless of your hair type.
Remember that layering hair is as much about confidence and practice as it is about technique—your first attempt may not be perfect, but each time you pick up those scissors, your skills will improve.
Start conservatively, check your work frequently, and don’t be afraid to take breaks to reassess with fresh eyes.
Whether you’re looking to refresh your current style, try something completely new, or simply maintain your layers between salon visits, the knowledge in this complete guide equips you to transform your hair with confidence.
With patience, This response paused because Claude reached its max length for a message. Hit continue to nudge Claude along.
