
Transforming your hair with a trendy shag haircut doesn’t require an expensive salon visit or professional expertise.
The At-Home Shag Haircut Tutorial for Messy Layers empowers you to create that effortlessly cool, textured look right in your own bathroom.
This comprehensive guide walks you through every step of achieving perfectly imperfect layers that add volume, movement, and personality to your hair.
Whether you have straight, wavy, or curly hair, this tutorial breaks down the cutting techniques, tool requirements, and styling secrets that professional hairdressers use.
You’ll discover how to section your hair properly, master the point-cutting technique, create face-framing layers, and style your new shag to perfection.
From understanding the right angles to troubleshooting common mistakes, this article equips you with all the knowledge needed to confidently cut your own messy layers at home.
Get ready to save money, gain a valuable skill, and rock a hairstyle that looks like you just stepped out of a high-end salon.
1. Understanding the Shag Haircut and Messy Layers
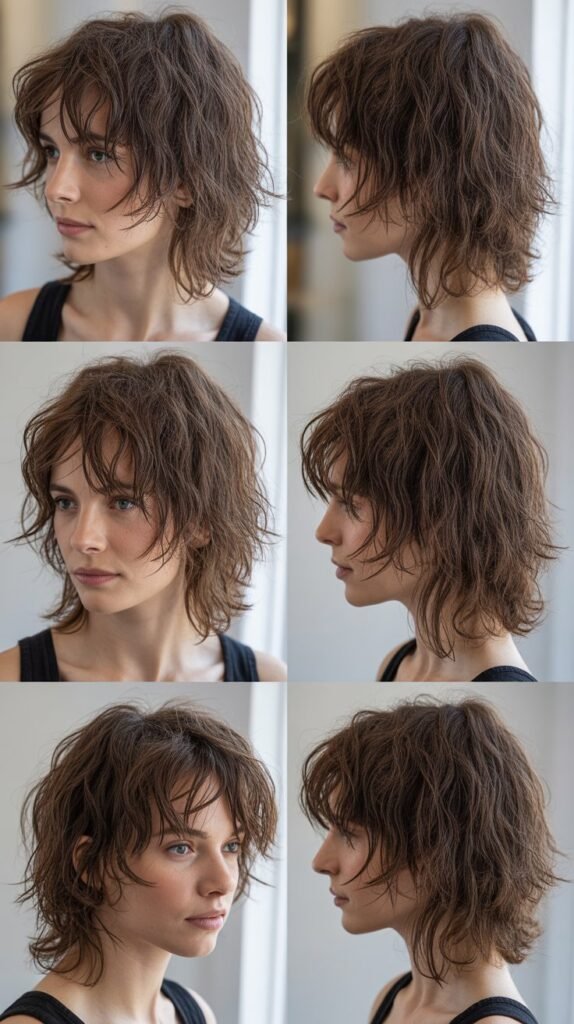
The shag haircut represents one of the most versatile and forgiving hairstyles you can create at home, making it perfect for DIY hair enthusiasts.
This style originated in the 1970s and has experienced multiple revivals because of its adaptable nature and low-maintenance appeal.
Messy layers are the foundation of the shag, creating texture, volume, and movement that works beautifully with various hair types and face shapes.
Key characteristics of the shag haircut:
- The style features choppy, uneven layers throughout the hair that create a deliberately disheveled appearance
- Shorter layers concentrate around the crown to add volume and lift at the roots
- Longer pieces frame the face and blend seamlessly into the overall length
- The cutting technique relies on point-cutting and texturizing rather than blunt cuts
- Shags work exceptionally well for fine hair by creating the illusion of thickness and body
Benefits of messy layers:
- They disguise uneven cutting mistakes better than precise, uniform layers
- The textured finish requires minimal styling effort for a polished look
- Layers remove weight from thick hair while adding dimension to thin hair
- The style grows out gracefully without requiring frequent maintenance trims
- Messy layers complement both casual and dressed-up aesthetics
Hair types that work best:
- Wavy and curly hair naturally enhances the shag’s texture and movement
- Straight hair can achieve beautiful shags with proper cutting angles and styling products
- Medium to thick hair density provides enough material to create substantial layers
- Fine hair benefits tremendously from the volume-boosting properties of layered cuts
- Hair lengths from chin-length bobs to past-shoulder work well with shag techniques
2. Essential Tools and Materials You’ll Need
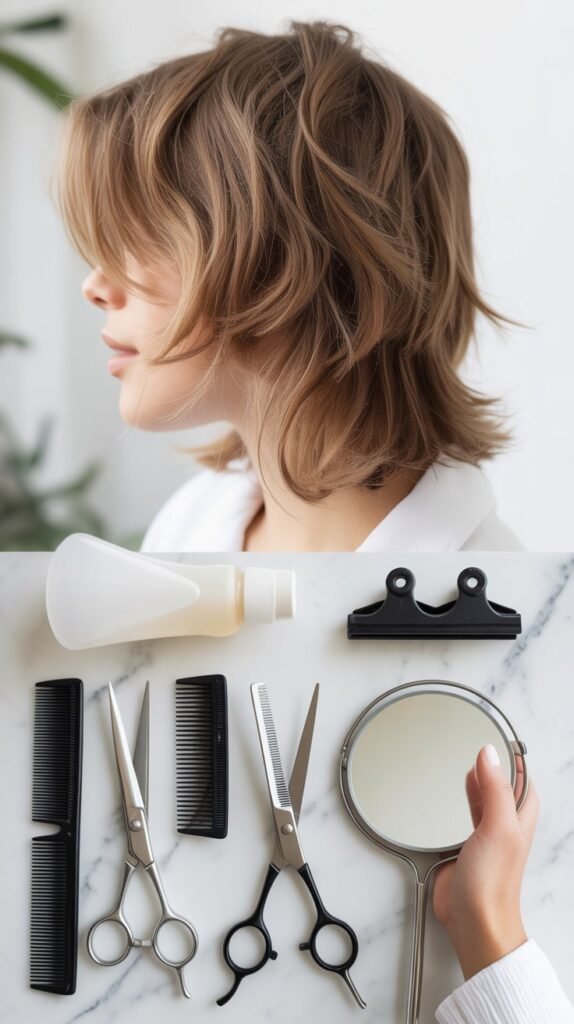
Gathering the right tools before starting your at-home shag haircut ensures a smoother cutting process and professional-looking results.
Quality equipment makes a significant difference in achieving clean cuts and precise layers.
Investing in proper haircutting tools pays off through multiple uses and better outcomes than attempting the cut with household scissors.
Cutting tools:
- Professional hair-cutting shears with sharp blades measuring 5.5 to 6.5 inches in length work best for home cuts
- Thinning shears or texturizing scissors help create the choppy, piecey effect essential to shag haircuts
- Regular household scissors damage hair by crushing rather than cutting cleanly, so avoid using them
- Keep your cutting shears exclusively for hair to maintain their sharpness and effectiveness
- Razor tools offer an alternative for advanced cutters but require more skill to use safely
Sectioning and preparation supplies:
- Hair clips or clamps (at least 6-8) secure sections while you work on other areas
- A fine-toothed comb helps create clean parts and smooth sections before cutting
- A spray bottle filled with water keeps hair damp throughout the cutting process
- A handheld mirror allows you to check the back and sides of your cut
- A cape or old towel protects your clothing from hair clippings
Styling products for post-cut:
- Texturizing spray or sea salt spray enhances the messy, piecey look of shag layers
- Lightweight mousse adds volume to the crown area where shorter layers begin
- A small amount of styling cream or pomade defines individual pieces and reduces frizz
- Dry shampoo at the roots creates additional lift and extends the style between washes
- Heat protectant spray safeguards hair if you plan to use styling tools
Optional but helpful items:
- A cutting guide or level helps ensure sections are cut at consistent angles
- Bobby pins assist in keeping smaller sections separated during the cutting process
- A hair tie pulls back sections you’re not currently working on
- Good lighting from multiple angles helps you see what you’re cutting clearly
- Reference photos of shag haircuts guide your vision and technique
3. Preparing Your Hair Before Cutting
Proper preparation sets the foundation for a successful at-home shag haircut and prevents common mistakes that occur when rushing into the cutting process.
Taking time to prepare your hair ensures you achieve even, balanced layers that work with your natural hair texture.
The preparation phase also helps you visualize the final result and make informed decisions about length and layering.
Washing and conditioning:
- Wash your hair with a clarifying shampoo to remove product buildup that might affect how hair falls
- Apply a lightweight conditioner primarily to the mid-lengths and ends to prevent tangling
- Rinse thoroughly with cool water to close the hair cuticle and reduce frizz
- Gently squeeze excess water from hair rather than rubbing aggressively with a towel
- Avoid applying leave-in products or oils before cutting as they can interfere with clean cuts
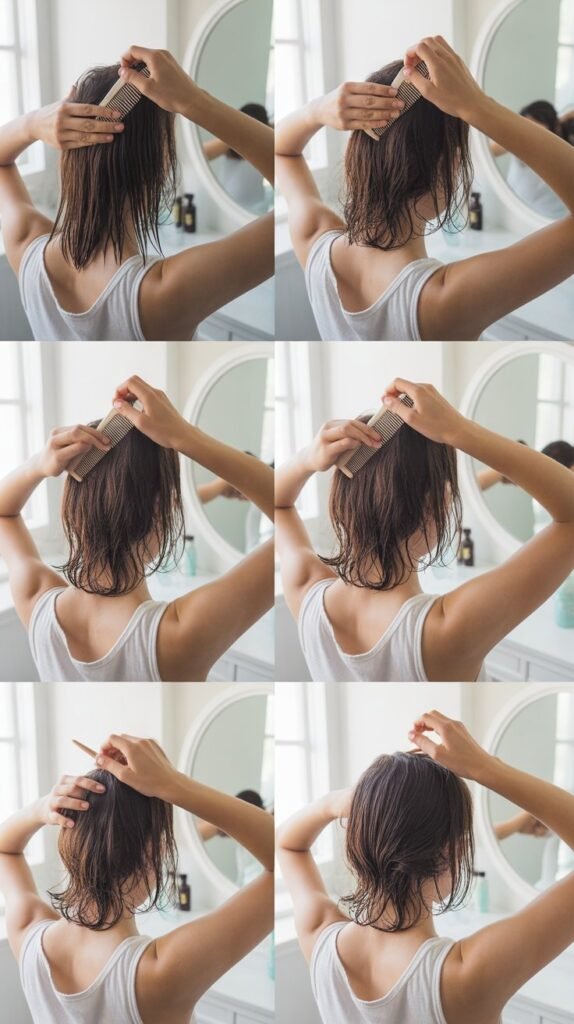
Detangling and combing:
- Use a wide-tooth comb or detangling brush to remove all knots starting from the ends
- Work your way up gradually toward the roots to prevent breakage and hair loss
- Ensure hair is completely tangle-free before beginning the sectioning process
- Comb through each section multiple times to guarantee smooth, even texture
- Address any persistent tangles with a small amount of water or detangling spray
Determining your starting length:
- Measure your current hair length and decide how much you want to remove overall
- Remember that hair appears longer when wet and will spring up when dry, especially curly hair
- Start conservatively by cutting less than you think you need, as you can always remove more
- Consider your face shape and which lengths are most flattering for your features
- Mark your desired shortest layer length mentally or with a small clip as a reference point
Creating your workspace:
- Set up in a well-lit bathroom or room with access to a large mirror
- Position a handheld mirror where you can easily grab it to check the back
- Lay out all your tools within easy reach to avoid searching mid-cut
- Cover the floor with newspaper or a sheet for easy cleanup afterward
- Eliminate distractions and give yourself at least 45-60 minutes for the entire process
4. Sectioning Your Hair Properly
Strategic sectioning creates the roadmap for your shag haircut and determines how well your layers blend together.
Professional hairstylists rely on precise sectioning techniques to ensure balanced cuts, and following these methods at home produces similarly polished results.
Proper sections also make the cutting process more manageable by breaking down the haircut into smaller, less intimidating steps.
Creating the initial divisions:
- Part your hair down the center from forehead to nape, dividing it into left and right halves
- Create a horizontal part from ear to ear across the top of your head, separating crown from lower sections
- You should now have four main quadrants: top left, top right, bottom left, and bottom right
- Secure each quadrant with a sturdy clip that won’t slip during the cutting process
- These foundational sections serve as the framework for all subsequent cutting
Refining the top section:
- The crown area requires the shortest layers to create volume and lift in a shag cut
- Subdivide the top sections into smaller horizontal layers about one to two inches apart
- Work from the front hairline backward toward the crown area with these subdivisions
- Clip each subsection securely out of the way until you’re ready to cut it
- Smaller sections provide more control and precision during the cutting process
Organizing the side sections:
- The hair around your face frames your features and requires special attention
- Create a triangular or curved section at the front that extends from your temples
- This face-framing section typically measures about two to three inches back from your hairline
- Separate side sections from back sections with vertical parts that run behind your ears
- Keep side sections accessible since you’ll frequently check symmetry between left and right
Managing the back sections:
- The back of your head presents the biggest challenge since you can’t see it directly
- Divide the back into at least three horizontal sections for better control
- The nape section at the bottom serves as your guide for the longest layers
- Middle and upper back sections gradually shorten as you work toward the crown
- Use your handheld mirror frequently to check your sectioning and ensure even divisions
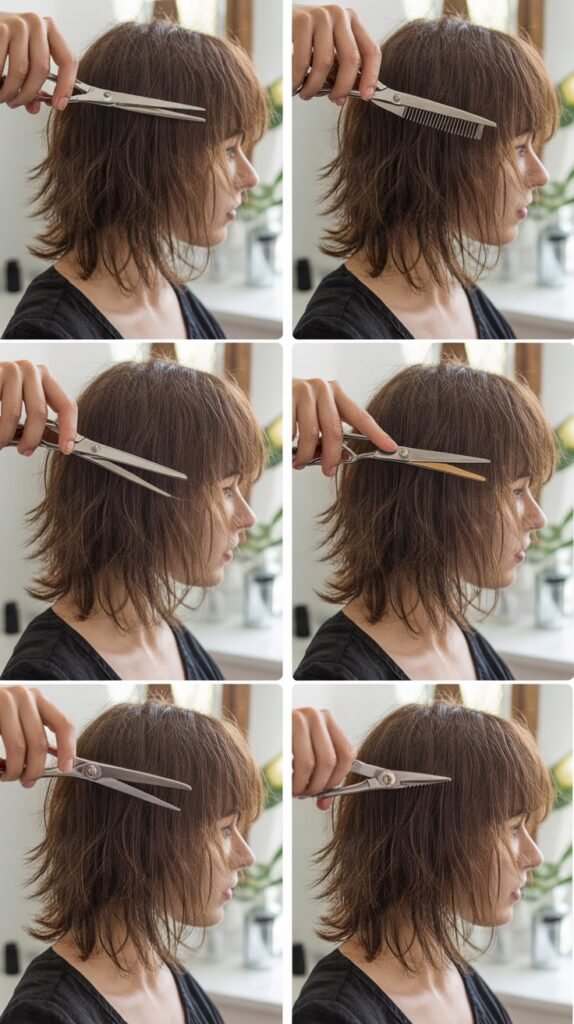
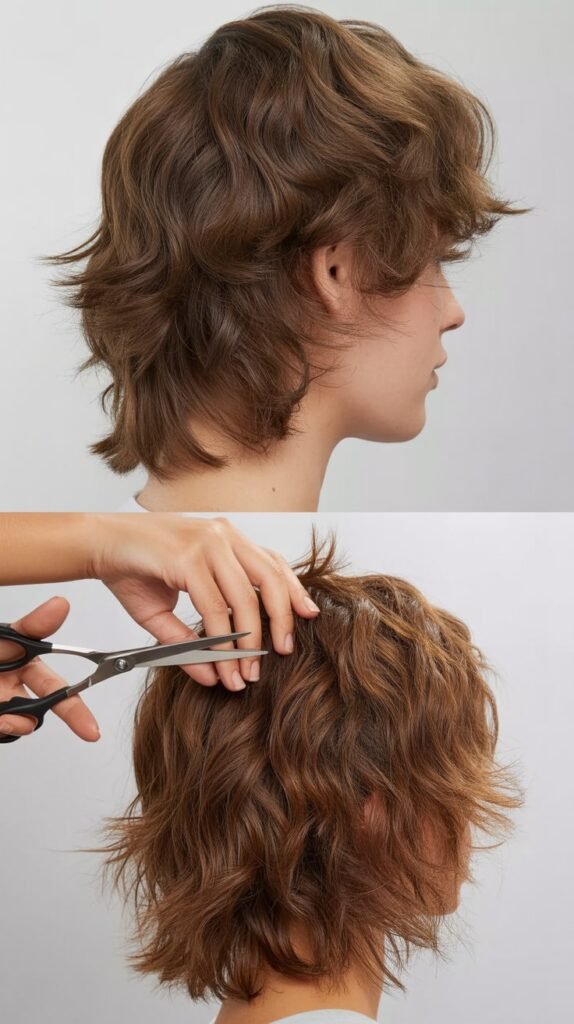
5. The Point-Cutting Technique for Messy Texture
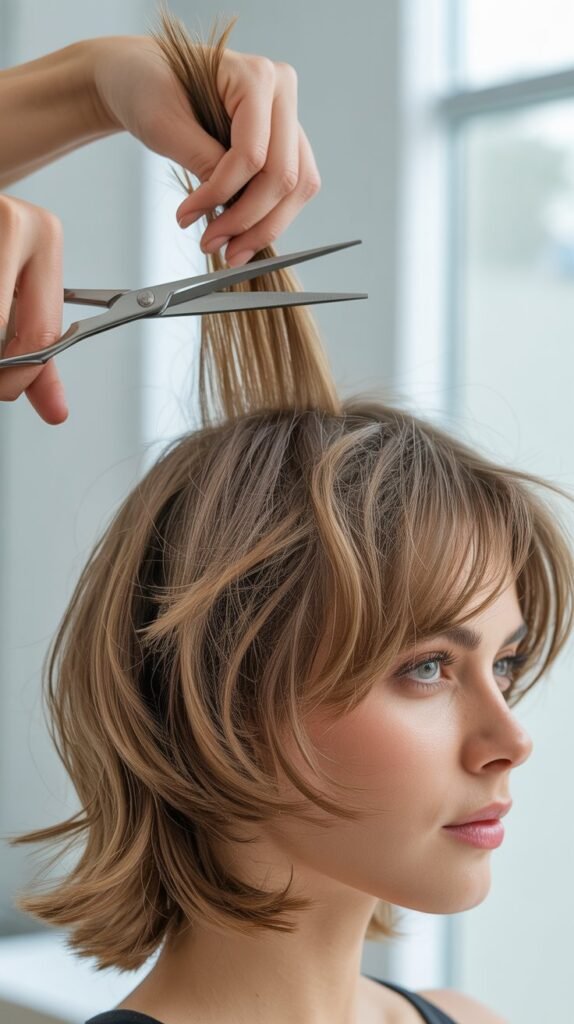
Point-cutting serves as the cornerstone technique for creating the textured, choppy appearance that defines shag haircuts.
This method produces softer, less blunt edges than traditional straight-across cutting, resulting in the perfectly imperfect finish that makes shags so appealing.
Mastering point-cutting elevates your at-home haircut from amateur to professional-looking, and the technique is surprisingly easy to learn with practice.
Understanding point-cutting basics:
- Point-cutting involves holding scissors vertically and cutting into the hair ends at an angle
- The technique creates tiny points or teeth along the cutting line rather than a blunt edge
- This method removes weight while maintaining length and creates natural-looking texture
- Professional stylists use point-cutting extensively for modern, lived-in hairstyles
- The resulting texture makes styling easier and helps hair move more naturally
Proper hand positioning:
- Hold your cutting shears with your thumb in one handle and ring finger in the other
- Keep your index and middle fingers resting on the outside of the blade for stability
- Position the scissors perpendicular to the hair section, with tips pointing toward the scalp
- Maintain a light, controlled grip that allows precise movements without tension
- Your cutting hand should feel relaxed and comfortable throughout the process
Executing the cutting motion:
- Take a small section of hair (about half an inch wide) and hold it taut between your fingers
- Point the scissors vertically into the ends of the section at a slight angle
- Make small snips (about quarter-inch deep) into the hair ends rather than cutting straight across
- Space your cuts about a quarter to half-inch apart along the section
- Work methodically through each section with this pattern of point-cuts
Creating varying depths for maximum texture:
- Alternate between shallow cuts (just a few millimeters) and deeper cuts (up to half an inch)
- Random variation in cutting depth produces the most natural, unstructured appearance
- Concentrate deeper cuts on thicker sections to remove more weight and bulk
- Use shallower cuts on finer sections to maintain density while adding softness
- Step back occasionally to assess the overall texture and adjust your technique accordingly
Common point-cutting mistakes to avoid:
- Cutting straight across instead of pointing in creates blunt lines that look unnatural in shag cuts
- Taking sections that are too thick prevents the scissors from cutting cleanly through all the hair
- Holding scissors at the wrong angle can result in unexpected lengths or uneven texture
- Rushing through the process leads to inconsistent results and poor blending between sections
- Neglecting to keep scissors sharp causes frayed, damaged ends rather than clean texture
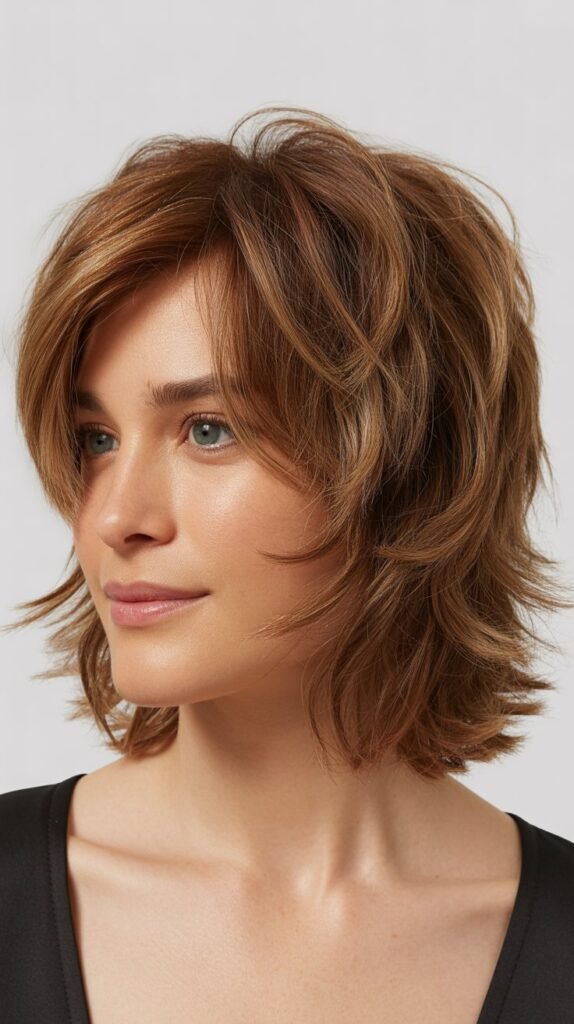
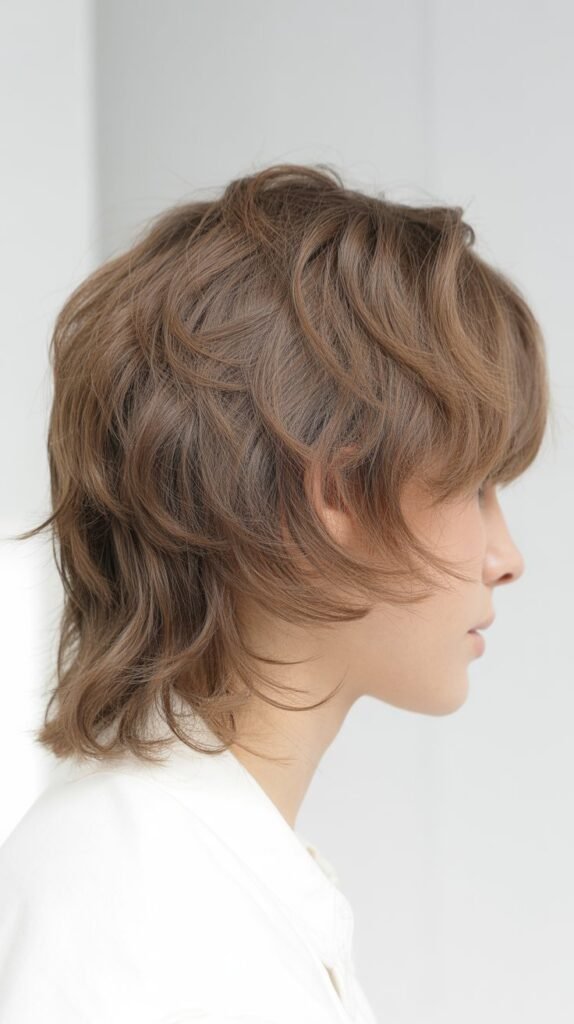
6. Creating the Crown Layers for Volume
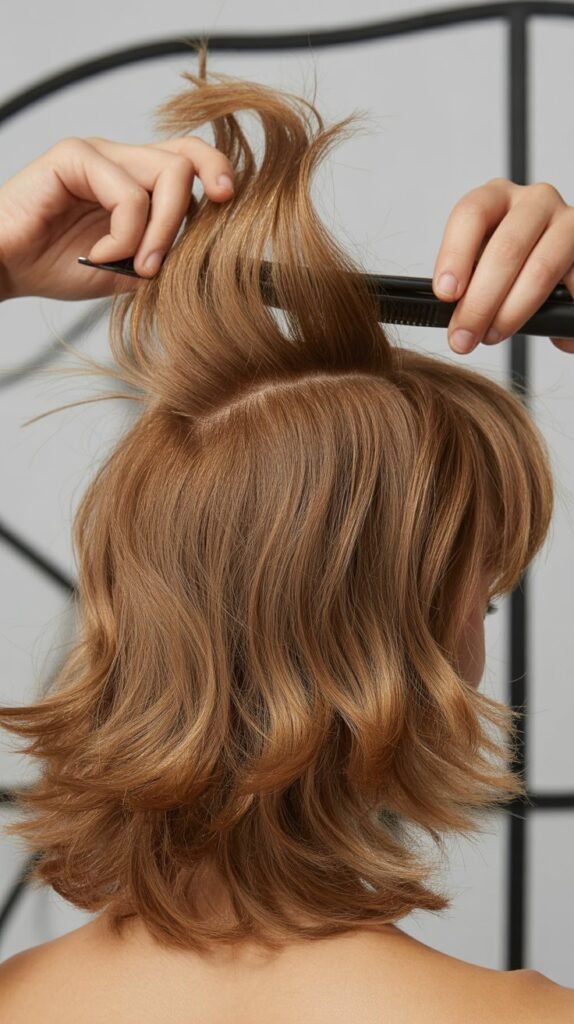
The crown layers form the heart of any shag haircut, providing the lift, volume, and signature shape that makes this style so recognizable.
These shorter layers at the top of your head create height and movement while establishing the foundation from which all other layers flow.
Getting the crown layers right transforms a basic layered cut into a true shag with that coveted lived-in texture.
Identifying the crown area:
- The crown sits at the highest point of your head, roughly where you’d place a small crown or hat
- This area extends from approximately your temples across the top to the back curve of your skull
- Identify the crown by feeling for the natural high point where hair naturally radiates outward
- The crown section typically measures about three to four inches in diameter
- Mark this area mentally or with a clip to ensure you cut the right sections
Determining crown layer length:
- Crown layers in a shag typically measure between two and four inches when pulled straight up
- Shorter crown layers create more dramatic volume and a punkier, edgier aesthetic
- Longer crown layers offer a softer, more subtle volume boost with easier styling
- Consider your hair texture when deciding length—curly hair appears much shorter when dry
- Start longer than you think you need, as you can always go shorter in subsequent cuts
The elevated cutting technique:
- Pull a section straight up from the crown, perpendicular to the scalp at a 90-degree angle
- Ensure the section is completely smooth and all hairs are aligned in the same direction
- Hold the hair firmly between your index and middle fingers at your desired cutting length
- Use point-cutting technique to create texture as you cut the section
- Let the section fall and observe how it creates natural volume and lift
Creating graduation from crown to back:
- The key to a flattering shag involves gradual length increase from crown to longest layers
- After establishing crown length, take sections radiating outward from the crown
- Cut each subsequent section slightly longer than the previous one to create seamless blending
- Use your previously cut sections as guides for the new sections you’re cutting
- This graduation prevents harsh lines and ensures smooth transitions throughout the cut
Blending crown layers with surrounding hair:
- The transition zone where crown layers meet longer hair requires special attention for natural appearance
- Take thin vertical sections that include both short crown hair and longer surrounding hair
- Use point-cutting to blend where the different lengths meet, softening any visible lines
- Check your blending from multiple angles using your handheld mirror
- Err on the side of cutting less in transition zones—you can always remove more
Testing volume and adjusting:
- After cutting crown layers, spray the area lightly with water and scrunch to activate texture
- Observe whether the volume meets your expectations or needs adjustment
- If volume appears insufficient, you can carefully cut crown layers slightly shorter
- Avoid cutting more than a quarter-inch at a time when making adjustments
- Remember that styling products and blow-drying will enhance volume beyond what you see with wet hair
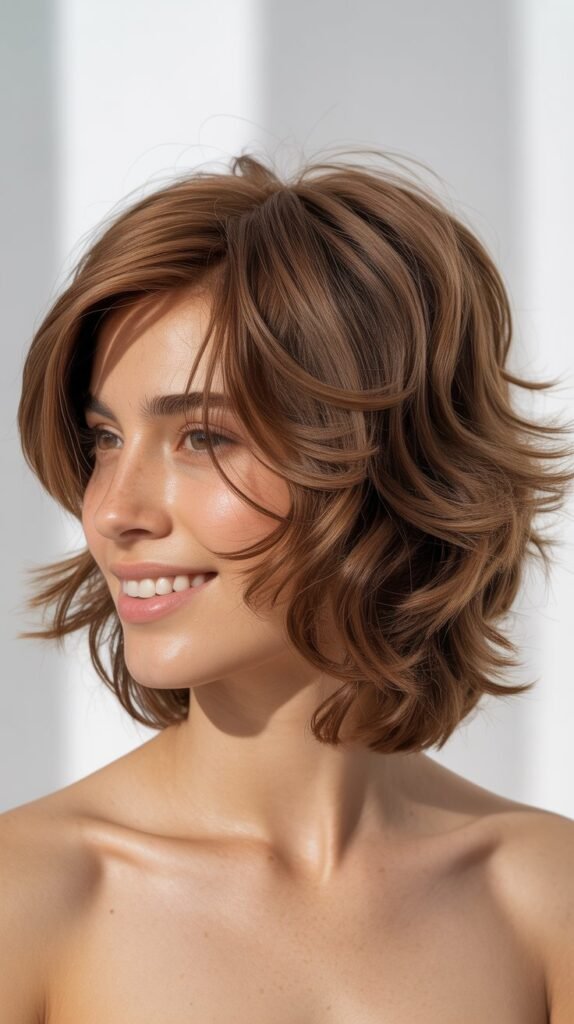
7. Face-Framing Layers and Front Sections
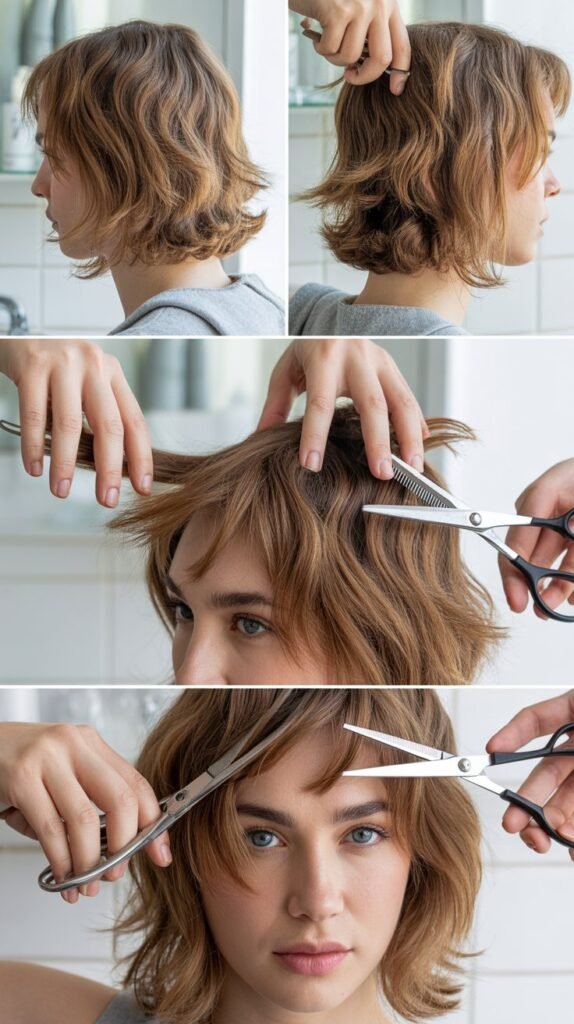
Face-framing layers serve as the most visible and impactful element of your shag haircut, drawing attention to your best features while softening your overall appearance.
These strategic cuts around your face create movement and dimension that photographs beautifully and flatters nearly every face shape.
Getting the face-framing layers right makes the difference between a haircut that looks intentional and polished versus one that appears accidentally choppy.
Determining optimal face-framing length:
- Classic face-framing layers typically start at cheekbone length and gradually extend toward chin length
- Round face shapes benefit from longer layers that start near the chin to create length
- Square or angular faces look softer with shorter layers beginning at the cheekbone
- Oval faces have the flexibility to work with almost any face-framing layer length
- Heart-shaped faces look balanced with layers that begin near the jawline
Sectioning the face-framing pieces:
- Create a triangular section at each side of your face, with the point at your temple
- The base of the triangle should extend about two inches back from your hairline
- Ensure both triangular sections are symmetrical by measuring from the center part
- Clip the remaining hair securely away from these sections to avoid accidentally cutting it
- Work on one side completely before moving to the other for better symmetry control
The sliding technique for face-framing cuts:
- Hold the face-framing section between your fingers and pull it forward toward your nose
- Position your scissors at a slight angle rather than perfectly horizontal
- Cut from longer (near the ear) to shorter (near the center of face) in a gradual slide
- This creates a gentle angle that blends seamlessly rather than obvious steps
- Use point-cutting as you slide to add texture and softness to the edges
Creating symmetry between both sides:
- After cutting the first face-framing section, pull both sides forward together toward your nose
- Hold them side by side and check whether the lengths match precisely
- Make tiny adjustments with point-cutting to ensure perfect symmetry
- Remember that your face itself may be slightly asymmetrical, which affects how layers appear
- Step back from the mirror periodically to assess overall balance rather than fixating on millimeter differences
Connecting face-framing to overall layers:
- Face-framing layers should blend naturally into the side layers of your shag
- Take sections behind your face-framing pieces and cut them slightly longer to create graduation
- Use vertical subsections rather than horizontal to maintain the flowing quality of a shag
- Check the connection by running your fingers through from face to back, feeling for smooth transitions
- The blend should feel seamless with no obvious stopping points or blunt edges
Customizing for hair texture:
- Straight hair shows face-framing layers most dramatically and requires precision for clean lines
- Wavy hair creates soft, romantic face-framing that disguises minor imperfections in cutting
- Curly hair should be cut slightly longer to account for shrinkage when dry
- Thick hair may need thinning shears on face-framing pieces to reduce bulk and encourage movement
- Fine hair looks best with fewer, chunkier face-framing pieces rather than many thin wisps
8. Cutting and Blending the Back Sections
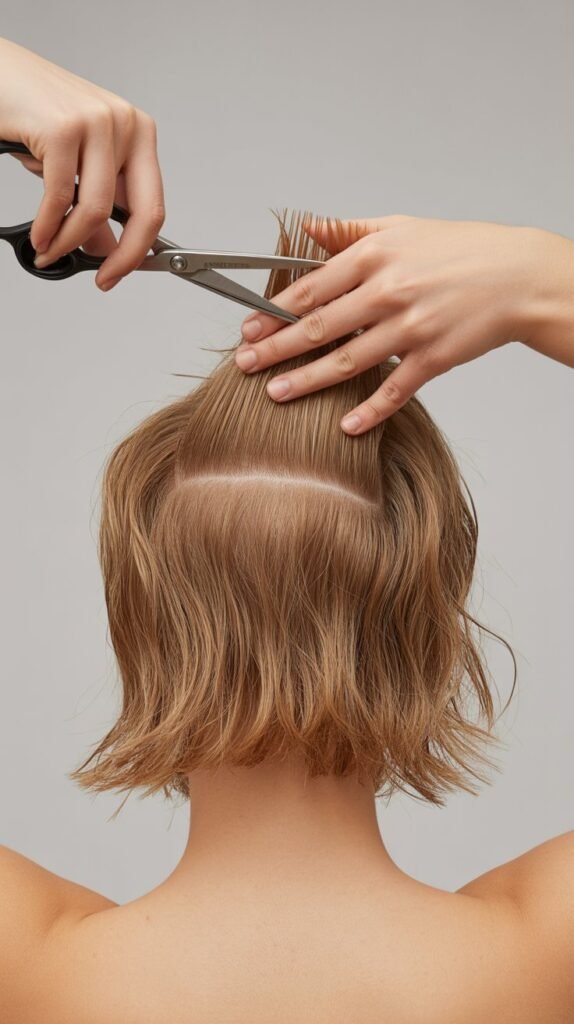
The back sections present the greatest challenge in at-home shag haircuts since you can’t directly see what you’re cutting, yet they’re crucial for a balanced, professional-looking result.
These areas require patience, frequent mirror checks, and systematic approaches to ensure even layering throughout.
Many DIY haircut disasters occur in the back, making this section critical to master for overall success.
Setting up for back cutting:
- Position yourself between two mirrors so you can see the back of your head reflected
- Adjust the handheld mirror angle until you have a clear view of your working area
- Ensure your main mirror and handheld mirror both have good, even lighting without shadows
- Practice holding the handheld mirror comfortably before you begin cutting
- Consider enlisting a trusted friend to help with back sections if possible
Establishing the base length:
- The nape section at the very bottom back of your head determines your overall longest length
- Pull this section straight down and cut it evenly to establish your baseline
- Use point-cutting even on this section to maintain the textured shag aesthetic
- This bottom length should coordinate with your face-framing length for a cohesive look
- Be conservative with this cut since it anchors all other back layers
Working upward with graduated layers:
- After establishing the base, create horizontal sections working up toward the crown
- Each subsequent section should be slightly shorter than the one below it
- Pull sections straight back at a 90-degree angle to maintain consistent layering
- Use your previously cut section as a guide by including a small portion in your new section
- This traveling guide technique ensures smooth gradation from longest to shortest layers
The flip-and-cut method for better visibility:
- For upper back sections, flip your head forward and let hair fall toward the floor
- This position brings the back of your head into easier view and reach
- Hold sections straight up (which is actually perpendicular to your bent-over position)
- Cut these sections, then flip your head back up to check how they fall naturally
- This method works especially well for the back layers that transition into crown layers
Checking for balance and symmetry:
- Divide your back hair down the center with a clean vertical part
- Pull matching sections from left and right sides forward over your shoulders
- Hold them in front of you to compare lengths and ensure they match
- Make adjustments using point-cutting to correct any discrepancies
- Repeat this check at multiple horizontal levels from nape to crown
Blending back sections with sides:
- The areas where back sections meet side sections often show visible lines if not properly blended
- Take diagonal sections that include hair from both the back and sides
- Use vertical point-cutting through these sections to soften any demarcation lines
- Check the blend by running your fingers through hair from back to front
- The transition should feel smooth without your fingers catching on distinct steps
9. Using Thinning Shears for Additional Texture
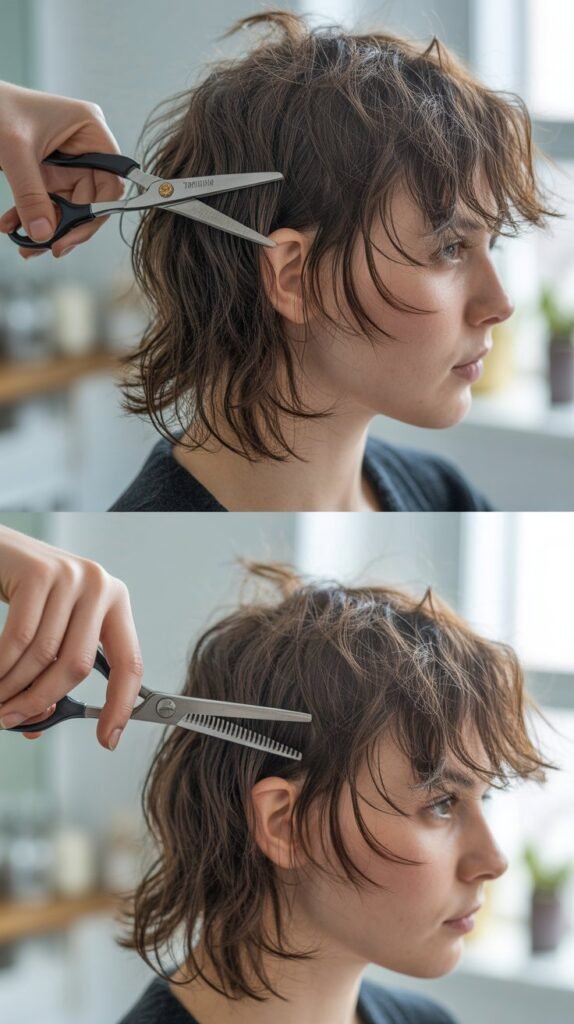
Thinning shears elevate your at-home shag haircut from good to exceptional by adding that professional-quality texture and movement that’s difficult to achieve with regular scissors alone.
These specialized tools remove bulk and create internal texture without affecting the overall length, resulting in hair that moves naturally and styles effortlessly.
Understanding when and how to use thinning shears prevents over-thinning while maximizing their texture-creating benefits.
Understanding thinning shear mechanics:
- Thinning shears feature one regular blade and one blade with teeth that remove only some hairs
- These teeth create gaps that catch approximately 30-50% of the hair in any section
- The untouched hairs maintain length while removed hairs create space and lightness
- Different thinning shears have varying tooth counts, affecting how much hair they remove per cut
- Higher tooth counts (30-40 teeth) remove less hair for subtle results, while lower counts are more aggressive
Identifying areas that need thinning:
- Thick, heavy areas around the crown benefit from thinning to encourage volume and lift
- The mid-lengths of your hair often hold too much weight, preventing layers from showing movement
- Areas where different layer lengths meet sometimes need thinning to blend seamlessly
- Sections that appear dense or clumpy after cutting respond well to strategic thinning
- Avoid thinning the hair near your hairline or the very ends of your layers
Proper thinning technique:
- Hold a small section of hair taut between your fingers at mid-length position
- Position thinning shears at a slight angle rather than perpendicular to the hair shaft
- Make quick, decisive cuts rather than slowly closing the shears which can pull hair
- Start your thinning cuts at least two to three inches away from the roots
- Stop thinning about one inch from the ends to prevent a wispy, straggly appearance
The sliding thinning method:
- For maximum texture, open thinning shears midway down a section of hair
- Gently close them while simultaneously sliding toward the ends
- This creates varied texture at different points along the hair shaft
- Use very light pressure to avoid pulling or damaging hair during the slide
- Limit this technique to one or two passes per section to prevent over-thinning
Strategic placement for shag enhancement:
- Concentrate thinning around the crown layers to amplify the volume-creating effect
- Thin the underneath layers to reduce bulk that weighs down the top layers
- Add texture to thicker face-framing pieces that might look too heavy or blunt
- Work through back sections where multiple layers meet to improve blending
- Use minimal thinning on fine hair to avoid creating an over-thinned, scraggly appearance
Avoiding over-thinning disasters:
- Over-thinned hair loses its ability to hold shape and looks stringy or damaged
- Limit yourself to one or two passes with thinning shears through each section
- Step back frequently to assess the overall effect rather than working too long in one area
- Remember that you can always thin more later but cannot undo excessive thinning
- If you’re unsure whether a section needs thinning, skip it and reassess after styling
Thinning based on hair texture:
- Thick, coarse hair handles aggressive thinning and often requires multiple passes
- Medium density hair benefits from moderate thinning focused on specific heavy areas
- Fine hair needs minimal thinning using high-tooth-count shears for subtle results
- Curly hair should receive thinning carefully since curls can become frizzy if over-thinned
- Straight hair shows thinning results most obviously, requiring extra precision and restraint
10. Styling Your New Shag Haircut
Proper styling brings your at-home shag haircut to life, transforming the cut from freshly-cut hair into a gorgeous, textured style that looks like you just left the salon.
The beauty of shag haircuts lies in their versatile styling options, from effortlessly tousled to more polished and intentional.
Learning multiple styling approaches ensures you can adapt your shag to different occasions and personal preferences.
Air-drying for natural texture:
- Apply a texturizing spray or sea salt spray to damp hair immediately after cutting and rinsing
- Scrunch hair gently from ends toward roots to encourage natural wave and texture
- Flip your head forward and scrunch again to add volume at the crown
- Allow hair to dry completely without touching it to prevent frizz and maintain definition
- Once fully dry, gently separate larger clumps with your fingers for a more lived-in appearance
Blow-drying for volume and shape:
- Apply volumizing mousse to roots and a heat protectant spray throughout damp hair
- Use a diffuser attachment on your blow dryer for curly or wavy hair to maintain texture
- For straight hair, rough-dry with your fingers while flipping sections in different directions
- Focus the dryer at the roots while bending forward to create maximum lift at the crown
- Finish by directing cool air over the entire style to set the volume and texture
Creating messy, piecey texture:
- Work a small amount of texturizing paste or clay through dry hair using your fingertips
- Focus on the mid-lengths and ends rather than applying product to roots
- Pinch and twist small sections randomly throughout your hair to create definition
- Use your fingers to separate and define the face-framing layers
- Finish with a light-hold texturizing spray to lock in the piece-y, tousled effect
Enhancing layers with styling tools:
- Use a small curling iron or wand to add bends and waves to different layers
- Curl sections in alternating directions for a more natural, undone appearance
- Focus on face-framing pieces and crown layers where added texture makes the most impact
- Allow curls to cool completely before gently separating them with fingers
- Avoid creating uniform curls throughout—varied texture looks more authentically shaggy
Styling for different occasions:
- For casual everyday wear, apply texturizing spray to dry hair and scrunch for instant tousled texture
- For work or polished events, smooth face-framing layers with a flat iron while keeping crown volume intact
- For edgy going-out styles, add more texturizing product and create dramatic piece-y separation
- For workout or casual activities, pull the longer pieces into a messy bun while leaving face-framing layers loose
- For sleek occasions, apply smoothing serum and blow-dry smooth while maintaining the layered shape
Product recommendations by hair type:
- Fine hair performs best with lightweight mousses, volumizing sprays, and minimal finishing products
- Thick hair handles heavier creams, pastes, and more generous product application
- Curly hair benefits from curl-defining creams, anti-frizz serums, and gel-based products
- Straight hair looks best with texturizing sprays, dry shampoo for volume, and light-hold finishing sprays
- All hair types benefit from dry shampoo at the roots between washes to maintain volume
Maintaining the style throughout the day:
- Keep a small amount of texturizing spray or dry shampoo in your bag for touch-ups
- Avoid constantly touching or playing with your hair, which causes oil buildup and lost texture
- If hair falls flat mid-day, flip your head forward and tousle at the roots to revive volume
- Refresh face-framing pieces by misting with water and re-scrunching or re-curling if needed
- Consider your environment—humidity affects texture differently than dry air conditions
11. Common Mistakes and How to Fix Them
Even experienced DIY hair cutters encounter challenges when creating shag haircuts at home, but recognizing and correcting mistakes prevents minor issues from becoming major disasters.
Understanding what went wrong allows you to make targeted fixes rather than panic-cutting additional hair.
Most at-home cutting mistakes are easily correctable with patience and the right techniques, so don’t despair if your first attempt isn’t perfect.
Cutting layers too short:
- This represents the most common and frustrating mistake in home shag haircuts
- If crown layers are dramatically shorter than intended, embrace the edgy look and style accordingly
- Use styling products to create texture that makes the short layers appear intentional
- Avoid trying to “fix” overly short layers by cutting more hair shorter to match
- Remember that hair grows approximately half an inch per month, so patience helps
Uneven sides or asymmetrical layers:
- Pull matching sections from both sides forward over your shoulders to compare lengths
- Identify which side is longer and carefully trim the excess using point-cutting
- Make tiny adjustments (no more than an eighth of an inch at a time) to avoid overcorrecting
- Check symmetry from multiple angles, not just straight-on in the mirror
- Accept that perfect symmetry is nearly impossible—slight variations look natural and intentional
Visible lines or harsh demarcations between layers:
- Harsh lines occur when sections are cut too bluntly or graduation is too aggressive
- Fix by taking thin vertical sections that span the problem area
- Use point-cutting or thinning shears to soften and blend where different lengths meet
- Work gradually, checking frequently, until the transition appears seamless
- These fixes often require patience and multiple small adjustments rather than one big correction
Too much bulk or not enough texture:
- If your shag looks heavy and lacks the signature messy texture, thinning shears provide the solution
- Strategically thin throughout the mid-lengths and ends, avoiding the roots and final inch of hair
- Focus thinning efforts on the areas that appear densest or most weighed-down
- Use the point-cutting technique on ends that appear too blunt or solid
- Add texturizing products during styling to enhance any texture you’ve created through cutting
Face-framing layers that don’t frame:
- Sometimes face-framing pieces end up too long, too short, or in the wrong position
- If too long, carefully point-cut them shorter using small increments
- If too short, style them differently (swept back, tucked behind ears) while they grow
- If poorly positioned, consider cutting new face-framing pieces from adjacent hair
- Ensure future face-framing cuts start at your actual face (not too far back on the head)
Choppy back sections:
- The back often appears uneven when you can’t see clearly what you’re cutting
- Systematic checking using the two-mirror method helps identify problem areas
- Pull all back hair forward over your shoulders in sections and trim uneven pieces
- Have someone you trust examine the back and provide honest feedback about issues
- Consider having a professional stylist clean up the back if problems persist
Over-thinned or stringy ends:
- Excessive thinning creates wispy, damaged-looking ends that lack shape
- Unfortunately, the only real fix involves cutting hair slightly shorter to remove damaged ends
- Use regular scissors (not thinning shears) to make these corrective cuts
- Going forward, use thinning shears more sparingly with better strategic placement
- Focus future thinning on mid-lengths rather than ends to avoid repeat problems
Crown layers that lay flat:
- Sometimes crown layers don’t create expected volume despite proper cutting
- Apply volumizing products specifically at the crown and blow-dry while lifting sections upward
- Consider cutting crown layers slightly shorter if they’re weighted down by length
- Use backcombing or teasing at the roots for temporary volume boosts
- Ensure you’re styling with your head flipped forward to encourage lift at the roots
Emergency fixes for major disasters:
- If your cut is significantly uneven or problematic beyond simple fixes, don’t continue cutting randomly
- Assess honestly whether a professional correction is necessary to avoid making things worse
- Pull hair into a ponytail or bun while deciding on next steps or waiting for an appointment
- Use styling products, hats, headbands, or accessories to camouflage issues temporarily
- Most “disasters” look far less catastrophic after proper styling than they do freshly cut while wet
12. Maintenance and Growing Out Your Shag
Proper maintenance extends the life of your at-home shag haircut and keeps it looking fresh and intentional rather than grown-out and neglected.
One of the shag’s greatest advantages lies in how gracefully it grows out compared to more structured haircuts, requiring less frequent trims to maintain shape.
Understanding the growth timeline and making strategic mini-trims helps you enjoy your shag for months between major cutting sessions.
The growth timeline:
- Shag haircuts typically look their best for 8-12 weeks before requiring significant maintenance
- Crown layers may start losing volume around the 6-8 week mark as they grow longer
- Face-framing layers maintain their shape longest since they naturally blend into longer lengths
- The overall silhouette remains flattering even as layers grow out due to the graduated cutting technique
- Hair grows approximately half an inch per month on average, though individual growth rates vary
Between-cut maintenance:
- Trim face-framing layers every 4-6 weeks to keep them looking fresh and intentional
- Use point-cutting to maintain the textured ends without removing significant length
- Focus mini-trims on areas that show growth most noticeably, typically around the face and crown
- Remove any split ends with small point-cutting snips to prevent damage from traveling upward
- Maintain regular deep conditioning treatments to keep ends healthy and prevent breakage
Refreshing the crown area:
- Crown layers often need attention before other areas as they control overall volume
- Pull crown sections straight up and point-cut just enough to restore the original length
- Focus on maintaining the shortest layers while allowing mid-lengths to catch up gradually
- Add additional texturizing with thinning shears if crown appears heavy or flat
- Consider this a monthly maintenance task rather than waiting for a full haircut
Strategic trimming for growth:
- If growing your shag out, resist the urge to trim all layers at the same rate
- Allow the shortest crown layers to grow while maintaining or slightly trimming the longest layers
- This approach gradually reduces the difference between shortest and longest layers
- The style transitions naturally from dramatic shag to long layers as growth continues
- Focus maintenance trims on keeping ends healthy and face-framing pieces flattering
Styling adjustments as hair grows:
- As layers grow out, adjust your styling routine to accommodate changing lengths
- Longer crown layers may require different product application or styling techniques for volume
- Face-framing pieces might need more intentional styling (curling, straightening) as they lengthen
- Update your product selection as hair weight and texture change with growth
- Experiment with new styling methods that work better with your current length
Dealing with awkward growth stages:
- Most shags go through a period around 10-14 weeks where they feel awkward or lose shape
- Use accessories like headbands, clips, or scarves to manage pieces that won’t cooperate
- Consider updos or half-up styles that showcase the layering while controlling length
- Increase texturizing product use to maintain the messy, intentional shag aesthetic
- Remember this stage is temporary—either trim to restore shape or continue growing through it
Washing and conditioning for shag maintenance:
- Avoid over-washing, which strips natural oils and causes frizz in layered cuts
- Focus shampoo on roots and scalp while allowing it to rinse through lengths
- Apply conditioner primarily to mid-lengths and ends where layers can become dry
- Use a clarifying shampoo monthly to remove product buildup that weighs down layers
- Deep condition weekly to maintain healthy, manageable hair that styles easily
Professional touch-ups versus DIY maintenance:
- Consider professional cleanups every 3-4 months even if you’re cutting at home
- Stylists can perfect areas that are difficult to see and cut yourself (especially the back)
- Professional thinning and texturizing often surpasses what you can achieve at home
- Use salon visits as learning opportunities by asking questions about technique
- Balance professional visits with at-home maintenance for cost-effective upkeep
13. Adapting the Shag for Different Hair Types
The universal appeal of shag haircuts stems from their remarkable adaptability across various hair textures, densities, and natural patterns.
Understanding how to modify cutting techniques and styling approaches for your specific hair type ensures optimal results rather than fighting against your hair’s natural characteristics.
Each hair type brings unique advantages and challenges to creating the perfect messy-layered shag.
Straight hair shag modifications:
- Straight hair shows every cutting imperfection, requiring extra precision with your point-cutting technique
- Cut layers slightly shorter than you might for textured hair since straight hair doesn’t shrink when dry
- Focus heavily on texturizing with thinning shears to prevent blunt, heavy-looking layers
- Create more dramatic length variation between layers to generate movement in hair that naturally lies flat
- Use aggressive styling techniques (curling irons, texturizing products) to create the messy aesthetic
Wavy hair shag advantages:
- Wavy hair represents the ideal texture for shag haircuts with natural movement and body
- Cut conservatively since waves will shorten the apparent length when hair dries
- Allow the natural wave pattern to create texture rather than over-thinning
- Focus face-framing layers at points that enhance the wave pattern (typically near the natural bend)
- Minimal styling creates beautiful results—often just scrunching with product suffices
Curly hair shag considerations:
- Curly hair requires cutting when dry or expecting significant shrinkage if cutting wet
- Create more space between layer lengths since curls stack and compact more than straight hair
- Use minimal thinning to avoid frizz and maintain the curl structure
- Point-cut conservatively as aggressive texturizing disrupts curl clumps
- Focus on enhancing natural curl pattern rather than creating additional texture through cutting
Fine hair volume strategies:
- Fine hair benefits tremendously from shag layers that create the illusion of thickness
- Keep layers throughout to prevent flat, limp appearance at the crown
- Use thinning shears sparingly as excessive thinning makes fine hair look wispy
- Cut crown layers slightly shorter to maximize lift and volume potential
- Employ volumizing products and blow-drying techniques religiously for best results
Thick hair weight removal:
- Thick hair often overwhelms shag shape unless properly thinned throughout
- Use thinning shears extensively, especially through mid-lengths where bulk concentrates
- Create more dramatic layer graduation to remove weight and allow movement
- Consider longer crown layers to prevent overwhelming volume at the top
- Focus on internal thinning rather than removing length to maintain shape while reducing bulk
Coarse hair texture management:
- Coarse hair creates beautiful, piece-y texture naturally suited to shag aesthetics
- Cut layers with confidence as coarse hair holds shape well without excessive product
- Use thinning shears to soften ends and create movement despite the strong texture
- Embrace the natural texture rather than fighting it with smoothing products
- Consider slightly longer overall length to weigh down coarse texture if it becomes unruly
Combination textures (multiple patterns):
- Many people have different textures at the crown, sides, and nape
- Assess each section individually and adjust cutting technique accordingly
- Cut curlier sections conservatively while being more aggressive with straighter areas
- Use different styling approaches for different sections to create cohesive overall appearance
- Accept and work with your hair’s natural variation rather than trying to force uniformity
Color-treated or damaged hair special care:
- Chemically treated hair often shows damage at ends, requiring careful cutting to remove compromised hair
- Use very sharp scissors to prevent further damage to already weakened hair structure
- Avoid excessive thinning which can make damaged hair look more fragile
- Focus on creating healthy, strong lines rather than wispy, over-textured ends
- Coordinate your haircut with your coloring schedule—cut after coloring for best results
14. Troubleshooting Guide and Expert Tips

Every at-home haircutter encounters specific challenges unique to DIY shag creation, and knowing expert solutions prevents frustration and achieves professional-quality results.
These accumulated tips from professional stylists and experienced home cutters address the most common questions and problems.
Applying these insights elevates your technique from amateur experimentation to confident skill execution.
Determining how much hair to cut initially:
- Always start conservatively, removing only half of what you think you want to cut off
- Hold sections at 90-degree angles to accurately assess how much you’re removing
- Remember that wet hair appears longer than dry hair, especially for textured types
- Cut progressively shorter through multiple rounds rather than committing to dramatic cuts immediately
- When in doubt, step away from the mirror for 10 minutes and reassess with fresh perspective
Managing cutting fatigue:
- Complete shag haircuts require 45-90 minutes depending on hair thickness and length
- Take breaks every 15-20 minutes to rest your arms and prevent sloppy cutting from tiredness
- Don’t attempt to cut your hair when already tired, rushed, or distracted
- Break the process into sessions if needed—basic cut one day, refining and texturizing another
- Fatigue leads to mistakes, so prioritize being well-rested and focused
Dealing with cowlicks and growth patterns:
- Identify your cowlicks before cutting by observing how dry hair naturally falls
- Cut cowlick areas slightly longer as they tend to stick up more than surrounding hair
- Work with natural growth patterns rather than fighting them with your cut
- Style cowlicks in the direction they naturally want to go for easier daily management
- Consider letting cowlick areas remain in longer layers that weigh down the unruly growth
Creating balance for different face shapes:
- Round faces benefit from longer face-framing layers and more volume at the crown
- Square faces look softer with layers starting at cheekbone length to soften angles
- Long faces need width at the sides achieved through shorter, wider layers
- Heart-shaped faces require volume at the jawline rather than at the forehead
- Oval faces work with virtually any layer length and placement
Preventing scissor hand strain:
- Invest in ergonomically designed scissors with comfortable finger rests
- Take frequent breaks to stretch your hands, wrists, and forearms
- Keep your wrists in neutral positions rather than extreme angles during cutting
- Use your whole arm to move sections rather than just hand and wrist movements
- If pain develops, stop cutting and resume another day to prevent injury
Working with limited mobility or dexterity:
- Consider cutting hair while sitting rather than standing to reduce fatigue
- Use magnetic or weighted clips that stay in place without constant adjustment
- Employ a hands-free mirror stand rather than holding a handheld mirror
- Pre-section all hair before beginning to cut, taking your time without pressure
- Ask for assistance with difficult-to-reach areas rather than straining
Best time of day for cutting:
- Morning light provides the most accurate color perception and shadow-free visibility
- Avoid cutting when tired, hungry, or emotionally stressed
- Choose times when you won’t be interrupted or rushed to finish
- Consider your hair’s natural behavior—if it’s frizziest in humidity, don’t cut during rainstorms
- Schedule enough time that you don’t feel pressured or hurried through the process
Testing before committing:
- Practice your point-cutting technique on a small, hidden section before cutting visible areas
- Test your thinning shears on one small section to understand how much hair they remove
- Try different cutting angles on a single section to see what results they produce
- Cut one face-framing layer completely before cutting the other to ensure satisfaction
- Make all test cuts on areas that can be hidden or easily corrected if unsuccessful
When to seek professional help:
- If you’ve made mistakes that continue to look worse with each attempted fix
- When you need a dramatic change from very long to very short hair
- If you have extremely thick or textured hair that feels unmanageable during cutting
- For fixing problems in the back that you genuinely cannot see or reach effectively
- When you want to learn by watching a professional perform the cut on your hair
Building confidence over time:
- Your first at-home shag won’t be perfect, and that’s completely expected
- Each cutting session teaches valuable lessons that improve your next attempt
- Take photos of successful cuts to reference your technique for future cuts
- Keep notes about what worked well and what you’d change next time
- Celebrate improvements rather than fixating on perfection—even professionals make adjustments
Essential safety reminders:
- Always cut with completely dry scissors to prevent rust and blade damage
- Store scissors safely away from children and pets
- Never cut hair while distracted by phone calls, TV, or other activities
- Use sharp scissors to prevent pulling and damaging hair
- Stop immediately if you feel unsteady, dizzy, or unable to focus clearly
Documentation for future reference:
- Take before photos from multiple angles to track your progress
- Photograph your hair at different growth stages to identify ideal trim timing
- Record which products and techniques worked best for your specific hair type
- Note any challenges you encountered and how you solved them
- Create a simple journal or notes file with your personal shag cutting insights
Conclusion
The At-Home Shag Haircut Tutorial for Messy Layers provides you with comprehensive knowledge to confidently create a stylish, textured haircut without professional assistance or expensive salon costs.
By mastering the techniques covered—from proper sectioning and point-cutting to crown layer creation and texturizing—you’ve gained skills that will serve you for years to come.
The beauty of the shag haircut lies in its forgiving nature, graceful growth pattern, and versatile styling options that adapt to your lifestyle and personal aesthetic.
Whether you’re working with straight, wavy, or curly hair, the principles outlined in this guide ensure you can customize the cut to flatter your unique features and hair texture.
Remember that perfection comes with practice, and each cutting session builds your confidence and refines your technique.
The money saved from at-home haircuts quickly adds up, but more importantly, you’ve gained the independence and satisfaction of mastering a valuable self-care skill.
Armed with the right tools, proper technique, and styling knowledge from this tutorial, your messy layered shag will look professionally crafted while reflecting your personal style and individuality.