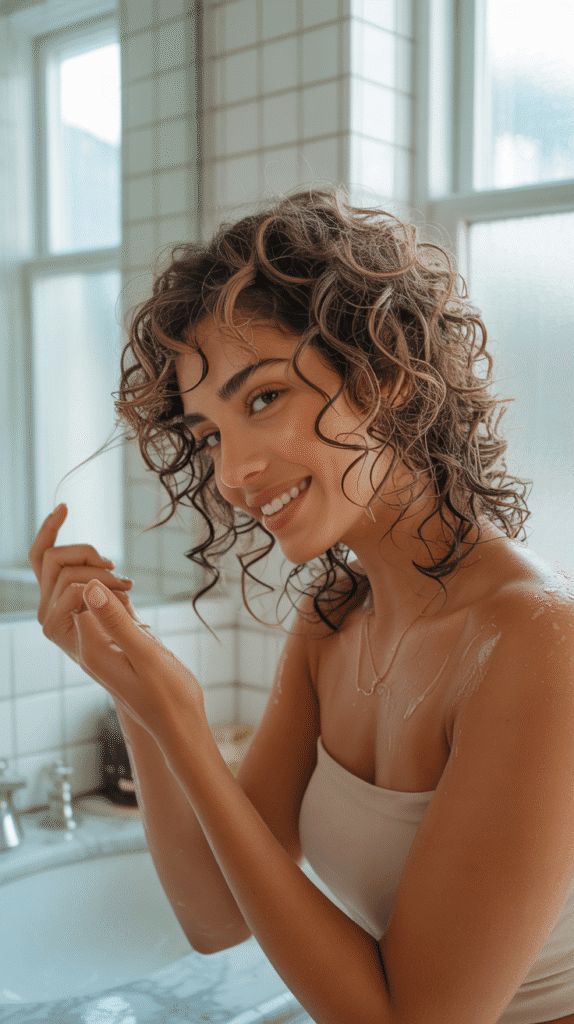
Cutting curly hair at home can feel intimidating, but with the right techniques and understanding of your curl pattern, you can achieve salon-quality results in your own bathroom.
This comprehensive guide will walk you through everything you need to know about the best way to cut curly hair at home, from understanding your unique curl type to mastering professional cutting methods that work specifically for textured hair.
Whether you’re looking to trim split ends, add shape, or completely transform your look, you’ll discover the tools, techniques, and expert tips that make home haircuts not only possible but surprisingly successful.
You’ll learn why cutting curly hair requires different approaches than straight hair, how to work with your natural texture instead of against it, and the essential preparations that set you up for success before you even pick up the scissors.
1. Understanding Your Curl Type Before Cutting
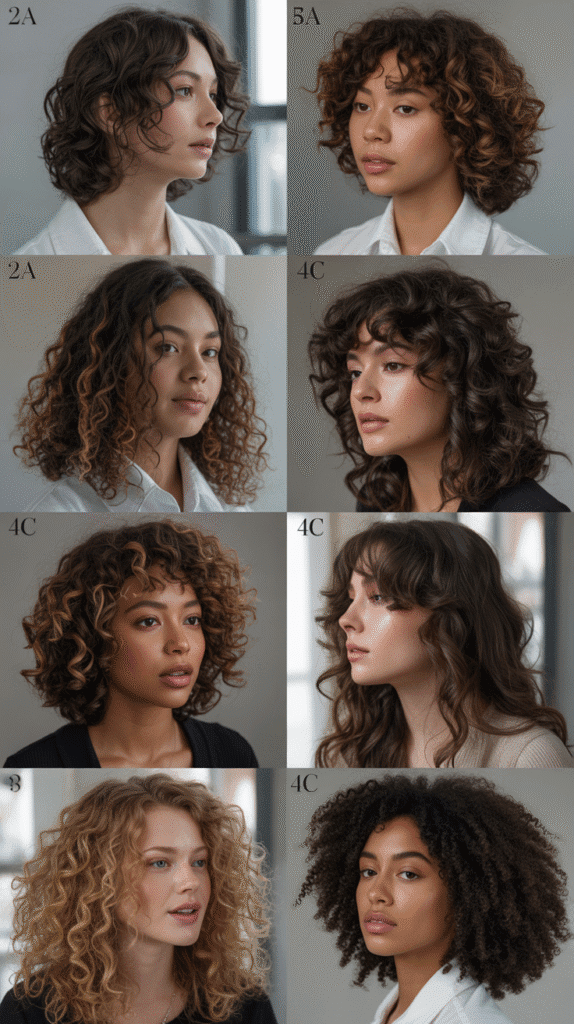
Before you make that first cut, understanding your specific curl pattern is absolutely essential because different curl types require different cutting approaches and techniques.
Curly hair ranges from loose waves to tight coils, and each type behaves differently when cut, so identifying where your hair falls on the curl spectrum will help you choose the most effective cutting method and avoid common mistakes that can lead to unwanted triangle shapes or uneven lengths.
Key Points About Curl Types:
- Type 2 (Wavy Hair) forms an S-shape pattern and typically lies flatter at the roots with more texture toward the ends, requiring point-cutting techniques to maintain movement and prevent a blunt, heavy appearance.
- Type 3 (Curly Hair) creates defined spiral curls or ringlets that bounce back when stretched, needing careful attention to cutting each curl individually to maintain uniformity and prevent disrupting the natural curl pattern.
- Type 4 (Coily Hair) features tight zigzag patterns or springy coils that shrink significantly when dry, demanding extra caution when cutting because even a small trim can appear as a dramatic length change once the hair springs back.
- Understanding your curl’s porosity and density helps determine how much hair you’re actually working with, as high-density curls may need more layering to remove bulk while low-density curls require strategic cutting to maintain fullness.
- Your curl pattern may vary across different sections of your head, with looser curls often appearing in the front or crown area and tighter curls at the nape, requiring you to adjust your cutting technique section by section.
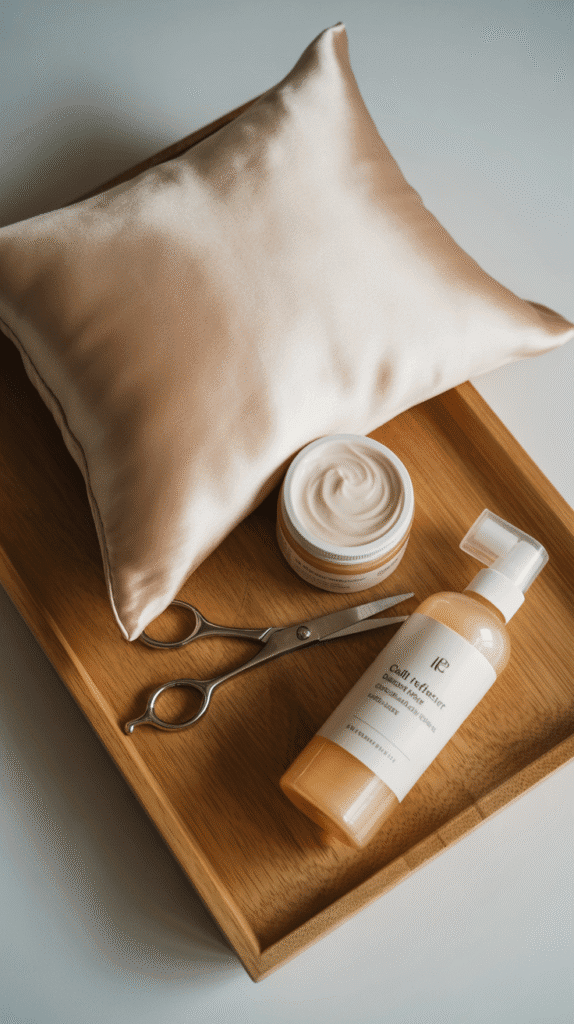
2. Essential Tools and Materials Needed

Having the right tools makes the difference between a successful home haircut and a frustrating experience that leaves you reaching for a hat.
Professional-grade tools designed specifically for cutting curly hair will give you better control, cleaner cuts, and results that actually enhance your curl pattern rather than creating frizz and damage.
Required Tools and Their Purposes:
- Professional hair-cutting shears (6-7 inches) with sharp, precision-ground blades are absolutely non-negotiable, as regular household scissors will crush the hair shaft and create split ends rather than making clean cuts.
- Thinning shears or texturizing scissors help remove bulk from thick, dense curls without sacrificing length, featuring teeth that cut only some strands while leaving others intact for a natural, blended appearance.
- Wide-tooth comb or detangling brush allows you to section and separate curls without disrupting their natural pattern, essential for working through tangles before cutting without causing breakage.
- Hair clips or sectioning clamps (at least 6-8) help you divide your hair into manageable sections and keep uncut portions out of the way, preventing accidental cuts and ensuring you work systematically through your entire head.
- Spray bottle filled with water or a water-based leave-in conditioner mixture keeps your curls hydrated and defined while cutting, as curly hair should typically be cut while damp or dry, never soaking wet.
- Large mirror plus a handheld mirror creates the visibility you need to see the back and sides of your head, allowing you to check your progress from all angles and maintain symmetry throughout the cut.
- Good lighting from multiple sources eliminates shadows that can hide uneven sections, with natural daylight being ideal but bright overhead lights combined with side lighting working as a suitable alternative.
3. Preparing Your Hair for Cutting

Proper preparation is the foundation of a successful curly haircut, determining whether your curls will fall beautifully or end up uneven and shapeless.
The way you prep your hair directly affects how accurately you can assess length, shape, and curl pattern, making this step just as important as the actual cutting process.
Preparation Steps and Considerations:
- Wash your hair 1-2 days before cutting rather than immediately before, as freshly washed hair can be too soft and slippery to cut accurately, while hair with some natural oils provides better grip and shows how your curls naturally fall in their everyday state.
- Deep condition your hair before cutting to ensure your curls are properly hydrated and displaying their true pattern, since dry, damaged hair will curl differently than healthy hair and may lead you to cut more than necessary.
- Detangle thoroughly from ends to roots using your fingers first, then a wide-tooth comb, working in small sections to remove all knots without ripping through your hair or disrupting the curl clumps you’ll be cutting.
- Apply your regular styling products that you use daily so your hair dries in its natural, typical curl pattern, giving you an accurate preview of how your cut will look in real life rather than in an artificial state.
- Let your hair dry completely or reach the dampness level appropriate for your chosen cutting method, as curly hair shrinks significantly as it dries and cutting it too wet will result in shorter length than you intended.
- Section your hair into four quadrants by creating a part down the middle from forehead to nape and another from ear to ear across the crown, securing each section with clips to establish a systematic approach to cutting.
- Choose your cutting location wisely by setting up in a bathroom or area with excellent lighting, easy cleanup access, and enough space to move around your head with mirrors positioned to see all angles clearly.
4. The Dry Cutting Method
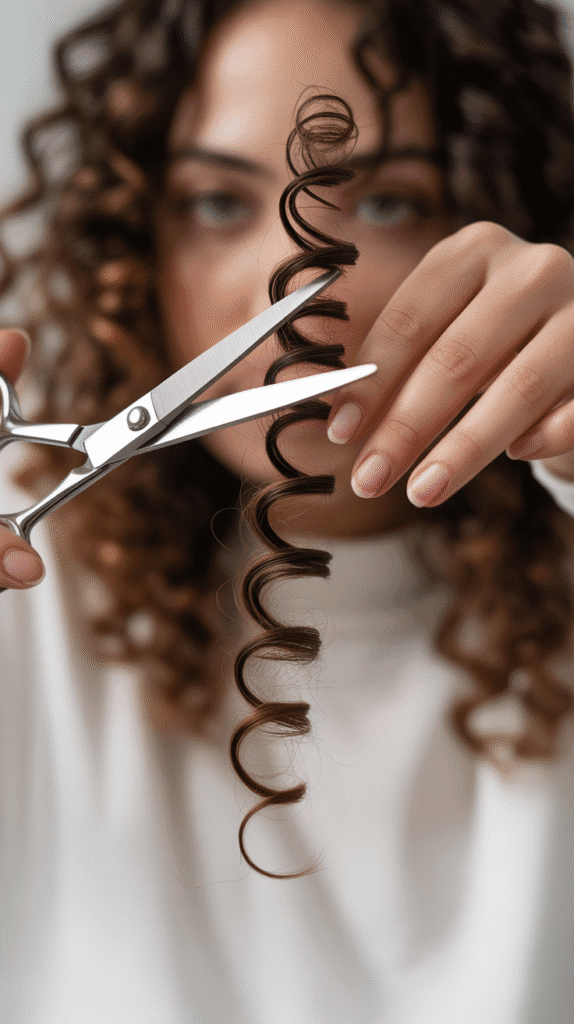
Dry cutting is widely considered the gold standard for curly hair because it allows you to see exactly how each curl naturally falls and springs, enabling precision cuts that enhance your curl pattern rather than fighting against it.
This method, often called the “curl-by-curl” or “Deva cut” approach, involves cutting each ringlet individually in its natural dry state to create a customized shape that complements your unique curl formation.
Dry Cutting Technique and Process:
- Start with completely dry, styled hair that’s been allowed to air-dry or diffuse naturally with your regular products, ensuring your curls are in their true resting position showing exactly how they’ll look after your cut.
- Release one small section at a time from your clipped quadrants, working with sections no larger than 1-2 inches wide to maintain control and ensure you can see each individual curl clearly throughout the cutting process.
- Identify and isolate individual curl clumps by gently separating them with your fingers, respecting the natural groupings your hair forms rather than combing through and destroying the curl pattern you’re trying to enhance.
- Hold each curl gently at the end without stretching or pulling it, allowing it to rest in its natural spiral position as you assess where to cut, typically trimming just the very ends where damage or splits are visible.
- Cut at a slight upward angle into the curl rather than straight across, using point-cutting or slide-cutting techniques that create soft, blended edges instead of harsh blunt lines that can make curls look boxy or triangular.
- Work from the bottom layers upward and from the back of your head toward the front, establishing the longest length first as your guide and then working up to shorter layers, constantly checking symmetry by comparing sides.
- Trim conservatively by cutting less than you think you need to remove, as you can always cut more but cannot add length back, with a general rule of removing only 1/4 to 1/2 inch at a time for maintenance trims.
- Step back frequently to assess the overall shape from a distance, using your mirrors to view your hair from all angles and ensuring you’re creating a balanced, proportional silhouette rather than getting too focused on individual curls.
5. The Damp Cutting Method

Damp cutting offers a middle ground between traditional wet cutting and dry cutting, providing enough moisture to make hair manageable and stretchable while still maintaining enough of the curl pattern to cut accurately.
This method works particularly well for curlier textures that are difficult to detangle when completely dry, allowing you to see the general shape while maintaining some curl definition.
Damp Cutting Technique and Guidelines:
- Mist your dry, styled hair lightly with water or a water-based leave-in conditioner mixture until curls are damp but not dripping wet, achieving a level of moisture where curls are defined and slightly elongated but not weighed down or straightened.
- Refresh your curl definition by gently scrunching sections upward after misting to reactivate the curl pattern, ensuring your hair isn’t hanging limp or straight which would result in inaccurate length assessment.
- Work with slightly larger sections than you would with dry cutting, as the dampness makes hair more manageable and allows you to see multiple curls at once while still respecting the natural curl groupings.
- Use the twist method by taking a small section of damp curls, twisting them gently in the direction they naturally spiral, and then cutting straight across the twisted section to create a soft, tapered end that blends naturally.
- Check your work as hair dries by allowing cut sections to spring back to their natural position, periodically stepping away to let your hair dry partially and reassessing whether additional adjustments are needed.
- Avoid over-wetting which causes curls to hang straighter and longer than they naturally would, leading to cutting too much length and ending up with shorter hair than intended once everything dries and springs back up.
- Re-mist sections as needed if your hair dries too much during the cutting process, maintaining consistent dampness throughout your entire haircut to ensure even results from the first section to the last.
6. Creating Layers in Curly Hair
Layering curly hair is an art that removes weight and bulk while creating movement and dimension, transforming heavy, triangular shapes into bouncy, voluminous styles with beautiful curl definition throughout.
Strategic layering helps curls fall in flattering ways, prevents the dreaded pyramid shape, and allows curls at different lengths to stack on each other for maximum volume and visual interest.
Layering Techniques for Curls:
- The unicorn cut method involves gathering all your hair into a high ponytail at your forehead, holding it straight up, and cutting across the ponytail to create automatic layers throughout, with the technique creating shorter layers in front and longer layers in back for a naturally flattering shape.
- Face-framing layers start shorter around the face and gradually get longer toward the back, drawing attention to your features while adding movement and preventing the heavy, weighed-down look that comes from one-length cuts on curly hair.
- The DevaCut three-tier layering system divides hair into three horizontal sections (bottom, middle, and top), with each layer cut progressively shorter to remove bulk while maintaining length, creating stacked curls that enhance volume without sacrificing overall hair length.
- Point cutting techniques involve holding scissors vertically and cutting small notches into the hair ends rather than cutting straight across, creating soft, textured edges that blend seamlessly and prevent harsh lines between layers.
- Slide cutting uses scissors to literally slide down the hair shaft while cutting, removing weight and creating internal layers without dramatically changing the length, particularly effective for very thick or coarse curly hair that needs significant bulk removal.
- Keep layers no more than 2-3 inches apart to maintain cohesion and prevent disconnected sections where shorter layers stick out awkwardly from longer ones, with the goal being seamless blending from one layer to the next.
- Concentrate shorter layers at the crown where you want maximum volume and lift, gradually increasing length toward the perimeter of your hair to create shape without losing the overall length you’ve been growing.
7. Addressing Problem Areas and Fixing Mistakes
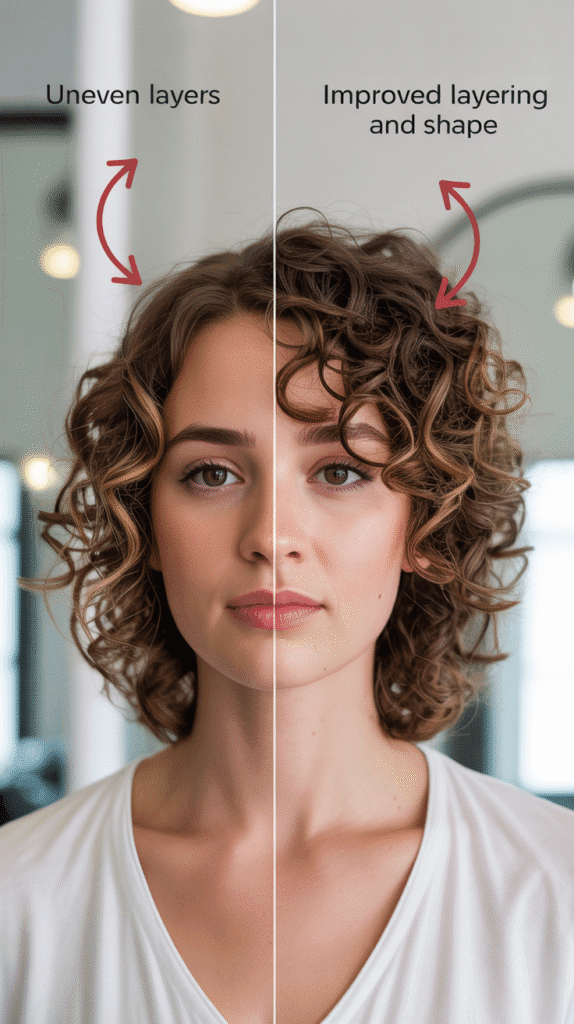
Even experienced cutters occasionally create uneven sections, remove too much length, or discover unexpected results when hair dries and springs into its final shape.
Knowing how to identify and correct these issues as you go prevents small problems from becoming major disasters, while understanding damage control techniques gives you confidence to fix mistakes if they happen.
Problem-Solving Strategies:
- For uneven lengths on opposite sides, identify your longest layer as the guide and carefully trim the shorter side in tiny increments (1/8 inch at a time) until both sides match, constantly checking symmetry by bringing sections forward to compare them directly side by side.
- When you’ve cut too much length, there’s no immediate fix for the hair itself, but you can balance the overall look by cutting surrounding sections slightly shorter to blend the mistake, or add face-framing pieces that draw attention away from the too-short area.
- If layers are too disconnected or choppy, use point-cutting or texturizing shears to blend the harsh lines between layers, cutting into the ends at an angle to create softer transitions that merge sections together more naturally.
- For the dreaded triangle shape, remove additional weight from the sides by using thinning shears on the mid-lengths (never the ends), or create shorter layers at the crown to add volume at the top and balance the width at the bottom.
- When individual curls are sticking out awkwardly, identify whether they’re actually longer than surrounding curls or simply damaged and frizzy, cutting only the truly longer ones while treating frizzy ones with smoothing products rather than scissors.
- If your hair appears bulky or puffy, use texturizing shears to remove internal weight by opening and closing them as you move down sections of hair (never cutting at the root or ends), removing approximately 20-30% of the hair bulk without affecting the external shape.
- For correcting an overly rounded shape, add longer face-framing layers that extend past the jaw or collarbone, creating vertical lines that elongate the silhouette and prevent the mushroom effect common in overly layered curly hair.
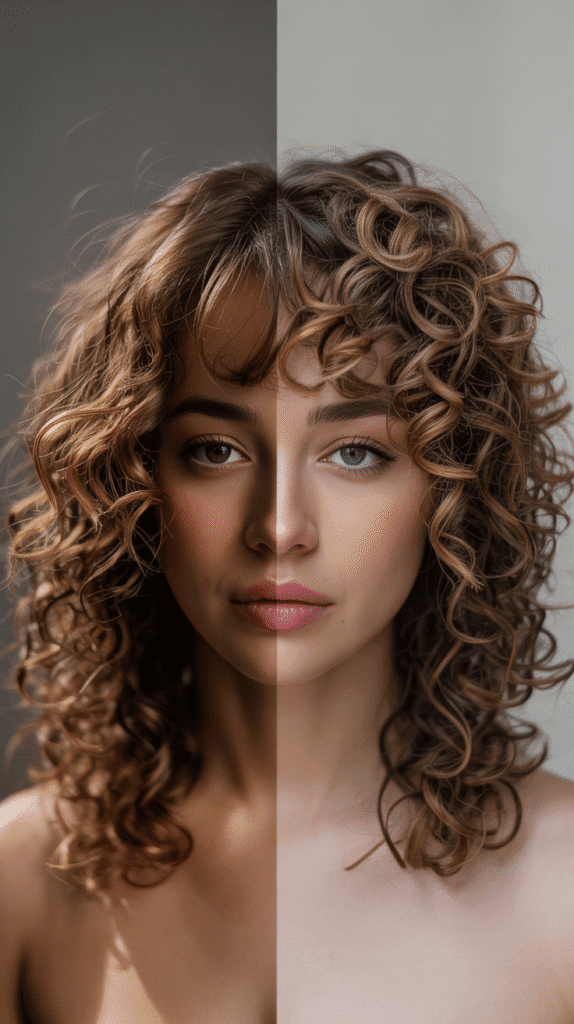
8. Styling and Finishing Your Cut
The way you style your freshly cut curls immediately after cutting reveals the true result of your work and sets the foundation for how your hair will look moving forward.
Proper finishing techniques enhance the shape you’ve created, encourage curl definition, and help you assess whether any final adjustments are needed before considering your haircut complete.
Post-Cut Styling Process:
- Wash your hair with a sulfate-free cleanser after cutting to remove any loose hairs and styling product buildup, giving you a fresh start to see your new cut in its cleanest, most natural state without interference from old products.
- Apply a leave-in conditioner while hair is soaking wet, distributing it evenly through all sections with praying hands or scrunching motions to provide moisture and help curls clump together in their new, freshly cut formation.
- Use a curl-enhancing cream or gel appropriate for your curl type and desired hold level, applying it to wet hair in sections to encourage curl definition and minimize frizz as your newly cut hair dries for the first time.
- Scrunch out excess water with a microfiber towel or cotton T-shirt using a gentle squeezing motion rather than rubbing, which disturbs the curl pattern and creates frizz that prevents you from seeing the clean lines of your new cut.
- Air dry or diffuse on low heat to allow your curls to form naturally in their new shape, resisting the urge to touch or manipulate your hair as it dries since this is when curl patterns set and you’ll finally see the full effect of your cutting work.
- Scrunch out the crunch once hair is 100% dry by gently scrunching sections with a small amount of oil on your hands, breaking the gel cast to reveal soft, touchable curls with the volume and shape your cut created.
- Assess the final result by examining your hair in natural lighting from all angles, checking for any missed sections, uneven areas, or spots that need minor adjustment before considering your cut complete.
- Take photos from multiple angles to document your cut for future reference, helping you remember what worked well and what you’d change next time, plus providing visual records of length and shape to track your hair journey.
9. Maintenance and Between-Cut Care
Maintaining the shape and health of your curly haircut between trimming sessions determines how long your cut looks fresh and how well your curls continue to perform.
Strategic care routines preserve the style you worked hard to create, while knowing when and how to do mini-trims keeps your cut looking intentional rather than grown-out and shapeless.
Maintenance Strategies:
- Schedule regular micro-trims every 3-4 months to remove split ends and maintain your desired shape, with curly hair typically needing less frequent cutting than straight hair since the curl pattern hides some split ends and length changes are less obvious.
- Search for and snip “whispy” or frizzy hairs between cuts by identifying individual strands that stick out awkwardly from your curl pattern, carefully trimming just those problem hairs in their dry, natural state without disturbing surrounding curls.
- Refresh your face-framing layers every 6-8 weeks by trimming only the front sections that frame your face, since these pieces grow most noticeably and have the biggest impact on your overall appearance even when the rest of your hair maintains its shape.
- Use a silk or satin pillowcase to reduce friction while sleeping, preventing the tangling and breakage that can make your carefully cut layers appear uneven or create frizz that obscures your haircut’s shape.
- Maintain curl health with regular deep conditioning treatments (weekly or bi-weekly) to keep your hair hydrated and elastic, as healthy curls hold their shape better and showcase your cut more effectively than dry, damaged curls.
- Protect your ends with the LOC or LCO method (Liquid, Oil, Cream or Liquid, Cream, Oil) to seal in moisture and prevent the dryness that leads to split ends, extending the time between necessary trims.
- Refresh your curls between wash days using a water-based spray or curl refresher rather than re-wetting and restyling completely, maintaining the shape your cut created without constantly manipulating your hair.
- Avoid heat styling tools that can damage your curl pattern and create split ends requiring more frequent trimming, or use them sparingly with heat protectant when necessary for special occasions.
10. When to Seek Professional Help
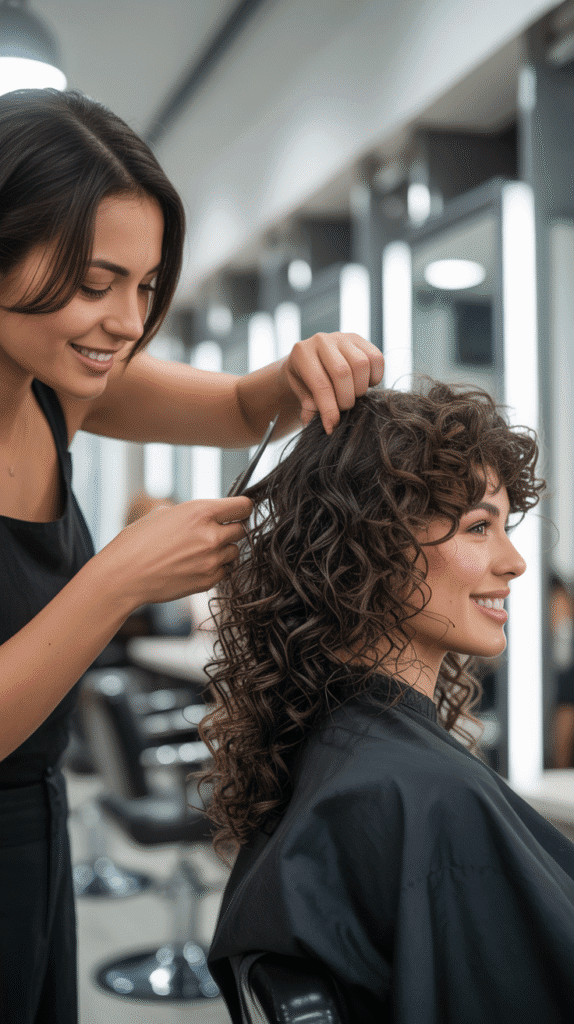
While cutting curly hair at home can be incredibly successful, certain situations call for professional expertise to avoid costly mistakes or achieve results beyond at-home capabilities.
Recognizing when to put down the scissors and book an appointment with a curl specialist saves you from potential disasters and ensures your hair gets the expert attention it needs for major transformations or problem-solving.
Situations Requiring Professional Assistance:
- Your first major curly haircut or transitioning from straight-hair cutting methods to curl-specific techniques should ideally be done by a professional who can establish the right shape and teach you what your specific curl pattern needs for future maintenance.
- Dramatic length changes of more than 4-6 inches require professional precision to create proper proportions and layering, as removing significant length affects weight distribution throughout your entire head and impacts how curls stack and fall.
- Correcting previous bad cuts whether self-inflicted or from an inexperienced stylist, often requires professional assessment to determine the best path forward, as attempting to fix mistakes yourself can compound the problem and lead to removing more hair than necessary.
- Chemical treatments or color application should always be done professionally before cutting, as these services require expertise to avoid damage, and the cutting should happen after treatments when your hair is in its final texture and condition.
- Complex shapes like asymmetrical cuts, undercuts, or precision geometric styles demand professional training and experience with angles, weight distribution, and finishing techniques that are difficult to execute on yourself at home.
- Extremely thick, coarse, or dense curly hair that requires significant thinning and texturizing benefits from professional tools and techniques that remove bulk without creating holes or uneven texture throughout the hair.
- When you’re feeling uncertain or anxious about cutting your own hair, trust your instincts and seek professional help rather than proceeding nervously, as hesitation often leads to mistakes and uneven results that end up costing more to fix professionally later.
- Annual shape corrections with a professional curl specialist help maintain the integrity of your cut even if you do regular maintenance trims yourself, ensuring your overall shape remains balanced and your layering strategy continues to work as your hair grows.
Finding a Curly Hair Specialist:
- Research salons that specialize in curly hair by looking for certifications in DevaCut, Rezo Cut, or other curl-specific cutting methods, checking their social media for client transformations on curl types similar to yours.
- Read reviews specifically mentioning curly hair rather than general salon reviews, as stylists skilled with straight hair may lack the specialized training needed for curly textures and cutting methods.
- Schedule a consultation before booking a cut to discuss your curl pattern, goals, and concerns, assessing whether the stylist understands curly hair and communicates in a way that makes you feel confident in their expertise.
- Expect to pay more for curl specialists as their advanced training and time-intensive cutting methods command higher prices, typically ranging from $75-200+ depending on location and the stylist’s experience level with curly hair.
Conclusion
Learning the best way to cut curly hair at home empowers you to take control of your curl journey, saving money while developing a deeper understanding of your unique hair needs and how to work with your natural texture.
Throughout this guide, you’ve discovered that successful curly hair cutting relies on understanding your specific curl type, using the right tools and techniques designed specifically for textured hair, and respecting your curl pattern rather than fighting against it.
From the precision of dry cutting individual ringlets to the strategic layering that creates volume and prevents the dreaded triangle shape, each method offers distinct advantages depending on your curl type, skill level, and desired results.
Remember that cutting curly hair is a skill that improves with practice—start conservatively with small trims, focus on removing only what’s necessary, and don’t be afraid to seek professional help for major changes or corrections that feel beyond your comfort level.
With patience, the right preparation, and the techniques outlined in this article about the best way to cut curly hair at home, you can maintain beautiful, healthy curls that showcase your personality and make you feel confident every single day.
Your curls are unique, and now you have the knowledge to cut them in a way that celebrates rather than tames their natural beauty.