
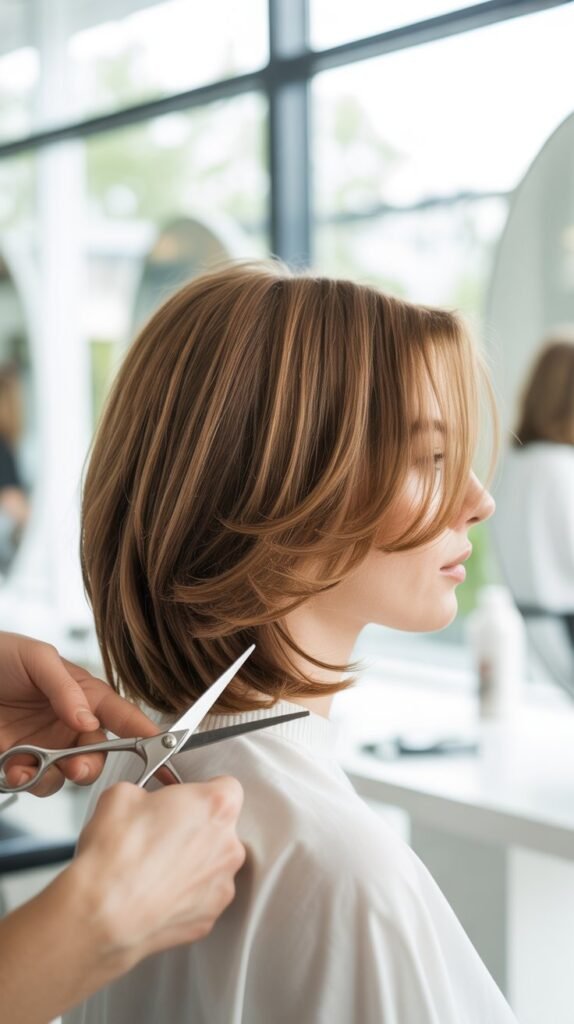
Have you ever walked out of a salon with perfectly styled face-framing layers that made you feel like a completely new person, only to wonder if you could recreate that magic at home?
The truth is, cutting face-framing layers yourself is not only possible but can also be an empowering and cost-effective way to refresh your look between salon visits.
This comprehensive Guide to Cutting Face-Framing Layers Yourself will walk you through everything you need to know, from understanding what face-framing layers actually are to mastering the cutting techniques that professional stylists use.
You’ll discover the essential tools required, learn how to prepare your hair properly, explore different layering styles that complement various face shapes, and understand the common mistakes to avoid.
Whether you’re a complete beginner or someone who has trimmed their own hair before, this guide will provide you with the confidence and knowledge to create salon-quality face-framing layers in the comfort of your own home.
By the end of this article, you’ll have a clear roadmap to achieving that effortlessly chic, dimensional look that draws attention to your best features and adds movement to your hairstyle.
1. Understanding Face-Framing Layers and Their Benefits

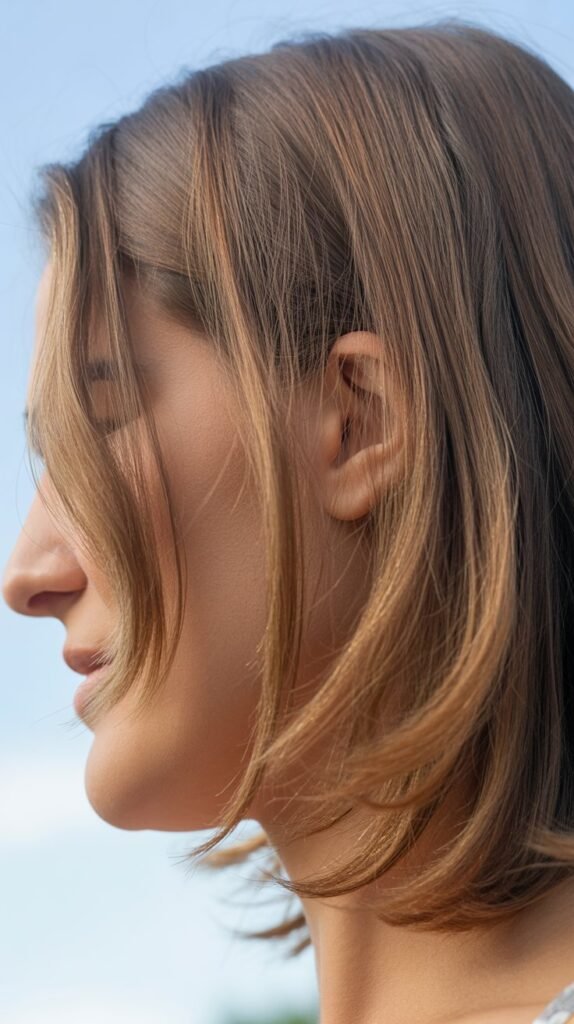
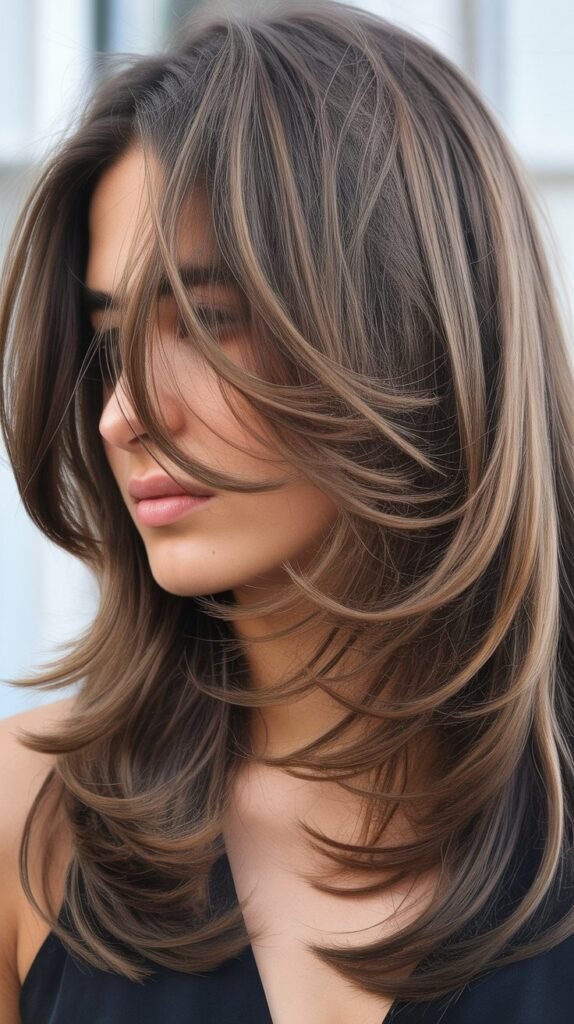
Face-framing layers are strategic cuts that fall around the perimeter of your face, typically starting anywhere from your cheekbones to your collarbone.
These layers are designed to highlight your facial features and create a soft, flattering frame that adds dimension and movement to your overall hairstyle.
Before you pick up scissors, understanding the purpose and benefits of these layers will help you make informed decisions about your cut.
Key characteristics of face-framing layers include:
- These layers are shorter at the front and gradually blend into the longer sections of your hair, creating a seamless transition that looks natural and intentional.
- They work by drawing the eye toward the center of your face, emphasizing features like your eyes and cheekbones while softening the jawline.
- Face-framing layers add texture and volume to hair that might otherwise appear flat or one-dimensional, making them ideal for fine or straight hair types.
- Unlike traditional layers throughout the entire head, face-framing layers concentrate the cutting around the front sections, making them less commitment-heavy and easier to maintain.
The primary benefits of cutting face-framing layers include:
- Instantly updating your look without sacrificing overall length, which is perfect for those who want change but aren’t ready for a dramatic chop.
- Creating the illusion of a professional blowout with minimal styling effort, as the layers naturally fall in a way that adds movement.
- Offering versatility in styling, allowing you to wear your hair down with enhanced dimension or pull it back for a softer, more romantic updo.
- Reducing the weight of thick hair around the face, which can make styling easier and prevent your hair from overwhelming your features.
- Providing a cost-effective solution for maintaining a fresh look between salon appointments, potentially saving hundreds of dollars annually.
2. Essential Tools and Materials You’ll Need

Gathering the right tools before you begin is crucial for achieving professional-looking results when cutting your own face-framing layers.
Using proper hair-cutting equipment rather than household scissors will make a significant difference in the precision of your cuts and the overall health of your hair.
Investing in quality tools may seem unnecessary at first, but they will serve you well for years of at-home trims and touch-ups.
Must-have cutting tools include:
- Professional hair-cutting shears with a blade length between 5.5 to 6.5 inches, which provide the precision and sharpness needed for clean cuts without causing split ends or damage.
- A fine-tooth comb for sectioning and detangling, preferably one with both wide and narrow teeth to accommodate different hair textures and densities.
- Hair clips or sectioning clips (at least 4-6 clips) to keep the hair you’re not working with out of the way and maintain organization throughout the cutting process.
- A spray bottle filled with water to keep hair damp during cutting, as hair should be slightly moist but not soaking wet for the most accurate results.
- A handheld mirror in addition to your main mirror, allowing you to check the back and sides of your layers from multiple angles.
Supporting materials that enhance the cutting process:
- A cape or old towel to drape over your shoulders, protecting your clothing from hair clippings and making cleanup significantly easier.
- Point-cutting or texturizing shears if you want to add softness to the ends of your layers, though these are optional for beginners.
- Hair ties or elastic bands to secure sections of hair you’re not currently working on, preventing them from interfering with your cutting area.
- A well-lit space with good natural or bright artificial lighting, as proper visibility is essential for making accurate cuts and checking symmetry.
Where to source quality tools:
- Professional beauty supply stores offer the best selection of hair-cutting tools, with staff who can provide guidance on choosing the right scissors for your needs.
- Online retailers like Amazon, Sally Beauty, or specialized hair tool websites provide extensive options with customer reviews to help guide your purchase (professional hair shears can be found at beauty supply retailers).
- Investing between $20-$50 in a good pair of hair-cutting scissors will provide significantly better results than using craft or kitchen scissors, which can crush the hair shaft.
3. Preparing Your Hair Before Cutting

Proper preparation is the foundation of a successful at-home haircut and can mean the difference between professional-looking layers and an uneven disaster.
Taking the time to prepare your hair correctly will give you better control during cutting and help ensure your layers fall exactly where you want them.
This preparation phase should never be rushed, as it sets you up for success in all the steps that follow.
Hair washing and conditioning protocol:
- Wash your hair with your regular shampoo to remove any product buildup, oils, or dirt that could interfere with how the scissors glide through your hair.
- Apply conditioner from mid-length to ends only, avoiding the roots to prevent the hair from becoming too slippery and difficult to control during cutting.
- Rinse thoroughly with cool water to seal the hair cuticle, which helps the hair lie smoother and makes it easier to see the natural fall and texture.
- Gently towel-dry your hair by squeezing rather than rubbing, as rough toweling can create frizz and make it harder to see the true length and shape.
Detangling and sectioning preparation:
- Use a wide-tooth comb to carefully detangle your hair starting from the ends and working your way up to the roots, which prevents breakage and makes sectioning easier.
- Allow your hair to air dry until it’s about 70-80% dry, as cutting hair that’s too wet can result in layers that are shorter than intended once they dry.
- Part your hair exactly as you normally wear it, whether that’s a center part, side part, or no part at all, since this determines where the layers will naturally fall.
- Identify the front sections of hair that frame your face by creating a triangular section from the top of your head, with the point at your hairline and the base extending to behind your ears.
Setting up your cutting environment:
- Position yourself in front of a large mirror in a well-lit bathroom or room with minimal distractions, ensuring you can see your entire head and both sides of your face clearly.
- Have all your tools within easy reach on a clean, dry surface so you don’t have to search for items mid-cut, which can lead to mistakes or uneven sections.
- Set up your second mirror at an angle that allows you to check the back and sides of your head throughout the cutting process.
- Consider taking “before” photos from multiple angles, which will help you track your progress and identify any areas that need adjustment once you’re finished.
4. Face Shape Analysis and Layer Placement
Understanding your face shape is critical for determining where your face-framing layers should begin and end to create the most flattering effect.
Different face shapes benefit from different layer placements, and what looks stunning on one person might not have the same effect on another.
Taking a few minutes to analyze your face shape will help you customize your layers for maximum impact.
Identifying your face shape:
- Oval faces are characterized by balanced proportions with the forehead slightly wider than the chin, and they’re considered the most versatile shape that can accommodate almost any layer placement.
- Round faces have similar width and length measurements with softer angles and fuller cheeks, benefiting from layers that start below the chin to create the illusion of length.
- Square faces feature a strong jawline with forehead, cheekbones, and jaw of similar width, and they look best with layers starting at the cheekbone level to soften angular features.
- Heart-shaped faces are wider at the forehead and temples with a narrower chin, and they benefit from layers that start at the chin level to balance the wider upper face.
- Long or rectangular faces have greater length than width with a fairly uniform width from forehead to jaw, and they work well with layers starting at the cheekbone or just below to add width.
Optimal layer placement by face shape:
| Face Shape | Starting Point for Layers | Ending Point | Additional Notes |
|---|---|---|---|
| Oval | Cheekbone to chin | Collarbone | Most versatile; can experiment with various lengths |
| Round | Below chin | Mid-chest | Avoid layers at cheek level as they can emphasize roundness |
| Square | Cheekbone | Collarbone | Soft, wispy layers work better than blunt cuts |
| Heart | Chin level | Collarbone | Add volume at chin level to balance wider forehead |
| Long/Rectangle | Cheekbone | Shoulder | Creates horizontal visual interest to balance length |
Testing layer placement before cutting:
- Use your fingers to hold sections of hair at different lengths around your face while looking in the mirror, which gives you a preview of how various layer placements will look.
- Take photos with your hair held at different lengths to review later, as sometimes what looks good in person appears different in photos.
- Consider your typical styling routine when determining placement, since layers that look great when styled may fall differently when your hair is in its natural state.
- If you’re unsure, start conservative with longer layers that begin at chin level or below, as you can always cut more but cannot add length back.
5. Basic Cutting Technique for Beginners
Mastering the fundamental cutting technique is essential for creating even, professional-looking face-framing layers at home.
This step-by-step approach has been refined by stylists over decades and provides a foolproof method for beginners who want consistent results.
Following this technique carefully will help you avoid common pitfalls and give you the confidence to refine your skills over time.
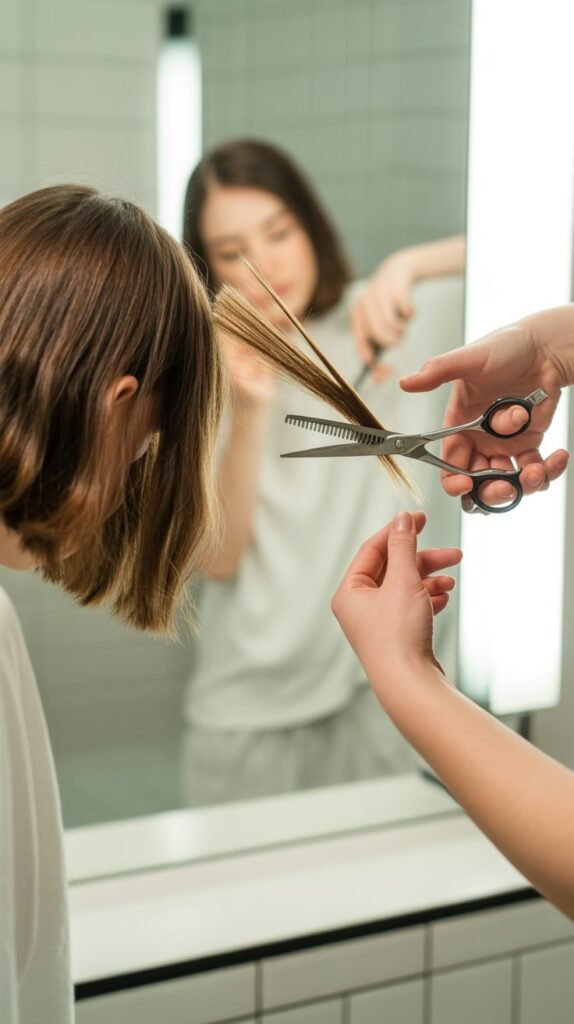
The twist-and-cut method for face-framing layers:
- Start by taking a front section of hair that’s about 1-2 inches wide, running from your part down to where you want the shortest layer to fall, typically at your cheekbone or chin.
- Comb this section straight down in front of your face, ensuring there are no tangles and the hair is evenly damp throughout the entire section.
- Hold the section between your index and middle fingers, sliding your fingers down to the point where you want to make your cut, keeping the hair taut but not stretched.
- Twist the section of hair once or twice away from your face, which creates a subtle angle and ensures the hair will fall nicely when you release it.
- Using your hair-cutting scissors, cut straight across just below your fingers, making one decisive cut rather than multiple small snips that can create an uneven line.
- Release the hair and comb it out to check the length, remembering that hair typically springs up slightly when dry, so leave it slightly longer than your target length.
Creating the gradual blend into longer hair:
- After cutting the first face-framing piece, take a section immediately behind it that includes a small portion of the already-cut hair as a guide.
- Hold this new section at the same angle and position as the first section, ensuring consistency in your holding technique for uniform results.
- Cut this section slightly longer than the first piece, typically by about a quarter to half an inch, which creates the gradual transition from short to long.
- Continue this process of taking sections that include previously cut hair as guides, gradually increasing the length as you work back toward your ears.
- Check both sides frequently in the mirror to ensure symmetry, making adjustments as needed before moving too far through the cutting process.
Point-cutting for natural, textured ends:
- After completing your blunt cuts, you can soften the ends by using a technique called point-cutting, which involves holding the scissors vertically rather than horizontally.
- Take small sections of the newly cut layers and hold them away from your face, then gently cut tiny notches into the ends with the tips of your scissors pointing upward.
- Make these point cuts shallow and sparse, removing only about 1/8 inch of hair at a time to create subtle texture without removing too much length.
- This technique prevents the blunt, heavy look of a straight-across cut and adds movement and softness to your layers.
- Work carefully and conservatively with point-cutting, as it’s easy to remove too much hair and create a choppy, over-textured appearance.
6. Advanced Techniques for More Dramatic Layers
Once you’ve mastered the basic technique, you may want to explore more advanced methods that create more dramatic, dimensional face-framing layers.
These techniques require more precision and confidence but can produce stunning results that rival professional salon work.
Advancing your skills gradually will help you develop the expertise needed to customize your cuts for various looks and occasions.
The slide-cutting technique for seamless blending:
- Slide-cutting involves gliding the scissors down the hair shaft while making small snips, which creates an ultra-smooth transition between different layer lengths.
- Hold a section of hair taut between your fingers, then position your scissors at about a 45-degree angle pointing downward along the hair shaft.
- Gently close and open the scissors as you slide them down the section, removing small amounts of hair throughout the length rather than in one place.
- This technique works particularly well for thick or coarse hair that needs extra blending to avoid harsh lines between layers.
- Practice this method on less visible sections first, as it requires steady hands and confidence to execute properly without removing too much length.
Creating choppy, piecey layers for textured styles:
- Choppy layers involve cutting sections at varying lengths with more pronounced differences, creating a deliberately uneven, edgy appearance.
- Instead of following the gradual lengthening pattern, cut some sections significantly shorter than others, creating gaps and separation in the layers.
- Use point-cutting more aggressively on these layers, cutting deeper into the hair shaft to enhance the disconnected, textured look.
- This style works best on hair with natural texture or wave, as the irregular lengths create more visual interest when the hair has movement.
- Balance is key with choppy layers—too much variation can look messy rather than intentionally edgy, so step back frequently to assess the overall effect.
The razor-cutting alternative for ultra-soft layers:
- Razor-cutting uses a specialized razor tool instead of scissors to create feathered, ultra-soft layer ends with minimal bulk (razor cutting tools are available at professional beauty retailers).
- This technique works by shaving into the hair at an angle, which removes weight and creates tapered ends that blend seamlessly into longer sections.
- Hold each section taut and use the razor in short, controlled strokes at about a 45-degree angle, working from mid-length toward the ends.
- Razor-cutting is particularly effective on thick, heavy hair that needs significant weight removal, but it should be used sparingly on fine or damaged hair.
- The results of razor-cutting tend to be softer and more romantic than scissor-cutting, making it ideal for creating wispy, face-framing pieces.
Layering for specific hair textures:
- Straight hair requires more precise cutting as every imperfection is visible, so measurements and symmetry must be exact to avoid obvious mistakes.
- Wavy hair is the most forgiving texture for face-framing layers, as the natural movement disguises minor irregularities and enhances the dimensional quality of layers.
- Curly hair should be cut slightly longer than intended, as curls spring up significantly when dry, and it’s often best to cut curly hair when it’s dry to see the true length.
- Coarse or thick hair benefits from internal layering techniques that remove bulk from within the section rather than just cutting the perimeter shorter.
7. Checking for Symmetry and Making Adjustments
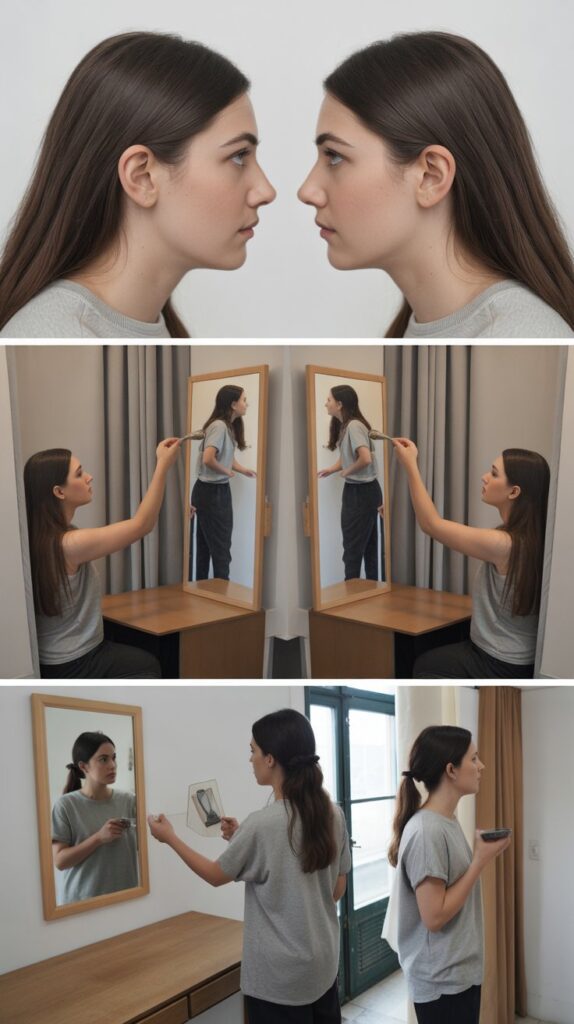
Achieving perfectly symmetrical face-framing layers is one of the biggest challenges when cutting your own hair, but with the right checking methods, you can ensure both sides match beautifully.
Even professional stylists constantly check their work from multiple angles, and this attention to detail is what separates a good haircut from a great one.
Developing a systematic approach to checking symmetry will help you catch and correct issues before they become noticeable problems.
Methods for checking layer symmetry:
- Pull matching sections from each side of your face forward and hold them side by side in front of your nose, which allows you to directly compare the lengths and see any discrepancies.
- Stand directly in front of your mirror and let your hair fall naturally, then visually compare the layers on both sides to ensure they appear to end at the same point on your face.
- Use your fingers to feel the layers on both sides, running them along the cut edges to detect differences in length that might not be immediately visible.
- Take photos from straight on and from both profile angles, as sometimes asymmetry that’s hard to see in the mirror becomes obvious in photographs.
- Ask someone you trust to look at your layers from a front view and provide honest feedback about whether both sides appear even.
Common symmetry issues and their fixes:
- One side appearing shorter than the other typically results from holding sections at different angles, and can be corrected by carefully evening out the longer side to match the shorter one.
- Layers that look even when pulled forward but uneven when hair falls naturally often indicate you need to account for your hair’s natural fall pattern and cowlicks when cutting.
- Blunt or choppy ends on one side compared to the other suggest inconsistent cutting technique, which can be softened through point-cutting or light trimming.
- Layers that work well on one side but fall oddly on the other might be due to hair density differences, requiring you to adjust the cutting angle to compensate for thicker or thinner sections.
Making strategic corrections:
- Always make corrections by cutting less rather than more, taking off tiny amounts (1/8 to 1/4 inch at a time) until both sides match perfectly.
- If one side is significantly shorter, resist the temptation to cut the longer side dramatically—instead, work on blending the shorter side better into the rest of your hair.
- Use the twist-and-cut method on the section that needs adjustment, maintaining the same technique you used for the initial cut to ensure consistency.
- Step away from the mirror for a few minutes between making corrections, as fresh eyes will help you see your work more objectively and prevent over-cutting.
- Document your corrections with notes or photos so you can remember what adjustments were needed for your next self-cut session.
When to stop adjusting:
- Recognize that perfect symmetry is nearly impossible and that minor differences of 1/8 inch or less are unlikely to be noticed by anyone, including yourself in everyday situations.
- Understand that over-correcting is one of the most common mistakes, where people continue trimming in pursuit of perfection and end up with layers much shorter than intended.
- Set a limit for yourself—if you’ve made three rounds of adjustments and the layers still don’t look perfect, step away and live with the cut for a day before making further changes.
- Remember that hair grows about half an inch per month on average, so even if your layers aren’t perfect this time, you’ll have another opportunity to refine them soon.
8. Styling and Maintaining Your New Layers

Once you’ve successfully cut your face-framing layers, learning how to style and maintain them properly will ensure they continue looking salon-fresh between trims.
The right styling techniques can enhance the dimension and movement of your layers, while proper maintenance will keep the ends healthy and the shape intact.
Understanding these care principles will maximize the lifespan and appearance of your new cut.
Blow-drying techniques for face-framing layers:
- Start with damp hair that’s been towel-dried and has had heat protectant spray applied evenly throughout, focusing especially on the newly cut layers that tend to be more vulnerable to heat damage.
- Use a round brush to blow-dry your layers, wrapping small sections around the brush and directing the dryer’s nozzle downward along the hair shaft to smooth the cuticle and add shine.
- For layers to curve gently toward your face, roll the brush under and toward your face as you dry, creating a soft, face-framing effect that enhances the layered look.
- For layers to curve away from your face in a more voluminous style, roll the brush away from your face while drying, which creates lift and an outward flip.
- Finish each section with a blast of cool air while still wrapped around the brush, which sets the style and helps it last longer throughout the day.
Styling products that enhance layered hair:
- Volumizing mousse applied to damp hair before blow-drying adds body and fullness to layers, preventing them from falling flat against your face.
- Texturizing spray or sea salt spray creates separation and definition in layers, emphasizing the individual pieces and adding a lived-in, effortless appearance (quality texturizing products can enhance layered styles).
- Lightweight oils or serums applied sparingly to the ends of layers prevent frizz and add shine without weighing down the face-framing pieces.
- Dry shampoo at the roots between washes maintains volume in your layers and prevents them from becoming greasy and separated.
- Flexible-hold hairspray as a finishing touch keeps layers in place without making them stiff or crunchy, allowing natural movement throughout the day.
Maintenance schedule for face-framing layers:
- Trim your face-framing layers every 6-8 weeks to maintain their shape and remove split ends, which is one of the primary benefits of learning to cut them yourself.
- Dust the very ends of your layers every 3-4 weeks if you notice any splitting or damage, removing just 1/8 to 1/4 inch to keep them healthy without changing the overall length.
- Deep condition your layers weekly, as these shorter pieces are exposed to more heat styling and environmental damage than the rest of your hair.
- Adjust your layer placement seasonally—you might want longer, heavier layers in winter for warmth and shorter, lighter layers in summer for a breezier feel.
Heat styling alternatives for layers:
- Air-drying with product gives layers a natural, textured appearance that requires no heat, making it ideal for minimizing damage on days when you don’t need a polished look.
- Braiding damp layers and letting them dry creates subtle waves that enhance the dimensional quality without requiring hot tools.
- Using foam rollers on dry layers for 20-30 minutes adds volume and curl without heat, and this method is gentler on hair than hot rollers or curling irons.
- The sock bun method involves twisting damp hair into a bun high on your head and sleeping on it, creating soft waves throughout including in your face-framing layers.
9. Common Mistakes and How to Avoid Them

Learning from the most common mistakes people make when cutting their own face-framing layers can save you from costly errors that take months to grow out.
Even experienced home hair-cutters occasionally fall into these traps, so understanding them in advance will help you navigate the cutting process with greater confidence.
Awareness of these pitfalls is your best defense against ending up with a cut you regret.
Cutting too much length at once:
- The single most common mistake is cutting layers much shorter than intended because people don’t account for how much hair springs up when it dries, especially if hair has natural wave or curl.
- Always cut hair when it’s only damp, not soaking wet, as waterlogged hair is stretched longer and will shrink considerably upon drying.
- Cut conservatively at first, leaving layers at least a half-inch longer than your goal length, then reassess after your hair is completely dry and styled.
- Remember the golden rule: you can always cut more, but you cannot put hair back, so err on the side of leaving layers too long rather than too short.
- If you’re unsure about a length, cut to that point, dry your hair completely, and live with it for a day before cutting any shorter.
Using the wrong scissors:
- Kitchen or craft scissors have blunt blades that crush the hair shaft rather than cutting cleanly through it, which leads to split ends and damage that makes hair look ragged.
- Dull or old hair scissors produce the same crushing effect, so if your scissors require multiple snips to cut through a section, they need sharpening or replacement.
- Cutting with improper tools can actually make your hair appear frizzier and less healthy than before you cut it, as the damaged ends fray and separate.
- Investing in proper hair-cutting shears with sharp, beveled edges ensures clean cuts that leave the hair shaft sealed and healthy.
Cutting hair in the wrong state:
- Cutting dry hair without proper sectioning often results in uneven layers because hair doesn’t fall uniformly when it’s completely dry and has been styled.
- Cutting hair that’s been straightened or curled with heat tools is misleading, as the layers will look completely different once the hair returns to its natural texture.
- Cutting soaking wet hair causes the most dramatic length miscalculations, as hair can appear 1-2 inches longer when waterlogged compared to its dry length.
- The ideal cutting state is slightly damp hair that’s been combed through and allowed to begin air-drying, showing its natural fall pattern while still being manageable.
Not accounting for natural part and hair growth patterns:
- Cutting hair pulled straight down without considering where you actually part it means the layers will fall in unexpected places when you style your hair normally.
- Cowlicks, natural waves, and growth patterns significantly affect how layers fall, and ignoring these factors leads to pieces that stick out awkwardly or fall too short.
- Always part your hair exactly as you wear it before cutting, and observe how different sections naturally fall before making any cuts.
- If your hair tends to flip or curve in a particular direction naturally, work with that pattern rather than against it when determining your cutting angle.
Creating disconnected or choppy layers unintentionally:
- Cutting each section without using previously cut hair as a guide results in layers that don’t flow smoothly from one length to the next, creating obvious, unflattering lines.
- Taking sections that are too large or too small disrupts the gradual transition that makes face-framing layers look professional and polished.
- Rushing through the process or skipping sections to save time almost always results in noticeable gaps or jumps in your layers.
- The key to seamless layers is patience and consistency—maintaining the same section size, holding technique, and cutting angle throughout the entire process.
10. Troubleshooting and Damage Control
Despite your best efforts and careful preparation, sometimes face-framing layers don’t turn out exactly as planned, and knowing how to troubleshoot these situations can save your look until the hair grows back.
Understanding your options for damage control will reduce stress and help you make rational decisions about how to proceed.
Most hair “disasters” are less catastrophic than they initially appear and can be remedied with creative styling or minor adjustments.
When layers are too short:
- Embrace the shorter length temporarily and style them with texture products that create a piecey, intentional look rather than trying to hide them.
- Use styling techniques that blend the short layers into the rest of your hair, such as creating loose waves or curls that disguise the length difference.
- Consider getting clip-in hair extensions for special occasions when you need the appearance of longer layers, which can be removed when you don’t need them.
- Focus on accelerating hair growth through scalp massages, biotin supplements, and protective styling that minimizes breakage (hair growth strategies are discussed on health and beauty resources).
- Be patient and remember that hair grows approximately half an inch per month, so layers that are an inch too short will reach your desired length in about two months.
When layers are uneven or asymmetrical:
- Assess whether the unevenness is actually noticeable to others by asking a trusted friend for honest feedback, as we’re often our own harshest critics.
- If one side is significantly shorter, you can disguise this by parting your hair on the opposite side or styling with waves that blur the difference.
- Consider having a professional stylist do a “corrective cut” that evens out the layers while maintaining as much length as possible.
- In cases of minor asymmetry of a quarter-inch or less, simply living with it often makes the most sense, as you’ll likely be the only one who notices.
When layers create unwanted volume or puffiness:
- This issue typically occurs when layers are cut too bluntly or when there’s too much hair in the layered sections, creating bulk rather than the intended sleekness.
- Use texturizing or thinning shears to carefully remove some of the internal bulk from the layers without changing their length.
- Apply smoothing serums or creams to the layers before heat styling to help them lie flatter against your face rather than poufing outward.
- Blow-dry the layers using a flat paddle brush instead of a round brush, directing them downward to reduce volume.
- Point-cut the ends of the layers to remove some of the blunt weight and create a softer, less bulky appearance.
When layers expose damaged or unhealthy ends:
- If cutting your layers revealed split ends or damage, you’ll need to address this before the layers will look their best, even if it means cutting slightly shorter than intended.
- Apply deep conditioning treatments and hair masks specifically to the layered sections twice weekly to begin repairing damage.
- Avoid heat styling the damaged layers for at least a week, allowing them to recover before subjecting them to additional stress.
- Use a small amount of hair oil on the ends to temporarily seal splits and smooth the appearance while the damage grows out.
Professional intervention options:
- If you’ve made a significant mistake that you cannot fix yourself, don’t compound the problem by continuing to cut—consult a professional stylist who specializes in corrective cuts.
- Be honest with the stylist about what you did and what went wrong, as this information helps them determine the best correction strategy.
- Understand that professional correction might involve cutting your hair shorter than you’d like to even everything out, but this is often the fastest path to a polished look.
- Use the experience as a learning opportunity, asking the stylist for tips on how to avoid the same mistakes when you maintain the cut yourself in the future.
Conclusion
The journey to mastering the Guide to Cutting Face-Framing Layers Yourself is one that empowers you to take control of your appearance, saves you money, and gives you the flexibility to refresh your look whenever inspiration strikes.
Throughout this comprehensive guide, you’ve learned that cutting your own face-framing layers is not only achievable but can produce results that rival professional salon work when approached with patience, the right tools, and proper technique.
From understanding what face-framing layers are and how they benefit different face shapes, to gathering essential tools, preparing your hair correctly, and executing both basic and advanced cutting techniques, you now have a complete roadmap for success.
You’ve discovered how to check for symmetry, make necessary adjustments, and style your new layers to perfection, as well as how to avoid the most common mistakes that trip up beginners.
You’ve also gained valuable troubleshooting skills that will help you handle any unexpected outcomes with confidence rather than panic.
Remember that becoming proficient at cutting your own face-framing layers is a skill that develops over time, and each cutting session will teach you something new about your hair’s unique characteristics and behaviors.
The confidence you build through this process extends beyond just haircuts—it’s about trusting yourself to learn new skills and take creative control of your personal style.
With the knowledge from this guide, you’re now equipped to maintain beautiful, professionally styled face-framing layers from the comfort of your home, saving both time and money while always looking your absolute best.