
Have you ever dreamed of achieving that effortlessly cool, textured shag look without spending hundreds at a salon? The Step-by-Step DIY Shag Haircut for Beginners is your gateway to mastering one of the most versatile and flattering hairstyles from the comfort of your own home.
This comprehensive guide breaks down every aspect of cutting a shag haircut yourself, from understanding the foundational techniques to perfecting those signature choppy layers that define this iconic style.
Whether you have straight, wavy, or curly hair, you’ll discover how to adapt this timeless cut to suit your unique texture and face shape.
Throughout this article, you’ll learn about essential tools, proper sectioning methods, cutting angles, and finishing techniques that professional stylists use.
We’ll walk you through preparing your hair, creating the perfect guide layers, adding texture and movement, and styling your new shag to perfection.
By the end, you’ll have the knowledge and confidence to transform your hair with scissors in hand, saving money while expressing your personal style through a fresh, modern shag haircut that turns heads wherever you go.
1. Understanding the Shag Haircut Style
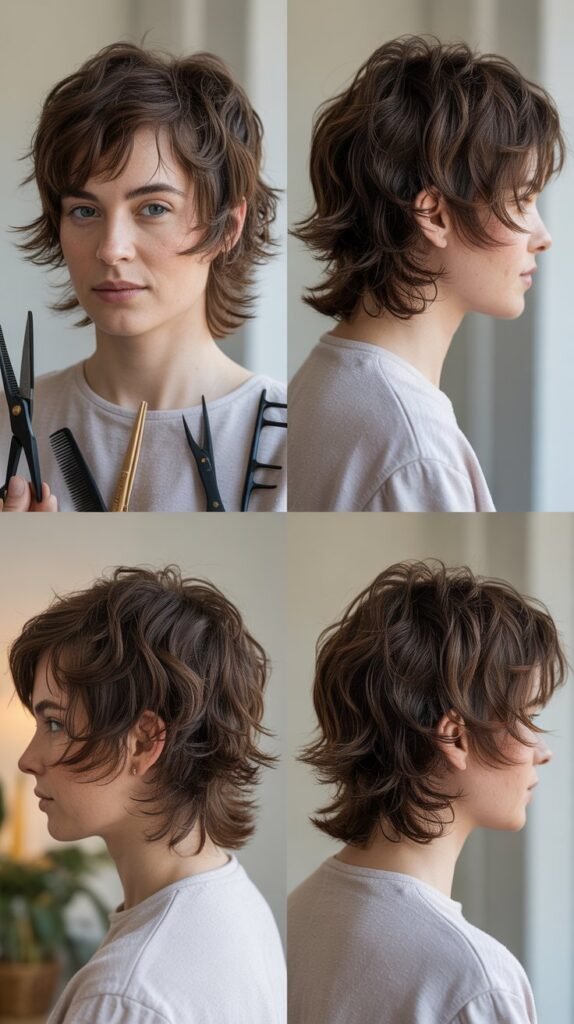
The shag haircut is characterized by its multi-layered structure, feathered ends, and volume-rich appearance that creates natural movement and texture.
Before picking up scissors, it’s essential to understand what makes a shag unique and how to identify the key elements that will guide your cutting process.
- The shag haircut originated in the 1970s and has evolved into countless modern variations suitable for all hair types and lengths.
- This style features shorter layers at the crown that gradually become longer toward the ends, creating a distinctive cascading effect.
- The hallmark of a shag is its heavy layering throughout the head, which removes bulk while adding dimension and movement.
- Shag haircuts typically include textured, wispy ends rather than blunt lines, giving the hair a soft, lived-in appearance.
- Face-framing layers are a critical component, with shorter pieces around the face that blend seamlessly into longer lengths.
- The beauty of a shag lies in its versatility—it works beautifully on straight, wavy, curly, and even coily hair textures.
- Modern shags can be customized with varying degrees of choppiness, from subtle and refined to bold and edgy.
- Understanding your hair’s natural texture will help you determine how aggressive your layering should be for optimal results.
2. Essential Tools and Materials Needed
Having the right tools makes the difference between a professional-looking DIY shag and a disaster that requires salon intervention.
Gathering quality equipment before you start ensures smoother cuts, better precision, and results you’ll actually love.
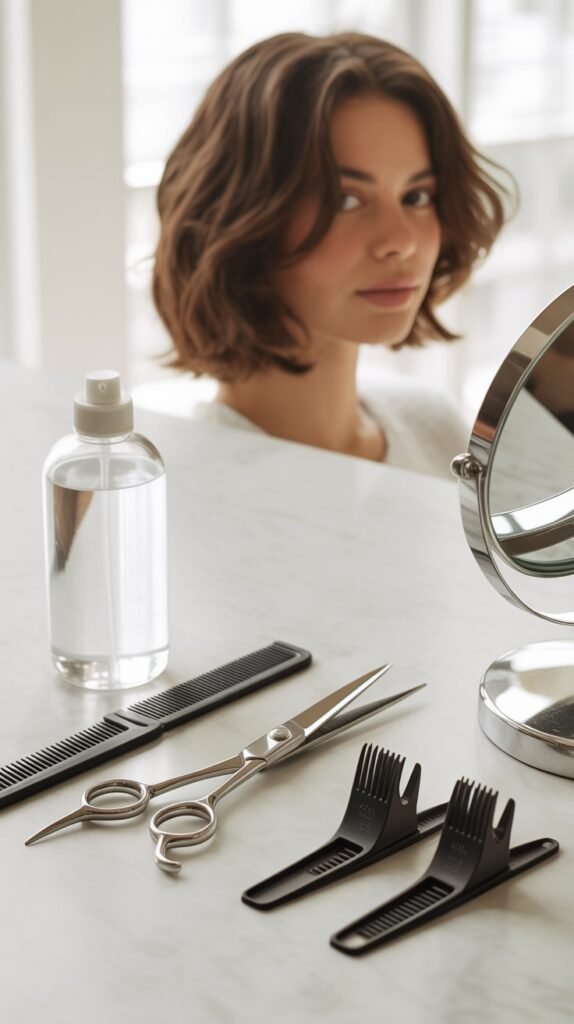
- Professional haircutting shears (6-7 inches long) are absolutely essential and should never be substituted with regular household scissors.
- Regular scissors crush hair strands rather than cutting cleanly, leading to split ends and uneven results.
- Thinning shears or texturizing shears help create the signature wispy, feathered ends characteristic of shag haircuts.
- Multiple sectioning clips (at least 6-8) keep hair organized and prevent accidentally cutting sections you’re not working on.
- A fine-tooth comb allows for precise sectioning and helps guide your scissors during the cutting process.
- A spray bottle filled with clean water keeps hair damp throughout the cutting process for better control and accuracy.
- A handheld mirror or a second large mirror helps you see the back of your head during the cutting process.
- Hair ties or elastic bands secure sections temporarily when creating your initial guide layers.
- A cape or old towel protects your clothing from cut hair and makes cleanup significantly easier afterward.
- Invest in quality shears from beauty supply stores or online retailers specializing in professional hair tools—they typically cost between $30-100.
3. Preparing Your Hair for Cutting
Proper preparation sets the foundation for a successful DIY shag haircut and significantly impacts your final results.
Taking time to wash, condition, and section your hair correctly ensures even cutting and helps you avoid common mistakes beginners make.
- Start by washing your hair with shampoo and conditioner to remove all products, oils, and buildup that could interfere with cutting.
- Towel-dry your hair until it’s damp but not dripping wet—hair that’s too wet shrinks more when it dries and can lead to cutting too much length.
- Comb through your hair thoroughly with a wide-tooth comb first, then a fine-tooth comb to remove all tangles and knots.
- For best results, work with hair that has its natural texture rather than straightening or curling it before cutting.
- Part your hair in your preferred style (middle part, side part, or no part) so your layers will frame your face correctly.
- Divide your hair into four main sections: top, two sides, and back, securing each with sectioning clips.
- The top section should extend from your hairline to the crown of your head, creating a rectangular shape.
- Side sections run from above your ears to behind your ears on each side of your head.
- The back section includes all hair from the crown down to your nape, which you’ll subdivide further during cutting.
- Take your time with sectioning—accurate sections are crucial for achieving balanced, symmetrical layers throughout your shag.
4. Creating the Foundation Guide Layer
The guide layer serves as your roadmap for the entire haircut, determining the overall length and shape of your shag.
This first cut is the most critical step, as all subsequent layers will reference this initial length.
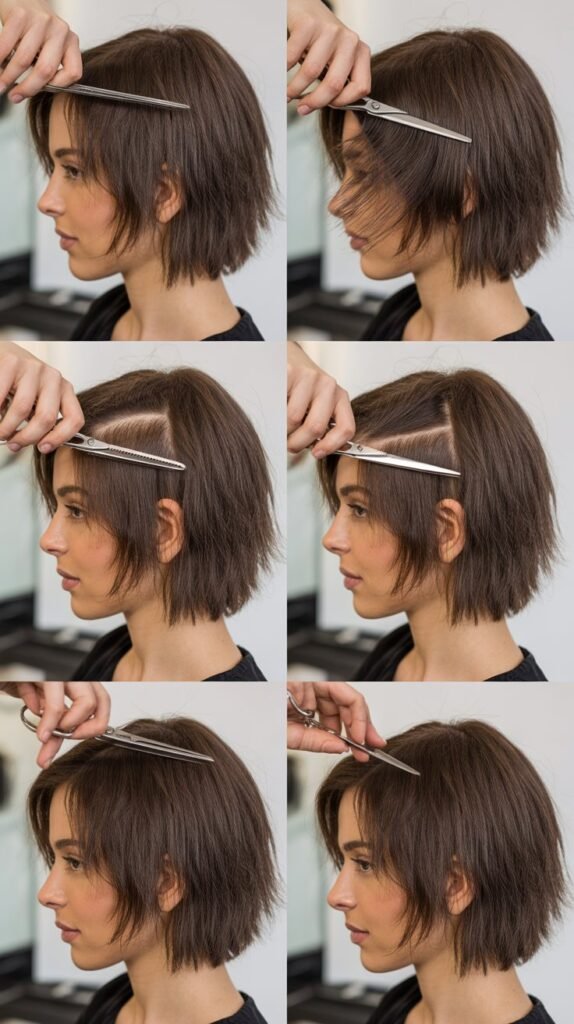
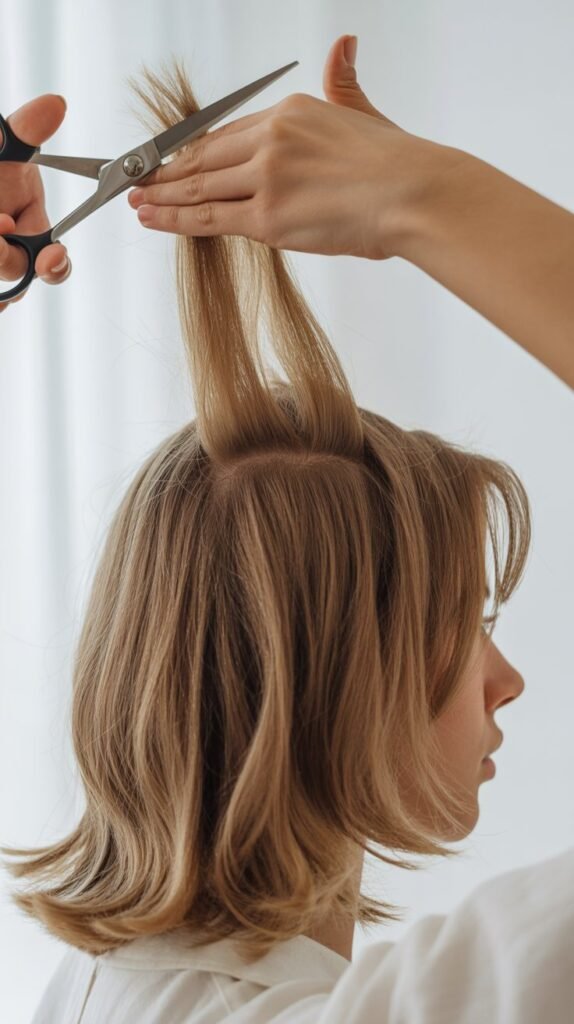
- Begin with the top section of your hair at the crown, as this area determines your shortest layer length.
- Pull a small subsection (about 1-2 inches wide) straight up from your scalp at a 90-degree angle to your head.
- Hold the hair firmly between your index and middle fingers, sliding your fingers to the desired length you want for your shortest layer.
- Most shag haircuts have guide layers at the crown ranging from 3 to 6 inches long, depending on your preferred intensity.
- Cut straight across just above your fingers in one smooth motion, using sharp haircutting shears held parallel to the floor.
- This initial cut creates your “traveling guide”—the reference point you’ll use to cut all surrounding sections.
- Take another small subsection next to your first cut, including a small portion of your already-cut guide layer for reference.
- Pull this new subsection up at the same 90-degree angle and cut it to match the length of your guide layer.
- Continue working in small subsections radiating outward from your crown in all directions, always including previously cut hair as your guide.
- Check your guide layer frequently from different angles to ensure it’s even and at your desired length before proceeding to the next section.
- Remember that hair shrinks when it dries, so if you’re cutting while damp, leave about a quarter to half inch extra length.
5. Cutting the Side and Face-Framing Layers
Face-framing layers are what give the shag its signature flattering shape and define the overall structure of your haircut.
These sections require extra attention as they’re the most visible and impact how the style frames your features.
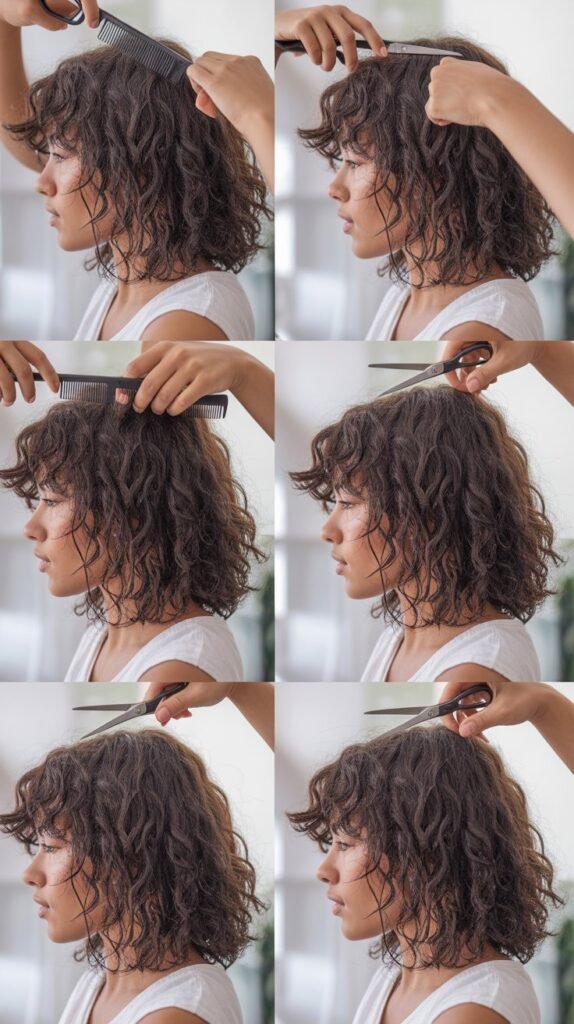
- Unclip one side section and comb it smooth, allowing the hair to fall naturally toward your face.
- Determine where you want your shortest face-framing pieces to hit—common options include cheekbone, chin, or collarbone length.
- Pull a small subsection of hair from near your temple area forward and hold it between your fingers at your desired length.
- Cut at a slight diagonal angle rather than straight across to create a softer, more blended look.
- This first face-framing piece becomes your guide for the rest of the side section layers.
- Take vertical subsections moving from front to back along the side of your head, pulling each section straight out at 90 degrees.
- Use your previously cut hair as a guide, ensuring each new section matches the length established by connecting to your crown guide layer.
- Create a gradual graduation by allowing the hair to get slightly longer as you move from crown to ends.
- Repeat the entire process on the opposite side, constantly checking that both sides are symmetrical in length and angle.
- Stand in front of your mirror frequently to assess balance—your face-framing layers should mirror each other when you look straight ahead.
- For added dimension, you can point-cut into the ends (cutting small vertical snips) to create texture and soften the lines.
6. Layering the Back Section
The back section contains the most hair and creates the bulk of your shag’s volume and movement.
Proper technique in this area ensures your haircut looks intentional and polished from every angle, not just the front.
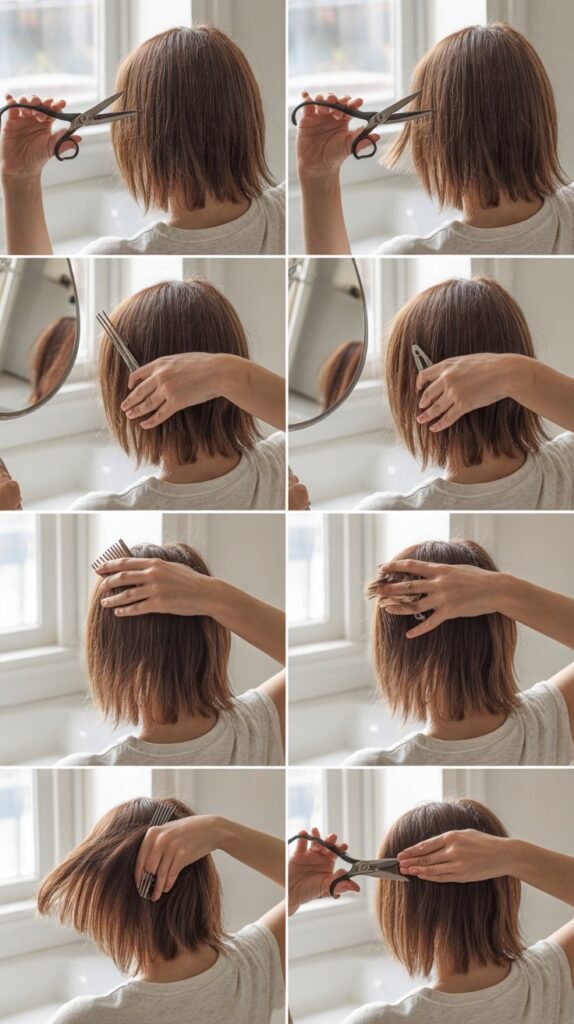
- Unclip the back section and divide it into three horizontal subsections: upper back (near crown), middle back, and lower back (nape area).
- Start with the upper back section closest to your crown, where your layers will be shortest.
- Take a thin horizontal subsection about half an inch thick, pulling it straight up from your head at a 90-degree angle.
- Match this section to your crown guide layer by including some previously cut hair from the top section as reference.
- Cut straight across to match your guide, creating continuity between the top and back of your head.
- Move down to the next horizontal subsection, again pulling hair straight up at 90 degrees and including your previous cut as a guide.
- Each subsequent section should be slightly longer than the one above it, creating that signature graduated shag effect.
- Use a handheld mirror in combination with your main mirror to see what you’re doing—visibility is crucial for even results.
- The middle back section requires careful attention to blending, as it transitions from shorter crown layers to longer perimeter lengths.
- For the lower back near your nape, you may want to maintain more length, depending on your overall desired haircut length.
- Some shaggers prefer to keep the very bottom layer as a “weight line”—a slightly heavier, less layered section that provides shape and structure.
- Check your work by running your fingers through your hair in different directions to feel for any obvious uneven sections.
7. Adding Texture and Dimension
Texturizing transforms a basic layered cut into a true shag by creating that coveted piece-y, lived-in appearance.
This step softens harsh lines and adds movement, making your hair look naturally tousled and effortlessly stylish.
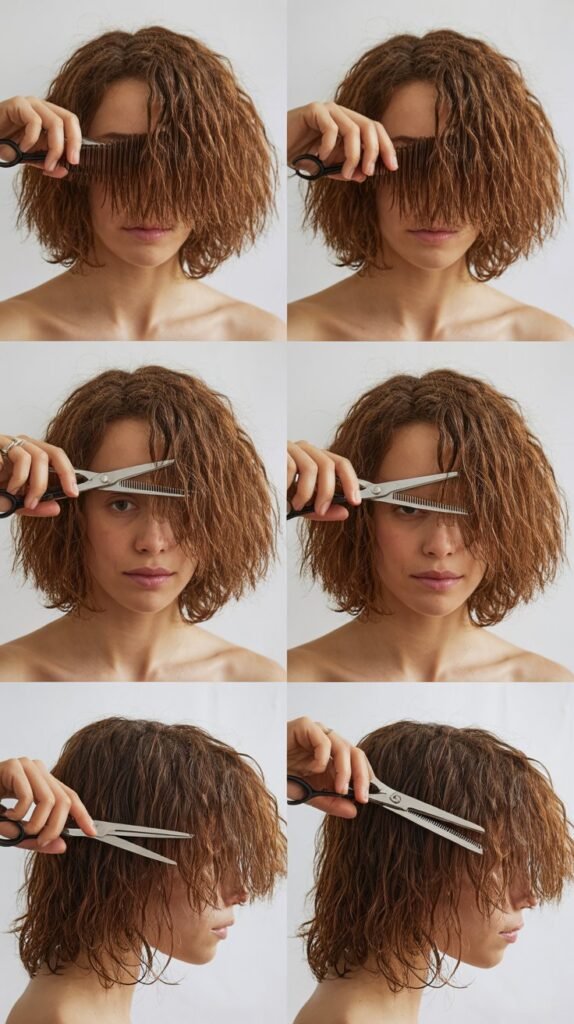
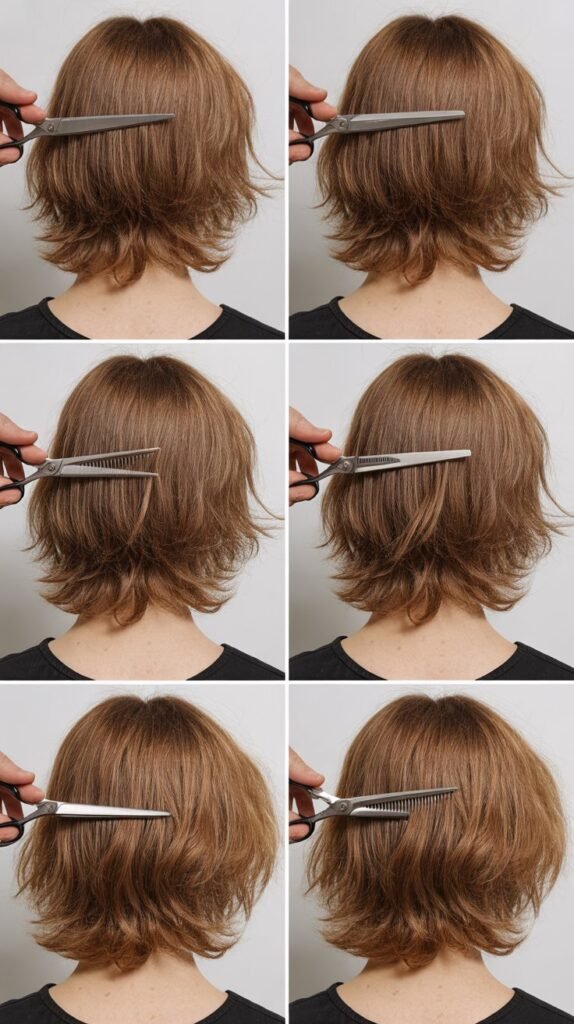
- Point cutting is the primary technique for adding texture—hold your scissors vertically and make small snips into the hair ends.
- Take small sections of hair (about 1 inch wide) and hold them between your fingers at the ends.
- Snip vertically into the hair about a quarter to half inch, creating irregular, soft edges rather than blunt lines.
- Work methodically through your entire head, point-cutting into the ends of every section for consistency.
- Thinning shears are excellent for removing bulk and creating wispy, feathered pieces characteristic of shag haircuts.
- Use thinning shears on the mid-lengths to ends of thicker sections, making 2-3 snips while sliding down the hair shaft.
- Avoid using thinning shears too close to your roots or on the very ends, as this can create frizz and damage.
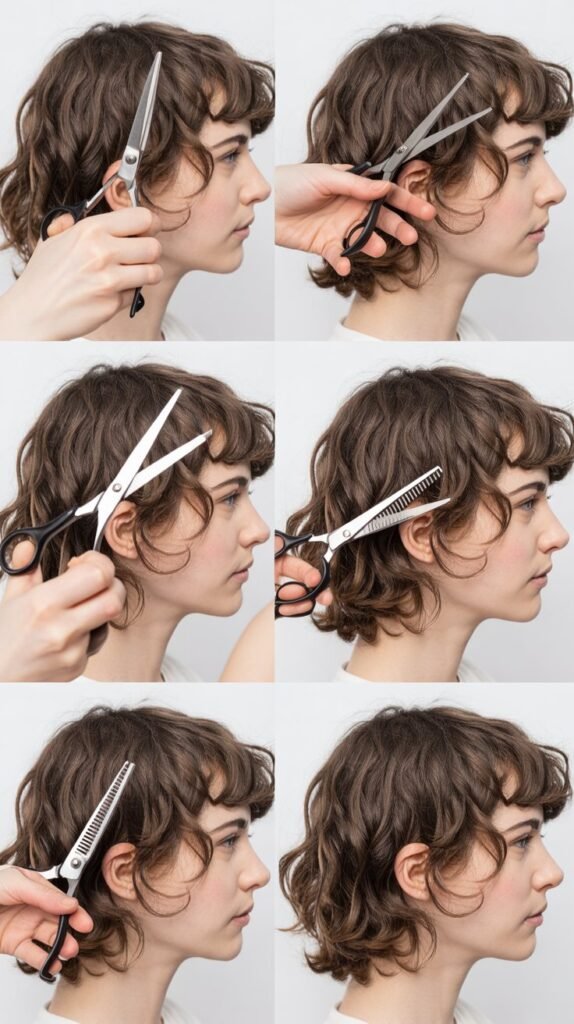
- For face-framing pieces, aggressive point-cutting creates that signature choppy, piecey look around your face.
- If you have naturally thick or coarse hair, you may need more texturizing to remove weight and allow movement.
- Fine hair requires a lighter touch—over-texturizing can make hair look thin and stringy rather than full and voluminous.
- Step back from the mirror frequently to assess your overall texture, ensuring you’re not over-working any particular area.
- Remember that texturizing is easier to add than to remove, so start conservatively and add more if needed.
8. Cutting Shag Bangs (Optional)

Shag bangs complete the iconic 70s-inspired look and add an extra dimension of style to your DIY haircut.
Whether you prefer curtain bangs, choppy straight-across bangs, or wispy face-framing pieces, this step personalizes your shag.
- Decide what bang style suits your face shape and personal aesthetic before making any cuts—this is a commitment.
- For curtain bangs, create a triangular section starting at the center of your head and extending to the outer edges of your eyebrows.
- Part this triangular section down the middle and clip the rest of your hair out of the way to avoid accidents.
- Pull one side of your bang section forward and hold it between your fingers at the bridge of your nose level.
- Cut at a downward diagonal angle, creating shorter pieces in the center that gradually become longer toward the sides.
- Repeat on the opposite side, ensuring both sides match in length and angle for a symmetrical curtain effect.
- For choppy straight-across bangs, create the same triangular section but don’t part it down the middle.
- Hold the entire bang section forward and cut straight across at your desired length—eyebrow length is most flattering for most face shapes.
- After cutting the initial blunt line, use point-cutting to add texture and create that essential shaggy, piecey appearance.
- If you’re nervous about cutting bangs, start longer than you think you want—you can always cut more, but you can’t add length back.
- Dry your bangs completely before making final adjustments, as hair shrinks significantly when it dries, especially around the face.
- For wispy, barely-there bangs, take a much smaller section and use thinning shears to create soft, face-framing pieces rather than heavy fringe.
9. Checking for Balance and Making Adjustments
Once the main cutting is complete, thorough evaluation and refinement ensure your DIY shag looks polished and professional.
Taking time to check your work from all angles helps you catch any unevenness before styling.
- Allow your hair to fall naturally and examine it from the front, sides, and back using multiple mirrors.
- Pull small sections of hair straight down on each side of your face and compare the lengths—they should be equal.
- Check that your layers blend smoothly without any obvious lines of demarcation or choppy transitions.
- Run your fingers through your hair in different directions to feel for any pieces that seem significantly longer or shorter than surrounding sections.
- Look for any areas that appear bulky or heavy compared to the rest of your hair—these may need additional thinning or layering.
- Ask a friend or family member to examine the back of your head, as this area is difficult to assess on your own.
- Make small, conservative adjustments rather than cutting large sections—it’s better to trim gradually than to remove too much at once.
- If you notice sections that are too short, there’s no immediate fix, but proper styling can help disguise unevenness until hair grows.
- Take photos of your haircut from multiple angles to assess the overall shape and identify any areas needing refinement.
- Remember that hair looks different wet versus dry, so don’t make final adjustments until your hair is completely dry and styled.
- Consider waiting a day before making final tweaks—sometimes what looks uneven initially settles into place after sleeping and restyling.
10. Styling and Maintaining Your DIY Shag
Proper styling brings your shag haircut to life, emphasizing the texture and movement you’ve created through careful cutting.
Learning to maintain your shag ensures it continues looking fresh and intentional between trims.
- Allow your hair to air-dry slightly (about 50% dry) before styling to enhance natural texture and prevent heat damage.
- Apply a volumizing mousse or sea salt spray to damp hair, focusing on roots and mid-lengths for maximum lift and texture.
- Flip your head upside down while blow-drying to create volume at the roots—this is essential for achieving that signature shag fullness.
- Use a round brush while blow-drying to add shape to face-framing layers, rolling the brush away from your face for a flattering lift.
- For wavy or curly hair, scrunch sections while blow-drying with a diffuser attachment to enhance natural texture without causing frizz.
- Finish with a texturizing spray or dry shampoo at the roots to add grip and piecey-ness throughout your layers.
- Use a flat iron or curling wand on random sections to create varied, undone-looking waves that emphasize the shag’s layered structure.
- The beauty of a shag is its versatility—it looks great messy and tousled or polished and smooth, depending on your mood.
- To maintain your shag between cuts, trim your bang area every 3-4 weeks and point-cut any split ends you notice.
- Deep condition your hair weekly to keep those textured ends healthy and prevent the frayed appearance from becoming actual damage.
- Schedule a full trim or reshape every 8-12 weeks to maintain your shag’s structure and prevent it from growing out awkwardly.
- Consider professional correction if you’ve made a mistake you can’t fix—most stylists can work with DIY cuts to create something beautiful.
Conclusion
Mastering the Step-by-Step DIY Shag Haircut for Beginners opens up a world of creative freedom and significant savings on salon visits.
Throughout this guide, you’ve learned the fundamental techniques that transform a basic layered cut into a textured, dimensional shag that captures that effortlessly cool aesthetic.
From understanding the essential tools and proper sectioning methods to creating guide layers, adding face-framing dimensions, and incorporating the perfect amount of texture, you now have a comprehensive roadmap for achieving professional-looking results at home.
Remember that practice makes perfect—your first DIY shag might not be flawless, but each attempt will build your confidence and refine your technique.
The beauty of the shag haircut lies in its forgiving nature and inherent “imperfection,” making it an ideal style for beginners to experiment with. As you maintain and style your new shag, you’ll discover what works best for your unique hair texture and lifestyle.
Whether you’re seeking a dramatic transformation or a subtle refresh, the skills you’ve gained here empower you to take control of your hair journey.
So gather your tools, section your hair with confidence, and embrace the creative process of crafting your own signature shag—you’re now equipped with everything you need to succeed.