
We’ve all been there—waking up to hair that’s seen better days, with that telltale oily sheen that makes you want to reach for dry shampoo or hide under a hat.
But what if I told you that greasy hair could actually be your styling secret weapon?
Welcome to our comprehensive guide on 27 Elegant Greasy Hair Updo Hairstyles, where we’ll transform your hair dilemma into a fashion statement.
This article will walk you through why oily hair is surprisingly perfect for updos, showcase 27 stunning styles ranging from classic buns to bohemian braids, and provide you with step-by-step techniques to create salon-worthy looks at home.
Whether you’re dealing with second-day hair or intentionally working with natural oils for better hold, these elegant updos will prove that greasy hair isn’t a problem—it’s an opportunity.
Get ready to discover sleek chignons, textured top knots, romantic twisted styles, and so much more that will make you rethink your entire hair routine.
Why Greasy Hair is Perfect for Updos
Oily hair often gets a bad reputation, but seasoned hairstylists know it’s actually a blessing in disguise when creating updos.
The natural oils provide grip, texture, and hold that freshly washed hair simply can’t match.
- Freshly washed hair tends to be slippery and silky, making it difficult for pins and ties to grip properly, whereas hair with natural oils creates the perfect amount of friction for secure styling.
- The sebum produced by your scalp acts as a natural styling product, giving your hair more pliability and making it easier to manipulate into intricate shapes and designs.
- Updos created with slightly greasy hair tend to last significantly longer throughout the day because the oils help hold the style in place without the need for excessive products.
- Working with oily hair reduces the need for additional texturizing sprays, dry shampoo, or mousse, which means you’re using fewer chemicals and saving money on styling products.
- Many professional hairstylists actually recommend not washing your hair before formal events because second or third-day hair holds styles better and photographs more beautifully than freshly washed locks.
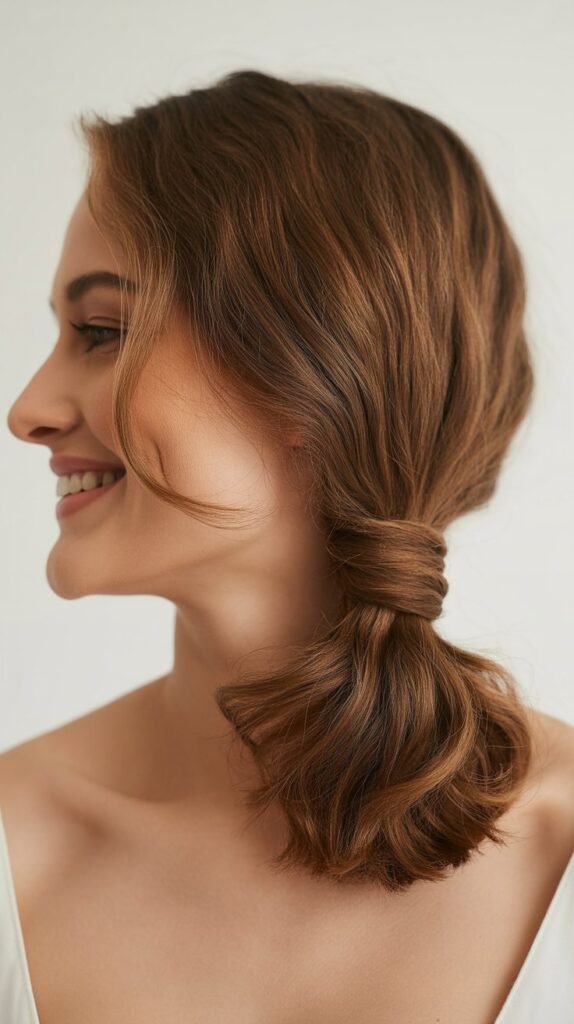
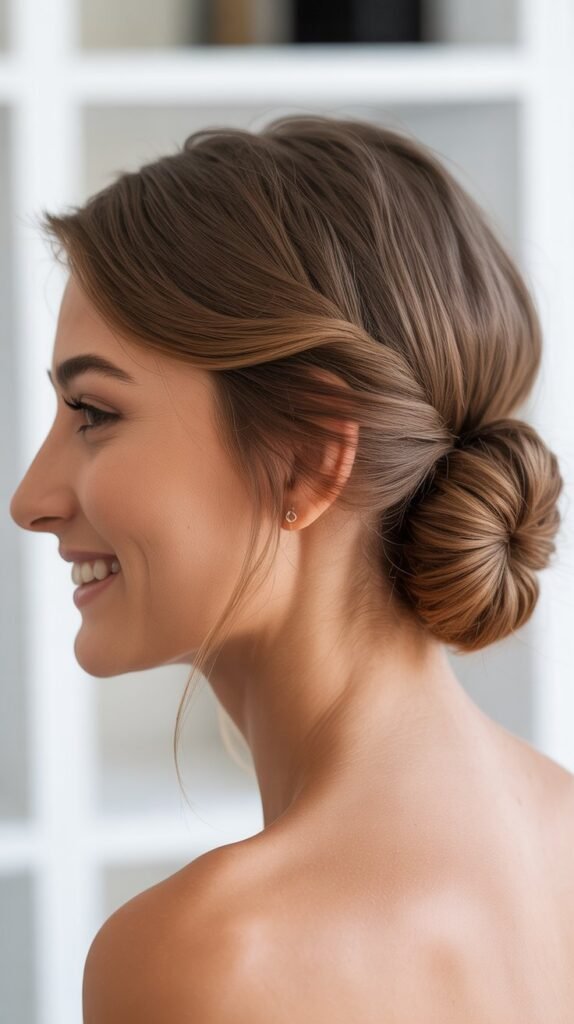
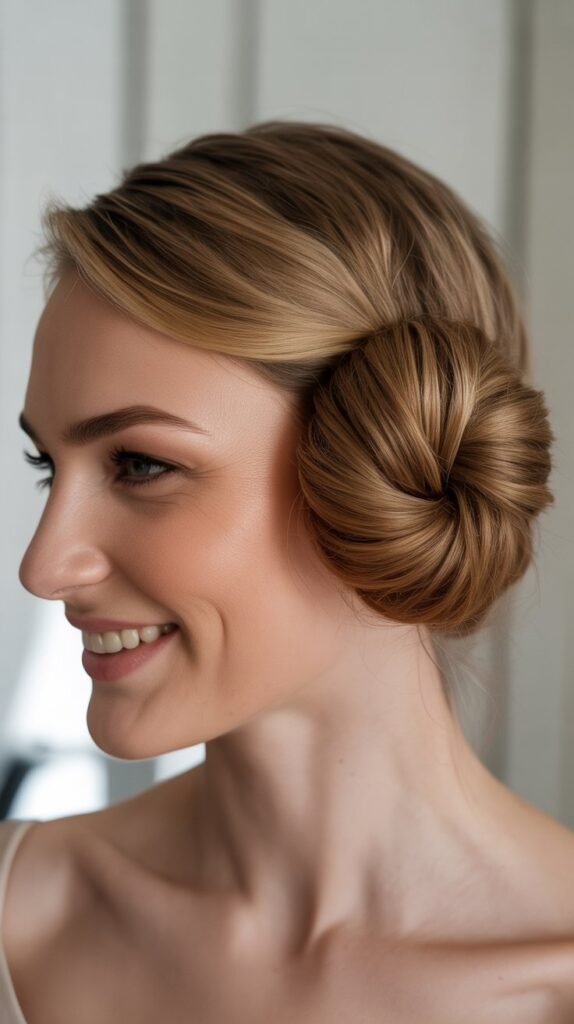
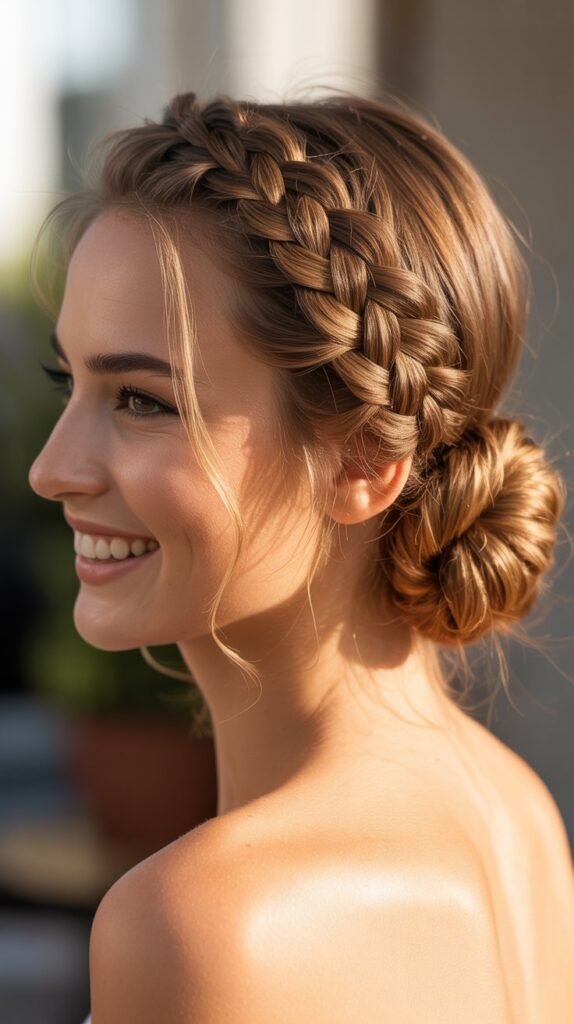
1. The Classic Low Bun
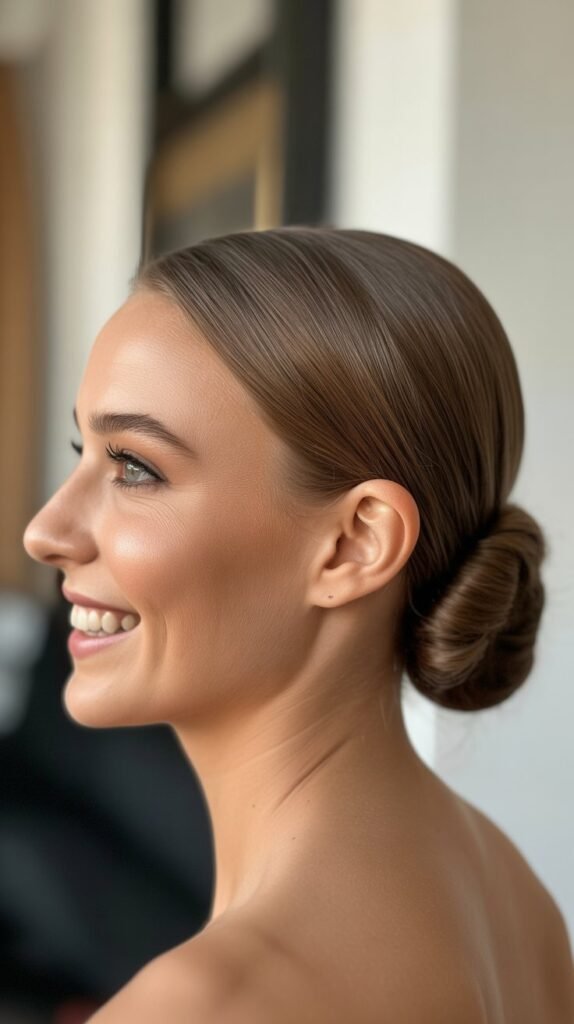
The low bun is timeless, sophisticated, and incredibly versatile, making it the perfect starting point for anyone looking to master greasy hair updos.
This style works beautifully for both professional settings and elegant evening events.
- Begin by brushing your greasy hair back smoothly, allowing the natural oils to create that sleek, polished appearance that would require gel or pomade on clean hair.
- Gather all your hair at the nape of your neck and twist it gently to create a rope-like texture that adds dimension to the final look.
- Wrap the twisted hair around itself to form a circular bun shape, securing it with bobby pins by sliding them in at different angles for maximum hold.
- For a more relaxed version, leave the bun slightly loose and pull out a few face-framing pieces to soften the overall appearance.
- The natural oils in your hair will keep flyaways at bay and give the bun a beautiful, glossy finish that looks intentionally styled rather than accidental.
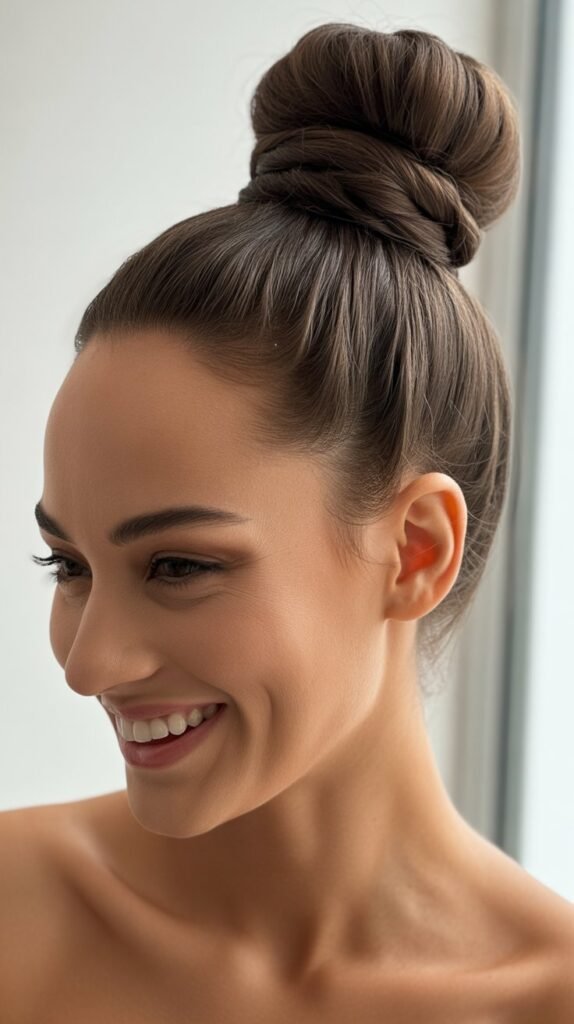
2. The Messy Top Knot
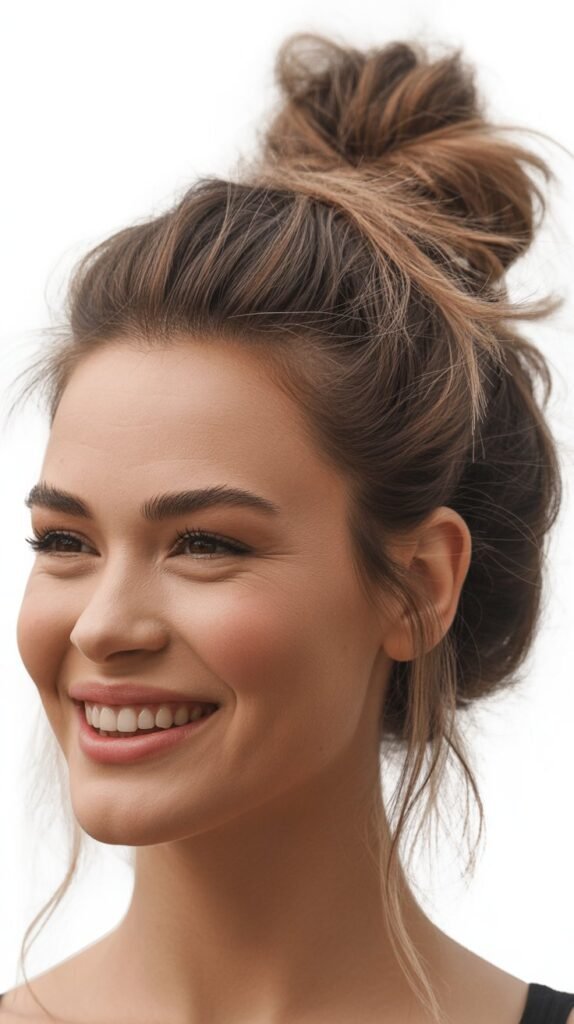
The messy top knot embraces the “undone” aesthetic that’s been dominating fashion runways and street style, and greasy hair makes this look effortlessly achievable.
This style perfectly balances casual chicness with intentional styling.
- Flip your head upside down and gather all your hair at the crown of your head, allowing the natural oils to help create that lived-in texture.
- Twist your hair loosely and wrap it around the base, intentionally leaving some pieces loose and uneven for that perfectly imperfect finish.
- Secure the knot with a hair elastic and use bobby pins only where necessary, embracing the relaxed nature of this style.
- Pull and tug at different sections of the knot to create more volume and texture, making it look fuller and more dimensional.
- The oils in your hair will prevent the style from looking too neat or structured, which is exactly what makes the messy top knot so appealing and modern.
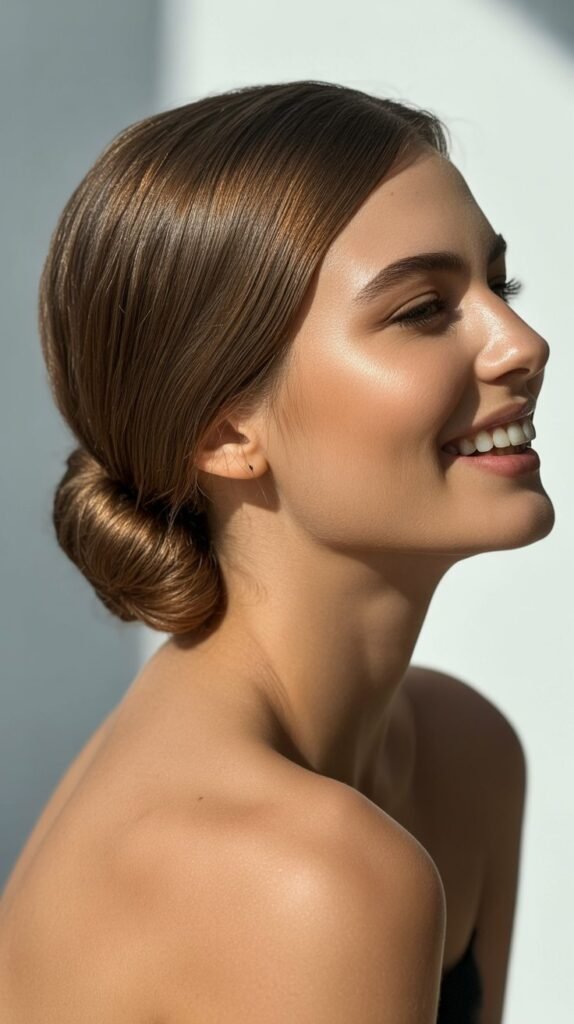
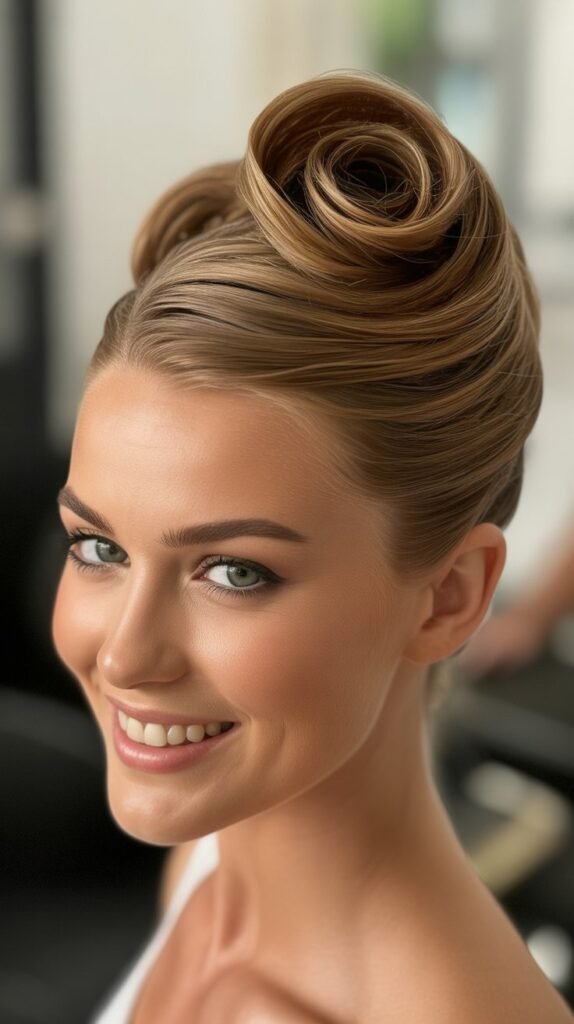
3. The Sleek Ballerina Bun
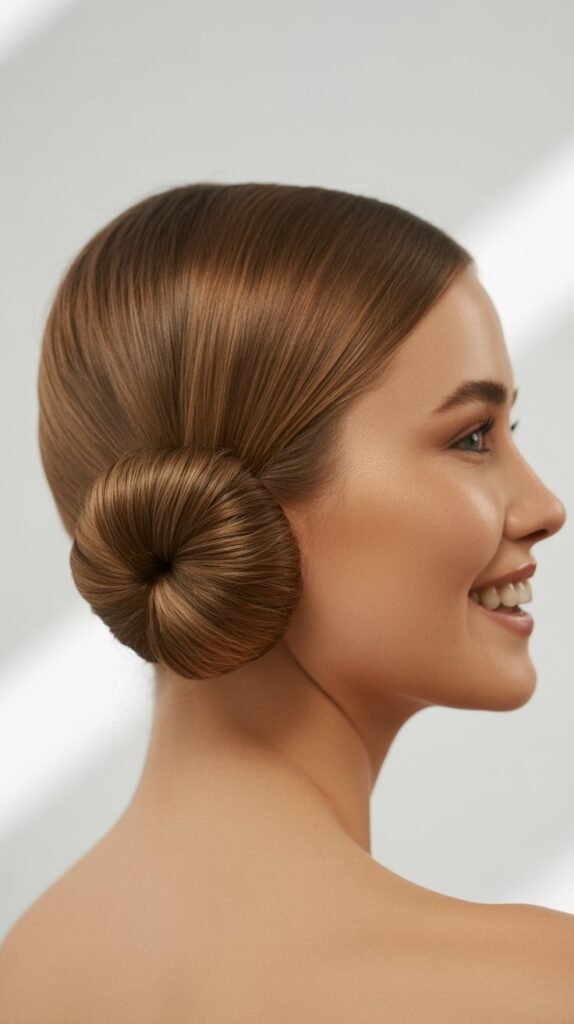
Channel your inner prima ballerina with this ultra-polished, sophisticated bun that takes full advantage of greasy hair’s natural sleekness.
This style is perfect for formal occasions, interviews, or any time you want to look refined and put-together.
- Start by creating a deep side part or center part, then use a fine-tooth comb to brush your hair back extremely smoothly, utilizing the natural oils for that high-gloss finish.
- Apply just a tiny amount of hair oil or serum to any dry patches, ensuring the entire surface is uniformly sleek and reflective.
- Gather your hair into a high ponytail at the crown or slightly behind it, pulling tightly to eliminate any bumps or texture.
- Twist the ponytail tightly and wrap it around the base in a spiral pattern, creating a perfectly round, compact bun.
- Secure with bobby pins and finish with a light mist of strong-hold hairspray to lock everything in place for hours of wear.
- Use a clean toothbrush or edge brush with a small amount of gel to smooth down any baby hairs along the hairline for that flawlessly polished appearance.
4. The Twisted Chignon
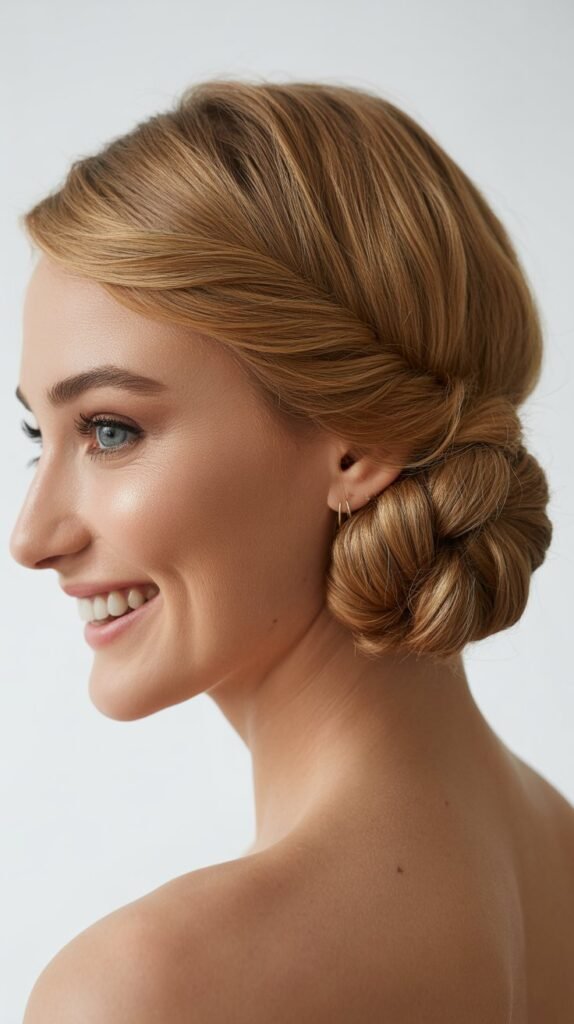
The twisted chignon is a romantic and feminine updo that looks intricate but is surprisingly simple to create, especially when working with hair that has natural oils for grip.
This style works beautifully for weddings, date nights, or any special occasion.
- Divide your hair into two equal sections down the middle, creating a clean center part from forehead to nape.
- Take each section and twist it tightly in a downward direction, allowing the natural oils to help the twists hold their shape without unraveling.
- Cross the two twists at the nape of your neck, then continue wrapping them around each other to create an intertwined rope effect.
- Pin the twisted sections into a low bun shape at the nape, tucking the ends underneath and securing them with multiple bobby pins for stability.
- Gently pull and loosen small sections of the twists to create more volume and a softer, more romantic appearance.
- Add decorative hairpins or a small hair accessory at the base of the chignon to elevate the style for formal events.
5. The French Twist

The French twist is the epitome of Parisian elegance and sophistication, and greasy hair actually makes this classic style easier to achieve and maintain.
This timeless updo has been gracing red carpets and formal events for decades.
- Brush all your hair to one side of your head, utilizing the natural oils to keep everything smooth and in place.
- Hold your hair with one hand while using the other to twist it upward vertically along the back of your head.
- Continue twisting until all the hair is incorporated and forms a vertical roll along the center back of your head.
- Tuck the ends of your hair into the twist and secure the entire style with bobby pins inserted vertically into the roll.
- Use additional pins horizontally across the twist to ensure it stays secure throughout the day or evening.
- For a modern take on this classic style, leave a few pieces loose around the face or pull the twist slightly to one side for an asymmetrical look.
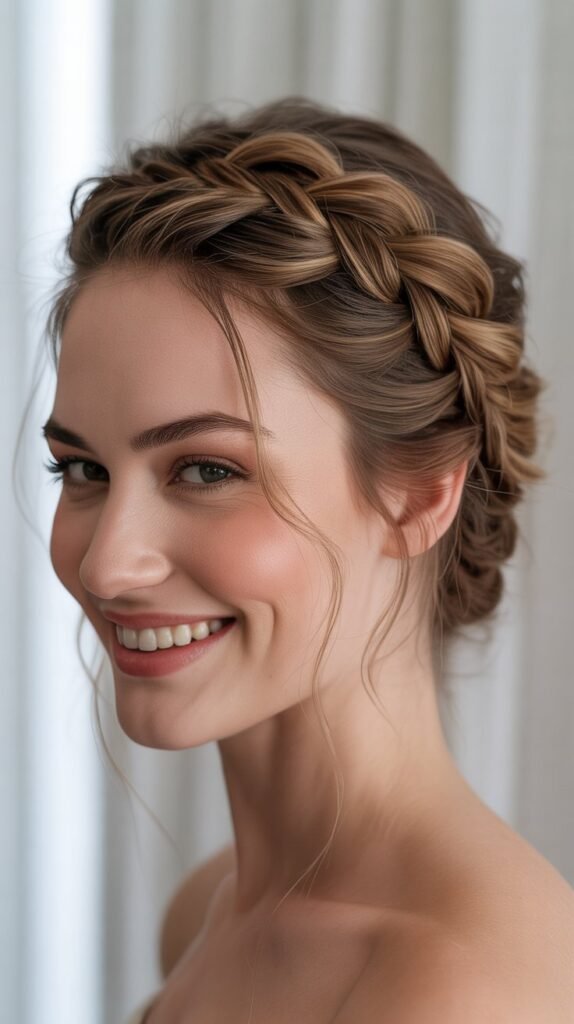
6. The Braided Crown

The braided crown creates an ethereal, bohemian look that’s perfect for festivals, outdoor weddings, or casual weekend gatherings.
Greasy hair provides the perfect texture for braiding, preventing pieces from slipping out.
- Create a deep side part and begin braiding a section of hair from one side of the part, incorporating more hair as you braid along the hairline.
- Continue the braid around the crown of your head like a halo, following your natural hairline from one side to the other.
- When you reach the opposite side, secure the braid end with a small clear elastic and tuck it underneath the crown braid.
- Pin the braid in place with bobby pins that match your hair color, ensuring they’re hidden within the braid structure.
- Gently pull and loosen the braid sections to create a fuller, more voluminous crown effect that looks soft and romantic.
- Allow some face-framing pieces to fall naturally, or pull out a few strategic pieces for a more relaxed, bohemian appearance.
7. The Low Ponytail Twist
This understated yet elegant style elevates the basic ponytail into something special, perfect for professional environments or polished casual looks.
The natural oils in greasy hair help create smooth, sleek sections.
- Gather your hair into a low ponytail at the nape of your neck, securing it with a hair elastic that matches your hair color.
- Create a small opening in the hair just above the elastic by separating it into two sections with your fingers.
- Flip the ponytail up and through the opening, creating an elegant twist that adds visual interest to a simple ponytail.
- For added sophistication, take a small section of hair from the ponytail and wrap it around the elastic to hide it completely.
- Secure the wrapped section with a bobby pin underneath the ponytail where it won’t be visible.
- Gently pull and loosen the twisted section to create more volume and dimension, making the style look more intricate than it actually is.
8. The Double Bun

The double bun is playful, youthful, and surprisingly versatile, working equally well for casual outings and creative professional environments.
Greasy hair helps these buns maintain their shape without constant adjustment.
- Part your hair down the center from forehead to nape, creating two equal sections on either side of your head.
- Gather each section into a high ponytail on either side of your head, positioning them symmetrically for a balanced appearance.
- Twist each ponytail and wrap it around its base to create two rounded buns, securing each with bobby pins.
- For a sleeker look, keep the buns tight and smooth, or pull them apart slightly for a more textured, voluminous appearance.
- The natural oils in your hair will help the buns stay secure and maintain their shape throughout the day without sagging.
- This style can be positioned high for a more playful look or lower near the ears for a more sophisticated, modern aesthetic.
9. The Twisted Half-Up Style
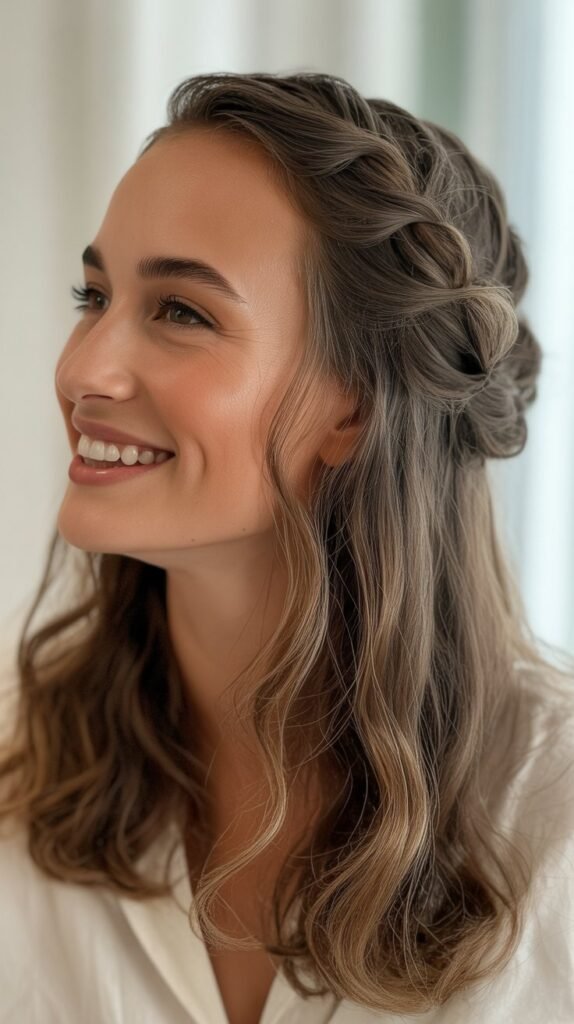
This versatile style combines the elegance of an updo with the softness of wearing your hair down, creating a perfect balance for various occasions.
The natural oils help the twisted sections hold their shape beautifully.
- Section off the top half of your hair from temple to temple, leaving the bottom half down and loose.
- Divide the top section into two parts and twist each section away from your face, moving toward the back of your head.
- Cross the two twisted sections at the back of your head and secure them together with bobby pins or a decorative clip.
- Allow the remaining hair to fall naturally over your shoulders, creating a soft, romantic cascade.
- Gently pull and loosen the twisted sections to add volume and create a more relaxed, effortless appearance.
- This style works particularly well when you want to keep hair off your face while still showing off your length and natural texture.
10. The Knotted Updo

The knotted updo is an artistic and unique style that creates visual interest through multiple knots and twisted sections.
Greasy hair’s natural grip makes creating and maintaining these knots much easier.
- Divide your hair into multiple sections—typically four to six depending on your hair thickness and desired complexity.
- Take two adjacent sections and literally tie them together in a simple overhand knot, pulling gently to tighten.
- Continue knotting different sections together, working your way up the back of your head in a vertical pattern.
- Once all sections are knotted, gather the ends and tuck them under the lowest knot, securing everything with bobby pins.
- Gently pull and adjust the knots to create more volume and texture, making them look intentionally loose and dimensional.
- This style looks intricate and time-consuming but is actually quite simple once you understand the basic knotting technique.
11. The Side-Swept Low Bun
This asymmetrical style is incredibly flattering and adds an elegant, romantic touch to any look.
The natural oils in greasy hair help achieve that coveted smooth sweep across the head.
- Create a deep side part on your preferred side, then brush all your hair to the opposite side at the nape of your neck.
- Use the natural oils to smooth the hair across your head, creating a sleek surface that showcases the dramatic side sweep.
- Gather all the hair to one side of your neck and twist it into a low bun, positioning it just behind and below your ear.
- Secure the bun with bobby pins, ensuring it sits securely at the side rather than the center back.
- Leave a few face-framing pieces on the side with less hair to balance the asymmetry and soften the overall look.
- This style is particularly photogenic and works beautifully for formal events, showing off earrings and necklines elegantly.
12. The Rope Braid Bun

The rope braid bun combines the texture of braiding with the sophistication of a bun, creating a unique style that stands out.
Greasy hair provides the perfect texture for rope braids to hold their twisted structure.
- Gather your hair into a high ponytail and secure it with a strong elastic that won’t slip.
- Divide the ponytail into two equal sections and twist each section tightly in the same direction—clockwise works well for most people.
- Once both sections are tightly twisted, wrap them around each other in the opposite direction, creating a rope effect that naturally stays together.
- Wrap the rope braid around the base of the ponytail in a circular motion, creating a textured bun with visible rope details.
- Secure the bun with bobby pins inserted at various angles to ensure it stays in place all day.
- The natural oils in your hair will help maintain the twisted structure and prevent the rope braid from unraveling or loosening.
13. The Gibson Tuck
The Gibson Tuck is a vintage-inspired style that exudes old Hollywood glamour and romance.
This elegant updo is surprisingly simple and works wonderfully with hair that has natural oils for enhanced grip.
- Create a low ponytail at the nape of your neck, securing it loosely with an elastic rather than pulling it tight.
- Create an opening above the elastic by separating the hair into two sections with your fingers.
- Tuck the entire length of the ponytail up and through the opening, rolling it under and into itself.
- Continue tucking and rolling the hair until all the length is secured in an elegant roll at the nape.
- Secure the tucked sections with bobby pins inserted horizontally to keep everything in place.
- Gently pull and loosen the roll to create more volume and a softer, more romantic appearance.
- Add a decorative hair accessory or vintage-inspired clip to the side for an extra touch of glamour.
14. The High Bun with Wrapped Base
This elevated version of the basic bun adds a polished detail that makes the style look more intentional and refined.
The natural oils help the wrapped section stay smooth and sleek.
- Gather your hair into a high ponytail at the crown of your head, securing it tightly with an elastic.
- Twist the ponytail and wrap it around the base to create a rounded bun shape, securing with bobby pins.
- Before finishing, separate out a small section of hair from the ponytail before creating the bun.
- Once the bun is secure, wrap this reserved section around the base of the bun, covering the elastic completely.
- Secure the wrapped section with a bobby pin tucked underneath where it won’t be visible.
- The wrapped base creates a polished, seamless finish that elevates the entire style from basic to sophisticated.
15. The Fishtail Braid Updo
The fishtail braid creates intricate, delicate texture that looks complex but is quite simple to master.
When incorporated into an updo, it becomes a stunning statement style that works for any special occasion.
- Gather your hair to one side and divide it into two equal sections to begin the fishtail braid.
- Take a small piece from the outer edge of one section and cross it over to join the opposite section.
- Repeat this process, alternating sides and taking small pieces from the outer edges, creating the distinctive fishtail pattern.
- Continue braiding all the way to the ends, then secure with a clear elastic.
- Wrap the fishtail braid around itself at the nape or side of your head, creating an intricate bun shape.
- Secure with bobby pins and gently pull apart the braid sections to create a fuller, more voluminous appearance.
- The natural oils in greasy hair help the small sections stay separated and defined, making the fishtail pattern more visible and impressive.
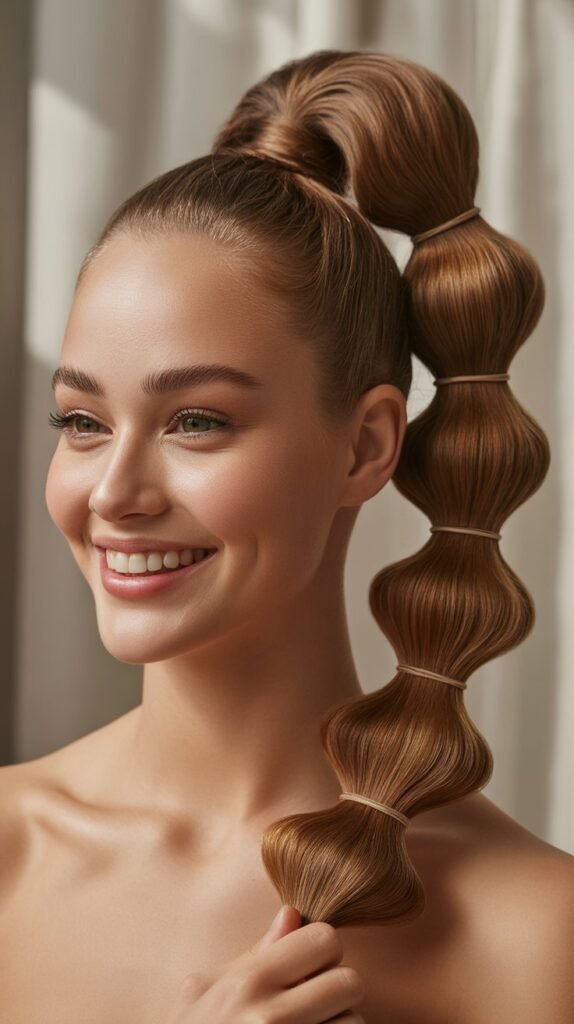
16. The Bubble Ponytail Updo
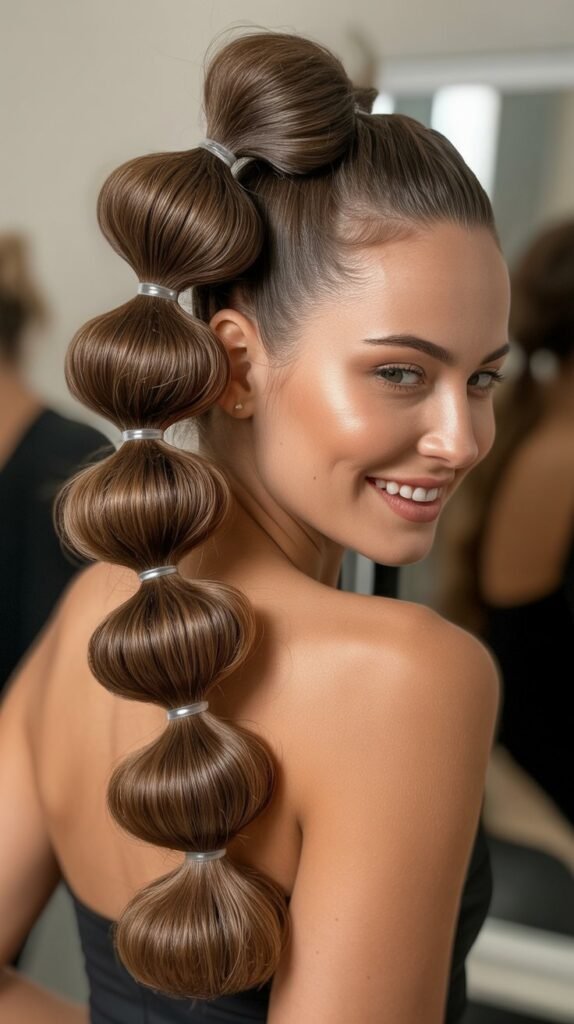
This trendy style adds playful volume through a series of “bubbles” created along a ponytail, then tucked into an updo.
Greasy hair helps maintain the bubble shapes without deflating.
- Create a high ponytail and secure it with a hair elastic at the crown of your head.
- Add additional elastics down the length of the ponytail at regular intervals, spacing them 2-3 inches apart.
- Gently pull and tease the hair between each elastic to create rounded “bubble” sections with volume.
- Once all bubbles are created, carefully tuck and roll the entire ponytail under itself, creating an updo with visible bubble texture.
- Secure the tucked ponytail with bobby pins, ensuring all the bubble sections remain visible and defined.
- This modern style works well for both casual and dressy occasions depending on how polished you make the bubbles.
17. The Twisted Side Bun
This asymmetrical style combines twisting and pinning techniques to create an elegant side bun with beautiful texture and dimension.
The natural oils provide grip that keeps the twisted sections secure.
- Create a deep side part and gather all your hair to one side of your head, just below and behind your ear.
- Divide the gathered hair into two or three sections and twist each section individually.
- Begin wrapping the twisted sections around each other and around themselves, creating a textured side bun.
- Pin each twisted section as you go, ensuring the entire bun is secure and won’t slip during wear.
- Leave some of the twisted ends loose and visible for a more relaxed, romantic appearance.
- This style beautifully showcases the texture created by twisting and looks particularly elegant from all angles.
18. The Criss-Cross Updo
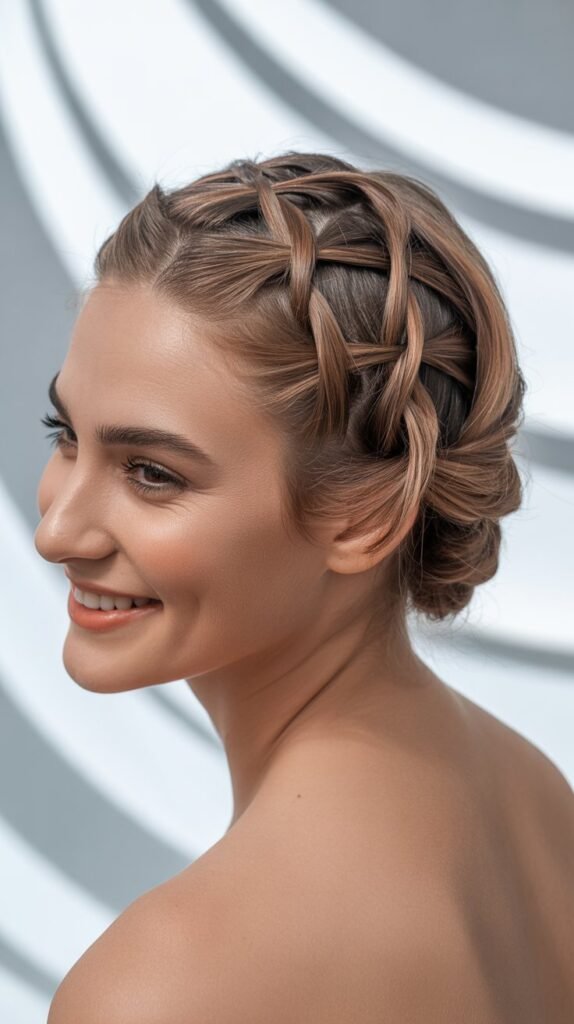
This geometric style creates visual interest through crossing and weaving sections of hair in a structured pattern.
Greasy hair’s natural hold makes maintaining the criss-cross structure much easier.
- Divide your hair into multiple horizontal sections from front to back, creating 4-6 sections depending on your hair length.
- Take sections from opposite sides and cross them over each other at the back of your head, pinning each cross as you go.
- Continue this criss-cross pattern from the crown down to the nape, creating a beautiful woven effect down the back of your head.
- Gather any remaining loose ends at the nape and tuck them under, securing with bobby pins.
- The natural oils help keep each crossed section smooth and in place, preventing the pattern from becoming messy.
- This style looks intricate and artistic, perfect for making a statement at special events.
19. The Pinned Curl Updo
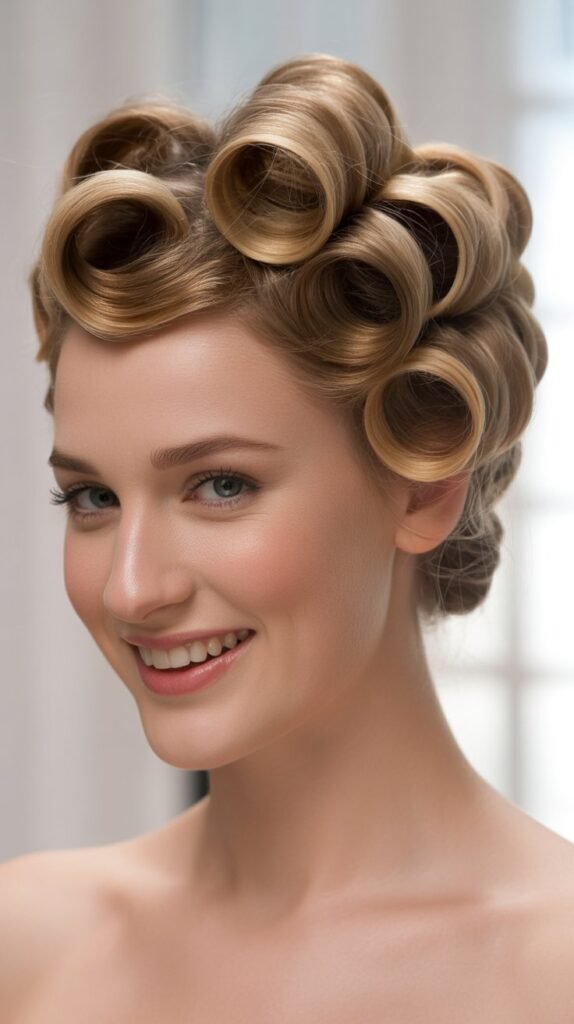
This vintage-inspired style uses pinned curls to create a romantic, old Hollywood aesthetic.
Greasy hair actually helps curls hold their shape better and creates more defined pin curl sections.
- Section your hair into multiple small to medium sections throughout your head.
- Take each section, twist it into a curl, and pin it flat against your head using bobby pins in an X-pattern.
- Continue creating pinned curls all over your head, arranging them in an aesthetically pleasing pattern.
- For a more structured look, arrange the curls in rows, or for a more relaxed appearance, pin them randomly.
- Once all curls are pinned, you can leave them as is for a vintage pin curl updo, or gently remove the pins and arrange the curls into a soft updo.
- The natural oils help the curls maintain their shape and add that authentic vintage sheen to the style.
20. The Braided Low Bun
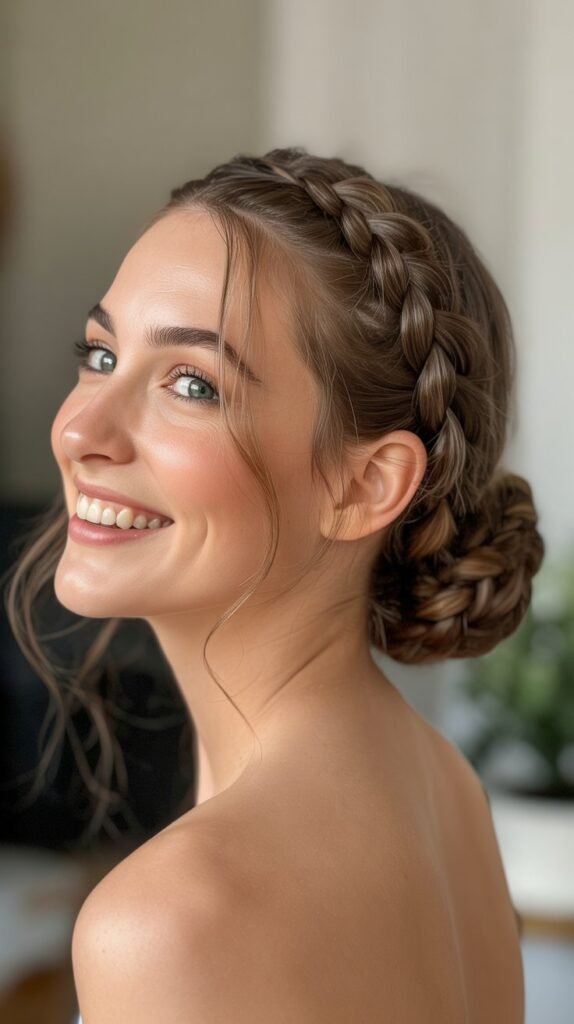
This combination style merges the texture of braids with the elegance of a low bun, creating a sophisticated look suitable for any formal occasion.
The natural oils help braids maintain their structure.
- Create one or multiple braids starting from different points on your head—try a French braid from the crown or side braids from the temples.
- Continue braiding all the way to the ends of your hair, incorporating all or most of your hair into the braid pattern.
- Once the braiding is complete, gather all the braided sections along with any unbraided hair at the nape of your neck.
- Wrap the braids around themselves to create a textured bun with visible braid patterns adding dimension.
- Secure the bun with bobby pins, ensuring the braided texture remains visible and becomes a feature of the style.
- This style combines the best of both worlds—the intricate detail of braiding with the polished appearance of a bun.
21. The Infinity Bun
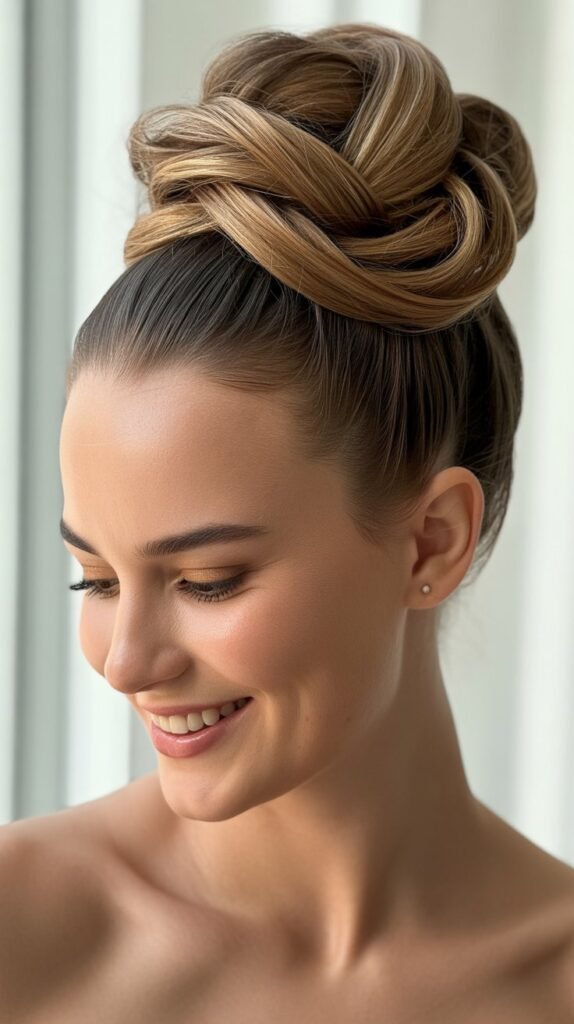
The infinity bun creates a unique figure-eight or infinity symbol shape that’s both artistic and secure.
Greasy hair’s natural texture helps maintain this distinctive shape throughout wear.
- Gather your hair into a ponytail at your desired height—mid-head positioning works best for this style.
- Divide the ponytail into two equal sections and create two separate buns side by side using each section.
- Position the buns so they touch or slightly overlap, creating the figure-eight or infinity symbol appearance.
- Secure each bun independently with bobby pins, then add additional pins where the two buns meet for extra security.
- Gently adjust and shape each bun to ensure they’re symmetrical and the infinity shape is clearly visible.
- This unique style stands out from traditional updos and works wonderfully for both casual and dressy occasions.
22. The Folded Ponytail Updo
This clever style creates the illusion of a fuller, more voluminous updo by folding a ponytail back on itself.
The natural oils help the folded sections stay in place without excessive pinning.
- Create a high ponytail at the crown of your head, securing it tightly with a strong elastic.
- Instead of wrapping the ponytail around the base, fold it back down toward your head, creating a loop.
- Secure the folded section to your head with bobby pins along the length where it touches your scalp.
- Adjust the loop to create the desired volume and shape, making it fuller or sleeker depending on your preference.
- Tuck and secure the ends underneath or wrap them around the base for a polished finish.
- This technique instantly creates the appearance of more volume and fullness, even with medium-density hair.
23. The Asymmetrical Twisted Bun
This modern, edgy style places a twisted bun off-center for an asymmetrical look that’s both artistic and fashion-forward.
Greasy hair’s grip helps maintain the twisted texture and asymmetrical positioning.
- Create a side part and gather all your hair to one side, positioning it off-center at the back of your head.
- Twist the gathered hair tightly as you work, maintaining the twist as you begin wrapping it into a bun shape.
- Position the bun asymmetrically—either to the left or right of center and possibly at a slight angle.
- Secure the twisted bun with bobby pins, ensuring the asymmetrical placement stays secure.
- Leave some of the twisted texture visible to add dimension and interest to the final style.
- This contemporary style works particularly well for fashion-forward events and creative professional environments.
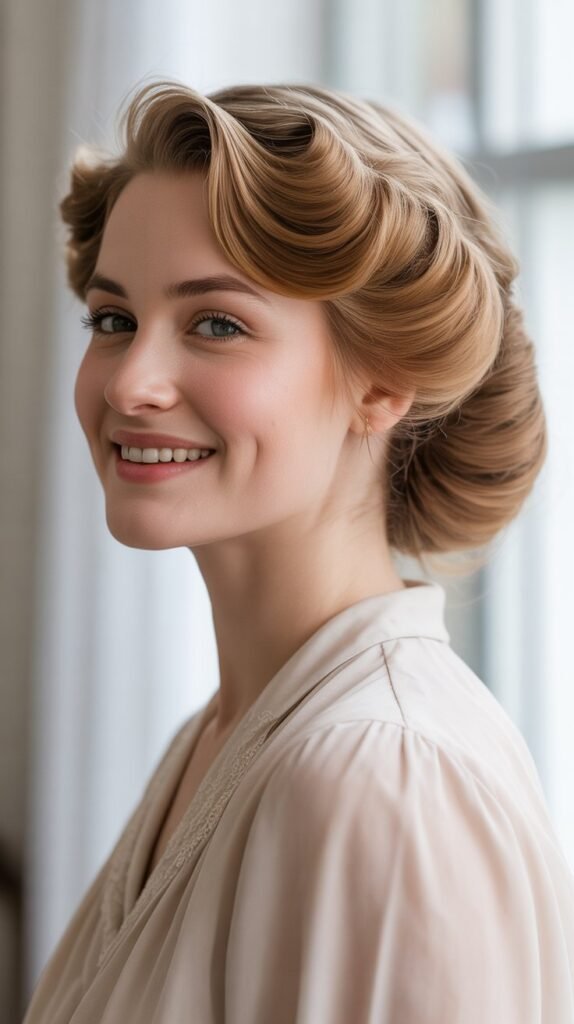
24. The Rolled Updo
The rolled updo creates elegant horizontal rolls across the back of the head, reminiscent of 1940s hairstyles.
The natural oils in greasy hair help these rolls maintain their shape and structure.
- Section your hair horizontally into three or four layers from the crown to the nape.
- Starting with the bottom section, roll the hair under toward your head, creating a horizontal rolled cylinder.
- Pin the roll securely in place, then move to the next section above it.
- Continue rolling each section upward, stacking the rolls on top of each other to create a tiered effect.
- Ensure each roll is secure before moving to the next one, using multiple bobby pins for each section.
- The finished style should show distinct horizontal rolls stacked vertically, creating an elegant vintage-inspired updo.
25. The Pretzel Bun
The pretzel bun gets its name from its distinctive twisted, interwoven shape that resembles a pretzel.
This unique style is surprisingly simple and benefits greatly from greasy hair’s natural grip.
- Gather your hair into a ponytail at your desired height and secure it with an elastic.
- Divide the ponytail into two equal sections and twist each section individually in the same direction.
- Cross the two twisted sections over each other, then bring them around and through the center opening, creating a pretzel-like knot.
- Wrap any remaining length around the base and secure the entire structure with bobby pins.
- Adjust and tighten the pretzel shape to make it more defined and secure.
- This distinctive style creates a conversation-starting look that’s both elegant and playful.
26. The Wrapped Ponytail Updo

This style elevates a simple ponytail by wrapping sections of hair around the length, creating a sophisticated columnar effect.
Greasy hair helps the wrapped sections stay smooth and secure.
- Create a sleek ponytail at your desired height—mid-head works particularly well for this style.
- Separate a small section of hair from the ponytail and wrap it around the base to cover the elastic.
- Secure the wrapped section with a bobby pin, then take another small section from the ponytail.
- Wrap this section around the ponytail at a point about two inches below the first wrap, securing it with pins.
- Continue this wrapping pattern down the length of the ponytail, creating evenly spaced wrapped sections.
- Tuck the remaining ends up into the wrapped structure or secure them at the bottom with a small elastic hidden by one final wrap.
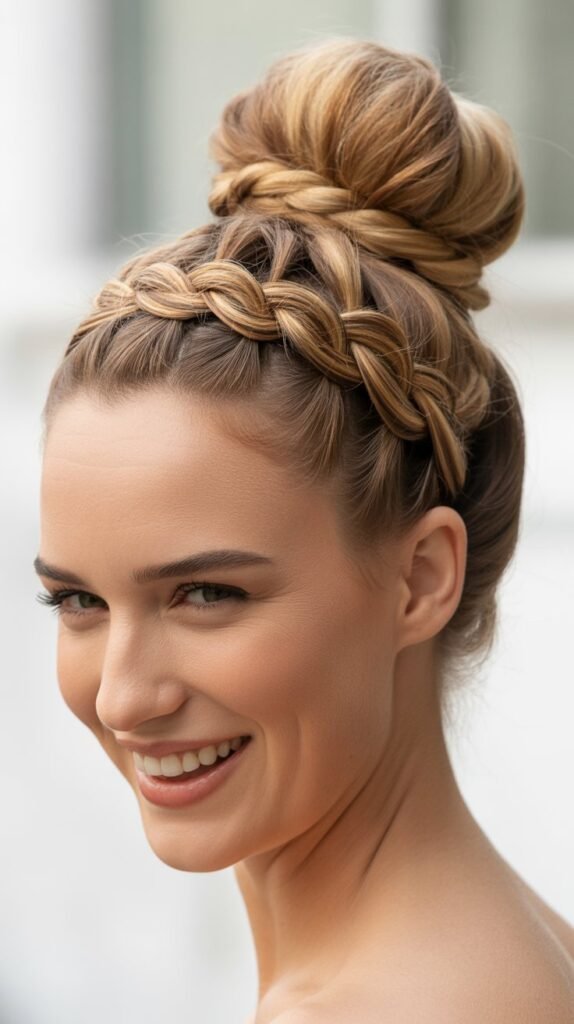
27. The Crown Braid Bun
This final style combines the romantic appeal of a crown braid with the elegance of a bun, creating a complete updo that’s perfect for special occasions.
Greasy hair provides excellent grip for both braiding and bun formation.
- Create a Dutch braid or French braid starting at one temple and working around the crown of your head like a headband.
- Continue the braid around to the opposite temple, incorporating hair as you go to create a full crown effect.
- Once the crown braid is complete, gather all remaining unbraided hair at the nape of your neck.
- Create a low bun with the remaining hair, choosing any bun style that complements the crown braid.
- Secure both the crown braid and the bun with bobby pins, ensuring everything is secure for all-day wear.
- This combination style beautifully frames your face with the crown braid while keeping all hair elegantly secured in the bun.
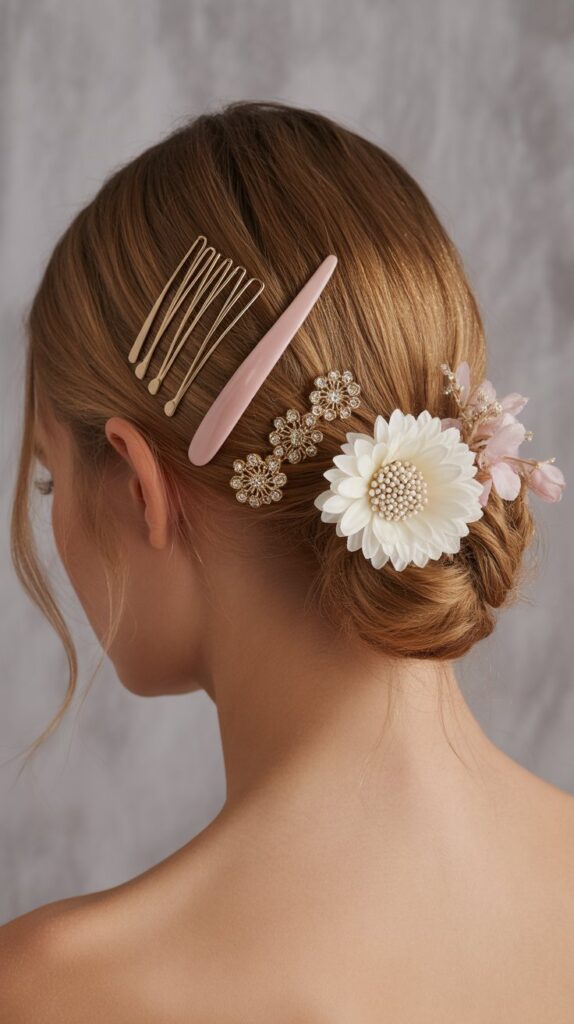
- Add small flowers, pearls, or decorative pins along the crown braid for an extra special occasion look.
Essential Tools and Products for Greasy Hair Updos
Having the right tools and products makes creating these updos significantly easier and helps them last longer.
While greasy hair reduces the need for many styling products, a few key items remain essential.
- Bobby pins in colors matching your hair are absolutely essential—invest in high-quality pins that grip well and don’t slip out easily.
- Hair elastics in various sizes and strengths allow you to secure different types of ponytails and buns according to the style’s needs.
- A fine-tooth comb helps smooth hair and create clean parts, while a wide-tooth comb is better for detangling without removing too much of the natural oil.
- U-shaped hair pins provide extra security for heavier buns and updos, offering more hold than traditional bobby pins.
- A small amount of texturizing spray can add extra grip if your hair is extremely oily or slippery, but use sparingly to avoid product buildup.
- Strong-hold hairspray applied lightly at the end helps set the style without making it stiff or crunchy.
- Decorative hair accessories like clips, flowers, or jeweled pins can elevate any updo from everyday to special occasion-worthy.
Tips for Making Your Updo Last All Day
Creating a beautiful updo is only half the battle—making it last throughout your entire day or event is equally important.
These professional tips will help your greasy hair updos stay secure and beautiful.
- Always start with hair that has the right amount of oil—second or third-day hair is ideal, while extremely oily hair may need a small amount of dry shampoo at the roots.
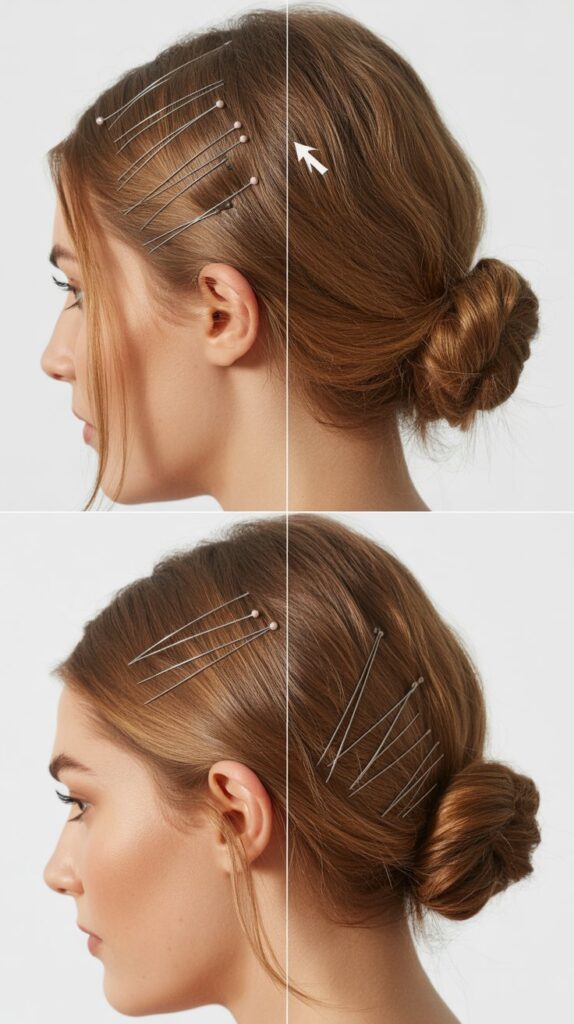
- Use bobby pins strategically by inserting them in opposite directions to create an X-pattern, which provides much more hold than pins all going the same direction.
- For maximum security, place bobby pins with the wavy side down against your scalp, as this creates more friction and grip than the smooth side.
- Build your updo in sections rather than trying to manipulate all your hair at once, securing each section thoroughly before moving to the next.
- Mist your finished updo lightly with hairspray from about 12 inches away, allowing it to dry completely before touching or adjusting anything.
- Carry a few extra bobby pins with you throughout the day for quick touch-ups if needed, especially for complex styles with multiple elements.
- Consider your activity level when choosing a style—opt for lower, more secure buns for active days and save higher, more elaborate styles for events where you’ll be relatively stationary.
Common Mistakes to Avoid When Styling Greasy Hair
Understanding what not to do is just as important as knowing the right techniques when creating updos with greasy hair.
Avoiding these common pitfalls will help you achieve better results every time.
- Using too much additional product on already oily hair creates buildup that makes the style look dirty rather than intentionally sleek and styled.
- Brushing too aggressively can distribute oils too evenly and make hair look flat and lifeless instead of having that perfect amount of texture and grip.
- Creating updos with hair that’s too greasy—beyond day three or four—can result in styles that look unkempt rather than elegant, so know your hair’s limit.
- Placing all your bobby pins in the same direction reduces their holding power significantly and causes updos to slip and fall throughout the day.
- Skipping the preparation step of detangling can create bumps and uneven texture in styles that are meant to look smooth and polished.
- Pulling hair too tightly can cause headaches and also makes the style look severe rather than elegant and flattering.
- Forgetting to secure the ends of your hair properly leaves them poking out of buns and twists, creating an unfinished appearance.
- Attempting overly complex styles when you’re rushed often results in messy, insecure updos that won’t last, so choose simpler styles for time-pressed mornings.
How to Adapt These Styles for Different Hair Lengths
Not all updos work equally well for all hair lengths, but most can be adapted with a few modifications.
Understanding how to adjust these styles for your specific length ensures better results.
- For shoulder-length hair, focus on styles that don’t require wrapping hair multiple times around a base, such as simple twisted buns, Gibson tucks, or pinned curl updos.
- Medium-length hair works beautifully for most of these styles but may need more bobby pins for security since there’s less hair to anchor the style.
- Long hair can sometimes be too heavy for certain updos, so consider creating two smaller buns instead of one large one, or divide hair into more sections for better distribution.
- Very long hair works wonderfully for wrapped and coiled styles since you have plenty of length to create multiple rotations around a base.
- Fine hair benefits from teasing or backcombing sections before creating the updo to add the appearance of more volume and thickness.
- Thick hair may need to be divided into more sections for manageability, and you’ll likely need more bobby pins to secure everything properly.
- Layered hair works well for messier, more textured updos where pieces can intentionally fall loose, while blunt cuts are better for sleek, structured styles.
Troubleshooting: Solving Common Updo Problems
Even experienced stylists encounter challenges when creating updos, but knowing how to troubleshoot common issues saves time and frustration.
These solutions address the most frequent problems.
- If your updo keeps falling out, you’re likely not using enough bobby pins or not inserting them at the right angles—add more pins in X-patterns for better hold.
- When buns look too flat or small, gently pull and pancake sections to create more volume, or use a small hair donut or padding underneath for extra fullness.
- If you’re experiencing lumps and bumps in sleek styles, use a fine-tooth comb with a small amount of water or smoothing serum to flatten problem areas.
- For updos that look too messy or undone, carefully smooth surfaces with your hands or a brush, and add a few strategic bobby pins to tame flyaways.
- When hair is too slippery even with natural oils, lightly mist sections with texturizing spray or dry shampoo before twisting or braiding.
- If bobby pins keep sliding out, ensure you’re using the correct size and strength for your hair thickness, and consider roughing up smooth pins with a nail file for better grip.
- For updos that cause headaches, create the style slightly lower or looser, and avoid pulling hair tightly at the hairline where tension is most uncomfortable.
- When you can’t achieve the look you want, consider that the style may not be suited to your hair length, texture, or density—choose a more compatible option instead.
Accessorizing Your Greasy Hair Updos
The right accessories can transform a simple updo into a statement-making style while also providing additional security and visual interest.
Strategic accessorizing elevates any of these 27 elegant updos.
- Decorative bobby pins with pearls, crystals, or metallic finishes add subtle sparkle when placed strategically throughout the updo without overwhelming the style.
- Hair combs work beautifully at the base of buns or along braided sections, providing both decorative appeal and functional hold for heavier hair.
- Flowers—whether fresh, silk, or preserved—create romantic, feminine accents perfect for weddings, garden parties, or any spring and summer events.
- Ribbons can be woven through braids, wrapped around bun bases, or tied as bows to add color, texture, and a playful or vintage touch.
- Statement hair clips positioned at strategic points can become the focal point of the entire style while securing loose sections effectively.
- Headbands worn across the crown add interest to simpler updos and help control flyaways along the hairline for a more polished appearance.
- Jeweled pins scattered throughout the updo catch light beautifully and add glamour for evening events without requiring complicated styling changes.
- Hair scarves wrapped around buns or threaded through updos inject color and personality while nodding to retro and bohemian aesthetics.
Quick 5-Minute Updos for Busy Mornings

Not every day allows time for elaborate styling, but you can still achieve elegant results with these quick updo options that work perfectly with greasy hair.
These streamlined styles take five minutes or less.
- The classic low bun requires only gathering, twisting, and pinning—literally three steps that create a polished look in under two minutes.
- A simple twisted ponytail with the flip-through technique adds interest to a basic ponytail with just one extra 30-second step.
- The messy top knot is inherently quick by design, requiring only flipping, gathering, twisting, and securing with one elastic and a few pins.
- A half-up twist takes minutes to create by simply twisting two front sections back and pinning them together at the crown.
- The wrapped ponytail updo adds sophistication to a regular ponytail with just one small section wrapped around the elastic base.
- Side-swept styles work quickly because you’re working with all your hair in one accessible location rather than reaching behind your head.
- Pre-plan your style the night before by deciding which updo you’ll create, laying out your tools, and even sectioning hair if helpful.
Seasonal Variations and Adaptations
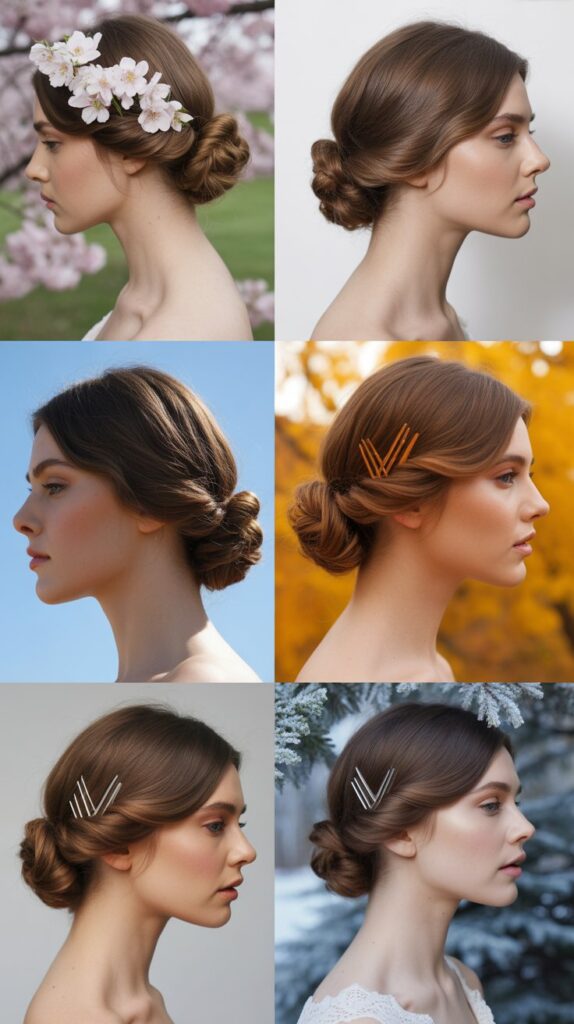
Different seasons call for different styling approaches, and adapting your greasy hair updos to seasonal conditions ensures they look their best year-round.
Weather and temperature significantly impact updo performance.
- Summer heat and humidity actually benefit greasy hair updos since the natural oils help control frizz and flyaways that humid weather typically causes.
- Winter dryness may require a small amount of additional oil or serum on the ends before styling to prevent static electricity and breakage in cold conditions.
- Fall weather is ideal for trying textured, romantic updos since moderate temperatures and humidity levels make hair more manageable and easier to style.
- Spring rain and changing weather call for extra-secure updos with additional bobby pins and a light finishing spray to protect against unexpected moisture.
- Hot yoga or summer workouts pair best with very secure, low updos that won’t slip when you sweat, such as low buns or wrapped ponytail styles.
- Cold weather activities like skiing or winter sports benefit from double buns or braided styles that can accommodate hats and helmets comfortably.
- Pool and beach outings require pre-swimming updos that keep hair protected and off your neck, with styles that can easily be adjusted after water exposure.
Cultural and Historical Context of Updos
Understanding the rich history and cultural significance of updo hairstyles adds depth and appreciation to these timeless styling techniques.
Many of these 27 styles have fascinating origins.
- Updos have been documented throughout human history across virtually every culture, serving both practical purposes and as indicators of social status and identity.
- Ancient Greek and Roman women created elaborate updos using braids, curls, and decorative elements, with different styles indicating marital status and social class.
- The Gibson Girl look of the early 1900s popularized the Gibson Tuck and similar romantic updos that defined feminine beauty of that era.
- The 1940s brought practical rolled updos that kept hair secure for women working in factories during wartime while maintaining elegance and femininity.
- Asian cultures have long traditions of intricate updo styling, with different styles reserved for specific ceremonies, life stages, and social positions.
- Ballerina buns became iconic not just in dance but in fashion and everyday styling due to their association with grace, discipline, and refinement.
- Modern updos continue to evolve, incorporating elements from various cultural traditions and historical periods while adapting to contemporary aesthetics and lifestyles.
Conclusion
Throughout this comprehensive exploration of 27 Elegant Greasy Hair Updo Hairstyles, we’ve discovered that oily hair is far from a styling obstacle—it’s actually a valuable asset that provides natural grip, hold, and texture for creating stunning updos.
From the timeless sophistication of the French twist and classic low bun to the playful creativity of the pretzel bun and infinity bun, these styles prove that you can transform any hair day into an opportunity for elegant styling.
We’ve covered everything from quick five-minute options for busy mornings to elaborate special occasion styles, along with essential techniques, troubleshooting tips, and seasonal adaptations that ensure your updos always look their best.
The natural oils in second or third-day hair eliminate the need for excessive styling products while providing that coveted texture that makes updos more secure and longer-lasting.
Remember that mastering these styles takes practice, so don’t be discouraged if your first attempts aren’t perfect—each time you create an updo, you’ll develop better technique and muscle memory.
Whether you’re heading to the office, attending a formal event, or just want to look polished on a casual weekend, these 27 elegant greasy hair updo hairstyles offer endless possibilities for expressing your personal style while making the most of your hair’s natural state.
Embrace those oily hair days with confidence, knowing you now have an entire repertoire of beautiful, practical, and elegant styling options at your fingertips.
