
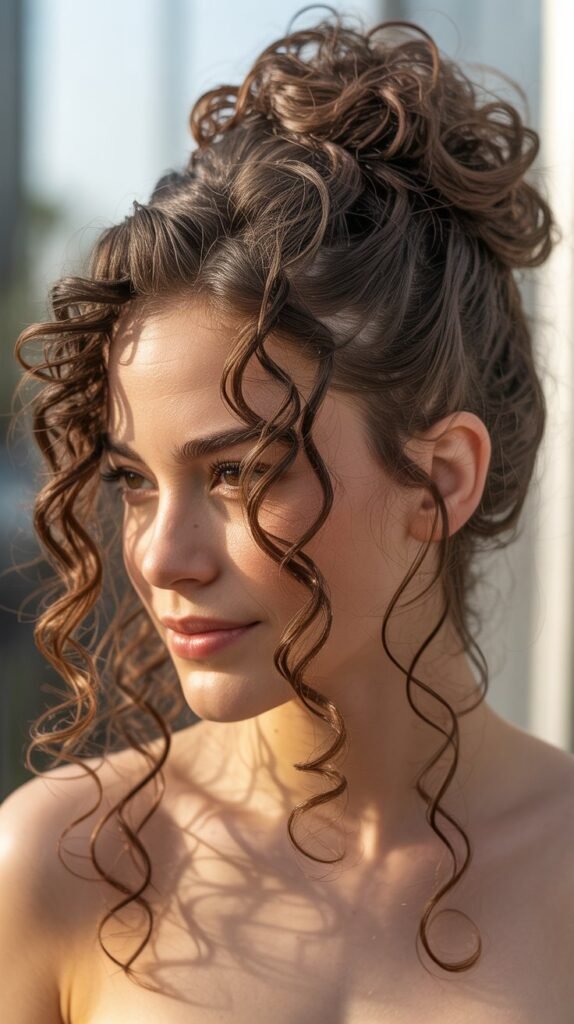
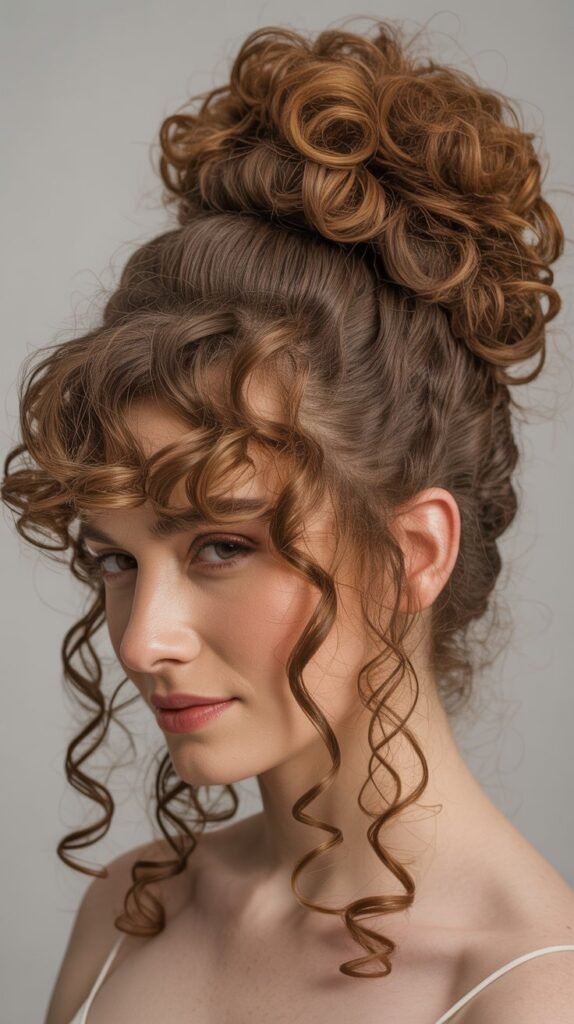
Curly hair possesses an enchanting quality that straight hair simply cannot replicate—the natural bounce, texture, and volume create endless possibilities for styling that ranges from playfully romantic to boldly artistic.
If you’ve been searching for fresh ways to showcase your gorgeous curls while embracing a whimsical, head-turning aesthetic, you’ve come to the right place.
This comprehensive guide to 30 Beautiful Whimsical Hairstyles for Curly Hair That Turn Heads will walk you through an inspiring collection of styles that celebrate your natural texture while adding elements of fantasy, romance, and creative flair.
From ethereal braided crowns adorned with delicate accessories to voluminous half-up styles that frame your face like a halo, each hairstyle has been carefully selected to help you express your unique personality while keeping your curls healthy and beautifully defined.
Whether you’re preparing for a special occasion, seeking everyday styling inspiration, or simply want to experiment with looks that make you feel magical, these whimsical styles will transform your curly hair into a stunning work of art that commands attention and admiration wherever you go.
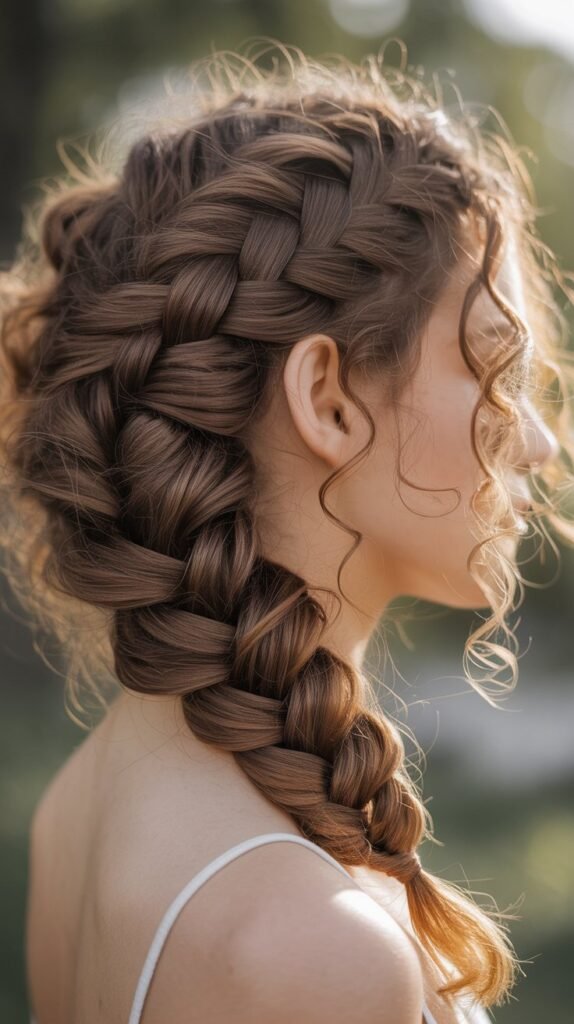
1. Ethereal Waterfall Braid with Loose Curls

The waterfall braid creates a cascading effect that mimics flowing water through your curls, offering a romantic and dreamy appearance perfect for any occasion.
This technique works exceptionally well with curly hair because it allows your natural texture to shine while adding structured elegance.
The combination of the interwoven braid and free-flowing curls creates dimensional beauty that photographs beautifully.
How to Create This Style:
- Start with freshly defined curls using a curl-enhancing cream or mousse for maximum hold and definition.
- Section off a two-inch portion of hair near your temple and divide it into three equal strands.
- Begin a French braid by crossing the back strand over the middle, then the front strand over the middle.
- Drop the front strand and let it cascade down, picking up a new section of hair to replace it.
- Continue this pattern around your head, consistently dropping strands to create the waterfall effect.
- Secure the end with a small clear elastic and allow the remaining curls to flow freely.
- Apply a light-hold hairspray to maintain the braid’s integrity without weighing down your curls.
Best Occasions: Garden weddings, spring photoshoots, romantic date nights, outdoor festivals
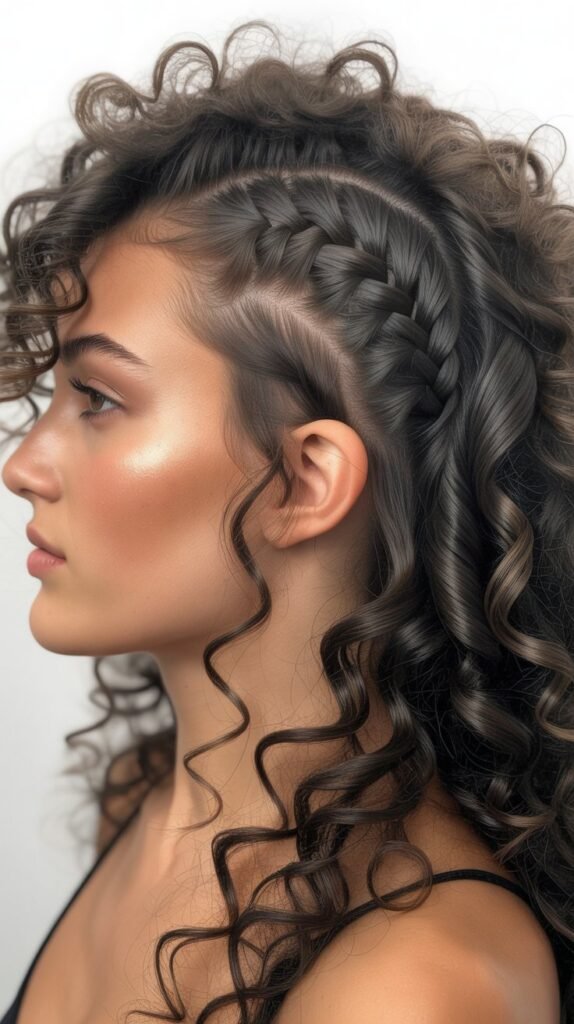
2. Crown Braid Halo with Face-Framing Tendrils
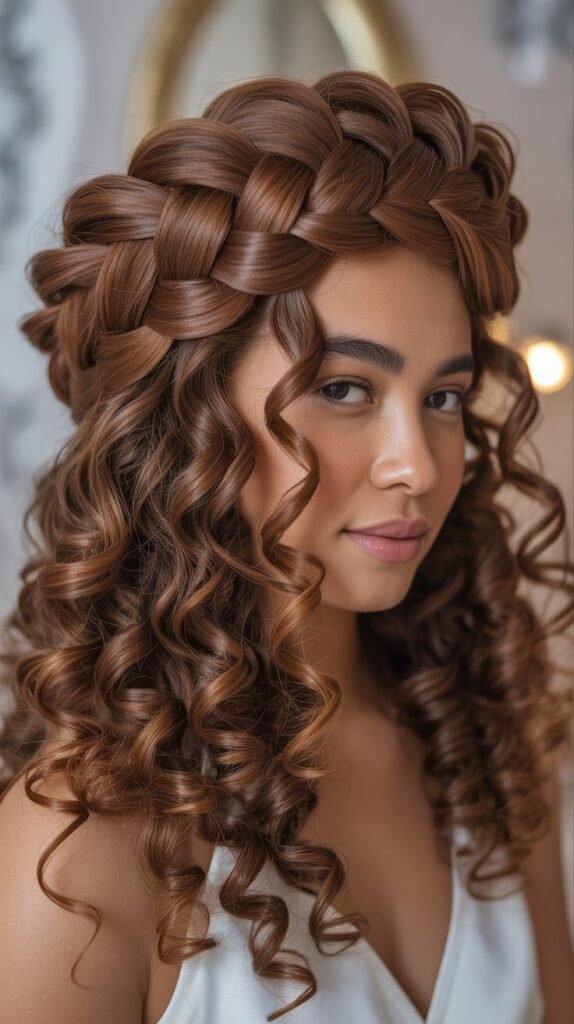
A crown braid halo encircles your head like natural royalty, creating an angelic silhouette that perfectly complements the texture and volume of curly hair.
This timeless style keeps hair away from your face while showcasing your curl pattern.
The face-framing tendrils add a soft, romantic touch that prevents the style from appearing too severe.
Styling Details:
- Wash and condition your hair with products designed for curl definition and moisture retention.
- Part your hair down the middle from forehead to nape to create two equal sections.
- Begin Dutch braiding on one side by crossing sections under rather than over for a raised effect.
- Continue braiding along your hairline, following the natural curve of your head toward the opposite side.
- Repeat with the second section, meeting both braids at the back and tucking the ends underneath.
- Pull out small sections from the braid to create a fuller, more relaxed appearance.
- Release 2-3 thin curls around your face and temples for a softer, whimsical finish.
- Secure with bobby pins that match your hair color and mist with flexible-hold hairspray.
Maintenance Tips: Touch up face-framing curls with a small curling wand if needed, sleep on a satin pillowcase to preserve the style overnight
3. Half-Up Cloud Bun with Spiraling Curls

This voluminous half-up style creates the illusion of a fluffy cloud perched atop your head while allowing the bottom half of your curls to cascade freely.
The contrast between the structured bun and free-flowing curls delivers a balanced whimsical look.
This style works wonderfully for showcasing curl definition while keeping hair manageable and out of your face.
Step-by-Step Instructions:
- Apply a volumizing mousse to damp hair and diffuse or air-dry until completely dry.
- Section the top half of your hair from ear to ear, creating a horizontal part.
- Gather this top section at the crown of your head and gently tease the roots for added height.
- Twist the gathered section loosely without pulling curls apart to maintain their natural pattern.
- Wrap the twisted section into a bun shape and secure with an elastic band.
- Pull small sections of the bun outward to create a fuller, cloudlike appearance.
- Fluff and separate the remaining bottom curls with your fingers for enhanced volume.
- Set the style with a lightweight holding spray that won’t create crunchiness.
Curl Type Suitability: Works best with 2C to 4A curl patterns, provides excellent volume for finer curl textures
4. Twisted Side Swept Glamour with Floral Accents
Side-swept styles exude old Hollywood glamour while the twisted elements add texture and visual interest that complements curly hair beautifully.
Adding fresh or artificial flowers transforms this elegant style into something truly whimsical.
The asymmetrical nature of this hairstyle creates a dramatic effect perfect for making memorable impressions.
Creation Process:
- Deep condition your curls the night before to ensure maximum shine and manageability.
- Create a deep side part on your preferred side, approximately two inches from center.
- Take 2-3 inch sections from the heavier side and twist them back toward your ear.
- Secure each twist with bobby pins along the side of your head, layering them for dimension.
- Allow the remaining curls to fall over one shoulder for asymmetrical elegance.
- Tuck small fresh flowers or decorative hairpins into the twisted sections.
- Apply shine serum to the visible curls for a glossy, healthy appearance.
- Finish with medium-hold hairspray focusing on the twisted sections to maintain structure.
Recommended Flower Types: Baby’s breath, small roses, lavender sprigs, delicate orchids, stephanotis blooms
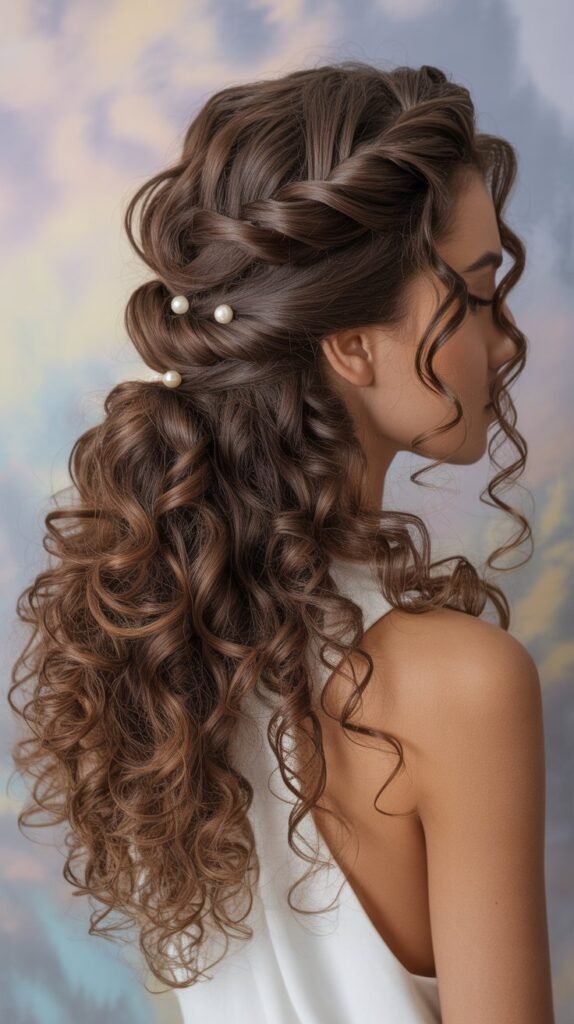
5. Bohemian Double Braided Crown with Loose Waves

Double braids create a more intricate crown effect that frames the face beautifully while showcasing the natural texture underneath.
This bohemian-inspired style channels carefree elegance perfect for festivals and creative environments.
The combination of structured braiding and loose curls achieves the perfect balance between polished and effortlessly undone.
Detailed Instructions:
- Start with second-day curls that have slightly relaxed for easier braiding manipulation.
- Create a center part from forehead to crown, leaving the back section free.
- Take a two-inch section on one side near the part and divide into three strands.
- Execute a Dutch braid staying close to the hairline, incorporating new hair as you progress.
- Continue the braid around the side of your head toward the back, following your head’s curve.
- Repeat the braiding process on the opposite side to create symmetrical crowns.
- Cross both braids at the back and secure the ends underneath with bobby pins.
- Pull gently on the braid sections to create a fuller, more relaxed appearance.
- Scrunch the remaining loose curls with a bit of curl cream for enhanced definition.
Style Longevity: This style typically lasts 2-3 days with proper nighttime maintenance using a silk bonnet
6. Vintage Pin-Up Rolls with Cascading Curls
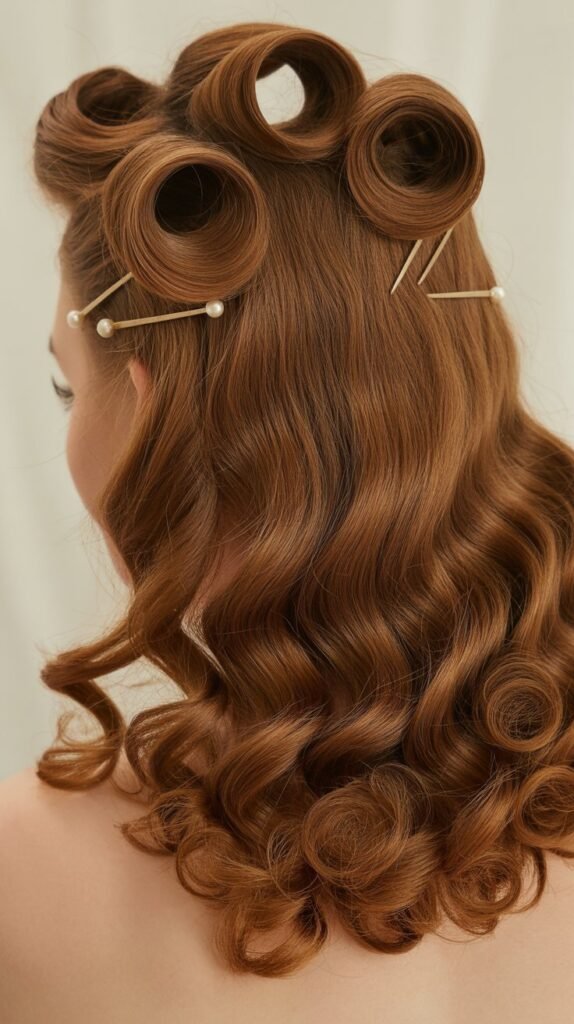
Vintage pin-up rolls bring retro glamour to curly hair by creating structured volume at the front while allowing natural curls to cascade down.
This style captures 1940s sophistication with a modern whimsical twist.
The dramatic height difference between the front rolls and flowing back curls creates stunning visual impact.
How to Achieve:
- Apply setting lotion to the front three-inch section of slightly damp hair for moldability.
- Roll this front section backward toward the crown using a large foam roller or create the roll manually.
- Secure the roll with crossed bobby pins ensuring it stays elevated and smooth.
- Create a second roll behind the first one if desired for additional vintage drama.
- Define the remaining curls using the finger-coiling method with curl-defining gel.
- Allow curls to air-dry or use a diffuser on low heat to prevent frizz.
- Once completely dry, remove any rollers and gently shape the vintage rolls with your fingers.
- Spray the rolled sections with strong-hold hairspray while leaving the curls with flexible hold.
Accessories That Enhance: Victory rolls work beautifully with pearl pins, polka dot headscarves, retro hair flowers
7. Fairy-Tale Side Braid with Ribbon Weaving
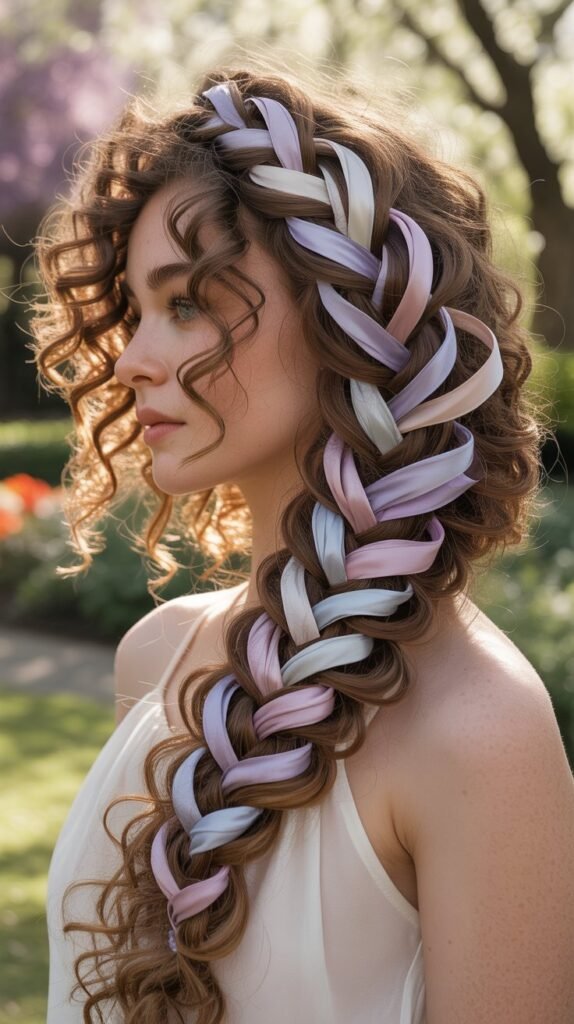
Incorporating ribbons into braids adds a storybook quality that elevates a simple side braid into something magical and memorable.
This technique allows for color customization to match any outfit or occasion.
The ribbon creates clean lines that beautifully contrast with the organic texture of curly hair.
Braiding Technique:
- Choose a ribbon that complements your hair color—contrasting colors create drama while similar tones offer subtle elegance.
- Section all hair to one side and divide into three portions, incorporating the ribbon as a fourth strand.
- Begin a traditional four-strand braid by weaving the ribbon over and under the hair sections.
- Maintain consistent tension throughout the braid to ensure the ribbon remains visible and even.
- Continue braiding down to the ends, incorporating all hair into the woven pattern.
- Secure with a small elastic and wrap remaining ribbon around the elastic to conceal it.
- Gently pull on braid sections to create a fuller, more voluminous appearance.
- Leave the ribbon ends long and tied in a bow for added whimsical charm.
Ribbon Material Recommendations: Satin ribbons for formal events, velvet for winter styles, sheer organza for delicate looks
8. Messy High Bun with Spiral Curl Wisps
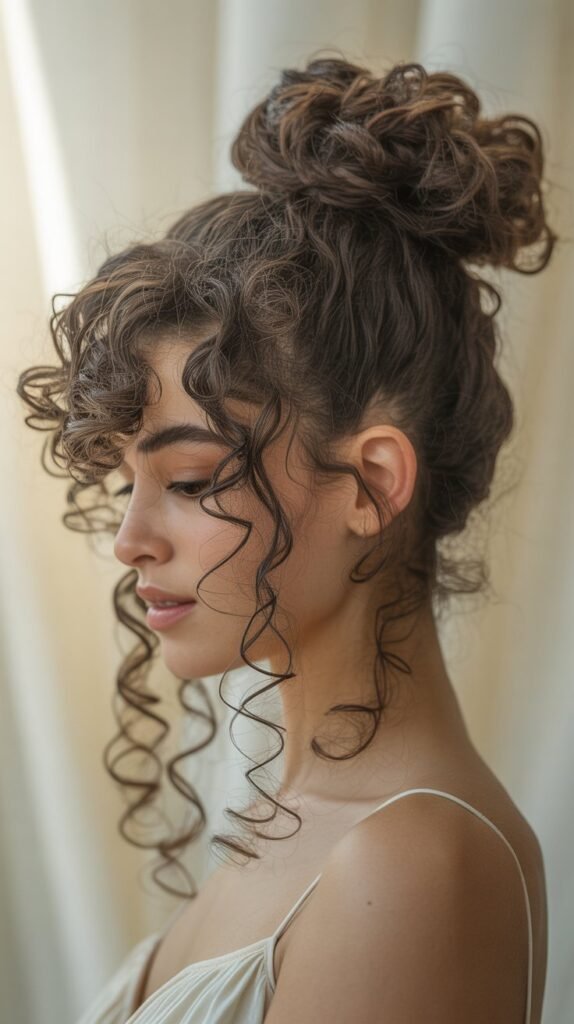
The messy high bun embraces perfectly imperfect beauty while strategically placed curl wisps add romantic softness.
This effortless style works wonderfully for casual outings while remaining elegant enough for semi-formal occasions.
The key to this look is achieving controlled messiness that appears intentional rather than neglected.
Quick Styling Guide:
- Flip your head upside down and gather all hair at the crown while maintaining curl integrity.
- Twist the gathered hair loosely without smoothing out the natural curl pattern.
- Wrap the twisted section around itself to form a bun shape, leaving ends loose and curly.
- Secure with a hair tie, allowing some curls to escape naturally for texture.
- Pull 2-3 face-framing spirals loose at the temples and nape for softness.
- Use fingers to gently pull sections of the bun outward for added volume and messiness.
- Apply a texturizing spray throughout for enhanced piecey definition.
- Optional: Wrap a small curl around the base of the bun to conceal the elastic.
Time Required: 3-5 minutes, perfect for rushed mornings or last-minute plans
9. Mermaid Waves with Starfish Hair Clips
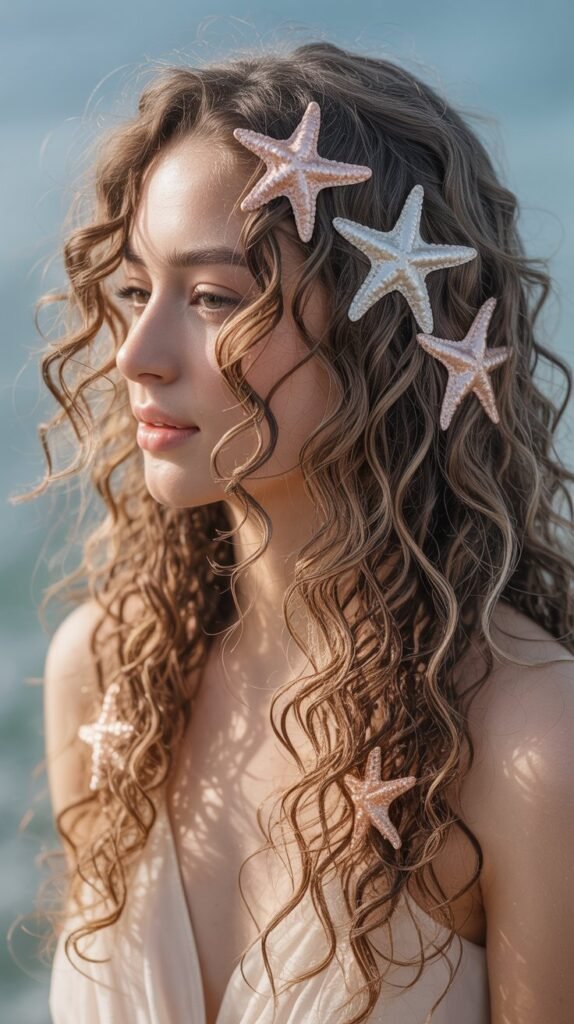
Mermaid-inspired styling creates elongated, flowing waves that evoke oceanic beauty and fantasy.
Adding starfish or shell-themed accessories reinforces the aquatic theme perfectly.
This beachy look celebrates natural texture while adding whimsical coastal charm that turns heads.
Achieving Mermaid Waves:
- Start with clean, conditioned curls and apply a sea salt spray for beachy texture.
- Scrunch curls upward while the spray is still damp to enhance wave formation.
- Twist random sections of hair and clip them up, allowing them to set for 20-30 minutes.
- Release clips and gently separate the waves with your fingers for a softer appearance.
- Create a deep side part or center part based on your face shape preference.
- Place decorative starfish clips, pearl pins, or shell barrettes strategically throughout.
- Apply a shine-enhancing serum to the mid-lengths and ends for glossy dimension.
- Finish with a flexible-hold hairspray that maintains movement while controlling frizz.
Color Enhancement Ideas: Temporary hair chalks in aqua or turquoise tones, ombre coloring, subtle highlights
10. Braided Headband with Voluminous Curly Ponytail
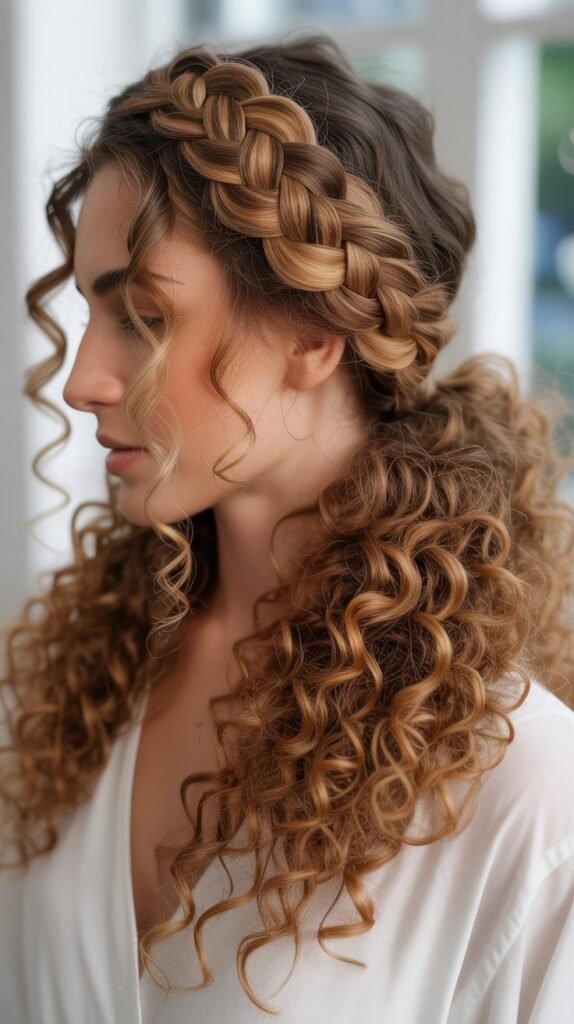
A braided headband created from your own hair adds bohemian charm while serving the functional purpose of keeping hair off your face.
Combining this with a high voluminous ponytail creates a style that’s both practical and stunning.
The contrast between the sleek braid and full ponytail delivers impressive visual interest.
Construction Steps:
- Section a two-inch strip of hair from behind one ear to create the headband braid.
- Divide this section into three strands and execute a tight three-strand braid along the hairline.
- Bring the braid across the top of your head like a headband to the opposite side.
- Secure the braid end with bobby pins behind your ear, tucking the end underneath.
- Gather remaining hair into a high ponytail at the crown or slightly below.
- Secure with a strong elastic band that can support the weight of curly hair.
- Fluff the ponytail by gently separating curls and lifting at the roots for maximum volume.
- Wrap a small section of hair around the elastic to conceal it and secure with pins.
Volume Boosting Tips: Tease the ponytail base before securing, use volumizing powder at roots, consider a ponytail insert for extra fullness
11. Asymmetrical Low Bun with Escaped Curly Tendrils
Asymmetrical styling creates modern edge while the low placement keeps this look elegant and refined.
Strategic curl placement around the face softens the structured bun for romantic appeal.
This sophisticated style works beautifully for professional settings with whimsical flair.
Styling Process:
- Create a deep side part approximately three inches from the center for dramatic asymmetry.
- Gather hair into a low ponytail positioned off-center near one side of your nape.
- Twist the ponytail gently and wrap it around the base to form a loose bun.
- Secure with bobby pins while allowing some texture and loops to remain visible.
- Pull several curly sections loose around your face, ears, and nape for softness.
- Use a small amount of pomade or gel to smooth any flyaways near the part.
- Apply curl cream to the escaped tendrils to redefine their shape and eliminate frizz.
- Set with light hairspray, focusing on the smooth areas while leaving curls touchable.
Face Shape Flattery: Oval and heart-shaped faces, creates the illusion of width for longer face shapes
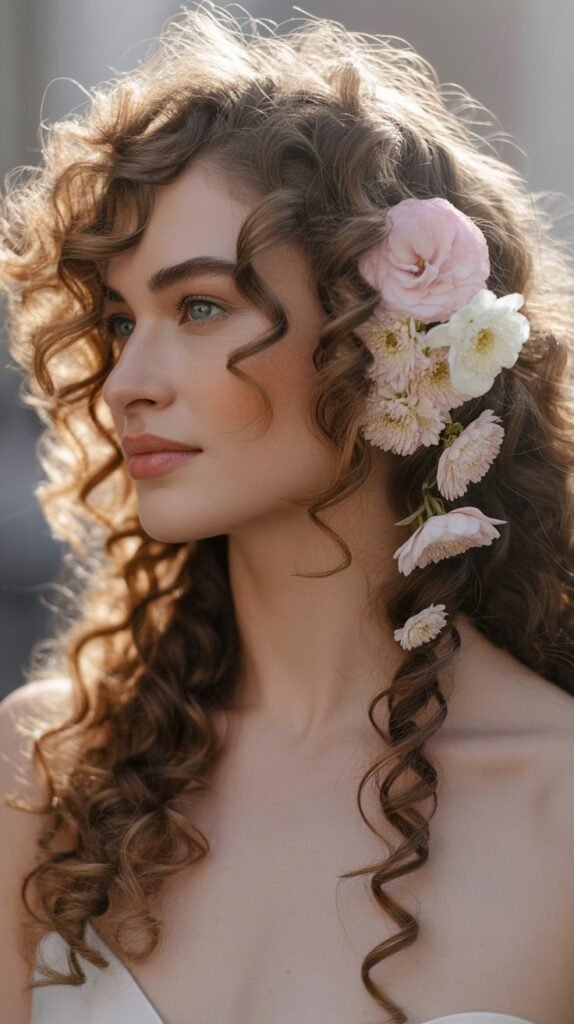
12. Flower Crown Integration with Free-Flowing Curls

Fresh or artificial flower crowns transform any curly hairstyle into a bohemian fantasy perfect for weddings and festivals.
The key is selecting flowers that complement rather than overwhelm your natural curl texture.
This ethereal style celebrates natural beauty enhanced by nature’s own decorations.
Integration Technique:
- Start with well-defined, freshly styled curls using your preferred curl-enhancing products.
- Position a flexible flower crown wire base on your head like a headband, adjusting for comfort.
- Weave small sections of hair through the crown base to secure it naturally without clips.
- Alternatively, use bobby pins to anchor the crown at multiple points for secure attachment.
- Adjust individual flowers to sit at varying heights for dimensional interest.
- Allow all remaining curls to flow freely, showcasing their natural pattern and volume.
- Pull a few face-framing pieces forward for softness if the crown feels too structured.
- Consider the flower colors in relation to your hair tone—complementary colors create visual harmony.
Flower Preservation: Use fresh flowers for same-day events, high-quality silk flowers for reusable styling, dried flowers for rustic appeal
13. Twisted Updo with Deliberately Loose Sections
This intentionally imperfect updo combines structure with organic looseness that celebrates curly hair’s natural personality.
The twisted sections provide sophisticated form while deliberate escapees maintain whimsical softness.
This versatile style transitions seamlessly from daytime elegance to evening romance.
Updo Assembly:
- Divide hair into four quadrants—two front sections and two back sections.
- Begin by twisting one back section loosely and pinning it at the center back of your head.
- Repeat with the opposite back section, crossing it over or under the first twist.
- Take one front section, twist it loosely, and wrap it around the back twisted base.
- Secure with bobby pins while allowing some curls to escape naturally from the twist.
- Repeat with the remaining front section, crisscrossing for added texture and security.
- Deliberately pull out random curls throughout the updo for romantic imperfection.
- Use fingers to gently expand twisted sections for fuller appearance without complete unraveling.
Longevity Secrets: Use strong-hold bobby pins, secure at multiple anchor points, apply setting spray before pinning
14. Half-Up Space Buns with Flowing Bottom Curls

Space buns deliver playful, youthful energy that embraces fun and creativity without sacrificing style.
Keeping the bottom half down balances the boldness of the buns with flowing femininity.
This trendy look works perfectly for music festivals, casual outings, and creative expression.
Bun Formation Guide:
- Create a horizontal part from ear to ear, sectioning the top half of your hair.
- Divide this top section down the middle to create two equal portions.
- Gather one side into a high ponytail positioned where you want the bun to sit.
- Twist the ponytail and wrap it around its base in a circular pattern to form a bun.
- Secure with bobby pins and gently pull the bun apart for fuller, messier texture.
- Repeat the process on the opposite side, ensuring both buns are positioned symmetrically.
- Leave the bottom half of your curls completely loose and flowing for balance.
- Define bottom curls with a curl refresher spray and scrunch gently for enhanced shape.
Styling Variations: Small tight buns for subtle style, large buns for dramatic impact, decorated with scrunchies or ribbons
15. Romantic Low Ponytail with Ribbon Bow

A low ponytail provides classic elegance while strategic styling creates volume and movement that prevents the look from appearing flat.
Adding a substantial ribbon bow introduces whimsical charm and nostalgic appeal.
This simple yet striking style proves that minimal effort can yield maximum impact.
Ponytail Perfection:
- Brush or finger-comb hair back gently to smooth the top while maintaining curl definition.
- Position the ponytail at the nape of the neck, either centered or slightly off to one side.
- Before securing, tease the crown area for added height and dimension at the top.
- Secure with a strong elastic band designed to hold thick or curly hair without slipping.
- Take a small section from the underside of the ponytail and wrap it around the elastic.
- Secure the wrapped section with a bobby pin to conceal the elastic completely.
- Tie a large ribbon bow around the ponytail base, allowing long tails to flow with your curls.
- Gently pull curls apart in the ponytail to create fuller volume and enhanced texture.
Ribbon Selection Guide: Satin for formal events, grosgrain for structured bows, velvet for luxurious winter styling
16. Braided Side Swept Style with Metallic Accessories

Combining braiding techniques with side-swept styling creates dimension and visual interest enhanced by metallic accents.
Gold or silver hair jewelry adds contemporary edge to romantic styling.
This combination of texture, asymmetry, and shine creates a look that photographs beautifully.
Styling Instructions:
- Create a deep side part about three inches from center for dramatic side-swept effect.
- Section a three-inch portion from the heavier side near the front hairline.
- Execute a Dutch or French braid along the hairline toward your ear, staying close to the scalp.
- Continue braiding past the ear, gradually transitioning to a regular three-strand braid.
- Sweep all remaining hair to the same side as the braid, allowing curls to cascade over one shoulder.
- Secure the braid end with a small clear elastic and tuck it underneath other hair.
- Slide metallic hair rings, cuffs, or threader accessories onto random curls throughout the style.
- Apply shine serum to enhance the glossy quality that complements metallic accessories.
Accessory Placement: Space metallic pieces evenly, cluster for drama, or create a graduated pattern down the length
17. Top Knot with Curly Fringe and Face Frame
The top knot offers practical sophistication while framing elements keep the style soft and approachable.
Leaving curly fringe and face-framing pieces creates the perfect balance between structured and relaxed.
This versatile style works for both active days and evening events.
Creation Method:
- Apply volumizing mousse to roots before styling for maximum height potential.
- Flip hair upside down and gather everything into a high ponytail at the crown.
- Leave out a 1-2 inch section of bangs or fringe at the front before securing the ponytail.
- Release face-framing pieces on both sides, approximately finger-width sections near temples.
- Twist the secured ponytail loosely and wrap it around the base to form a top knot.
- Secure the knot with bobby pins, maintaining a slightly messy, textured appearance.
- Define the fringe and face-framing curls with curl cream, scrunching to enhance their shape.
- Use a strong-hold hairspray on the knot while leaving the loose pieces with natural movement.
Best Curl Types: Works with all curl types, particularly flattering for 3A-3C patterns with defined spirals
18. Cascading Curls with Pearl Pin Scatter

Sometimes the most whimsical styling comes from keeping curls completely natural while adding delicate decorative elements.
Pearl pins scattered throughout create the appearance of treasures hidden within your curls.
This minimalist approach to styling maximizes the beauty of natural texture while adding subtle glamour.
Decoration Technique:
- Start with your natural curl pattern enhanced with definition products and proper drying technique.
- Consider where curls naturally part and flow to determine optimal pin placement.
- Insert pearl-topped bobby pins at varying depths throughout your curls randomly.
- Cluster 2-3 pins together in some areas while spacing others individually for varied visual interest.
- Focus placement near the face and crown where pins will be most visible.
- Angle some pins horizontally and others vertically for dimensional appeal.
- Ensure pins are secure but not pulling on hair by sliding them parallel to curl direction.
- Apply a light-hold finishing spray to maintain curl definition without disturbing pin placement.
Pin Quality Matters: Invest in genuine pearl or high-quality imitation pins that won’t rust or damage hair
19. Braided Mohawk with Curly Sides
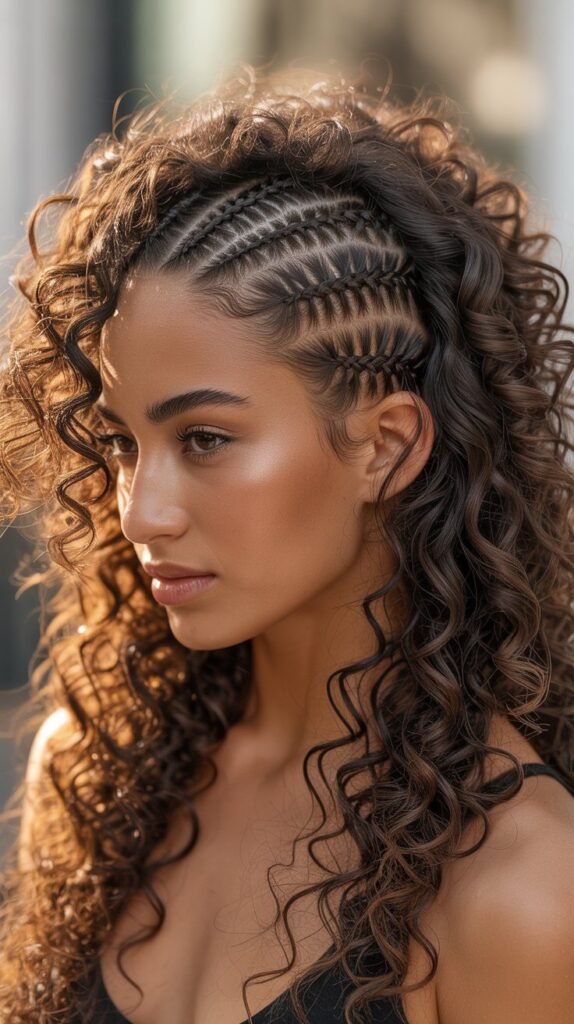
This edgy yet romantic style combines structured braiding down the center with soft curls flowing on the sides.
The mohawk silhouette adds boldness while the curly volume maintains femininity and whimsy.
This fashion-forward look makes powerful statements at creative events and artistic gatherings.
Mohawk Construction:
- Section hair into three vertical parts—one center strip about three inches wide and two side sections.
- Temporarily clip or tie the side sections away from your working area.
- Starting at the hairline, begin a Dutch braid down the center using the center section hair.
- Pull the braid slightly upward as you work to create the mohawk’s raised appearance.
- Continue braiding all the way to the nape, securing with a strong elastic.
- Gently pull on the braid edges to widen and raise it for more dramatic mohawk height.
- Release the side sections and fluff the curls for maximum volume and softness.
- Define side curls with curl cream and scrunch for enhanced texture contrast with the sleek braid.
Styling Variations: Single center braid, multiple small braids, cornrow mohawk pattern, twisted mohawk alternative
20. Vintage-Inspired Barrel Curls with Side Part

Barrel curls harken back to old Hollywood glamour with their uniform, sculptural appearance that showcases curl definition.
The deep side part adds drama and frames the face asymmetrically.
This polished look delivers red-carpet elegance with nostalgic whimsical charm.
Curl Formation Process:
- Work with clean, product-free hair for maximum curl definition and shine.
- Create a deep side part approximately 2-3 inches from center line.
- Divide hair into 1-2 inch horizontal sections throughout the head.
- Wrap each section around a large barrel curling iron or hot rollers, holding for 10-15 seconds.
- Allow each curl to cool completely in your hand before releasing to set the shape.
- Once all sections are curled and cooled, gently brush through with a paddle brush.
- Use your fingers to separate and shape individual barrel curls for defined yet soft appearance.
- Apply a strong-hold hairspray to maintain the curl structure throughout your event.
Heat Protection Essential: Always use thermal protectant spray before hot tool application, work with completely dry hair
21. Floral Wire-Wrapped Curls with Bohemian Crown
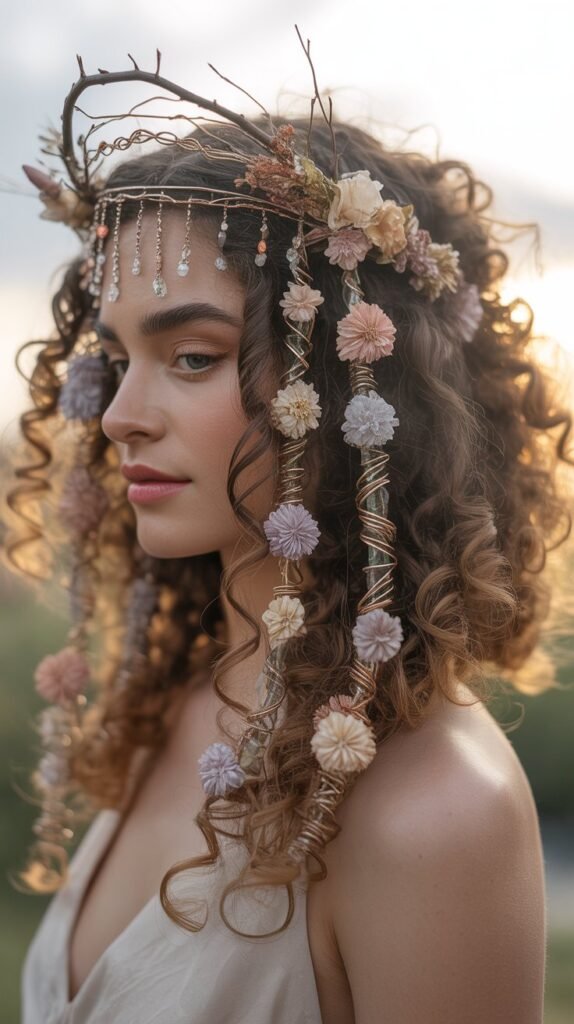
Wrapping thin floral wire around select curls creates a fairy-like appearance that seems almost magical.
Combined with a bohemian flower crown, this style channels woodland nymph aesthetics.
This creative approach works wonderfully for themed photoshoots and fantasy-inspired events.
Wire Wrapping Technique:
- Select flexible, lightweight floral wire in green, gold, or copper tones.
- Choose 5-8 prominent curls throughout your hair to wrap with wire.
- Starting at the root, gently spiral the wire around the curl following its natural pattern.
- Wrap loosely to avoid disturbing the curl’s shape or causing damage to hair strands.
- Secure wire ends by tucking them into the curl or twisting them closed carefully.
- Position a bohemian-style flower crown made with wildflowers and greenery on your head.
- Secure the crown with bobby pins at strategic points, weaving hair through for stability.
- Allow remaining unwrapped curls to flow naturally, showcasing the contrast between wrapped and free sections.
Safety Note: Remove wire carefully at day’s end, never sleep with wire in hair, choose coated wire to prevent snagging
22. Fishtail Side Braid with Pulled-Apart Texture
The fishtail braid creates intricate texture that beautifully showcases curly hair’s natural volume and dimension.
Pulling the braid apart after completion creates a fuller, more romantic appearance.
This detailed braiding technique results in a stunning statement piece perfect for special occasions.
Fishtail Braiding Steps:
- Gather all hair to one side and divide into two large equal sections.
- Take a thin strand from the outer edge of the left section and cross it over to join the right section.
- Take a thin strand from the outer edge of the right section and cross it over to join the left section.
- Continue this alternating pattern all the way down, maintaining consistent tension throughout.
- The thinner your crossover strands, the more intricate and detailed your fishtail will appear.
- Secure the end with a clear elastic band that won’t distract from the braid pattern.
- Starting from the bottom, gently pull on the edges of the braid to widen and flatten it.
- Continue pulling sections all the way up for a fuller, more voluminous pancaked effect.
Time Investment: 15-20 minutes for detailed fishtail, worth the effort for stunning results
23. Half-Up Twisted Crown with Metallic Headband

Combining twisted sections with a metallic headband creates a look that’s both structured and romantic.
The headband provides a foundation while twists add organic texture that celebrates curly hair.
This style offers the perfect solution for keeping hair partially controlled while showcasing length and volume.
Assembly Instructions:
- Position a metallic headband approximately 2-3 inches back from your hairline.
- Section hair from above each ear forward, dividing into workable portions on each side.
- Take a two-inch section near one temple and twist it back toward the center back.
- Secure the twist at the center back with bobby pins, allowing the end to blend with loose hair.
- Repeat with sections on the opposite side, crossing or positioning beside the first twist.
- Continue taking and twisting sections from each side until you’ve created a crown effect.
- Allow all remaining hair below the twisted crown to flow freely and showcase its natural curl.
- Apply shine serum to the visible curls and headband for a polished, cohesive finish.
Headband Styles: Metallic bands for modern edge, jeweled for formal events, braided fabric for bohemian vibes
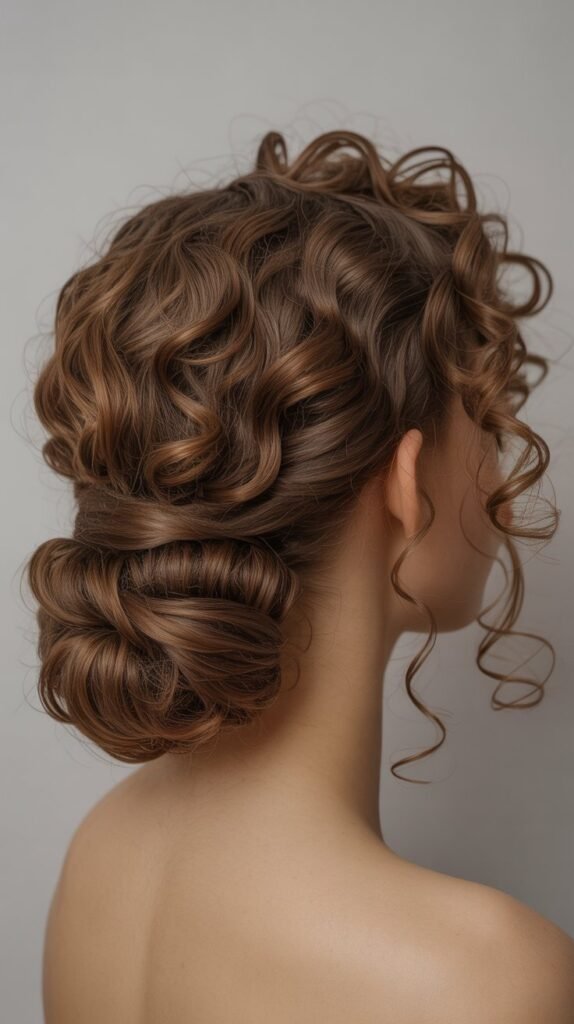
24. Stacked Buns with Spiral Curl Accents

Multiple buns stacked vertically create dramatic height and architectural interest that’s undeniably eye-catching.
Leaving strategic spiral curls loose softens the structured buns for whimsical balance.
This avant-garde style works beautifully for fashion events and creative photoshoots.
Stacking Technique:
- Divide hair horizontally into 2-3 sections depending on hair length and desired bun quantity.
- Create the first bun at the nape by twisting the bottom section and wrapping into a small bun.
- Secure with bobby pins and an elastic, ensuring it’s stable enough to support additional weight.
- Create the second bun directly above the first using the middle section of hair.
- For a third bun, use the remaining top section and position it at the crown.
- Pull 3-4 prominent spiral curls loose from various buns to frame the face and add softness.
- Adjust each bun’s fullness by gently pulling sections outward for dimensional texture.
- Set the entire style with strong-hold hairspray, focusing on the bun bases for stability.
Styling Consideration: This style works best with shoulder-length or longer hair, may require hair padding for thinner textures
25. Loose Grecian-Inspired Twist with Gold Accessories

Grecian styling evokes ancient goddess aesthetics with its flowing, draped quality that complements curly hair beautifully.
Gold accessories enhance the mythological theme while adding luxurious shine.
This timeless style works wonderfully for formal events where you want to embody ethereal elegance.
Grecian Style Creation:
- Apply a smoothing cream to the front sections while leaving back curls fully textured.
- Create a center or slightly off-center part from forehead to crown.
- Take sections from each side of the part and twist them loosely back toward the crown.
- Cross these twists at the back of the head and secure with bobby pins.
- Continue taking sections from the sides, twisting and pinning them to build the Grecian drape.
- Allow the remaining curls to cascade down your back in a loose, flowing manner.
- Weave gold chain headpieces, laurel leaf accessories, or gold bobby pins throughout the twisted sections.
- Leave a few face-framing curls loose at the temples for softness and romantic appeal.
Historical Inspiration: Ancient Greek sculptures, Roman goddess imagery, classical art representations
26. Bubble Ponytail with Curly Volume
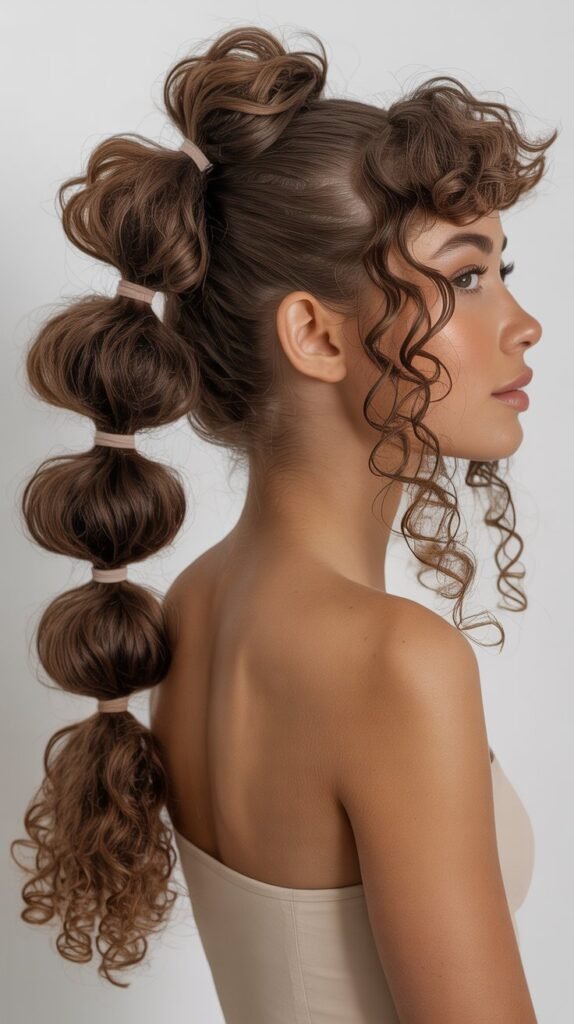
The bubble ponytail transforms a simple ponytail into a dimensional, sculptural statement through strategic elastic placement.
Curly hair adds natural volume that makes each bubble even more impressive.
This playful yet polished style has become increasingly popular on social media for good reason.
Bubble Formation Guide:
- Gather all hair into a ponytail at your desired height—high for drama, mid-level for balance.
- Secure with a strong elastic band capable of holding thick curly hair weight.
- Position a second elastic 2-3 inches below the first, creating the first bubble section.
- Gently pull the hair between the elastics outward from all sides to create rounded volume.
- Add a third elastic 2-3 inches below the second and repeat the pulling technique.
- Continue this pattern down the length of your ponytail, creating 4-6 bubbles depending on hair length.
- Each bubble should be roughly equal in size for cohesive visual appeal.
- Apply texturizing spray to enhance the volume and dimension of each bubble section.
Elastic Selection: Use clear elastics for subtle look, colored elastics for playful style, or wrap hair around elastics to conceal
27. Side-Pinned Vintage Waves with Fresh Flowers
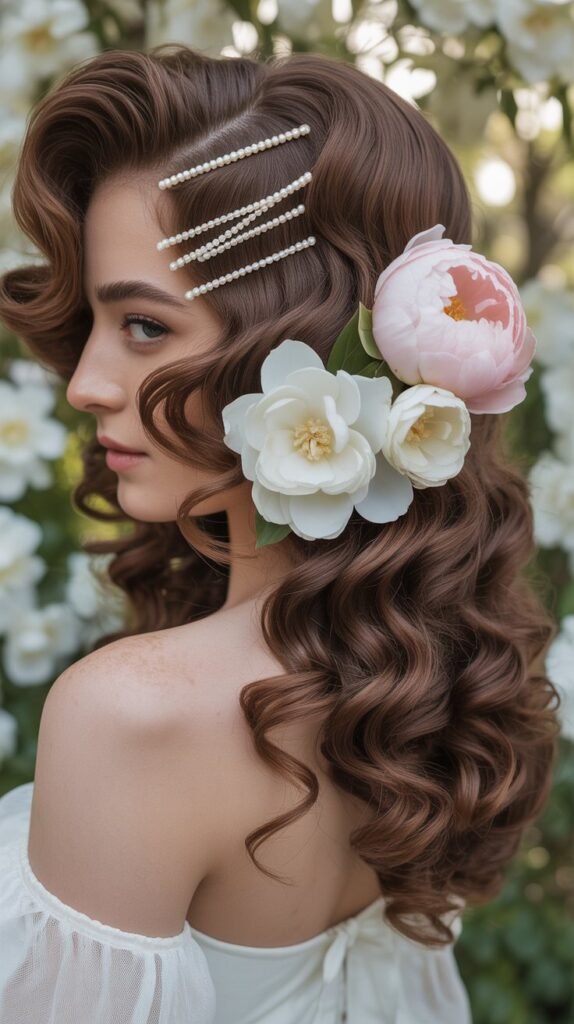
Pinning one side back while allowing the other to flow creates beautiful asymmetry perfect for showcasing face shape.
Vintage wave patterns add old-world romance while fresh flowers introduce natural whimsy.
This style beautifully balances structure with organic softness.
Pinning and Waving Process:
- Start with defined curls and use a wide-tooth comb to gently brush them into softer waves.
- Create a deep side part positioned about three inches from center.
- On the lighter side, take 2-3 inch sections and pin them back behind the ear decoratively.
- Overlap bobby pins in an artistic pattern or use jeweled pins for added visual interest.
- Apply wave-setting spray to the front sections and use fingers to shape S-curve wave patterns.
- Allow the heavy side to flow freely over your shoulder, showcasing the wave pattern.
- Tuck small fresh flowers like roses, ranunculus, or dahlias into the pinned sections.
- Set the waves with medium-hold hairspray while leaving the length soft and touchable.
Best Fresh Flowers: Garden roses (spray varieties), small dahlias, ranunculus, sweet peas, freesia
28. Twisted Half-Up with Cascading Curly Waterfall
This elevated half-up style creates the illusion of a curly waterfall flowing from a twisted base.
The combination of structure and free-flowing movement embodies whimsical romance.
This style photographs exceptionally well due to its dimensional layering and texture contrast.
Construction Process:
- Section the top half of hair from ear to ear across the crown.
- Divide this top section into two parts on either side of a center part.
- Twist one section tightly and bring it toward the center back, securing with pins.
- Twist the opposite section and cross it over or beside the first twist at center back.
- Create a secure anchor point where both twists meet using multiple bobby pins.
- Gently pull on the twisted sections to loosen them slightly for romantic fullness.
- Allow all remaining bottom curls to cascade freely like a waterfall from the twisted anchor point.
- Apply curl refresher spray and scrunch the bottom sections for enhanced definition and bounce.
Length Requirements: Works best on shoulder-length or longer hair for dramatic waterfall effect
29. Faux Hawk Braid with Loose Curly Sides
The faux hawk braid creates edgy appeal without requiring actual shaved sides, making it perfect for temporary transformation.
Keeping the sides loose and curly maintains femininity while the braided center adds bold structure.
This rebellious yet romantic style suits music festivals and creative events perfectly.
Faux Hawk Construction:
- Create a rectangular section down the center of your head, approximately 3-4 inches wide.
- Section and clip away both side portions to keep them separate from your working area.
- Begin a Dutch braid at the front hairline using hair from the center rectangular section.
- Braid tightly and close to the scalp to create the raised mohawk effect.
- Continue adding hair from the center section only as you braid toward the crown.
- Once you reach the crown, switch to a regular three-strand braid and continue to the ends.
- Release the side sections and fluff the curls dramatically for maximum volume contrast.
- Optional: Cross the braid end underneath and pin it to create a hidden finish.
Braid Variation: Single thick braid, multiple small braids, cornrow pattern, twisted faux hawk alternative
30. Layered Twisted Updo with Crystal Pins

This intricate updo layers multiple twisted sections to create a sculptural masterpiece that showcases advanced styling.
Crystal pins catch light beautifully while securing the structure.
This glamorous style works perfectly for weddings, galas, and formal celebrations where you want to make an unforgettable impression.
Advanced Updo Assembly:
- Divide hair into 6-8 sections throughout the head for manageable layering.
- Start with bottom sections, twisting each one loosely and pinning at the nape to create a base.
- Work upward, taking each section, twisting it, and pinning it over or around previous twists.
- Vary the direction of each twist (some clockwise, some counterclockwise) for dimensional texture.
- Allow some curls to escape from twists naturally for organic whimsical appeal.
- Continue layering twisted sections until all hair is incorporated into the updo structure.
- Insert crystal-topped bobby pins throughout the updo at varying angles for sparkle.
- Secure any loose sections with additional pins and set with strong-hold hairspray for all-night wear.
Pin Placement Strategy: Cluster crystals in one area for focal point, or scatter evenly for overall sparkle
Essential Products for Whimsical Curly Hairstyles
Creating and maintaining these beautiful styles requires the right products formulated specifically for curly hair needs.
Understanding which products serve which purposes helps you build an effective styling routine.
Curl Definition Products:
- Curl-enhancing creams provide moisture while defining natural curl patterns without crunchiness.
- Curl gels offer stronger hold for styles requiring structure and all-day staying power.
- Mousse adds volume at the roots while maintaining lightweight definition throughout the length.
- Leave-in conditioners keep curls hydrated and reduce frizz during styling manipulation.
Styling Essentials:
- Strong-hold hairspray maintains intricate styles without weighing down curls or creating stiffness.
- Texturizing spray enhances piecey definition and adds moveable volume to finished styles.
- Shine serum provides glossy finish and smooths flyaways without greasiness.
- Anti-humidity spray protects styles from moisture-induced frizz in challenging weather conditions.
Tools and Accessories:
- Bobby pins in multiple colors matching various hair tones ensure invisible security.
- Clear elastic bands eliminate visible bulk while providing strong hold for ponytails.
- Diffuser attachments for blow dryers dry curls gently without disrupting pattern formation.
- Wide-tooth combs detangle without breaking curls or causing damage.
- Satin pillowcases preserve overnight styles while reducing friction-induced frizz.
Tips for Maintaining Whimsical Styles Throughout the Day
Even the most beautifully created hairstyle requires maintenance to look fresh from morning through evening.
These practical tips help preserve your whimsical creations.
Morning to Evening Longevity:
- Carry a small emergency kit with bobby pins, clear elastics, and mini hairspray for quick touch-ups.
- Refresh flattened curls by misting with water and scrunching gently to reactivate product.
- Bring a small comb or brush to smooth any frizz that develops throughout the day.
- Reposition accessories like flowers or pins that shift during movement or activity.
Weather Protection Strategies:
- Apply anti-humidity products before styling in humid climates to prevent frizz expansion.
- Use stronger hold products in windy conditions to maintain structural integrity.
- Protect styles from rain with stylish head scarves that complement your whimsical aesthetic.
- In dry environments, refresh with lightweight oil or serum to combat static electricity.
Overnight Preservation:
- Sleep on satin or silk pillowcases to reduce friction that disrupts styled sections.
- Wrap braided styles in a silk scarf to maintain their pattern for next-day wear.
- For updos, carefully repin loose sections before bed rather than completely taking down.
- Use a pineapple method (high loose ponytail) for styles with loose curls to maintain volume.
Customizing Styles for Different Curl Types
Curly hair ranges from loose waves to tight coils, and understanding how to adapt these styles for your specific curl pattern ensures the best results.
Each curl type has unique characteristics that affect styling approaches.
For Type 2 Wavy Hair (2A-2C):
- Add volumizing products at roots to compensate for less natural lift than tighter curl patterns.
- Use stronger hold products to maintain braid and twist definition throughout the day.
- Consider hot tools for styles requiring more defined curl formation like barrel curls.
- Embrace the softer romantic quality that waves naturally provide to whimsical styles.
For Type 3 Curly Hair (3A-3C):
- This curl type works beautifully with almost all the styles presented without major adaptation.
- Use sufficient product to maintain definition but avoid weighing down the natural bounce.
- Separate curls gently with fingers rather than brushes to preserve spiral formation.
- These curls photograph exceptionally well in most whimsical styling applications.
For Type 4 Coily Hair (4A-4C):
- Moisturize extensively before styling as this hair type requires maximum hydration for manageability.
- Use edge control products for sleeker sections while celebrating the natural texture in loose areas.
- Protective styling variations of these looks help maintain hair health while looking beautiful.
- Stretching techniques like banding or braiding overnight can ease manipulation for certain styles.
Adapting Styles for Different Hair Lengths
Hair length significantly impacts which styles work best and how they should be modified for optimal results.
Understanding length-based adaptations helps you successfully recreate these looks.
Short Curly Hair (Chin to Shoulder Length):
- Focus on half-up styles that work with limited length like cloud buns and space buns.
- Accessories become more important for adding whimsical elements to shorter styles.
- Braided headbands and side braids work beautifully without requiring significant length.
- Embrace volume and texture as your primary styling elements rather than length-dependent techniques.
Medium Curly Hair (Shoulder to Mid-Back):
- This length provides the most versatility for executing nearly all presented styles successfully.
- Ponytails sit at ideal positions without excessive weight pulling them down.
- Braids have sufficient length for visual impact without becoming unmanageable.
- Updos can be created fully without needing extensions or additional padding.
Long Curly Hair (Mid-Back and Beyond):
- Consider the weight of your hair when creating high styles that must defy gravity.
- Use additional bobby pins and strong elastics to support the weight of lengthy curls.
- Showcase your length advantage in cascading styles and dramatic waterfalls.
- Be prepared for longer styling times as more hair requires more manipulation.
Color Enhancement Ideas for Whimsical Styles
While these styles look stunning on natural hair color, strategic color enhancements can amplify their whimsical quality.
Consider these coloring techniques that complement curly styling.
Temporary Color Options:
- Hair chalk provides commitment-free color experimentation perfect for festivals and themed events.
- Temporary spray colors wash out completely, allowing you to match styles to specific occasions.
- Clip-in colored extensions add pops of color without chemical processing your natural curls.
- Colored hair mascara targets specific sections for subtle highlights throughout styled areas.
Semi-Permanent Enhancements:
- Pastel tones like lavender, pink, or blue create fairy-tale aesthetics perfect for whimsical styling.
- Vibrant fashion colors in jewel tones add drama to already eye-catching styles.
- Oil slick or galaxy color techniques create iridescent effects that shift in different lighting.
- These typically last 4-8 weeks depending on hair porosity and washing frequency.
Permanent Color Techniques:
- Balayage highlights add dimension that enhances the texture visible in braids and twists.
- Ombre or gradient coloring creates beautiful depth in cascading curl styles.
- Money piece highlights frame the face beautifully in side-swept and asymmetrical styles.
- Rainbow or multi-tonal coloring makes even simple styles appear more whimsical and artistic.
Seasonal Adaptations for Year-Round Whimsy
Different seasons present unique challenges and opportunities for whimsical curly hairstyling.
Adapting your approach seasonally ensures your styles remain beautiful regardless of weather.
Spring Styling Considerations:
- Incorporate fresh flowers abundantly as they’re readily available and affordable during spring months.
- Combat increased humidity with anti-frizz products and stronger hold styling formulas.
- Embrace pastel accessories and lighter, airier styles that match the season’s energy.
- Rain protection becomes essential—carry clear umbrellas or decorative rain bonnets.
Summer Whimsy Adaptations:
- Choose styles that keep hair off your neck and back for comfort in heat.
- Water-resistant products maintain style integrity during beach and pool activities.
- Mermaid-inspired styles with oceanic accessories align perfectly with summer aesthetics.
- Protect color-treated hair with UV protection products to prevent fading in intense sunlight.
Autumn Styling Approaches:
- Incorporate warm metallic accessories in copper, bronze, and gold tones matching fall colors.
- Use richer, more moisturizing products as air becomes drier and cooler.
- Earth-tone flowers like burgundy dahlias and rust-colored chrysanthemums enhance autumn whimsy.
- Structured styles tend to hold better in the crisp, lower-humidity fall air.
Winter Wonderland Styles:
- Combat static electricity with leave-in conditioners and anti-static hair serums.
- Velvet ribbons and luxurious fabric accessories complement winter’s richness.
- Protected updos work well under hats and winter accessories without compromising style.
- Deep conditioning treatments become essential as indoor heating dries hair significantly.
Professional Styling vs. DIY: When to Seek Help
While many of these styles can be mastered at home with practice, some situations warrant professional assistance.
Understanding when to visit a stylist versus attempting DIY saves time and prevents frustration.
DIY-Friendly Styles:
- Simple half-up styles, basic ponytails, and messy buns require minimal technique and can be perfected quickly.
- Single braids and basic twisting techniques become easier with practice and patience.
- Accessory-dependent styles often require just well-defined curls plus strategic decoration placement.
- Video tutorials and practice on friends help build confidence for intermediate styles.
Consider Professional Help For:
- Wedding or major life event styling where perfection and longevity are essential.
- Complex braiding patterns you haven’t successfully executed after multiple attempts.
- Styles requiring precise symmetry that’s difficult to achieve on yourself.
- First-time attempts at advanced techniques before important events to ensure successful results.
Building Your Skills:
- Start with beginner styles and progress gradually to more complex techniques over time.
- Practice new styles on low-pressure days rather than right before important events.
- Take photos of your practice attempts to track improvement and identify areas needing refinement.
- Consider taking a curly hair styling class or workshop to learn professional techniques.
Conclusion
The journey through these 30 Beautiful Whimsical Hairstyles for Curly Hair That Turn Heads reveals that your natural curls are not a limitation but rather an incredible asset capable of creating stunning, memorable looks.
From the romantic elegance of waterfall braids to the playful boldness of space buns, each style celebrates the unique texture and personality that curly hair brings to every aesthetic.
The whimsical elements—whether delicate flowers, sparkling accessories, or artistic braiding patterns—transform everyday styling into wearable art that expresses your creativity and individuality.
Remember that mastering these styles takes practice, patience, and the right products formulated specifically for curly hair’s needs, but the confidence and joy you’ll feel wearing these head-turning looks makes every moment of learning worthwhile.
Whether you’re preparing for a special celebration, refreshing your daily styling routine, or simply embracing your natural texture in new and exciting ways, these whimsical hairstyles prove that curly hair deserves to be celebrated, adorned, and showcased as the beautiful crown it truly is.
Let your curls tell your story through styles that are as unique, dynamic, and captivating as you are.
