
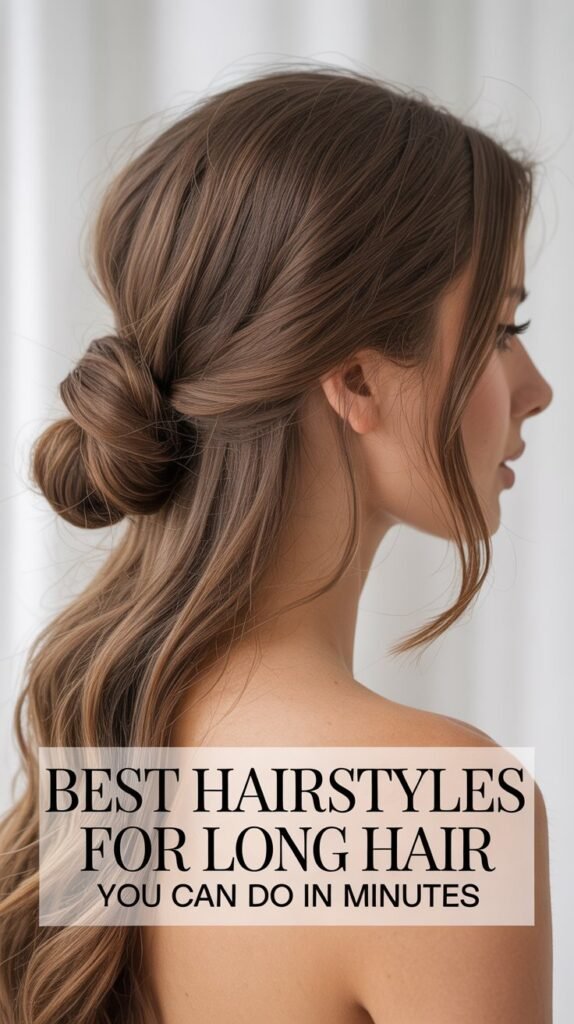
Long hair is beautiful, but styling it every morning can feel like a time-consuming challenge.
Whether you’re rushing to work, heading to a casual brunch, or preparing for an evening out, you need hairstyles that look polished without demanding hours in front of the mirror.
The good news is that stunning long hair looks are absolutely achievable in just minutes with the right techniques and a bit of practice.
This comprehensive guide to the 26 Best Hairstyles for Long Hair You Can Do in Minutes will transform your daily routine with quick, elegant options ranging from classic braids and effortless buns to romantic waves and sophisticated updos.
Each style is designed for real life, real mornings, and real women who want to look their best without sacrificing precious time.
You’ll discover step-by-step approaches for casual everyday looks, professional office styles, and even options perfect for special occasions—all ready in five minutes or less.
1. The Classic Low Ponytail
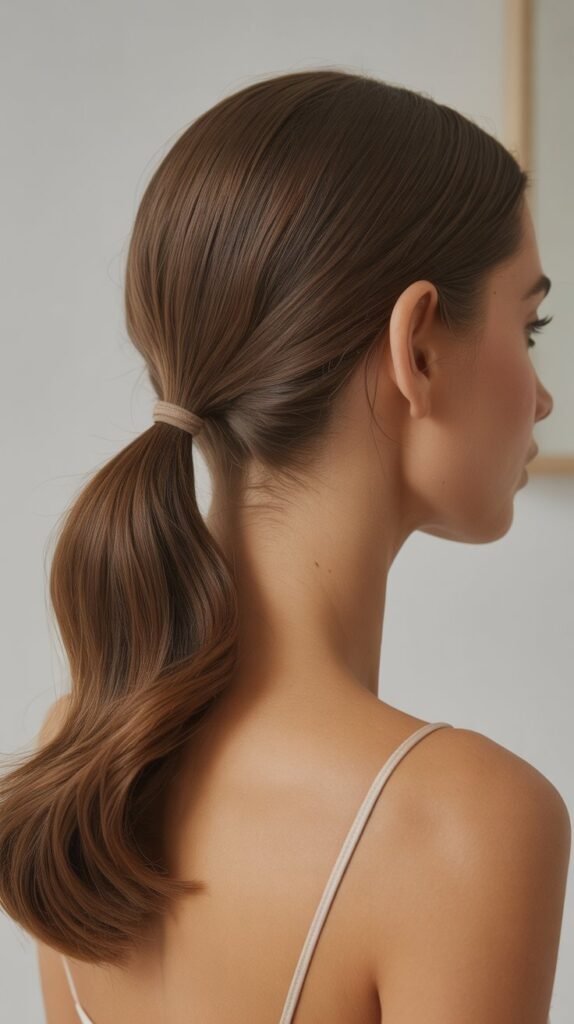
The low ponytail remains one of the most versatile and timeless hairstyles for long hair, offering both elegance and simplicity.
This style works beautifully for any occasion, from corporate meetings to weekend errands, and can be dressed up or down depending on your needs.
How to Create:
- Brush your hair thoroughly to remove all tangles and create a smooth base.
- Gather all your hair at the nape of your neck, positioning it slightly to one side for a more relaxed look or centered for classic appeal.
- Secure with a hair elastic that matches your hair color for a seamless finish.
- Take a small section of hair from the ponytail and wrap it around the elastic to conceal it.
- Pin the wrapped section underneath the ponytail with a bobby pin.
- For extra polish, apply a small amount of smoothing serum to tame flyaways.
Best For: Professional settings, casual outings, gym sessions
Time Required: 2 minutes
2. The Messy Top Knot
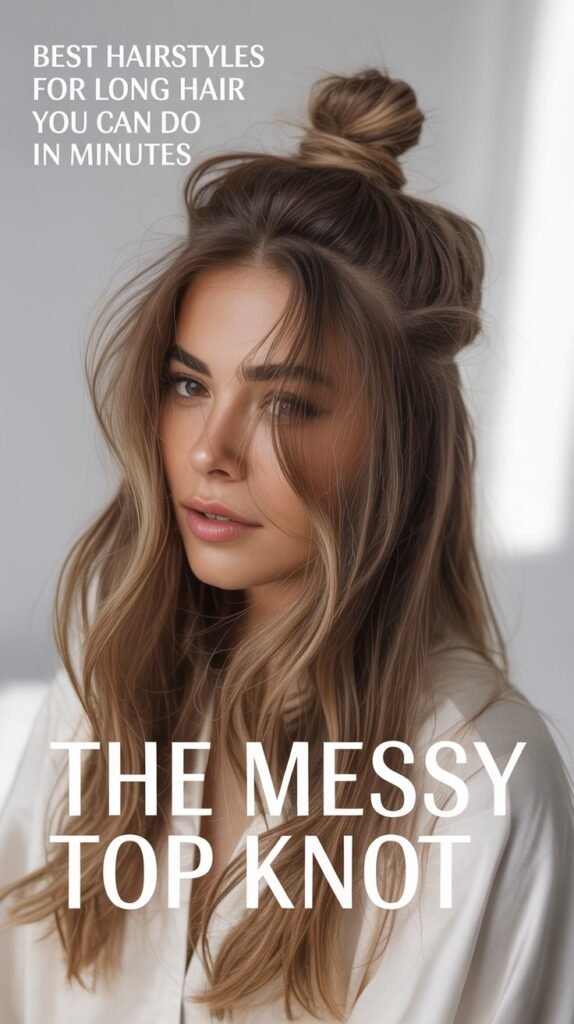
The messy top knot embraces effortless chic and has become a signature style for women who appreciate both comfort and fashion.
This intentionally undone look radiates confidence and casual elegance.
How to Create:
- Flip your head upside down and gather all hair into a high ponytail at the crown.
- Twist the ponytail loosely around its base without pulling too tightly.
- Secure the twisted hair with another elastic or multiple bobby pins.
- Gently pull at sections of the bun to create volume and that perfectly imperfect texture.
- Allow a few face-framing pieces to fall naturally for a softer appearance.
- Set with light-hold hairspray if needed.
Best For: Weekend brunches, creative workspaces, running errands
Time Required: 3 minutes
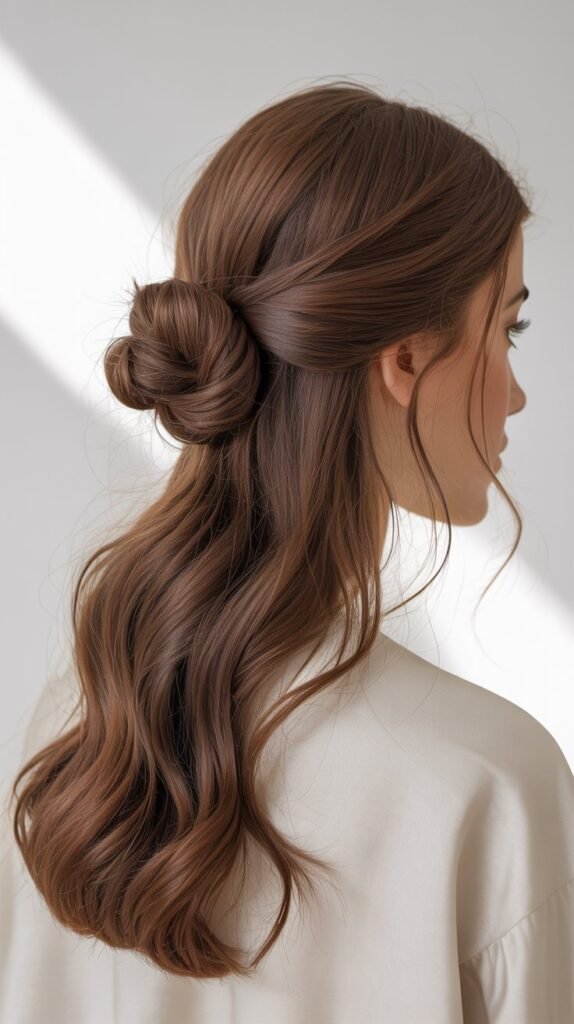
3. The Half-Up Half-Down Style
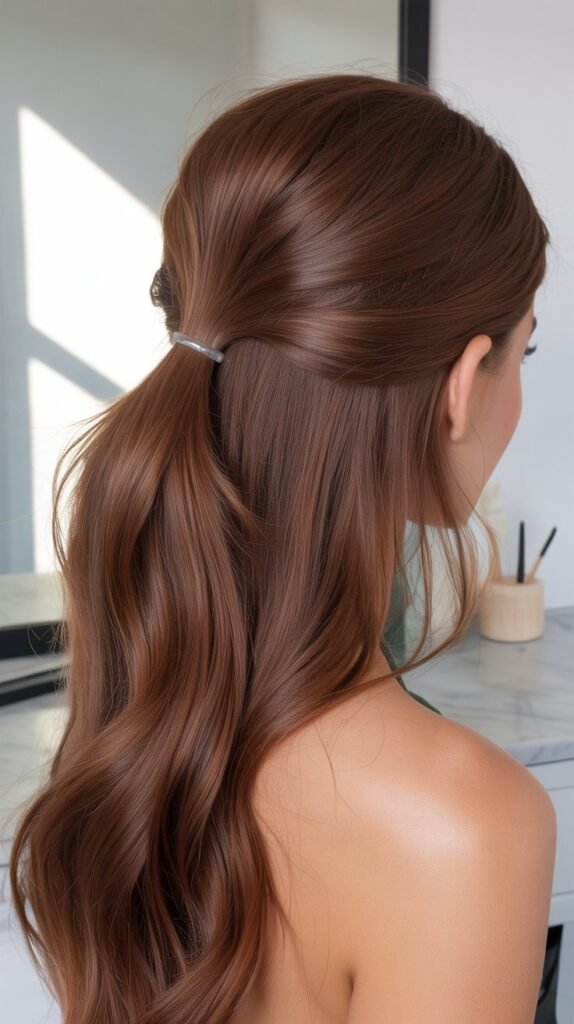
This balanced hairstyle combines the best of both worlds, keeping hair away from your face while showcasing your length.
The half-up half-down style flatters virtually every face shape and hair texture.
How to Create:
- Section off the top half of your hair from temple to temple, creating a horizontal part.
- Gather this top section and smooth it back toward your crown.
- Secure with a clear elastic or decorative hair accessory.
- Leave the bottom half flowing freely for natural movement.
- For added interest, twist the top section before securing it.
- Gently tease the crown area for subtle volume if desired.
Best For: Date nights, office presentations, social gatherings
Time Required: 2 minutes
4. The Quick Dutch Braid
The Dutch braid, often called the “inside-out braid,” creates a raised, dimensional look that appears more intricate than its simple technique suggests.
This style keeps hair controlled while making a bold style statement.
How to Create:
- Brush hair to eliminate knots and create a smooth working surface.
- Take a section of hair from the top center of your head and divide it into three equal strands.
- Begin braiding by crossing the side strands under the middle strand instead of over.
- Add small sections of hair to each strand as you work down toward the nape.
- Continue until you reach the ends and secure with an elastic.
- Gently pancake the braid by pulling at the edges to create width and fullness.
Best For: Athletic activities, festivals, casual weekends
Time Required: 4 minutes
5. The Twisted Side Bun
The twisted side bun offers romantic sophistication with minimal effort, making it ideal for those moments when you need to look polished quickly.
This asymmetrical style adds visual interest and works beautifully for various occasions.
How to Create:
- Sweep all your hair to one side, gathering it near your ear.
- Divide the gathered hair into two equal sections.
- Twist each section individually in the same direction.
- Wrap the two twisted sections around each other to create a rope effect.
- Coil the twisted rope into a bun shape at the base of your neck.
- Secure with bobby pins, tucking ends underneath for a clean finish.
Best For: Weddings, evening events, romantic dinners
Time Required: 3 minutes
6. The Sleek High Ponytail
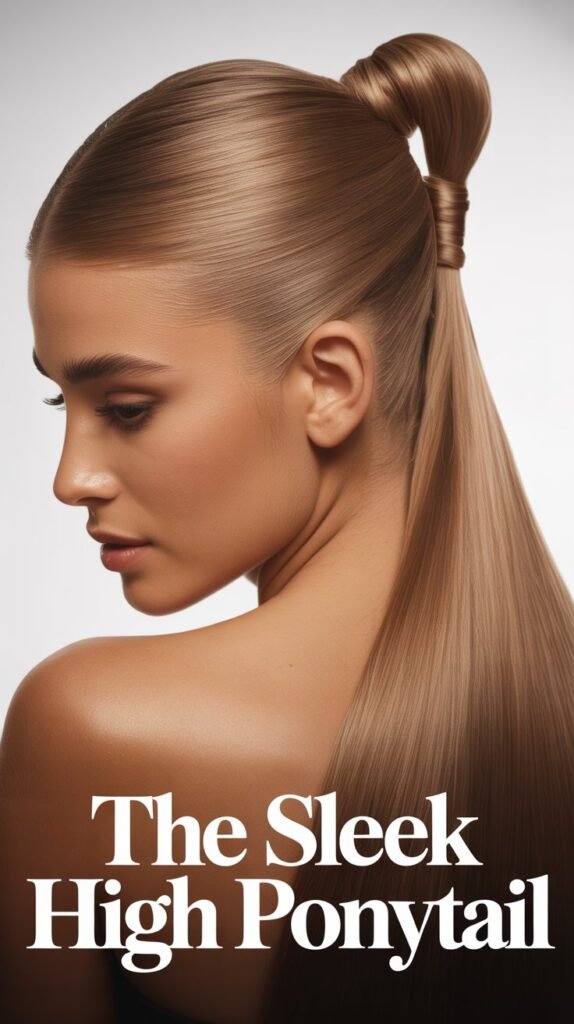
The high ponytail exudes energy, confidence, and a youthful spirit while keeping hair completely off your face and neck.
This style has dominated runways and red carpets alike for its commanding presence.
How to Create:
- Apply smoothing cream or gel throughout your hair for a polished finish.
- Brush hair upward toward the crown while tilting your head back.
- Gather all hair at the highest point of your head and secure tightly.
- Use a fine-tooth comb to smooth any bumps or irregularities.
- Wrap a small hair section around the elastic base and pin it underneath.
- Apply hairspray for long-lasting hold throughout the day.
Best For: Workouts, hot weather, making a fashion statement
Time Required: 3 minutes
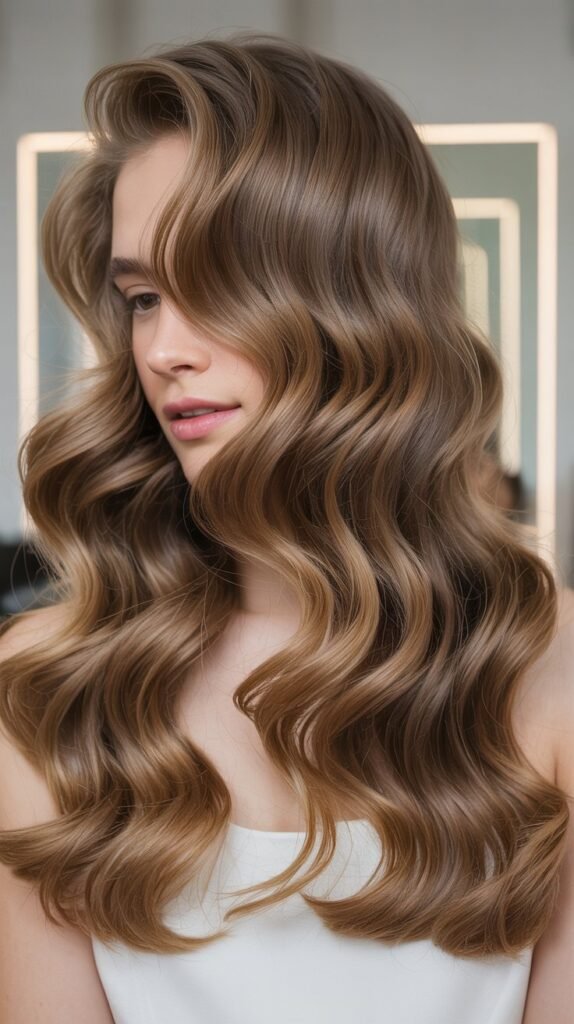
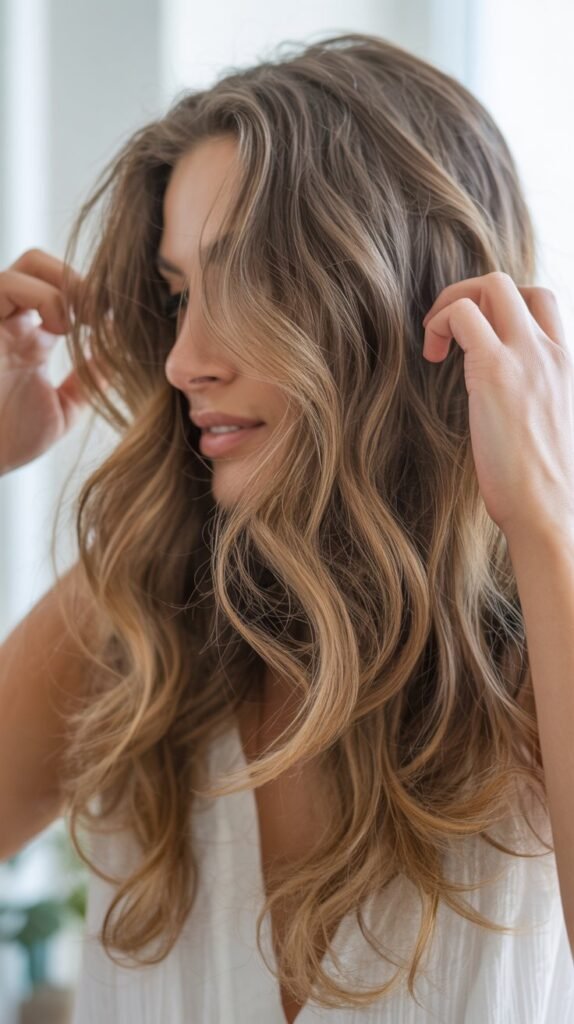
7. The Loose Waves
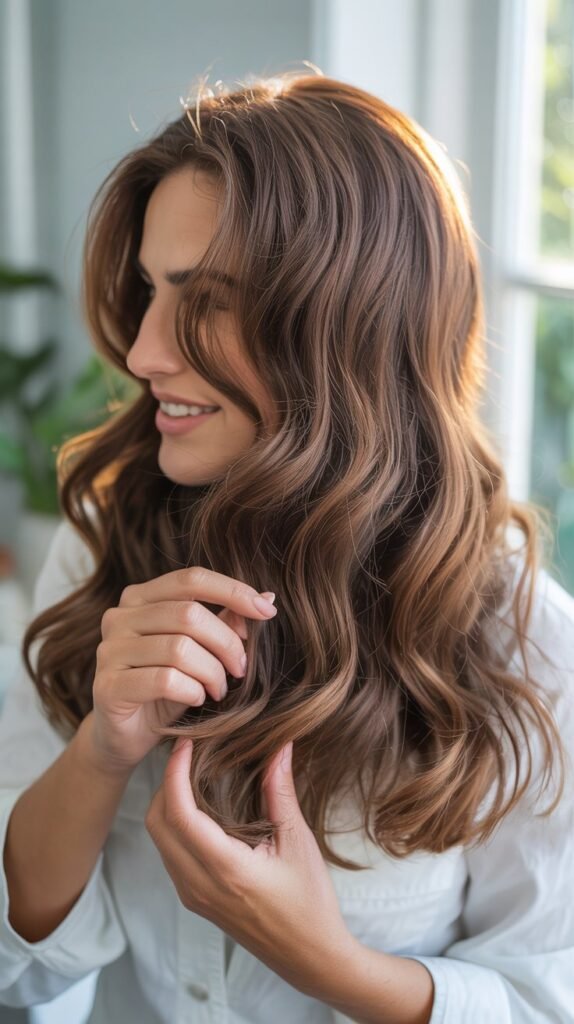
Loose waves create an effortlessly glamorous look that suggests you’ve just returned from a beach vacation.
This style adds movement, dimension, and a relaxed sophistication to long hair.
How to Create:
- Apply heat protectant spray throughout damp or dry hair.
- Divide hair into four to six large sections for faster styling.
- Use a large-barrel curling iron or wand, wrapping hair loosely around it.
- Hold for only five to eight seconds per section to create soft waves rather than tight curls.
- Allow curls to cool completely before touching them.
- Run your fingers through the waves to separate and soften them for a natural finish.
Best For: Casual social events, date nights, everyday elegance
Time Required: 5 minutes
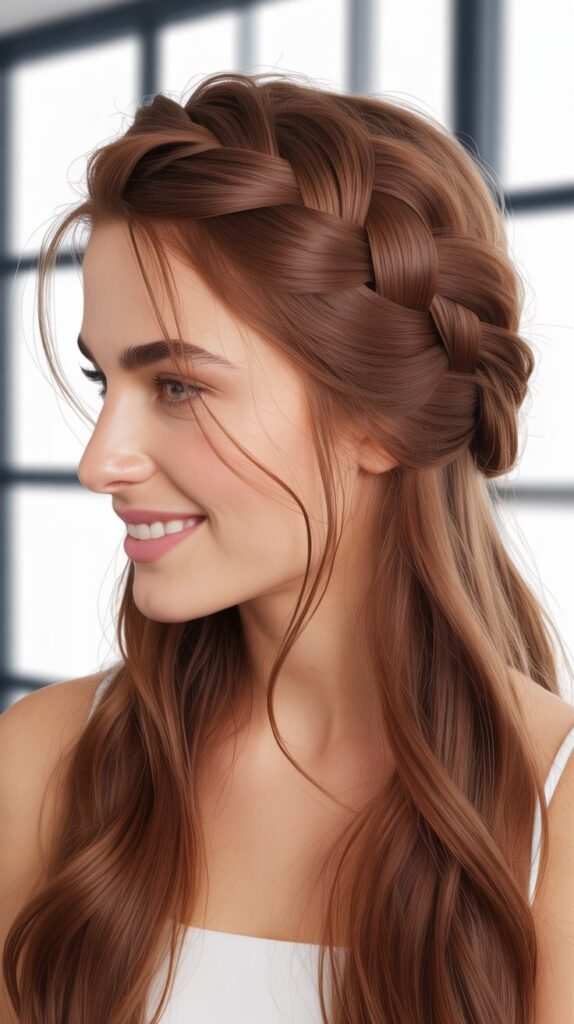
8. The Braided Headband
The braided headband creates a bohemian-inspired look that’s both practical and beautiful, keeping hair away from your face while adding textural interest.
This style works wonderfully for outdoor activities and casual gatherings.
How to Create:
- Part your hair on one side and take a section near your ear.
- Braid this section traditionally, keeping it relatively tight for structure.
- Bring the braid across the top of your head like a headband.
- Secure the end behind your opposite ear with bobby pins.
- Leave the rest of your hair down and flowing naturally.
- Pull a few face-framing pieces loose for a softer appearance.
Best For: Music festivals, outdoor weddings, casual summer days
Time Required: 3 minutes
9. The Quick Fishtail Braid
The fishtail braid creates an intricate-looking pattern that’s surprisingly simple to execute, offering a sophisticated alternative to traditional three-strand braids.
This style looks complex but requires only a basic braiding technique.
How to Create:
- Divide all your hair into two large equal sections.
- Take a thin piece from the outer edge of the left section.
- Cross this thin piece over to join the right section.
- Take a thin piece from the outer edge of the right section.
- Cross it over to join the left section.
- Continue alternating sides until you reach the ends and secure with an elastic.
Best For: Office environments, creative settings, social occasions
Time Required: 4 minutes
10. The Double Twist
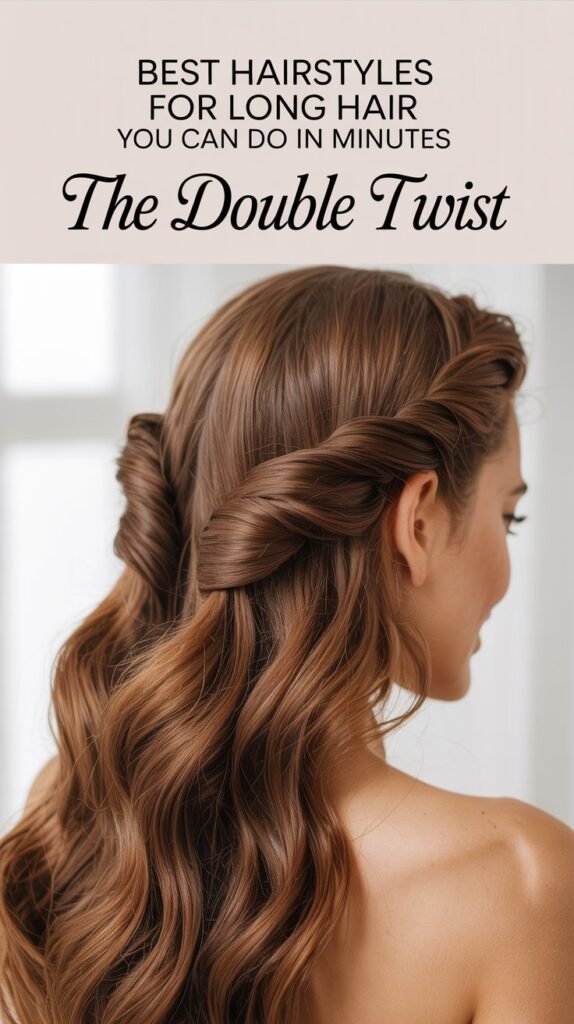
The double twist creates an elegant and polished look with minimal effort, making it perfect for those mornings when you need to look put-together quickly.
This style works beautifully for both professional and social settings.
How to Create:
- Part your hair down the middle from forehead to crown.
- Take the right section and twist it away from your face toward the back.
- Secure the twisted section at the back center of your head with bobby pins.
- Repeat the same process with the left section, twisting away from your face.
- Secure the left twist so it meets the right twist at the back.
- Leave the remaining hair flowing freely or gather it into a low ponytail.
Best For: Business meetings, dinner parties, religious services
Time Required: 2 minutes
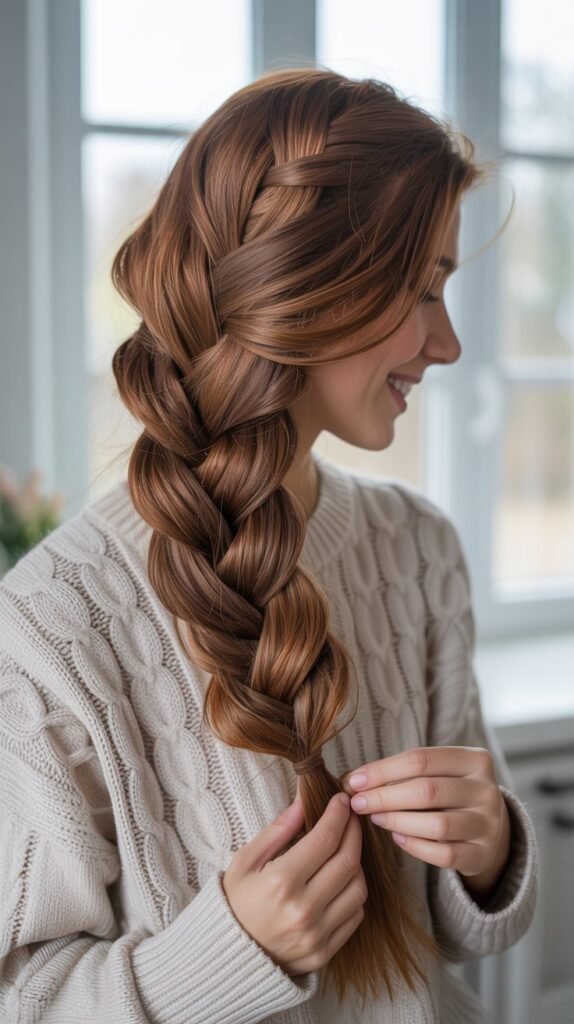
11. The Low Braided Bun
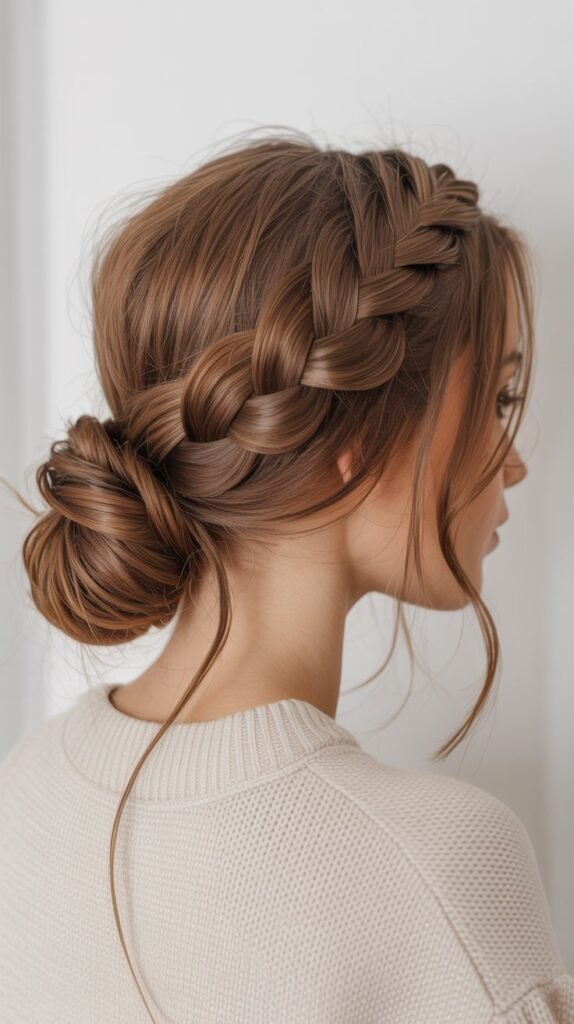
The low braided bun combines the structure of a braid with the elegance of a classic bun, creating a sophisticated style perfect for formal occasions.
This look appears intricate while remaining surprisingly quick to achieve.
How to Create:
- Create a traditional three-strand braid with all your hair, starting at the nape.
- Braid all the way to the ends and secure with a clear elastic.
- Coil the entire braid around its base in a circular motion.
- Tuck the end underneath the bun and secure with bobby pins.
- Pin the bun at multiple points to ensure it stays secure throughout the day.
- Apply hairspray for extra hold if needed.
Best For: Formal events, professional interviews, special occasions
Time Required: 3 minutes
12. The Side Swept Waves
Side swept waves offer Hollywood glamour with minimal effort, creating a romantic and feminine look that works for various occasions.
This asymmetrical style adds drama and sophistication to long hair.
How to Create:
- Create loose waves throughout your hair using a curling iron or wand.
- Apply texturizing spray for enhanced volume and hold.
- Create a deep side part on your preferred side.
- Sweep the larger section of hair across your forehead and over one shoulder.
- Pin the hair behind your ear on the opposite side to keep it in place.
- Allow the waves to cascade over one shoulder for a romantic finish.
Best For: Evening events, red carpet moments, romantic occasions
Time Required: 4 minutes
13. The Bubble Ponytail
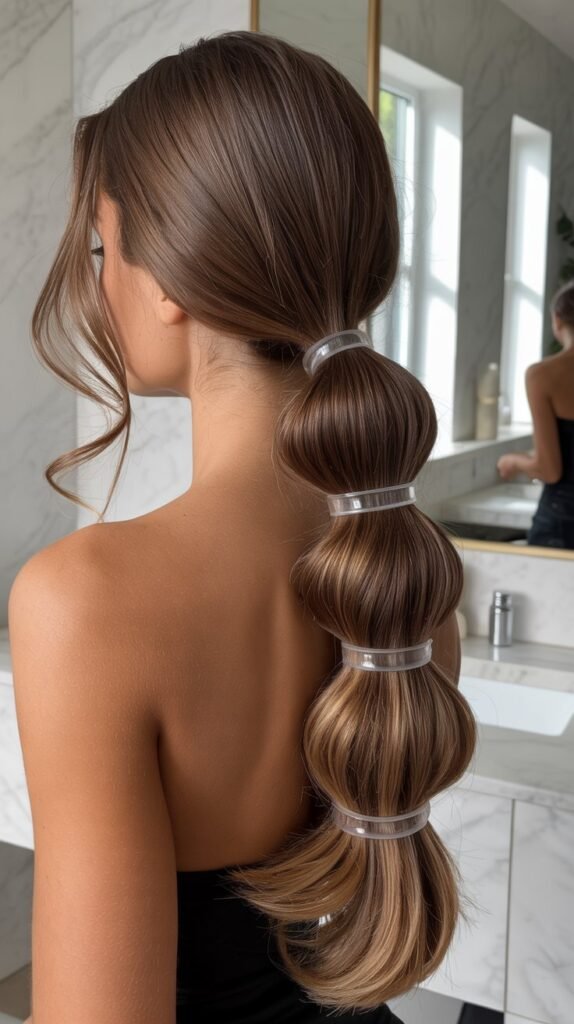
The bubble ponytail transforms a basic ponytail into a playful and trendy statement piece.
This style has gained popularity on social media for its fun, youthful appearance and surprising versatility.
How to Create:
- Create a high or mid-level ponytail and secure it with an elastic.
- Place additional elastics down the length of the ponytail at equal intervals.
- Gently pull and loosen the hair between each elastic to create rounded “bubbles.”
- Adjust each bubble section to make them uniform in size.
- Continue down the entire length of your ponytail.
- Apply light hairspray to maintain the bubble structure throughout the day.
Best For: Casual outings, trendy events, playful occasions
Time Required: 3 minutes
14. The Textured Low Bun
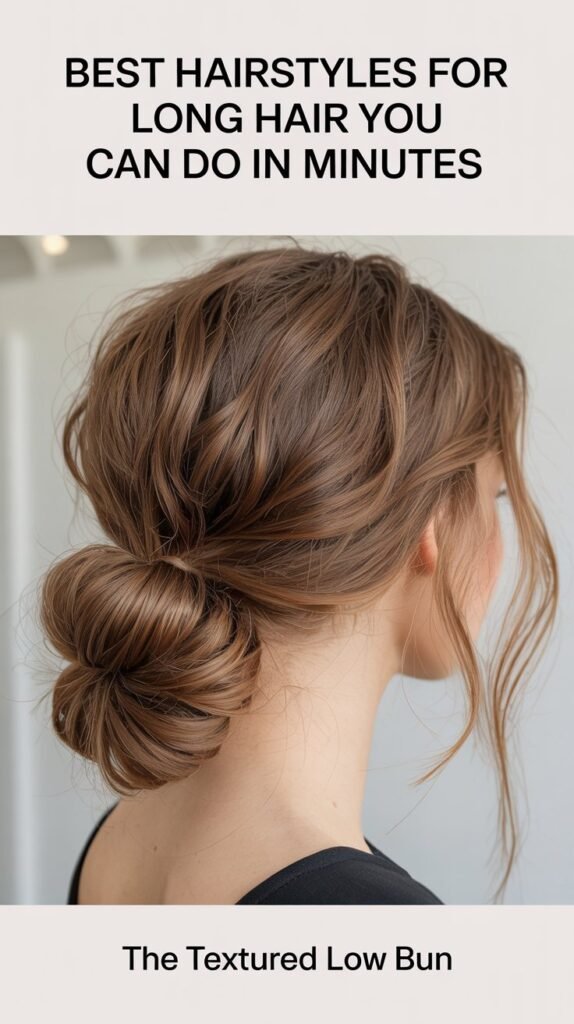
The textured low bun offers an updated take on the classic chignon with a more relaxed, modern feel. This style balances sophistication with effortless charm.
How to Create:
- Apply texturizing spray or dry shampoo throughout your hair for grip.
- Gather hair into a low ponytail without smoothing it perfectly.
- Twist the ponytail loosely and wrap it around the base.
- Secure with bobby pins in multiple directions for stability.
- Pull out small pieces around your face and at the bun for a lived-in texture.
- Allow some imperfection in the bun for a modern, undone appearance.
Best For: Work environments, casual gatherings, everyday elegance
Time Required: 3 minutes
15. The Quick Top Braid
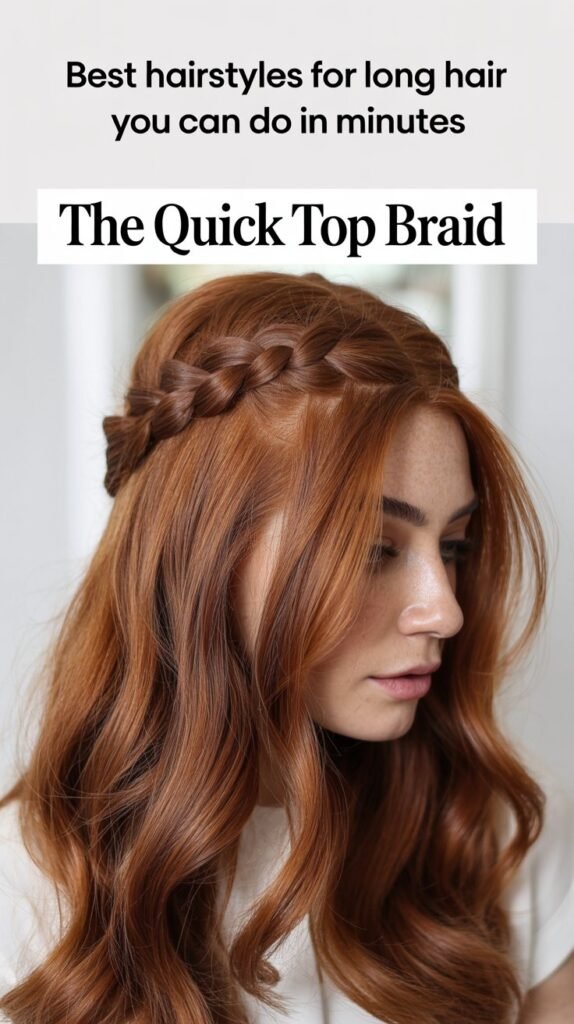
The top braid adds interest to otherwise simple styles by incorporating a braid detail at the crown.
This versatile technique can be combined with various other styles for added dimension.
How to Create:
- Section off hair from your hairline to the crown in a rectangular shape.
- Divide this section into three strands and begin a traditional braid.
- Braid down for three to four inches, then secure with a small elastic.
- Leave the rest of your hair flowing freely for a half-up effect.
- Alternatively, gather all hair including the braid into a ponytail.
- Gently pull at the braid edges to create a fuller, more relaxed appearance.
Best For: Active days, casual meetings, everyday wear
Time Required: 2 minutes
16. The Rolled Side Updo
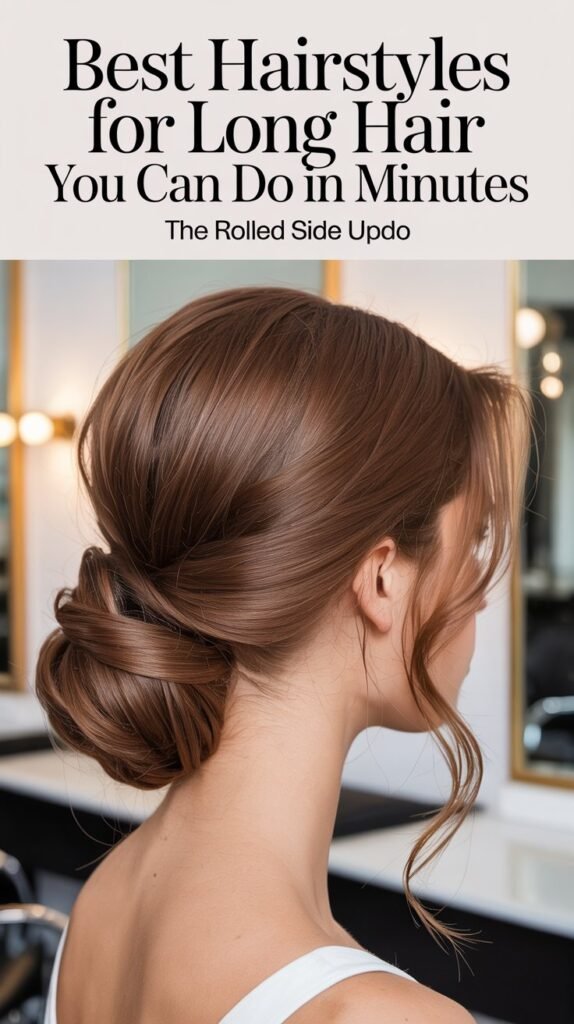
The rolled side updo creates vintage-inspired elegance with a contemporary twist, offering a sophisticated option for special occasions.
This style showcases long hair while keeping it completely secured.
How to Create:
- Sweep all your hair to one side and gather it near your ear.
- Begin rolling the hair inward toward your head, moving upward.
- Continue rolling until you reach your crown area.
- Secure the roll with bobby pins inserted horizontally for maximum hold.
- Tuck loose ends into the roll to create a clean finish.
- Apply hairspray to set the style and prevent unwinding.
Best For: Weddings, formal events, vintage-themed occasions
Time Required: 4 minutes
17. The Knotted Half-Up
The knotted half-up style replaces traditional elastics with an actual knot, creating a unique and eye-catching detail.
This simple twist on a classic style adds unexpected interest.
How to Create:
- Section off the top half of your hair from temple to temple.
- Divide this section into two equal parts.
- Tie these two parts together in a simple overhand knot.
- Pull the knot tight to secure it in place.
- Use a small clear elastic beneath the knot for extra security if needed.
- Leave the rest of your hair down and flowing naturally.
Best For: Casual dates, creative workspaces, social gatherings
Time Required: 2 minutes
18. The Quick Faux Hawk
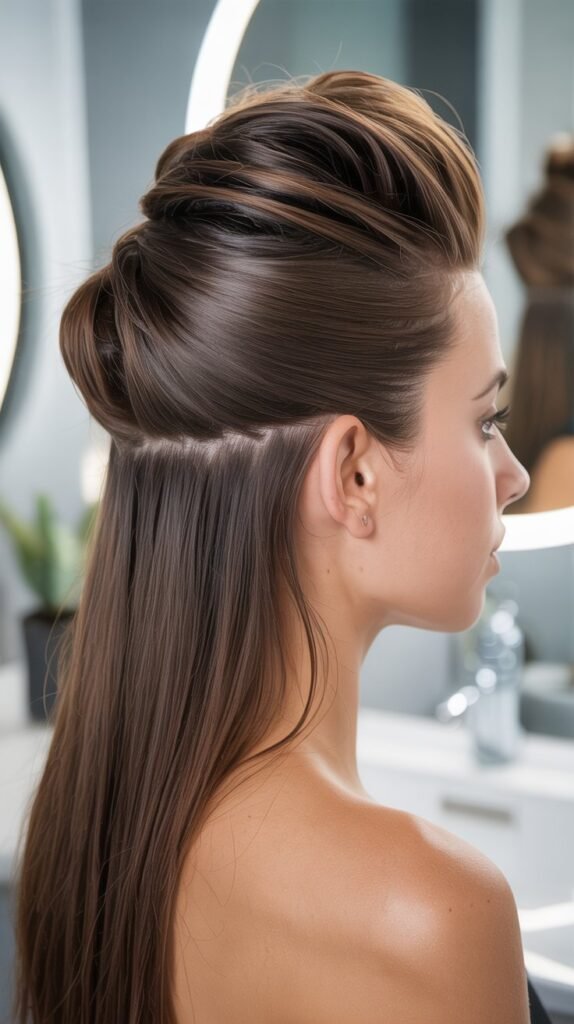
The faux hawk brings edgy style to long hair without requiring any cutting or commitment.
This bold look makes a statement while remaining professional enough for many settings.
How to Create:
- Section hair from your forehead to crown in a mohawk-style strip.
- Tease this center section at the roots for volume.
- Smooth the outer layers of the teased section for a polished appearance.
- Pin the sides of your hair flat against your head using multiple bobby pins.
- Allow the center section to stand up with volume.
- Apply strong-hold hairspray to maintain the height throughout the day.
Best For: Concerts, fashion-forward events, creative industries
Time Required: 4 minutes
19. The Criss-Cross Ponytail
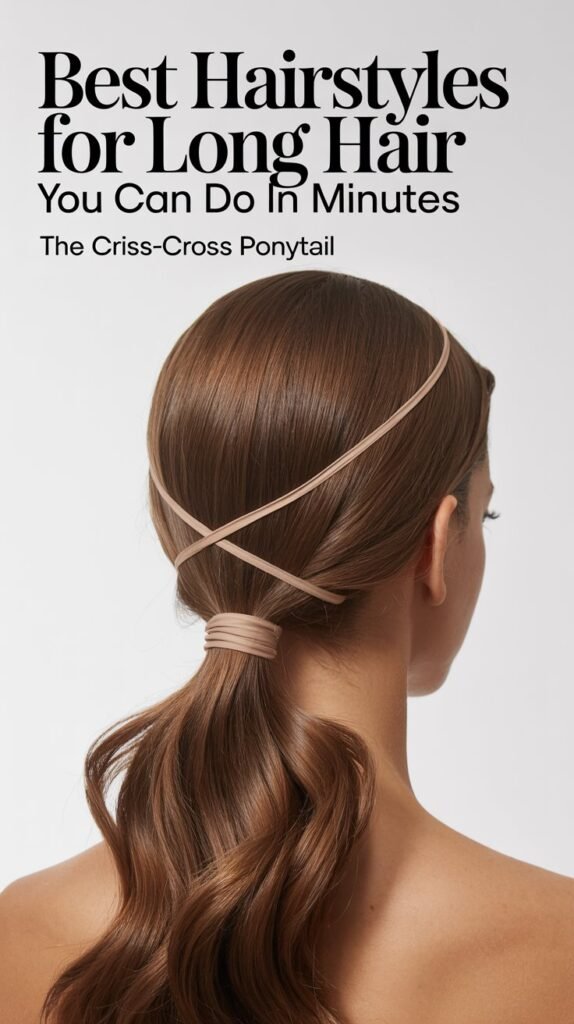
The criss-cross ponytail adds visual interest to a basic style through a simple crossing technique at the base.
This detail elevates an everyday ponytail into something special.
How to Create:
- Create a mid-level or high ponytail and secure with an elastic.
- Divide the ponytail into two equal sections.
- Cross the right section over the left and pull them to opposite sides.
- Secure both sections to the base of the ponytail with bobby pins.
- Allow the remaining length to flow freely from the secured crossed sections.
- Adjust the cross to ensure it’s visible and symmetrical.
Best For: Athletic activities, casual outings, everyday wear
Time Required: 2 minutes
20. The Rope Braid Ponytail
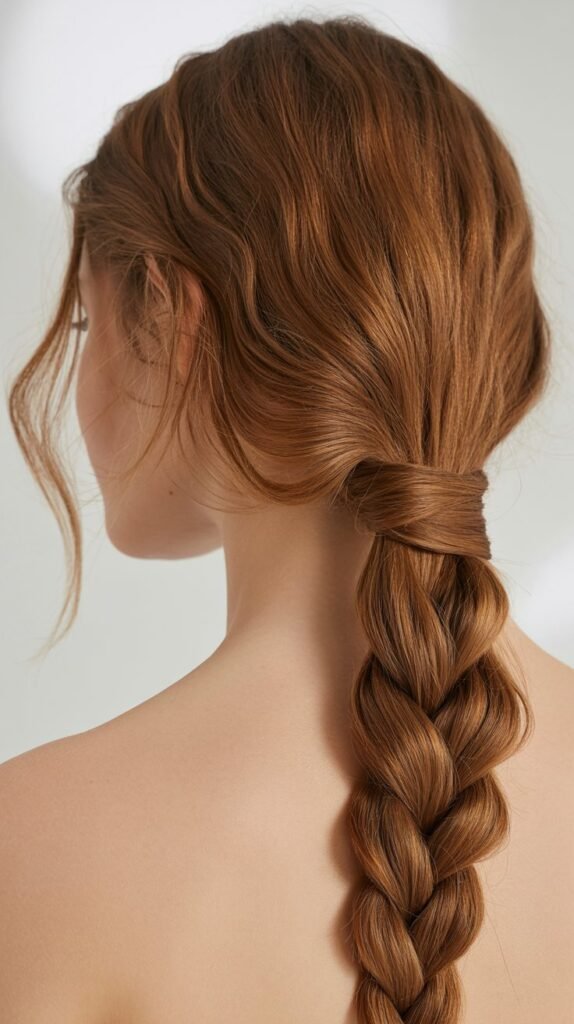
The rope braid ponytail creates a unique twisted texture that stands out from traditional braiding techniques.
This style offers visual interest while remaining quick and practical.
How to Create:
- Gather all hair into a high or mid-level ponytail.
- Divide the ponytail into two equal sections.
- Twist each section individually in a clockwise direction.
- Wrap the two twisted sections around each other in a counterclockwise direction.
- Secure the end with an elastic when you reach the bottom.
- The opposing twist directions create a rope-like appearance that won’t unravel.
Best For: Gym sessions, beach days, casual weekends
Time Required: 3 minutes
21. The Low Twisted Ponytail
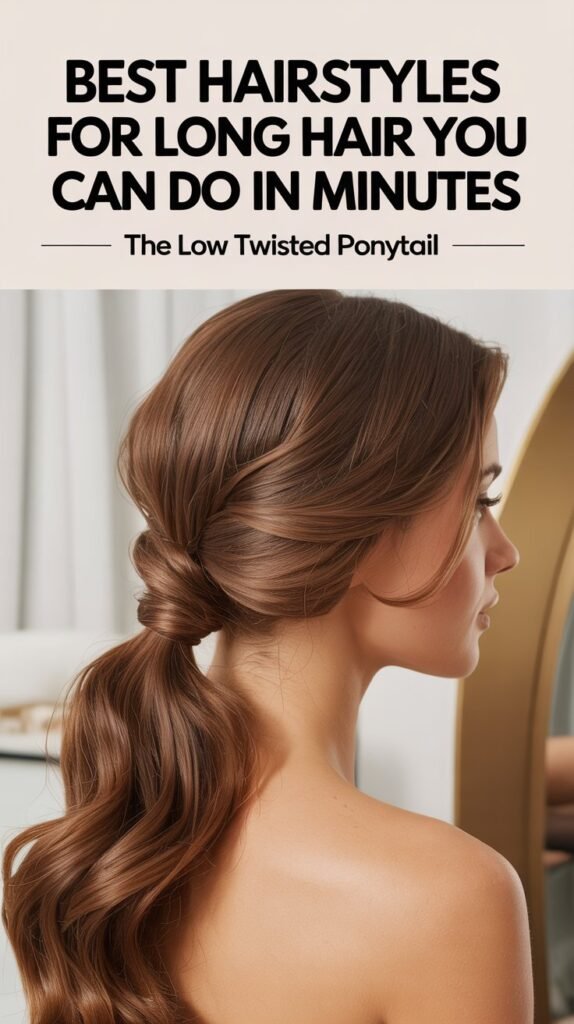
The low twisted ponytail adds elegant detail to a classic style through simple twisting at the crown.
This refined look works beautifully for both professional and social settings.
How to Create:
- Create a low ponytail at the nape of your neck but don’t pull it completely through the elastic.
- Create a small opening in the hair above the elastic.
- Flip the ponytail up and through this opening from underneath.
- Pull the ponytail down to tighten and create a twisted effect.
- Repeat the flip-through once or twice more for additional twists if desired.
- Smooth any flyaways with a light application of hair oil or serum.
Best For: Office settings, dinner parties, religious services
Time Required: 2 minutes
22. The Side Fishtail
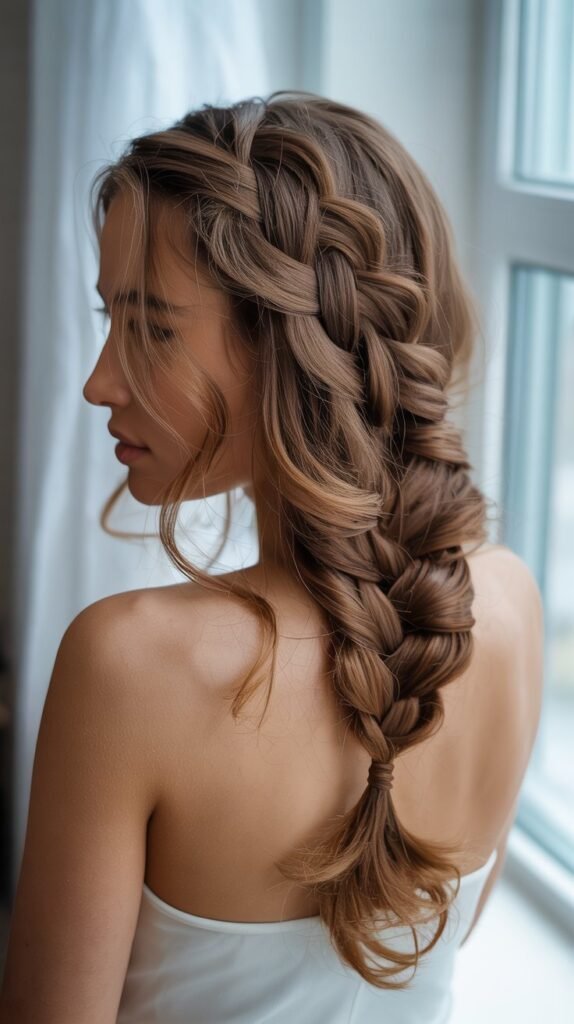
The side fishtail braid creates a romantic, bohemian appearance that showcases the intricate pattern of fishtail braiding.
This style keeps hair controlled while maintaining a relaxed, feminine vibe.
How to Create:
- Sweep all your hair over one shoulder.
- Divide the hair into two equal sections.
- Begin the fishtail braiding technique by crossing thin outer pieces to opposite sections.
- Continue the pattern down the entire length of your hair.
- Secure at the ends with a clear or decorative elastic.
- Gently pull at the braid edges to create a fuller, more relaxed appearance.
Best For: Outdoor weddings, festivals, romantic dates
Time Required: 4 minutes
23. The Double Low Buns
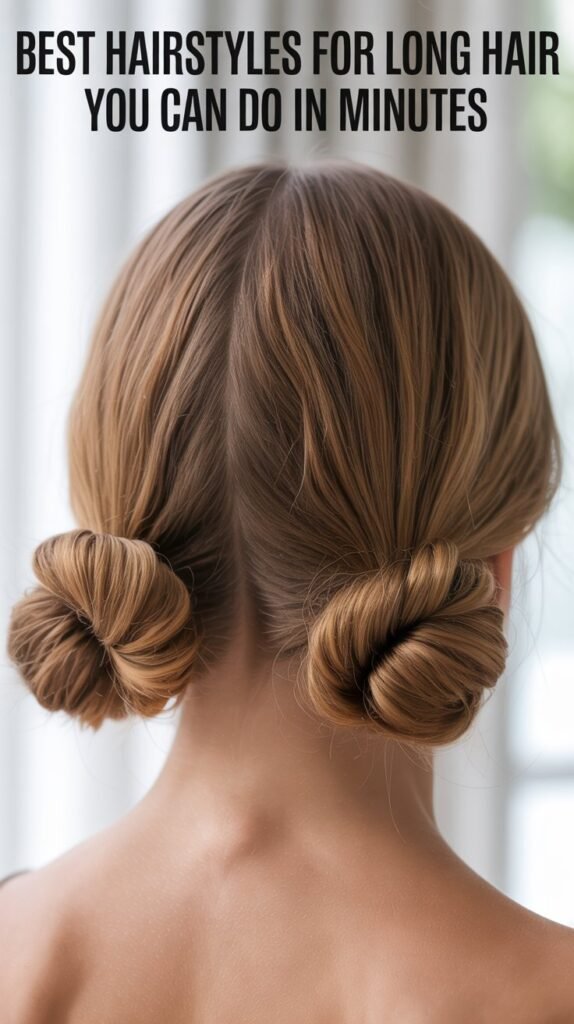
Double low buns create a playful, youthful look that’s both practical and stylish.
This symmetric style has become popular for its fun appearance and impressive hair-holding capabilities.
How to Create:
- Part your hair down the middle from forehead to nape.
- Gather each section into a low ponytail behind each ear.
- Twist each ponytail and wrap it around its base to form a bun.
- Secure each bun with bobby pins and additional elastics if needed.
- Keep the buns relatively loose for a casual appearance or tight for a neater look.
- Pull out a few face-framing pieces for added softness.
Best For: Casual outings, festivals, creative environments
Time Required: 3 minutes
24. The Wrapped Low Ponytail
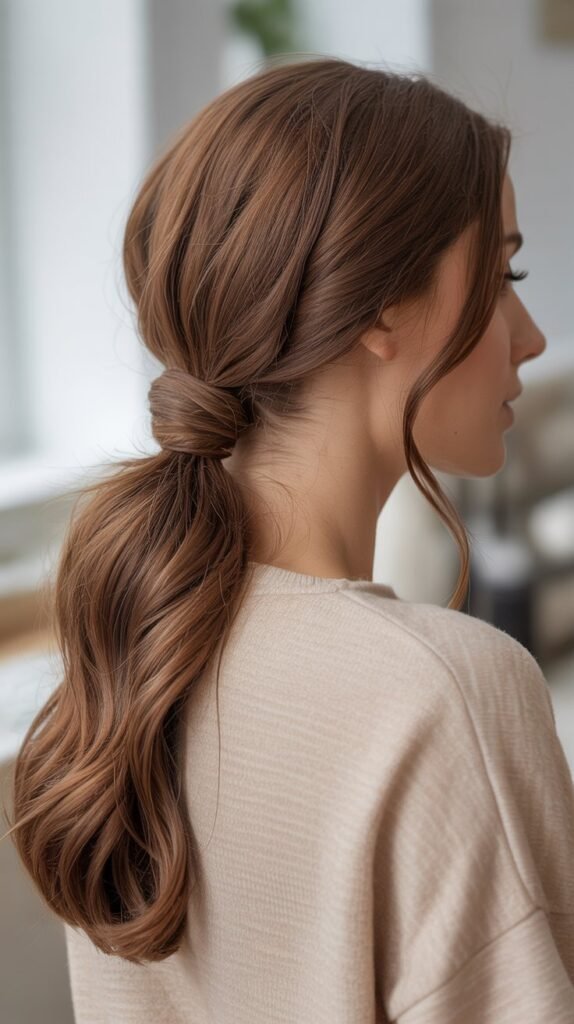
The wrapped low ponytail conceals the elastic with your own hair, creating a polished, sophisticated appearance.
This refined detail transforms a simple ponytail into an elegant style.
How to Create:
- Create a low ponytail at the nape of your neck and secure with an elastic.
- Take a small section of hair from the underside of the ponytail.
- Wrap this section around the elastic base, covering it completely.
- Secure the wrapped section with a bobby pin tucked underneath the ponytail.
- Apply smoothing serum to the wrapped section for a sleek finish.
- Ensure the wrap is tight and smooth for the most polished appearance.
Best For: Professional meetings, formal events, polished everyday looks
Time Required: 2 minutes
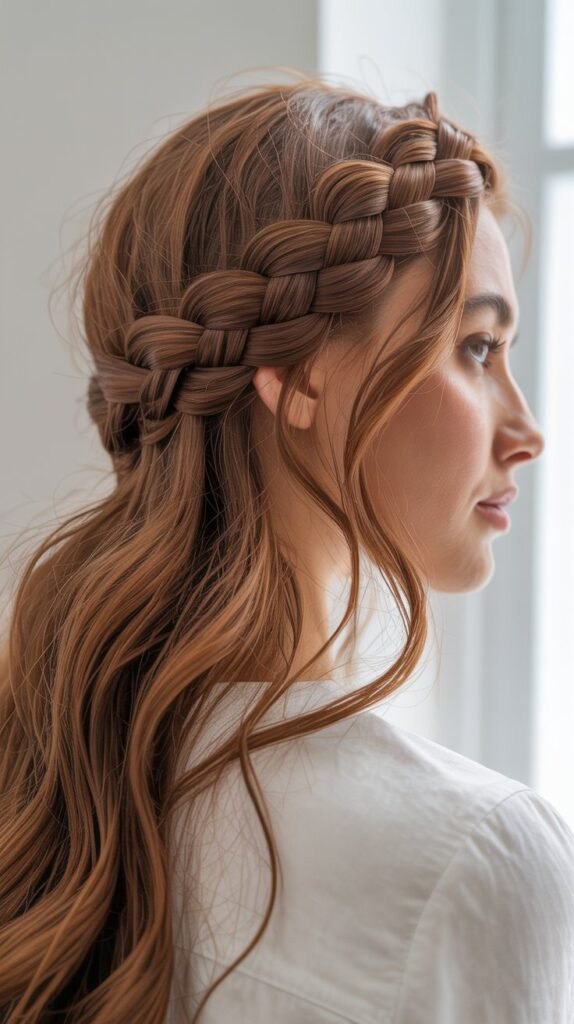
25. The Crown Braid with Loose Hair
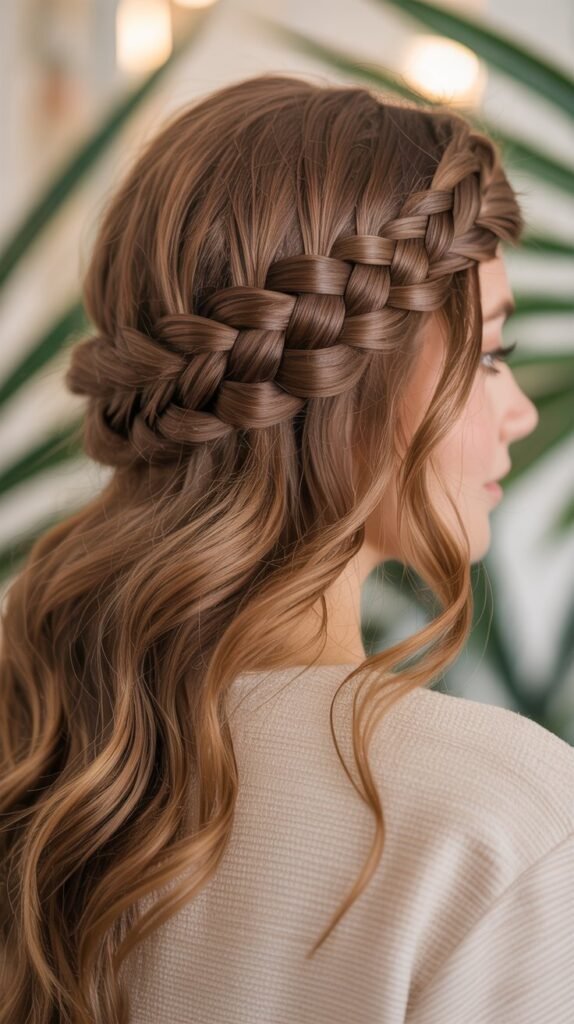
The crown braid creates a beautiful halo effect while leaving most of your hair down and flowing.
This romantic style works wonderfully for special occasions and everyday elegance alike.
How to Create:
- Part your hair on one side and begin braiding from behind one ear.
- Create a traditional three-strand braid that curves around your head like a crown.
- Continue braiding along your hairline, adding small sections as you go for a Dutch or French braid effect.
- When you reach the opposite ear, secure the braid with bobby pins.
- Leave the remaining length of your hair down and flowing freely.
- Gently pull at the crown braid to create fuller, more dimensional texture.
Best For: Weddings, garden parties, romantic occasions
Time Required: 5 minutes
26. The Quick Beach Waves with Salt Spray
Beach waves with salt spray create that coveted “just left the ocean” texture without any heat styling.
This effortless style is perfect for achieving casual, tousled waves in minimal time.
How to Create:
- Apply sea salt spray generously throughout damp or dry hair.
- Scrunch your hair upward in sections to encourage wave formation.
- Twist random sections of hair and hold briefly to create additional texture.
- Allow hair to air dry completely or use a diffuser on low heat.
- Once dry, separate waves with your fingers for a natural, lived-in appearance.
- Apply a small amount of texturizing cream to enhance definition and reduce frizz.
Best For: Summer days, casual events, everyday relaxed styling
Time Required: 3 minutes (plus drying time)
Essential Tools and Products
Having the right tools and products makes executing these styles significantly easier and ensures longer-lasting results.
Basic Tools You’ll Need:
- Quality hair elastics in various sizes and colors matching your hair
- Bobby pins in both blonde and brunette shades for secure holding
- A wide-tooth comb for detangling without breakage
- A fine-tooth comb for creating clean parts and smoothing sections
- Hair clips or sectioning clips for separating hair while styling
- A good paddle brush for smoothing and general brushing
Recommended Products:
- Heat protectant spray for any styles involving hot tools
- Texturizing or sea salt spray for adding grip and volume
- Light to medium hold hairspray for setting finished styles
- Smoothing serum or oil for controlling frizz and adding shine
- Dry shampoo for adding volume and extending time between washes
- Hair ties specifically designed to prevent breakage and creasing
Tips for Making These Styles Last All Day
Creating a beautiful hairstyle in minutes is wonderful, but ensuring it stays intact throughout your day requires a few strategic techniques.
Pre-Styling Preparation:
- Start with second-day hair when possible, as freshly washed hair can be too slippery for many updos and braided styles.
- Apply dry shampoo at the roots before styling to add grip and texture that helps styles hold better.
- Use appropriate products for your hair type—fine hair needs volumizing products while thick hair benefits from smoothing formulas.
During Styling:
- Don’t skimp on bobby pins—using enough pins strategically placed ensures your style won’t fall apart.
- Cross bobby pins in an X formation for maximum holding power in buns and updos.
- Always smooth flyaways with a small amount of product rather than trying to pin every single hair.
Finishing Touches:
- Apply hairspray from at least 10 inches away to avoid creating crunchy or sticky spots.
- Use a light misting technique rather than heavy application for natural-looking hold.
- Carry a few extra bobby pins and a small hair elastic in your bag for quick touch-ups throughout the day.
Adapting Styles for Different Hair Types
Not all hair types respond the same way to every styling technique, and understanding your hair’s unique characteristics helps you adapt these styles for best results.
For Fine Hair:
- Apply volumizing mousse before styling to create fuller-looking results.
- Tease roots gently before creating updos to prevent flat, lifeless styles.
- Use smaller sections when braiding to create more substantial-looking braids.
- Opt for textured, messy styles rather than sleek looks that can emphasize thinness.
For Thick Hair:
- Use strong-hold elastics specifically designed for thick hair to prevent breakage.
- Section hair into multiple parts when creating ponytails to ensure all hair is captured smoothly.
- Allow extra time for heat styling as thick hair requires more passes with hot tools.
- Consider creating styles on slightly damp hair, then allowing them to dry in place for better hold.
For Curly or Textured Hair:
- Work with your natural texture rather than fighting it—embrace the volume curls provide.
- Use more bobby pins than you think necessary, as curly hair has more movement.
- Apply leave-in conditioner before styling to prevent frizz and maintain definition.
- Avoid brushing dry curly hair, which creates frizz; instead, detangle while wet with fingers or a wide-tooth comb.
Common Mistakes to Avoid
Even simple hairstyles can go wrong when certain mistakes are made, but awareness of these common pitfalls helps you achieve better results.
Styling Errors:
- Using too much product, which weighs hair down and creates a greasy appearance rather than enhancing your style.
- Pulling hair too tight, especially around the hairline, which can cause breakage and headaches.
- Forgetting to secure buns and updos at multiple points, leading to styles that fall apart within hours.
- Creating styles on hair that’s too clean and slippery, making it difficult to achieve texture and hold.
Tool-Related Issues:
- Using the wrong size elastic for your hair thickness, resulting in either hair breakage or insufficient hold.
- Inserting bobby pins in the wrong direction—they should go against the direction hair naturally falls for maximum grip.
- Not allowing hot tools to fully heat up, which requires multiple passes and increases heat damage.
- Using damaged or snagging hair elastics that catch and break individual strands.
Timing Mistakes:
- Rushing through the style without proper sectioning, creating uneven or messy results.
- Applying hairspray too early in the process, making hair stiff and difficult to manipulate.
- Not testing a new style before an important event, potentially leading to frustration and poor results when time is limited.
Seasonal Adaptations
Different seasons call for different styling approaches, and adapting these hairstyles to weather conditions ensures they remain practical and beautiful year-round.
Summer Styling:
- Prioritize updos and braids that keep hair completely off your neck in hot, humid weather.
- Use anti-humidity products to prevent frizz in moisture-heavy environments.
- Embrace textured, beachy styles that work with rather than against summer humidity.
- Apply UV protection products to prevent sun damage to hair.
Winter Styling:
- Combat static electricity by applying leave-in conditioner or hair oil before styling.
- Choose styles that accommodate hats and scarves without becoming completely destroyed.
- Use more moisturizing products as indoor heating creates dry, brittle hair.
- Opt for lower ponytails and buns that won’t interfere with winter accessories.
Spring and Fall Transitions:
- Adjust product usage as humidity levels change with the seasons.
- Experiment with new styles as weather becomes more moderate and comfortable.
- Use these transitional seasons to try more intricate styles that might be too hot for summer or too cold for winter.
From Day to Night Transformations
Many of these quick hairstyles can be easily transformed from professional day looks to evening glamour with just a few simple adjustments.
Ponytail to Evening Updo:
- Start with a sleek ponytail for daytime professionalism.
- In the evening, twist the ponytail and pin it into an elegant bun.
- Pull out a few face-framing pieces and add a decorative hair accessory for instant glamour.
Simple Waves to Dramatic Side Sweep:
- Wear loose waves down during the day for casual elegance.
- For evening, create a deep side part and sweep everything to one shoulder.
- Pin the hair behind one ear with decorative bobby pins or a jeweled clip.
Half-Up to Full Updo:
- Begin with a simple half-up style for daytime activities.
- Gather the remaining bottom section and twist it into the existing half-up portion.
- Secure everything together for a complete updo suitable for evening events.
Hairstyles for Special Occasions
While all these styles work for everyday wear, certain looks shine particularly bright for special events and celebrations.
Wedding Guest Styles:
- Crown braids with loose flowing hair create romantic, photo-ready looks.
- Twisted side buns offer elegance without competing with the bride’s styling.
- Side swept waves provide glamour appropriate for formal celebrations.
Professional Interviews:
- Sleek low ponytails project competence and polish.
- Classic low buns demonstrate professionalism and attention to detail.
- Neat half-up styles show personality while maintaining workplace appropriateness.
Date Night Options:
- Loose waves create effortlessly romantic appeal.
- Side fishtail braids offer bohemian charm and conversation-starting detail.
- Messy top knots balance casual confidence with feminine softness.
Long hair opens up a world of styling possibilities, and these 26 Best Hairstyles for Long Hair You Can Do in Minutes prove that beautiful hair doesn’t require hours of preparation or professional expertise.
From elegant updos perfect for business meetings to romantic braids ideal for special occasions, you now have a comprehensive toolkit of quick, achievable styles for every situation.
The key to mastering these looks lies in practice—start with the simplest styles and gradually work toward more complex techniques as your confidence grows.
Remember that even the most intricate-looking hairstyles become second nature with repetition, and soon you’ll find yourself creating stunning looks in just minutes each morning.
Whether you’re rushing to work, preparing for a special event, or simply want to feel more polished in your everyday life, these versatile hairstyles ensure your long hair always looks intentional, beautiful, and effortlessly chic.
