
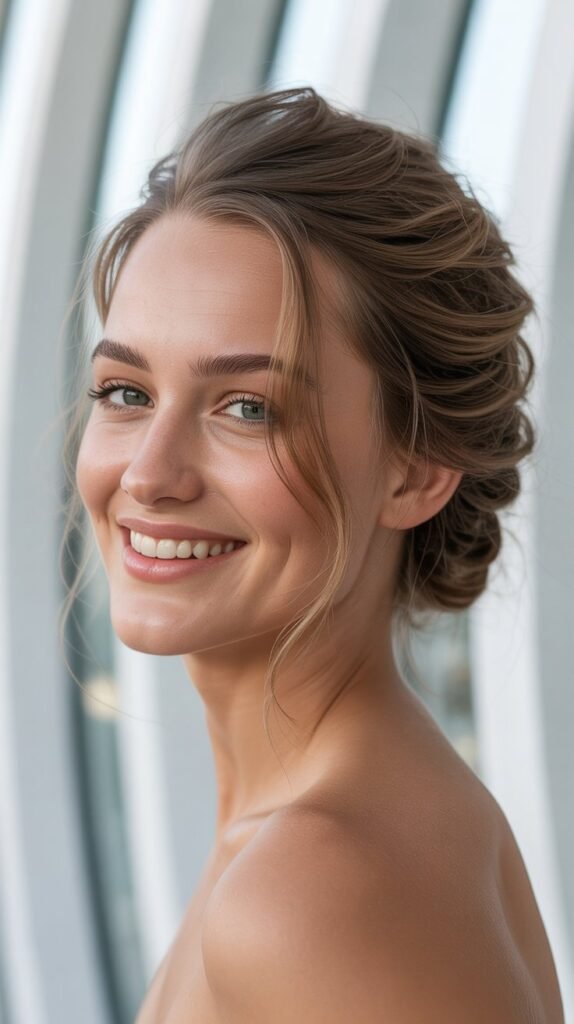
Prom night stands as one of the most memorable evenings in a young woman’s life, and your hairstyle can make all the difference between looking good and looking absolutely unforgettable.
When you have long hair, the possibilities are endless, yet choosing the perfect style can feel overwhelming with so many gorgeous options available.
This comprehensive guide to 33 Stunning Prom Hairstyles for Long Hair That Turn Heads will walk you through classic elegance, modern trends, romantic waves, intricate braids, and show-stopping updos that complement every dress style and face shape.
Whether you prefer timeless Hollywood glamour, bohemian braids, or sleek contemporary looks, you’ll discover detailed styling tips, maintenance advice, and expert recommendations to ensure your hair looks flawless from the first photo to the last dance.
Get ready to find your dream prom hairstyle that will have everyone asking who did your hair.
1. Classic Hollywood Waves
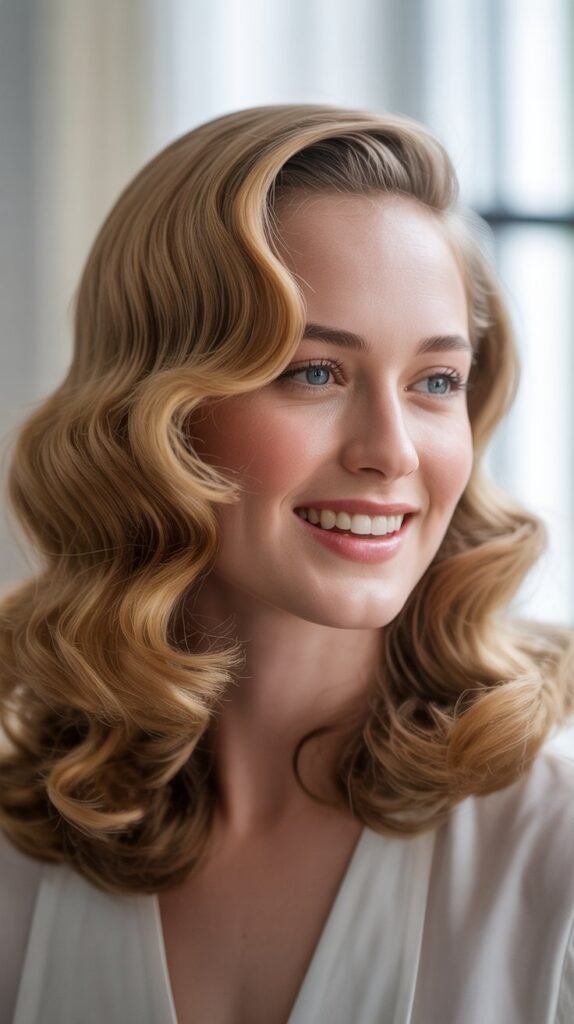
Hollywood waves have graced red carpets for decades and remain one of the most sophisticated choices for prom night.
This timeless style features deep, glossy waves that cascade over the shoulders with old-world glamour and modern appeal.
The look works beautifully with strapless gowns, one-shoulder dresses, and creates an instant aura of elegance that photographs beautifully.
Key Features:
- Deep S-shaped waves that start mid-length
- High shine finish for maximum impact
- Side-swept styling for dramatic effect
- Works best on hair past shoulder length
- Requires heat styling tools and strong-hold products
Styling Process:
- Begin with freshly washed and completely dried hair to create the perfect foundation
- Apply a heat protectant spray generously from roots to ends to prevent damage
- Use a 1.5-inch curling iron to create large barrel curls in uniform sections
- Pin each curl immediately after curling and allow to cool completely for lasting hold
- Once all curls have cooled, gently brush through with a paddle brush to create waves
- Apply a shine serum to enhance the glossy, polished appearance
- Finish with strong-hold hairspray to maintain the style throughout the night
Best Face Shapes: Oval, heart-shaped, and square faces benefit most from the softening effect of these waves.
Maintenance Tips:
- Touch up with a curling iron if waves begin to fall
- Carry a small bottle of shine serum for quick refreshes
- Avoid touching your hair excessively to prevent frizz
- Use bobby pins strategically to keep the side-swept portion in place
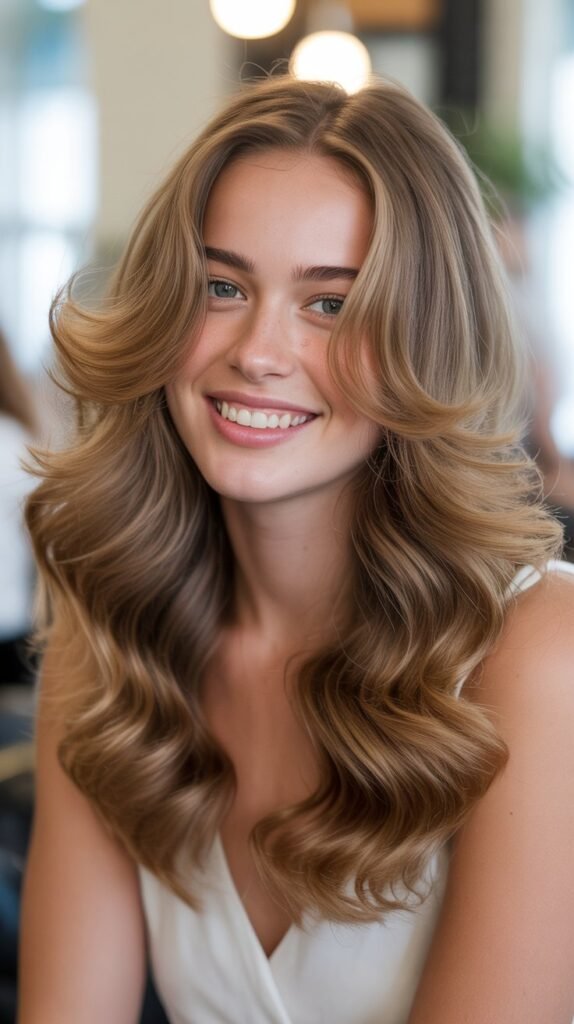
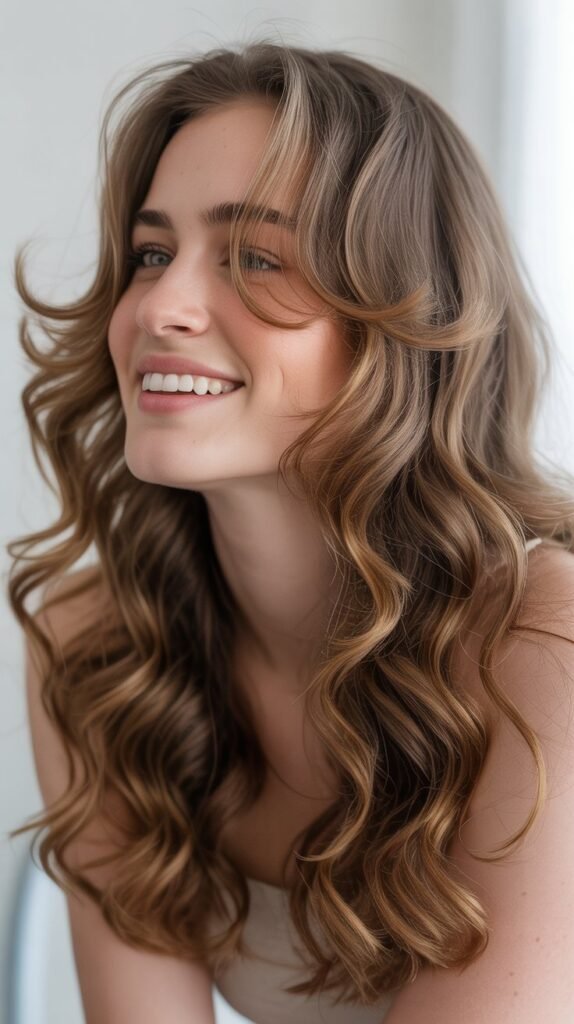
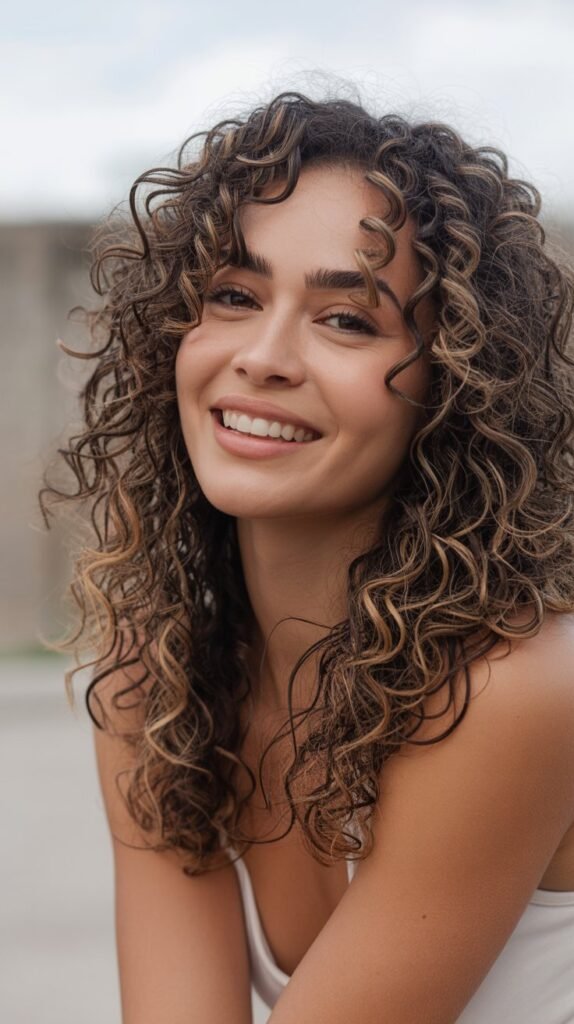
2. Romantic Loose Curls
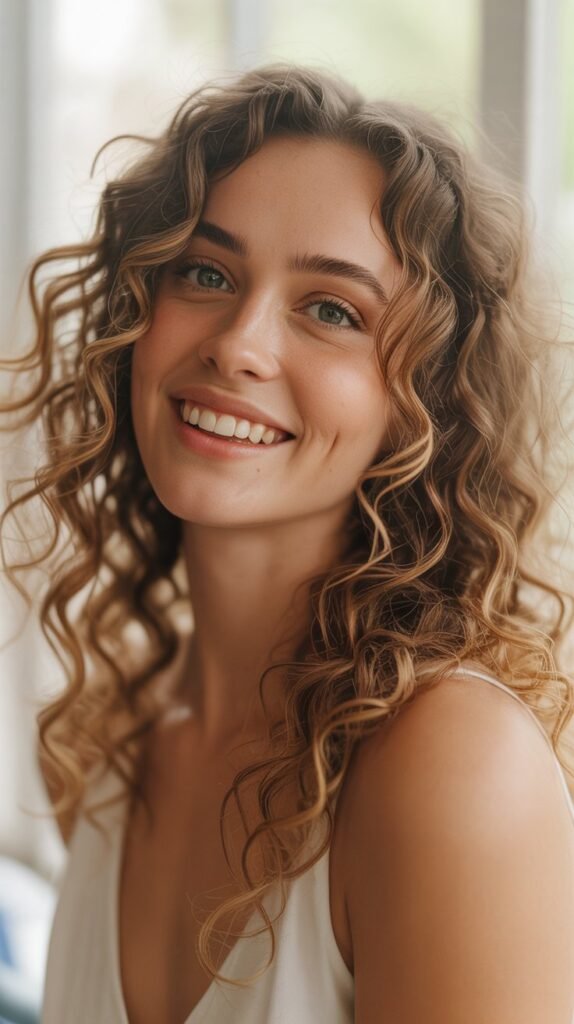
Romantic loose curls offer an effortless, dreamy aesthetic that perfectly balances casual elegance with formal sophistication.
This versatile style features soft, bouncy curls that move naturally and create a youthful, feminine appearance ideal for prom.
The relaxed nature of these curls means they work with virtually any dress style and provide comfort throughout the evening.
Styling Approach:
- Start with second-day hair or apply texturizing spray to clean hair for better hold
- Divide hair into large sections approximately 2-3 inches wide for natural-looking curls
- Use a 1.25 to 1.5-inch curling wand, wrapping hair around the barrel loosely
- Alternate the direction of curls for a more organic, dimensional appearance
- Allow curls to cool before gently separating them with your fingers
- Spray with a flexible-hold hairspray to maintain movement while preventing frizz
- Add a decorative hair accessory like a jeweled clip for extra sparkle
Advantages:
- Forgiving style that hides minor imperfections
- Comfortable to wear for extended periods
- Easy to touch up throughout the evening
- Complements both simple and elaborate dress designs
- Suitable for all hair types with proper preparation
Product Recommendations:
- Volumizing mousse for fine hair
- Curl-defining cream for thick hair
- Lightweight texturizing spray for hold without stiffness
- Anti-humidity spray for outdoor venues
3. Sleek High Ponytail
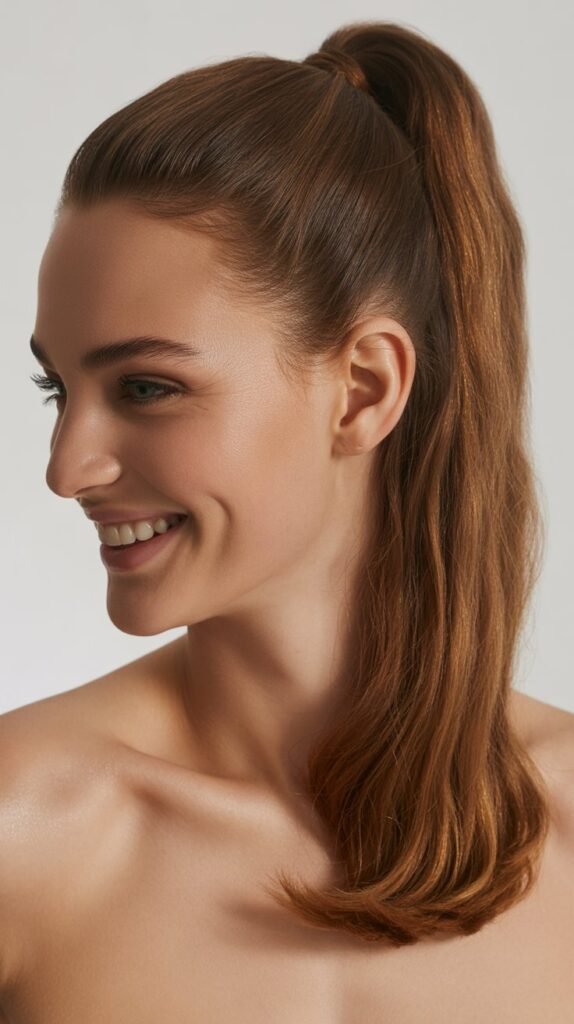
The sleek high ponytail delivers modern sophistication with a powerful, confident vibe that commands attention.
This contemporary style showcases facial features beautifully while keeping hair completely off the shoulders for dancing comfort.
The high placement creates an illusion of added height and works exceptionally well with statement earrings and off-shoulder gowns.
Creation Steps:
- Wash hair with smoothing shampoo and conditioner to eliminate frizz potential
- Blow-dry hair straight using a paddle brush and directing heat downward along the hair shaft
- Apply a smoothing serum or cream to tame flyaways and add shine
- Brush hair upward to the crown area using a boar bristle brush for smoothness
- Secure with a strong elastic band at the desired height on the crown
- Take a small section of hair from the ponytail and wrap around the elastic to conceal it
- Secure the wrapped section with a bobby pin underneath the ponytail
- Apply hairspray and use a soft toothbrush to smooth down any baby hairs or flyaways
- Optional: add hair extensions to the ponytail for extra length and volume
Styling Variations:
- Wrap the ponytail around a curling iron for added volume and movement
- Keep completely straight for ultra-modern minimalism
- Add a braided section along the hairline before gathering into the ponytail
- Incorporate a decorative hair wrap or ribbon around the base
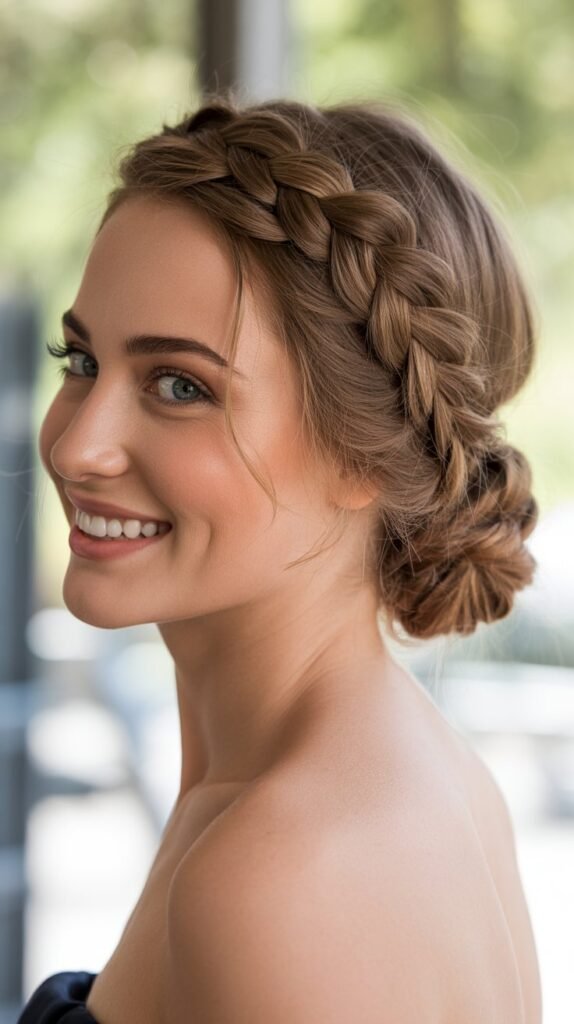
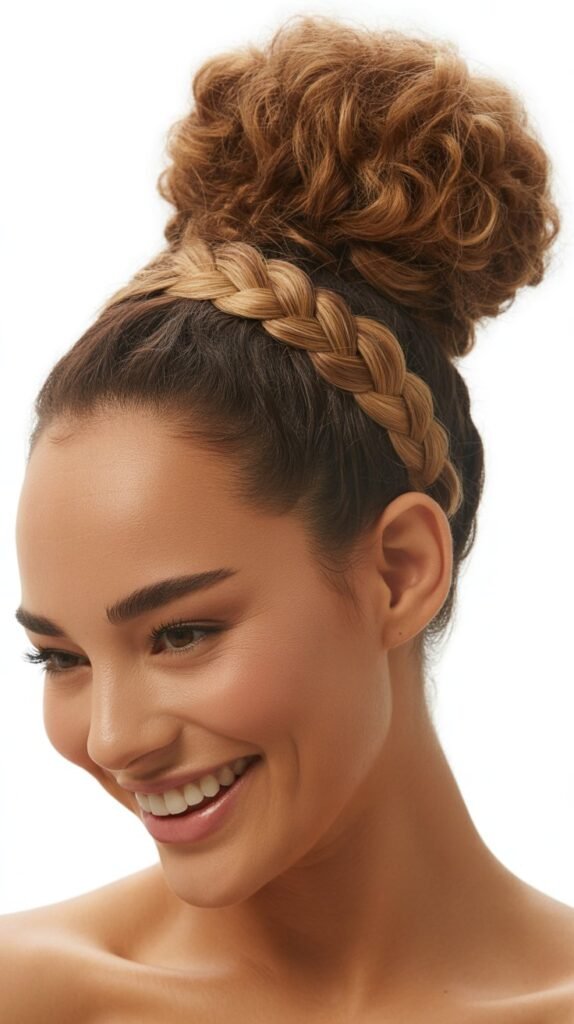
4. Braided Crown Updo
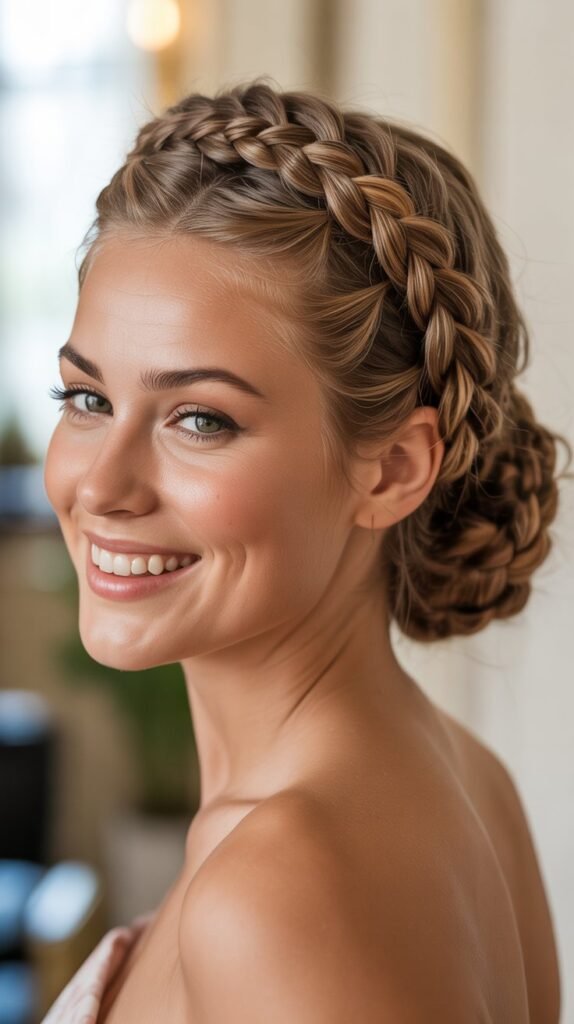
The braided crown updo combines intricate braiding technique with romantic elegance, creating a regal appearance fit for prom royalty.
This style features braids that wrap around the head like a crown while incorporating the remaining hair into a sophisticated updo.
The look offers both visual interest and practical comfort for an evening of celebration.
Construction Method:
- Part hair down the center from forehead to nape for symmetry
- Begin a Dutch braid on one side starting at the temple area
- Continue braiding along the hairline toward the back of the head
- Repeat the Dutch braid on the opposite side to create the crown effect
- Meet both braids at the back and secure temporarily
- Gather remaining loose hair and create a low bun or twisted updo
- Incorporate the braid ends into the base of the updo for seamless integration
- Secure with bobby pins strategically placed for maximum hold
- Pull gently on the braid sections to create fuller, more dimensional braids
- Finish with strong-hold hairspray and add decorative pins if desired
Technical Considerations:
- Practice the braiding pattern several times before prom night
- Use clear elastic bands to maintain a cohesive look
- Consider having a professional stylist create this intricate style
- Factor in approximately 45-60 minutes for completion
5. Half-Up Half-Down with Twists

The half-up half-down style with twists perfectly balances showcasing your long hair while keeping it manageable and elegant.
This versatile option adds dimension through twisted sections that create visual interest without requiring complex braiding skills.
The style flatters virtually every face shape and works beautifully with any dress neckline.
Assembly Instructions:
- Create a deep side part or center part based on personal preference
- Take a 2-inch section of hair from one side of the part near the temple
- Twist this section backward toward the crown while keeping it relatively tight
- Secure the twisted section at the back of the head with bobby pins
- Repeat the twisting process on the opposite side of the head
- Cross the second twist over the first for added texture and security
- Leave the remaining hair down in natural waves or curls
- Pull out a few face-framing pieces for a softer, romantic effect
- Set the style with flexible-hold hairspray to maintain structure
Enhancement Options:
- Add small pearl pins along the twisted sections for sparkle
- Curl the lower portion of hair for added glamour
- Backcomb the crown area before twisting for extra volume
- Incorporate small flowers into the twisted sections for bohemian appeal
Suitable Occasions: This adaptable style transitions beautifully from prom photos to dancing without losing its shape.
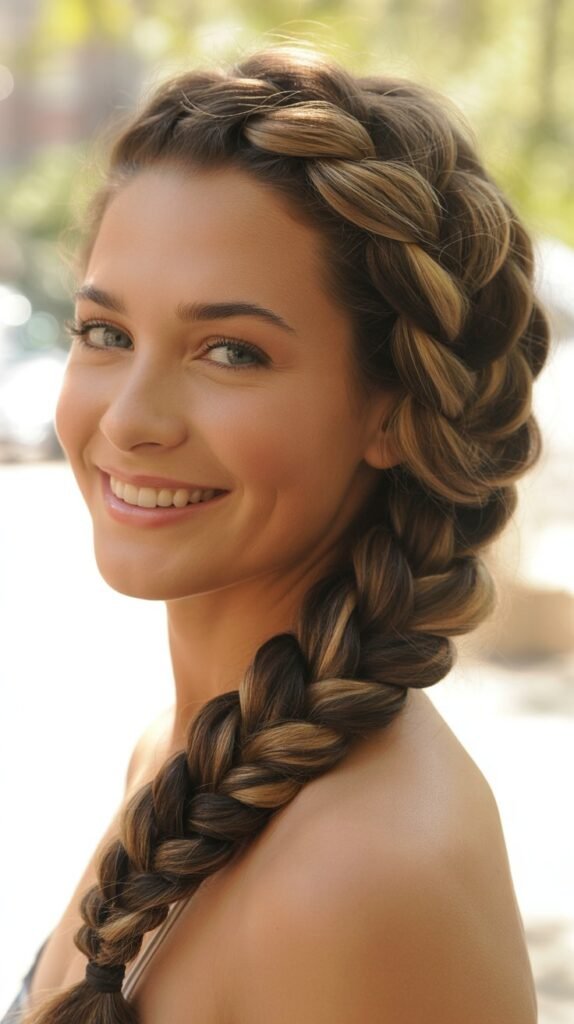
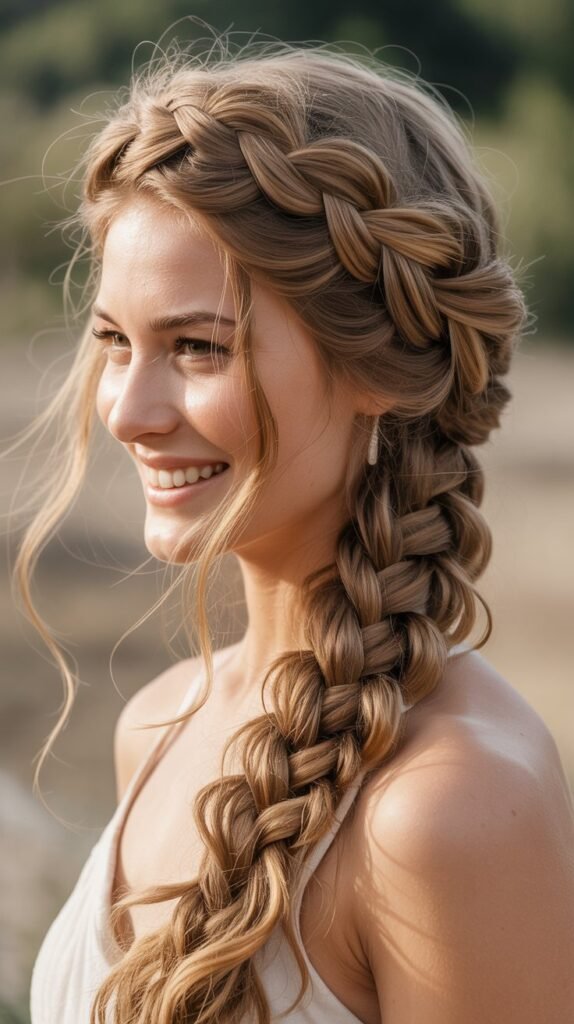
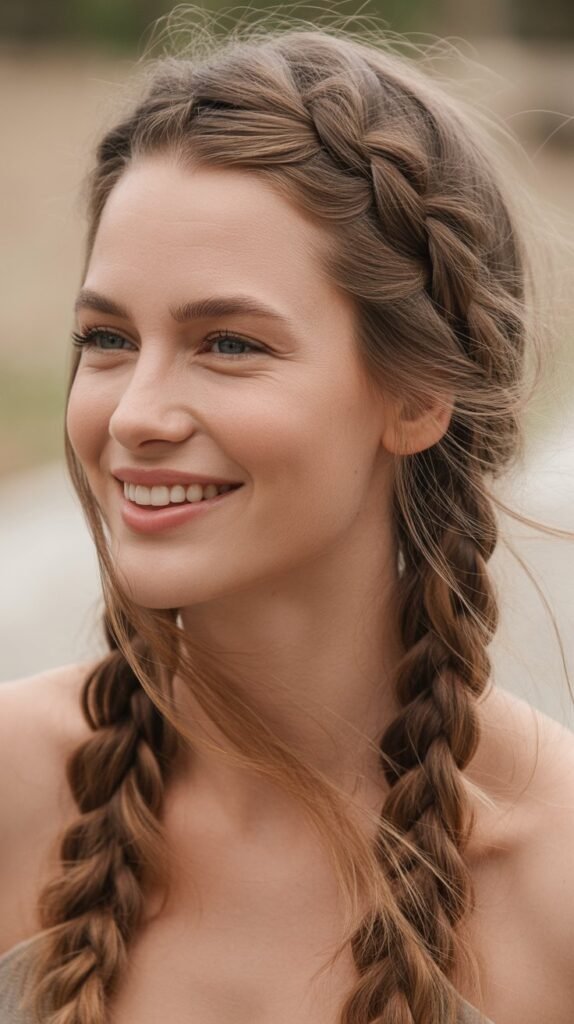
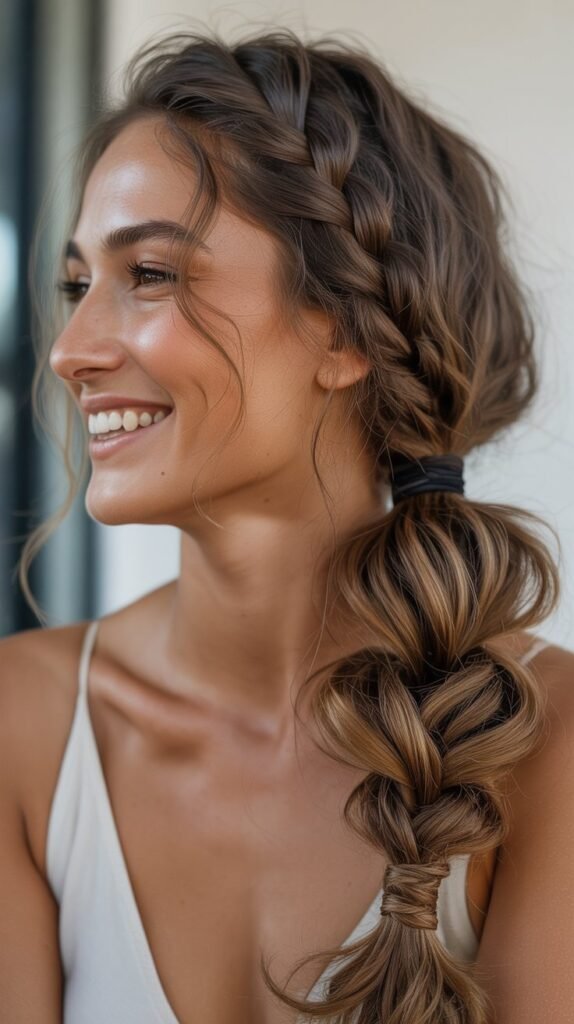
6. Fishtail Braid Down the Back
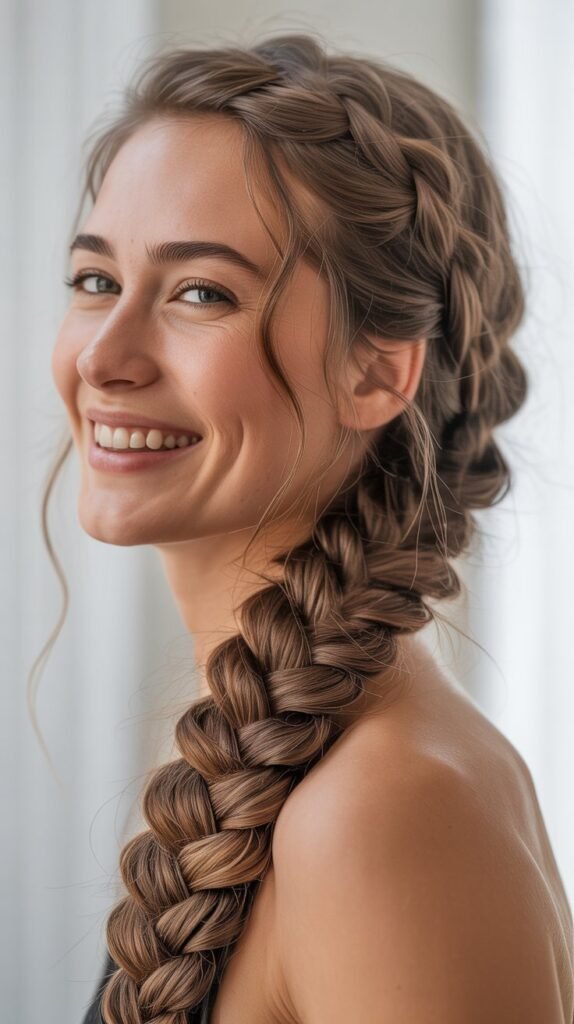
A single fishtail braid cascading down the back creates an intricate, textured look that appears more complex than the actual technique requires.
This bohemian-inspired style showcases the length and beauty of long hair while providing an artistic, eye-catching element.
The fishtail pattern catches light beautifully and photographs exceptionally well from all angles.
Braiding Technique:
- Brush hair thoroughly to remove all tangles and knots
- Apply a light texturizing spray for grip and to prevent slipping
- Divide all hair into two equal sections at the nape
- Take a thin strand from the outer edge of the left section
- Cross it over to join the right section
- Take a thin strand from the outer edge of the right section
- Cross it over to join the left section
- Continue this alternating pattern down the entire length of hair
- Secure the end with a clear or matching elastic band
- Gently pull apart the braid sections to create a fuller, more voluminous appearance
- Apply a light mist of hairspray to set the style
Variation Ideas:
- Start the fishtail braid from the crown for a completely braided look
- Create a side-swept fishtail braid over one shoulder
- Leave the top section loose and begin the fishtail at mid-length
- Incorporate ribbon or chain accessories woven through the braid
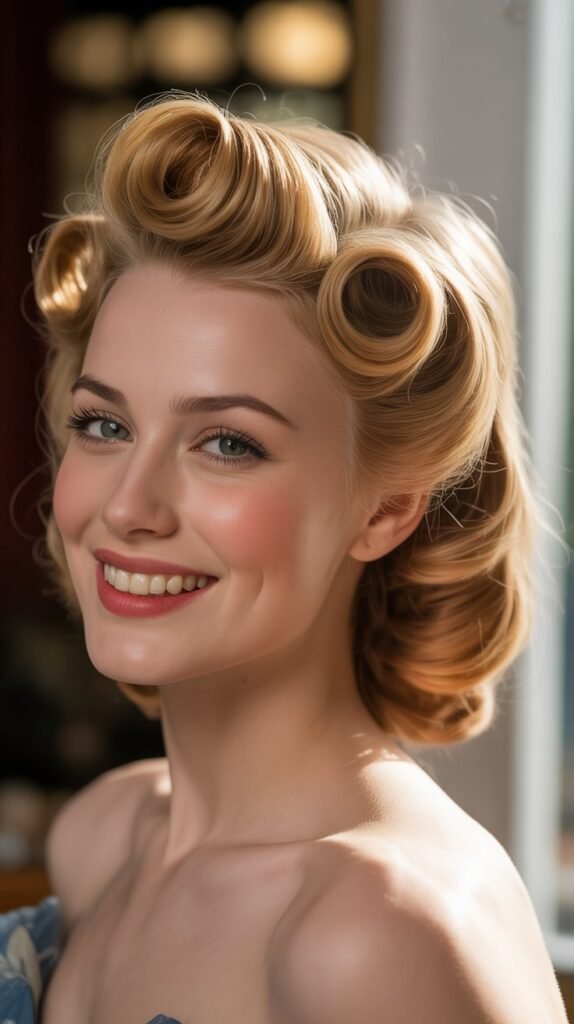
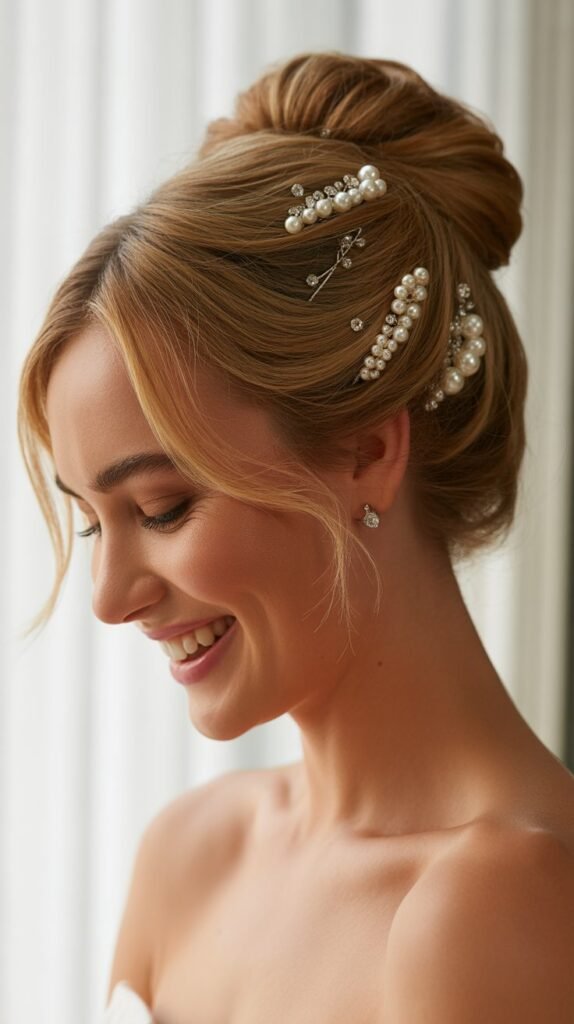
7. Vintage Pin Curls Updo
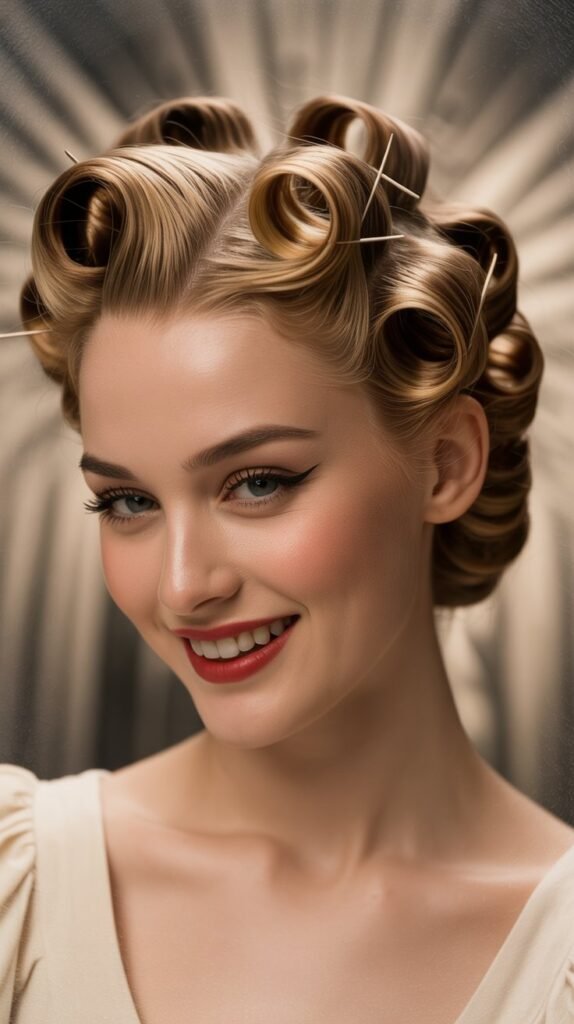
Vintage pin curls arranged into an updo transport you back to the glamorous 1940s and 1950s with authentic period styling.
This sophisticated approach creates structured, uniform curls pinned into place to form an intricate updo that exudes old-world elegance.
The style works magnificently with vintage-inspired prom dresses and creates a cohesive, themed appearance.
Period-Accurate Creation:
- Set hair in pin curls the night before using setting lotion for authentic texture
- Allow pin curls to dry completely before removing pins
- Gently separate curls with fingers without brushing to maintain definition
- Begin pinning curls in organized rows starting from the nape upward
- Use the natural curl formation to create waves and swoops characteristic of the era
- Secure each curl section with crossed bobby pins for maximum security
- Create a defined crown area with larger, more prominent curl formations
- Finish with a vintage-style hair net for authenticity and hold
- Apply strong-hold hairspray generously to preserve the style
Authentic Touches:
- Add a decorative hair comb or brooch typical of the vintage era
- Use victory roll techniques at the hairline for added period detail
- Consider finger waves along the front sections
- Match your makeup to the vintage aesthetic for complete coordination
8. Waterfall Braid with Curls
The waterfall braid technique creates the illusion of hair cascading through a braid like a waterfall while maintaining romantic curls throughout.
This ethereal style combines the structure of braiding with the softness of loose curls for a magical, princess-like appearance.
The complexity of the design ensures you’ll receive compliments all evening.
Waterfall Technique:
- Start with the hair pre-curled for the complete effect
- Begin a French braid at one temple area
- Instead of incorporating all three sections continuously, drop the bottom section after each crossover
- Pick up a new section to replace the dropped piece and continue the braid
- The dropped sections become the “waterfall” cascading through the braid
- Continue the waterfall pattern across the back of the head
- Secure the braid end behind the opposite ear with bobby pins
- Ensure the dropped sections are prominently curled and defined
- Spray with flexible-hold hairspray to maintain both braid and curl definition
Complexity Level: Intermediate to advanced; consider professional assistance for perfection.
Styling Duration: Approximately 30-45 minutes depending on hair thickness and length.
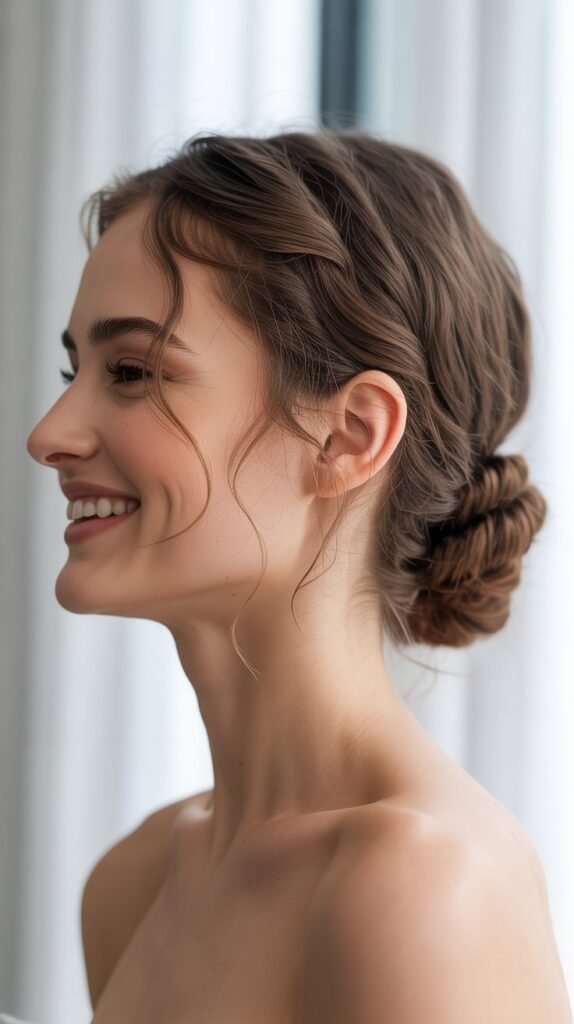
9. Low Chignon with Face-Framing Pieces
The low chignon represents timeless sophistication with its elegant bun positioned at the nape of the neck.
This refined updo keeps hair completely secured while maintaining an air of grace and polish perfect for formal occasions.
Face-framing pieces soften the overall look and prevent the style from appearing too severe or dated.
Professional Assembly:
- Create a deep side part to add asymmetry and modern appeal
- Pull out thin sections on both sides of the face before gathering hair
- Smooth remaining hair back to the nape using a boar bristle brush
- Twist the ponytail into a rope-like formation
- Wrap the twisted hair around its base to form a circular bun shape
- Tuck the ends underneath and secure with multiple bobby pins in a crisscross pattern
- Curl the face-framing pieces away from the face with a small curling iron
- Apply smoothing serum to the pulled-back sections for sleek appearance
- Finish with strong-hold hairspray and insert decorative pins if desired
Advantages of This Style:
- Showcases jewelry and dress neckline beautifully
- Extremely comfortable for all-night wear
- Highly secure and resistant to falling or loosening
- Appropriate for the most formal prom settings
- Emphasizes facial features and bone structure
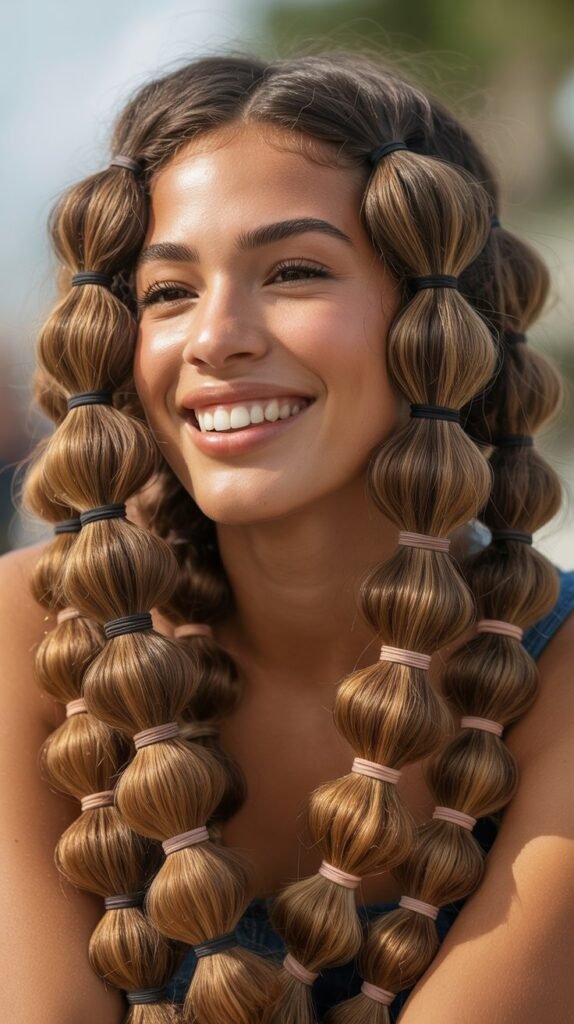
10. Bubble Ponytail
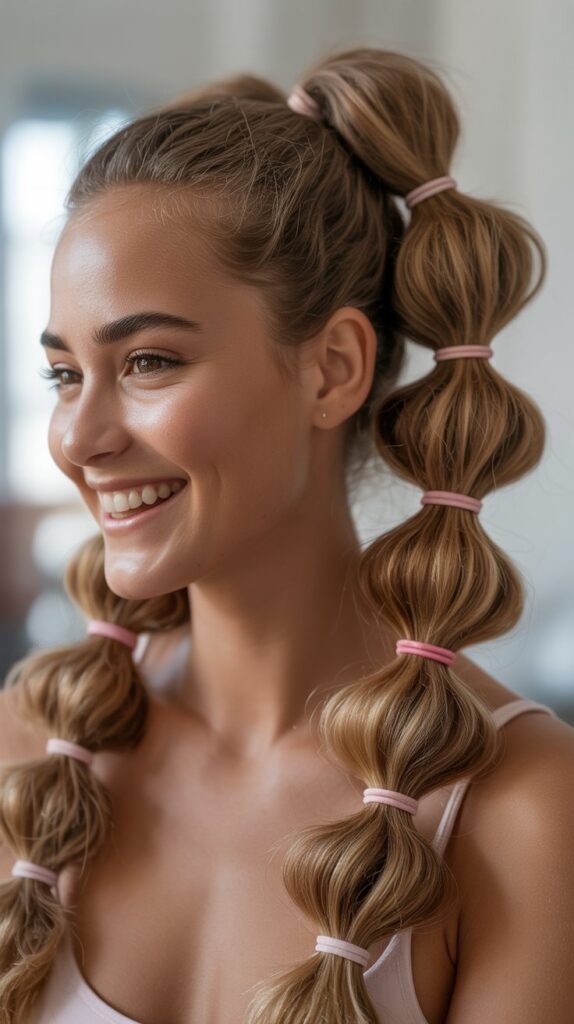
The bubble ponytail transforms a basic ponytail into a playful, dimensional style through strategic elastic placement.
This trendy, Instagram-worthy look adds volume and visual interest while remaining surprisingly practical and secure.
The modern aesthetic appeals to those seeking contemporary style rather than traditional prom looks.
Bubble Creation Process:
- Gather hair into a high or mid-level ponytail at the desired placement
- Secure the base with a strong elastic band
- Move down 2-3 inches and add another elastic band around the ponytail
- Gently pull apart the hair between the two elastics to create a “bubble” shape
- Continue adding elastics every 2-3 inches down the entire ponytail length
- Create bubbles between each elastic section by carefully pulling hair outward
- Ensure each bubble is similar in size for uniformity
- Spray each bubble section with hairspray as you create it for lasting hold
- Consider wrapping small sections of hair around each elastic for a polished look
Modern Variations:
- Use colorful elastics that coordinate with your dress
- Add glitter spray to each bubble section for extra sparkle
- Combine with a braided section leading into the ponytail
- Create asymmetrical bubbles for an edgier appearance
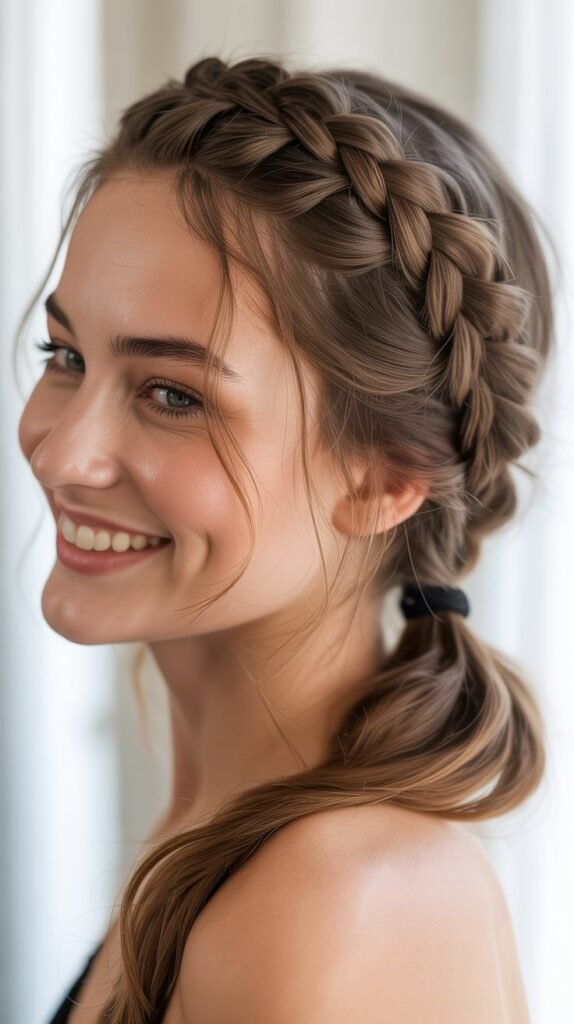
11. Dutch Braid Into Low Bun
Combining a Dutch braid with a low bun creates an elegant style that offers both intricate detail and classic sophistication.
The Dutch braid adds texture and visual interest while leading seamlessly into a refined bun that keeps hair secure.
This combination style works beautifully for formal prom settings and photographs exceptionally well.
Integration Technique:
- Begin a Dutch braid at the crown by taking three sections of hair
- Cross the side sections under the middle section rather than over
- Continue adding hair to each section as you braid downward
- Maintain consistent tension for a neat, uniform braid appearance
- Stop adding new hair when you reach the nape area
- Complete a regular three-strand braid with the remaining length
- Wrap the braided section around itself to form a circular bun
- Secure the bun with bobby pins inserted at various angles for stability
- Tuck any loose ends into the bun for a clean finish
- Apply hairspray and add decorative elements if desired
Best Attributes:
- Combines two popular techniques into one cohesive style
- Provides excellent hold that lasts through extended wear
- Showcases the hair’s texture and dimension
- Appropriate for all prom dress styles and themes
12. Side-Swept Curls with Hair Jewelry

Side-swept curls adorned with hair jewelry combine Old Hollywood glamour with modern embellishment trends.
This dramatic style features all hair swept to one side in cascading curls while strategically placed hair jewelry adds sparkle and personalizes the look.
The asymmetrical styling creates visual intrigue and works beautifully with strapless or one-shoulder gowns.
Dramatic Creation:
- Curl all hair in uniform sections using a consistent barrel size
- Create a deep side part extending from the front hairline to the crown
- Sweep all hair to the heavier side of the part
- Use bobby pins to secure hair behind the opposite ear
- Arrange curls over the shoulder on the heavy side for maximum impact
- Insert hair jewelry pieces along the part line or throughout the curls
- Consider jeweled bobby pins, decorative combs, or hair vines
- Ensure jewelry coordinates with dress embellishments and jewelry
- Apply strong-hold hairspray to maintain the side-swept position
- Keep one side sleek and pinned while the other showcases volume
Jewelry Selection Tips:
- Choose pieces that complement rather than compete with your dress
- Silver-toned jewelry suits cool-toned dresses and skin
- Gold-toned pieces enhance warm color palettes
- Consider pearl accents for classic elegance
13. Twisted Rope Braid
The twisted rope braid offers a unique alternative to traditional three-strand braiding with its elegant, spiral appearance.
This technique creates a sophisticated, textured look that appears intricate while actually being simpler to execute than complex braiding patterns.
The rope-like structure catches light beautifully and provides a distinctive style element.
Rope Twist Method:
- Divide all hair into two equal sections at the nape
- Twist the right section clockwise until it forms a tight rope
- Twist the left section clockwise in the same direction
- Cross the right twisted section over the left section counter-clockwise
- The key is twisting sections in one direction while crossing in the opposite direction
- Continue this pattern of twisting individual sections clockwise and crossing counter-clockwise
- The braid will naturally form a rope-like spiral appearance
- Secure the end with an elastic band when reaching desired length
- Gently pull on the rope sections to add width and dimension
- Apply hairspray to prevent the twists from loosening
Positioning Options:
- Center rope braid down the back for traditional placement
- Side rope braid over one shoulder for asymmetrical appeal
- Multiple smaller rope braids combined for textured effect
14. Voluminous Blowout
A voluminous blowout creates big, bouncy hair with maximum body and movement that embodies confidence and glamour.
This salon-quality style focuses on root lift and overall volume while maintaining a polished, finished appearance.
The luxurious fullness makes a statement without requiring intricate styling techniques.
Volume-Building Process:
- Begin with freshly washed hair to ensure maximum lift potential
- Apply volumizing mousse to damp hair, focusing on the roots
- Blow-dry hair in sections using a round brush for tension and lift
- Direct heat at the roots while lifting hair upward and away from the scalp
- Roll ends under or outward depending on desired finish
- Once completely dry, flip head upside down and blast roots with heat
- Use fingers to massage scalp and lift roots for additional volume
- Apply dry texturizing spray throughout for lasting fullness
- Flip hair back over and arrange into desired style
- Finish with flexible-hold hairspray that won’t weigh down the volume
Longevity Tips:
- Use volumizing powder at roots for extended lift
- Avoid touching hair excessively as oils can deflate volume
- Carry dry shampoo for quick root refreshes throughout the evening
- Consider strategic teasing at the crown for added height
15. Braided Mohawk Updo
The braided mohawk updo brings edgy sophistication to prom styling with its bold, fashion-forward design.
This daring style features Dutch braids along both sides of the head that meet at the center, creating a mohawk effect while keeping hair elegantly secured.
The look perfectly suits confident individuals seeking to make a memorable impression.
Edgy Construction:
- Part hair down the center from forehead to nape in a precise line
- Begin a Dutch braid on the right side starting at the temple
- Keep the braid close to the center part for mohawk effect
- Continue braiding down to the nape and secure temporarily
- Repeat the Dutch braid process on the left side
- Both braids should run parallel along the center parting
- Gather remaining hair at the crown between the two braids
- Tease the center section for height and volume
- Pin the center section upward to create the mohawk appearance
- Secure both side braids at the nape and tuck ends under
- Apply strong-hold hairspray and add edge with accessories
Personality Match: This style suits bold, confident personalities and alternative dress styles.
16. Soft Romantic Updo
The soft romantic updo embodies femininity and grace through loosely gathered hair, delicate tendrils, and intentionally imperfect placement.
This dreamy style creates an ethereal, garden-party aesthetic perfect for spring proms and outdoor venues.
The deliberately relaxed construction ensures comfort while maintaining elegant sophistication.
Romantic Assembly:
- Start with hair that has natural texture or add waves with a curling iron
- Pull out several thin face-framing pieces before gathering
- Loosely gather hair at the nape without using a brush for natural texture
- Twist gathered hair into a loose, messy bun shape
- Secure with bobby pins placed strategically but not too tightly
- Allow pieces to fall naturally rather than forcing perfection
- Pull a few strands from the bun to create additional texture
- Curl any loose tendrils for consistency
- Add small flowers, baby’s breath, or pearl pins for romantic detail
- Apply light-hold hairspray to maintain the loose, airy feel
Ideal Settings:
- Outdoor or garden venue proms
- Bohemian or rustic themed events
- Spring and summer evening celebrations
- Pairing with flowy, romantic dress styles
17. Sleek Ballerina Bun

The sleek ballerina bun delivers pure elegance through its perfectly smooth, high-positioned bun that emphasizes poise and sophistication.
This classic style, inspired by professional ballet dancers, creates a refined, polished appearance ideal for the most formal prom settings.
The high placement elongates the neck and showcases facial features beautifully.
Ballet-Inspired Technique:
- Brush hair thoroughly with a boar bristle brush until completely smooth
- Apply generous smoothing cream or gel to eliminate any texture
- Gather hair into a high ponytail at the crown of the head
- Secure tightly with a strong elastic band
- Twist the ponytail into a tight rope formation
- Wrap the twisted hair around the base in a circular motion
- Tuck ends underneath the bun and secure with hairnet
- Insert bobby pins around the perimeter of the bun for security
- Use an edge control product and brush to smooth baby hairs
- Apply strong-hold hairspray and gel for mirror-like shine
- Consider a decorative hair donut for added fullness if needed
Styling Considerations:
- This style works best with extremely formal, elegant gowns
- Showcases statement earrings and necklaces perfectly
- Requires confident posture to carry the height and severity
- Extremely long-lasting and resistant to falling throughout the night
18. Mermaid Waves
Mermaid waves create an enchanting, oceanic effect through loose, flowing waves that evoke the mystical beauty of mythical sea creatures.
This whimsical style features soft, undulating waves throughout the length with emphasis on natural movement and dimension.
The relaxed wave pattern suits bohemian and beach-themed proms beautifully.
Wave Creation Method:
- Apply sea salt spray to damp hair for authentic texture
- Braid hair into 3-5 loose braids while still damp
- Allow to air dry completely or sleep in the braids overnight
- Remove braids and gently separate waves with fingers
- Use a curling wand to refine any areas needing definition
- Apply a lightweight oil for the glossy, wet-look effect
- Scrunch hair gently to enhance the wave pattern
- Consider adding temporary hair color in blue or teal tones for authentic mermaid effect
- Apply texturizing spray for hold without stiffness
- Leave waves loose and flowing for maximum movement
Color Enhancement Options:
- Temporary hair chalk in ocean-inspired colors
- Washable teal or purple tints throughout
- Subtle ombre effect fading to lighter ends
- Glitter spray for sparkle reminiscent of water droplets
19. Crown Braid with Low Ponytail
The crown braid with low ponytail combines structured braiding at the crown with the simplicity of a flowing ponytail.
This hybrid style offers the best of both worlds—intricate detail up top with carefree, swinging hair below.
The crown braid acts as a natural headband while keeping hair away from the face.
Hybrid Construction:
- Create a horseshoe-shaped section at the front of the head from ear to ear
- Begin braiding this section from one side, incorporating hair as you move across
- Continue the braid along the hairline like a crown or headband
- Secure the braid end behind the opposite ear with bobby pins
- Gather all remaining hair at the nape into a low ponytail
- Include the braid end in the ponytail for seamless integration
- Curl or straighten the ponytail based on desired aesthetic
- Wrap a small section of hair around the elastic to conceal it
- Pull gently on the crown braid sections for added volume
- Apply hairspray to the braided section for hold
Versatility Factor: This style easily transitions from photos to dancing due to its secure yet comfortable construction.
20. Textured Messy Bun
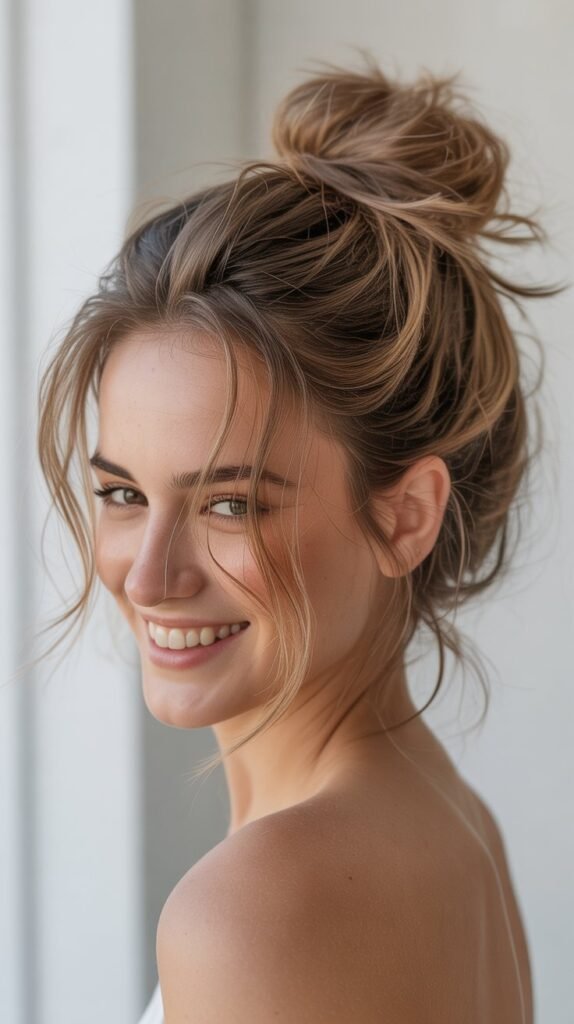
The textured messy bun embraces intentional imperfection with its deliberately disheveled appearance that paradoxically requires careful construction.
This effortlessly chic style projects confidence and modern sensibility while providing supreme comfort.
The purposefully undone aesthetic suits contemporary dress styles and relaxed prom atmospheres.
Artfully Messy Creation:
- Start with second-day hair or apply dry shampoo for necessary grip
- Tease hair throughout for texture and volume before gathering
- Pull hair into a ponytail at the desired height without smoothing bumps
- Twist ponytail loosely and wrap around base without pulling tight
- Secure with bobby pins placed randomly rather than uniformly
- Pull several pieces out of the bun intentionally for texture
- Leave some shorter pieces around the face for softening
- Use fingers to roughen up the bun shape rather than smoothing
- Apply texturizing spray throughout for enhanced definition
- The goal is controlled chaos rather than perfect placement
Common Mistakes to Avoid:
- Making it too messy so it appears genuinely unkempt
- Securing too loosely causing it to fall during the evening
- Not creating enough volume and texture beforehand
- Forgetting that “messy” still requires strategic construction
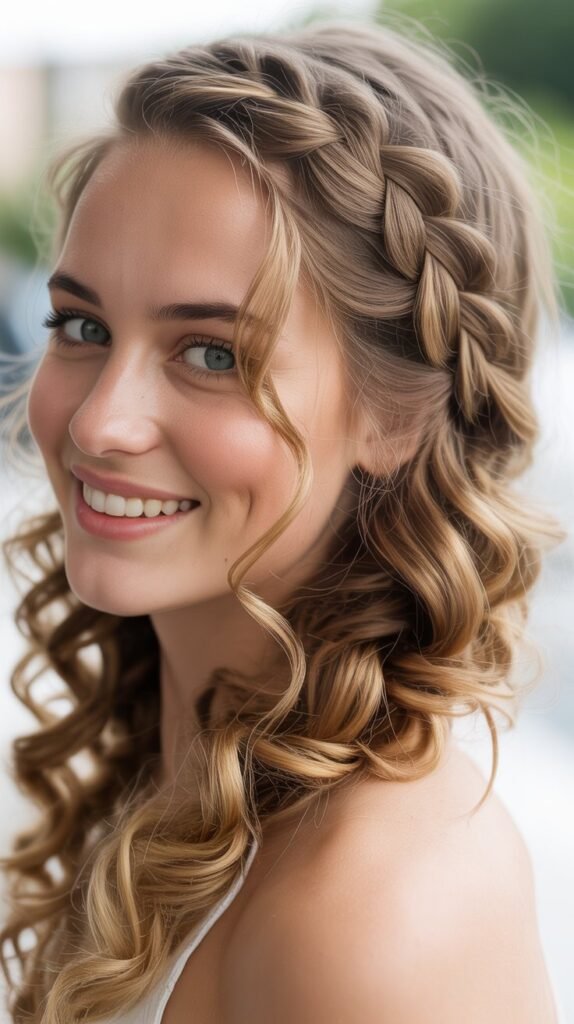
21. Grecian Goddess Braid
The Grecian goddess braid draws inspiration from ancient Greek art and mythology, creating an ethereal, classical appearance worthy of Mount Olympus.
This romantic style typically features a crown or halo braid combined with flowing waves and often incorporates accessories like gold leaves or ribbons.
The timeless elegance suits formal proms and creates stunning photographs.
Mythological Styling:
- Part hair in the center or slightly off-center for classical proportions
- Take a section from one side near the temple and begin a regular braid
- Continue the braid across the forehead like a headband
- Wrap the braid around the back of the head to the opposite side
- Secure the braid end with bobby pins behind the opposite ear
- Leave remaining hair flowing in loose waves or curls
- Consider adding a second braid for more intricate effect
- Insert gold leaf accessories, pearls, or ribbons throughout the braid
- Pull gently on braid sections for a softer, more romantic appearance
- Allow several tendrils to fall naturally around the face
Accessory Recommendations:
- Gold leaf hair pins placed throughout
- Pearl-embellished hair vine woven through braids
- Thin gold ribbon wrapped around braids
- Delicate chain accessories for modern interpretation
22. High Bun with Wrapped Braid
The high bun with wrapped braid combines the sophistication of a ballet-style bun with the added interest of a braid encircling its base.
This elevated style creates height and elegance while the wrapped braid adds an unexpected detail that sets it apart from standard buns.
The construction provides exceptional security for active prom activities.
Wrapped Detail Construction:
- Gather hair into a high ponytail at the crown area
- Before securing, separate out a small section from underneath
- Secure the main ponytail with a strong elastic band
- Twist the ponytail and wrap around its base to form a bun
- Secure the bun with bobby pins and a hairnet if needed
- Braid the separated section into a three-strand braid
- Wrap the braid around the base of the bun like a headband
- Tuck the braid end underneath and secure with bobby pins
- Apply smoothing product to the base and braid for polish
- Finish with strong-hold hairspray for all-night security
Visual Impact: The wrapped braid creates a frame around the bun that draws attention and adds dimension.
23. Loose Side Braid
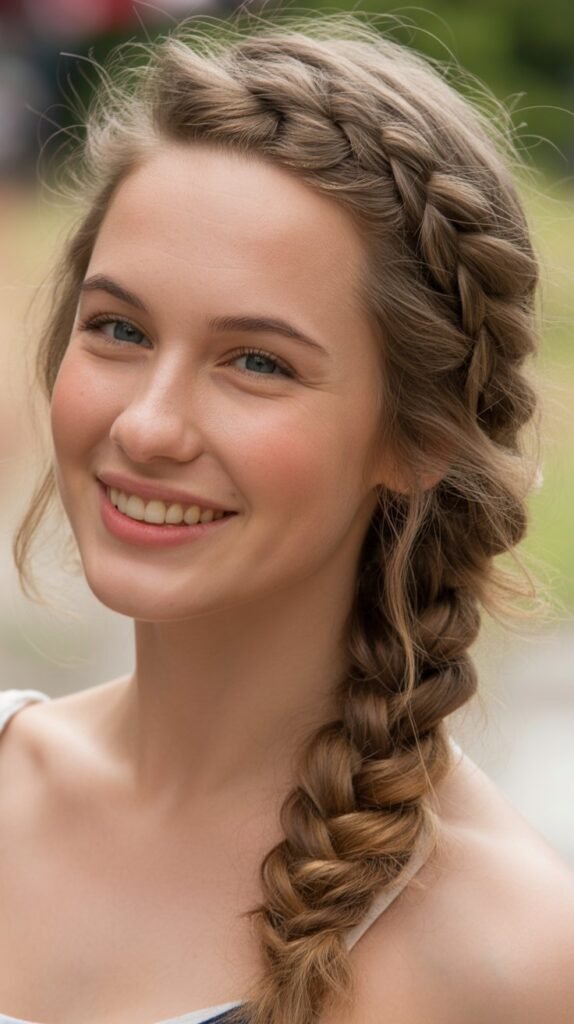
The loose side braid offers relaxed, bohemian charm through its deliberately casual placement and softly pulled-apart sections.
This approachable style drapes over one shoulder in a comfortable, easygoing manner while still maintaining formal appropriateness.
The looseness creates romantic volume and a free-spirited aesthetic.
- Sweep all hair over one shoulder without brush for natural texture
- Divide hair into three relatively equal sections
- Begin a standard three-strand braid loosely without tight tension
- Continue braiding down the entire length in a relaxed manner
- Secure the end with a clear or decorative elastic
- Gently pull apart each section of the braid to create width
- Pull more from the center of each section than the edges
- Allow some pieces to escape naturally around the face
- Apply a light texturizing spray for hold while maintaining softness
- Consider weaving flowers, ribbon, or small accessories throughout
Comfort Factor: This style allows for easy adjustment throughout the evening and doesn’t create tension headaches.
24. Victory Rolls
Victory rolls represent authentic 1940s glamour through their distinctive rolled sections that frame the face with vintage perfection.
This retro style requires technique and patience but delivers unmatched period authenticity.
The dramatic rolls work beautifully with vintage-inspired dresses and create a cohesive throwback aesthetic.
Period-Accurate Rolling:
- Set hair in hot rollers or pin curls for appropriate texture
- Section off the front portion of hair on both sides
- Backcomb each front section at the roots for volume
- Roll one section upward and toward the face, creating a tube shape
- Secure the roll with bobby pins inserted from multiple angles
- Repeat on the opposite side ensuring symmetry
- The rolls should be prominent and sit above the forehead
- Style remaining hair in victory roll-appropriate manner (pin curls or waves)
- Apply strong-hold hairspray throughout for security
- Consider adding vintage hair accessories like decorative combs
Historical Context: Victory rolls earned their name during WWII as women’s patriotic hairstyle.
25. Boho Braided Half-Up
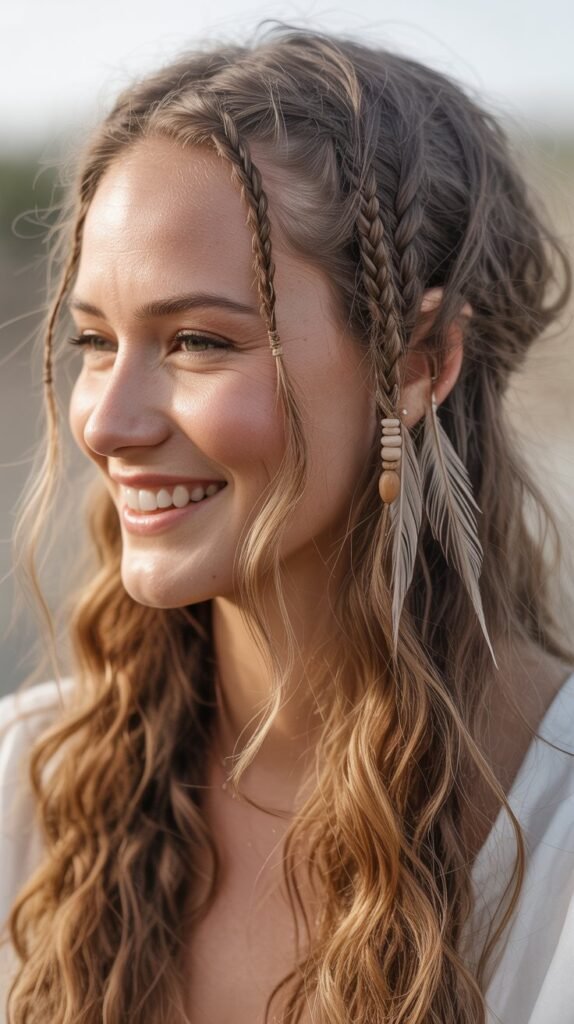
The boho braided half-up combines free-spirited braiding with flowing hair for a festival-inspired look perfect for outdoor proms.
This relaxed style features multiple small braids in the upper section while leaving the lower half natural and flowing.
The carefree aesthetic suits casual dress styles and creates an effortlessly cool appearance.
Bohemian Assembly:
- Create natural waves or leave hair in its natural texture
- Part hair down the center for authentic bohemian symmetry
- Take small sections from both sides near the temples
- Create thin braids with these sections without pulling tight
- Continue adding 2-3 more small braids on each side
- Gather all braids at the back of the head
- Secure together with a small elastic or wrap with hair
- Leave remaining hair flowing naturally below
- Pull gently on braids to create fuller, more relaxed appearance
- Add small flowers, feathers, or beads throughout for festival vibe
Essential Characteristics:
- Multiple thin braids rather than one large braid
- Intentionally imperfect and relaxed construction
- Natural hair texture embraced rather than fought
- Accessorized with nature-inspired elements
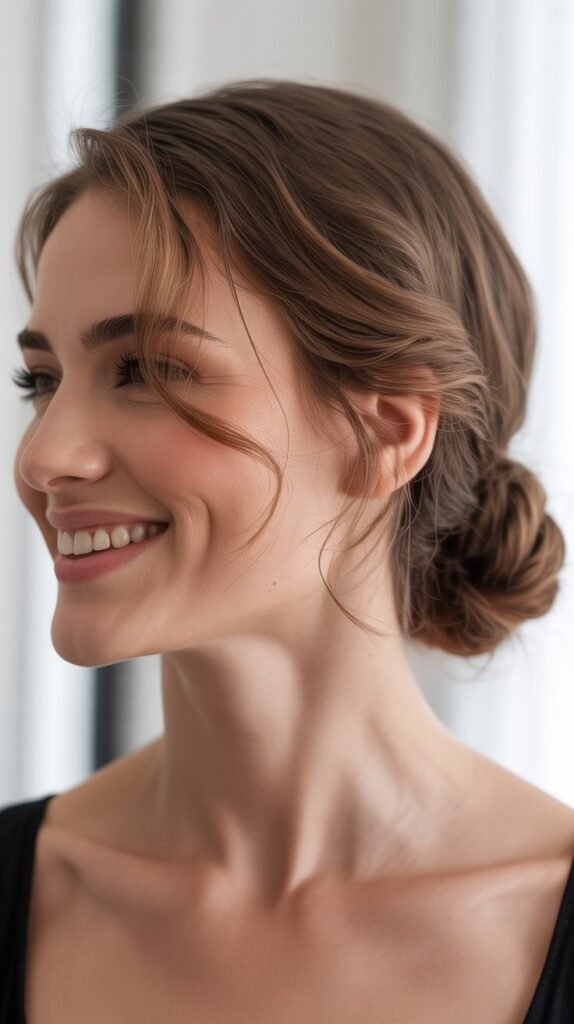
26. Elegant Low Twist
The elegant low twist creates refined sophistication through a simple yet effective twisting technique that gathers hair at the nape.
This understated style emphasizes graceful simplicity while providing secure, comfortable wear.
The classic appearance suits traditional prom settings and timeless dress styles.
Refined Twisting Technique:
- Brush hair smooth and gather at the nape without excessive height
- Divide the ponytail into two equal sections
- Twist each section individually in the same direction (clockwise)
- Wrap both twisted sections around each other in the opposite direction (counter-clockwise)
- Continue twisting the two sections together down the length
- Fold the twisted length upward toward the nape
- Tuck the twisted section against the head horizontally
- Secure with bobby pins along the twist length
- Apply smoothing serum for sleek, polished appearance
- Finish with hairspray and add subtle accessories if desired
Advantages:
- Quick to create compared to intricate braiding
- Extremely comfortable for extended wear periods
- Timeless appearance that won’t look dated in photos
- Easy to touch up if sections loosen
27. Bubble Braid
The bubble braid transforms a standard braid into a dimensional, segmented style through strategic elastic placement and pulling.
This trendy technique creates distinct “bubbles” along the braid length for visual interest and modern appeal.
The style works beautifully for side or back braids and photographs exceptionally well.
Segmented Braiding Method:
- Begin a standard three-strand braid at the desired starting point
- Braid for 2-3 inches and secure with a small elastic
- Gently pull the braided section outward to create a bubble shape
- Continue braiding for another 2-3 inches below the elastic
- Add another elastic and create another bubble
- Repeat this pattern down the entire braid length
- Ensure bubbles are relatively uniform in size
- The bubbles should be full and rounded, not flat
- Secure the final section with a larger or decorative elastic
- Apply hairspray to each bubble section for lasting shape
Placement Variations:
- Single bubble braid down the back
- Side bubble braid over shoulder
- Double bubble braids for playful effect
- Combined with other techniques like half-up styles
28. Asymmetrical Updo
The asymmetrical updo breaks traditional styling rules through deliberately unbalanced placement that creates modern, artistic appeal.
This fashion-forward style features height and volume concentrated on one side while the other remains sleek.
The architectural construction makes a bold statement perfect for contemporary dress styles.
Asymmetric Construction:
- Create a deep side part extending from front to back
- Smooth the hair on the lighter side back toward the nape
- On the heavier side, backcomb for significant volume and height
- Twist and pin the voluminous side upward and to one side
- Create an intentionally uneven, artistic shape with the pinned section
- The finished updo should sit predominantly on one side of the head
- Keep the opposite side smooth and sleek for contrast
- Secure with numerous bobby pins for stability despite the asymmetry
- Apply strong-hold hairspray to maintain the architectural shape
- Consider adding modern accessories like geometric pins
Fashion-Forward Characteristics:
- Deliberately breaks symmetry rules
- Creates visual interest through imbalance
- Suits confident, fashion-conscious personalities
- Pairs beautifully with asymmetrical dress designs
29. French Twist with Embellishments
The French twist represents quintessential Parisian elegance through its vertical roll of hair secured at the back.
This iconic updo has graced formal events for decades and continues to embody refined sophistication.
Adding embellishments updates the classic style with personalized, modern touches.
Parisian Elegance Technique:
- Brush hair smooth and gather to one side at the back
- Hold hair with one hand while twisting it toward the center
- Continue twisting until hair forms a vertical roll
- Tuck the ends into the roll as you twist
- Secure the roll with bobby pins inserted vertically along its length
- Ensure pins catch both the twisted section and the head
- Apply smoothing product for sleek, polished finish
- Insert decorative pins, combs, or accessories along the twist
- Consider a jeweled comb at the base or pearl pins throughout
- Finish with strong-hold hairspray for security
Embellishment Options:
- Vintage decorative combs for classic appeal
- Modern geometric pins for contemporary edge
- Pearl pins scattered throughout for romantic touch
- Jeweled accessories coordinating with jewelry
30. Pulled-Through Braid
The pulled-through braid creates the illusion of an intricate braid without actually braiding, making it accessible for those who struggle with traditional techniques.
This faux braiding method uses strategically placed elastics and pulled-through sections to create impressive, dimensional results.
The final appearance rivals complex braiding with fraction of the difficulty.
Faux Braiding Technique:
- Create a half-up ponytail at the crown and secure with elastic
- Create another ponytail directly below the first using remaining hair
- Split the first ponytail into two sections
- Bring these sections around the second ponytail
- Secure these sections with the hair below the second ponytail
- Continue this pattern of creating ponytails and pulling sections through
- Each new ponytail passes through the split sections of the previous one
- Gently pull on each section after creating for added volume
- The result resembles a complex braid but uses no braiding
- Secure the final section and apply hairspray
Advantages for Beginners:
- No braiding skills required
- Easier to create than it appears
- Highly dimensional and impressive final result
- Adjustable throughout the creation process
31. Cascade Curls
Cascade curls create a waterfall effect through curls that gradually transition from tighter at top to looser at bottom.
This dimensional styling technique adds movement and visual flow that draws the eye downward.
The graduated curl pattern showcases hair length while creating elegant, dynamic movement.
Gradual Curl Technique:
- Divide hair into three horizontal sections from crown to ends
- Use a 3/4-inch curling iron for the top section to create tight curls
- Use a 1-inch barrel for the middle section for medium curls
- Use a 1.5-inch barrel for the bottom section for large, loose curls
- This creates a natural transition from tight to loose
- Ensure all curls are curled in the same direction for uniformity
- Gently brush through with fingers to blend the transitions
- Apply texturizing spray throughout for definition and hold
- The cascading effect creates flowing, waterfall-like movement
- Focus on maintaining the graduated sizes for maximum impact
Visual Effect: The graduated curl sizes create depth and dimension that appears natural yet polished.
32. Knotted Half-Up
The knotted half-up style replaces traditional elastic bands or clips with hair knots for a creative, bohemian twist.
This technique creates visual interest through the unexpected use of hair itself as the securing mechanism.
The resulting look appears intricate while remaining surprisingly simple to achieve.
Knot-Tying Technique:
- Take sections from both sides of the head near the temples
- Bring both sections to the back of the head at crown level
- Tie these two sections together in a simple overhand knot
- Pull the knot tight to secure without using any elastic
- Leave the ends of the tied sections hanging with remaining hair
- Take another set of sections below the first knot
- Tie these sections in another knot below the first
- Continue for one or two more knots if desired
- Gently pull on the sides of each knot for fuller appearance
- Apply hairspray to prevent knots from loosening
Creative Variations:
- Single large knot for minimalist appeal
- Multiple small knots cascading down
- Side-positioned knotting for asymmetrical look
- Combined with curls or braids in remaining hair
33. Textured Ponytail with Braided Wrap
The textured ponytail with braided wrap elevates a simple ponytail through added texture and a braided section that wraps around the base.
This hybrid style combines comfort and practicality with unexpected detail that makes it prom-appropriate.
The contrast between textured ponytail and sleek braid creates visual intrigue.
Enhanced Ponytail Construction:
- Apply texturizing spray throughout hair for grip and volume
- Tease hair at the crown for added height before gathering
- Before securing ponytail, separate a small section from underneath
- Gather remaining hair into ponytail at desired height
- Secure with strong elastic band
- Divide the separated section into three strands and create a braid
- Wrap the braid around the ponytail base concealing the elastic
- Secure the braid end underneath with bobby pins
- Add waves or curls to the ponytail itself for additional texture
- Apply hairspray focusing on the braided wrap for security
- Consider adding volume with strategic teasing within the ponytail
Detail Elements: The braided wrap adds sophistication while the textured ponytail maintains youthful energy.
Essential Products for Long-Lasting Prom Hairstyles
Creating a stunning prom hairstyle requires the right products to ensure your look lasts from the first photo through the final dance.
Heat Protection:
- Always apply heat protectant spray before using any hot tools
- Look for products with silicone-based formulas for maximum protection
- Reapply if hair becomes damp during styling process
- Consider leave-in treatments for damaged or chemically treated hair
Hold Products:
- Strong-hold hairspray for structured styles like updos and smooth looks
- Flexible-hold spray for styles requiring movement like loose curls
- Texturizing spray for styles benefiting from grip and volume
- Hair gel or pomade for sleek styles requiring shine and control
Styling Aids:
- Volumizing mousse for fine or thin hair needing body
- Anti-frizz serum for humid environments or outdoor venues
- Shine serum for glossy, polished finishes
- Dry shampoo for adding texture and absorbing excess oil
Additional Resources:
For professional product recommendations and detailed styling tutorials, visit Allure’s hair care section or consult with your stylist about products specifically suited to your hair type and chosen style.
Maintenance Tips Throughout Prom Night
Keeping your hairstyle fresh throughout the entire evening requires strategic planning and quick-fix knowledge.
Emergency Kit Essentials:
- Bobby pins in your hair color
- Small travel-size hairspray
- Mini brush or comb
- Clear elastic bands
- Decorative pins matching your style
- Shine serum or anti-frizz product
- Compact mirror for checking
Quick Fixes:
- If curls fall flat, use fingers to twist sections and re-pin briefly
- Combat frizz immediately with small amounts of serum or oil
- Refresh roots with dry shampoo if they become oily
- Tighten loosened updos by adding strategic bobby pins
- Smooth flyaways with edge control or light hairspray on a brush
Weather Considerations:
- For outdoor venues, apply extra hairspray and anti-humidity products
- In hot weather, choose styles that keep hair off neck and shoulders
- For rainy conditions, prioritize updos over down styles
- Wind-resistant styles include tight braids and secure buns
Additional Tips:
For comprehensive maintenance advice and product reviews, check Byrdie’s hair section for expert guidance on keeping styles intact during long events.
Face Shape Guide for Choosing Your Perfect Style
Selecting a hairstyle that complements your face shape ensures the most flattering final result.
Oval Face:
- Most versatile face shape that suits virtually any hairstyle
- Can wear hair up, down, or half-up successfully
- Both symmetrical and asymmetrical styles work beautifully
- Consider your dress neckline as the primary deciding factor
Round Face:
- Benefit from styles that add height at the crown
- Side parts create flattering asymmetry
- Avoid styles with excessive width at cheekbone level
- Recommended: high ponytails, voluminous updos, side-swept styles
Square Face:
- Soft, romantic styles balance strong jawline
- Side parts and face-framing pieces are highly flattering
- Avoid severe center parts and styles pulled too tightly back
- Recommended: loose curls, soft updos, romantic waves
Heart-Shaped Face:
- Styles with volume at the bottom balance narrower chin
- Side-swept styles soften wider forehead
- Avoid excessive height at crown
- Recommended: low buns, curls at jaw level, half-up styles
Long Face:
- Styles with width and volume at sides are most flattering
- Avoid excessive height which elongates further
- Consider bangs or face-framing pieces
- Recommended: side-swept curls, wide updos, horizontal styling elements
Conclusion
Your prom hairstyle represents the crowning glory of your entire look, transforming your appearance from beautiful to absolutely unforgettable.
These 33 Stunning Prom Hairstyles for Long Hair That Turn Heads offer something for every personality, dress style, and skill level, ensuring you’ll find the perfect match for your special evening.
From timeless elegance found in Hollywood waves and French twists to contemporary edge in braided mohawks and bubble ponytails, each style has been carefully selected to help you feel confident and gorgeous throughout your celebration.
Remember that the best hairstyle is one that makes you feel authentically yourself while complementing your natural beauty and chosen dress.
Consider practicing your selected style beforehand, gather the necessary products and tools, and don’t hesitate to consult with a professional stylist if your chosen look requires advanced techniques.
With proper preparation, quality products, and the guidance provided here, you’ll step into your prom with a hairstyle that not only turns heads but also makes you feel like the most beautiful version of yourself, creating memories and photographs you’ll treasure for years to come.
