
Every parent knows that finding the perfect hairstyle for their little one can be both exciting and challenging.
Braided hairstyles offer a wonderful solution that combines style, practicality, and protection for your child’s delicate hair.
Whether you’re preparing for a school day, a special occasion, or simply want to keep your child’s hair neat and tangle-free, braids provide endless possibilities that are both adorable and functional.
In this comprehensive guide to 27 Cute Braided Hairstyles for Kids, you’ll discover a diverse collection of braiding techniques suitable for various hair types, lengths, and skill levels.
From simple three-strand braids perfect for beginners to more intricate styles that will make your child stand out, each hairstyle comes with practical insights to help you create beautiful looks that your kids will love wearing and you’ll enjoy creating.
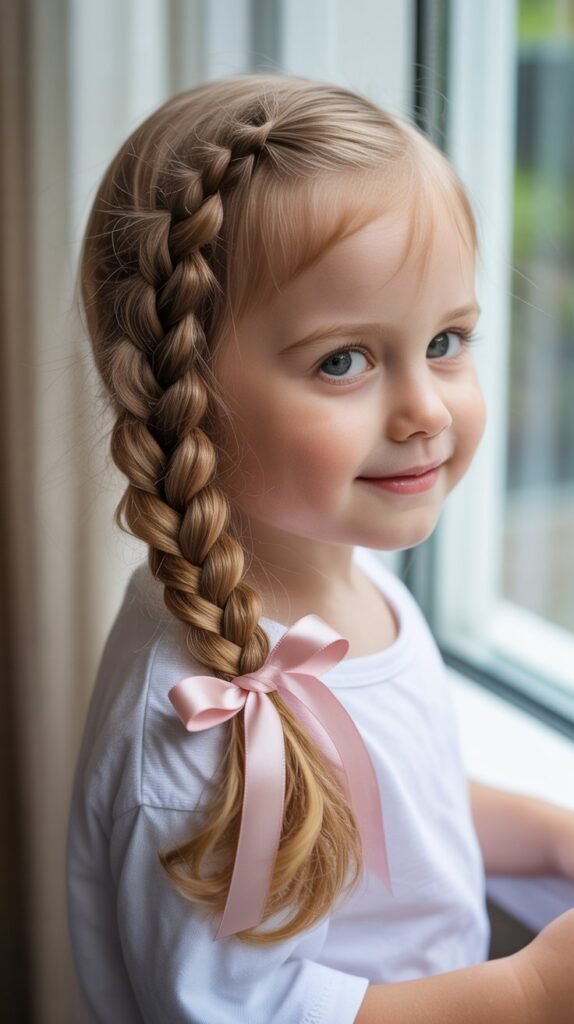
1. Classic Three-Strand Braid

The classic three-strand braid is the foundation of all braiding techniques and the perfect starting point for parents new to styling their children’s hair.
This timeless style works beautifully for school, play, and everything in between.
How to Create:
- Brush the hair thoroughly to remove all tangles and knots
- Divide the hair into three equal sections at the nape of the neck
- Cross the right section over the middle section, then cross the left section over the new middle section
- Continue this pattern, alternating sides, until you reach the ends
- Secure with a hair elastic and gently pull on the braid to add volume if desired
Best For:
- Beginners who are just learning to braid
- All hair types and textures
- Quick morning routines when time is limited
- Children who are active and need secure hairstyles
Pro Tips:
- Slightly dampen the hair before braiding for better control and a neater finish
- Use a leave-in conditioner to make the hair more manageable
- Practice on dolls or willing friends before attempting on a fidgety child
- Keep the tension even throughout the braid for a uniform appearance
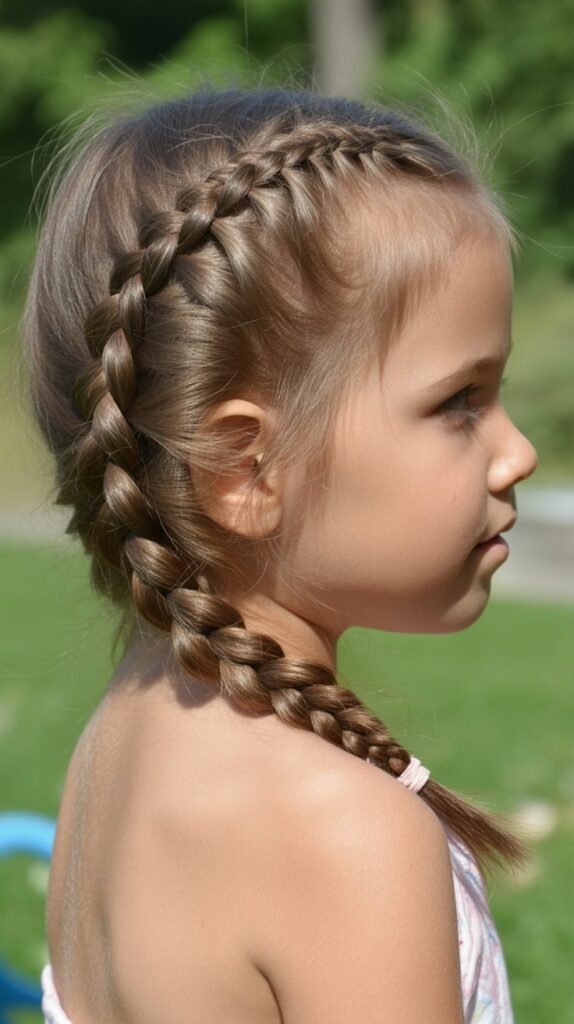
2. Dutch Braids (Reverse French Braids)

Dutch braids create a stunning raised effect that sits on top of the hair rather than weaving into it, making them a show-stopping choice for kids who want a bold, dimensional look.
Also known as “inside-out” braids, this style adds texture and visual interest.
Technique Breakdown:
- Start with a small section of hair at the crown of the head
- Divide this section into three equal strands
- Cross the right strand under the middle strand instead of over it
- Cross the left strand under the new middle strand
- Add small sections of hair to each strand as you work down, always crossing under
- Continue until all hair is incorporated, then finish with a regular braid
- Secure with an elastic and gently tug on the edges for a fuller appearance
Styling Variations:
- Create two Dutch braids for a sporty, symmetrical look
- Make one central Dutch braid down the middle for a mohawk effect
- Combine with loose curls at the bottom for added texture
- Add colorful ribbons woven through the braids for special occasions
Maintenance:
- This style can last 2-3 days with proper care and sleeping in a silk bonnet
- Spray with a light hold hairspray to tame flyaways
- Touch up the edges with a small amount of gel or edge control
- Refresh by lightly misting with water and smoothing with hands
3. Fishtail Braid

The fishtail braid creates an intricate, woven appearance that looks complex but is surprisingly simple once you master the technique.
This elegant style is perfect for kids who want something special without being overly formal.
Step-by-Step Process:
- Divide all hair into two large, equal sections
- Take a thin strand from the outer edge of the right section
- Cross this thin strand over to join the left section
- Take a thin strand from the outer edge of the left section
- Cross this strand over to join the right section
- Continue alternating sides, keeping strands thin for a detailed pattern
- Secure at the end and gently pull on the sections to create width
Why Kids Love It:
- The unique pattern looks impressive to friends and teachers
- It feels special without being uncomfortable or too tight
- Works beautifully for both casual and dressy occasions
- Can be styled messy for a relaxed, bohemian vibe
Styling Duration:
- Takes approximately 10-15 minutes depending on hair length and thickness
- Faster to create with practice and when using slightly damp hair
- Can be done while watching a favorite show to keep children entertained
- Worth the time investment for a style that lasts all day
4. French Braid Crown

The French braid crown transforms your child into royalty with a beautiful braid that circles the entire head like a halo.
This sophisticated style keeps hair completely off the face and neck while looking absolutely enchanting.
Creation Method:
- Start behind one ear with a small section of hair
- Begin a French braid by adding hair from the hairline as you work around the head
- Continue braiding in a circular pattern, following the natural hairline
- Add sections from both the scalp and the loose hair as you progress
- When you reach the starting point, continue with a regular braid
- Tuck the end under the crown braid and secure with bobby pins
Perfect Occasions:
- Flower girl duties at weddings
- Dance recitals and performances
- Birthday parties and celebrations
- Family photos and portrait sessions
- Any time your child wants to feel like a princess
Hair Length Requirements:
- Works best on medium to long hair (shoulder length or longer)
- Layered hair may need extra pins to secure shorter pieces
- Can be adapted for shorter hair by creating a partial crown
- Consider hair extensions for very short hair if attempting this style
5. Side Braid with Ribbon
A side braid adorned with a colorful ribbon combines simplicity with charm, creating a playful asymmetrical look that’s both practical and pretty.
The added ribbon elevates a basic braid into something truly special.
How to Incorporate Ribbon:
- Create a side part and gather all hair to one side
- Choose a ribbon that complements your child’s outfit
- Secure the ribbon at the top of where the braid will start
- Include the ribbon as a fourth strand or wrap it around the braid as you work
- For a wrapped effect, twist the ribbon around the braid after completing it
- Tie the ribbon in a bow at the bottom for a finishing touch
Ribbon Selection Tips:
- Satin ribbons create a formal, polished appearance
- Grosgrain ribbons offer texture and hold their shape well
- Choose colors that match school uniforms or special event attire
- Consider seasonal patterns like florals for spring or plaids for fall
- Wider ribbons (1-2 inches) make more dramatic statements
Quick Styling:
- Perfect for busy mornings when you need something cute but fast
- Pre-cut ribbons to the right length to save time
- Keep a collection of ribbons in various colors for daily variety
- This style typically takes only 5-7 minutes to complete
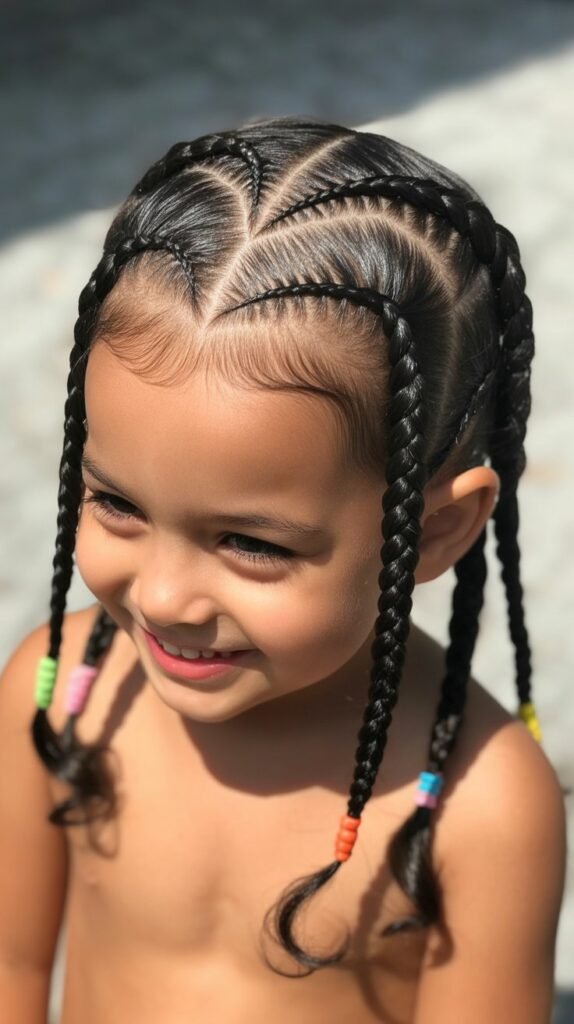
6. Double Dutch Braids with Beads

Double Dutch braids decorated with colorful beads create a fun, cultural style that celebrates heritage while keeping hair neatly secured.
The rhythmic clicking of beads adds a playful element kids adore.
Bead Application Technique:
- Complete both Dutch braids first, securing with small elastics
- Thread beads onto the braid strands using a bead threader or bobby pin
- Alternate bead colors for a rainbow effect or coordinate with outfits
- Secure beads by crimping them gently or using small elastics between beads
- Ensure beads aren’t too heavy, which could cause discomfort or hair stress
- Distribute beads evenly along the length of the braids
Cultural Significance:
- Beaded braids have deep roots in African and African-American culture
- This style represents identity, heritage, and artistic expression
- Teaches children about cultural traditions and pride
- Creates opportunities for meaningful conversations about history
Bead Options:
- Plastic pony beads are lightweight and come in countless colors
- Wooden beads offer a natural, earthy aesthetic
- Metal beads add glamour but should be used sparingly due to weight
- Choose beads with holes large enough to accommodate hair thickness
7. Waterfall Braid

The waterfall braid creates a cascading effect where sections of hair appear to flow through the braid like water over rocks.
This romantic, ethereal style works beautifully for special occasions when you want hair partially up and partially down.
Braiding Technique:
- Start with a small section of hair near the temple
- Begin a regular three-strand braid
- After the first stitch, drop the bottom strand and let it fall
- Pick up a new section from the top to replace the dropped strand
- Continue this pattern of dropping and replacing strands
- The dropped strands create the “waterfall” effect cascading down
- Secure behind the opposite ear with bobby pins or continue around the head
Ideal Settings:
- Birthday parties where your child wants to look extra special
- Holiday gatherings and family celebrations
- School picture day for a memorable photo
- Communion, confirmation, or other religious ceremonies
Skill Level:
- Intermediate to advanced braiding skills required
- Practice on willing participants before important events
- Watch video tutorials to understand the drop-and-replace motion
- Consider professional styling for first-time attempts before big occasions
8. Twisted Rope Braid

The twisted rope braid offers a unique alternative to traditional braiding, using only two sections twisted around each other to create a spiral effect.
This simple technique looks intricate while being one of the easiest styles to master.
Creation Steps:
- Divide hair into two equal sections
- Twist each section individually in the same direction (clockwise or counterclockwise)
- Then wrap the two twisted sections around each other in the opposite direction
- The opposing twist directions keep the braid from unraveling
- Continue twisting and wrapping until you reach the ends
- Secure with an elastic band
- Gently pull on the braid to create more volume and texture
Benefits:
- Incredibly quick to create, perfect for rushed mornings
- Gentle on hair with less tension than traditional tight braids
- Creates lovely texture even on fine or thin hair
- Easy enough for older children to do on themselves
Variations:
- Create multiple small rope braids throughout the hair for a bohemian look
- Combine with a half-up style for versatility
- Wrap a rope braid around a ponytail base to hide the elastic
- Make tiny rope braids as accent pieces in otherwise loose hair
9. Heart-Shaped Braid

A heart-shaped braid transforms hair into wearable art that expresses sweetness and creativity.
This adorable style uses strategic parting and braiding to form an actual heart shape on the head.
Design Process:
- Part hair down the center from forehead to crown
- Create a curved part on each side that forms the top humps of a heart
- These sections should meet in a point at the center back
- Braid each curved section with a Dutch or French braid technique
- Bring both braids together at the heart’s point
- Combine the braids into one single braid down the back
- Secure and adjust the heart shape until symmetrical
Occasion Suitability:
- Valentine’s Day celebrations at school
- Birthday parties throughout the year
- Any day your child wants to spread love and joy
- Photo opportunities that capture childhood sweetness
Time Investment:
- Requires 20-30 minutes depending on experience level
- Best attempted when you have adequate time without rushing
- Consider practicing on weekends before trying on school mornings
- The results are worth the investment for special days
10. Four-Strand Braid
The four-strand braid creates a sophisticated, dimensional pattern that sets it apart from simpler three-strand versions.
While it requires more coordination, the stunning result makes it worth learning.
Weaving Pattern:
- Divide hair into four equal sections, numbered 1-2-3-4 from left to right
- Cross section 1 over section 2
- Cross section 4 over section 3
- Cross the two middle sections over each other
- Repeat this pattern: outer over inner, then middle over middle
- Maintain even tension for a uniform braid
- Practice until the motion becomes natural and rhythmic
Visual Impact:
- Creates a wider, flatter braid than traditional styles
- The weave pattern catches light beautifully
- Adds perceived thickness to fine or thin hair
- Looks complex and impressive to observers
Learning Curve:
- Start by practicing with four ribbons tied to a stable surface
- Use different colored sections initially to track the pattern easily
- Patience and practice are essential for mastery
- Once learned, the technique becomes second nature
11. Braided Ponytail

A braided ponytail combines the sleekness of a ponytail with the texture and interest of braids, creating a hybrid style that’s both sporty and stylish.
This versatile look works for virtually any activity.
Style Variations:
- Gather hair into a high, mid, or low ponytail based on preference
- Create a single braid from the ponytail for classic simplicity
- Make multiple small braids within the ponytail for added texture
- Wrap a small braid around the elastic to conceal it elegantly
- Combine different braid types within one ponytail for variety
Activity Suitability:
- Sports and physical education classes where secure hair is essential
- Dance practice when hair needs to stay completely out of the way
- Swimming (do before chlorine exposure to protect hair)
- Active play dates and outdoor adventures
Height Options:
- High ponytails create a youthful, energetic appearance
- Mid-level ponytails offer classic versatility
- Low ponytails appear more sophisticated and mature
- Side ponytails add playful asymmetry
12. Milkmaid Braids
Milkmaid braids create a vintage, pastoral charm by wrapping braids over the crown of the head like a headband.
This elegant style evokes countryside innocence while being surprisingly practical.
Construction Method:
- Part hair down the middle from forehead to nape
- Create two regular three-strand braids, one on each side
- Bring the right braid over the top of the head like a headband
- Secure with bobby pins along the left side
- Bring the left braid over the top, covering where the first braid was pinned
- Secure with bobby pins on the right side
- Tuck any loose ends underneath and pin securely
- Adjust for symmetry and comfort
Historical Context:
- Inspired by traditional European farming and rural styles
- Popular in folk costumes and cultural celebrations
- Modern interpretations bring vintage charm to contemporary fashion
- Links children to timeless, classic aesthetics
Outfit Pairings:
- Flowy, bohemian dresses and sundresses
- Linen and cotton clothing for natural fiber coordination
- Floral patterns that complement the pastoral vibe
- Festival and outdoor event attire
13. Zig-Zag Part with Braids
A zig-zag part adds unexpected visual interest to any braided style, transforming ordinary braids into something eye-catching and fun.
This playful element requires minimal extra effort for maximum impact.
Creating the Zig-Zag Part:
- Use the pointed end of a rat-tail comb
- Start at the hairline in the center of the forehead
- Create a part that angles to the left, then sharply to the right
- Continue this alternating pattern down to the crown or nape
- Keep the angles sharp and distinct for best visual effect
- The more dramatic the angles, the more prominent the zig-zag appears
Braid Combinations:
- Two braids on either side of the zig-zag part
- Multiple small braids following the zig-zag pattern
- Large Dutch braids that emphasize the creative parting
- Combination of braids and twists alternating along the part
Kid Appeal:
- The geometric pattern fascinates children and peers
- Easy way to make a familiar style feel fresh and new
- Takes only seconds longer than a straight part
- Children feel trendy and fashion-forward
14. Ladder Braid

The ladder braid creates a stunning visual effect resembling an actual ladder woven through the hair.
This advanced technique produces an intricate look that’s sure to impress at any gathering.
Technique Breakdown:
- Create a French braid as the “side rail” of the ladder
- Leave out small sections of hair at regular intervals as you braid
- These loose sections become the “rungs” of the ladder
- Once the main braid is complete, weave the loose sections through the braid
- Thread each section under and over portions of the braid
- Create a pattern that resembages ladder rungs
- Secure all sections carefully with small elastics or pins
Complexity Level:
- Advanced styling requiring patience and precision
- Best for special occasions when time isn’t limited
- Consider professional styling for first attempts
- Excellent for competitive dance, pageants, or formal events
Wow Factor:
- Guaranteed to receive compliments and questions
- Photographs beautifully from all angles
- Demonstrates advanced styling skills
- Makes children feel uniquely special
15. Bubble Braid
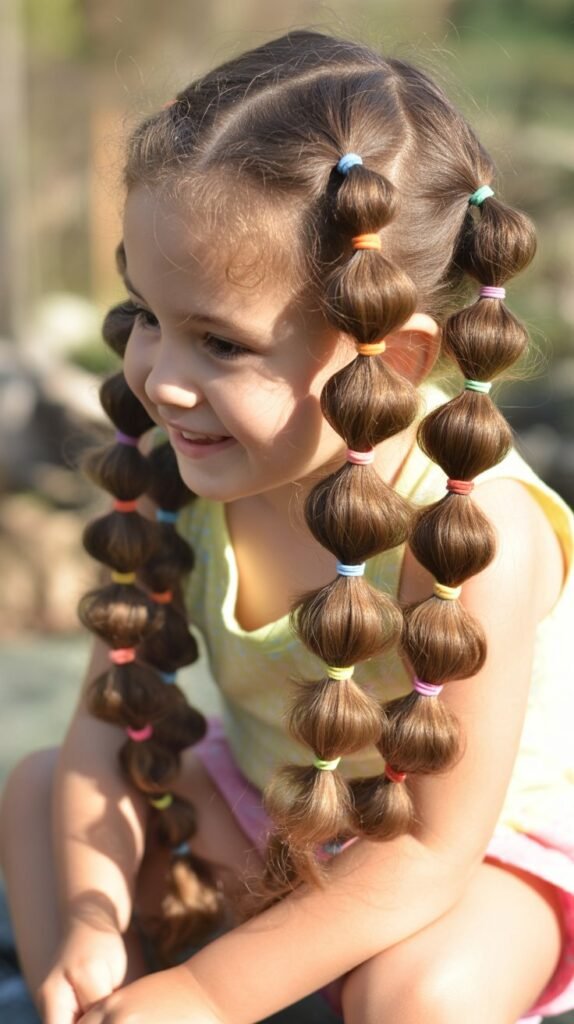
Bubble braids create a playful, dimensional effect using strategic elastic placement rather than traditional weaving.
This modern style is incredibly trendy and surprisingly simple to achieve.
Step-by-Step Creation:
- Start with a ponytail at desired height
- Secure with a clear or matching elastic
- About 2-3 inches down, add another elastic
- Gently pull on the hair between elastics to create a “bubble”
- Continue adding elastics at regular intervals down the length
- Create bubbles between each elastic by carefully tugging hair outward
- Vary bubble sizes for visual interest or keep them uniform
Elastic Selection:
- Clear elastics disappear into the hair for subtle styling
- Colored elastics that match outfits make intentional fashion statements
- Small elastics work better than large ones for this style
- Silicone elastics grip better and are less damaging than rubber
Customization:
- Create one dramatic bubble braid down the center
- Make two side bubble braids for a playful look
- Combine with regular braids for mixed textures
- Add ribbons or small accessories to each elastic
16. Crown Braid with Flowers

A crown braid adorned with fresh or artificial flowers transforms your child into a woodland fairy or flower princess.
This enchanting style combines natural beauty with skilled braiding for unforgettable results.
Flower Integration:
- Complete the crown braid first, securing it firmly
- Select flowers with sturdy stems or use floral wire for artificial flowers
- Insert flower stems directly into the braid, weaving through sections
- Distribute flowers evenly or cluster them on one side
- Secure with bobby pins if flowers don’t stay naturally
- Spray with water to keep fresh flowers from wilting during events
Flower Choices:
- Baby’s breath creates delicate, ethereal effects
- Small roses add romantic elegance
- Daisies offer cheerful, innocent charm
- Lavender provides color and pleasant scent
- Artificial flowers last longer for all-day events
Event Perfection:
- Outdoor weddings where children are in the bridal party
- Spring and summer festivals celebrating nature
- Birthday parties with garden or fairy themes
- Holiday celebrations and family portraits
- Any occasion calling for maximum prettiness
17. Pull-Through Braid

The pull-through braid creates an illusion of an incredibly thick, voluminous braid without actual weaving.
This clever technique uses ponytails pulled through each other to achieve a stunning faux-braid effect.
Technique Explained:
- Create a small ponytail at the crown and secure with an elastic
- Create a second ponytail directly below the first
- Split the first ponytail in half
- Pull the second ponytail up through the split sections
- Bring the halves of the first ponytail down and combine with new hair
- Create a third ponytail below the second
- Continue this pattern down the head
- Gently pull on each section to create volume and width
Volume Benefits:
- Makes fine or thin hair appear incredibly thick
- Creates dimension without backcombing or teasing
- Achieves impressive fullness with minimal damage
- The pulled sections can be adjusted for desired fullness
Time Efficiency:
- Faster than complex braiding techniques once mastered
- Requires only elastic placement and pulling through
- No intricate finger work or coordination needed
- Great for those who struggle with traditional braiding
18. Mohawk Braid

A mohawk braid brings edgy cool to children’s hairstyling, creating a bold statement that’s both fashion-forward and practical.
This style keeps side hair secured while featuring a dramatic central braid.
Creating the Look:
- Section hair into three parts: center and two sides
- Secure the side sections with elastics close to the head
- Create a Dutch or French braid down the center section
- The raised Dutch braid creates the most dramatic mohawk effect
- Leave the side sections sleek and smooth against the scalp
- Optional: create small braids or twists in the side sections
- Finish with strong hold gel or spray to keep sides flat
Personality Match:
- Perfect for confident, outgoing children
- Appeals to kids who love standing out
- Great for children interested in music and performance
- Suits bold personalities and creative spirits
Styling Intensity:
- Mild version: subtle center braid with simple sides
- Medium: prominent Dutch braid with gelled sides
- Extreme: add color, glitter, or dramatic accessories
- Adjust intensity based on school dress codes and personal preference
19. Mermaid Braid

The mermaid braid combines multiple braiding techniques to create a whimsical, ocean-inspired style that flows and moves like waves.
This fantastical look brings underwater magic to everyday wear.
Construction Elements:
- Begin with a side part for asymmetrical appeal
- Create a loose French or Dutch braid as the foundation
- Pull sections very loose for a relaxed, flowing appearance
- Add small accent braids woven through the main braid
- Incorporate different braid types for varied texture
- Leave the bottom loose or continue with a fishtail braid
- Optional: add blue, teal, or purple temporary color spray
Magical Enhancements:
- Add pearl or iridescent bead accessories
- Weave in thin ribbons in ocean colors
- Use hair chalk for temporary teal or purple highlights
- Include starfish or shell hair clips
- Apply shimmer spray for an ethereal glow
Imaginative Play:
- Encourages creative storytelling and role-play
- Perfect for mermaid-themed parties and costumes
- Pairs with ocean-inspired outfits
- Makes pool days and beach trips extra special
20. Cornrow Braids

Cornrow braids are traditional African braids that lie flat against the scalp in various geometric patterns.
These protective styles honor cultural heritage while offering practical, long-lasting hair management.
Basic Technique:
- Part hair into the desired pattern (straight back, curved, geometric)
- Take a small section at the hairline to begin
- Create an underhand (Dutch) braid very close to the scalp
- Add hair from the scalp to each section as you braid
- Keep tension firm but not painfully tight
- Continue each row until all hair is braided
- Secure ends with small elastics or leave free depending on length
Pattern Possibilities:
- Straight back cornrows in parallel lines
- Curved cornrows following the head’s contour
- Geometric patterns with triangles or zig-zags
- Side-swept cornrows for asymmetrical style
- Combination patterns mixing straight and curved rows
Cultural Respect:
- Acknowledge the African origins and cultural significance
- Learn about the history and meaning behind the style
- Support and respect the communities from which this style originates
- Educate children about cultural appreciation versus appropriation
Maintenance and Longevity:
- Can last 1-2 weeks with proper care
- Sleep with a satin or silk bonnet to prevent frizz
- Keep scalp moisturized with light oils
- Avoid excessive manipulation
- Cleanse scalp gently without disturbing braids
21. Infinity Braid

The infinity braid creates a continuous figure-eight pattern that appears to loop endlessly through the hair.
This mathematically inspired style fascinates children who love patterns and creates stunning visual interest.
Weaving Method:
- Divide hair into two sections
- Take a thin strand from the outer edge of the right section
- Weave it in a figure-eight pattern through both sections
- Bring it under the right section, over to the left, under the left section
- Take a new strand from the left and repeat the figure-eight in reverse
- Continue alternating sides with the infinity pattern
- Keep strands thin for a defined pattern or thick for bold effect
Mathematical Interest:
- Introduces the infinity symbol concept visually
- Engages children interested in math and patterns
- Creates talking points about mathematics in everyday life
- Combines art and logic beautifully
Practice Tips:
- This complex technique requires significant practice
- Use ribbons or colored yarn to learn the pattern first
- Watch slow-motion video tutorials repeatedly
- Practice on doll hair before attempting on your child
- Be patient—mastery takes time but yields impressive results
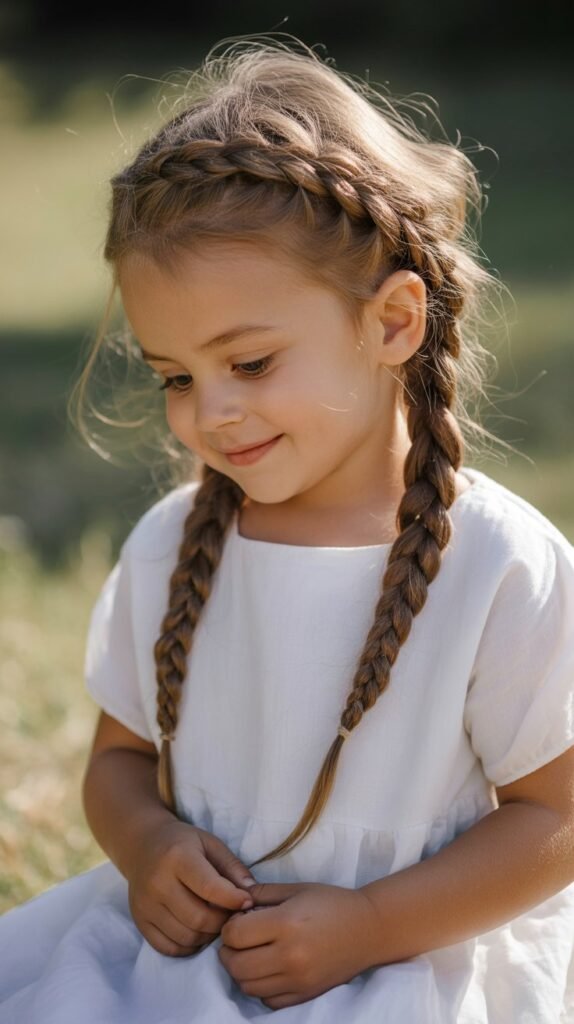
22. French Braid Pigtails
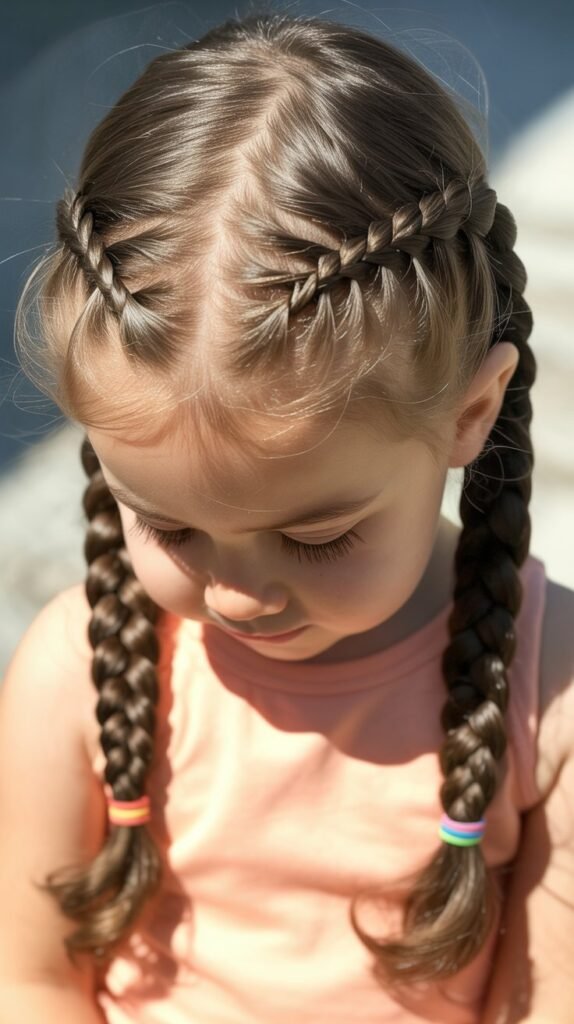
French braid pigtails combine the sophistication of French braiding with the playful charm of dual braids.
This classic style keeps hair completely secured while maintaining a youthful, cheerful appearance.
Technique:
- Part hair straight down the center from forehead to nape
- Begin a French braid on one side at the temple
- Add sections from the scalp as you braid down
- Keep tension even for smooth, neat results
- Secure the first braid and repeat on the other side
- Ensure both braids are symmetrical in placement and tightness
- Tie with matching or coordinating ribbons or elastics
Symmetry Considerations:
- Use a comb to create a perfectly straight center part
- Take equal amounts of hair in each section added
- Braid at the same pace on both sides
- Check in a mirror frequently to ensure balance
- Don’t worry about absolute perfection—slight variations add character
Age Range:
- Suits toddlers through pre-teens
- Young children look adorable with this innocent style
- Older children appreciate the secure, no-fuss practicality
- Can be styled more sophisticated or more playful based on age
23. Braided Top Knot

A braided top knot elevates the simple bun by incorporating braided elements, creating a style that’s both elegant and playful.
This updo works wonderfully for keeping hair completely off the neck and face.
Assembly Instructions:
- Create a high ponytail at the crown of the head
- Divide the ponytail into sections and braid each section
- Multiple small braids create more texture than one large braid
- Wrap the braided sections around the ponytail base
- Secure with bobby pins, creating a bun shape
- Tuck ends under the bun and pin securely
- Leave a few pieces out to frame the face if desired
Occasion Versatility:
- Casual enough for everyday wear
- Elevated enough for special occasions
- Perfect for dance classes and recitals
- Ideal for hot weather when neck cooling is priority
- Works for both dress-up and active play
Bun Size Variations:
- Large, voluminous buns make dramatic statements
- Small, tight buns appear neat and controlled
- Messy buns offer relaxed, bohemian vibes
- Adjust based on hair thickness and event formality
24. Side Dutch Braid with Loose Curls
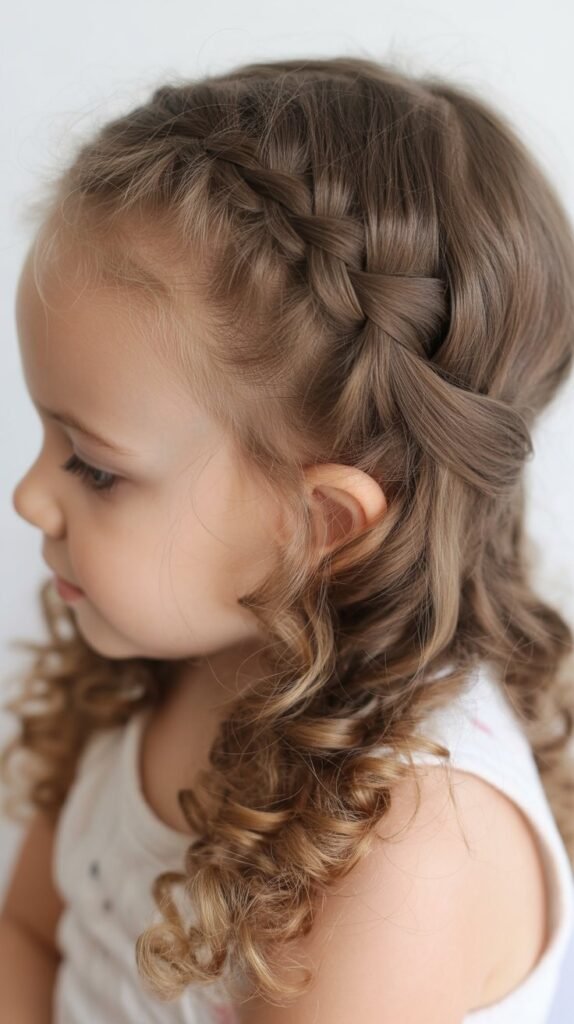
Combining a side Dutch braid with loose, flowing curls creates a romantic, princess-worthy style that balances structure with softness.
This elegant look suits formal occasions beautifully.
Creating the Style:
- Create a deep side part
- Begin a Dutch braid on the heavier side at the part
- Braid along the hairline, incorporating hair as you move back
- Continue the Dutch braid to behind the ear
- Secure the braid and leave the remaining hair loose
- Curl the loose hair with foam rollers, braids, or heat-free methods
- Gently separate curls for soft, natural waves
Curl Methods (No Heat):
- Braid damp hair overnight for natural waves
- Use foam rollers or flexi-rods for defined spirals
- Try the sock bun method for large, loose curls
- Apply mousse or curl cream before setting for better hold
Formal Event Suitability:
- Weddings and formal family celebrations
- School dances and special ceremonies
- Holiday parties and seasonal photography
- Any occasion requiring extra elegance
25. Braided Headband

A braided headband uses the child’s own hair to create a natural headband effect, combining functionality with style.
This simple yet effective technique keeps hair out of the face while adding decorative detail.
Creation Steps:
- Section hair from ear to ear across the top of the head
- Leave the back section loose or secure it temporarily
- Braid the front section in the style of your choice
- A Dutch braid creates a raised headband effect
- Secure the braid behind the opposite ear with bobby pins
- Release the back section and style as desired
- The braid acts as a natural headband holding hair back
Styling the Remaining Hair:
- Leave it loose and natural
- Create waves or curls for added texture
- Pull into a ponytail for sporty simplicity
- Add small accent braids throughout
- Style in a low bun for complete updo effect
Practical Benefits:
- Keeps hair out of eyes during activities
- Doesn’t require uncomfortable headband accessories
- Works for various hair types and textures
- Can be casual or dressed up with additions
view, natural outdoor lighting, casual clothing, showing headband detail clearly, youthful and fresh appearance*
26. Criss-Cross Braids
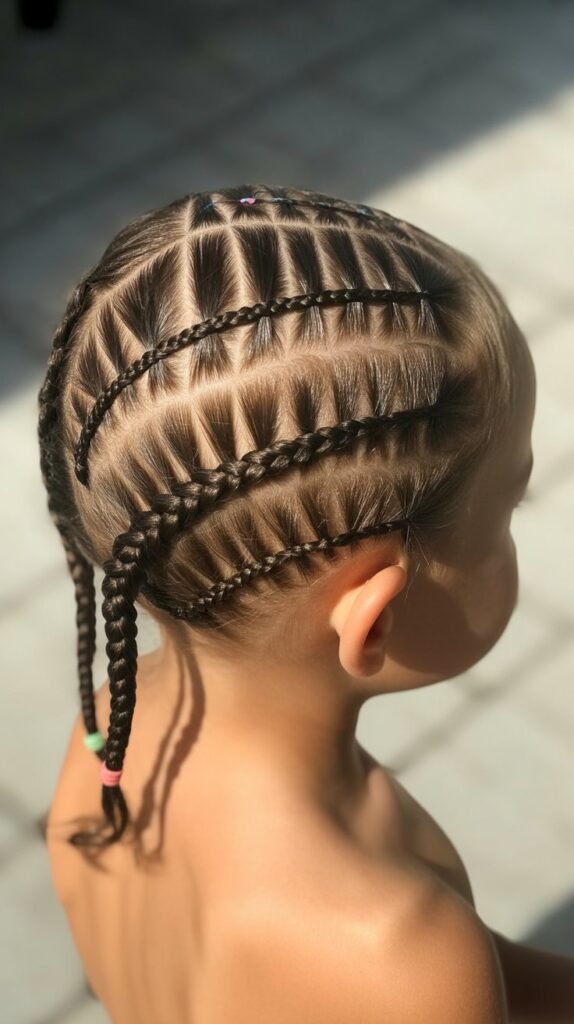
Criss-cross braids create an eye-catching geometric pattern where braids intersect and weave over each other on the scalp.
This architectural style showcases advanced braiding skills and produces a truly unique look.
Pattern Creation:
- Section hair into multiple parts creating a grid pattern
- Begin braiding sections in different directions
- When braids intersect, weave one over the other
- Pin the crossing braid temporarily while working on the second
- Release and continue both braids after the intersection
- Create multiple crossing points for complex geometric designs
- Secure all ends and ensure crossings are firmly pinned
Design Complexity:
- Simple version: two braids crossing once in the center
- Intermediate: multiple braids with several crossing points
- Advanced: intricate lattice patterns covering the entire head
- Start simple and increase complexity as skills develop
Visual Drama:
- The geometric precision creates modern, edgy appeal
- Photographs exceptionally well from all angles
- Shows off your advanced styling capabilities
- Makes children feel like they’re wearing art
Planning Considerations:
- Sketch the pattern before starting to visualize crossings
- Use different colored elastics during practice to track sections
- Allow 30-45 minutes for complex crossing patterns
- Best for children who can sit still for extended periods
27. Box Braids for Kids

Box braids are individual plaits divided into square-shaped sections across the scalp, creating a protective style that’s both beautiful and low-maintenance.
This versatile technique works wonderfully for children with textured or curly hair.
Installation Process:
- Part hair into square or rectangular sections across the entire head
- Each section should be roughly equal in size for uniformity
- Apply moisturizer or light oil to each section before braiding
- Create three-strand braids from root to tip
- Braids can be done with natural hair only or with added extensions
- Secure ends with small elastics or by burning synthetic hair (adults only)
- Ensure tension is firm but comfortable to avoid scalp stress
Length and Thickness Options:
- Short box braids (chin-length) for younger children
- Medium-length braids (shoulder-length) for versatility
- Long braids for dramatic effect (consider child’s age and activity level)
- Thin braids create more braids but take longer
- Thick braids are faster but create fewer, bulkier plaits
Maintenance Schedule:
- Can last 4-6 weeks with proper care
- Moisturize scalp 2-3 times weekly with light oil or spray
- Sleep with a satin bonnet or pillowcase nightly
- Gently cleanse scalp without roughing up braids
- Re-do edges or front braids as they loosen
- Remove before braids become too matted or tight
Styling Versatility:
- Wear loose and flowing for everyday style
- Pull into high ponytails for sports and activities
- Create half-up styles for varied looks
- Add beads, cuffs, or thread for decoration
- Twist or braid multiple box braids together for updos
Cultural Context:
- Box braids have significant African and African-American heritage
- Protective styling helps maintain hair health and growth
- Teaches children about cultural traditions and hair care
- Celebrates natural hair texture and beauty
- Creates community through shared styling experiences
Essential Tools and Products for Kid’s Braiding
Basic Tools:
- Wide-tooth comb for detangling without breakage
- Rat-tail comb for precise parting and sectioning
- Spray bottle filled with water or leave-in conditioner mixture
- Small hair elastics in various colors (avoid rubber bands)
- Bobby pins in colors matching your child’s hair
- Hair clips for sectioning hair during complex styles
- Soft-bristle brush for smoothing without static
Recommended Products:
- Gentle, tear-free detangling spray for easier combing
- Leave-in conditioner to add moisture and manageability
- Light hold gel or smoothing cream for flyaway control
- Natural oils (coconut, olive, or jojoba) for scalp health
- Edge control for sleek, polished hairlines
- Hair accessories (ribbons, beads, flowers) for embellishment
- Satin or silk pillowcases or bonnets for nighttime protection
Product Selection Tips:
- Choose products specifically formulated for children’s delicate hair and scalp
- Avoid heavy products that weigh down fine hair or cause buildup
- Test new products on a small area first to check for allergic reactions
- Prioritize natural, gentle ingredients over harsh chemicals
- Consider your child’s specific hair type and texture needs
- Read reviews from other parents before purchasing
- Keep products within easy reach of your styling area
Hair Care Tips for Braided Styles
Before Braiding:
- Always start with clean, well-conditioned hair for best results
- Detangle thoroughly using a wide-tooth comb starting from ends
- Apply leave-in conditioner or detangling spray for easier manipulation
- Slightly damp hair is easier to braid than completely dry hair
- Never braid soaking wet hair as it can lead to breakage
During Braiding:
- Maintain consistent tension throughout—not too tight, not too loose
- Check with your child regularly to ensure they’re comfortable
- Tight braiding can cause tension headaches and damage hair follicles
- Take breaks if the styling session becomes lengthy
- Keep hair hydrated with light misting if it dries during styling
After Braiding:
- Apply light oil to the scalp to prevent dryness and itching
- Tie down edges with a silk or satin scarf for the first 20-30 minutes
- Avoid over-manipulating fresh braids immediately after completion
- Teach children not to pull or play with their braids excessively
- Compliment your child’s new style to boost their confidence
Nighttime Care:
- Use a satin or silk bonnet to reduce friction and frizz
- Alternatively, sleep on a satin or silk pillowcase
- Gently re-braid any sections that have loosened if needed
- Apply light oil to scalp before bed to maintain moisture
- Avoid cotton pillowcases which absorb moisture and cause friction
Removal and Recovery:
- Never leave protective styles in longer than recommended
- Remove braids gently, using oil to help slip out tangles
- Deep condition hair after removing long-term braids
- Give hair a break between protective styles to prevent damage
- Trim ends regularly to maintain healthy hair growth
Making Braiding Fun for Kids
Entertainment Strategies:
- Allow children to watch their favorite shows during styling sessions
- Set up a tablet or device at eye level with engaging content
- Tell stories or play verbal games that don’t require movement
- Sing songs together or play audiobooks through speakers
- Let them hold a special toy or stuffed animal for comfort
Comfort Considerations:
- Ensure your child is seated at a comfortable height for you to work
- Provide snacks and drinks before starting (avoid during to prevent messes)
- Take frequent breaks if your child becomes restless or uncomfortable
- Ask for feedback about tension and adjust accordingly
- Create a fun “salon” atmosphere with play music and pretend styling tools
Reward Systems:
- Offer small rewards for sitting patiently through longer styles
- Create a sticker chart for cooperative braiding sessions
- Let children choose their accessories or style as a reward
- Take photos of completed styles to show them how beautiful they look
- Plan a special outing or activity after particularly long styling sessions
Building Positive Associations:
- Make braiding time special bonding time together
- Share stories about your own childhood hairstyles
- Discuss cultural significance and heritage during braiding
- Teach older children to braid on dolls or willing siblings
- Celebrate the artistry and skill involved in creating beautiful styles
Age-Appropriate Expectations:
- Toddlers (2-4 years): Quick, simple styles only; expect limited patience
- Young children (5-7 years): Can handle 15-20 minute sessions with breaks
- Older children (8-12 years): Capable of longer styling sessions with entertainment
- Teens: May want to learn and participate in their own styling
- Adjust complexity and duration based on individual child’s temperament
Conclusion
Throughout this comprehensive guide to 27 Cute Braided Hairstyles for Kids, we’ve explored an incredible variety of braiding techniques that range from beautifully simple to impressively complex.
Each style offers unique benefits, whether you’re seeking quick morning solutions, protective styling for hair health, cultural celebration, or show-stopping looks for special occasions.
Remember that mastering braiding is a journey that improves with practice, patience, and persistence.
Start with simpler techniques and gradually build your skills toward more advanced styles as both you and your child become comfortable with the process.
The most important elements are ensuring your child’s comfort, maintaining hair health, and creating positive experiences that make styling time something you both look forward to.
These braided hairstyles not only keep your child’s hair neat and manageable but also provide opportunities for creativity, cultural connection, and precious bonding moments.
Whether your child prefers classic elegance, bold statements, or playful charm, there’s a perfect braided style waiting to be discovered among these 27 options.
