
Finding the perfect hairstyle for kids with short hair can feel challenging, but braided styles open up a world of creative possibilities that are both adorable and practical.
Short hair doesn’t mean limited options—in fact, it offers unique opportunities for cute, manageable braids that stay put throughout playtime, school hours, and family gatherings.
Whether you’re a parent looking for quick morning hairstyles or seeking special occasion looks, 27 Stylish Braided Hairstyles for Kids with Short Hair will guide you through diverse braiding techniques that work beautifully on shorter lengths.
From mini cornrows and side braids to crown braids and twisted styles, these hairstyles combine charm with functionality, keeping hair neat while allowing children to express their personality.
This comprehensive guide explores age-appropriate styles suitable for toddlers, preschoolers, and elementary-aged children, covering everything from basic three-strand braids to more intricate patterns that create stunning visual effects even with limited hair length.
Each style in this collection considers the delicate nature of children’s hair, prioritizing gentle techniques that protect their scalp and hair health while delivering maximum cuteness.
You’ll discover styling tips, time-saving tricks, and creative embellishments that transform simple braids into statement hairstyles your child will love wearing.
1. Mini Side Braid

Mini side braids are perfect starter styles for children with short hair, offering a sweet accent without requiring much length or complexity.
This simple yet charming look involves creating one or two small braids along the side of the head, keeping hair away from the face while maintaining a playful appearance.
The beauty of mini side braids lies in their versatility—they work for everyday wear, enhance any outfit, and take just minutes to create, making them ideal for busy mornings.
Styling Details:
- Start with slightly damp or dry hair, applying a small amount of detangling spray to make sectioning easier and reduce breakage.
- Part the hair on one side, taking a small section about one inch wide near the temple area.
- Divide this section into three equal strands and braid downward using the basic three-strand technique, keeping the braid tight enough to hold but loose enough to avoid discomfort.
- Secure the end with a small elastic band, preferably one designed for children’s delicate hair.
- For added flair, attach a small bow, flower clip, or colorful elastic to the braid’s end.
- This style works exceptionally well for hair that’s 3-5 inches long and can last throughout the day with minimal touch-ups.
2. Double Dutch Braids on Short Hair

Double Dutch braids create an athletic, neat appearance that’s surprisingly achievable on short hair by adapting the technique to work with limited length.
Unlike traditional Dutch braids that run the full length of the head, the short-hair version focuses on braiding as far as possible and securing creatively.
This style is excellent for active children who need their hair completely secure during sports, dance classes, or outdoor play.
Styling Details:
- Begin with clean, detangled hair, using a light styling cream to add grip and control.
- Create a center part from the forehead to the nape, dividing hair into two equal sections.
- Starting on one side at the hairline, take a small section and divide it into three strands.
- Execute a Dutch braid by crossing the outer strands under the middle strand (opposite of a regular braid), adding small sections of hair with each stitch.
- Continue braiding downward as far as the hair length allows, even if it’s just 2-3 inches.
- Secure with a small elastic band, then repeat the identical process on the opposite side.
- If the braids are very short, use bobby pins to secure them flat against the head for a cleaner finish.
- Add ribbon woven through the braids or colorful elastics at multiple points for decorative enhancement.
3. Crown Braid for Short Hair
The crown braid creates an elegant, princess-like appearance by braiding around the perimeter of the head, working beautifully even with shorter lengths.
This romantic style is perfect for special occasions like birthday parties, family photos, or holidays, giving children a sophisticated look that still feels age-appropriate.
The key to success with short hair is keeping the braid close to the scalp and using strategic pinning.
Styling Details:
- Start with hair that has some texture—second-day hair or hair with light styling product works best for grip.
- Create a deep side part, then begin braiding at the part line on the heavier side.
- Use a Dutch or French braid technique, incorporating hair as you braid along the hairline, moving around the head like a crown or halo.
- Keep the braid tight and close to the scalp to maximize the hair length you’re working with.
- When you reach the starting point or run out of hair to incorporate, braid the remaining length and tuck it under the crown braid.
- Secure the end with bobby pins that match the hair color, hiding them beneath the braid.
- Gently pull on the braid edges to create a fuller, more dimensional appearance.
- Accessorize with small flowers, pearls, or a delicate headband for enhanced elegance.
4. Cornrow Accents
Cornrow accents involve creating one to three sleek, close-to-scalp braids that add stylish detail without requiring extensive length or time.
These braids originated from African braiding traditions and have become popular across cultures for their neat appearance and durability.
For children with short hair, cornrow accents offer a cool, modern look that stays intact for several days with proper care.
Styling Details:
- Work with freshly washed, conditioned, and completely detangled hair for the smoothest results.
- Apply a light braiding gel or edge control product to create hold and shine without heaviness.
- Section off where you want the cornrows—popular placements include along the hairline, creating a side design, or adding them as parallel lines.
- Take a small section of hair and divide it into three strands at the starting point.
- Braid by picking up small amounts of hair from the scalp with each stitch, keeping the braid flat and tight against the head.
- Continue the cornrow as far as the hair length permits, then secure with a small elastic or continue with a regular braid.
- For children new to cornrows, start with just one or two to assess comfort levels.
- This style typically lasts 3-5 days and works best on hair that’s at least 2-3 inches long.
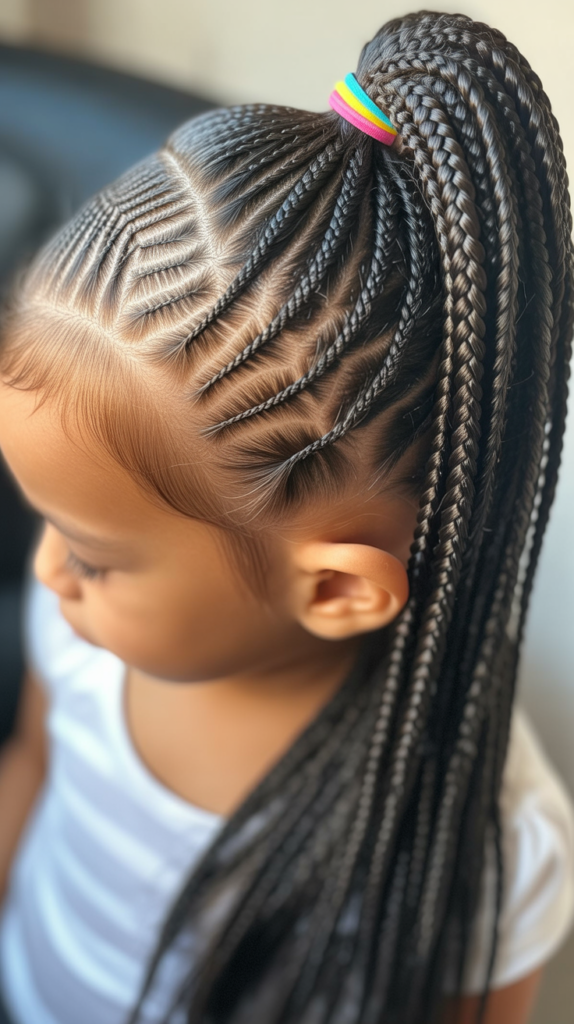
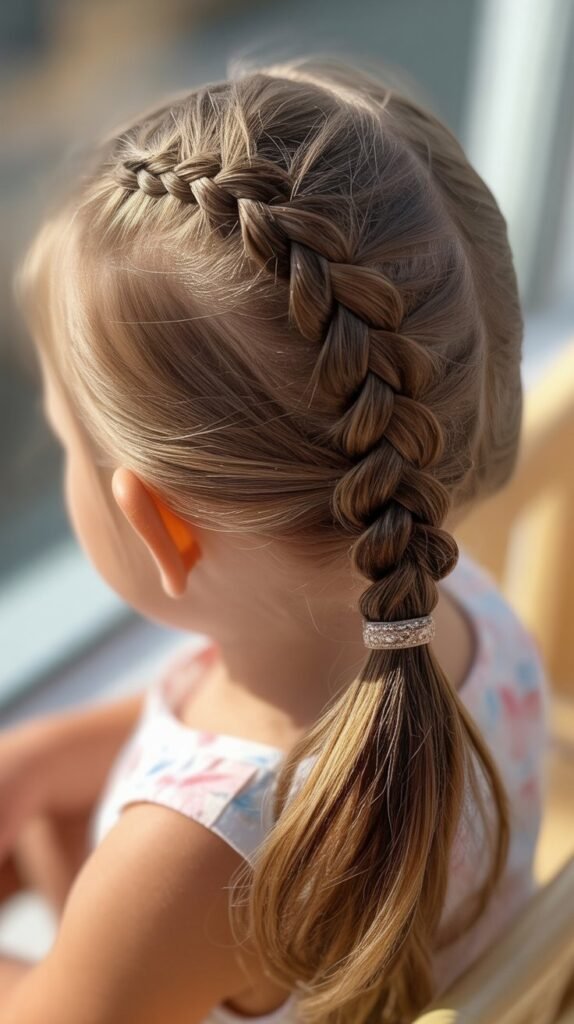
5. Twisted Side Ponytail with Braid

The twisted side ponytail with braid combines two techniques to create a charming, asymmetrical style that maximizes the visual impact of short hair.
This playful look involves gathering hair to one side, incorporating twists and a small braid for added texture and interest.
It’s perfect for children who want something different from standard ponytails but don’t have the length for elaborate styles.
Styling Details:
- Brush hair thoroughly to remove all tangles, applying a light leave-in conditioner for manageability.
- Create a deep side part, determining which side will hold the ponytail.
- On the heavier side, take a section near the part and divide it into two strands.
- Twist these two strands around each other, moving toward the side where the ponytail will sit.
- Secure the twist temporarily with a clip while gathering the remaining hair.
- Collect all hair into a low side ponytail, incorporating the twisted section.
- From the ponytail, take a small section and create a simple three-strand braid.
- Wrap this braid around the ponytail elastic to hide it, securing the end underneath with a bobby pin.
- Leave the remaining ponytail hair loose or add curls with kid-safe styling tools for extra volume.
6. Micro Braids Scattered Throughout

Micro braids scattered throughout short hair create a bohemian, carefree aesthetic that’s surprisingly easy to maintain and wonderfully unique.
Instead of one structured braid, this style features multiple tiny braids placed randomly or strategically throughout the hair.
It’s an excellent choice for children who enjoy distinctive looks and works particularly well during summer months or vacations.
Styling Details:
- Start with dry hair that’s been brushed smooth, working in natural light to see sections clearly.
- Decide on a placement pattern—random scattered braids or specific areas like around the face or crown.
- Take very small sections of hair, approximately the width of a pencil or smaller.
- Create simple three-strand braids, making them as long as the hair permits.
- Secure each micro braid with a tiny elastic band, using colors that either match the hair or create contrast.
- Create anywhere from 5 to 15 micro braids depending on hair density and desired effect.
- These braids can stay in place for several days, making them low-maintenance once installed.
- When removing, carefully cut the elastics and gently unbraid to avoid tangles.
- Add beads, threads, or tiny charms to individual braids for personalized decoration.
7. Zigzag Part with Side Braids

The zigzag part with side braids adds a fun, geometric element to a classic style, creating visual interest through the unconventional parting pattern.
This technique involves creating a zigzag rather than a straight part, then adding small braids on either side.
It’s particularly appealing to children who want their hairstyle to stand out and works on various hair textures and lengths.
Styling Details:
- Begin with damp or dry hair, using a rat-tail comb for precision in creating the zigzag part.
- Starting at the hairline, create the zigzag pattern by moving the comb in alternating diagonal directions as you work toward the crown.
- The zigzag can be subtle or dramatic depending on how wide you make each “zig” and “zag.”
- Once the part is complete, take a section on each side near the temples.
- Create a small three-strand braid on each side, braiding downward for 1-3 inches depending on hair length.
- Secure each braid with a small elastic band in a color that complements the child’s outfit or hair color.
- Leave the remaining hair loose, or gather it into pigtails if there’s sufficient length.
- This style works best when hair is at least 3-4 inches long for optimal braid creation.
8. Waterfall Braid on Short Hair

The waterfall braid creates a cascading effect by dropping strands as you braid, producing a delicate, romantic appearance that adapts beautifully to shorter lengths.
While traditionally done on longer hair, the short-hair version focuses on the front section, creating a pretty accent piece.
This style is ideal for special events where you want an elegant yet youthful look.
Styling Details:
- Work with hair that has slight texture or curl for better grip and visual impact.
- Start at the temple area on one side, taking a section about two inches wide.
- Begin a regular three-strand braid, but after the first stitch, drop the bottom strand and let it fall.
- Pick up a new section of hair from above to replace the dropped strand and continue braiding.
- Repeat this drop-and-replace technique as you braid toward the back or opposite side of the head.
- The dropped strands create the “waterfall” effect, hanging down prettily.
- Secure the end of the braid with a small elastic or bobby pins, tucking it behind the ear or into the hair.
- This technique works best on hair that’s 4-6 inches long for adequate braid length and visible waterfall strands.
- Add small clips or pins with embellishments along the braid for extra sparkle.
9. Boxer Braids Modified for Short Hair

Boxer braids, also known as reverse French braids or tight Dutch braids, create a sporty, sleek look that’s modified for short hair by focusing on the top section.
These braids sit flat against the scalp and are excellent for keeping hair completely secure during physical activities.
The modified version for short hair may not extend far down the head but still delivers the stylish, athletic aesthetic.
Styling Details:
- Start with clean hair, applying a light gel or mousse to add grip and control flyaways.
- Create a center part from the forehead to as far back as possible, dividing hair into two equal sections.
- Clip one section away while working on the other to maintain the part.
- Begin at the hairline, taking a small section and dividing it into three strands.
- Create a Dutch braid by crossing outer strands under the middle strand, adding hair from the sides with each stitch.
- Braid as tightly as comfortable, keeping the braid flat against the scalp for the authentic boxer braid look.
- Continue for 2-4 inches depending on hair length, then secure with a strong elastic band.
- Repeat the process on the other side, ensuring both braids are symmetrical and sit at the same height.
- Use edge control product to smooth any flyaways around the hairline for a polished finish.
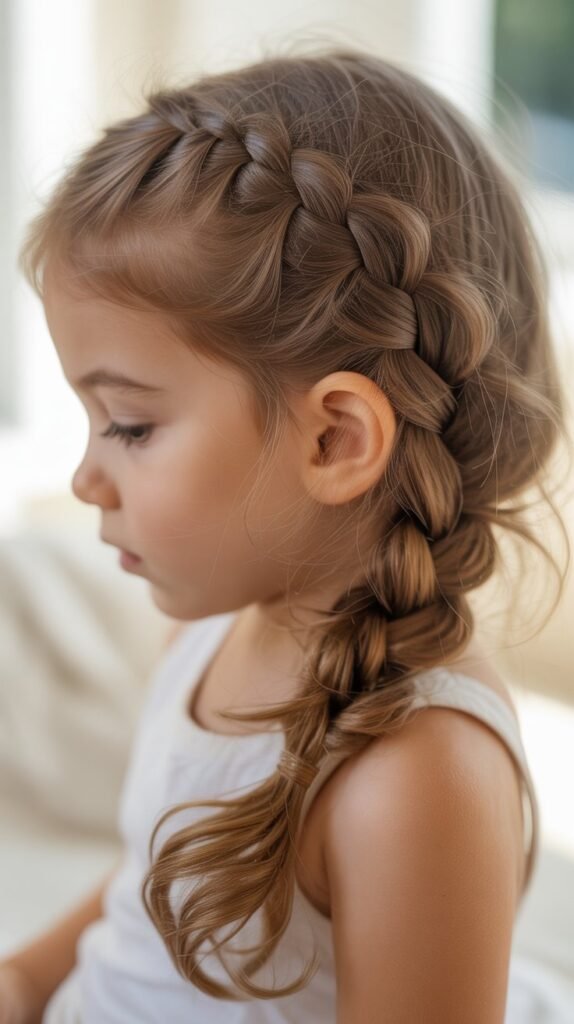
10. Half-Up Braid Crown
The half-up braid crown gathers the top section of hair into a braided band across the crown, leaving the bottom layer loose for a balanced, pretty style.
This versatile look works for both casual and dressy occasions, providing the structure of a braid while maintaining the soft, flowing appearance of loose hair.
It’s particularly effective on short hair as it creates the illusion of more elaborate styling.
Styling Details:
- Begin by sectioning the hair horizontally from ear to ear across the crown, clipping the bottom section away.
- Take the top section and create a center part or side part based on preference.
- Starting on one side, begin a French or Dutch braid at the hairline, incorporating hair as you braid toward the opposite side.
- Keep the braid at crown level, creating a band-like effect across the top of the head.
- When you reach the opposite side, secure the braid with bobby pins, tucking the end underneath to hide it.
- Release the bottom section of hair, allowing it to hang naturally.
- Gently tug at the braid edges to create width and a fuller appearance.
- Add volume to the loose hair by lightly teasing at the roots or using a small curling iron for gentle waves.
11. Side-Swept Braid with Accessories

The side-swept braid with accessories combines asymmetrical styling with decorative elements to create a charming, personalized look perfect for short hair.
This style involves sweeping all hair to one side and creating a braid that’s embellished with ribbons, beads, flowers, or clips.
It’s an excellent choice for children who love expressing their personality through their hairstyle and accessories.
Styling Details:
- Brush all hair to one side, determining which side frames the face most attractively.
- Apply a light styling cream to help hair stay in place and reduce flyaways.
- Gather all accessible hair to the chosen side, using your hand to smooth and direct the hair.
- Create a side braid using whichever technique works best for the hair length—three-strand, rope, or fishtail.
- As you braid, keep it loose enough to weave in accessories but tight enough to hold its shape.
- Secure the end with an elastic band, leaving a small tail if length permits.
- Weave a thin ribbon through the braid, threading it in and out of the braid sections.
- Attach decorative clips, small flowers, or beads along the braid’s length for added visual interest.
- Use bobby pins to secure any shorter layers that don’t quite reach the braid.
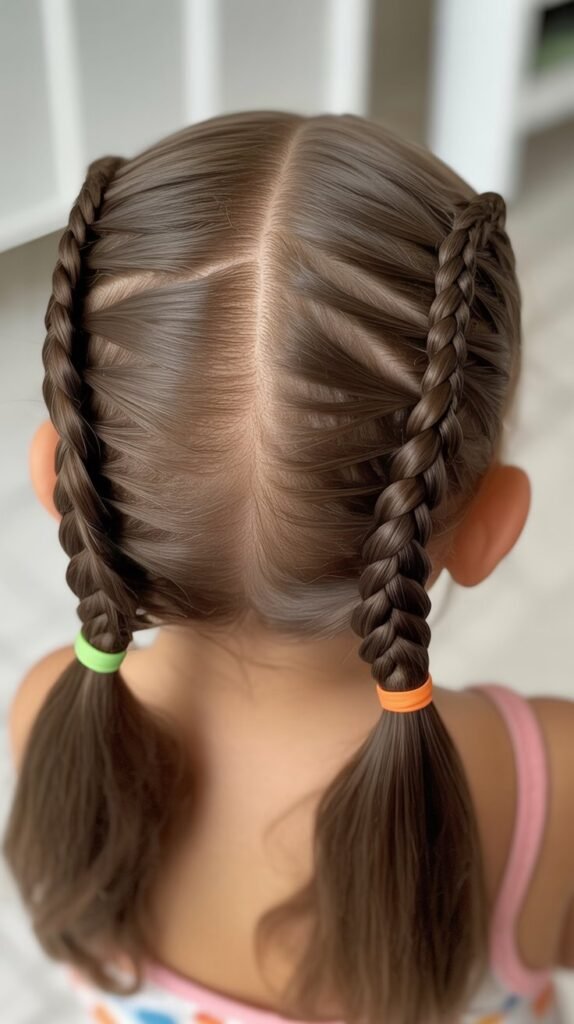
12. Rope Braid Pigtails

Rope braid pigtails offer a simple alternative to traditional three-strand braids, using just two strands twisted together for a unique texture and appearance.
This style is quicker to create than standard braids while still providing a polished, put-together look.
Rope braids work exceptionally well on short hair because they require less length to achieve visible results and stay secure throughout active play.
Styling Details:
- Create a center part from forehead to nape, dividing hair into two equal sections.
- Gather one section into a low or mid-height pigtail, securing with an elastic band.
- Divide the ponytail into two equal strands.
- Twist each strand clockwise (or in the same direction) several times until tight.
- Then wrap the two twisted strands around each other counterclockwise, creating a rope effect.
- Secure the end with another elastic band to prevent unraveling.
- Repeat the entire process on the other side, ensuring both rope braids match in tightness and positioning.
- The twisting technique naturally shortens the hair, making it ideal for shorter lengths.
- Add colorful elastics at intervals along the rope braids for a fun, segmented appearance.
13. French Braid Mohawk Style
The French braid mohawk style creates an edgy, trendy look by braiding a strip down the center of the head while leaving the sides loose or slicked down.
This bold style has gained popularity for its cool aesthetic that appeals to fashion-forward kids and parents alike.
Despite its dramatic appearance, it’s relatively simple to create on short hair and can transition from casual to dressy with the right styling.
Styling Details:
- Section off a strip of hair down the center of the head, approximately 2-3 inches wide, from the hairline to the crown.
- Clip or tie the side sections away to keep them separate while working on the center braid.
- Begin a French braid at the hairline, taking three small sections to start.
- Continue braiding by adding hair from the center strip with each stitch, keeping the braid tight and raised for the mohawk effect.
- Braid as far down as the hair length allows, even if it only extends a few inches.
- Secure the end of the braid with a small elastic band.
- Style the sides by slicking them down with gel or water, or leave them loose for a softer interpretation.
- For extra drama, use a small amount of temporary hair color spray on the braid or add small spikes with styling gel.
14. Criss-Cross Braids at the Crown
Criss-cross braids at the crown create an intricate-looking design that’s achieved by braiding two sections and crossing them over each other.
This style adds dimensional interest to short hair without requiring significant length, making it perfect for creating the illusion of a more complex hairstyle.
The criss-cross technique works beautifully for special occasions or when you want to elevate an everyday look.
Styling Details:
- Create a side part, then section off a triangular area at the crown on the heavier side.
- Divide this section into two smaller sections, creating two separate areas to braid.
- Braid each section using a tight three-strand technique, braiding downward for 1-2 inches.
- Secure each mini braid temporarily with a small clip.
- Take the front braid and cross it over toward the back, pinning it securely with bobby pins.
- Take the back braid and cross it over toward the front, also securing with bobby pins.
- The braids should create an “X” pattern at the crown area.
- Blend any remaining loose hair by smoothing it with the crossed braids or leaving it natural.
- Add small decorative pins at the crossing point for enhanced visual appeal.
15. Bubble Braid Style

The bubble braid style creates a fun, segmented appearance by using multiple elastics to create “bubbles” along a ponytail or braid section.
This trendy style has become popular on social media and works wonderfully on short hair because it adds volume and length perception without requiring extensive natural length.
Kids love the playful, bouncy appearance of bubble braids, making them perfect for school or casual outings.
Styling Details:
- Gather hair into a ponytail at the desired location—high, mid, or low depending on hair length.
- Secure the base with an elastic band, ensuring it’s tight enough to hold but not uncomfortable.
- Measure approximately one inch down from the first elastic and add another elastic band.
- Gently pull at the hair between the two elastics, creating a “bubble” effect by loosening and puffing out that section.
- Continue adding elastics every inch or so down the length of the ponytail, creating bubbles between each one.
- On short hair, you may only achieve 2-4 bubbles, but the effect is still charming and noticeable.
- Use colorful elastics alternating between different colors for added visual interest.
- Finish by gently adjusting each bubble to ensure they’re evenly sized and properly puffed.
16. Diagonal Braid Across the Forehead

The diagonal braid across the forehead creates a sweeping, graceful line that adds sophistication to short hair while keeping bangs and face-framing pieces secured.
This style works as a headband alternative and is particularly useful for growing out bangs or managing shorter front sections.
The diagonal angle adds visual interest that draws the eye across the face in a flattering way.
Styling Details:
- Start on one side near the temple, taking a section of hair about 1-2 inches wide.
- Begin a French or Dutch braid, angling diagonally across the forehead toward the opposite temple.
- Incorporate small sections of hair as you braid, keeping close to the hairline for a headband-like effect.
- Keep the braid relatively tight to ensure it stays in place throughout the day.
- When you reach the opposite temple, secure the braid with bobby pins, tucking the end behind the ear.
- Leave the remaining hair loose or style it as desired.
- This technique works best on hair that’s at least 3-4 inches long in the front section.
- Add a small decorative clip at the end point where the braid is secured for a finishing touch.
17. Ladder Braid on Short Hair

The ladder braid creates a distinctive woven appearance with horizontal sections that resemble a ladder’s rungs, offering a unique and eye-catching style.
While more complex than basic braids, it’s achievable on short hair by working with smaller sections and focusing on the technique rather than length.
This style showcases braiding skill and creates a memorable look for special occasions.
Styling Details:
- Section off a strip of hair where you want the ladder braid, typically along the side or from front to back.
- Begin with a small section at the starting point, dividing it into three strands for a standard braid.
- After braiding one stitch, separate a small piece from the outer strand and clip it aside—this becomes a “rung.”
- Continue braiding, periodically separating these small sections and securing them aside.
- After creating several rungs (3-5 depending on hair length), weave a separate thin braid or ribbon through these separated sections horizontally.
- This creates the ladder effect, with the vertical braid as the sides and the woven sections as the rungs.
- Secure all ends with small elastics or bobby pins, ensuring the structure holds.
- This advanced technique requires patience but creates stunning results even on 4-6 inch hair lengths.
18. Pull-Through Braid

The pull-through braid creates the illusion of an intricate braid without traditional braiding techniques, instead using a series of ponytails that are divided and pulled through each other.
This style is perfect for beginners or parents who struggle with braiding, yet it delivers impressive results.
On short hair, even 2-3 pull-through sections create a beautiful, voluminous effect that looks complex and deliberate.
Styling Details:
- Create a small ponytail at the crown or desired starting point, securing with a clear or matching elastic.
- Leave some hair below the first ponytail, then create a second ponytail directly beneath it.
- Divide the first ponytail into two sections, bringing them around the second ponytail.
- Secure these two sections together below the second ponytail with another elastic, creating a new ponytail.
- Take the second ponytail (now in the middle) and gently pull it outward to create volume and the braided appearance.
- Continue this pattern for as many sections as the hair length allows—typically 2-4 sections on short hair.
- Each “link” should be gently loosened and puffed for maximum visual impact.
- The result looks like a thick, dimensional braid without any actual braiding required.
19. Asymmetrical Double Braids

Asymmetrical double braids create visual interest by intentionally placing braids at different heights or angles on each side of the head.
This modern, artistic approach breaks away from traditional symmetry, appealing to creative kids who want something unique.
The asymmetry can be subtle or dramatic depending on preference and works beautifully on various hair textures and lengths.
Styling Details:
- Create an off-center part rather than a perfectly centered one, dividing hair unevenly.
- On one side, position a braid higher—near the temple or crown area.
- On the other side, position the braid lower—near the ear or nape.
- Both braids can be the same style (three-strand, Dutch, French) or different styles for added contrast.
- Keep one braid tight and the other looser for textural variation if desired.
- Secure each braid with elastics, using different colors or styles on each side to emphasize the asymmetry.
- This intentional imbalance creates a fashion-forward, editorial look that’s surprisingly wearable for everyday.
- The asymmetrical approach works particularly well on short hair as it draws attention to the styling rather than the length.
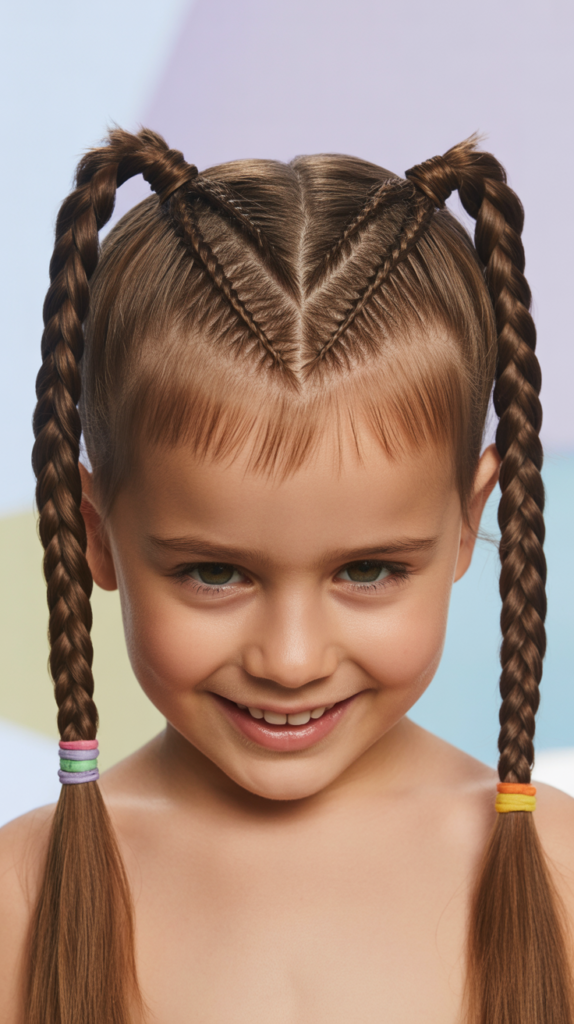
20. Heart-Shaped Braided Design

The heart-shaped braided design creates a romantic, sweet pattern by positioning two braids to form a heart shape at the back of the head.
This adorable style is perfect for Valentine’s Day, special occasions, or any time you want to create something extra special.
While it requires some practice and planning, the result is absolutely worth the effort and generates lots of compliments.
Styling Details:
- Create a center part from the forehead to the crown, stopping at the point where the heart will begin.
- Section the hair into two parts, one on each side of the part.
- On the right side, begin a Dutch or French braid that curves outward and then inward, creating half of a heart shape.
- On the left side, mirror the technique, braiding to match the right side and complete the heart shape where the two braids meet.
- The braids should curve outward at the top (forming the bumps of the heart) and angle inward at the bottom (forming the point).
- Secure both braids together where they meet at the point of the heart with an elastic band or bobby pins.
- This style works best on hair that’s at least 4-5 inches long to create the necessary curves.
- Use a mirror or ask another person for help to ensure the heart shape is symmetrical and positioned correctly.
21. Braided Headband with Loose Hair

The braided headband with loose hair creates a bohemian, effortless look by using the child’s own hair as a headband across the crown.
This style keeps the front sections secure while allowing the rest of the hair to flow naturally, offering both functionality and beauty.
It’s an excellent choice for children who dislike wearing actual headbands but need hair kept away from their face.
Styling Details:
- Take a section of hair from behind one ear, approximately one inch wide, keeping it separate from the rest.
- Braid this section using a standard three-strand technique, braiding all the way to the end.
- Secure the braid’s end with a small clear elastic.
- Bring the braid across the top of the head like a headband, positioning it where a traditional headband would sit.
- Secure the end behind the opposite ear using bobby pins, tucking the elastic end underneath to hide it.
- Leave all remaining hair loose and natural, or add gentle waves for enhanced texture.
- For fuller headband effect, create a braid on each side and cross them over the top of the head.
- This style works best on hair that’s at least 4-6 inches long to reach across the head.
22. Twisted and Braided Combination

The twisted and braided combination incorporates both twisting and braiding techniques in one style, creating rich texture and visual complexity without requiring extensive length.
This approach allows you to maximize the styling potential of short hair by combining techniques strategically.
The interplay between smooth twists and defined braids creates dimension that catches light beautifully and holds shape well.
Styling Details:
- Divide the hair into multiple sections based on the desired pattern—typically 4-6 sections work well.
- Alternate between creating rope twists (two-strand twists) and three-strand braids in adjacent sections.
- For twists: divide a section in two, twist each strand individually, then wrap them around each other.
- For braids: divide a section in three and create standard braids using the classic over-under technique.
- Arrange the finished twists and braids in a pattern—parallel lines, converging toward a central point, or radiating outward.
- Secure each twist and braid with small elastics, then pin them in place if creating an updo or gathered style.
- The combination of techniques creates visual interest that compensates for limited length.
- This style works across various hair textures and can be adjusted for different occasions by changing the arrangement pattern.
23. Side Cornrows with Free-Flowing Hair

Side cornrows with free-flowing hair combine structured braiding with natural volume by creating cornrows on one side while leaving the other side loose.
This style offers the best of both worlds—the sleek, secure appearance of cornrows with the soft, natural look of loose hair.
It’s particularly popular for its asymmetrical aesthetic and practical benefits of keeping hair away from one side of the face.
Styling Details:
- Create a deep side part, determining which side will feature the cornrows.
- On the cornrow side, section the hair into 2-4 rows depending on the width desired and hair density.
- Apply a light braiding gel to the sectioned area for hold and shine.
- Create cornrows by starting at the hairline, keeping the braids tight and close to the scalp, adding hair with each stitch.
- Continue each cornrow as far as the length allows, securing the ends with small elastics.
- Leave the opposite side completely loose, or add gentle curls or waves for contrast.
- The juxtaposition between the structured braided side and flowing free side creates dramatic visual impact.
- This style typically lasts several days and works best on hair that’s at least 3-4 inches long.
24. Bow Braid Accent

The bow braid accent creates an adorable bow shape using braided hair, adding a playful, feminine touch that delights children and admirers alike.
This creative style transforms a simple braid into a decorative element that resembles a hair bow without using any accessories.
While it requires some technique, the bow braid works surprisingly well on short hair and creates a memorable focal point for special occasions or everyday charm.
Styling Details:
- Select a section of hair at the crown or side where you want the bow to appear, approximately 2 inches wide.
- Create a small ponytail with this section, securing it loosely with an elastic band.
- Divide the ponytail in half vertically, creating two loops that will form the bow’s sides.
- Take a small piece from underneath the ponytail and wrap it around the center where the elastic sits, creating the bow’s knot.
- Secure this center piece with a bobby pin underneath to hold the bow shape.
- Gently adjust and shape the two loops to create symmetrical bow sides, pinning if necessary.
- If hair length permits, allow the ponytail ends to hang as bow tails, or tuck them under for a cleaner finish.
- This technique works best on hair that’s at least 4-5 inches long in the section where the bow is created.
- Spray lightly with kid-safe hairspray to maintain the bow shape throughout the day.
25. Infinity Braid

The infinity braid creates a beautiful figure-eight pattern that appears intricate and mathematical yet achieves a soft, romantic result.
This unique braiding technique involves creating loops that interweave in a continuous infinity symbol pattern, producing stunning visual effects.
On short hair, even a partial infinity braid makes a strong style statement and works beautifully as an accent piece combined with loose hair.
Styling Details:
- Section off hair where the infinity braid will be positioned—typically along the side or as a headband across the front.
- Divide the starting section into two equal strands.
- Create the infinity pattern by looping one strand over and under the other in a figure-eight motion.
- With each loop, pick up small sections of additional hair to incorporate into the braid, maintaining the infinity pattern.
- Keep the loops relatively loose to showcase the distinctive pattern clearly.
- Continue the infinity braid for 3-5 loops depending on available hair length.
- Secure the end with a small elastic or bobby pins, positioning the braid to display the pattern prominently.
- This advanced technique may require practice but creates breathtaking results that look professionally styled.
- The mathematical precision of the pattern combined with the soft texture of hair creates appealing contrast.
26. Starburst Crown Braid

The starburst crown braid creates a radiating pattern from a central point, with multiple small braids extending outward like sun rays or star points.
This creative geometric style makes a bold statement and works exceptionally well on short hair since the braids don’t need to be long to achieve the dramatic starburst effect.
It’s perfect for children who want to stand out and don’t mind spending extra time on their hairstyle.
Styling Details:
- Identify the center point of the starburst—typically at the crown or slightly off-center for artistic effect.
- Section the hair into 6-8 triangular sections radiating from this central point, like pizza slices.
- Create a small three-strand braid in each section, braiding outward from the center point.
- Keep the braids relatively tight at the base where they originate from the center.
- As you braid outward, each braid will naturally angle away from the center, creating the starburst pattern.
- Secure each braid’s end with a small elastic, using colors that coordinate or create rainbow effects.
- The braids may only extend 1-2 inches on short hair, but the starburst pattern is still clearly visible and impactful.
- Add small decorative clips or beads at the center point where all braids originate for enhanced visual interest.
- This style works best viewed from above or behind to appreciate the full geometric pattern.
27. Basket Weave Braid

The basket weave braid creates an interwoven checkerboard effect that mimics actual basket weaving, producing a complex-looking pattern that impresses everyone who sees it.
This advanced technique involves braiding multiple sections and weaving them together horizontally and vertically.
While challenging, it can be adapted for short hair by working with smaller sections and focusing on one area rather than the entire head, creating a striking accent piece.
Styling Details:
- Section off a rectangular area where the basket weave will be created—the side of the head or a strip down the center works well.
- Divide this area into 4-6 vertical sections of equal width.
- Create tight three-strand braids in each vertical section, braiding downward.
- Secure each vertical braid temporarily with clips.
- Now create horizontal sections by carefully weaving thin pieces of hair or ribbon through the vertical braids in an over-under pattern.
- Alternate the weaving pattern in each horizontal row to create the authentic basket weave checkerboard effect.
- Secure all ends with bobby pins or small elastics, ensuring the woven structure holds firmly.
- This technique requires significant patience and precision but creates museum-quality results.
- Consider practicing on a doll or mannequin head before attempting on actual short hair.
Essential Tools for Braiding Short Hair
Creating beautiful braided hairstyles for kids with short hair becomes significantly easier when you have the right tools at your disposal.
- Rat-tail comb: Essential for creating precise parts and sectioning hair cleanly, the pointed end helps separate small sections accurately.
- Wide-tooth comb: Perfect for detangling without causing breakage, especially important for children’s delicate hair.
- Small elastic bands: Invest in quality snag-free elastics in various colors to match outfits and hair tones.
- Bobby pins: Choose pins that match the hair color for invisible hold when securing braid ends or creating updos.
- Sectioning clips: Hold hair sections aside while working on specific areas, preventing interference and maintaining organization.
- Spray bottle: Lightly misting hair with water or detangling spray makes it more manageable and easier to braid.
- Light styling products: Keep child-safe gel, mousse, or leave-in conditioner on hand for grip and hold without stiffness.
- Mirror setup: Use a handheld mirror in combination with a wall mirror to check all angles and ensure symmetry.
Hair Health Considerations
Maintaining healthy hair while enjoying braided styles requires attention to several important factors that protect children’s delicate hair and scalp.
- Avoid braiding hair too tightly, as this can cause traction alopecia—gradual hair loss from consistent pulling at the roots.
- Give hair regular breaks between braided styles, allowing at least 1-2 days of loose hair between elaborate braiding sessions.
- Always braid clean, conditioned hair to minimize tangles and ensure the scalp stays healthy beneath the braids.
- Monitor the scalp for signs of irritation, redness, or discomfort, addressing any issues immediately by loosening or removing braids.
- Use gentle, sulfate-free shampoos formulated for children to maintain natural oils while keeping hair clean.
- Apply light moisturizing products to prevent dryness, focusing on the hair lengths rather than saturating the scalp.
- Trim hair regularly to prevent split ends, which can travel up the hair shaft and cause more damage.
- Teach children to communicate if braids feel too tight or uncomfortable, empowering them to advocate for their own comfort.
- Consider hair texture and type when selecting braid styles—some techniques work better for straight hair while others suit curly or textured hair.
- Consult with a professional hairstylist experienced in children’s hair if attempting particularly complex styles for the first time.
Age-Appropriate Styling Guidelines
Different ages require different approaches to braided hairstyles, considering attention span, comfort, and appropriateness.
- Toddlers (2-4 years): Keep styles extremely simple and quick—single side braids, rope braids, or 1-2 cornrows work best with limited sitting tolerance.
- Preschoolers (4-6 years): Can handle slightly more complex styles like double braids, crown braids, or bubble braids that take 10-15 minutes to complete.
- Early Elementary (6-8 years): Often enjoy participating in style selection and can sit still for 15-20 minute styling sessions, making them perfect candidates for waterfall braids, pull-through braids, or decorated styles.
- Older Children (8+ years): May want to learn braiding themselves and can appreciate more intricate designs like basket weave, infinity braids, or asymmetrical patterns.
- Regardless of age, always prioritize comfort over appearance—a child who is uncomfortable will be unhappy despite a beautiful hairstyle.
- Schedule styling during calm times when children are well-rested and fed, avoiding rushed mornings or tired evenings.
- Make styling time enjoyable by allowing children to watch shows, listen to music, or engage in conversation during the process.
- Celebrate their patience and the finished result with enthusiastic praise and perhaps a mirror reveal for added excitement.
Troubleshooting Common Issues
Even experienced parents and stylists encounter challenges when braiding short hair, but most issues have simple solutions.
- Problem: Hair too slippery to braid
- Solution: Apply a small amount of dry shampoo, texturizing spray, or light mousse to add grip without making hair sticky or dirty.
- Problem: Braids unraveling quickly
- Solution: Braid slightly tighter, use stronger elastic bands, and finish with a light mist of hairspray to set the style.
- Problem: Flyaways and frizz
- Solution: Use a small amount of edge control or gel on a toothbrush to smooth baby hairs and wispy sections without over-applying product.
- Problem: Child complaining of discomfort
- Solution: Immediately loosen or remove the braid, give the scalp a gentle massage, and try again with less tension.
- Problem: Difficulty incorporating short layers
- Solution: Use small bobby pins to secure shorter pieces, or embrace the textured look of some pieces falling out naturally.
- Problem: Asymmetrical or uneven braids
- Solution: Use reference points like the ears or eyes to ensure braids are positioned at matching heights and angles.
- Problem: Running out of hair length mid-braid
- Solution: Secure the braid where the length ends and embrace the shorter result, or incorporate the braid into a gathered style using pins.
Seasonal and Occasion-Based Styling
Adapting braided hairstyles to seasons and special occasions maximizes their versatility and appropriateness.
- Summer styling: Focus on styles that keep hair completely off the neck and face—cornrows, boxer braids, and high crown braids prevent overheating during hot weather.
- Winter styling: Incorporate braids that work well with hats and headwear, such as low side braids or braided pigtails that don’t create uncomfortable bumps under winter accessories.
- School days: Choose practical, long-lasting styles like double Dutch braids, rope braid pigtails, or simple side braids that survive recess and physical education classes.
- Sports and activities: Prioritize secure styles that won’t come loose during movement—tight cornrows, boxer braids, or French braid mohawks keep hair controlled during athletics.
- Birthday parties: Add festive elements like colorful elastics, ribbons, beads, or temporary glitter spray to celebrate special occasions.
- Family photos: Select elegant, timeless styles like crown braids, waterfall braids, or half-up braid crowns that photograph beautifully and won’t look dated in future years.
- Holiday themes: Incorporate seasonal accessories—small flowers for spring, patriotic ribbons for summer holidays, autumn leaf clips for fall, or sparkly elements for winter celebrations.
Teaching Children to Braid
Empowering children to learn basic braiding skills builds confidence, fine motor skills, and independence in self-care.
- Start by teaching braiding on a doll, stuffed animal with yarn hair, or even thick rope to develop the fundamental motion without the frustration of working on actual hair.
- Demonstrate the three-strand braid technique slowly and clearly, using three different colored ribbons or yarns so children can track which strand goes where.
- Use simple language like “side over middle” rather than complex directional terms to make instructions easy to follow.
- Allow children to practice on your hair or a sibling’s hair under supervision once they master the technique on practice materials.
- Celebrate small successes enthusiastically, acknowledging that learning to braid takes time and persistence.
- Introduce more complex techniques like French braids or Dutch braids only after three-strand braids are completely mastered.
- Create fun challenges like “braid races” or “braid of the day” contests to keep practice engaging and enjoyable.
- By age 8-10, many children can create simple braids on themselves, though helping with back sections may still be necessary.
Cultural Appreciation and Sensitivity
Braiding has deep cultural significance in many communities, and it’s important to approach all hairstyles with respect and awareness.
- Recognize that many braiding techniques, particularly cornrows and box braids, have origins in African and African American culture with rich historical significance dating back thousands of years.
- Understand that these styles served practical purposes, cultural identity, and even carried messages of resistance and resilience throughout history.
- When choosing braided styles for children, focus on appreciation rather than appropriation by learning about the cultural context and significance.
- Give credit to the cultural origins of styles when discussing them, teaching children to respect and honor diverse hair traditions.
- Consider whether a particular style is appropriate for your child’s hair type and your family’s cultural background, choosing styles that work with rather than against natural hair texture.
- Support businesses and stylists from the communities that originated these techniques when seeking professional braiding services.
- Use braiding as an opportunity to teach children about diversity, history, and the importance of respecting different cultural practices.
- Avoid treating any cultural hairstyle as a costume or temporary trend, instead approaching all styles with genuine respect and understanding.
Product Recommendations for Different Hair Types
Selecting appropriate products ensures successful braiding across all hair textures without causing damage or buildup.
- Fine, straight hair: Use lightweight mousse or texturizing spray to add grip; avoid heavy oils or creams that weigh hair down and make it greasy.
- Thick, straight hair: Apply smoothing cream or light gel to control volume and reduce bulk when braiding; detangling spray helps with initial combing.
- Wavy hair: Embrace natural texture by using curl-enhancing cream or leave-in conditioner that maintains wave pattern within braids while preventing frizz.
- Curly hair: Apply moisture-rich creams or curl defining products before braiding; consider braiding on slightly damp hair for better definition and easier manipulation.
- Coily/kinky hair: Use generous amounts of moisturizing products like shea butter blends, curl custards, or braiding gels designed specifically for textured hair; keep hair well-hydrated to prevent breakage.
- Mixed texture hair: Identify which sections have which texture and apply appropriate products to each area rather than using one product throughout.
- Always choose sulfate-free, gentle formulations designed for children’s sensitive skin and scalp.
- Conduct patch tests with new products to ensure no allergic reactions before applying throughout the hair.
Creating Braid-Friendly Bedtime Routines
Protecting braided styles overnight extends their lifespan and maintains their appearance with minimal morning maintenance.
- Invest in satin or silk pillowcases that reduce friction against braids, preventing frizz and preserving smoothness throughout the night.
- Consider a child-sized satin bonnet or sleep cap that covers braids completely, especially for more intricate styles that need maximum protection.
- For children who resist bonnets, try a satin-lined hood or hoodie that feels more comfortable while still providing protection.
- Before bed, gently smooth any flyaways with a small amount of light oil or edge control product to refresh the style.
- Avoid letting children go to bed with wet or damp braids, as this can lead to mildew odor and scalp irritation.
- If braids have been in for multiple days, lightly mist with water and apply a small amount of leave-in conditioner to keep hair moisturized.
- Check that braids aren’t too tight before bedtime, as lying on overly tight braids can cause discomfort and disrupt sleep.
- Position braids carefully on the pillow to avoid uncomfortable pressure points that might wake children during the night.
Budget-Friendly Styling Solutions
Creating beautiful braided hairstyles doesn’t require expensive products or professional services when you develop skills and use creative alternatives.
- Learn to braid yourself through free online tutorials and practice rather than paying for professional styling except for special occasions.
- Purchase basic supplies in bulk—large packages of elastic bands, bobby pins, and clips cost significantly less per unit.
- Use household items creatively: ribbons from gift wrap, scarves cut into strips, or even clean shoelaces can serve as decorative braid accessories.
- Make your own detangling spray by mixing water with a small amount of conditioner in a spray bottle for a fraction of commercial product costs.
- Shop for hair products at discount stores or during sales, stocking up on favorites when prices drop.
- Organize braid supply swaps with other parents, exchanging accessories, elastics, and styling tools your children have outgrown or no longer use.
- Invest in quality essentials like good combs and brushes that last for years rather than repeatedly buying cheap versions that break quickly.
- Focus on mastering a few versatile styles that can be dressed up or down with different accessories rather than learning dozens of complex techniques.
Conclusion
Finding creative and practical hairstyling solutions for children with short hair opens up unexpected possibilities that combine beauty, functionality, and fun.
The 27 Stylish Braided Hairstyles for Kids with Short Hair presented in this guide demonstrate that limited length never means limited options—instead, it invites innovation, creativity, and the discovery of charming styles perfectly suited to active, growing children.
From quick morning fixes like mini side braids to special occasion showstoppers like heart-shaped designs and basket weave patterns, these braiding techniques transform short hair into canvases for self-expression and artistry.
Each style balances practical considerations like comfort, durability, and age-appropriateness with aesthetic appeal that makes children feel confident and special.
The journey of learning to braid, whether you’re a parent developing new skills or a child discovering their own capabilities, strengthens bonds, builds patience, and creates memories that extend far beyond the hairstyles themselves.
By prioritizing hair health, respecting cultural significance, and embracing the unique characteristics of your child’s hair texture and length, you create styling experiences that nurture both appearance and wellbeing.
These braided hairstyles prove that short hair on children isn’t a limitation but rather an opportunity to showcase creativity, celebrate childhood, and discover that sometimes the most beautiful results come from working with what you have rather than wishing for something different.
