
Morning chaos with tangled long hair doesn’t have to be your daily nightmare anymore.
If you’re a parent struggling to style your child’s beautiful long locks while racing against the clock, you’re not alone.
This comprehensive guide on 28 Adorable Easy Hairstyles for Kids with Long Hair for Busy Mornings is your ultimate solution to transform hectic mornings into smooth, stress-free routines.
Whether you’re dealing with sleepy toddlers, fidgety preschoolers, or independent school-aged children, these hairstyles are designed to be completed in under five minutes without compromising on style or comfort.
From classic braids with modern twists to innovative buns and ponytails that stay put all day, each hairstyle has been carefully selected for its simplicity, durability, and adorable appeal.
You’ll discover styles perfect for school days, playdates, sports activities, and special occasions—all achievable even if you’ve never considered yourself a hairstyling expert.
Get ready to bookmark this page and revolutionize your morning routine with practical, tested techniques that will have your little one looking picture-perfect while you both start the day with smiles instead of tears.
1. The Classic High Ponytail

The classic high ponytail remains a timeless favorite for busy mornings because it combines simplicity with elegance while keeping hair completely off the face.
This style works wonderfully for active children who need their hair secured throughout the day, and it takes less than two minutes to create even for beginners.
How to Create:
- Brush the hair thoroughly from roots to ends to remove all tangles and create a smooth surface.
- Tilt the child’s head slightly back and gather all hair at the crown of the head using both hands.
- Secure with a soft elastic band, wrapping it 2-3 times depending on hair thickness.
- Gently pull small sections from the ponytail to create volume and prevent the style from looking too tight.
- Wrap a decorative scrunchie or ribbon around the base to add personality and hide the elastic.
Best For:
- School days when your child has physical education or outdoor activities.
- Hot summer mornings when keeping hair off the neck is essential for comfort.
- Children with thick, heavy hair that needs strong support throughout the day.
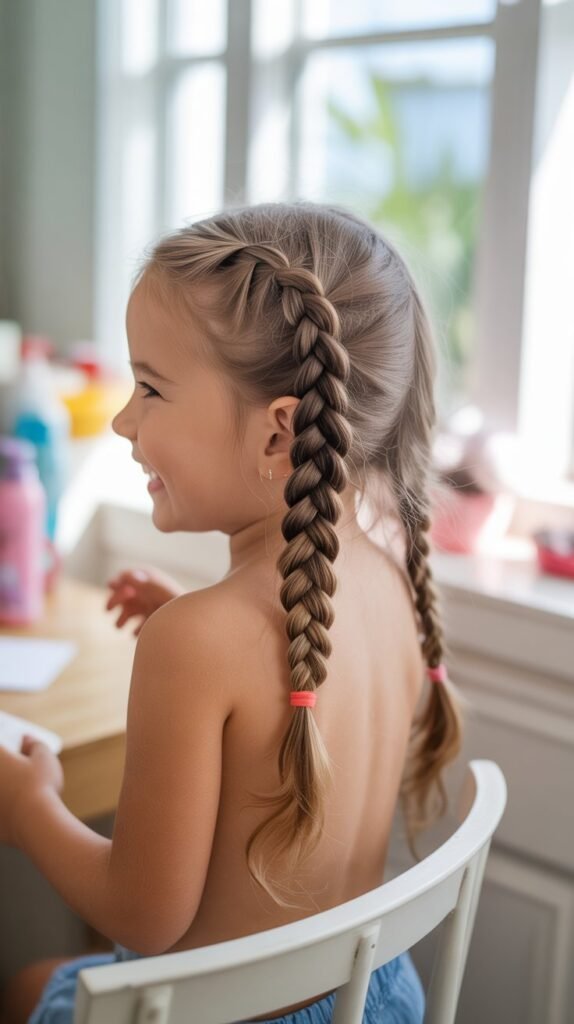
2. Quick Side Braid

The quick side braid offers effortless charm while keeping hair manageable and tangle-free throughout busy days.
This style is particularly forgiving for parents still developing their braiding skills, as small imperfections often add to its casual, carefree aesthetic.
Step-by-Step Process:
- Sweep all hair to one side of the head, choosing whichever side your child prefers.
- Divide the hair into three equal sections at the point where you want the braid to begin.
- Cross the right section over the middle section, then cross the left section over the new middle section.
- Continue this alternating pattern all the way down to the ends of the hair.
- Secure with a small elastic band and gently pull apart sections of the braid to create a fuller, more relaxed appearance.
Styling Tips:
- Add small flowers or decorative pins along the braid for special occasions.
- Use a texturizing spray before braiding to help the style hold better for fine or slippery hair.
- Leave some face-framing pieces loose at the front for a softer, more romantic look.
3. Double Dutch Braids/
Double Dutch braids create a sporty, polished appearance that keeps hair completely secure during even the most active days.
While they may seem intimidating at first, this style becomes remarkably quick with just a few practice sessions and can last for multiple days with proper nighttime care.
Creation Method:
- Part the hair straight down the middle from forehead to nape, creating two equal sections.
- Clip one section away while working on the other to prevent mixing.
- Take a small section at the hairline and divide it into three strands.
- Cross sections under the middle strand (opposite of regular braiding) while gradually adding more hair from the sides with each crossing.
- Continue braiding down to the ends and secure with a clear or matching elastic band.
- Repeat the exact process on the other side, ensuring both braids sit at the same height.
Maintenance Advantages:
- This style can be refreshed for a second or even third day by simply smoothing flyaways with water or leave-in conditioner.
- Dutch braids protect hair from breakage and environmental damage during outdoor play.
- The tight weaving pattern prevents painful tangles that often occur with loose hairstyles during naptime or sports.
4. Messy Top Bun

The messy top bun delivers maximum style with minimum effort, making it the perfect solution when you’re running extremely late.
This intentionally imperfect style actually looks better when it’s not too polished, which means you can create it successfully even in the darkest morning fog.
Quick Instructions:
- Flip the head upside down and gather all hair at the crown using your fingers instead of a brush for added texture.
- Twist the gathered hair loosely around itself to form a coil.
- Wrap the twisted hair around its base in a circular motion to create the bun shape.
- Secure everything with a single hair elastic or multiple bobby pins depending on hair weight.
- Pull out a few strategic pieces around the face and allow some sections to fall naturally for the signature messy appearance.
Perfect Occasions:
- Weekend mornings when comfort takes priority over precision.
- Art class days when you want hair completely up and out of the way.
- Sick days at home when your child needs a comfortable style that won’t irritate them.
5. Half-Up Half-Down with Twist

The half-up half-down hairstyle with twist combines the elegance of styled hair with the freedom of loose flowing locks.
This versatile option works beautifully for both casual and dressy occasions while keeping hair out of your child’s face during activities.
Assembly Steps:
- Section off the top half of the hair from temple to temple, leaving the bottom half free.
- Divide the top section into two equal parts on either side of a center part.
- Take one side and twist it tightly away from the face toward the back of the head.
- Secure the twist with bobby pins or a small clip at the center back of the head.
- Repeat with the other side, ensuring both twists meet at the same point.
- Allow the bottom section to hang naturally or add loose curls for extra flair.
Accessory Ideas:
- Replace plain bobby pins with decorative pearl or flower pins for birthday parties.
- Add a small bow or ribbon at the point where both twists meet for a sweet finishing touch.
- Incorporate tiny braids within the twisted sections for added visual interest and texture.
6. Low Twisted Ponytail

The low twisted ponytail offers a sophisticated alternative to the standard ponytail while remaining incredibly simple to execute.
This style sits comfortably at the nape of the neck and works particularly well for children who find high ponytails uncomfortable or too tight.
How to Achieve:
- Brush all hair back and gather it at the nape of the neck into a low ponytail.
- Secure with an elastic band, but don’t make the final pull-through complete.
- Create a small opening above the elastic band by separating the hair into two sections.
- Take the ponytail end and thread it up through this opening from underneath.
- Pull the ponytail through completely and tighten by gently pulling on the ends.
- Smooth any bumps with your hands or a light application of smoothing cream.
Why It Works:
- The twisted rope effect adds visual interest without requiring any actual braiding skills.
- This style puts minimal tension on the scalp, making it comfortable for all-day wear.
- It transitions seamlessly from morning school drop-off to evening family activities without needing adjustments.
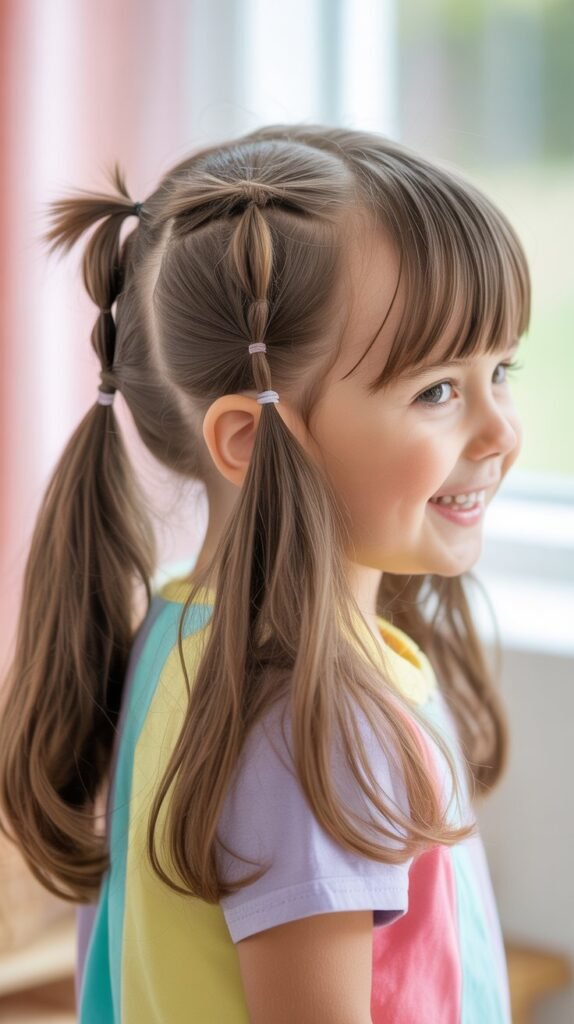
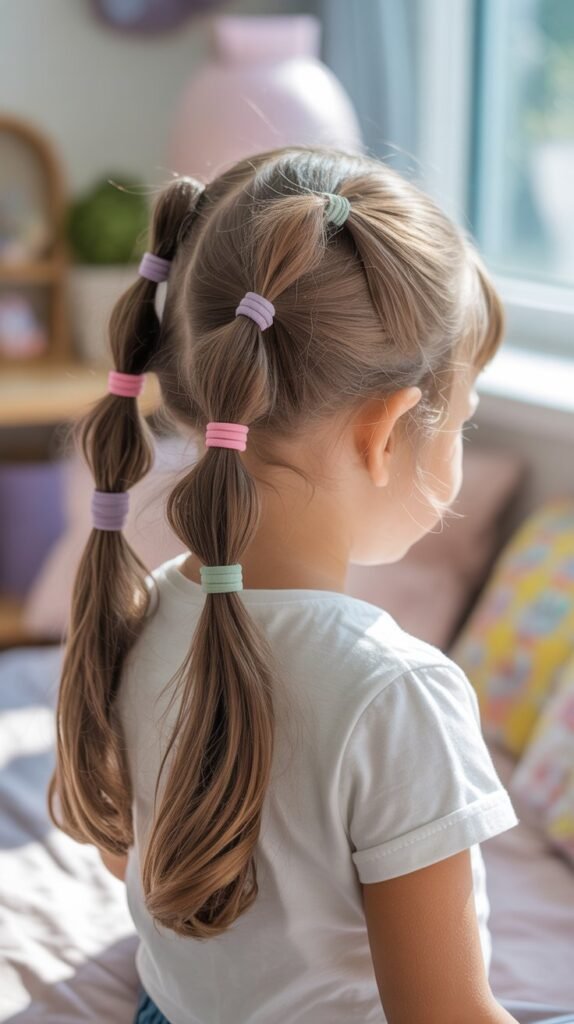
7. Bubble Ponytail

The bubble ponytail has become a social media sensation for good reason—it’s adorable, easy, and surprisingly practical for keeping long hair organized.
This playful style works for various hair textures and can be adjusted in size from subtle to dramatic depending on your preference.
Creation Process:
- Start by creating a high ponytail and securing it with a strong elastic band.
- Measure down approximately 2-3 inches and add another elastic band around the ponytail.
- Gently pull and tease the hair between the two elastics to create the first bubble shape.
- Continue adding elastic bands at regular intervals down the length of the ponytail.
- Fluff each section between elastics by gently pulling the hair outward from all sides.
- Finish by wrapping the very end with a final elastic to prevent the last bubble from unraveling.
Customization Options:
- Use different colored elastics for each section to create a rainbow effect that children absolutely love.
- Vary the size of the bubbles by adjusting the distance between elastic bands.
- Add small ribbon bows or clips to each elastic for extra decoration during special events.
8. French Braid Crown

The French braid crown transforms your child into a little princess with a regal hairstyle that’s actually far easier than it appears.
This style works beautifully for keeping hair completely secured while distributing tension evenly across the scalp for maximum comfort.
Detailed Instructions:
- Part the hair from the center of the forehead around to the center back, creating a circular section.
- Begin French braiding from behind one ear, starting with a small three-strand section.
- Add small amounts of hair from the outer edge only as you braid around the head toward the other ear.
- Keep the braid close to the hairline as you work your way around the entire head circumference.
- When you return to the starting point, continue braiding the remaining length without adding new hair.
- Tuck the braid end underneath the crown and secure with bobby pins that match the hair color.
Special Event Suitability:
- This style is perfect for flower girls at weddings or special ceremonies.
- Dance recitals and performances benefit from this secure, elegant hairstyle that won’t shift during movement.
- Holiday gatherings and family photo sessions become more memorable with this timeless classic style.
9. Simple Low Bun

The simple low bun provides a classic, neat appearance that works for both formal and casual settings while being genuinely achievable in under three minutes.
This style is particularly valuable for children who participate in activities requiring hair to be completely contained and off the neck.
Basic Technique:
- Gather all hair into a low ponytail at the nape of the neck and secure with an elastic.
- Twist the entire ponytail length into a rope-like coil.
- Wrap the twisted hair around the base of the ponytail in a circular motion.
- Tuck the ends underneath the bun and secure with bobby pins inserted from different angles.
- Smooth any flyaways with a light mist of water or hairspray formulated for children.
Professional Applications:
- Ballet classes and dance performances traditionally require this tidy, distraction-free style.
- School picture day benefits from this polished look that photographs beautifully from all angles.
- Formal family events and restaurant dinners call for this sophisticated yet age-appropriate hairstyle.
10. Criss-Cross Ponytails
Criss-cross ponytails create an eye-catching geometric pattern that looks incredibly complex but requires only basic ponytail-making skills.
This creative style keeps hair exceptionally secure while adding an element of fun that children genuinely get excited about.
Step-by-Step Guide:
- Part the hair horizontally across the head from ear to ear, creating top and bottom sections.
- Divide the top section vertically down the middle into two smaller sections.
- Create two ponytails with these top sections, positioning them slightly toward the center.
- Divide the bottom section the same way and create two lower ponytails.
- Now split each top ponytail in half and combine each half with the lower ponytail on the opposite side.
- Secure the newly combined ponytails with fresh elastics, creating the criss-cross effect.
Durability Benefits:
- The multiple securing points prevent the style from loosening during active play or sports.
- This technique works exceptionally well for slippery fine hair that usually slides out of simpler styles.
- The criss-cross pattern creates natural volume and prevents the flat appearance sometimes caused by single ponytails.
11. Rope Braid Ponytail

The rope braid ponytail offers a stunning twisted appearance that’s actually easier to create than traditional three-strand braids.
This style works particularly well for younger children who have difficulty sitting still, as it requires fewer steps and less precision than other braiding techniques.
How to Create:
- Pull all hair into a high or low ponytail depending on preference and secure firmly.
- Divide the ponytail into two equal sections.
- Twist each section tightly in the same direction (clockwise or counterclockwise).
- Once both sections are twisted individually, wrap them around each other in the opposite direction.
- Secure the end with an elastic band and gently pull the rope braid to widen it slightly.
Key Advantages:
- This technique creates less tension on individual hair strands compared to tight three-strand braiding.
- The rope texture naturally prevents the style from unraveling easily throughout the day.
- Even parents with minimal coordination can master this technique after just one or two attempts.
12. Side Swept with Clip
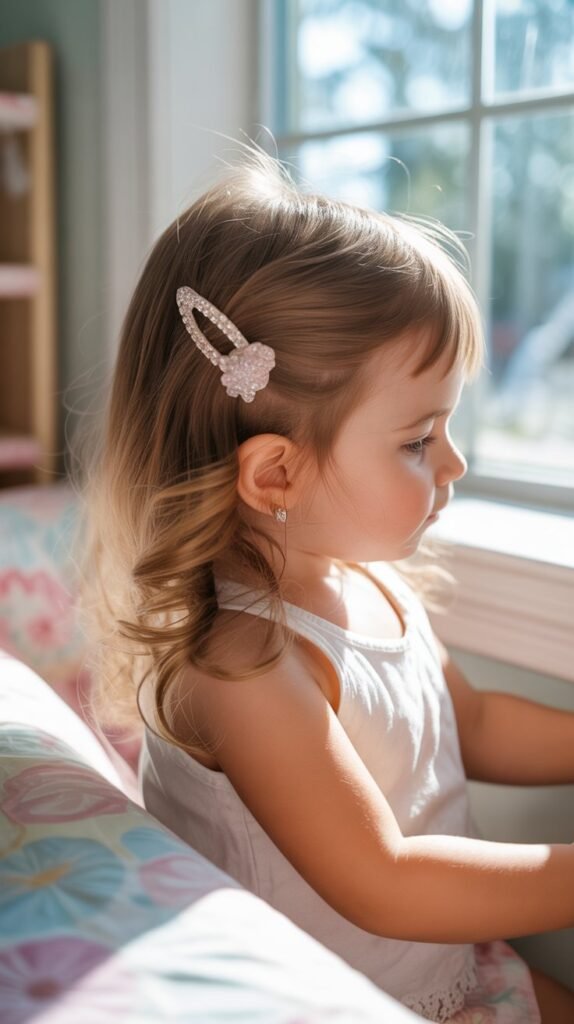
The side swept hairstyle with decorative clip provides effortless elegance while keeping hair away from the face during focused activities.
This no-fuss style is perfect for mornings when you’re running late but still want your child to look put-together and adorable.
Quick Creation:
- Brush all hair to one side of the head, choosing the side that naturally falls better for your child’s hair pattern.
- Gather a section of hair from the heavy side near the temple area.
- Twist this section lightly or leave it smooth depending on desired texture.
- Secure the swept section with a large decorative clip, barrette, or multiple smaller clips arranged in a pattern.
- Allow the remaining hair to cascade over the shoulder on one side for a romantic flowing effect.
Clip Selection Tips:
- Choose clips with secure grips that won’t slide throughout the day, especially for fine or straight hair.
- Match clip colors to school uniforms or outfit choices for a coordinated appearance.
- Invest in a variety of clip styles—from casual everyday options to sparkly special occasion pieces.
13. Braided Headband

The braided headband creates the illusion of wearing an accessory while actually using the child’s own hair for a seamless, natural look.
This style beautifully frames the face while keeping flyaways controlled and the hairline neat throughout busy days.
Assembly Method:
- Take a horizontal section of hair from behind one ear, about one inch wide.
- French braid this section along the hairline toward the opposite ear, adding small amounts of hair from the front only.
- Continue braiding across the entire hairline until you reach the other ear.
- Secure the braid end with a small elastic that matches the hair color.
- Hide the elastic by tucking it behind the ear or pinning it underneath surrounding hair.
- Leave all remaining hair down and flowing, or incorporate it into an additional style.
Versatility Features:
- This style works equally well with straight, wavy, or curly hair textures.
- The braided headband can be combined with other styles like ponytails or buns for added dimension.
- Adding small flowers or decorative pins along the braid transforms this into a special occasion hairstyle.
14. Triple Ponytail Stack
The triple ponytail stack creates impressive volume and length while using a clever stacking technique that’s surprisingly simple.
This Instagram-worthy style makes hair appear much fuller and longer than it actually is, which children often find exciting and confidence-boosting.
Creation Steps:
- Create the first ponytail at the crown of the head, securing it with a clear elastic.
- Take a second section of hair from just below and behind the first ponytail, including the tail from the first ponytail.
- Secure this second section into another ponytail positioned lower on the head.
- Repeat once more by gathering remaining hair along with the second ponytail tail.
- Gently pull and fluff each ponytail section to create maximum volume and coverage.
- The stacked arrangement creates the illusion of one extremely long, full ponytail.
Best Hair Types:
- This technique works exceptionally well for medium to thick hair densities.
- Children with layers or varying lengths benefit from this style as it disguises uneven ends.
- Fine hair appears dramatically fuller when styled using this stacking method.
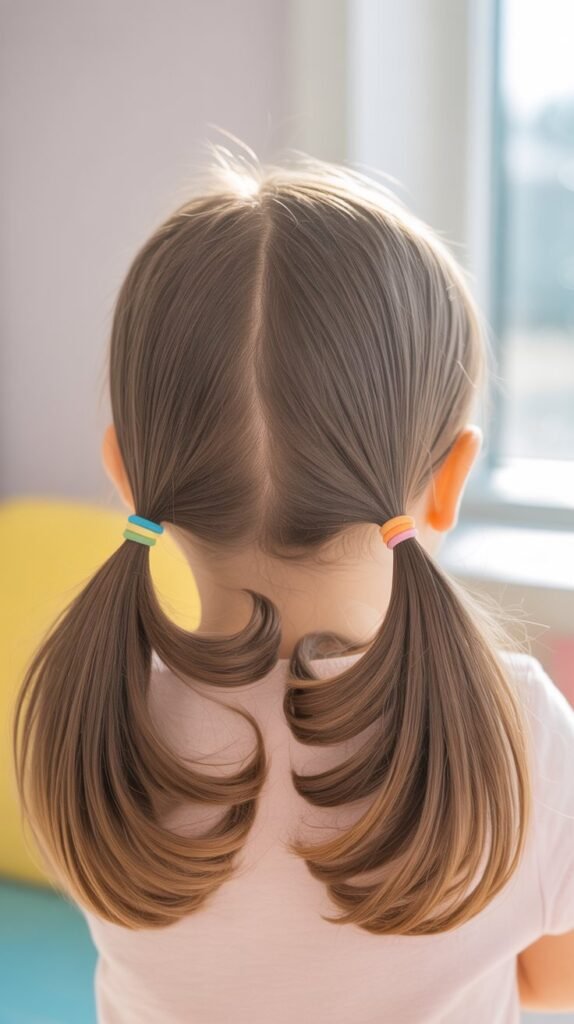
15. Twisted Side Pigtails
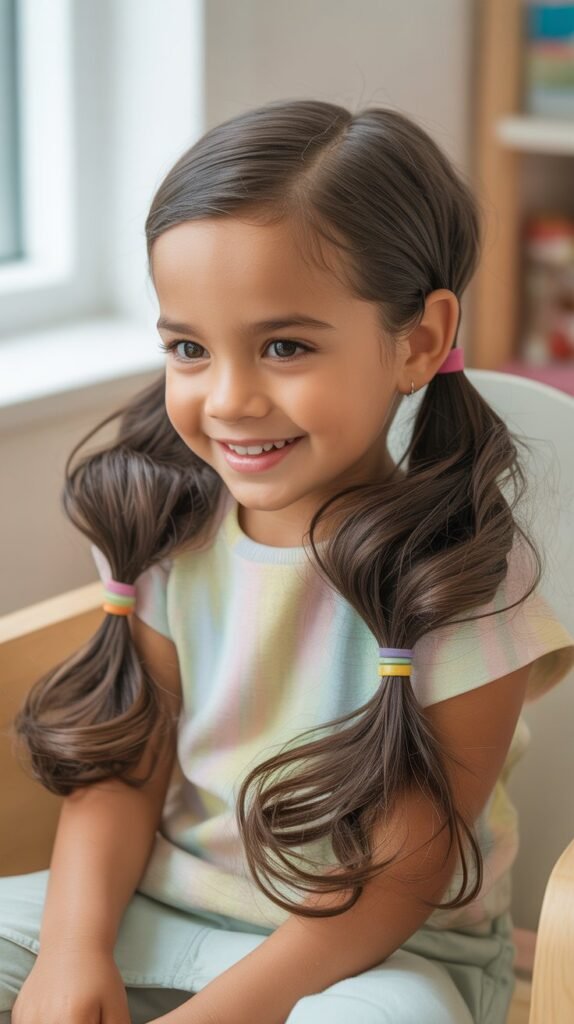
Twisted side pigtails offer a fresh take on the classic two-ponytail look with added texture and visual interest.
This style strikes the perfect balance between playful and polished, making it suitable for both school days and weekend adventures.
How to Achieve:
- Part the hair straight down the middle from forehead to nape, creating two equal sections.
- Gather one section into a low side ponytail position and hold firmly.
- Before securing with an elastic, twist the gathered section several times.
- Wrap an elastic around the twisted section while maintaining the twist.
- Repeat the identical process on the other side, ensuring both sit at matching heights.
- Gently pull small sections from each twist to create a fuller, more relaxed appearance.
Age Appropriateness:
- This style works beautifully for toddlers through pre-teens with minor adjustments in positioning.
- Younger children often prefer higher placement for a bouncy, playful look.
- Older children typically choose lower positioning for a more mature, sophisticated appearance.
16. High Bun with Braided Wrap
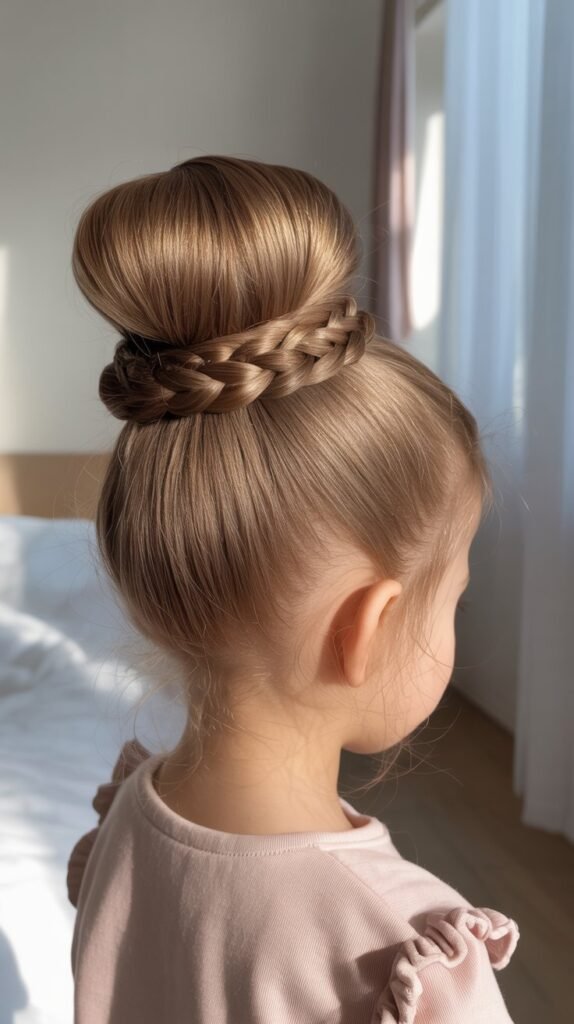
The high bun with braided wrap combines two classic techniques into one show-stopping style that’s perfect for special occasions yet achievable on busy mornings.
This elegant combination keeps hair completely secured while adding an artistic finishing touch that elevates the entire look.
Detailed Process:
- Gather all hair into a high ponytail at the crown and secure with a strong elastic.
- Separate a small section (about one inch) from the underside of the ponytail.
- Create a regular bun with the remaining ponytail hair using your preferred bun technique.
- Secure the bun with bobby pins and ensure it feels stable and comfortable.
- Braid the small section you set aside into a simple three-strand braid.
- Wrap this braid around the base of the bun to conceal the elastic and pins.
- Tuck the end of the braid underneath the bun and secure with a final bobby pin.
Enhancement Suggestions:
- Add small rhinestone pins throughout the braided wrap for recitals or performances.
- Use a donut bun form underneath for extra volume and a more polished shape.
- Finish with a light mist of shine spray to create a glossy, professional appearance.
17. Waterfall Braid

The waterfall braid creates a cascading effect that looks intricate and impressive while being more manageable than it appears.
This romantic style works beautifully for school photos, special events, or any day when you want to create something memorable without spending excessive time.
Creation Instructions:
- Start with a small three-strand section near the temple on one side of the head.
- Begin French braiding by crossing sections over the middle strand.
- After the first cross, drop the bottom strand completely and let it fall free.
- Pick up a new section from the top to replace the dropped strand and continue braiding.
- Repeat this drop-and-replace pattern as you work toward the back of the head.
- Secure the braid with a small elastic once you’ve reached the center back or opposite side.
- Gently pull sections of the braid to create a softer, fuller appearance.
Styling Variations:
- Create waterfall braids on both sides of the head and connect them at the center back.
- Curl the falling strands with a child-safe curling method for added dimension and movement.
- Weave ribbon through the braid as you create it for a special decorative element.
18. Side Fishtail Braid
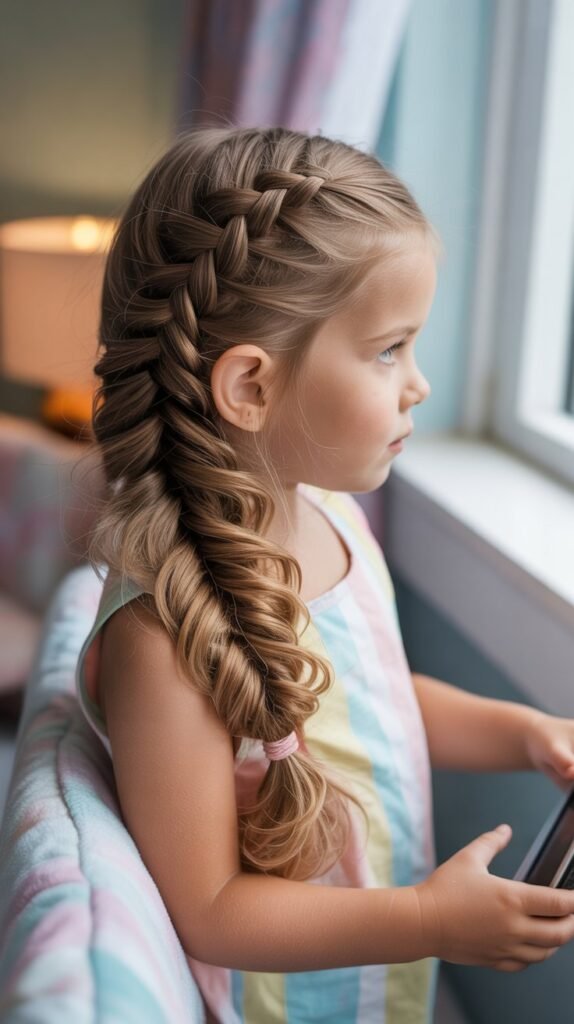
The side fishtail braid delivers bohemian charm with a distinctive woven pattern that sets it apart from standard braids.
While it may take slightly longer than a regular braid, the stunning result is worth the extra minute or two, especially for children who love having unique hairstyles.
Step-by-Step Method:
- Sweep all hair to one side and divide it into two large equal sections rather than three.
- Take a thin strand from the outer edge of the right section and cross it over to join the left section.
- Take a thin strand from the outer edge of the left section and cross it over to join the right section.
- Continue alternating this pattern, always pulling thin strands from the outer edges.
- The smaller the strands you take, the more intricate and detailed the fishtail pattern will appear.
- Secure the end with an elastic and gently pull sections apart for a fuller, more relaxed look.
Time-Saving Tips:
- Practice this technique during calm weekend moments so you can execute it quickly on busy mornings.
- Use a small amount of texturizing product to give grip to slippery hair, making the braiding process faster.
- The looser and messier the fishtail braid, the more forgiving it is of small mistakes.
19. Double Top Knots
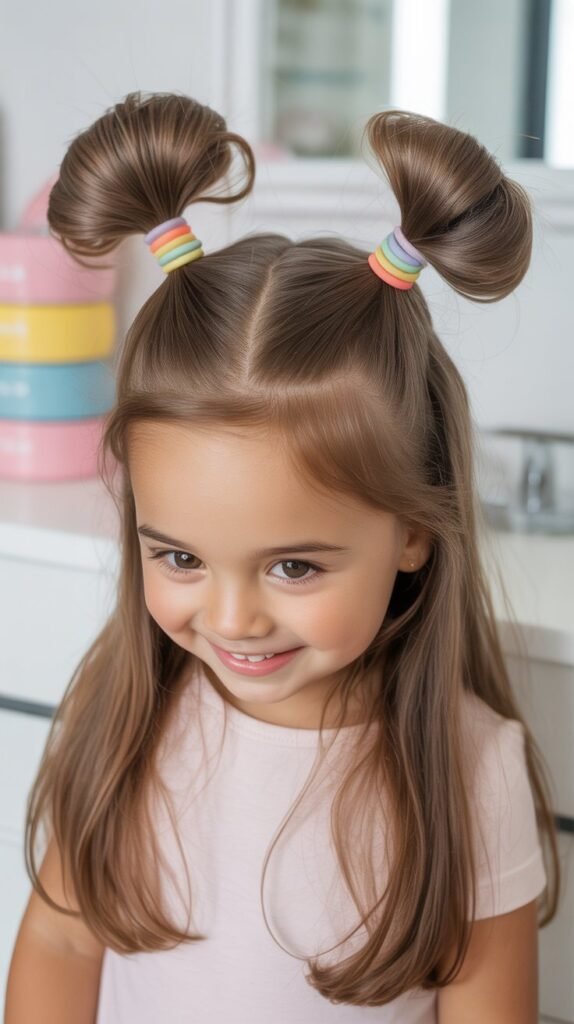
Double top knots create an adorable, youthful look that’s become increasingly popular for its practical benefits and undeniable cuteness.
This style works exceptionally well for toddlers and young children while remaining quick enough for the most hectic morning routines.
Assembly Instructions:
- Part the hair down the middle from forehead to nape, creating two equal sections.
- Gather the top portion of one section at the crown area and secure into a high ponytail.
- Twist the ponytail and wrap it around the base to form a small bun.
- Secure with an additional elastic or several bobby pins depending on hair thickness.
- Repeat the exact process on the other side, ensuring both buns match in size and height.
- Leave the bottom sections of hair loose or gather them into two low pigtails for extra security.
Character Styling:
- This style naturally resembles adorable animal ears, which children often find delightful.
- Add small bow clips between the buns for an extra sweet finishing touch.
- The double bun style works perfectly under hats or headbands without creating uncomfortable bulk.
20. Twisted Crown with Loose Ends
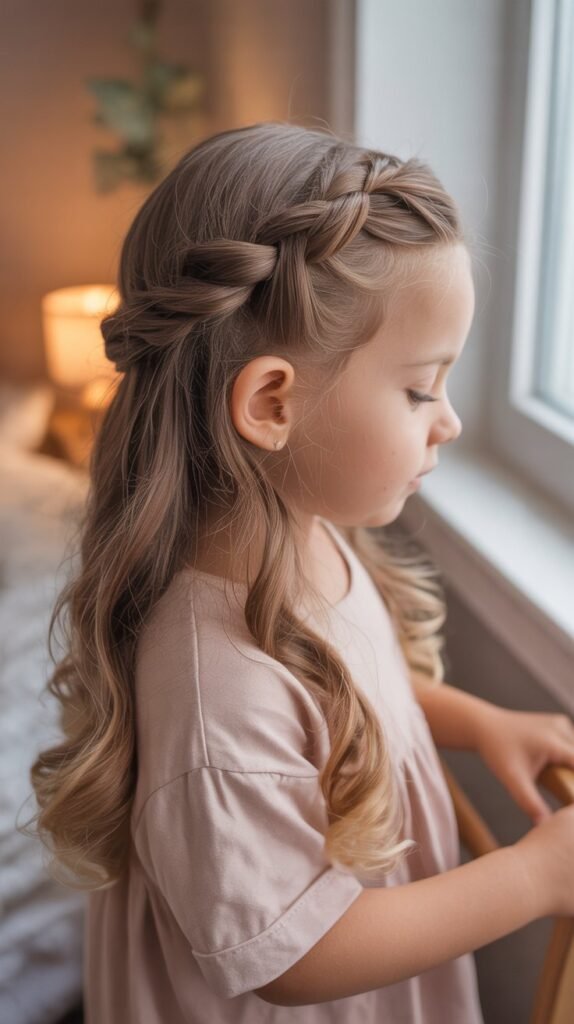
The twisted crown with loose ends offers a fairy-tale princess aesthetic while keeping the front sections of hair controlled and manageable.
This style beautifully combines the security of an updo with the freedom of wearing hair down, making it ideal for children who dislike having all their hair pulled back.
Creation Process:
- Section off the front portions of hair from temple to temple, leaving the back sections free.
- Divide the front section into two equal parts along a center part.
- Take the right section and twist it tightly while moving toward the back of the head.
- Secure the twist temporarily with a clip at the center back.
- Repeat with the left section, twisting toward the center back.
- Secure both twists together with bobby pins, creating a meeting point at the crown.
- Allow all remaining hair to flow naturally down the back and sides.
Occasion Suitability:
- Birthday parties and celebrations benefit from this party-ready yet comfortable style.
- First day of school photos look especially sweet with this polished but youthful hairstyle.
- Outdoor events and garden parties pair perfectly with the romantic, flowing nature of this style.
21. Zigzag Parted Pigtails

Zigzag parted pigtails transform the traditional two-ponytail look with an unexpected geometric part that adds instant personality.
This playful variation takes only seconds longer than a regular center part but creates a dramatically different and fun appearance.
How to Create:
- Use the end of a rattail comb to create the zigzag pattern down the center of the head.
- Start at the forehead and move the comb in a back-and-forth motion toward the nape.
- Keep the zigzag movements consistent in size for a uniform appearance.
- Once the part is complete, gather each section into a ponytail or pigtail position.
- Secure with colorful elastics that complement your child’s outfit or school colors.
- Smooth any flyaways along the part line with a small amount of water or styling product.
Why Kids Love It:
- The unexpected zigzag adds an element of fun that children find exciting and different.
- This small change makes an ordinary hairstyle feel special without additional time investment.
- The technique works equally well with high or low pigtail positioning for versatility.
22. Low Ponytail with Bow

The low ponytail with bow combines simplicity with sweetness, creating a timeless look that never goes out of style.
This classic combination works for virtually any occasion while being achievable even when you’re running significantly behind schedule.
Quick Steps:
- Brush all hair back smoothly and gather it at the nape of the neck.
- Secure with a clear or neutral-colored elastic band.
- Choose a fabric bow, ribbon, or bow clip that coordinates with the outfit.
- Attach the bow directly over the elastic to conceal it completely.
- Smooth any bumps or flyaways around the hairline and crown area.
- For extra security, wrap a small section of hair around the elastic before adding the bow.
Bow Selection Guide:
- Larger bows create a statement look perfect for special occasions and photo opportunities.
- Smaller, subtle bows work better for everyday school wear and activities.
- Velvet bows add texture and visual interest during fall and winter months.
- Grosgrain ribbon bows offer a classic, preppy aesthetic that never goes out of style.
23. Braided Ponytail

The braided ponytail combines the security of a ponytail with the decorative appeal of a braid, creating a style that’s both practical and pretty.
This versatile option prevents the ponytail from tangling during active play while adding texture and visual interest from every angle.
Assembly Method:
- Create a high, medium, or low ponytail depending on preference and secure firmly.
- Divide the ponytail into three equal sections.
- Braid these sections using the standard over-under-over three-strand braiding technique.
- Continue braiding all the way to the ends of the hair.
- Secure the braid end with a small elastic band that matches the hair color.
- Gently pull sections of the braid to create a fuller, more voluminous appearance.
Practical Benefits:
- The braided ponytail prevents tangling during gymnastics, dance classes, and sports activities.
- This style can be slept in comfortably and refreshed the next morning with minimal effort.
- Hair remains more protected from split ends and breakage when contained in a braid.
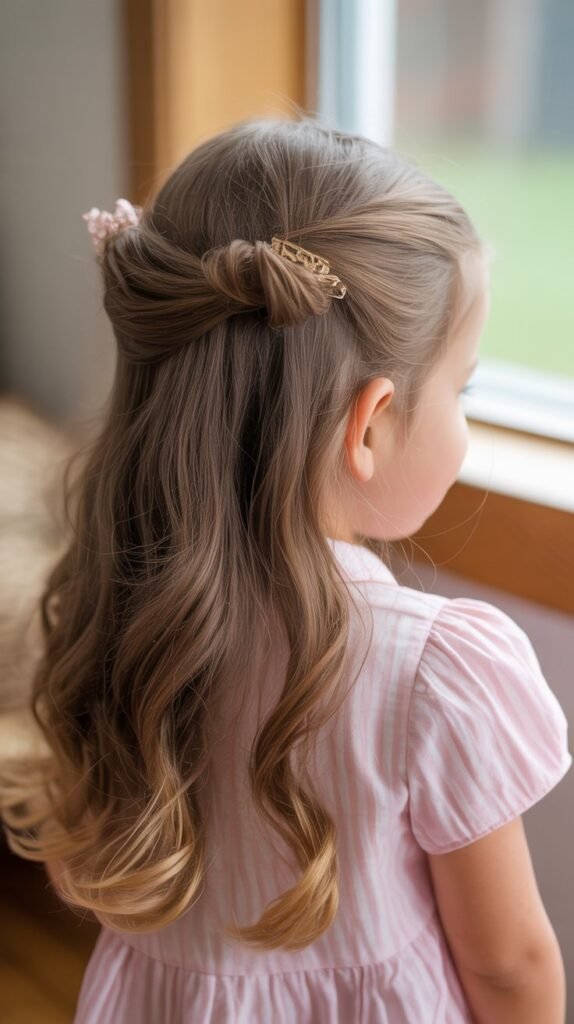
24. Half-Up Bun

The half-up bun offers the perfect compromise between wearing hair up and wearing it down, making it ideal for children who have strong opinions about their hairstyles.
This trendy style keeps face-framing sections controlled while allowing the freedom of flowing hair in the back.
Creation Steps:
- Section off the top half of the hair from temple to temple, gathering it at the crown.
- Secure this section into a ponytail with an elastic band.
- Twist the ponytail length and wrap it around the base to form a bun.
- Secure the bun with bobby pins or an additional elastic, ensuring it feels stable.
- Leave the bottom half of the hair completely loose and flowing naturally.
- Adjust face-framing pieces and smooth any bumps around the hairline.
Styling Flexibility:
- Position the bun higher on the head for a more playful, youthful appearance.
- Create a lower half-up bun for older children who prefer a more sophisticated look.
- Make the bun intentionally messy for a relaxed weekend vibe or neat for school days.
25. Three-Strand Side Braid with Ribbon

The three-strand side braid with woven ribbon elevates a simple braid into something special without requiring advanced skills or significant time.
This charming addition transforms an everyday style into one suitable for parties, performances, or days when your child wants to feel extra special.
How to Create:
- Sweep all hair to one side and divide it into three sections at the starting point.
- Attach a ribbon to the middle section by tying it loosely or securing with a small clip.
- Begin braiding the three sections of hair while incorporating the ribbon with the middle section.
- Continue braiding to the ends, ensuring the ribbon remains visible throughout the pattern.
- Secure the end with an elastic band and tie the ribbon into a bow for a finishing touch.
- Trim any excess ribbon length if it extends too far beyond the braid end.
Ribbon Selection:
- Choose ribbons that complement the outfit colors for a coordinated appearance.
- Satin ribbons create a formal, elegant look perfect for special events.
- Grosgrain ribbons offer more texture and a casual, everyday aesthetic.
- Seasonal ribbons (holiday patterns, school colors) make ordinary days feel more festive.
26. Twist and Pin Half-Up
The twist and pin half-up style delivers elegant sophistication through a remarkably simple technique that any parent can master.
This versatile option works beautifully for school photos, holiday gatherings, or any occasion requiring a polished appearance without the commitment of a full updo.
Step-by-Step Instructions:
- Take a section of hair from the front on one side, approximately two inches wide.
- Twist this section tightly
while moving it toward the back of the head in a diagonal line.
- Secure the twisted section temporarily at the center back with a bobby pin or clip.
- Repeat the same twisting process with a matching section from the opposite side.
- Cross both twisted sections over each other at the center back of the head.
- Secure both twists together with bobby pins or a decorative clip, removing temporary pins.
- Allow the remaining bottom section to flow freely or add loose curls for enhanced elegance.
Enhancement Options:
- Use decorative bobby pins with pearls or crystals for an upgraded appearance.
- Create multiple smaller twists on each side instead of one large twist for added dimension.
- Incorporate small braids within the twisted sections for extra texture and visual complexity.
Comfort Considerations:
- This style distributes tension evenly across the head, preventing the headaches sometimes caused by tight ponytails.
- The pins can be strategically placed to avoid any uncomfortable pressure points on the scalp.
- Children with sensitive scalps tolerate this style well due to its gentle securing method.
27. Criss-Cross Low Pigtails
The criss-cross low pigtails feature an innovative parting technique that creates visual interest while keeping hair neatly sectioned and organized.
This creative variation on traditional pigtails adds personality without requiring additional styling time or advanced techniques.
Creation Method:
- Create a diagonal part from the center front hairline to behind the right ear.
- Create a second diagonal part from the center front to behind the left ear, forming an X pattern.
- Take the top right section and combine it with the bottom left section into one low pigtail.
- Secure this combined section with an elastic at the nape level on the left side.
- Repeat by combining the top left section with the bottom right section.
- Secure the second combined section with an elastic on the right side at matching height.
Pattern Variations:
- Adjust the angle of the diagonal parts to create wider or narrower X patterns.
- Add small braids along each part line before combining sections for extra detail.
- Use different colored elastics for each pigtail to emphasize the criss-cross pattern.
Durability Advantages:
- The intersecting sections create natural tension that helps the style stay secure throughout active days.
- This parting method prevents the flat appearance that sometimes occurs with simple center parts.
- Children with cowlicks or difficult growth patterns often find this style works better than traditional parting.
28. Quick Braided Bun
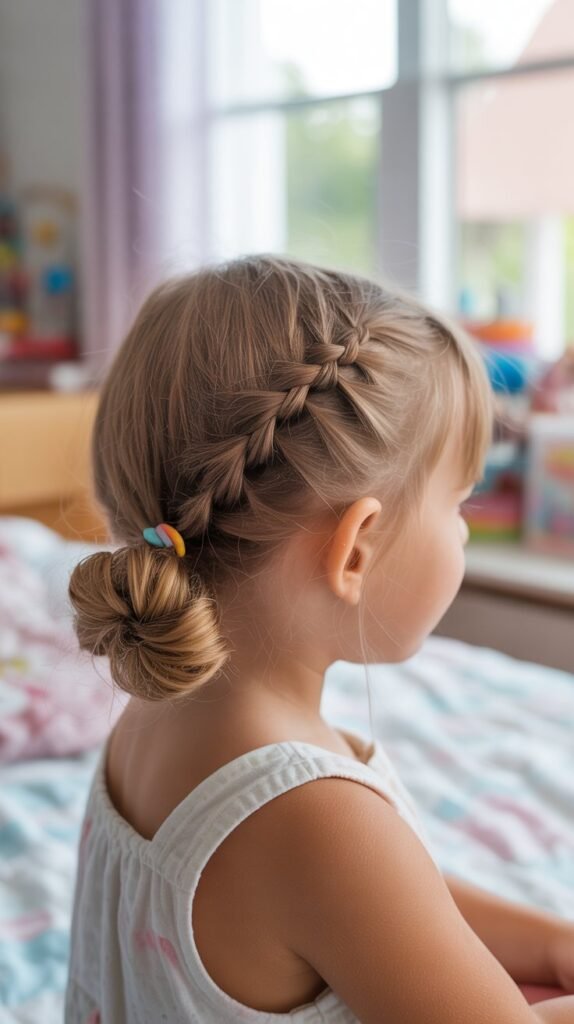
The quick braided bun combines the elegance of a bun with the decorative detail of braiding for a sophisticated look that takes less than five minutes.
This style perfectly demonstrates that impressive hairstyles don’t always require significant time investments or professional-level skills.
Assembly Process:
- Gather all hair into a ponytail at your desired height—high, medium, or low.
- Secure the ponytail firmly with a strong elastic band appropriate for the hair thickness.
- Divide the ponytail into three sections and create a standard three-strand braid to the ends.
- Secure the braid end with a small clear or matching elastic band.
- Wrap the entire braided length around the base of the ponytail in a circular motion.
- Tuck the end underneath the bun and secure everything with bobby pins from multiple angles.
- Smooth any flyaways and ensure the bun feels comfortable and secure.
Style Advantages:
- The braided texture prevents the bun from looking too severe or tight, adding softness to the overall appearance.
- This technique uses less bobby pins than traditional buns because the braid structure provides natural stability.
- The braid creates a rope-like thickness that makes fine or thin hair appear more voluminous.
Professional Applications:
- Ballet performances and dance recitals traditionally require secure buns, and this version adds artistic detail.
- School choir concerts and musical performances benefit from this neat, polished appearance.
- Job shadowing days or professional events call for this mature, sophisticated styling option.
Essential Tools and Products for Morning Hairstyling
Having the right tools readily accessible can transform your morning hairstyling routine from chaotic to calm.
Investing in quality basics ensures that creating these adorable hairstyles becomes easier and faster with each attempt.
Must-Have Tools:
- A wide-tooth comb for gentle detangling without causing breakage or pain.
- A fine-tooth rattail comb for creating clean, precise parts and sections.
- A paddle brush with rounded bristles for smoothing and general brushing.
- Clear elastic bands in various sizes that won’t damage hair or create visible lines.
- Bobby pins in colors matching your child’s hair for invisible securing.
- Small hair clips for sectioning hair while working on different areas.
- A spray bottle filled with water for refreshing styles and taming flyaways.
Recommended Products:
- Leave-in conditioner spray formulated for children to ease detangling and add moisture.
- Light-hold hairspray designed for kids to keep styles intact without stiffness.
- Texturizing spray for fine or slippery hair that won’t hold styles easily.
- Natural oils like coconut or argan oil for adding shine without heavy buildup.
- Detangling brush with flexible bristles that bend to prevent hair breakage.
Organization Tips:
- Keep all hairstyling supplies in a dedicated caddy or basket for quick access.
- Store the caddy in the bathroom or your child’s room where morning styling occurs.
- Replenish elastics and bobby pins weekly to avoid last-minute shortages.
- Involve your child in tool selection by letting them choose colors and accessories they love.
Tips for Making Morning Hairstyling Easier
Successfully styling your child’s long hair on busy mornings extends beyond just knowing the techniques—it requires strategic preparation and realistic expectations.
These practical tips help create a sustainable routine that works for your family’s unique needs and schedule.
Evening Preparation:
- Brush hair thoroughly before bedtime to minimize morning tangles and knots.
- Use a silk or satin pillowcase to reduce friction that causes tangling during sleep.
- Apply a small amount of leave-in conditioner to ends before bed for easier morning brushing.
- Have your child sleep with hair in a loose braid to prevent severe tangling overnight.
- Lay out hair accessories and tools the night before to save precious morning minutes.
Time Management Strategies:
- Wake your child 10 minutes earlier on school days specifically for hair time without rushing.
- Set realistic expectations about which styles are achievable on particular mornings.
- Practice complex styles on relaxed weekend mornings before attempting them on busy weekdays.
- Keep a rotation of 5-7 go-to styles that you’ve mastered for predictable success.
- Use a timer to track how long each style actually takes for better morning planning.
Communication with Your Child:
- Let your child look at pictures and choose their hairstyle the night before when possible.
- Establish clear expectations that hair time is non-negotiable and must happen calmly.
- Make hairstyling time bonding time by chatting, singing, or listening to music together.
- Praise your child for sitting still and cooperating to reinforce positive behavior.
- Allow age-appropriate children to help with simple steps to build independence and skills.
Problem-Solving Common Issues:
- For children who hate hair brushing, try detangling in the bathtub with conditioner applied.
- If your child resists sitting still, let them watch a short video or hold a special toy.
- When running extremely late, have a one-minute emergency style ready (like a simple ponytail with decorative elastic).
- For tender-headed children, work in small sections and hold hair above where you’re brushing to minimize scalp pulling.
- If styles never last until pickup time, investigate whether ponytails are too loose or bobby pins are insufficient.
Age-Appropriate Hairstyle Considerations
Different ages come with different needs, abilities, and preferences when it comes to hairstyling.
Understanding these developmental differences helps you choose styles that your child will actually tolerate and that will survive their typical daily activities.
Toddlers (Ages 2-4):
- Prioritize speed and comfort over complexity since attention spans are extremely limited.
- Choose styles that don’t require perfect stillness, like simple high ponytails or loose braids.
- Avoid using excessive bobby pins that might become safety hazards or cause discomfort.
- Expect styles to loosen or fall out partially—this age group is incredibly active and exploratory.
- Use extra-soft elastics designed specifically for fine baby hair to prevent breakage.
Young Children (Ages 5-8):
- Balance fun, cute styles with practicality for school rules and activity requirements.
- Involve children in choosing their hairstyle to build autonomy and cooperation.
- Teach simple skills like holding sections or handing you tools to make them feel included.
- Consider school dress codes that may restrict certain accessories or styles.
- This age often enjoys matching hairstyles with friends or copying favorite characters.
Preteens (Ages 9-12):
- Respect growing opinions about personal style and preferences for certain looks.
- Introduce more sophisticated styles that reflect their maturing sense of fashion.
- Begin teaching basic hairstyling skills so they can create simple styles independently.
- Be prepared for strong preferences influenced by social media, friends, and trends.
- Discuss the balance between desired styles and the time available on school mornings.
Special Considerations:
- Children with sensory sensitivities may require extra-gentle handling and specific tools.
- Active children in sports need styles that meet coach or team requirements for safety.
- Children with fine or thick hair need different approaches to achieve the same styles.
- Consider your child’s hand coordination development when teaching them to style their own hair.
Hair Care Tips for Maintaining Healthy Long Hair
Beautiful hairstyles start with healthy, well-maintained hair that’s easier to work with and style.
Establishing good hair care habits benefits not only the appearance of these styles but also the long-term health and growth of your child’s hair.
Daily Maintenance:
- Brush hair at least twice daily—once in the morning and once before bedtime.
- Start brushing from the ends and work upward to prevent unnecessary breakage.
- Use a detangling spray on damp hair after washing to make brushing significantly easier.
- Never brush hair when it’s soaking wet as this is when hair is most vulnerable to damage.
- Check for and carefully remove any remaining elastics or pins before bedtime.
Washing Routine:
- Wash children’s hair 2-3 times per week unless it becomes genuinely dirty or oily more frequently.
- Use sulfate-free shampoos designed for children that won’t strip natural protective oils.
- Apply conditioner primarily to the mid-lengths and ends rather than the scalp.
- Let conditioner sit for 2-3 minutes before rinsing for maximum detangling benefit.
- Rinse with cool water as the final step to seal hair cuticles and add shine.
Deep Conditioning Treatments:
- Apply a deep conditioning mask once weekly for children with dry or damaged hair.
- Focus treatment on the ends where damage typically accumulates most severely.
- Cover hair with a shower cap during treatment time to increase product effectiveness.
- Natural options like coconut oil masks work beautifully for chemical-free deep conditioning.
- Always rinse thoroughly to prevent product buildup that can make hair appear greasy.
Trimming Schedule:
- Schedule regular trims every 8-12 weeks to remove split ends and maintain healthy growth.
- Explain to your child that trimming doesn’t significantly change length but improves hair health.
- Trims prevent split ends from traveling up the hair shaft and causing more extensive damage.
- Find a child-friendly salon or stylist who understands working with young clients.
- Consider small rewards after salon visits to create positive associations with hair maintenance.
Protection Strategies:
- Use heat styling tools sparingly and always with a heat protectant product when necessary.
- Protect hair from chlorine damage by wetting it with clean water before swimming.
- Apply leave-in conditioner or oil before pool or beach days for an additional protective barrier.
- Encourage wearing hats during extended sun exposure to prevent drying and color fading.
- Avoid pulling hair too tightly into styles, which can cause breakage and traction alopecia over time.
Troubleshooting Common Morning Hairstyling Challenges
Even with the best techniques and preparation, certain challenges inevitably arise during morning hairstyling routines.
Having solutions ready for these common problems helps maintain your calm and ensures you can still get out the door on time.
Challenge: Severe Tangles and Knots
- Apply a generous amount of detangling spray or leave-in conditioner to the tangled area.
- Use your fingers to gently separate the worst tangles before introducing a brush.
- Start with a wide-tooth comb at the very ends and work upward in small sections.
- Hold hair above the tangle to prevent painful pulling on the scalp while working.
- For impossible knots, apply a small amount of oil or conditioner directly to the knot.
- Prevention: braid hair loosely before bed or use a silk pillowcase to reduce overnight tangling.
Challenge: Hair Won’t Hold Style
- Ensure hair is completely dry before styling, as damp hair doesn’t hold shapes well.
- Apply a small amount of texturizing spray or mousse to give hair more grip.
- Use stronger elastic bands specifically designed for thick or slippery hair types.
- Increase the number of bobby pins used in styles, inserting them from multiple angles.
- Create styles with more twists or braids, as texture naturally provides better hold.
- Consider whether your child’s hair is too clean and slippery—second-day hair often styles better.
Challenge: Uneven or Crooked Parts
- Use the end of a rattail comb instead of trying to create parts with your fingers.
- Work in good lighting where you can clearly see what you’re creating.
- Have your child sit at the proper height so you’re looking down at their head, not from the side.
- Practice creating straight parts on calm weekend mornings when time pressure is absent.
- Remember that slightly imperfect parts often don’t show from the front where others see them.
- For zigzag or decorative parts, embrace imperfection as part of the playful aesthetic.
Challenge: Child Complains of Pain or Discomfort
- Immediately loosen or redo any style that’s genuinely causing pain—tight styles damage hair and scalp.
- Check that elastics aren’t catching and pulling individual hairs, which causes sharp pain.
- Ensure bobby pins aren’t pressing directly against the scalp or poking sensitive areas.
- Distribute ponytails and buns in slightly different positions daily to prevent tension on the same spots.
- Consider that your child might have a sensitive scalp requiring extra-gentle handling techniques.
- Never dismiss complaints of pain—this damages trust and makes future styling sessions more difficult.
Challenge: Style Falls Out Before End of Day
- Evaluate whether the style is appropriate for your child’s activity level that day.
- Use professional-quality elastics that grip better than decorative or thin elastics.
- Apply a light-hold hairspray designed for children after completing the style.
- Teach your child not to touch or play with their hair throughout the day.
- For recurring problems, add extra securing points like additional elastics or bobby pins.
- Accept that some styles are meant for special occasions rather than all-day active wear.
Challenge: Running Late and No Time for Planned Style
- Default to your fastest mastered style rather than attempting something new under time pressure.
- Keep emergency supplies in the car—brush, elastics, clips—for finishing touches en route.
- Use a decorative headband or bow to make a simple ponytail look more intentional.
- Remember that a simple, neat hairstyle is always better than a rushed, messy complex one.
- Consider dry shampoo at the roots if there’s no time to brush, then secure in a simple low ponytail.
- Learn from each late morning and adjust your routine or wake time accordingly for future success.
Seasonal Hairstyle Adaptations
Different seasons bring unique challenges and opportunities for children’s hairstyling, from weather conditions to seasonal activities and dress requirements. Adapting your hairstyle choices throughout the year ensures comfort and practicality while maintaining adorable aesthetics.
Spring Styling:
- Lighter, airier styles work well as temperatures rise and outdoor time increases.
- Incorporate floral accessories, pastel ribbons, and nature-inspired elements.
- Half-up styles keep hair off the neck while allowing spring breezes to flow through.
- Prepare for unpredictable weather with styles that survive sudden rain showers.
- Spring sports and outdoor activities may require more secure styles than winter months.
Summer Considerations:
- Prioritize styles that keep hair completely off the neck and face for maximum cooling.
- High buns, braided crowns, and top knots become essential for hot, humid days.
- Protect styles from pool chlorine and salt water with pre-swimming preparation.
- Use lighter products that won’t feel heavy or greasy in warm weather.
- Embrace messy, textured styles that work with humidity rather than fighting it.
- Consider temporary braids for beach vacations that last multiple days without restyling.
Fall Transitions:
- Incorporate autumn colors through accessories like burgundy, orange, and brown ribbons.
- Back-to-school season often requires quick, reliable styles for early morning routines.
- Cooler temperatures allow for wearing hair down more comfortably than summer.
- Halloween provides opportunities for themed hairstyles with festive accessories.
- Football season and fall sports require secure styles that survive outdoor games and practices.
Winter Styling:
- Account for hats, hoods, and winter gear that can disrupt hairstyles.
- Lower buns and braids work better under winter hats than high ponytails.
- Static electricity becomes a challenge—use leave-in conditioner to combat flyaways.
- Indoor heating dries hair out, requiring more intensive conditioning treatments.
- Holiday events and parties call for special occasion styles with sparkly accessories.
- Shorter daylight hours mean styling often happens in artificial light, requiring good bathroom lighting.
Building Your Child’s Hair Styling Skills
Teaching your child to eventually style their own hair builds independence, confidence, and valuable life skills.
Starting age-appropriately and progressing gradually creates capable young people who can manage their own morning routines.
Ages 5-7: Beginning Skills
- Teach proper brushing technique, including starting from ends and working upward.
- Practice holding sections of hair while you work on other areas.
- Learn to identify tangles and request help before attempting to brush through them.
- Begin recognizing the difference between comfortable and too-tight hairstyles.
- Help gather supplies and accessories needed for each styling session.
Ages 8-10: Intermediate Skills
- Master creating a simple ponytail independently with proper placement.
- Learn basic three-strand braiding on their own hair or practice braids.
- Understand how to section hair evenly for pigtails or two-braid styles.
- Develop the coordination to insert bobby pins and secure simple styles.
- Begin making styling choices and communicating preferences clearly.
Ages 11+: Advanced Skills
- Create multiple hairstyles from this list independently without assistance.
- Adapt basic styles with personal creative touches and variations.
- Manage their own morning hair routine completely from start to finish.
- Research and learn new techniques through videos and tutorials.
- Help younger siblings with simple hairstyles and share their knowledge.
Teaching Strategies:
- Demonstrate techniques on yourself, a doll, or a willing sibling first.
- Break complex styles into small, manageable steps that can be mastered individually.
- Practice during calm weekend moments rather than rushed school mornings.
- Celebrate successes and improvements without criticizing imperfect results.
- Provide age-appropriate tools that are easier to manipulate for developing coordination.
- Remember that building these skills takes time and patience from both parent and child.
Conclusion
Mastering these 28 Adorable Easy Hairstyles for Kids with Long Hair for Busy Mornings transforms one of parenting’s most stressful daily challenges into an opportunity for creativity, bonding, and confidence-building.
Each style in this comprehensive guide has been specifically selected for its achievability, durability, and undeniable charm, ensuring that even the most harried mornings can result in picture-perfect hair that lasts throughout your child’s active day.
From the simplicity of a classic high ponytail to the intricate beauty of a waterfall braid, you now possess a complete toolkit of options suitable for every occasion, skill level, and time constraint.
Remember that perfection isn’t the goal—creating a positive morning experience while ensuring your child feels beautiful and confident is what truly matters.
As you practice these techniques, you’ll discover which styles work best for your child’s unique hair texture, face shape, and activity level, allowing you to develop a personalized rotation that becomes second nature.
The time invested in learning these hairstyles pays dividends not only in smoother mornings but also in the precious moments of connection as you style your child’s hair and prepare them to face their day.
Embrace the journey, be patient with yourself and your little one, and watch as these morning styling sessions evolve from stressful obligations into cherished rituals that both of you will look back on fondly for years to come.
