
Braided hairstyles have become increasingly popular for children of all hair types, offering both style and practicality for busy parents and active kids.
Whether you’re preparing for a special occasion, looking for school-ready styles, or simply want to keep your child’s hair neat and manageable, braids provide endless creative possibilities.
This comprehensive guide explores 30 pretty braided hairstyles specifically designed for white kids, taking into account their unique hair texture and characteristics.
From simple three-strand braids to more intricate designs, you’ll discover styles suitable for various hair lengths, textures, and skill levels.
Each hairstyle includes practical tips, styling techniques, and creative variations to help you master the art of braiding. Get ready to transform your child’s hair into beautiful, long-lasting styles that combine comfort, functionality, and undeniable charm.
1. Classic Three-Strand Braid

The three-strand braid is the foundation of all braiding techniques and serves as the perfect starting point for beginners.
This timeless style works beautifully on straight to wavy hair textures and can be worn for any occasion, from casual playdates to formal events.
Styling Process:
- Brush the hair thoroughly to remove all tangles and create a smooth base for braiding.
- Divide the hair into three equal sections at the desired starting point, whether at the crown, nape, or side of the head.
- Cross the right section over the middle section, then cross the left section over the new middle section.
- Continue this alternating pattern while maintaining even tension throughout the braid to ensure a uniform appearance.
- Secure the end with a hair elastic and gently pull on the braid sections to create a fuller, more voluminous look.
Best For:
- Children with medium to long hair length who are just beginning their braiding journey.
- Quick morning routines when time is limited but you still want a polished appearance.
- Fine to medium hair textures that hold braids well without excessive slipping.
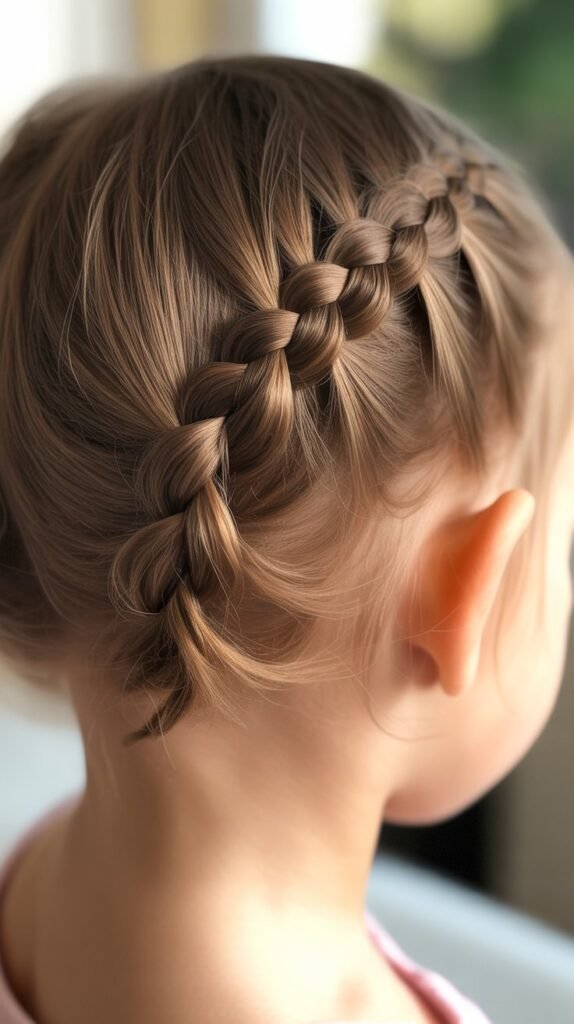
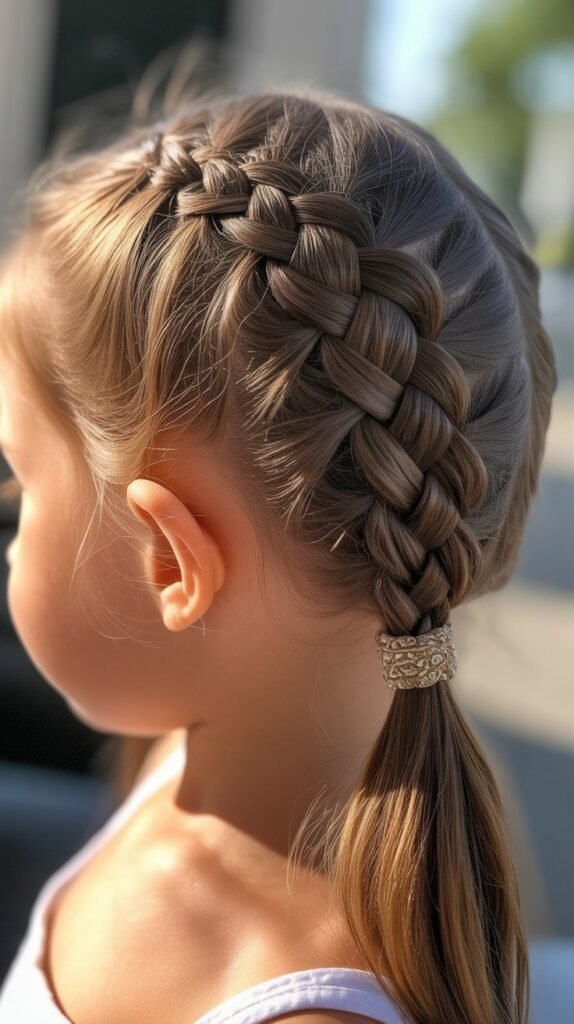
2. Dutch Braid (Reverse French Braid)

The Dutch braid creates a raised, three-dimensional effect that stands out from the scalp, making it an eye-catching alternative to traditional braiding methods.
This technique involves crossing sections under rather than over, resulting in a braid that appears to sit on top of the hair.
Styling Technique:
- Start with brushed, detangled hair and apply a light styling cream to add grip for finer hair textures.
- Take a section of hair at the crown and divide it into three equal parts to begin the braiding process.
- Cross the right section under the middle section, then cross the left section under the new middle section.
- Add small portions of hair from each side as you work down, incorporating them into the outer sections before crossing under.
- Continue braiding down to the nape of the neck and finish with a regular three-strand braid technique.
- Secure with an elastic and pancake the braid by gently pulling on the edges to create width and dimension.
Advantages:
- Provides excellent hold for active children who need their hair to stay in place during sports and play.
- Creates a bold, prominent design that looks more complex than the effort required to achieve it.
- Works exceptionally well on both thick and fine hair when proper tension is maintained throughout.
3. French Braid
The French braid is an elegant, classic style that gathers all the hair smoothly against the scalp while creating a sophisticated woven appearance.
This versatile technique has remained popular for generations due to its practicality and timeless beauty.
Step-by-Step Instructions:
- Begin at the crown of the head with a triangular section of hair divided into three strands.
- Create one standard cross-over motion with the three sections to establish the braid foundation.
- Before the next crossover, gather a small section of loose hair from the right side and add it to the right strand.
- Cross this combined section over the middle strand, then repeat the process on the left side.
- Continue incorporating hair from alternating sides as you braid down toward the nape of the neck.
- Finish with a regular braid once all hair has been incorporated and secure with a decorative hair tie.
Perfect Occasions:
- School days when a neat, contained style is required for active participation in classes and activities.
- Dance recitals, performances, or special events where hair needs to stay perfectly in place.
- Swimming and water activities as the braid keeps hair secure and minimizes tangling when wet.
4. Fishtail Braid

The fishtail braid creates an intricate, woven pattern that looks remarkably complex despite requiring only two sections of hair rather than three.
This stunning style adds texture and visual interest to any hair length beyond shoulder-length.
Creating the Look:
- Divide the ponytail or loose hair into two equal sections instead of the traditional three.
- Take a thin strand from the outer edge of the right section and cross it over to join the left section.
- Take a thin strand from the outer edge of the left section and cross it over to join the right section.
- Repeat this alternating pattern down the length of the hair, keeping the pulled sections thin for a more defined pattern.
- Maintain consistent strand thickness throughout for an even, professional-looking finish.
- Secure the end and gently loosen the braid for a softer, more romantic appearance.
Styling Tips:
- Work with slightly textured or day-old hair as it provides better grip than freshly washed, silky hair.
- Use smaller sections for a more intricate, detailed pattern or larger sections for a quicker, bolder look.
- Add small flowers, ribbons, or decorative pins throughout the braid for special occasions and enhanced visual appeal.
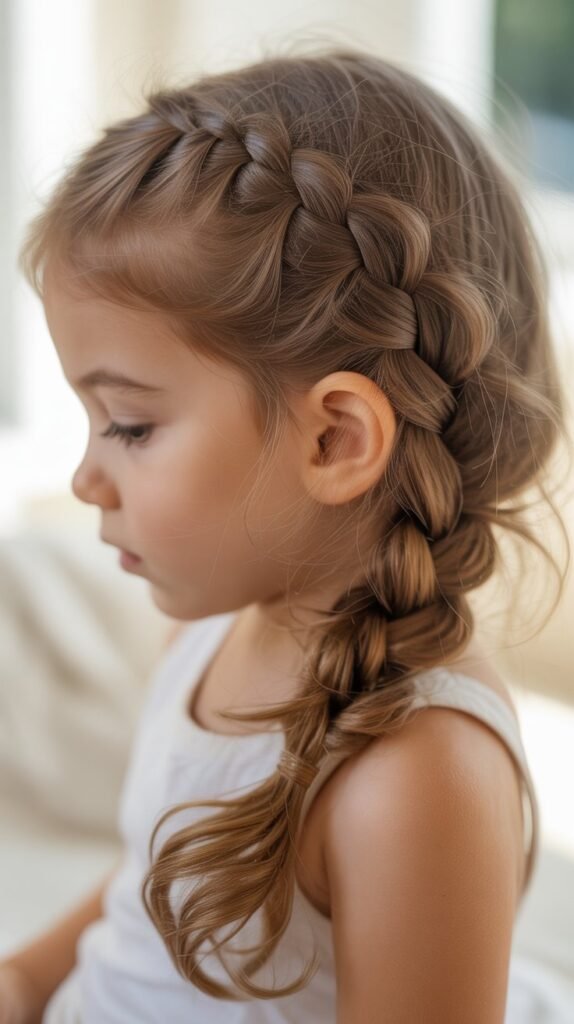
5. Side Braid
The side braid offers a casual, bohemian aesthetic that works beautifully for everyday wear while still looking intentionally styled.
This effortless look can be adapted to various braid types and dressed up or down depending on the occasion.
How to Style:
- Brush all hair to one side of the head, gathering it over the shoulder for easy access.
- Secure with a small elastic at the base of the neck if needed for extra control during braiding.
- Choose your preferred braid style—three-strand, fishtail, or rope braid—and execute it along the side.
- Leave a few face-framing pieces loose at the front for a softer, more romantic effect.
- Finish by securing the end and gently pulling at the braid to create a relaxed, lived-in appearance.
Versatility Options:
- Combine with a side part for an asymmetrical look that flatters most face shapes.
- Add colorful hair chalk or temporary hair color for fun, festival-ready vibes.
- Incorporate small braided sections within the main braid for added texture and dimension.
6. Double Dutch Braids

Double Dutch braids, also known as boxer braids, create a sporty, symmetrical look that has gained immense popularity in recent years.
These parallel braids offer superior hold and keep hair completely secure during vigorous activities.
Braiding Method:
- Part the hair straight down the middle from forehead to nape, creating two equal sections.
- Clip one section away while working on the first braid to keep hair separated and organized.
- Begin the Dutch braid technique on one side, crossing sections under while adding hair from the sides.
- Continue braiding close to the scalp in a straight line down to the nape of the neck.
- Repeat the exact process on the opposite side, ensuring both braids are positioned at the same height.
- Secure both braids with matching elastics and pancake them equally for a balanced, voluminous appearance.
Athletic Benefits:
- Keeps hair completely away from the face during sports, dance, gymnastics, and other physical activities.
- Prevents tangles and knots that commonly occur during active play and movement.
- Lasts for multiple days with minimal maintenance, making it ideal for busy schedules and travel.
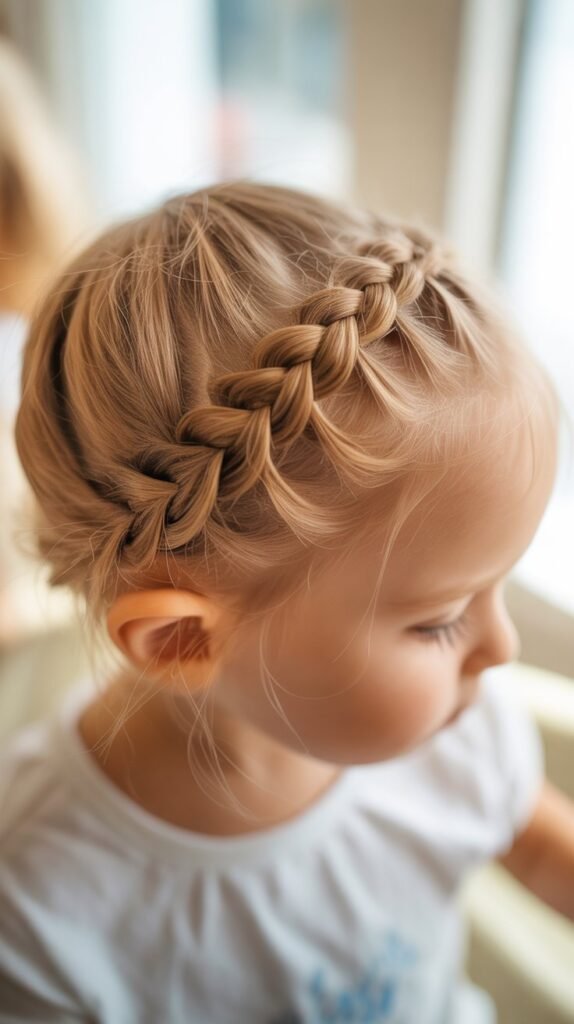
7. Crown Braid (Halo Braid)

The crown braid encircles the head like a halo, creating an angelic, princess-like appearance perfect for special occasions.
This elegant updo keeps all hair secured while showcasing a beautiful, intricate design.
Construction Steps:
- Part the hair horizontally from ear to ear across the back of the head, creating top and bottom sections.
- Begin a Dutch or French braid on one side, starting near the ear and curving around the head.
- Continue braiding along the hairline, following the natural curve of the head toward the opposite ear.
- Incorporate all the hair as you work around the crown, maintaining consistent tension for an even appearance.
- When you reach the starting point, tuck the remaining braid end underneath the crown and secure with bobby pins.
- Use hairspray and additional pins as needed to ensure the style stays secure throughout the day.
Special Occasion Suitability:
- Weddings, flower girl duties, and formal family portraits where an elegant appearance is desired.
- Birthday parties, holiday celebrations, and school events that call for something extra special.
- Costume events and themed parties where a fairy tale or princess look is appropriate.
8. Waterfall Braid

The waterfall braid creates the illusion of cascading strands flowing through a woven braid, resulting in a romantic, ethereal appearance.
This semi-updo style combines the security of a braid with the softness of loose, flowing hair.
Technique Breakdown:
- Begin with a small section of hair near the temple area, dividing it into three strands.
- Start a basic French braid by crossing the top strand over the middle strand.
- Instead of continuing with that strand, drop it and let it fall, creating the waterfall effect.
- Pick up a new section from the top to replace the dropped strand and continue the braiding motion.
- Repeat this drop-and-replace pattern as you work around the head from temple to temple.
- Secure the end with a small, discreet elastic or bobby pins hidden within the hair.
Styling Variations:
- Create a double waterfall braid with a second row below the first for enhanced visual impact.
- Curl the loose cascading sections for added volume, movement, and a more formal appearance.
- Use this technique on one side only for an asymmetrical, modern interpretation of the classic style.
9. Rope Braid

The rope braid offers a quick, twisted alternative to traditional braiding methods while still creating an attractive, textured appearance.
This simple technique works particularly well on hair that tends to slip out of conventional braids.
Creating the Twist:
- Gather the hair into a ponytail and secure it with an elastic at the desired height.
- Divide the ponytail into two equal sections, holding one in each hand.
- Twist the right section clockwise several times until it begins to coil on itself.
- Twist the left section clockwise the same number of times, maintaining consistent tension.
- Wrap the two twisted sections around each other in a counterclockwise direction, creating a rope effect.
- Secure the end with an elastic and apply light hairspray to maintain the twist throughout the day.
Advantages:
- Takes significantly less time than traditional three-strand braiding techniques, perfect for rushed mornings.
- Provides an interesting texture that looks more complex than the simple two-section technique requires.
- Works exceptionally well on layered hair that might otherwise fall out of conventional braids.
10. Bubble Braid
The bubble braid creates a playful, modern look using strategically placed elastics to form rounded sections resembling bubbles.
This trendy style requires no braiding skills whatsoever, making it perfect for beginners or creative kids who want to style their own hair.
Simple Steps:
- Create a ponytail at the desired location, whether high on the crown, mid-height, or low at the nape.
- Place additional elastics down the length of the ponytail at evenly spaced intervals of 2-3 inches.
- Gently pull and loosen the hair between each elastic, creating rounded, puffy sections that resemble bubbles.
- Continue this pattern down the entire length of the ponytail until you reach the ends.
- Use your fingers to carefully adjust each bubble section for uniform size and fullness.
- Spray lightly with hairspray or apply a small amount of texturizing spray for enhanced hold and definition.
Creative Customization:
- Use colorful elastics that match or coordinate with the child’s outfit for a cohesive look.
- Create multiple bubble braids side by side for a more dramatic, statement-making style.
- Vary the bubble sizes for an artistic, asymmetrical interpretation of this playful technique.
11. Pull-Through Braid

The pull-through braid creates the appearance of a complex, chunky braid without any actual braiding technique required.
This illusion braid uses ponytails stacked and pulled through each other to create impressive volume and dimension.
Step-by-Step Process:
- Create a half-up ponytail at the crown of the head, securing it with a clear or matching elastic.
- Make a second ponytail directly below the first using the remaining loose hair from that section.
- Split the first ponytail in half and bring both sections down on either side of the second ponytail.
- Create a third ponytail beneath the second, incorporating the split sections from the first ponytail.
- Continue this pattern of splitting and incorporating ponytails down the length of the hair.
- Gently pull on each section to create fullness and hide the elastics within the voluminous braid.
Best Applications:
- Fine or thin hair that needs extra volume and the appearance of fullness in braided styles.
- Beginners who want an impressive-looking result without mastering complex braiding techniques.
- Photo shoots, special events, and occasions where a statement hairstyle is desired.
12. Milkmaid Braid

The milkmaid braid, also called a crown braid updo, wraps braids across the top of the head for a vintage, countryside-inspired appearance.
This charming style keeps hair completely secured while creating a soft, romantic silhouette.
Styling Instructions:
- Part the hair down the center from forehead to nape, creating two equal sections.
- Braid each section with a standard three-strand braid, securing both ends with elastics.
- Take the right braid and wrap it across the top of the head like a headband, securing with bobby pins.
- Take the left braid and wrap it parallel to the first braid, positioning it just behind the first braid.
- Tuck the ends of both braids underneath each other and secure with additional pins for a clean finish.
- Pull gently on the braids to soften the look and release a few wispy pieces around the face.
Vintage Appeal:
- Perfect for themed events, historical reenactments, or costume parties requiring period-appropriate styling.
- Creates a sweet, innocent appearance ideal for younger children and special photographs.
- Works beautifully with hair accessories like flowers, ribbons, or decorative pins woven throughout.
13. Four-Strand Braid

The four-strand braid elevates braiding to an art form with an intricate, woven pattern that appears professionally styled.
While it requires practice to master, this technique creates a stunning, dimensional result worth the learning curve.
Braiding Technique:
- Divide the hair into four equal sections, numbering them 1, 2, 3, and 4 from left to right for reference.
- Cross section 1 under section 2, then cross section 4 under section 3 to begin the pattern.
- Cross the new section 2 (originally section 1) over the new section 3 (originally section 4).
- Continue this under-under-over pattern, always working with the outermost strands moving inward.
- Maintain even tension throughout to ensure the pattern remains visible and consistent.
- Secure at the end and gently manipulate the braid to enhance its dimensional, woven appearance.
Advanced Styling:
- Incorporate a ribbon as the fourth strand for added color, texture, and visual interest.
- Use this technique for special occasions when a truly unique hairstyle is desired.
- Practice on damp hair with styling product for better control while learning the complex pattern.
14. Lace Braid

The lace braid adds hair to only one side of a French braid, creating a delicate, decorative edge along one side of the head.
This elegant variation works beautifully as an accent braid or headband alternative.
Creating the Delicate Look:
- Begin with a small section of hair near the hairline at the temple or forehead area.
- Start a basic three-strand braid with one standard crossover to establish the foundation.
- Add small sections of hair only from the side closest to the hairline, leaving the other side without additions.
- Continue this one-sided addition pattern along the curve of the head wherever you want the accent braid.
- The braid will naturally curve and lie flat against the head, creating a delicate, lace-like appearance.
- Secure the end with a small elastic and continue as a regular braid or pin it discreetly.
Decorative Uses:
- Frame the face with a braid that follows the hairline from temple around to the opposite side.
- Create multiple lace braids in parallel lines for an intricate, textured updo effect.
- Use as a headband alternative that keeps hair away from the face while adding style.
15. Zig-Zag Braids
Zig-zag braids create visual interest by alternating the direction of the braiding path, resulting in playful, geometric patterns across the scalp.
This creative style showcases personality and artistic flair while maintaining practical functionality.
Pattern Creation:
- Part the hair in a zig-zag pattern using the pointed end of a comb for precision.
- Begin a Dutch or cornrow braid following the zig-zag parting line at an angle.
- When you reach a point in the zig-zag pattern, change the angle of the braid to follow the new direction.
- Continue braiding in alternating angles, creating a geometric, angular pattern across the head.
- Repeat with multiple braids if desired, ensuring all zig-zags angle in the same directional pattern.
- Secure ends with small elastics and apply styling gel for a sleek, polished finish.
Creative Expression:
- Experiment with different angles and numbers of zig-zags for varied geometric effects.
- Combine with straight braids for an artistic mix of patterns and visual texture.
- Add beads or clips at the zig-zag points to emphasize the geometric design.
16. Braided Ponytail

The braided ponytail combines the sleekness of a ponytail with the textured detail of braiding for a style that’s both sporty and sophisticated.
This versatile look works for virtually any occasion and hair length.
Assembly Method:
- Gather all hair into a ponytail at the desired height, smoothing any bumps or flyaways.
- Secure tightly with a strong elastic that can support the weight of the hair.
- Divide the ponytail into sections and braid using your chosen technique—three-strand, fishtail, or Dutch.
- Wrap a small section of hair around the elastic to conceal it for a polished, finished appearance.
- Secure the end of the braid with another elastic and adjust the tightness as desired.
- Pull gently on the braid sections if you want a fuller, more voluminous braided ponytail.
Height Variations:
- High ponytail braids create an energetic, youthful appearance perfect for active days.
- Mid-height ponytail braids offer a balanced, versatile look suitable for most occasions.
- Low ponytail braids provide an elegant, sophisticated style appropriate for formal events.
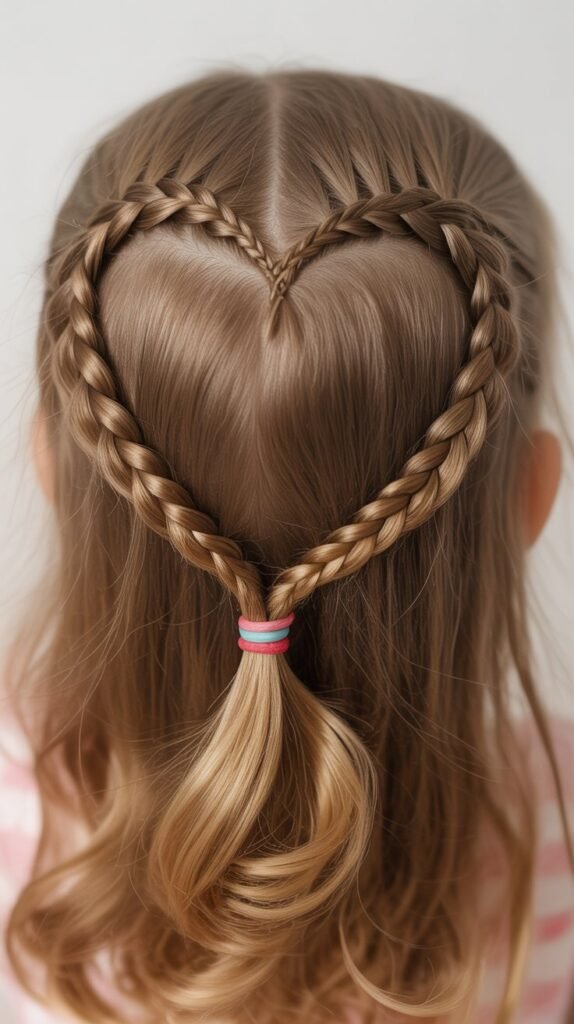
17. Heart-Shaped Braid
The heart-shaped braid creates an adorable, romantic design perfect for Valentine’s Day, special occasions, or any time your child wants to show some love.
This creative style requires patience but delivers a truly memorable result.
Formation Process:
- Part the hair horizontally across the back of the head from ear to ear, clipping the top section away.
- Create a center part in the top section, dividing it into two equal halves.
- Begin a Dutch braid on one side, curving it inward and downward to form one half of the heart shape.
- Mirror the process on the opposite side, ensuring both curves meet at the bottom point of the heart.
- Bring both braids together at the meeting point and continue with a single braid down the remaining length.
- Secure with a red or pink elastic to emphasize the romantic theme and complete the heart design.
Occasion Ideas:
- Valentine’s Day celebrations at school or family gatherings where themed styling is fun and appropriate.
- Weddings, particularly for flower girls who need an extra-special, memorable hairstyle.
- Photo sessions, recitals, or performances where a unique, eye-catching style enhances the overall appearance.
18. Twisted Crown
The twisted crown offers a simplified alternative to braided crown styles while still creating an elegant, regal appearance.
This quick technique uses twists instead of braids for an easier execution with similarly beautiful results.
Twisting Technique:
- Part the hair horizontally from ear to ear, separating the crown section from the lower section.
- Divide the crown section down the middle, creating two equal portions to twist.
- Take one side and twist it tightly away from the face, securing it temporarily with a clip.
- Repeat the twisting process on the opposite side, ensuring both twists have similar tightness.
- Wrap the first twist across the top of the head and secure it with bobby pins along the opposite side.
- Wrap the second twist parallel to the first and tuck the end underneath for a seamless finish.
Quick Morning Solution:
- Takes significantly less time than elaborate braiding while still providing an elegant, put-together appearance.
- Works well on second or third-day hair when natural texture adds grip to the twists.
- Easily dressed up with decorative pins, flowers, or sparkly accessories for special occasions.
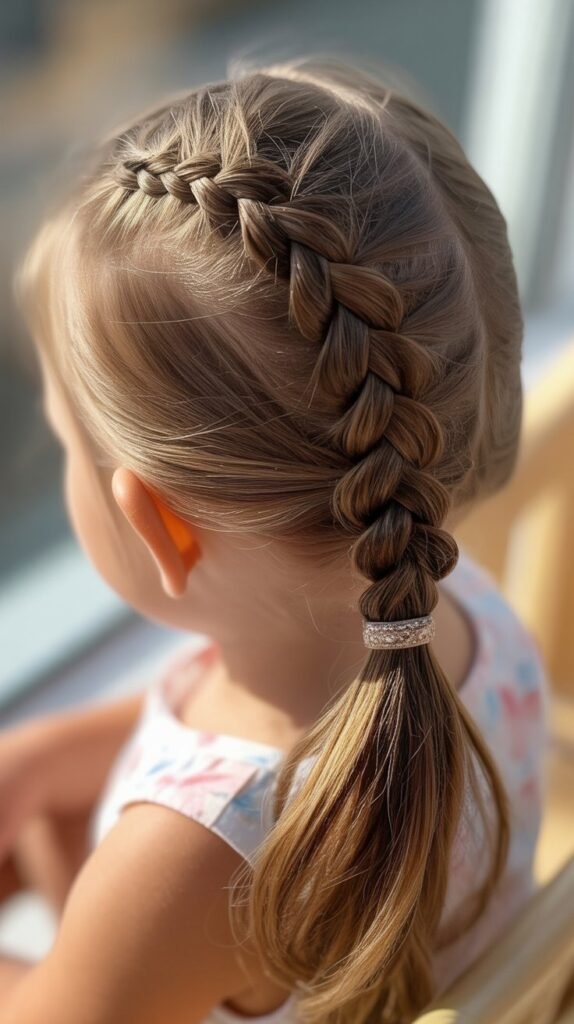
19. Side Dutch Braid into Ponytail

This combination style merges the dramatic effect of a side Dutch braid with the practicality of a ponytail, creating a look that’s both fashionable and functional.
The contrasting textures add visual interest and dimension.
Combination Styling:
- Begin a Dutch braid on one side of the head, starting near the temple or forehead area.
- Braid along the side of the head, curving toward the back and incorporating hair as you go.
- Continue the Dutch braid until you reach the desired ponytail position, typically at the side or back.
- Gather all remaining loose hair together with the braid and secure into a ponytail with an elastic.
- The ponytail can be left straight, curled, braided, or styled in any preferred manner.
- Pancake the Dutch braid section to create contrast between the braided portion and the ponytail.
Style Benefits:
- Combines the security of a braid with the versatility and movement of a ponytail.
- Keeps hair away from one side of the face while maintaining volume and flow on the other side.
- Easily transitions from daytime casual to evening formal by adjusting the ponytail styling.
20. Braided Space Buns

Braided space buns combine the playful, youthful appeal of space buns with the added texture and security of braids.
This fun, trendy style has become increasingly popular among children and teenagers alike.
Building the Buns:
- Part the hair straight down the middle from forehead to nape, creating two symmetrical sections.
- Create a high ponytail on one side, positioning it where you want the space bun to sit.
- Braid the ponytail using your preferred technique—three-strand, fishtail, or rope braid work beautifully.
- Wrap the braided ponytail around its base in a circular motion, forming a bun shape.
- Secure with bobby pins and repeat the exact process on the opposite side for matching buns.
- Gently pull on the buns to create fuller, more voluminous shapes and adjust for symmetry.
Playful Personality:
- Perfect for casual outings, festivals, concerts, and fun events where a playful style fits the atmosphere.
- Easily customized with different braid types for varied textures and visual effects.
- Works especially well with hair accessories like scrunchies, ribbons, or colorful elastics that match the outfit.
21. Mohawk Braid

The mohawk braid creates an edgy, fashion-forward look by braiding a strip of hair down the center of the head while leaving the sides smooth or styled differently.
This bold style makes a statement while keeping hair secured and manageable.
Creating the Edge:
- Section a wide strip of hair down the center of the head from forehead to nape, approximately 2-3 inches wide.
- Clip the side sections away or smooth them back and secure them to keep them separate from the mohawk section.
- Begin a Dutch braid at the hairline, working down the center strip to create the raised mohawk effect.
- Continue braiding all the way down the center section, maintaining consistent width and tension throughout.
- The braid should stand slightly raised from the head, creating the distinctive mohawk silhouette.
- Finish with a small elastic and style the sides sleekly or add small accent braids for additional detail.
Bold Statement:
- Appeals to children who want a unique, trendy style that stands out from traditional braiding options.
- Works exceptionally well for sports and activities as all hair is secured close to the scalp.
- Can be softened with loose face-framing pieces or amplified with gel for maximum dramatic effect.
22. Diagonal Braids
Diagonal braids create dynamic movement and visual flow by braiding at angles rather than straight down or across.
These artistic braids demonstrate advanced styling while offering excellent hold for active children.
Angled Approach:
- Create diagonal partings using the pointed end of a rattail comb for precise, clean lines.
- Begin Dutch or cornrow braids at the top corner of each diagonal section, following the angled part.
- Continue braiding along the diagonal line, maintaining the angle consistently down to the nape of the neck.
- Multiple diagonal braids can run parallel to each other, all angling in the same direction for cohesive flow.
- Secure the ends with small elastics and apply light styling gel along the partings for definition.
- The resulting pattern creates visual movement and interest that sets this style apart from vertical or horizontal braids.
Artistic Direction:
- Experiment with braids angling from right to left or left to right depending on personal preference.
- Combine with straight braids for an artistic mix of angles and directions that showcase creativity.
- Add colored extensions or temporary hair chalk along specific braids to emphasize the angular pattern.
23. Braided Headband

The braided headband creates a natural hair accessory by braiding a section along the hairline while leaving the remaining hair loose and flowing.
This practical yet pretty style keeps hair away from the face without requiring any actual headband.
Headband Creation:
- Section off a strip of hair along the hairline from ear to ear, approximately 1-2 inches wide.
- Begin a standard three-strand braid on one side, starting near the ear and working across the forehead.
- Continue braiding along the hairline toward the opposite ear, maintaining consistent thickness throughout.
- Secure the end with a small elastic that matches the hair color for a discreet finish.
- Pin the braid end behind the opposite ear or blend it into the loose hair for seamless integration.
- The remaining hair can be worn straight, curled, or in a ponytail while the braided headband frames the face.
Practical Beauty:
- Keeps bangs and shorter face-framing pieces secured away from the eyes and face.
- Adds style and detail to otherwise simple hairstyles like loose, flowing hair or casual ponytails.
- Works perfectly for sports, outdoor activities, or any situation where hair needs to stay out of the face.
24. Boxer Braids with Design

Boxer braids with design take traditional double Dutch braids to the next level by incorporating shaved or drawn patterns in the parting between braids.
This trending style offers creative expression and bold visual impact.
Enhanced Technique:
- Create a center part from forehead to nape, but instead of a straight line, design a pattern using the comb.
- Common patterns include zig-zags, waves, hearts, or lightning bolt shapes drawn into the scalp.
- Use hair chalk, temporary color, or leave the parting as-is to showcase the designed pattern.
- Braid Dutch braids on either side of the patterned parting, keeping them tight and close to the scalp.
- The contrasting braids on either side frame and emphasize the creative parting design.
- Secure both braids and apply gel along the parting to ensure the pattern remains visible and defined.
Creative Options:
- Experiment with different parting designs to match holidays, seasons, or personal interests.
- Add glitter gel along the designed parting for sparkle and enhanced visibility of the pattern.
- Combine multiple techniques like beads, cuffs, or wraps within the braids for maximum style impact.
25. Five-Strand Braid

The five-strand braid represents the pinnacle of braiding complexity, creating an incredibly intricate, wide pattern that showcases advanced skill.
While challenging to master, this show-stopping technique produces professional-quality results.
Complex Pattern:
- Divide the hair into five equal sections, labeling them mentally as 1 through 5 from left to right.
- Cross section 1 over section 2, then cross section 5 over section 4 to begin the pattern.
- Cross the current middle strand (section 3) over the strand to its right to continue the weaving.
- Return to the outer strands and repeat the over-under-over pattern with consistent rhythm.
- Maintain even tension across all five sections to ensure the complex pattern remains visible and uniform.
- Secure at the end and gently manipulate the braid to enhance its dimensional, woven appearance and width.
Advanced Achievement:
- Perfect for competitive dance, figure skating, or performances where intricate styling is appreciated and noticed.
- Creates impressive width and visual impact that photographs beautifully from all angles.
- Demonstrates serious braiding skill and dedication, making it a point of pride for both stylist and wearer.
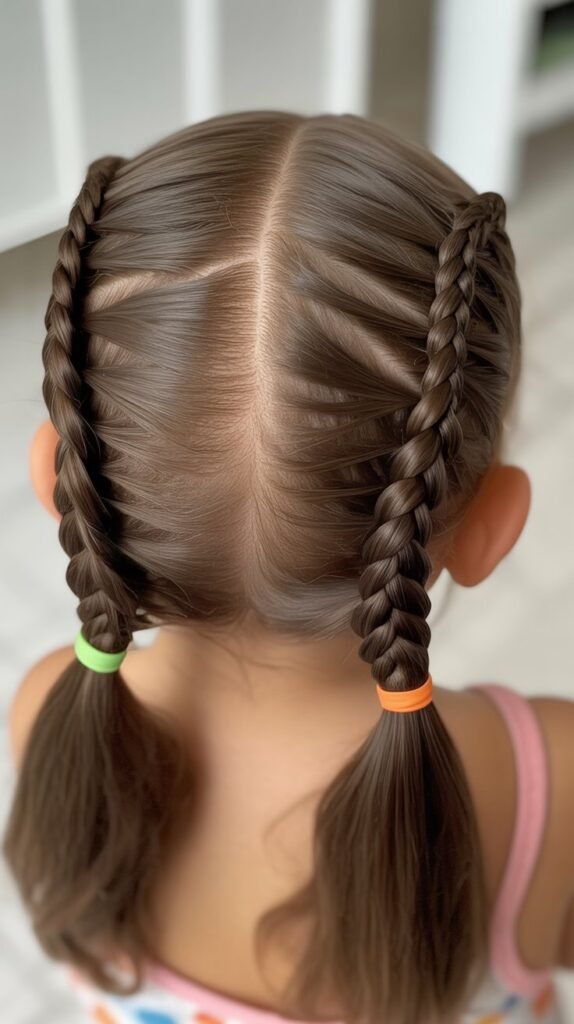
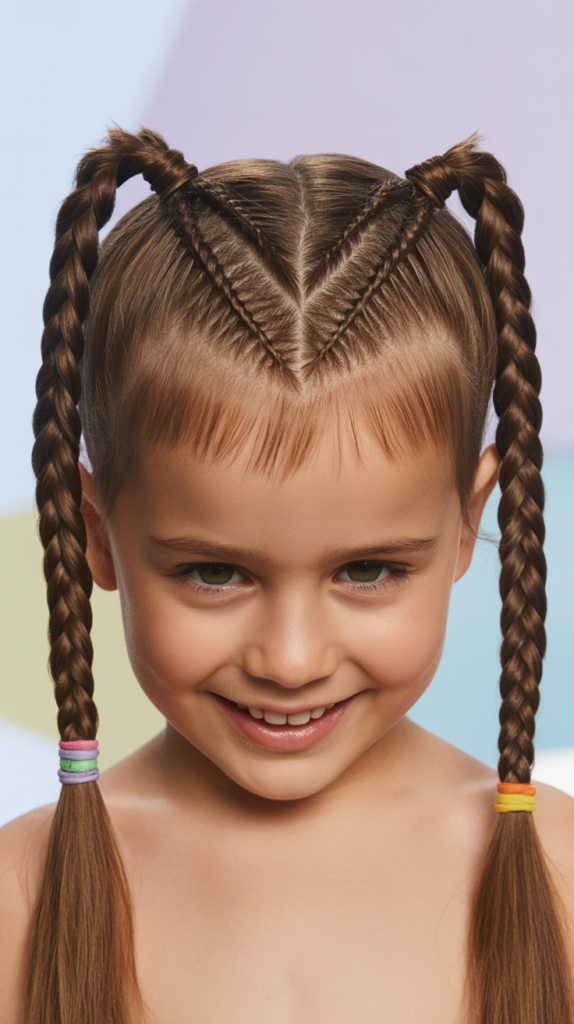
26. Braided Pigtails
Braided pigtails offer a classic, youthful look that combines the playfulness of pigtails with the practicality and texture of braids.
This timeless style remains popular across generations for its versatility and charm.
Classic Construction:
- Part the hair straight down the center from forehead to nape, creating two symmetrical sections.
- Create a ponytail on one side at the desired height, typically mid-head or slightly lower.
- Braid the ponytail using your chosen technique—three-strand, fishtail, or Dutch—maintaining even tension throughout the length.
- Secure the end with a decorative elastic and repeat the process on the opposite side for matching pigtails.
- Ensure both braids are positioned at equal heights and have similar tightness for a balanced appearance.
- Gently pull on the braids to create matching fullness or leave them tight depending on the desired effect.
Childhood Charm:
- Evokes a sweet, innocent aesthetic perfect for younger children and nostalgic styling choices.
- Allows for creative customization with ribbons, bows, or coordinating hair accessories at the base and ends.
- Works beautifully for school photos, family portraits, and everyday wear with equal appropriateness.
27. Infinity Braid

The infinity braid creates a mesmerizing figure-eight pattern that weaves through the hair, producing an optical illusion of endless loops.
This sophisticated technique requires practice but delivers a truly unique and conversation-starting result.
Figure-Eight Technique:
- Divide the hair into two main sections, holding one section in each hand for control.
- Take a small piece from the outside of the left section and cross it over to the right section.
- Take that same piece and loop it under and back over to the left section, creating a figure-eight motion.
- Repeat this over-under-over pattern with small sections from alternating sides down the length of the hair.
- The resulting pattern creates the appearance of infinity symbols or figure-eights stacked vertically.
- Maintain consistent section sizes and tension to ensure the pattern remains clear and visible throughout.
Unique Appeal:
- Creates a mathematical, geometric pattern that appeals to children interested in art and patterns.
- Stands out dramatically in photos and videos due to its unusual, eye-catching structure.
- Works best on medium to thick hair where the intricate pattern shows most clearly.
28. Starburst Braid

The starburst braid creates a circular, radiating pattern at the crown of the head with multiple braids extending outward like sunbeams.
This artistic style makes a bold statement and works wonderfully for special occasions.
Radial Pattern:
- Create a small circular section at the crown of the head, which will be the center of the starburst.
- Divide the surrounding hair into equal sections radiating out from the center point, typically 4-8 sections.
- Begin a Dutch or cornrow braid from the center circle outward along each sectioned pathway.
- Each braid should extend from the center like spokes on a wheel or rays of sunshine.
- Continue each braid down to the nape or desired length, securing all ends with small elastics.
- The finished result resembles a starburst or sun pattern when viewed from above.
Geometric Beauty:
- Creates stunning visual symmetry that photographs beautifully from overhead angles and captures attention.
- Perfect for dance performances, recitals, or competitions where unique styling helps performers stand out.
- Can be combined with colored extensions, beads, or wraps at the ends of each ray for enhanced effect.
29. Mermaid Braid

The mermaid braid combines multiple braiding techniques into one flowing, textured style that evokes underwater beauty and fantasy.
This whimsical look layers different braid types for dimensional, eye-catching results.
Layered Technique:
- Create a Dutch braid down the center back of the head, braiding only the top layer of hair.
- Leave the underneath layers loose and flowing while working on the top section.
- Once the Dutch braid reaches mid-head, transition into a fishtail braid for textural contrast.
- Gently pull and pancake sections of both braids to create a wide, flowing, organic appearance.
- The combination of braiding techniques creates varying widths and textures that mimic scales or waves.
- Add small braided sections within the loose hair for additional mermaid-inspired details and dimension.
Fantasy Inspiration:
- Perfect for themed parties, Halloween costumes, or any time your child wants to embrace fantasy styling.
- Works beautifully with temporary hair color in ocean shades like blue, green, purple, or teal.
- Pairs wonderfully with shell accessories, starfish clips, or pearl embellishments for complete mermaid transformation.
30. Ladder Braid
The ladder braid creates the appearance of horizontal rungs connecting two parallel braids, resulting in a structured, architectural look.
This impressive technique combines lace braiding with strategic strand placement for a truly unique outcome.
Building the Ladder:
- Create two small sections of hair on either side of the head, leaving a gap of 2-3 inches between them.
- Begin lace braids on both sides, adding hair only from the outer edges, not from the space between.
- As you braid, periodically take a thin strand from one braid and cross it horizontally to the other braid.
- Incorporate this crossing strand into the opposite braid, creating the horizontal “rung” of the ladder.
- Continue alternating vertical braiding with horizontal strand crossings down the length of the hair.
- The finished style showcases two parallel braids connected by evenly-spaced horizontal strands resembling a ladder.
Architectural Design:
- Requires patience and practice but creates a truly show-stopping result that few can replicate.
- Works best on longer hair where multiple ladder rungs can be displayed clearly.
- Perfect for competitions, pageants, or any event where a unique, memorable hairstyle provides an advantage.
Hair Care Tips for Braided Styles

Proper hair care ensures that braided styles remain beautiful, comfortable, and healthy for your child’s delicate hair.
Understanding the specific needs of white hair textures helps prevent damage while maximizing style longevity.
Pre-Braiding Preparation:
- Wash and condition hair thoroughly before braiding to remove buildup and create a clean foundation.
- Apply a leave-in conditioner or detangling spray to prevent breakage during the braiding process.
- Work with slightly damp hair when possible, as it’s more pliable and less prone to static and flyaways.
- Never braid hair that’s soaking wet, as this can cause breakage and doesn’t allow proper drying.
- Use a wide-tooth comb or detangling brush to remove all knots before beginning any braiding technique.
During Styling:
- Avoid braiding too tightly, especially at the hairline, where tension can cause discomfort and potential hair loss.
- Take breaks during long braiding sessions to prevent scalp fatigue and discomfort for your child.
- Use small, clear elastics that won’t damage hair or create visible bulk at the ends of braids.
- Keep sections even and consistent for a polished appearance and balanced tension across the scalp.
Maintenance and Longevity:
- Spray braids lightly with water mixed with leave-in conditioner to refresh and add moisture without unraveling.
- Sleep with a satin or silk pillowcase to reduce friction and prevent frizz around braided styles.
- Limit braid wear to 2-3 days for young children to prevent excessive tangling of loose ends.
- Apply a light oil or serum to the scalp if dryness or itching occurs while braids are in place.
Removal and Aftercare:
- Remove braids gently, working from bottom to top to minimize tangles and breakage.
- Use a detangling spray or conditioner during removal to ease the process and protect hair integrity.
- Wash hair thoroughly after removing braids to cleanse the scalp and remove product buildup.
- Allow hair to rest for a day or two between intensive braided styles to prevent stress on the hair follicles.
Styling Tools and Products Guide

Having the right tools and products makes braiding easier, more enjoyable, and produces better results.
This guide helps you build an effective braiding toolkit suited specifically for white hair textures.
Essential Tools
Product Recommendations:
- Detangling Spray: Lightweight formulas with slip help prevent breakage during combing and sectioning.
- Leave-In Conditioner: Provides moisture and manageability without weighing down fine hair textures.
- Light Hold Hairspray: Sets styles without crunchiness, perfect for finishing and controlling flyaways.
- Texturizing Spray: Adds grip to slippery, freshly washed hair that won’t hold braids easily.
- Hair Oil or Serum: Small amounts smooth frizz and add shine without creating greasy buildup.
- Styling Gel: Edge control and clean parts benefit from light gel application at the roots.
Application Tips:
- Use products sparingly on children’s fine hair to avoid buildup that weighs down styles and requires frequent washing.
- Apply leave-in conditioner to damp hair before braiding for optimal moisture and slip during styling.
- Spray hairspray from 10-12 inches away to create a light mist rather than concentrated application.
- Warm a small amount of oil or serum between your palms before applying to prevent over-application.
Budget-Friendly Options:
- DIY detangling spray can be made with water, conditioner, and a few drops of oil in a spray bottle.
- Regular conditioner can substitute for leave-in products when diluted and applied to damp hair.
- Basic drugstore elastics work perfectly well when chosen carefully to avoid metal clasps and rough textures.
Age-Appropriate Braiding Guide
Different ages require different approaches to braiding, considering factors like attention span, hair texture development, and activity levels.
This guide helps match styles to appropriate age groups.
Ages 2-4: Toddler Years
Best Styles:
- Simple three-strand braids that take minimal time and don’t require prolonged sitting.
- Single braids or pigtails that keep hair contained during active play and messy eating.
- Loose styles that don’t pull on sensitive scalps or cause discomfort during nap time.
Considerations:
- Keep styling sessions under 10 minutes to match short attention spans and limited patience.
- Avoid tight braiding that could cause discomfort during this tender developmental stage.
- Use soft fabric elastics that won’t pull or catch on fine baby hair textures.
- Be prepared to restyle or remove braids if the child shows signs of discomfort or fussiness.
Ages 5-7: Early Elementary
Best Styles:
- French braids and Dutch braids that stay secure during school activities and playground time.
- Braided ponytails that combine practicality with style for busy school days.
- Simple crown braids or braided headbands for special occasions and family photos.
Considerations:
- Children can typically sit for 15-20 minute styling sessions at this age with entertainment.
- Begin teaching basic braiding skills on dolls or their own hair to develop motor skills.
- Choose styles that last all day without needing adjustment or causing distraction in class.
- Consider wash schedules and ensure braids don’t need to stay in longer than comfortable.
Ages 8-10: Late Elementary
Best Styles:
- More complex braids like fishtails, waterfall braids, and multi-strand techniques.
- Double Dutch braids and boxer braids for sports and athletic activities.
- Creative designs like heart braids, ladder braids, or starburst patterns for events.
Considerations:
- Children often want input on their hairstyles and can express clear preferences at this age.
- They may begin learning to braid their own hair with practice and guidance.
- Peer influence becomes important, so consider trending styles popular among their age group.
- Can typically tolerate 30-45 minute styling sessions for special occasion braids.
Ages 11-12: Pre-Teen Years
Best Styles:
- Trendy styles like bubble braids, space buns, and mohawk braids that reflect developing personal style.
- Sophisticated updos and crown braids suitable for more formal events and occasions.
- Advanced techniques they can learn and potentially execute independently with practice.
Considerations:
- Pre-teens often have strong opinions and want autonomy over their appearance choices.
- Social media influences styling preferences, so be open to current trends and adaptations.
- They can learn advanced braiding techniques and may enjoy styling friends’ hair.
- Hair texture may be changing during puberty, requiring product and technique adjustments.
Conclusion
The world of braided hairstyles offers endless possibilities for creativity, practicality, and beauty when styling white kids’ hair.
From the foundational simplicity of classic three-strand braids to the intricate artistry of five-strand and ladder braids, each of the 30 Pretty Braided Hairstyles for White Kids presented in this guide serves a unique purpose in your styling repertoire.
These versatile techniques accommodate various hair lengths, textures, and occasions while considering the specific characteristics of finer, straighter hair types.
Whether you’re preparing your child for an active day at school, a special celebration, or simply exploring new creative outlets together, braiding provides both functional benefits and aesthetic appeal.
Remember that practice makes perfect—don’t be discouraged if your first attempts don’t match professional results. With patience, the right tools and products, and attention to your child’s comfort and preferences, you’ll develop the skills to create beautiful, long-lasting braided styles.
Most importantly, these styling sessions offer precious bonding time, teaching your children about self-care and creativity while building memories that will last far beyond the lifespan of any individual hairstyle.
Embrace the journey, celebrate the learning process, and enjoy creating these pretty braided looks that help your child feel confident, comfortable, and beautiful.
