
Finding the perfect hairstyle for your child can transform their entire look while keeping their hair neat and manageable throughout the day.
30 Trendy Braided Ponytail Hairstyles for Kids offers a comprehensive collection of styles that combine the elegance of braids with the practicality of ponytails, creating looks that are both beautiful and functional.
These hairstyles work wonderfully for school days, special occasions, sports activities, and everything in between.
Whether your child has thick, thin, curly, or straight hair, you’ll discover styles that suit their unique texture and personality.
From simple designs that take just minutes to create to more elaborate patterns perfect for memorable events, this guide provides step-by-step inspiration for parents and caregivers of all skill levels.
Each style has been carefully selected to ensure comfort, durability, and age-appropriate beauty that will make your little one feel confident and special.
Get ready to explore creative combinations that will revolutionize your morning hair routine and bring excited smiles to your child’s face.
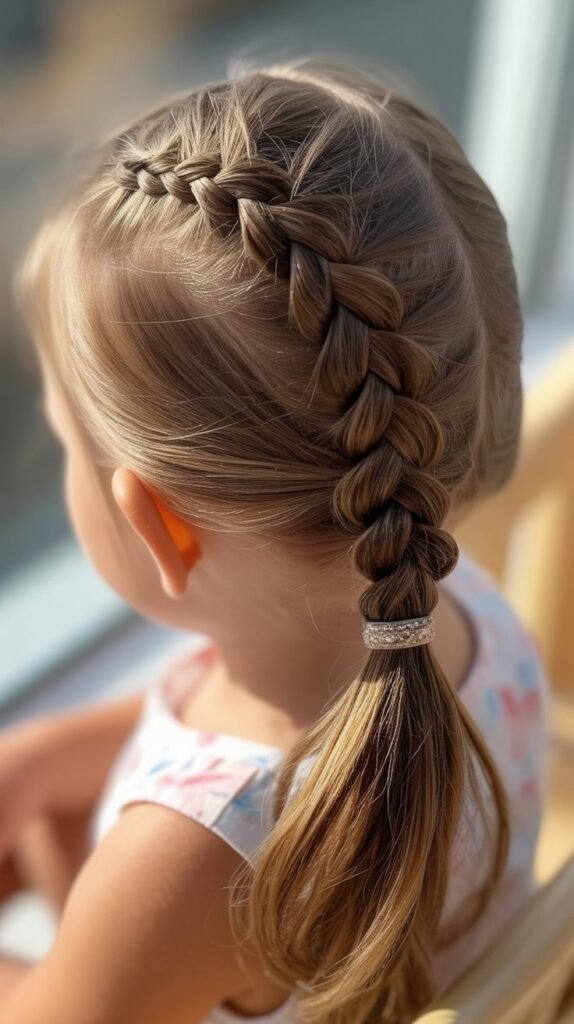
1. Classic Side Braid Ponytail
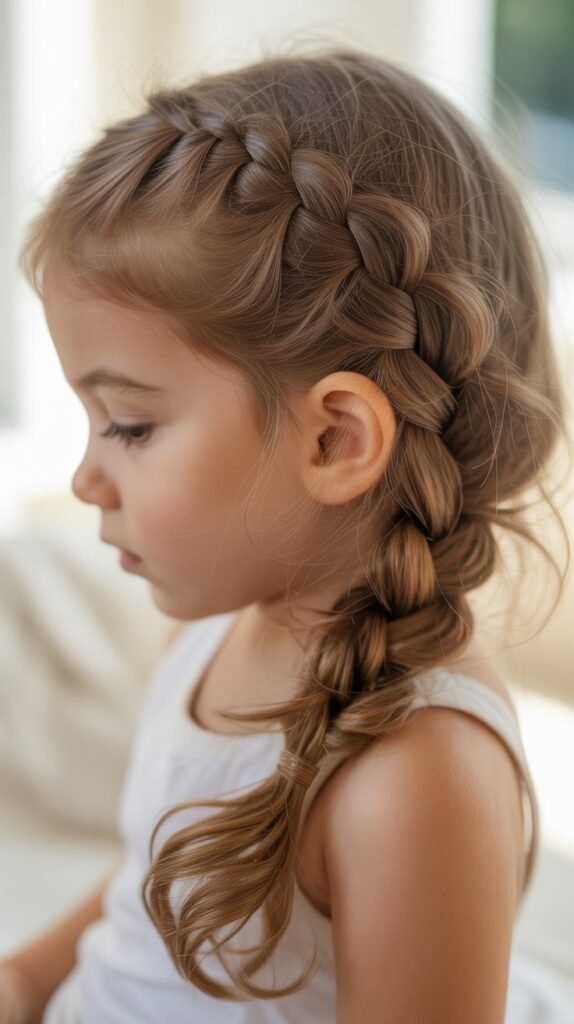
The classic side braid ponytail combines timeless elegance with modern simplicity, making it an ideal choice for kids who want a polished yet playful look.
This style features a single braid starting from one side of the head, flowing into a ponytail positioned at the back or opposite side.
- The side braid creates visual interest by drawing the eye across the head, adding dimension to what would otherwise be a simple ponytail.
- This hairstyle works exceptionally well for children with medium to long hair and can be adapted for various hair textures.
- Start by parting the hair deeply on one side, then begin a three-strand braid just above the ear.
- Continue braiding along the hairline, gradually incorporating hair from the front section as you move toward the back.
- Once you reach the desired ponytail position (typically at the nape or mid-head), secure all hair including the braid into a ponytail with an elastic band.
- For added security during active play, spray lightly with water or <a href=”https://www.healthline.com/health/hair-care-tips-for-kids”>child-safe hair product</a> before braiding.
- The finished look stays neat for 8-12 hours, making it perfect for school days or family outings.
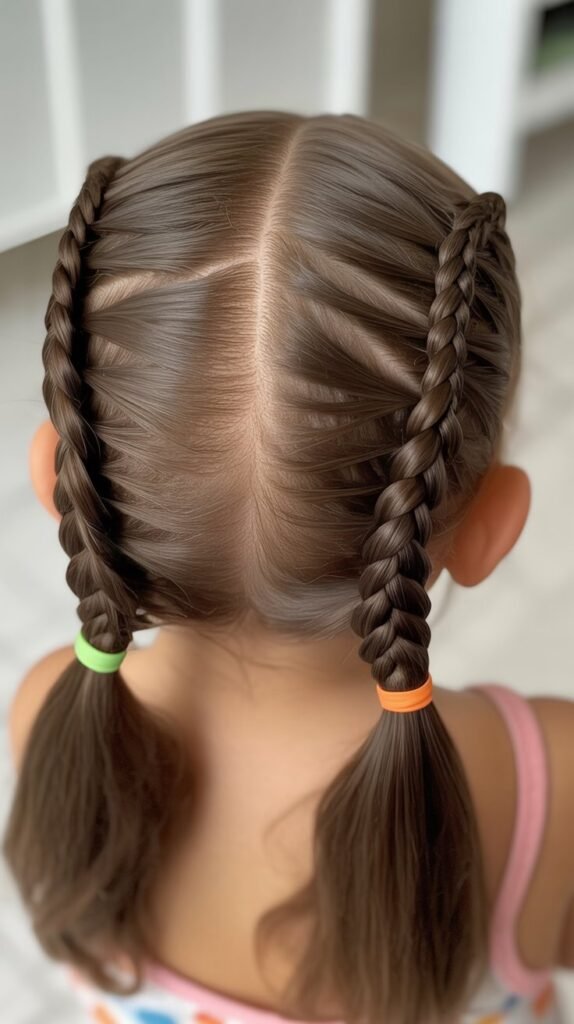
2. Double Dutch Braid Ponytail
Double Dutch braid ponytail elevates the traditional ponytail by incorporating two symmetrical Dutch braids that create a stunning raised effect along the scalp.
This sporty yet sophisticated style keeps hair completely secure while showcasing impressive braiding technique.
- Dutch braids differ from regular braids because strands are crossed under rather than over, creating a three-dimensional appearance that sits atop the head.
- Begin by parting the hair straight down the middle from forehead to crown, creating two equal sections.
- Work on one section at a time, starting the Dutch braid at the hairline by dividing hair into three small strands.
- Cross the right strand under the middle, then the left strand under the middle, adding small sections of hair from the scalp with each crossing.
- Continue this pattern down to where you want the ponytail to begin, typically at the crown or mid-head area.
- Repeat the exact process on the second section, ensuring both braids are symmetrical and positioned at the same height.
- Gather both braids together with all remaining loose hair and secure with a strong elastic band to create a high, secure ponytail.
3. Fishtail Braid Ponytail

The fishtail braid ponytail offers an intricate, woven appearance that looks complex but becomes surprisingly easy with practice.
This style creates a delicate, textured pattern that adds sophistication to any child’s look.
- Fishtail braids use only two sections of hair instead of three, creating a distinctive herringbone pattern that appears more intricate than standard braids.
- Start by gathering all hair into a ponytail at the desired height and securing it with an elastic band.
- Divide the ponytail into two equal sections, holding one section in each hand.
- Take a thin strand from the outer edge of the right section and cross it over to join the left section.
- Then take a thin strand from the outer edge of the left section and cross it over to join the right section.
- Continue alternating sides, always pulling strands from the outer edges and crossing them to the opposite section.
- The thinner the strands you select, the more intricate and detailed the fishtail pattern will appear.
- Secure the end with a small elastic band and gently tug on the braid edges to create a fuller, more textured appearance.
- This style works beautifully for special occasions like birthday parties, family photos, or holiday celebrations.
4. Bubble Ponytail with Braided Base

The bubble ponytail with braided base combines two trending techniques to create a playful, dimensional style that children absolutely love.
This fun approach adds volume and visual interest through strategic elastic placement.
- Begin with a small braid at the crown or front hairline, which serves as a decorative foundation for the bubble effect.
- Create a simple three-strand braid starting at the forehead, incorporating hair for 2-3 inches before securing it temporarily.
- Gather all hair including the braid into a ponytail at your chosen height, securing with a clear or matching elastic band.
- Measure approximately 2-3 inches down the ponytail and add another elastic band, creating the first “bubble” section.
- Gently pull and fluff the hair between the two bands outward to create volume and the characteristic bubble shape.
- Continue adding elastic bands at even intervals down the length of the ponytail, creating multiple bubble sections.
- Each section should be gently teased and fluffed to maintain consistent bubble sizes throughout the style.
- For extra dimension, you can pancake the initial braid by gently pulling on its edges before incorporating it into the ponytail.
- This whimsical style typically works best on hair that’s at least shoulder-length or longer to accommodate multiple bubble sections.
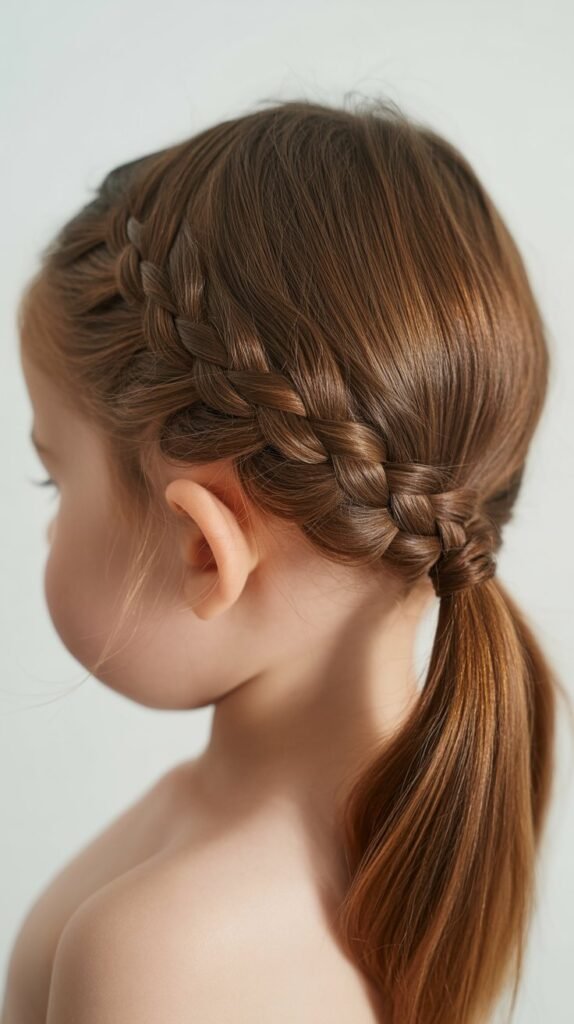
5. French Braid into Low Ponytail

The French braid into low ponytail creates an elegant, sophisticated look that’s perfect for formal occasions while remaining comfortable for all-day wear.
This classic combination showcases traditional braiding technique flowing seamlessly into a refined low ponytail.
- French braids incorporate hair gradually from both sides as you work down the head, creating a smooth, integrated appearance.
- Start at the crown by taking a small section of hair and dividing it into three equal strands.
- Begin a standard braid by crossing the right strand over the middle, then the left strand over the middle.
- With each subsequent crossing, add a small section of hair from the right side of the head to the right strand before crossing it over.
- Similarly, add hair from the left side to the left strand before crossing it over the middle.
- Continue this pattern down the back of the head, keeping the braid centered and tension consistent.
- Once you reach the nape of the neck, gather the braid together with any remaining loose hair and secure with an elastic band at a low position.
- This positioning at the nape is particularly comfortable and elegant, making it suitable for <a href=”https://www.parents.com/kids/hair/easy-hairstyles-for-kids/”>formal events</a> like weddings, recitals, or portraits.
- The low placement also prevents the ponytail from interfering with headrests in cars or during rest time.
6. Zigzag Part with Double Braided Ponytails

The zigzag part with double braided ponytails transforms the ordinary center part into an eye-catching design element.
This creative style appeals to kids who want something unique and playful while maintaining the functionality of braided ponytails.
- Creating a zigzag part requires a fine-toothed comb or the pointed end of a rat-tail comb for precision.
- Start at the forehead and use the comb tip to create a zigzag pattern by moving it back and forth as you part the hair toward the crown.
- The zigzag should be pronounced enough to be visible but not so extreme that it creates difficulty in braiding.
- Once the part is complete, you’ll have two sections of hair divided by the decorative zigzag line.
- Create a three-strand braid on each section, starting near the temple area and working down toward where the ponytails will be positioned.
- These braids can be standard, Dutch, or French style depending on your skill level and the desired effect.
- Secure each braided section into its own ponytail, typically positioned behind the ears or at the back of the head.
- The zigzag part adds a fun, unexpected detail that makes this style stand out from standard double ponytails.
- This look is excellent for school picture day or any occasion where you want your child to feel special and noticed.
7. Rope Braid Ponytail

The rope braid ponytail offers a quick, easy alternative to traditional braiding that creates a twisted, cable-like appearance.
This technique is perfect for busy mornings when you need something that looks polished but doesn’t require complex braiding skills.
- Rope braids use only two sections of hair that are twisted together, making them significantly faster than three-strand braids.
- Begin by creating a ponytail at any desired height and securing it firmly with an elastic band.
- Divide the ponytail into two equal sections, holding one in each hand.
- Twist the right section clockwise (toward the right) several times until it forms a tight, spiral rope.
- Similarly, twist the left section clockwise until it also forms a tight rope shape.
- Now take both twisted sections and wrap them around each other in a counterclockwise direction (toward the left).
- This counterclockwise wrapping is crucial because it prevents the individual twists from unraveling as you combine them.
- Continue wrapping the two ropes around each other all the way down the ponytail length.
- Secure the end with another elastic band, and the contrasting twist directions will hold the rope braid firmly in place throughout the day.
- This style works particularly well for children with fine or slippery hair that doesn’t hold traditional braids easily.
8. Crown Braid into High Ponytail

The crown braid into high ponytail combines regal elegance with youthful energy, creating a style that’s both sophisticated and age-appropriate.
This look features a braid that wraps around the head like a crown before gathering into an elevated ponytail.
- Start by creating a deep side part, positioning it about an inch from the ear on one side.
- Begin a Dutch or French braid at the part line, working along the hairline toward the forehead.
- Continue braiding around the front of the head, following the hairline across the forehead and down the opposite side.
- The braid should create a crown-like arc around the top portion of the head, incorporating hair from the front section only.
- Once the crown braid reaches the opposite temple area, gather it together with all remaining loose hair from the back.
- Secure everything into a high ponytail at the crown, ensuring the braid integrates smoothly into the gathered hair.
- The high positioning of the ponytail creates lift and volume while the crown braid adds a princess-like quality.
- This style is particularly stunning for <a href=”https://www.webmd.com/parenting/features/kids-hair-care”>special occasions</a> where your child wants to feel extra special and beautiful.
- Adding a decorative hair tie or ribbon at the ponytail base enhances the regal appearance even further.
9. Waterfall Braid Ponytail

The waterfall braid ponytail creates a cascading, romantic effect that looks stunning while keeping hair secure and manageable.
This style features strands that appear to “fall” through the braid like water flowing over rocks.
- Waterfall braids involve dropping strands as you braid rather than carrying them through, creating the signature cascading effect.
- Begin at one temple by taking a small section of hair and dividing it into three strands.
- Start a regular braid pattern by crossing the back strand over the middle strand.
- Then cross the front strand over the middle, but instead of continuing with this strand, drop it completely and let it fall.
- Pick up a new strand from the hair near the scalp to replace the dropped strand and continue the braid pattern.
- Repeat this process, consistently dropping the front strand and replacing it with new hair from above.
- Continue the waterfall braid across the back of the head until you reach the opposite side.
- Gather all hair including the braid and the cascading strands into a ponytail at the back or side.
- The dropped strands create beautiful texture and movement within the gathered ponytail.
- This romantic style works wonderfully for photos, parties, or any occasion where you want a softer, more delicate appearance.
10. Boxer Braids into Low Ponytail

Boxer braids into low ponytail combine athletic practicality with sleek style, creating a look that’s both functional and fashionable.
This sporty variation keeps hair completely secure during even the most vigorous activities.
- Boxer braids are essentially tight Dutch braids that sit close to the scalp, creating a streamlined appearance.
- Part the hair straight down the middle from forehead to nape, creating two perfectly equal sections.
- Work on one section first, starting a Dutch braid at the hairline by crossing strands under rather than over.
- Keep the braid very tight and close to the scalp by pulling each addition snugly as you incorporate new hair.
- Continue the boxer braid straight down the back of the head until you reach the nape area.
- Repeat the process on the second section, ensuring both braids are equally tight and positioned symmetrically.
- When both boxer braids reach the nape, gather them together with any remaining loose hair.
- Secure everything into a single low ponytail at the nape using a strong elastic band.
- This style is ideal for young athletes, dancers, or any child involved in physical activities where hair must stay completely controlled.
- The low ponytail positioning prevents it from swinging and interfering with movement during sports or active play.
11. Twisted Side Ponytail with Braid
The twisted side ponytail with braid offers an asymmetrical, modern look that combines simple twisting techniques with traditional braiding.
This style creates visual interest through varied textures and off-center positioning.
- Begin by creating a deep side part, positioning it far to one side for maximum asymmetrical effect.
- On the heavier side with more hair, separate the front section from the crown to the temple area.
- Divide this front section into two strands and twist them around each other, working backward toward the ear.
- Secure the twist temporarily with a small clip or bobby pin at the side of the head.
- Gather all remaining hair including the twisted section toward the opposite shoulder, creating a side-swept effect.
- Secure everything into a ponytail positioned just behind and below the ear on one side.
- Take a small section from the ponytail and braid it using a standard three-strand technique.
- Wrap this small braid around the elastic band at the ponytail base to conceal it and add a polished finishing touch.
- Secure the braid end underneath the wrapped portion with a bobby pin or small elastic that matches the hair color.
- This style creates dimension through the combination of smooth twists, loose ponytail hair, and the textured braid accent.
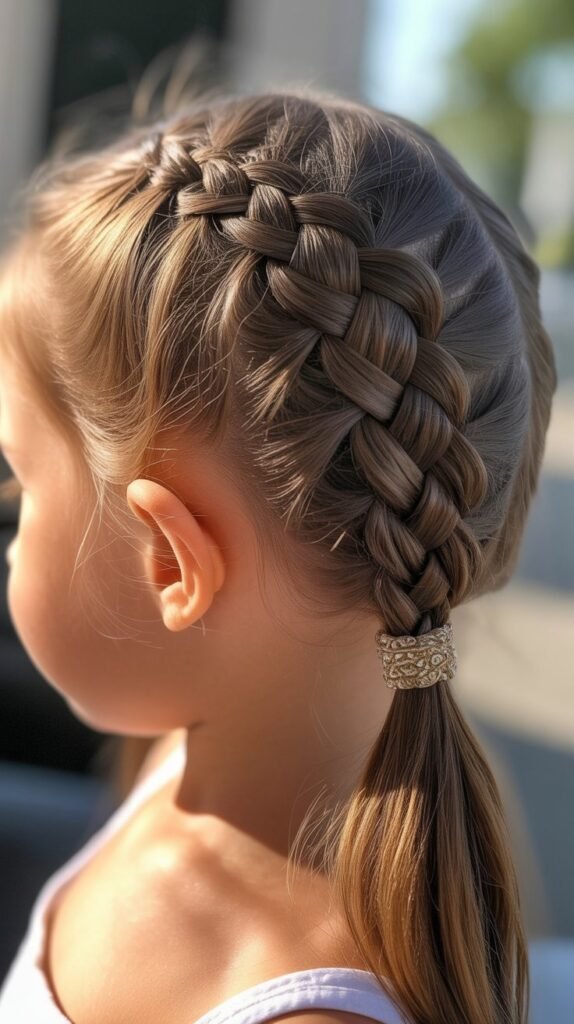
12. Lattice Braid Ponytail

The lattice braid ponytail creates an intricate, basket-weave appearance that looks incredibly complex but can be achieved with patience and practice.
This show-stopping style is perfect for children who love detailed, elaborate hairstyles.
- The lattice effect is created by weaving multiple small braids together in a crisscross pattern.
- Start by sectioning the hair into four or five horizontal rows from the forehead to the crown.
- Create small braids in each section, alternating their starting positions slightly to create the weaving effect.
- Once you have multiple parallel braids, begin weaving them together by threading one braid under and over the others.
- This process creates a lattice or basket-weave pattern across the scalp before gathering into a ponytail.
- The weaving requires securing small sections temporarily with clips as you work to keep the pattern intact.
- After completing the lattice pattern, gather all braids and remaining hair into a ponytail at the back or crown.
- This style showcases advanced braiding skills and creates a truly unique look that will garner compliments and questions.
- While time-intensive, the lattice braid stays secure for extended periods, making it worthwhile for special events.
13. Pull-Through Braid Ponytail

The pull-through braid ponytail creates the illusion of a thick, voluminous braid without actual braiding, making it accessible for those still learning traditional braiding techniques.
This style uses strategic elastic placement and pulling to create dramatic dimension.
- Pull-through braids don’t involve crossing strands like traditional braids; instead, they use ponytails stacked and pulled through each other.
- Start by creating a ponytail at the crown and securing it with a clear or matching elastic band.
- Approximately two inches below the first elastic, create a second ponytail using hair from the sides of the head.
- Split the first ponytail in half and bring the two sections down along either side of the second ponytail.
- Create a third ponytail two inches below the second one, this time incorporating the two sections from the first ponytail.
- Continue this pattern of splitting ponytails, bringing sections down, and creating new ponytails down the length of the hair.
- After securing each new ponytail, gently pull and pancake the section above it to create volume and width.
- This pulling creates the signature voluminous appearance that makes pull-through braids so striking.
- The technique works exceptionally well for children with fine or thin hair as it creates the appearance of much thicker, fuller hair.
- Finish with a decorative elastic or ribbon at the final ponytail to complete the look.
14. Mohawk Braid Ponytail

The mohawk braid ponytail creates an edgy, fashion-forward look that combines punk-inspired styling with kid-appropriate elegance.
This bold style features a raised braid running down the center of the head into a ponytail.
- Create a section of hair approximately two inches wide running from the forehead straight back to the crown.
- Clip or tie away the hair on both sides of this center section to keep it separate during braiding.
- Begin a Dutch braid at the front hairline using hair only from the center section.
- The Dutch braiding technique (crossing under rather than over) creates the raised, mohawk-like appearance.
- Add hair only from the center section as you work backward, keeping the braid tight and elevated.
- Continue the Dutch braid down the center of the head until you reach the crown or desired ponytail position.
- Release the side sections and gather all hair including the center braid into a high ponytail.
- The raised center braid creates a mohawk silhouette that’s bold yet age-appropriate for children.
- This style works particularly well for themed parties, dance recitals, or kids who enjoy standing out with unique hairstyles.
- For extra drama, gently pull on the edges of the center braid to make it appear even wider and more pronounced.
15. Heart-Shaped Braid Ponytail

The heart-shaped braid ponytail creates an adorable, love-inspired design that’s perfect for Valentine’s Day, special occasions, or any time your child wants to express their sweet personality.
This creative style forms a heart shape at the crown.
- Part the hair down the middle from the forehead to the crown, creating two equal sections.
- Starting on one side, create a Dutch braid that begins at the front hairline and curves outward toward the temple.
- As you continue braiding, gradually curve the direction inward, creating the rounded upper portion of a heart shape.
- Bring this braid down and across toward the center back of the head, forming half of the heart outline.
- Repeat the exact process on the opposite side, ensuring the braid curves symmetrically to create the other half of the heart.
- Both braids should meet at a point in the center back, completing the heart shape when viewed from above or behind.
- Secure both braids together at their meeting point along with all remaining loose hair into a ponytail.
- The ponytail emerges from the point of the heart, creating a lovely visual flow from the design into the gathered hair.
- This charming style requires practice to achieve symmetrical curves, but the result is truly magical and guaranteed to delight.
- Consider adding small decorative pins or clips along the heart outline to emphasize the shape and add extra sparkle.
16. Four-Strand Braid Ponytail
The four-strand braid ponytail elevates traditional braiding with added complexity and texture, creating a sophisticated woven pattern.
This advanced technique produces a wider, more intricate braid that impresses with its dimensional appearance.
- Four-strand braiding requires dividing hair into four equal sections instead of the traditional three.
- Start by creating a ponytail at any desired height and securing it with an elastic band.
- Divide the ponytail into four equal strands, mentally numbering them 1, 2, 3, and 4 from left to right.
- Cross strand 1 over strand 2, then cross strand 4 over strand 3.
- Next, cross the two middle strands (previously strands 2 and 3) over each other.
- Repeat this pattern: outer strands cross over their neighbors, then middle strands cross each other.
- Maintain consistent tension throughout to ensure the braid remains even and well-defined.
- The resulting pattern creates a complex woven appearance that’s wider and flatter than traditional three-strand braids.
- This technique works best on hair that’s at least medium thickness, as very fine hair may not show the pattern as clearly.
- Secure the finished braid with an elastic band and gently tug on the edges to enhance the width and texture of the weave.
17. Infinity Braid Ponytail

The infinity braid ponytail creates a continuous figure-eight pattern that symbolizes eternal connection, making it meaningful as well as beautiful.
This unique braiding technique produces a distinctive look that differs from all traditional braid patterns.
- The infinity braid uses a specialized technique that creates interlocking loops resembling the infinity symbol.
- Begin by creating a ponytail and dividing it into two equal sections.
- Take a small strand from the outside of the left section and create a small loop.
- Pass the entire right section through this loop, then tighten the loop around it.
- Now take a small strand from the outside of the right section and create a loop.
- Pass the left section through this new loop and tighten.
- Continue alternating sides, creating loops and passing sections through in a rhythmic pattern.
- The result is a series of connected figure-eight shapes running down the length of the ponytail.
- This braid requires practice to master the timing and tension, but creates a truly one-of-a-kind appearance.
- The infinity braid works particularly well for medium to thick hair textures that can support the looping structure.
18. Diagonal Braid Ponytail

The diagonal braid ponytail breaks away from traditional center-parted styles by creating a dynamic, slanted design that adds movement and modern flair.
This asymmetrical approach creates visual interest through unexpected angles.
- Start by creating a side part at the front, positioning it at one temple rather than in the center.
- Begin a French or Dutch braid at the part line, but instead of braiding straight back, angle it diagonally across the head.
- The braid should travel from one upper corner toward the opposite lower corner, creating a diagonal line.
- Continue incorporating hair from both sides as you braid diagonally across the scalp.
- The diagonal angle creates a dynamic, contemporary appearance that differs dramatically from straight-back braiding.
- Once the diagonal braid reaches the opposite side of the head, gather it with all remaining hair into a ponytail.
- The ponytail can be positioned on the side, creating an asymmetrical side ponytail, or centered at the back.
- This style particularly suits children with square or round face shapes as the diagonal line creates flattering angles.
- The slanted design also helps distribute hair weight differently, which can be more comfortable than center-positioned braids.
- For added dimension, consider creating two diagonal braids traveling in opposite directions before gathering into the ponytail.
19. Knotted Ponytail with Braid Base
The knotted ponytail with braid base replaces traditional elastic bands with hair knots, creating an organic, bohemian appearance.
This technique combines braiding with strategic knotting for a natural, textured look.
- Begin with a small Dutch or French braid at the crown, working it back for approximately 3-4 inches.
- This braided section serves as the decorative foundation for the knotted ponytail technique.
- Gather all hair including the braid into a ponytail position but don’t use an elastic yet.
- Divide the gathered hair into two equal sections at the base where you would typically place an elastic.
- Tie these two sections together in a simple overhand knot, pulling it snug against the scalp.
- Create a second knot immediately below the first one for added security and visual effect.
- The double knot replaces the traditional elastic band while creating an interesting textural element.
- Continue down the ponytail by dividing hair into sections and tying additional knots at intervals.
- Each knot can be gently loosened and pancaked to create volume and a more relaxed appearance.
- This bohemian style works beautifully for casual outings, beach days, or festival-inspired looks.
- The knotted technique is especially useful when elastics aren’t available or for children with sensitivities to tight hair accessories.
20. Pancaked Dutch Braid Ponytail

The pancaked Dutch braid ponytail transforms a standard raised braid into a voluminous, statement-making style through strategic pulling and loosening.
This technique creates dramatic width and dimension perfect for photos and special occasions.
- Start with a Dutch braid at the crown, crossing strands under rather than over to create the raised effect.
- Braid tightly at first to establish a solid structure that will support the pancaking process.
- Continue the Dutch braid down the back of the head, incorporating hair from both sides as you work.
- Once the braid reaches your desired ponytail position, secure all hair including the braid into a ponytail.
- Now begin the pancaking process by gently pulling on the outer edges of each braid segment.
- Work from the top of the braid downward, pulling each section outward to create width and volume.
- The goal is to transform the narrow braid into a wide, flat ribbon of hair that appears much thicker.
- Be careful not to pull so hard that you disrupt the braid structure or pull out incorporated strands.
- The pancaked effect creates an Instagram-worthy, editorial appearance that photographs beautifully.
- This technique particularly benefits children with fine or medium hair, as it creates the illusion of significantly thicker, fuller hair.
- Finish with light hairspray to maintain the pancaked shape throughout the day without weighing down the style.
21. Spiral Braid Ponytail

The spiral braid ponytail creates a twisted, DNA-helix-like appearance that wraps around itself in a mesmerizing pattern.
This eye-catching style combines elements of rope braiding with twisting techniques for unique visual appeal.
- Begin by creating a high ponytail and securing it firmly with a strong elastic band.
- Divide the ponytail into two equal sections, each forming one strand of the spiral.
- Twist each section individually in the same direction, typically clockwise, creating tight rope-like strands.
- Once both sections are tightly twisted, begin wrapping them around each other in the opposite direction (counterclockwise).
- As you wrap, the two twisted ropes will naturally spiral around each other, creating a double helix pattern.
- The opposing twist directions (individual twists clockwise, wrapping counterclockwise) prevent the braid from unraveling.
- Continue spiraling down the entire length of the ponytail, maintaining consistent tension throughout.
- Secure the end with an elastic band, ensuring the spiral remains tight and defined.
- This style creates a rope-like, nautical appearance that’s both sporty and sophisticated, suitable for various occasions.
22. Braided Headband into Ponytail
The braided headband into ponytail creates a crown-like accent across the forehead while maintaining the practicality of a gathered ponytail.
This style mimics the appearance of a headband accessory using the child’s own hair.
- Create a horizontal part from ear to ear across the top of the head, separating the front section from the back.
- Clip the back section away temporarily to keep it separate while working on the braided headband.**
- Starting just above one ear, begin a three-strand braid using only hair from the front section.
- Work the braid horizontally across the forehead, following the hairline like a headband would sit.
- Continue braiding across to the opposite ear, maintaining consistent tension to keep the “headband” snug against the head.
- Once the braided headband reaches the other side, secure it temporarily with a small clip or bobby pin.
- Release the back section and gather all hair including the ends of the braided headband into a ponytail.
- Position the ponytail at your desired height—mid or low works particularly well with this style.
- The braided section creates the illusion of wearing a headband accessory while being completely integrated into the hairstyle.
- This look is perfect for keeping bangs or front layers out of the face while adding decorative interest.
- For children who lose or dislike wearing actual headbands, this built-in alternative provides the same functional and aesthetic benefits.
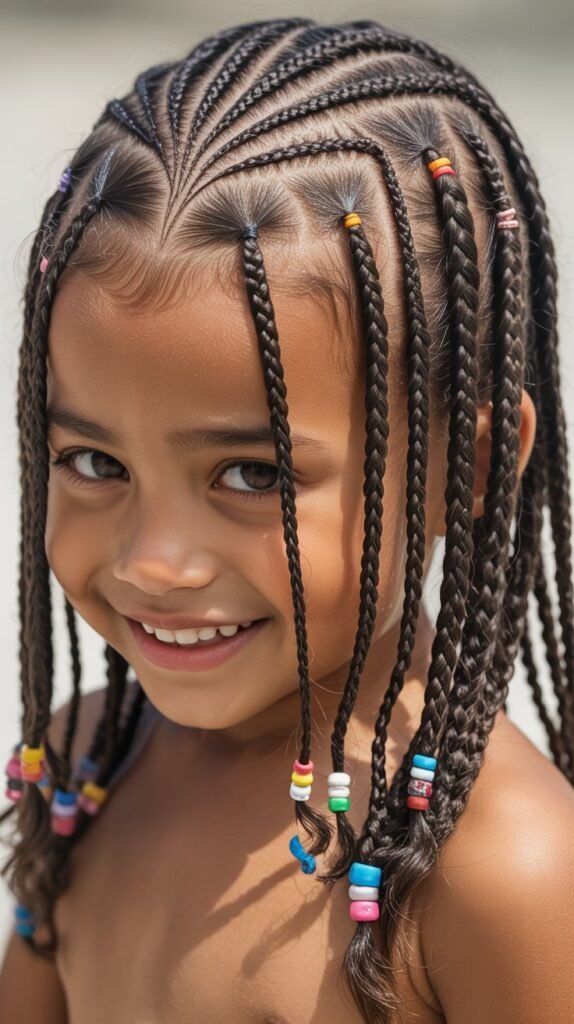
23. Micro Braids into Ponytail

Micro braids into ponytail feature multiple tiny braids throughout the hair that gather into a single ponytail, creating incredible texture and dimension.
This detailed style showcases intricate work and creates a unique, bohemian-inspired look.
- Section the hair into multiple small squares or rectangles across the scalp, creating a grid pattern.
- Each section should be approximately one inch square or smaller, depending on desired braid size.
- Create a tiny three-strand braid in each section, working systematically across the head.
- The micro braids can cover the entire head or be concentrated in specific areas like the crown or sides.
- Depending on hair length and density, you may create anywhere from 10 to 30 individual micro braids.
- Secure each micro braid temporarily with a small elastic or leave them loose if gathering immediately.
- Once all desired micro braids are complete, gather them together with any remaining unbraided hair into a ponytail.
- The collection of tiny braids creates fascinating texture within the ponytail, with each braid maintaining its individual definition.
- This style can last multiple days if done well, making it practical despite the time investment required for creation.
- Micro braids work beautifully for children with textured or curly hair, as they help manage and showcase the hair’s natural beauty.
- Consider incorporating colorful small elastics on each micro braid for added visual interest and a playful touch.
24. Twisted Crown into Side Ponytail
The twisted crown into side ponytail combines elegant twisting around the hairline with an asymmetrical ponytail placement.
This romantic style creates a soft, feminine appearance perfect for portraits and special occasions.
- Create a deep side part, positioning it far to one side for dramatic asymmetry.
- Starting at the part on the heavier side, take a small section of hair from the front.
- Divide this section into two strands and begin twisting them around each other, working along the hairline.
- As you twist, gradually add small amounts of hair from the hairline into one of the strands before each twist.
- This creates a rope-like twist that follows the hairline around from the forehead toward the back.
- Continue the twisting crown around the side of the head toward the nape area on the opposite side.
- Once the twist reaches the desired ponytail position (typically behind one ear), gather all hair including the twist.
- Secure everything into a side ponytail positioned at approximately ear level on one side.
- The twisted crown creates a soft, romantic frame around the face while the side ponytail adds modern asymmetry.
- Add small flowers or decorative pins along the twisted crown for extra enchantment and formal appeal.
25. Starburst Braid Ponytail

The starburst braid ponytail features multiple braids radiating from a central point like sun rays, creating a striking geometric design.
This creative style showcases advanced sectioning and braiding skills with impressive visual impact.
- Identify the center point where you want the ponytail to be positioned, typically at the crown.
- From this central point, create sections radiating outward like spokes on a wheel.
- Each section should be triangular, with the narrow point at the center and wider at the perimeter.
- Create 6-8 sections depending on hair thickness and desired effect—more sections create a fuller starburst.
- Starting with one section, create a three-strand braid from the outer perimeter toward the central point.
- Work systematically around the head, braiding each section from the outside in toward the center.
- All braids should meet at the central point, creating the starburst pattern when viewed from above.
- Once all braids are complete, gather them together at the center point with all remaining hair.
- Secure everything into a ponytail at the center, where all the braids converge.
- The result is a sunburst or flower-like pattern radiating from the ponytail base, creating stunning geometric appeal.
- This elaborate style is perfect for dance recitals, competitions, or any event where your child wants to showcase a truly unique hairstyle.
26. Feather Braid Ponytail

The feather braid ponytail creates a delicate, feathery appearance through strategic strand dropping and incorporating techniques.
This ethereal style combines elements of waterfall braiding with traditional techniques for a light, airy effect.
- Begin with a French braid at the crown, starting with three small strands of hair.
- After each standard crossing in the braid, allow small wisps of hair to drop out rather than continuing through.
- These dropped strands create the feathery, delicate appearance characteristic of this style.
- Simultaneously incorporate new hair from the sides as you would in a traditional French braid.
- The combination of dropping and adding creates a braid with texture and movement, with small strands framing it like feathers.
- Continue this pattern down the back of the head, maintaining consistent dropping for even feathering.
- Once you reach your desired ponytail position, gather all hair including the feather braid.
- Secure into a ponytail, allowing the dropped feathery strands to blend naturally with the gathered hair.
- The overall effect is softer and more romantic than solid braids, with an almost whimsical quality.
- This style works particularly well for children with layered haircuts, as the layers enhance the feathery effect.
- Light curling of the ponytail and dropped strands amplifies the soft, feathery aesthetic even further.
27. Checkerboard Braid Ponytail

The checkerboard braid ponytail creates an alternating pattern that resembles a woven checkerboard, showcasing advanced technique and precision.
This geometric style makes a bold statement through contrasting sections and meticulous planning.
- This style works best with two contrasting hair colors (natural highlights, temporary color, or colored extensions).
- Section the hair into a grid pattern with horizontal and vertical lines creating small squares.
- Alternate braiding pattern: braid squares in a checkerboard pattern, leaving alternating squares unbraided initially.
- Create small three-strand braids in every other square, following a checkerboard layout across the head.
- The alternating braided and smooth sections create the characteristic checkerboard appearance.
- Once the pattern is established across the crown and sides, begin incorporating sections into larger braids leading backward.
- These gathering braids should maintain the alternating visual pattern as they travel toward the ponytail position.
- When all braided and smooth sections reach the back, gather everything into a ponytail.
- The checkerboard pattern creates optical interest and showcases the contrast between braided and unbraided sections.
- This complex style requires patience and precision but results in a truly show-stopping look for competitions or performances.
28. Ribbon-Wrapped Braid Ponytail

The ribbon-wrapped braid ponytail incorporates colorful ribbon directly into the braiding process, creating a woven appearance that adds color and texture.
This decorative technique transforms a simple braid into something special and festive.
- Choose a ribbon that’s approximately 1/4 to 1/2 inch wide in your child’s favorite color or matching their outfit.
- Create a ponytail at your desired height and secure it with an elastic band.
- Tie the ribbon around the elastic band base, leaving two equal ribbon lengths hanging down with the ponytail.
- Divide the ponytail into three sections, incorporating one ribbon length into one of the side sections.
- Braid the ponytail using standard three-strand technique, with the ribbon becoming part of one strand.
- The ribbon weaves through the braid, creating pops of color and visual interest throughout the pattern.
- For enhanced effect, incorporate both ribbon lengths by splitting the ponytail into four sections and braiding with two ribbons.
- Secure the finished braid with another elastic band, then tie the ribbon ends into a bow below it.
- This festive style is perfect for holidays, birthday parties, school spirit days, or any celebration.
- Choose ribbons in school colors, team colors, or holiday themes to customize the look for specific occasions.
- Satin or grosgrain ribbons work best as they hold their shape and provide nice contrast against the hair.
29. Triple Braid Ponytail

The triple braid ponytail features three distinct braids side by side that gather into a single ponytail, creating impressive width and texture.
This style showcases repetitive braiding skill and creates a bold, statement-making appearance.
- Part the hair into three vertical sections from the forehead to the crown, creating left, center, and right sections.
- Each section should be approximately equal in width, though the center section can be slightly wider if desired.
- Begin with the center section, creating a French or Dutch braid straight down the middle of the head.
- Temporarily secure the center braid when it reaches the crown or mid-head area.
- Create a braid in the left section, working parallel to the center braid with the same technique.
- Repeat the process on the right section, ensuring all three braids are positioned at the same height and angle.
- The three side-by-side braids create impressive visual width across the back of the head.
- When all three braids reach your desired ponytail position, gather them together with any remaining loose hair.
- Secure everything into a single ponytail, allowing the three distinct braids to merge while maintaining their individual definition.
- For added dimension, pancake the outer edges of the two side braids to create even more width and volume.
- This bold style works wonderfully for children with thick hair and makes a strong statement at performances or competitions.
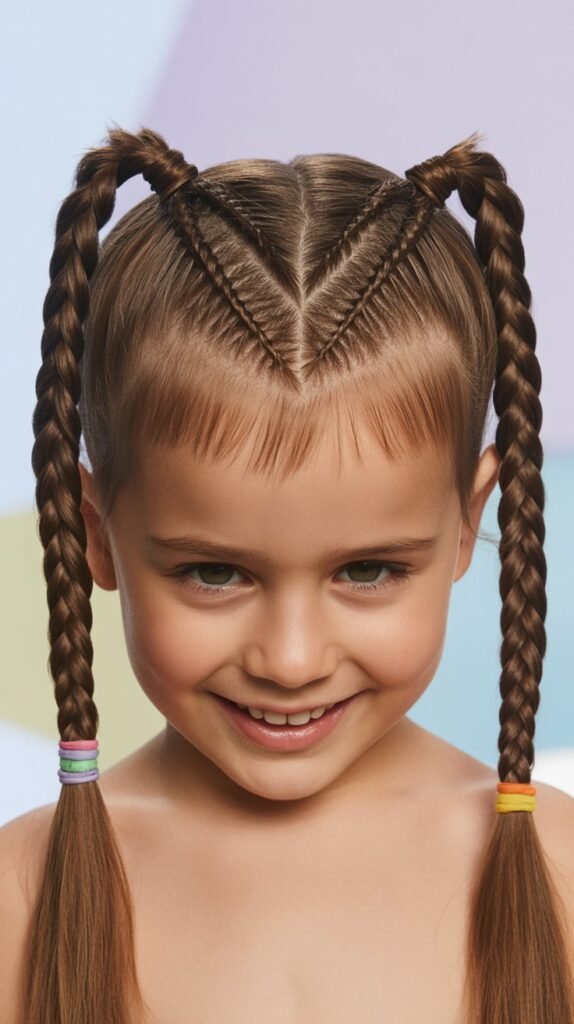
30. Asymmetrical Multi-Braid Ponytail

The asymmetrical multi-braid ponytail combines braids of varying sizes and positions for an artistic, modern appearance.
This creative style breaks traditional symmetry rules to create intentionally unbalanced beauty.
- This freestyle design allows for creative expression by mixing different braid types, sizes, and positions.
- Start by creating 3-5 braids of varying thicknesses across one side of the head.
- Mix techniques by using some French braids, some Dutch braids, and perhaps a small rope braid for variety.
- Position the braids at different angles rather than parallel, creating dynamic, intersecting lines.
- Leave the opposite side of the head smooth or with minimal braiding to emphasize the asymmetry.
- Some braids can be thick and prominent while others are thin accent braids woven between larger ones.
- The intentional imbalance creates artistic interest and modern aesthetic appeal.
- Gather all braids and remaining hair into a ponytail positioned on the heavily braided side.
- The asymmetrical ponytail placement enhances the overall unbalanced design theme.
- This style celebrates creativity and individuality, perfect for children who enjoy expressing their unique personality through their appearance.
- Encourage your child to help choose braid positions and types, making the style a collaborative creative project.
Tips for Maintaining Braided Ponytail Styles
Preparation is Key for Long-Lasting Results
- Start with clean, slightly damp hair rather than completely dry hair for easier manipulation and better hold.
- Apply a small amount of leave-in conditioner or detangling spray to prevent breakage during braiding.
- Use a boar bristle brush or wide-tooth comb to remove all tangles before beginning any braided style.
- Section hair cleanly using a rat-tail comb for precise parts and professional-looking results.
During Braiding Best Practices
- Maintain consistent tension throughout the braid to ensure even appearance and lasting hold.
- Keep elastics, clips, and bobby pins within easy reach before starting to avoid interruption.
- Work in good lighting conditions to see the hair clearly and maintain pattern accuracy.
- Take breaks if the child becomes uncomfortable, as rushed braiding often leads to uneven results.
Securing and Finishing Techniques
- Use snag-free elastics designed specifically for hair to prevent damage and breakage.
- Double-wrap elastics for extra security, especially for active children involved in sports.
- Apply a light mist of flexible-hold hairspray to tame flyaways without creating stiffness.
- Check that no hair is pulled too tightly at the scalp, as this can cause discomfort and damage over time.
Overnight Care for Multi-Day Styles
- Cover braided styles with a <a href=”https://www.healthline.com/health/beauty-skin-care/silk-pillowcase-benefits”>silk or satin bonnet</a> to reduce friction and maintain smoothness.
- Avoid getting elaborate braided styles wet before bedtime as damp hair can create frizz.
- Teach children to sleep on their back or side rather than directly on braided areas when possible.
Removal and Hair Health
- Never force or rush the removal of braided styles as this causes unnecessary breakage.
- Apply detangling spray or conditioner before carefully unbraiding from bottom to top.
- Give hair a break between complex braided styles to prevent stress on the hair follicles.
- Follow up with gentle cleansing and deep conditioning after removing intricate braided styles.
Conclusion
Throughout this comprehensive guide to 30 Trendy Braided Ponytail Hairstyles for Kids, you’ve discovered an incredible variety of styles ranging from simple five-minute options to elaborate designs perfect for the most special occasions.
Each hairstyle offers unique benefits whether you’re prioritizing quick morning routines, all-day hold for active children, or show-stopping beauty for memorable events.
These braided ponytail combinations provide the perfect balance between practical hair management and creative expression, allowing your child to feel confident and comfortable while looking absolutely beautiful.
The techniques you’ve learned can be mixed, matched, and modified to create countless additional variations suited to your child’s individual personality, hair type, and lifestyle needs.
Remember that practice makes perfect, and even the most complex styles become easier with repetition and patience.
By mastering these 30 Trendy Braided Ponytail Hairstyles for Kids, you’ve equipped yourself with a valuable skill set that will serve your family for years to come, creating not just beautiful hairstyles but also precious bonding moments and lasting memories with your child.
